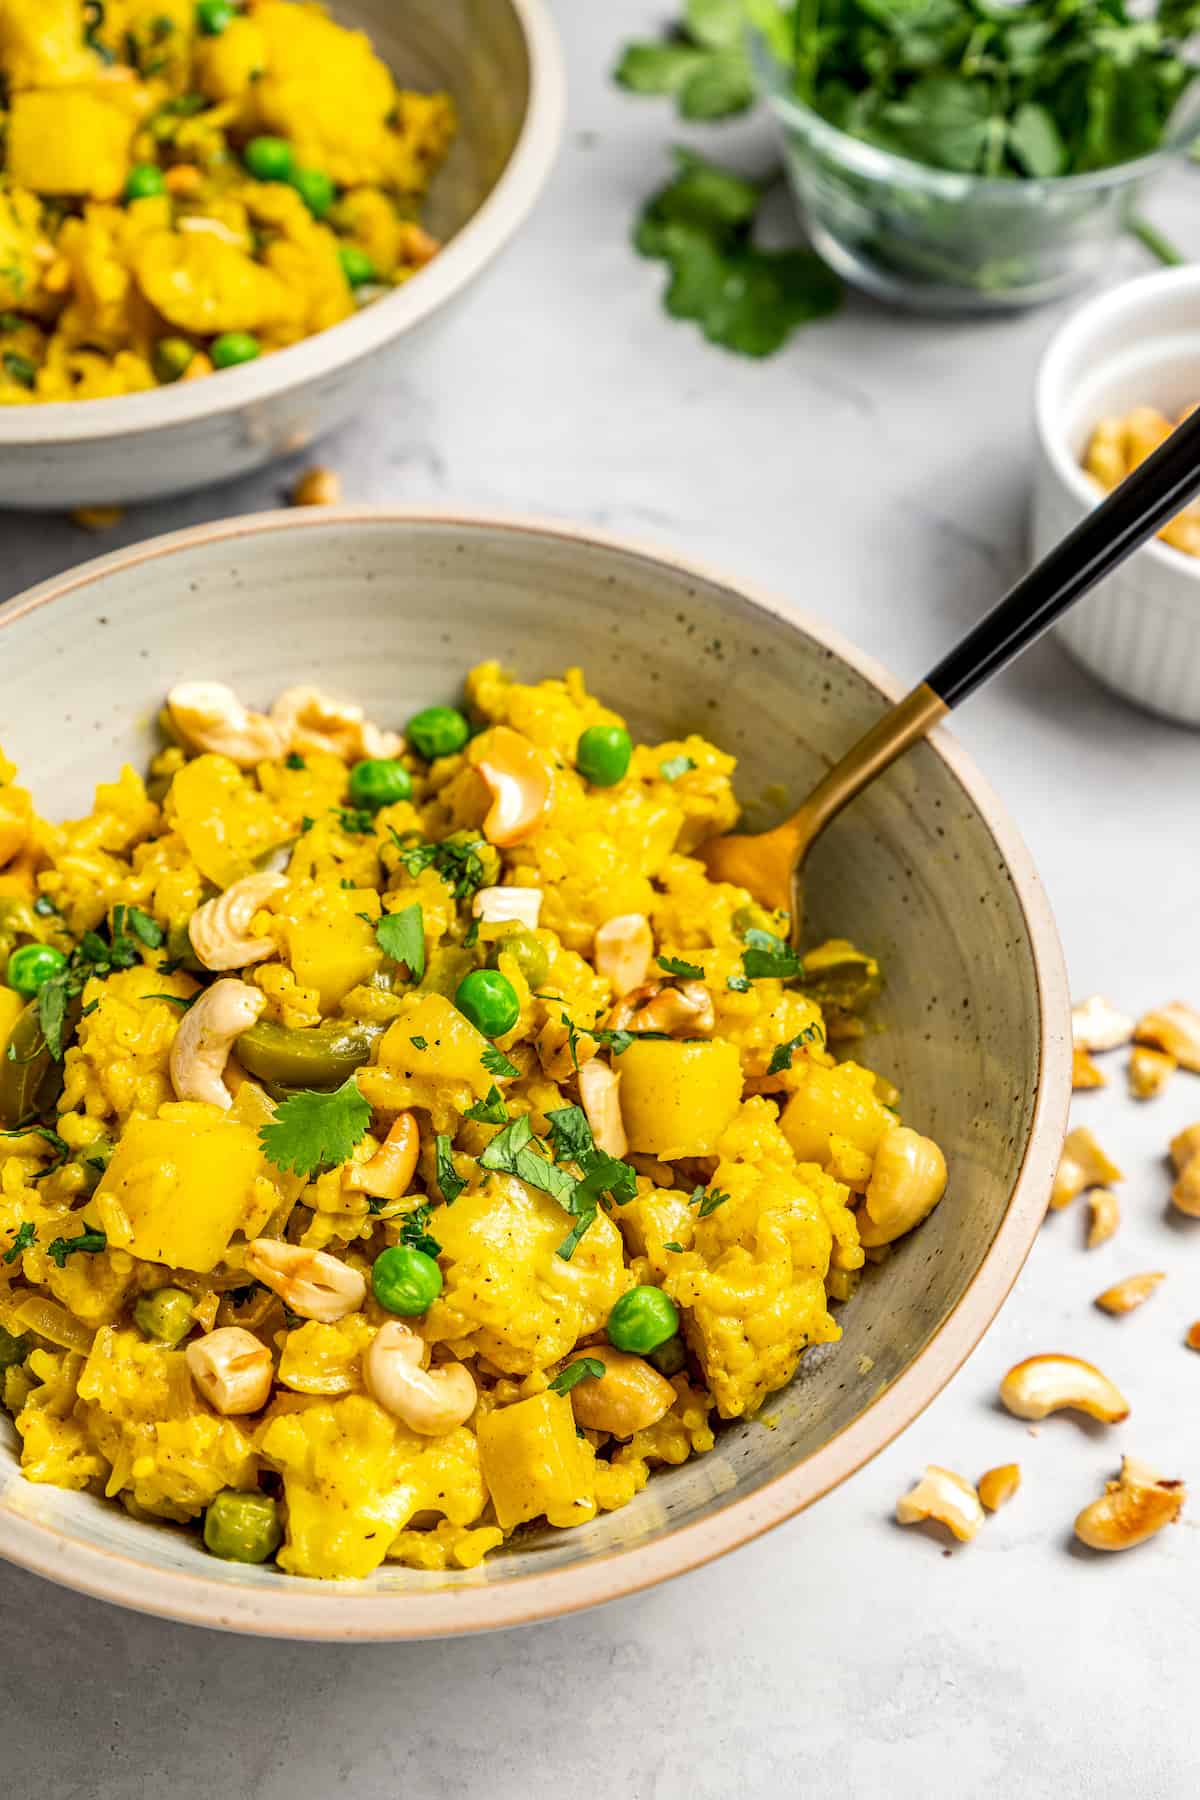
This vegan vegetable biryani is fragrant, flavourful, and perfect for pairing with all your favourite Indian curries! It’s loaded with vegetables, so you can make a meal of it or serve it as a side dish.

On the whole, Indian cuisine tends to be very vegan friendly, but there’s a hidden dairy ingredient in many popular dishes: ghee. When I was a vegetarian, I loved vegetable biryani, but now that I’m vegan, I have to forego the restaurant version and make it myself. But that’s okay! Because this vegan vegetable biryani is delicious .
If you haven’t had it before, vegetable biryani is an Indian dish made with rice, vegetables, spices, and herbs. The name is derived from the Persian word “birian,” which means “fried before cooking.” This refers to the way in which the spices and vegetables are cooked together in a pot before adding the rice. The combination of flavours creates a mouthwatering, aromatic one-dish meal that is sure to please everyone at the dinner table.
To really bring out the flavors in this dish, try using freshly ground spices. This will enhance the flavour of the biryani and give it some authentic Indian flair!
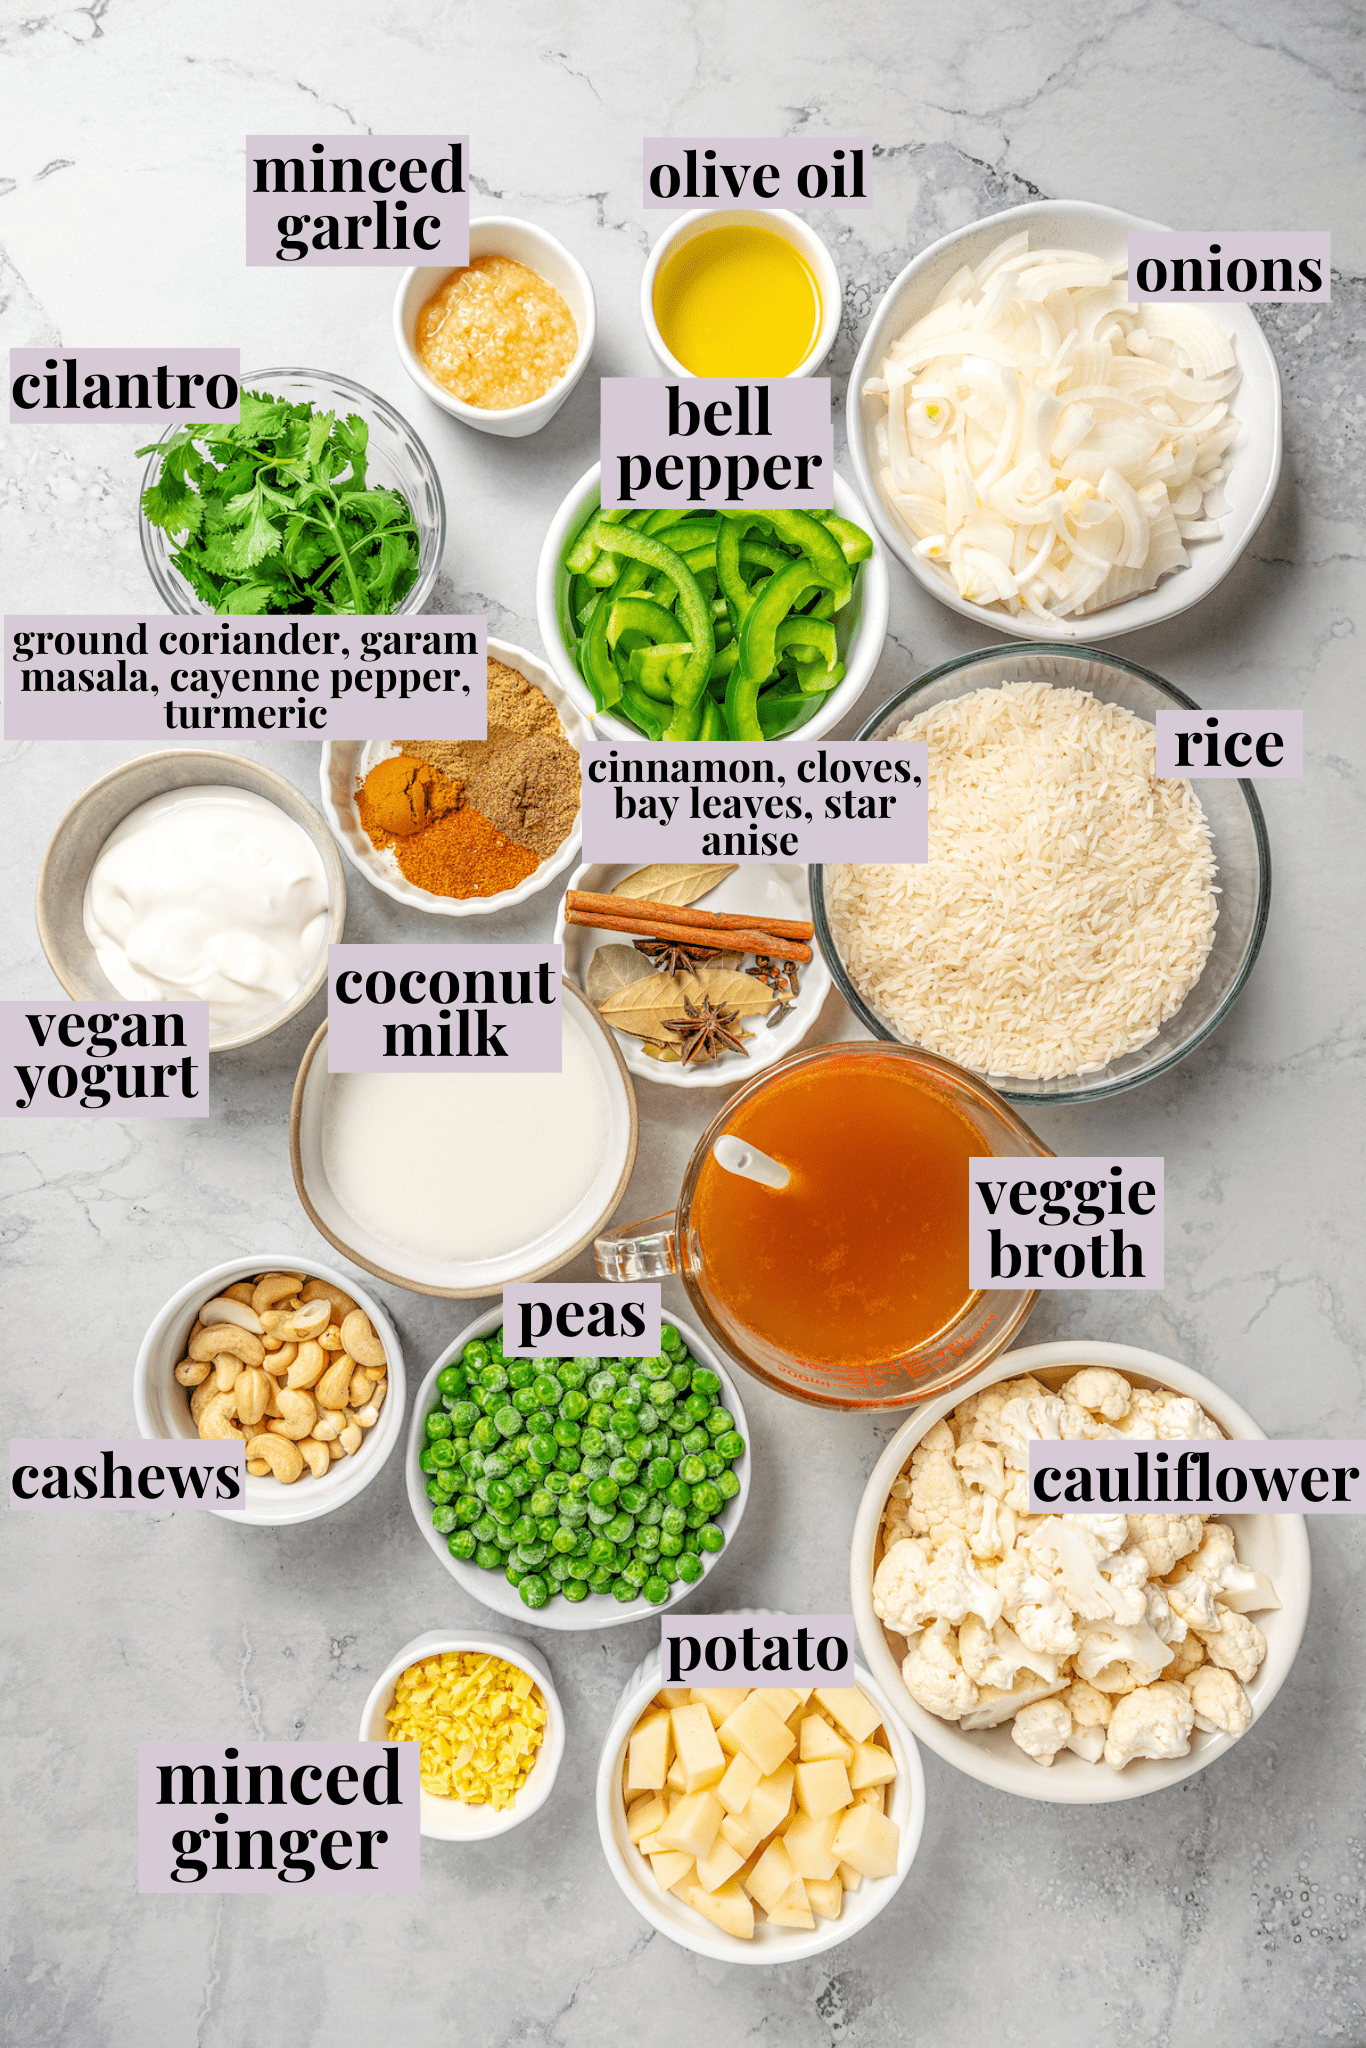
Notes on ingredients
Scroll down to the recipe card to find the ingredient quantities and recipe instructions.
- Olive oil – You can use vegetable oil or canola oil in place of olive oil.
- Raw cashew pieces
- Yellow onions – White onions are fine, too.
- Garlic
- Ginger – Use fresh ginger root, not ground. The flavour is much stronger!
- Cinnamon stick
- Cloves
- Bay leaves
- Ground coriander
- Garam masala
- Cayenne pepper – You can use less for a milder vegetable biryani, or omit it.
- Star anise
- Turmeric – Ground turmeric gives biryani its signature golden colour.
- Green bell pepper
- Cauliflower florets
- Russet potato – You can substitute another potato variety if you’d like.
- Salt
- Peas – Not a fan of peas? Try swapping them out for edamame or chickpeas.
- Plain unsweetened vegan yogurt – Use store-bought or homemade vegan yogurt .
- Coconut milk – Use full-fat coconut milk here.
- Vegetable broth – I use my homemade vegetable broth from veggie scraps .
- Basmati rice – Rinse this well, until the water runs clear.
- Cilantro
How Is Basmati Rice Different from Regular Rice?
Basmati rice is a type of long-grain rice commonly used in Indian and Middle Eastern cuisines. It has a nutty aroma (some say it smells like popcorn!), and when cooked, it becomes light and fluffy. It’s much more flavourful than your standard white or brown rice, so it’s the preferred choice when making vegetable biryani.
How to Make Vegan Vegetable Biryani
Once you’ve gathered all of your ingredients, making vegetable biryani is a breeze! Here’s what you’ll need to do.
Prepare. Warm a teaspoon of oil in a large pot or Dutch oven set over medium heat.
Toast the cashews. Add the cashew pieces to the heated oil and cook for 2 to 3 minutes, or until golden brown. Transfer the toasted cashews to a small bowl or plate.
Cook the onions, garlic, and ginger. Add 1 tablespoon of oil to the pot and add the onions. Cook for 3 to 4 minutes, or until just softened. Add the garlic and ginger and cook for a minute or two, or until fragrant.
Bloom the spices. Add another tablespoon of oil to the pot, along with the cinnamon stick, cloves, bay leaves, coriander, garam masala, cayenne pepper, star anise, and turmeric. Cook for about a minute, or until the spices are fragrant.
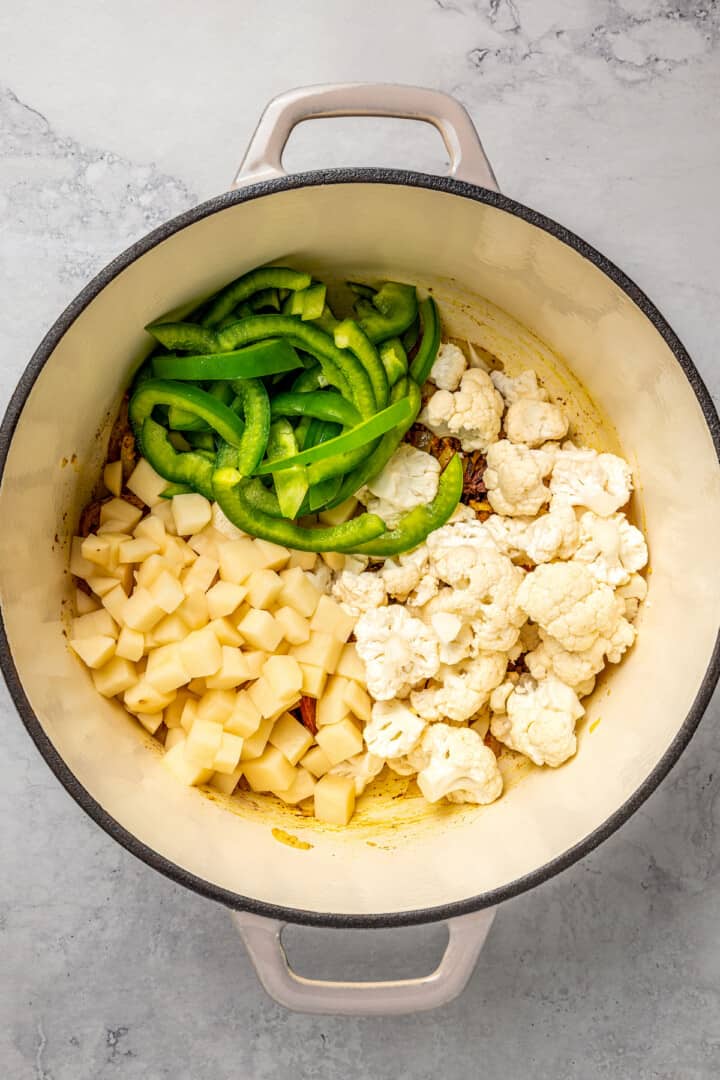
Cook the vegetables. Stir the potato, bell pepper, cauliflower, and salt into the pot. Cover and cook for 20 minutes, stirring often. Remove the lid and stir in the peas. If you’re using the vegan yogurt, stir it in at this point and cook for 2 to 3 minutes.
Add the rice. Stir the rice, broth, and coconut milk into the pot. Bring to a boil, then cover and reduce the heat to low. Simmer, covered, for 20 minutes.
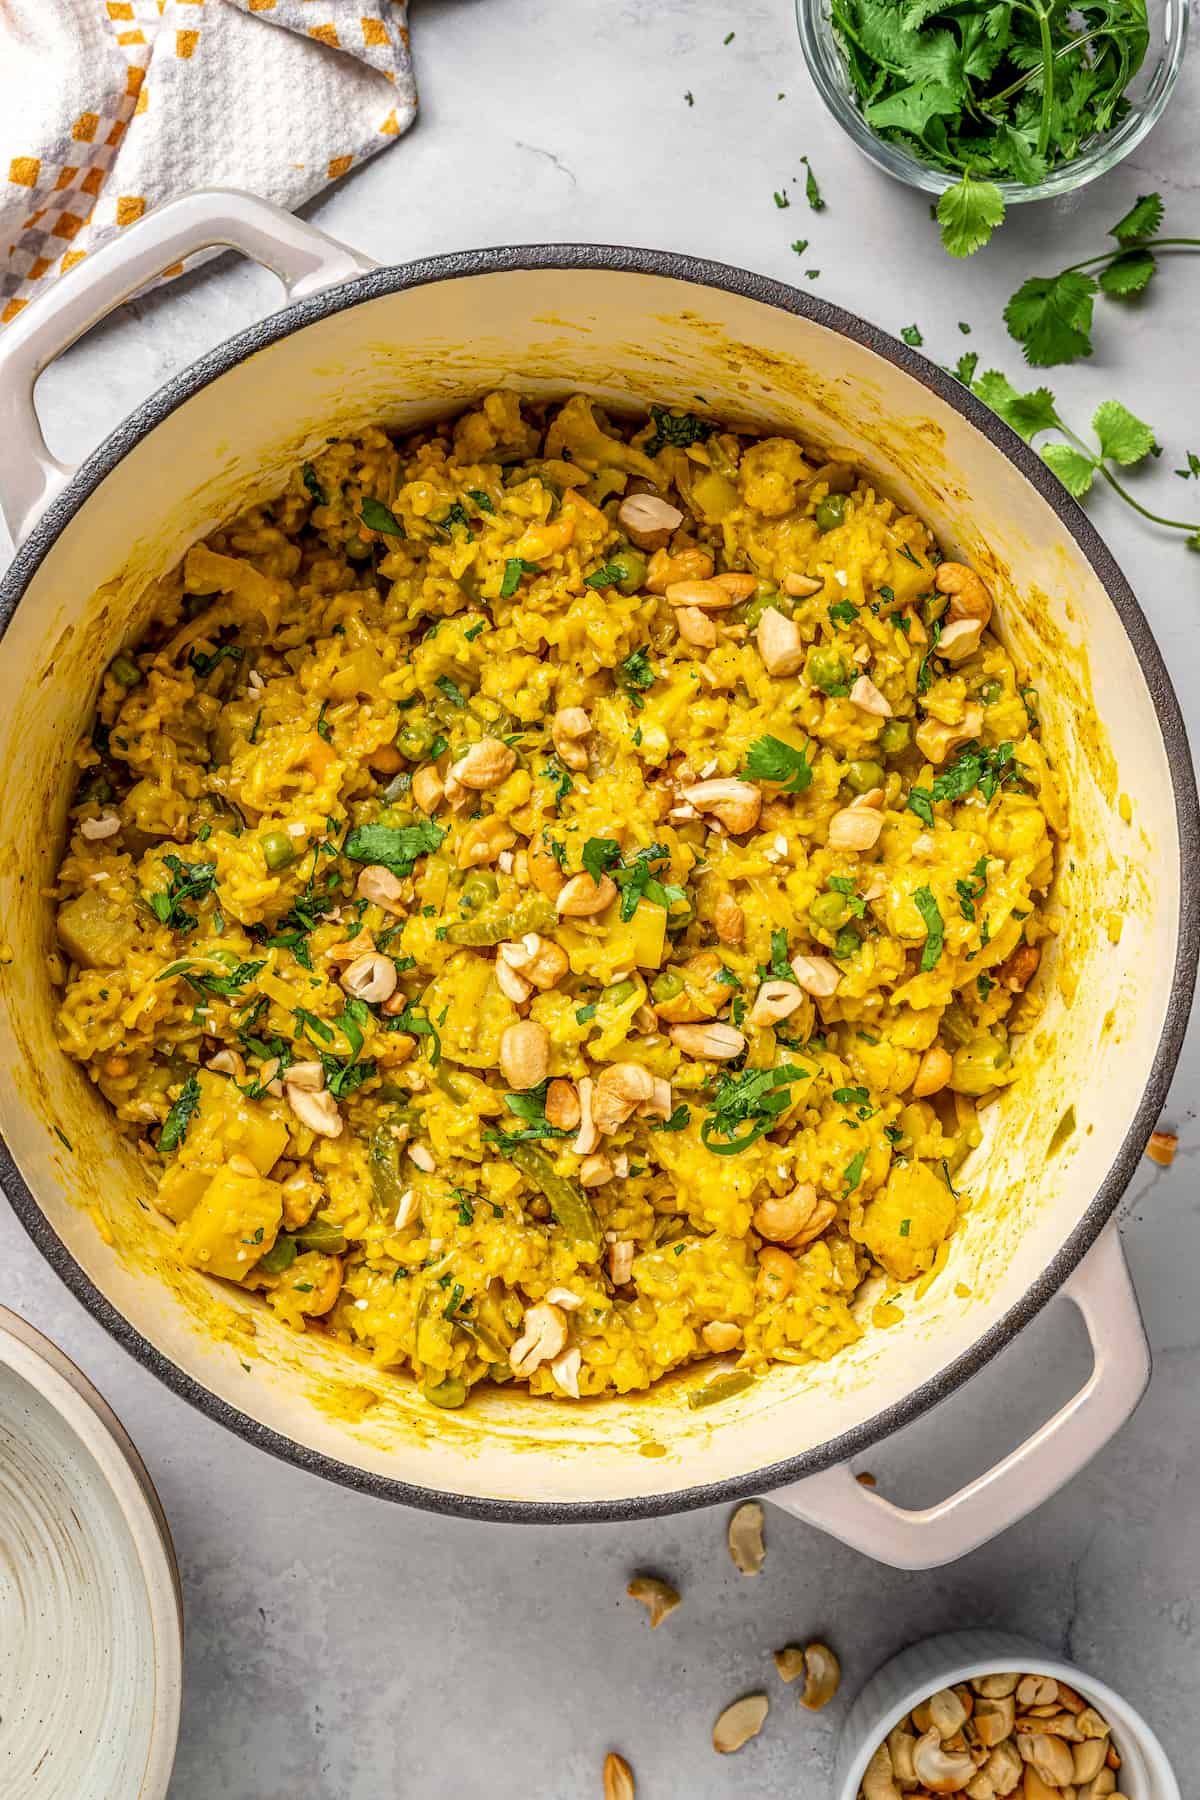
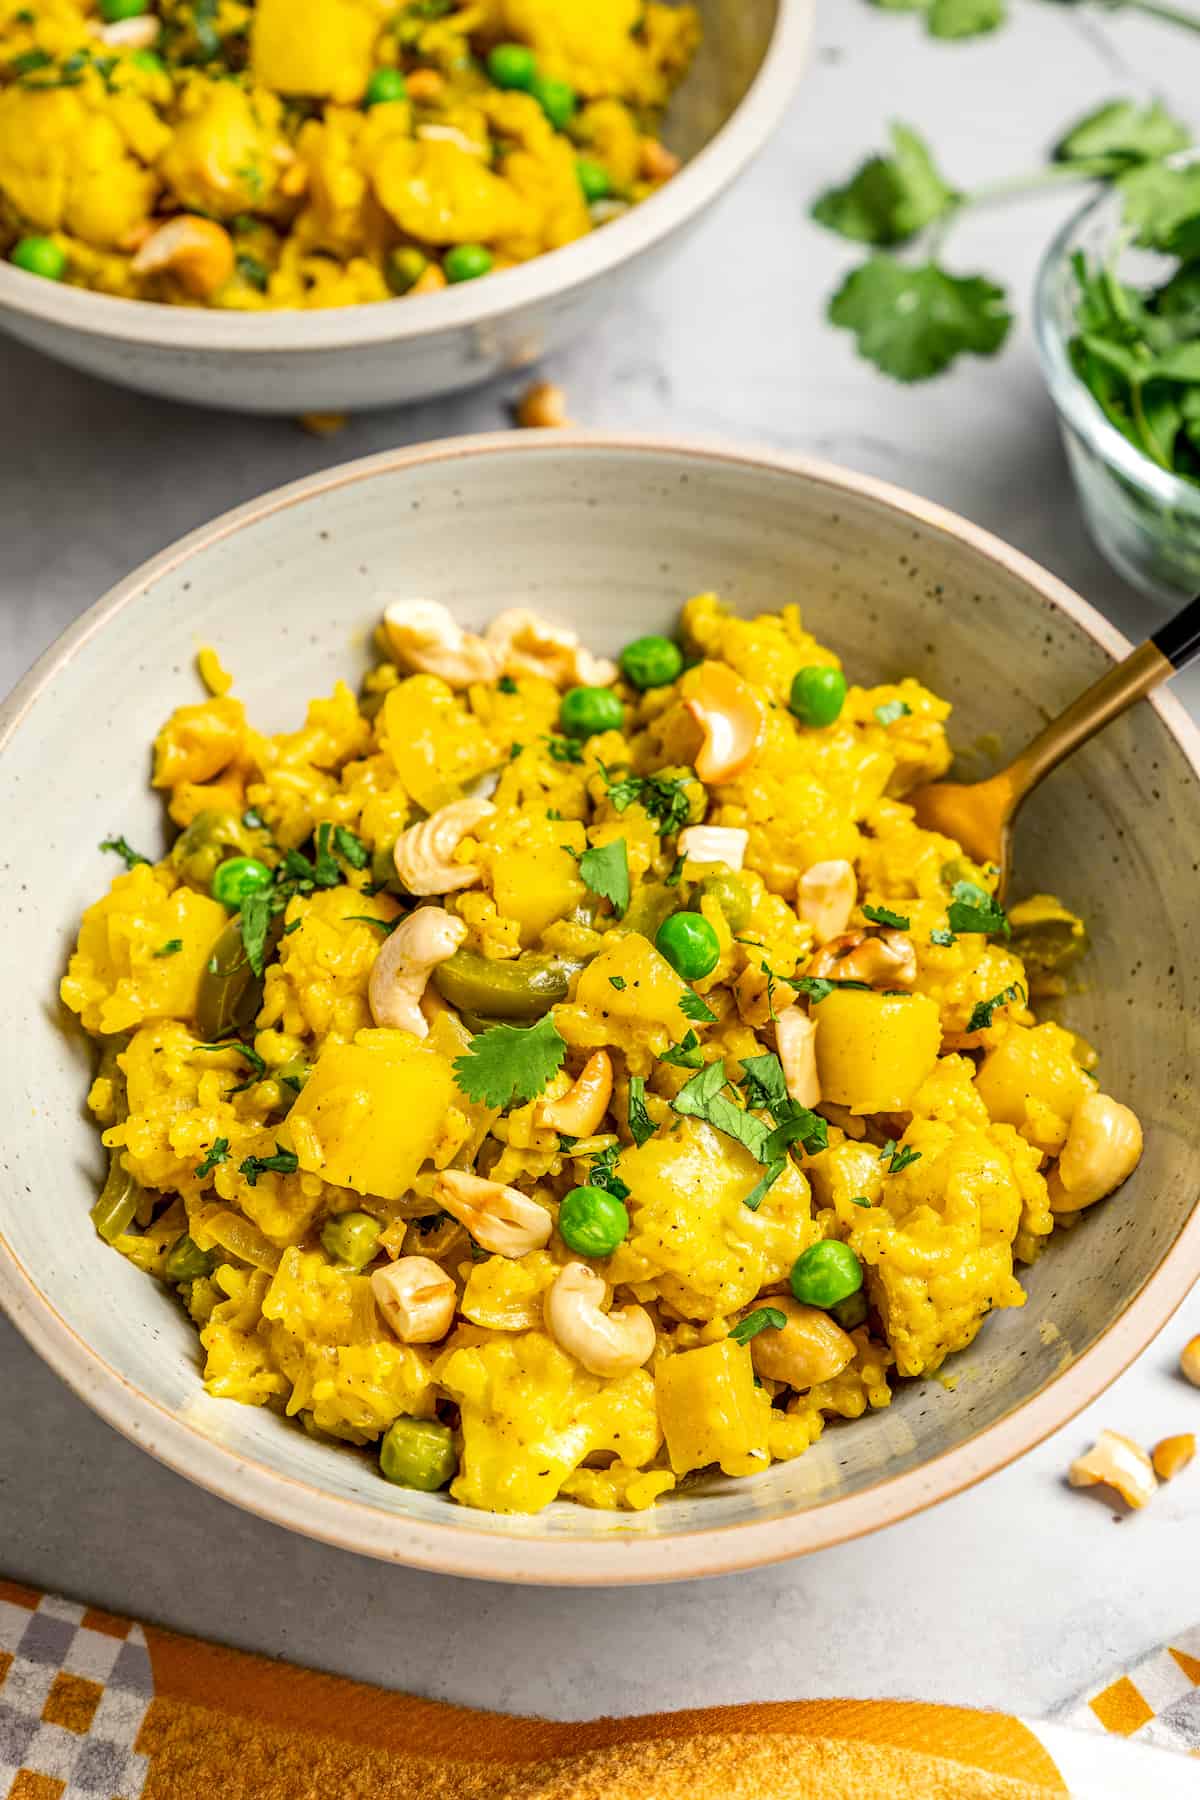
Finish. Sprinkle the toasted cashews and fresh cilantro over the biryani and serve warm.
Tips for Success
These tips will help you make sure your vegetable biryani turns out perfect!
- Rinse the rice before cooking it. This will make it less sticky and more fluffy once cooked.
- Keep a close eye on the spices. Don’t walk away from the stovetop when you’re blooming the spices. You want them toasted and fragrant, not burnt!
- Don’t turn up the heat. Simmer the rice over low heat and check once in a while to make sure the liquid hasn’t cooked off. Add more broth if needed.
Variations
Vegetable biryani is the kind of versatile dish that can be easily customised to your tastes. Here are a few ideas for changing things up:
- Use other vegetables such as zucchini, eggplant, or mushrooms.
- Toss in some chickpeas, tofu, or tempeh for a boost of protein.
- Add dried fruit like raisins, chopped apricots, or currants for a sweet twist.
Serving Suggestions
I love serving this vegetable biryani as part of a full vegan Indian feast. Serve it alongside:
- Vegan Mulligatawny Soup
- Vegan Butter Chicken (With Tofu!)
- Easy Chickpea Tikka Masala
- Vegan Garlic Naan
How to Store
Vegetable biryani can be stored in an airtight container in the refrigerator for up to 5 days. Reheat it in the microwave, or in a skillet over low heat.
Can This Recipe Be Frozen?
Yes, vegetable biryani can be frozen. Transfer the leftovers to an airtight container or zip-top freezer bag and freeze it for up to 3 months. To serve, allow the biryani to thaw in the fridge overnight, then reheat according to the instructions above.

More Vegan Rice Dishes
- Vegan Instant Pot Risotto
- Congri (Cuban Rice and Black Beans)
- Vegan Arancini Fried Rice Balls (With Air Fryer Option)
- Jamaican Rice and Peas

Ingredients
- 1 teaspoon 4 grams + 2 tablespoon (24 grams) olive oil, divided
- ¼ cup raw cashew pieces , 55 grams
- 1 yellow onions , thinly sliced (225 grams)
- 2 tablespoons minced garlic , approximately 6 garlic cloves (32 grams)
- 2 tablespoons minced ginger , approximately 3 inches fresh ginger root (20 grams)
- 2 inches of cinnamon stick , 4 grams
- 6 whole cloves
- 4 bay leaves
- 2 tablespoons ground coriander , 12 grams
- 1 tablespoon garam masala , 5 grams
- 1 teaspoon cayenne pepper , optional
- 2 whole star anise
- 1 teaspoon turmeric , 3 grams
- 1 green bell pepper , thinly sliced (approximately 1 1⁄2 cups or 140 grams)
- 2 cups cauliflower florets , approximately 230 grams
- 1 russet potato , peeled cubed (1 1⁄2 cups or 250 grams)
- 1 ½ teaspoons salt , 10 grams
- 1 cup frozen peas , 130 grams
- ½ cup plain vegan yogurt , unsweetened, optional (122 grams)
- 1 cup canned coconut milk , 220 grams
- 1 ½ cups vegetable broth , 390 grams
- 2 cups basmati rice , rinsed (450 grams)
- Fresh cilantro for topping , optional
Instructions
- Place a large pot or dutch oven over medium heat and add 1 teaspoon of oil.
- Add the cashew pieces to the heated oil and cook for 2 – 3 minutes until golden brown.
- Remove the cooked cashew pieces from the pot and set aside.
- Add 1 tablespoon (12 grams) of oil to the pot and add onions. Cook until just softened, approximately 3 – 4 minutes.
- Add the garlic and ginger and cook until fragrant for approximately 1 – 2 minutes.
- Add another tablespoon (12 grams) of oil along with the cinnamon stick, cloves, bay leaves, coriander, garam masala, cayenne pepper, star anise, and turmeric. Cook until fragrant, approximately 1 minute.
- Add the potato, bell pepper, cauliflower florets, and salt, and stir to combine. Cover the pot with a lid and cook for 20 minutes, stirring often.
- Remove the lid and stir the peas into the vegetable and spice mixture.
- Optional step: Stir in the vegan yogurt if preferred and cook for another 2 – 3 minutes.
- Add the rice, broth, and coconut milk and stir to combine. Bring to a boil then cover the pot with a lid and reduce the heat to low. Simmer for 20 minutes.
- When finished, sprinkle on the cooked cashew pieces and fresh cilantro leaves and serve. Store in an airtight container in the fridge for up to 5 days.
Notes
- Oil: You can use vegetable oil or canola oil in place of olive oil if preferred.
- To store: Vegetable biryani can be stored in an airtight container in the refrigerator for up to 5 days. Reheat it in the microwave, or in a skillet over low heat.
- To freeze: Transfer the leftovers to an airtight container or zip-top freezer bag and freeze it for up to 3 months. To serve, allow the biryani to thaw in the fridge overnight then reheat according to the instructions above.

Vegetable Biryani
Ingredients
- 1 teaspoon 4 grams + 2 tablespoon (24 grams) olive oil, divided
- ¼ cup raw cashew pieces 55 grams
- 1 yellow onions thinly sliced (225 grams)
- 2 tablespoons minced garlic approximately 6 garlic cloves (32 grams)
- 2 tablespoons minced ginger approximately 3 inches fresh ginger root (20 grams)
- 2 inches of cinnamon stick 4 grams
- 6 whole cloves
- 4 bay leaves
- 2 tablespoons ground coriander 12 grams
- 1 tablespoon garam masala 5 grams
- 1 teaspoon cayenne pepper optional
- 2 whole star anise
- 1 teaspoon turmeric 3 grams
- 1 green bell pepper thinly sliced (approximately 1 1⁄2 cups or 140 grams)
- 2 cups cauliflower florets approximately 230 grams
- 1 russet potato peeled cubed (1 1⁄2 cups or 250 grams)
- 1 ½ teaspoons salt 10 grams
- 1 cup frozen peas 130 grams
- ½ cup plain vegan yogurt unsweetened, optional (122 grams)
- 1 cup canned coconut milk 220 grams
- 1 ½ cups vegetable broth 390 grams
- 2 cups basmati rice rinsed (450 grams)
- Fresh cilantro for topping optional
Instructions
- Place a large pot or dutch oven over medium heat and add 1 teaspoon of oil.
- Add the cashew pieces to the heated oil and cook for 2 - 3 minutes until golden brown.
- Remove the cooked cashew pieces from the pot and set aside.
- Add 1 tablespoon (12 grams) of oil to the pot and add onions. Cook until just softened, approximately 3 - 4 minutes.
- Add the garlic and ginger and cook until fragrant for approximately 1 - 2 minutes.
- Add another tablespoon (12 grams) of oil along with the cinnamon stick, cloves, bay leaves, coriander, garam masala, cayenne pepper, star anise, and turmeric. Cook until fragrant, approximately 1 minute.
- Add the potato, bell pepper, cauliflower florets, and salt, and stir to combine. Cover the pot with a lid and cook for 20 minutes, stirring often.
- Remove the lid and stir the peas into the vegetable and spice mixture.
- Optional step: Stir in the vegan yogurt if preferred and cook for another 2 - 3 minutes.
- Add the rice, broth, and coconut milk and stir to combine. Bring to a boil then cover the pot with a lid and reduce the heat to low. Simmer for 20 minutes.
- When finished, sprinkle on the cooked cashew pieces and fresh cilantro leaves and serve. Store in an airtight container in the fridge for up to 5 days.
Notes
- Oil: You can use vegetable oil or canola oil in place of olive oil if preferred.
- To store: Vegetable biryani can be stored in an airtight container in the refrigerator for up to 5 days. Reheat it in the microwave, or in a skillet over low heat.
- To freeze: Transfer the leftovers to an airtight container or zip-top freezer bag and freeze it for up to 3 months. To serve, allow the biryani to thaw in the fridge overnight then reheat according to the instructions above.
Nutrition
Vegetable Biryani https://jessicainthekitchen.com/vegetable-biryani/ May 11, 2023
This vegan kaju katli is rich, creamy, and nutty. Swapping the ghee for coconut oil makes this cashew fudge recipe dairy-free!
I love traveling, but when I can’t travel, sometimes trying sweets and treats from around the world is a good substitute. This past year I’ve made Tahô and Haupia , and now we’re traveling (virtually!) to India to enjoy kaju katli!
What Is Kaju Katli?
Kaju katli is a popular Indian sweet made with ground cashews, sugar, and ghee. (My vegan version substitutes the ghee for coconut oil.) The name itself translates to “cashew slice” in Hindi, and it’s commonly cut into diamond-shaped pieces. It has an absolutely irresistible melt-in-your-mouth texture, a little bit like chocolate fudge—which is probably why it’s often referred to as cashew fudge.
Sometimes also known as kaju barfi, kaju katli dates back hundreds of years and is believed to have been brought to India by Persians, who first introduced the sweet to Mughal courts. It was traditionally made on special occasions like Diwali, weddings, and other festivals. Today, kaju katli has become a popular treat throughout India and the Indian diaspora.
Notes on Ingredients
Scroll down to the recipe card to find the ingredient quantities and recipe instructions.
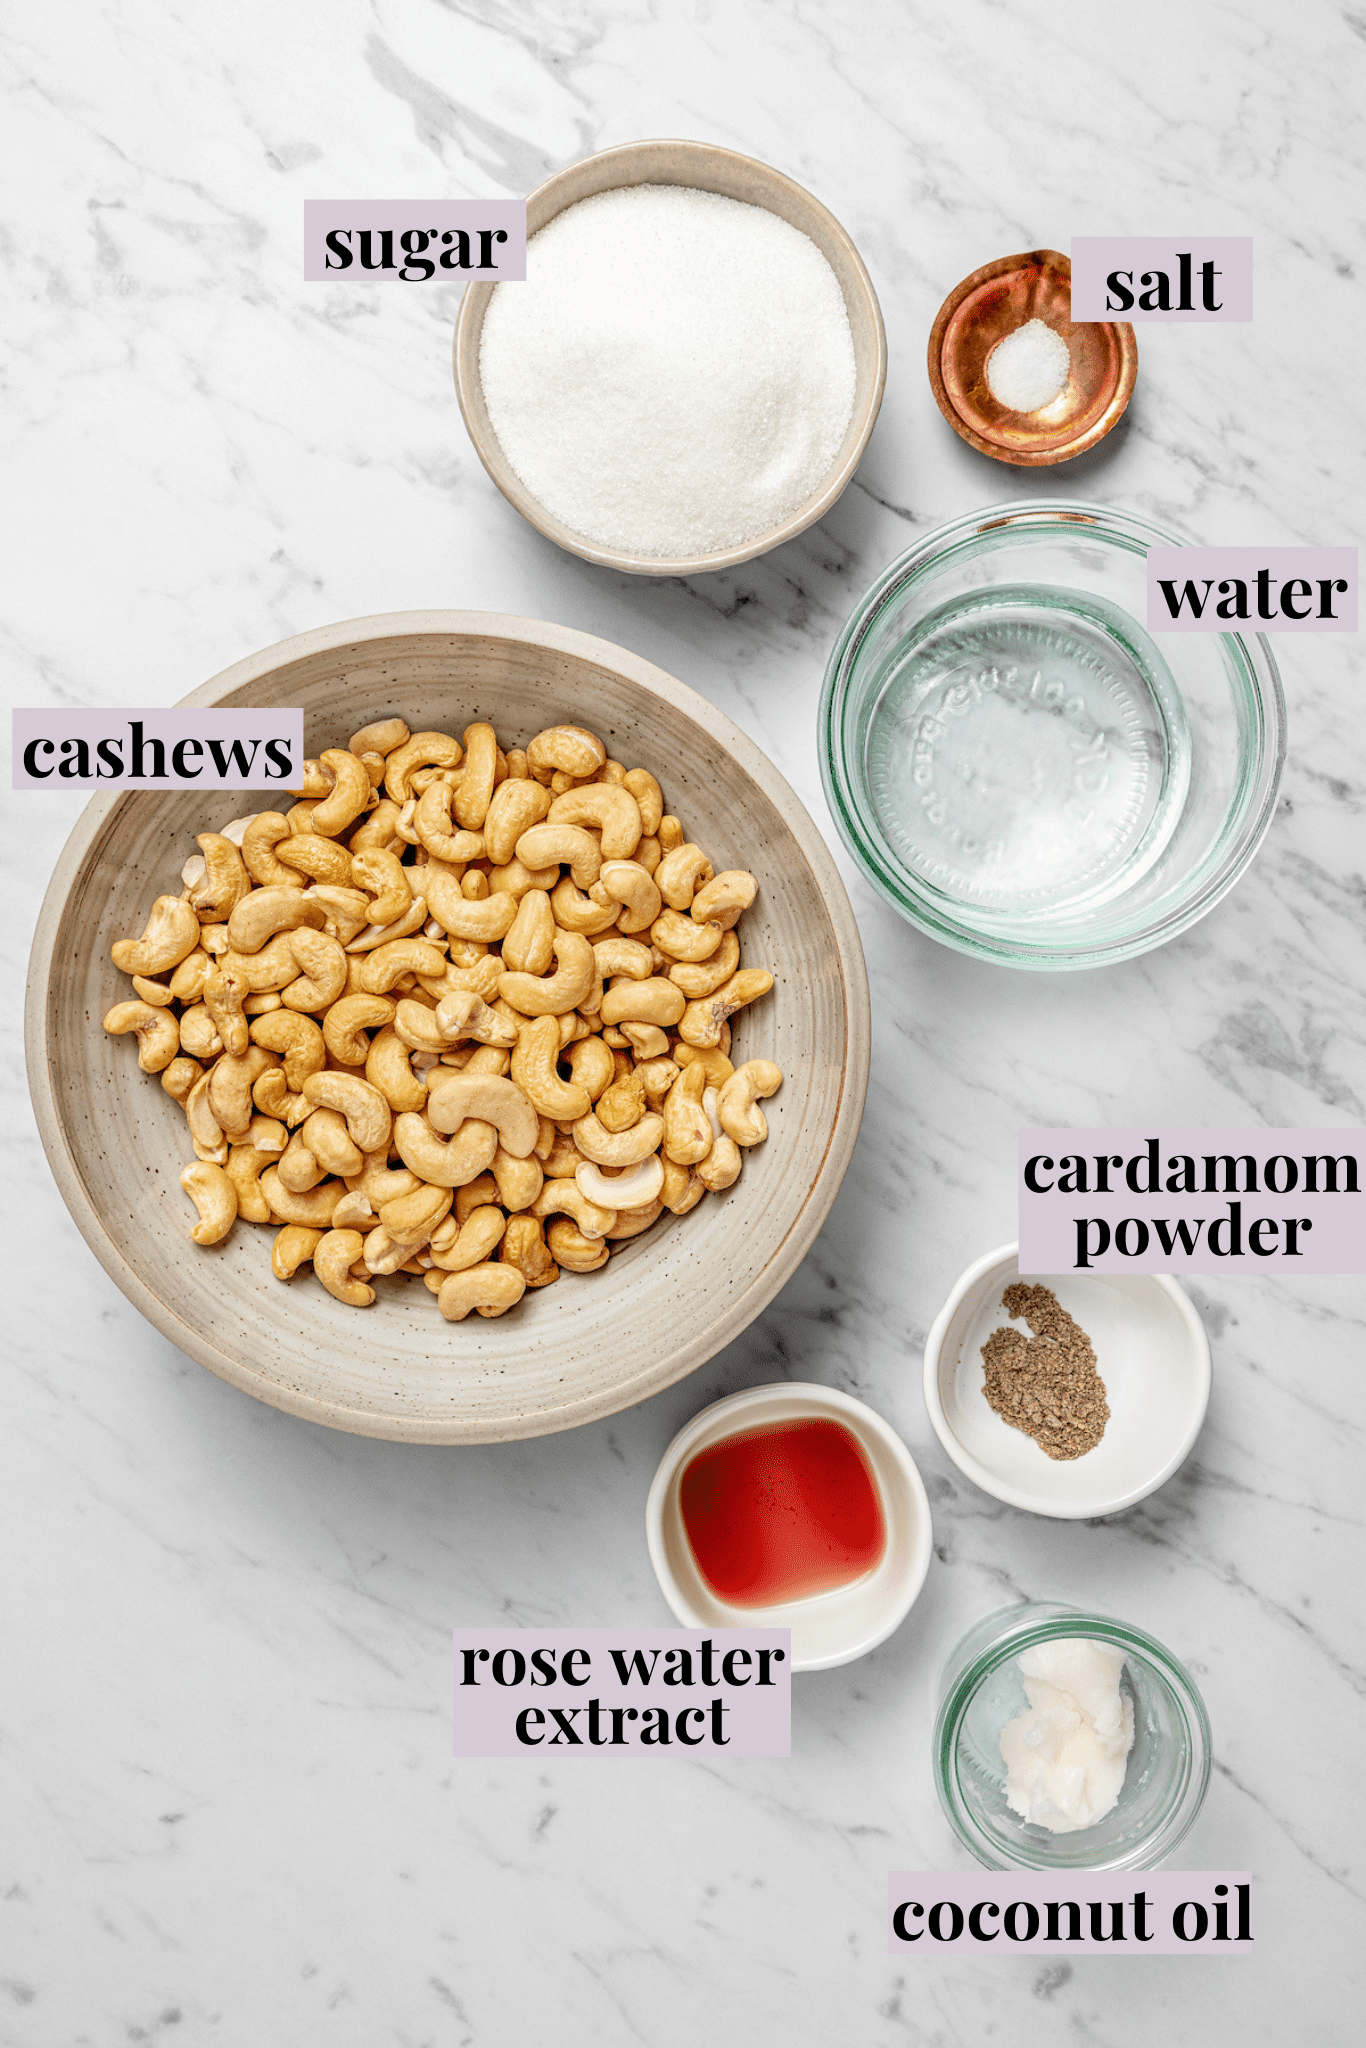
- Whole raw cashews – Buy these in the bulk section of the grocery store for the best price.
- Granulated sugar – Be sure to use vegan sugar; some granulated sugar is refined with bone char.
- Water
- Coconut oil – This replaces the ghee. It’s important to use coconut oil and not another oil, as it is solid at room temperature.
- Salt
Optional Flavour Additives:
- Rose water extract
- Cardamom powder
What Is Rose Water Extract?
Rose water extract is a fragrant liquid made by steeping rose petals in water. It has been used in Indian cuisine for centuries and adds a delicate floral aroma and flavour to desserts. If you can’t find it locally, feel free to omit it or substitute with almond or orange extract.

How to Make Vegan Kaju Katli
Making Indian cashew fudge is easier than you think! Here’s what you’ll need to do.
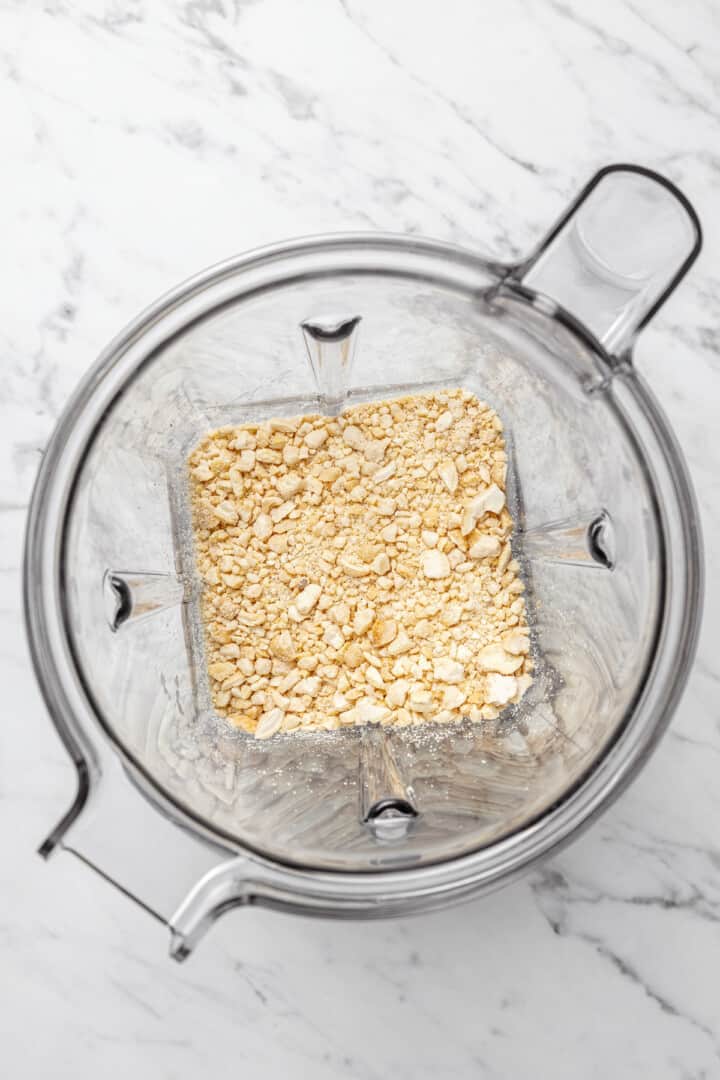
Process the cashews. Place the cashews in a blender and blend them into a powder.
Strain the cashews. Set a fine mesh strainer over a bowl and pour the cashew powder into it. Shake and scrape the sides of the strainer to separate the larger pieces from the fine powder.
Repeat. Return the large pieces back to the blender, then blend and strain again. Continue to repeat until all of the cashews are blended into a fine powder.
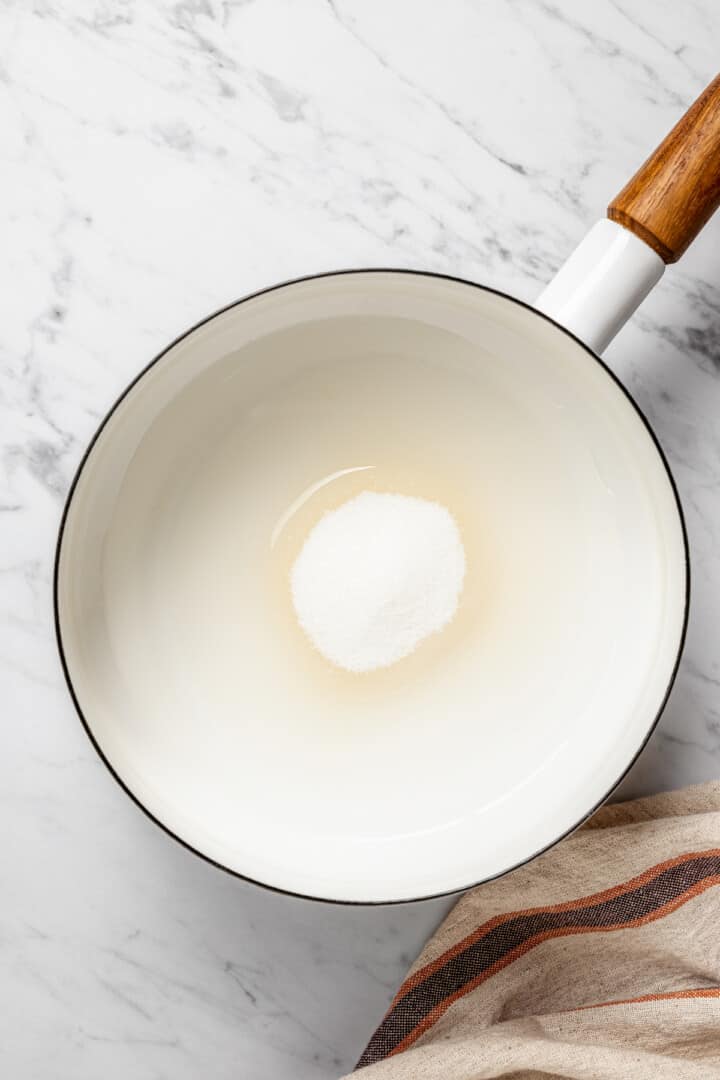
Heat the water and sugar. In a medium saucepan, stir together the water and sugar until the sugar dissolves. Bring the mixture to a boil and keep boiling, whisking often, for approximately 4 minutes.
Add the remaining ingredients. Remove the pan from the heat, then stir in the cashew powder until the mixture thickens. Add the coconut oil, along with any flavour additives you’re using, and stir to combine; the mixture should resemble a firm cookie dough.

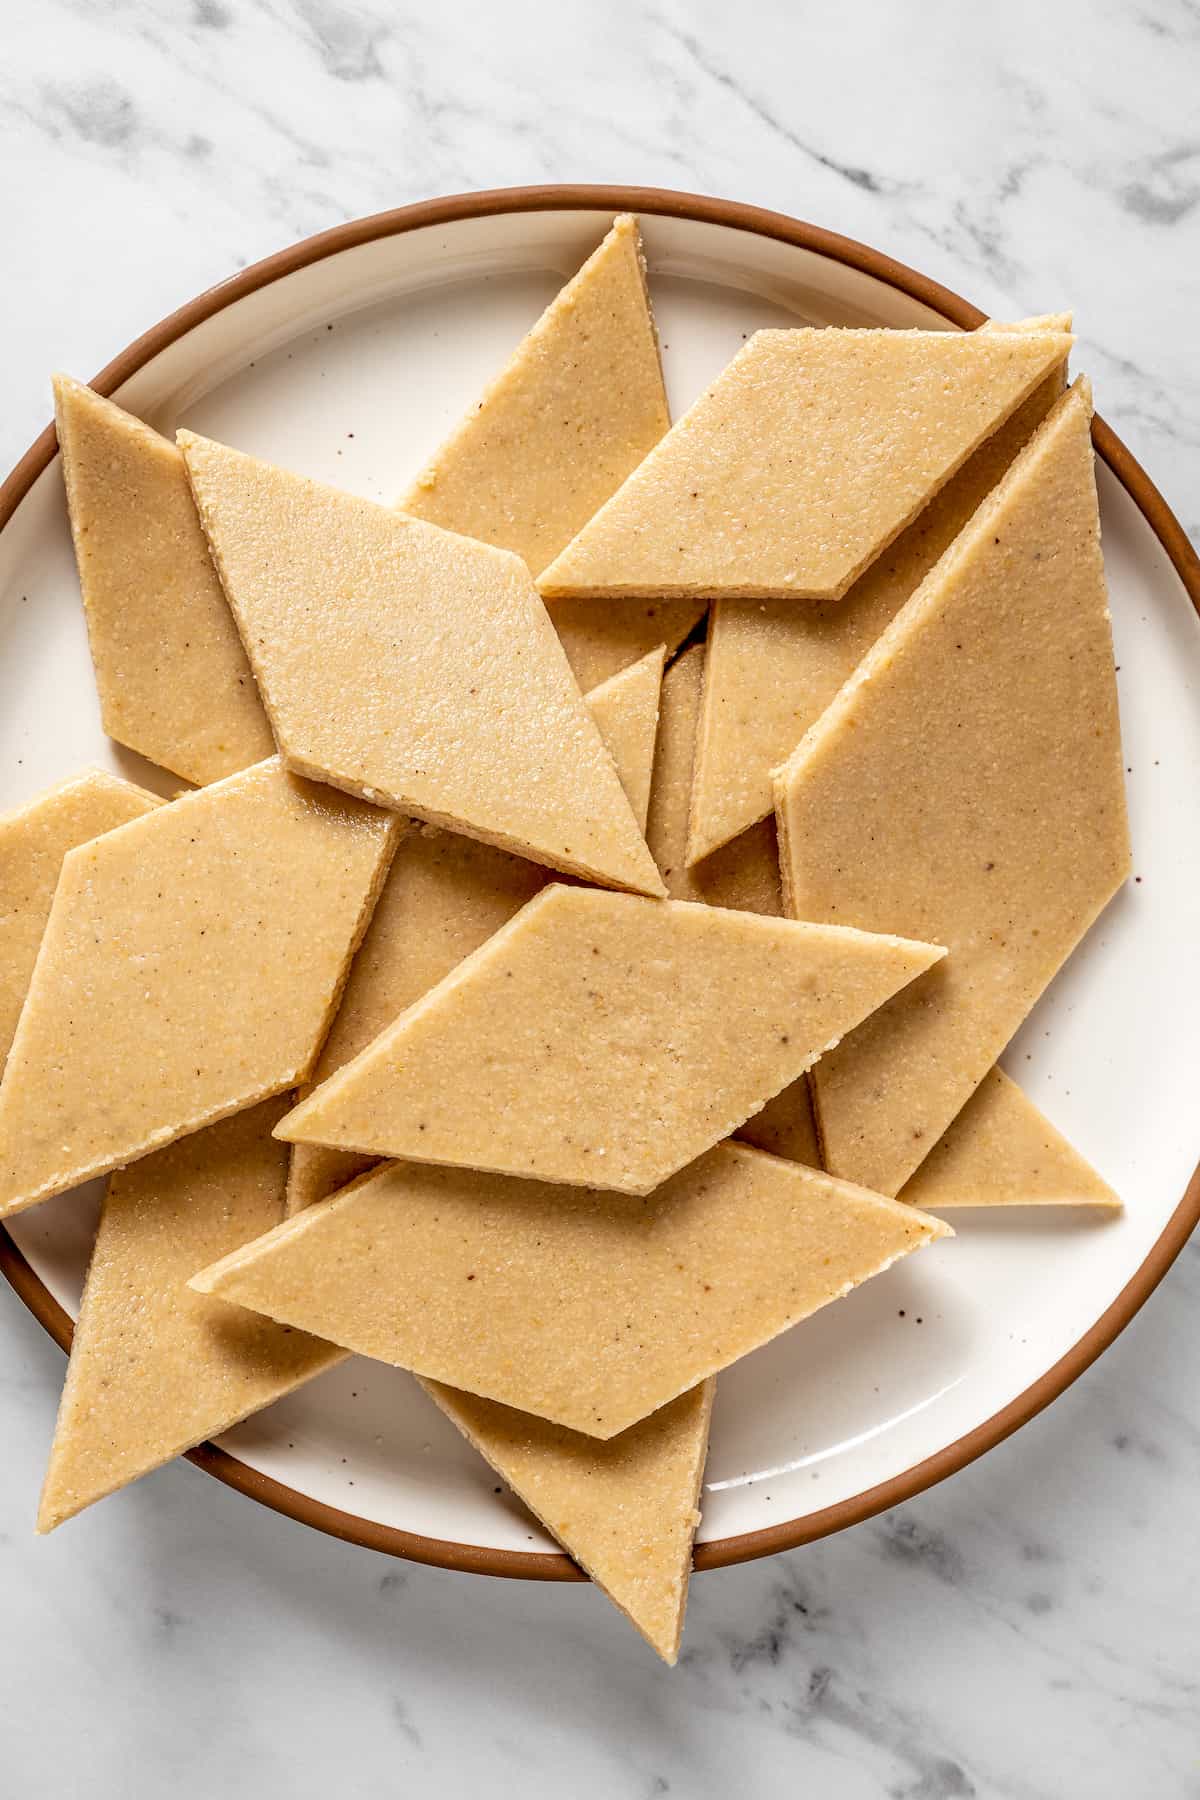
Roll out the cashew fudge. Generously grease a cutting board with coconut oil and turn out the kaju katli onto it. Place a piece of parchment paper over the dough and use a rolling pin to roll it out until it’s about 1/4-inch thick.
Cool and cut. Let the cashew fudge cool slightly, but not completely, then cut it into diamond shapes with a large, sharp knife.

Tips for Success
These simple tips will help you make perfect kaju katli:
- Don’t over-blend. If you blend too much, the oil from the cashews will start to release and create a wet, sandy texture.
- Be careful when boiling the water and sugar. If you overcook it, the fudge will be too hard. Be sure to cook just until it reaches a syrup stage.
- Adjust as needed. The finished kaju katli mixture should not be dry and crumbly, nor should it be wet and sticky. If the dough is crumbly, add more coconut oil a teaspoon at a time until the texture improves. If the dough is too sticky and doesn’t hold its shape, place the pan back on the stovetop over low heat and cook, stirring often, for 1 to 2 minutes, until the dough thickens.
Variations
While the fudge is still warm and not quite set, you can gently press cashews, pistachios, saffron threads and/or dried rose petals into the top for some extra flavour and a decorative touch. Edible silver leaf, or varak, is another popular embellishment for kaju katli.

How to Store
Store kaju katli in an airtight container in the refrigerator, where it will stay fresh for up to 1 week.
Can This Recipe Be Frozen?
Yes, you can freeze kaju katli for up to 3 months. Allow the fudge to cool completely before freezing it in an airtight container or zip-top bag. Thaw the fudge in the refrigerator before serving.

More Vegan Sweets and Treats
- Air Fryer Chocolate Chip Cookies
- Vegan Mug Brownie
- Vegan Apple Pie Recipe
- Chocolate Avocado Ice Cream
Ingredients
- 2 cups whole raw cashews , 280 grams
- ¾ cup granulated sugar , 150 grams
- ½ cup water , 185 grams
- 1 tablespoon coconut oil , 12 grams
- ⅛ teaspoon salt , 285 milligrams
Optional flavor additives:
- 1 teaspoon rose water extract , 4 grams
- ¼ teaspoon cardamom powder , 0.5 grams
Instructions
- Add the cashews to a blender and blend into a powder. Do not blend too much or the oils from the cashews will start to release and form a type of wet sandy texture.
- Place a fine mesh strainer over a bowl and dump the cashew powder into the strainer. Shake and scrape the sides of the strainer to strain all of the fine cashew powder into the bowl. Add any large cashew pieces that won’t go through the strainer back to the blender and pulse into a powder. Return the contents of the blender to the strainer and shake again to release the cashew powder into the bowl. Repeat this process until all cashews are blended into a fine powder.
- In a medium saucepan, add the water and sugar and stir to dissolve. Bring the mixture to a boil and keep boiling, whisking often, for approximately 4 minutes.
- Remove the pan from the heat. Add the cashew powder and stir to combine. The mixture will quickly start to thicken.
- Add the coconut oil, and any flavor additives if preferred and stir to combine.
- The cashew fudge is done when the dough mixture resembles a firm cookie dough. It should not be dry and crumbly at all and it also shouldn’t be too wet and sticky. You should be able to scoop it with a spoon and have it hold its shape without breaking into crumbly pieces. If the dough is crumbly, add more coconut oil, 1 teaspoon at a time, and mix until combined and the dough is the right texture. If the dough is too sticky and doesn’t hold its shape, add the pan back to the stovetop over low heat and cook, stirring often, for about 1 – 2 minutes until the dough is slightly thickened.
- Generously grease a cutting board with coconut oil and place the dough on it. Place a piece of parchment paper over the dough and use a rolling pin to roll it out until it is 1⁄4 inch in thickness.
- Allow the cashew fudge to cool slightly, but not completely, before cutting it angled into diamond shapes. I recommend using a large knife for easier cutting. Store the cooled fudge in an airtight container in the fridge for up to 1 week.
