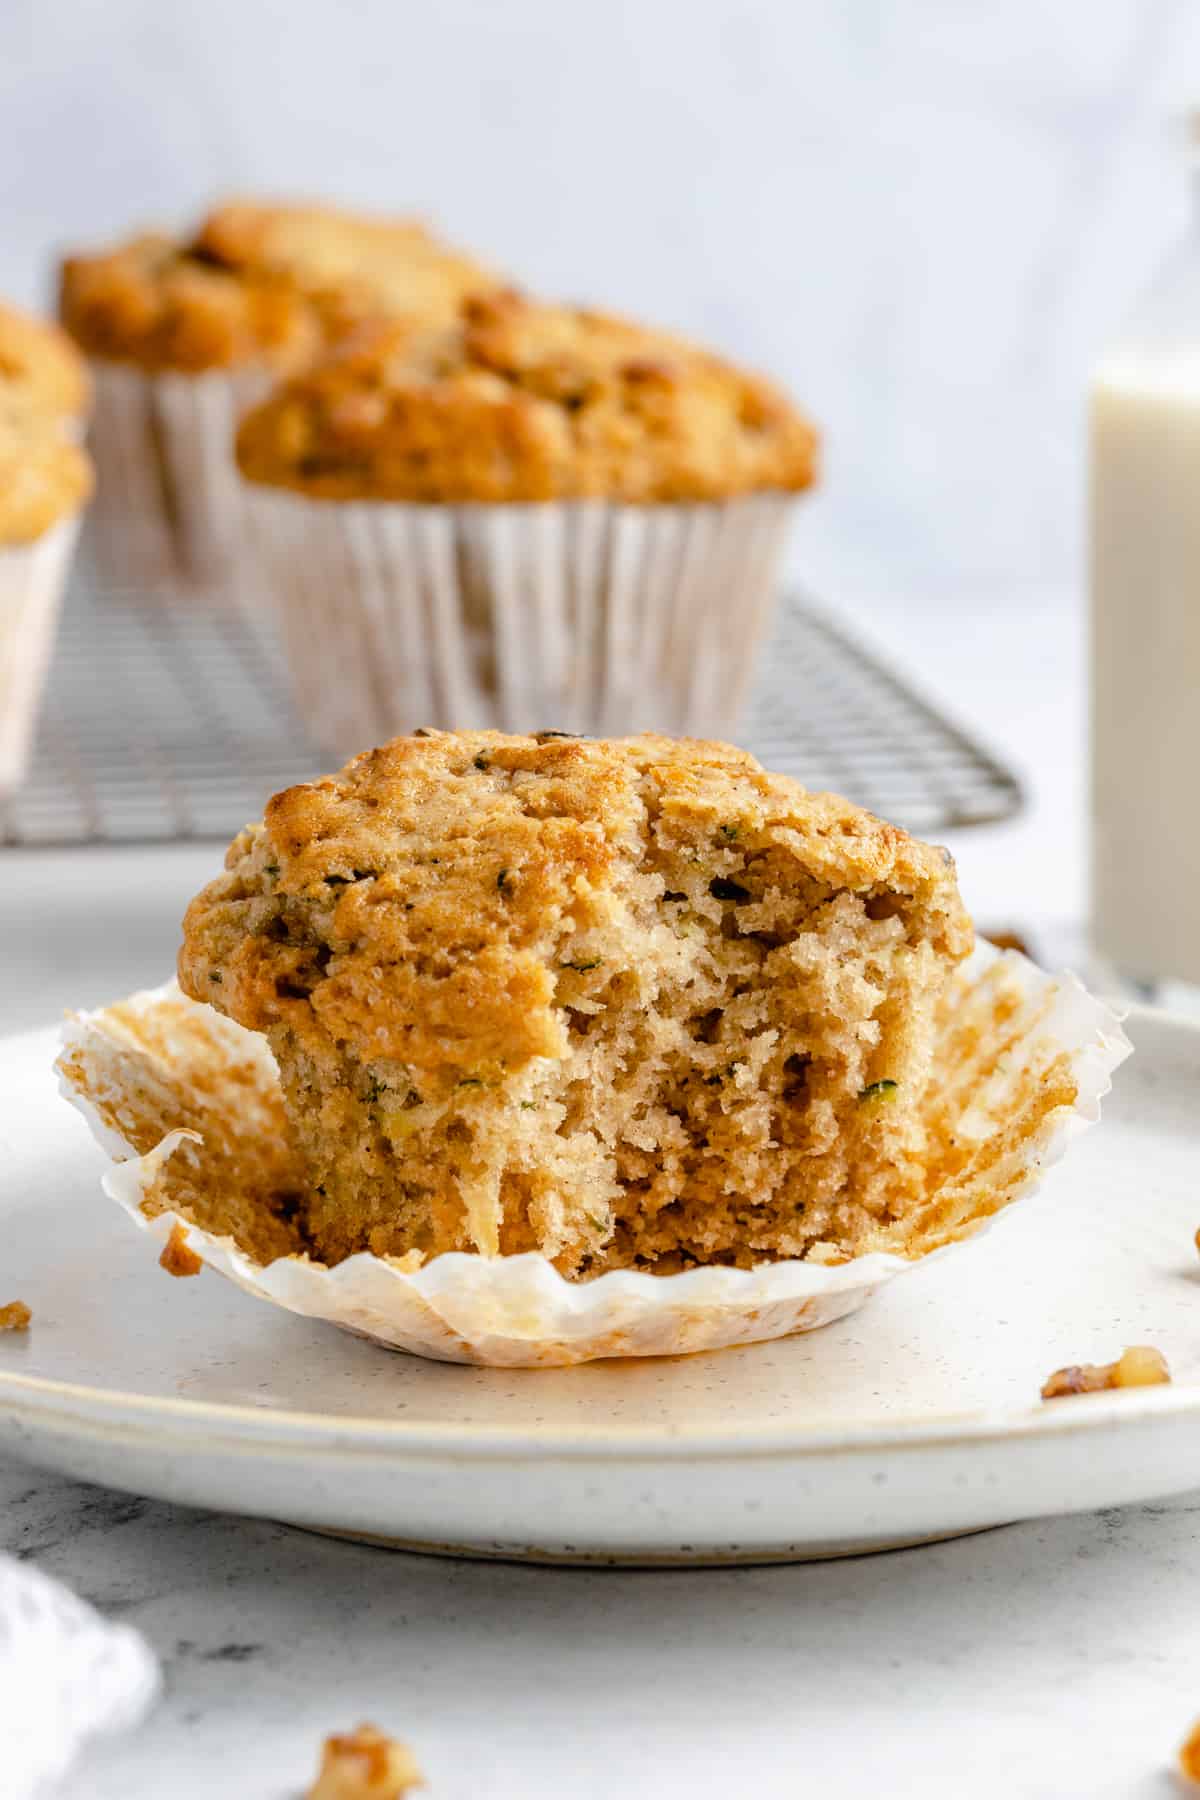
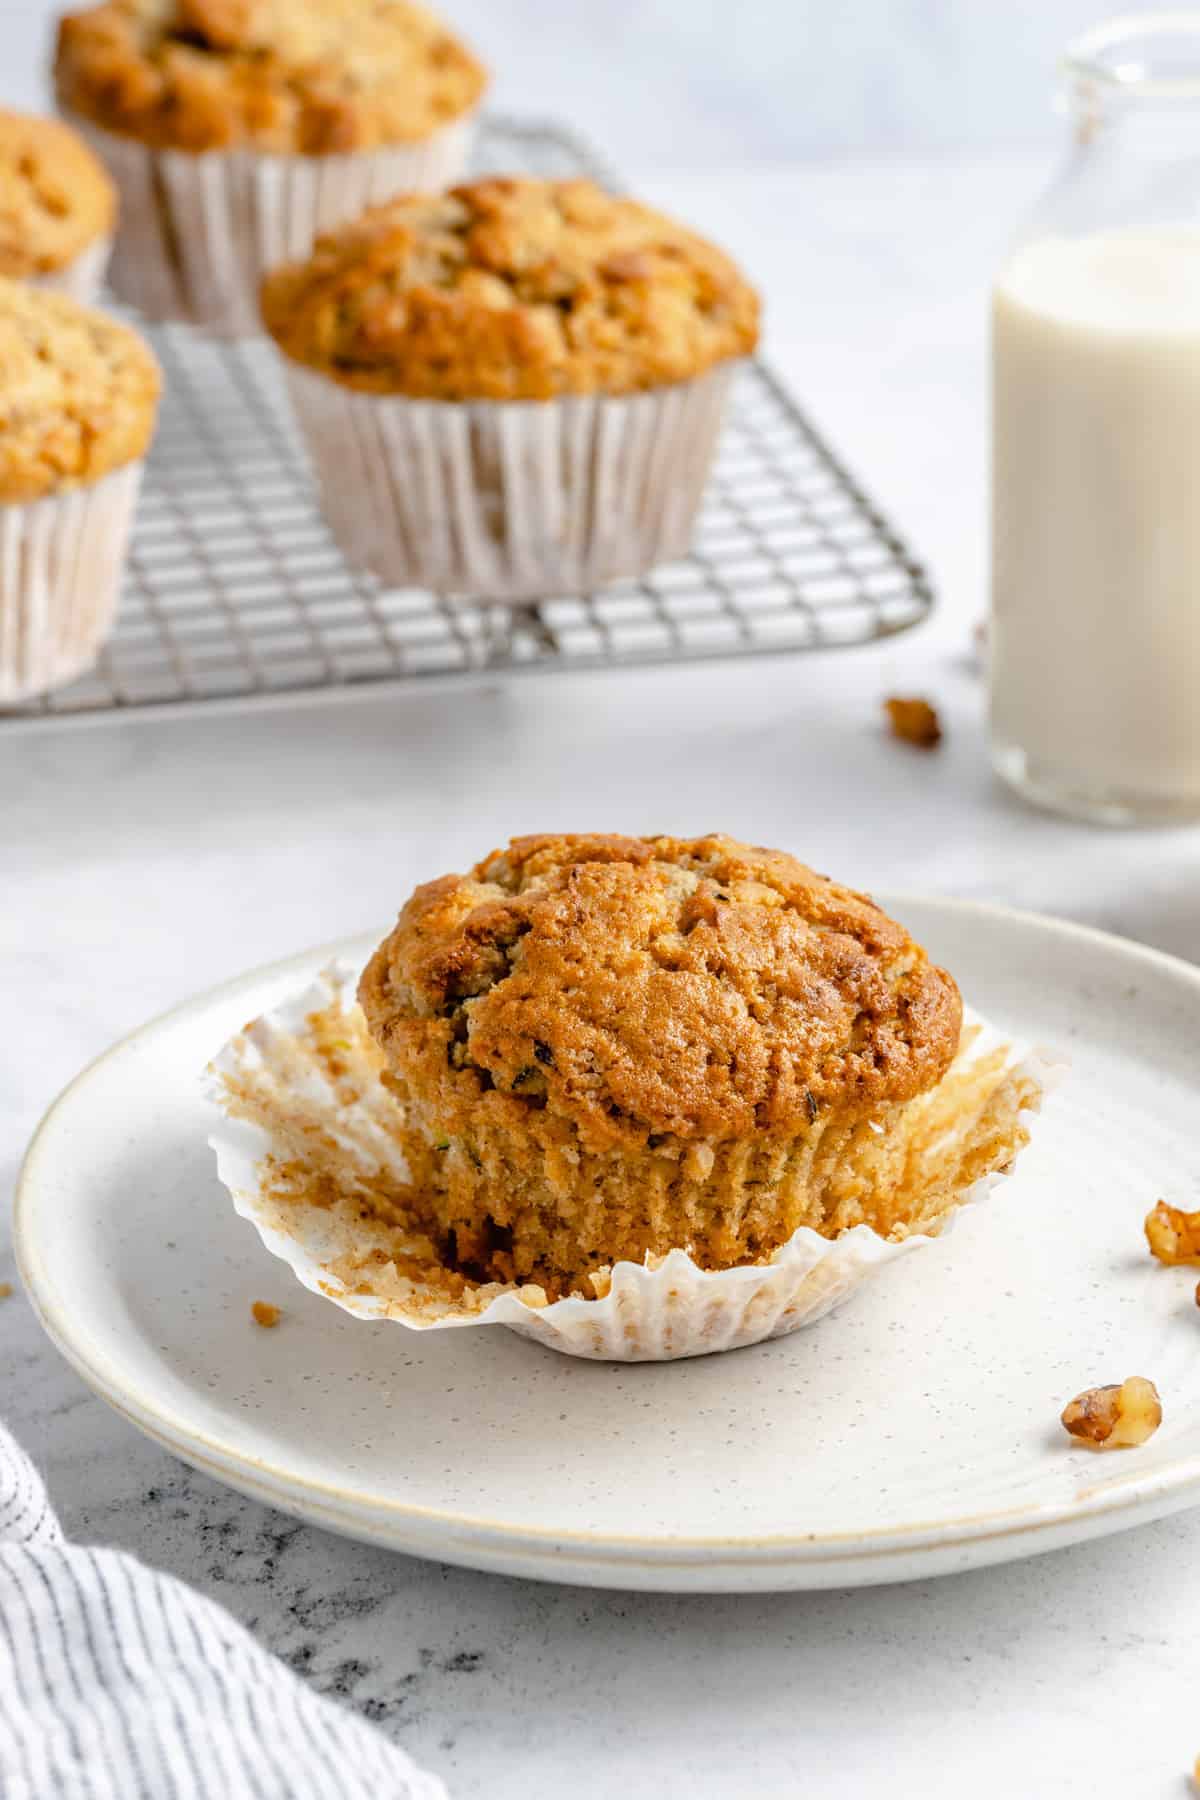
Vegan Zucchini Muffins are equal parts tender, fluffy, and moist. These easy make ahead muffins are a quick yet delicious breakfast that you’ll want to treat yourself to over and over again!
I don’t know about you, but I am a big believer in the power of a good breakfast. Starting off the day with a filling meal gives you the necessary energy to tackle the packed schedule ahead of you!
There are so many great options to fall back on: pancakes , waffles , a bowl of oatmeal , tofu scramble, quinoa bars , etc. My go-to breakfast option, though, is usually muffins. Specifically, these Vegan Zucchini Muffins. They’re really easy to make, they’re the perfect amount of moist and the perfect crumb texture, and so fluffy!
These Are the Best Vegan Zucchini Muffins: Why You’ll Love Them
- They’re Made with Lots of Veggies: These muffins are made with ingredients such as freshly grated zucchini (that you can pick right out of your garden if you’re growing it!) and applesauce. Making zucchini muffins will give you a sweet start to the day that will feel indulgent, but really isn’t!
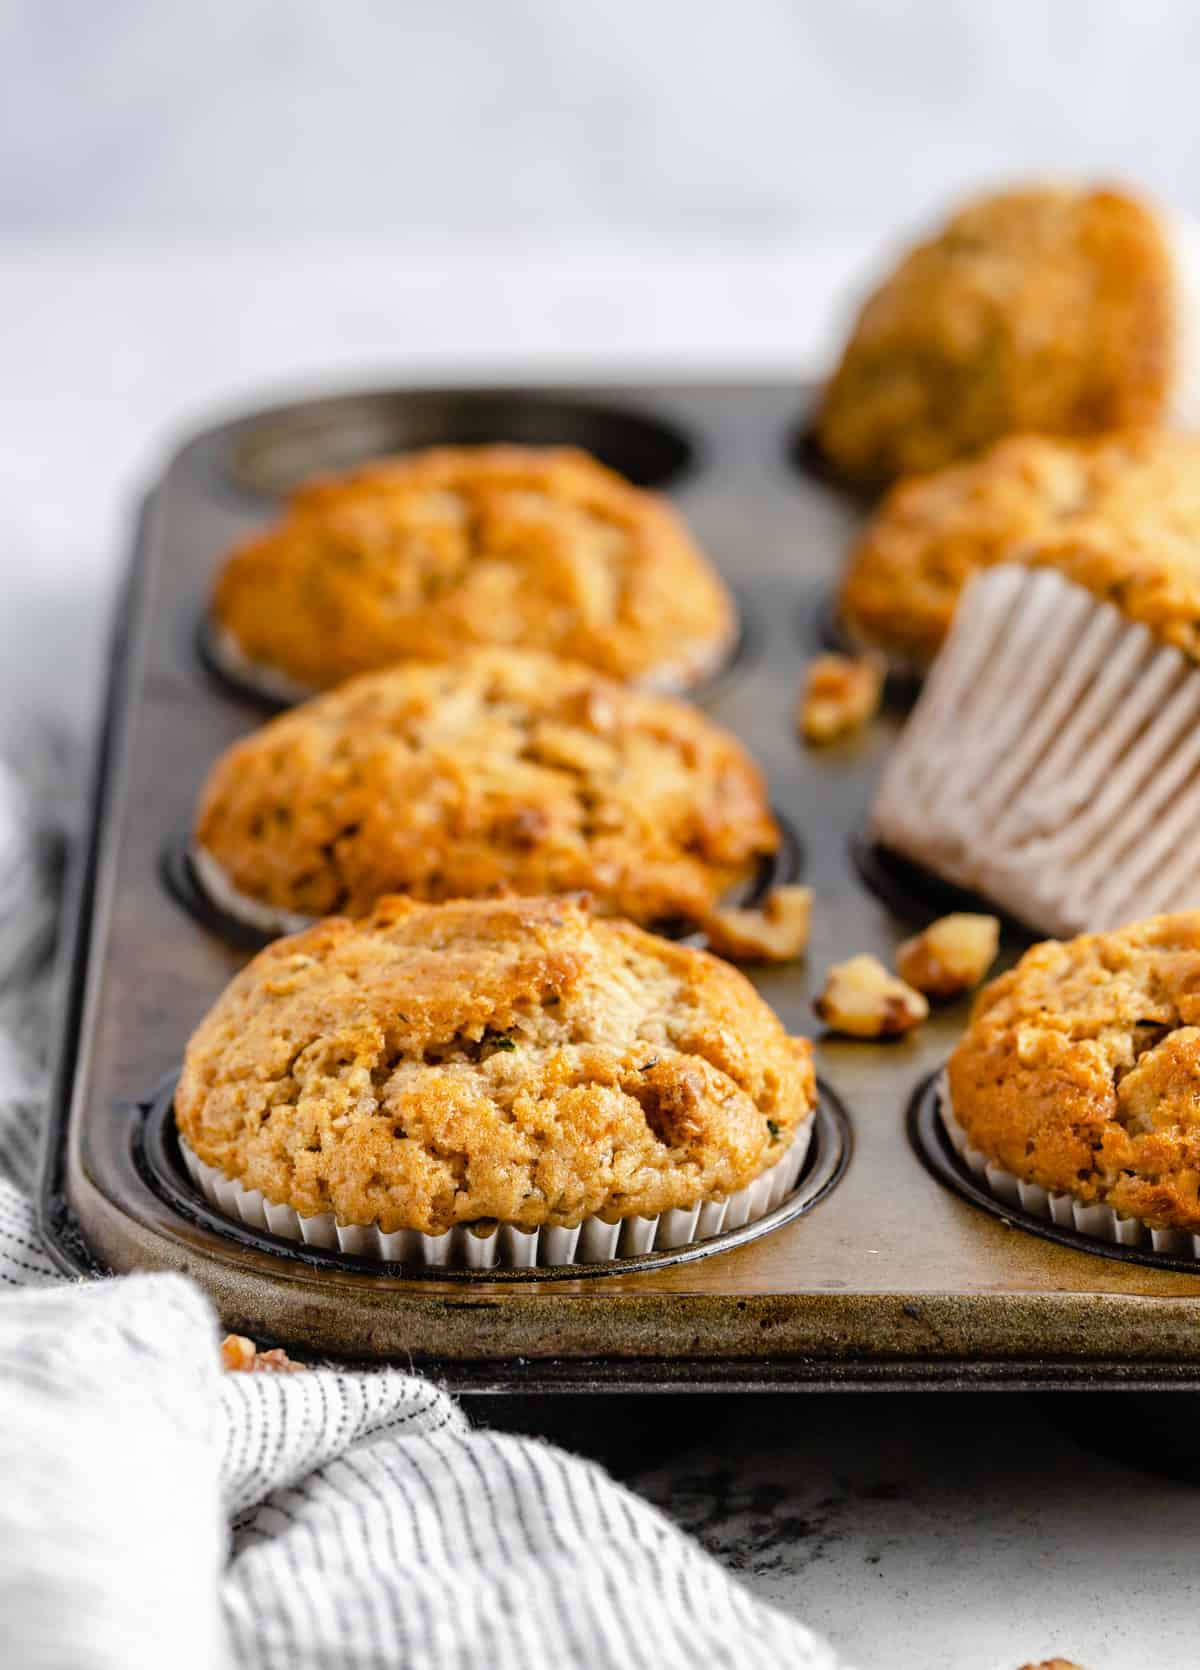
- They’re Make-Ahead: I know I already touched on this, but it’s a really great quality! This recipe makes 10 muffins, so I like to prepare them on Sunday afternoon or evening. Once they’ve cooled, we have the question of ‘what’s for breakfast?’ solved for the rest of the week.
- They’re Quick: You can make these muffins on relatively short notice. All you have to do is round up the ingredients, mix the batter together, bake for 8 minutes, let the muffins cool, and then you can call it a day!
- You Can Customize Them! Don’t feel like you have to stick 100% to the original recipe. While I do recommend keeping the current measurements the same, throwing in some vegan chocolate chunks or chopped pecans isn’t a bad idea. You might even say it’s encouraged!
Notes on Ingredients
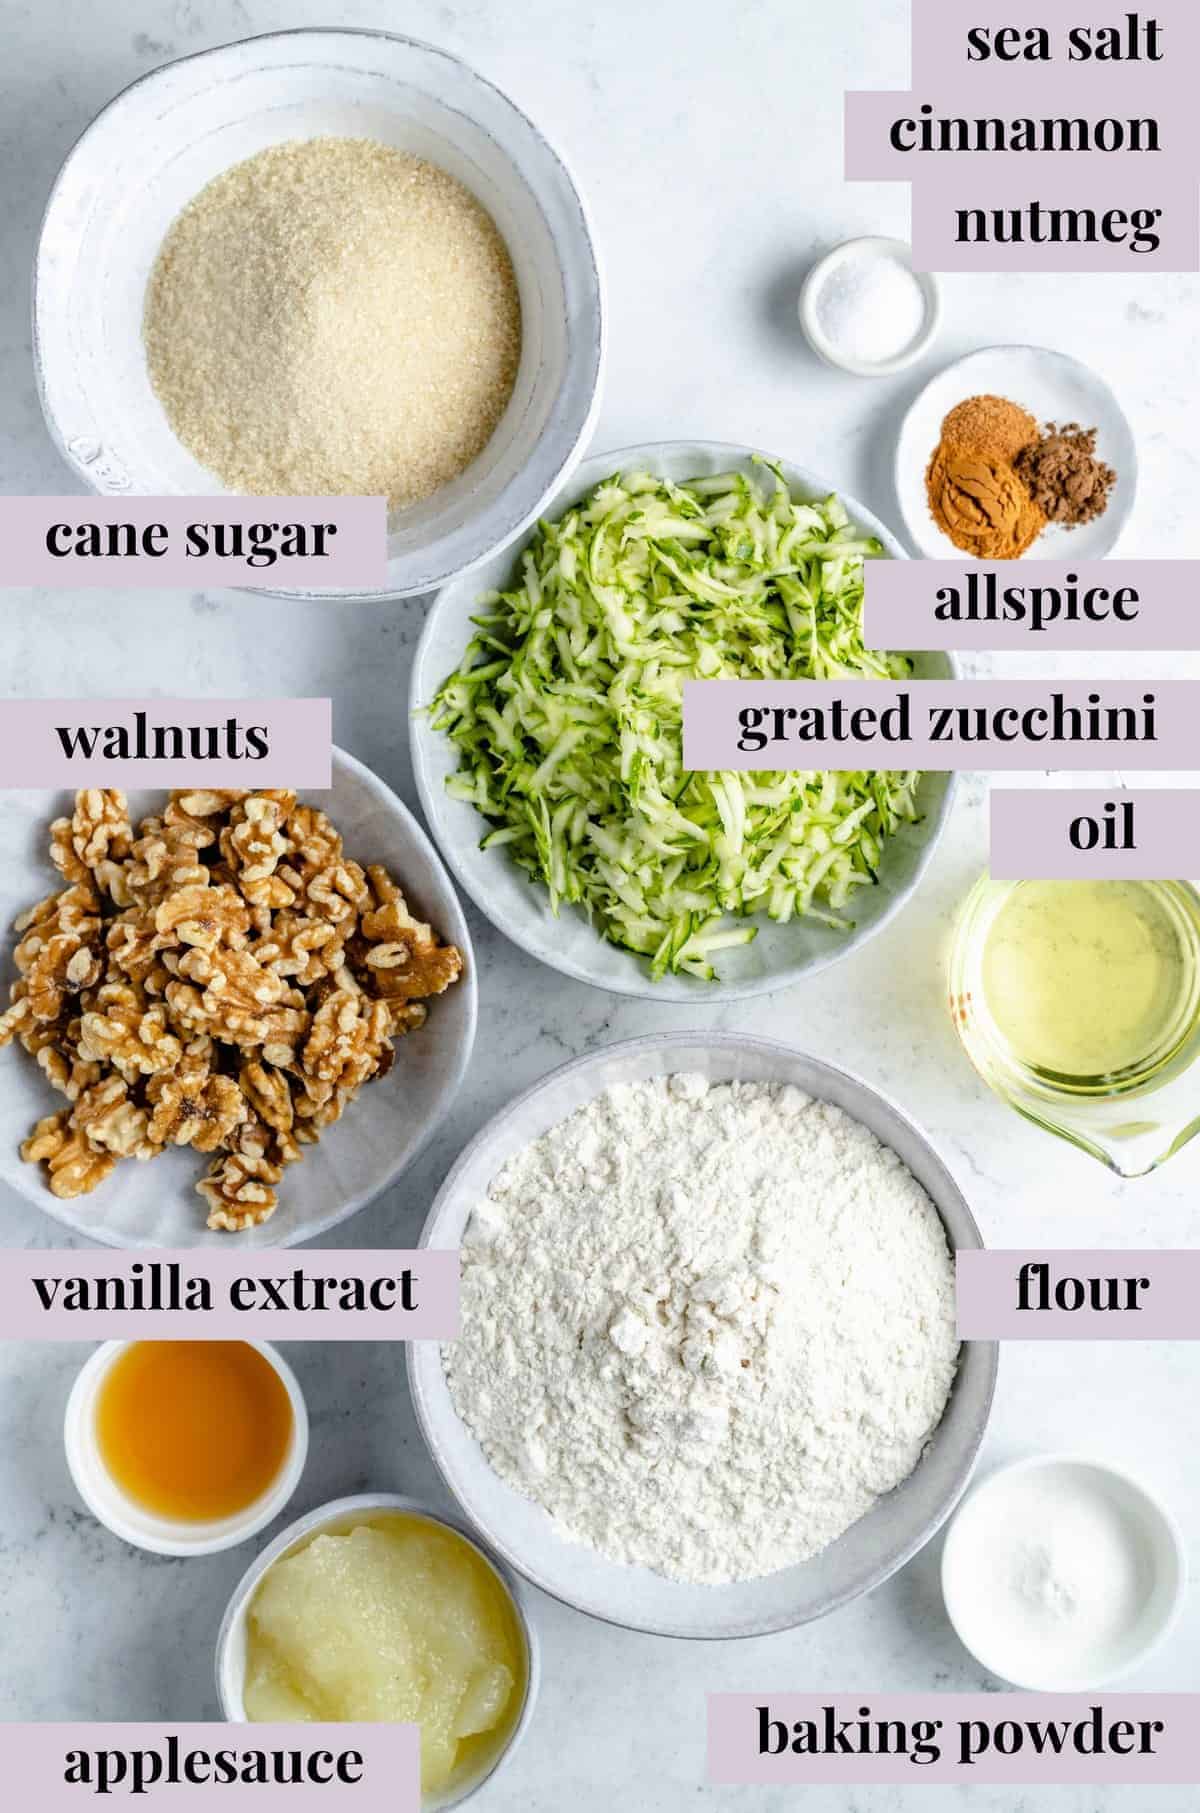
- Sugar: I used organic cane sugar for this recipe. If you don’t have any, granulated sugar is fine as a substitute.
- Oil: If you’re using coconut oil, make sure that you melt it before starting.
- Vanilla Extract: For extra sweet flavor. Vanilla bean paste also works well.
- Flour: I used all-purpose flour, sifted. Weighing out your flour is the most accurate way to measure it, but if you don’t have a scale, spoon it into your measuring cup so that you don’t pack in too much.
- Baking Powder: To ensure that your muffins rise up nice and tall.
- Salt: I like to put sea salt in this recipe.
- Spices: Today we’ll use a mixture of cinnamon, ground nutmeg, and ground allspice.
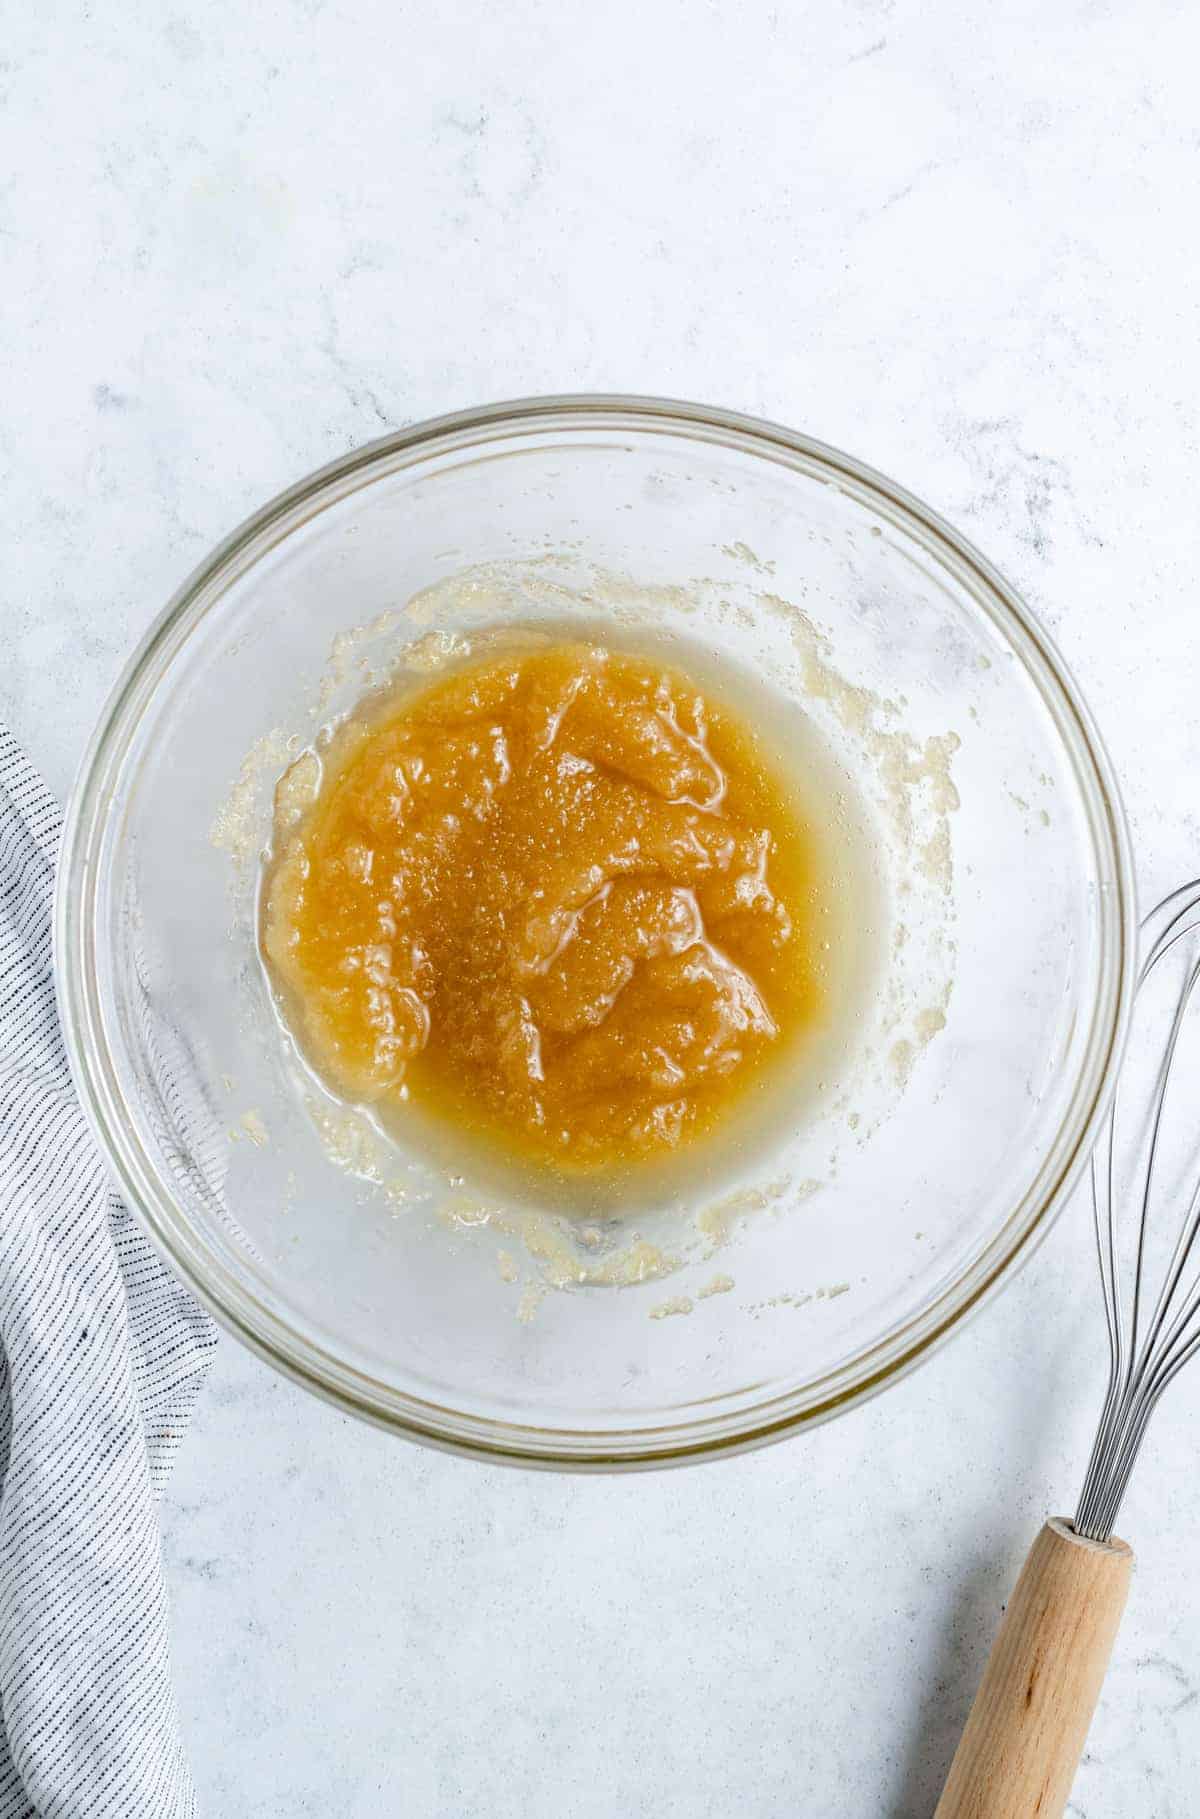
- Applesauce: This is a replacement for the eggs that most muffin recipes contain. Walnuts: These are optional, but if you include them, make sure they are chopped and toasted.
- Grated Zucchini: Do not press or drain your fresh zucchini.
How to Make Vegan Zucchini Muffins
Like I mentioned above, making zucchini muffins is super easy – anyone can do it! First you’ll toast the walnuts, then you’ll mix the batter together, bake, and lastly you’ll let these beautiful muffins cool. It’s really that simple!
Preheat the Oven to 425°F/220°C: Spray a muffin pan with non-stick flour spray or rub with vegan butter, or line with muffin/cupcake liners.
Combine the Sugar, Oil & Vanilla: In a large mixing bowl or bowl of a stand mixer, add the sugar, oil and vanilla extract. Mix together with a whisk for about 2-3 minutes on low speed until fully incorporated. Scrape down the sides as needed.
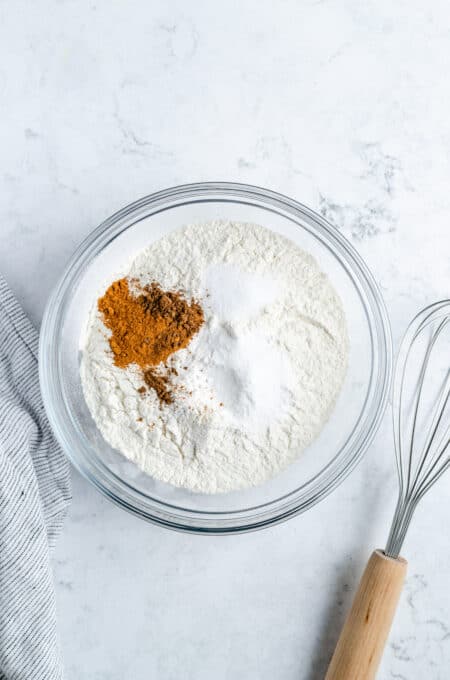
Combine Dry Ingredients: In a small bowl, stir together the flour, baking powder, sea salt, cinnamon, ground nutmeg, and ground allspice. Add into the wet ingredients for a minute on medium speed until just incorporated, typically less than a minute. The batter will be thick and dry (this is normal at this stage). Scrape down the sides again.
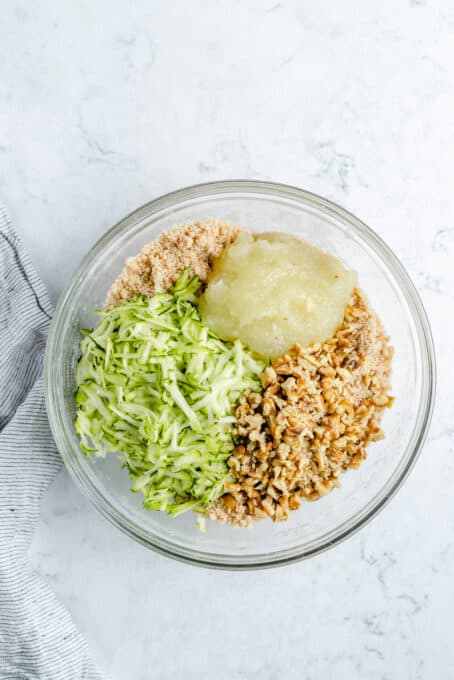
Mix in the Zucchini: Add in the applesauce, grated zucchini and the walnuts until incorporated. Let the batter rest for about 10 minutes until the zucchini releases some more liquid, then stir again. The batter will still be thick, but a lot more smooth now and more liquidy.
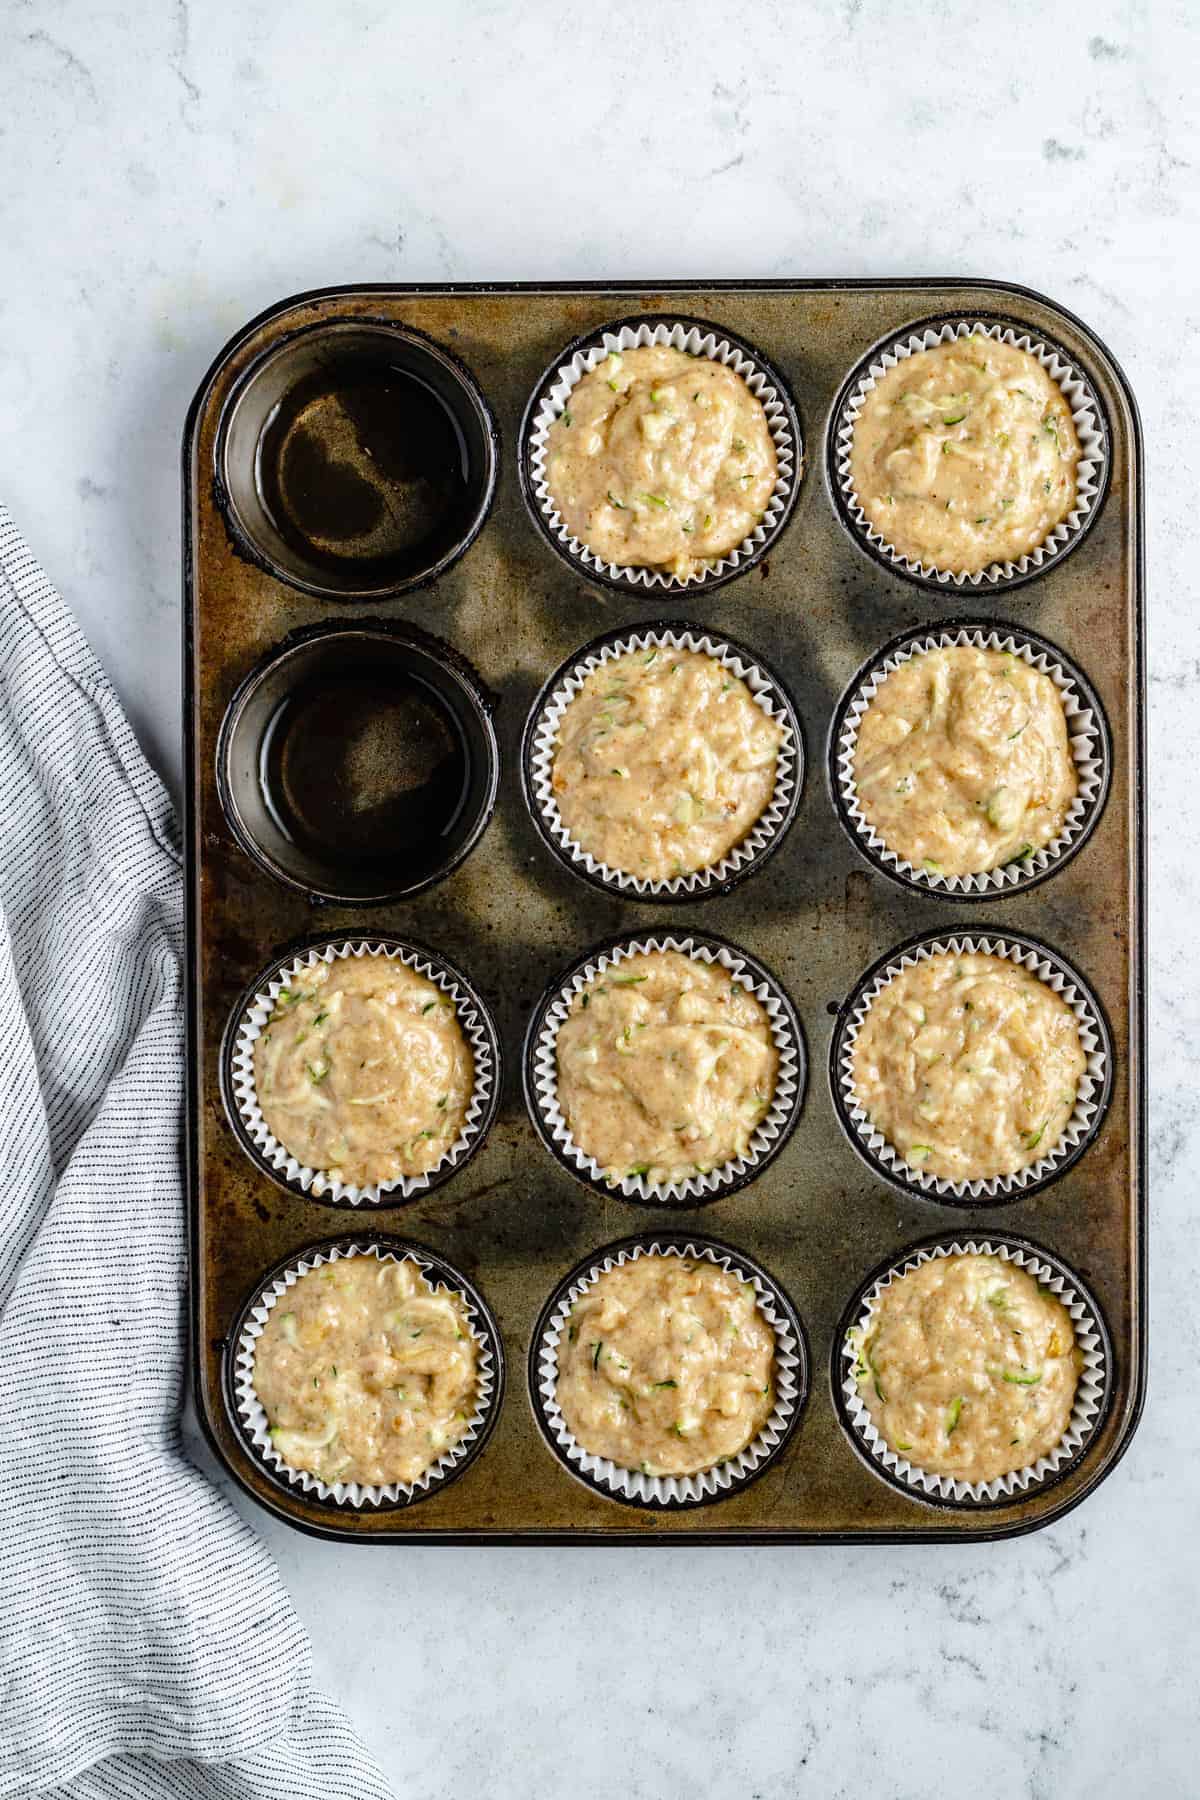
Prepare the Muffin Pan: Scoop the muffin batter (I use a cookie scoop) equally into 10 muffin cups/holes. Fill the other two empty holes with a tablespoon or two of water each.
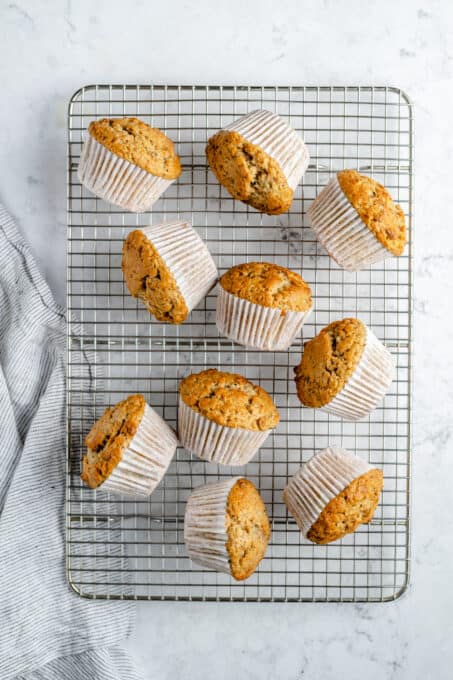
Bake the Muffins: Bake for 8 minutes at 425°F/220°C, then reduce the temperature to 375°F/190°C degrees (don’t open the oven!) and bake for another 13 minutes until a toothpick inserted into a muffin comes out clean. Remove from the oven and let it cool in the pan for about 5 minutes. Remove (I just use the same toothpick or a knife) and place on a wire rack to cool completely.
Tips for Success
That’s just about it! Before you head on over to the kitchen, though, I’ve got some last minute tips that will ensure you get the best results with your vegan zucchini muffins:
- Toasting the Walnuts: If you’re toasting the walnuts, do this part first. Toast the nuts in a lightly oiled pan over medium high heat for about 2-4 minutes until fragrant. Spread them onto a baking sheet or cutting board to cool. You can chop them before toasting, or after toasting.
- Should I Peel the Zucchini? You can if you want to, but it’s definitely not necessary. I usually just rinse the zucchinis and then get to grating.
- Use Fresh Baking Powder: Make sure your baking powder is not expired before you start – there’s no disappointment like baking a batch of muffins, only to find that they are sunken and dense once out of the oven!
- The Best Way to Let Your Muffins Cool: Turn the muffins on their sides while cooling to help prevent the domes from collapsing.
- A Fun Way to Serve These Muffins: You can enjoy these muffins as they are, or cut them in half height-wise, smother with vegan cream cheese frosting in the center, then eat them like a muffin sandwich!
How to Store Homemade Muffins
I like to store these homemade zucchini muffins in an airtight container, and keep them on the counter for 3-4 days, or in the fridge for 6-7 days.
Can I Freeze These?
Sure can! If you don’t want to store your muffins in the fridge or on the counter, save them in the freezer for 2-3 months. I generally use an airtight container or a tightly-sealed Ziploc bag. Make sure you thaw them in the fridge overnight before eating again.

Ingredients
- 1 cup cane sugar , (200g)
- ½ cup oil , (100g), if using coconut oil, ensure it’s melted but any oil works
- 2 teaspoons vanilla extract , or paste
- 2 ¼ cups all-purpose flour , (280g), sifted
- 2 teaspoons baking powder
- ¾ teaspoon sea salt
- 1 teaspoon cinnamon
- ¼ teaspoon ground nutmeg
- ¼ teaspoon ground allspice
- ½ cup applesauce
- 1 cup walnuts , chopped and toasted (optional)
- 1 cup grated zucchini , (about 152g), do not press or drain
Instructions
- Preheat the oven to 425°F/220°C. Spray a muffin pan with non-stick flour spray or rub with vegan butter, or line with muffin/cupcake liners.
- In a large mixing bowl or bowl of a stand mixer, add the sugar, oil and vanilla extract. Mix together with a whisk for about 2-3 minutes on low speed until fully incorporated. Scrape down the sides as needed.
- In a small bowl, stir together the flour, baking powder, sea salt, cinnamon, ground nutmeg, and ground allspice. Add into the wet ingredients for a minute on medium speed until just incorporated, typically less than a minute. The batter will be thick and dry (this is normal at this stage). Scrape down the sides again.
- Add in the applesauce, grated zucchini and the walnuts until incorporated. Let the batter rest for about 10 minutes until the zucchini releases some more liquid, then stir again. The batter will still be thick, but a lot more smooth now and more liquidy.
- Scoop the muffin batter (I use a cookie scoop) equally into 10 muffin cups/holes. Fill the other two empty holes with a tablespoon or two of water each.
- Bake for 8 minutes at 425°F/220°C, then reduce the temperature to 375°F/190°C degrees (don’t open the oven!) and bake for another 13 minutes until a toothpick inserted into a muffin comes out clean.
- Remove from the oven and let it cool in the pan for about 5 minutes. Remove (I just use the same toothpick or a knife) and place on a wire rack to cool completely. Turn the muffins on their sides while cooling to help prevent the domes from collapsing.
Notes
- Toasting the Walnuts: If you’re toasting the walnuts, do this part first. Toast the nuts in a lightly oiled pan over medium high heat for about 2-4 minutes until fragrant. Spread them onto a baking sheet or cutting board to cool. You can chop them before toasting, or after toasting.
- Should I Peel the Zucchini? You can if you want to, but it’s definitely not necessary. I usually just rinse the zucchinis and then get to grating.
- Use Fresh Baking Powder: Make sure your baking powder is not expired before you start – there’s no disappointment like baking a batch of muffins, only to find that they are sunken and dense once out of the oven!
- The Best Way to Let Your Muffins Cool: Turn the muffins on their sides while cooling to help prevent the domes from collapsing.
- A Fun Way to Serve These Muffins: You can enjoy these muffins as they are, or cut them in half height-wise, smother with vegan cream cheese frosting in the center, then eat them like a muffin sandwich!
Vegan Zucchini Muffins are equal parts tender, fluffy, and moist. These easy make ahead muffins are a quick yet delicious breakfast that you’ll want to treat yourself to over and over again!
I don’t know about you, but I am a big believer in the power of a good breakfast. Starting off the day with a filling meal gives you the necessary energy to tackle the packed schedule ahead of you!
There are so many great options to fall back on: pancakes , waffles , a bowl of oatmeal , tofu scramble, quinoa bars , etc. My go-to breakfast option, though, is usually muffins. Specifically, these Vegan Zucchini Muffins. They’re really easy to make, they’re the perfect amount of moist and the perfect crumb texture, and so fluffy!
These Are the Best Vegan Zucchini Muffins: Why You’ll Love Them
- They’re Made with Lots of Veggies: These muffins are made with ingredients such as freshly grated zucchini (that you can pick right out of your garden if you’re growing it!) and applesauce. Making zucchini muffins will give you a sweet start to the day that will feel indulgent, but really isn’t!
- They’re Make-Ahead: I know I already touched on this, but it’s a really great quality! This recipe makes 10 muffins, so I like to prepare them on Sunday afternoon or evening. Once they’ve cooled, we have the question of ‘what’s for breakfast?’ solved for the rest of the week.
- They’re Quick: You can make these muffins on relatively short notice. All you have to do is round up the ingredients, mix the batter together, bake for 8 minutes, let the muffins cool, and then you can call it a day!
- You Can Customize Them! Don’t feel like you have to stick 100% to the original recipe. While I do recommend keeping the current measurements the same, throwing in some vegan chocolate chunks or chopped pecans isn’t a bad idea. You might even say it’s encouraged!
Notes on Ingredients
- Sugar: I used organic cane sugar for this recipe. If you don’t have any, granulated sugar is fine as a substitute.
- Oil: If you’re using coconut oil, make sure that you melt it before starting.
- Vanilla Extract: For extra sweet flavor. Vanilla bean paste also works well.
- Flour: I used all-purpose flour, sifted. Weighing out your flour is the most accurate way to measure it, but if you don’t have a scale, spoon it into your measuring cup so that you don’t pack in too much.
- Baking Powder: To ensure that your muffins rise up nice and tall.
- Salt: I like to put sea salt in this recipe.
- Spices: Today we’ll use a mixture of cinnamon, ground nutmeg, and ground allspice.
- Applesauce: This is a replacement for the eggs that most muffin recipes contain. Walnuts: These are optional, but if you include them, make sure they are chopped and toasted.
- Grated Zucchini: Do not press or drain your fresh zucchini.
How to Make Vegan Zucchini Muffins
Like I mentioned above, making zucchini muffins is super easy – anyone can do it! First you’ll toast the walnuts, then you’ll mix the batter together, bake, and lastly you’ll let these beautiful muffins cool. It’s really that simple!
Preheat the Oven to 425°F/220°C: Spray a muffin pan with non-stick flour spray or rub with vegan butter, or line with muffin/cupcake liners.
Combine the Sugar, Oil & Vanilla: In a large mixing bowl or bowl of a stand mixer, add the sugar, oil and vanilla extract. Mix together with a whisk for about 2-3 minutes on low speed until fully incorporated. Scrape down the sides as needed.
Combine Dry Ingredients: In a small bowl, stir together the flour, baking powder, sea salt, cinnamon, ground nutmeg, and ground allspice. Add into the wet ingredients for a minute on medium speed until just incorporated, typically less than a minute. The batter will be thick and dry (this is normal at this stage). Scrape down the sides again.
Mix in the Zucchini: Add in the applesauce, grated zucchini and the walnuts until incorporated. Let the batter rest for about 10 minutes until the zucchini releases some more liquid, then stir again. The batter will still be thick, but a lot more smooth now and more liquidy.
Prepare the Muffin Pan: Scoop the muffin batter (I use a cookie scoop) equally into 10 muffin cups/holes. Fill the other two empty holes with a tablespoon or two of water each.
Bake the Muffins: Bake for 8 minutes at 425°F/220°C, then reduce the temperature to 375°F/190°C degrees (don’t open the oven!) and bake for another 13 minutes until a toothpick inserted into a muffin comes out clean. Remove from the oven and let it cool in the pan for about 5 minutes. Remove (I just use the same toothpick or a knife) and place on a wire rack to cool completely.
Tips for Success
That’s just about it! Before you head on over to the kitchen, though, I’ve got some last minute tips that will ensure you get the best results with your vegan zucchini muffins:
- Toasting the Walnuts: If you’re toasting the walnuts, do this part first. Toast the nuts in a lightly oiled pan over medium high heat for about 2-4 minutes until fragrant. Spread them onto a baking sheet or cutting board to cool. You can chop them before toasting, or after toasting.
- Should I Peel the Zucchini? You can if you want to, but it’s definitely not necessary. I usually just rinse the zucchinis and then get to grating.
- Use Fresh Baking Powder: Make sure your baking powder is not expired before you start – there’s no disappointment like baking a batch of muffins, only to find that they are sunken and dense once out of the oven!
- The Best Way to Let Your Muffins Cool: Turn the muffins on their sides while cooling to help prevent the domes from collapsing.
- A Fun Way to Serve These Muffins: You can enjoy these muffins as they are, or cut them in half height-wise, smother with vegan cream cheese frosting in the center, then eat them like a muffin sandwich!
How to Store Homemade Muffins
I like to store these homemade zucchini muffins in an airtight container, and keep them on the counter for 3-4 days, or in the fridge for 6-7 days.
Can I Freeze These?
Sure can! If you don’t want to store your muffins in the fridge or on the counter, save them in the freezer for 2-3 months. I generally use an airtight container or a tightly-sealed Ziploc bag. Make sure you thaw them in the fridge overnight before eating again.
Ingredients
- 1 cup cane sugar , (200g)
- ½ cup oil , (100g), if using coconut oil, ensure it’s melted but any oil works
- 2 teaspoons vanilla extract , or paste
- 2 ¼ cups all-purpose flour , (280g), sifted
- 2 teaspoons baking powder
- ¾ teaspoon sea salt
- 1 teaspoon cinnamon
- ¼ teaspoon ground nutmeg
- ¼ teaspoon ground allspice
- ½ cup applesauce
- 1 cup walnuts , chopped and toasted (optional)
- 1 cup grated zucchini , (about 152g), do not press or drain
Instructions
- Preheat the oven to 425°F/220°C. Spray a muffin pan with non-stick flour spray or rub with vegan butter, or line with muffin/cupcake liners.
- In a large mixing bowl or bowl of a stand mixer, add the sugar, oil and vanilla extract. Mix together with a whisk for about 2-3 minutes on low speed until fully incorporated. Scrape down the sides as needed.
- In a small bowl, stir together the flour, baking powder, sea salt, cinnamon, ground nutmeg, and ground allspice. Add into the wet ingredients for a minute on medium speed until just incorporated, typically less than a minute. The batter will be thick and dry (this is normal at this stage). Scrape down the sides again.
- Add in the applesauce, grated zucchini and the walnuts until incorporated. Let the batter rest for about 10 minutes until the zucchini releases some more liquid, then stir again. The batter will still be thick, but a lot more smooth now and more liquidy.
- Scoop the muffin batter (I use a cookie scoop) equally into 10 muffin cups/holes. Fill the other two empty holes with a tablespoon or two of water each.
- Bake for 8 minutes at 425°F/220°C, then reduce the temperature to 375°F/190°C degrees (don’t open the oven!) and bake for another 13 minutes until a toothpick inserted into a muffin comes out clean.
- Remove from the oven and let it cool in the pan for about 5 minutes. Remove (I just use the same toothpick or a knife) and place on a wire rack to cool completely. Turn the muffins on their sides while cooling to help prevent the domes from collapsing.
Notes
- Toasting the Walnuts: If you’re toasting the walnuts, do this part first. Toast the nuts in a lightly oiled pan over medium high heat for about 2-4 minutes until fragrant. Spread them onto a baking sheet or cutting board to cool. You can chop them before toasting, or after toasting.
- Should I Peel the Zucchini? You can if you want to, but it’s definitely not necessary. I usually just rinse the zucchinis and then get to grating.
- Use Fresh Baking Powder: Make sure your baking powder is not expired before you start – there’s no disappointment like baking a batch of muffins, only to find that they are sunken and dense once out of the oven!
- The Best Way to Let Your Muffins Cool: Turn the muffins on their sides while cooling to help prevent the domes from collapsing.
- A Fun Way to Serve These Muffins: You can enjoy these muffins as they are, or cut them in half height-wise, smother with vegan cream cheese frosting in the center, then eat them like a muffin sandwich!

Vegan Zucchini Muffins
Ingredients
- 1 cup cane sugar (200g)
- ½ cup oil (100g), if using coconut oil, ensure it’s melted but any oil works
- 2 teaspoons vanilla extract or paste
- 2 ¼ cups all-purpose flour (280g), sifted
- 2 teaspoons baking powder
- ¾ teaspoon sea salt
- 1 teaspoon cinnamon
- ¼ teaspoon ground nutmeg
- ¼ teaspoon ground allspice
- ½ cup applesauce
- 1 cup walnuts chopped and toasted (optional)
- 1 cup grated zucchini (about 152g), do not press or drain
Instructions
- Preheat the oven to 425°F/220°C. Spray a muffin pan with non-stick flour spray or rub with vegan butter, or line with muffin/cupcake liners.
- In a large mixing bowl or bowl of a stand mixer, add the sugar, oil and vanilla extract. Mix together with a whisk for about 2-3 minutes on low speed until fully incorporated. Scrape down the sides as needed.
- In a small bowl, stir together the flour, baking powder, sea salt, cinnamon, ground nutmeg, and ground allspice. Add into the wet ingredients for a minute on medium speed until just incorporated, typically less than a minute. The batter will be thick and dry (this is normal at this stage). Scrape down the sides again.
- Add in the applesauce, grated zucchini and the walnuts until incorporated. Let the batter rest for about 10 minutes until the zucchini releases some more liquid, then stir again. The batter will still be thick, but a lot more smooth now and more liquidy.
- Scoop the muffin batter (I use a cookie scoop) equally into 10 muffin cups/holes. Fill the other two empty holes with a tablespoon or two of water each.
- Bake for 8 minutes at 425°F/220°C, then reduce the temperature to 375°F/190°C degrees (don’t open the oven!) and bake for another 13 minutes until a toothpick inserted into a muffin comes out clean.
- Remove from the oven and let it cool in the pan for about 5 minutes. Remove (I just use the same toothpick or a knife) and place on a wire rack to cool completely. Turn the muffins on their sides while cooling to help prevent the domes from collapsing.
Notes
- Toasting the Walnuts: If you’re toasting the walnuts, do this part first. Toast the nuts in a lightly oiled pan over medium high heat for about 2-4 minutes until fragrant. Spread them onto a baking sheet or cutting board to cool. You can chop them before toasting, or after toasting.
- Should I Peel the Zucchini? You can if you want to, but it’s definitely not necessary. I usually just rinse the zucchinis and then get to grating.
- Use Fresh Baking Powder: Make sure your baking powder is not expired before you start - there’s no disappointment like baking a batch of muffins, only to find that they are sunken and dense once out of the oven!
- The Best Way to Let Your Muffins Cool: Turn the muffins on their sides while cooling to help prevent the domes from collapsing.
- A Fun Way to Serve These Muffins: You can enjoy these muffins as they are, or cut them in half height-wise, smother with vegan cream cheese frosting in the center, then eat them like a muffin sandwich!
Nutrition
Vegan Zucchini Muffins https://jessicainthekitchen.com/vegan-zucchini-muffins/ August 11, 2021
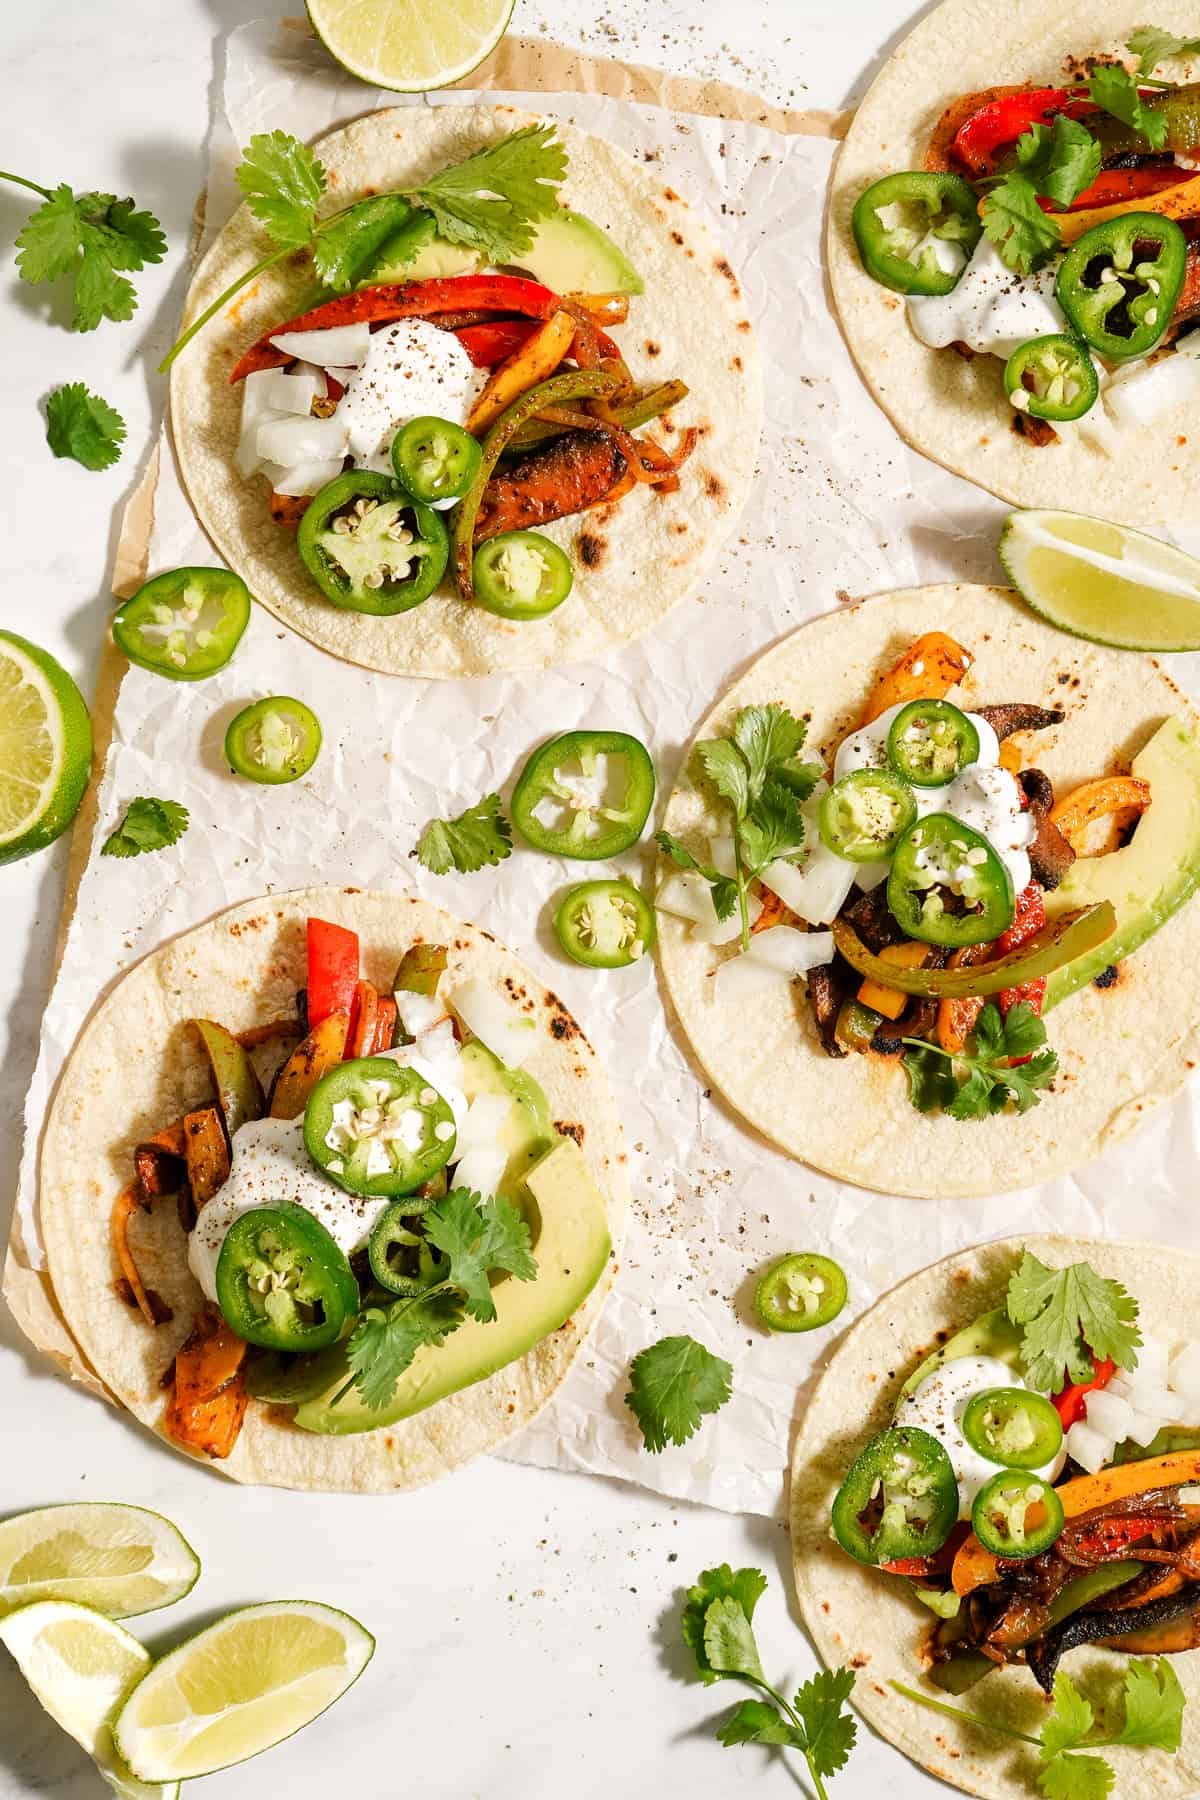
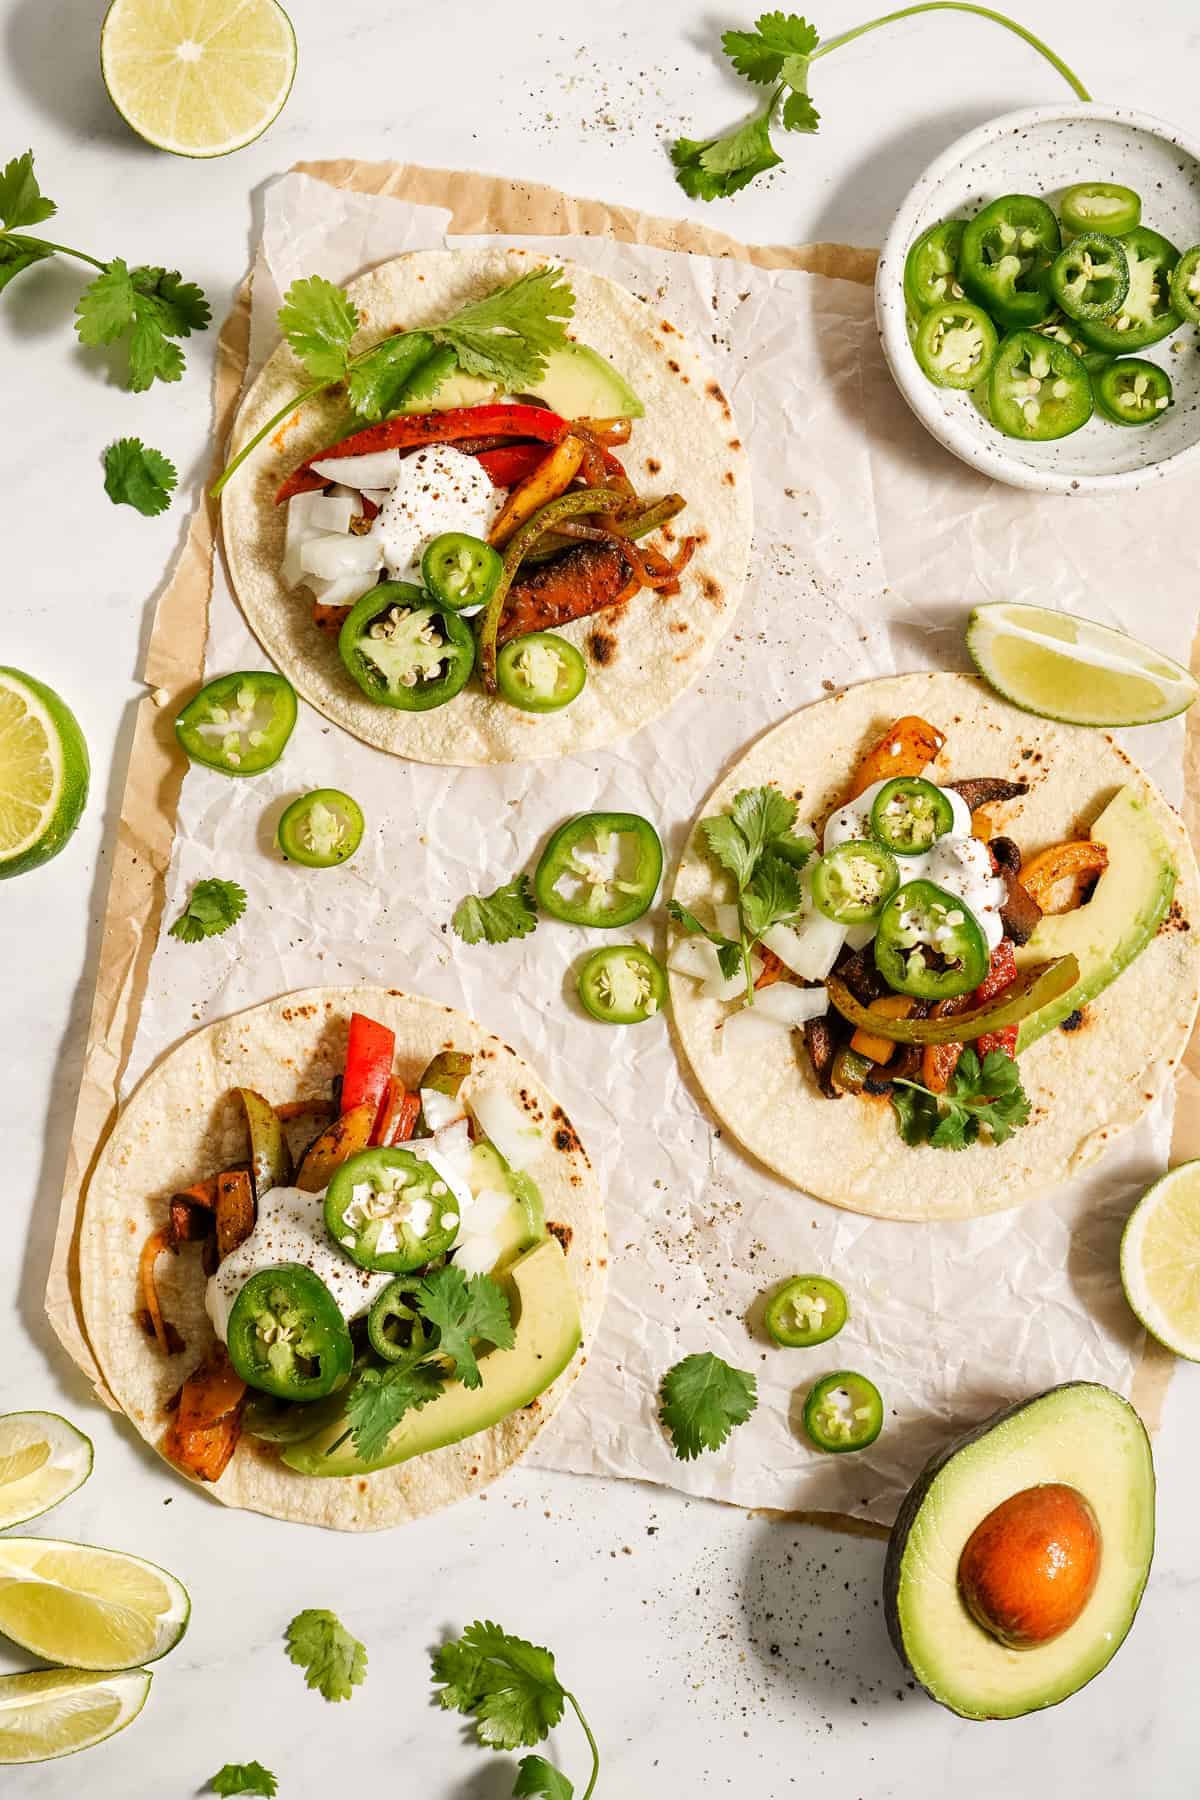
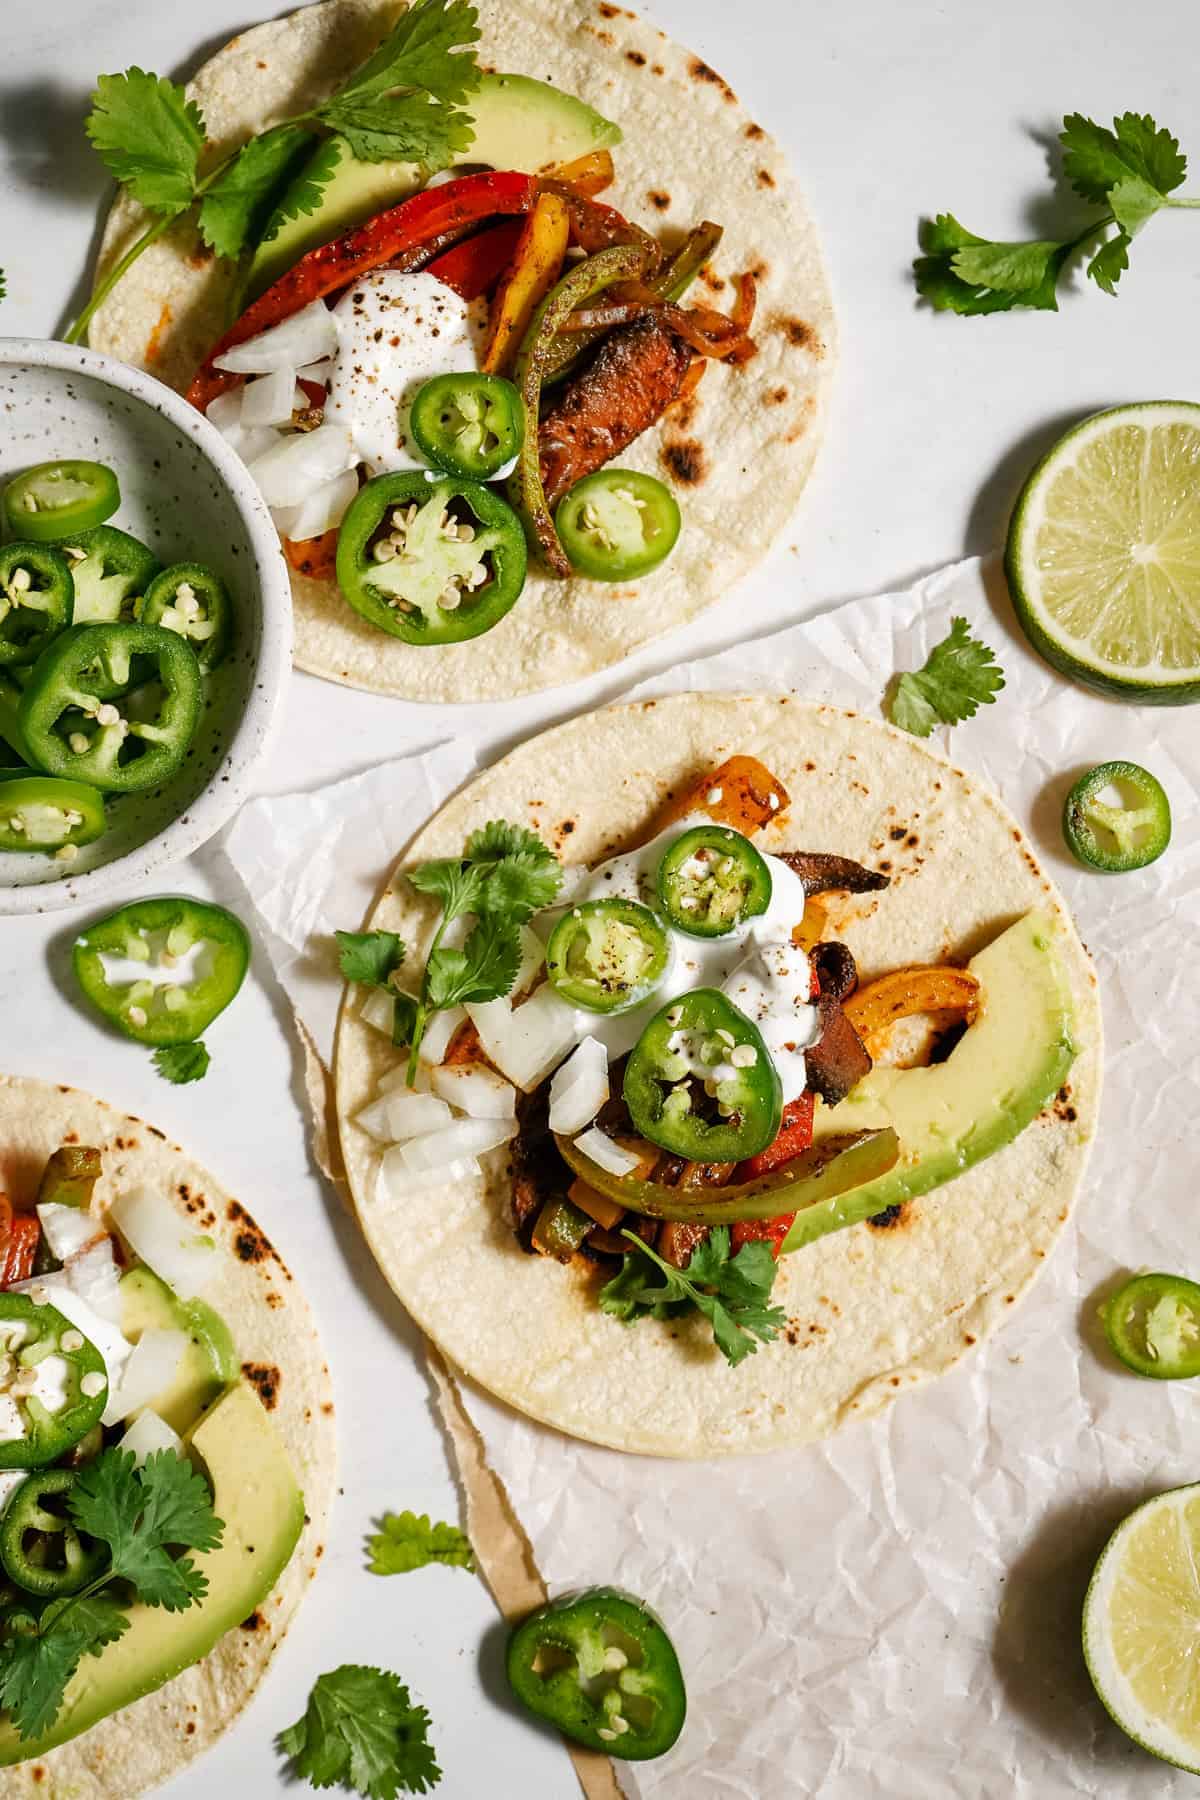
30-minute vegan fajitas are quick, easy, and (most importantly) filling and flavorful! These one-skillet fajitas, packed with fresh veggies and warm spices, can also be made on the grill, perfect for summertime eating!
Any other mushroom lovers in the house? I hope so. After incorporating juicy, caramelized portobello mushrooms into my vegan fajitas, I’ve got a new favorite mushroom recipe! Meaty portobellos don’t weigh down this Mexican-style dinner at all. It’s a light, portable, and perfect-for-summer meal.
The absolute best part about this recipe is that these homemade vegetable fajitas can be prepared in just 30 minutes. All you have to do is sauté/grill and season the veggies, build your fajita, and then dig in. That’s it! (And go back for seconds, of course.)
Reasons To Make These Vegan Mushroom Fajitas
- Meaty mushrooms. Portobellos are quickly becoming a staple in this kitchen! I love how easily you can transform them, and the amazing flavor they soak up when they’re sautéed. They’re the perfect vegan swap for traditional steak fajitas, and even meat lovers won’t miss the meat.
- Dinner in 30 minutes. On a busy weeknight, I’m always glad to have these vegetable fajitas in my back pocket so that I can serve a tasty dinner ASAP.
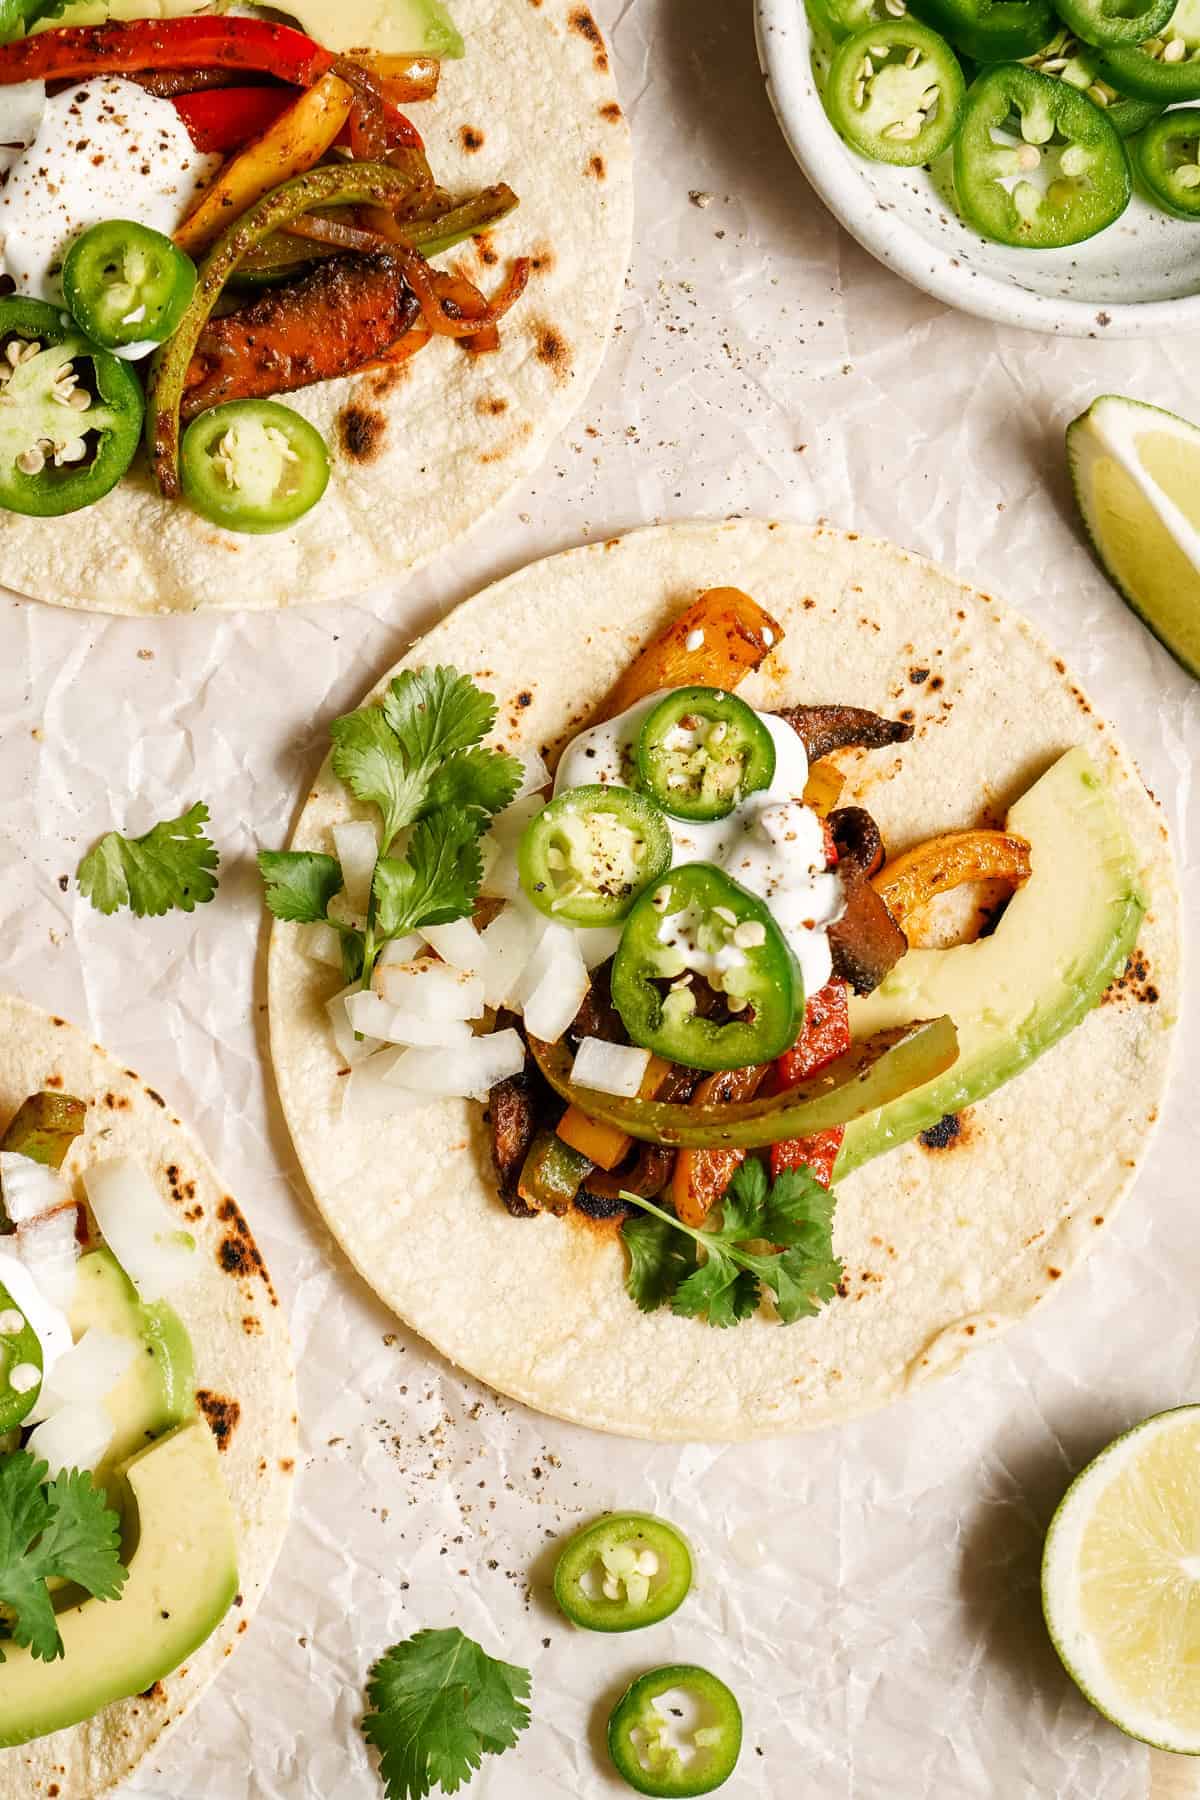
- Ready for toppings. Just about anything you’d add to vegan tacos goes great with these meat-free fajitas. Wrap them up in a soft tortilla with tasty toppings like avocado, vegan sour cream, and lime.

Notes on Ingredients
We’ve got pretty traditional fajita ingredients here, minus the meat. Here are the fresh veggies and seasonings/spices that you’ll need to grab to get started. Scroll to the full, printable ingredients list in the recipe card below the post for the full amounts, followed by the recipe details.
- Mushrooms – I like using portobello mushrooms for the reasons voiced earlier, but you can sauté other kinds of mushrooms, if you like. White or brown mushrooms, and more exotic types like shiitake and oyster mushrooms, will also work.
- Coconut Oil – Or other cooking oil, like canola.
- Seasoning – Make your own fajita seasoning with cumin, chipotle (or chili powder), paprika, salt, and ground black pepper.
- Garlic – Minced, for added flavor.
- Liquid Smoke – This is totally optional, but SO good. If you don’t have liquid smoke, a little extra smoked paprika or a dash of (gluten-free) Worcestershire sauce can help deepen the flavors.
- Lime Juice – Don’t skip the lime! Tangy lime juice adds great, bright flavor to your fajitas.
- Peppers – I like to use a mix of yellow bell peppers, red bell peppers, and green bell peppers for color.
- Onion – You can use red, yellow, or white onion, whatever you like best.
How to Make the Best Vegan Fajitas
Any meal that results in smiling faces around the table and minimal dish-washing time is an instant favorite of mine! These easy vegan fajitas are a great fit for that description. With just one skillet necessary (and no forks and knives needed because, yay, finger food!), both the cooking process and clean up are a breeze.
Here’s what you need to know to make these portobello mushroom fajitas:
- Sauté and season the mushrooms . In a pan over medium heat, heat the coconut oil. Add in the mushroom slices, spices, garlic, and salt and pepper. Stir to combine everything, and allow the vegetables to cook down for about 5 minutes, until mushrooms have begun to absorb the seasonings.

Season the mushrooms.
- Add the bell peppers and onion. Next, squeeze lime over the skillet, and stir to combine. Allow the pan to simmer until the peppers begin to soften slightly and the onions are cooked through, about 10 to 15 minutes.
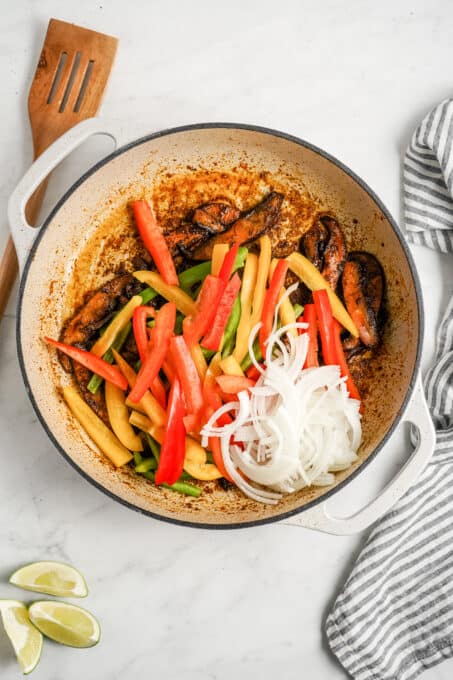
Add the peppers and onions.
- Taste test, and serve! Add more salt if necessary, then remove the pan from the heat. Divide the mix between about 5 gluten-free soft taco shells, and add in your favorite toppings. Serve and enjoy!
Grill Your Fajitas
These mushroom fajitas turn out wonderfully on the outdoor grill or in a grill pan. If you’re cooking them on the outdoor grill, season the veggies and place everything into a foil pack. Cook over medium-high heat until the fajitas inside are softened. Then, toast the tortilla/taco shell lightly and assemble as usual. Don’t forget to grab a watermelon mojito to enjoy with it. 😉
Quick Tips
- Cut the ingredients into similar sizes. This ensures that all the vegetables cook evenly. If some of the cut veggies are larger than others, you’ll end up with smaller slices that are overcooked, while others aren’t cooked enough.
- Roast the fajitas instead. On top of sautéing or grilling, there’s also the option to roast these vegan fajitas on a sheet pan in the oven. Toss the vegetables with the seasonings and coconut oil in a mixing bowl, and then spread them out on a baking tray (or two) in a single layer. Roast for 20 minutes or so at 450ºF. Check the fajitas at the 15-minute mark, just in case.
Optional Fajita Toppings
I love how versatile these portobello fajitas are. You know I am always encouraging you to play with your food (and have fun!), and this is no exception. I kept it pretty simple with vegan sour cream and fresh cilantro, but you can make other additions:
- Add your favorite vegan cheese .
- Top with sliced avocado or borrow the creamy avocado sauce from my vegan quesadillas recipe.
- I love serving my homemade salsa with these vegan fajitas, but pico de gallo, guacamole, and enchilada sauce are also good if you prefer those.
- I like to add diced jalapeños for a little extra spice.
- Garnish with fresh greens like lettuce, spinach, etc., and fresh herbs like cilantro or parsley.
Easy Vegan Fajita Bowls
Instead of traditional tortilla-style fajitas, make your own vegan fajita bowls by assembling these vegan fajitas over white rice or quinoa with any of the toppings above. This is also a great way to meal prep a delicious lunch during the week.
More Serving Suggestions
As I mentioned above, I like to use gluten-free soft taco shells for my fajitas. They’re also great with flour tortillas or corn tortillas, whichever you prefer! Or, serve these mushroom fajitas over a bed of Mexican rice , and mix in some extra grilled vegetables or black beans for a filling meal. A side of refried beans also pairs well with vegetable fajitas, as does elote (street corn).
Storing and Reheating Leftovers
- Rerigerate. Store your leftover vegetables in an airtight container in the fridge for 4-5 days. You can also refrigerate homemade salsa if you decide to make it, but I would store it separately from the vegetables.
- Reheat. Reheat your veggies for these vegan fajitas by adding them to a skillet, over low heat, until they’re cooked through. I would suggest using fresh tortillas or taco shells, and not trying to save/reheat old ones.
- Freeze. Freeze your sautéed vegetables in an airtight container for 2-3 months. Make sure to let them thaw in the fridge overnight before making fajitas again.
Try These Other Vegan Dinner Ideas
- Coconut Chickpea Curry
- Crispy Teriyaki Tofu
- The Best Vegan Enchiladas
- 30-Minute Quinoa Burgers
- Black Bean and Corn Quesadillas
Ingredients
- 10-12 ounces portobello mushrooms , stems & gills removed, sliced
- 1 tablespoon coconut oil
- 1/2 teaspoon cumin
- 1 teaspoon chipotle or chili powder
- 1 teaspoon paprika
- 3 cloves garlic , minced
- 1/2 tablespoon liquid smoke
- 1/2 teaspoon salt
- 1/2 teaspoon ground black pepper
- Juice of one lime
- 1/3 cup yellow bell peppers
- 1/3 cup red bell peppers
- 1 small green bell peppers – about 2.75 ounces
- 1 small onion , halved and sliced
Instructions
- In a pan over medium heat, heat the coconut oil. Add in the mushroom slices, the cumin, chipotle powder, paprika, garlic and salt and pepper. Stir to combine and allow to cook down for about 5 minutes, until mushrooms have began to absorb seasonings,
- Add in the bell peppers and the onion, squeeze lime over, and stir to combine. Allow to cool until peppers begin to soften slightly and onions are cooked through, about 10 to 15 minutes.
- Taste test, add more salt if necessary, then remove from heat.
- Divine the mix between about 5 gluten free soft taco shells, and add in your favourite toppings – cheese, avocados,https://jessicainthekitchen.com/restaurant-style- blender -salsa/, and jalapeños. Serve and enjoy!
Notes
- How to Grill Your Fajitas: Like I mentioned earlier, you can make these on your grill. Just season the veggies and place them in a foil pack. Then toast the tortilla/taco shell lightly and place the veggies inside. Don’t forget to grab a watermelon mojito to enjoy with it. 😉
- Cut Your Veggies into Similar Sizes: If your vegetables vary significantly in size, you may end up overcooking some while undercooking others.
- Can These Vegetables Be Roasted? Sure! If you would rather roast these vegetables on a sheet pan instead of sautéing them, that works too. Just season them (also adding in the coconut oil) in a mixing bowl instead, and then spread them out on a tray – or two – in a single layer. (20 minutes or so at 450 degrees F is probably good, but I would suggest checking on your vegetables at the 15-minute mark so that you don’t burn them.)
- Storage: Store your leftover vegetables in an airtight container in the fridge for 4-5 days, or freeze the same way for 2-3 months. You can also refrigerate homemade salsa if you decide to make it, but I would store it separately from the vegetables.
