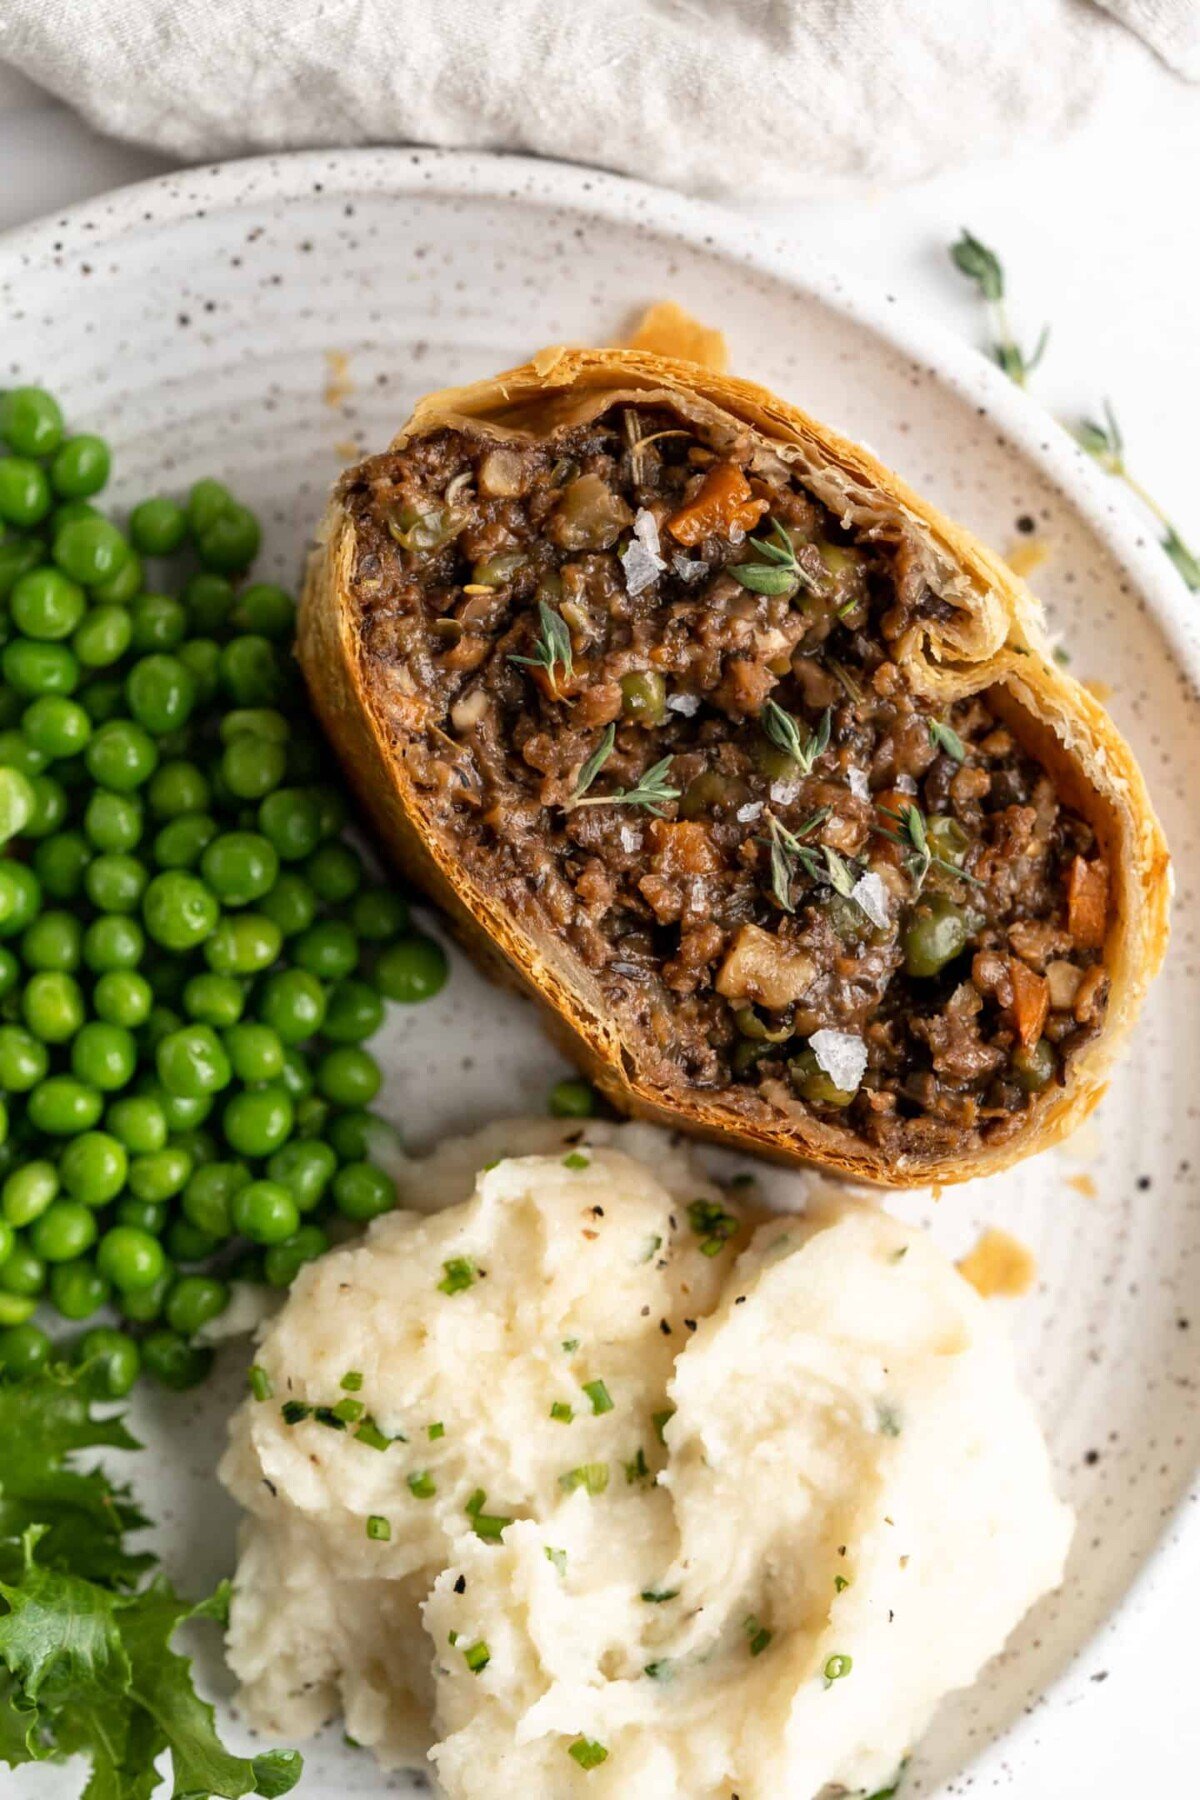
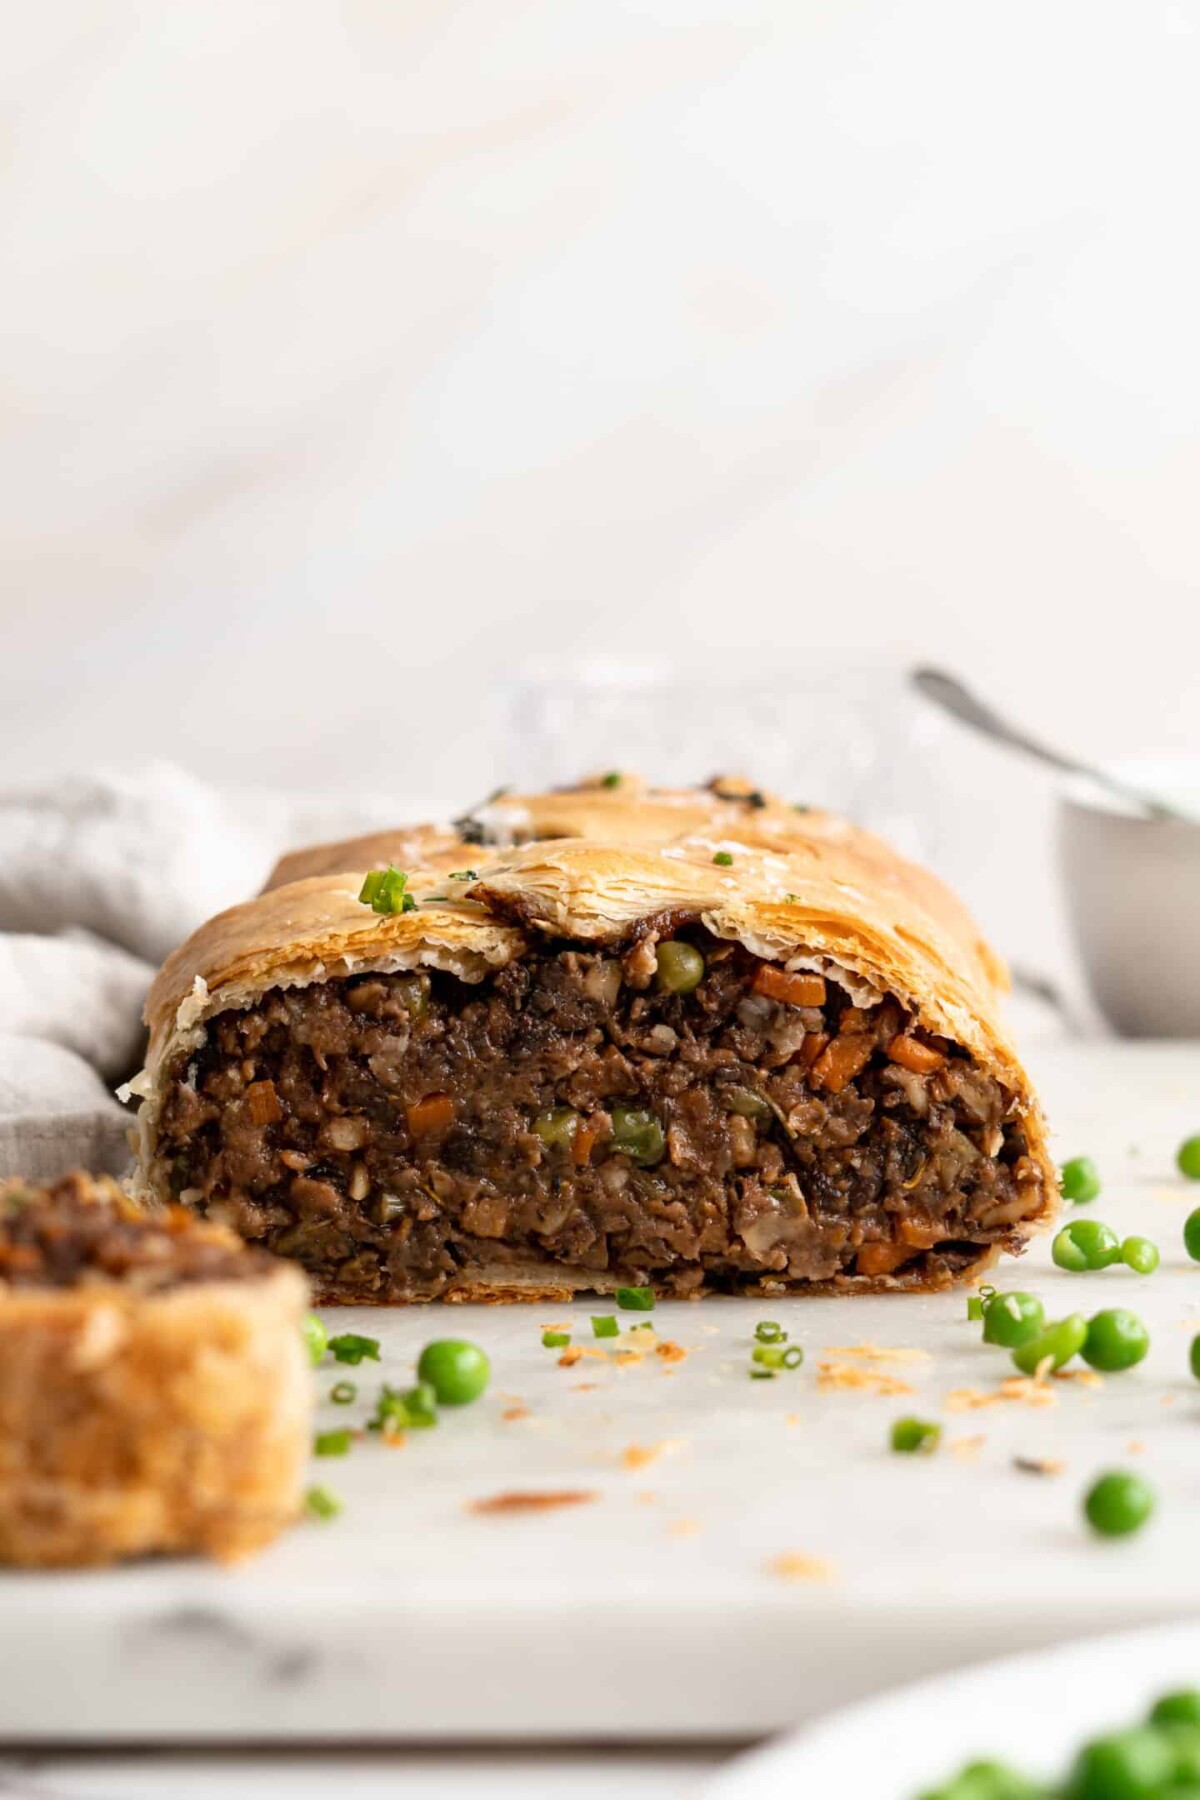
This vegan wellington is a fun plant-based take on a popular high-end meal. With vegan beef, walnuts, and mushrooms, this recipe is rich and hearty. Plus, it’s a lot of fun to make, and goes perfectly with any holiday menu.
Wellingtons are a popular item at steakhouses and other fancy restaurants, as well as at Christmas dinner tables all over the world. But there are two big issues I have with the wellingtons that you see Gordon Ramsay yelling about on TV. First, they’re incredibly expensive to order or make. And second, they’re made out of beef.
That’s why I came up with this vegan wellington recipe, which solves both of those problems. It has everything that makes a beef wellington popular, but it’s fully plant-based, and you can make it at home for a low price. This vegan wellington uses plant-based beef, chopped walnuts, and a lot of mushrooms to replicate the flavor of steak. Herbs and vegetables add depth and brightness to the dish, and the puff pastry makes it look just like a wellington you’d find if you dropped $80 at a high-end restaurant.
Notes on Ingredients
Here’s everything you need to make this juicy, hearty vegan wellington for the holidays. Check out the recipe card at the bottom of the page to see the quantities for the ingredients.
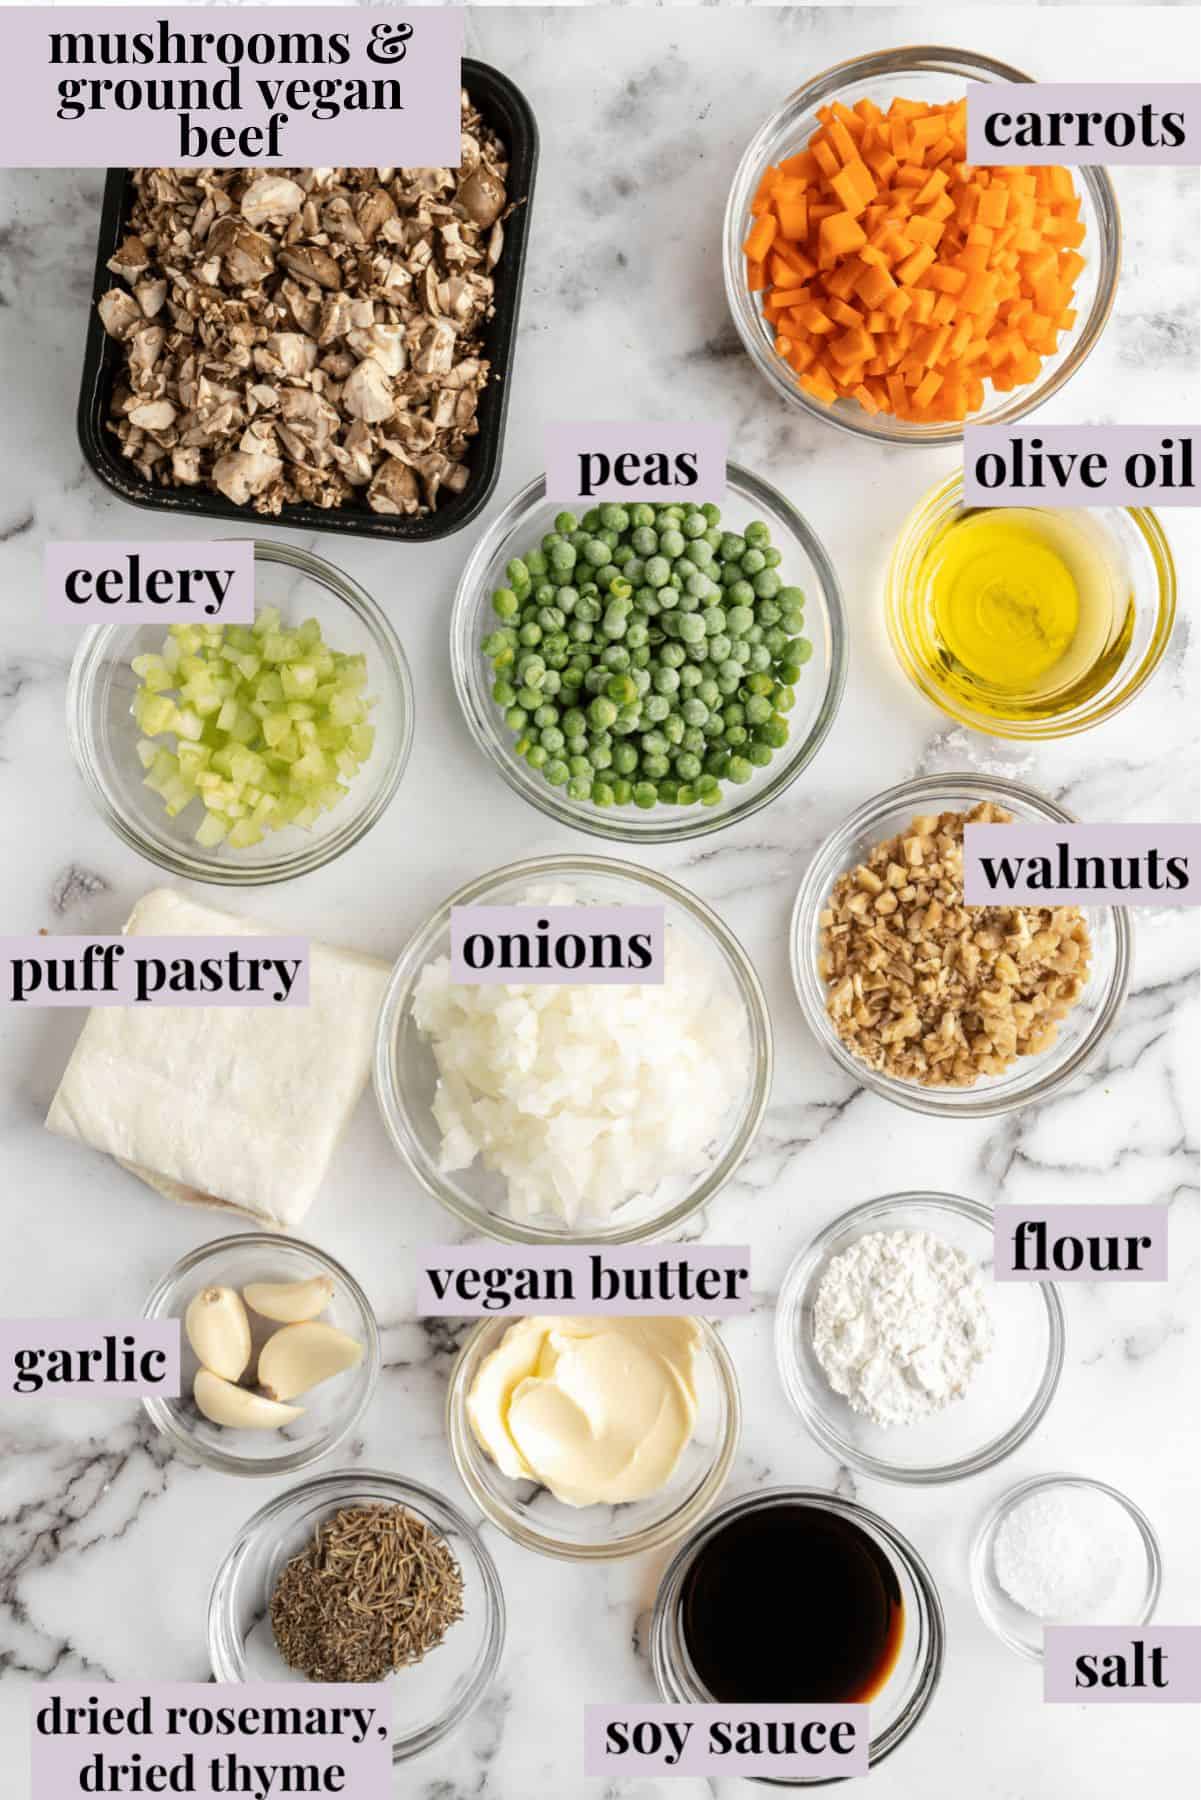
- Puff pastry – Make sure to thaw your puff pastry before making this recipe.
- Olive oil
- Yellow onion – You can use a white onion or a red onion if that’s all you have.
- Carrot
- Celery stalks
- Button mushrooms
- Garlic
- Kosher salt
- Dried rosemary
- Dried thyme
- Low-sodium soy sauce – Soy sauce may seem like an unconventional ingredient, but the umami flavor helps the dish taste more meaty.
- All-purpose flour
- Frozen petite peas
- Ground vegan beef – Use whatever brand you prefer.
- Walnuts
- Vegan butter – You’ll want to use unsalted vegan butter for this recipe.
How to Make a Vegan Wellington
Here’s how to make this fun dish. It might look fancy, but it’s surprisingly easy to make.
- Prep. Preheat the oven to 400F, and line a baking sheet with parchment paper.
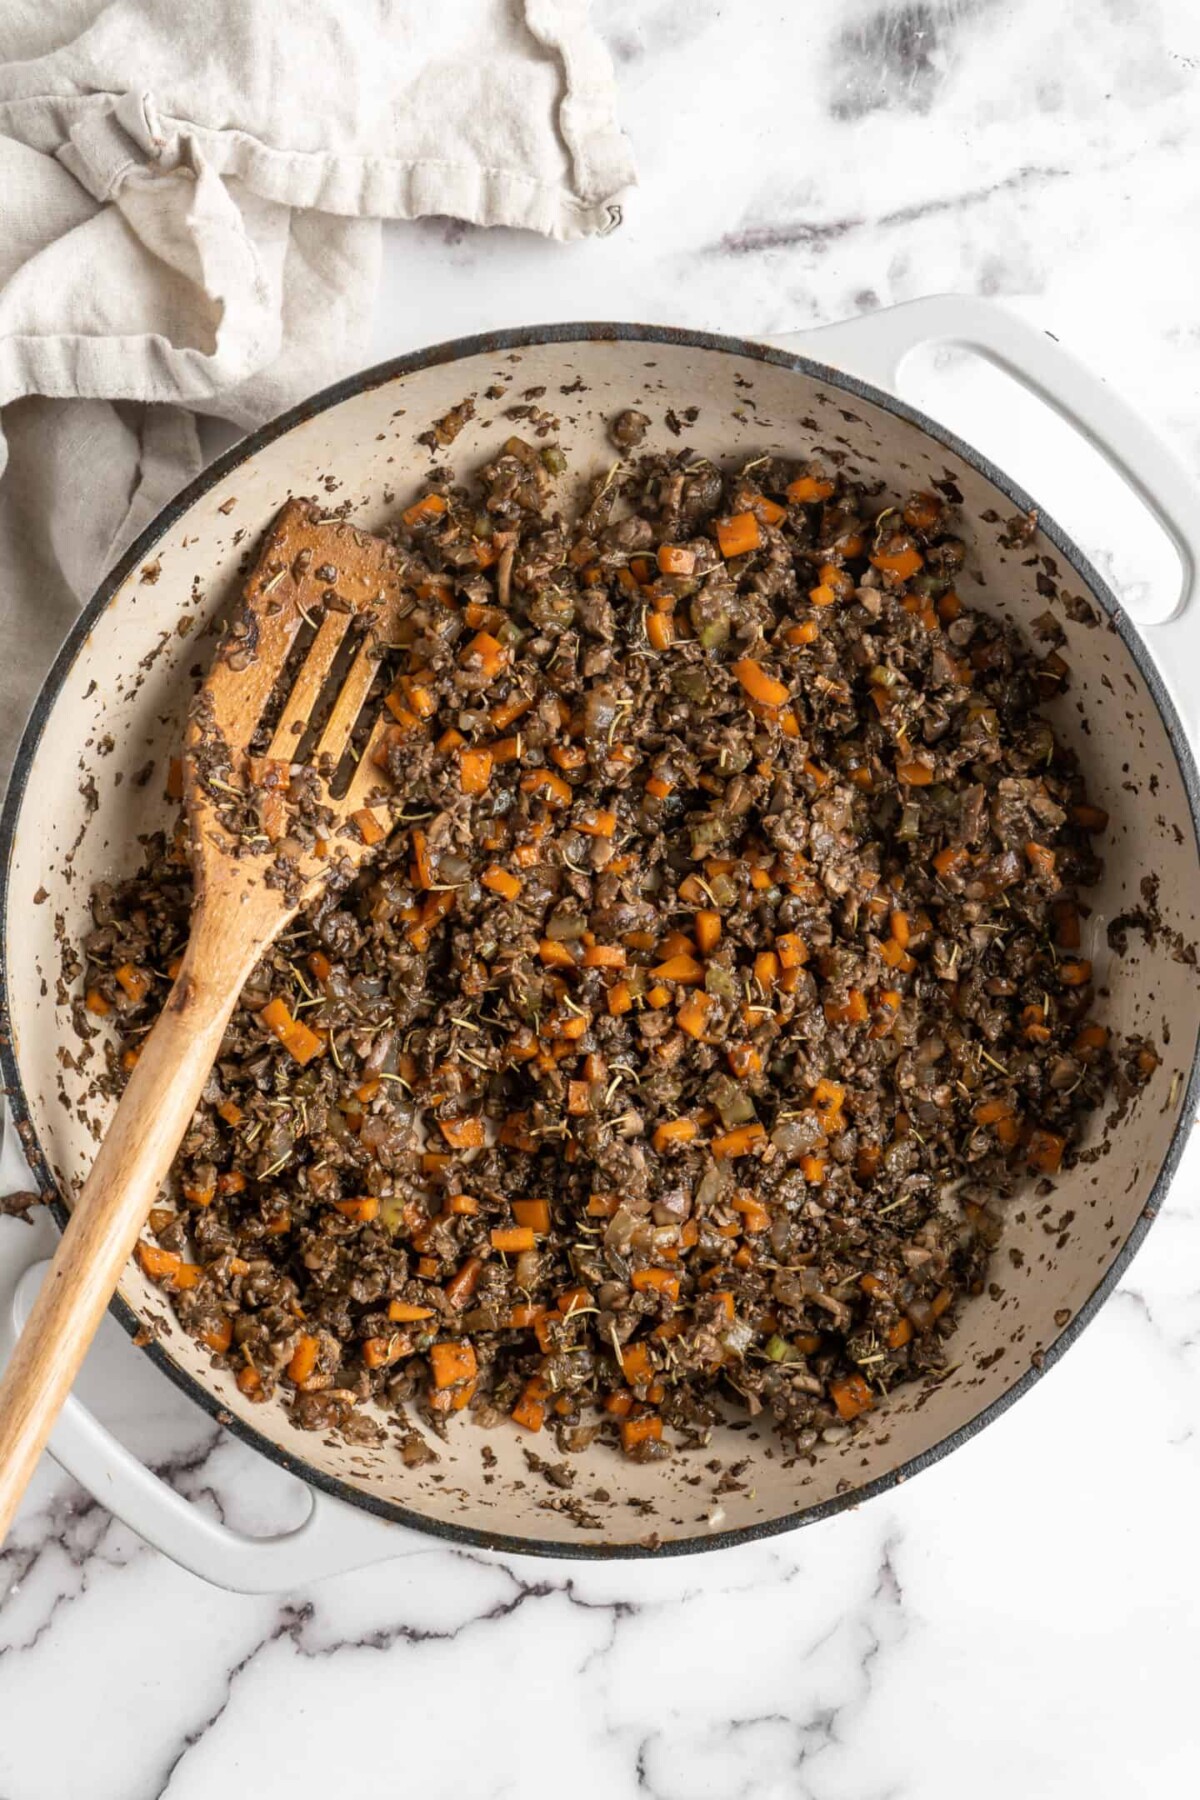
- Cook the vegetables. Heat a skillet over medium heat and add the oil. When the oil is hot, add the onion, carrot, celery, mushrooms, and salt. Stir the mixture occasionally, and cook until all of the veggies are soft, and the mushrooms have released their liquid. This should take about 10-15 minutes. Then add the garlic, thyme, rosemary, and soy sauce. Cook while stirring until the mixture becomes fragrant, which should take about a minute. Transfer the veggies into a mixing bowl.
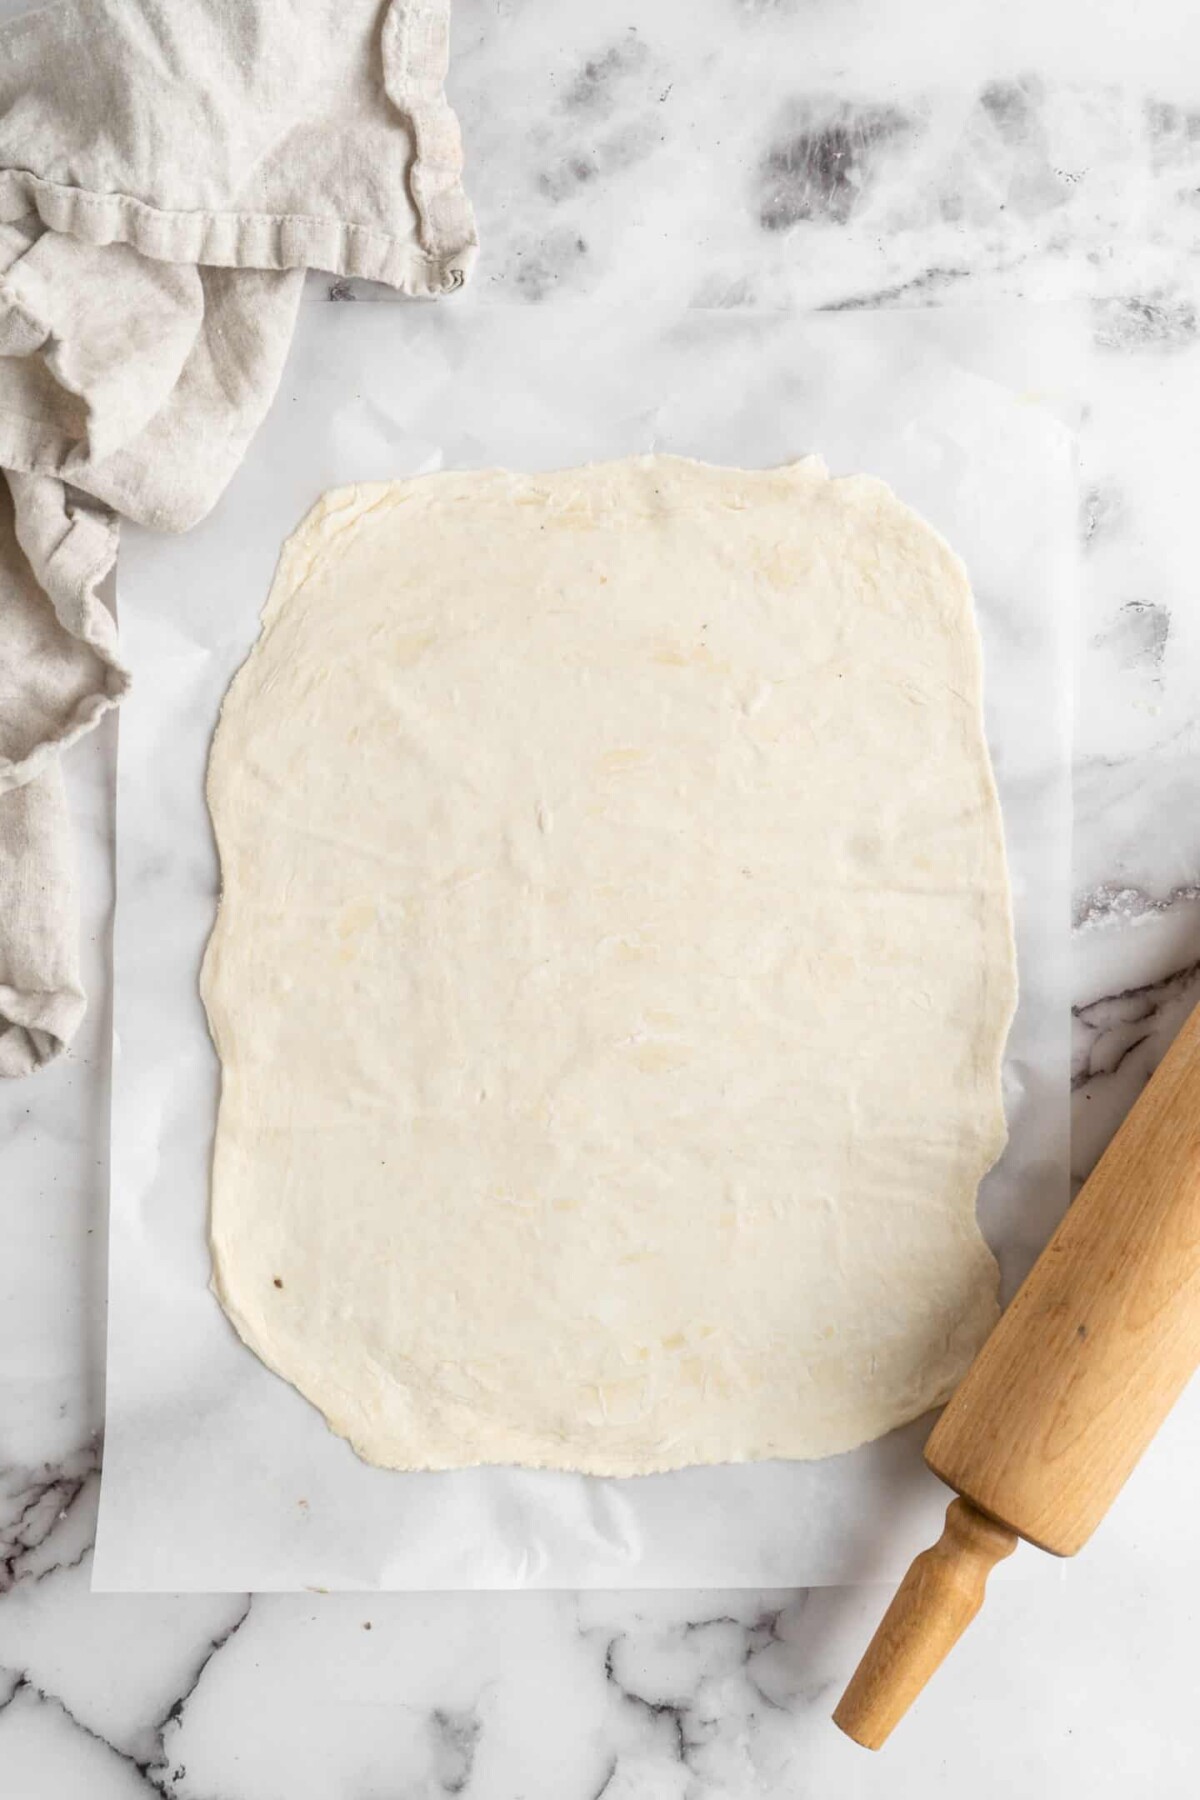
- Roll out the puff pastry. Take your puff pastry and roll it into a rectangle that’s roughly 13×10 inches.
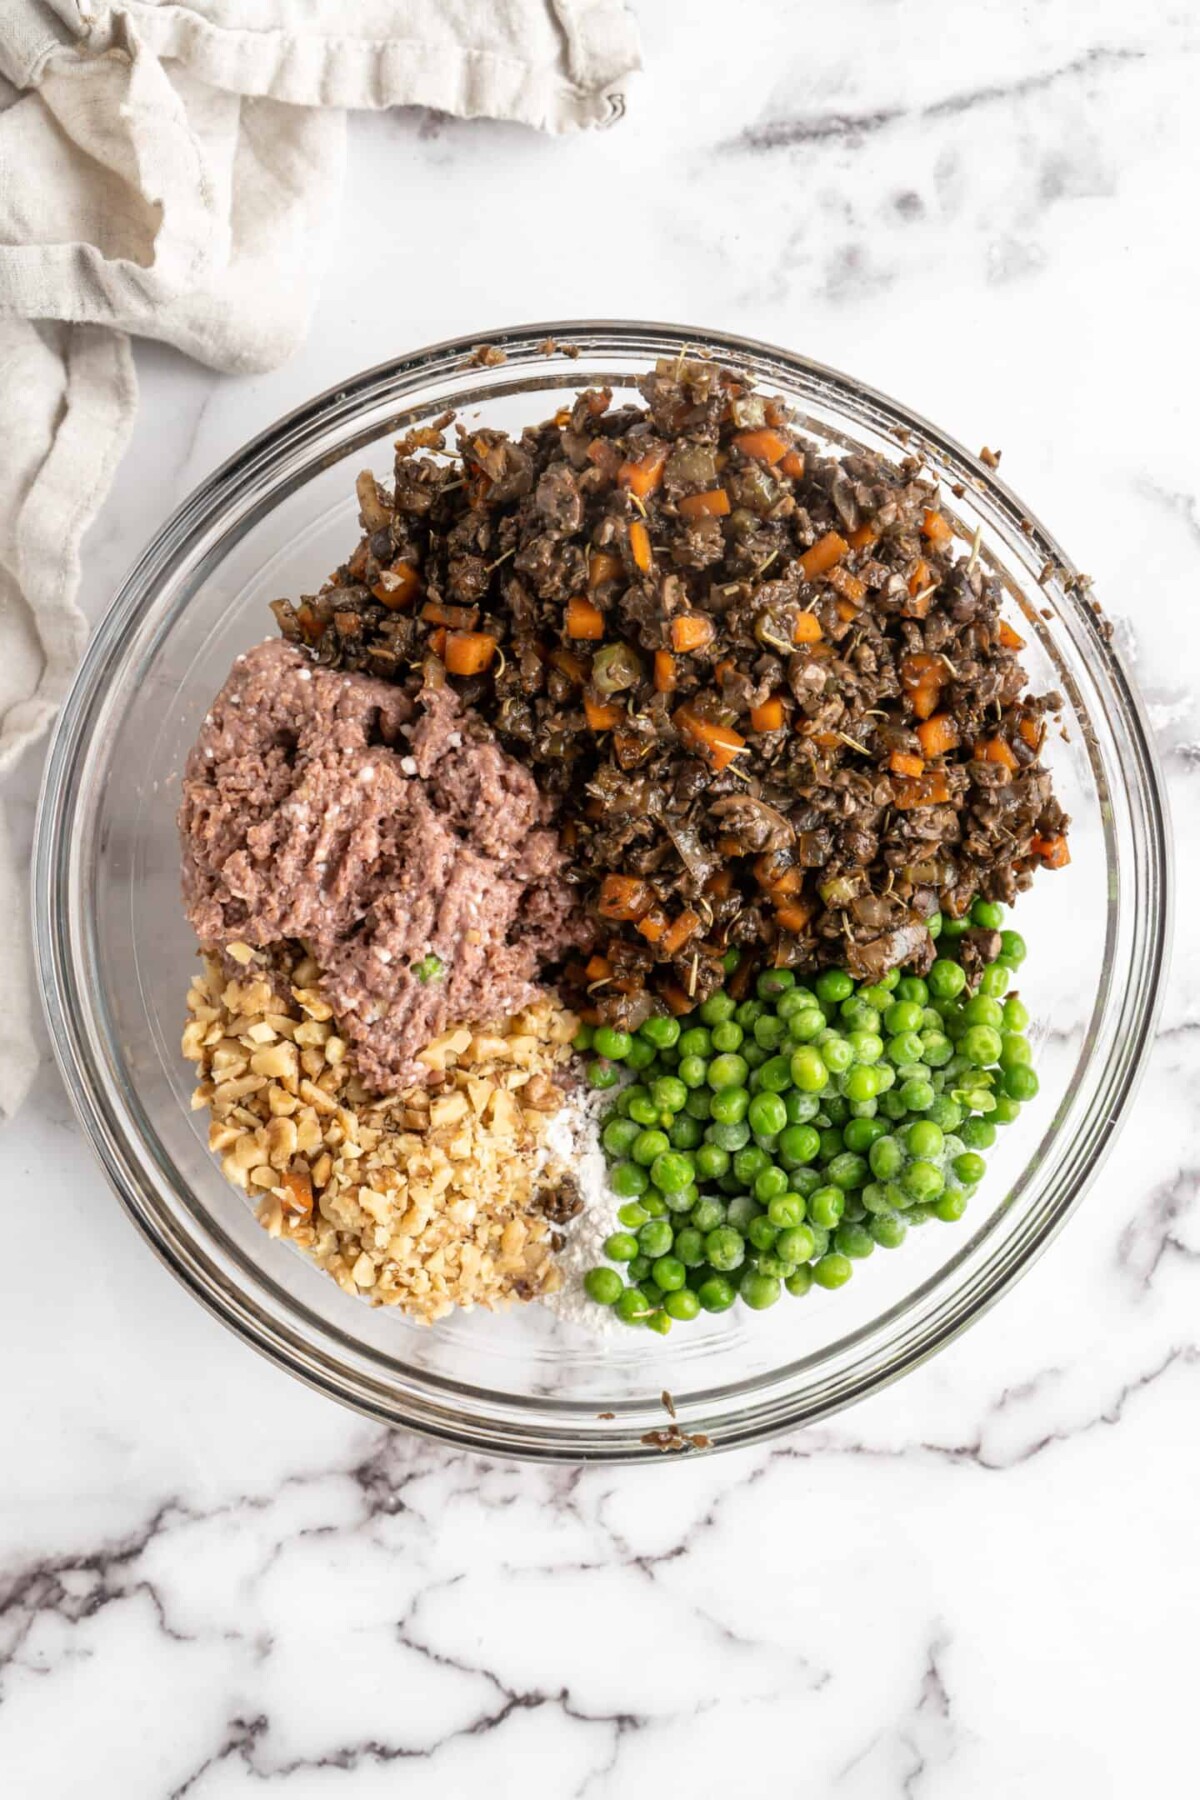
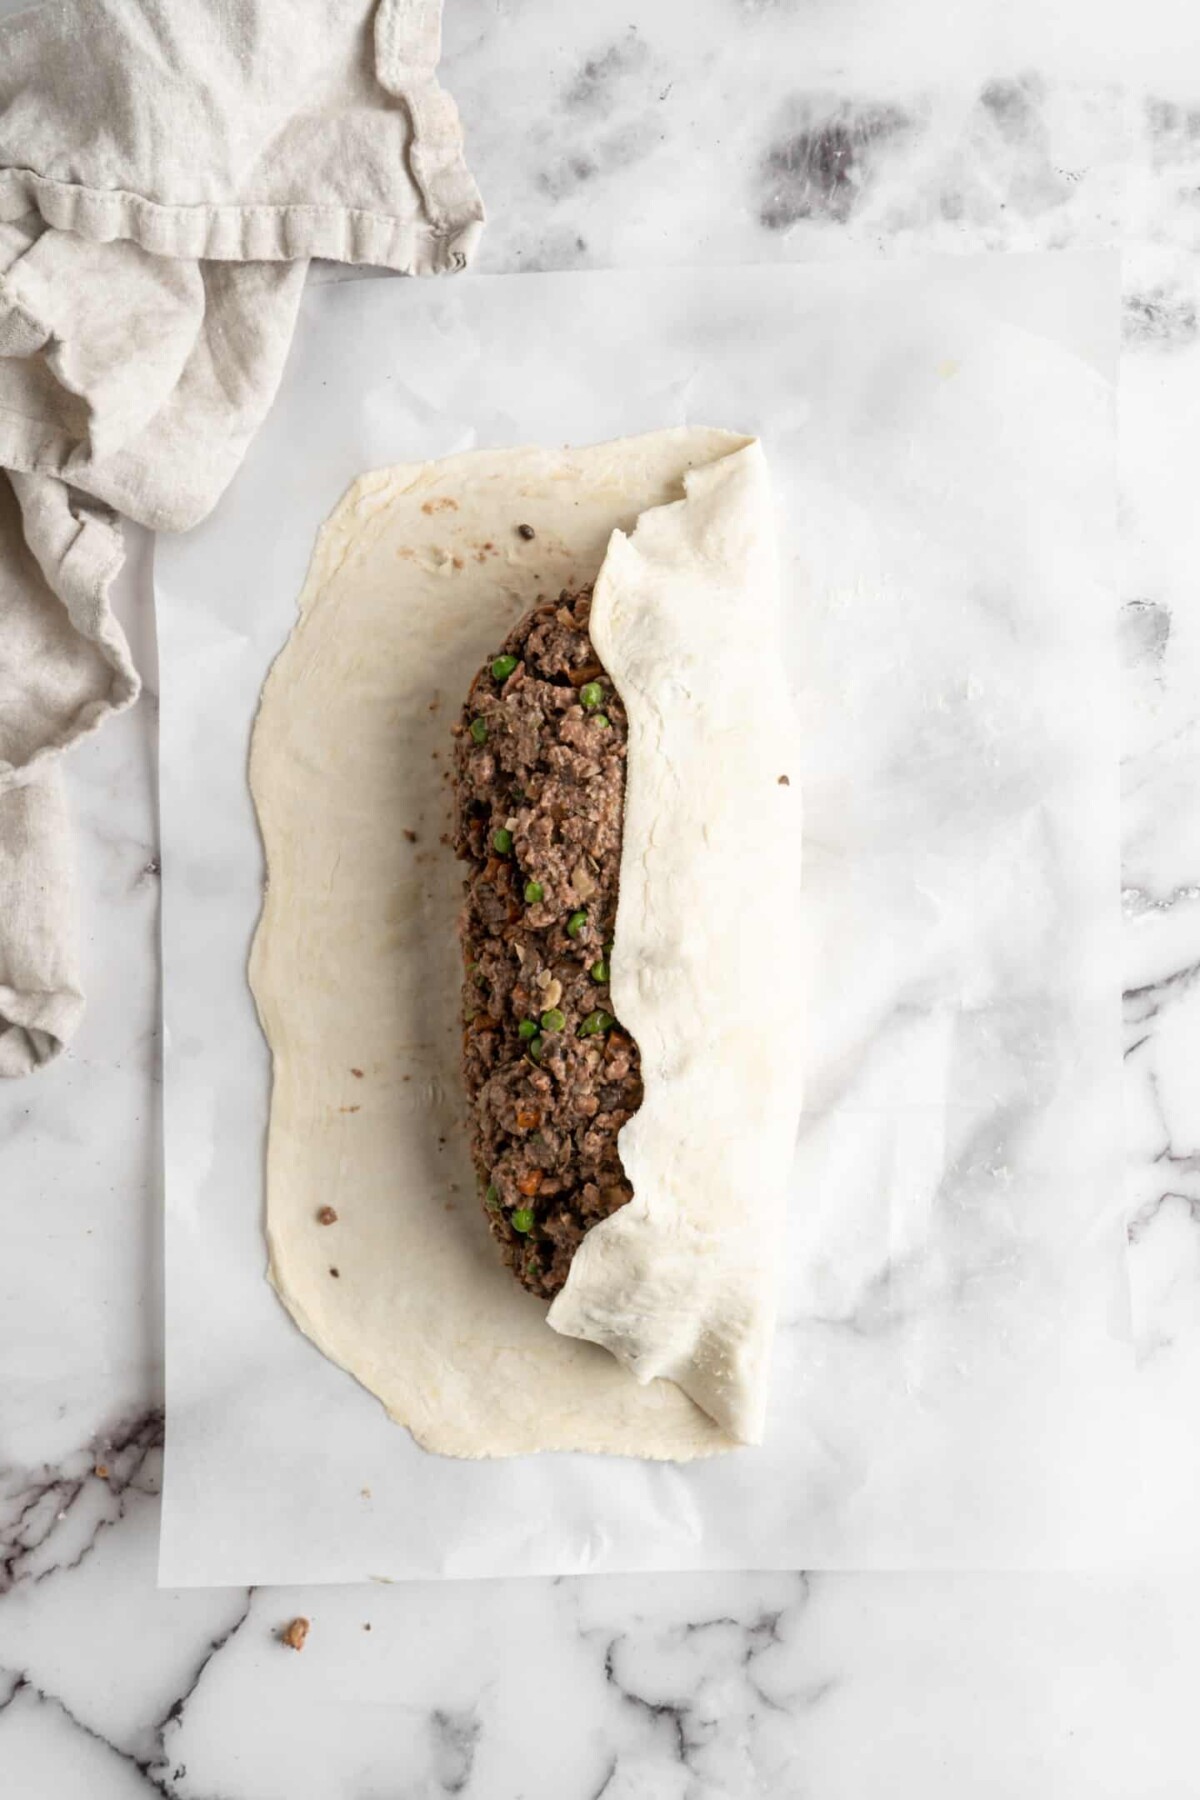
- Make the filling. When the veggies have cooled down a little bit, add the vegan ground beef, chopped walnuts, peas, and flour to the mixing bowl. Combine the ingredients with the vegetable mixture using your hands.
- Shape the filling. Place the mixture on top of the rolled out puff pastry. Use your hands to shape the filling into a log shape in the middle of the pastry.
- Wrap the filling. Fold the long edges of the puff pastry over the top of the filling. There should be some overlap in the center. Get water on your finger, and run it over the seam to seal the puff pastry. Repeat the process with the short ends of the pastry, then flip the vegan wellington over so that the seams are on the bottom, and place on the baking sheet.
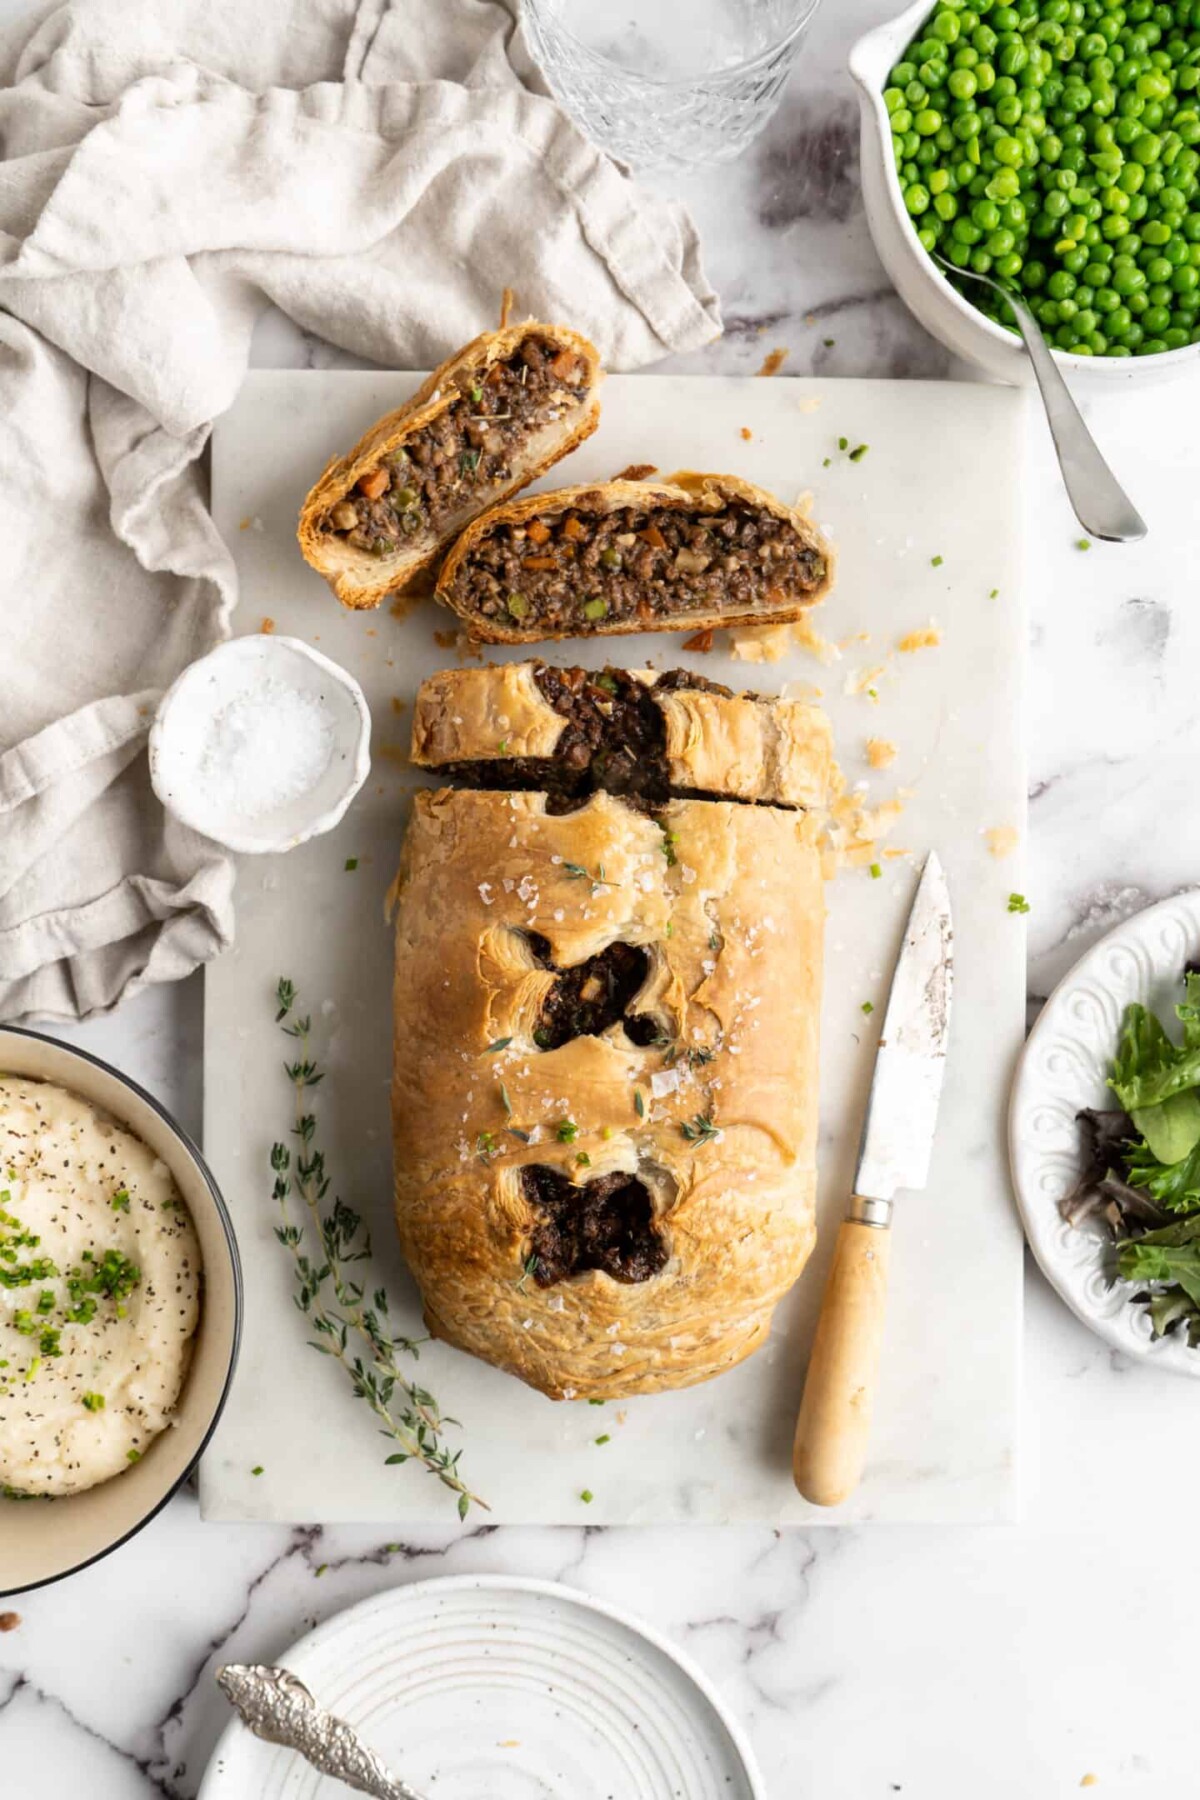
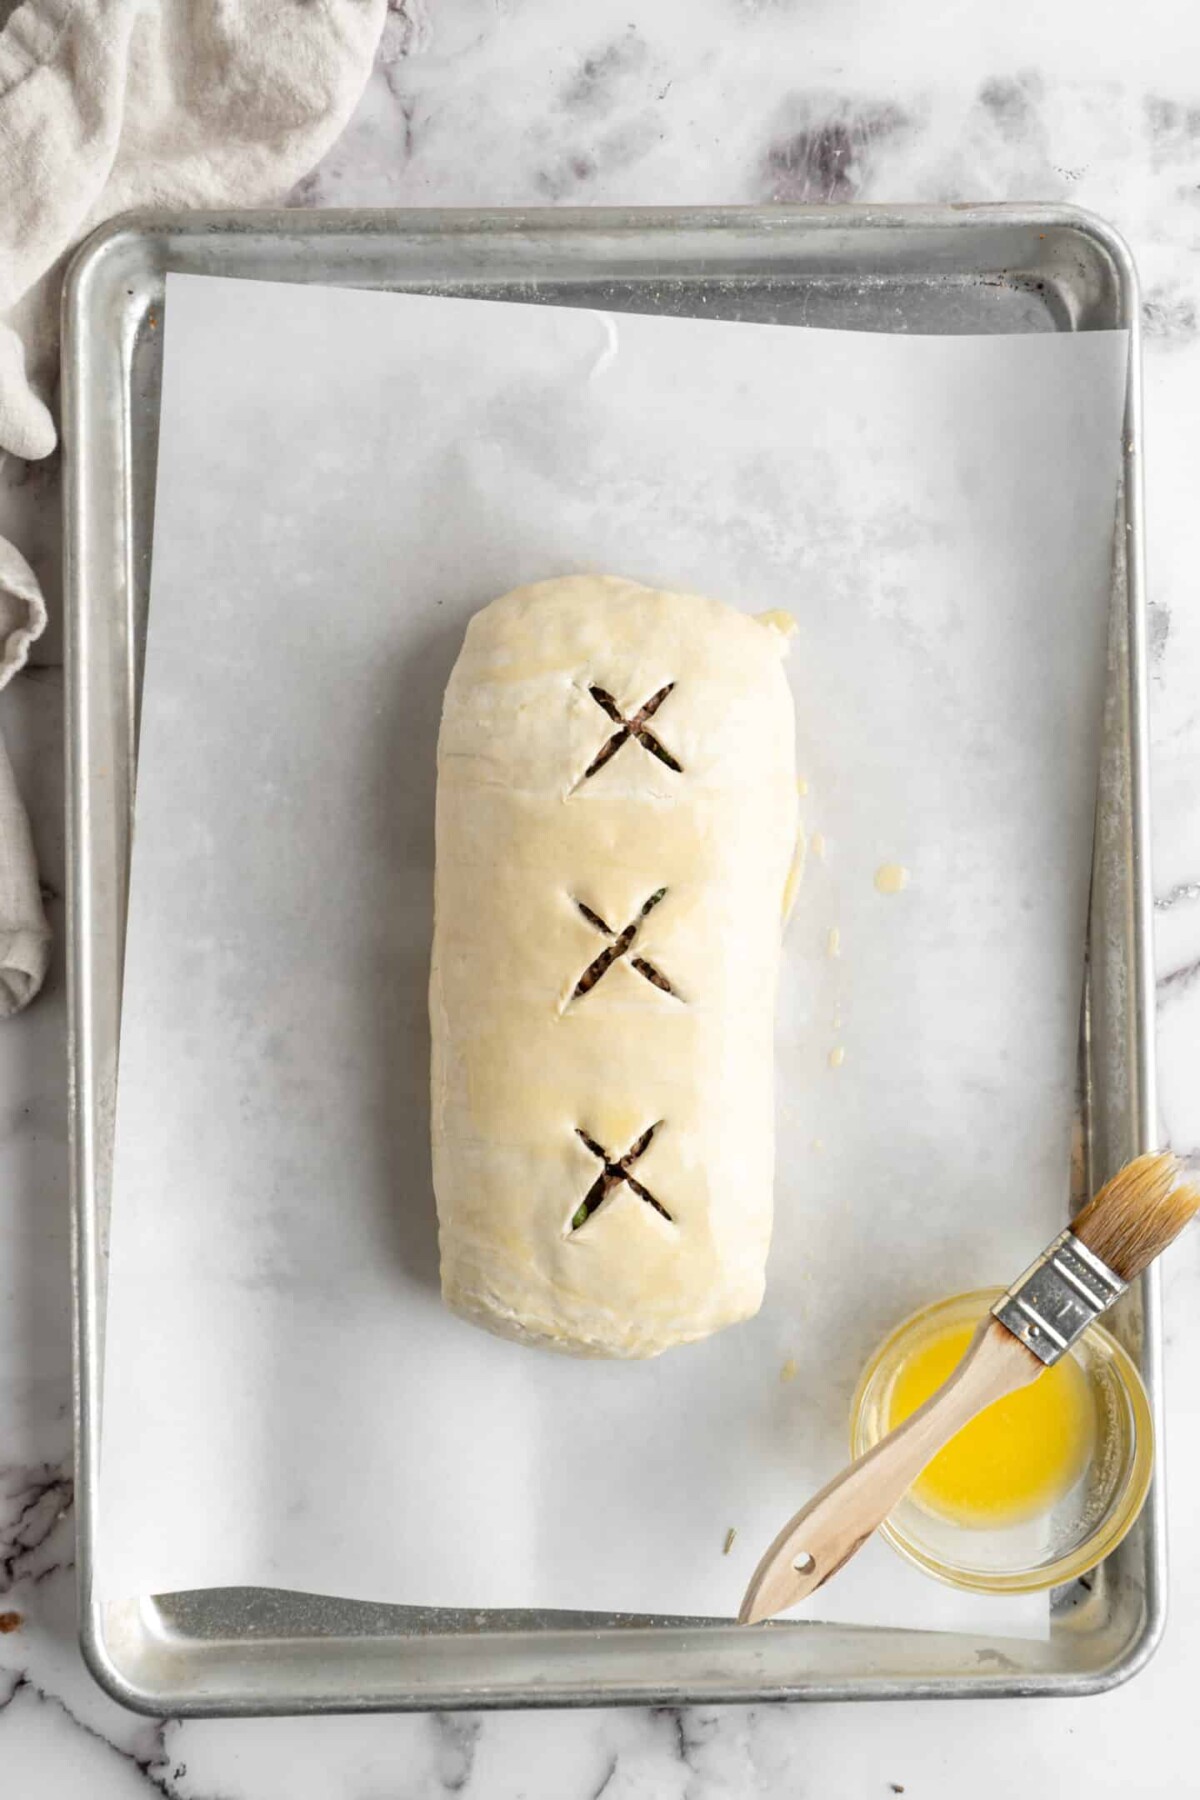
- Score the vegan wellington. Brush vegan butter over the top of the puff pastry, and then use a paring knife to score three X’s on top of the wellington.
- Bake. Cook the vegan wellington until the pastry is golden and flaky, and the filling has reached 165F. Let the wellington rest for at least 10 minutes before slicing and eating.
Tips for Success
Here are a few tricks and tips for you when making this vegan wellington.
- Experiment with different mushrooms. I usually use button mushrooms for this recipe, because they’re readily available, affordable, and taste great in this dish. However, button mushrooms are very basic, so if you feel like adding some extra flavor to this hearty plant-based wellington, try mixing up the mushrooms and using ones that have more flavor.
- Tent the wellington. Keep an eye on your vegan wellington while it’s in the oven. You want to make sure that you cook the dish all the way through, so that the pastry isn’t raw, and the filling reaches a temperature of 165F. If you notice that the puff pastry is getting pretty dark, but the wellington isn’t done cooking, then cover it with aluminum foil. This will allow you to keep baking the vegan wellington without burning the puff pastry.
- Let it rest. You always hear that you should let meat rest after cooking, but that’s also true with vegan meat and mushrooms. As you cook the vegan wellington, the juices from the vegan beef and from the vegetable mixture will start to move towards the surface of the wellington. By letting the dish rest, you give those juices time to get reabsorbed by the filling. The result will be a vegan wellington that’s firm, but still remarkably juicy.
How to Store and Reheat a Vegan Wellington
This vegan wellington will last in an airtight container in your fridge for up to 4 days. To reheat, cover in aluminum foil and bake in a 400F oven for 5-10 minutes, until warmed all the way through.
Can I Freeze This Recipe?
You can definitely freeze this vegan wellington. Just place it in an airtight container, and it will last in the freezer for up to 3 months. You can reheat the wellington directly from the freezer, though it will need a slightly longer cooking time.
More Vegan Meat Recipes
I hope you like this vegan wellington as much as I do. If so, then check out some of my other recipes that star vegan meat.
- The Best Vegan Lasagna
- Biscuits and Gravy
- Spaghetti Squash Lasagna Boats
- Vegan Naan Pizza
Ingredients
- 1 sheet frozen puff pastry , thawed
- 2 tablespoons olive oil
- 1 medium yellow onion , diced
- 1 carrot , diced
- 1 celery stalk , diced
- 1 pound button mushrooms , chopped finely
- 4 cloves garlic
- 1 ½ teaspoons kosher salt
- 1 teaspoon dried rosemary
- 1 teaspoon dried thyme
- 2 tablespoons low-sodium soy sauce
- 2 teaspoons all-purpose flour
- ½ cup frozen petite peas
- 1 pound ground vegan beef
- ½ cup walnuts , finely chopped
- 1 tablespoon vegan butter
Instructions
- Preheat the oven to 400°F. Line a baking sheet with parchment paper.
- Heat the oil in a large skillet over medium heat. When hot, add the onion, carrot, celery, mushrooms, and salt. Cook, stirring occasionally, until softened and the mushrooms have released their liquid, about 10-15 minutes. Add the garlic, rosemary, thyme, and soy sauce, and cook, stirring, for 1 minute, until fragrant.
- Transfer the cooked vegetables to a mixing bowl to cool until cool enough to handle. Meanwhile, roll the puff pastry into a 10×13-inch rectangle.
- Add the flour, peas, ground beef, and walnuts to the vegetable mixture. Use your hands to combine everything evenly.
- Transfer the filling to the pastry, then shape it into a log in the center of the pastry. Wrap the long edges of the pastry over the filling so they overlap in the center. Wet your finger and run it along the seam to help it seal closed.
- Fold the short ends up and seal the same way. Flip the wellington over onto the prepared baking sheet. Brush with melted butter. Use a sharp paring knife to score three X’s in the top of the wellington to vent.
- Bake for 45-50 minutes, until the top is golden and the pastry is flaky and cooked through. A thermometer in the center should register 165°F. Cool for 10 minutes before slicing.
Notes

Vegan Wellington
Ingredients
- 1 sheet frozen puff pastry thawed
- 2 tablespoons olive oil
- 1 medium yellow onion diced
- 1 carrot diced
- 1 celery stalk diced
- 1 pound button mushrooms chopped finely
- 4 cloves garlic
- 1 ½ teaspoons kosher salt
- 1 teaspoon dried rosemary
- 1 teaspoon dried thyme
- 2 tablespoons low-sodium soy sauce
- 2 teaspoons all-purpose flour
- ½ cup frozen petite peas
- 1 pound ground vegan beef
- ½ cup walnuts finely chopped
- 1 tablespoon vegan butter
Instructions
- Preheat the oven to 400°F. Line a baking sheet with parchment paper.
- Heat the oil in a large skillet over medium heat. When hot, add the onion, carrot, celery, mushrooms, and salt. Cook, stirring occasionally, until softened and the mushrooms have released their liquid, about 10-15 minutes. Add the garlic, rosemary, thyme, and soy sauce, and cook, stirring, for 1 minute, until fragrant.
- Transfer the cooked vegetables to a mixing bowl to cool until cool enough to handle. Meanwhile, roll the puff pastry into a 10x13-inch rectangle.
- Add the flour, peas, ground beef, and walnuts to the vegetable mixture. Use your hands to combine everything evenly.
- Transfer the filling to the pastry, then shape it into a log in the center of the pastry. Wrap the long edges of the pastry over the filling so they overlap in the center. Wet your finger and run it along the seam to help it seal closed.
- Fold the short ends up and seal the same way. Flip the wellington over onto the prepared baking sheet. Brush with melted butter. Use a sharp paring knife to score three X’s in the top of the wellington to vent.
- Bake for 45-50 minutes, until the top is golden and the pastry is flaky and cooked through. A thermometer in the center should register 165°F. Cool for 10 minutes before slicing.
Notes
Nutrition
Vegan Wellington https://jessicainthekitchen.com/vegan-wellington-recipe-mushroom/ November 21, 2022
This recipe for creamy vegan queso is an instant party starter for any occasion! No Tex-Mex meal is complete without this liquid gold. Gooey, velvety, spicy, and savory, you’ll never miss the dairy with this plant-based option on the table.

There’s no question that queso is beloved across the nation. It can be an appetizer, side dish, condiment, or entrée depending on your mood, and your appetite for indulgence. Think of it as a spicy version of fondue, glowing from the warmth of chilies and bold spices.
Many traditional queso recipes begin with a roux, which is butter and flour cooked together to act as a thickener, but this one is MUCH easier and is completely gluten-free! Naturally rich cashews create a sauce so silky-smooth, it could make a béchamel blush.

Why You’ll Love This Creamy Vegan Queso
What’s not to love about a spicy cheese sauce? Here are just a few reasons you’ll be hooked:
- Full of veggie goodness. Believe it or not, carrots are the secret ingredient creating that glorious golden glow!
- Luscious creamy texture at any temperature. The problem with conventional queso is that as it cools, it gets clumpy and congealed. Not so for vegan queso! This blend stays silky smooth no matter what.
- Ready in 15 minutes or less. Just simmer, blend, and serve! You’re minutes away from a fiesta at any time.
- Gets better with age. Like a fine wine, this queso only gets more flavorful as it sits. The spices mingle and meld, becoming deeper and more balanced, which makes it an excellent candidate to make ahead.
Notes on Ingredients
Please note that this is important information on the ingredients and instructions and the FULL recipe with amounts and details can be found DOWN BELOW (scroll to it) in the recipe card.
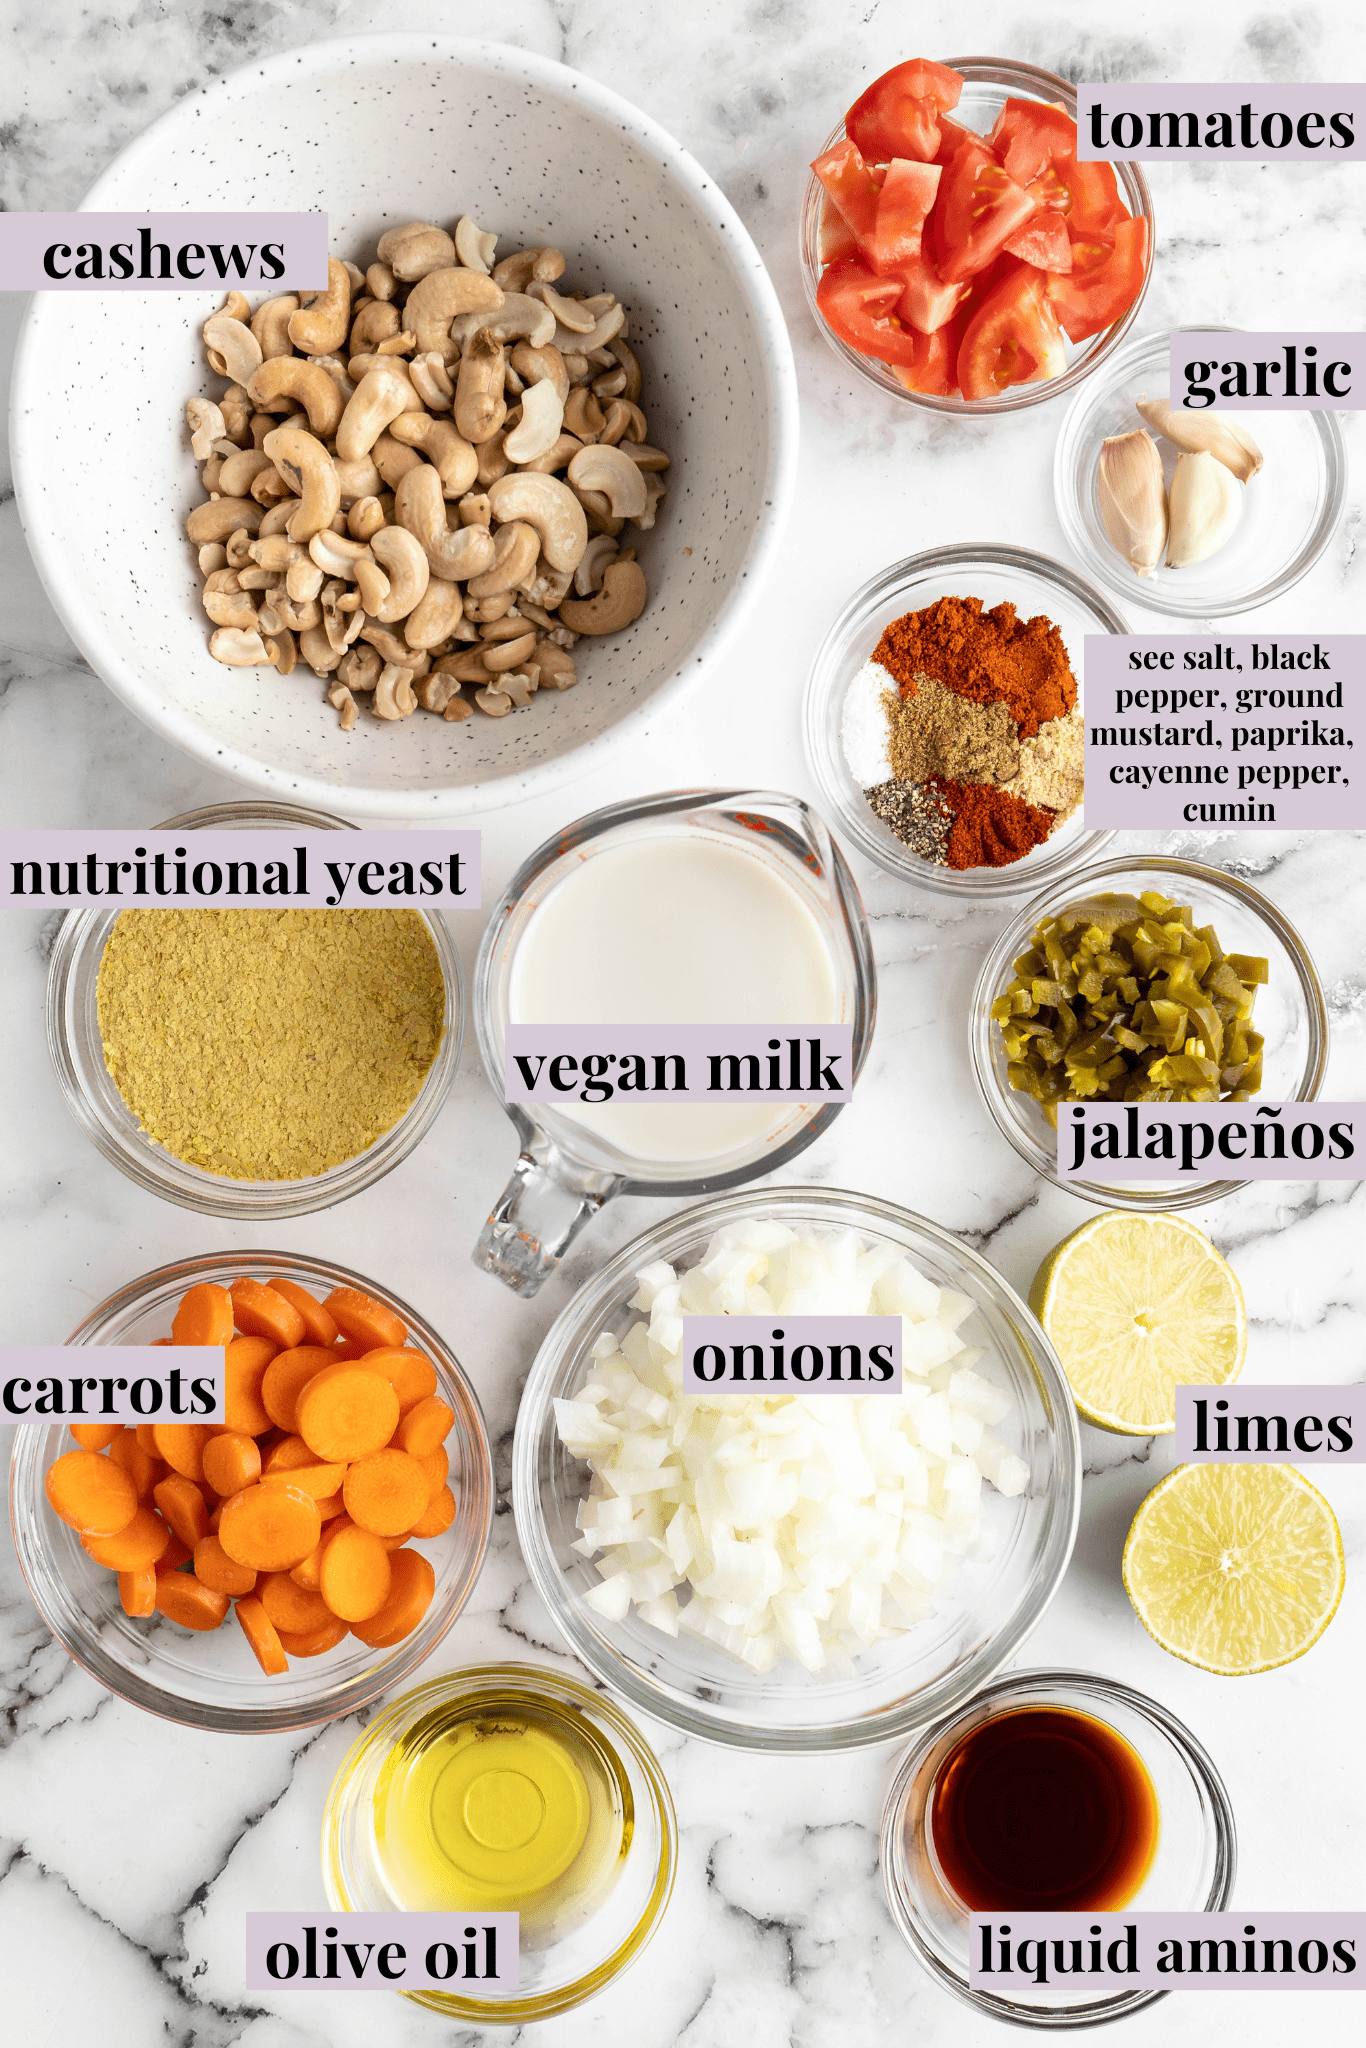
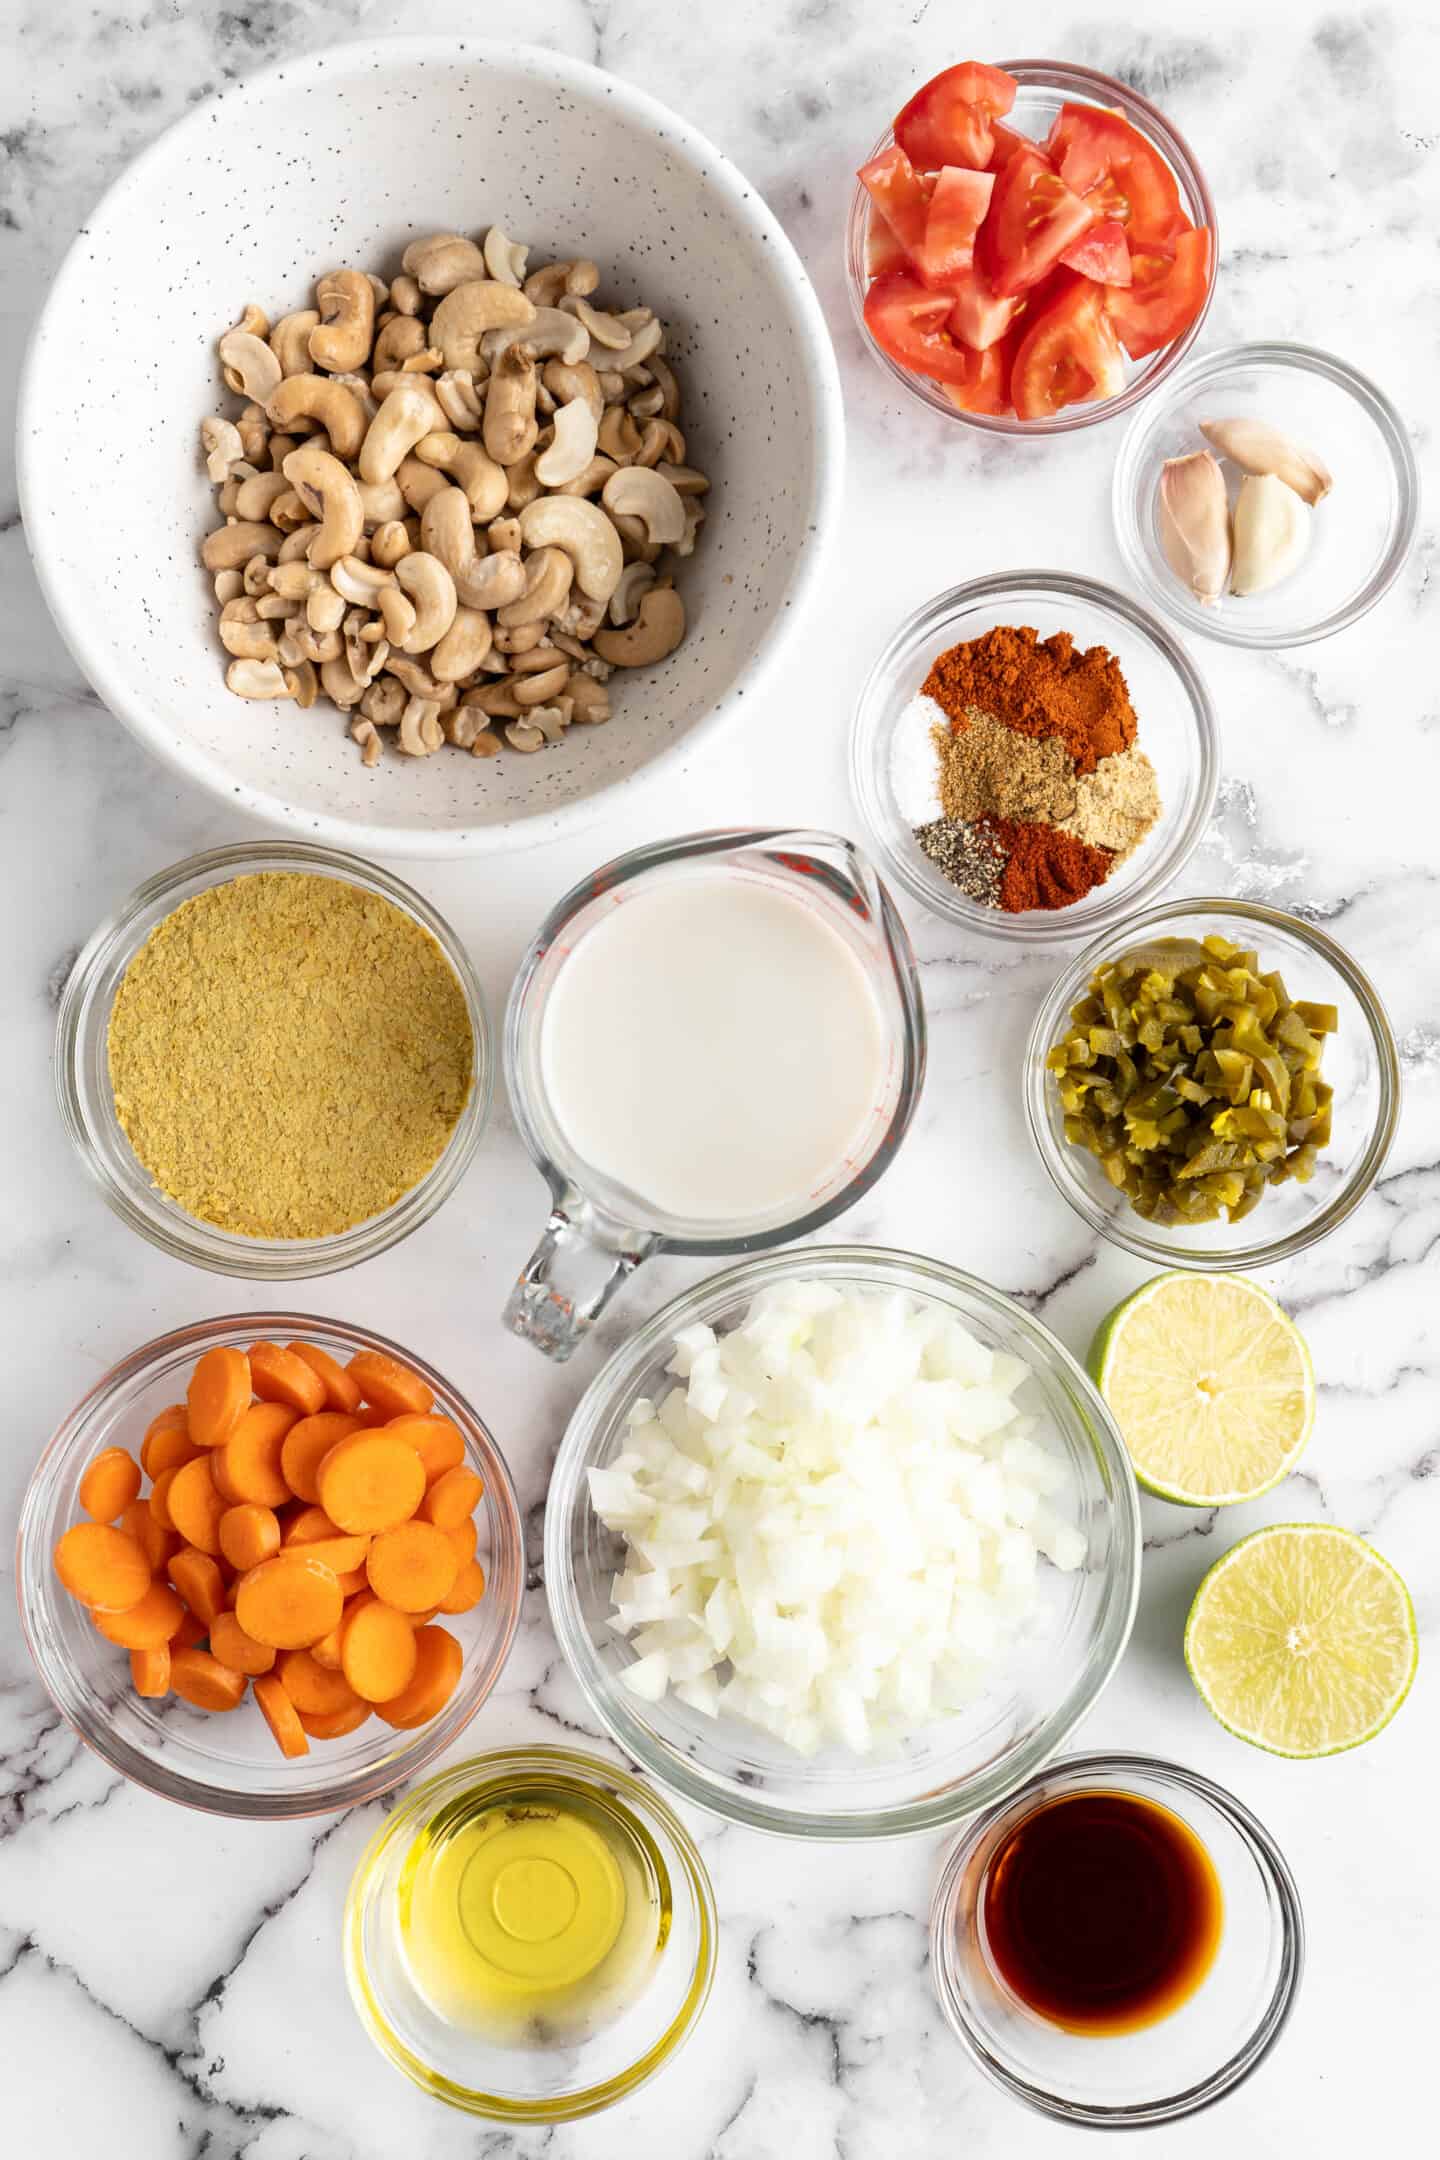
- Nutritional yeast – Otherwise known as “nooch” for short, this indispensable flaky yellow powder is the key to creating cheesy, buttery flavor without any dairy. You can find it with the spices and seasonings or in the baking aisle in most grocery stores.
- Olive oil
- Carrot
- Yellow onion
- Garlic
- Cashews – Raw, unsalted cashews create a rich, creamy texture when blended smooth. Soak them overnight or at least 8 hours in advance to ensure the best results.
- Sea salt
- Ground black pepper
- Dry mustard – In a pinch, you can use an equal amount of prepared Dijon mustard instead.
- Lime juice
- Liquid aminos , tamari, or capers
- Paprika
- Cayenne pepper
- Cumin
- Pickled jalapeños – You can substitute fresh if you’d prefer a sharper bite.
- Unsweetened almond milk
How to Make Vegan Queso
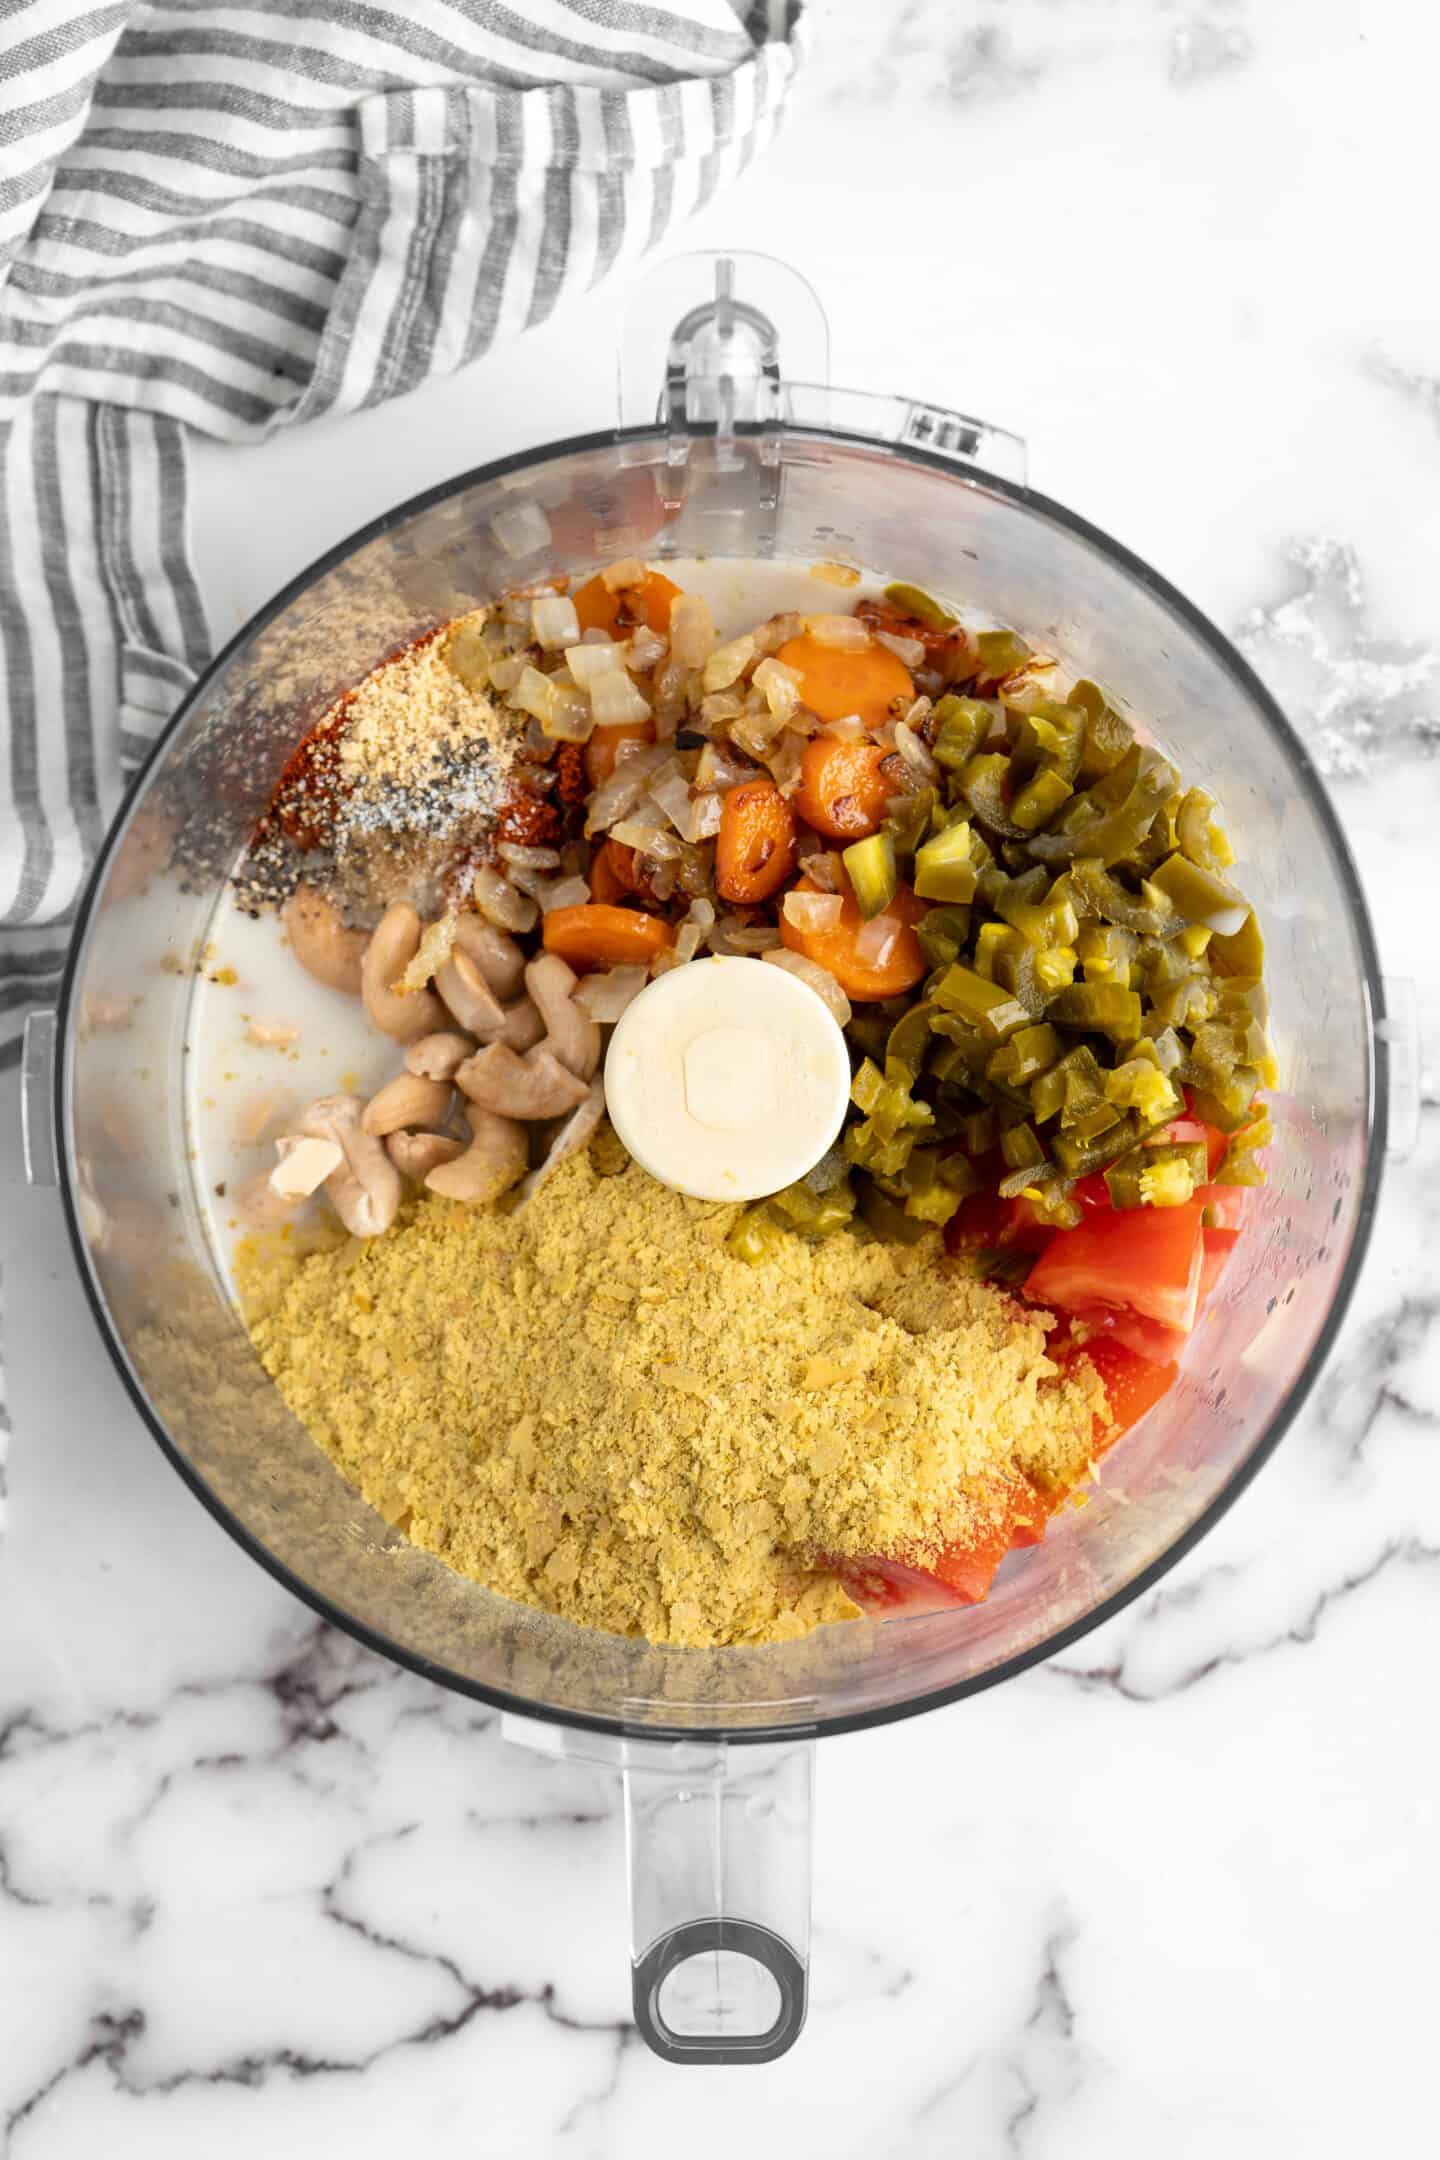
- Heat the oil in a medium saucepan and add carrots, onions, and garlic. Cover let cook for about 10 minutes, until the carrots are fork tender.
- Remove from heat and allow to cool slightly.
- Transfer the carrot mixture to a high-speed blender along with all the remaining ingredients.
- Blend on full power for about 2 minutes , until the sauce is completely smooth. Taste and add more salt if necessary.
- Top with extra jalapeños as a garnish. Enjoy!
Tips for Success
You can’t go wrong with this foolproof formula for vegan queso. Master the craft by considering the following notes:
- Add spices to taste. If you’re a serious heat-seeker, dial up the paprika and cayenne, or add in a splash of your favorite hot sauce until you feel the burn!
- Make it nut-free. In case of allergies, you can swap the cashews for raw sunflower seeds and use any other type of unsweetened non-dairy milk.
- Top it off! Add a dollop of salsa or pico de gallo right in the center for fresher flavor and texture.
Do I Need a High-Powered Blender for This Recipe?
While a high-speed blender makes quick work of even the hardest ingredients, transforming them into flawlessly smooth sauces with the push of a button, you don’t need any fancy equipment to make fantastic queso.
A standard blender or food processor will also do the trick. It may take 10 to 15 minutes to get the same results and be sure to pause periodically and scrape down the sides of the canister with your spatula to make sure all the ingredients are incorporated.

What To Serve With Dairy-Free Queso
Queso is best known as the perfect sidekick to tortilla chips, but it’s so much more than just a stand-alone dip.
- Chips, beyond tortilla chips, including pita chips , potato chips , are still a solid choice and always the easiest approach.
- Cut vegetable crudité offers a lighter option for indulging, such as celery sticks, baby carrots, cucumber slices, bell pepper strips, sliced radishes, and more.
- Nachos are practically begging for a thick blanket of rich queso. Pile on the salsa and all your favorite toppings!
- Burritos and burrito bowls are prime candidates for smothering with this cheesy sauce.
- Tacos and taco salads alike can benefit from some extra gooey goodness. Drizzle queso on top of tacos like crema, or over salads like dressing.
- Toss with pasta to make mac and cheese with a spicy kick!
How to Store & Reheat Leftovers
Let the queso cool completely before transferring it to an airtight container. Stored in the fridge, it will keep for up to 5 days. To reheat, warm in the microwave for 60 – 90 seconds, stirring every 30 seconds until smooth and warm all the way through.

Can I Freeze Cashew Queso?
Unlike traditional dairy-based queso cheese sauce, cashew queso can be frozen and revived beautifully! It will keep for up to 6 months in the freezer stored in an airtight container. Don’t forget to label it with the date! When you’re ready to serve, let it thaw out overnight in the fridge before reheating according to the directions above.
Ingredients
- 1/2 cup nutritional yeast
- 1 tablespoon olive oil
- 1 large carrot , chopped
- 1 small yellow onion , halved and chopped
- 3 cloves garlic , minced
- 1 cup raw cashews , soaked in water overnight, then drained and rinsed OR just easily boiled for 5 minutes*
- 1 teaspoon sea salt
- 1/2 teaspoon ground black pepper
- 1 teaspoon dry ground mustard
- 1 tablespoon lime juice
- 1/2 tablespoon tamari sauce , liquid aminos, or capers
- 2 teaspoons paprika
- 1/4 teaspoon cayenne pepper
- 1/2 teaspoon cumin
- 3 tablespoons chopped pickled jalapeños
- 1 small tomato , chopped
- 1 1/2 cups unsweetened almond milk , or preferred nut milk
Instructions
- In a pan over medium heat, heat the oil add in the carrots, onions and the garlic, stirring to combine. Cover with lid and allow to steam/roast until carrots are tender,about 10 minutes.
- Remove from heat and allow to cool slightly.
- In a large high speed blender add the carrot mixture,cashews, salt and pepper, ground mustard, lime juice, tamari, nutritional yeast, paprika, ground chili powder, cayenne pepper, cumin, chopped pickled jalapeños,tomato and almond milk.
- Blend together in a high powered blender for about 2minutes on a strong speed, until sauce is completely smooth and incorporate. Taste and add more salt if necessary. Top with extra jalapeños as a garnish. Enjoy!
Notes
- *You can easily boil your cashews with just enough water covering them for 5 minutes. Drain, let cool, and proceed! This way you can make the recipe the same day. Add spices to taste. If you’re a serious heat-seeker, dial up the paprika and cayenne, or add in a splash of your favorite hot sauce until you feel the burn!
- Make it nut-free. In case of allergies, you can swap the cashews for raw sunflower seeds and use any other type of unsweetened non-dairy milk.
- Top it off! Add a dollop of salsa or pico de gallo right in the center for fresher flavor and texture.
