When you make this vegan sushi at home, you can make it any way you like it! Cooking sushi rice in the Instant Pot makes it a cinch.
This vegan sushi recipe is a template for deliciousness! You can make it exactly as described below, or put your own spin on it. Although the customisation options are definitely a big draw here, the other thing I love about making this vegan sushi is that it’s fun! Like making onigiri , the process of rolling sushi is oddly satisfying, especially when you nail that perfect restaurant-style roll. (Don’t worry if it’s not perfect right away—it can take a little practice!)
Why You’ll Love This Vegan Sushi Recipe
- Make it your way . When you order vegan sushi at a restaurant, your choices are often cucumber, avocado, and maybe asparagus if you’re lucky. I add crispy tofu to my vegan sushi, but seriously: the possibilities are endless.
- A fun cooking project . If you love the process of cooking—and not just the end results of your efforts!—you will enjoy making your own vegan sushi at home.
- Perfect for meal prep . Vegan sushi is an excellent option for meal prepping since it keeps well in the fridge, and it’s easy to transport, too. This is the perfect work lunch!
Notes on Ingredients
Scroll down to the recipe card to find the ingredient quantities and recipe instructions.
Instant Pot Sushi Rice:
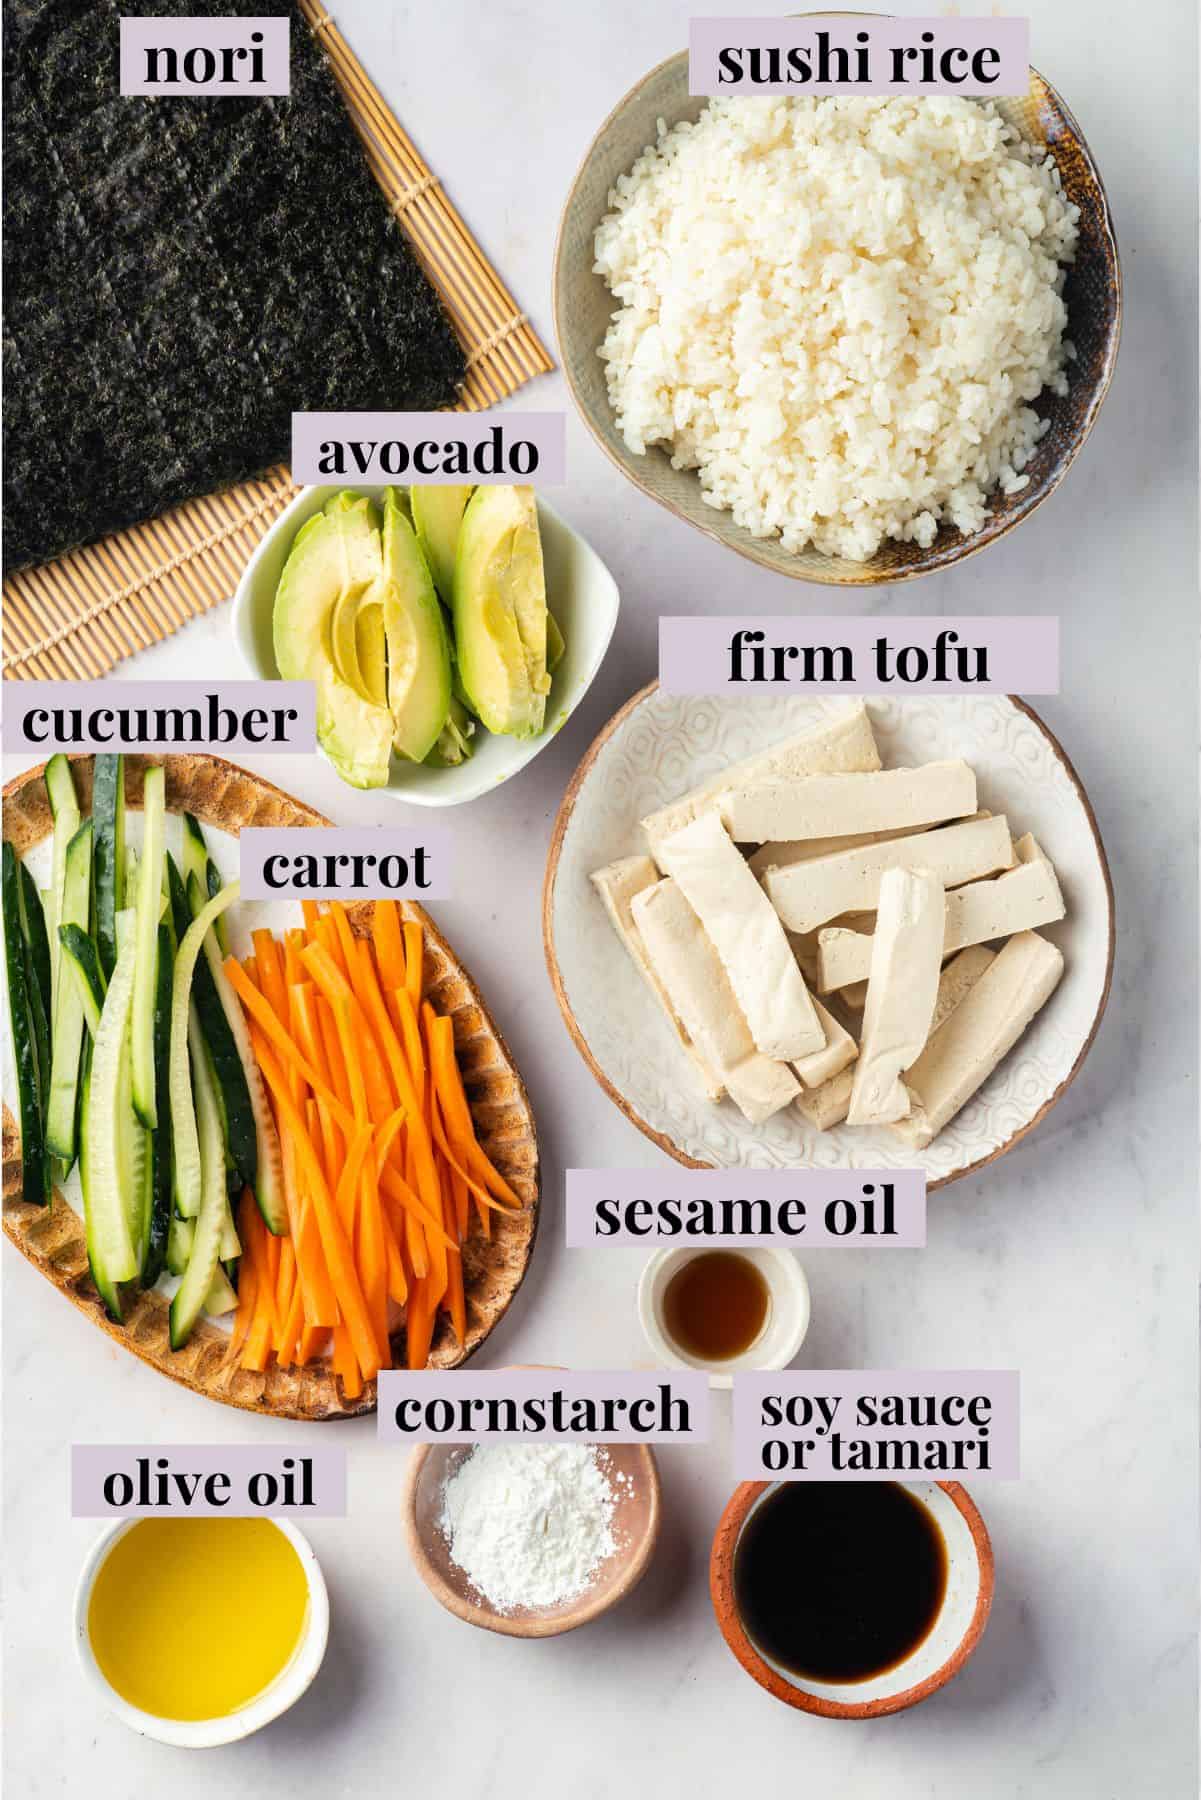
- Sushi rice – This short-grain rice is the foundation of any sushi roll. Sushi rice becomes sticky when cooked, making it easier to roll and hold its shape. You really can’t use long-grain rice here!
- Water – For cooking the rice.
- Rice vinegar – Be sure to use unseasoned rice vinegar, which isn’t sweetened. (We’re adding our own sugar to control the sweetness of the sushi rice.)
- Sugar
- Salt
Crispy Tofu:
- Firm tofu – Use a tofu press on the firm tofu before getting started. Learn more: How To Cook Tofu 101 + Best Tips on Making the Most Delicious Tofu
- Soy sauce or tamari – Using tamari will make this vegan sushi gluten-free.
- Sesame oil – For a flavorful marinade.
- Cornstarch – This helps the exterior get crispy when cooked.
- Olive oil
Sushi Filling and Wrap:
- Avocado – To prevent browning, eat rolls with avocado immediately.
- Cucumber – I recommend scooping out the seeds.
- Carrot
- Nori – AKA the seaweed wrapper .
Optional Garnishes:
- Soy sauce
- Sesame seeds – A combination of white and black looks nice!
How to Make Vegan Sushi
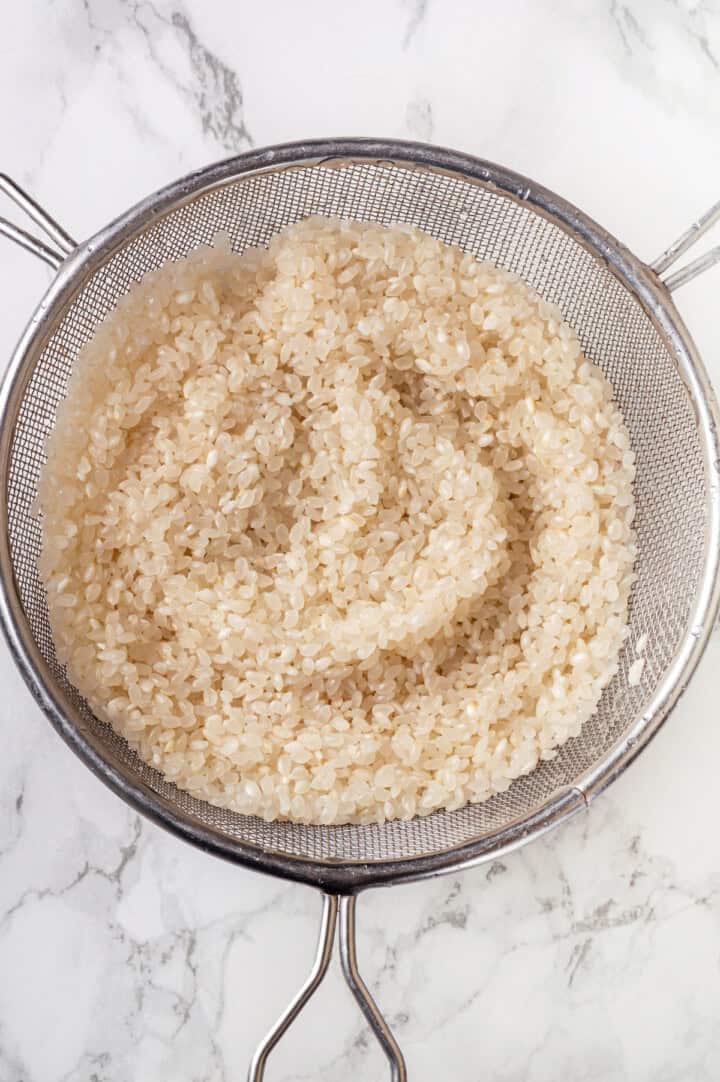
Rinse rice until water is clear.
- Prepare the sushi rice. Rinse the rice until the water runs clear. Add it to the Instant Pot with a cup of water. Close the lid and set the valve to “Sealing”. Select the Pressure Cook (Manual) function on high pressure and set the timer for 5 minutes, then allow the pressure to naturally release for 10 minutes. Turn the valve to “Venting” to release any remaining pressure.
- Season the rice . Whisk the rice vinegar, sugar, and salt until the sugar and salt are dissolved. Fold the mixture into the cooked rice, then transfer the rice to a bowl, lay a damp cloth on top, and let the rice cool.
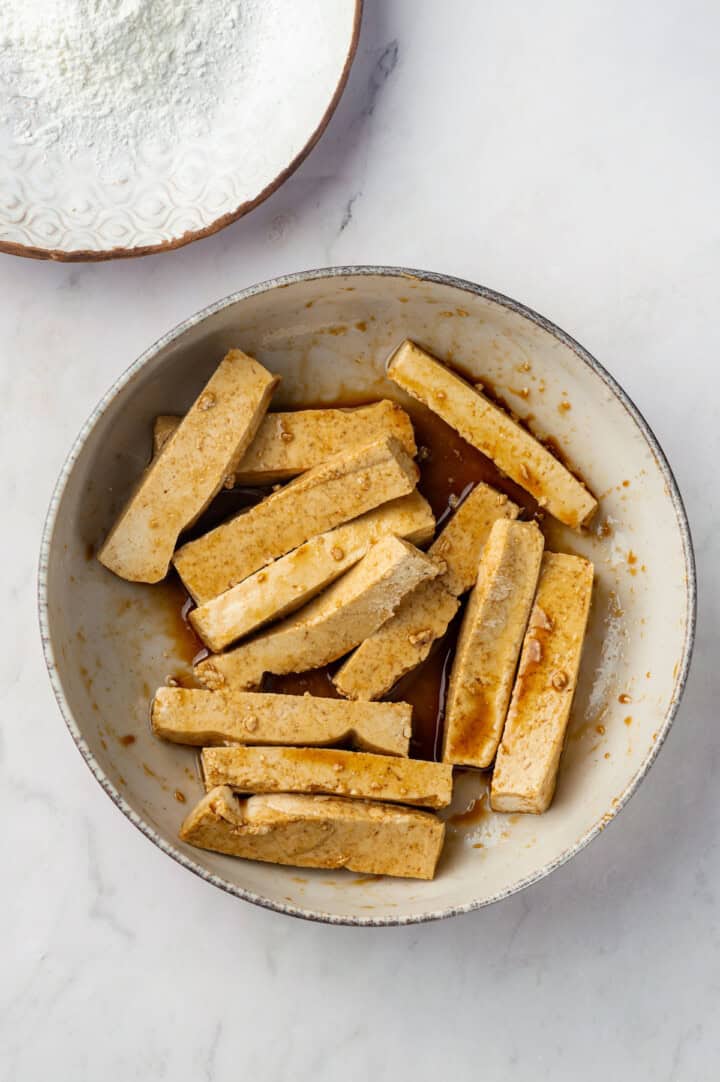
Marinate tofu in soy sauce and sesame oil.
- Season and coat the tofu. Gently coat the tofu strips in soy sauce and sesame oil. Marinate for 5 minutes, then roll the tofu in cornstarch.
- Cook the tofu . Heat the oil in a pan over medium-high heat and cook the tofu strips until they’re crispy on all sides.
Assemble sushi roll.
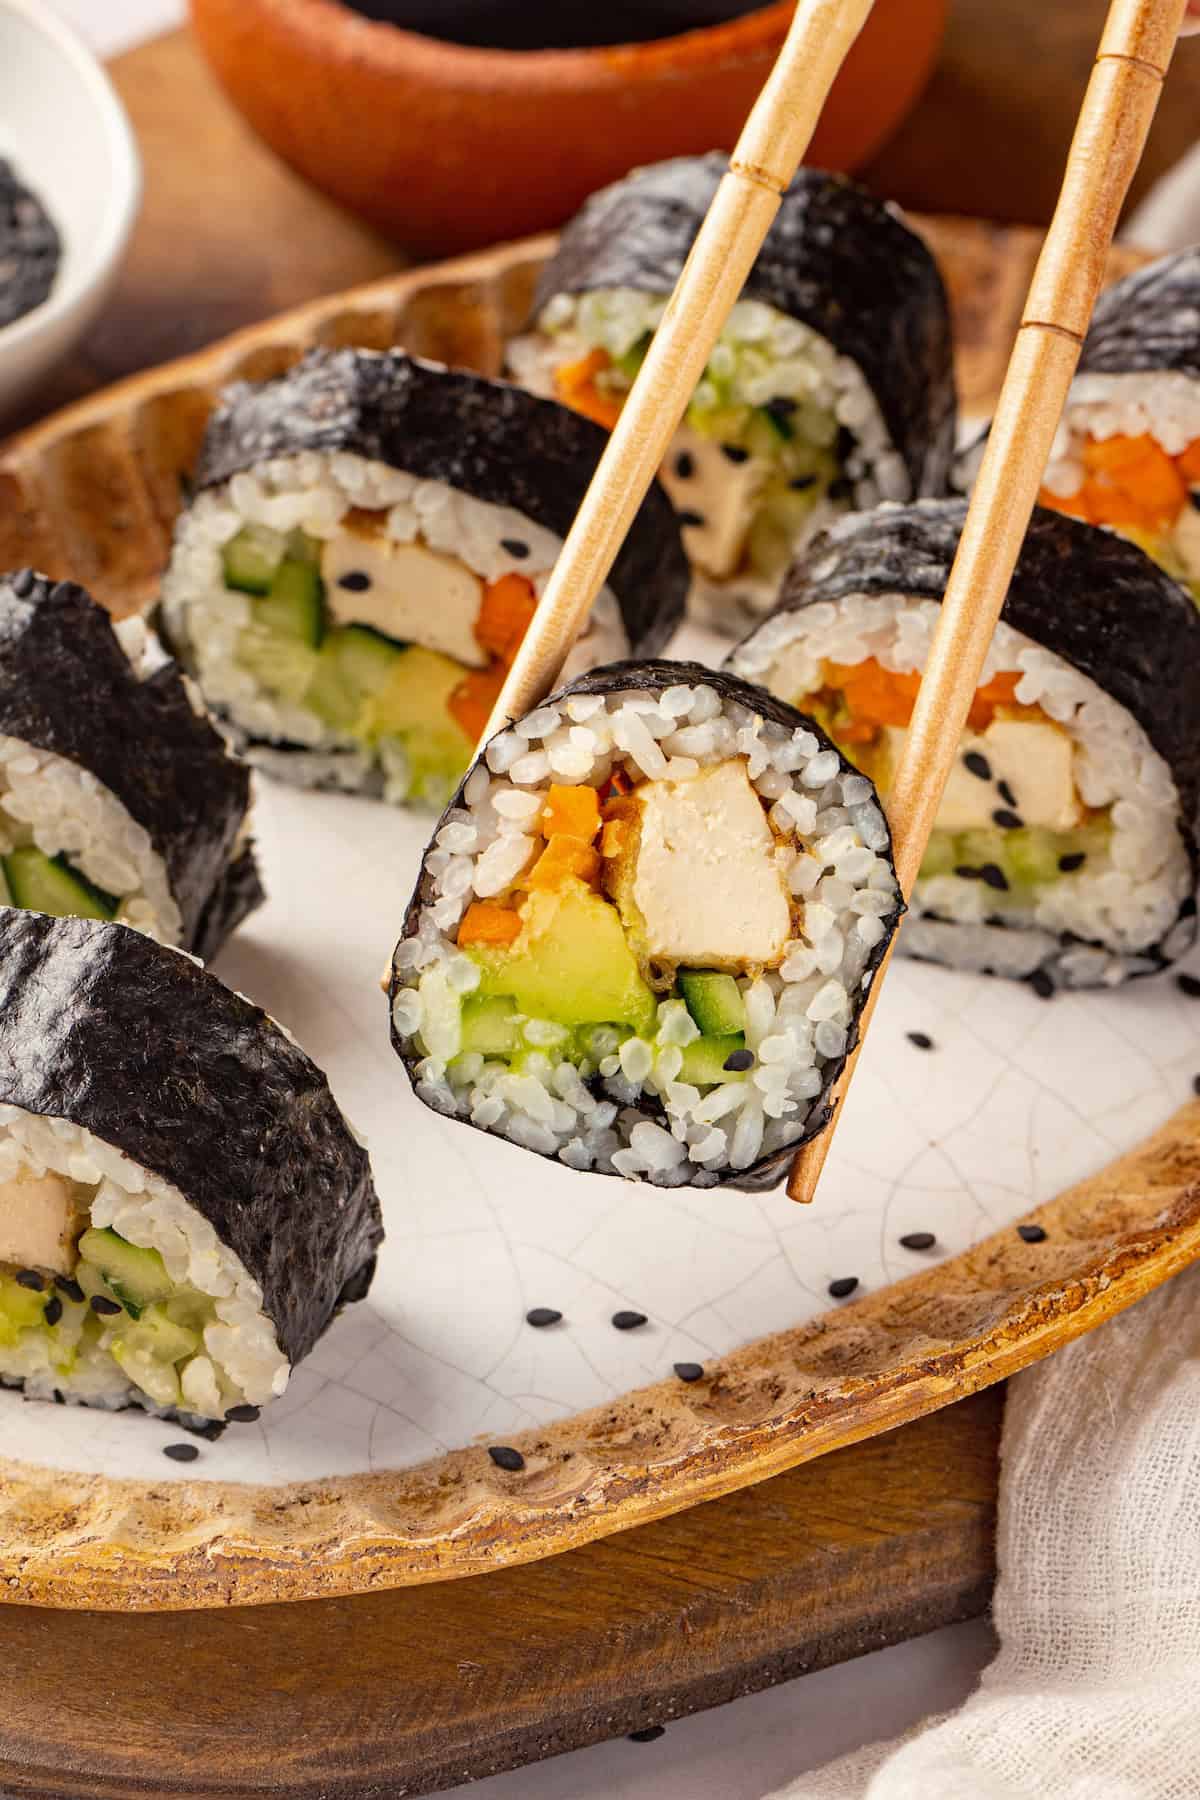
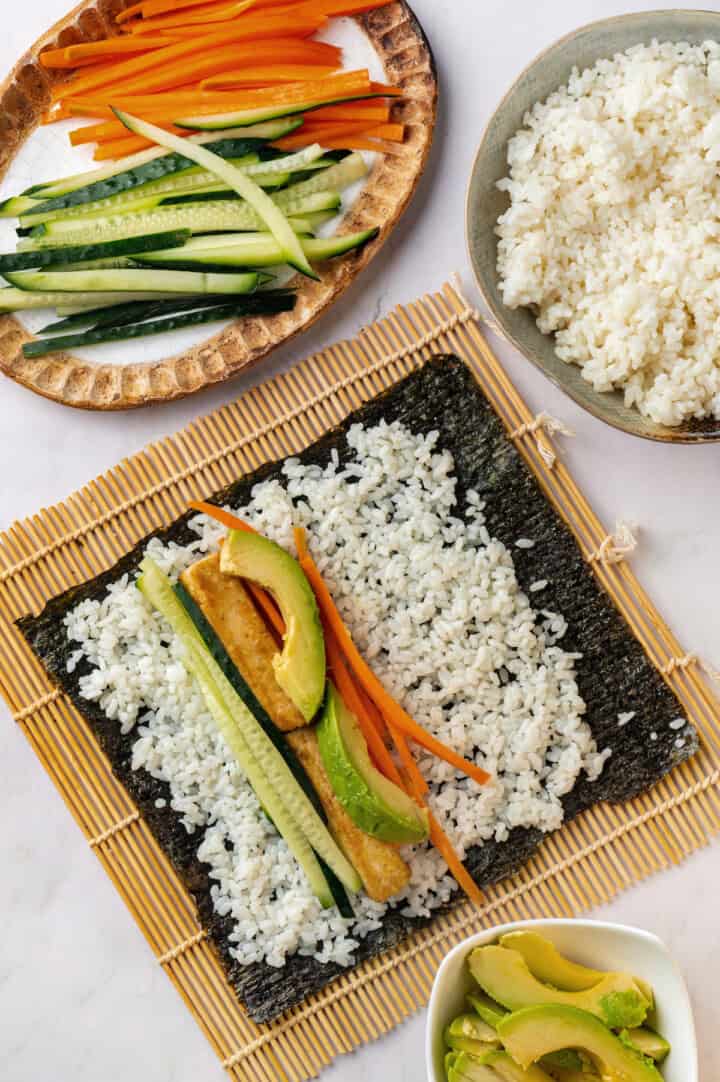
- Assemble the sushi . Spread sushi rice over the nori, leaving a 1-inch border at the top. Add avocado, cucumber, carrot, and tofu in the center of the rice, then roll from the bottom up. Moisten the edge of the nori with water to seal the roll.
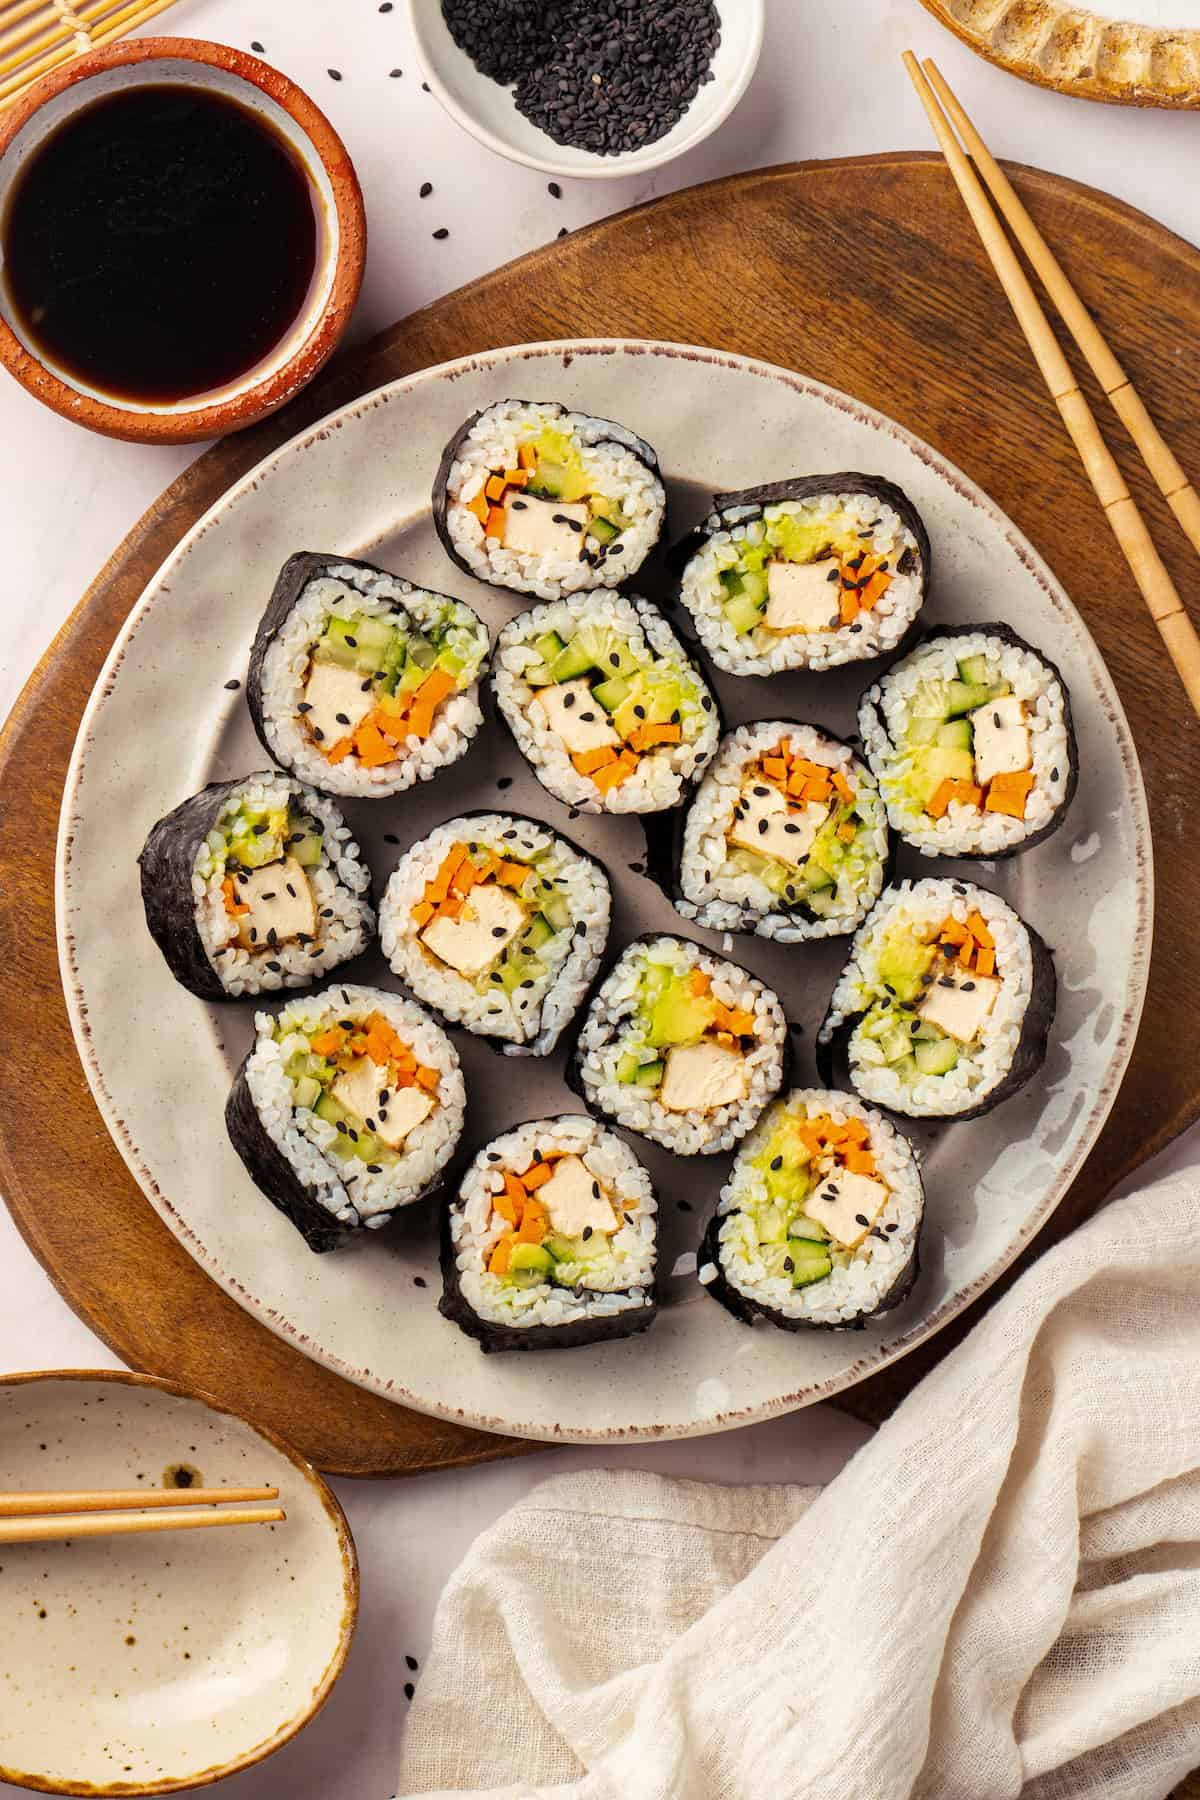
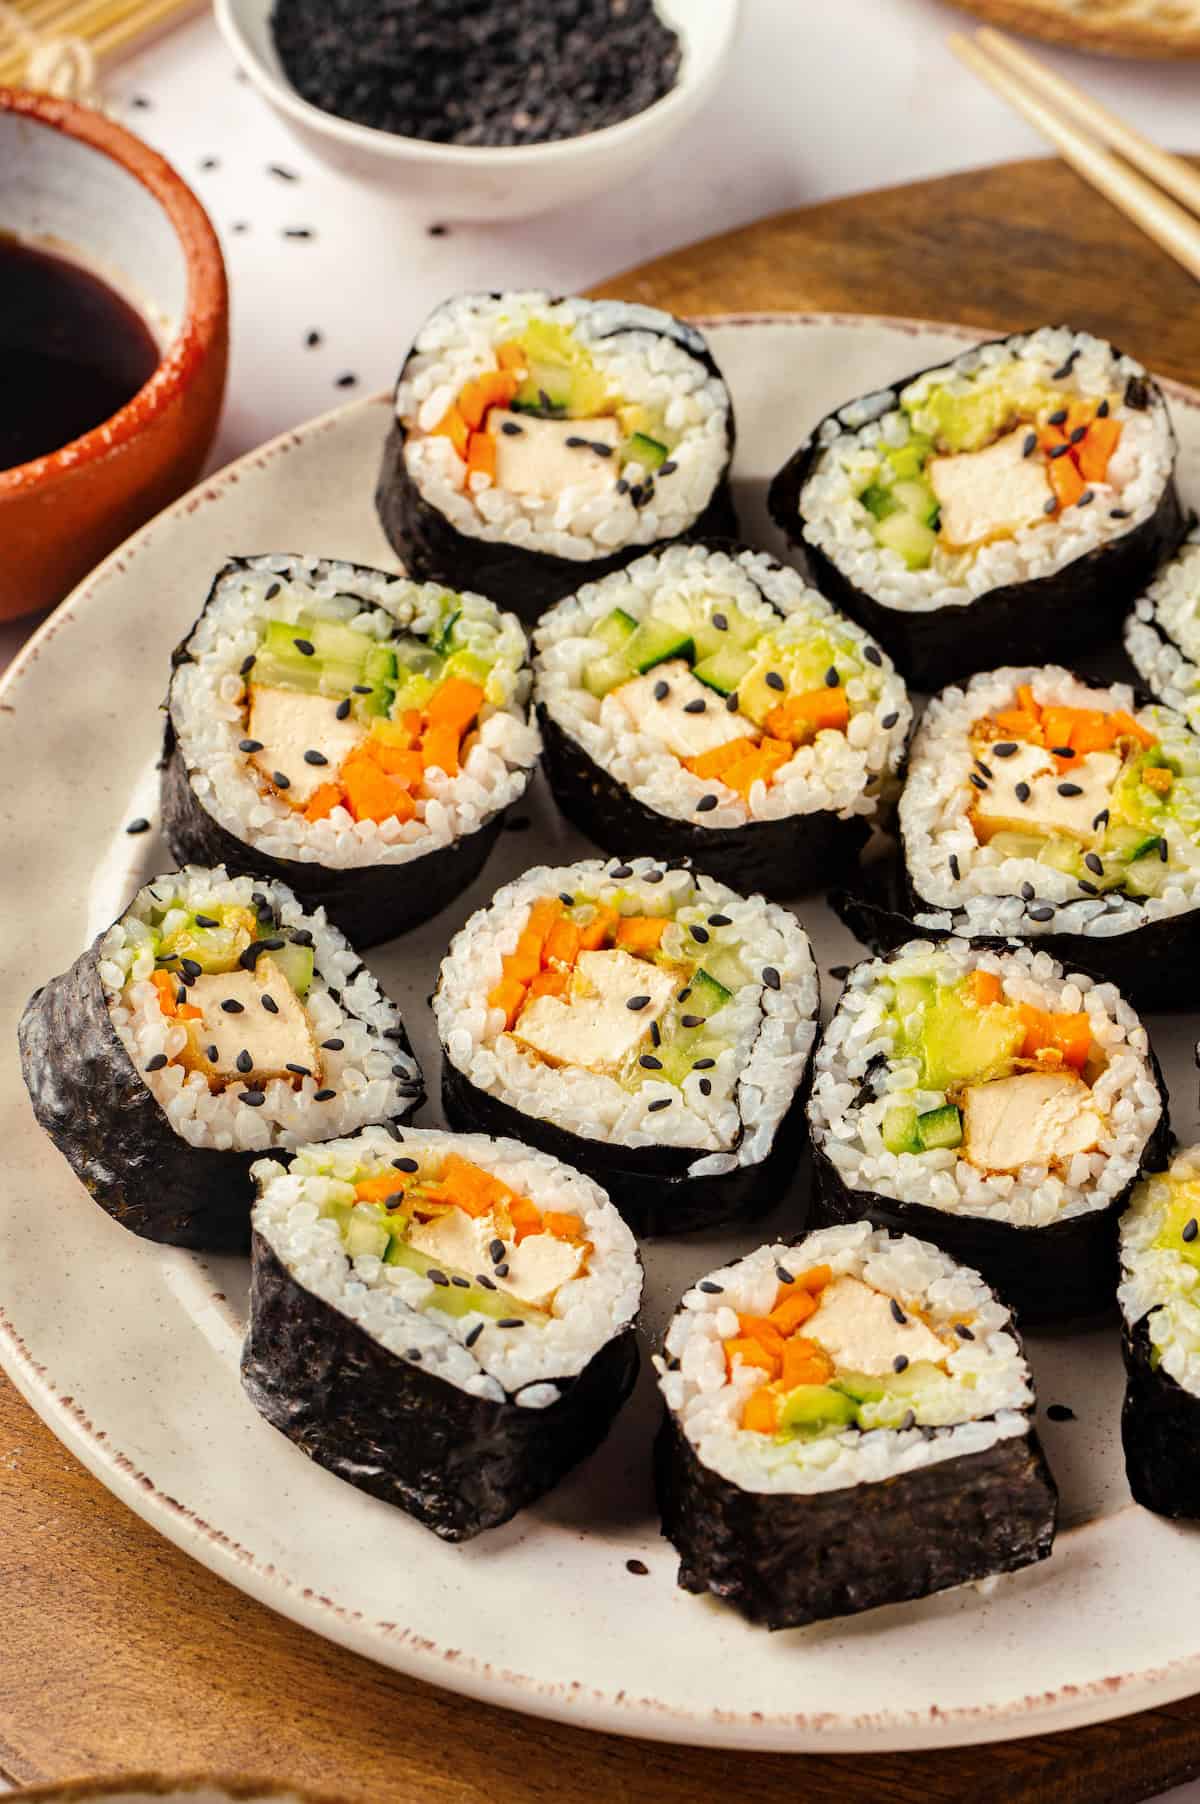
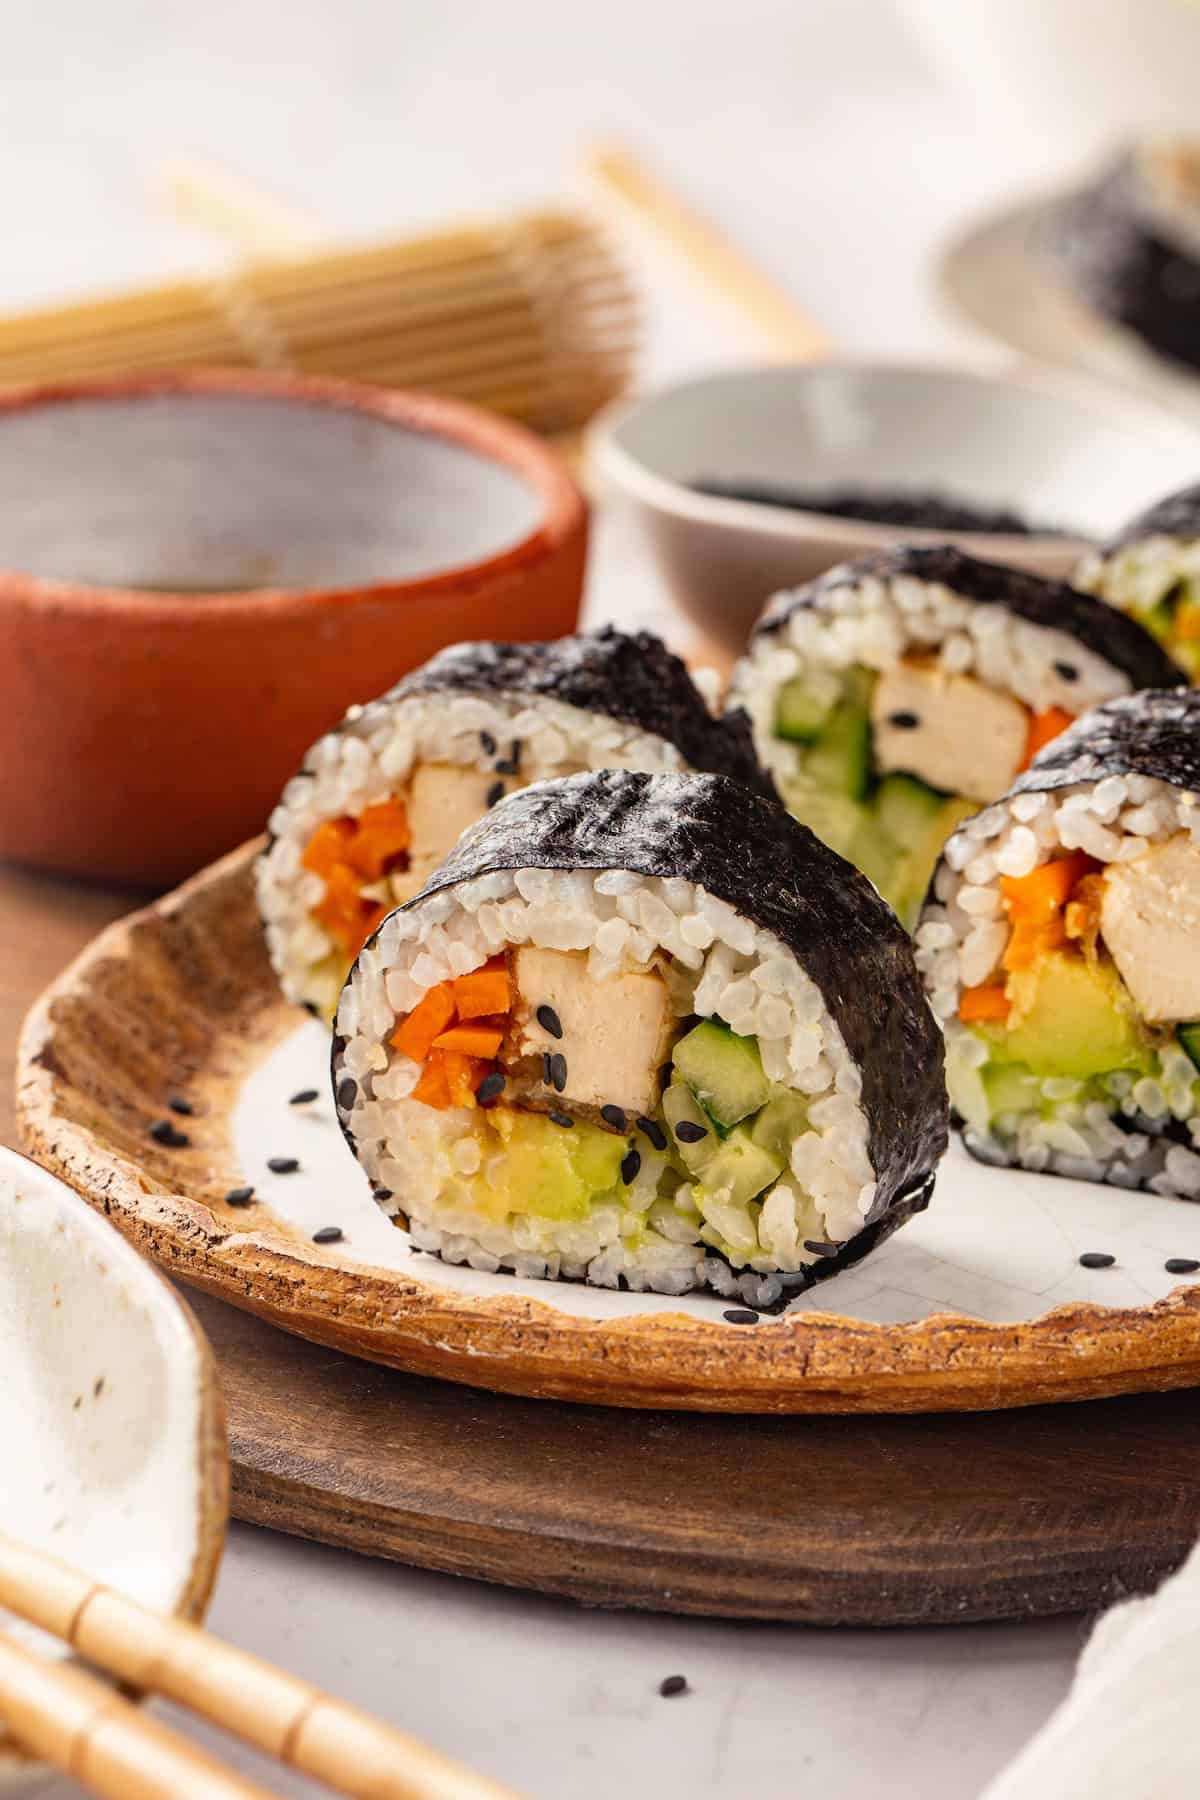
- Slice and serve . Use a sharp knife to slice the sushi roll and garnish as desired.
Tips for Success
- Roll tightly . To prevent the sushi from falling apart, it’s essential to roll it tightly. Use a bamboo mat or your hands to press and shape the roll as you go. There’s really no such thing as rolling it too tightly!
- Use a sharp knife . A dull knife will crush the roll instead of slicing through it cleanly. You don’t want flat vegan sushi!
- Don’t overstuff . It can be tempting to add as many ingredients as possible, but overstuffing the roll can make it difficult to wrap and eat.
- Try other garnishes . Pickled ginger and wasabi are two classics!
More Vegan Sushi Filling Ideas
Add these alone or in combination with other filling ingredients.
- Pickled beets . This adds a beautiful colour to your vegan sushi!
- Roasted sweet potato . I love vegan sushi filled with sweet potato tempura, but making a batch of tempura is a lot of work just for sushi. Roasted sweet potato is a great alternative! Cut it into strips rather than cubes.
- Mushrooms . Sautéed shiitake mushrooms are a meaty filling for vegetarian sushi.
- Asparagus . Steam the asparagus and lay a spear or two over the rice before rolling.
- Vegan fish . Make these vegan fish sticks and use them as a sushi filling.
How to Store
Vegan sushi can be stored in the refrigerator for 3 to 4 days. Wrap the rolls tightly in plastic wrap or store them in an airtight container. (Note that if you’re making sushi for meal prep, it’s probably best to avoid avocado to keep it from going brown.)
More Asian-Inspired Recipes
- Vegan Katsu Curry
- Vegan Dumplings With Dipping Sauce
- Chow Fun Noodles
- Tofu and Veggie Stir Fry in Sweet Ginger Sauce
- Vegan Pad Thai
Ingredients
Sushi Rice:
- 1 cup sushi rice
- 1 cup water
- 1 tablespoon rice vinegar
- ½ tablespoon sugar
- ½ teaspoon salt
Crispy Tofu:
- 1 block firm tofu , ( 14 ounces/ 340 g), pressed and cut into strips
- 2 tablespoons soy sauce , or tamari
- 1 tablespoon sesame oil
- 3 tablespoons cornstarch
- 2 tablespoon olive oil
Sushi Filling and Wrap:
- 1 avocado , sliced
- 1 small cucumber , julienned
- 1 medium carrot , julienned
- 4 nori sheets
Optional Garnishes:
- soy sauce
- sesame seeds
Instructions
Prepare the sushi rice:
- Rinse the sushi rice thoroughly under cold water until the water runs clear.
- Add the rice to the Instant Pot along with 1 cup of water. Ensure the rice is evenly spread out at the bottom.
- Close the Instant Pot lid and set the valve to “Sealing”. Select the Pressure Cook (Manual) function on high pressure and set the timer for 5 minutes.
- After 5 minutes of cooking, allow the pressure to naturally release for 10 minutes. After that, turn the valve to “Venting” to release any remaining pressure.
- While the rice is cooking, in a small bowl, combine the rice vinegar, sugar, and salt. Whisk until the sugar and salt are dissolved.
- Once the rice is done, while it’s still warm, gently mix in the vinegar mixture using a wooden or silicone spatula. Be careful not to mash the rice.
- Transfer to a bowl and let the rice cool to room temperature before using it for sushi. Cover it with a damp cloth to keep it from drying out.
Make the tofu:
- Press the tofu to remove excess water, then cut it into thin strips.
- Toss the tofu strips in soy or tamari sauce, and sesame oil. Let sit for 5 minutes to marinate.
- Roll each tofu piece in cornstarch to coat evenly.
- Heat olive oil in a pan over medium-high heat and fry the tofu strips until crispy and golden on all sides. Set aside.
Assemble the sushi:
- Place a sheet of nori on a bamboo sushi mat (shiny side down).
- Spread an even layer of sushi rice over the nori, leaving about 1 inch (2.5 cm) at the top uncovered. It’s easier to make with slightly wet hands, so the rice won’t stick to your fingers.
- Lay a few slices of avocado, cucumber, carrot, and crispy tofu strips in the center of the rice.
- Carefully roll the sushi from the bottom to the top, using the bamboo mat to keep the roll tight.
- Once rolled, moisten the edge of the nori with some water and seal the roll.
- Using a sharp knife, slice the sushi roll into bite-sized pieces.
- Garnish with sesame seeds, and serve with soy sauce and spicy mayo .
Notes

Vegan Sushi
Ingredients
Sushi Rice:
- 1 cup sushi rice
- 1 cup water
- 1 tablespoon rice vinegar
- ½ tablespoon sugar
- ½ teaspoon salt
Crispy Tofu:
- 1 block firm tofu ( 14 ounces/ 340 g), pressed and cut into strips
- 2 tablespoons soy sauce or tamari
- 1 tablespoon sesame oil
- 3 tablespoons cornstarch
- 2 tablespoon olive oil
Sushi Filling and Wrap:
- 1 avocado sliced
- 1 small cucumber julienned
- 1 medium carrot julienned
- 4 nori sheets
Optional Garnishes:
- soy sauce
- sesame seeds
Instructions
Prepare the sushi rice:
- Rinse the sushi rice thoroughly under cold water until the water runs clear.
- Add the rice to the Instant Pot along with 1 cup of water. Ensure the rice is evenly spread out at the bottom.
- Close the Instant Pot lid and set the valve to “Sealing”. Select the Pressure Cook (Manual) function on high pressure and set the timer for 5 minutes.
- After 5 minutes of cooking, allow the pressure to naturally release for 10 minutes. After that, turn the valve to “Venting” to release any remaining pressure.
- While the rice is cooking, in a small bowl, combine the rice vinegar, sugar, and salt. Whisk until the sugar and salt are dissolved.
- Once the rice is done, while it’s still warm, gently mix in the vinegar mixture using a wooden or silicone spatula. Be careful not to mash the rice.
- Transfer to a bowl and let the rice cool to room temperature before using it for sushi. Cover it with a damp cloth to keep it from drying out.
Make the tofu:
- Press the tofu to remove excess water, then cut it into thin strips.
- Toss the tofu strips in soy or tamari sauce, and sesame oil. Let sit for 5 minutes to marinate.
- Roll each tofu piece in cornstarch to coat evenly.
- Heat olive oil in a pan over medium-high heat and fry the tofu strips until crispy and golden on all sides. Set aside.
Assemble the sushi:
- Place a sheet of nori on a bamboo sushi mat (shiny side down).
- Spread an even layer of sushi rice over the nori, leaving about 1 inch (2.5 cm) at the top uncovered. It’s easier to make with slightly wet hands, so the rice won’t stick to your fingers.
- Lay a few slices of avocado, cucumber, carrot, and crispy tofu strips in the center of the rice.
- Carefully roll the sushi from the bottom to the top, using the bamboo mat to keep the roll tight.
- Once rolled, moisten the edge of the nori with some water and seal the roll.
- Using a sharp knife, slice the sushi roll into bite-sized pieces.
- Garnish with sesame seeds, and serve with soy sauce and spicy mayo .
Notes
Nutrition
Vegan Sushi https://jessicainthekitchen.com/vegan-sushi/ January 2, 2025
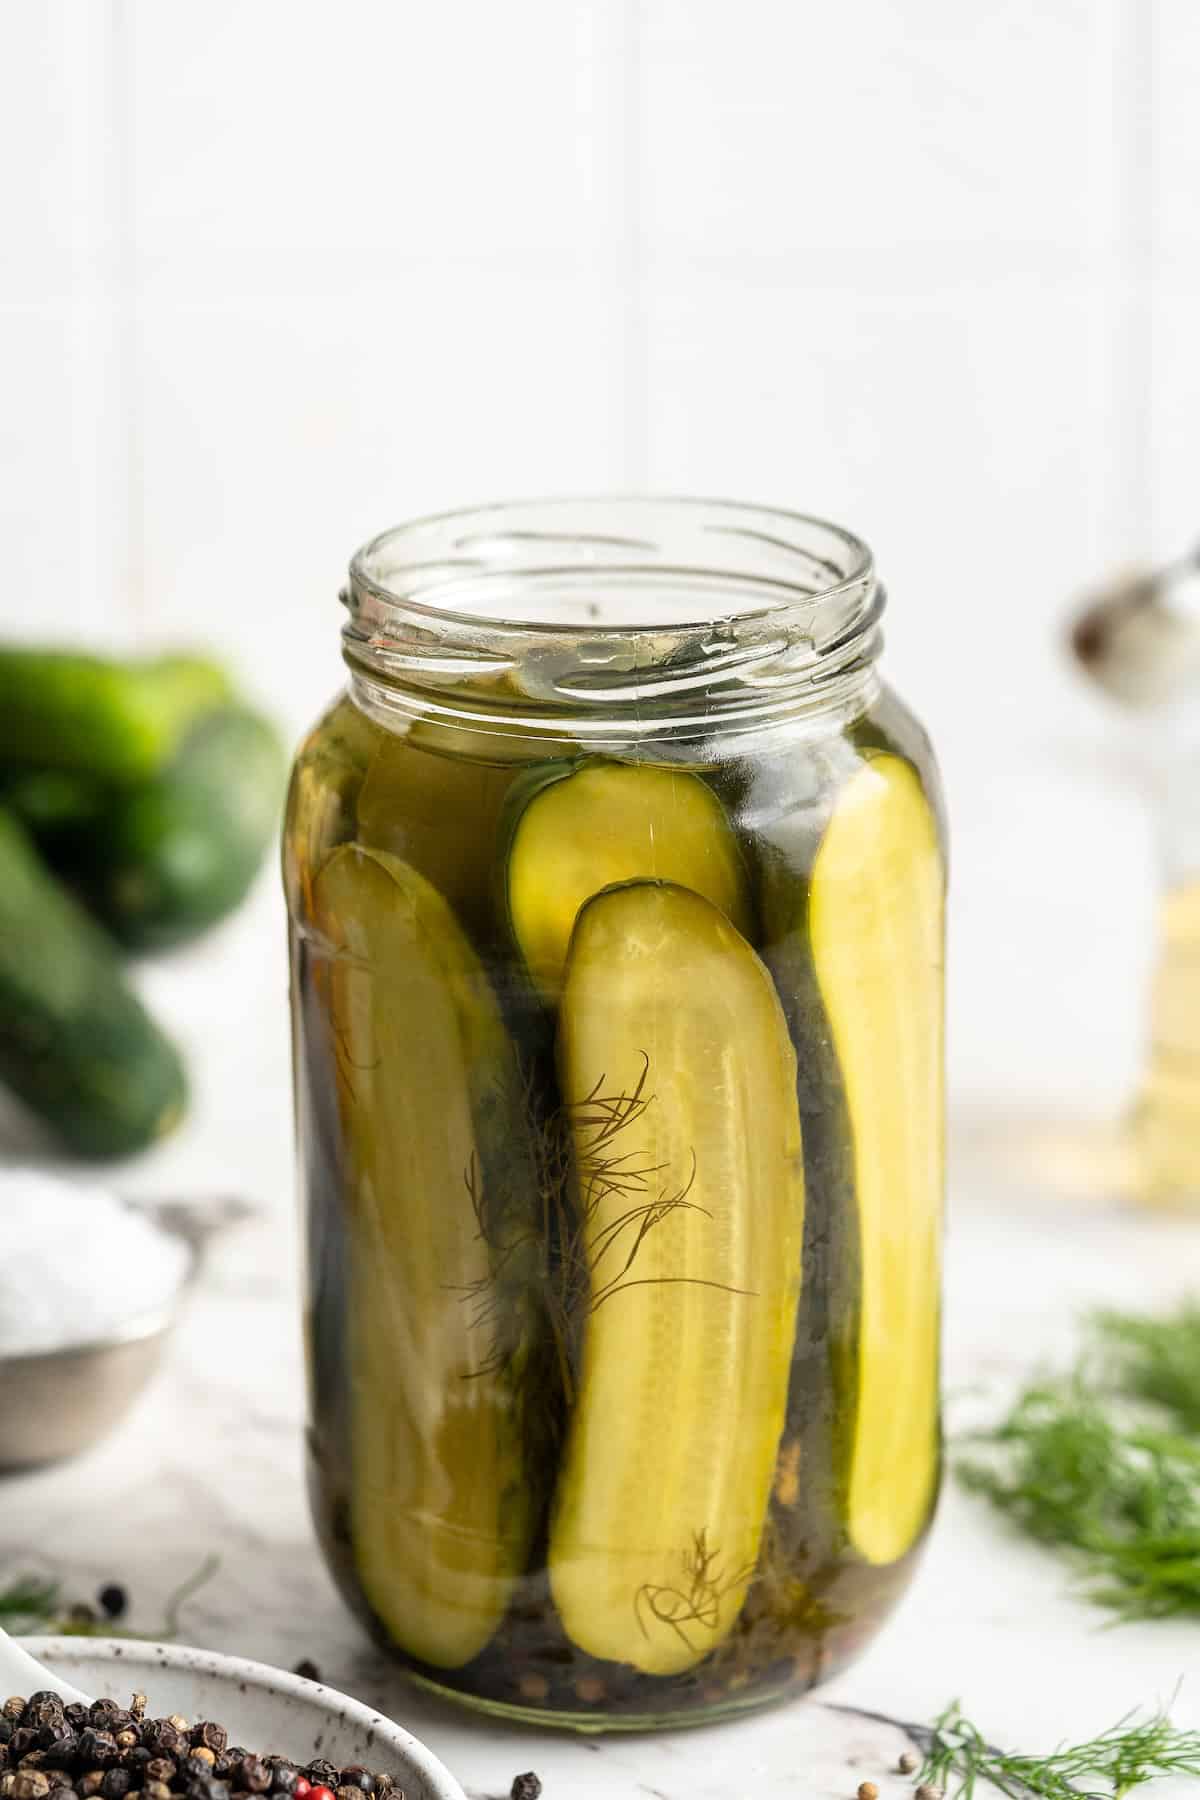
Making your own pickles is easier than you think! I’ll show you how to make pickles at home—no canning needed!
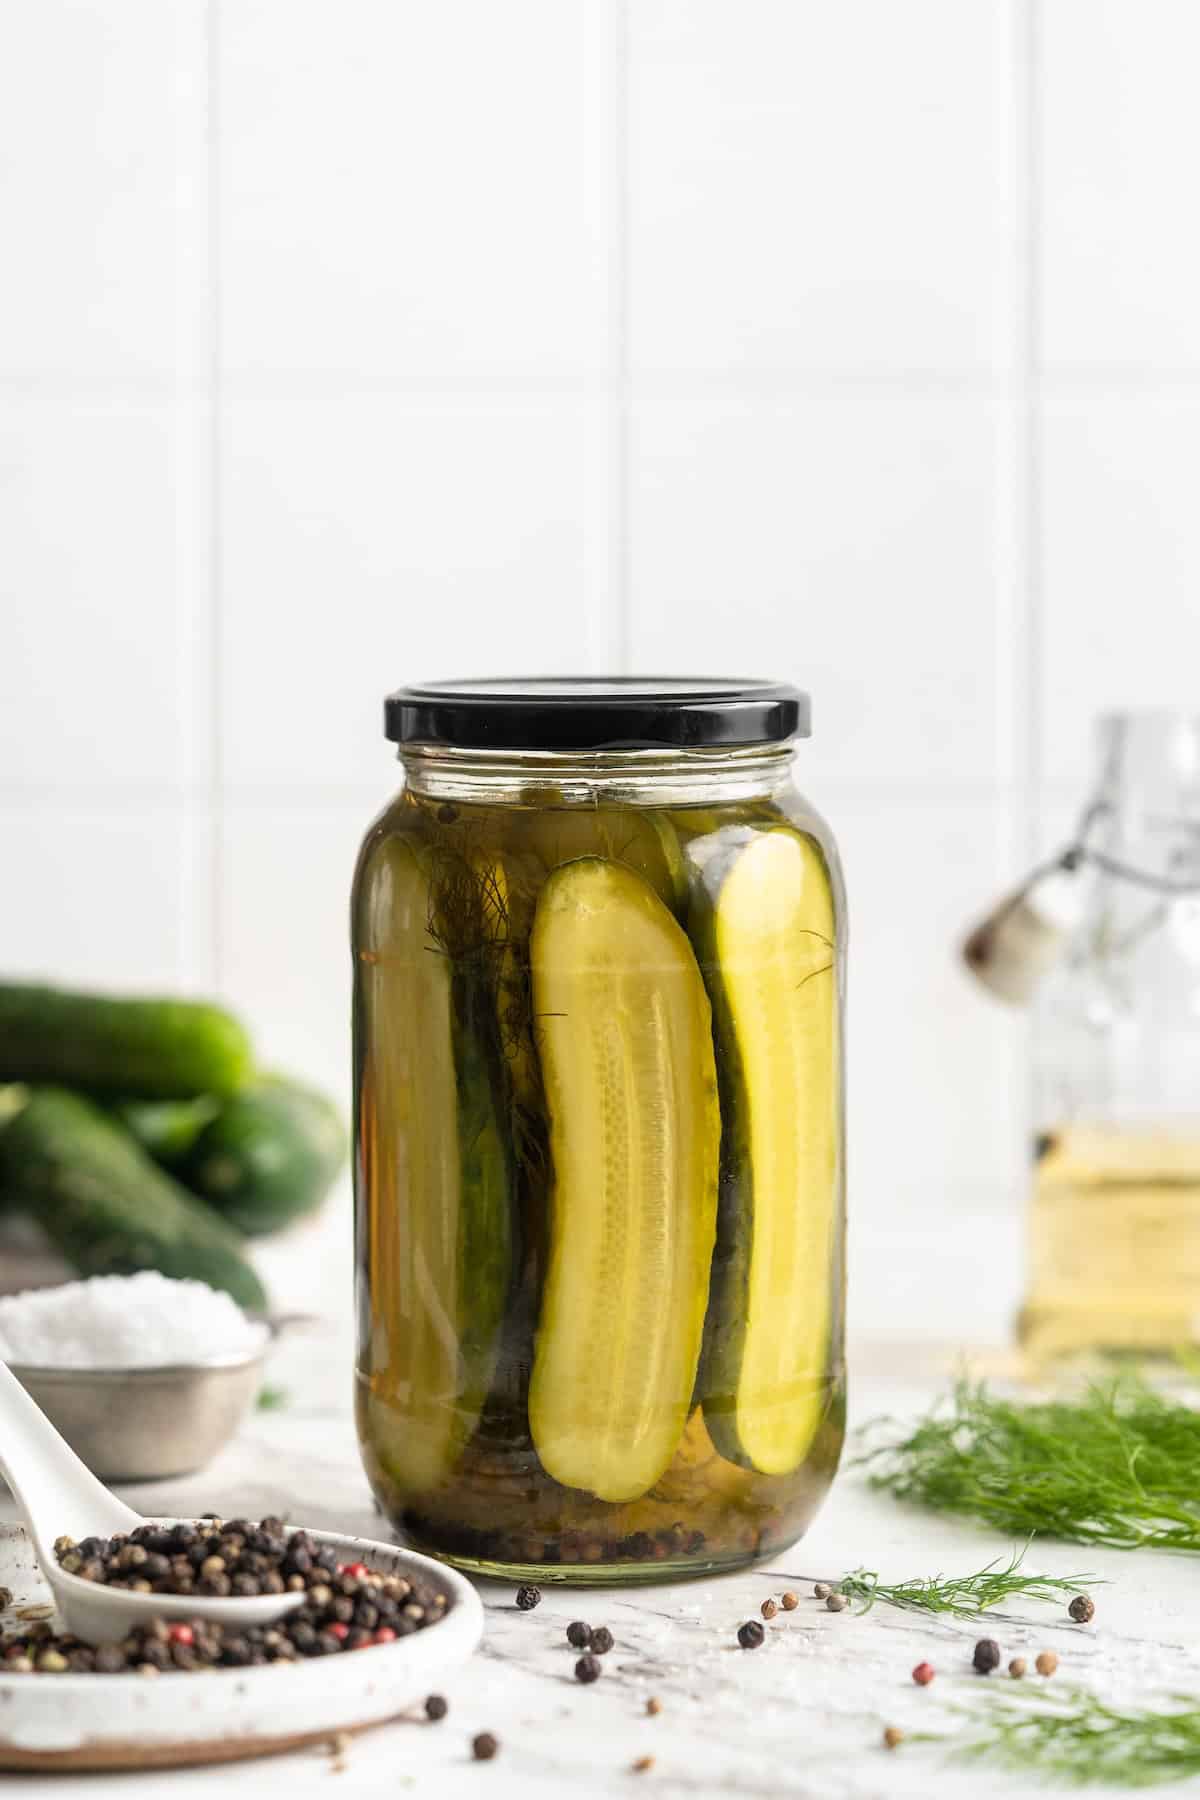
The process of making homemade pickles is surprisingly easy! If you’ve always been intimidated by the canning process, you’ll be glad to know that this is a quick refrigerator recipe, which means you don’t have to fuss with sterilising jars and boiling them. Just mix everything together and the fridge does the rest. Simple!
Why You’ll Love Making Your Own Pickles
- A fun cooking project . If you enjoy the science and process of cooking, you’ll love making these pickles. It’s fun and satisfying to make something you usually buy!
- Control over ingredients . When you make your own pickles, you have complete control over the ingredients. You can choose organic cucumbers, use less salt, or experiment with different types of vinegar and seasonings.
- Fresh and tasty . Friends, believe me when I tell you that these are the most delicious pickles you’ll ever taste—and definitely the freshest! They have fantastic flavour and a satisfying crunch.
Notes on Ingredients
Scroll down to the recipe card to find the ingredient quantities and recipe instructions.
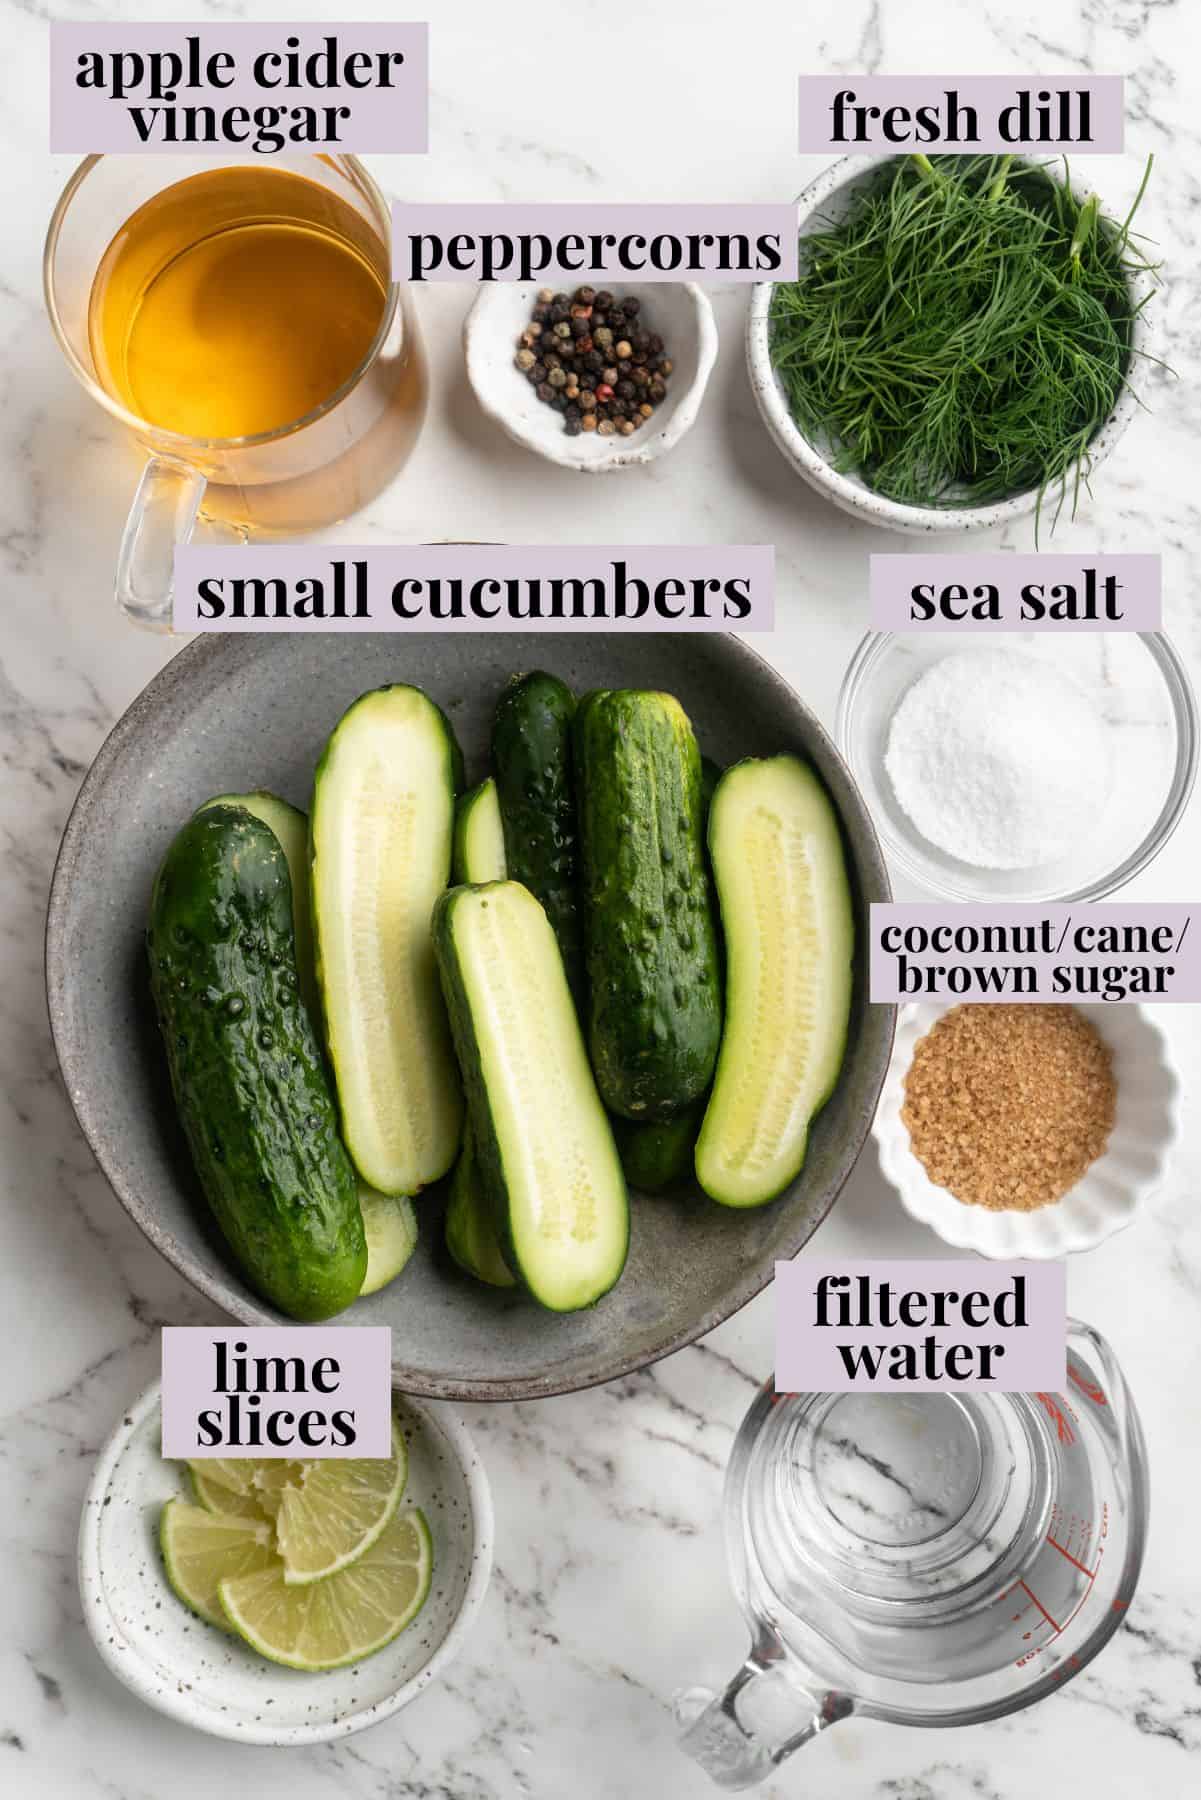
- Cucumbers – Small or mini cucumbers are best, but you can really use any size.
- Apple cider vinegar
- Filtered water
- Sea salt – I like to use a fine sea salt or pickling salt if you happen to have it on hand.
- Sugar – You can use coconut, cane, or brown sugar.
- Lime slices – These are optional.
- Seasonings – Peppercorns, dill, cumin seeds, jalapeño, or any other flavours you want to add to your homemade pickles.
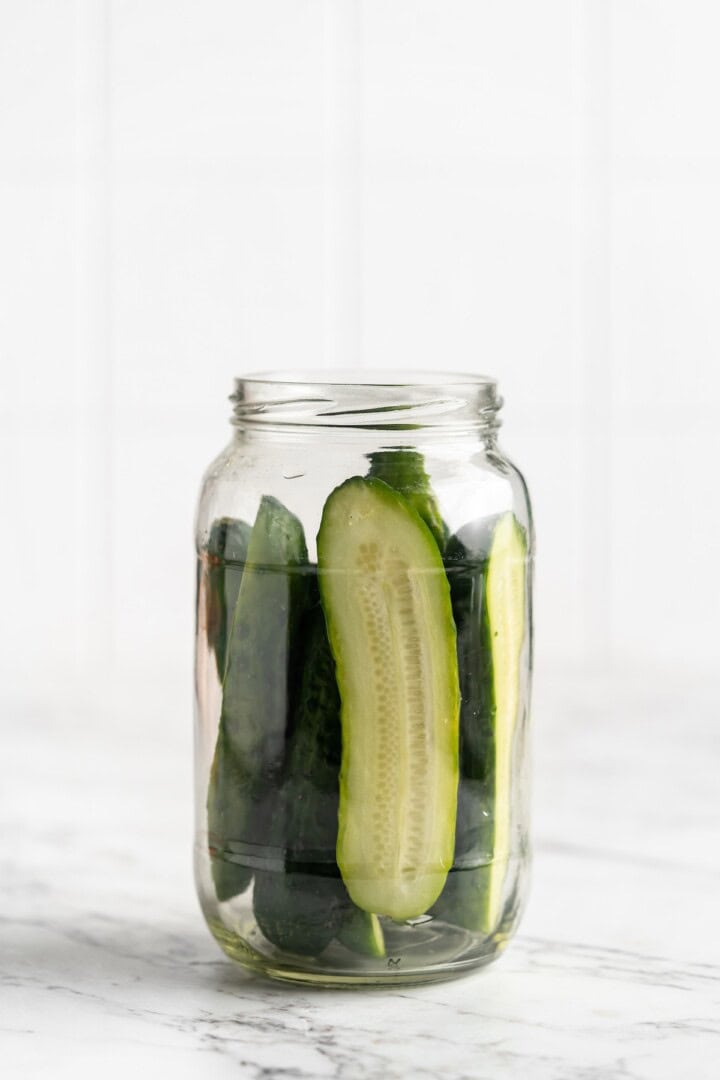
Add prepped cucumbers to the jar.
How to Make Pickles
- Prep . Wash, dry, and slice the pickles. Add them to a clean jar (or two clean jars, if needed). I like to use
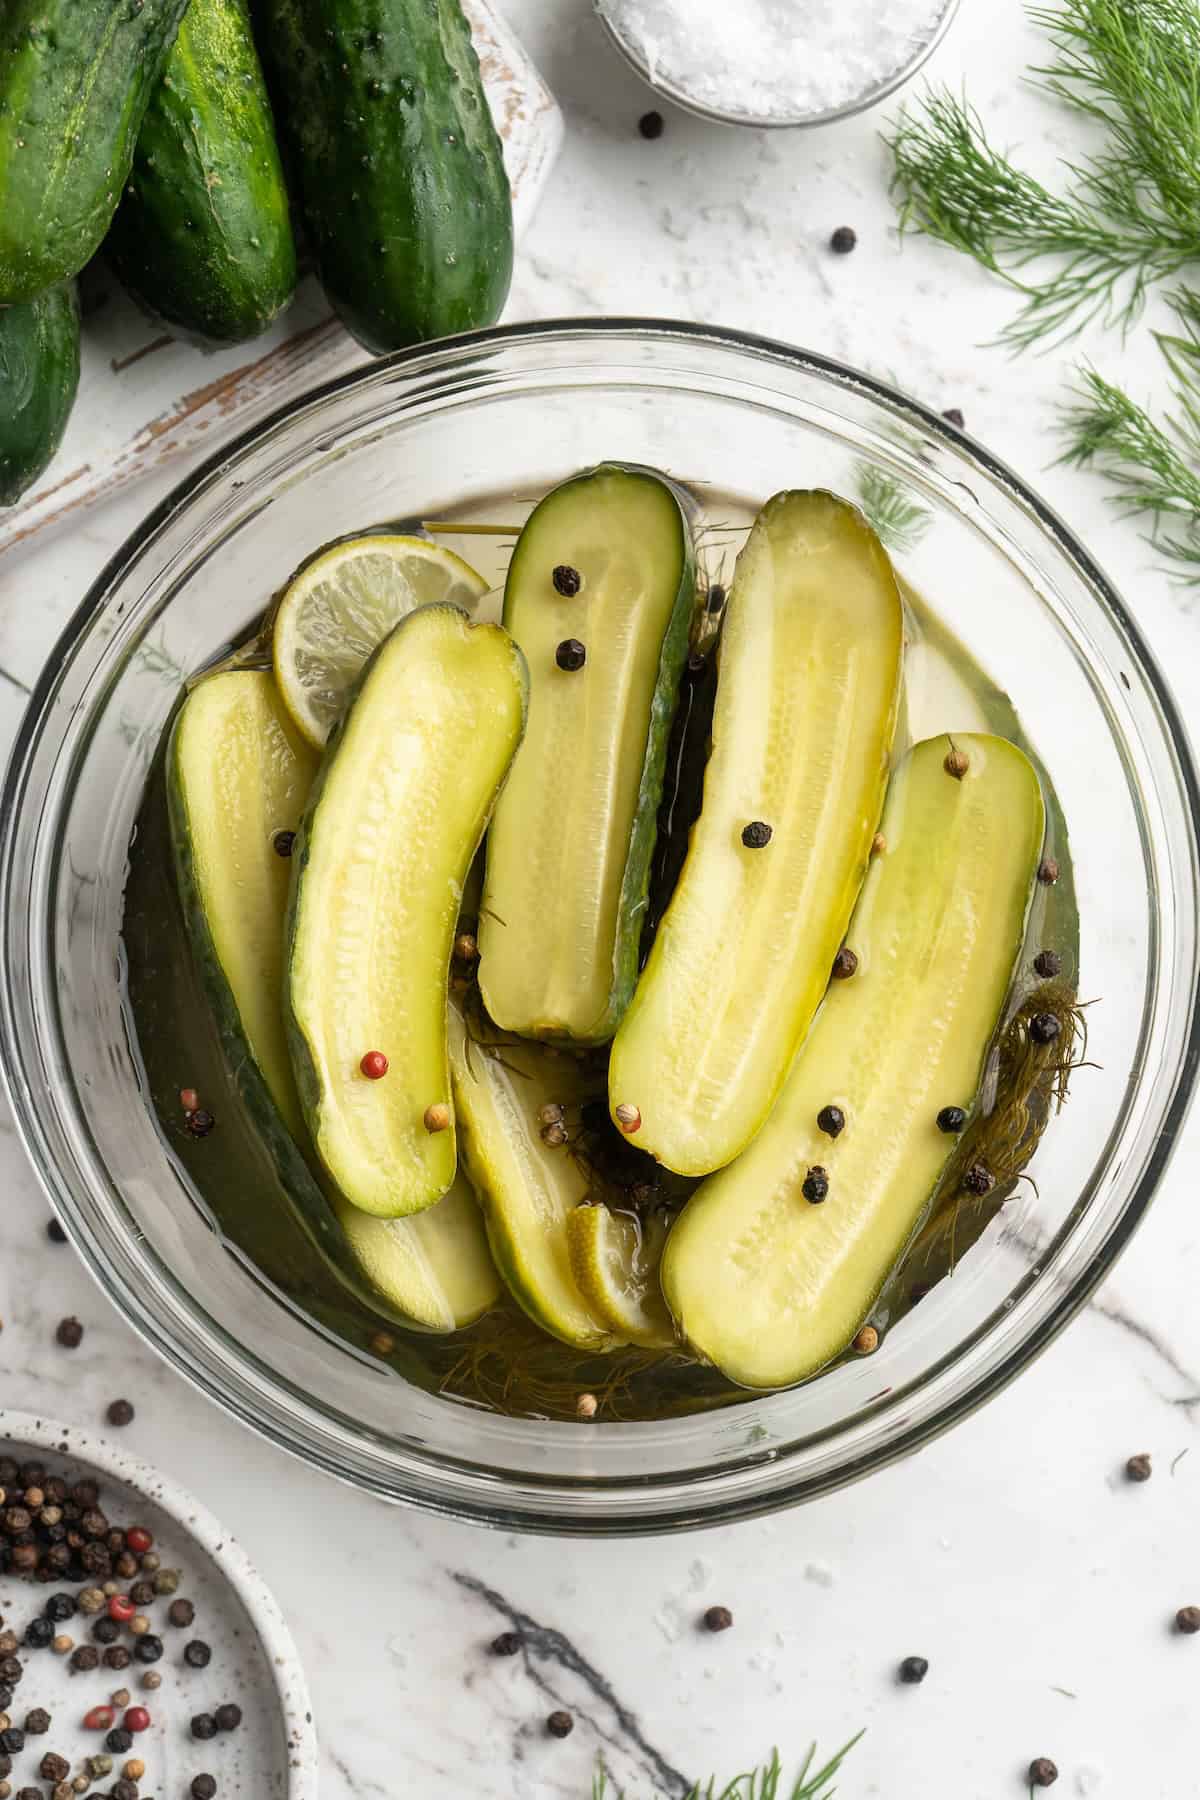
- Make the brine . Combine the vinegar, water, sea salt, sugar, peppercorns, and any seasonings you’re using. Boil for 2 minutes, then remove from heat and cool for 1 minute.
- Add the brine to the jars . Pour the brine into the jar(s), completely covering the cucumbers. Add the lime slices if you’re using them. Screw on the lid and shake gently to combine.
- Cool . Allow the mixture to cool completely to room temperature. At this point, you can serve the pickles or let them sit at room temperature for up to 48 hours more before refrigerating.
Tips and Variations
- Make the recipe in half . If you want a smaller batch of pickles, you can easily cut the recipe in half.
- Use different types of vinegar . While this recipe calls for apple cider vinegar, you can experiment with other types. Rice vinegar, for example, gives the pickles some Asian flair.
- Add in extra spices and herbs . Don’t be afraid to get creative with your seasonings! You can add in things like fresh garlic, mustard seeds, bay leaves, coriander seeds, green onions, etc.
- Experiment with different veggies . Pickling isn’t just limited to cucumbers! You can also try pickling other veggies like carrots, asparagus, green beans, and more.
My Favourite Ways to Use Homemade Pickles
Slice these pickles and add them to this chopped cheese sandwich or my easy grillable veggie burgers . Diced pickles are also a great addition to vegan chickpea tuna salad and tofu egg salad .
How to Store
Store homemade pickles in the refrigerator for up to 2 weeks. Use clean utensils when retrieving pickles from the jar to avoid contamination and maximize their storage life.
More Pickle Recipes
- Quick Pickled Red Onions
- Quick Pickled Cabbage (+ How To Pickle Any Vegetable)
- Quick Pickled Radishes
- Carrot Lox

Ingredients
- 4 small cucumbers , or several mini cucumbers or 2 medium to large cucumbers
- 1 cup apple cider vinegar
- 1 cup filtered water
- 2 teaspoons sea salt
- 1 tablespoon coconut sugar , or cane or brown sugar
- Lime slices , optional
- Handful of peppercorns + fresh dill + any additional seasonings, cumin seeds, jalapeño etc.
Instructions
- Wash, dry, and slice the pickles. Add them tightly packed to a mason jar (you might need two jars). Set aside for now.
- In a pot, add the vinegar, water, sea salt, sugar and peppercorns. If using any other additional seasonings, add them now too. Stir together. Bring to a boil for 2 minutes.
- Remove from heat and let cool for 1 minute.
- Pour the liquid into the mason jar(s) and completely cover the cucumbers. Add in the lime slices (optional), and shake slightly to mix everything together.
- Allow the mixture to cool completely to room temperature. You can serve immediately once cooled, but if you let it sit and continue to pickle for 24-48 hours, the flavours meld incredibly. I tried mine 48 hours later and they were perfect.
- They will last several weeks in your fridge in a mason jar that has the cover tightly screwed on.
