This vegan pumpkin pie tastes and bakes JUST like the classic – you’re going to LOVE this! Made with only 9 ingredients, it’s rich, smooth in texture, and filled with flavor! It also just so happens to be gluten-free!
After making this vegan pumpkin pie, friends, I am HOOKED on pie.
I always thought making pies was hard, but after making this super simple vegan pumpkin pie, I’ve learnt that it really isn’t! Speaking of which, one bite and you’ll be hooked, too. This pie is the perfect pie for Thanksgiving – that is a fact. The Mr., who grew up eating pumpkin pie at Thanksgiving, verified that 100% for me.
The three slices I had also verified this fact. Oops. But, when you’ve got a smooth pumpkin pie made with cinnamon, ginger, and rich pumpkin puree sitting in front of you, all sliced up and ready to go, it’s impossible not to sample a slice (or three!). Get in on the goodness, and you’ll see what I mean!
Also, if you’re in the mood to make some more easy pumpkin desserts, try these pumpkin sugar cookies , these pumpkin cupcakes , or this pumpkin sheet cake !
Why You’ll Love This Vegan Pumpkin Pie
Pumpkin pie is a classic Thanksgiving dessert, but you can make it all year-round if you like! Here’s why I think you’ll be hooked on it, just like me:
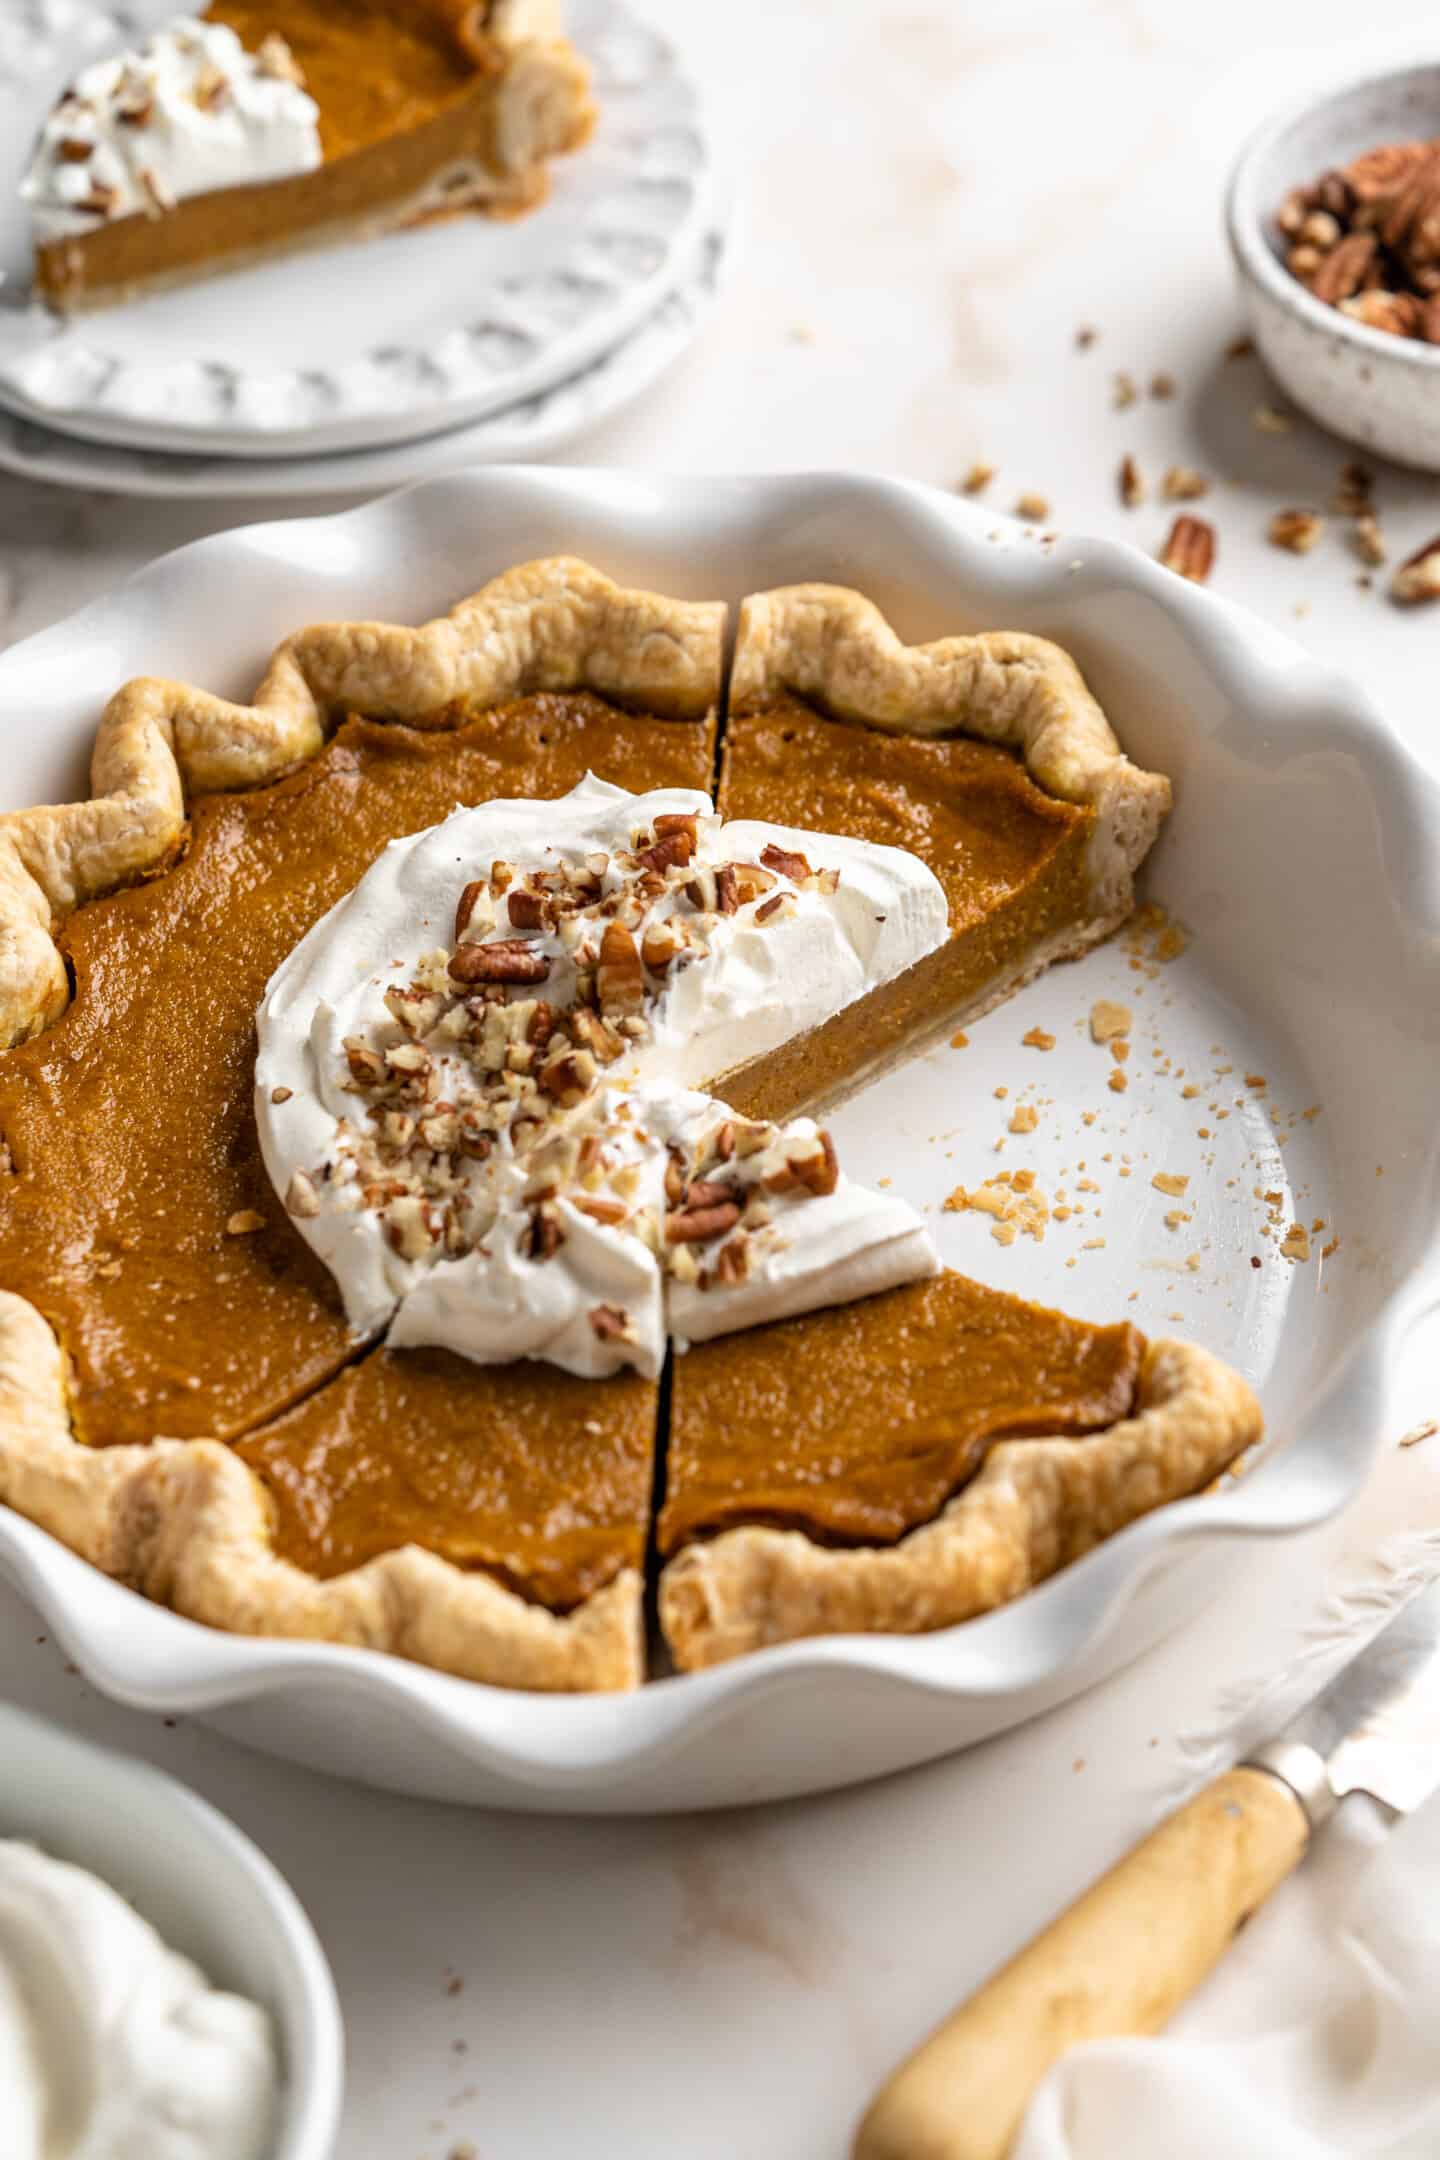
- Perfectly smooth. This pumpkin pie filling is so creamy and moist. Pair that with a flaky gluten-free crust, and every bite is a dream!
- Sweet and comforting. This pumpkin pie is filled with sugary maple syrup, sweet brown sugar, rich pumpkin puree, and cozy cinnamon and ginger. What a comforting combination!
- Quick and easy. This pie can be prepped in 15 minutes and baked in 1 hour! That’s all there is to it.
Notes on Ingredients
These are the ingredients you’ll need to round up to make a vegan gluten-free pumpkin pie. You can find the exact amounts for each in the recipe card below, along with the directions!
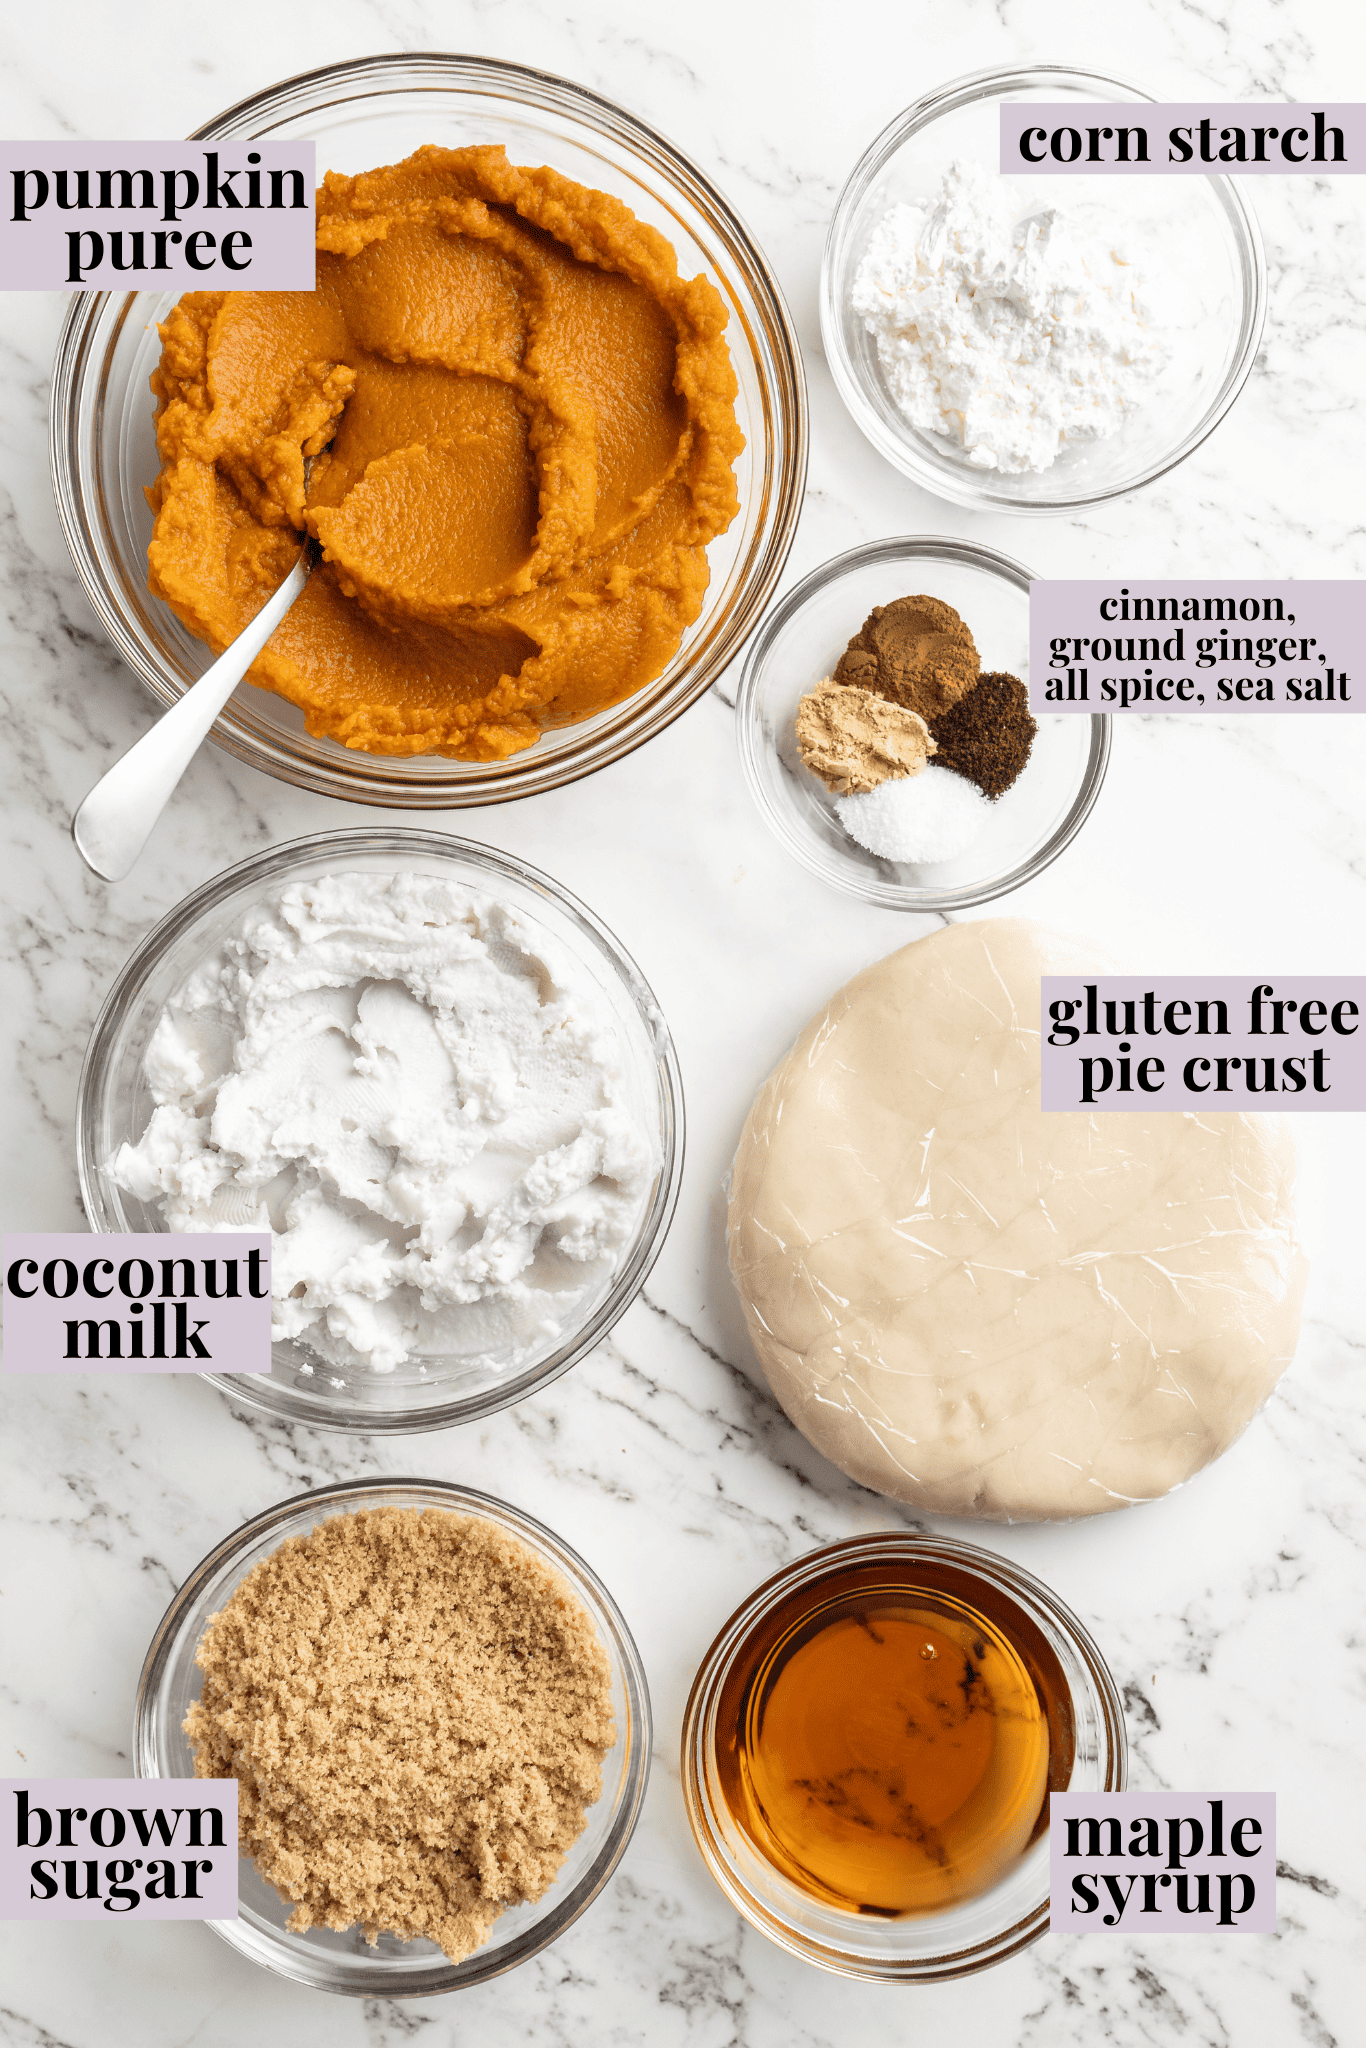
- Pumpkin – You can use fresh pumpkin pie puree or canned, up to you!
- Coconut Milk – You want to ensure you’re using the one from the can since it’s nice and thick and will yield that beautiful silkiness that you’re looking for!
- Spices – Although I’ve listed the cinnamon, ginger, and all spice separately, you can substitute 1 ½ teaspoons pumpkin pie spice instead! If you like your pie extra spiced, feel free to use 2 teaspoons.
- Salt – I like to use sea salt in this recipe.
- Maple Syrup – Pure maple syrup is the way to go!
- Brown Sugar – Cane sugar and coconut sugar can also be used.
- Cornstarch – This is crucial because it is the perfect thickener and it binds the pie ingredients together, creating a smooth texture. I have not tested arrow starch, but you can test it if you’d prefer to use that.
- Pie Crust – You don’t have to use mine if you’re not gluten-free! You can also substitute the gluten-free flour in mine for regular flour for a regular vegan pie crust .
How to Make Vegan Pumpkin Pie
This vegan pumpkin pie is made in just a few simple steps! Here’s how it all happens:
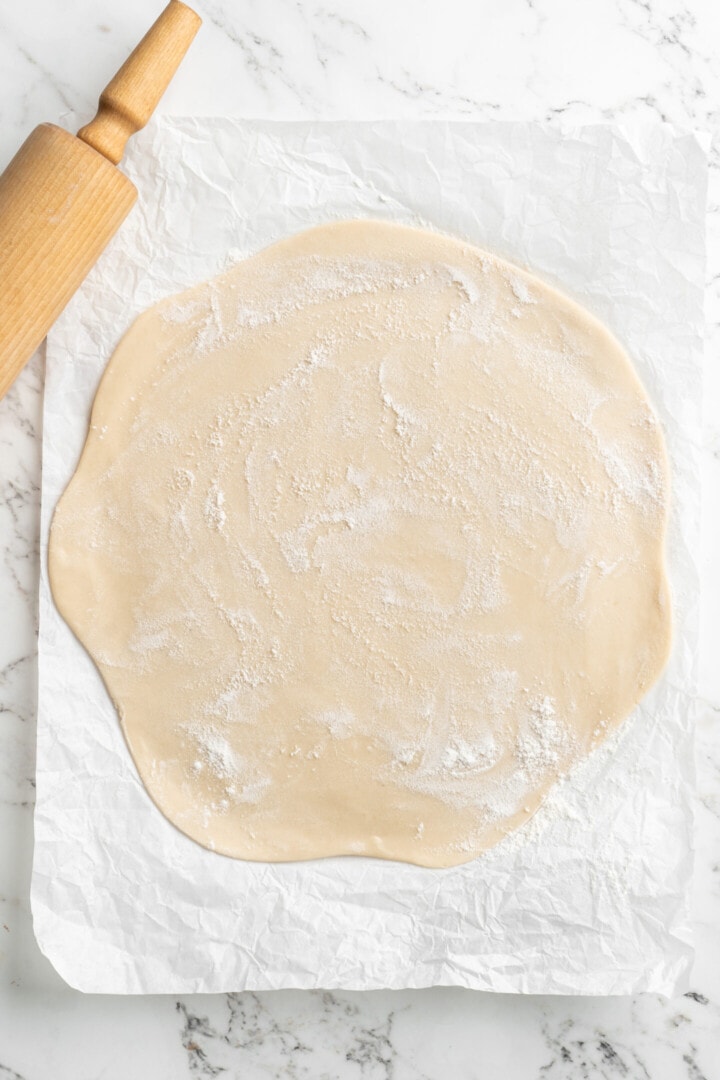
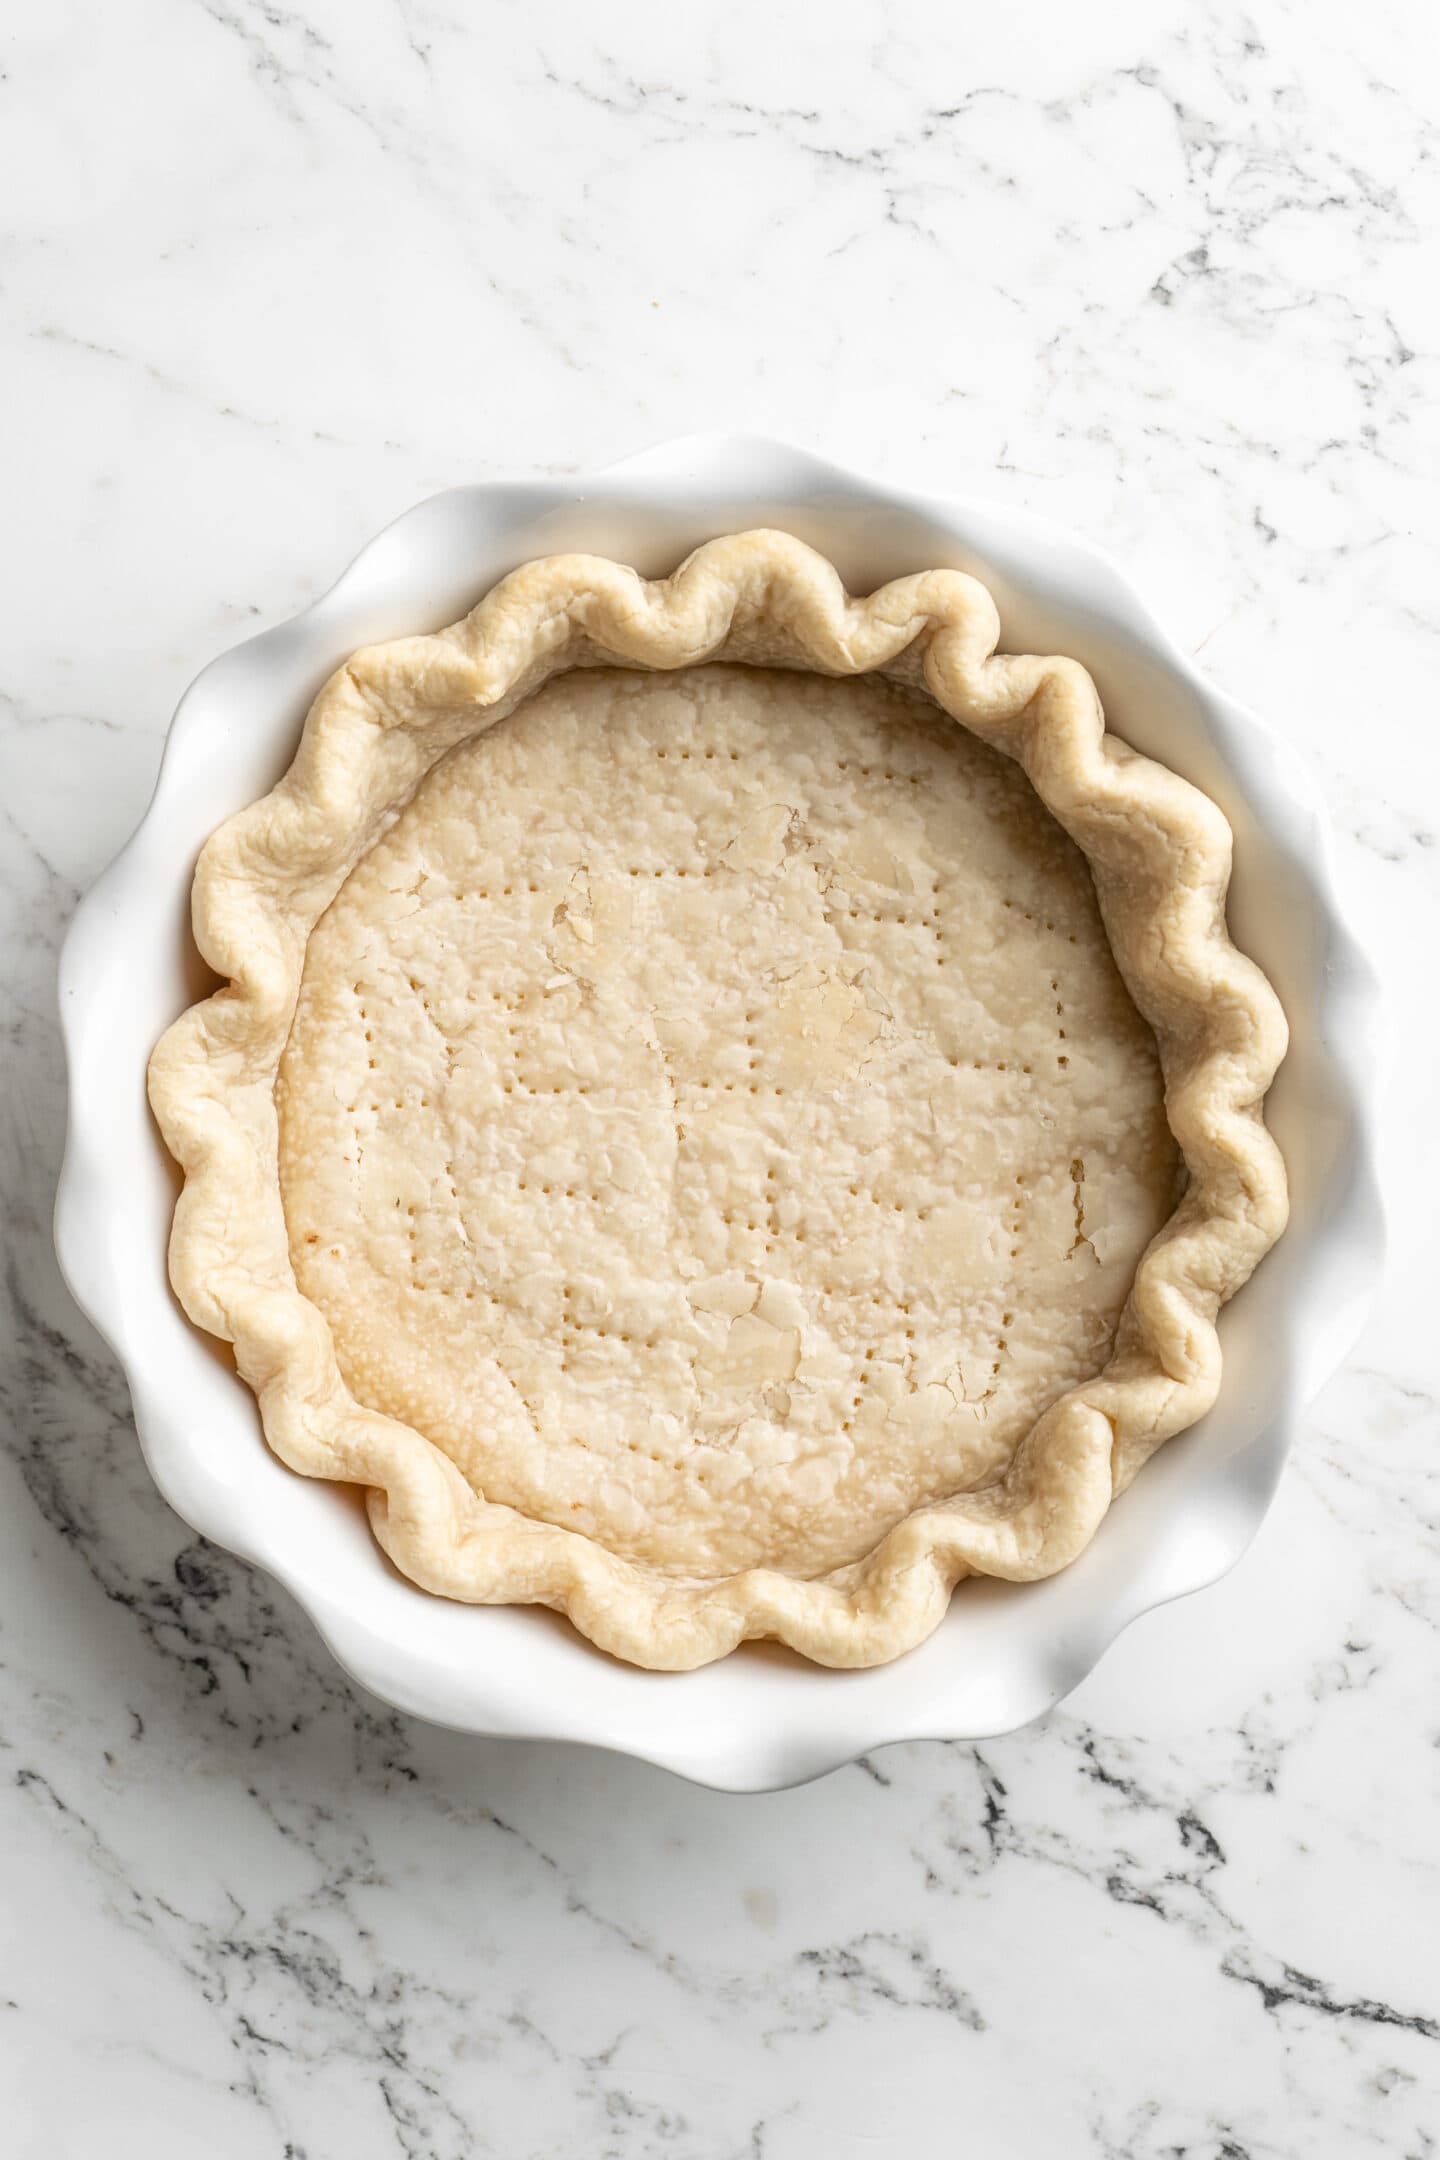
- Prepare the crust. Pre-bake your pie crust for 10 minutes, then set it aside.
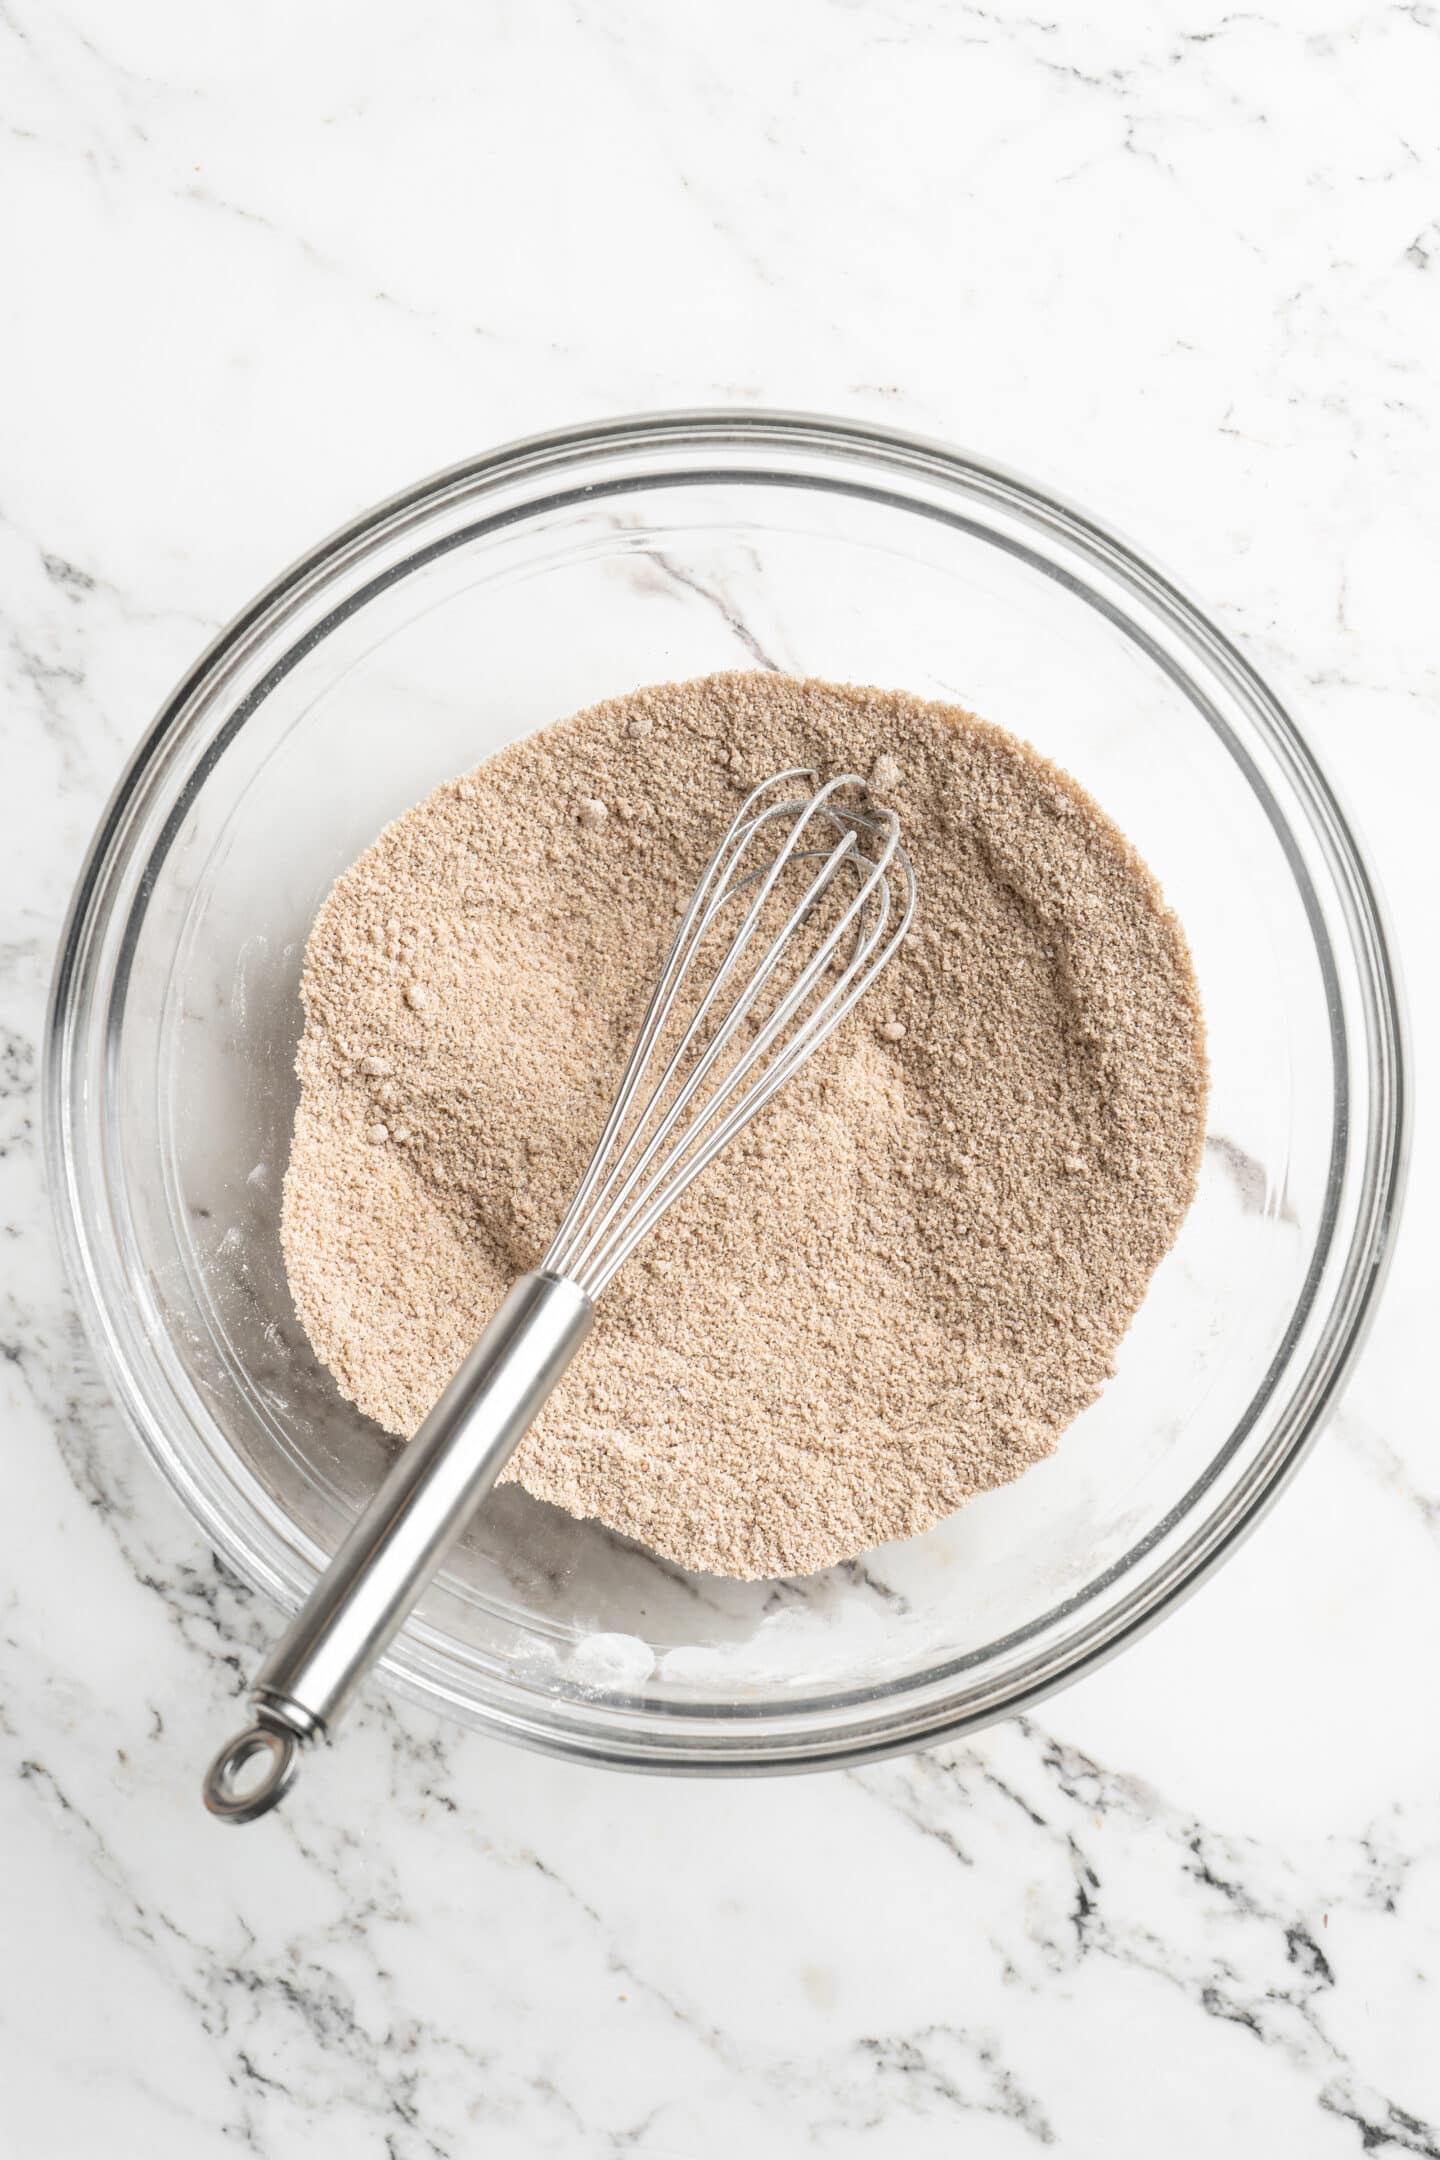
- Make the pie filling. In a large bowl, add all the pie ingredients. Add all the pumpkin puree, sea salt, thick coconut milk cream, cinnamon, ground ginger, all spice, maple syrup, sugar and sifted in cornstarch.
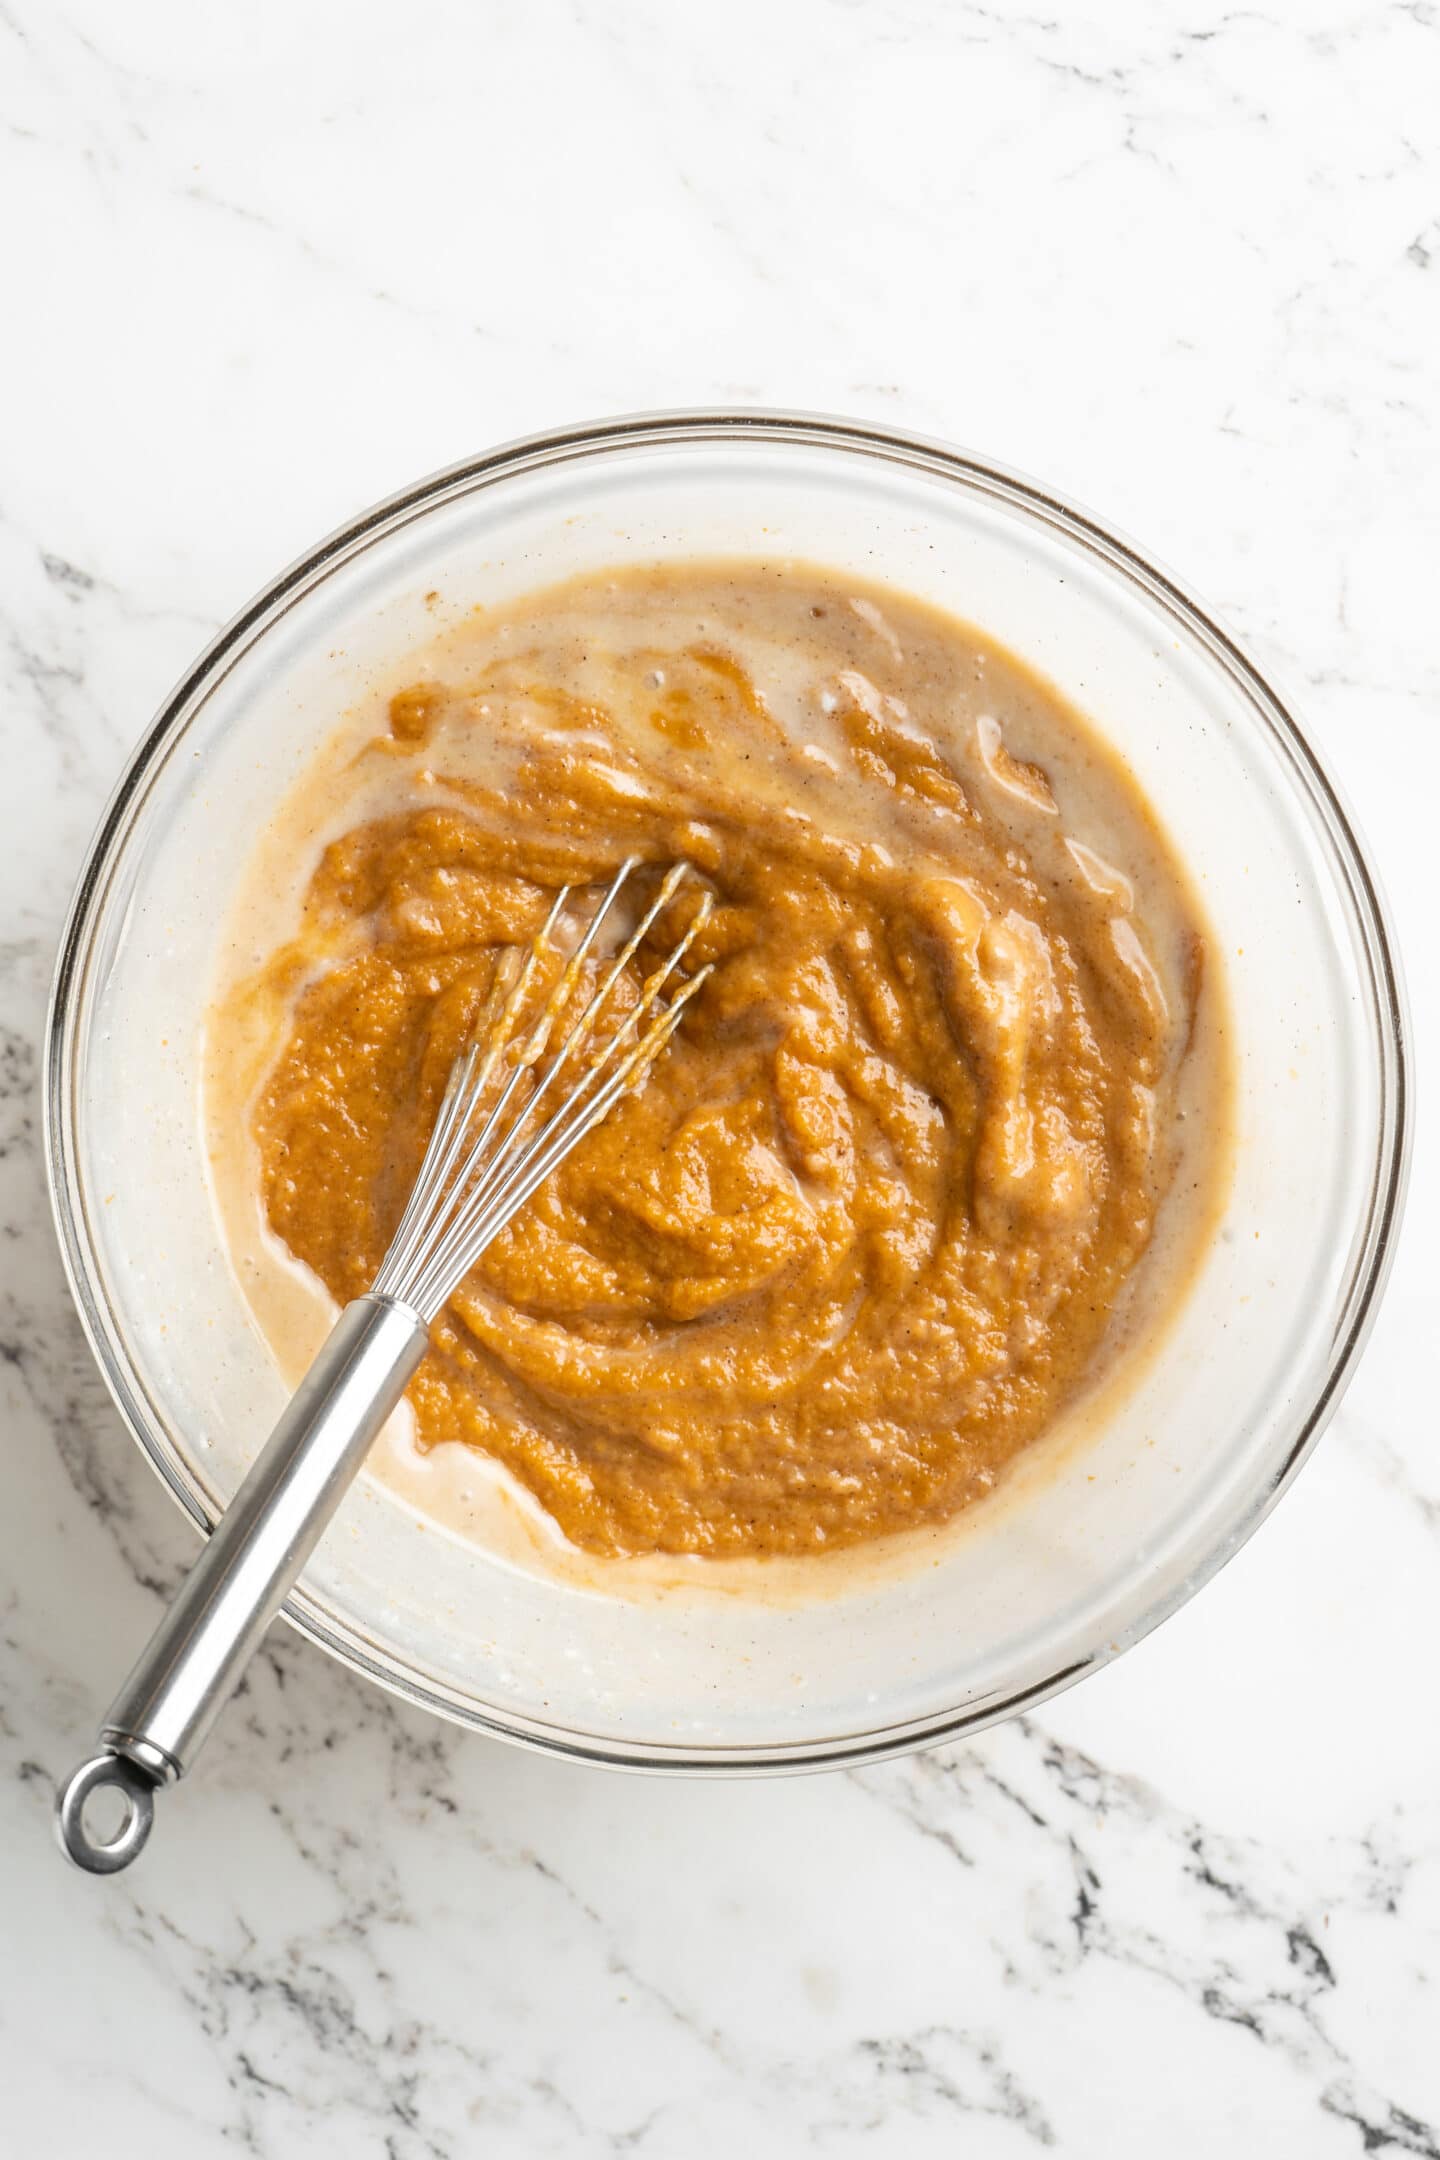
- Mix until everything is combined. Blend everything together well with a whisk until the cornstarch is completely whisked out. Alternatively, mix all the dry ingredients together first, blend out the cornstarch, and then add the wet ingredients.
- Allow the pie to rest before baking it. You can leave this to set for an hour covered with a kitchen towel first to allow the ingredients to completely blend together, or bake the pie immediately. To me, it tastes even better when the ingredients are left to sit a bit.
- Pour the batter into the pie crust. Then, bake the pie for 60 minutes in the oven on the lower shelf or highest shelf depending on your oven (whichever is furthest away from the heat). Finally, remove the pie from the oven and let it set and cool completely.
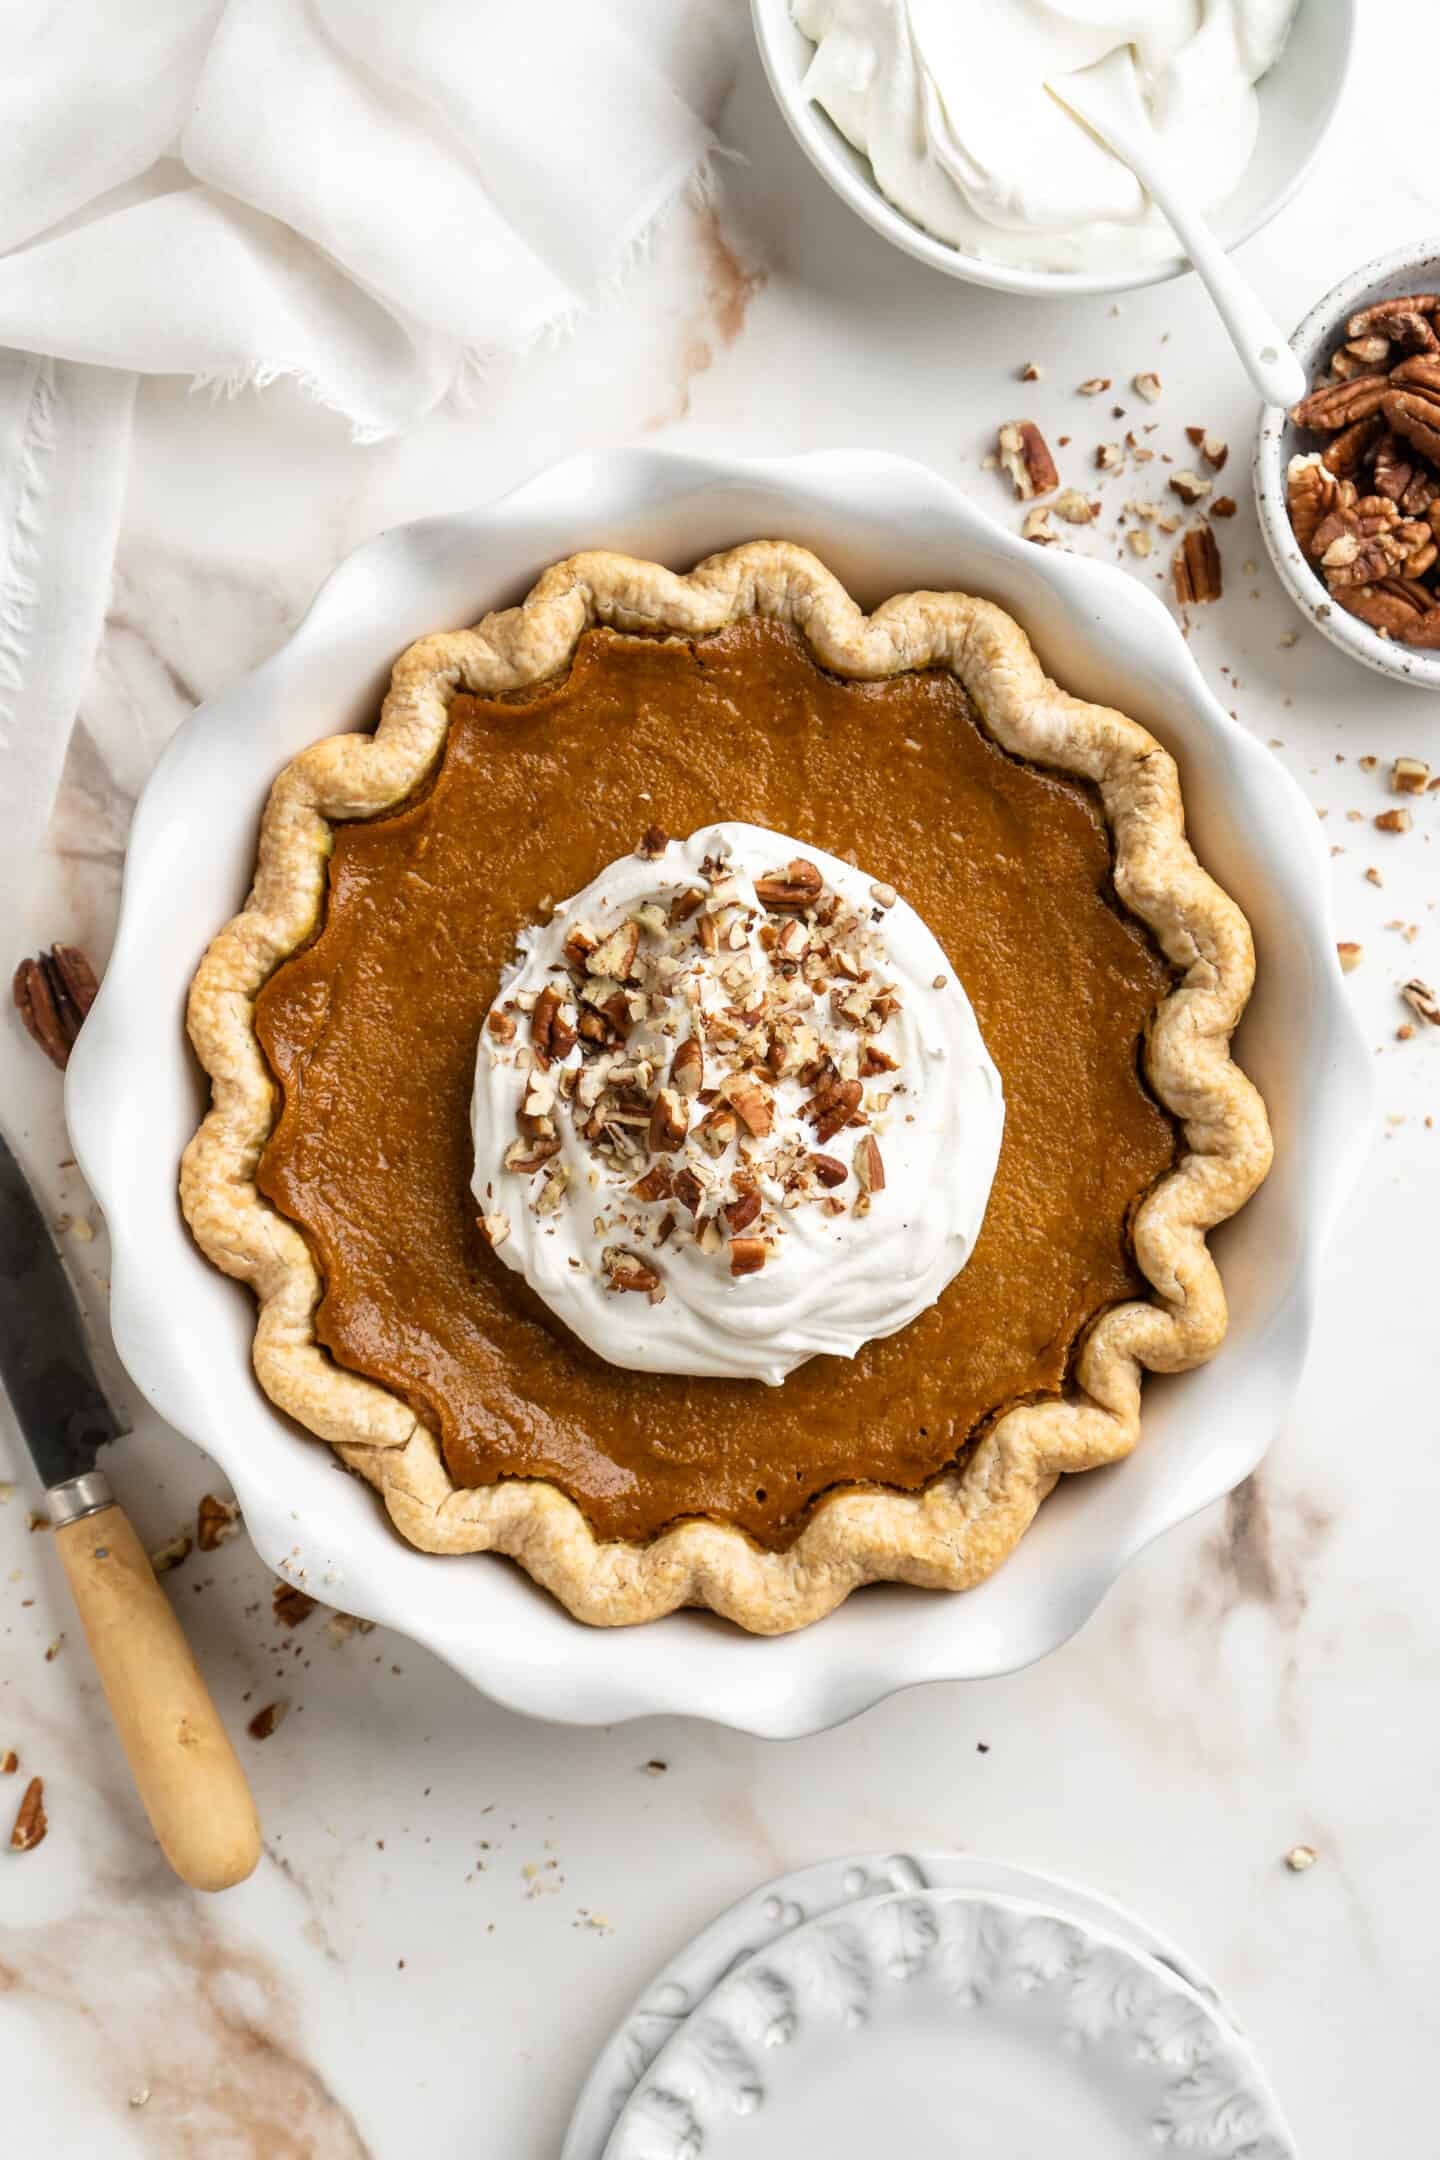
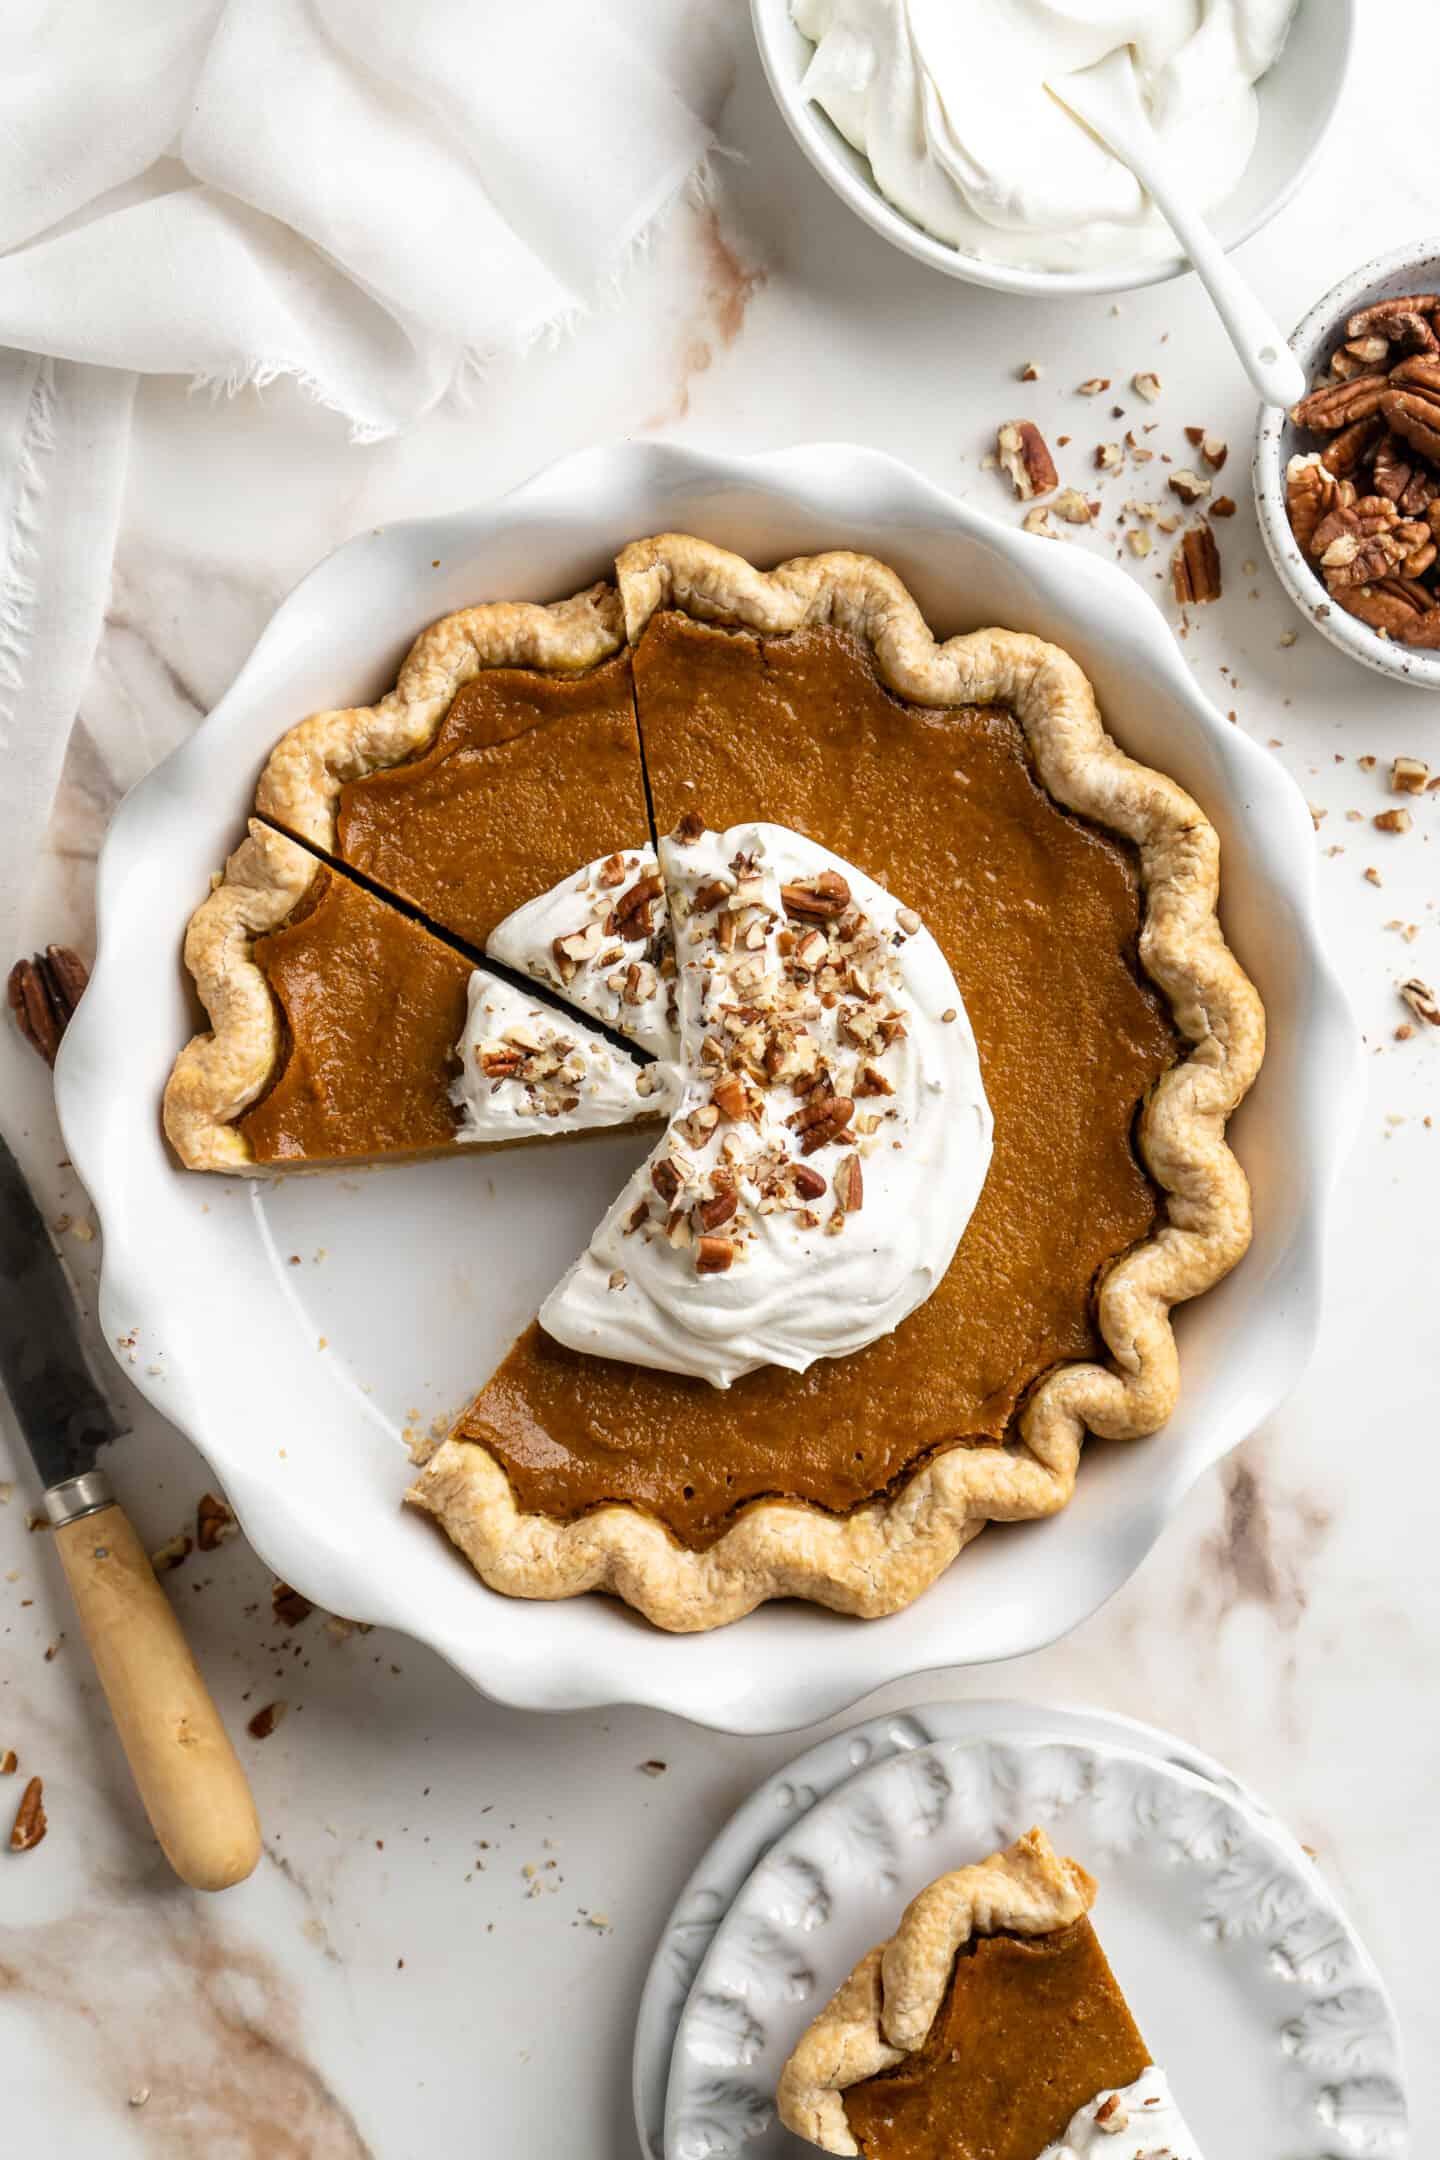
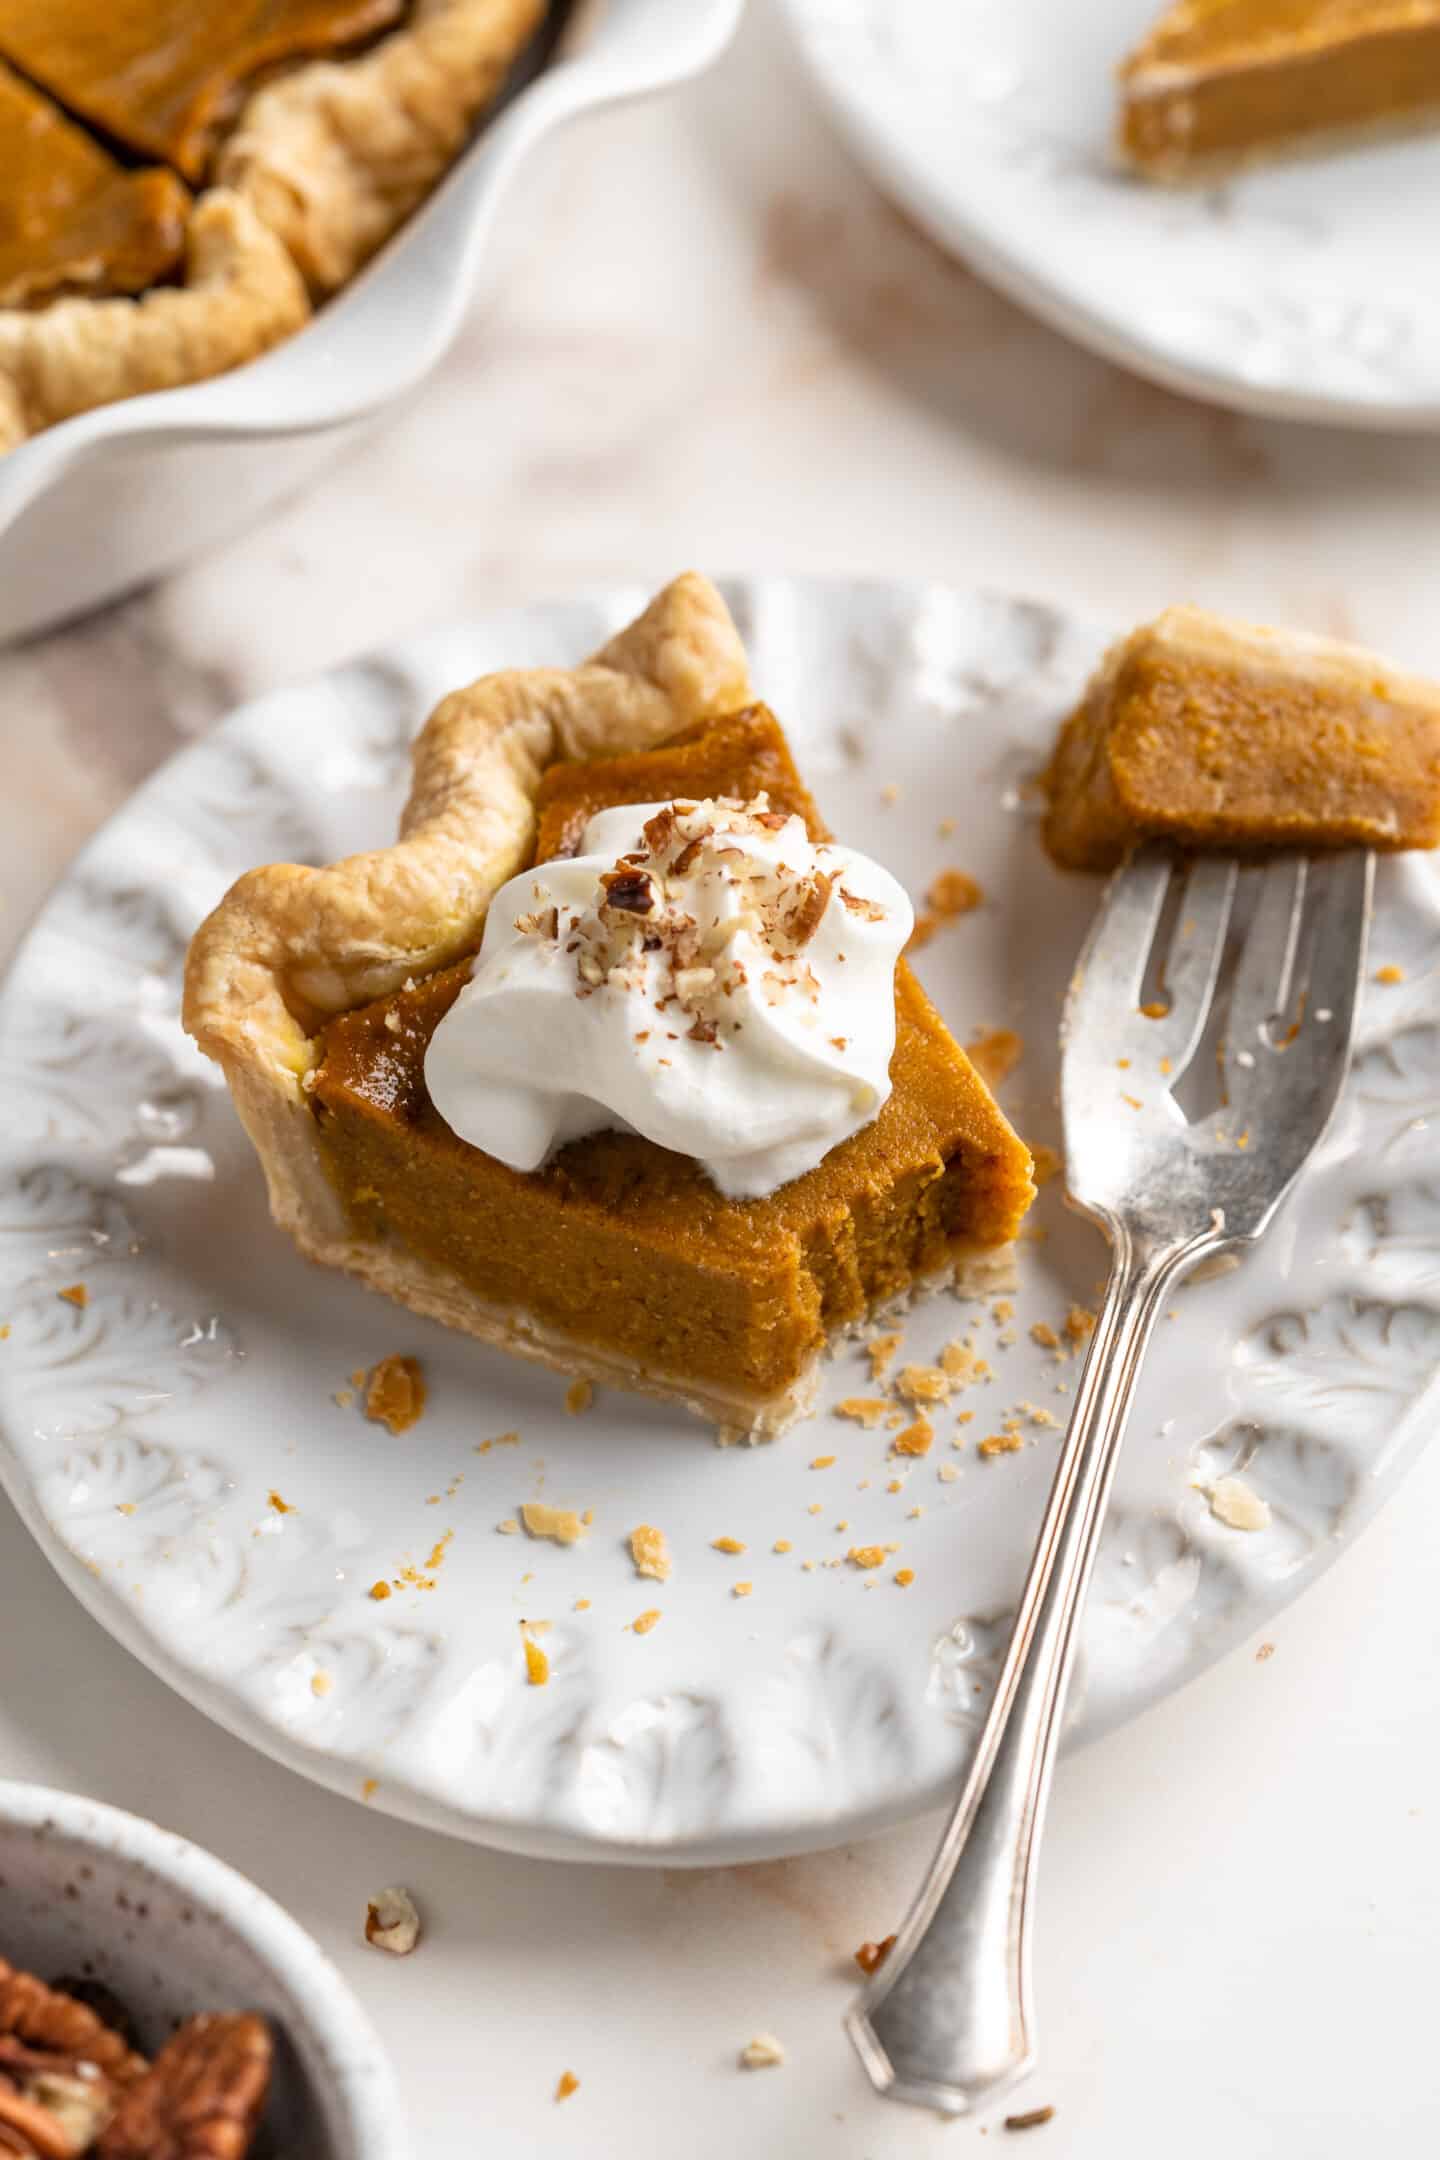
- Serve and enjoy. Cover the pie with saran wrap or foil and set it in the fridge for at least 4 to 6 hours, or ideally overnight. Then, remove the pie from the fridge, cut it, and serve. I highly recommend dolloping each slice with some delicious vegan coconut whipped cream. Enjoy!
Watch This Vegan Pumpkin Pie Recipe Come Together
You can mix this vegan gluten-free pumpkin pie together in no time. Watch it happen below!

Tips for Success
These quick tips and tricks will help you produce the best vegan pumpkin pie:
- Try not to make substitutions. I recommend making it just like I have. Substitutions can be extremely tempting, but this is fool-proof and already tested so many times that you don’t need to. The only substitutions I’d endorse would be using agave nectar instead of maple syrup, and coconut sugar for the cane sugar. I made this using both and loved them both in this.
- What to do if the pumpkin puree looks watery. If you’re using/getting a particularly watery pumpkin puree result (i.e. it looks more watery than the photos and the video) set it in a sieve/strainer over your sink for about 30 minutes to 1 hour. This will drain any excess liquid.
- Depending on the size of your pie dish, don’t fill the pie dish to the very top. It puffs up while baking, and you don’t want it to overflow. I have a 9″ pie dish that’s decently deep, so just keep that in mind. You want to fill it up to the level of what is in the video and photos.
- Let the pie cool completely, and then refrigerate it overnight. That way, the flavors are absolutely outstanding. I even made my batter ahead of time (about an hour) and let it sit so the flavors could blend. This isn’t necessary, but if you have the extra time, it makes the pie even better!
- Add a few simple decorations. You could spruce this pie up even more by adding a few cookie cutter leaves on top with the extra pie dough.
Serving Suggestions
While this pumpkin pie tastes amazing as-is, you can definitely add a few toppings when you serve it if you like!
- Whipped cream. As mentioned above, this coconut whipped cream is an incredible addition! Cashew whipped cream is also a personal favorite.
- Caramel sauce. Vegan caramel sauce tastes great on this pumpkin pie!
- Chopped nuts. Chopped pecans, for example, pair so well with a slice of pumpkin pie.
How to Store
Baked vegan pumpkin pie can be stored in an airtight container, or covered with saran wrap/foil. Keep it in the fridge for 4-5 days, and serve it warm, cold, or at room temperature – whatever you like best!
Can I Freeze Vegan Pumpkin Pie?
YES! You can freeze this for up to 4 days and it’ll still taste exactly the same. Or, you can freeze it for up to a month and it’ll taste very similar, although not as fresh at just baked. Wrap the pie in saran wrap, then in foil, and then place it in a freezer-safe zipped plastic bag. This ensures that smells and freezer burn will not affect your pie. When thawing, place the pie in the fridge. Do not thaw it on the counter, as this will cause your crust to get soggy. If you have raw fish in your freezer, remove this first since this will be the first smell to seep into your pie.
More Thanksgiving Dessert Recipes
If you loved this vegan pumpkin pie recipe, try out another of these classic Thanksgiving desserts!
- Pumpkin Cheesecake Swirl Brownies
- Pecan Pie
- Vegan Pumpkin Cheesecake
- Apple Pie Bars
- Pumpkin Pie Chia Pudding
| WHAT YOU’LL NEED // SHOP MY FAVORITE INGREDIENTS & PREP PRODUCTS |
Ingredients
- 2 cups pumpkin puree , (450g) homemade or canned
- 1/2 teaspoon sea salt
- 1 cup coconut cream , (230g) You can buy coconut cream or a full fat can of coconut milk and get it from the can, the thick creamy white portion only – *check notes on how to get it from the can
- 1/2 teaspoon cinnamon
- 1/2 teaspoon ground ginger
- 1/2 teaspoon all spice
- 1/4 cup maple syrup , (84g)
- 1/2 cup brown sugar , or cane sugar or coconut sugar , (105.3g)
- 1/4 cup cornstarch , (32g) – I recommend sifting this in
Instructions
- Preheat oven to 350°F/180°C.
- Pre-bake pie crust for 10 minutes. Set aside to cool.
- In a large bowl, add all the pumpkin puree, sea salt, thick coconut milk cream, cinnamon, ground ginger, all spice, maple syrup, sugar and sifted in cornstarch. Blend together well with a whisk or in a blender or food processor until cornstarch is completely combined. Alternatively to blend out the cornstarch, mix it with the spices first, then add the wet ingredients.
- You can leave this to set for an hour covered with a kitchen towel first to allow ingredients to completely blend together, or bake immediately. To me, it tastes even better when ingredients are left to sit a bit.
- Pour the batter into the cooled pie crust. Bake for 60 minutes in the oven on the lower shelf or highest shelf depending on your oven (furthest away from heat).
- Remove from oven and let set and cool completely.
- Cover with saran wrap or foil and set in the fridge for at least 4 to 6 hours, ideally overnight. Remove and cut the pie and serve. Dollop each slice with delicious whipped coconut cream . Enjoy!
Notes
- How to get the thick creamy white portion only from the coconut milk: Put a can of full-fat coconut milk in your fridge overnight. After being refrigerated overnight, open the can, and scoop out the thick solids out of the jar until you reach 1 cup. That’s what you want to use! You can set the coconut water into a jar in the fridge and use it in your smoothies or drink it.
- I recommend making this recipe exactly as made. If you want to, you can substitute the maple syrup with agave nectar. To test if your pie is finished baking, stick a toothpick into the corner of the pie. It should be solid. Try not to touch your pie – it’ll leave some imperfections.
- When your pie comes out, it may be two different colors. This is from the spices in the pie. As it cools and settles, it’ll change to one solid color.
- You could spruce this pie up even more by adding a few cookie cutter leaves on top with the extra pie dough.
- If you’re using/getting a particularly watery pumpkin puree result (looks more watery than the video and photos) set it in a sieve/strainer over your sink for about 30 minutes to 1 hour. This will drain any excess liquid.
- To store. You can store this baked pumpkin pie in the fridge wrapped with saran wrap or foil for up to 5 days.
- To freeze. You can freeze this for up to 4 weeks. It will taste the same after a week of freezing, and only slightly different after that. Wrap the pie in saran wrap, then in foil, and then place in a freezer-safe zipped plastic bag. This ensures that smells and freezer burn will not affect your pie. When thawing, place in the fridge to thaw. Do not thaw on the counter as this will cause your crust to get soggy.
This vegan pumpkin pie tastes and bakes JUST like the classic – you’re going to LOVE this! Made with only 9 ingredients, it’s rich, smooth in texture, and filled with flavor! It also just so happens to be gluten-free!
After making this vegan pumpkin pie, friends, I am HOOKED on pie.
I always thought making pies was hard, but after making this super simple vegan pumpkin pie, I’ve learnt that it really isn’t! Speaking of which, one bite and you’ll be hooked, too. This pie is the perfect pie for Thanksgiving – that is a fact. The Mr., who grew up eating pumpkin pie at Thanksgiving, verified that 100% for me.
The three slices I had also verified this fact. Oops. But, when you’ve got a smooth pumpkin pie made with cinnamon, ginger, and rich pumpkin puree sitting in front of you, all sliced up and ready to go, it’s impossible not to sample a slice (or three!). Get in on the goodness, and you’ll see what I mean!
Also, if you’re in the mood to make some more easy pumpkin desserts, try these pumpkin sugar cookies , these pumpkin cupcakes , or this pumpkin sheet cake !
Why You’ll Love This Vegan Pumpkin Pie
Pumpkin pie is a classic Thanksgiving dessert, but you can make it all year-round if you like! Here’s why I think you’ll be hooked on it, just like me:
- Perfectly smooth. This pumpkin pie filling is so creamy and moist. Pair that with a flaky gluten-free crust, and every bite is a dream!
- Sweet and comforting. This pumpkin pie is filled with sugary maple syrup, sweet brown sugar, rich pumpkin puree, and cozy cinnamon and ginger. What a comforting combination!
- Quick and easy. This pie can be prepped in 15 minutes and baked in 1 hour! That’s all there is to it.
Notes on Ingredients
These are the ingredients you’ll need to round up to make a vegan gluten-free pumpkin pie. You can find the exact amounts for each in the recipe card below, along with the directions!
- Pumpkin – You can use fresh pumpkin pie puree or canned, up to you!
- Coconut Milk – You want to ensure you’re using the one from the can since it’s nice and thick and will yield that beautiful silkiness that you’re looking for!
- Spices – Although I’ve listed the cinnamon, ginger, and all spice separately, you can substitute 1 ½ teaspoons pumpkin pie spice instead! If you like your pie extra spiced, feel free to use 2 teaspoons.
- Salt – I like to use sea salt in this recipe.
- Maple Syrup – Pure maple syrup is the way to go!
- Brown Sugar – Cane sugar and coconut sugar can also be used.
- Cornstarch – This is crucial because it is the perfect thickener and it binds the pie ingredients together, creating a smooth texture. I have not tested arrow starch, but you can test it if you’d prefer to use that.
- Pie Crust – You don’t have to use mine if you’re not gluten-free! You can also substitute the gluten-free flour in mine for regular flour for a regular vegan pie crust .
How to Make Vegan Pumpkin Pie
This vegan pumpkin pie is made in just a few simple steps! Here’s how it all happens:
- Prepare the crust. Pre-bake your pie crust for 10 minutes, then set it aside.
- Make the pie filling. In a large bowl, add all the pie ingredients. Add all the pumpkin puree, sea salt, thick coconut milk cream, cinnamon, ground ginger, all spice, maple syrup, sugar and sifted in cornstarch.
- Mix until everything is combined. Blend everything together well with a whisk until the cornstarch is completely whisked out. Alternatively, mix all the dry ingredients together first, blend out the cornstarch, and then add the wet ingredients.
- Allow the pie to rest before baking it. You can leave this to set for an hour covered with a kitchen towel first to allow the ingredients to completely blend together, or bake the pie immediately. To me, it tastes even better when the ingredients are left to sit a bit.
- Pour the batter into the pie crust. Then, bake the pie for 60 minutes in the oven on the lower shelf or highest shelf depending on your oven (whichever is furthest away from the heat). Finally, remove the pie from the oven and let it set and cool completely.
- Serve and enjoy. Cover the pie with saran wrap or foil and set it in the fridge for at least 4 to 6 hours, or ideally overnight. Then, remove the pie from the fridge, cut it, and serve. I highly recommend dolloping each slice with some delicious vegan coconut whipped cream. Enjoy!
Watch This Vegan Pumpkin Pie Recipe Come Together
You can mix this vegan gluten-free pumpkin pie together in no time. Watch it happen below!
Tips for Success
These quick tips and tricks will help you produce the best vegan pumpkin pie:
- Try not to make substitutions. I recommend making it just like I have. Substitutions can be extremely tempting, but this is fool-proof and already tested so many times that you don’t need to. The only substitutions I’d endorse would be using agave nectar instead of maple syrup, and coconut sugar for the cane sugar. I made this using both and loved them both in this.
- What to do if the pumpkin puree looks watery. If you’re using/getting a particularly watery pumpkin puree result (i.e. it looks more watery than the photos and the video) set it in a sieve/strainer over your sink for about 30 minutes to 1 hour. This will drain any excess liquid.
- Depending on the size of your pie dish, don’t fill the pie dish to the very top. It puffs up while baking, and you don’t want it to overflow. I have a 9″ pie dish that’s decently deep, so just keep that in mind. You want to fill it up to the level of what is in the video and photos.
- Let the pie cool completely, and then refrigerate it overnight. That way, the flavors are absolutely outstanding. I even made my batter ahead of time (about an hour) and let it sit so the flavors could blend. This isn’t necessary, but if you have the extra time, it makes the pie even better!
- Add a few simple decorations. You could spruce this pie up even more by adding a few cookie cutter leaves on top with the extra pie dough.
Serving Suggestions
While this pumpkin pie tastes amazing as-is, you can definitely add a few toppings when you serve it if you like!
- Whipped cream. As mentioned above, this coconut whipped cream is an incredible addition! Cashew whipped cream is also a personal favorite.
- Caramel sauce. Vegan caramel sauce tastes great on this pumpkin pie!
- Chopped nuts. Chopped pecans, for example, pair so well with a slice of pumpkin pie.
How to Store
Baked vegan pumpkin pie can be stored in an airtight container, or covered with saran wrap/foil. Keep it in the fridge for 4-5 days, and serve it warm, cold, or at room temperature – whatever you like best!
Can I Freeze Vegan Pumpkin Pie?
YES! You can freeze this for up to 4 days and it’ll still taste exactly the same. Or, you can freeze it for up to a month and it’ll taste very similar, although not as fresh at just baked. Wrap the pie in saran wrap, then in foil, and then place it in a freezer-safe zipped plastic bag. This ensures that smells and freezer burn will not affect your pie. When thawing, place the pie in the fridge. Do not thaw it on the counter, as this will cause your crust to get soggy. If you have raw fish in your freezer, remove this first since this will be the first smell to seep into your pie.
More Thanksgiving Dessert Recipes
If you loved this vegan pumpkin pie recipe, try out another of these classic Thanksgiving desserts!
- Pumpkin Cheesecake Swirl Brownies
- Pecan Pie
- Vegan Pumpkin Cheesecake
- Apple Pie Bars
- Pumpkin Pie Chia Pudding
| WHAT YOU’LL NEED // SHOP MY FAVORITE INGREDIENTS & PREP PRODUCTS |
Ingredients
- 2 cups pumpkin puree , (450g) homemade or canned
- 1/2 teaspoon sea salt
- 1 cup coconut cream , (230g) You can buy coconut cream or a full fat can of coconut milk and get it from the can, the thick creamy white portion only – *check notes on how to get it from the can
- 1/2 teaspoon cinnamon
- 1/2 teaspoon ground ginger
- 1/2 teaspoon all spice
- 1/4 cup maple syrup , (84g)
- 1/2 cup brown sugar , or cane sugar or coconut sugar , (105.3g)
- 1/4 cup cornstarch , (32g) – I recommend sifting this in
Instructions
- Preheat oven to 350°F/180°C.
- Pre-bake pie crust for 10 minutes. Set aside to cool.
- In a large bowl, add all the pumpkin puree, sea salt, thick coconut milk cream, cinnamon, ground ginger, all spice, maple syrup, sugar and sifted in cornstarch. Blend together well with a whisk or in a blender or food processor until cornstarch is completely combined. Alternatively to blend out the cornstarch, mix it with the spices first, then add the wet ingredients.
- You can leave this to set for an hour covered with a kitchen towel first to allow ingredients to completely blend together, or bake immediately. To me, it tastes even better when ingredients are left to sit a bit.
- Pour the batter into the cooled pie crust. Bake for 60 minutes in the oven on the lower shelf or highest shelf depending on your oven (furthest away from heat).
- Remove from oven and let set and cool completely.
- Cover with saran wrap or foil and set in the fridge for at least 4 to 6 hours, ideally overnight. Remove and cut the pie and serve. Dollop each slice with delicious whipped coconut cream . Enjoy!
Notes
- How to get the thick creamy white portion only from the coconut milk: Put a can of full-fat coconut milk in your fridge overnight. After being refrigerated overnight, open the can, and scoop out the thick solids out of the jar until you reach 1 cup. That’s what you want to use! You can set the coconut water into a jar in the fridge and use it in your smoothies or drink it.
- I recommend making this recipe exactly as made. If you want to, you can substitute the maple syrup with agave nectar. To test if your pie is finished baking, stick a toothpick into the corner of the pie. It should be solid. Try not to touch your pie – it’ll leave some imperfections.
- When your pie comes out, it may be two different colors. This is from the spices in the pie. As it cools and settles, it’ll change to one solid color.
- You could spruce this pie up even more by adding a few cookie cutter leaves on top with the extra pie dough.
- If you’re using/getting a particularly watery pumpkin puree result (looks more watery than the video and photos) set it in a sieve/strainer over your sink for about 30 minutes to 1 hour. This will drain any excess liquid.
- To store. You can store this baked pumpkin pie in the fridge wrapped with saran wrap or foil for up to 5 days.
- To freeze. You can freeze this for up to 4 weeks. It will taste the same after a week of freezing, and only slightly different after that. Wrap the pie in saran wrap, then in foil, and then place in a freezer-safe zipped plastic bag. This ensures that smells and freezer burn will not affect your pie. When thawing, place in the fridge to thaw. Do not thaw on the counter as this will cause your crust to get soggy.

Vegan Pumpkin Pie (9 Ingredients)
Ingredients
- 2 cups pumpkin puree (450g) homemade or canned
- 1/2 teaspoon sea salt
- 1 cup coconut cream (230g) You can buy coconut cream or a full fat can of coconut milk and get it from the can, the thick creamy white portion only - *check notes on how to get it from the can
- 1/2 teaspoon cinnamon
- 1/2 teaspoon ground ginger
- 1/2 teaspoon all spice
- 1/4 cup maple syrup (84g)
- 1/2 cup brown sugar or cane sugar or coconut sugar , (105.3g)
- 1/4 cup cornstarch (32g) - I recommend sifting this in
Instructions
- Preheat oven to 350°F/180°C.
- Pre-bake pie crust for 10 minutes. Set aside to cool.
- In a large bowl, add all the pumpkin puree, sea salt, thick coconut milk cream, cinnamon, ground ginger, all spice, maple syrup, sugar and sifted in cornstarch. Blend together well with a whisk or in a blender or food processor until cornstarch is completely combined. Alternatively to blend out the cornstarch, mix it with the spices first, then add the wet ingredients.
- You can leave this to set for an hour covered with a kitchen towel first to allow ingredients to completely blend together, or bake immediately. To me, it tastes even better when ingredients are left to sit a bit.
- Pour the batter into the cooled pie crust. Bake for 60 minutes in the oven on the lower shelf or highest shelf depending on your oven (furthest away from heat).
- Remove from oven and let set and cool completely.
- Cover with saran wrap or foil and set in the fridge for at least 4 to 6 hours, ideally overnight. Remove and cut the pie and serve. Dollop each slice with delicious whipped coconut cream . Enjoy!
Video
Notes
- How to get the thick creamy white portion only from the coconut milk: Put a can of full-fat coconut milk in your fridge overnight. After being refrigerated overnight, open the can, and scoop out the thick solids out of the jar until you reach 1 cup. That’s what you want to use! You can set the coconut water into a jar in the fridge and use it in your smoothies or drink it.
- I recommend making this recipe exactly as made. If you want to, you can substitute the maple syrup with agave nectar. To test if your pie is finished baking, stick a toothpick into the corner of the pie. It should be solid. Try not to touch your pie – it’ll leave some imperfections.
- When your pie comes out, it may be two different colors. This is from the spices in the pie. As it cools and settles, it’ll change to one solid color.
- You could spruce this pie up even more by adding a few cookie cutter leaves on top with the extra pie dough.
- If you’re using/getting a particularly watery pumpkin puree result (looks more watery than the video and photos) set it in a sieve/strainer over your sink for about 30 minutes to 1 hour. This will drain any excess liquid.
- To store. You can store this baked pumpkin pie in the fridge wrapped with saran wrap or foil for up to 5 days.
- To freeze. You can freeze this for up to 4 weeks. It will taste the same after a week of freezing, and only slightly different after that. Wrap the pie in saran wrap, then in foil, and then place in a freezer-safe zipped plastic bag. This ensures that smells and freezer burn will not affect your pie. When thawing, place in the fridge to thaw. Do not thaw on the counter as this will cause your crust to get soggy.
Nutrition
Vegan Pumpkin Pie (9 Ingredients) https://jessicainthekitchen.com/vegan-pumpkin-pie-gluten-free/ September 27, 2023
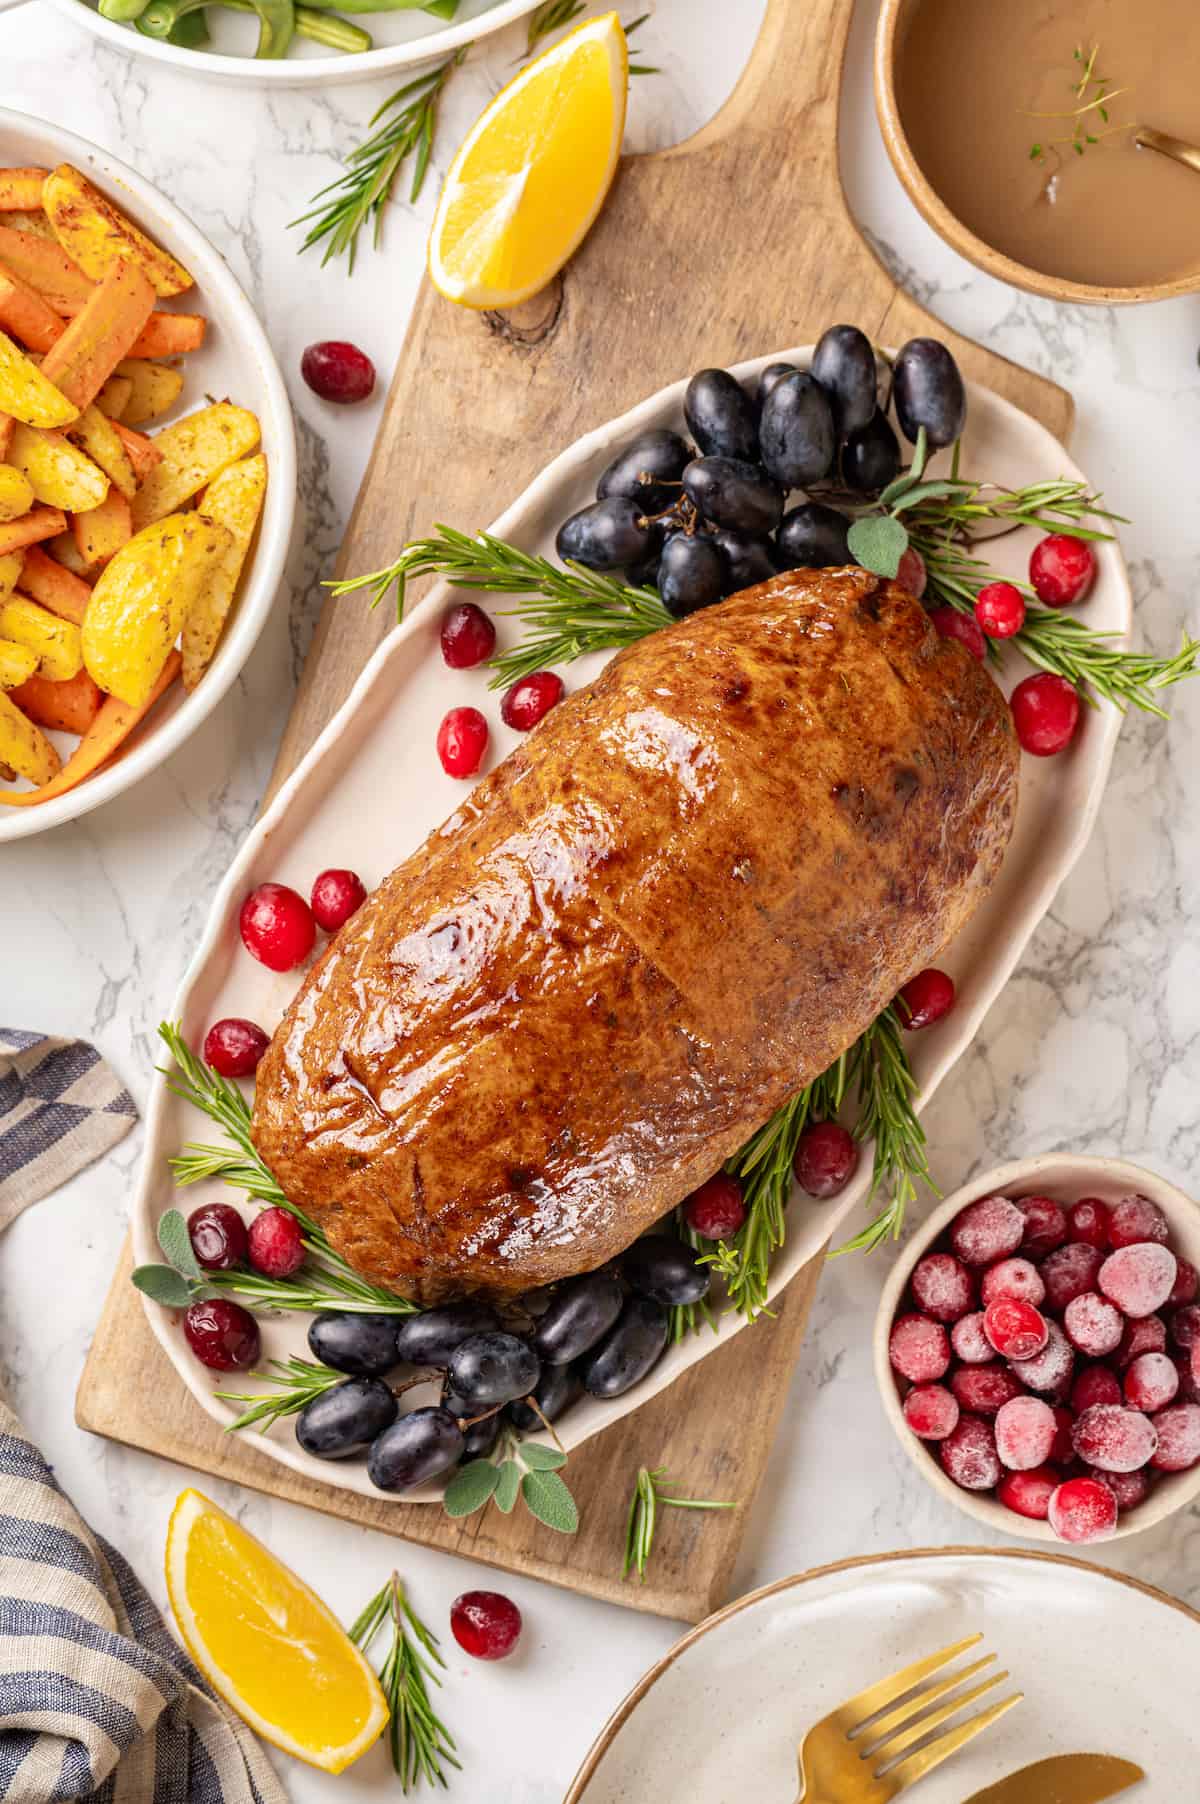
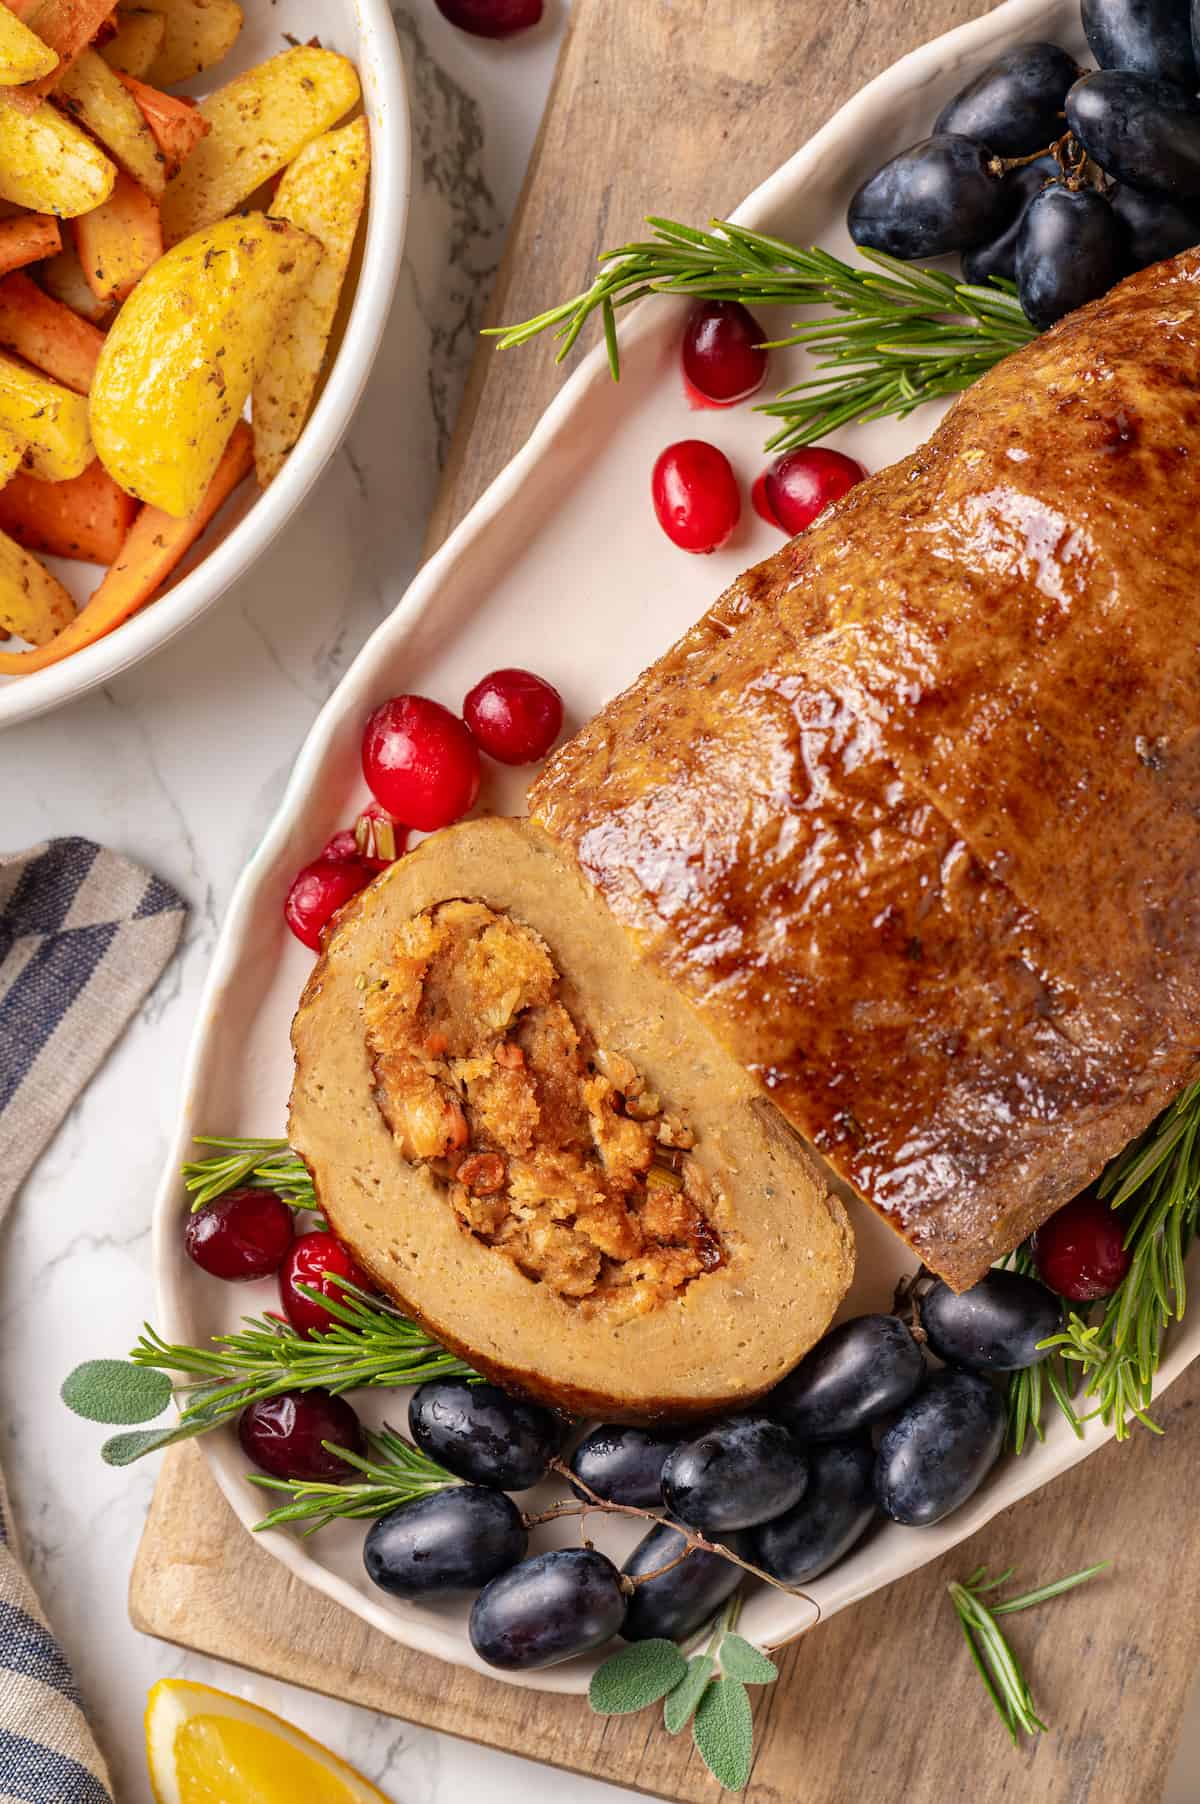
Homemade vegan turkey is the perfect entree for the holidays! This plant-based main course wonderfully replicates the taste of turkey, with rich, savoury flavours and a smoky brown sugar butter glaze that will make your mouth water.
Holiday foods are delicious and fun, but rarely vegan. That’s always a bummer for me. But thankfully I found the perfect solution: vegan turkey roast.
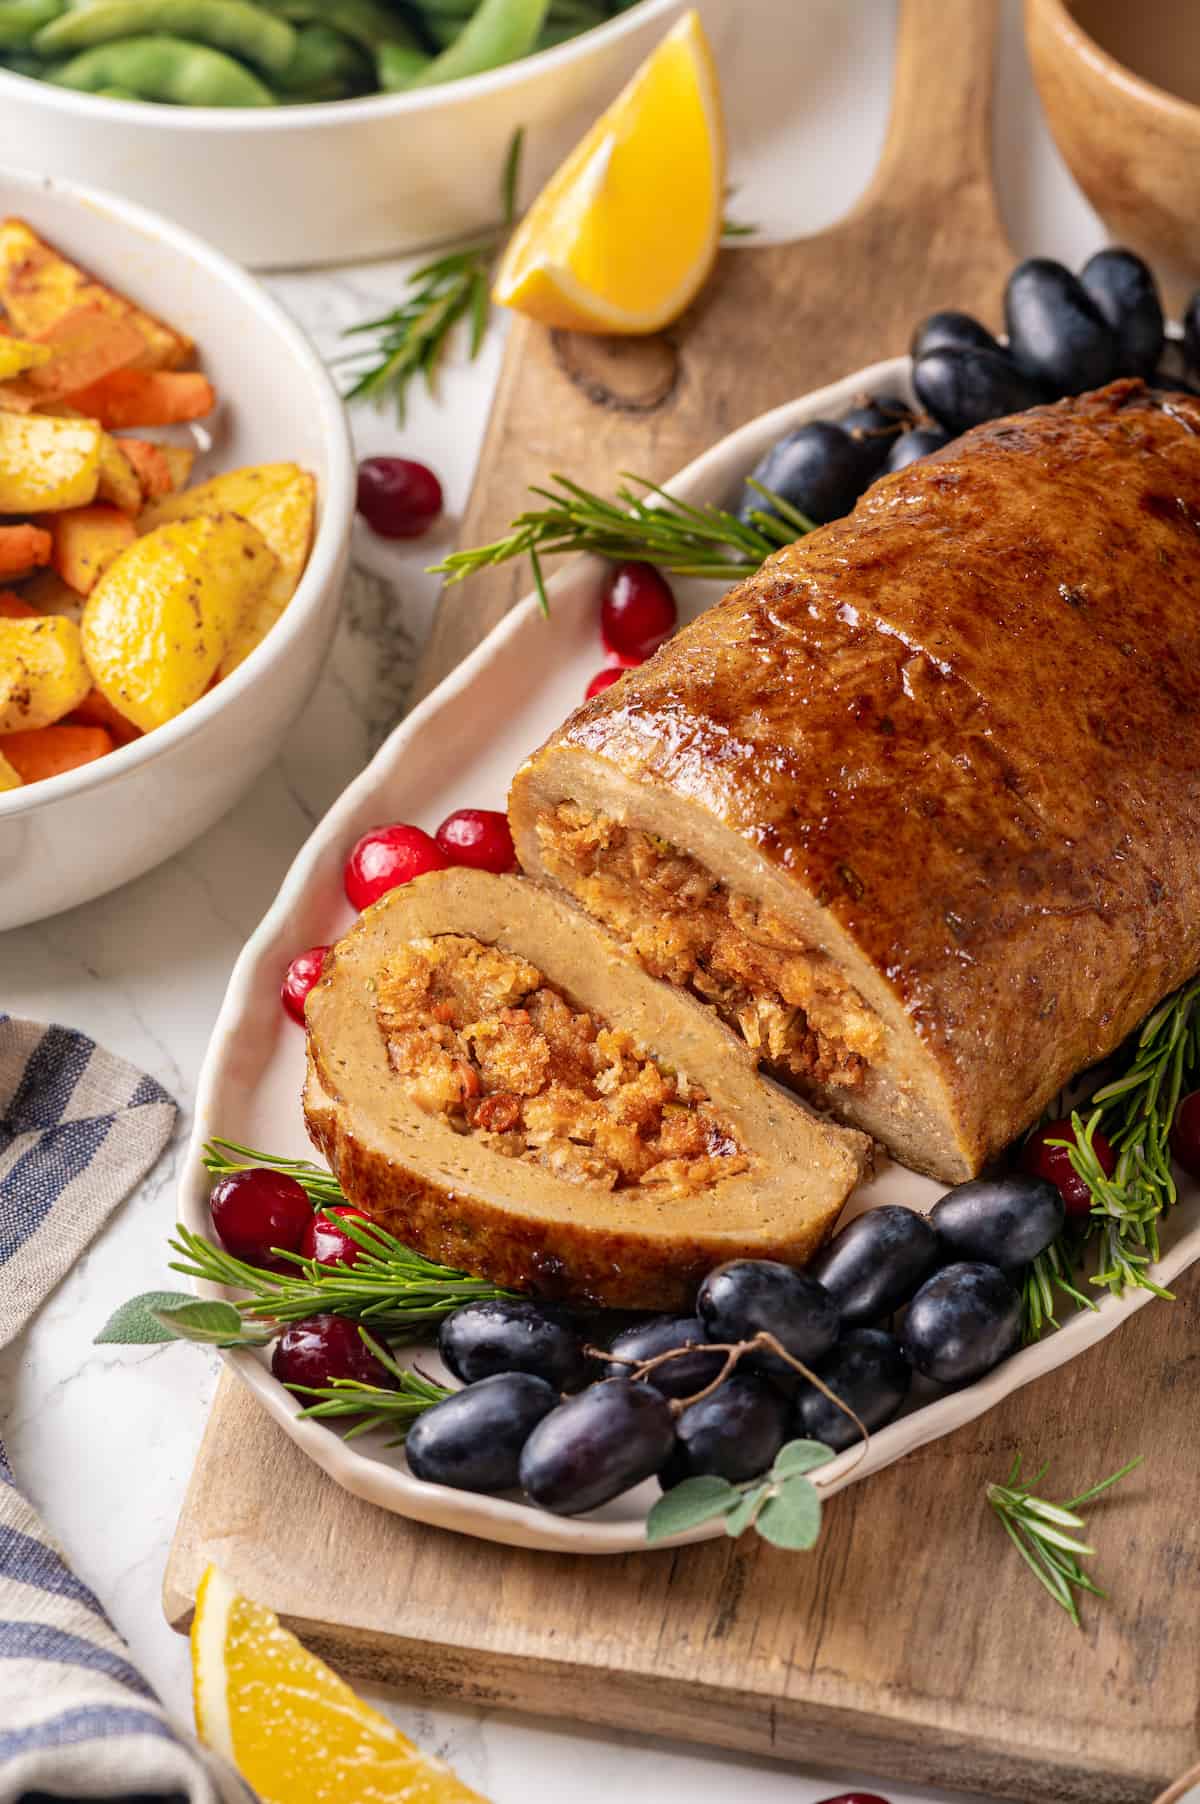
This plant-based turkey loaf uses white beans and vital wheat gluten (also known as seitan) as the base. The texture and the flavour are both very similar to a roasted turkey, making it a perfect headliner at Thanksgiving, Christmas, or any special occasion.
Why You’ll Love This Vegan Turkey Recipe
Here’s what makes this vegan turkey a winner:
- Made with whole food ingredients . Not a fan of highly processed vegan “meat” substitutes? I get it! This vegan turkey roast recipe only uses natural ingredients, making it a fantastic alternative to store-bought vegan turkey.
- It looks great on the plate . I mean, just look at this roast! Unlike so many faux turkey options, slices of this homemade vegan turkey are so appetizing, the meat eaters at the table are likely to dig in.
- Super affordable . You can make this vegan turkey roast for a fraction of the cost of store-bought vegan turkey substitutes. (Plus, once you have vital wheat gluten on hand, you can use it to make vegan chicken too!)
What Do Vegan People Eat on Thanksgiving?
If you’re hosting Thanksgiving and you have a vegan guest, you may wonder what to make for them. Quite honestly, you really don’t have to go out of your way—most vegans are happy to make a meal out of side dishes since there’s certainly no shortage of options!
So instead of focusing on a vegan turkey replacement, think about making side dishes without dairy, eggs, butter, and turkey drippings. If all your side dishes are vegan-friendly, there’s no need for a faux turkey—although if you do have several vegan guests at the table, this vegan turkey roast will certainly be appreciated!
Of course, it’s always a good idea to talk to your guests and find out what their expectations are and how you can accommodate their dietary needs.
How Do You Host a Vegan Thanksgiving?
Want to put together a completely vegan Thanksgiving menu? In that case, I do recommend a show-stopping main dish like this vegan turkey, or maybe vegan meatloaf or pot pies . Alongside the turkey, serve plant-based versions of your favourite holiday sides:
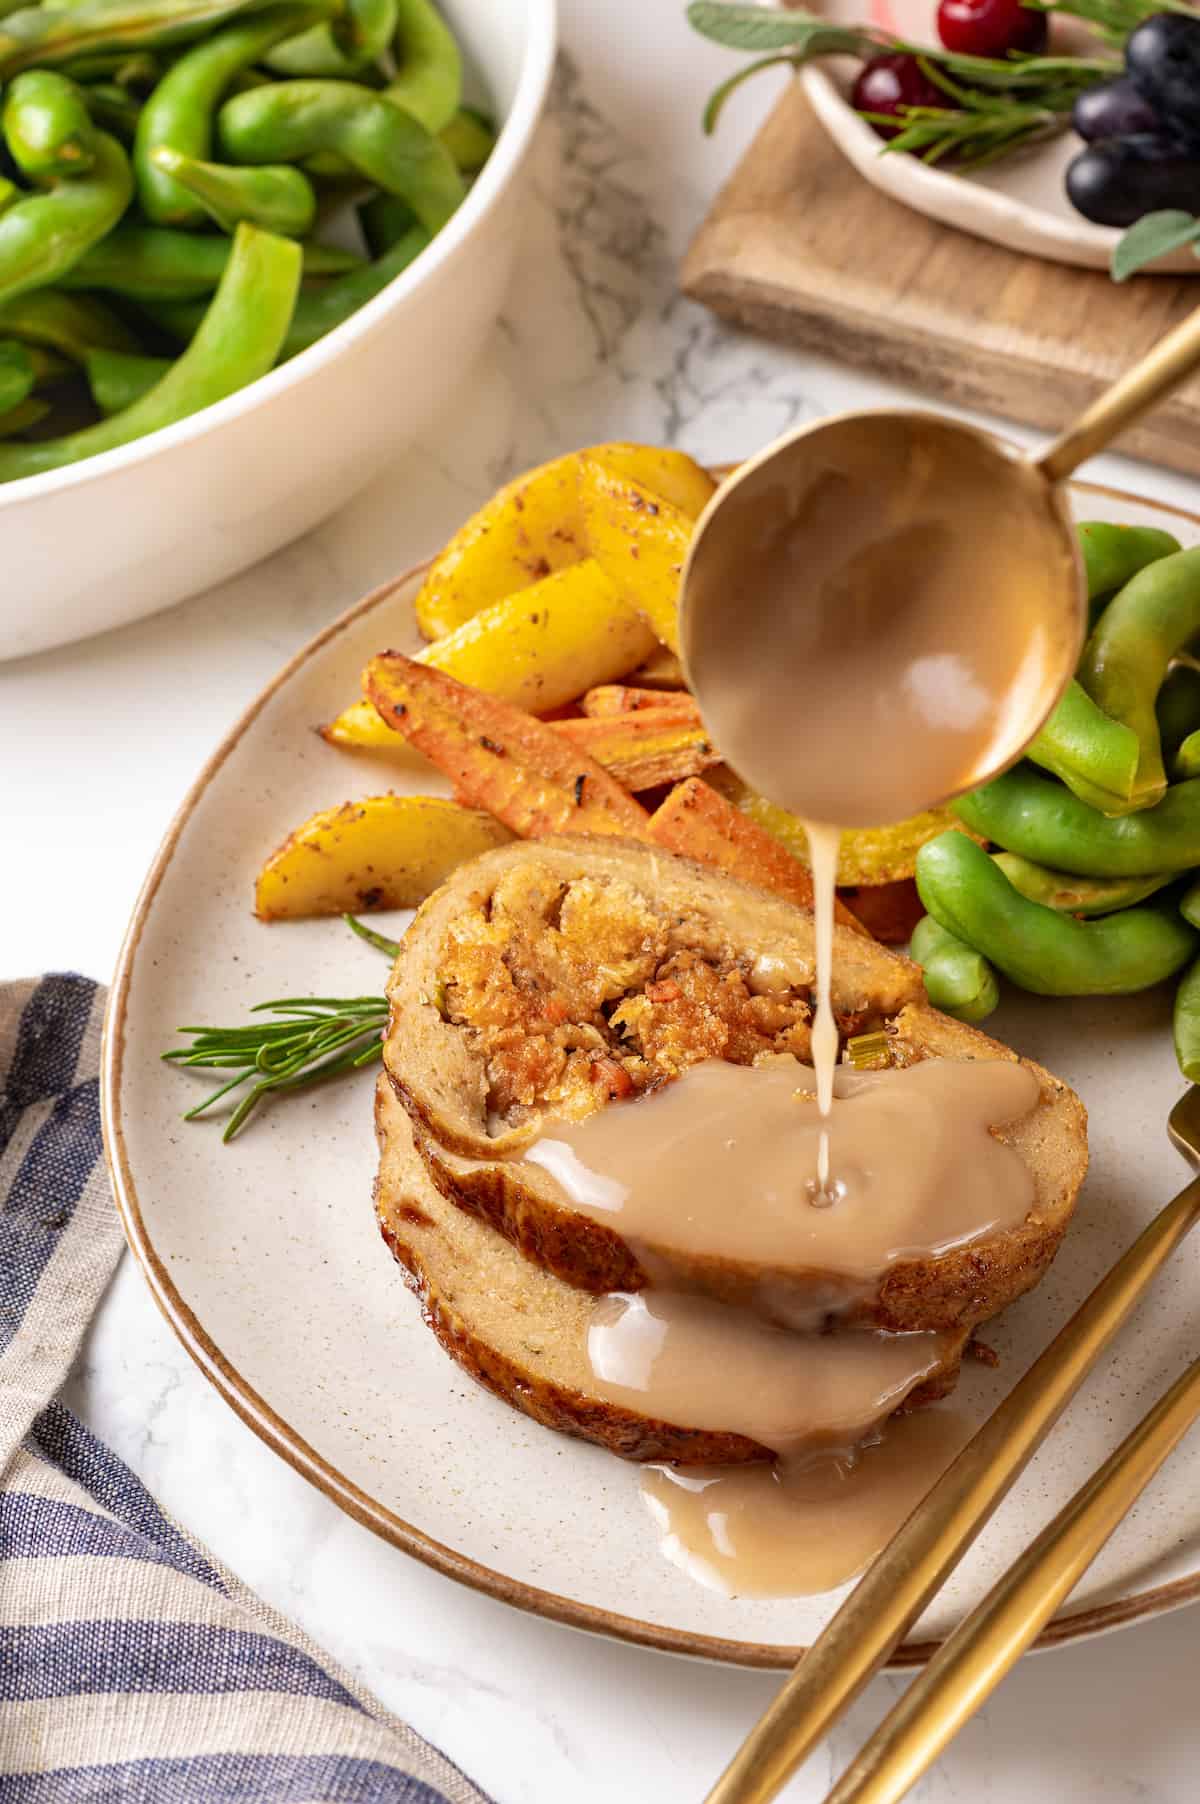
- Vegan Mashed Potatoes . It’s just not Thanksgiving without mashed potatoes! My Vegan Garlic Mashed Potatoes with Caramelised Onions are another excellent option. Don’t skip the vegan gravy !
- Cranberry Sauce . Canned cranberry sauce is typically vegan too, but there’s something really special about making it from scratch.
- Roasted Brussels Sprouts . The addition of maple syrup makes these extra tasty!
- Sweet Potato Casserole . This classic side has a creamy filling and irresistibly crunchy topping. Or try my Sweet Potato Souffle .
- Cornbread Stuffing . This cornbread stuffing is a Southern classic made vegan.
- Hasselback Butternut Squash . For something a little bit different, serve this impressive butternut squash for your vegan Thanksgiving celebration.
- Vegan Green Bean Casserole . Creamy, savoury, and always a welcome addition to the Thanksgiving table.
And don’t forget the dessert! Serve up a vegan pumpkin pie , apple crisp , or pecan pie to end the meal on a sweet note.
(Find more vegan Thanksgiving recipes here.)
Notes on Ingredients
Scroll down to the recipe card to find the ingredient quantities and recipe instructions.
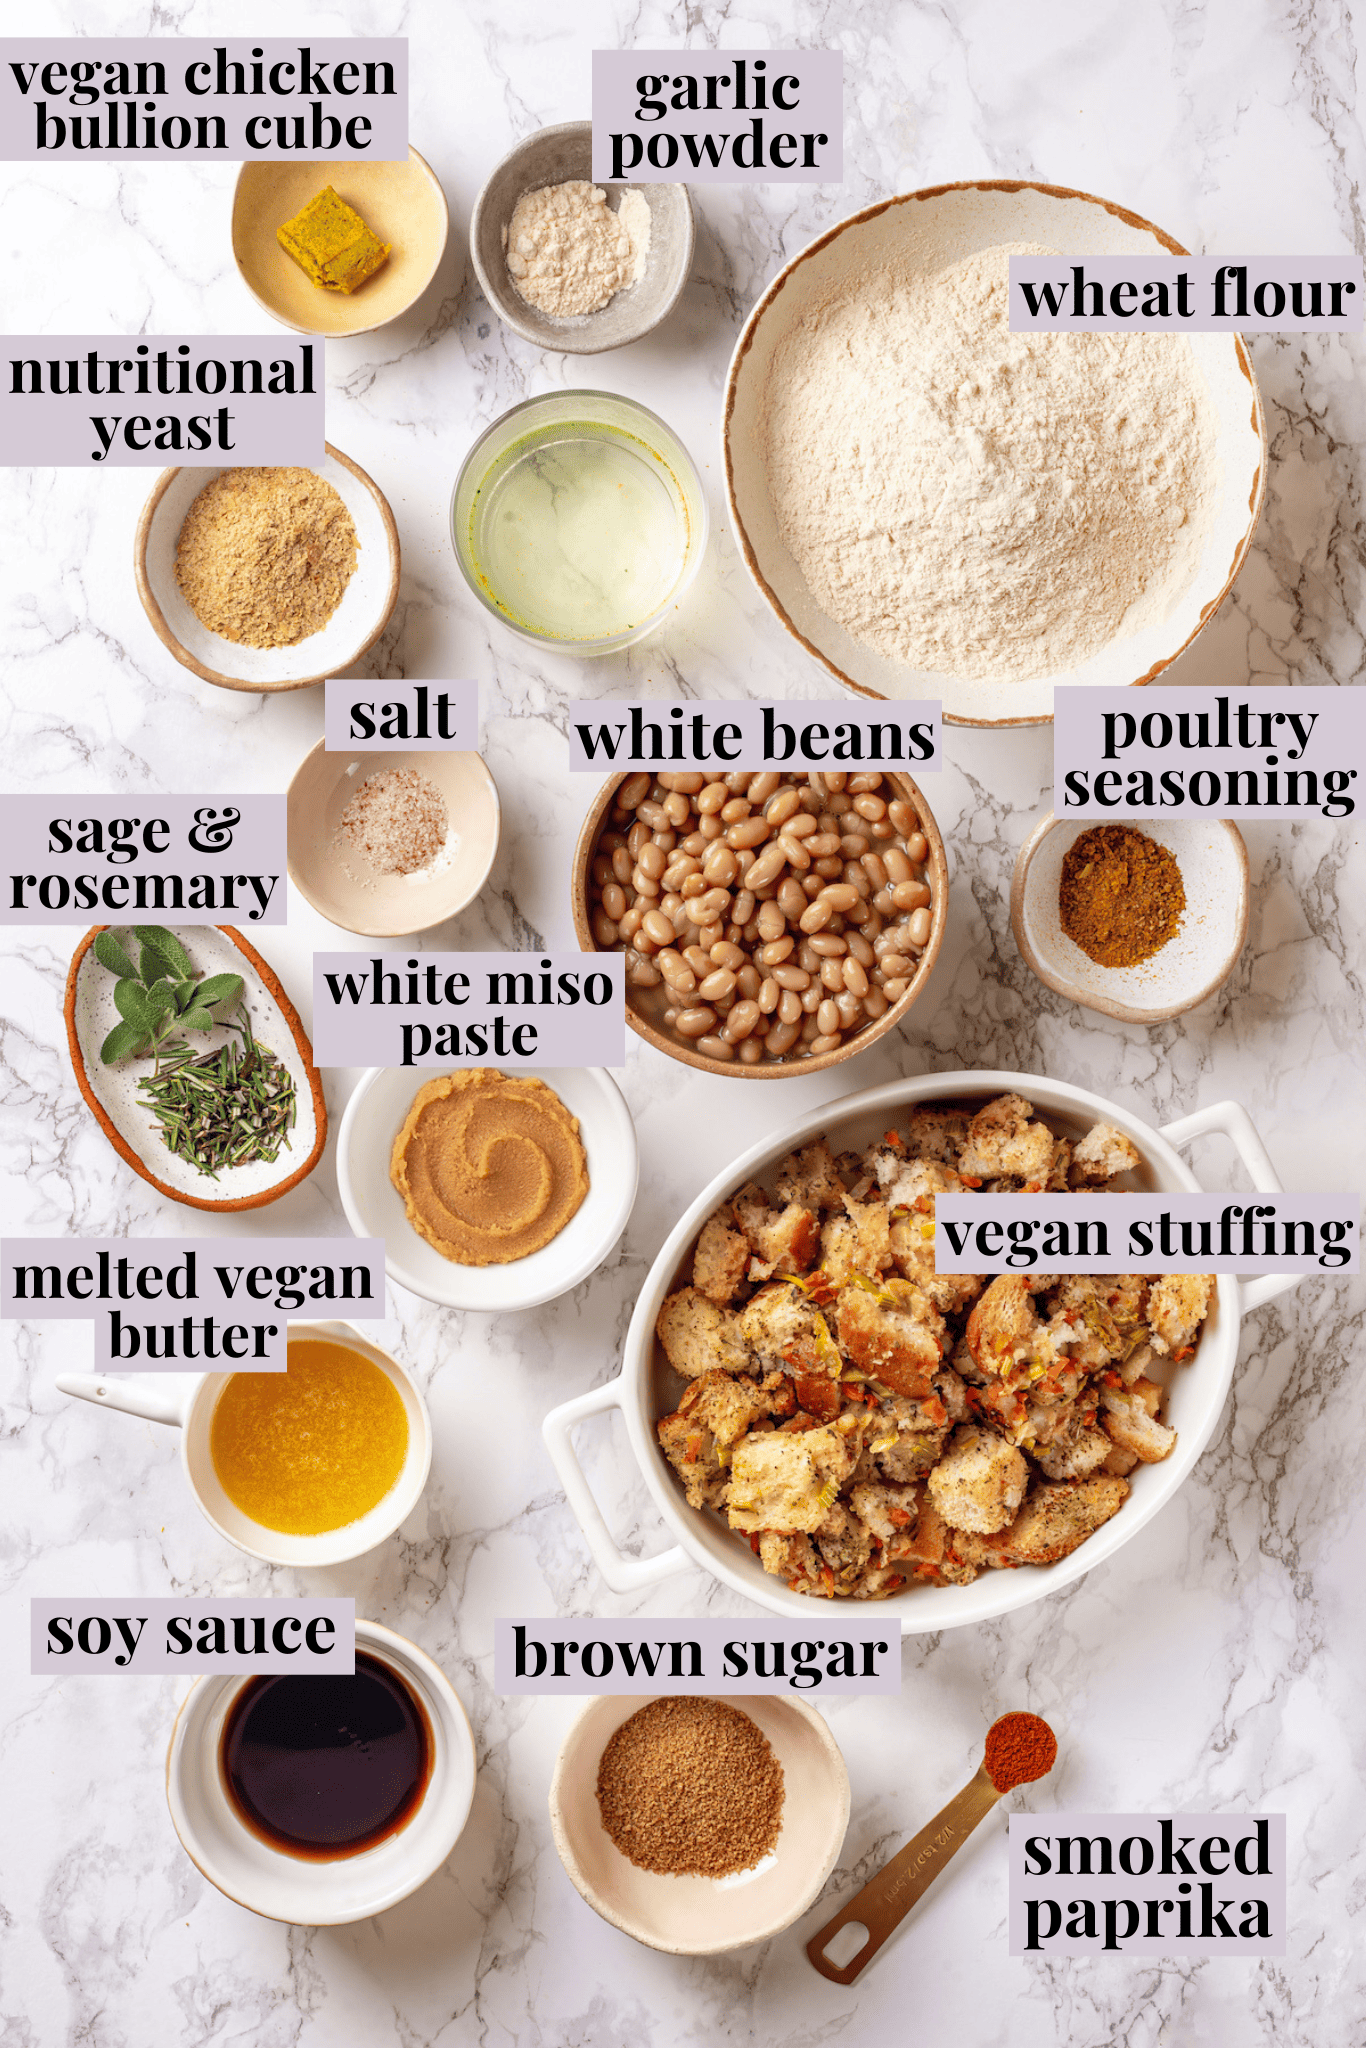
- White beans – Like cannellini beans.
- Vegetable bouillon or water
- Nutritional yeast – Nutritional yeast adds savoury flavour.
- Garlic powder
- White miso paste – White miso adds umami to our vegan turkey.
- Fresh rosemary and sage – Two herbs traditionally used for turkey.
- Salt
- Vegan chicken bouillon cube – If you can’t find vegan chicken bouillon, vegetable bouillon is fine.
- Vital wheat gluten flour
- Vegan stuffing – I used my vegan stuffing recipe.
- Poultry seasoning
For the glaze:
- Vegan butter – Store-bought or homemade vegan butter .
- Soy sauce – Tamari or liquid aminos are fine too.
- Brown sugar
- Smoked paprika
What Is Vital Wheat Gluten Flour?
One of the key ingredients in this plant-based turkey roast is the vital wheat gluten flour. Vital wheat gluten flour is the protein that is found in wheat. It’s essentially just gluten, and when added to bread recipes, it makes the bread chewier. It’s commonly used as a main ingredient in seitan, which is why it works so well in this recipe.
How to Make Vegan Turkey
This vegan turkey recipe is great for making in advance. After steaming, refrigerate the turkey until you’re ready to glaze and bake it on Thanksgiving day.
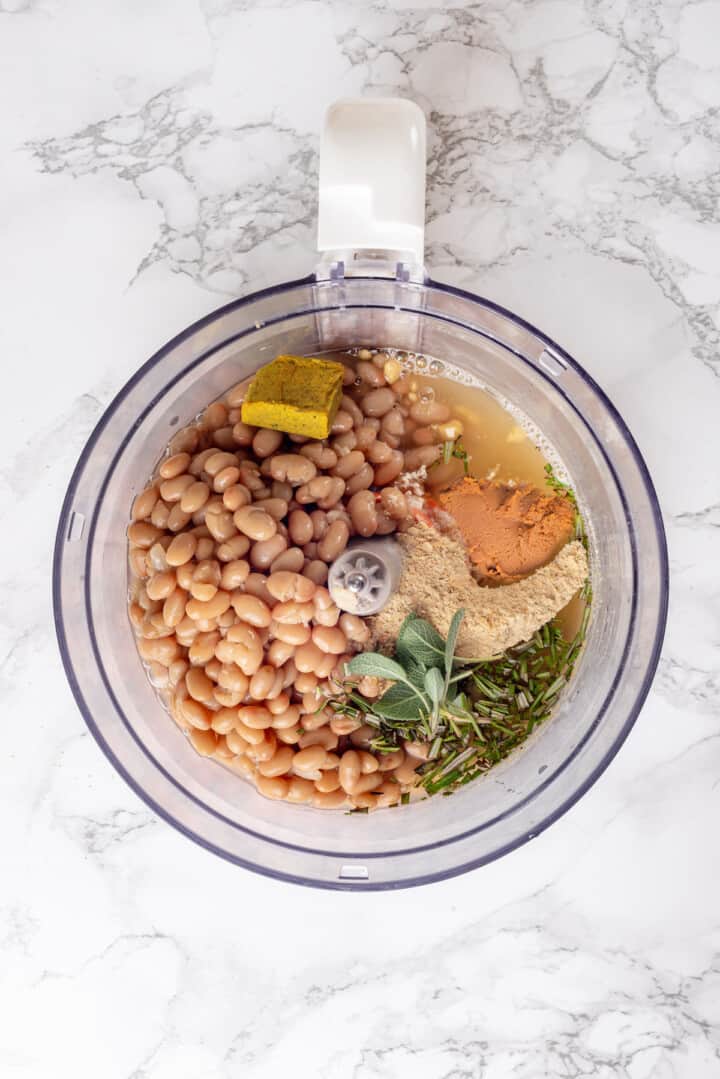
- Combine the beans and seasonings . Process the white beans, vegetable bouillon, nutritional yeast, garlic powder, miso paste, herbs, salt, and vegan chicken bouillon in a food processor until smooth.
- Finish the vegan turkey mixture . Add the vital wheat gluten flour and pulse to combine for about a minute.
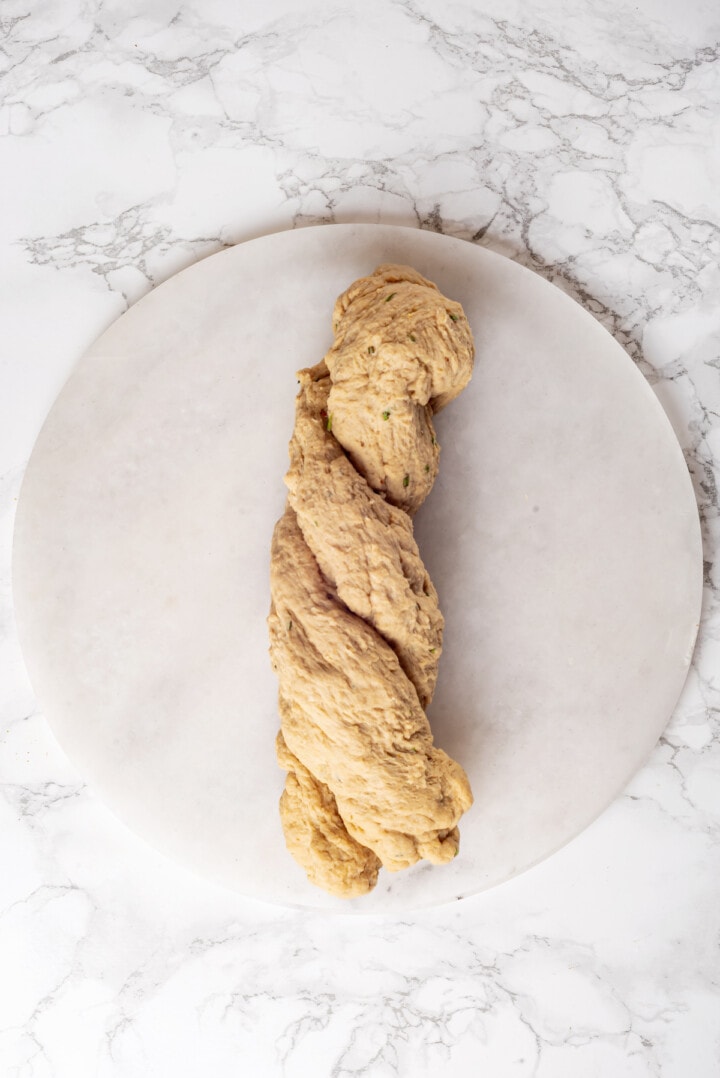
- Shape . Turn out the dough onto a work surface and shape it into a long roll about 1 ½ inch diameter. Fold the roll in two and twist it like a rope, then stretch it into a 1-inch thick rectangle.
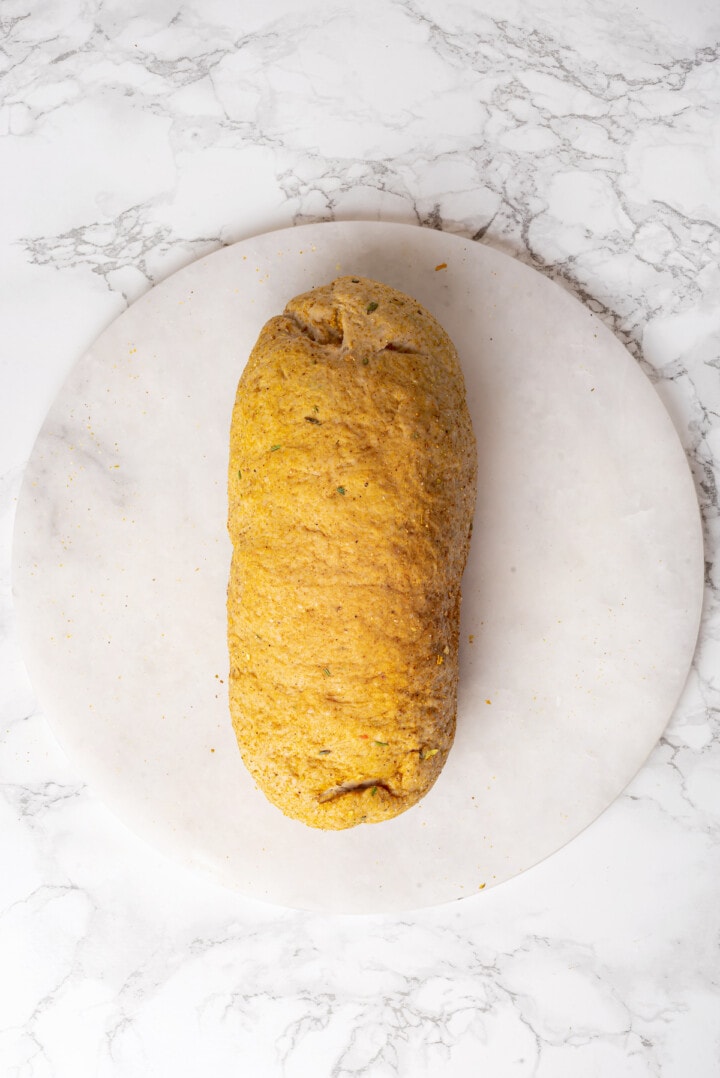
- Add the stuffing . Press the stuffing into the centre of the rectangle, shaping it into a log. Fold and close the dough, forming your turkey roast.
- Season and steam . Evenly rub the roast with a tablespoon of poultry seasoning. Wrap the roast with foil and secure it with kitchen twine. Steam for 45 minutes.
- Make the glaze . Stir together the ingredients for the glaze and let it sit while the roast is steaming to allow the sugar to dissolve.
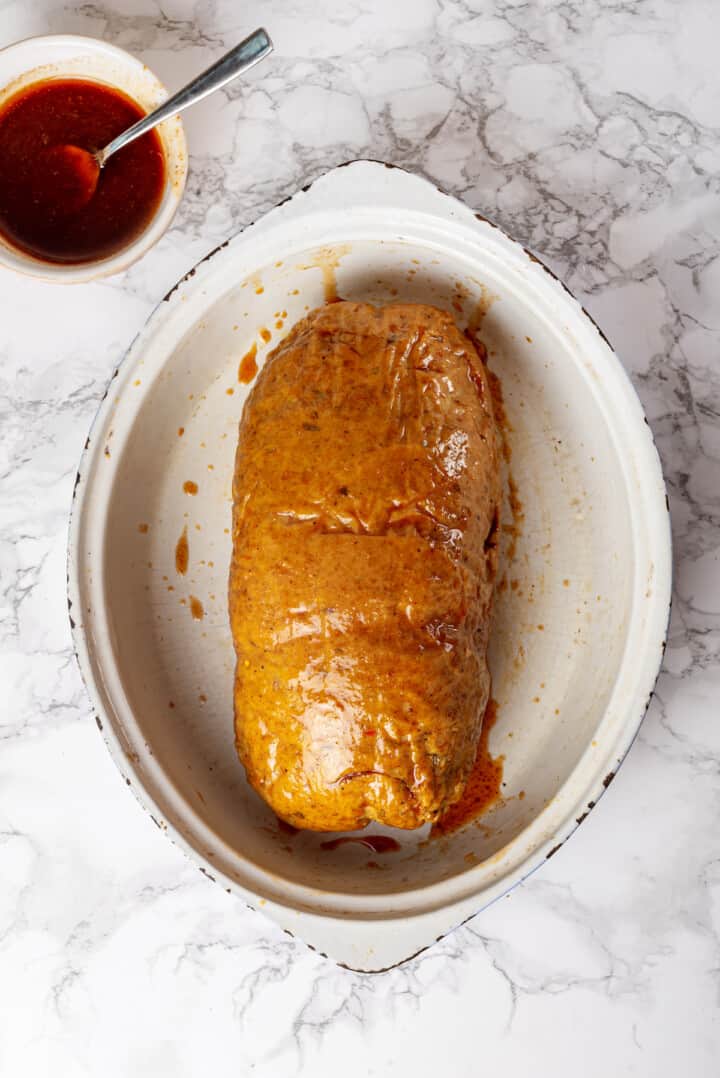
- Glaze the vegan turkey . Let the turkey cool slightly after steaming, then unwrap it and place it in a baking pan. Brush it with half of the glaze and preheat the oven to 400ºF.
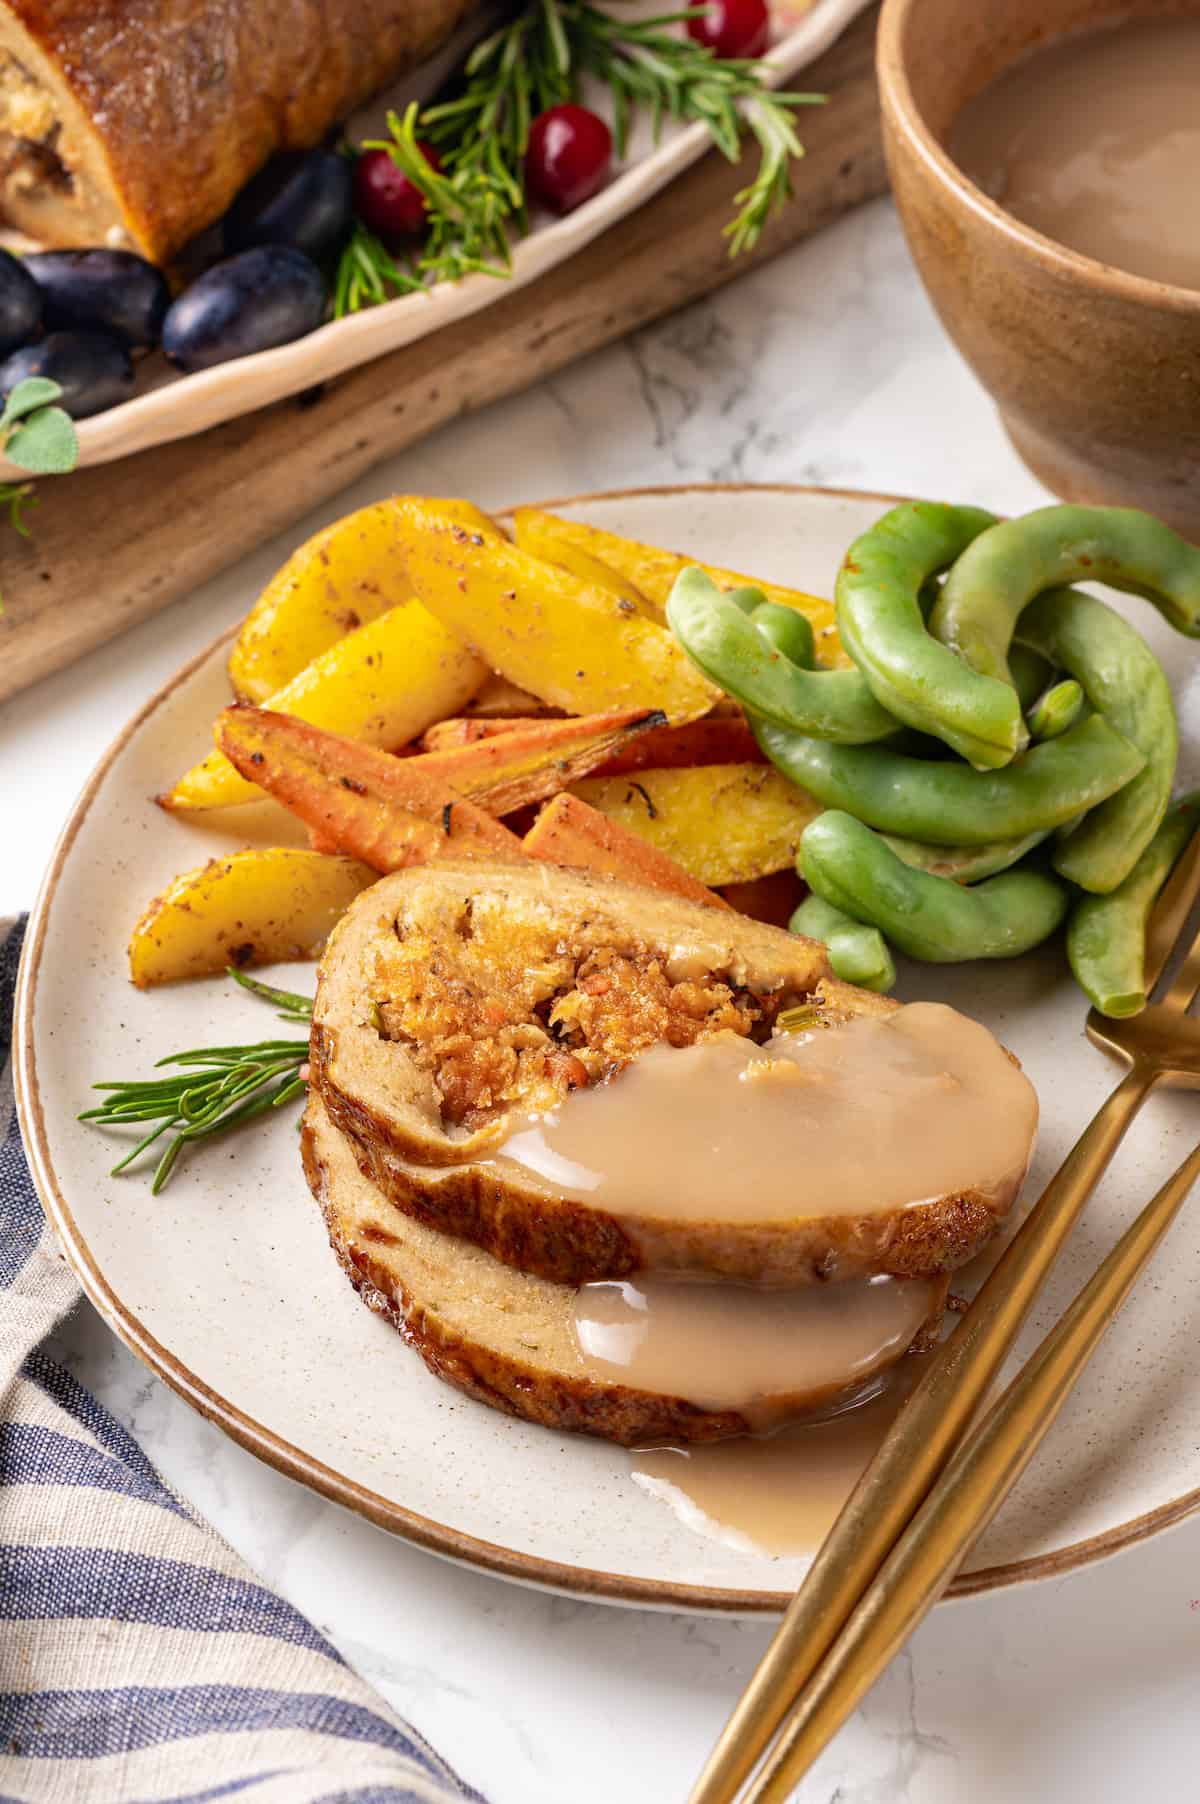
- Bake . Place the pan in the oven and bake the vegan turkey for 20 minutes, brushing it with additional glaze at the 10- and 15-minute marks. Slice and serve.
Tips for Success
Here are some additional pointers for a perfect vegan turkey.
- Make sure everything is well-incorporated . You want all the seasonings to be evenly distributed in the dough.
- Don’t over mix the dough. Once you’ve added the vital wheat gluten to the food processor, be sure not to over mix. If you over mix, you can break down the gluten in the flour. This will affect the texture of the vegan turkey.
- Make it unstuffed, if desired . Want to make this vegan turkey without stuffing in the middle? Shape it into a roll without the stuffing.
- Don’t cut it too thin . The stuffing will fall out if you try slicing the vegan turkey too thin, so I recommend slices that are about 3/4-inch thick, or even thicker.
How to Store
Store the plant-based turkey in an airtight container in the fridge for up to 3 days. You can eat it cold, or reheat it in your microwave or a 350ºF oven until warmed through.
Can I Freeze This Recipe?
Yes! This vegan turkey recipe will last in the freezer for up to 4 months. Store it in an airtight container, and thaw in the fridge before reheating according to the instructions above.
More Homemade Vegan Substitutes
- Homemade Oat Milk Creamer
- Vegan Marshmallows
- How to Make Vegan Parmesan Cheese
- Vegan Sour Cream (Creamy & Tangy)
- Vegan Heavy Cream Substitute
Ingredients
- 1 15 ounce can white beans , undrained (425g), I recommend salt free
- ¼ cup vegetable bouillon (broth) or water , 55g
- 2 tablespoons nutritional yeast
- 2 teaspoons garlic powder
- 1 tablespoon white miso paste
- 1 teaspoon chopped fresh rosemary
- 1 teaspoon chopped fresh sage
- ½ teaspoon salt
- Vegan chicken bouillon cube , low sodium if you need it to be
- 1 ½ cup + 2 tablespoons vital wheat gluten flour , 240g
- 2 packed cups vegan stuffing , you don’t need to bake this first
- 1 tablespoon poultry seasoning
For the glaze:
- 3 tablespoons vegan butter , melted
- 2 tablespoons soy sauce
- 1 tablespoon brown sugar
- ½ teaspoon smoked paprika
Instructions
- Place white beans, vegetable bouillon (broth), nutritional yeast, garlic powder, miso paste, chopped rosemary and sage, salt and vegan chicken bouillon cube to the bowl of the food processor.
- Process for about one minute until smooth.
- Add vital wheat gluten flour and pulse until combined, this will take about 1 minute.
- Invert the dough onto a table or working board and shape into a long roll about 1 ½ inch diameter. Fold the roll in two and twist like a rope.
- Now stretch the dough into a rectangle, about 1 inch thick.
- Shape the stuffing into a roll in the middle of the dough rectangle.
- Fold and close the dough, forming your turkey roast.
- Now evenly rub the roast with 1 tbsp of poultry seasoning.
- Wrap with aluminum foil, fold the sides inward toward the bottom and secure it with a rope.
- Steam for 45 minutes. If you don’t have an electric steamer: Fill a medium pot with 3 inches of water. Place a steamer basket into the pot, cover, and bring water to a simmer over high heat. Turn the heat to low and place your wrapped turkey to the basket. Steam for 45 minutes. If all of the water evaporates before the cooking ends add one more cup. If you don’t have a steamer basket, you can place like a circular wire rack in the pot and place it on top of it.
- Combine all ingredients for the glaze, stir and let it sit while the roast is steaming to let the sugar dissolve.
- After 45 minutes let the turkey cool down slightly, remove foil and transfer to a baking pan. Brush with half of the glaze.
- Preheat the oven to 400°F/200℃ and bake for 20 minutes, removing after 10 and 15 minutes to add another layer of glaze.
- It’s ready to slice and enjoy with gravy or veggies on the side.
- You can also shape it into a roll without stuffing, steaming and glazing with the same instructions
