With a thick and creamy no-bake cheesecake filling and a rich and nutty crust, this vegan pumpkin cheesecake is a classic holiday dessert. It’s loaded with your favorite fall flavors, is easy to make in the blender , and is entirely vegan and gluten-free!
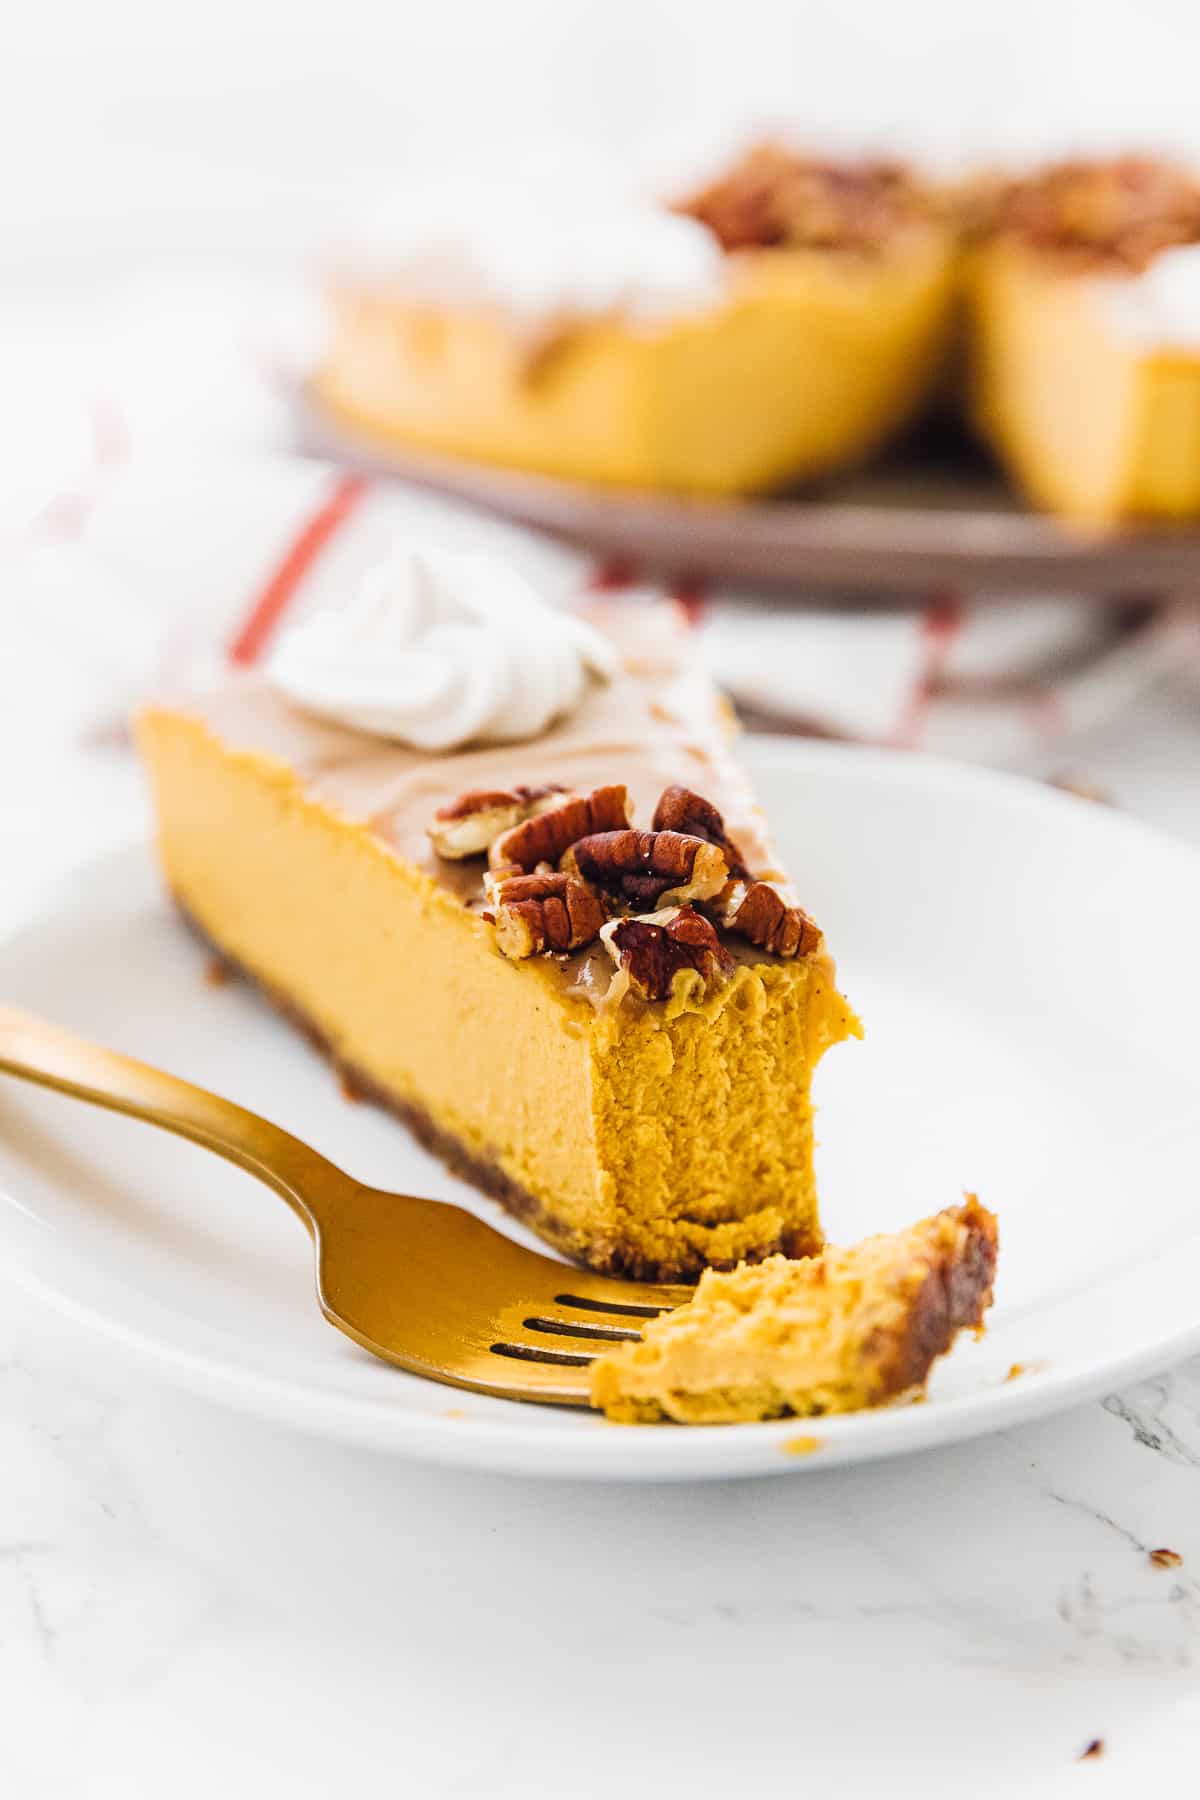
It’s not exactly a secret that I love a good cheesecake. After tasting dozens of vegan cheesecakes that didn’t resemble cheesecake at all, I can safely say that my homemade vegan cheesecake is the best I’ve tried. When Thanksgiving approaches, this equally delicious, no-bake vegan pumpkin cheesecake is one of my favorite alternatives to pumpkin pie . The pumpkin and warm spices shine in every bite, rounded out by the sweet dates and crunchy pecans in the crust. It’s rich, creamy, thick, indulgent, and doesn’t melt or fall apart. It doesn’t even need the oven!
Reasons to Love This Vegan Pumpkin Cheesecake Recipe
- Rich and creamy. This pumpkin cheesecake recipe might be vegan, but you wouldn’t know it from how thick and creamy the filling is. It’s made with rich coconut cream and blended cashews.
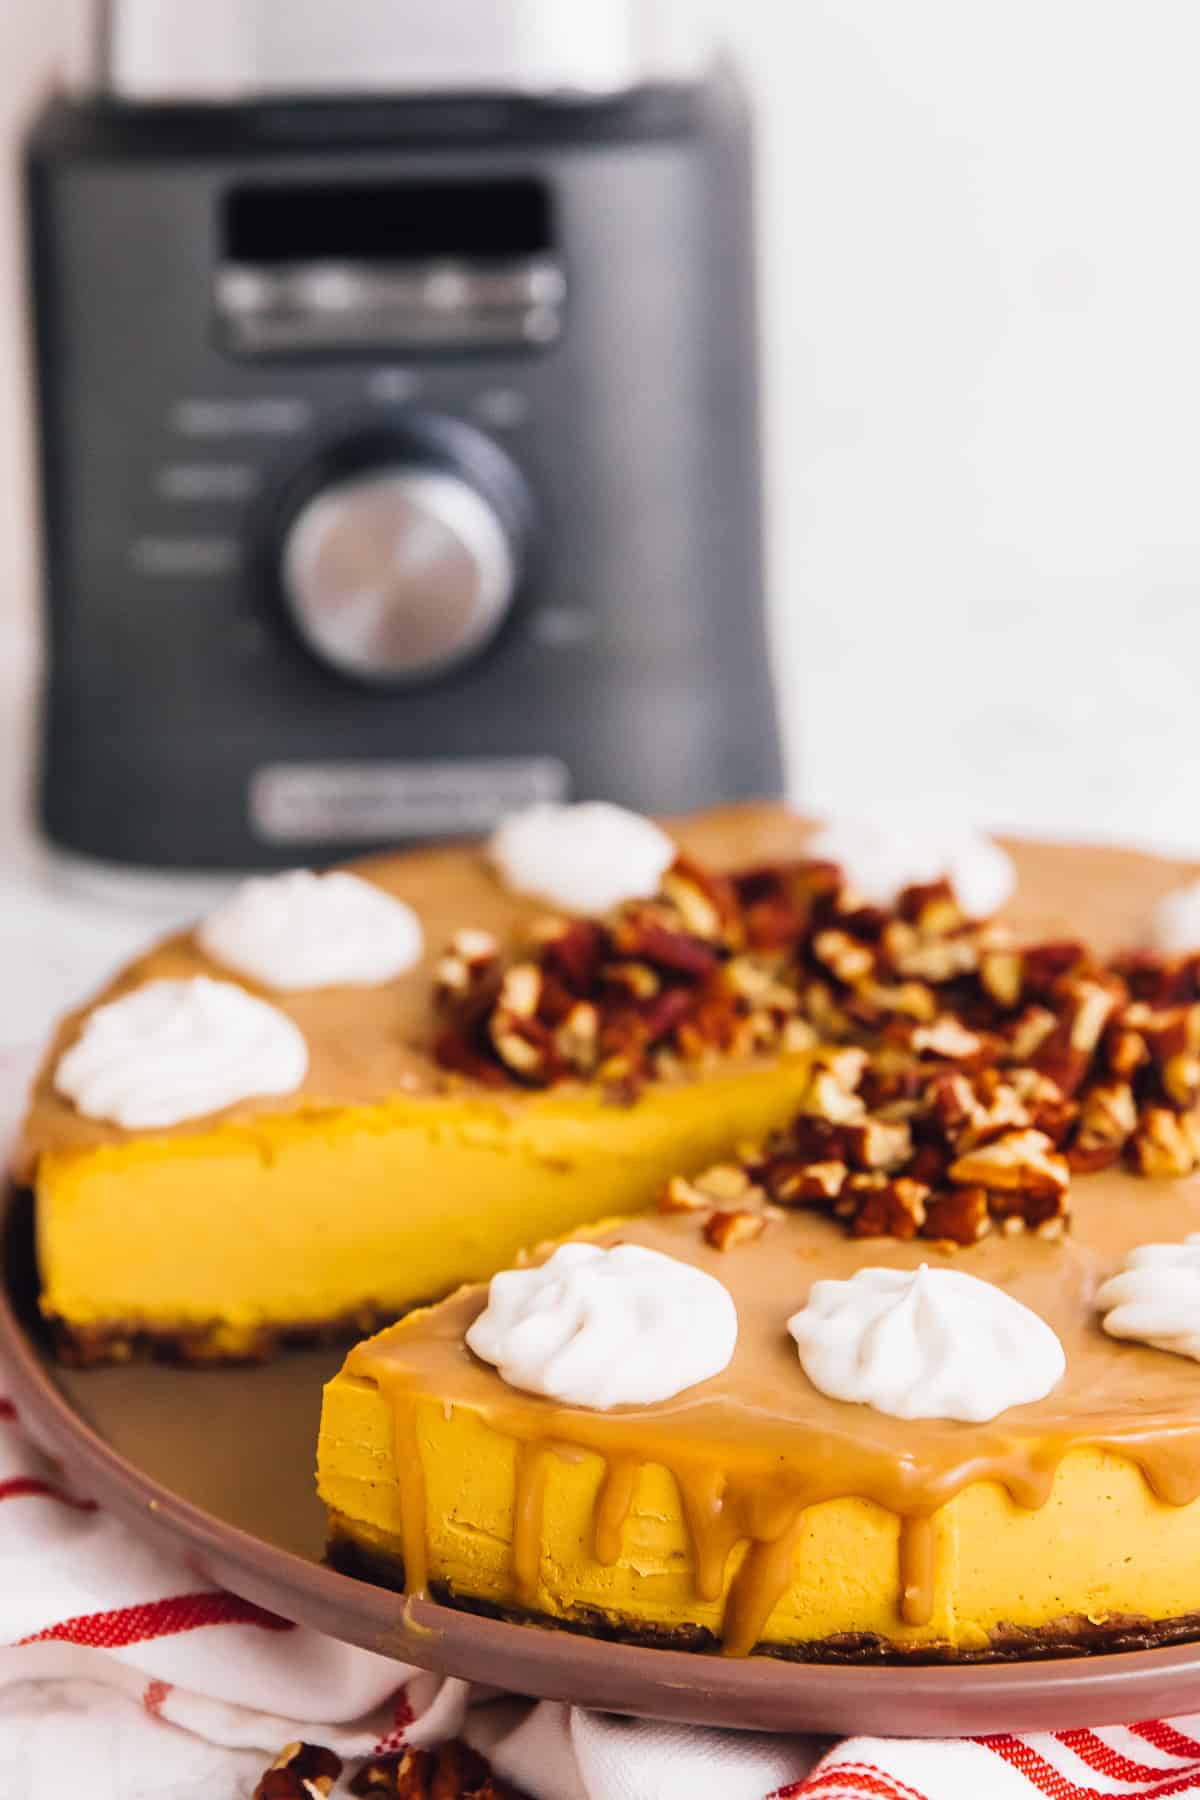
- Made in the blender. You’ll be blown away by how easy this cheesecake is to make using only the blender. You’ll blend the ingredients for the crust and the pumpkin cheesecake batter!
- No baking. While I love my original baked vegan cheesecake, this pumpkin version doesn’t require an oven. It’s a perfect make-ahead holiday dessert when the oven is often occupied with Christmas cookies and apple crisp .
- No melting. A common issue with vegan cheesecakes is that they melt. Because they use non-dairy cream and oil, vegan cheesecakes usually don’t hold up as well as cheesecakes that are made with cream cheese. But this vegan pumpkin cheesecake recipe will hold its shape and texture for a really long time.
Notes on Ingredients
Everyone loves fall flavors, and this creamy, gluten-free, and vegan pumpkin cheesecake is full of them thanks to a few key pantry ingredients. Scroll to the recipe card at the bottom of the article for the exact amounts of each ingredient.
Vegan Cheesecake Crust
- Dates – You want to use pitted dates, and they’ll need to soak in hot water for 10 minutes.
- Pecans – Walnuts, almonds, or macadamia nuts will also work.
Pumpkin Cheesecake Filling
- Cashews – The raw cashews will need to be soaked in water overnight, in hot water for an hour, or boiled for 5 minutes. I use this same method when preparing my vegan heavy cream substitute .
- Lemon juice – Always use freshly squeezed juice.
- Pumpkin puree – Make sure to use unsweetened and unseasoned pumpkin puree.
- Coconut oil – I don’t recommend substituting another oil in this case. Coconut oil is solid at room temperature (and when chilled), while other oils are not.
- Coconut cream – Not to be confused with super-sweet canned cream of coconut, which isn’t the same thing. I recommend full-fat coconut cream for the creamiest cheesecake filling.
- Maple syrup – Be sure to use pure maple syrup.
- Vanilla extract – Always use 100% pure extract.
- Pumpkin pie spice – This can be store-bought, or you can make homemade pumpkin pie spice from a blend of ground cinnamon, nutmeg, ginger, allspice, and cloves.
How to Make Vegan Pumpkin Cheesecake (No Bake!)
This gluten-free and vegan cheesecake is one of my go-to no-bake desserts, especially in the fall and winter. It’s actually very easy to make in a few simple steps:
- Blend the crust. Blend the pecans in your blender or food processor until the nuts are a mealy consistency. Then, add the dates, and pulse until the combination is well-mixed and sticky.
- Form the crust. Next, line a 10-inch cheesecake pan with parchment paper. Press the crust mixture firmly into the bottom of the pan. Afterward, chill the crust in the freezer while you make the filling.
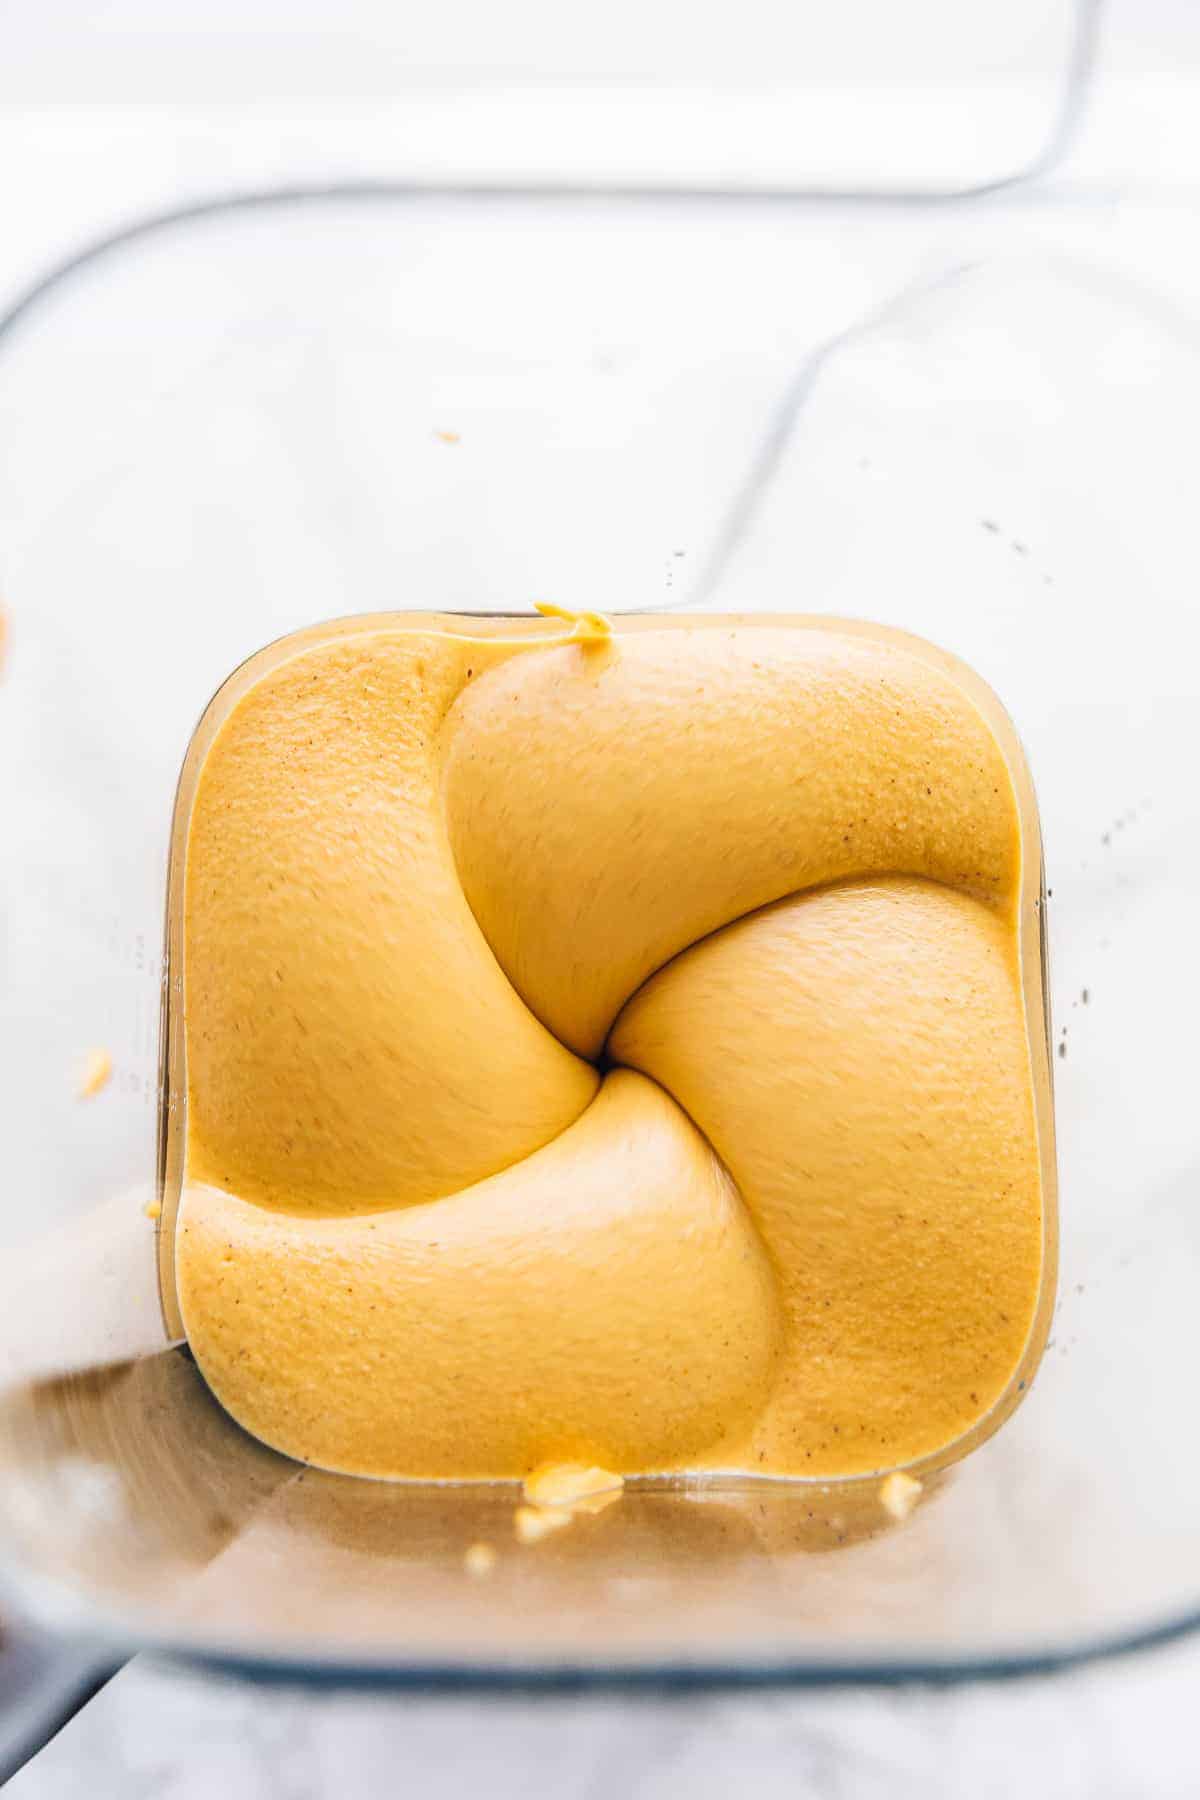
- Make the filling. Combine all of the cheesecake filling ingredients in the blender. Blend for about 4 minutes, until the mixture is smooth and creamy. It shouldn’t be grainy at all. Scrape down the sides, and blend for one more minute.
- Assemble. Pour the cheesecake filling into the crust, and smooth the top.
- Freeze. Place your vegan pumpkin cheesecake in the freezer. Let it chill overnight.
- Serve. Remove the cheesecake from the freezer 15-20 minutes before serving. Let it sit at room temperature, then serve it with any toppings you like.
Recipe Tips
- Make your own puree. You can use pumpkin puree that you buy at the store, and this recipe will still be delicious. But it will have a much stronger, richer, and more intense flavor if you make your own pumpkin puree. My homemade pumpkin puree recipe is simple, easy, and so much better than anything you’ll find at the store.
- Thoroughly blend the filling. Don’t be shy when using the blender in this recipe. This vegan pumpkin cheesecake is great in part because of how smooth and creamy it is, so make sure to blend it for as long as is necessary to get the filling to the perfect consistency.
- Solidify the coconut oil. Coconut oil is usually solid, but if you live in a hot climate, it might melt and become liquid. It’s important to use solid coconut oil for this gluten-free cheesecake recipe, so if your coconut oil is in liquid form, just throw it in the fridge for 15 minutes.
- Make your own coconut cream. You can buy coconut cream for this recipe, but it’s not always easy to find. If you don’t have coconut cream, you can just make your own with coconut milk. To make coconut cream, place a can of coconut milk in the fridge overnight. Then open the can and empty out the contents. The coconut milk will be separated into a solid and a liquid. The solids are coconut cream, so use them for the recipe. The liquid is coconut water, so drink it or use it in a different recipe.
- Adjust the size. I use a 10-inch cheesecake pan when making this recipe, but you can use a 9 or 8-inch pan. If you don’t have a cheesecake pan that big, either cut the recipe in half or make individual portions in ramekins.
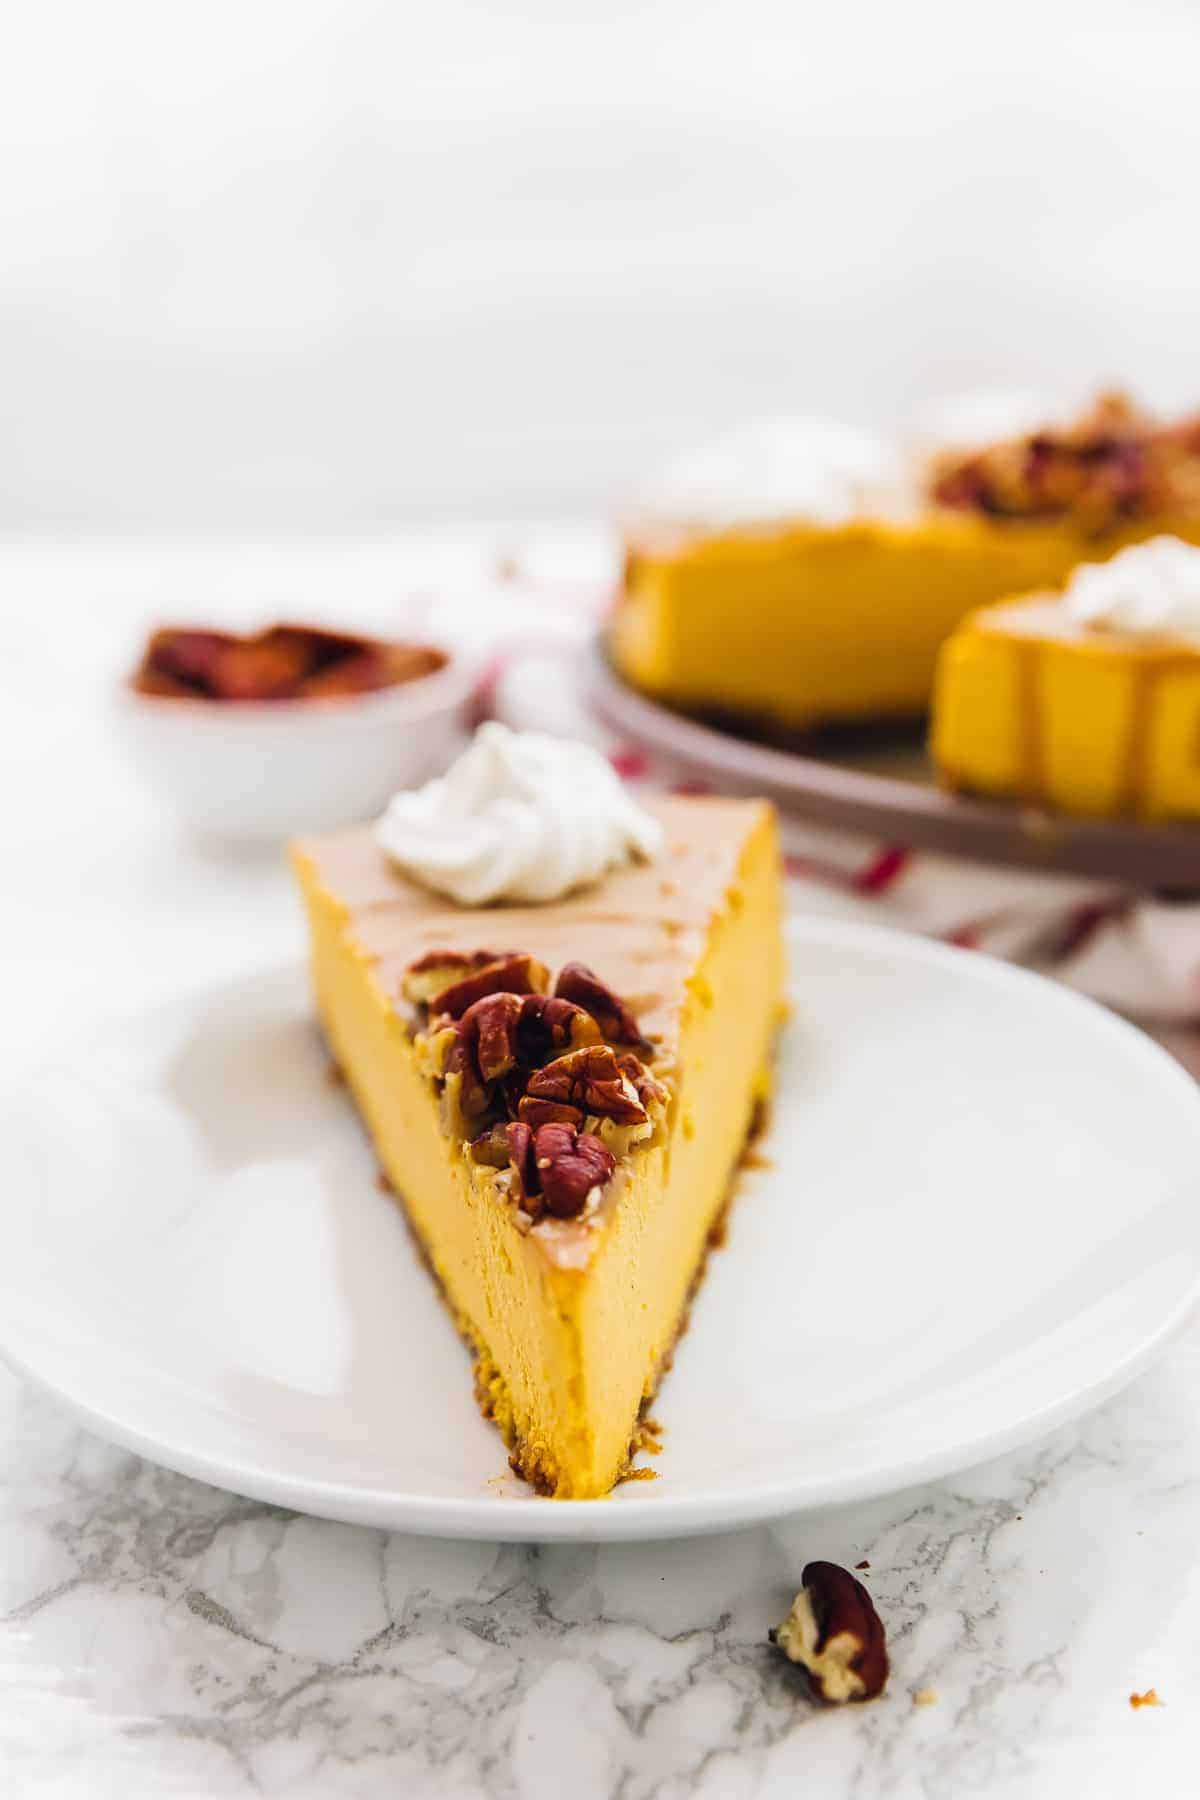
Cheesecake Toppings and Serving Ideas
I love to serve thick slices of creamy vegan pumpkin cheesecake with a dollop of homemade coconut whipped cream , or any of the following easy topping ideas:
- Toasted nuts or candied pecans
- Vegan ice cream
- Caramel sauce
Serve this pumpkin cheesecake as a Christmas dessert with vegan eggnog or enjoy it in the fall with vegan hot chocolate or golden milk after dinner.
How to Store Leftovers
- Keep leftovers frozen. To keep this vegan no-bake pumpkin cheesecake thick and creamy, it’s best to store it in the freezer. Wrap the cake in plastic wrap or store it in an airtight container, and it will last in the freezer for up to 4 months.
- Soften before serving. Remove the cheesecake from the freezer 15 minutes before serving, and you’ll have a perfect pumpkin dessert anytime you need one.
More Vegan Pumpkin Desserts
- Vegan Pumpkin Pie
- Pumpkin Dump Cake
- Vegan Pumpkin Cupcakes
- Vegan Pumpkin Cookies
Ingredients
For the Crust:
- 1 cup pitted dates , soaked in hot water for 10 minutes, then drained
- 1 cup raw pecans or walnuts , you can substitute with almonds or macadamia nuts
Pumpkin Cheesecake
- 4 cups raw cashews , soaked overnight or in hot water for one hour, then drained, OR just easily boiled for 5 minutes*
- ¼ cup lemon juice
- 1 cup pumpkin puree
- ⅔ + ¼ cup coconut oil , solidified
- 1 ¼ cups coconut cream
- 1 cup maple syrup
- 2 teaspoons vanilla extract
- ½ teaspoon sea salt
- 2 teaspoons pumpkin pie spice
Instructions
- Put the pecans or walnuts in a blender, and blend until they turn into a mealy consistency.
- Add the warm dates to the blender and pulse until the nuts and dates are blended together. Use a spatula to scrape down the sides of the blender. The mixture should be slightly sticky.
- Press the mixture into the bottom of a 10-inch cheesecake pan that’s lined with parchment paper. Place in the freezer while you make the filling.
- Put all of the cheesecake filling ingredients into the blender, and blend until entirely smooth and creamy. This should take about 4 minutes.
- Use a rubber spatula to scrape down the sides of the blender, and blend again for 1 minute. The mixture should not be grainy at all.
- Pour the cheesecake mixture over the crust in the cheesecake pan, and smooth the top.
- Place the pumpkin cheesecake in the freezer overnight.
- Remove the cheesecake from the freezer 15-20 minutes before you plan on eating it.
Notes
- If you don’t have a 10-inch pan, you can use an 8 or 9-inch pan. If you only have pans smaller than that, you can cut the recipe in half, or make the cheesecake in individual ramekins.
- You can make coconut cream out of coconut milk by placing the milk in the fridge overnight. Empty the cans into a bowl, and use the solids for the recipe. The liquid is coconut water, so you can drink it or use it in a different recipe.
- If your coconut oil is not solidified, place it in the fridge for 15 minutes before using it.

Vegan Pumpkin Cheesecake
Ingredients
For the Crust:
- 1 cup pitted dates soaked in hot water for 10 minutes, then drained
- 1 cup raw pecans or walnuts you can substitute with almonds or macadamia nuts
Pumpkin Cheesecake
- 4 cups raw cashews soaked overnight or in hot water for one hour, then drained, OR just easily boiled for 5 minutes*
- ¼ cup lemon juice
- 1 cup pumpkin puree
- ⅔ + ¼ cup coconut oil solidified
- 1 ¼ cups coconut cream
- 1 cup maple syrup
- 2 teaspoons vanilla extract
- ½ teaspoon sea salt
- 2 teaspoons pumpkin pie spice
Instructions
- Put the pecans or walnuts in a blender, and blend until they turn into a mealy consistency.
- Add the warm dates to the blender and pulse until the nuts and dates are blended together. Use a spatula to scrape down the sides of the blender. The mixture should be slightly sticky.
- Press the mixture into the bottom of a 10-inch cheesecake pan that’s lined with parchment paper. Place in the freezer while you make the filling.
- Put all of the cheesecake filling ingredients into the blender, and blend until entirely smooth and creamy. This should take about 4 minutes.
- Use a rubber spatula to scrape down the sides of the blender, and blend again for 1 minute. The mixture should not be grainy at all.
- Pour the cheesecake mixture over the crust in the cheesecake pan, and smooth the top.
- Place the pumpkin cheesecake in the freezer overnight.
- Remove the cheesecake from the freezer 15-20 minutes before you plan on eating it.
Notes
- If you don’t have a 10-inch pan, you can use an 8 or 9-inch pan. If you only have pans smaller than that, you can cut the recipe in half, or make the cheesecake in individual ramekins.
- You can make coconut cream out of coconut milk by placing the milk in the fridge overnight. Empty the cans into a bowl, and use the solids for the recipe. The liquid is coconut water, so you can drink it or use it in a different recipe.
- If your coconut oil is not solidified, place it in the fridge for 15 minutes before using it.
Nutrition
Vegan Pumpkin Cheesecake https://jessicainthekitchen.com/vegan-pumpkin-cheesecake-with-salted-caramel-topping/ October 3, 2023
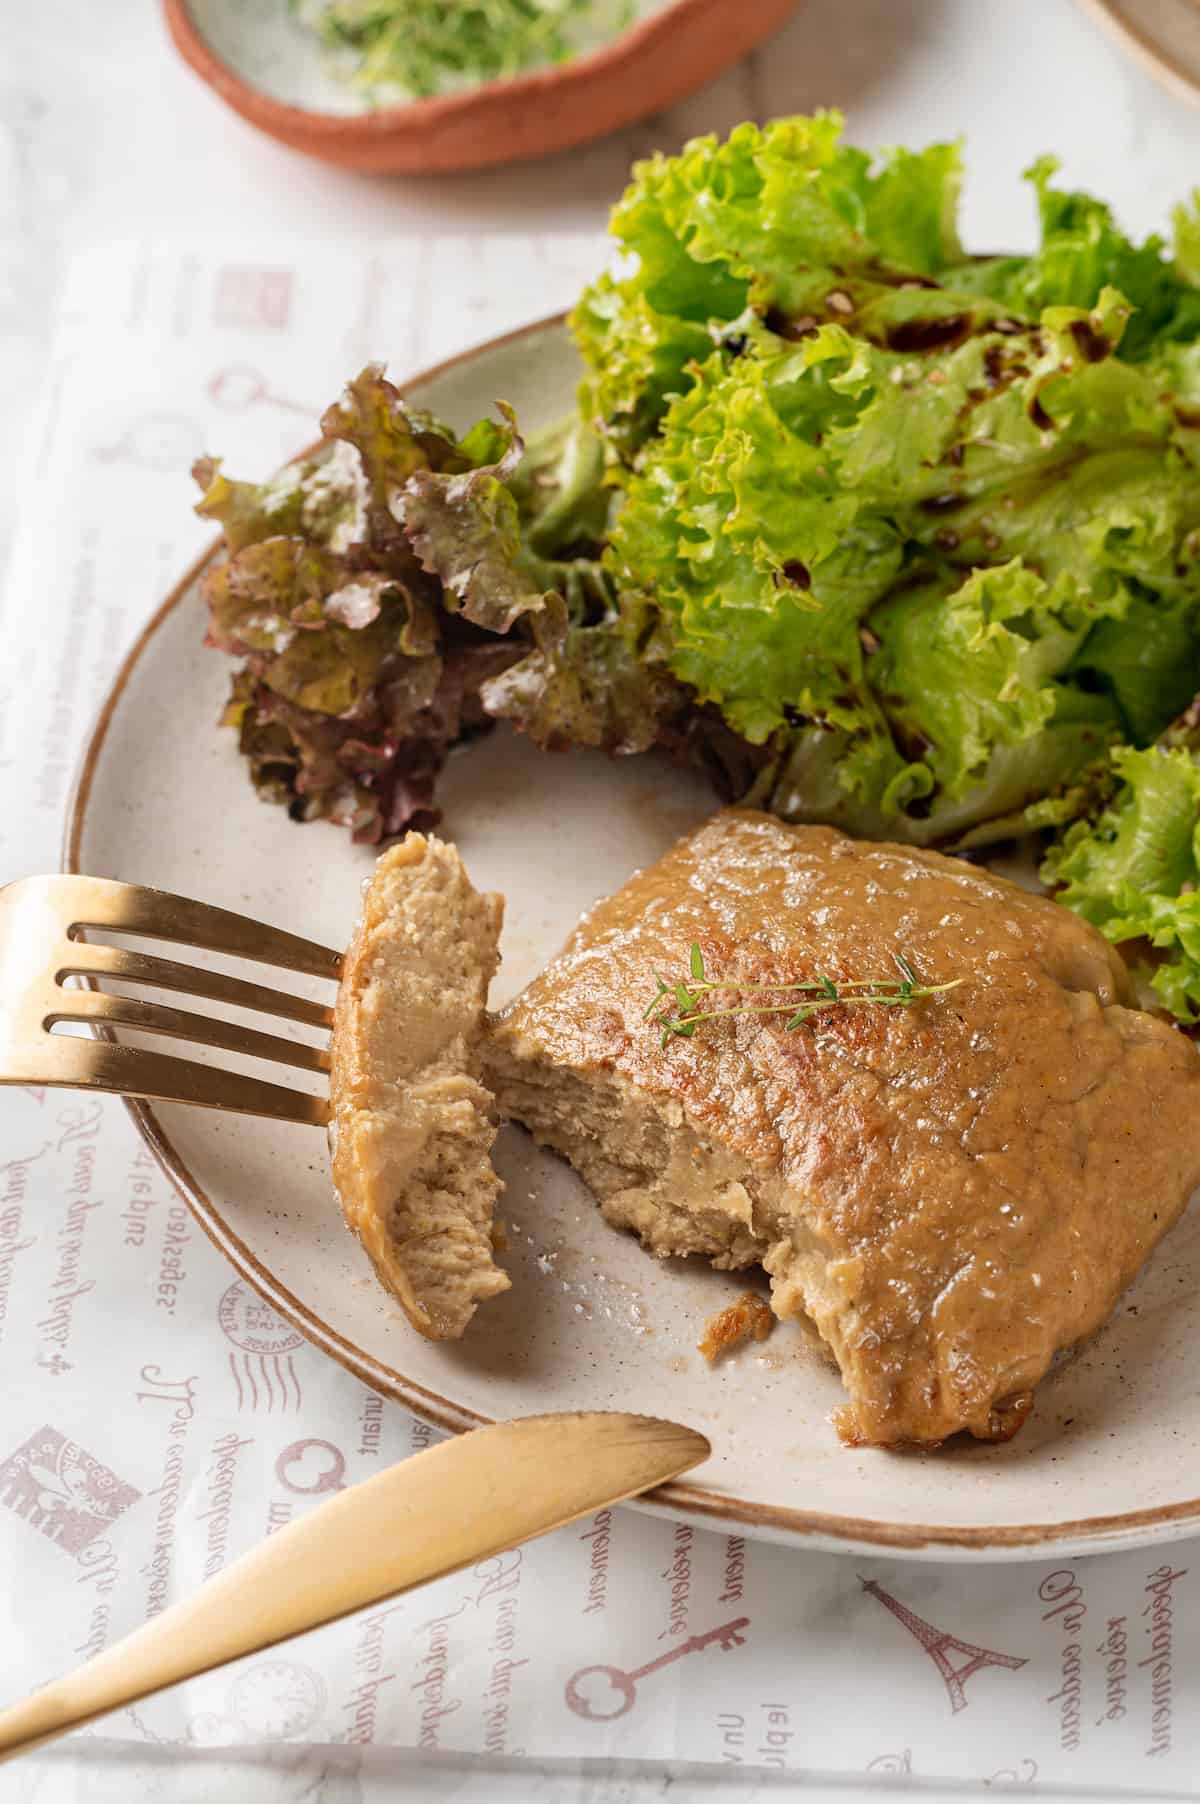
This vegan chicken recipe is chewy, savoury, and perfect for transforming any chicken dish into a plant-based option! Here’s how to make it.
Vegan chicken. Isn’t that an oxymoron?
Not really! This vegan chicken has the texture and flavour down pat, but it’s made with tofu, vital wheat gluten, and seasonings instead of, well, chicken .
What’s the Best Fake Chicken?
There are many types of vegan chicken in the grocery store these days, but let me tell you— none of them compare to homemade. The texture and flavour are far better, and it’s more budget-friendly too. You’ll end up with a surprisingly delicious and realistic vegan alternative to regular chicken that you can use in so many different ways.
Just like tofu, this is a vegan protein where the flavour comes from what you add to it. Below, I offer a blueprint for a basic vegan chicken, but you can tweak it based on what you’re using it for—i.e., omit the thyme if you’re using the vegan chicken in an Asian stir fry , or add some cayenne if you’re making vegan fried chicken. Just don’t skip the miso or nutritional yeast —both are essential for that baseline chicken flavour.
Why You’ll Love This Vegan Chicken Recipe
Here’s what makes this the best vegan chicken out there:
- Budget-friendly . Store-bought chicken substitutes are super expensive, so making your own vegan chicken is a much more affordable option.
- Surprisingly easy . This vegan chicken recipe is easier than you might expect—and it’s also kind of fun to make!
- So versatile . Whether you’re making chicken salad sandwiches or hearty chicken noodle soup, this vegan chicken has got you covered.
- Way better than store-bought . The texture and flavour of this vegan chicken are so superior to the plant-based chicken sold at the grocery store, you won’t believe it. Instead of tough or strangely spongy, this vegan chicken is absolute perfection—just the right amount of chewiness and lots of savoury flavour.
What Makes Vegan Chicken Taste Like Chicken?
Nutritional yeast and white miso are the stars of this vegan chicken recipe, making it taste like chicken. Nutritional yeast is a deactivated form of yeast that packs plenty of umami, while white miso adds depth and a hint of sweetness to help give it that classic chicken flavour.
Together with the vital wheat gluten, which has a similar texture to meat, and seasonings, these two ingredients create a vegan chicken that’s just as delicious as the real thing. (If you ask me, it tastes even better!)
Notes on Ingredients
Scroll down to the recipe card to find the ingredient quantities and recipe instructions.
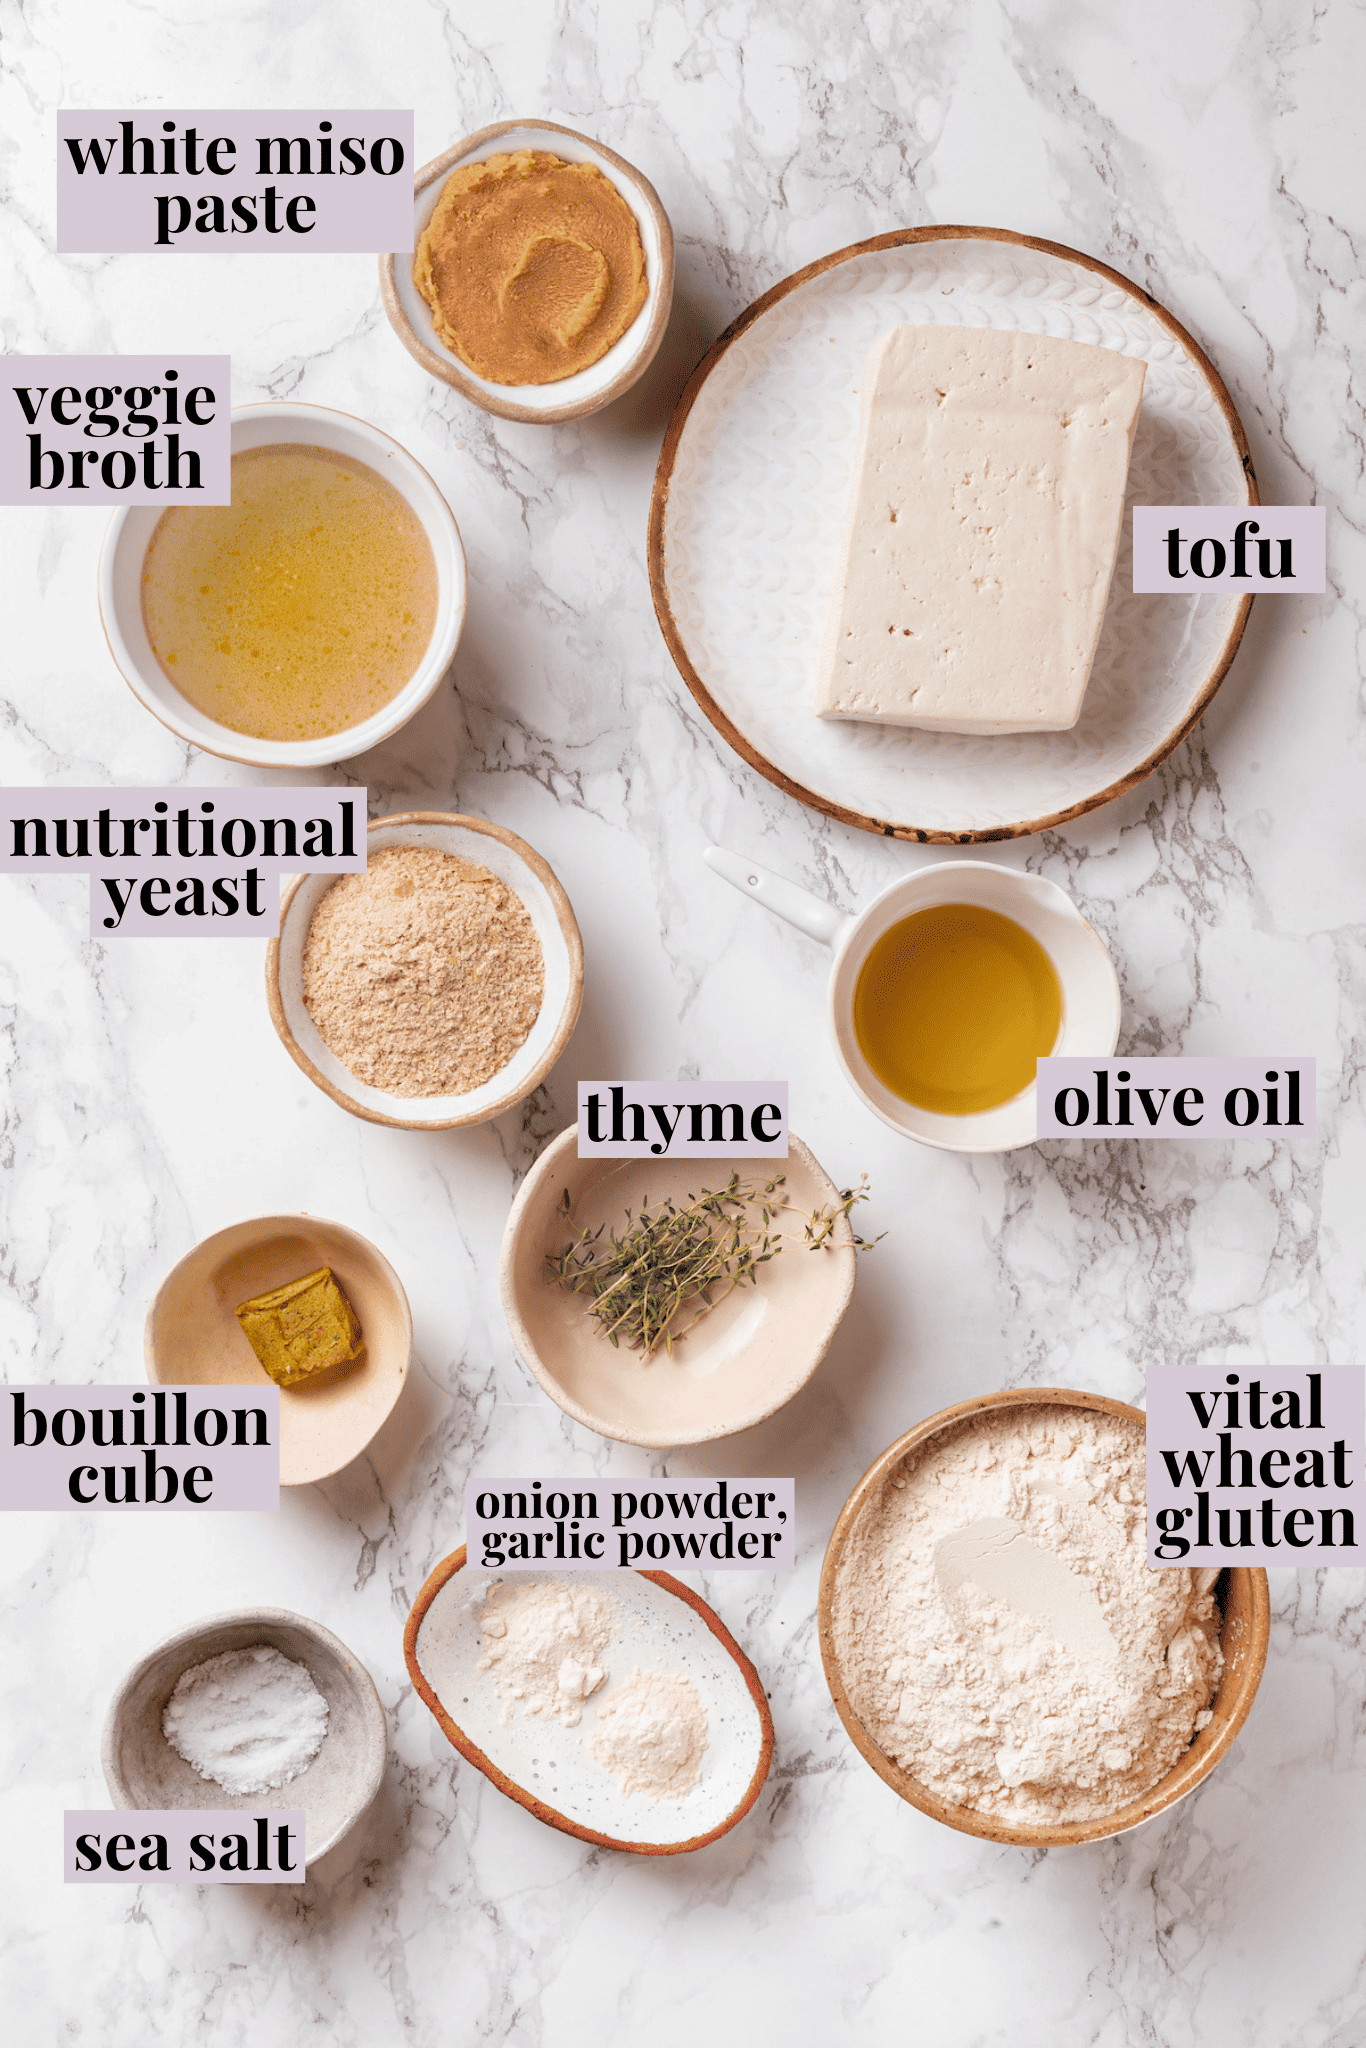
- Extra-firm tofu – Drain and press for 30 minutes to remove the excess liquid. (Learn more: How To Cook Tofu 101 )
- Nutritional yeast
- Vegetable broth or water – Homemade vegetable broth is best, but store-bought is fine too. If you don’t have either, use water.
- Olive oil
- White miso paste – Miso paste adds umami to this vegan chicken recipe.
- Thyme – You can use fresh or dried.
- Vegetable broth paste or vegetable or mushroom bouillon cube – I love using the no-chicken paste by Better Than Bouillon.
- Onion powder
- Garlic powder
- Fine sea salt
- Vital wheat gluten flour
What Is Vital Wheat Gluten?
Vital wheat gluten is a natural protein that comes from wheat and is used to make seitan, which is often referred to as “wheat meat” or “vegan chicken.” When mixed with liquid, it creates a dough-like consistency that is perfect for vegan dishes. It has a chewy texture and can be seasoned in any way you wish. Vital wheat gluten can be found in most health food stores or you can order it online.
How to Make Vegan Chicken
Making vegan chicken at home is easy, but it does take some time. Make sure to take that into account when planning your dinner!
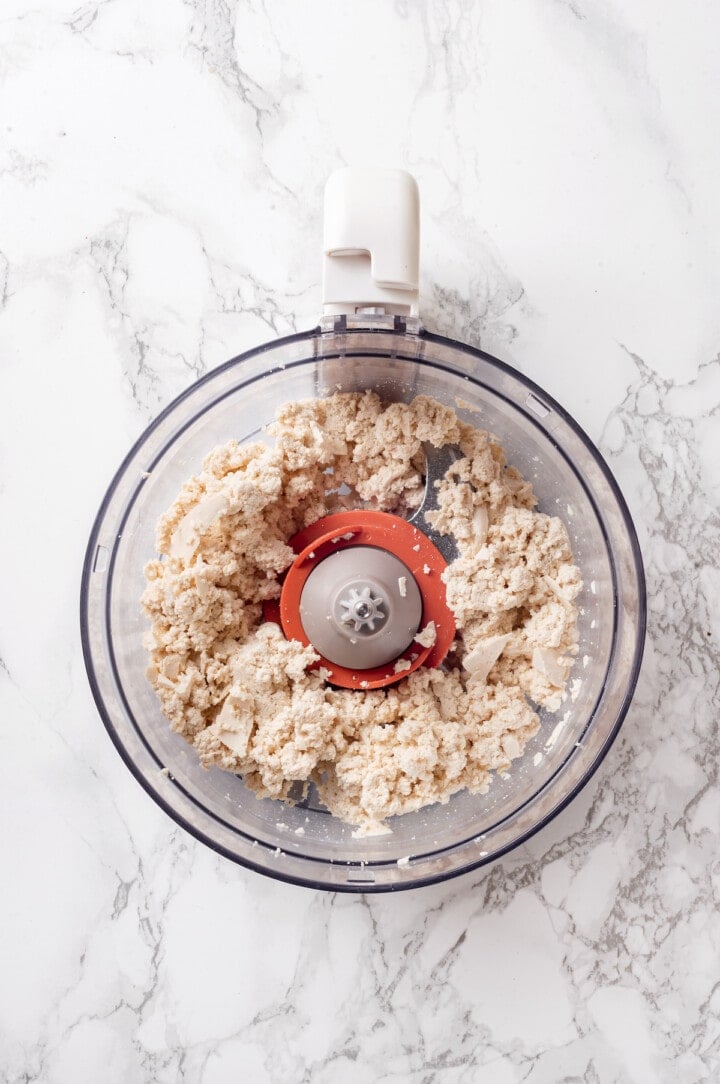
- Process the tofu. Add the tofu to a blender or food processor and process until it’s smooth.
- Add the remaining ingredients. Place the nutritional yeast, broth or water, oil, white miso, thyme, vegetable broth paste or bouillon cube, onion powder, garlic powder, sea salt, and vital wheat gluten in the food processor. Process until a cohesive dough forms, scraping down the sides of the processor as needed.
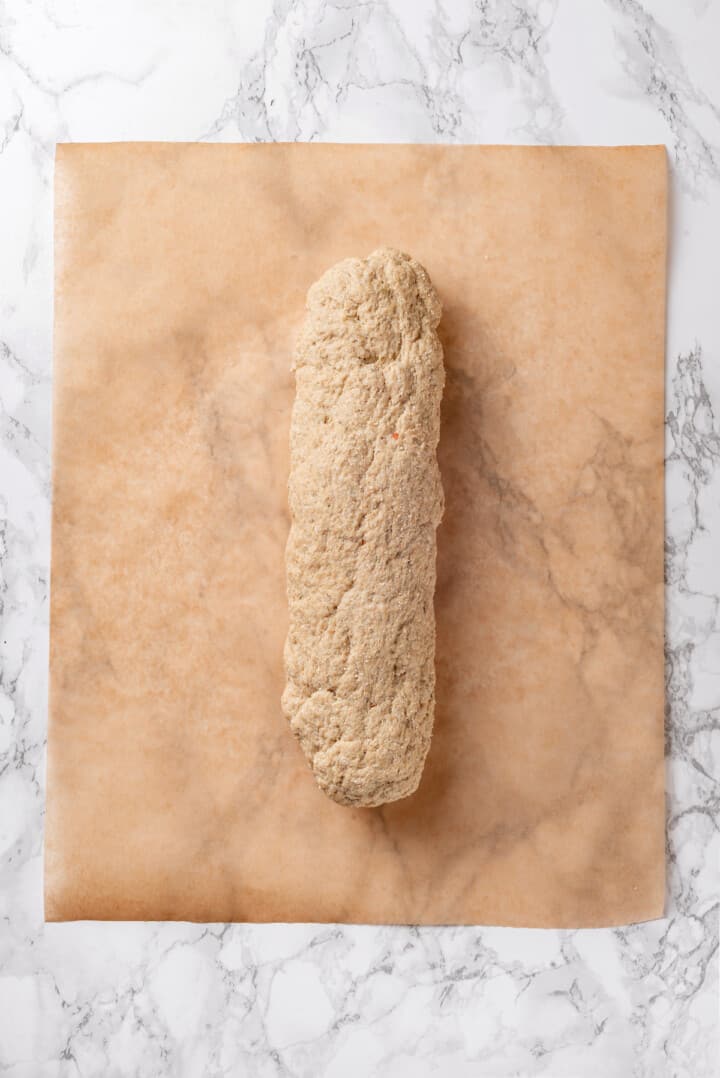
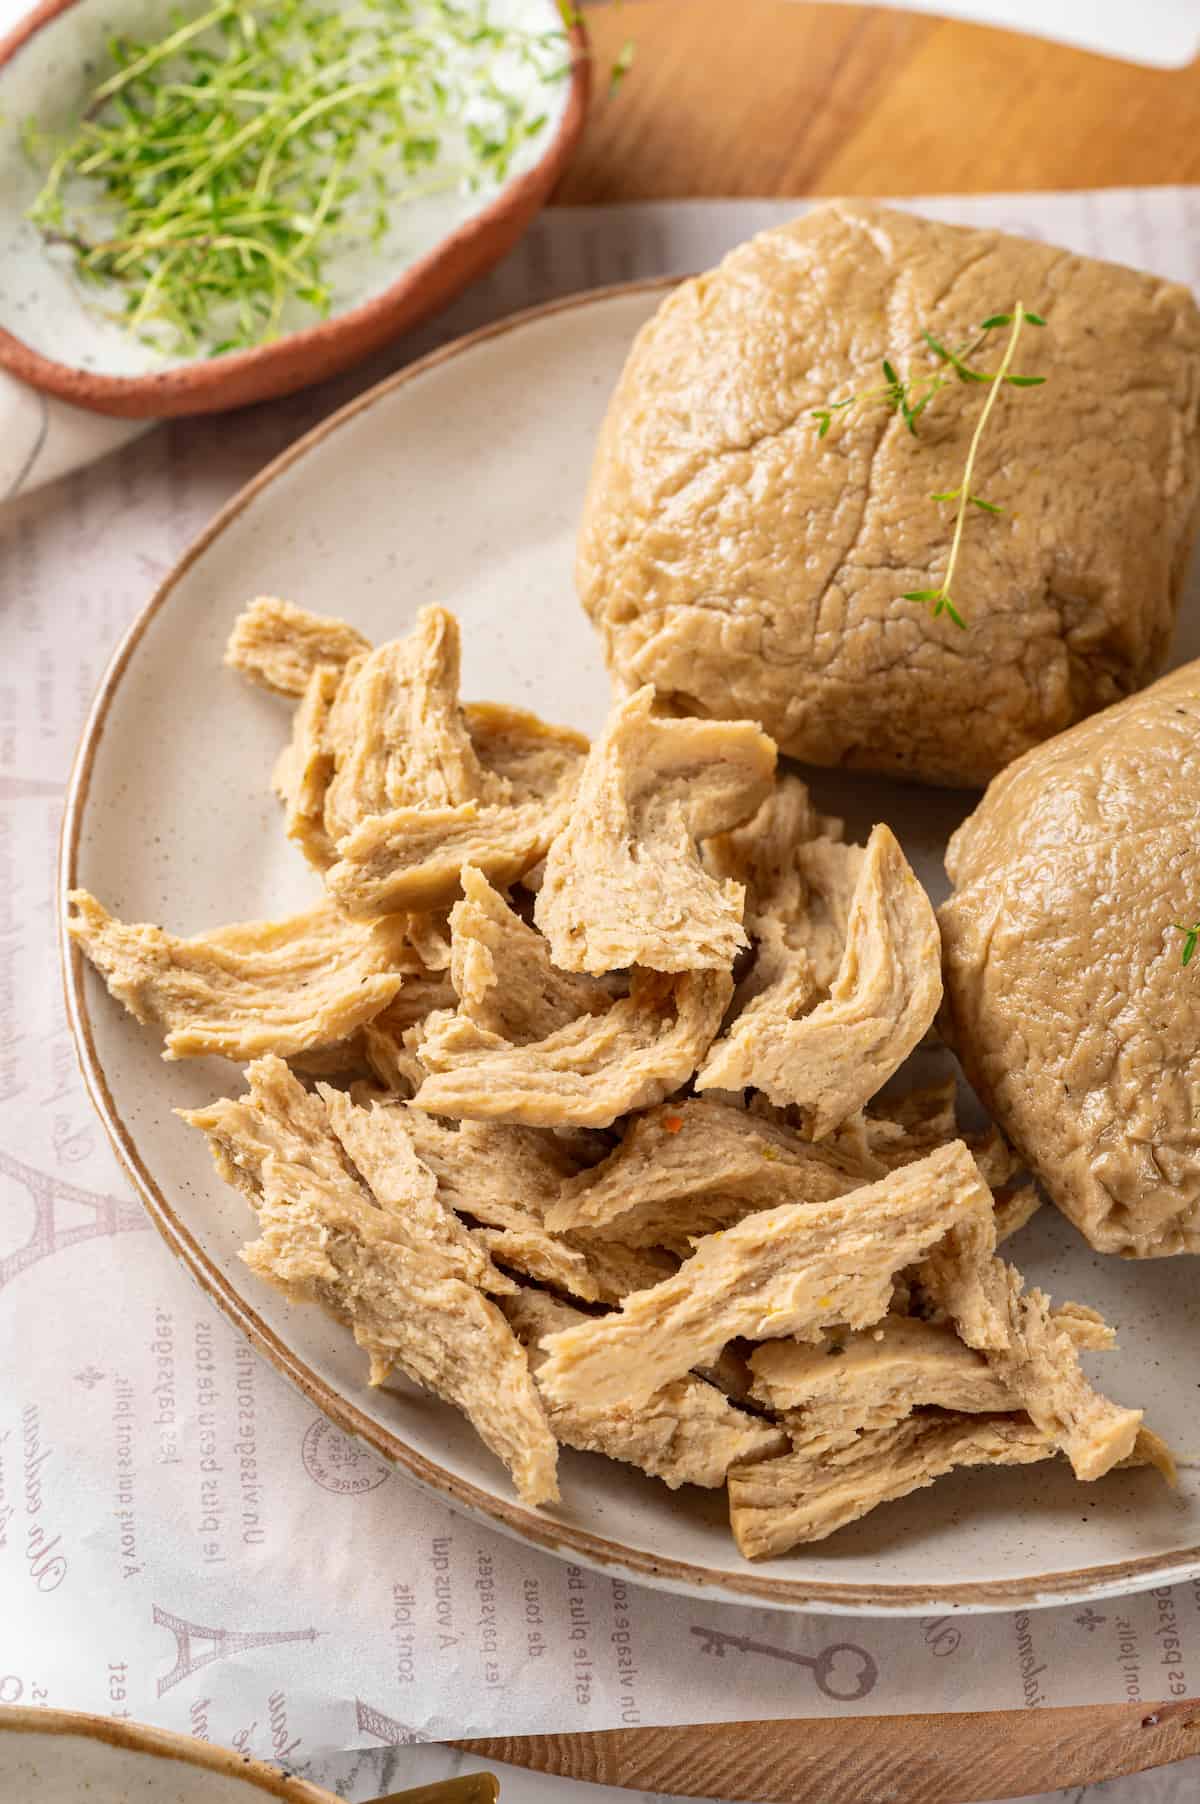
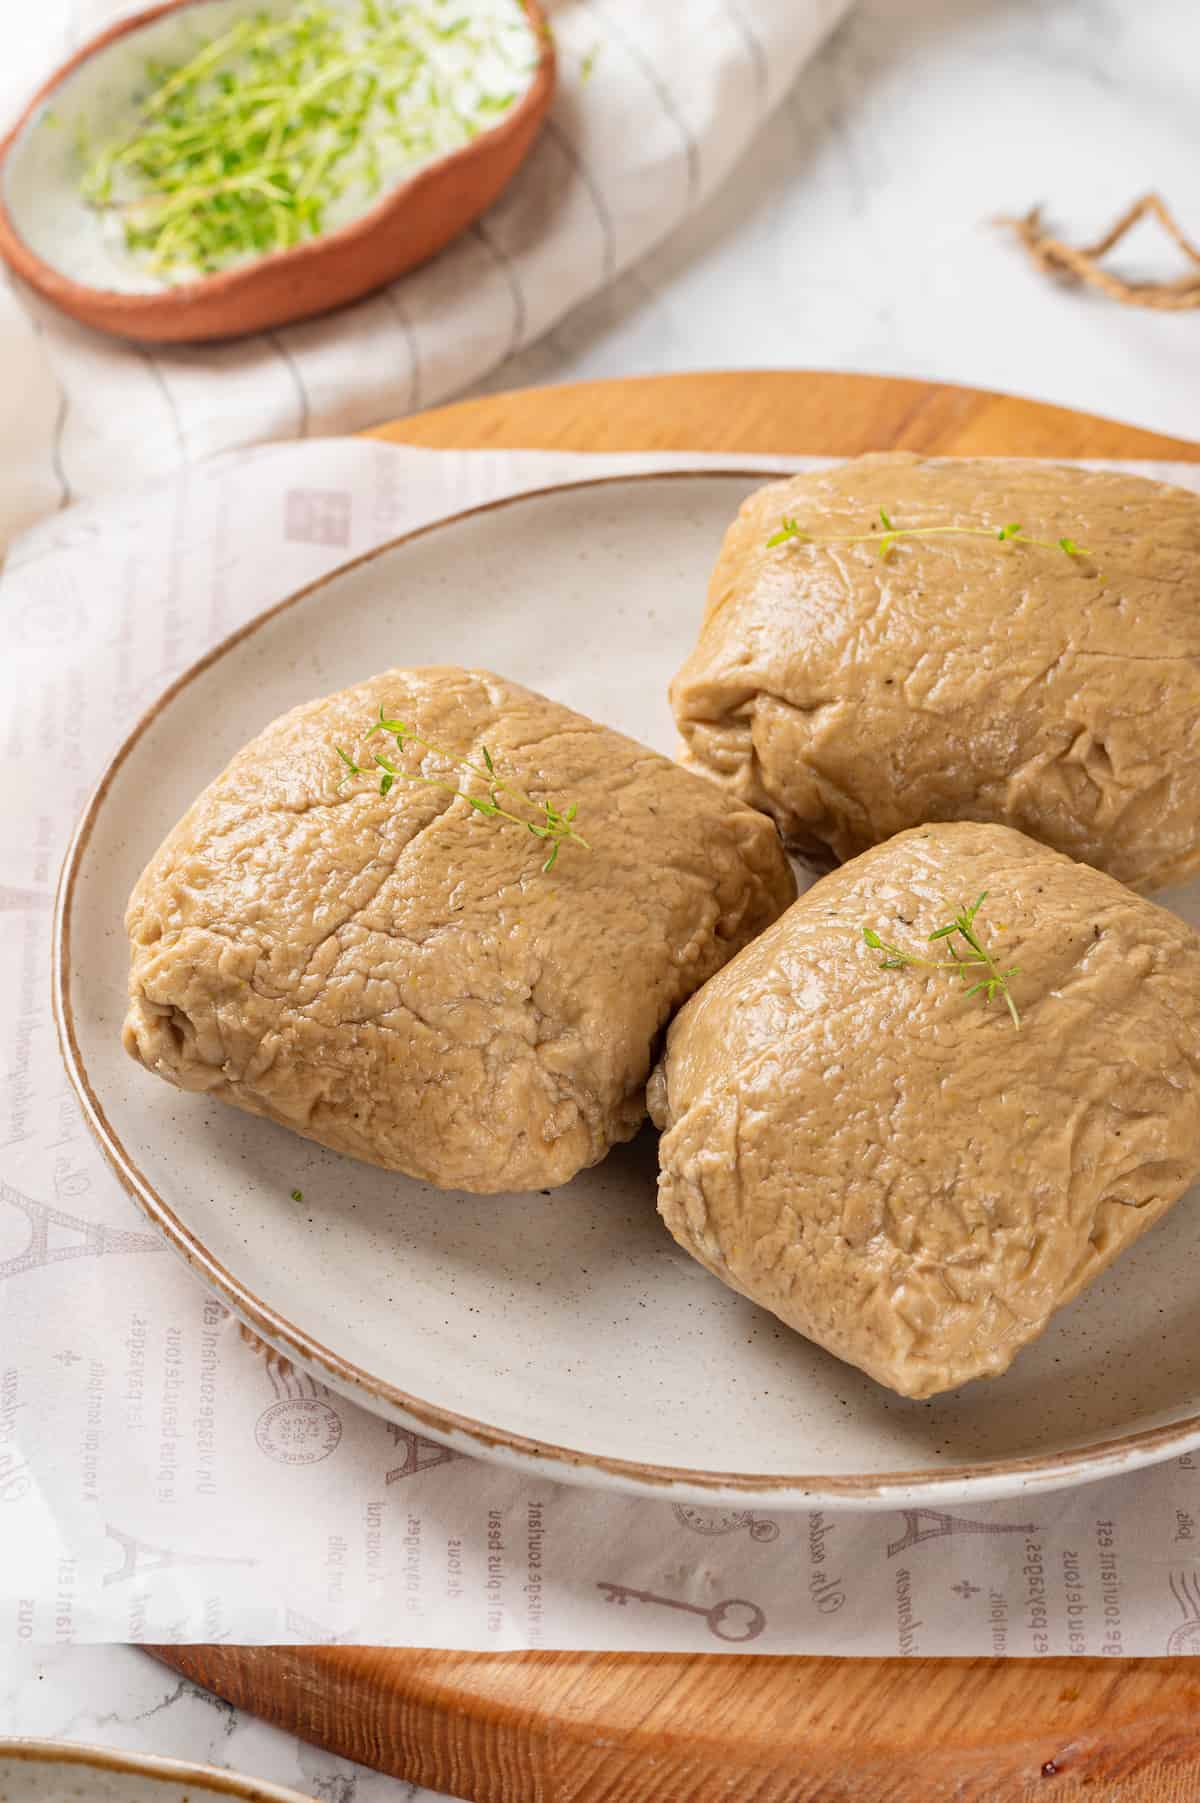
- Form the vegan chicken. Transfer the tofu mixture to a clean work surface. Shape it into a 1.5-inch diameter log, then fold the log in half and twist it like a rope. Divide it into 3 pieces and pat each into the shape of a chicken breast.
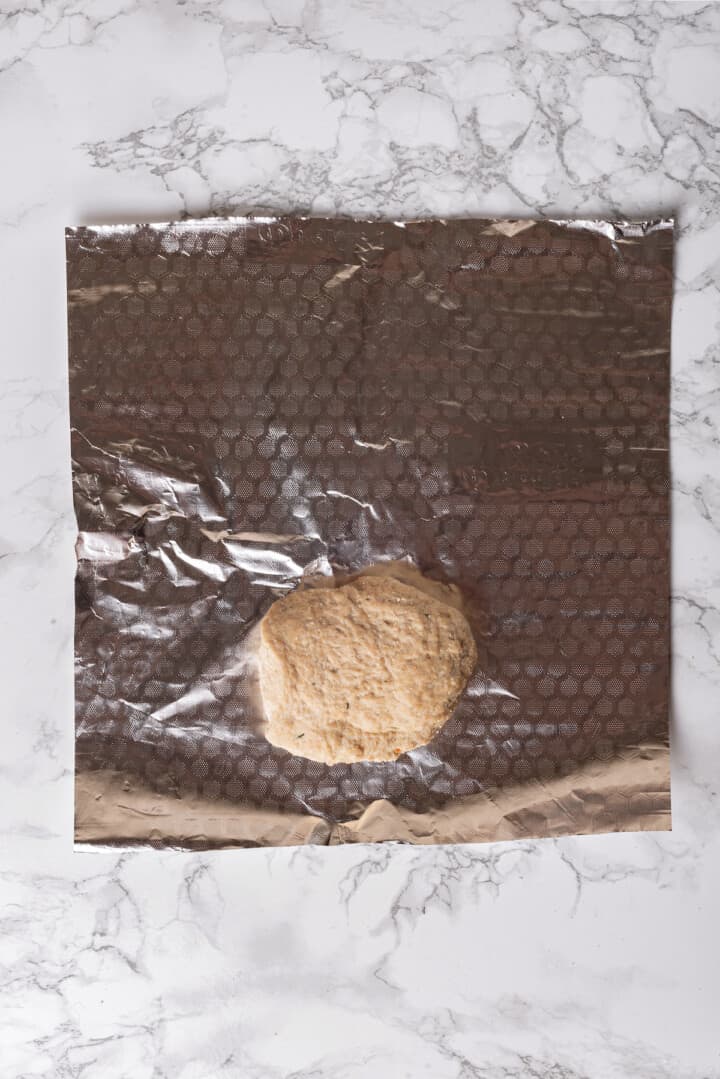
- Wrap . Place each piece of vegan chicken on a large sheet of aluminum foil. Roll the loaf in the foil. Loosely fold the sides inward toward the bottom to seal the loaf, leaving room for expansion.
- Steam. Place a steamer basket inside a large pot with 2 inches of water. Set the wrapped vegan chicken in the basket and bring the water to a boil. Cover and steam for 1 hour, or until the internal temperature reaches at least 160°F.
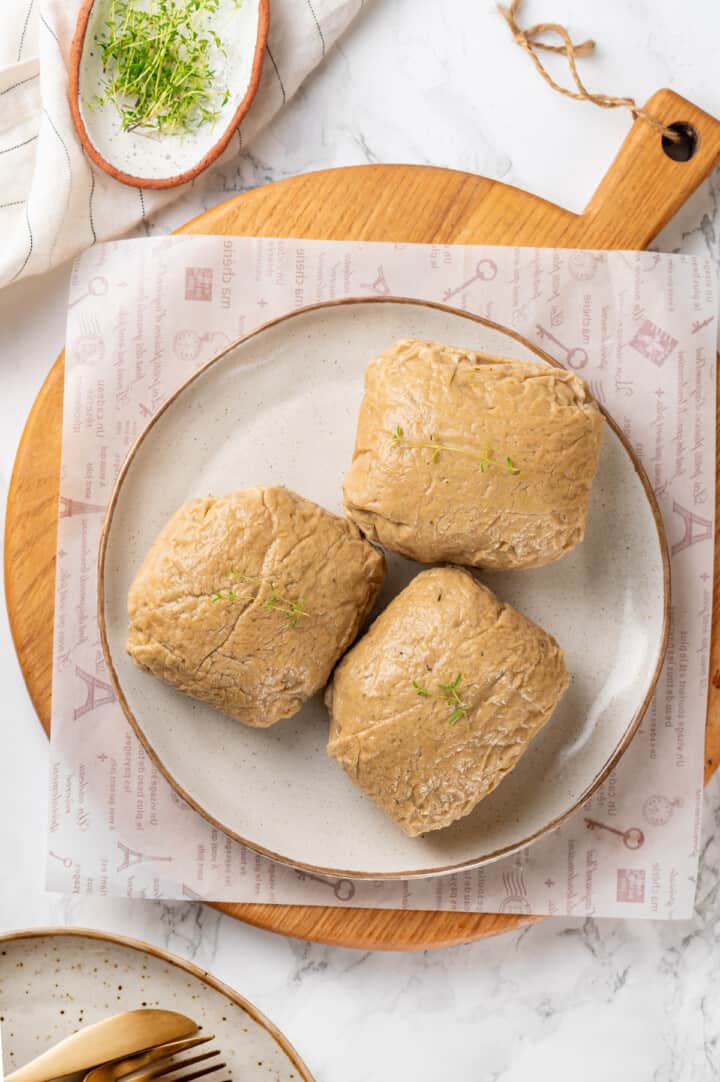
- Cool. Transfer the vegan chicken to a wire rack or plate. Remove the foil and cool to room temperature. For the best texture, cool the vegan chicken in the refrigerator for at least 4 hours or overnight.
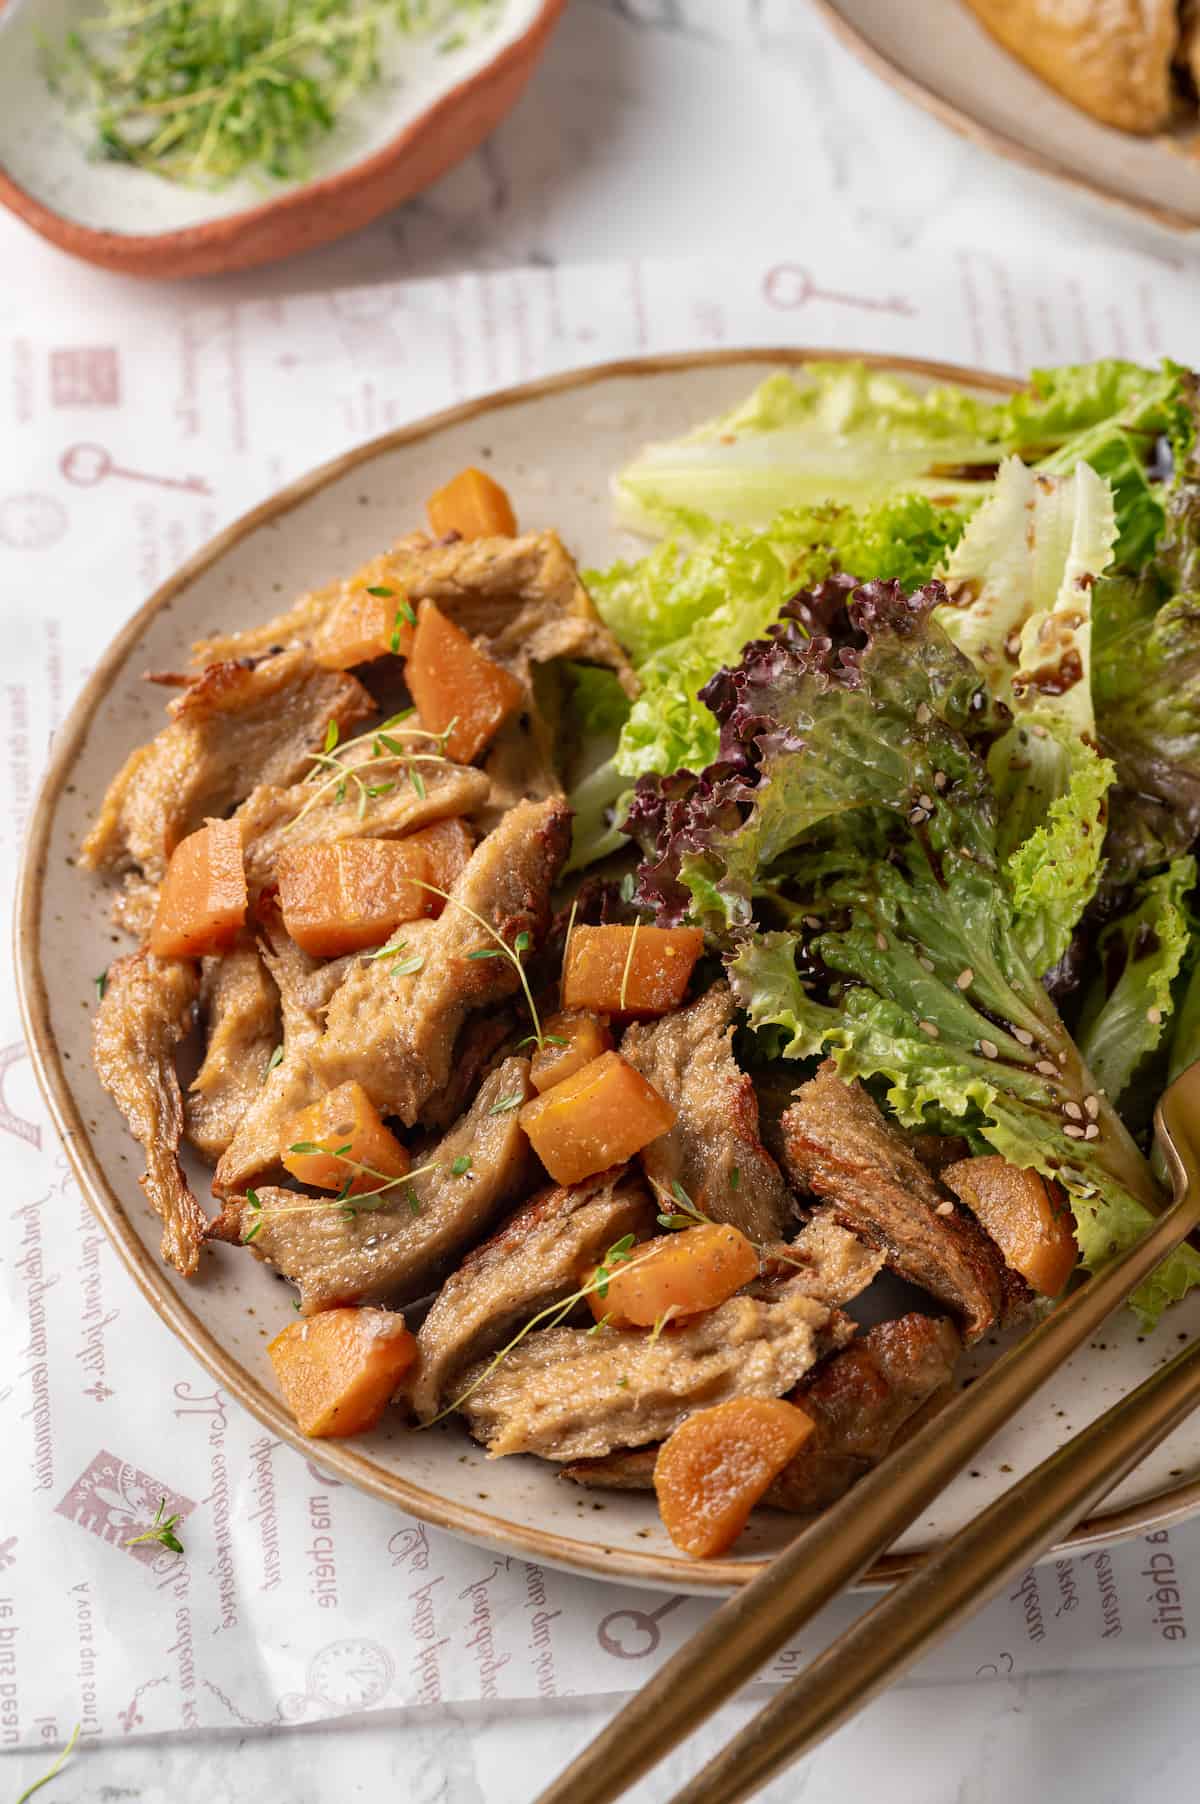
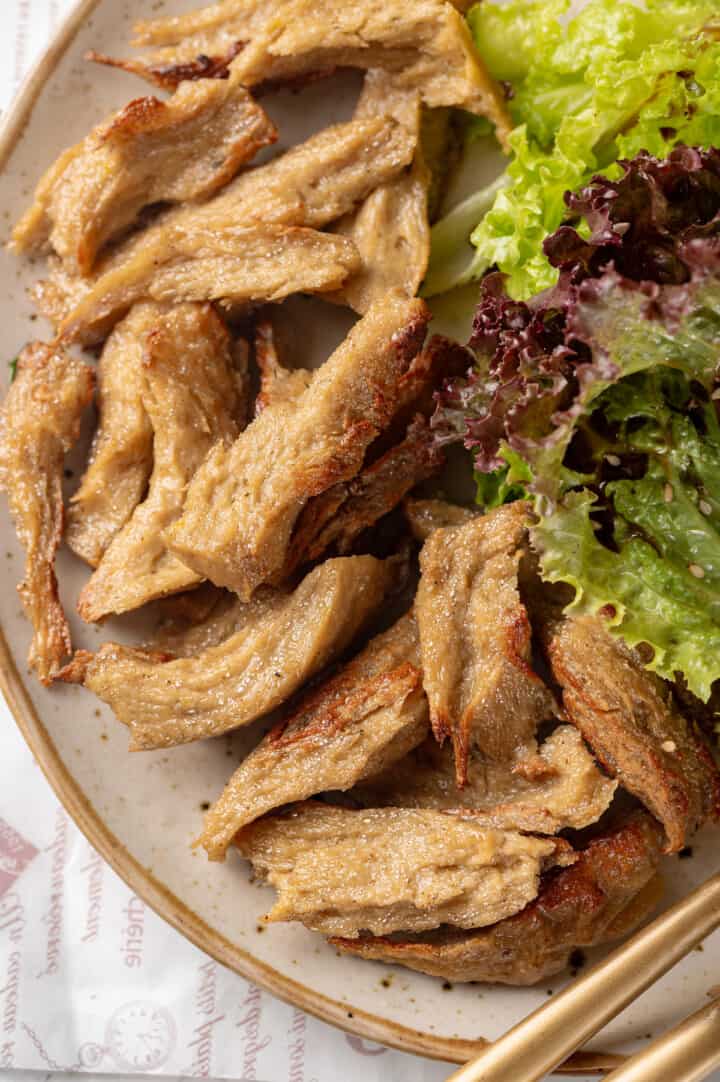
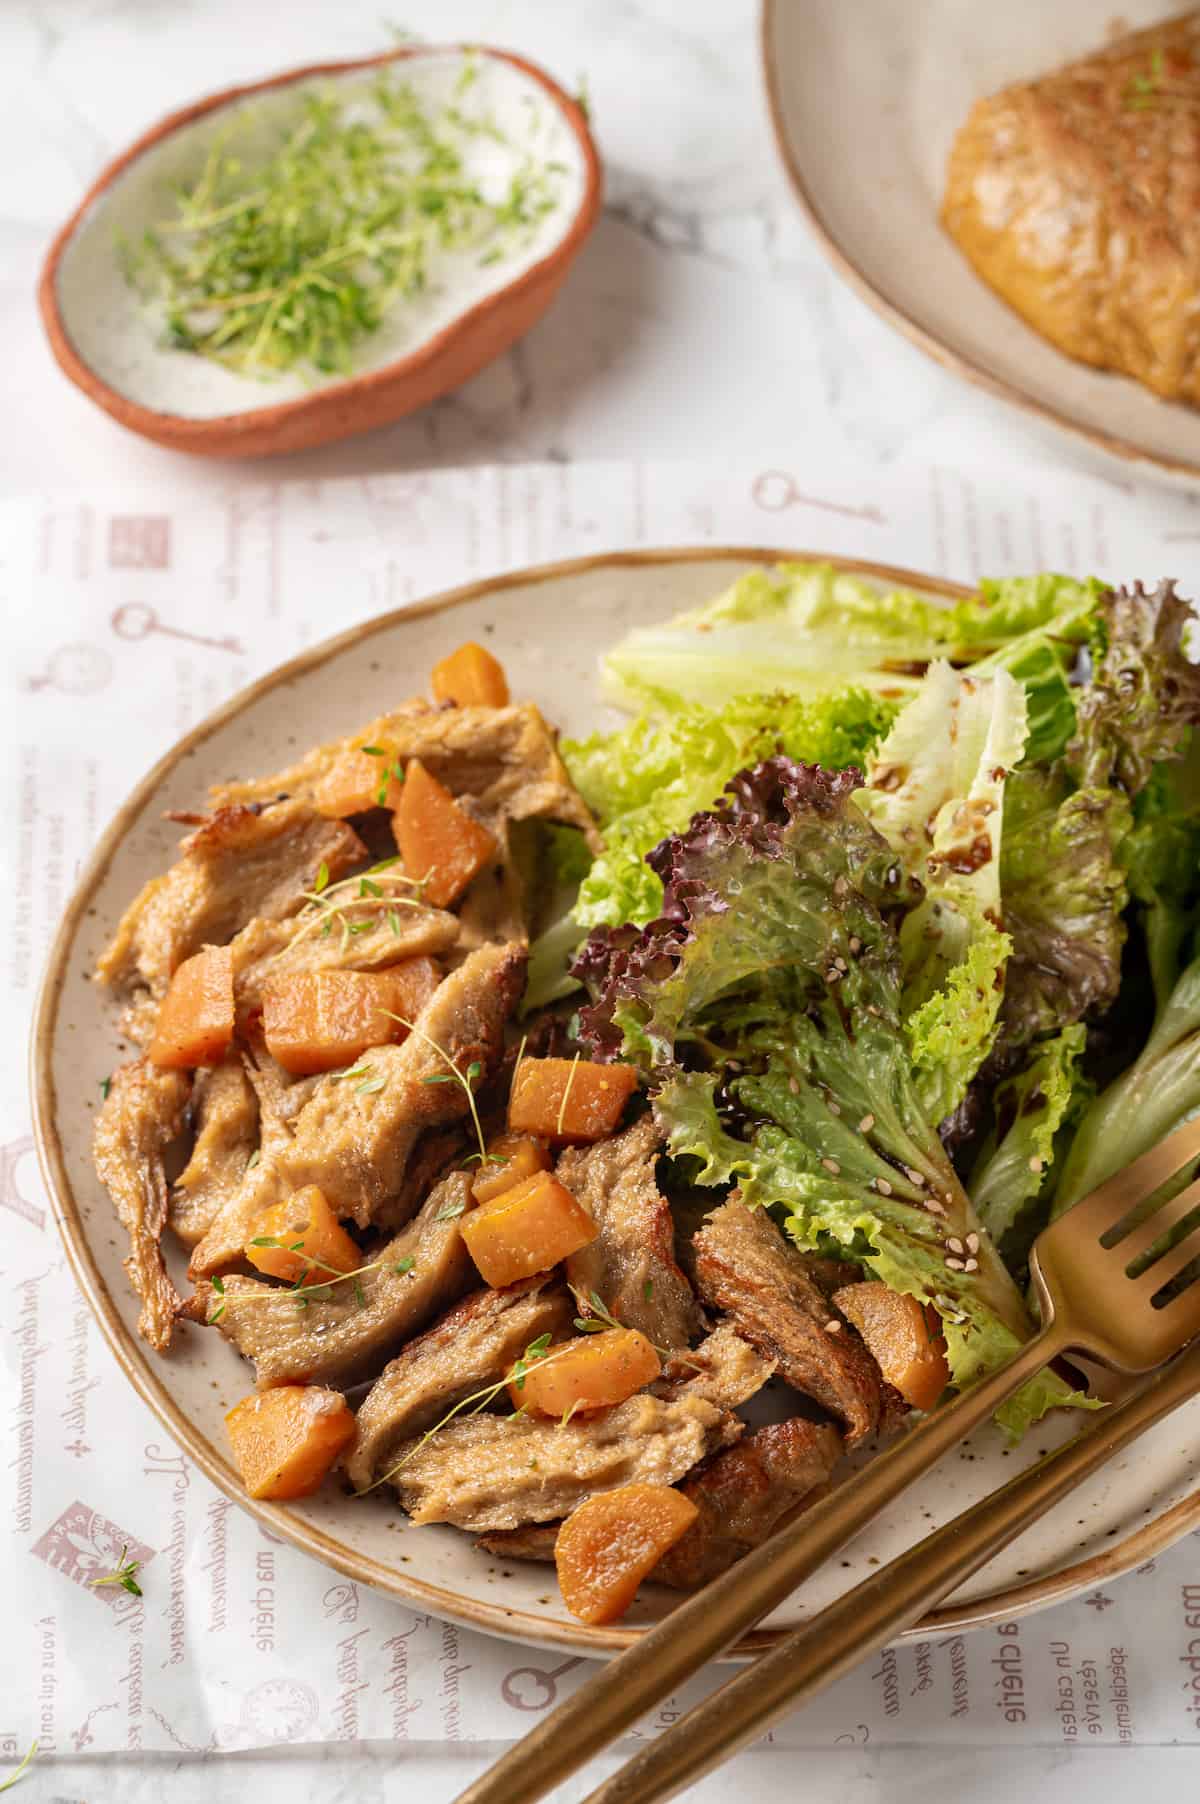
- Use it. Cut the chicken into slices or chunks before using it, or tear it into pieces by hand.
Tips for Success
Making plant-based chicken is easy, but here are a few tips to make sure it turns out perfect .
- Don’t over-mix. The vital wheat gluten gives this vegan chicken its chewy texture, but mix it too much and it will end up tough. Don’t run the food processor for more than 5 minutes.
- Use plenty of seasoning. To get the most flavour out of your chicken, use herbs and spices like garlic, onion powder, and thyme, or paprika and cumin for Tex-Mex dishes.
- Add more water if needed. Check the pot when the vegan chicken is steaming and add more water if it boils off.
- Shape as desired . You can also shape the chicken into burgers, drumsticks, or faux wings.
10 Ideas for Using This Vegan Chicken
Naturally, you can sauté your vegan chicken with olive oil in a skillet and serve it on a plate with mashed potatoes , vegan gravy , and green beans for some comfort food goodness. But you can also use it to make all kinds of different dishes by substituting it pound-for-pound in recipes that call for cooked chicken.
Here are some ideas for inspiration:
- Vegan Chicken Parmesan – Instead of store-bought plant-based chicken, substitute this homemade version.
- Thai Red Curry – Swap the tofu for chunks of vegan chicken.
- Pasta – I love tossing this savoury plant-based chicken with pasta recipes like Lemon Pasta , or using it in place of store-bought vegan chicken in my Cajun Chicken Pasta .
- Soup – The flavour and texture of this vegan chicken is ideal for all your favourite soups! Try it in Creamy Vegan Mushroom Wild Rice Soup .
- Chicken and Dumplings – A comfort food staple perfect for chilly winter evenings!
- Tacos and Fajitas – Sauté the faux chicken with sliced onions and green bell peppers along with taco or fajita seasoning.
- Chicken Pot Pie Casserole – Homemade vegan chicken is perfect in this satisfying casserole.
- Easy Chicken Stir-Fry – Stir-fry your plant-based chicken with veggies and your favourite Asian sauce.
- Vegan Wings – Swap the cauliflower for wing-shaped pieces of vegan chicken in my vegan cauliflower wings recipes .
- BBQ Chicken Sandwiches – Shape the seitan into patties and brush them with barbecue sauce ; bake, grill, or cook them in a skillet until warmed through and top with additional barbecue sauce and crunchy slaw .
How to Store
Vegan chicken can be refrigerated in a food-safe airtight container for up to 3 days. Cook it as directed in your recipe, or warm it up in a 350ºF oven, a skillet with olive oil, or even in the microwave.
Can I Freeze This Recipe?
Yes! To freeze, wrap the cooked vegan chicken in plastic and store it in an airtight container or freezer bag for up to 4 months. When you’re ready to use it, thaw it overnight in the refrigerator before cooking.
More Vegan Substitutes
- Vegan Turkey Roast
- How to Make Vegan Parmesan Cheese
- Vegan Marshmallows
- Vegan Butter (Nut Free Version Too!)
- How to Make Oat Milk Recipe
Ingredients
- 14 ounces extra firm tofu , drained and pressed for 30 minutes ( 365 g)
- ¼ cup nutritional yeast , 20 g
- 3 tablespoons vegetable broth , or water, 37 g
- 2 tablespoons olive oil , 29 g
- 2 tablespoons white miso paste , 36 g
- 1 tablespoon fresh thyme , 1 g or 1 tsp. dried thyme ( 0.5 g)
- 2 teaspoons vegetable broth paste , or 1 vegetable or mushroom bouillon cube (I like no-chicken paste by Better Than Bouillon)
- 1 ½ teaspoon onion powder , 5 g
- 1 teaspoon garlic powder , 3 g
- ¾ teaspoon fine sea salt , 4 g
- 1 ½ cups vital wheat gluten flour , 225 g
Instructions
- Add the tofu to a blender or food processor and blend until broken down.
- Add the nutritional yeast, broth or water, oil, white miso paste, fresh or dried thyme, vegetable broth paste or bouillon cube, onion powder, garlic powder, sea salt, and vital wheat gluten. Process to form a cohesive dough, scraping down the sides of the processor and fold the ingredients together as needed. Avoid over-mixing; the dough should not be processed for more than 5 minutes.
- Invert the dough onto a table or working board and shape into a long roll about 1 ½ inch diameter. Fold the roll in two and twist like a rope. This process will ensure the stringy meat texture.
- Divide into 3 parts and shape each one nicely to resemble a chicken breast. Roll each piece in the aluminum foil to wrap. Fold the sides inward toward the bottom.
- Place a steamer basket inside a large pot with 2 inches of water. Place the chicken pieces in the steamer basket and bring to a boil. Cover and steam for 1 hour, or until the internal temperature reaches at least 160°F. Check the pot occasionally and add more water as needed if it begins to get low.
- Transfer to the plate, remove the foil, and cool to room temperature. For the best texture, cool in the fridge for at least 4 hours or overnight.
Notes
- To store and use : Vegan chicken can be refrigerated in a food-safe airtight container for up to 3 days. Cook it as directed in your recipe, or warm it up in a 350ºF oven, a skillet with olive oil, or even in the microwave.
- To freeze : Wrap the cooked vegan chicken in plastic and store it in an airtight container or freezer bag for up to 4 months. When you’re ready to use it, thaw it overnight in the refrigerator before cooking.
