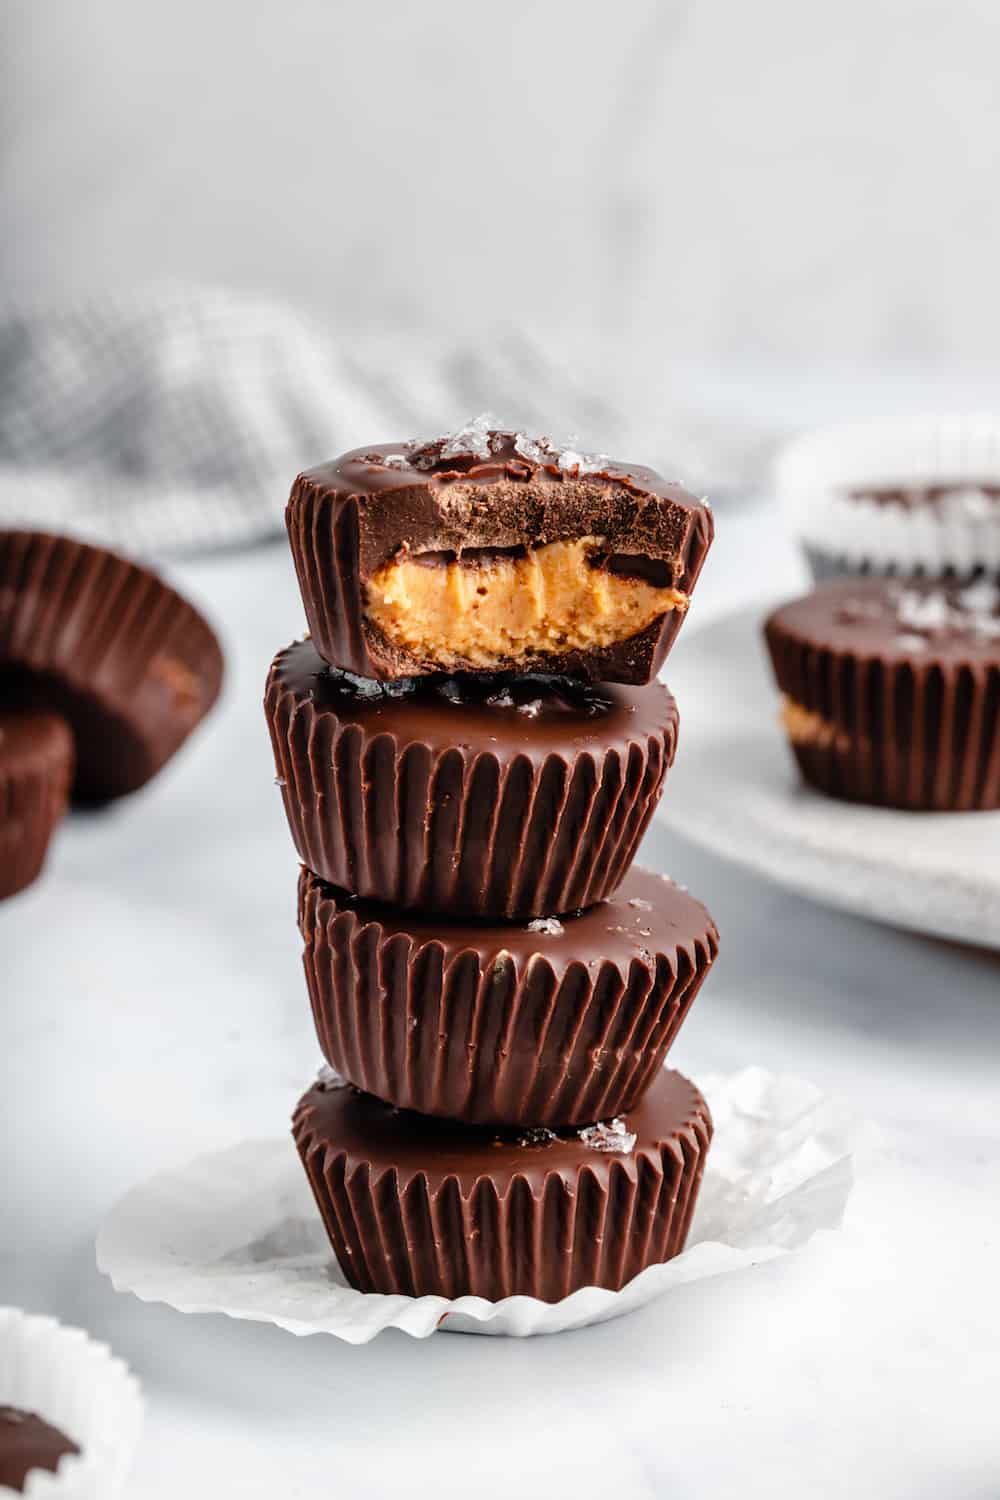
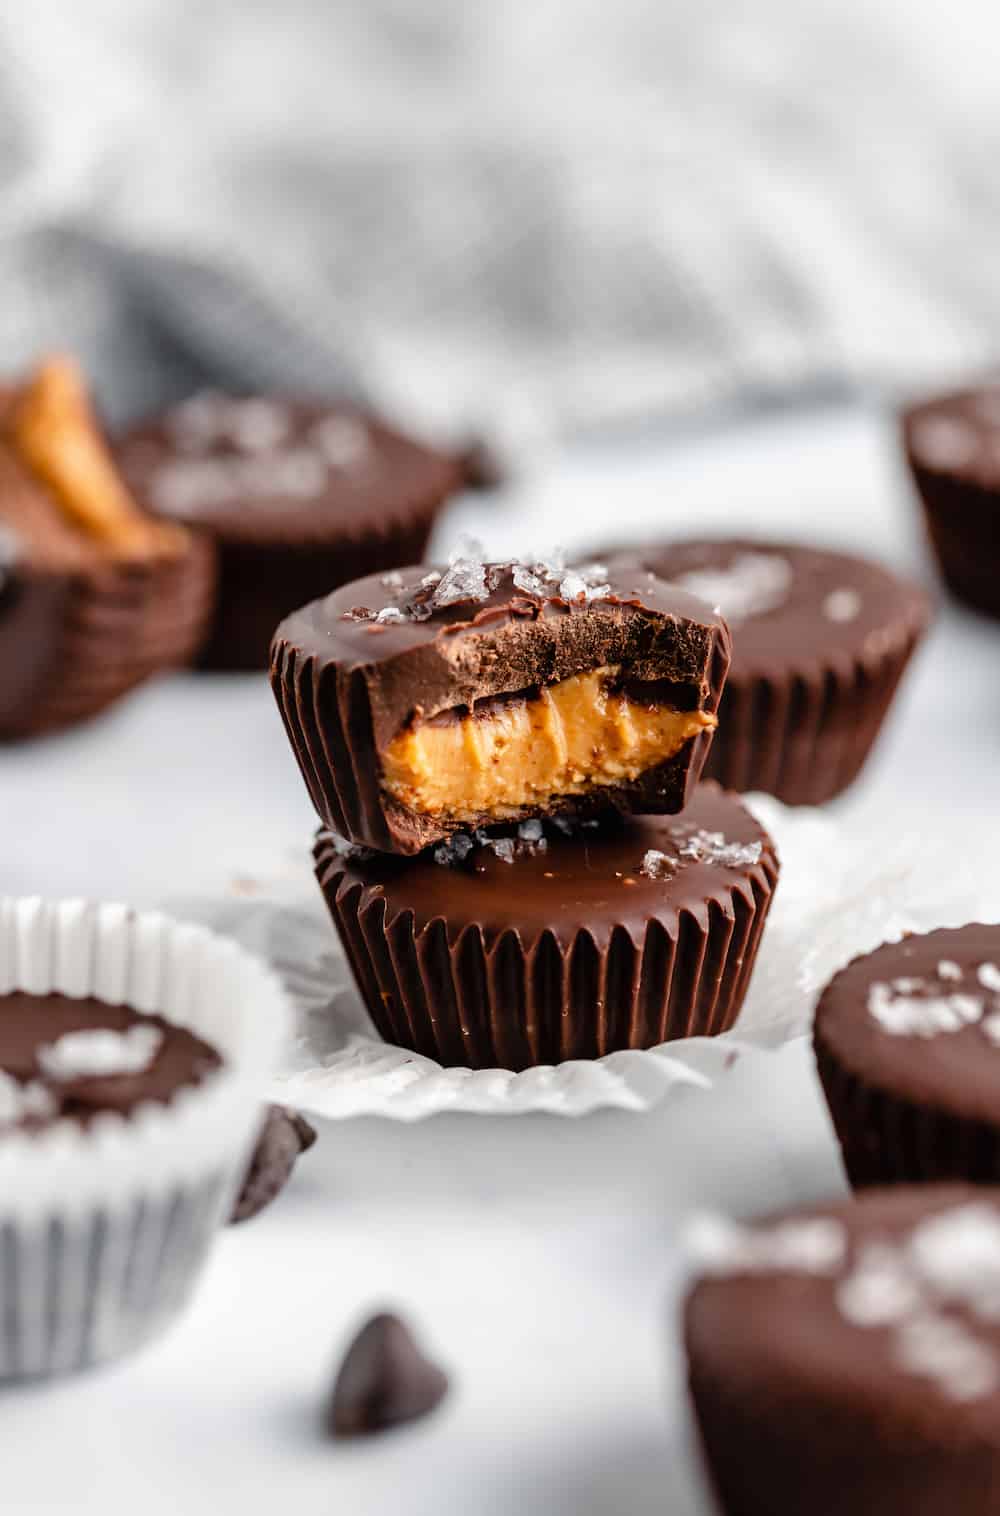
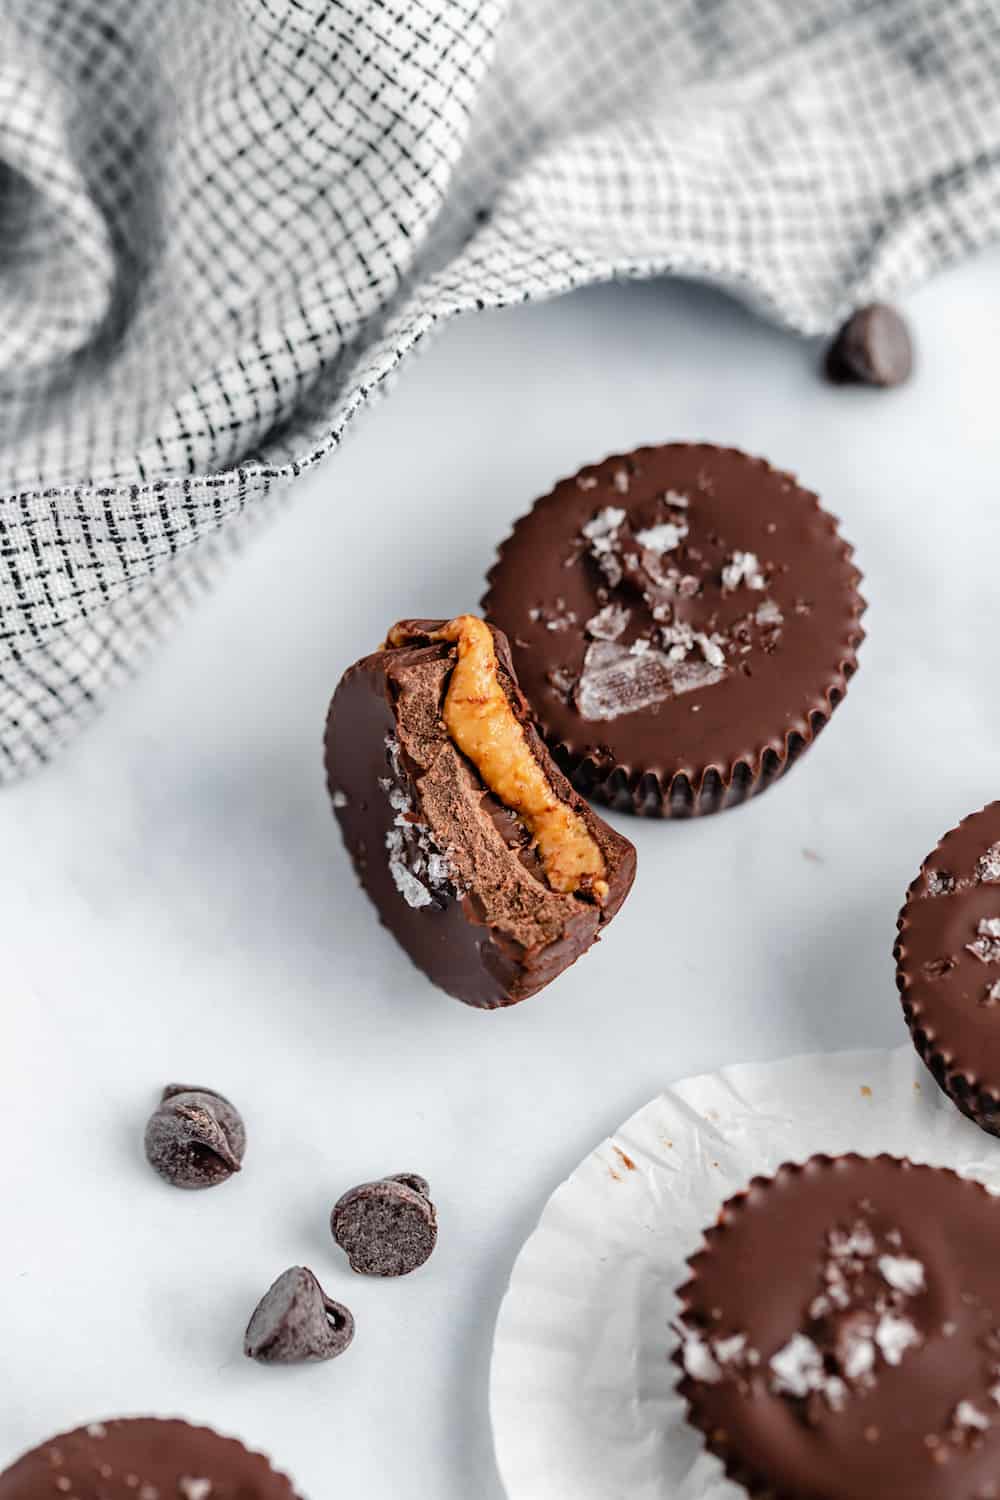
Luscious, chocolatey, and filled with all-natural peanut butter, my 3-Ingredient Vegan Peanut Butter Cups are an incredibly easy homemade, (& gluten-free!) version of your favourite store-bought peanut butter cups. They are every bit as divine, and of course, vegan!
A Simple Vegan Candy Recipe
Best news EVER – your favorite peanut butter cups are now super easy to make in an extremely delicious homemade version! Yes, believe it – these Vegan Peanut Butter Cups are about to be your new go-to fridge/freezer snack. They are perfect for your dietary needs, too: vegan, gluten free, and made without any refined sugar.
I know the idea of making vegan candy at home might sound super intimidating and complicated. But trust me, it’s EASY. Like you might never go back to buying the pre-made stuff.
Notes on Ingredients
If you didn’t know before, I’m a complete peanut butter addict. Proof of this is the 3 jars currently sitting in my pantry. It’s truly a life necessity for me. So this simple recipe, using just peanut butter and chocolate chips, is definitely a favorite!
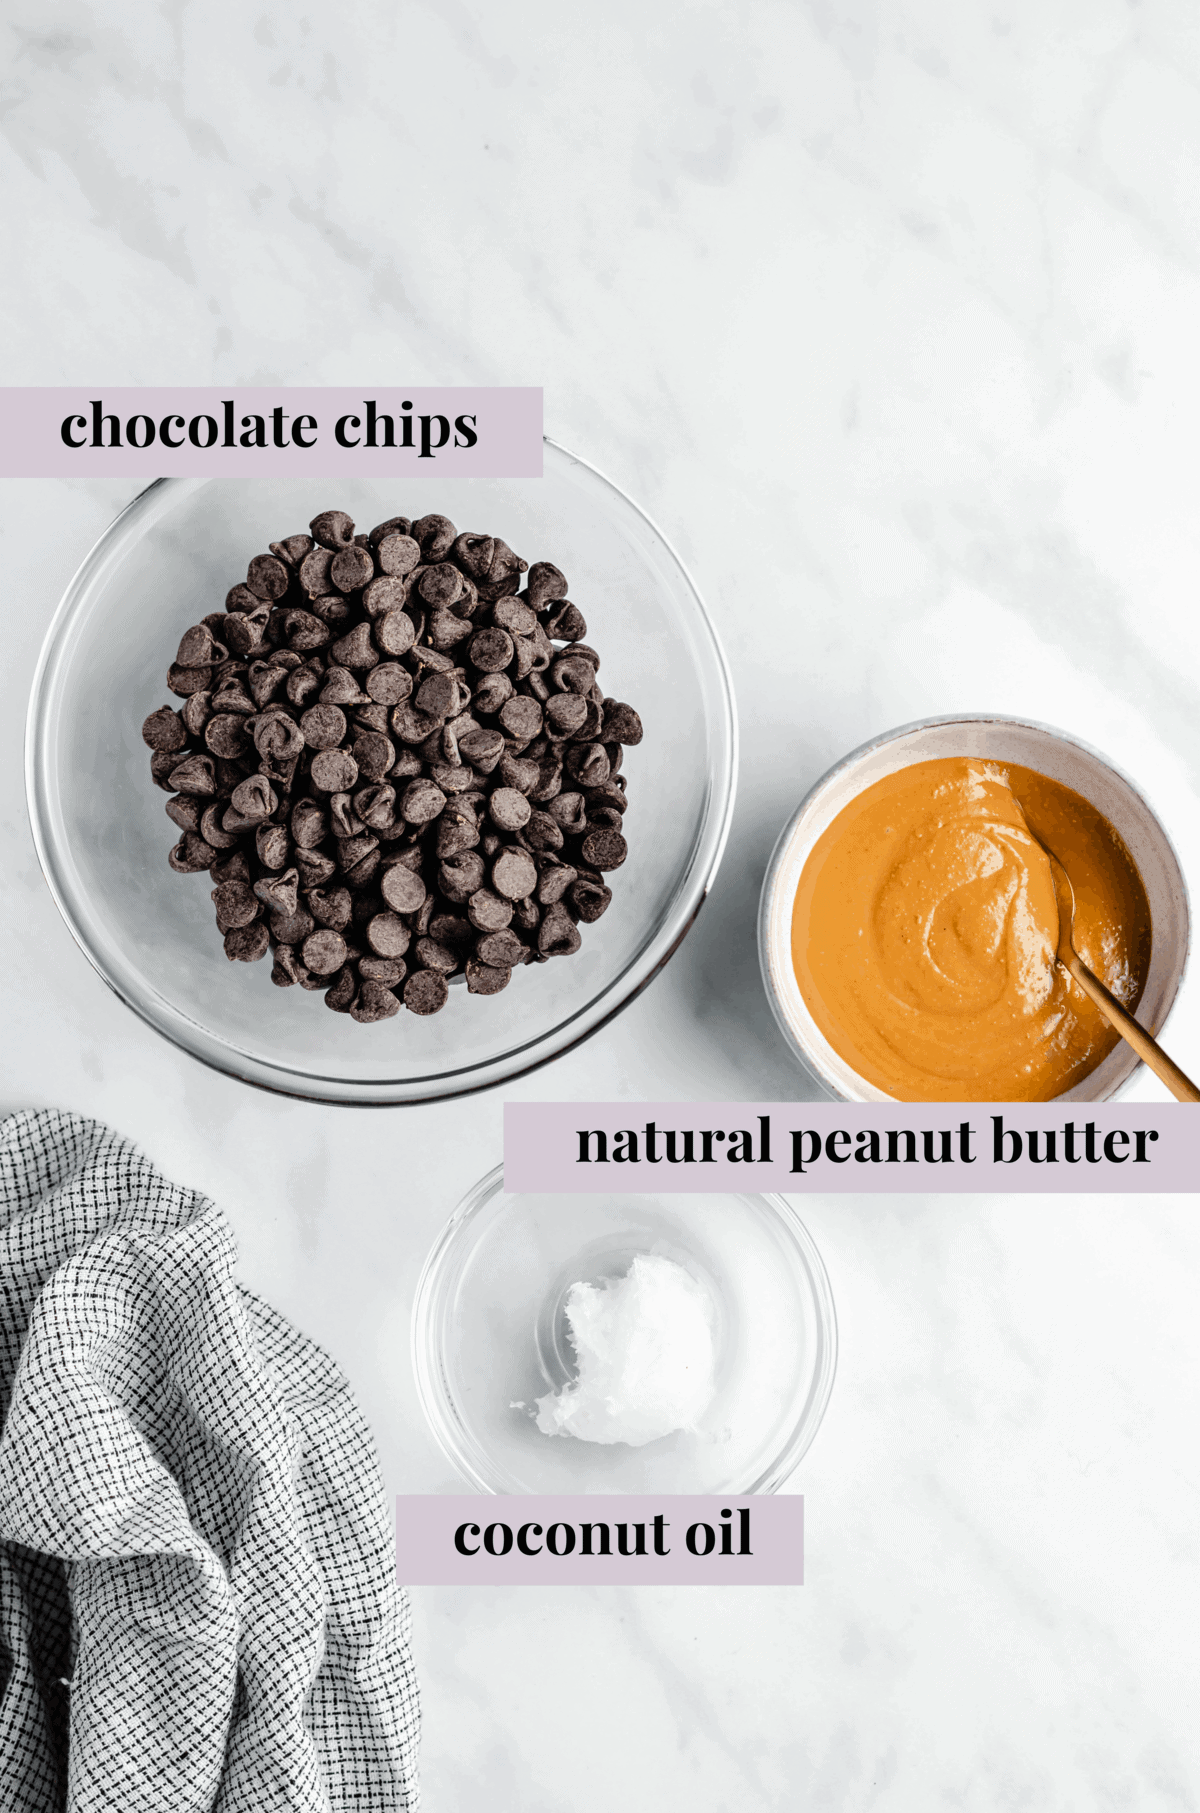
- Peanut Butter: I prefer to use all-natural peanut butter. There are quite a few brands and options out there: stir, no-stir, homemade, all-natural, and lots more. If you’d like, you can add a little sweetener to your peanut butter. I add a touch of maple syrup or agave, stirring it in before dolloping it into the cups. This isn’t necessary though, since the chocolate is already sweet.
- Chocolate Chips: In addition to the peanut butter, all you need is melted chocolate! Specifically, I use chocolate chips. And again, there are so many options out there. You can find great vegan chocolate chips that are free from refined sugar, free of sugar completely, organic, fair trade…. use whatever kind works for your needs!
- Coconut Oil : Coconut oil is actually essential here to help the chocolate cups solidify. It also helps to thin out the chocolate when it’s melting. I don’t recommend swapping it for another oil, but you can buy a refined version to eliminate the coconut taste.
How to Make Vegan Peanut Butter Cups
These are so easy to make (SO easy), and are no-bake. That’s definitely one of my favorite things about this recipe. It’s as simple as melt, mix and refrigerate.
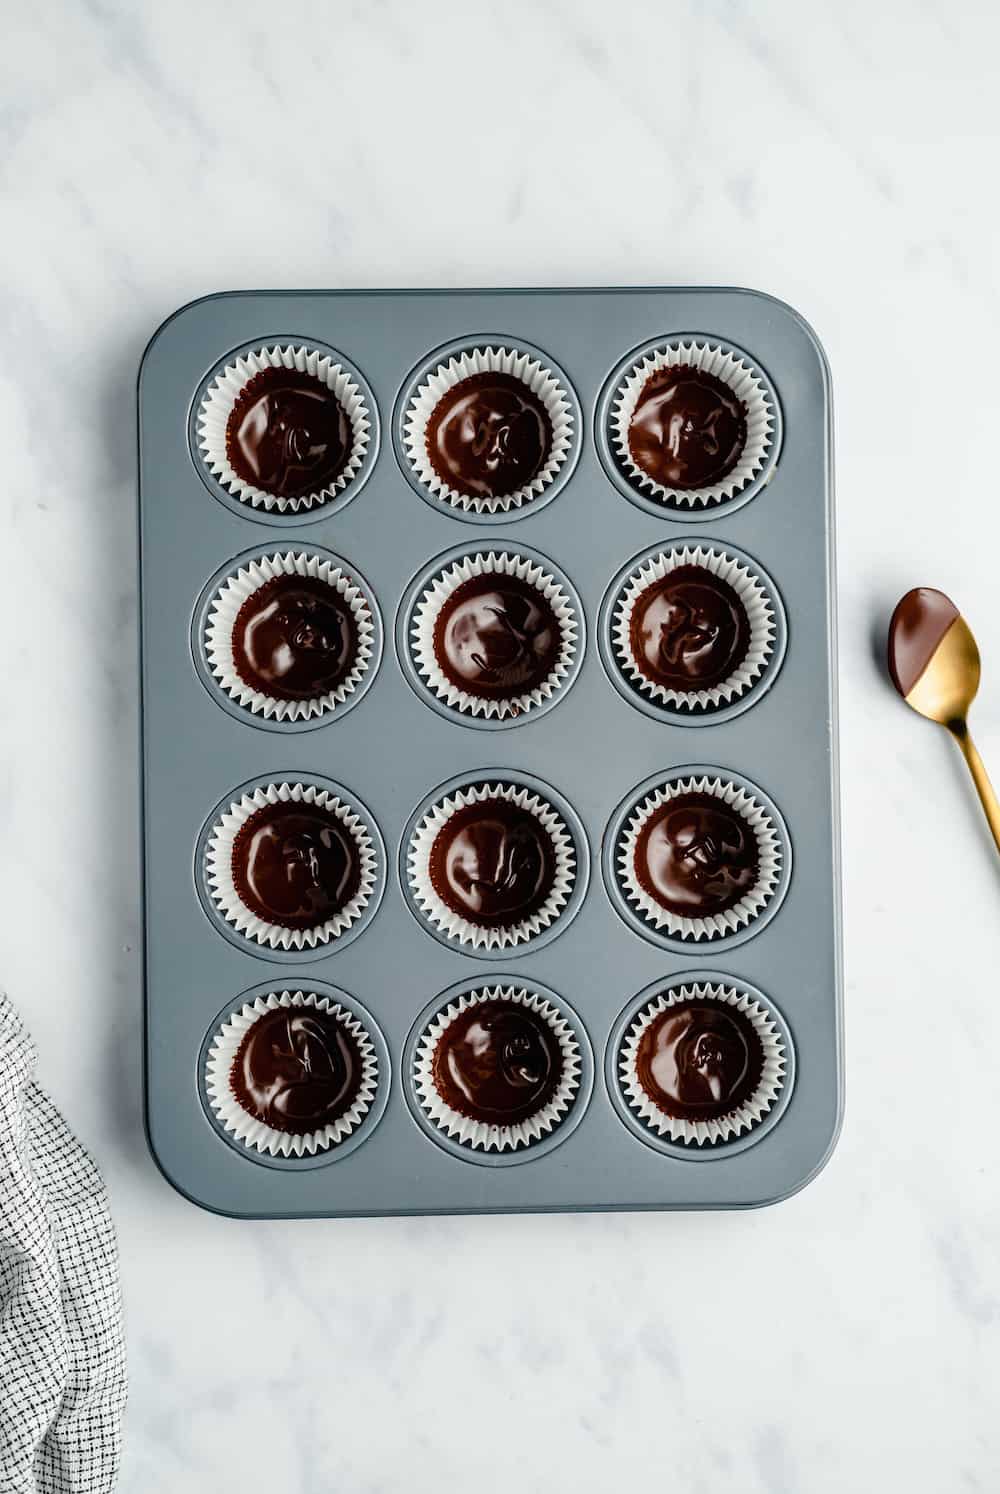
Prepare the Base of the Chocolate Cups: Line a mini muffin tin with 12 mini muffin/cupcake liners. Spoon a little bit of melted chocolate into each of the liners, spreading a thin layer up the sides. This will ensure that the peanut butter is encased in the chocolate. Place in the fridge for about 5 minutes, to set.
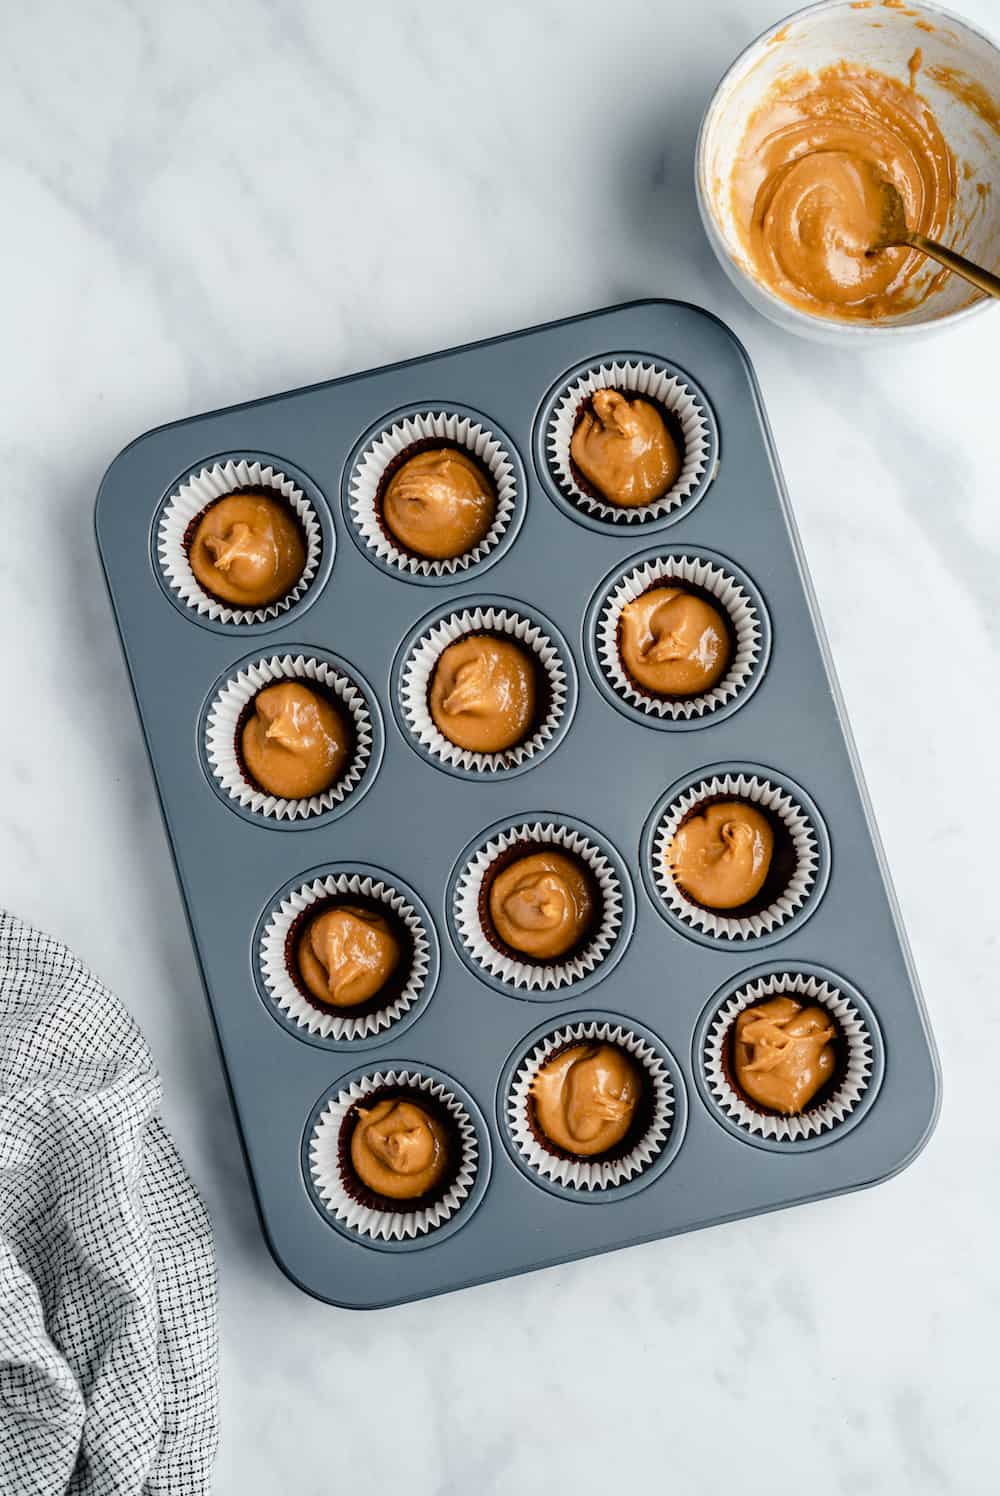
Add the Peanut Butter Filling: Remove the muffin tin from the refrigerator and spoon a small amount of peanut butter filling into the center of each chocolate cup, dividing the filling equally among the 12 cups.
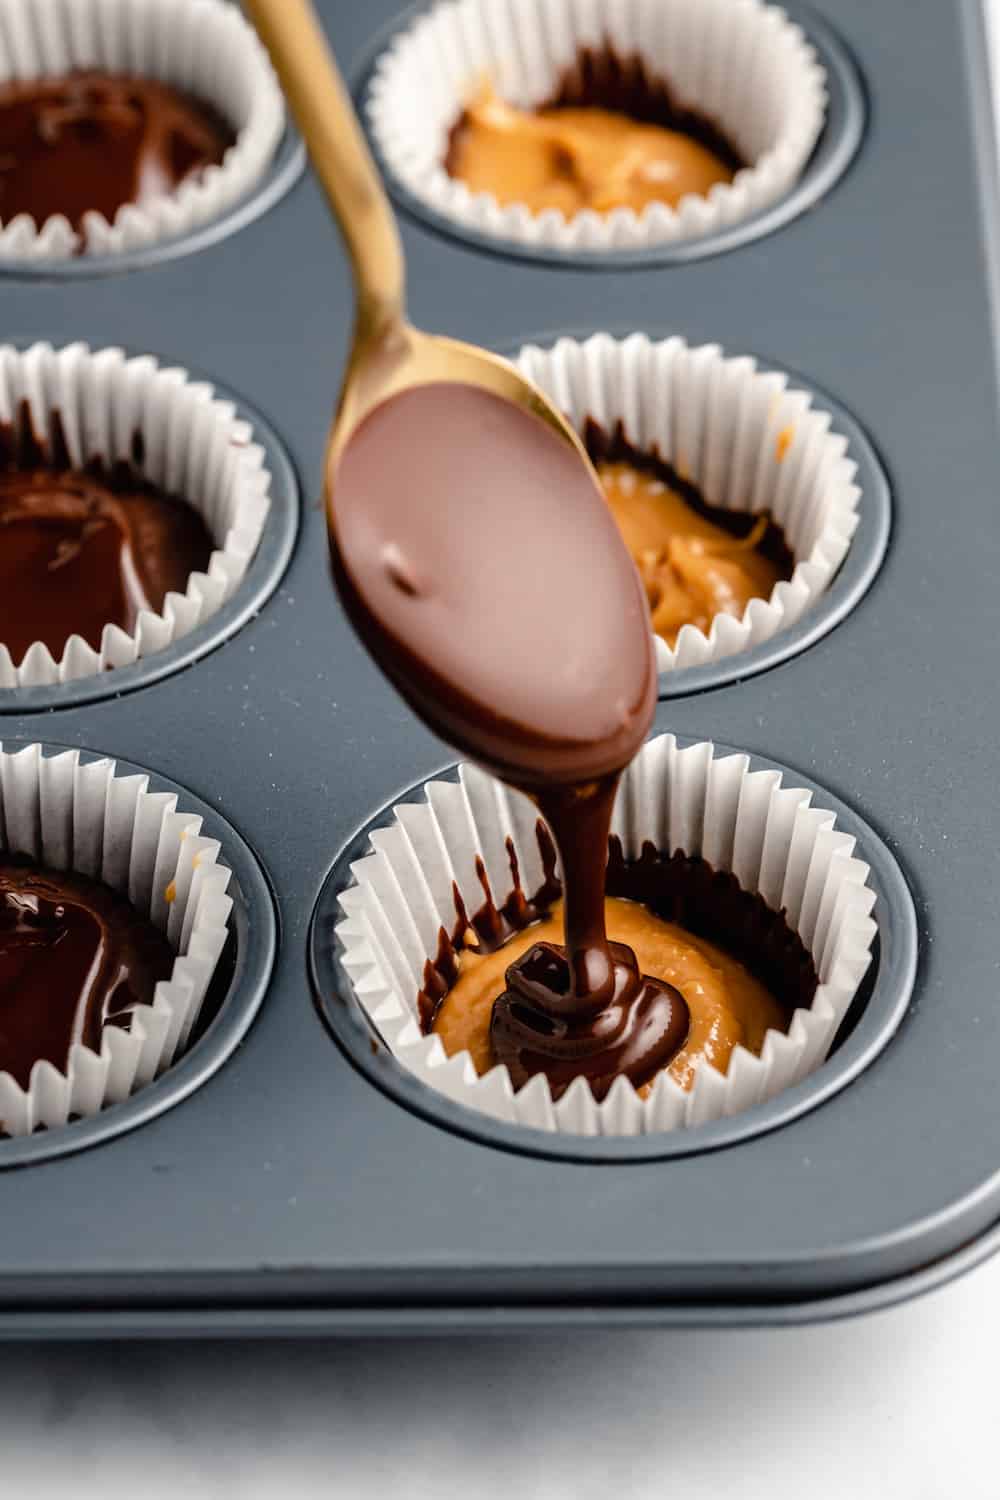
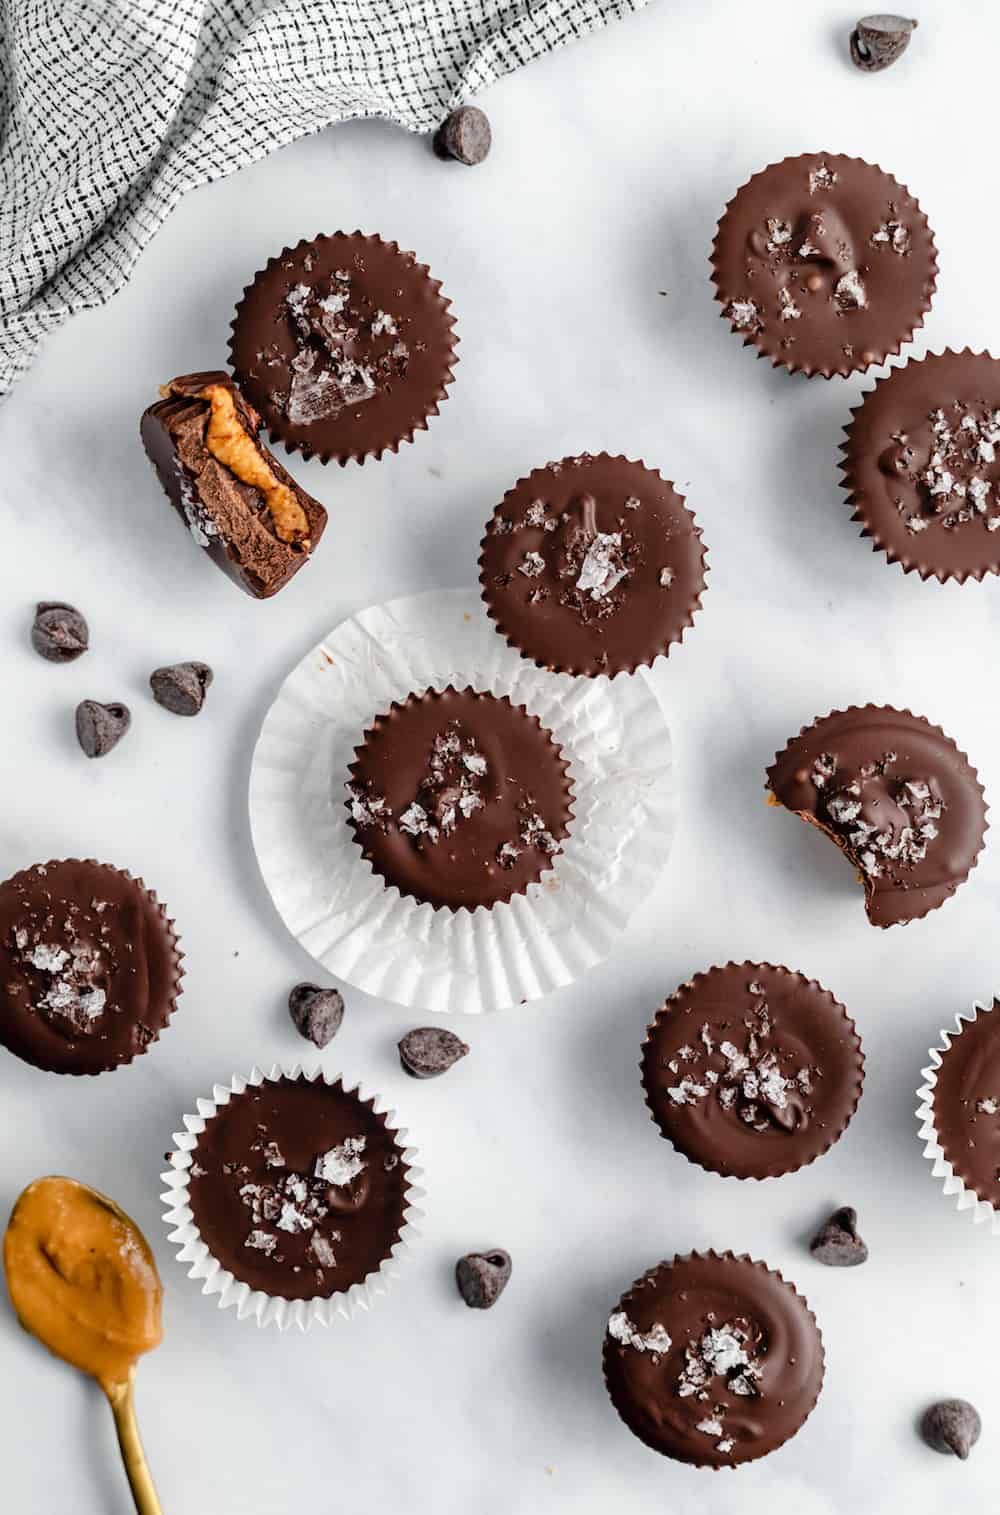
Top with More Chocolate: Top each peanut butter cup with a layer of chocolate, to cover and seal in the filling. Sprinkle with sea salt, if you’d like!
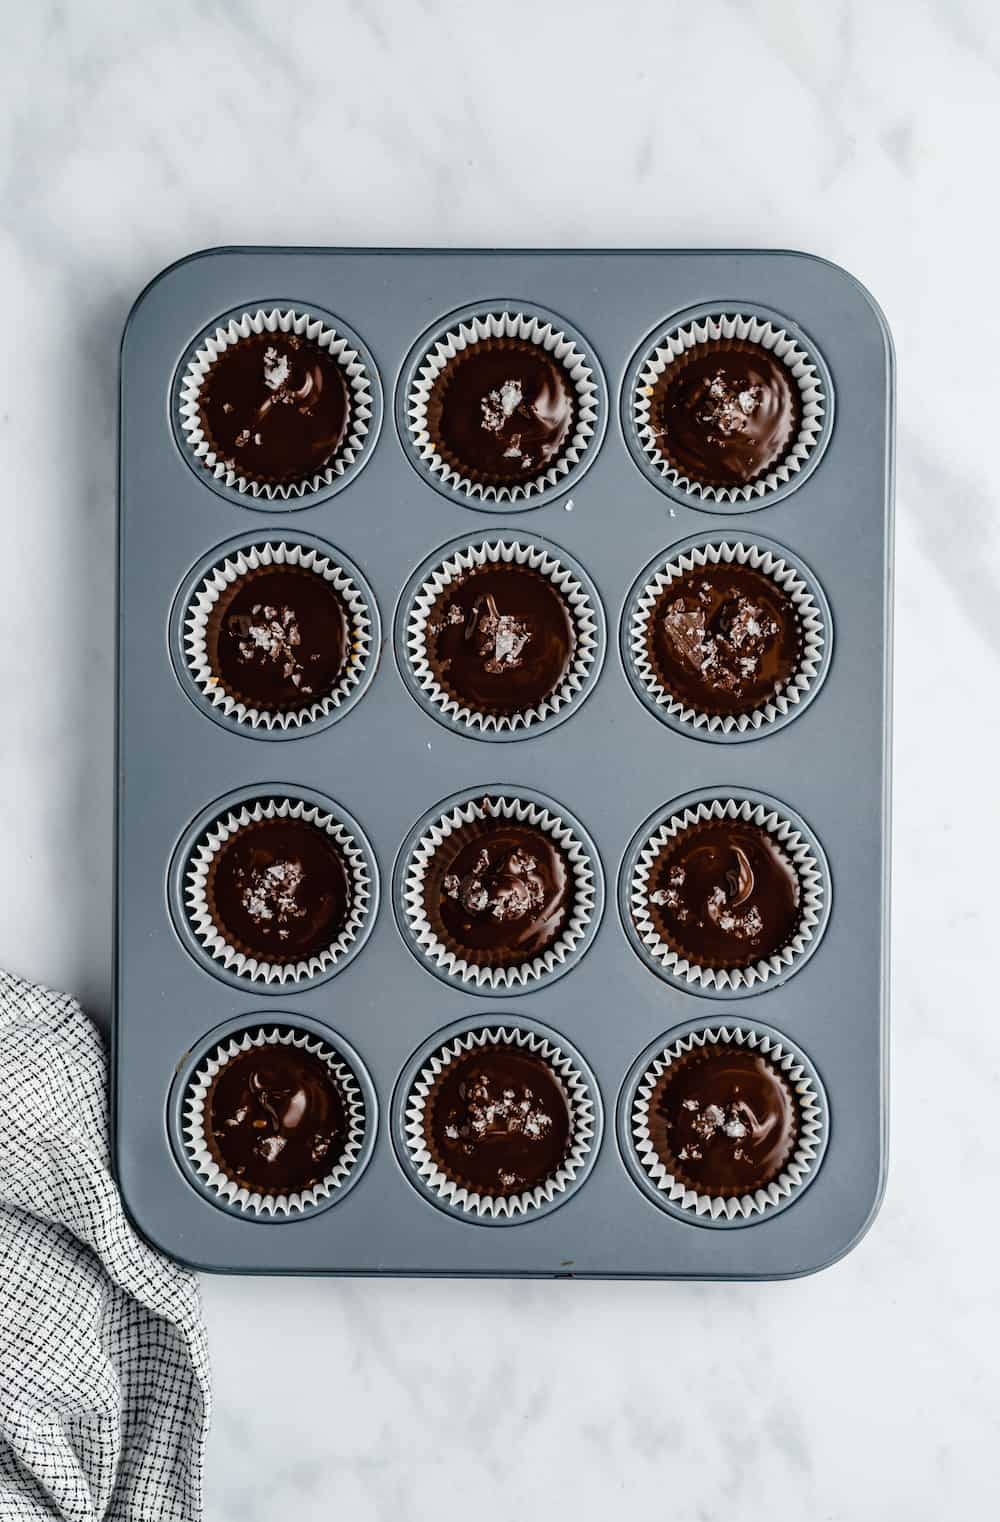
Refrigerate to Set: Place the muffin tin back in the fridge for another 30 minutes to fully set the chocolate.
Serve and Enjoy!
Do me a favor and ensure you enjoy these completely. They are such a great holiday or every day treat! I would make a whole lot, because I guarantee you won’t be able to keep your hands off them.
Tips for the Best Peanut Butter Cups
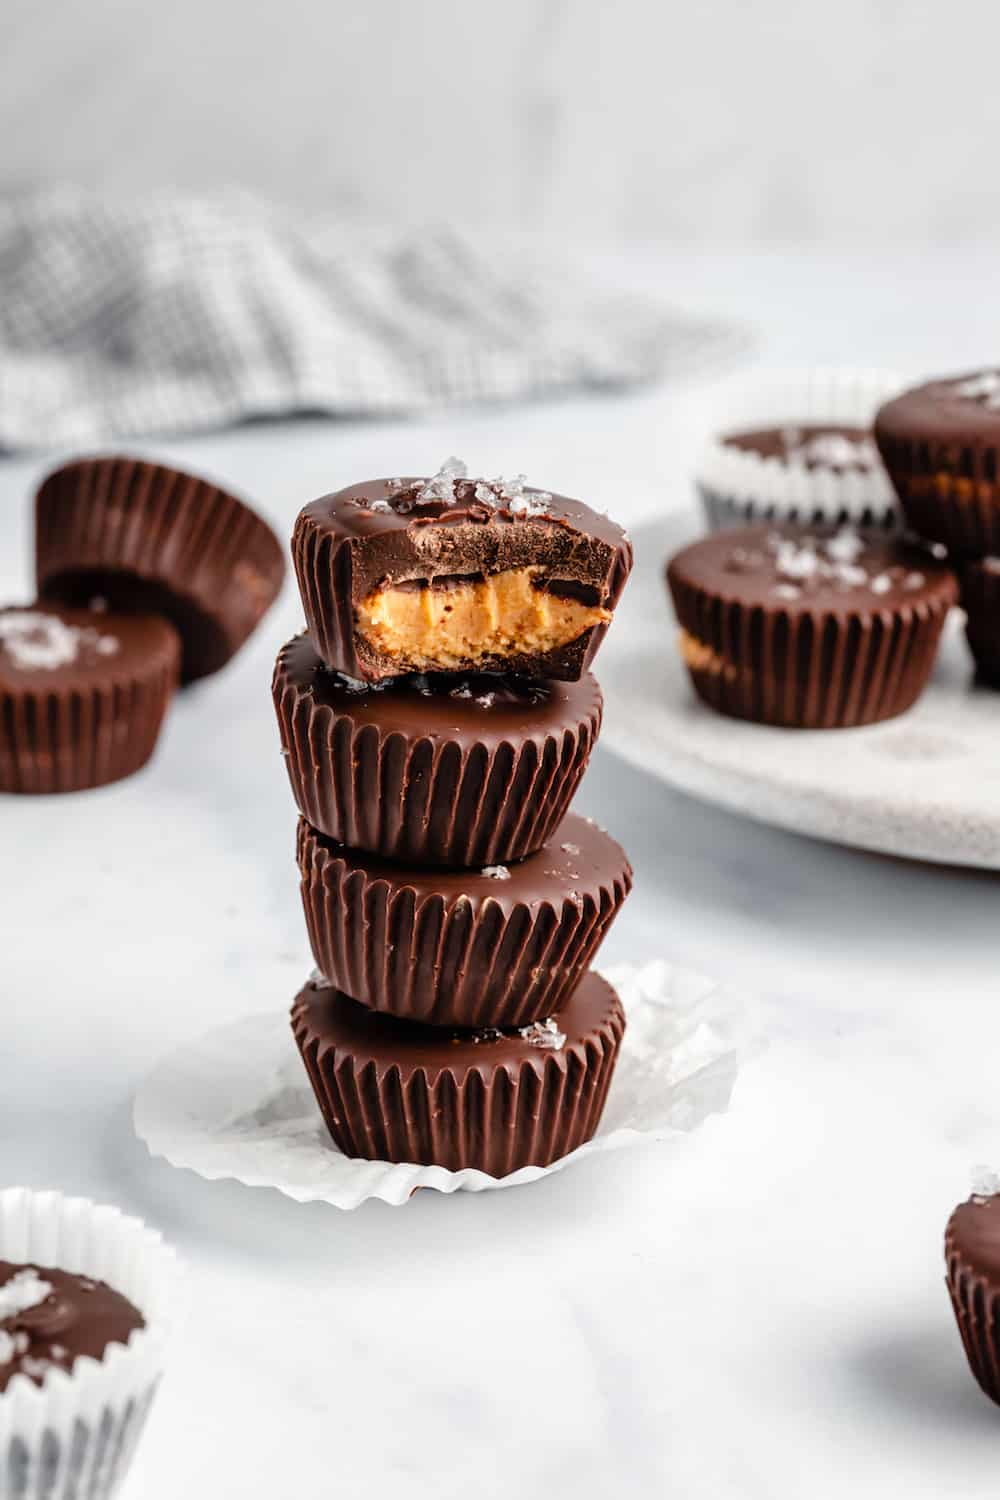
- Leave the Liners: While it’s fine to remove the muffin liner from each peanut butter cup, you can also leave them on. Trim them down like store-bought peanut butter cup wrappers, or fold the upper edges down over the top of the candies. This definitely makes them easier to handle and store!
- Peanut Alternatives: Yes, it’s definitely possible to make these using almond butter or sunflower seed butter. You may want to add a pinch of salt if the almond butter is on the mild side. I’ve also seen pecan butter and even cookie butter used!
How to Store Homemade Vegan Candy
These peanut butter cups tend to melt easily, so they should really be stored in the refrigerator until you’re ready to eat them. Keep them in an airtight container, and enjoy within 2 weeks for the best results.
Can I Freeze Peanut Butter Cups?
Yes, you can! I like to pop mine in the freezer once they are finished, to force myself not to eat them all at once, and because they last even longer in there – up to four months!
More Vegan Dessert Recipes
- Vegan Chocolate Chip Cookies
- Vegan Almond Flour Brownies (One Bowl, Gluten Free, and Fudgy)
- Rolled Pumpkin Spice Cookies (Vegan)
P.S. Here are some of the items I used to make this recipe, if you’d like to use them too:
| WHAT YOU’LL NEED // SHOP MY FAVORITE INGREDIENTS & PREP PRODUCTS |
I f you try this Vegan Peanut Butter Cups please let me know in the comment section below, or tag me on instagram with the hashtag #jessicainthekitchen ! For more exclusive recipes follow me on Instagram AND on Snapchat: jessinkitchen.
Ingredients
Vegan Peanut Butter Cups
- 1 cup chocolate chips , I love dark chocolate here
- 1 tablespoon coconut oil , to slightly thin out the chocolate
- ¼ cup natural peanut butter , (add a little maple syrup to sweeten if necessary) or nut butter of choice
Equipment
- Microwave
Instructions
- Line a mini muffin tin with 12 mini cupcake/muffin liners.
- In your microwave or over a pot of boiling water, melt your chocolate chips. Add the coconut oil to help to thin it out (it’ll also help to solidify the chocolate in a bite-able texture).
- Spoon a little bit of melted chocolate into each of the muffin liners, spreading a thin layer up the edges of the liners. This will ensure the peanut butter is encased in the chocolate.
- Put in the fridge for about 5 minutes to set slightly.
- Remove from fridge and divide the peanut butter equally throughout the 12 liners. Dollop a little bit over the chocolate into the middle of it.
- Top each liner with the remaining chocolate to cover. Top with a little sea salt if you desire.
- Set in the fridge for 30 more minutes to set.
- Remove and enjoy!
Notes
- Leave the Liners: While it’s fine to remove the muffin liner from each peanut butter cup, you can also leave them on. Trim them down like store-bought peanut butter cup wrappers, or fold the upper edges down over the top of the candies. This definitely makes them easier to handle and store!
- Peanut Alternatives: Yes, it’s definitely possible to make these using almond butter or sunflower seed butter. You may want to add a pinch of salt if the almond butter is on the mild side. I’ve also seen pecan butter and even cookie butter used!
Luscious, chocolatey, and filled with all-natural peanut butter, my 3-Ingredient Vegan Peanut Butter Cups are an incredibly easy homemade, (& gluten-free!) version of your favourite store-bought peanut butter cups. They are every bit as divine, and of course, vegan!
A Simple Vegan Candy Recipe
Best news EVER – your favorite peanut butter cups are now super easy to make in an extremely delicious homemade version! Yes, believe it – these Vegan Peanut Butter Cups are about to be your new go-to fridge/freezer snack. They are perfect for your dietary needs, too: vegan, gluten free, and made without any refined sugar.
I know the idea of making vegan candy at home might sound super intimidating and complicated. But trust me, it’s EASY. Like you might never go back to buying the pre-made stuff.
Notes on Ingredients
If you didn’t know before, I’m a complete peanut butter addict. Proof of this is the 3 jars currently sitting in my pantry. It’s truly a life necessity for me. So this simple recipe, using just peanut butter and chocolate chips, is definitely a favorite!
- Peanut Butter: I prefer to use all-natural peanut butter. There are quite a few brands and options out there: stir, no-stir, homemade, all-natural, and lots more. If you’d like, you can add a little sweetener to your peanut butter. I add a touch of maple syrup or agave, stirring it in before dolloping it into the cups. This isn’t necessary though, since the chocolate is already sweet.
- Chocolate Chips: In addition to the peanut butter, all you need is melted chocolate! Specifically, I use chocolate chips. And again, there are so many options out there. You can find great vegan chocolate chips that are free from refined sugar, free of sugar completely, organic, fair trade…. use whatever kind works for your needs!
- Coconut Oil : Coconut oil is actually essential here to help the chocolate cups solidify. It also helps to thin out the chocolate when it’s melting. I don’t recommend swapping it for another oil, but you can buy a refined version to eliminate the coconut taste.
How to Make Vegan Peanut Butter Cups
These are so easy to make (SO easy), and are no-bake. That’s definitely one of my favorite things about this recipe. It’s as simple as melt, mix and refrigerate.
Prepare the Base of the Chocolate Cups: Line a mini muffin tin with 12 mini muffin/cupcake liners. Spoon a little bit of melted chocolate into each of the liners, spreading a thin layer up the sides. This will ensure that the peanut butter is encased in the chocolate. Place in the fridge for about 5 minutes, to set.
Add the Peanut Butter Filling: Remove the muffin tin from the refrigerator and spoon a small amount of peanut butter filling into the center of each chocolate cup, dividing the filling equally among the 12 cups.
Top with More Chocolate: Top each peanut butter cup with a layer of chocolate, to cover and seal in the filling. Sprinkle with sea salt, if you’d like!
Refrigerate to Set: Place the muffin tin back in the fridge for another 30 minutes to fully set the chocolate.
Serve and Enjoy!
Do me a favor and ensure you enjoy these completely. They are such a great holiday or every day treat! I would make a whole lot, because I guarantee you won’t be able to keep your hands off them.
Tips for the Best Peanut Butter Cups
- Leave the Liners: While it’s fine to remove the muffin liner from each peanut butter cup, you can also leave them on. Trim them down like store-bought peanut butter cup wrappers, or fold the upper edges down over the top of the candies. This definitely makes them easier to handle and store!
- Peanut Alternatives: Yes, it’s definitely possible to make these using almond butter or sunflower seed butter. You may want to add a pinch of salt if the almond butter is on the mild side. I’ve also seen pecan butter and even cookie butter used!
How to Store Homemade Vegan Candy
These peanut butter cups tend to melt easily, so they should really be stored in the refrigerator until you’re ready to eat them. Keep them in an airtight container, and enjoy within 2 weeks for the best results.
Can I Freeze Peanut Butter Cups?
Yes, you can! I like to pop mine in the freezer once they are finished, to force myself not to eat them all at once, and because they last even longer in there – up to four months!
More Vegan Dessert Recipes
- Vegan Chocolate Chip Cookies
- Vegan Almond Flour Brownies (One Bowl, Gluten Free, and Fudgy)
- Rolled Pumpkin Spice Cookies (Vegan)
P.S. Here are some of the items I used to make this recipe, if you’d like to use them too:
| WHAT YOU’LL NEED // SHOP MY FAVORITE INGREDIENTS & PREP PRODUCTS |
I f you try this Vegan Peanut Butter Cups please let me know in the comment section below, or tag me on instagram with the hashtag #jessicainthekitchen ! For more exclusive recipes follow me on Instagram AND on Snapchat: jessinkitchen.
Ingredients
Vegan Peanut Butter Cups
- 1 cup chocolate chips , I love dark chocolate here
- 1 tablespoon coconut oil , to slightly thin out the chocolate
- ¼ cup natural peanut butter , (add a little maple syrup to sweeten if necessary) or nut butter of choice
Equipment
- Microwave
Instructions
- Line a mini muffin tin with 12 mini cupcake/muffin liners.
- In your microwave or over a pot of boiling water, melt your chocolate chips. Add the coconut oil to help to thin it out (it’ll also help to solidify the chocolate in a bite-able texture).
- Spoon a little bit of melted chocolate into each of the muffin liners, spreading a thin layer up the edges of the liners. This will ensure the peanut butter is encased in the chocolate.
- Put in the fridge for about 5 minutes to set slightly.
- Remove from fridge and divide the peanut butter equally throughout the 12 liners. Dollop a little bit over the chocolate into the middle of it.
- Top each liner with the remaining chocolate to cover. Top with a little sea salt if you desire.
- Set in the fridge for 30 more minutes to set.
- Remove and enjoy!
Notes
- Leave the Liners: While it’s fine to remove the muffin liner from each peanut butter cup, you can also leave them on. Trim them down like store-bought peanut butter cup wrappers, or fold the upper edges down over the top of the candies. This definitely makes them easier to handle and store!
- Peanut Alternatives: Yes, it’s definitely possible to make these using almond butter or sunflower seed butter. You may want to add a pinch of salt if the almond butter is on the mild side. I’ve also seen pecan butter and even cookie butter used!

Vegan Peanut Butter Cups
Equipment
- Microwave
Ingredients
Vegan Peanut Butter Cups
- 1 cup chocolate chips I love dark chocolate here
- 1 tablespoon coconut oil to slightly thin out the chocolate
- ¼ cup natural peanut butter (add a little maple syrup to sweeten if necessary) or nut butter of choice
Instructions
- Line a mini muffin tin with 12 mini cupcake/muffin liners.
- In your microwave or over a pot of boiling water, melt your chocolate chips. Add the coconut oil to help to thin it out (it’ll also help to solidify the chocolate in a bite-able texture).
- Spoon a little bit of melted chocolate into each of the muffin liners, spreading a thin layer up the edges of the liners. This will ensure the peanut butter is encased in the chocolate.
- Put in the fridge for about 5 minutes to set slightly.
- Remove from fridge and divide the peanut butter equally throughout the 12 liners. Dollop a little bit over the chocolate into the middle of it.
- Top each liner with the remaining chocolate to cover. Top with a little sea salt if you desire.
- Set in the fridge for 30 more minutes to set.
- Remove and enjoy!
Video
Notes
- Leave the Liners: While it’s fine to remove the muffin liner from each peanut butter cup, you can also leave them on. Trim them down like store-bought peanut butter cup wrappers, or fold the upper edges down over the top of the candies. This definitely makes them easier to handle and store!
- Peanut Alternatives: Yes, it’s definitely possible to make these using almond butter or sunflower seed butter. You may want to add a pinch of salt if the almond butter is on the mild side. I’ve also seen pecan butter and even cookie butter used!
Nutrition
Vegan Peanut Butter Cups https://jessicainthekitchen.com/vegan-peanut-butter-cups/ January 26, 2021
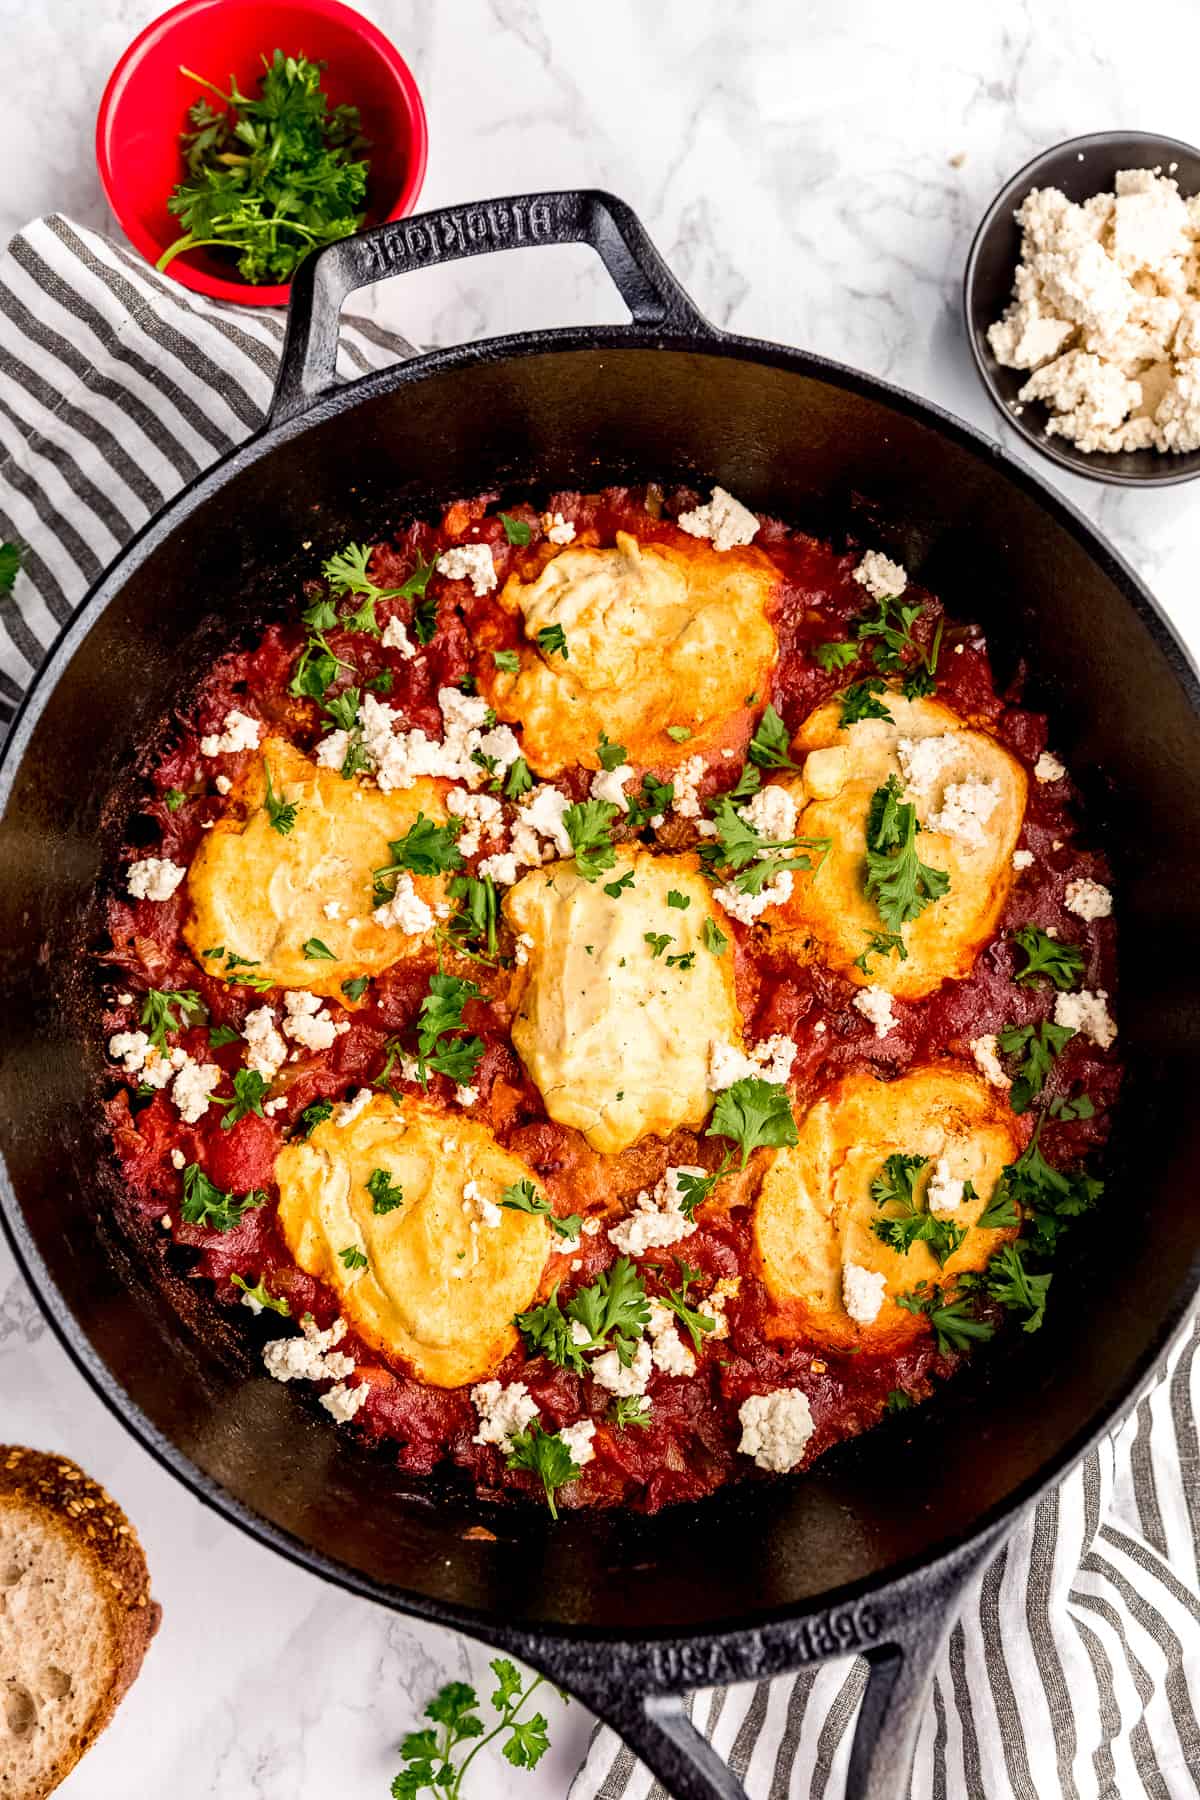
This Vegan Shakshuka (or Shakshouka) is a quick and easy dish takes less than 45 minutes and is a flavourful and delicious breakfast or brunch! Vegan tofu eggs are cooked in flavourful tomato sauce and is sure to be a crowd pleaser!
Thanks to Lodge Cast Iron for sponsoring this blog post! Thanks so much to you my readers for supporting the brands who support Jessica in the Kitchen! All texts and opinions are my own.
I had the pleasure of trying Vegan Shakshuka (or Shakshouka) a few years ago and haven’t stopped thinking about it since. What a treat. Saucy, creamy, loaded with flavour and a delicious vegan egg replacement. This re-creation is based on those delightful memories of the dish, and it’s pretty spot on. This Vegan Shakshuka makes for such a delightful breakfast or brunch and I hope will become a staple in your home!
One thing that’s a staple in my home is for sure my Lodge Cast Iron skillets . I got my first cast iron over 6 years ago and let me tell you – LOVE at first sight. I seasoned it, took care of it, and use it constantly to this day. These cast iron pans are forever.

So you can imagine how excited I was to do this collaboration with Lodge Cast Iron & to get two more skillets from Lodge’s Blacklock line which are a DREAM to use. For this Vegan Shakshuka, I’m using the Blacklock 4 Quart Deep Skillet With Lid. I love that it’s tripled seasoned so I was able to use this right out of the box! Probably what stood out the most to me was that it was lightweight! I know for a fact that alone will make me cook with it even more.
I love how deep it is because I am surely making some deep dish pizza in it, and the lid is so helpful for stews and curries and dishes like this one. Since the cast iron does such an incredible job at insulating, you don’t need to place it in the oven to cook through the vegan eggs. I LOVE this because there’s no turning on your oven and getting your kitchen hot, or waiting on it to preheat either. If you want to check out this incredible skillet, you can find it here along with the triple seasoned 12-Inch Blacklock Skillet that I also picked up!
Notes on the Ingredients
Shakshuka is a North African dish that is traditionally made with eggs and tomato sauce and delicious seasonings. While this dish is not the traditional version, I did my best to pay homage to the traditional dish.
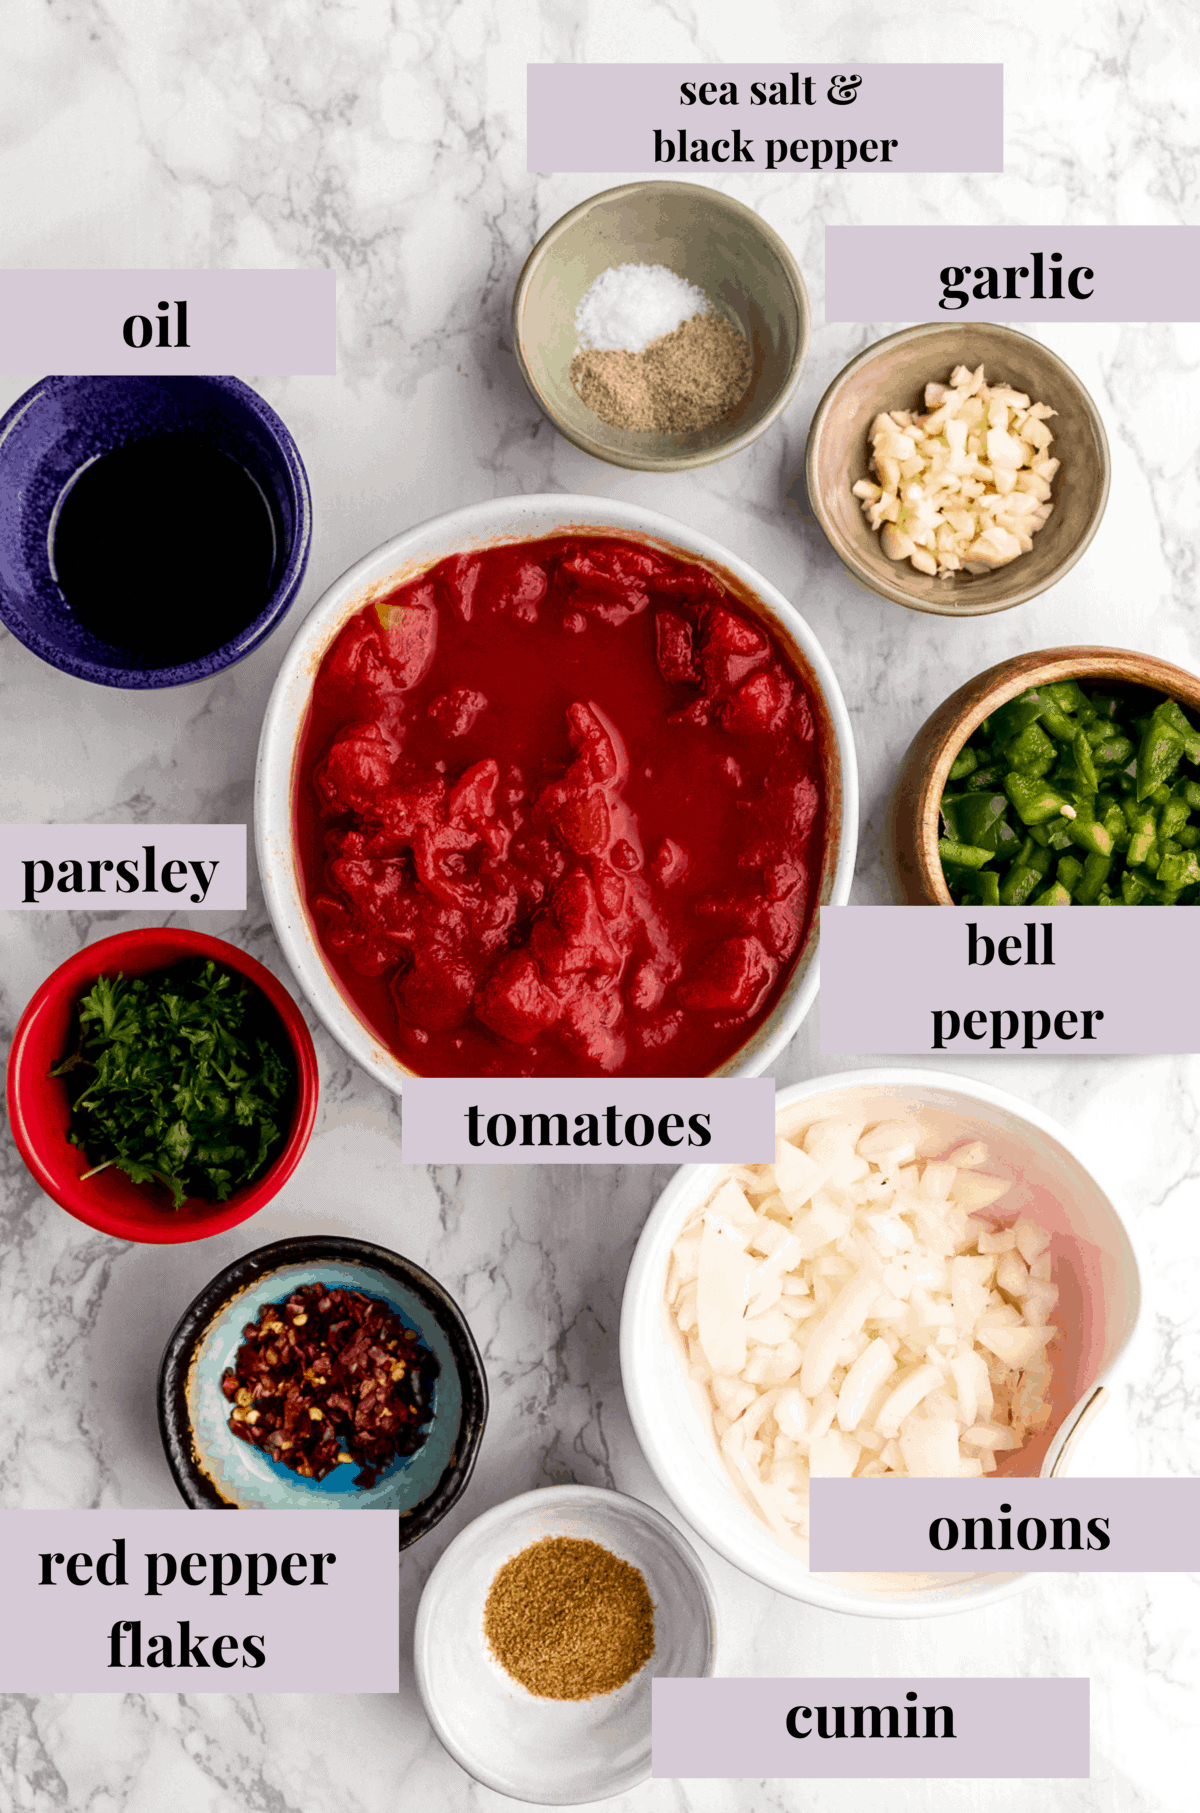
- Oil – you can use any oil!
- Diced tomatoes – I prefer using canned diced tomatoes for ease & the liquids, but you can certainly use fresh. If you’re using fresh, ensure they’re nice and juicy and deep in colour.
- Cumin, garlic & red pepper flakes – essential for that traditional flavour.
- Onions – you can use white, yellow or purple onions. I recommend dicing them.
- Bell pepper – traditionally also found in Shakshuka, it adds a nice flavour and texture to the sauce.
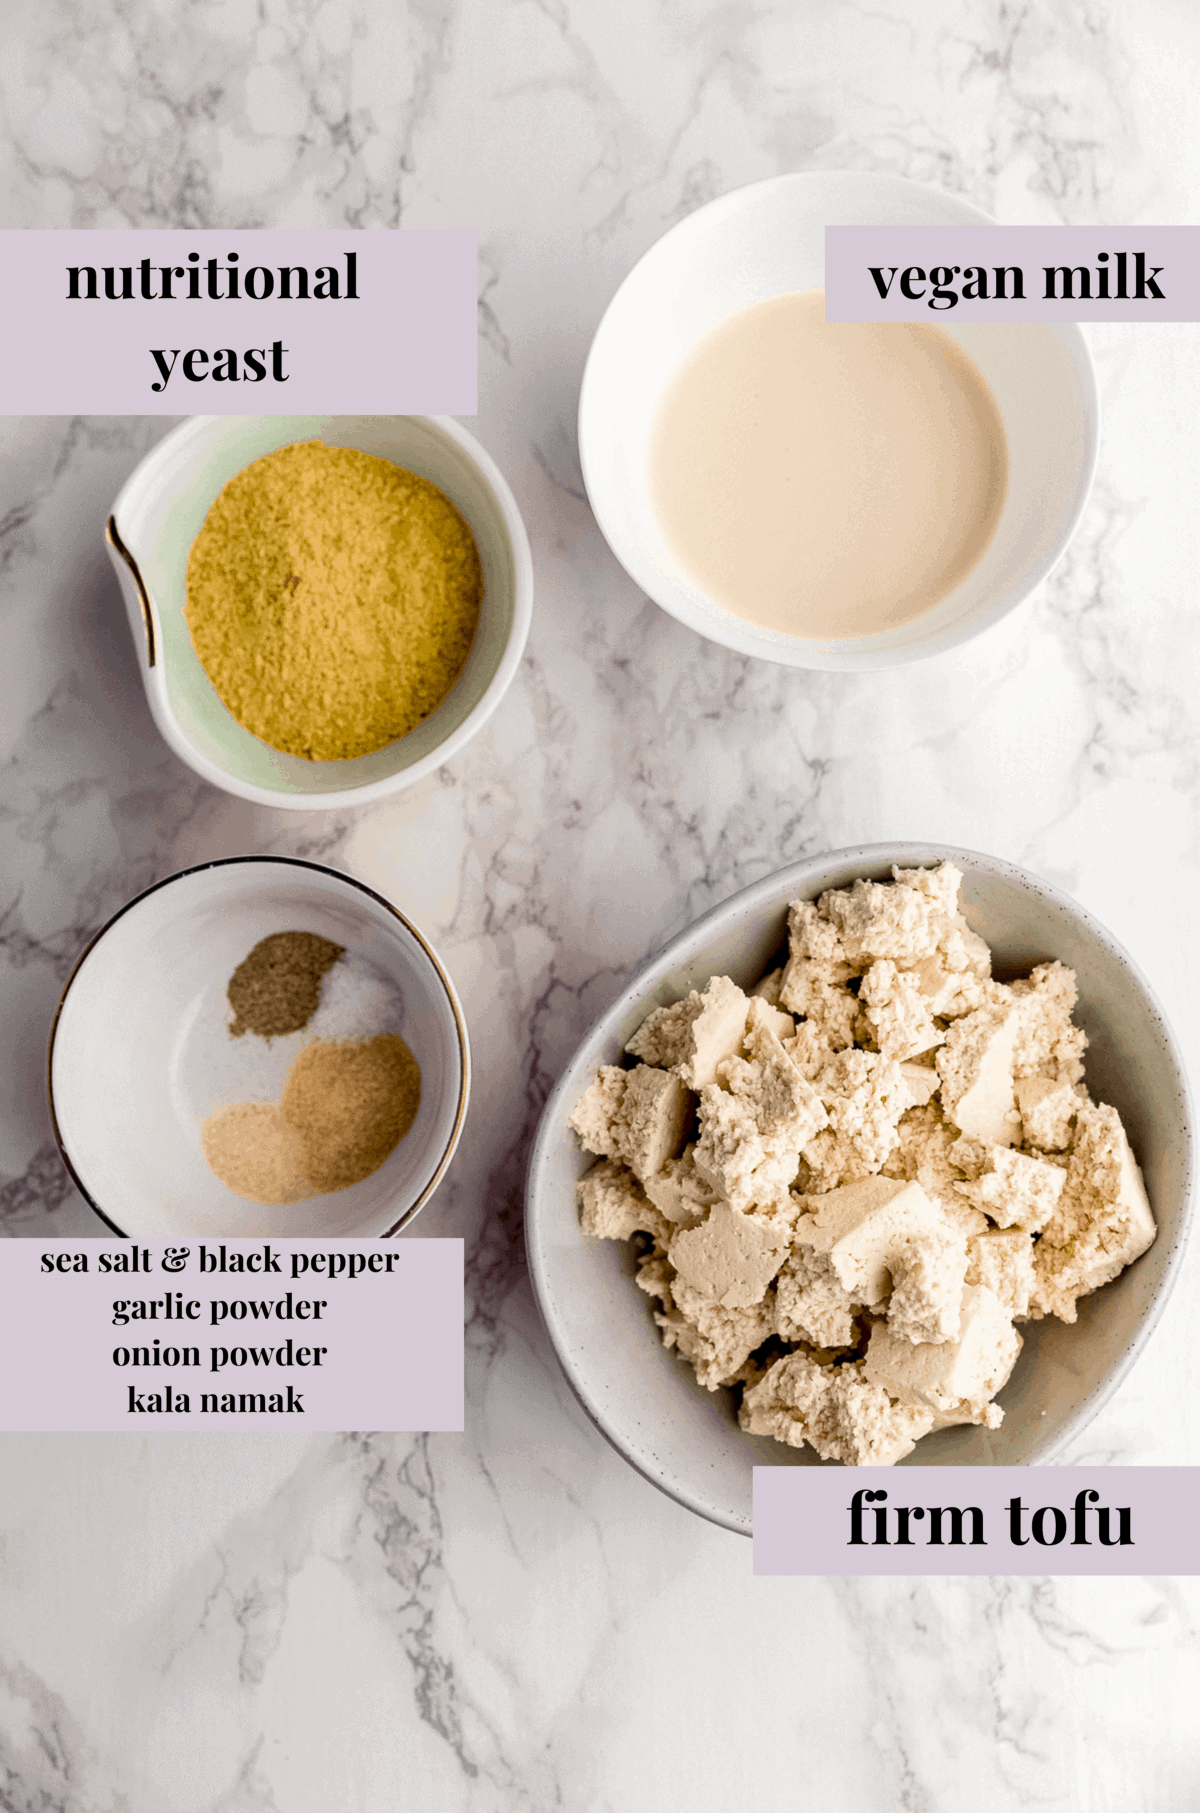
- Tofu eggs – I make an egg filling made with delicious seasonings and tofu. It really takes the dish over the top! Be sure to purchase medium, firm or extra firm tofu.
- Parsley – I love using parsley, but you can also use cilantro!
- Vegan feta cheese – I use my tofu feta cheese as a delicious topping! You can also use any store-bought vegan feta.
Step by Step Instructions
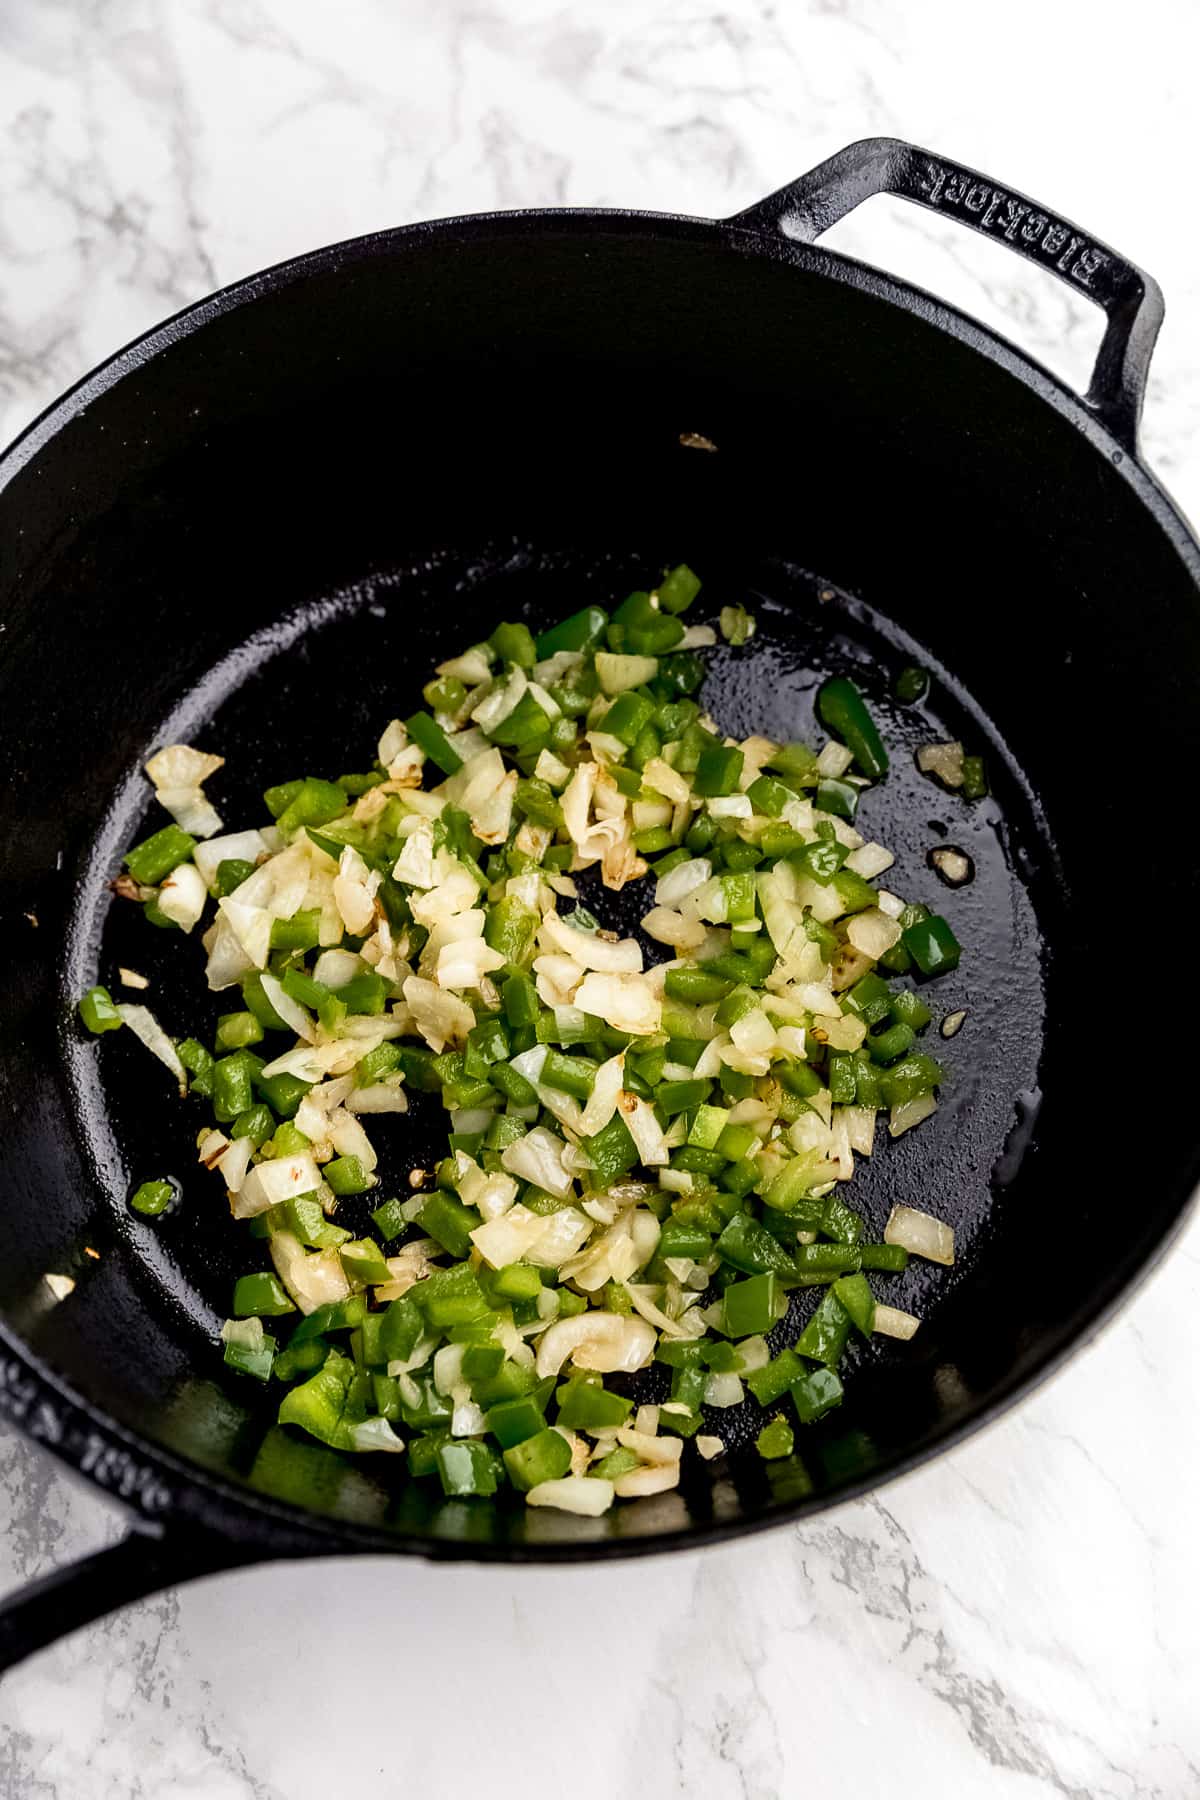
In your Blacklock 4 Quart Deep Skillet , over medium-high heat, heat the oil. Add the onions and bell peppers and stir. Cook for about 5 to 7 minutes until translucent and a bit softer.
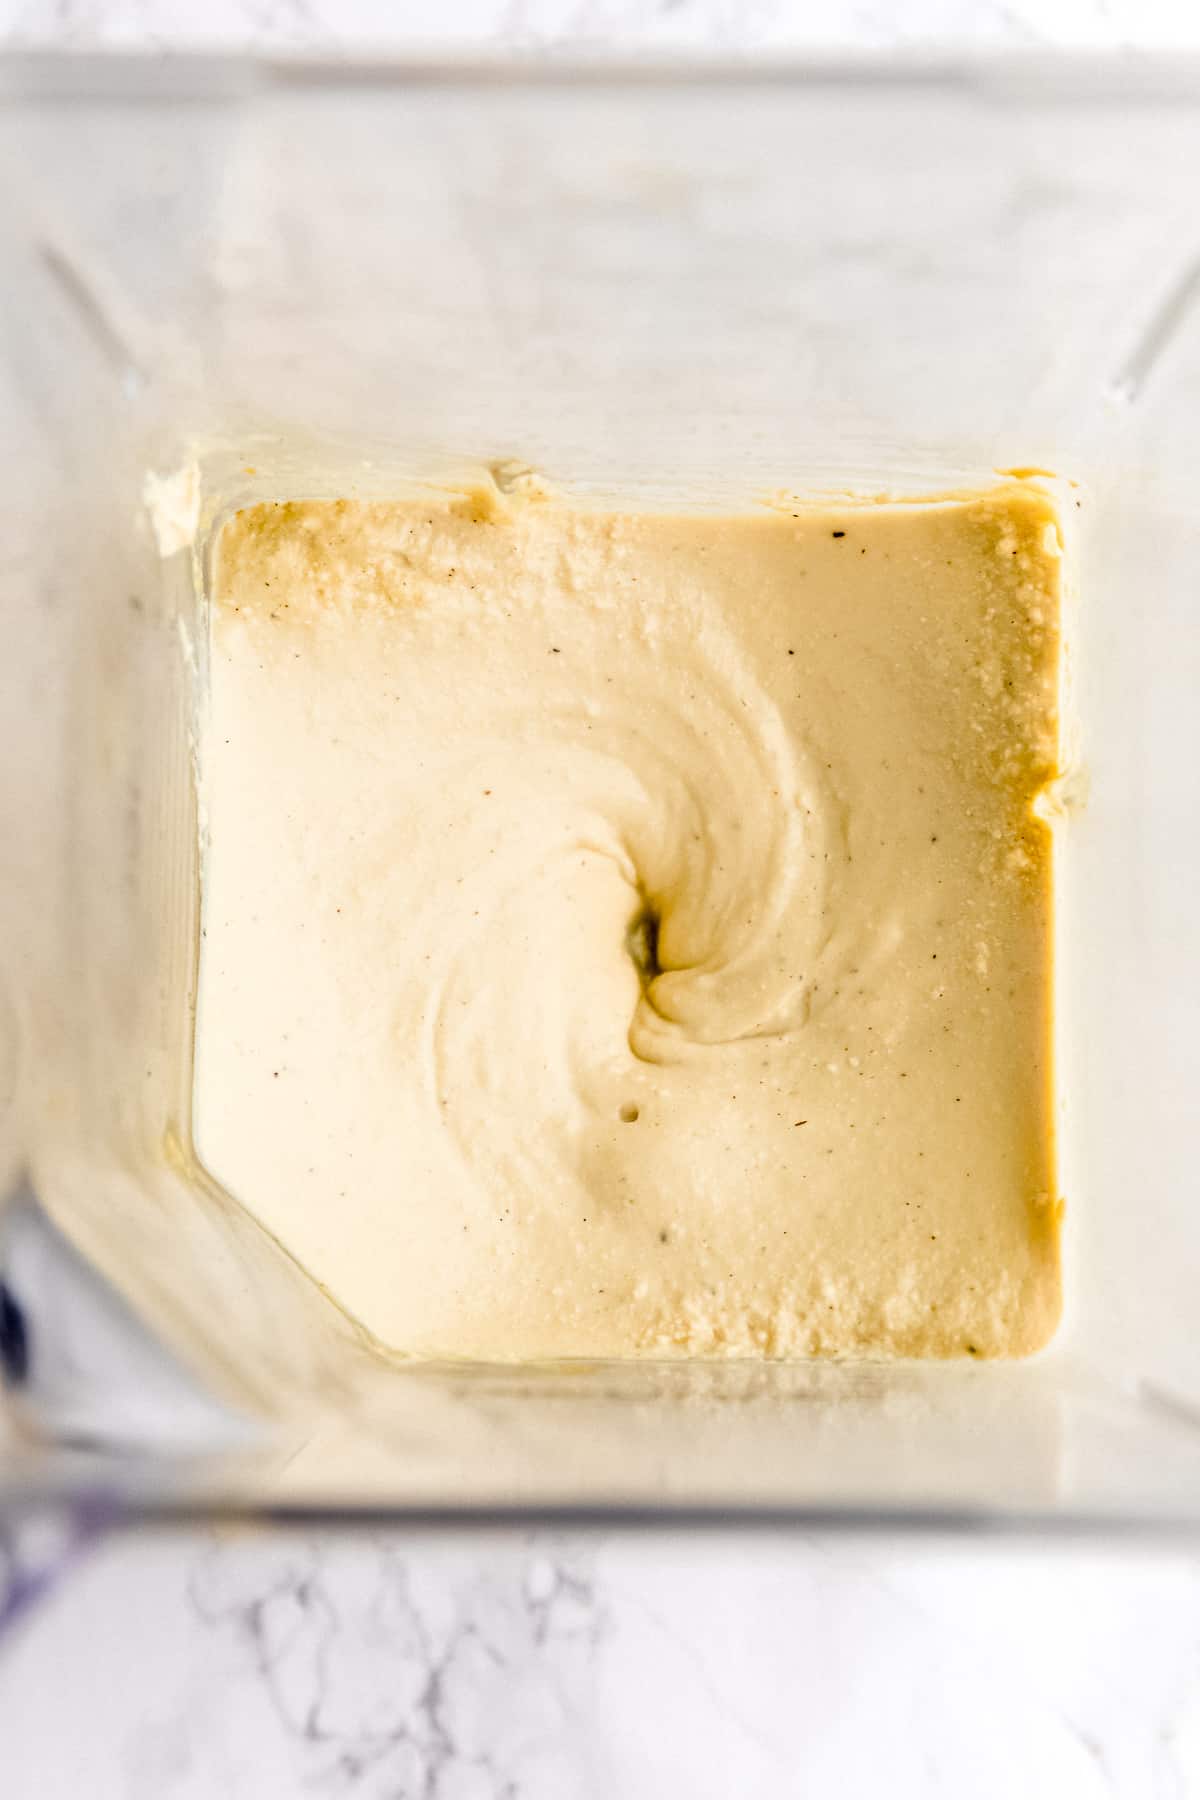
While this is cooking, make the tofu egg mixture. Add the tofu, nutritional yeast , kala namak, garlic powder, onion powder and blend. Taste and adjust seasonings if necessary. Set aside until needed.
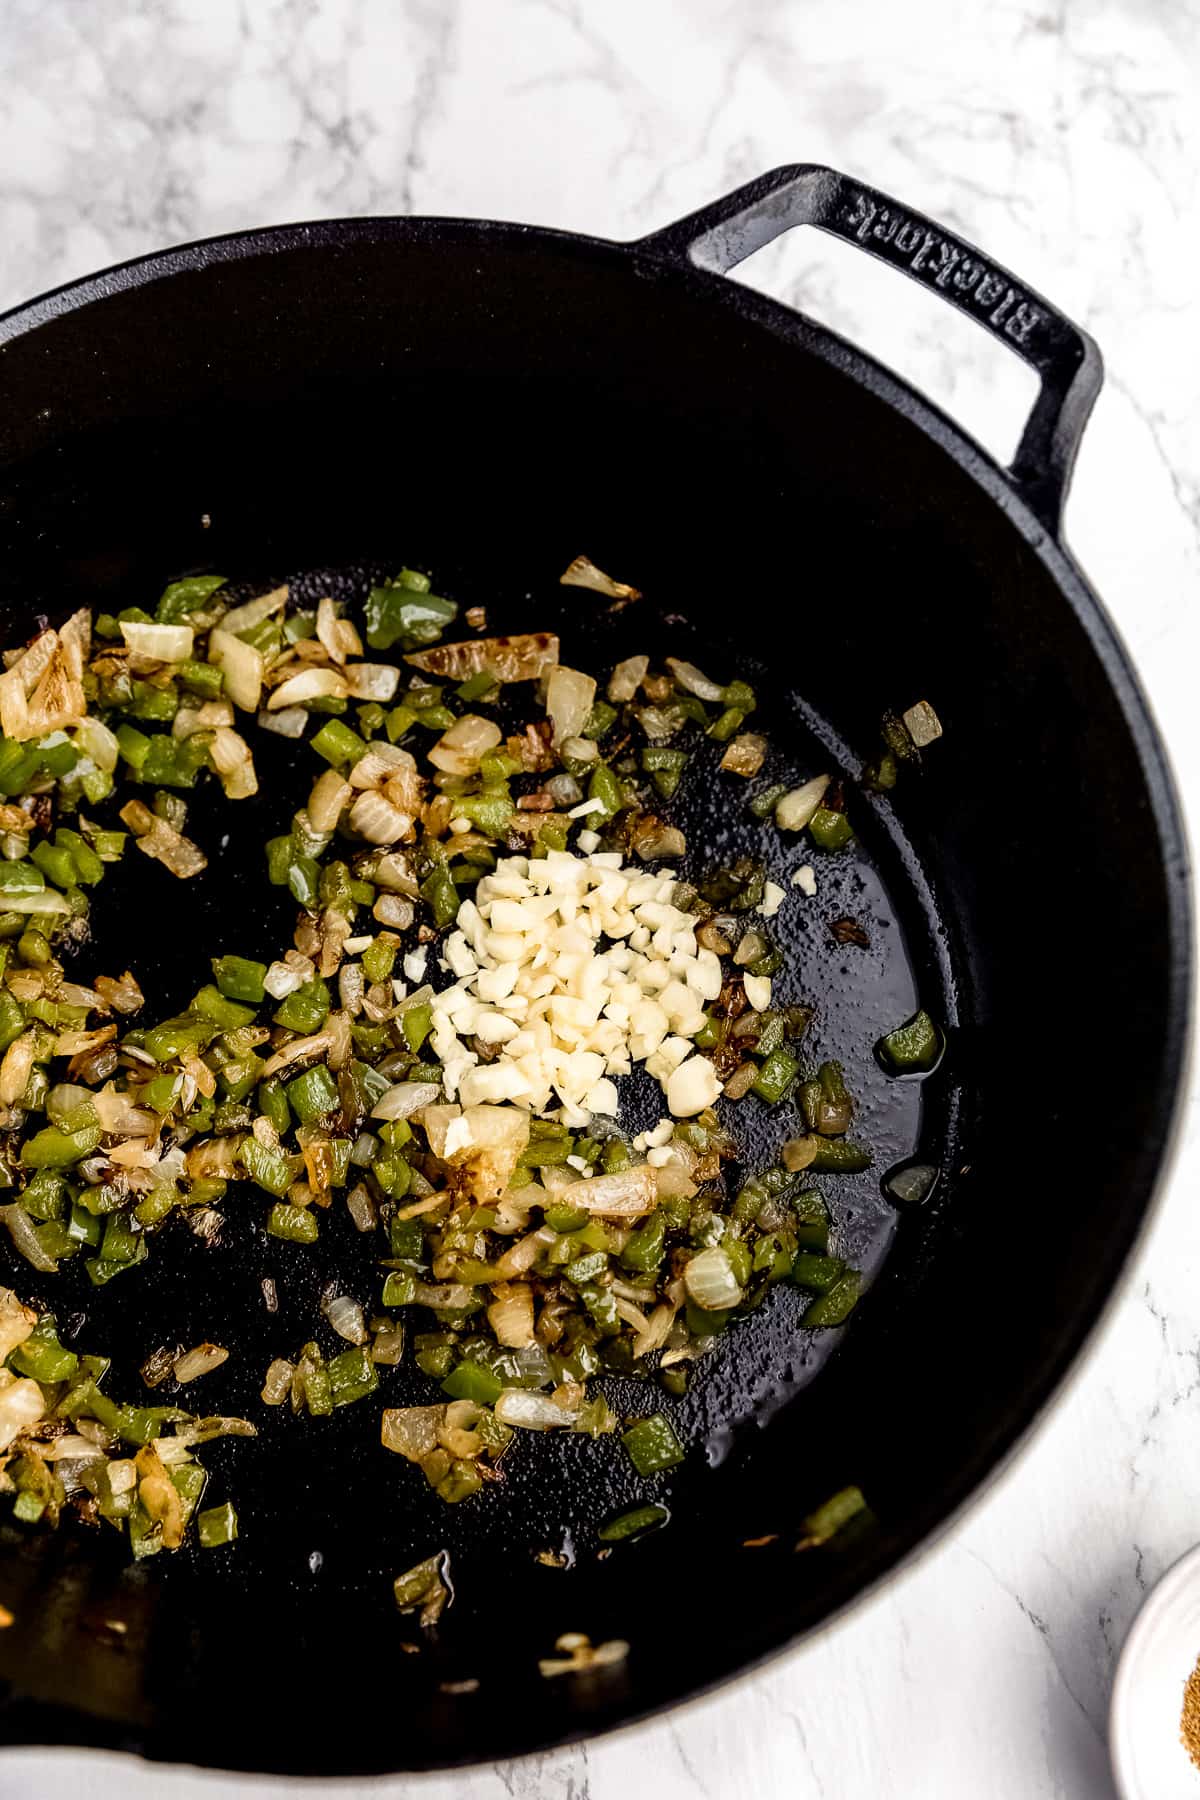
Add the garlic and stir for about 2 minutes until fragrant.
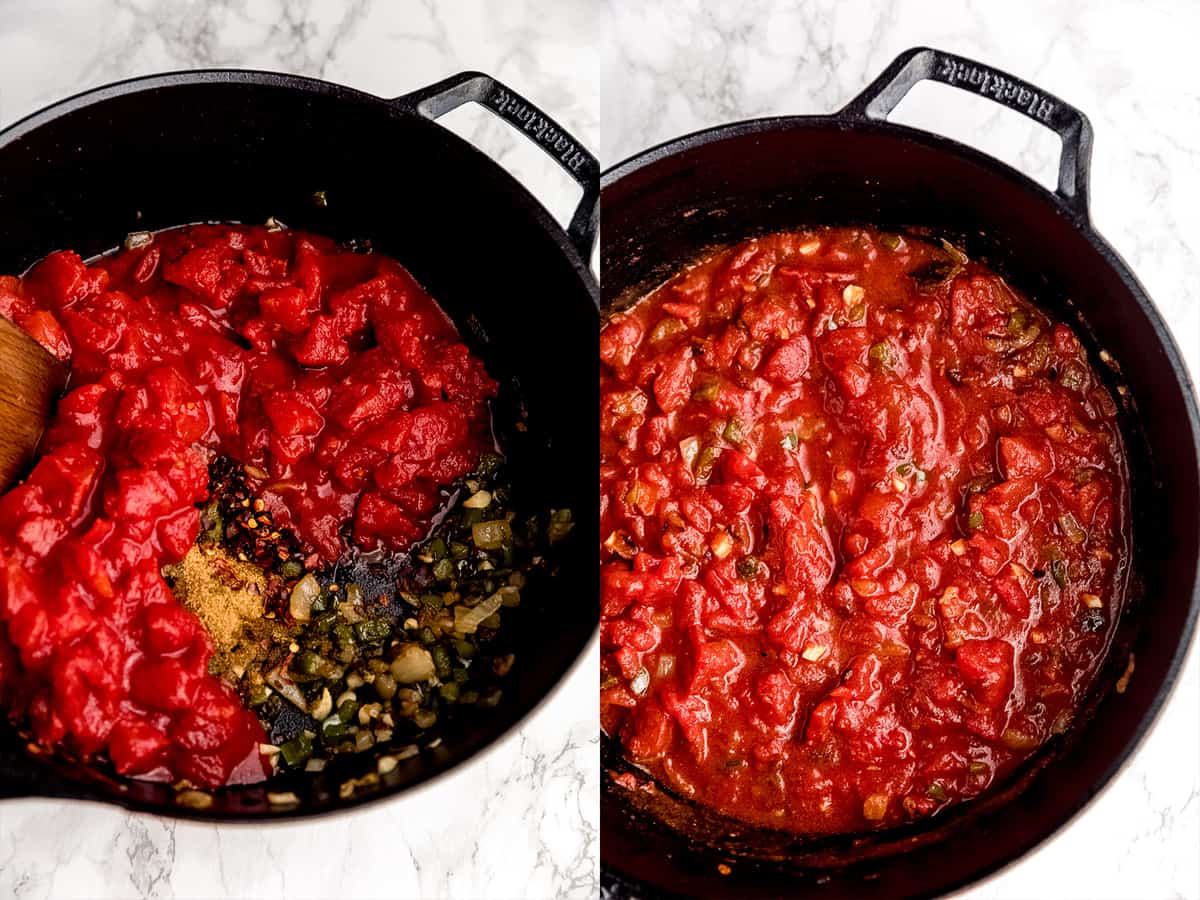
Add the tomato sauce, the cumin, the red pepper flakes and a pinch of salt and ground black pepper. Reduce the heat to medium and stir everything together. Cover your Blacklock 4 Quart Deep Skillet with the lid, and cook for another 2 minutes.
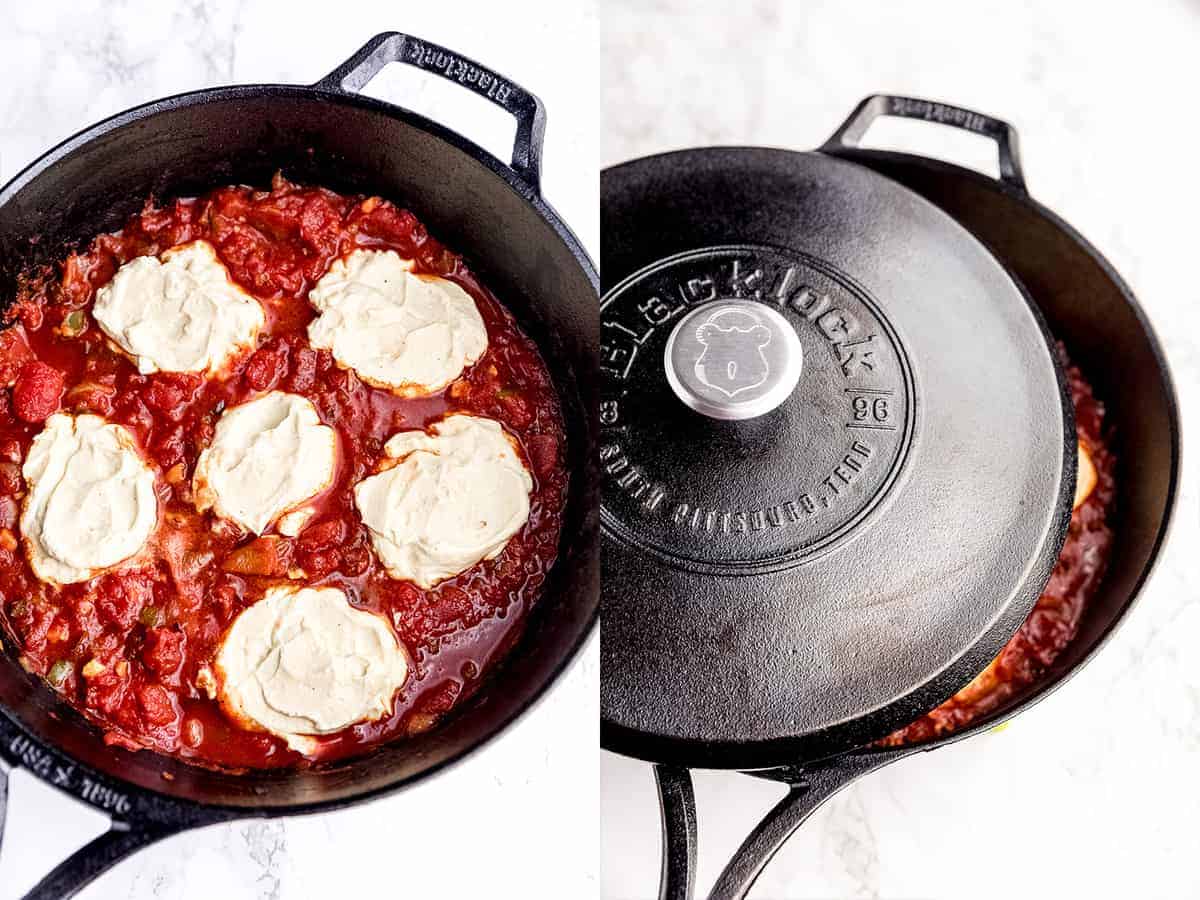
Remove the lid, make some small wells, and scoop in your tofu egg mixture. I like to do about 5 on the outside areas, and one in the middle.
Bring heat to medium (ensure it’s simmering) and cover your Deep Skillet with the lid. Cook the shakshuka for 5 minutes with the lid on to cook through, and then five to 8 minutes with the lid off, allowing all the excess liquid to escape until the tofu egg mixture is set.
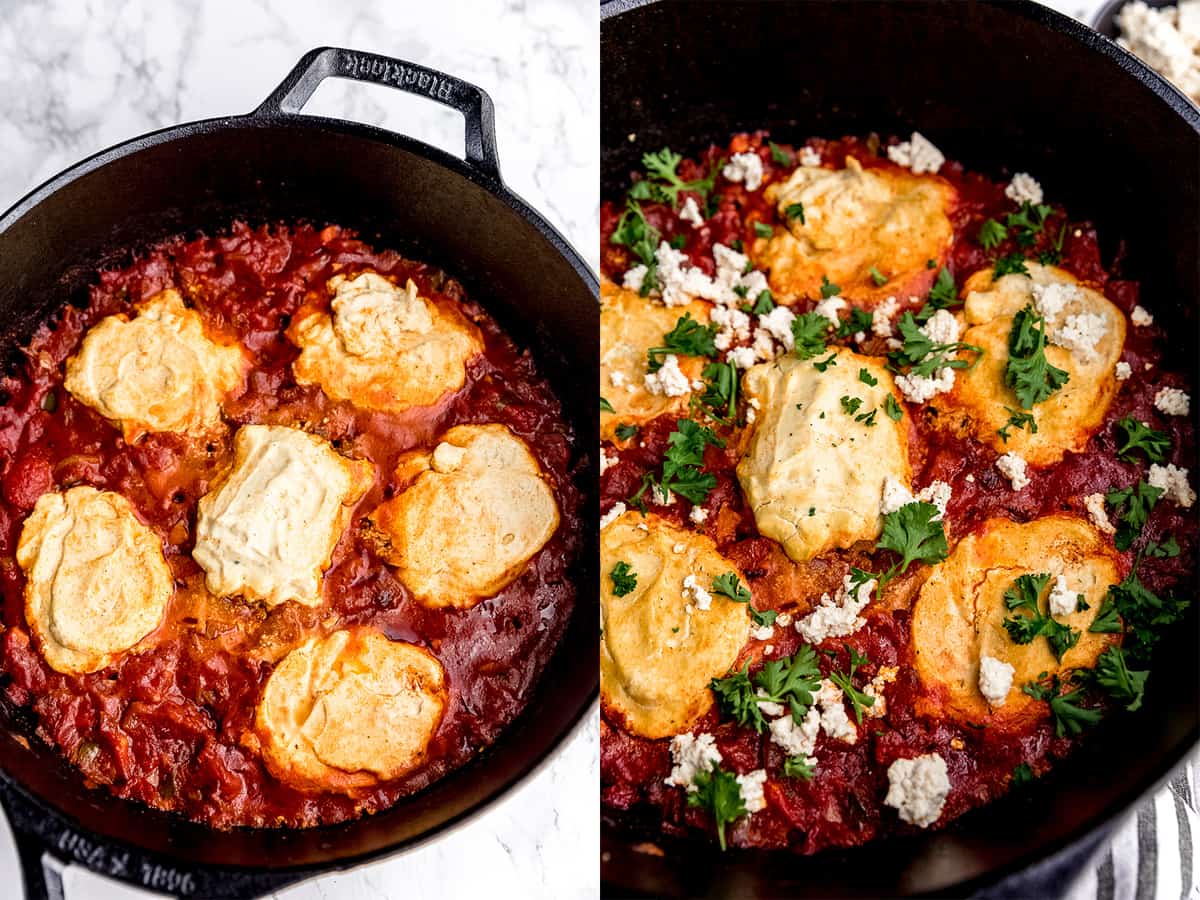
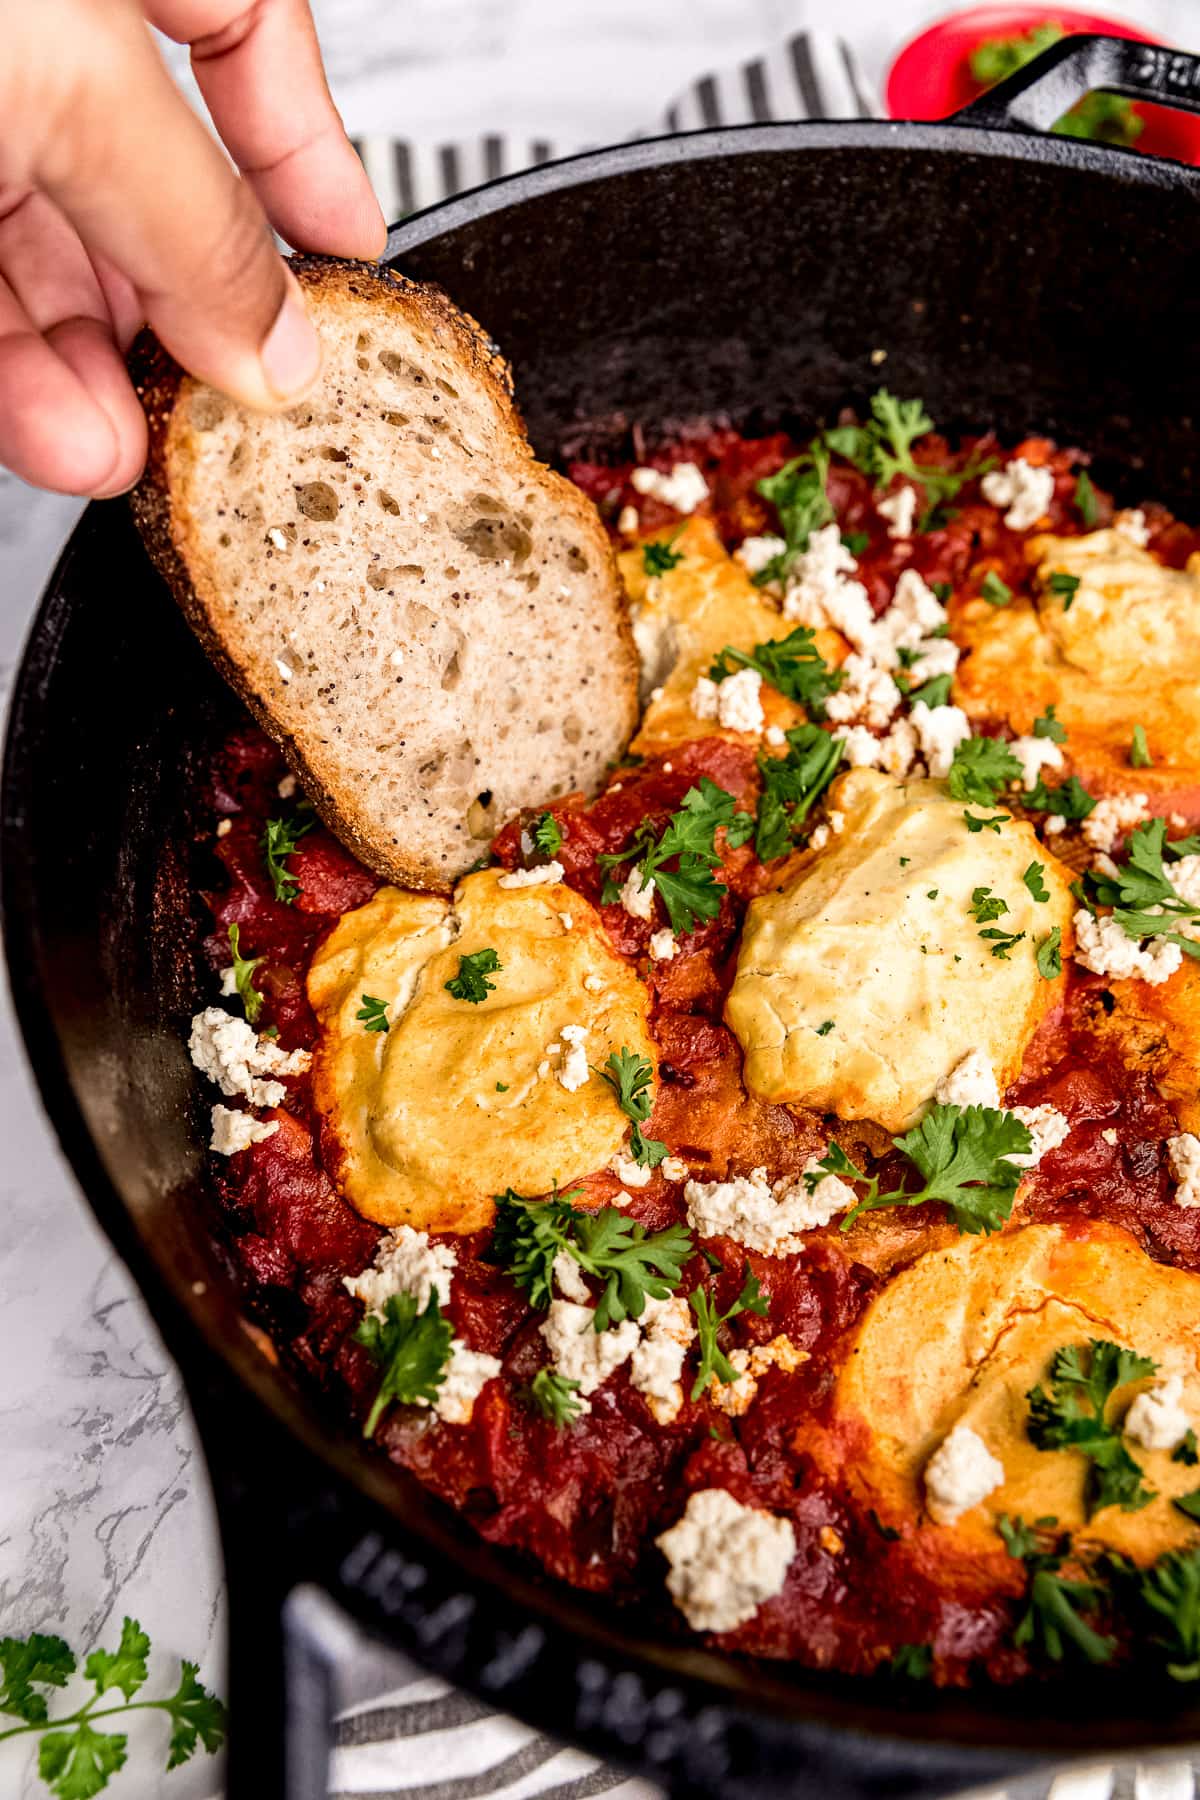
Remove from heat and top with vegan feta and chopped parsley. Serve with pita bread or any kind of crusty bread, and enjoy!
- You can prep the tofu egg mixture the day before or even a few days before! Just store it in your fridge, then bring to room temp for 30 minutes before you prepare the rest of the dish.
- This stores great in the fridge! To reheat use your microwave or your stovetop.
- You can also add a tablespoon of sugar if you find your tomatoes too acidic and want to balance it out.
- Kala namak gives the tofu egg mixture a very “eggy” taste, so I highly recommend using it!
Related Recipes
- Vegan Frittata
- Vegan Quiche
Ingredients
- 28 oz diced tomatoes , fresh or canned
- 1 teaspoon ground cumin
- ½ teaspoon red pepper flakes , or more
- 5 cloves garlic , peeled and chopped finely
- 1 medium onion , finely diced
- 1 medium bell pepper , finely diced
- 1 tablespoon chopped parsley or oregano or herbs of your choice
- ¼ teaspoon sea salt
- ½ teaspoon ground black pepper
- ¼ cup vegan feta cheese , (add more or less if you want to)
- parsley for garnish
Tofu Egg
- 1 lb block of extra firm tofu , pressed for at least 30 minutes
- ¼ teaspoon ground black pepper
- ½ teaspoon garlic powder
- ¼ teaspoon onion powder
- ½ teaspoon sea salt
- 3 tablespoons nutritional yeast
- ¾ cup vegan milk
- ½ teaspoon kala namak
Instructions
- In your Blacklock 4 Quart Deep Skillet, over medium high heat, heat the oil.
- Add the onions and bell peppers and stir. Cook for about 5 to 7 minutes until translucent and a bit softer.
- While this is cooking, make the tofu egg mixture. Add the tofu, nutritional yeast, kala namak, garlic powder, onion powder, milk and blend. Taste and adjust seasonings if necessary. Set aside until needed.
- Add the garlic and stir for about 2 minutes until fragrant.
- Add the tomato sauce, the cumin, the red pepper flakes and a pinch of salt and ground black pepper. Reduce the heat to medium and stir everything together. Cover your Blacklock 4 Quart Deep Skillet with the lid, and cook for another 2 minutes.
- Remove the lid, make some small wells, and scoop in your tofu egg mixture. I like to do about 5 on the outside areas, and one in the middle.
- Bring heat to medium (ensure it’s simmering) and cover your Deep Skillet with the lid. Cook the shakshuka for 5 minutes with the lid on to cook through, and then five to 8 minutes with the lid off, allowing all the excess liquid to escape until the tofu egg mixture is set.
- Remove from heat and allow to cool until set (around 5 minutes at least as it’ll be very hot). Top with vegan feta and chopped parsley. Serve with pita bread or any kind of crusty bread, and enjoy!
