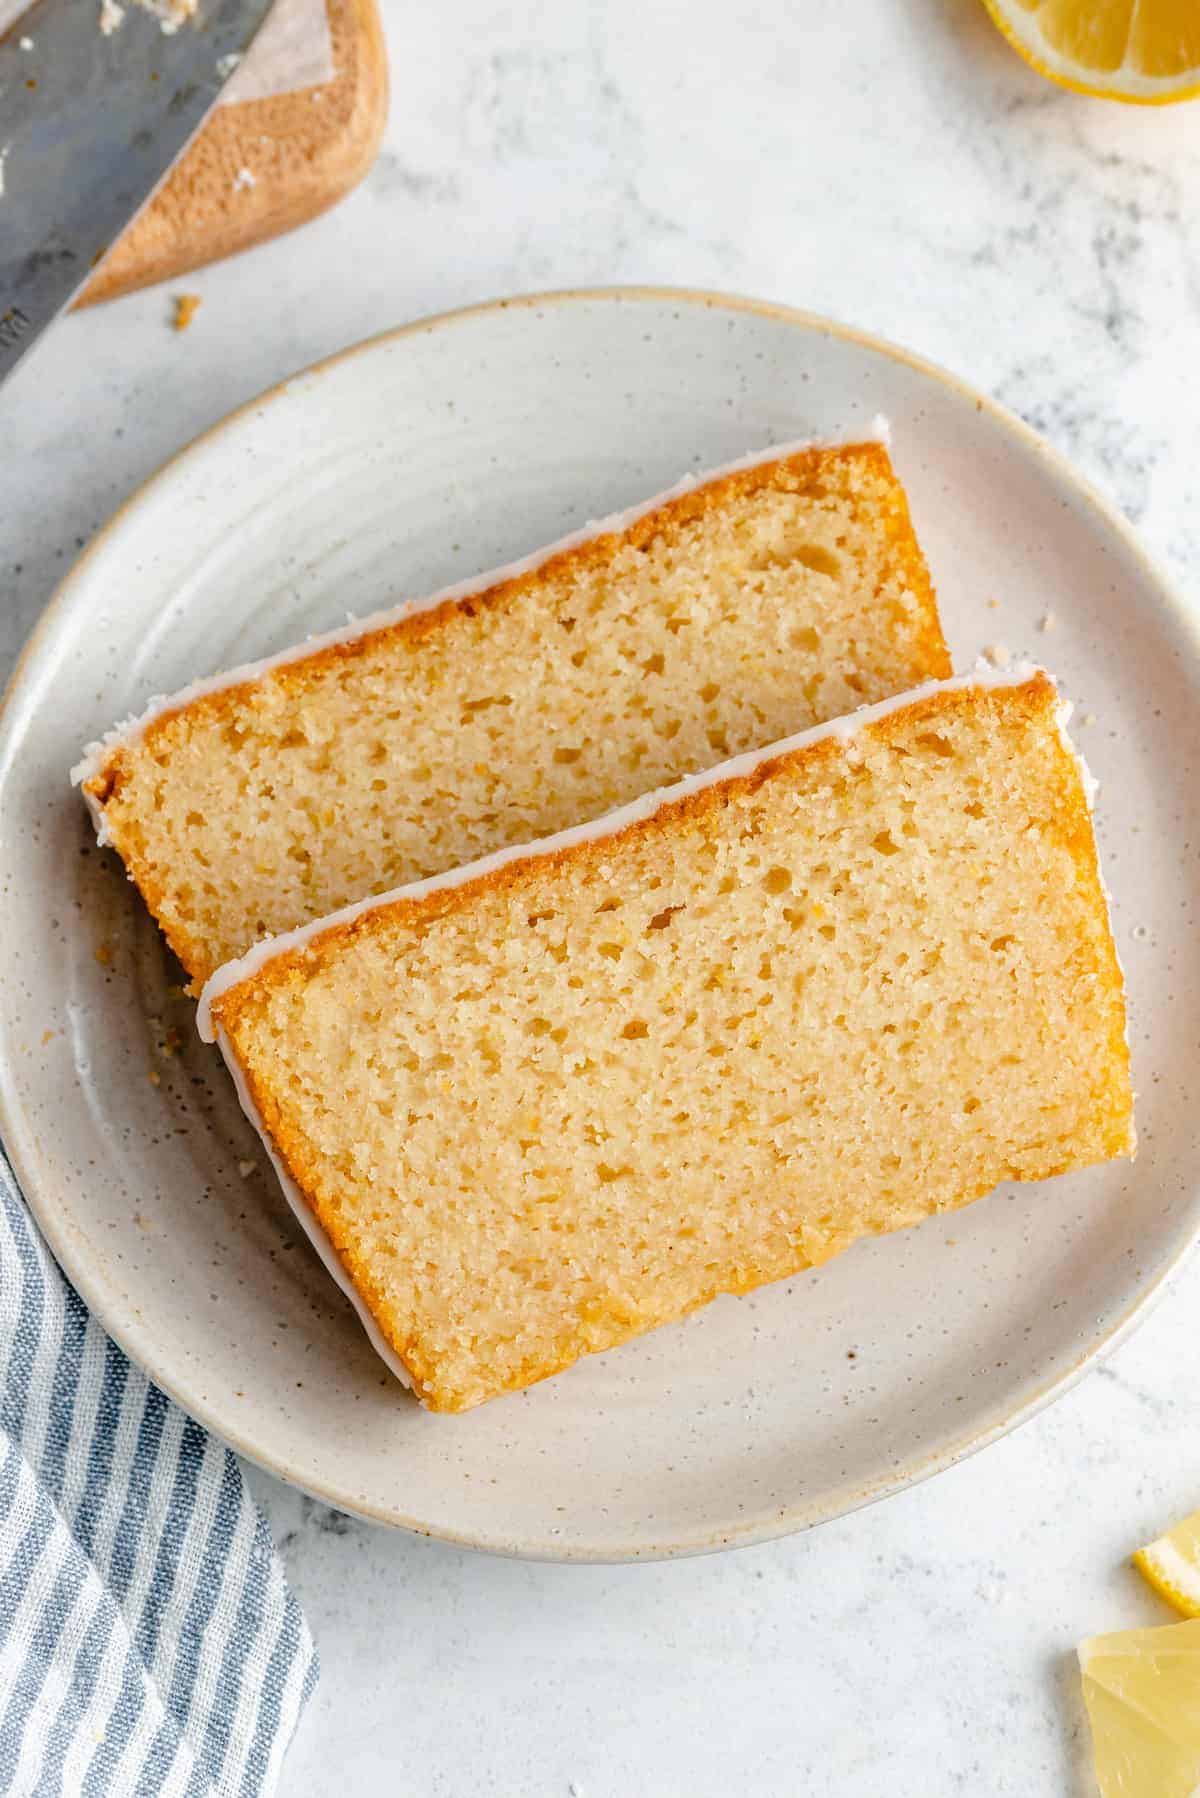
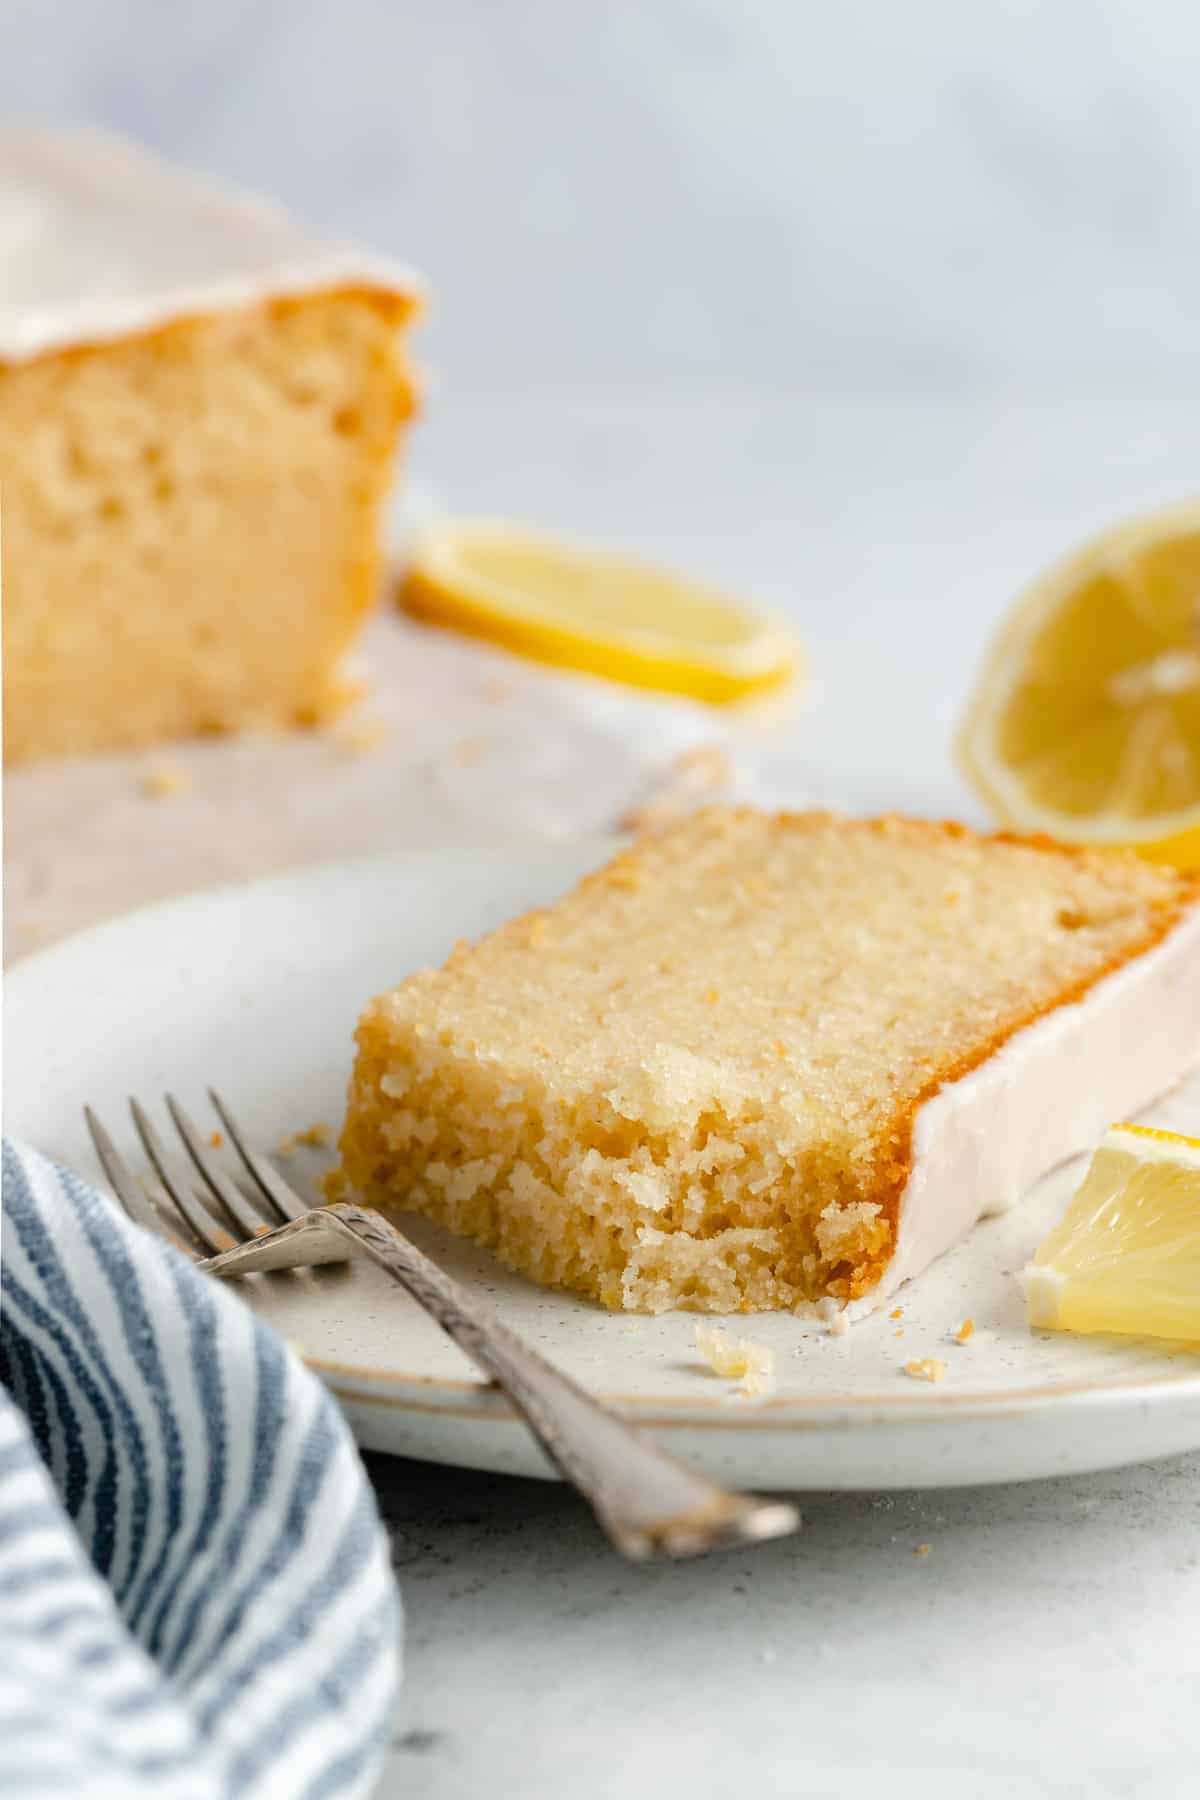
This vegan lemon loaf is a moist, flavourful lemon pound cake inspired by the Starbucks version! It’s packed with fresh lemon zest, topped with a citrusy vanilla glaze. Sweeten up breakfast or enjoy a slice with coffee or tea in the afternoon.
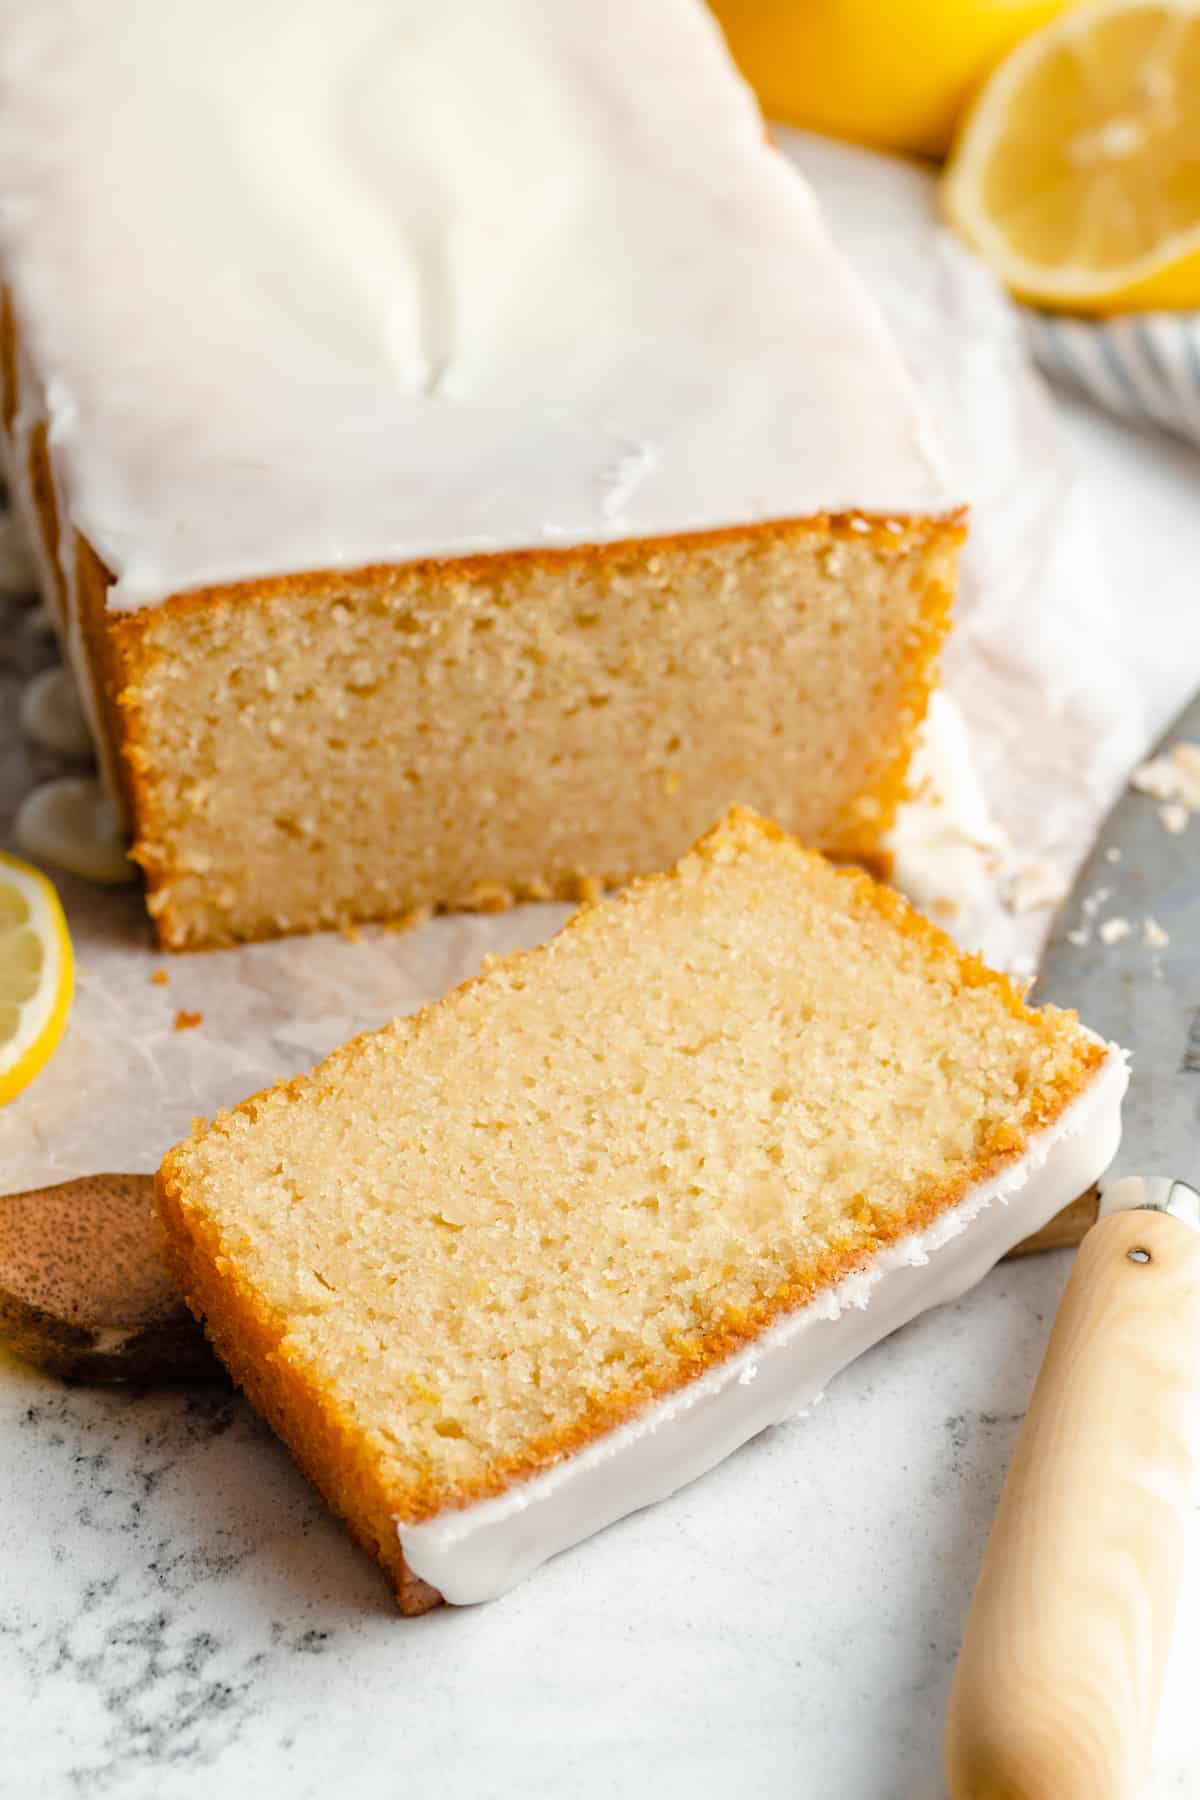
I love baking with lemon, whether it’s a lemon blueberry bread or lemon bars . This lemon loaf recipe is basically a glazed pound cake, a lot like the Starbucks lemon loaf, made vegan! It’s just as soft, tender, and flavourful as a classic lemon pound cake, and it’s also super easy to make. The cake itself is moist and spongy, and the simple glaze is tangy and sweet. Prepping both components won’t take you more than 15 minutes at most. I just know you’ll enjoy this vegan lemon loaf as much as I do.
About This Homemade Lemon Loaf Recipe
- Moist and tender. This lemon loaf is as soft and citrusy as ever, even though it’s made without eggs or dairy.
- Easy to make. I love that a lemon loaf falls somewhere between a lemon cake and a quick bread. It bakes up similarly to a banana bread , without yeast and with very little mixing.
- Any occasion. This moist vegan lemon loaf looks gorgeous on an Easter brunch table, and it’s easy enough for everyday baking, no matter the season. Serve it as a sweet breakfast, with a matcha latte for a midday snack, or as dessert (or all 3, just an idea!).
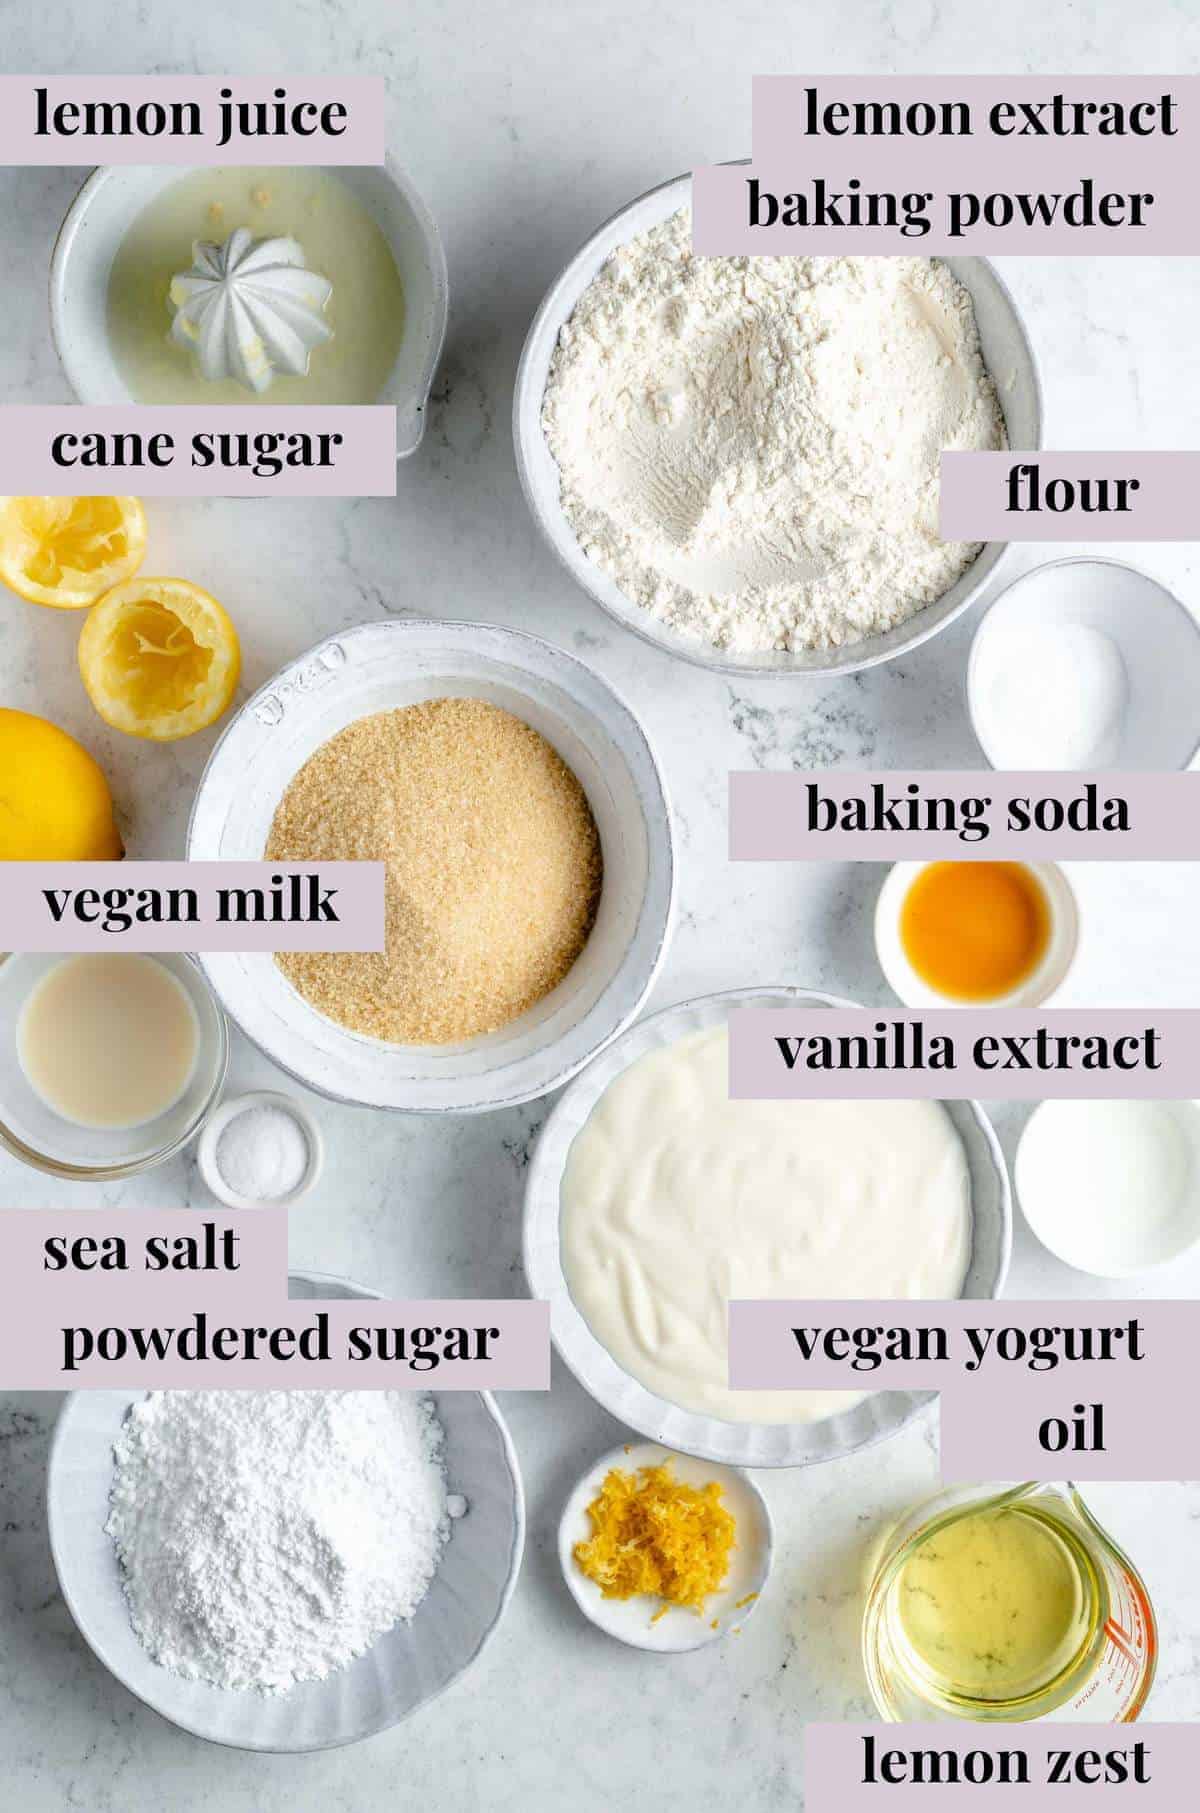
Notes on Ingredients
Here are the ingredients you’ll need to round up for this lemon loaf recipe. Please note that this is important information on the ingredients and instructions, and the FULL recipe with amounts and details can be found DOWN BELOW (scroll to it) in the recipe card.
- Sugar – I like to use cane sugar in this lemon loaf, but granulated sugar will also work just fine.
- Oil – This adds great moisture to the cake, and helps to keep the flavour focused on the lemon, which is why I don’t use melted vegan butter here.
- Lemon Extract – For extra tangy lemon flavour. Don’t skip this – this really gives it that lemon-y flavour.
- Vanilla Extract – Or an equal amount of vanilla bean paste if you’d prefer to use that instead.
- Lemon – You’ll need both the zest and the juice from two lemons. Zest first, then juice!
- Yogurt – Regular vegan yogurt, plain and unsweetened. Bring the yogurt to room temperature.
- Flour – I always mix in all-purpose flour, but you could use a 1:1 gluten-free baking flour to make this loaf gluten-free.
- Baking Powder and Baking Soda – To help your loaf cake rise tall. Make sure that both leavenings are fresh and not expired.
- Salt – I like to use sea salt. Remember that if you’re using table salt, you’ll need to reduce the amount since the granules are smaller than sea salt.
For the Glaze
- Powdered Sugar – If you’d prefer not to glaze the loaf, you can dust the top with powdered sugar instead.
- Milk – Use whatever vegan milk (soy, almond, coconut, etc.) that you like.
- Lemon Juice – For extra zesty flavor. Lemon extract works, too.
How to Make a Vegan Lemon Loaf (Step-by-Step)
When you have your ingredients ready, these are the steps to prepare your vegan lemon loaf from scratch.

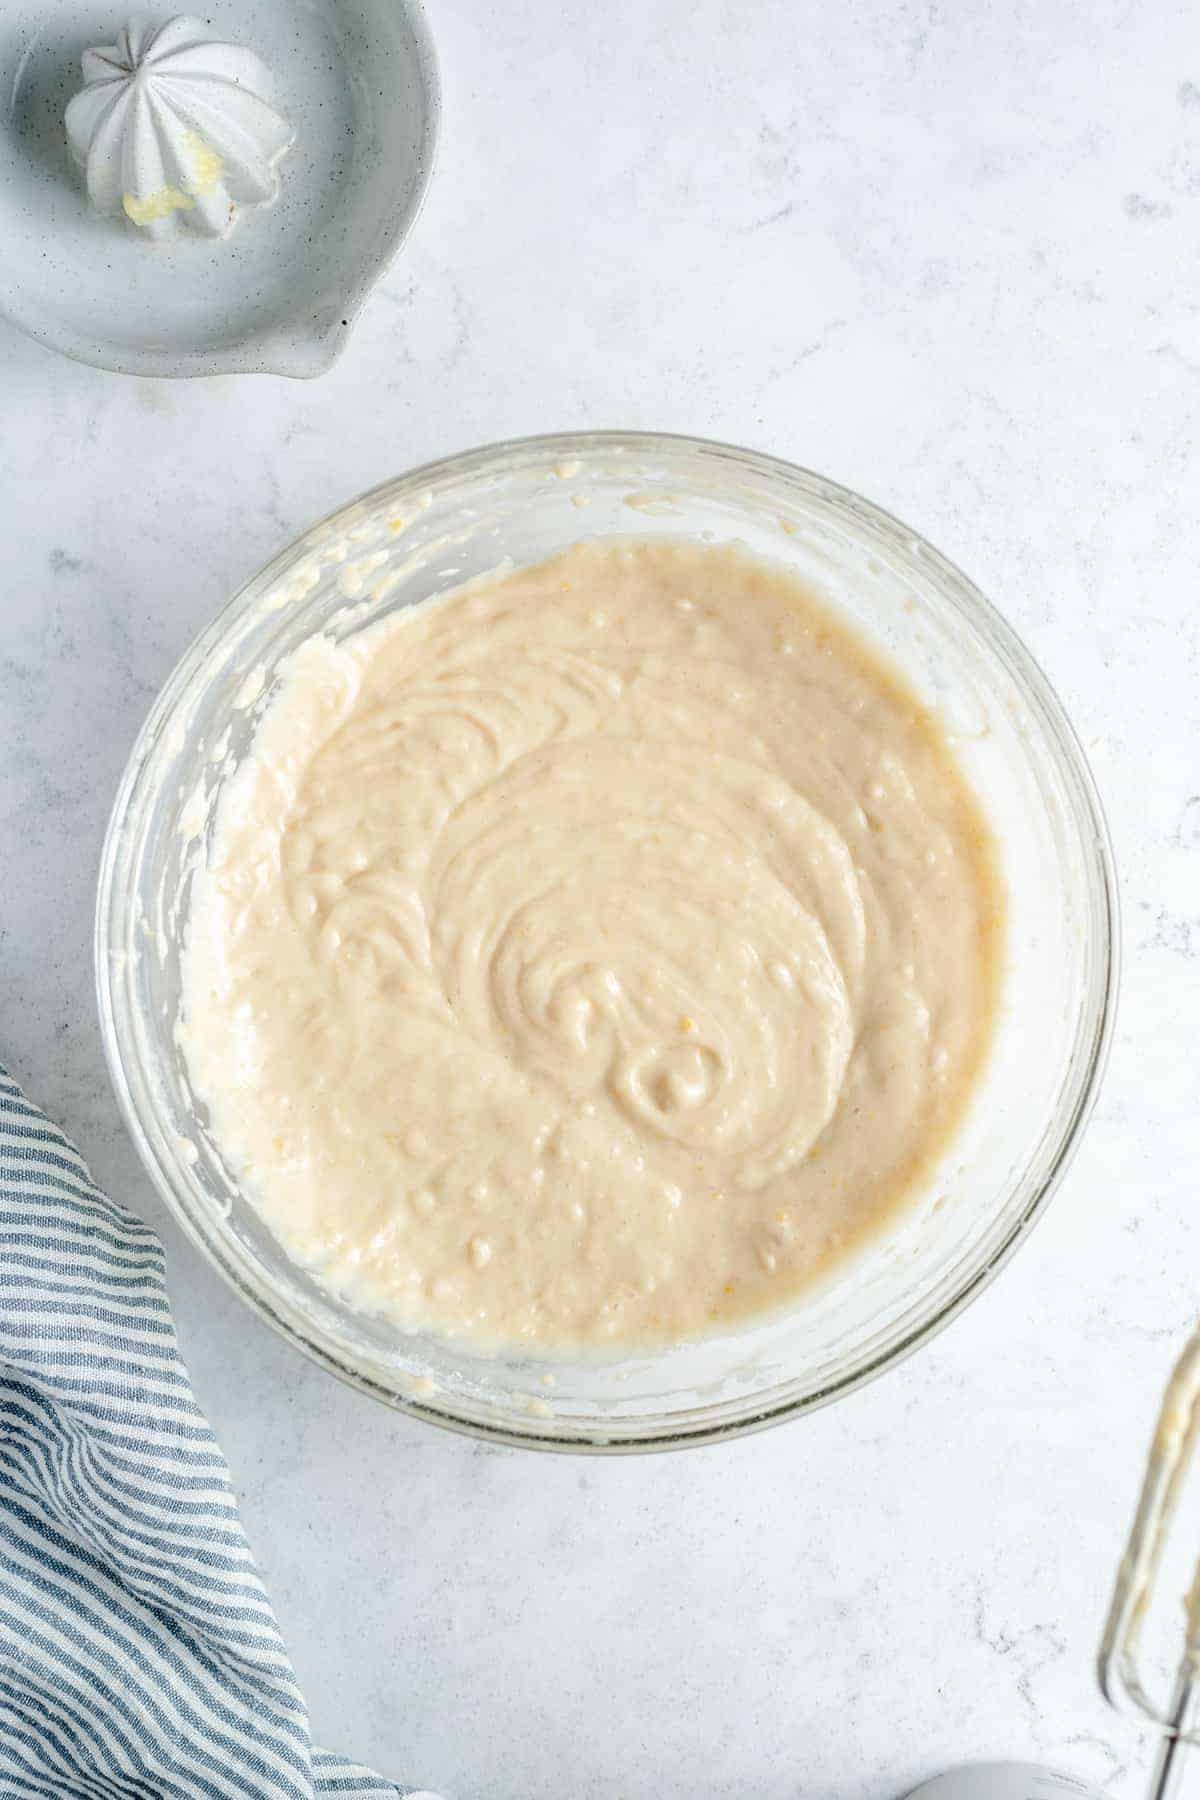
Cream the wet ingredients.
- Combine the wet ingredients. Cream the sugar, oil, lemon extract, vanilla extract, and lemon zest together until well-incorporated. Then, whisk in the vegan yogurt and lemon juice.
Mix in the dry ingredients.
- Add the dry ingredients. Now, in a separate bowl, whisk the flour, baking powder, baking soda, and salt. Add the dry mixture to the wet ingredients and mix until just incorporated. Spread the batter evenly into a greased loaf pan.
- Bake. Bake the lemon loaf on the middle rack at 350ºF for 55-60 minutes. When a toothpick stuck into the center of the loaf comes out clean, remove it from the oven. Let it cool in the pan for 10 minutes, then move the loaf to a wire rack. It’ll need to cool completely to room temperature before you add the glaze.
Add the Lemon Glaze
Once you’ve got the loaf cooling, you can get started on the glaze! It takes less than 5 minutes to whip together.
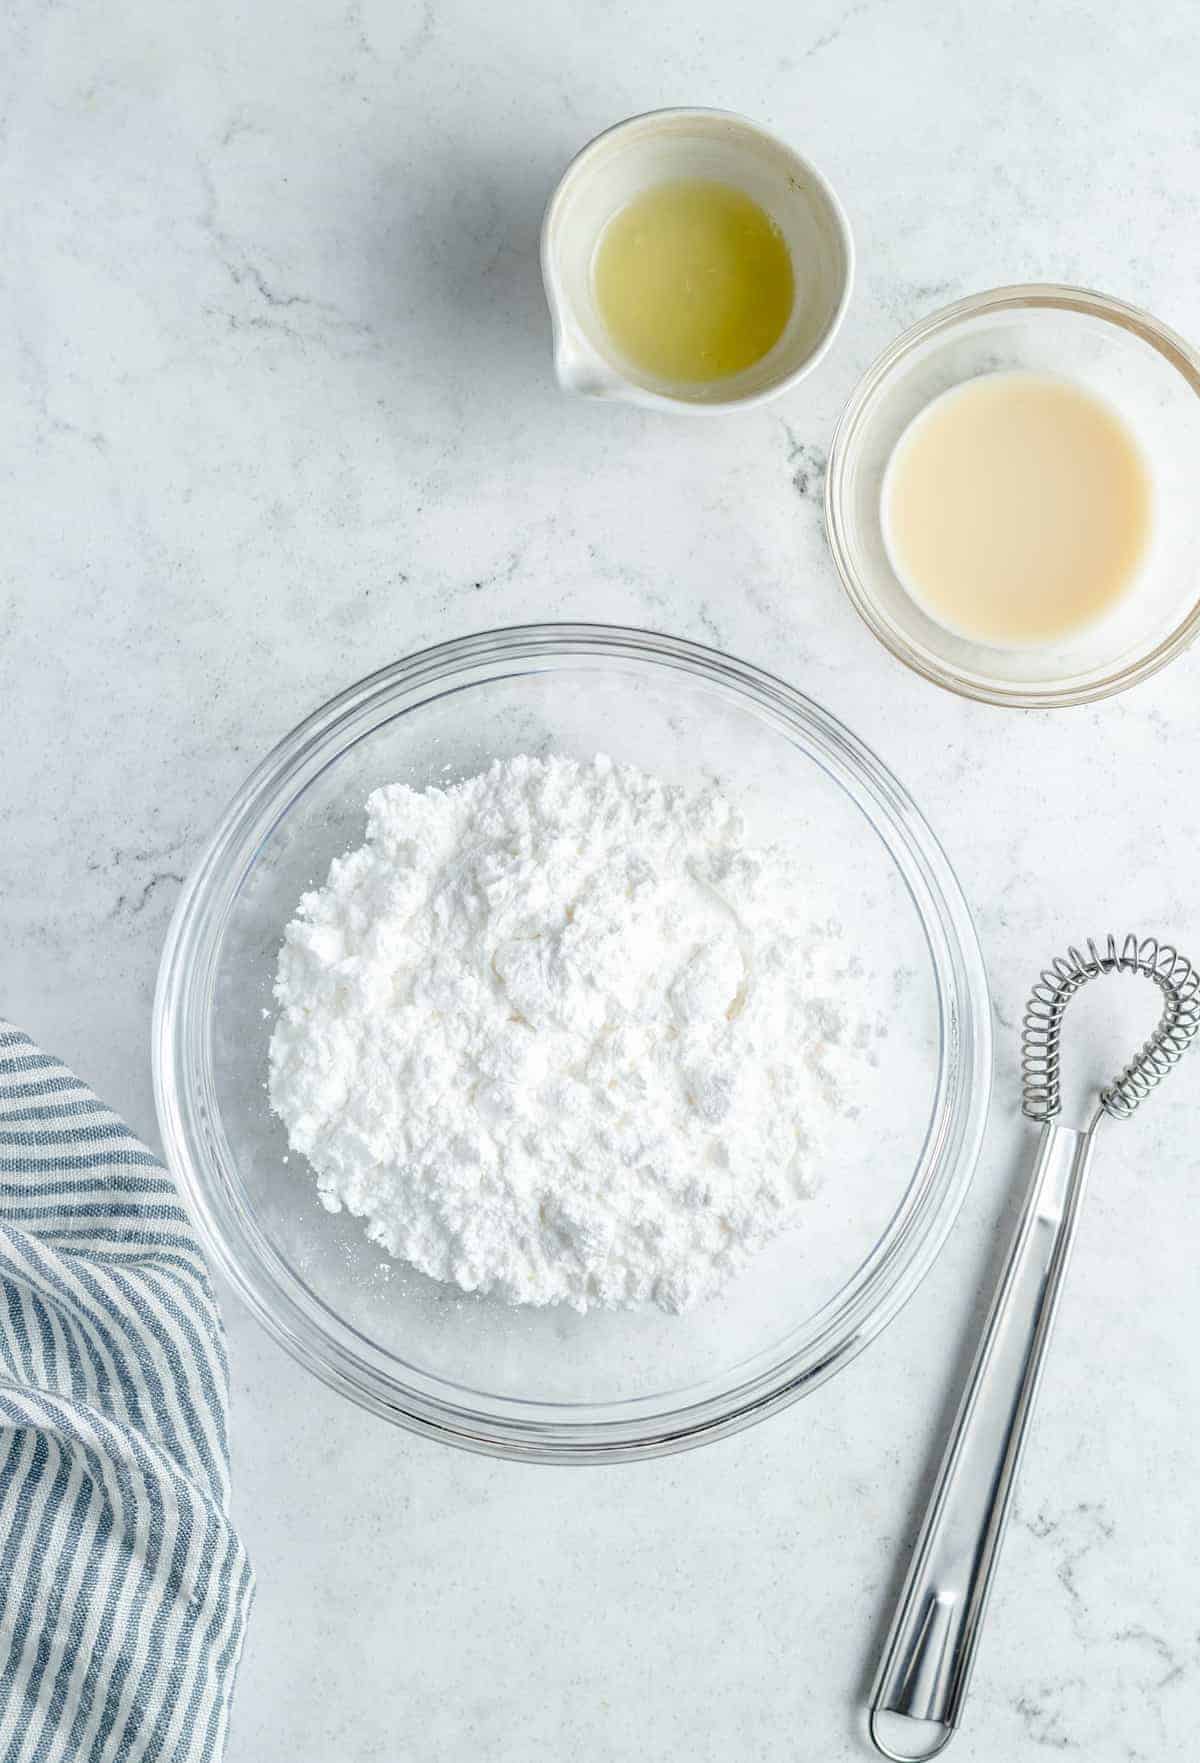
Combine the glaze ingredients.
- Combine the ingredients. Whisk the powdered sugar with vegan milk and lemon juice until smooth. Feel free to thicken the glaze with more powdered sugar, or thin out with more milk or lemon juice (depending on which flavor you prefer).
- Glaze the loaf. Drizzle or spread the glaze on top of the cooled lemon loaf.
Tips for a Successful Lemon Loaf
- Use room-temperature ingredients. All of the ingredients, but especially the yogurt, should be at room temperature so that they combine evenly into the batter.
- No stand mixer? Not a problem. You can mix the batter by hand; it just takes a little longer.
- How to tell when a lemon loaf is done: Bake your loaf cake until a toothpick comes out clean, or with a few moist crumbs attached.
- Let the loaf cool before icing: If the lemon loaf is too warm, the icing will become runny and thus messy. If you let the cake cool completely, though, you’ll have more control over how the glaze settles.
- Make the glaze ahead. Prepare the glaze in advance and store it in your fridge for up to 2 days, if needed. Use any leftovers to drizzle over lemon poppyseed muffins !
How to Store
- Refrigerate the glazed loaf. While the unglazed lemon loaf keeps at room temperature, the best way to store the glazed loaf is in an airtight container in the fridge. It should stay fresh for 3-4 days, and tastes great cold or at room temperature. This also helps to soften it up beautifully.
- Freeze. Freeze this lemon loaf cake in an airtight container, and it will keep for 1-2 months. I would recommend freezing your cake without icing, though, because it tastes better if you add fresh glaze once it’s thawed.
More Vegan Baking Ideas
- Vegan Zucchini Bread
- Vegan Scones
- Banana Oatmeal Muffins
- Strawberry Banana Bread
- Vegan Chocolate Chip Cookies
Ingredients
For the Loaf Cake**
- 1 cup cane sugar , (200g) or any granulated sugar
- ½ cup oil , (100g, if using coconut oil ensure it’s melted)
- 1 teaspoon lemon extract
- 1 teaspoon vanilla extract , or paste
- 2 teaspoons lemon zest , (from two lemons)
- 1 cup vegan yogurt , (plain and unsweetened)
- ⅓ cup lemon juice , (from two lemons)
- 2 cups all-purpose flour , (240g, sifted)
- 2 teaspoons baking powder
- ¼ teaspoon baking soda
- ¾ teaspoon sea salt
For the Lemon Glaze
- 1 cup powdered sugar
- 1 tablespoon vegan milk
- 1 tablespoon lemon juice
Instructions
For the Loaf Cake
- Preheat the oven to 350°F/180°C. Spray a 9×5 loaf pan with an oil spray to prepare it. Set aside.
- In a large mixing bowl or bowl of a stand mixer, add the sugar, oil, lemon extract, vanilla extract and lemon zest. Mix together with a whisk for about 3 minutes on low speed or via hand until all fully incorporated.
- Add in the vegan yogurt and the lemon juice and whisk for 30 seconds until fully incorporated. Scrape down the sides.
- In a small bowl, mix the flour, baking powder and sea salt. Add to the wet ingredients and mix for about a minute on low speed until just incorporated. Scrape down the sides again. Pour the batter into the loaf pan and use your spatula to smooth down the top.
- Bake the lemon loaf on the middle shelf of your oven for 55-60 minutes, until a toothpick comes out clean or with barely any crumbs.
- Remove from the oven and allow to cool for 10 minutes in the pan. Transfer the bread to a wire rack by placing the wire rack on top of the bread, then holding the sides of the pan and flipping it over and removing the pan. Hold the sides of the bread to turn right side up. You can also turn the pan over into your hand, and then flip right side up and place on a wire rack.
- Allow the bread to cool completely. Drizzle on the lemon glaze, ensuring to spread it down the sides too. Slice as desired. Enjoy!
For the Lemon Glaze
- Mix together the powdered sugar, vegan milk and lemon juice until fully combined. Feel free to thicken if desired with more powdered sugar or thin out with more milk or lemon juice depending on which flavor you prefer. You can store this in your fridge for 2 days.
Notes
- Do I Need a Stand Mixer? Nope! You can do everything by hand if you like, it just takes longer. But, at the same time, it’s a good workout!
- How to Tell When Your Loaf is Done: Bake your loaf cake until a toothpick comes out clean, or with barely any crumbs on it.
- Let the Loaf Cool Before Icing: If the lemon loaf is too warm, the icing will become runny and thus messy. If you let the cake cool completely, though, you’ll have more control over how the glaze settles.
- Can I Make the Glaze Ahead? Sure! You can store it in your fridge up to 2 days ahead of time, if needed.
- Weighing Out – I highly recommend as usual if you’re baking to use a scale instead of just scooping (it can be highly inaccurate and lead to a dough that’s too dry or too wet)! You’ll get far better results every time. This is my favourite scale (affiliate link) and it ranges $10-$11: GreaterGoods Scale
This vegan lemon loaf is a moist, flavourful lemon pound cake inspired by the Starbucks version! It’s packed with fresh lemon zest, topped with a citrusy vanilla glaze. Sweeten up breakfast or enjoy a slice with coffee or tea in the afternoon.
I love baking with lemon, whether it’s a lemon blueberry bread or lemon bars . This lemon loaf recipe is basically a glazed pound cake, a lot like the Starbucks lemon loaf, made vegan! It’s just as soft, tender, and flavourful as a classic lemon pound cake, and it’s also super easy to make. The cake itself is moist and spongy, and the simple glaze is tangy and sweet. Prepping both components won’t take you more than 15 minutes at most. I just know you’ll enjoy this vegan lemon loaf as much as I do.
About This Homemade Lemon Loaf Recipe
- Moist and tender. This lemon loaf is as soft and citrusy as ever, even though it’s made without eggs or dairy.
- Easy to make. I love that a lemon loaf falls somewhere between a lemon cake and a quick bread. It bakes up similarly to a banana bread , without yeast and with very little mixing.
- Any occasion. This moist vegan lemon loaf looks gorgeous on an Easter brunch table, and it’s easy enough for everyday baking, no matter the season. Serve it as a sweet breakfast, with a matcha latte for a midday snack, or as dessert (or all 3, just an idea!).
Notes on Ingredients
Here are the ingredients you’ll need to round up for this lemon loaf recipe. Please note that this is important information on the ingredients and instructions, and the FULL recipe with amounts and details can be found DOWN BELOW (scroll to it) in the recipe card.
- Sugar – I like to use cane sugar in this lemon loaf, but granulated sugar will also work just fine.
- Oil – This adds great moisture to the cake, and helps to keep the flavour focused on the lemon, which is why I don’t use melted vegan butter here.
- Lemon Extract – For extra tangy lemon flavour. Don’t skip this – this really gives it that lemon-y flavour.
- Vanilla Extract – Or an equal amount of vanilla bean paste if you’d prefer to use that instead.
- Lemon – You’ll need both the zest and the juice from two lemons. Zest first, then juice!
- Yogurt – Regular vegan yogurt, plain and unsweetened. Bring the yogurt to room temperature.
- Flour – I always mix in all-purpose flour, but you could use a 1:1 gluten-free baking flour to make this loaf gluten-free.
- Baking Powder and Baking Soda – To help your loaf cake rise tall. Make sure that both leavenings are fresh and not expired.
- Salt – I like to use sea salt. Remember that if you’re using table salt, you’ll need to reduce the amount since the granules are smaller than sea salt.
For the Glaze
- Powdered Sugar – If you’d prefer not to glaze the loaf, you can dust the top with powdered sugar instead.
- Milk – Use whatever vegan milk (soy, almond, coconut, etc.) that you like.
- Lemon Juice – For extra zesty flavor. Lemon extract works, too.
How to Make a Vegan Lemon Loaf (Step-by-Step)
When you have your ingredients ready, these are the steps to prepare your vegan lemon loaf from scratch.
Cream the wet ingredients.
- Combine the wet ingredients. Cream the sugar, oil, lemon extract, vanilla extract, and lemon zest together until well-incorporated. Then, whisk in the vegan yogurt and lemon juice.
Mix in the dry ingredients.
- Add the dry ingredients. Now, in a separate bowl, whisk the flour, baking powder, baking soda, and salt. Add the dry mixture to the wet ingredients and mix until just incorporated. Spread the batter evenly into a greased loaf pan.
- Bake. Bake the lemon loaf on the middle rack at 350ºF for 55-60 minutes. When a toothpick stuck into the center of the loaf comes out clean, remove it from the oven. Let it cool in the pan for 10 minutes, then move the loaf to a wire rack. It’ll need to cool completely to room temperature before you add the glaze.
Add the Lemon Glaze
Once you’ve got the loaf cooling, you can get started on the glaze! It takes less than 5 minutes to whip together.
Combine the glaze ingredients.
- Combine the ingredients. Whisk the powdered sugar with vegan milk and lemon juice until smooth. Feel free to thicken the glaze with more powdered sugar, or thin out with more milk or lemon juice (depending on which flavor you prefer).
- Glaze the loaf. Drizzle or spread the glaze on top of the cooled lemon loaf.
Tips for a Successful Lemon Loaf
- Use room-temperature ingredients. All of the ingredients, but especially the yogurt, should be at room temperature so that they combine evenly into the batter.
- No stand mixer? Not a problem. You can mix the batter by hand; it just takes a little longer.
- How to tell when a lemon loaf is done: Bake your loaf cake until a toothpick comes out clean, or with a few moist crumbs attached.
- Let the loaf cool before icing: If the lemon loaf is too warm, the icing will become runny and thus messy. If you let the cake cool completely, though, you’ll have more control over how the glaze settles.
- Make the glaze ahead. Prepare the glaze in advance and store it in your fridge for up to 2 days, if needed. Use any leftovers to drizzle over lemon poppyseed muffins !
How to Store
- Refrigerate the glazed loaf. While the unglazed lemon loaf keeps at room temperature, the best way to store the glazed loaf is in an airtight container in the fridge. It should stay fresh for 3-4 days, and tastes great cold or at room temperature. This also helps to soften it up beautifully.
- Freeze. Freeze this lemon loaf cake in an airtight container, and it will keep for 1-2 months. I would recommend freezing your cake without icing, though, because it tastes better if you add fresh glaze once it’s thawed.
More Vegan Baking Ideas
- Vegan Zucchini Bread
- Vegan Scones
- Banana Oatmeal Muffins
- Strawberry Banana Bread
- Vegan Chocolate Chip Cookies
Ingredients
For the Loaf Cake**
- 1 cup cane sugar , (200g) or any granulated sugar
- ½ cup oil , (100g, if using coconut oil ensure it’s melted)
- 1 teaspoon lemon extract
- 1 teaspoon vanilla extract , or paste
- 2 teaspoons lemon zest , (from two lemons)
- 1 cup vegan yogurt , (plain and unsweetened)
- ⅓ cup lemon juice , (from two lemons)
- 2 cups all-purpose flour , (240g, sifted)
- 2 teaspoons baking powder
- ¼ teaspoon baking soda
- ¾ teaspoon sea salt
For the Lemon Glaze
- 1 cup powdered sugar
- 1 tablespoon vegan milk
- 1 tablespoon lemon juice
Instructions
For the Loaf Cake
- Preheat the oven to 350°F/180°C. Spray a 9×5 loaf pan with an oil spray to prepare it. Set aside.
- In a large mixing bowl or bowl of a stand mixer, add the sugar, oil, lemon extract, vanilla extract and lemon zest. Mix together with a whisk for about 3 minutes on low speed or via hand until all fully incorporated.
- Add in the vegan yogurt and the lemon juice and whisk for 30 seconds until fully incorporated. Scrape down the sides.
- In a small bowl, mix the flour, baking powder and sea salt. Add to the wet ingredients and mix for about a minute on low speed until just incorporated. Scrape down the sides again. Pour the batter into the loaf pan and use your spatula to smooth down the top.
- Bake the lemon loaf on the middle shelf of your oven for 55-60 minutes, until a toothpick comes out clean or with barely any crumbs.
- Remove from the oven and allow to cool for 10 minutes in the pan. Transfer the bread to a wire rack by placing the wire rack on top of the bread, then holding the sides of the pan and flipping it over and removing the pan. Hold the sides of the bread to turn right side up. You can also turn the pan over into your hand, and then flip right side up and place on a wire rack.
- Allow the bread to cool completely. Drizzle on the lemon glaze, ensuring to spread it down the sides too. Slice as desired. Enjoy!
For the Lemon Glaze
- Mix together the powdered sugar, vegan milk and lemon juice until fully combined. Feel free to thicken if desired with more powdered sugar or thin out with more milk or lemon juice depending on which flavor you prefer. You can store this in your fridge for 2 days.
Notes
- Do I Need a Stand Mixer? Nope! You can do everything by hand if you like, it just takes longer. But, at the same time, it’s a good workout!
- How to Tell When Your Loaf is Done: Bake your loaf cake until a toothpick comes out clean, or with barely any crumbs on it.
- Let the Loaf Cool Before Icing: If the lemon loaf is too warm, the icing will become runny and thus messy. If you let the cake cool completely, though, you’ll have more control over how the glaze settles.
- Can I Make the Glaze Ahead? Sure! You can store it in your fridge up to 2 days ahead of time, if needed.
- Weighing Out – I highly recommend as usual if you’re baking to use a scale instead of just scooping (it can be highly inaccurate and lead to a dough that’s too dry or too wet)! You’ll get far better results every time. This is my favourite scale (affiliate link) and it ranges $10-$11: GreaterGoods Scale

Vegan Lemon Loaf
Ingredients
For the Loaf Cake**
- 1 cup cane sugar (200g) or any granulated sugar
- ½ cup oil (100g, if using coconut oil ensure it’s melted)
- 1 teaspoon lemon extract
- 1 teaspoon vanilla extract or paste
- 2 teaspoons lemon zest (from two lemons)
- 1 cup vegan yogurt (plain and unsweetened)
- ⅓ cup lemon juice (from two lemons)
- 2 cups all-purpose flour (240g, sifted)
- 2 teaspoons baking powder
- ¼ teaspoon baking soda
- ¾ teaspoon sea salt
For the Lemon Glaze
- 1 cup powdered sugar
- 1 tablespoon vegan milk
- 1 tablespoon lemon juice
Instructions
For the Loaf Cake
- Preheat the oven to 350°F/180°C. Spray a 9x5 loaf pan with an oil spray to prepare it. Set aside.
- In a large mixing bowl or bowl of a stand mixer, add the sugar, oil, lemon extract, vanilla extract and lemon zest. Mix together with a whisk for about 3 minutes on low speed or via hand until all fully incorporated.
- Add in the vegan yogurt and the lemon juice and whisk for 30 seconds until fully incorporated. Scrape down the sides.
- In a small bowl, mix the flour, baking powder and sea salt. Add to the wet ingredients and mix for about a minute on low speed until just incorporated. Scrape down the sides again. Pour the batter into the loaf pan and use your spatula to smooth down the top.
- Bake the lemon loaf on the middle shelf of your oven for 55-60 minutes, until a toothpick comes out clean or with barely any crumbs.
- Remove from the oven and allow to cool for 10 minutes in the pan. Transfer the bread to a wire rack by placing the wire rack on top of the bread, then holding the sides of the pan and flipping it over and removing the pan. Hold the sides of the bread to turn right side up. You can also turn the pan over into your hand, and then flip right side up and place on a wire rack.
- Allow the bread to cool completely. Drizzle on the lemon glaze, ensuring to spread it down the sides too. Slice as desired. Enjoy!
For the Lemon Glaze
- Mix together the powdered sugar, vegan milk and lemon juice until fully combined. Feel free to thicken if desired with more powdered sugar or thin out with more milk or lemon juice depending on which flavor you prefer. You can store this in your fridge for 2 days.
Notes
- Do I Need a Stand Mixer? Nope! You can do everything by hand if you like, it just takes longer. But, at the same time, it’s a good workout!
- How to Tell When Your Loaf is Done: Bake your loaf cake until a toothpick comes out clean, or with barely any crumbs on it.
- Let the Loaf Cool Before Icing: If the lemon loaf is too warm, the icing will become runny and thus messy. If you let the cake cool completely, though, you’ll have more control over how the glaze settles.
- Can I Make the Glaze Ahead? Sure! You can store it in your fridge up to 2 days ahead of time, if needed.
- Weighing Out - I highly recommend as usual if you’re baking to use a scale instead of just scooping (it can be highly inaccurate and lead to a dough that’s too dry or too wet)! You’ll get far better results every time. This is my favourite scale (affiliate link) and it ranges $10-$11: GreaterGoods Scale
Nutrition
Vegan Lemon Loaf https://jessicainthekitchen.com/vegan-lemon-loaf/ July 29, 2021
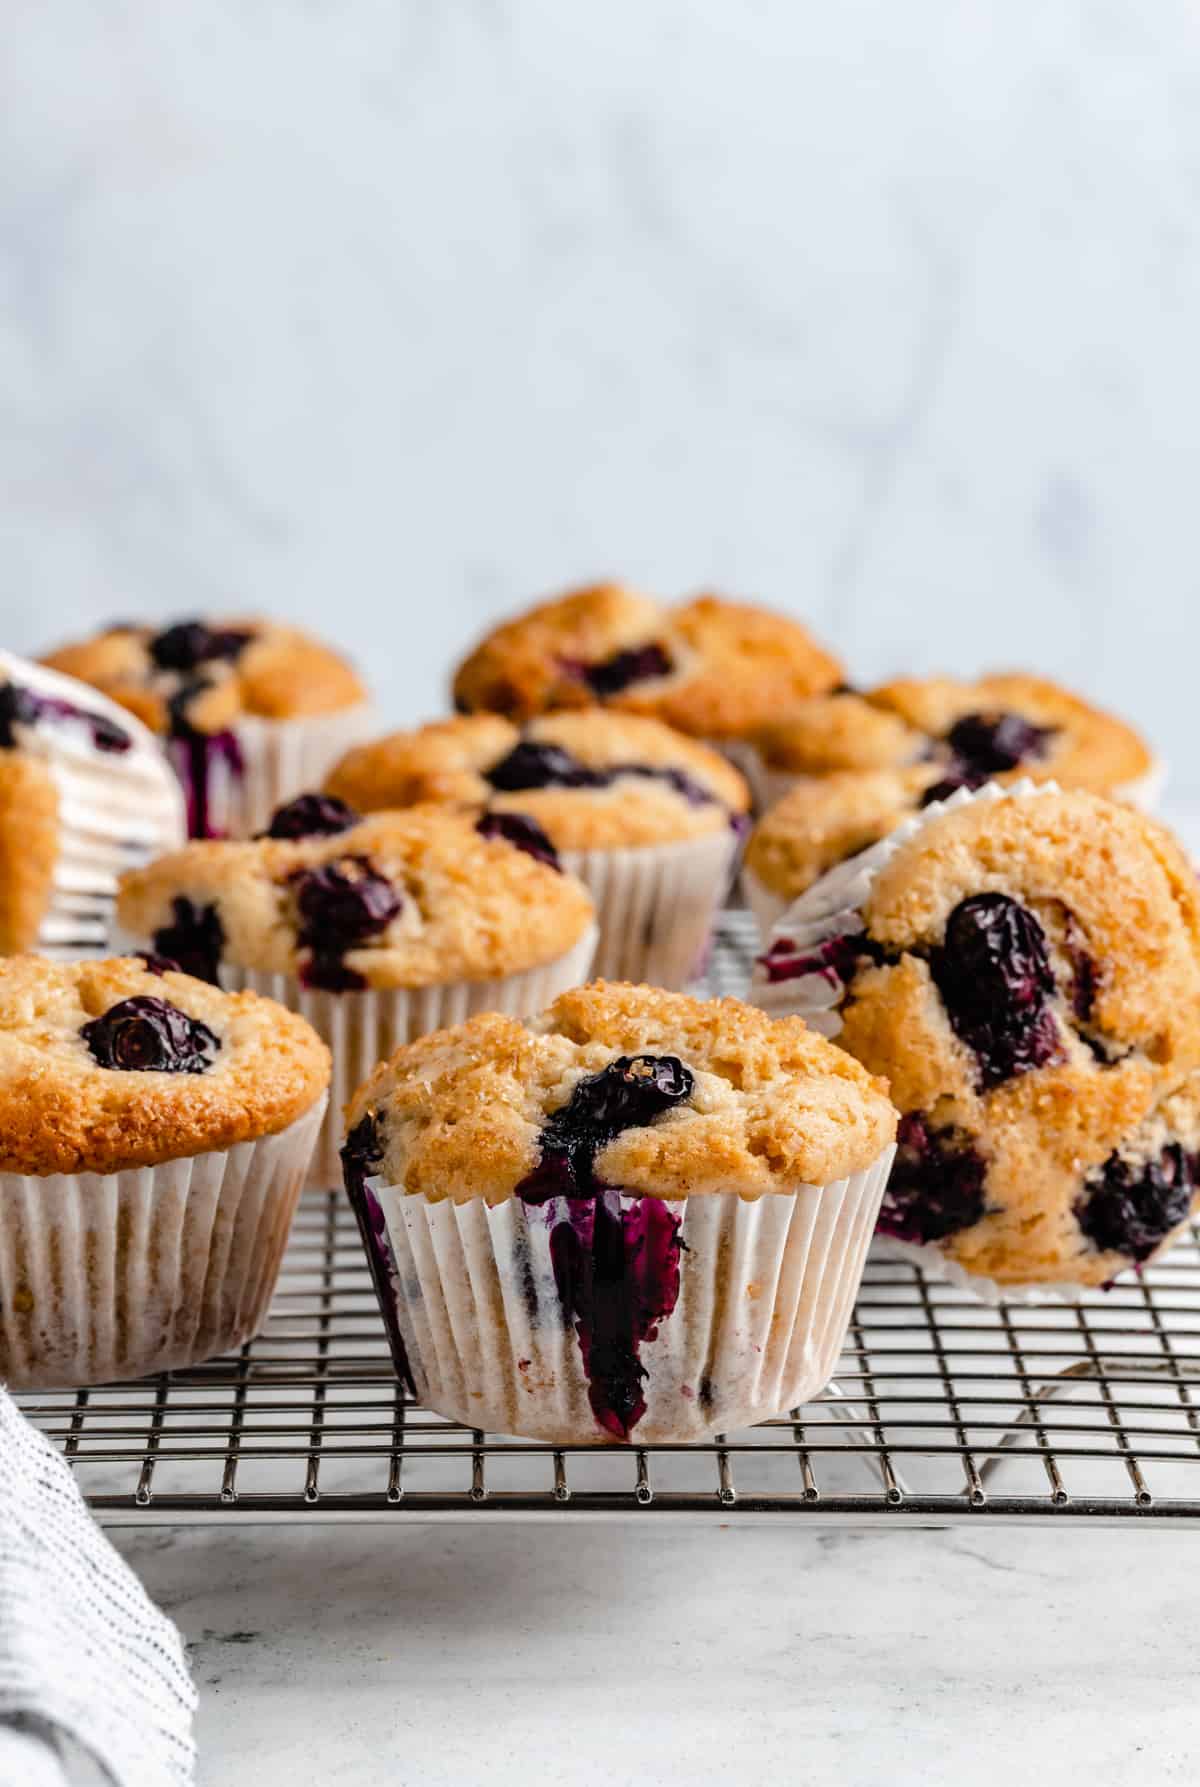
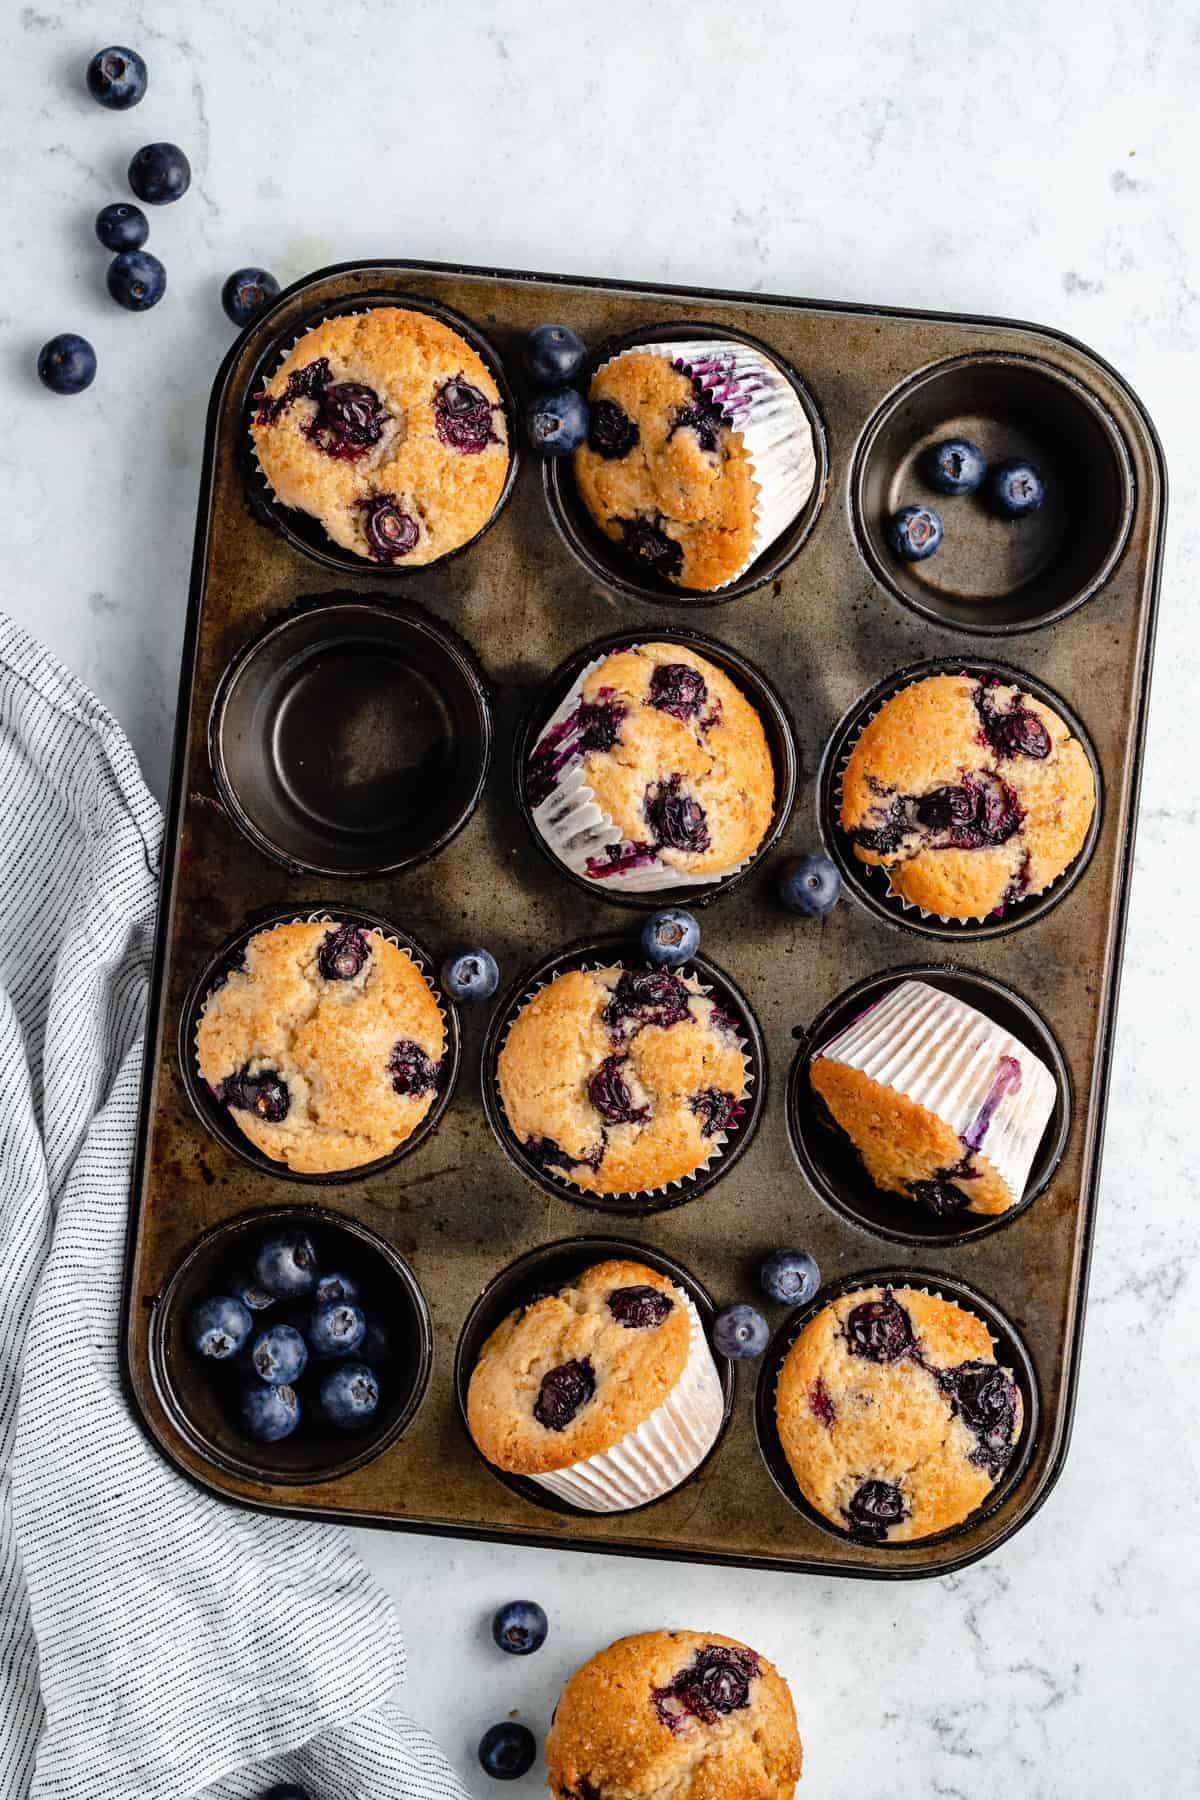
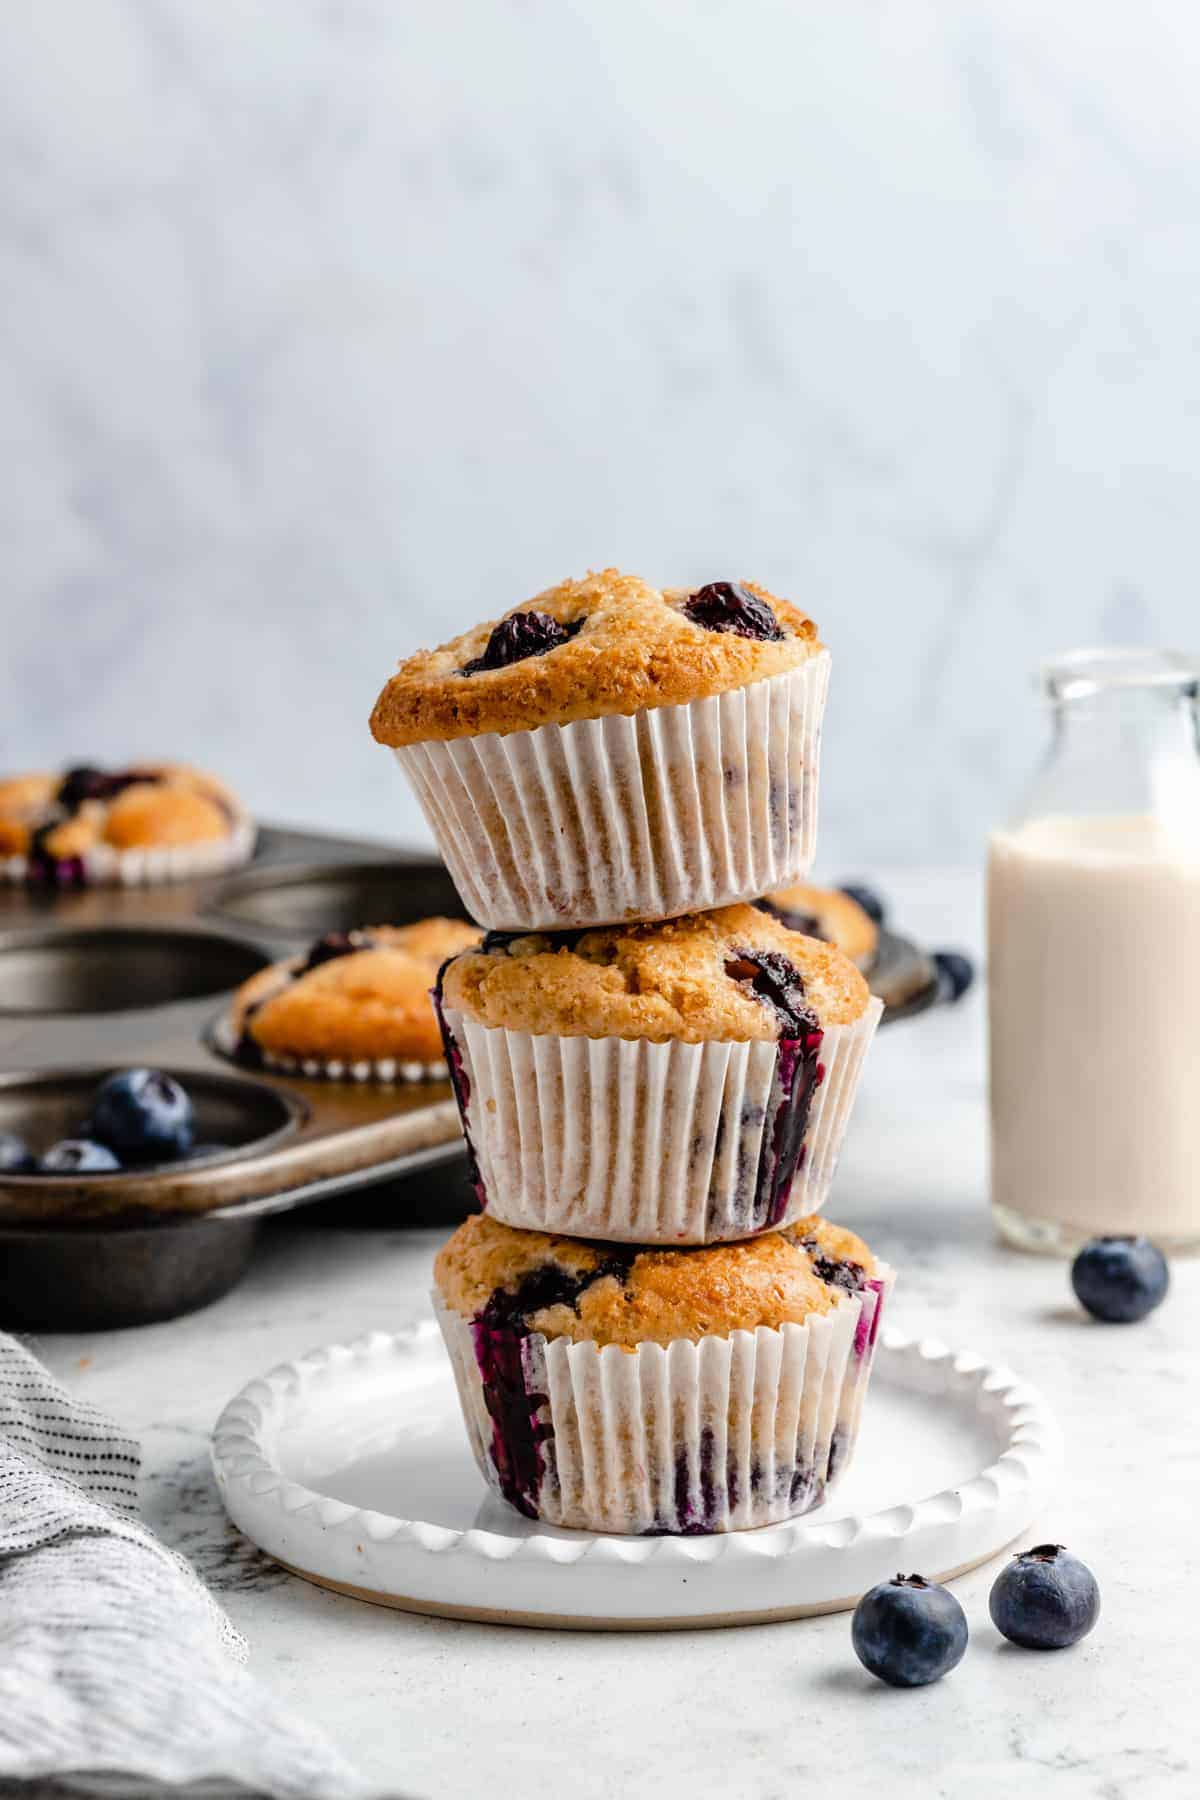
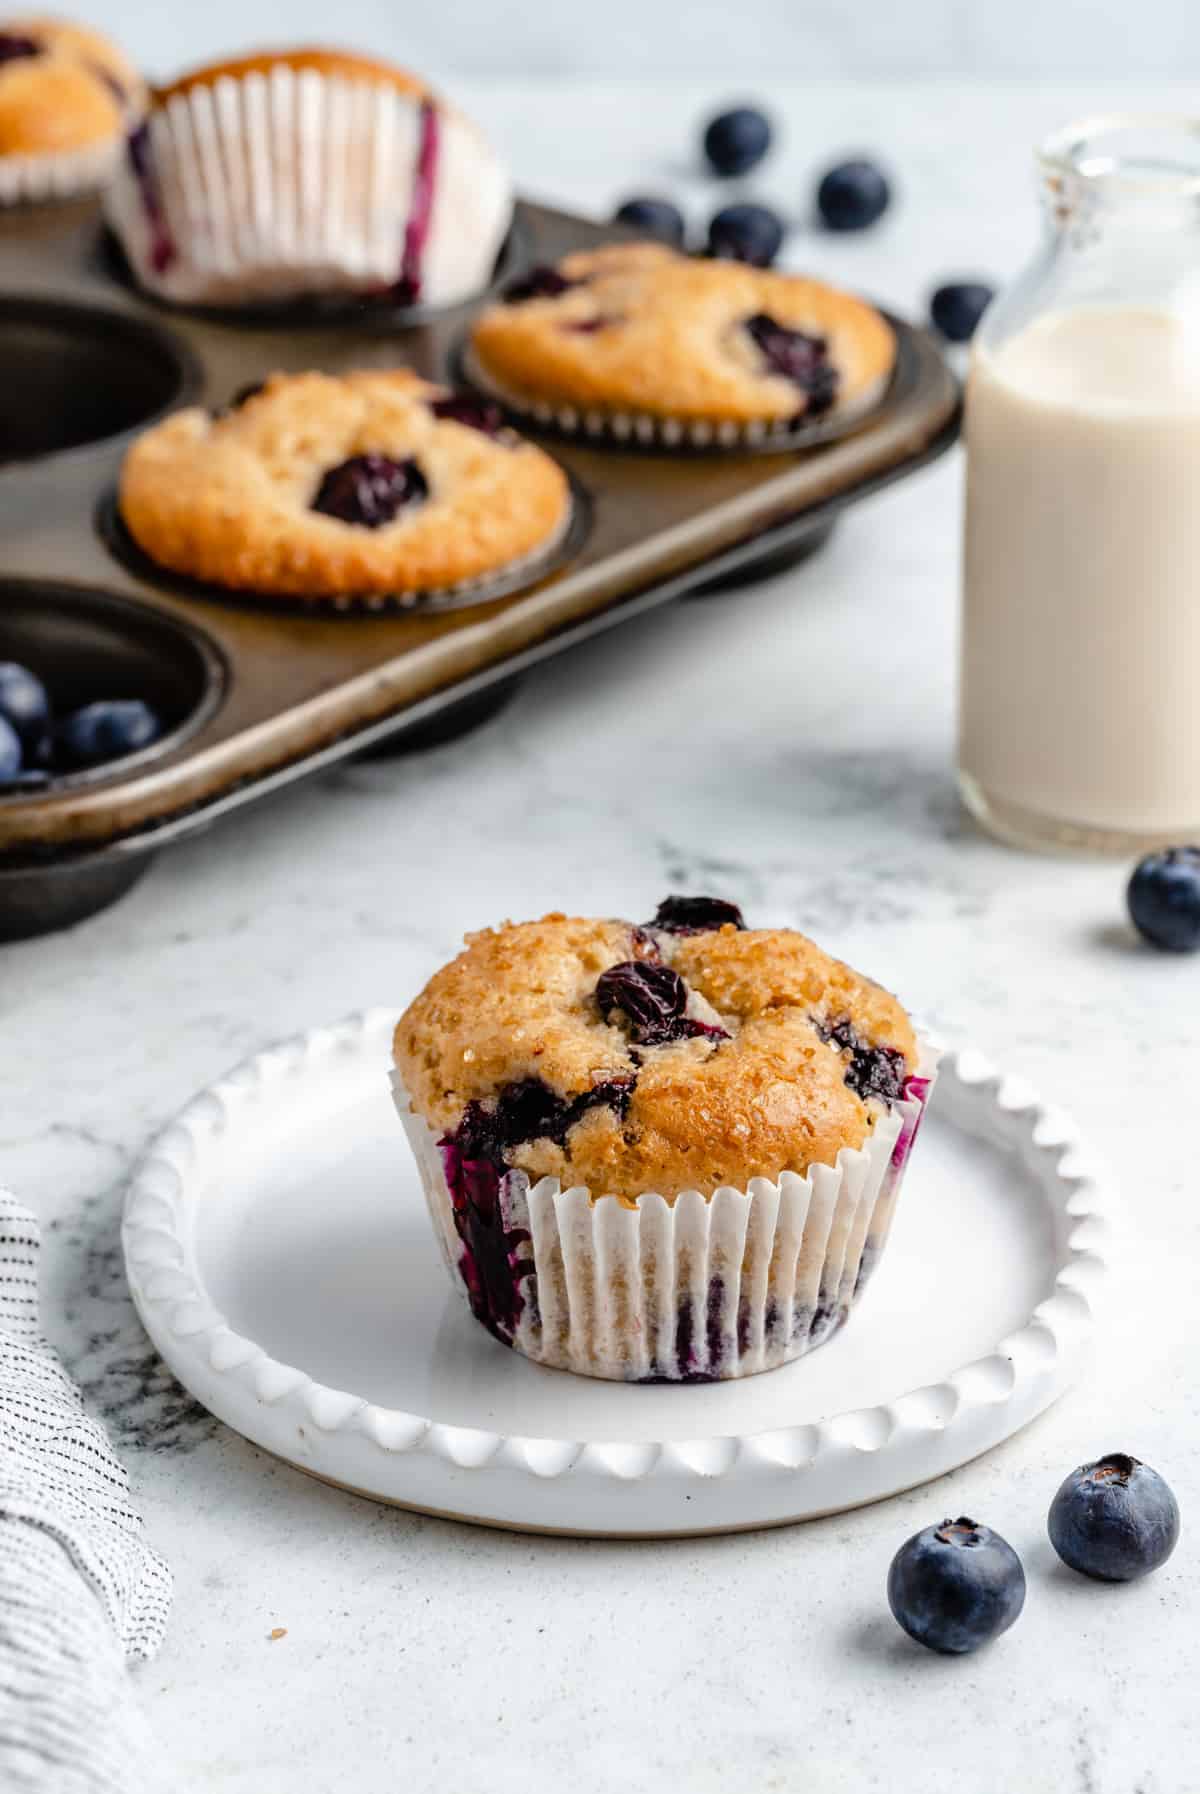
Vegan Blueberry Muffins are perfectly moist, fluffy, and sweet – in other words, everything a muffin should be! These homemade blueberry muffins are the best way to start your morning, and they’re a fabulous snack, too.
There are many fantastic muffin types out there to choose from. Chocolate chip, banana chocolate chip, key lime, cranberry orange, etc. It’s impossible to go wrong! But, in my mind, there’s no muffin recipe more classic than a blueberry muffin recipe. They’re hands-down a quintessential comfort breakfast.
Anyway, I thought that you all might share my love for this simple yet elegant and delicious breakfast muffin, so here we are with these Vegan Blueberry Muffins!
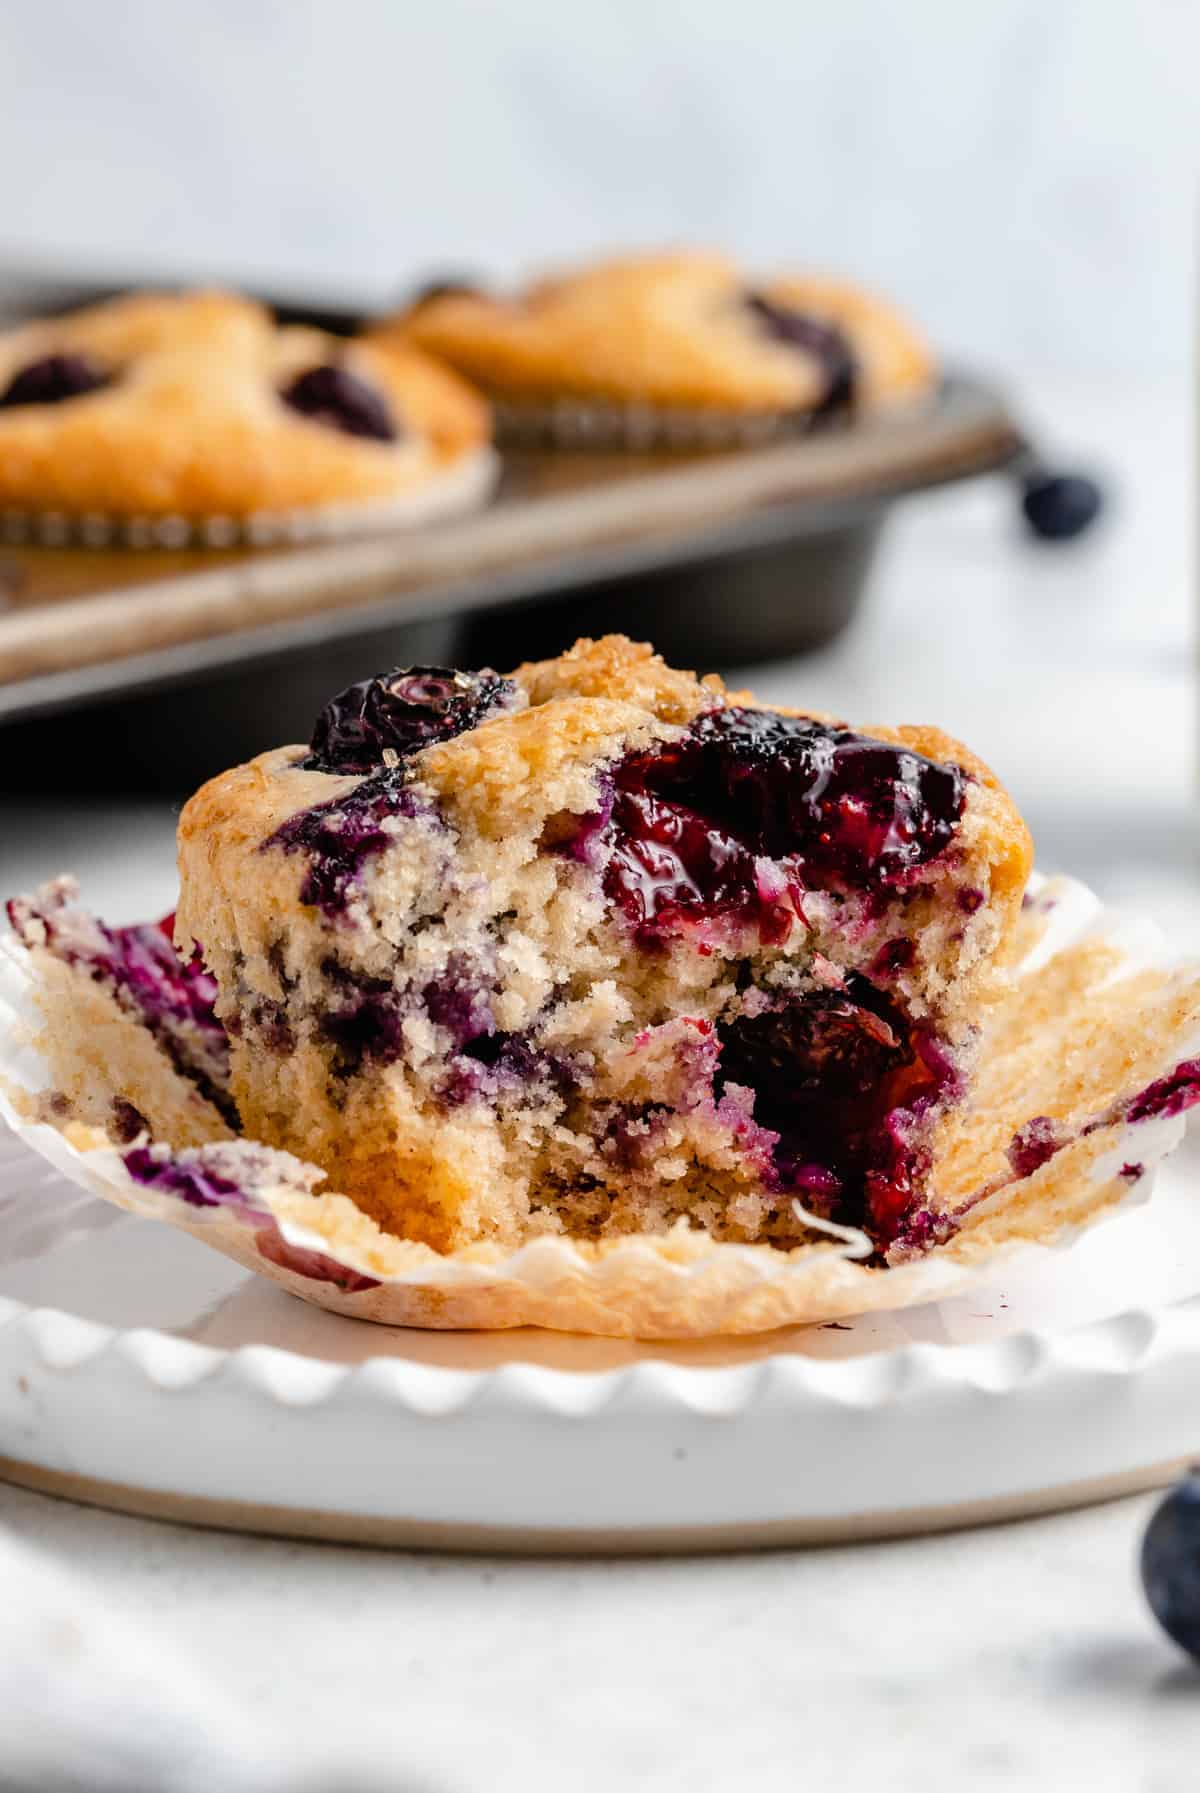
Here’s what we’re dealing with: Light, fluffy, golden-brown muffins are packed with juicy, fresh blueberries and a touch of cinnamon. In the simplest terms, these muffins are addicting and multiple batches will be necessary!
What Makes these the Best Vegan Blueberry Muffins?
While there are myriad reasons to love these vegan blueberry muffins, I’ll narrow the list down to the most important ones. After all, I can’t be responsible for keeping you out of the kitchen and away from these sweet muffins!
Here are some of the things I love most about this blueberry muffin recipe:
- It’s Flavorful: These muffins are infused with cinnamon, lemon (juice and zest), and vanilla. There’s sweetness, subtle tanginess, homey-ness, and more. One bite and you’ll be hooked!
- It’s Quick and Easy: There are just 8 steps to this recipe, and it won’t take you more than an hour to complete them. So, when those blueberry muffin cravings hit, you won’t have to wait too long to resolve the issue! Plus, I’ll bet you already have the majority of the necessary ingredients in your pantry.
- You Can Make It Ahead: These muffins are perfect for meal prep! Make a batch ahead of time and breakfast will be a breeze for the next few days.
- It’s Customizable: Not a big fan of cinnamon? Not a problem – leave that part out! You can customize these muffins with add-ins any way you like. You could even try swapping out the blueberries for vegan chocolate chips, nuts, etc!

Notes on Ingredients
Alright, now that we’ll both be craving blueberry muffins for days on end, let’s get started! I’ve got a few notes for you on the essential ingredients that you’ll need to round up:
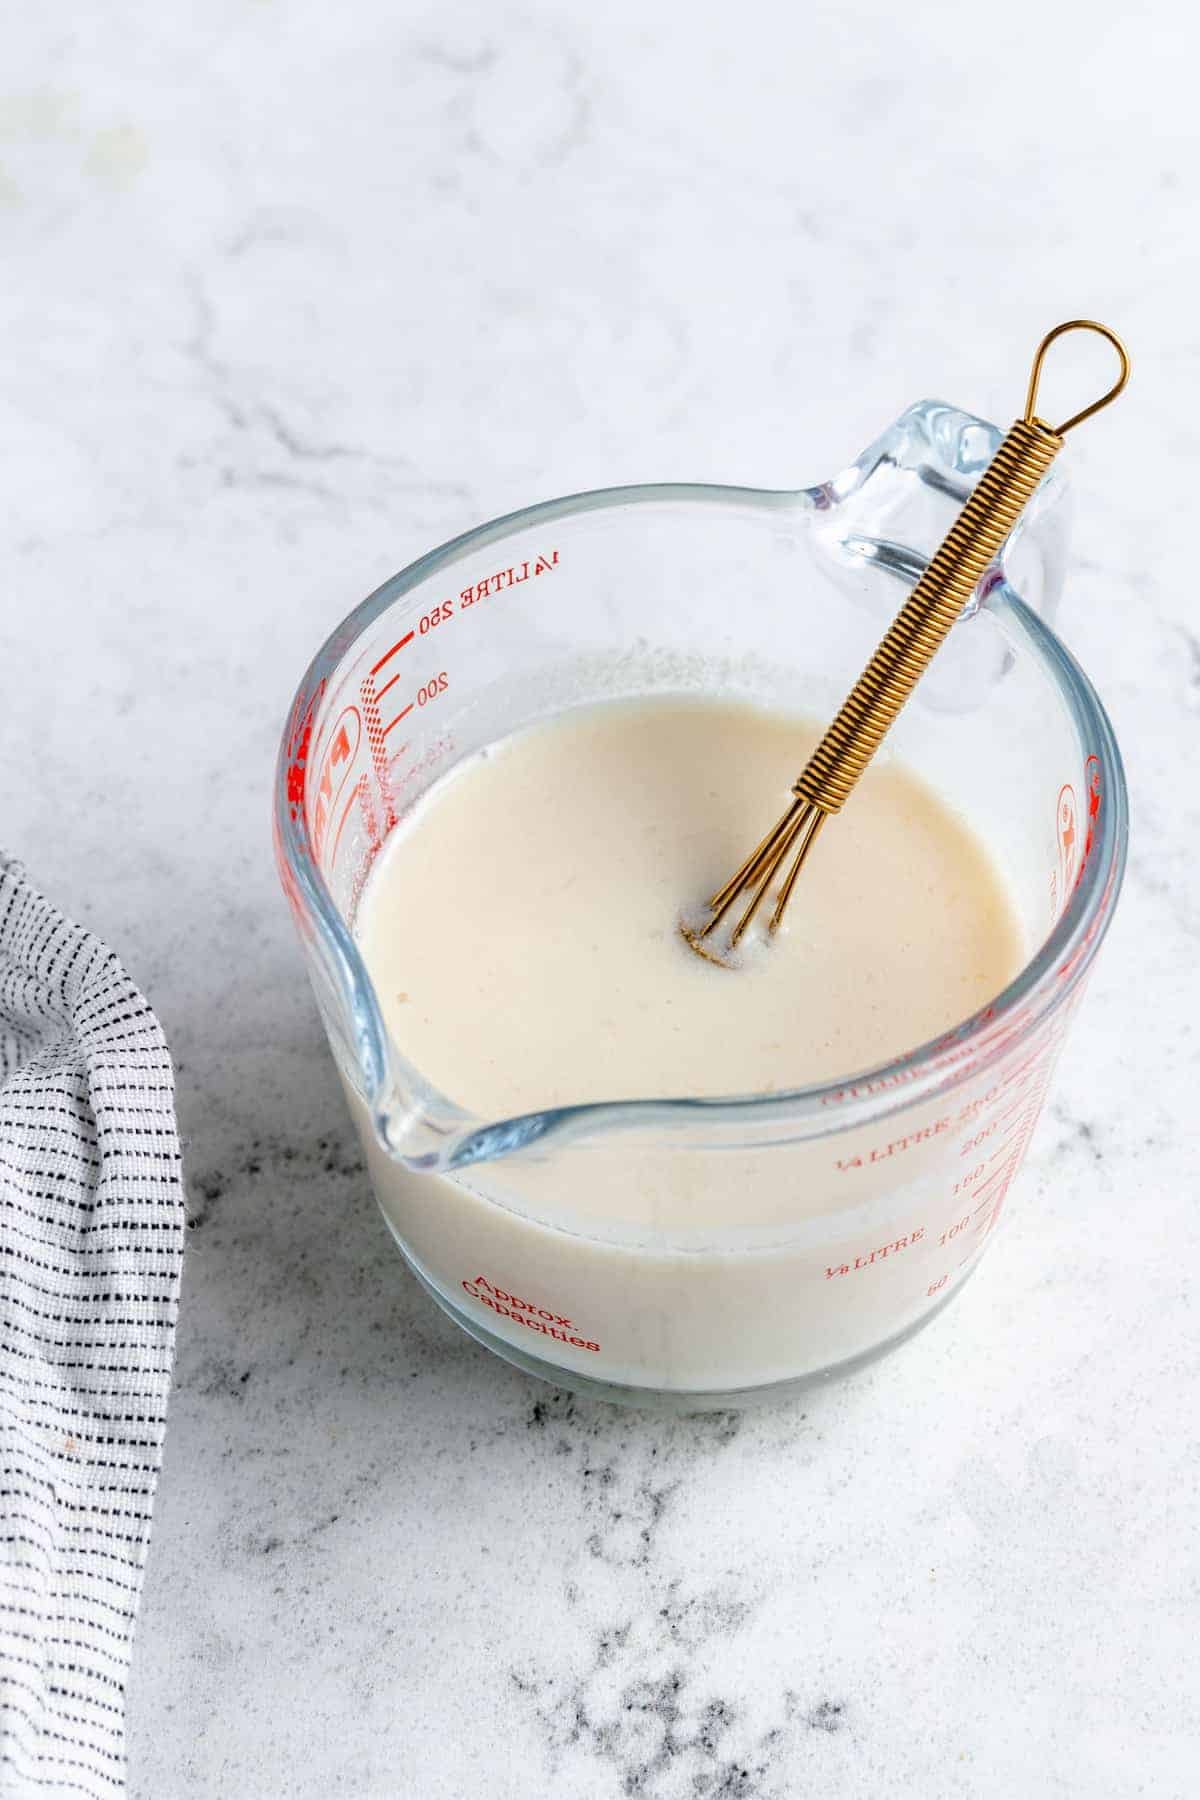
- Vegan Buttermilk: I like to use soy milk as the base, but another nut milk will work, too. Adding a bit of lemon juice to this creates a simple vegan buttermilk!
- Oil: My go-to is usually coconut oil, but vegan butter also works well.
- Sugar: I like to use cane sugar for this recipe.
- Vanilla Extract: For added sweet flavor!
- Lemon Juice: To activate the baking soda in the baking powder, resulting in muffins that are nice and tall.
- Flour: Sifted. I generally use all-purpose flour, but gluten-free flour will work as well.
- Baking Powder: To help the muffins rise.
- Salt: I like to use sea salt in these muffins.
- Cinnamon: This is optional, but it tastes amazing.
- Lemon Zest: Just a pinch, since you’re already squeezing the lemon juice. This is also optional.
- Blueberries: Fresh or frozen, tossed in a little flour. Make sure to save some extra ones for the top.
- Coarse Sugar: For sprinkling over the top of the muffins.
How to Make Vegan Blueberry Muffins (Step by Step)
Please note that this is important information on the ingredients and instructions and the FULL recipe with amounts and details can be found DOWN BELOW (scroll to it) in the recipe card.
As I mentioned earlier, these muffins will not take up too much of your day! You’ll be in and out of the kitchen within an hour, and your house will smell AMAZING by the time you’re day. Win-win situation, right?
Here’s the step-by-step blueberry muffin breakdown:
Preheat the Oven to 425°F/220°C: Spray a muffin pan with non-stick flour spray or rub with vegan butter, or line with 10 muffin liners.
Make the Vegan Buttermilk: Mix the soy milk and the first tablespoon of lemon juice together and set aside to create a vegan buttermilk.
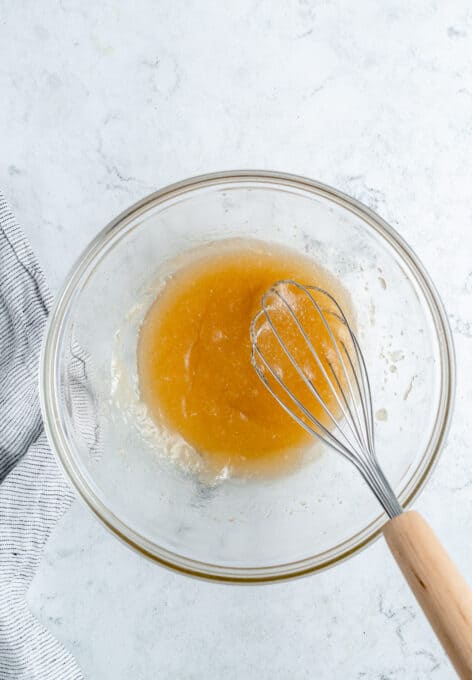
Mix the Wet Ingredients: With a whisk, mix the oil, sugar, vanilla extract and the other tablespoon of lemon juice together for about 3 minutes on low.
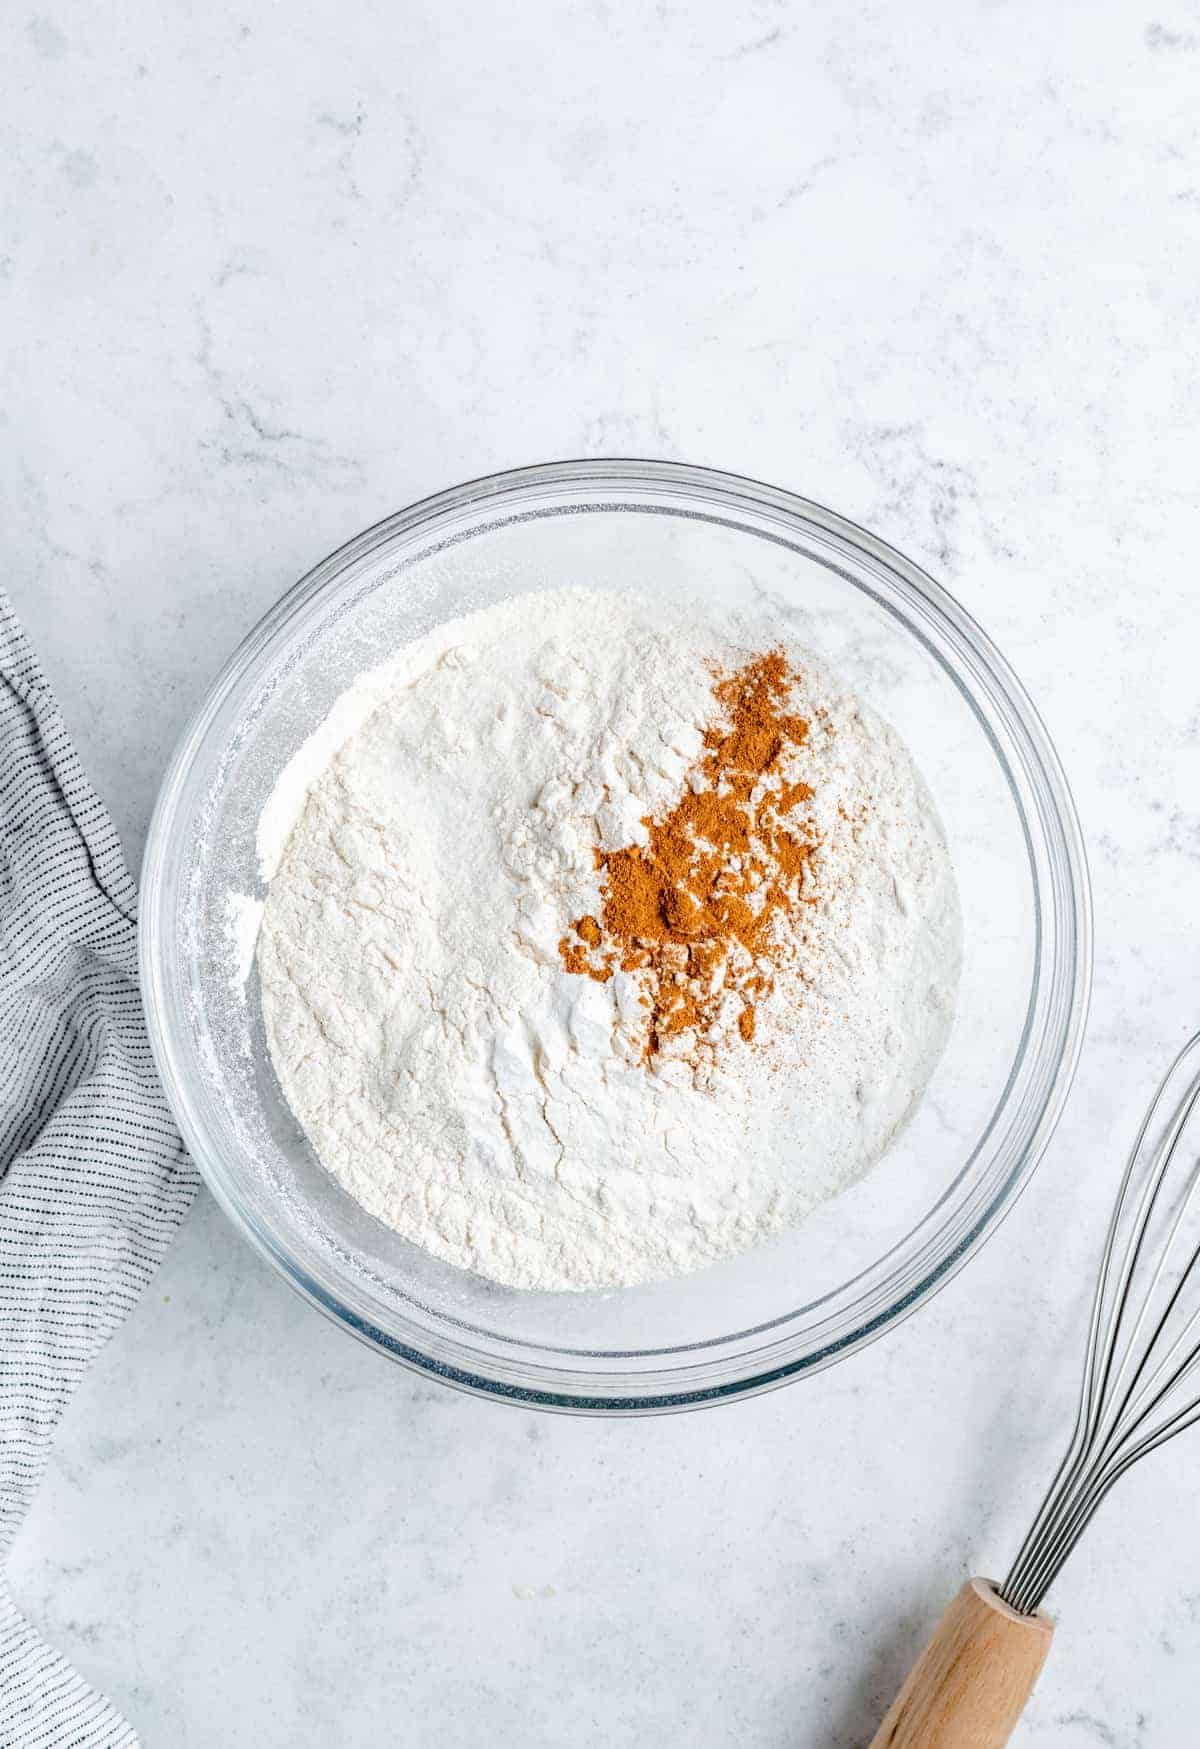
Mix the Dry Ingredients: While that’s mixing, in another small bowl, whisk together the flour, baking powder, sea salt and cinnamon.
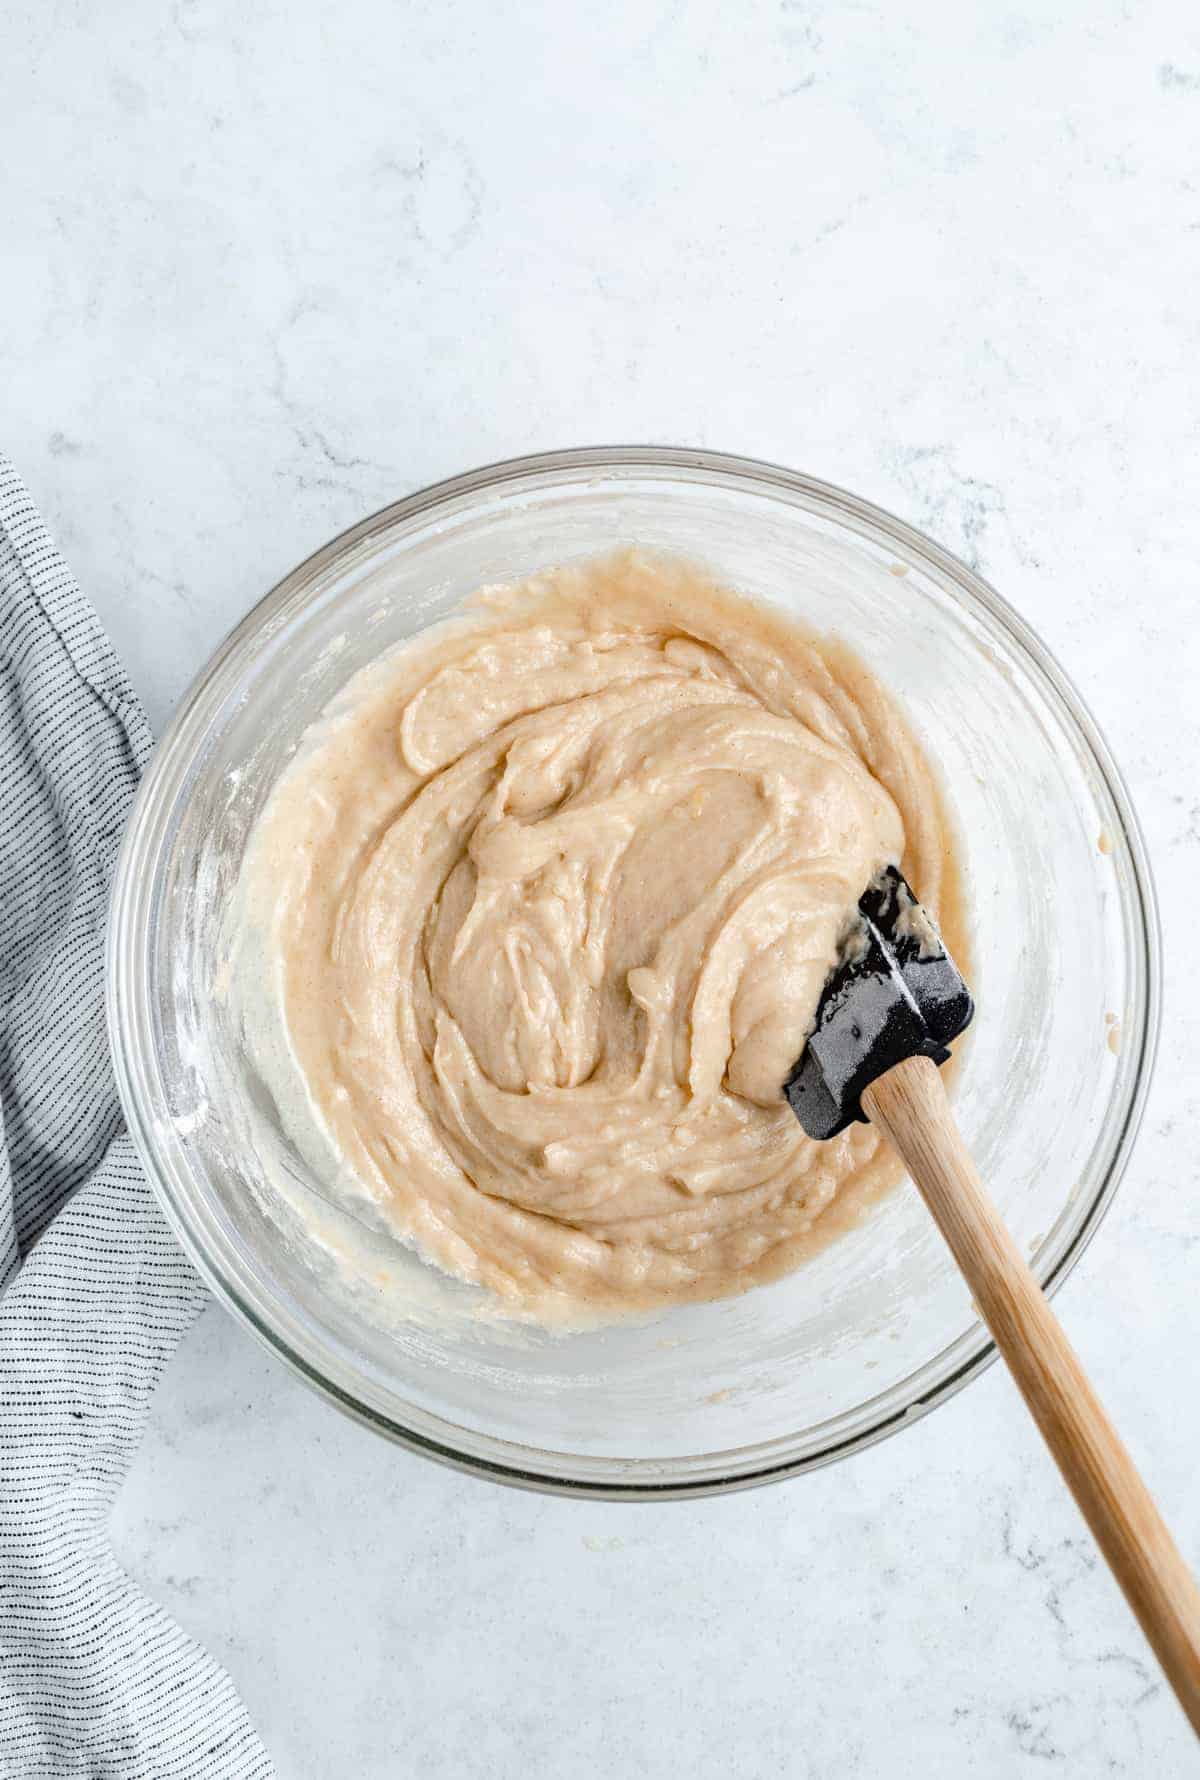
Whisk Wet & Dry Ingredients Together: Add the dry ingredients to the wet ingredients and slowly mix together, until just incorporated, about a minute on low or gently with your spatula. Scrape down the sides of the bowl as needed.
Add the Blueberries: Toss the blueberries in some flour, then fold into the batter lightly. Fold until combined.

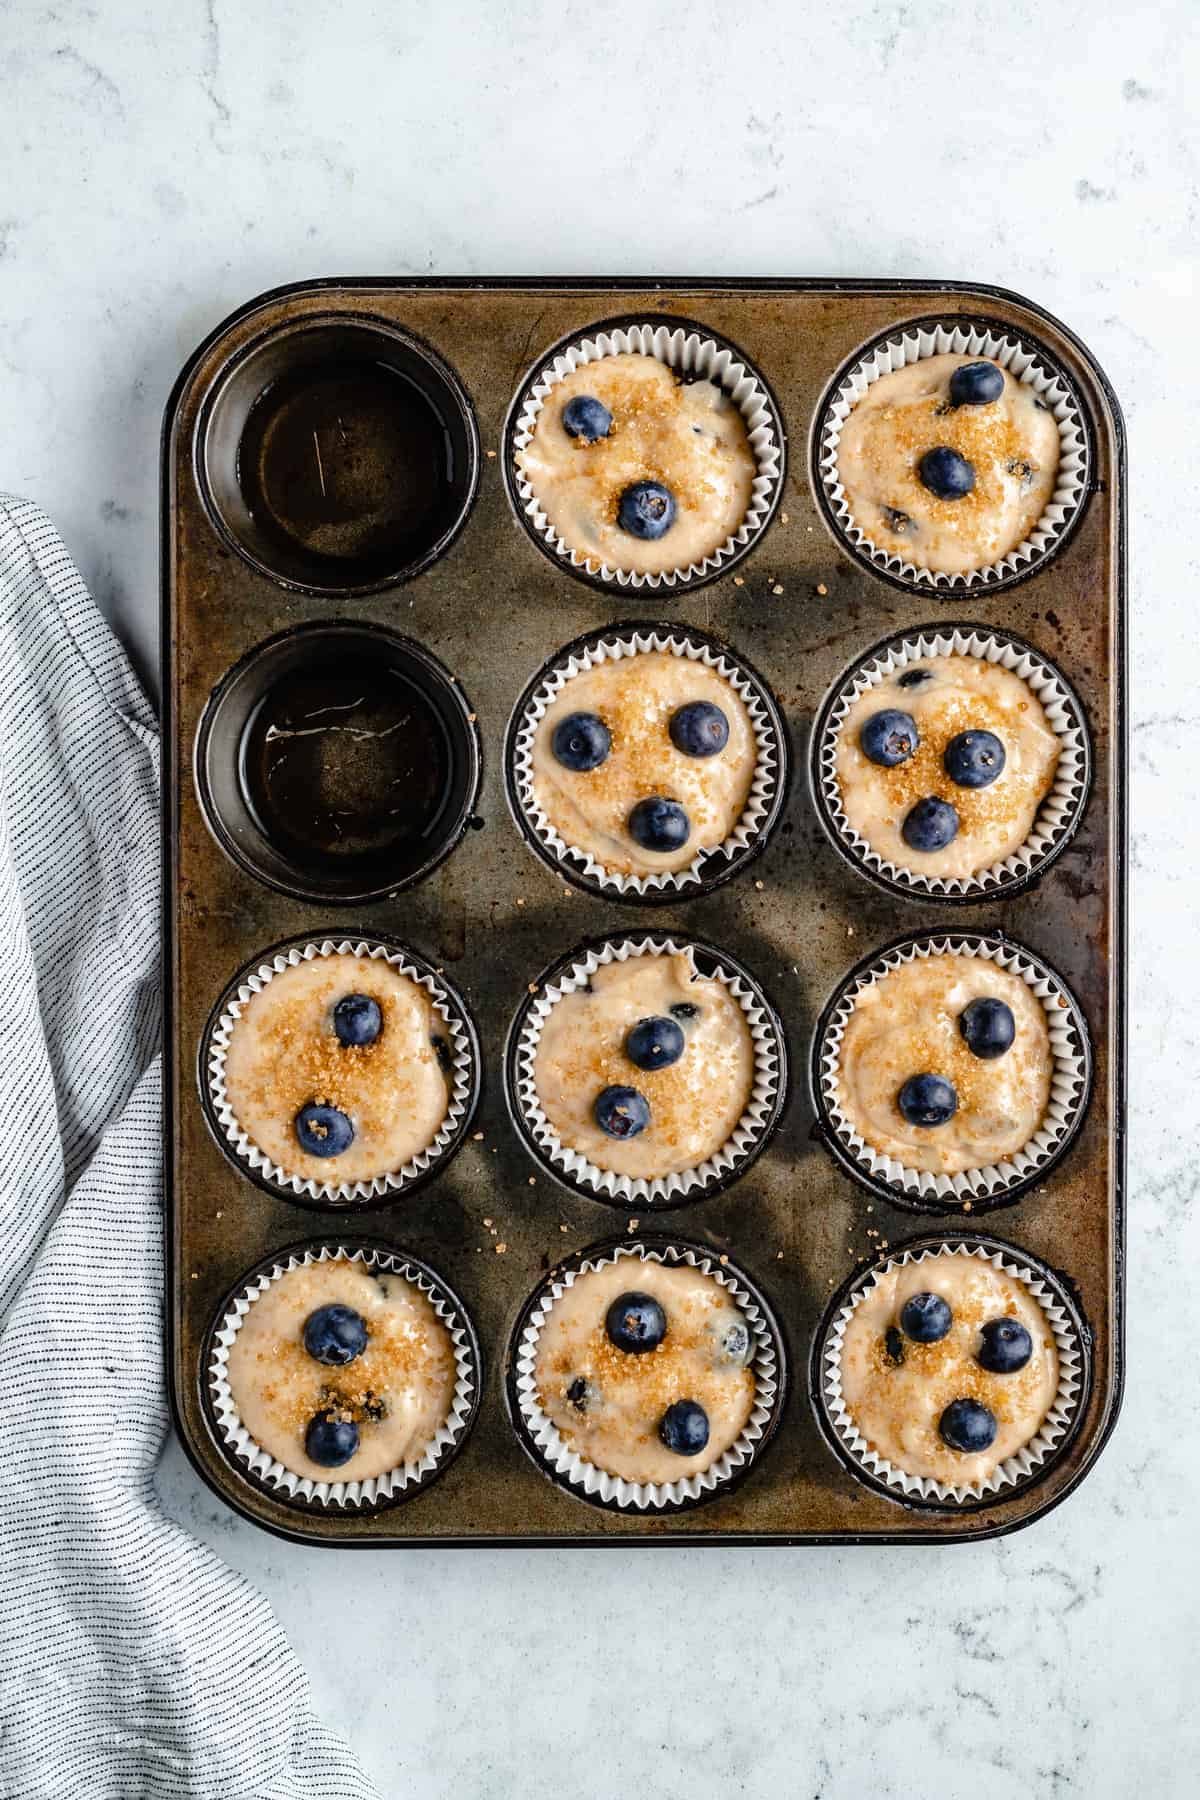
Prep the Muffin Pan: Scoop the muffin batter (I use a cookie scoop) equally into 10 muffin cups/holes. Fill the other two empty holes with a tablespoon or two of water each. Top the muffins with the extra ¼ cup of un-floured blueberries. You can also sprinkle over some coarse sugar.
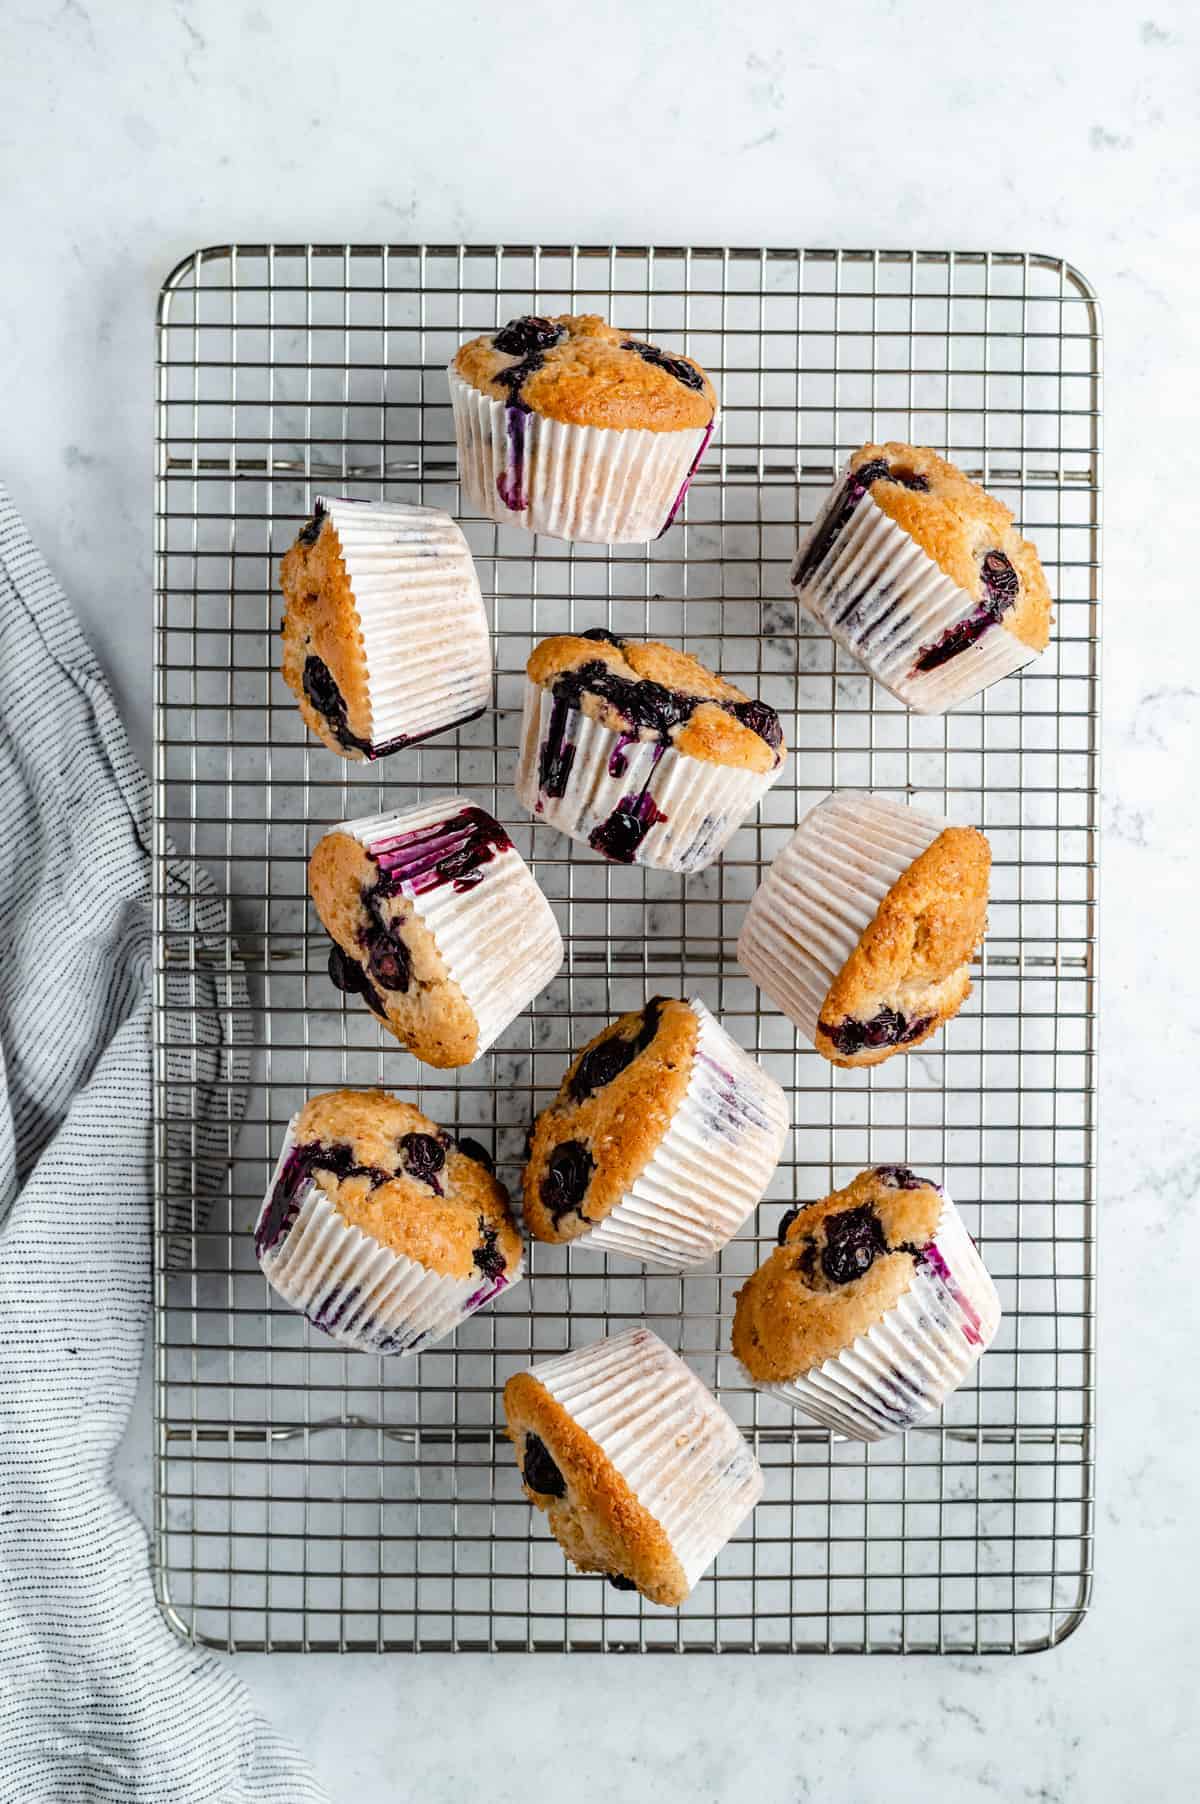
Bake the Muffins: Bake for 8 minutes at 425°F/220°C, then reduce the temperature to 375°F/190°C degrees (don’t open the oven!) and bake for another 13 minutes until a toothpick inserted into a muffin comes out clean. Remove from the oven and let it cool in the pan for about 5 minutes. Remove (I just use the same toothpick or a knife) and place on a wire rack to cool completely.
Tips for Success
Though mixing these blueberry muffins together is a breeze, it’s not a bad idea to have a couple of tips in your back pocket! So, with that said, here are some helpful things to keep in mind while baking:
- How to Get Tall Muffin Tops: Baking the muffins for the first few minutes at a higher temperature – and then lowering the temperature for the remaining time – is the best way to do this. So, make sure not to forget to lower the oven temp at the 8 minute mark – nobody wants sunken or burnt muffins!
- Can I Use Regular Vegan Milk Instead of Buttermilk? You could try this, but buttermilk helps achieve the fluffy texture in these muffins, and it also helps them rise. With that in mind, I highly recommend taking an extra minute to whip together some vegan buttermilk!
- Toss the Blueberries in Flour: This will prevent the blueberries from bleeding too much color into the batter. I would do this with both fresh and frozen blueberries.
- Don’t Over-Mix the Batter: Stirring the batter too much can cause the muffins to turn out dense or tough. Make sure to stir until everything is just combined, and then start the process of filling up your muffin pan.
- How to Let the Muffins Cool: I like to turn my muffins on their sides while they’re cooling so that the domes/tops don’t collapse.
How to Store Homemade Muffins
These muffins are at their absolute best when they’re fresh from the oven! You will, of course, have leftovers though, so here’s my preferred way of storing them:
Once the muffins have cooled, place them in an airtight container and keep them on the counter for 4-5 days. They will stay good for a couple days longer if you keep them in the fridge.
Can I Freeze These?
Sure! Keep your blueberry muffins in an airtight container or a tightly-sealed freezer bag for 1-2 months, and then thaw them overnight in the fridge when you’re ready to enjoy them again.
Ingredients
- ½ cup soy milk , (or other nut milk (120mL)) + 1 tablespoon extra soy milk + 1 tablespoon lemon juice
- ⅓ cup oil , (66g)
- ¾ cup cane sugar , (150g)
- 1 ½ teaspoon vanilla extract
- 1 tablespoon lemon juice
- 2 cups flour , (240g), sifted
- 2 teaspoon baking powder
- 1 teaspoon sea salt
- ¼ teaspoon cinnamon , optional, but tastes amazing
- pinch of lemon zest , since you’re already squeezing the lemon juice, but also optional
- 1 cup blueberries , fresh or frozen, tossed in a tablespoon of flour + ¼ cup extra unfloured for the top
- coarse sugar , for sprinkling over the top of muffins
Instructions
- Preheat the oven to 425°F/220°C. Spray a muffin pan with non-stick flour spray or rub with vegan butter, or line with 10 muffin liners.
- Mix the soy milk and the first tablespoon of lemon juice together and set aside to create a vegan buttermilk.
- With a whisk, mix the oil, sugar, vanilla extract and the other tablespoon of lemon juice together for about 3 minutes on low.
- While that’s mixing, in another small bowl, whisk together the flour, baking powder, sea salt, cinnamon and lemon zest.
- To the dry ingredients, add the vegan buttermilk and the oil, sugar and vanilla mix and slowly mix together, until just incorporated, about a minute on low or gently with your spatula. Scrape down the sides of the bowl as needed.
- Toss the blueberries in some flour, then fold into the batter lightly, so as to not streak too much blueberry all over it. Fold until combined.
- Scoop the muffin batter (I use a cookie scoop) equally into 10 muffin cups/holes. Fill the other two empty holes with a tablespoon or two of water each. Top the muffins with the extra ¼ cup of un-floured blueberries. You can also sprinkle over some coarse sugar.
- Bake for 8 minutes at 425°F/220°C, then reduce the temperature to 375°F/190°C degrees (don’t open the oven!) and bake for another 13 minutes until a toothpick inserted into a muffin comes out clean. Remove from the oven and let it cool in the pan for about 5 minutes. Remove (I just use the same toothpick or a knife) and place on a wire rack to cool completely. Turn the muffins on their sides like cooling to help prevent the domes from collapsing.
Notes
- How to Get Tall Muffin Tops: Baking the muffins for the first few minutes at a higher temperature – and then lowering the temperature for the remaining time – is the best way to do this. So, make sure not to forget to lower the oven temp at the 8 minute mark – nobody wants sunken or burnt muffins!
- Can I Use Regular Vegan Milk Instead of Buttermilk? You could try this, but buttermilk helps achieve the fluffy texture in these muffins, and it also helps them rise. With that in mind, I highly recommend taking an extra minute to whip together some vegan buttermilk!
- Toss the Blueberries in Flour: This will prevent the blueberries from bleeding too much color into the batter. I would do this with both fresh and frozen blueberries.
- Don’t Over-Mix the Batter: Stirring the batter too much can cause the muffins to turn out dense or tough. Make sure to stir until everything is just combined, and then start the process of filling up your muffin pan.
- How to Let the Muffins Cool: I like to turn my muffins on their sides while they’re cooling so that the domes/tops don’t collapse.
- Weighing Out – I highly recommend as usual if you’re baking to use a scale instead of just scooping (it can be highly inaccurate and lead to a dough that’s too dry or too wet)! You’ll get far better results every time. This is my favourite scale (affiliate link) and it ranges $10-$11: GreaterGoods Scale
