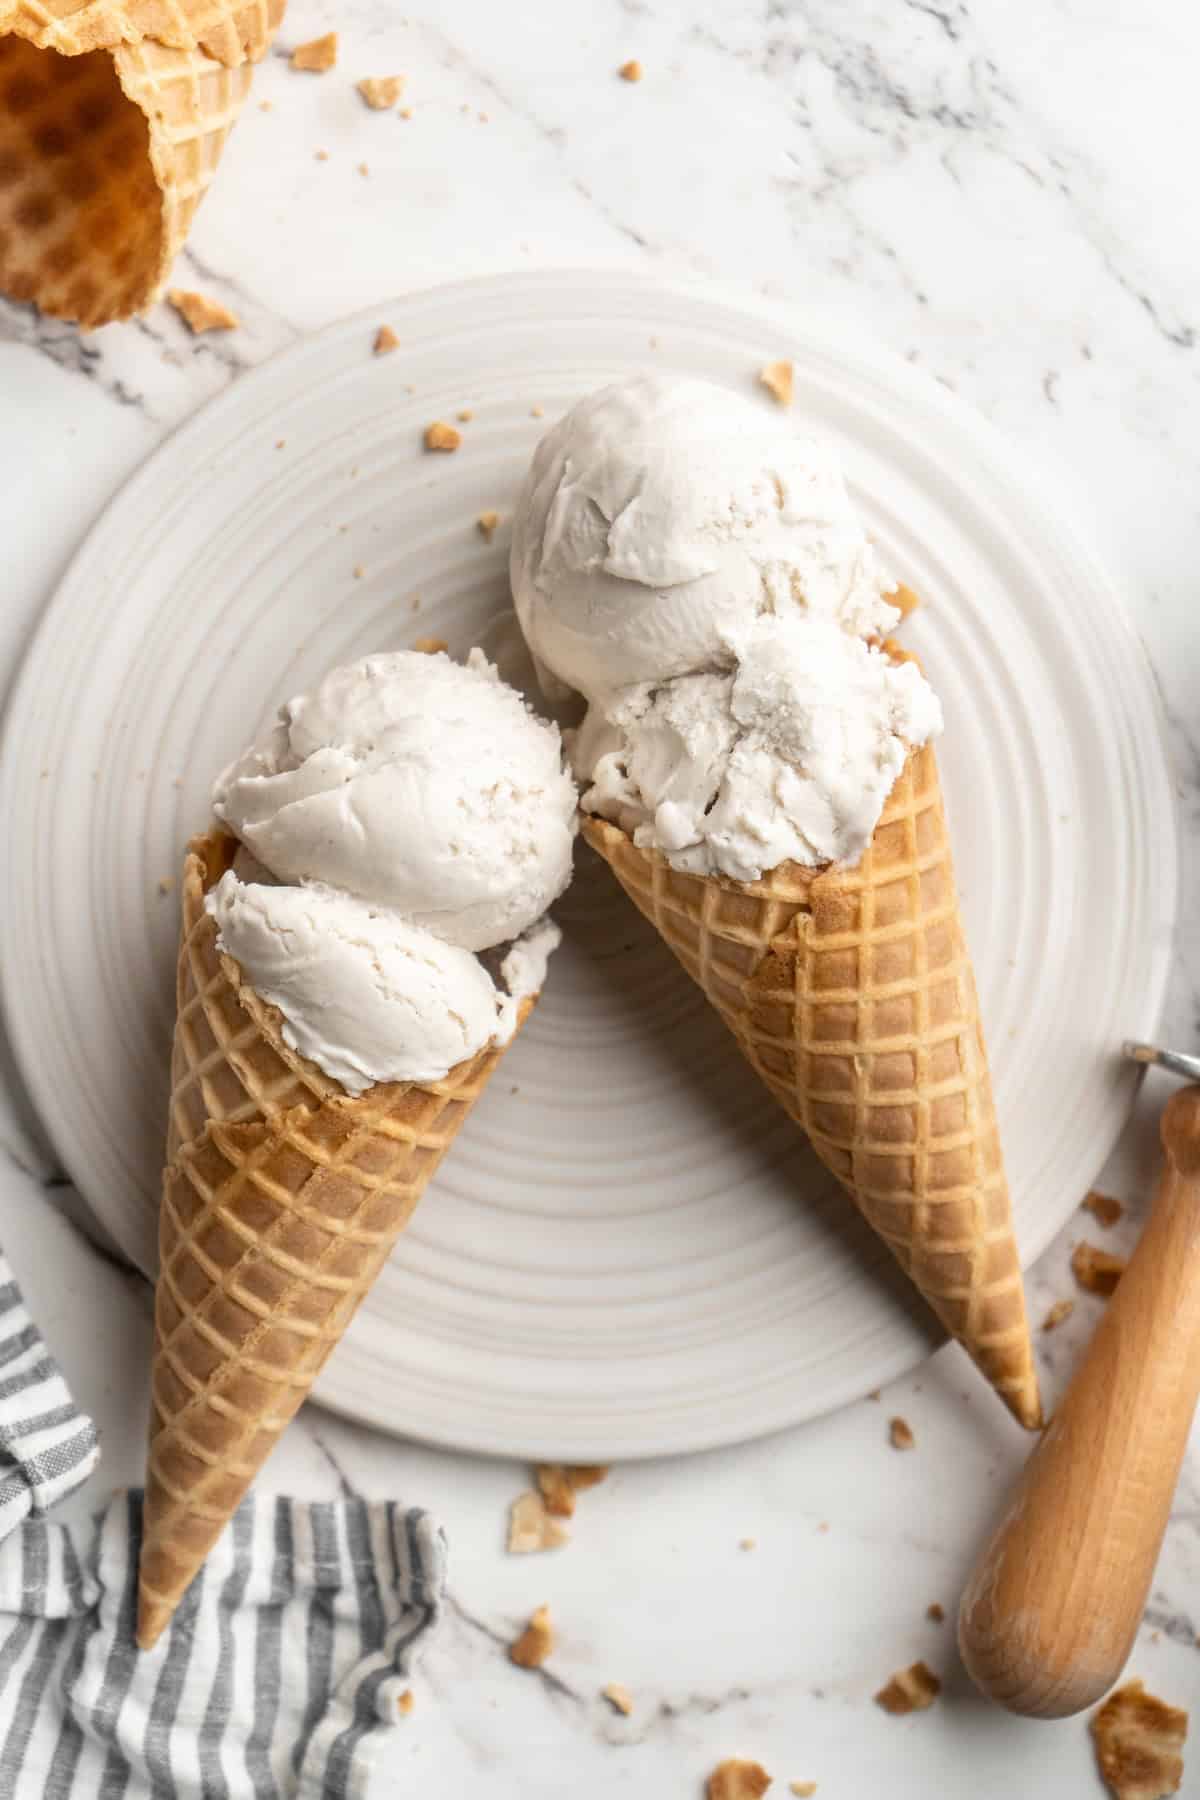
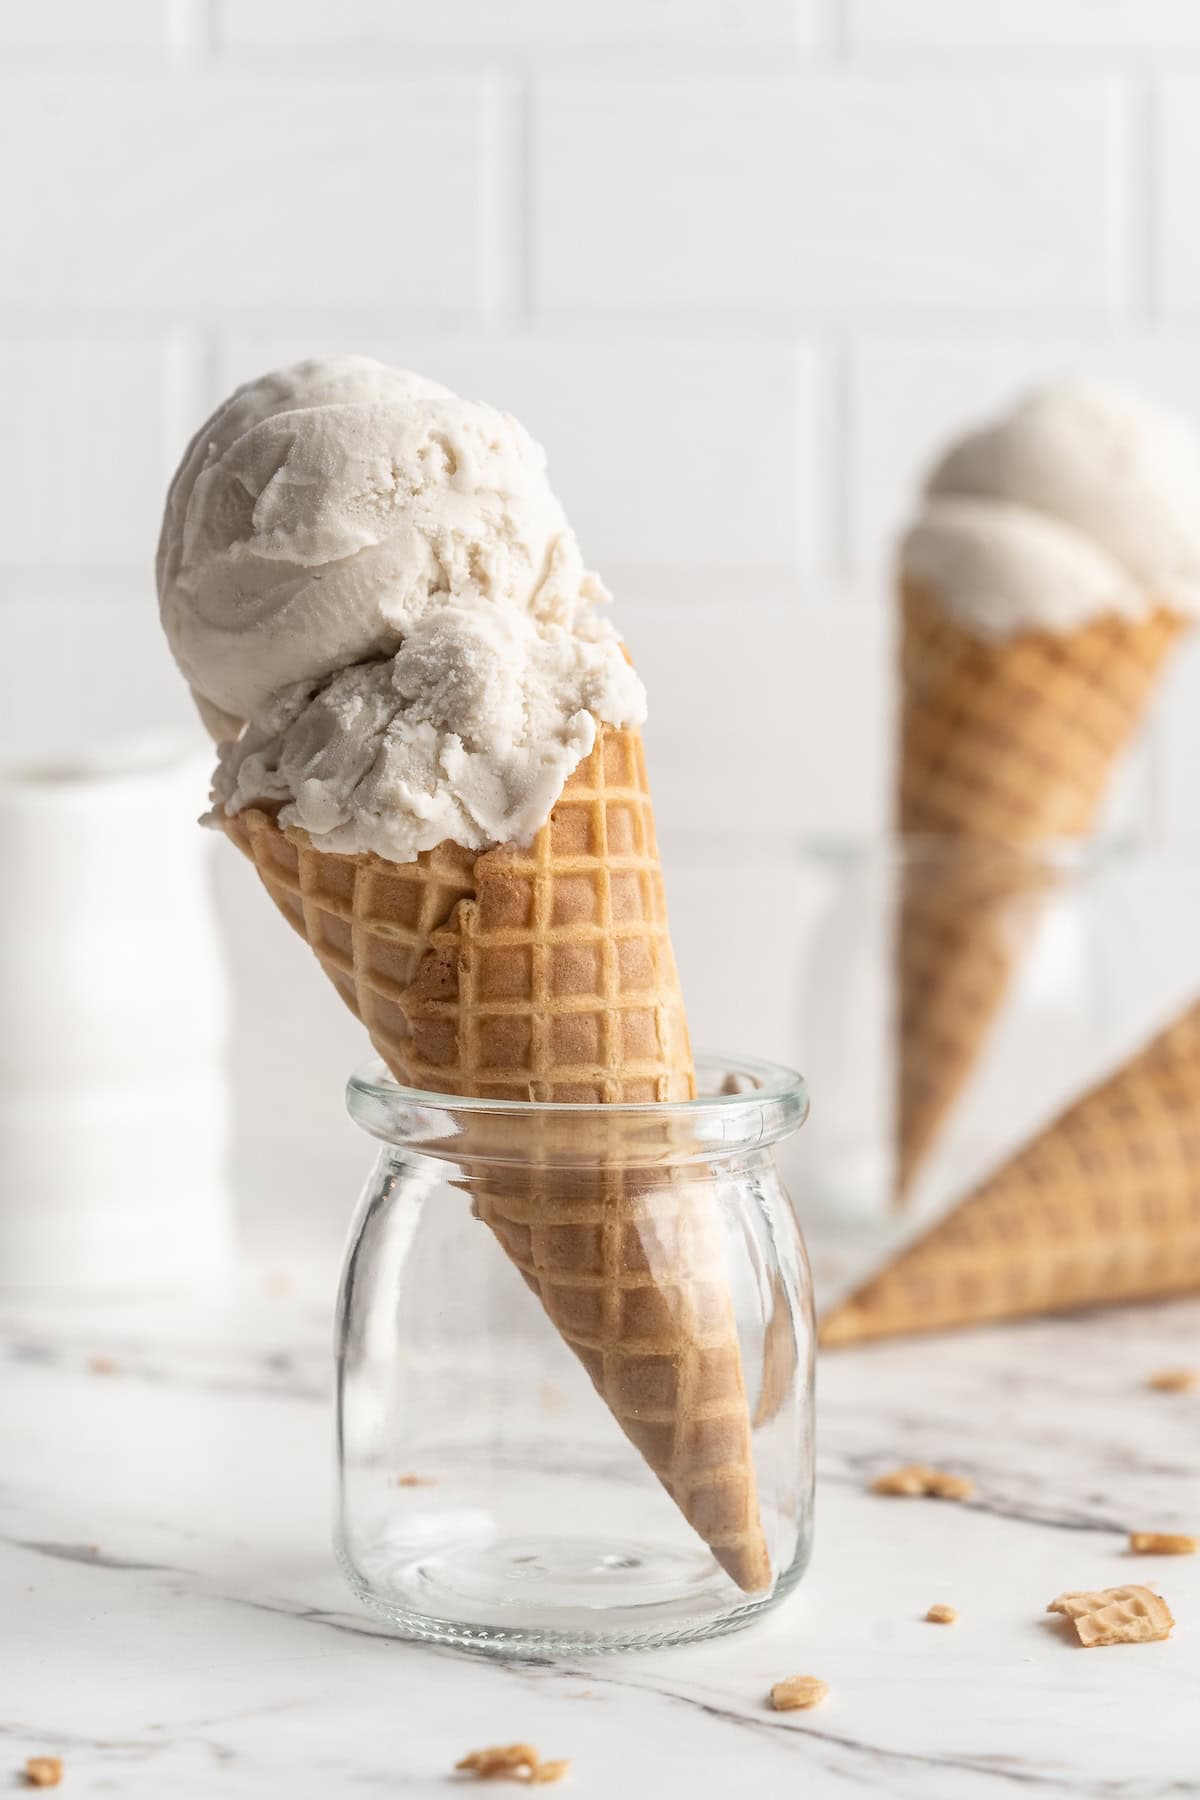
This vanilla vegan ice cream recipe is rich, creamy, and incredibly easy to make with only 5 ingredients!
I’ve made many vegan ice cream recipes over the years—even chocolate avocado ice cream ! Yet somehow, I never made my favourite flavour: vanilla bean.
Yes friends, I’m that girl who loves vanilla ice cream. In a world with thousands of ice cream flavours, my top choice is vanilla bean. Something about that classic flavour gets me every time—especially when it’s this vegan ice cream, which has the most fabulously rich cashew and coconut base.
Why You’ll Love This Vegan Ice Cream Recipe
- Creamy and smooth . Some vegan ice creams have a texture that’s thin and flat, but the cashew and coconut ensure that this recipe is super rich, decadent, and creamy.
- Easy to make . Skipping the egg-based custard makes this ice cream easier to make than the classic version. Woo hoo!
- Incredible flavour . Real vanilla extract or bean makes all the difference here. A true vanilla ice cream like this one is a real treat.
Notes on Ingredients
Scroll down to the recipe card to find the ingredient quantities and recipe instructions.
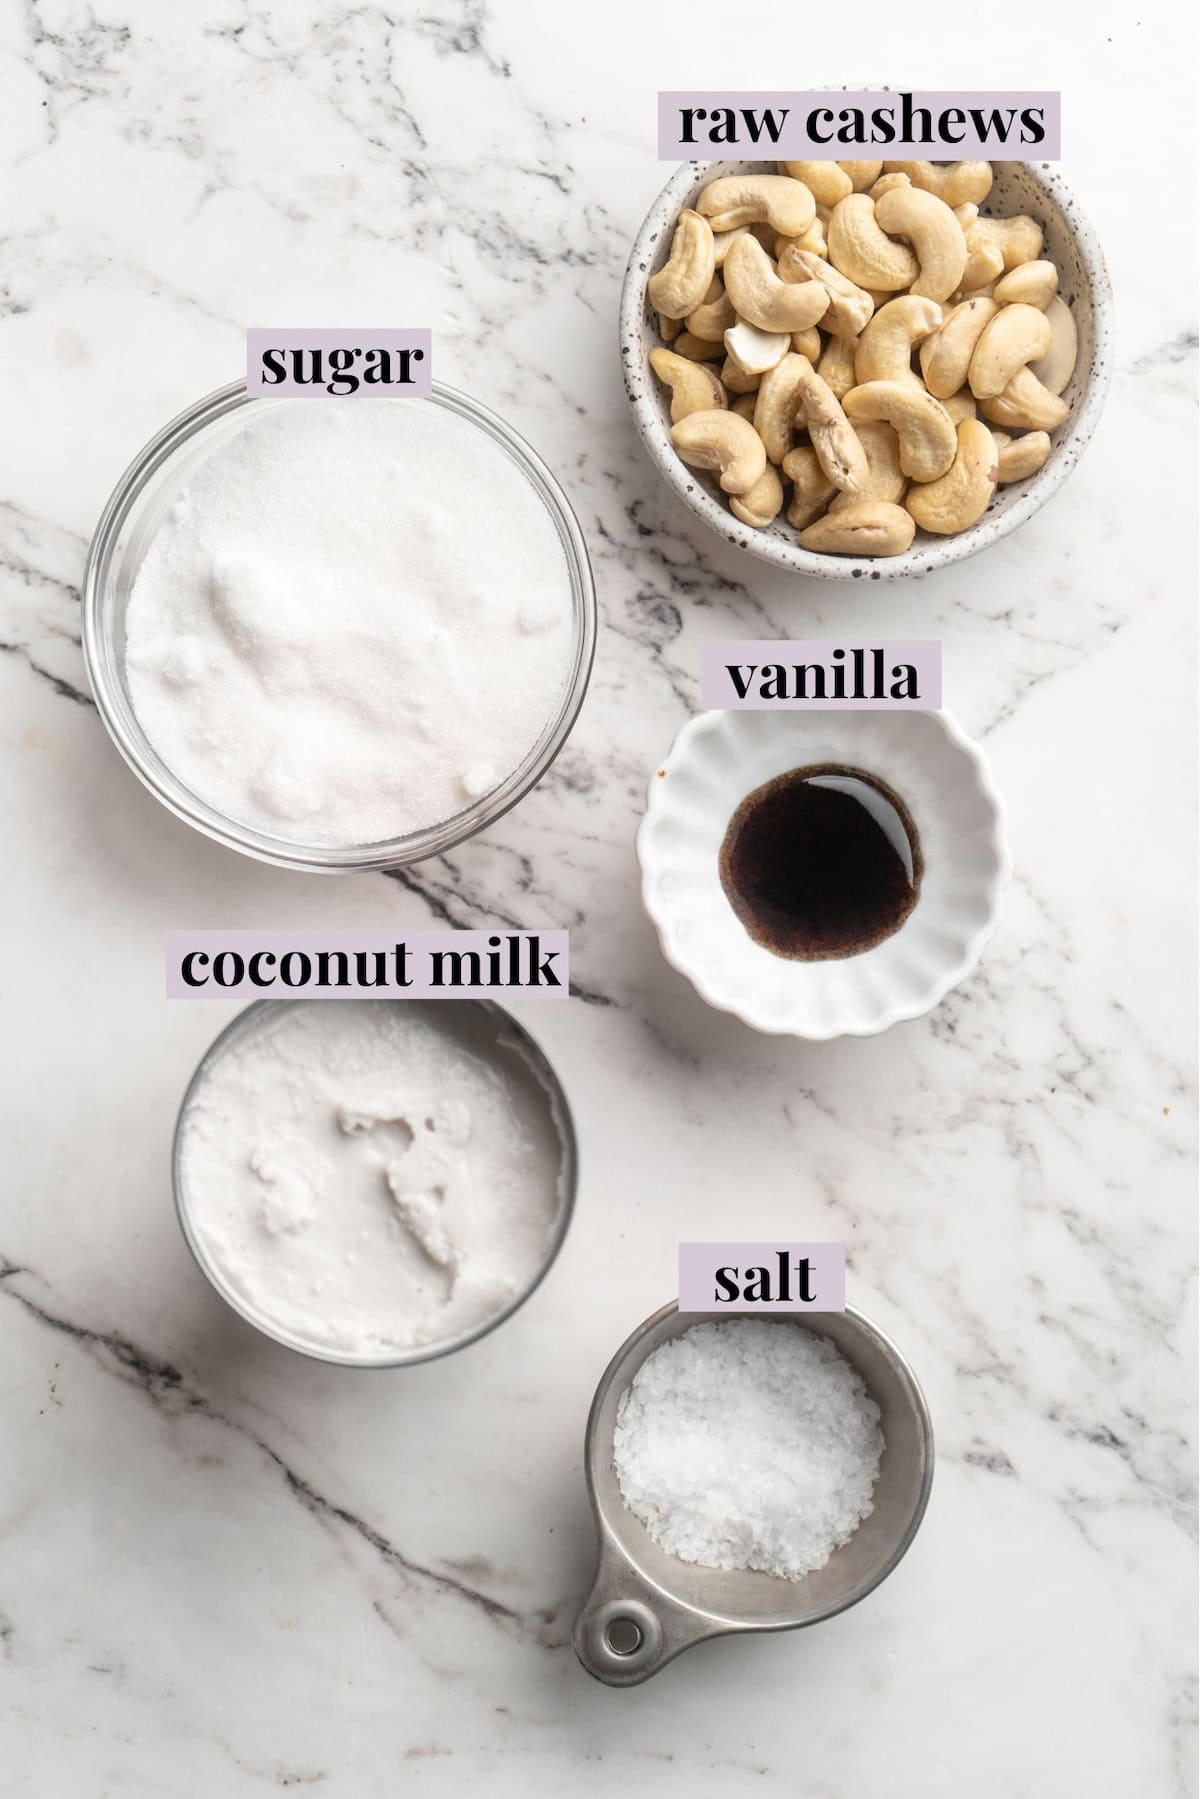
- Cashews – Soaking the cashews overnight is essential, as this allows them to puree into a completely smooth mixture. If you forget, you can boil the cashews with just enough water to cover them for 5 minutes. Drain, cool, and proceed!
- Coconut Milk –Use full-fat coconut milk, not lite or coconut milk powder.
- Vanilla – Vanilla bean paste is my go-to for this recipe because I love flecks of vanilla bean in my ice cream. You can also use a few vanilla beans or vanilla extract in equal amounts.
- Sugar – If you want a slightly less sweet ice cream, use ½ cup.
- Sea salt – A pinch of sea salt is a flavour enhancer and balances the sweetness.
How to Make Vegan Ice Cream
- Prepare . Soak the cashews and freeze your ice cream maker drum ahead of time.
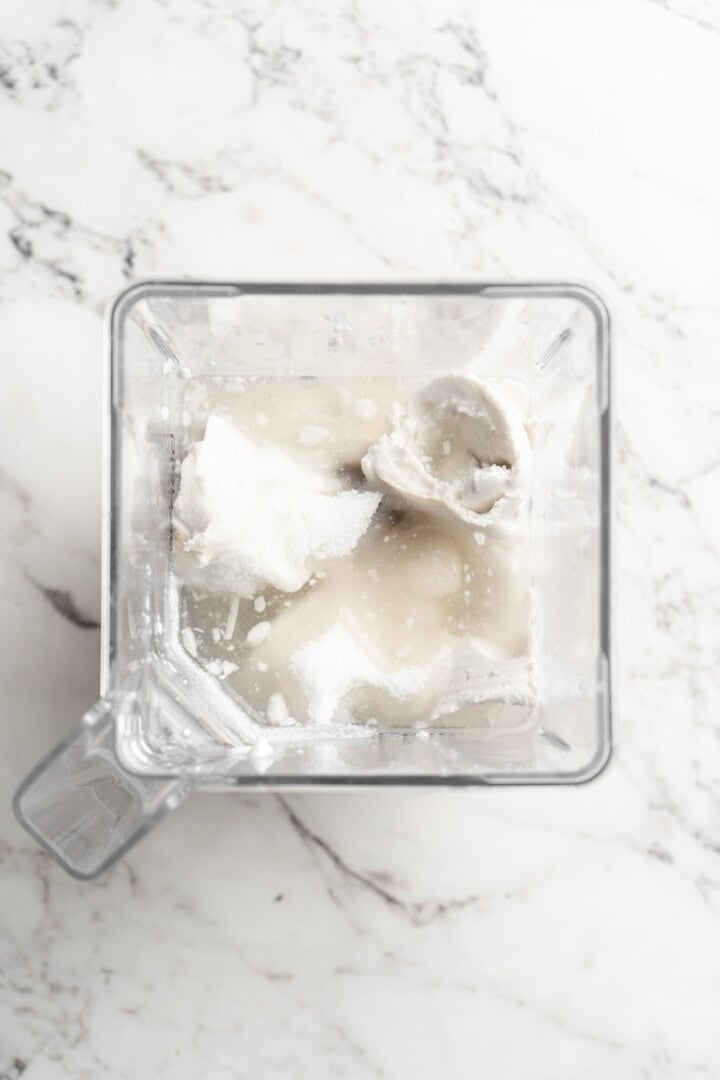
- Make the ice cream mixture . Blend all of the ingredients until completely smooth.
- Chill . Refrigerate the ice cream mixture for at least 4 hours.
- Churn the ice cream . Follow the instructions for your ice cream machine.
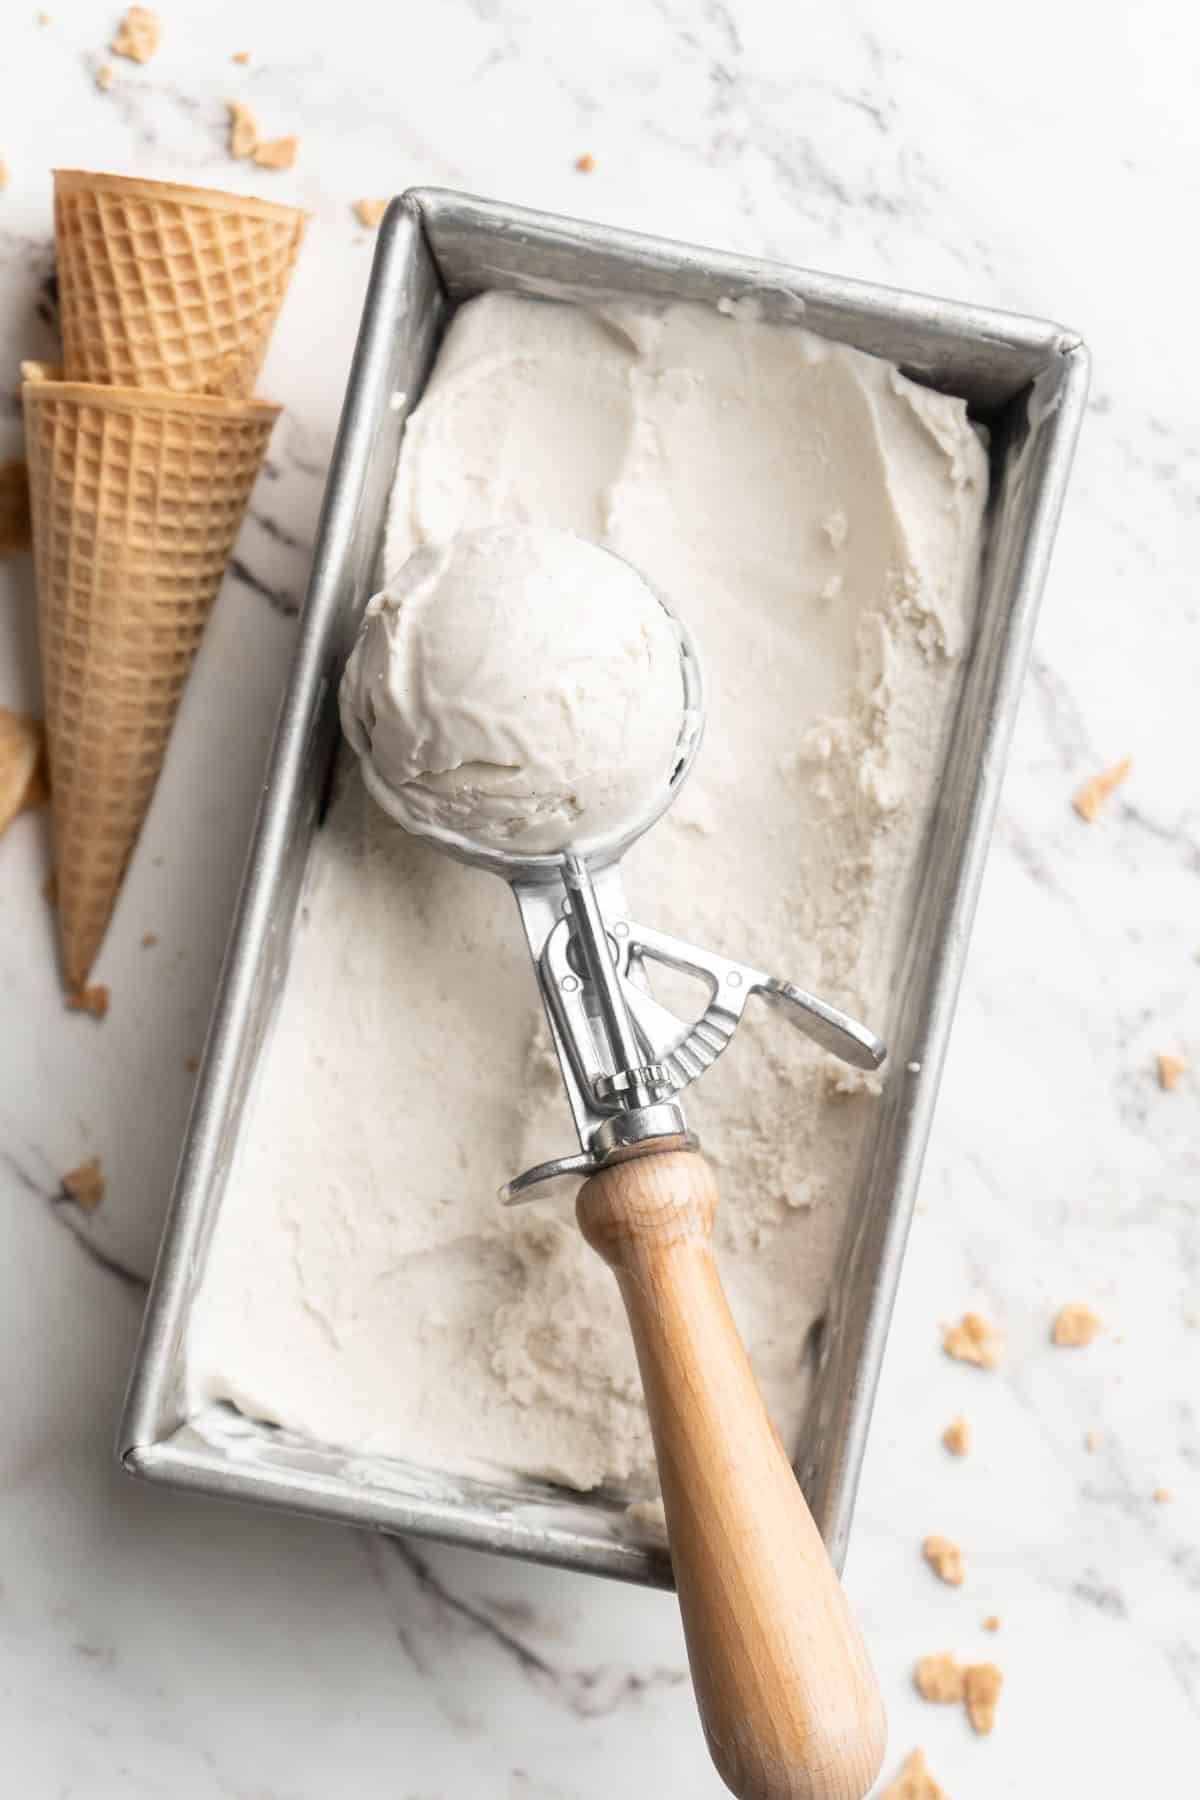
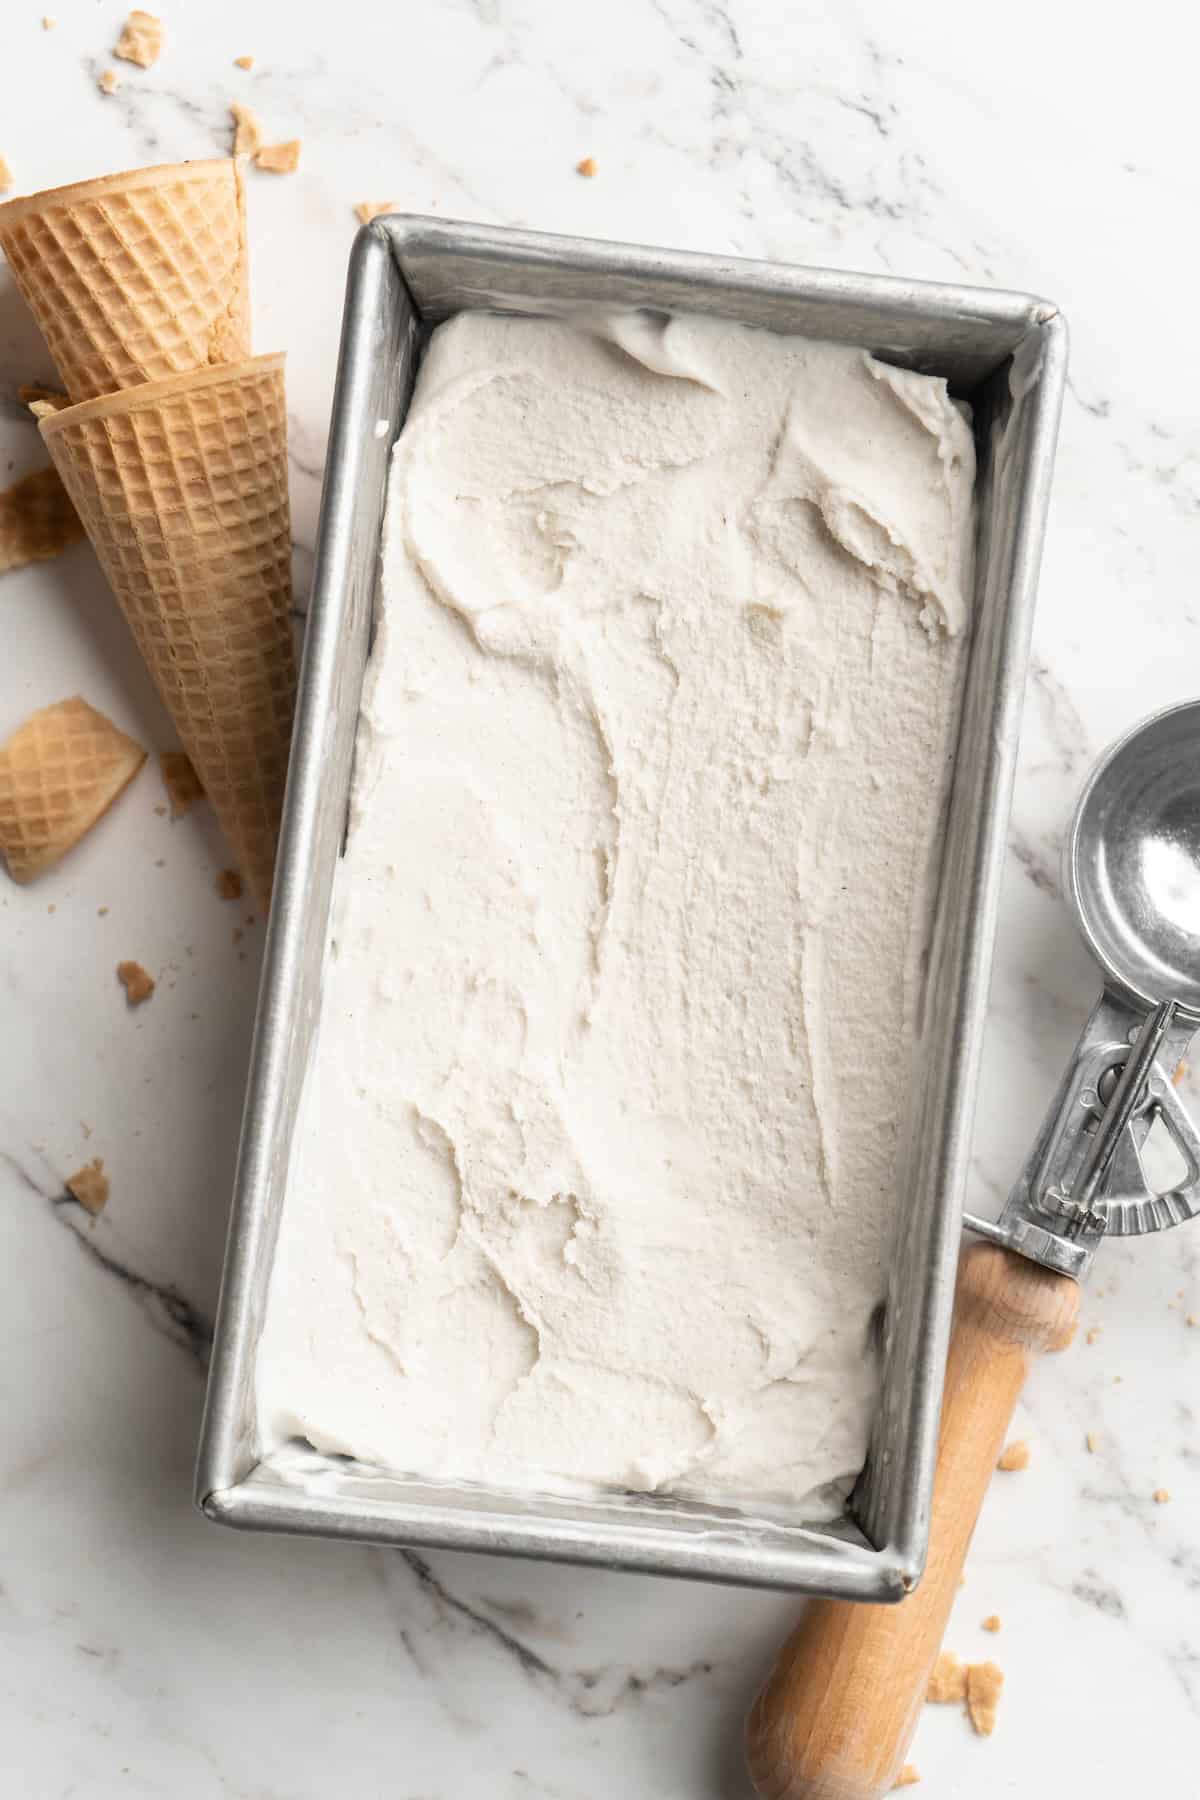
- Freeze . Transfer the ice cream into a container or loaf pan. Cover and freeze for at least 4 hours.
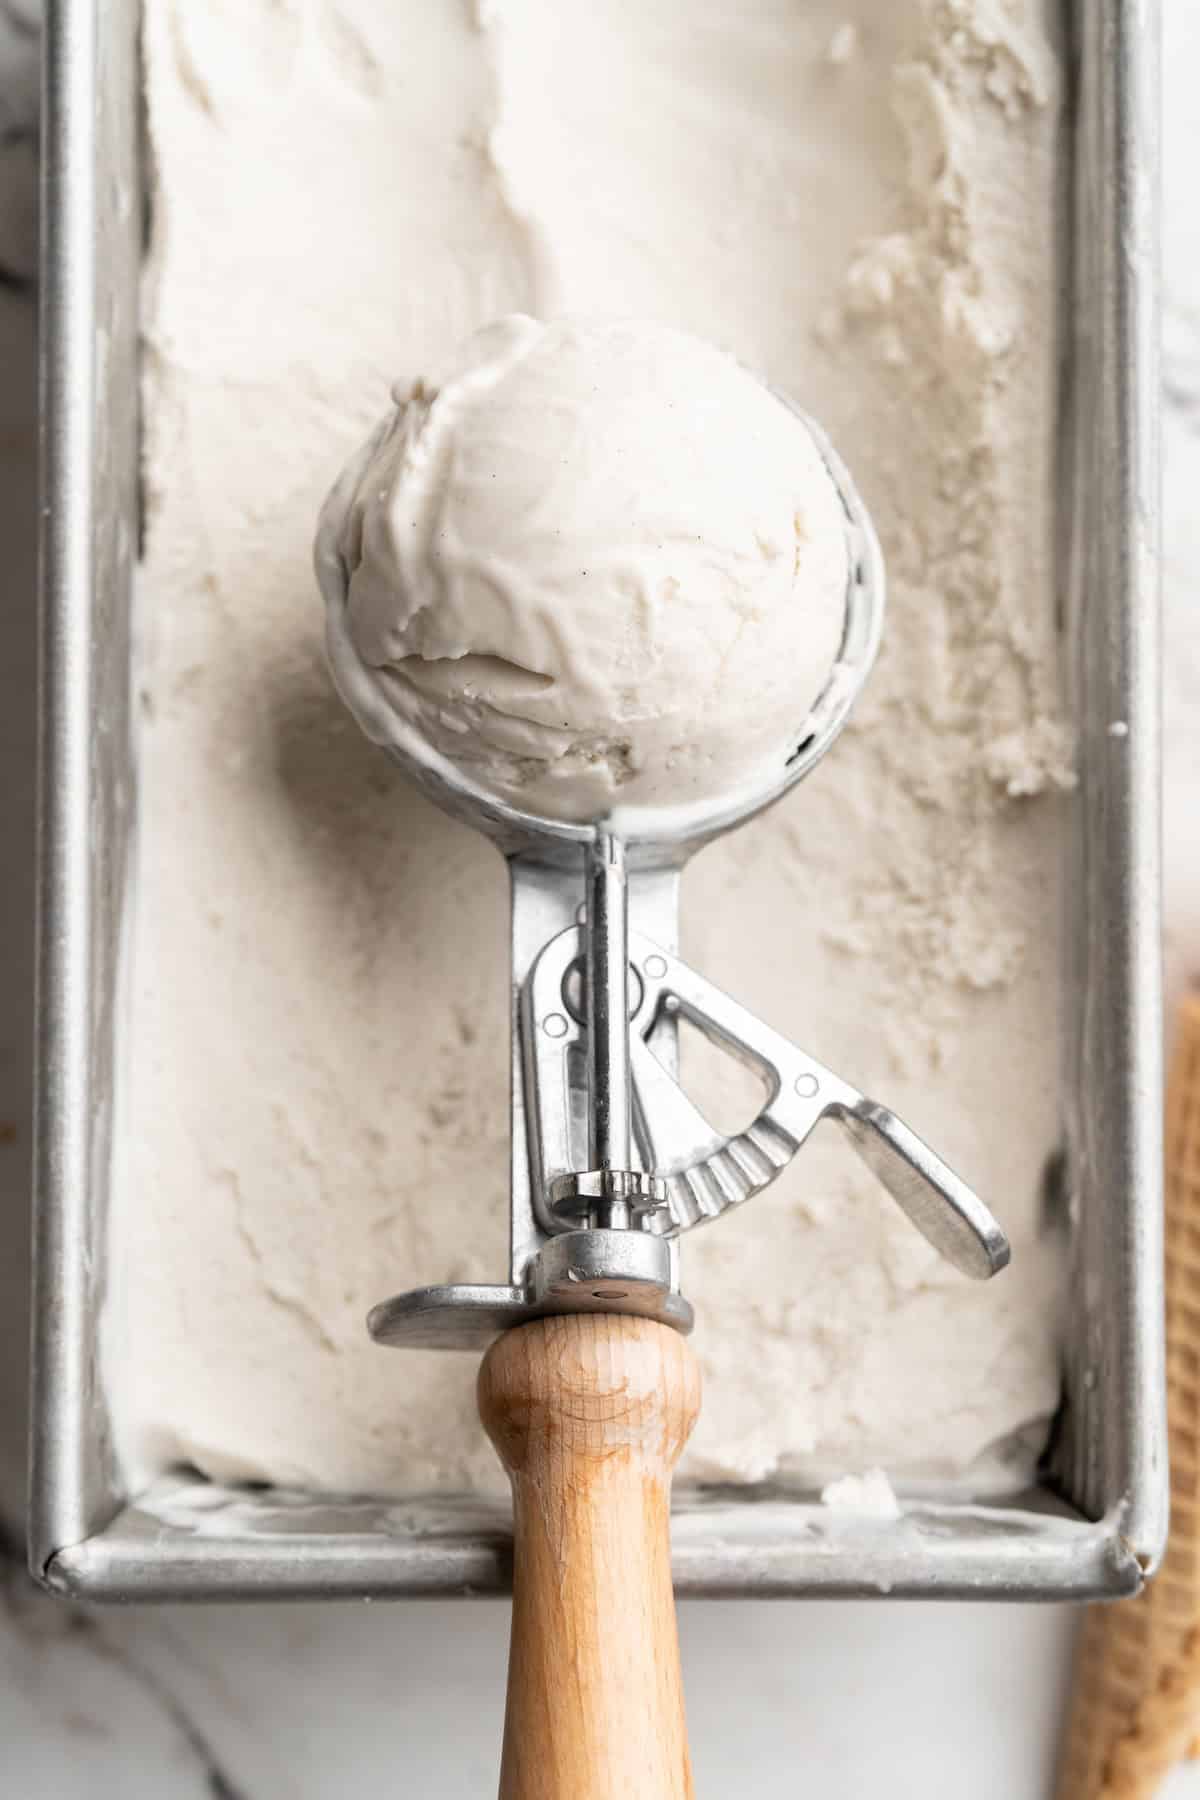
- Serve . Let the ice cream sit at room temperature for 5 minutes, then scoop and serve.
Tips for Success
- Freeze the ice cream maker drum ahead of time . I freeze it for at least 7 hours, but 24 hours is best. It can be tempting to shorten this time but it’s necessarily to get the mixture cold enough to turn it into ice cream. I just leave my base in the freezer, which means it’s always ready!
- Don’t skip chilling the ice cream mixture . I also tested this recipe with not chilling at all, chilling for 10 minutes, and chilling overnight. Chilling for at least 4 hours makes a difference—the vegan ice cream is creamier, freezes faster in the ice cream maker, and is even easier to scoop.
- Make sure the room is cold . If you live in a hot climate like I do, I recommend doing this in the coolest part of your house or turning on your AC if you have one. This ensures the mixture solidifies properly.
- Try some add-ins . Swirl jam, caramel, chopped peanut butter cups , and other add-ins into the soft ice cream after adding it to the storage container, but before freezing.
My Favourite Ways to Serve Vegan Ice Cream
- With a (generous!) drizzle of easy vegan caramel sauce
- Sprinkled with pumpkin granola on top
- Sandwiched between two air fryer chocolate chip cookies
- Scooped on top of warm slice of vegan apple pie
How to Store
Cover this vegan ice cream very tightly to prevent ice particles from forming. It will keep in the freezer for up to 2 weeks.
More Vegan Ice Cream Recipes
- Peanut Butter Ice Cream
- Grilled Peaches with Coconut Ice Cream
- Vegan Mango Ice Cream (3 Ingredients)
- 2-Ingredient Vegan Blueberry Ice Cream
- Vegan Strawberry Coconut Ice Cream (No Churn)
Ingredients
- 1 cup raw cashews , soaked in water overnight or boiled for 5 minutes*, drained
- 2 (13.4 ounce) cans full fat coconut milk
- 1 tablespoon vanilla bean paste , or extract or 1 vanilla bean
- ⅔ cup cane sugar , or other organic granulated sugar
- ½ teaspoon sea salt
Instructions
- Ensure your cashews are completely soaked from before. Also ensure your ice cream maker freezer base is in the freezer for at least 7 to 24 hours before (preferably 24 hours) . If you just keep it in your freezer, then it’s always ready!
- In a high speed blender , blend the soaked cashews, coconut milk, vanilla bean paste, cane sugar and the sea salt together until completely smooth, about 2-4 minutes on high speed depending on your blender. You want to ensure it’s 100% smooth, so feel free to blend longer until you’re sure all the cashews are blended out. If that means you need to blend longer, definitely blend until fully smooth.
- Pour mixture into a bowl, container or leave in the blender and cover. Sometimes the mixture can get hot while blending. Place it in the fridge for 4 hours in the coldest spot, up to 2 days if you don’t plan to make the ice cream immediately.
- Remove from the fridge. Set up your ice cream machine and place the ice cream maker freezer base into the machine and pour the ice cream mixture in. Prepare according to manufacturer settings, for about 20-25 minutes of churning. The mixture should be thick and smooth. If you’re not using an ice cream maker, check out my chocolate avocado post for no churn instructions.
- Scoop the soft serve ice cream into a container (I use a loaf pan) and smooth down. Place plastic wrap or a reusable wrap or parchment or wax paper flat against the ice cream, then wrap the outside of the pan too. You want to ensure it’s all protected from ice crystals. Place in the freezer for at least 4 hours to set up, even overnight if you desire. You can also enjoy it immediately like soft serve!
- After at least 4 hours in the freezer, remove container from freezer and allow it to sit for at least 5 minutes on the counter (like you would store bought ice cream). Scoop, serve and enjoy!
Notes
- You can easily boil your cashews with just enough water covering them for 5 minutes. Drain, let cool, and proceed! This way you can make the recipe the same day.
- I used an ice cream maker to make this recipe. Ensure your ice cream maker base is ready! It can be tempting to shorten this time but it’s necessarily to get the mixture cold enough to turn it into ice cream. I just leave my base in the freezer, which means it’s always ready!
- It’s important to use full fat coconut milk. Don’t use lite. Also remember we are using the full can of coconut milk. Also, do not substitute coconut milk powder. It isn’t creamy enough and will result in icy ice cream.
- Don’t rush your ice cream base (the actual mixture) chilling time. I made it after 10 minutes in the freezer, and after a few hours in the fridge and after whole night in the fridge. The last two were far more creamy, set much faster in the ice cream maker, and were much easier to scoop. I highly recommend chilling the cashew cream for the right length of time.
- If you live in a hot climate (like I do) I recommend doing this in the coolest part of your house or turning on your AC if you have one. This ensures the mixture solidifies properly.
- Always cover your finished ice cream as per the recipe, otherwise ice particles will form in it and result in some small ice chunks.
- If you’re not using an ice cream maker; follow my tips from my chocolate avocado ice cream to get the best texture.
- Cover this vegan ice cream very tightly to prevent ice particles from forming. It will keep in the freezer for up to 2 weeks.
This vanilla vegan ice cream recipe is rich, creamy, and incredibly easy to make with only 5 ingredients!
I’ve made many vegan ice cream recipes over the years—even chocolate avocado ice cream ! Yet somehow, I never made my favourite flavour: vanilla bean.
Yes friends, I’m that girl who loves vanilla ice cream. In a world with thousands of ice cream flavours, my top choice is vanilla bean. Something about that classic flavour gets me every time—especially when it’s this vegan ice cream, which has the most fabulously rich cashew and coconut base.
Why You’ll Love This Vegan Ice Cream Recipe
- Creamy and smooth . Some vegan ice creams have a texture that’s thin and flat, but the cashew and coconut ensure that this recipe is super rich, decadent, and creamy.
- Easy to make . Skipping the egg-based custard makes this ice cream easier to make than the classic version. Woo hoo!
- Incredible flavour . Real vanilla extract or bean makes all the difference here. A true vanilla ice cream like this one is a real treat.
Notes on Ingredients
Scroll down to the recipe card to find the ingredient quantities and recipe instructions.
- Cashews – Soaking the cashews overnight is essential, as this allows them to puree into a completely smooth mixture. If you forget, you can boil the cashews with just enough water to cover them for 5 minutes. Drain, cool, and proceed!
- Coconut Milk –Use full-fat coconut milk, not lite or coconut milk powder.
- Vanilla – Vanilla bean paste is my go-to for this recipe because I love flecks of vanilla bean in my ice cream. You can also use a few vanilla beans or vanilla extract in equal amounts.
- Sugar – If you want a slightly less sweet ice cream, use ½ cup.
- Sea salt – A pinch of sea salt is a flavour enhancer and balances the sweetness.
How to Make Vegan Ice Cream
- Prepare . Soak the cashews and freeze your ice cream maker drum ahead of time.
- Make the ice cream mixture . Blend all of the ingredients until completely smooth.
- Chill . Refrigerate the ice cream mixture for at least 4 hours.
- Churn the ice cream . Follow the instructions for your ice cream machine.
- Freeze . Transfer the ice cream into a container or loaf pan. Cover and freeze for at least 4 hours.
- Serve . Let the ice cream sit at room temperature for 5 minutes, then scoop and serve.
Tips for Success
- Freeze the ice cream maker drum ahead of time . I freeze it for at least 7 hours, but 24 hours is best. It can be tempting to shorten this time but it’s necessarily to get the mixture cold enough to turn it into ice cream. I just leave my base in the freezer, which means it’s always ready!
- Don’t skip chilling the ice cream mixture . I also tested this recipe with not chilling at all, chilling for 10 minutes, and chilling overnight. Chilling for at least 4 hours makes a difference—the vegan ice cream is creamier, freezes faster in the ice cream maker, and is even easier to scoop.
- Make sure the room is cold . If you live in a hot climate like I do, I recommend doing this in the coolest part of your house or turning on your AC if you have one. This ensures the mixture solidifies properly.
- Try some add-ins . Swirl jam, caramel, chopped peanut butter cups , and other add-ins into the soft ice cream after adding it to the storage container, but before freezing.
My Favourite Ways to Serve Vegan Ice Cream
- With a (generous!) drizzle of easy vegan caramel sauce
- Sprinkled with pumpkin granola on top
- Sandwiched between two air fryer chocolate chip cookies
- Scooped on top of warm slice of vegan apple pie
How to Store
Cover this vegan ice cream very tightly to prevent ice particles from forming. It will keep in the freezer for up to 2 weeks.
More Vegan Ice Cream Recipes
- Peanut Butter Ice Cream
- Grilled Peaches with Coconut Ice Cream
- Vegan Mango Ice Cream (3 Ingredients)
- 2-Ingredient Vegan Blueberry Ice Cream
- Vegan Strawberry Coconut Ice Cream (No Churn)
Ingredients
- 1 cup raw cashews , soaked in water overnight or boiled for 5 minutes*, drained
- 2 (13.4 ounce) cans full fat coconut milk
- 1 tablespoon vanilla bean paste , or extract or 1 vanilla bean
- ⅔ cup cane sugar , or other organic granulated sugar
- ½ teaspoon sea salt
Instructions
- Ensure your cashews are completely soaked from before. Also ensure your ice cream maker freezer base is in the freezer for at least 7 to 24 hours before (preferably 24 hours) . If you just keep it in your freezer, then it’s always ready!
- In a high speed blender , blend the soaked cashews, coconut milk, vanilla bean paste, cane sugar and the sea salt together until completely smooth, about 2-4 minutes on high speed depending on your blender. You want to ensure it’s 100% smooth, so feel free to blend longer until you’re sure all the cashews are blended out. If that means you need to blend longer, definitely blend until fully smooth.
- Pour mixture into a bowl, container or leave in the blender and cover. Sometimes the mixture can get hot while blending. Place it in the fridge for 4 hours in the coldest spot, up to 2 days if you don’t plan to make the ice cream immediately.
- Remove from the fridge. Set up your ice cream machine and place the ice cream maker freezer base into the machine and pour the ice cream mixture in. Prepare according to manufacturer settings, for about 20-25 minutes of churning. The mixture should be thick and smooth. If you’re not using an ice cream maker, check out my chocolate avocado post for no churn instructions.
- Scoop the soft serve ice cream into a container (I use a loaf pan) and smooth down. Place plastic wrap or a reusable wrap or parchment or wax paper flat against the ice cream, then wrap the outside of the pan too. You want to ensure it’s all protected from ice crystals. Place in the freezer for at least 4 hours to set up, even overnight if you desire. You can also enjoy it immediately like soft serve!
- After at least 4 hours in the freezer, remove container from freezer and allow it to sit for at least 5 minutes on the counter (like you would store bought ice cream). Scoop, serve and enjoy!
Notes
- You can easily boil your cashews with just enough water covering them for 5 minutes. Drain, let cool, and proceed! This way you can make the recipe the same day.
- I used an ice cream maker to make this recipe. Ensure your ice cream maker base is ready! It can be tempting to shorten this time but it’s necessarily to get the mixture cold enough to turn it into ice cream. I just leave my base in the freezer, which means it’s always ready!
- It’s important to use full fat coconut milk. Don’t use lite. Also remember we are using the full can of coconut milk. Also, do not substitute coconut milk powder. It isn’t creamy enough and will result in icy ice cream.
- Don’t rush your ice cream base (the actual mixture) chilling time. I made it after 10 minutes in the freezer, and after a few hours in the fridge and after whole night in the fridge. The last two were far more creamy, set much faster in the ice cream maker, and were much easier to scoop. I highly recommend chilling the cashew cream for the right length of time.
- If you live in a hot climate (like I do) I recommend doing this in the coolest part of your house or turning on your AC if you have one. This ensures the mixture solidifies properly.
- Always cover your finished ice cream as per the recipe, otherwise ice particles will form in it and result in some small ice chunks.
- If you’re not using an ice cream maker; follow my tips from my chocolate avocado ice cream to get the best texture.
- Cover this vegan ice cream very tightly to prevent ice particles from forming. It will keep in the freezer for up to 2 weeks.

Vegan Ice Cream
Ingredients
- 1 cup raw cashews soaked in water overnight or boiled for 5 minutes*, drained
- 2 (13.4 ounce) cans full fat coconut milk
- 1 tablespoon vanilla bean paste or extract or 1 vanilla bean
- ⅔ cup cane sugar or other organic granulated sugar
- ½ teaspoon sea salt
Instructions
- Ensure your cashews are completely soaked from before. Also ensure your ice cream maker freezer base is in the freezer for at least 7 to 24 hours before (preferably 24 hours) . If you just keep it in your freezer, then it’s always ready!
- In a high speed blender, blend the soaked cashews, coconut milk, vanilla bean paste, cane sugar and the sea salt together until completely smooth, about 2-4 minutes on high speed depending on your blender. You want to ensure it’s 100% smooth, so feel free to blend longer until you’re sure all the cashews are blended out. If that means you need to blend longer, definitely blend until fully smooth.
- Pour mixture into a bowl, container or leave in the blender and cover. Sometimes the mixture can get hot while blending. Place it in the fridge for 4 hours in the coldest spot, up to 2 days if you don’t plan to make the ice cream immediately.
- Remove from the fridge. Set up your ice cream machine and place the ice cream maker freezer base into the machine and pour the ice cream mixture in. Prepare according to manufacturer settings, for about 20-25 minutes of churning. The mixture should be thick and smooth. If you’re not using an ice cream maker, check out my chocolate avocado post for no churn instructions.
- Scoop the soft serve ice cream into a container (I use a loaf pan) and smooth down. Place plastic wrap or a reusable wrap or parchment or wax paper flat against the ice cream, then wrap the outside of the pan too. You want to ensure it’s all protected from ice crystals. Place in the freezer for at least 4 hours to set up, even overnight if you desire. You can also enjoy it immediately like soft serve!
- After at least 4 hours in the freezer, remove container from freezer and allow it to sit for at least 5 minutes on the counter (like you would store bought ice cream). Scoop, serve and enjoy!
Notes
- You can easily boil your cashews with just enough water covering them for 5 minutes. Drain, let cool, and proceed! This way you can make the recipe the same day.
- I used an ice cream maker to make this recipe. Ensure your ice cream maker base is ready! It can be tempting to shorten this time but it’s necessarily to get the mixture cold enough to turn it into ice cream. I just leave my base in the freezer, which means it’s always ready!
- It’s important to use full fat coconut milk. Don’t use lite. Also remember we are using the full can of coconut milk. Also, do not substitute coconut milk powder. It isn’t creamy enough and will result in icy ice cream.
- Don’t rush your ice cream base (the actual mixture) chilling time. I made it after 10 minutes in the freezer, and after a few hours in the fridge and after whole night in the fridge. The last two were far more creamy, set much faster in the ice cream maker, and were much easier to scoop. I highly recommend chilling the cashew cream for the right length of time.
- If you live in a hot climate (like I do) I recommend doing this in the coolest part of your house or turning on your AC if you have one. This ensures the mixture solidifies properly.
- Always cover your finished ice cream as per the recipe, otherwise ice particles will form in it and result in some small ice chunks.
- If you’re not using an ice cream maker; follow my tips from my chocolate avocado ice cream to get the best texture.
- Cover this vegan ice cream very tightly to prevent ice particles from forming. It will keep in the freezer for up to 2 weeks.
Nutrition
Vegan Ice Cream https://jessicainthekitchen.com/vegan-ice-cream-2/ August 28, 2024
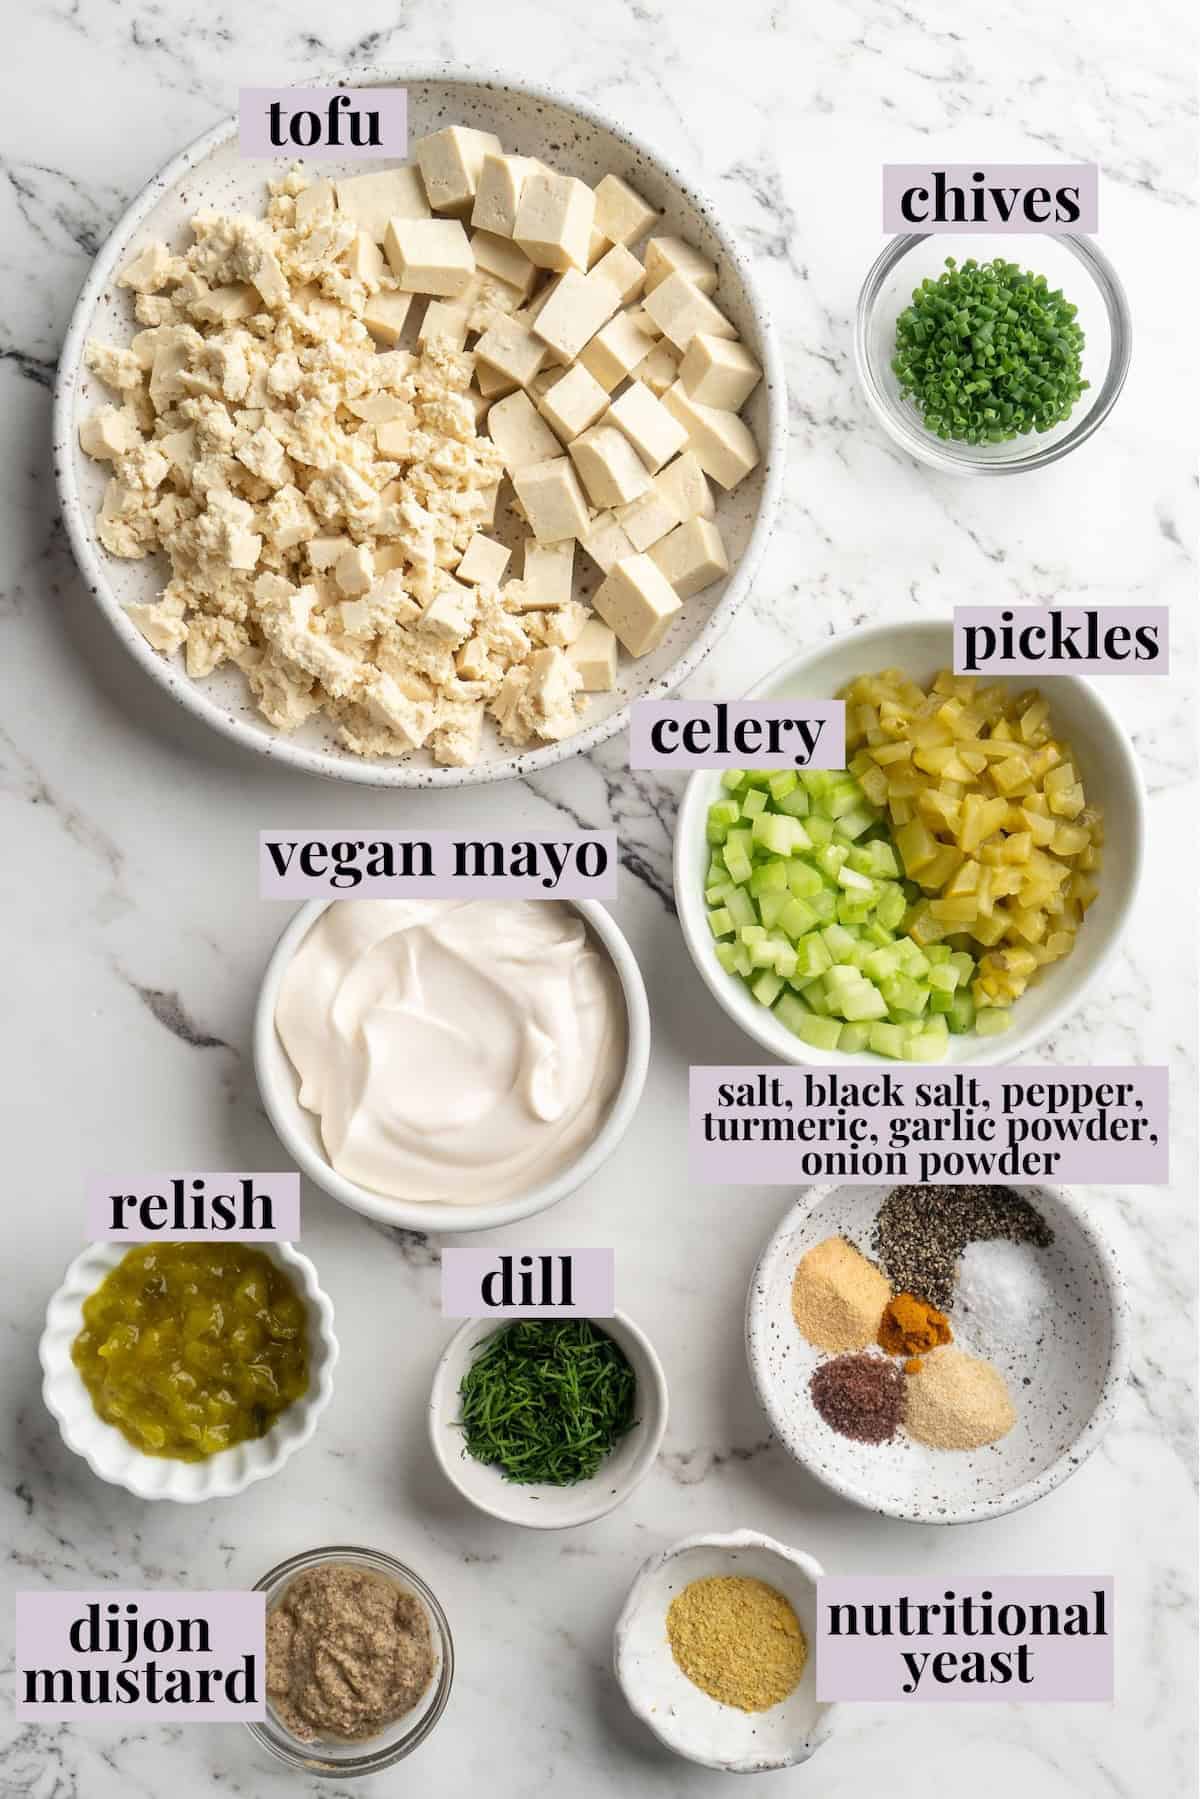
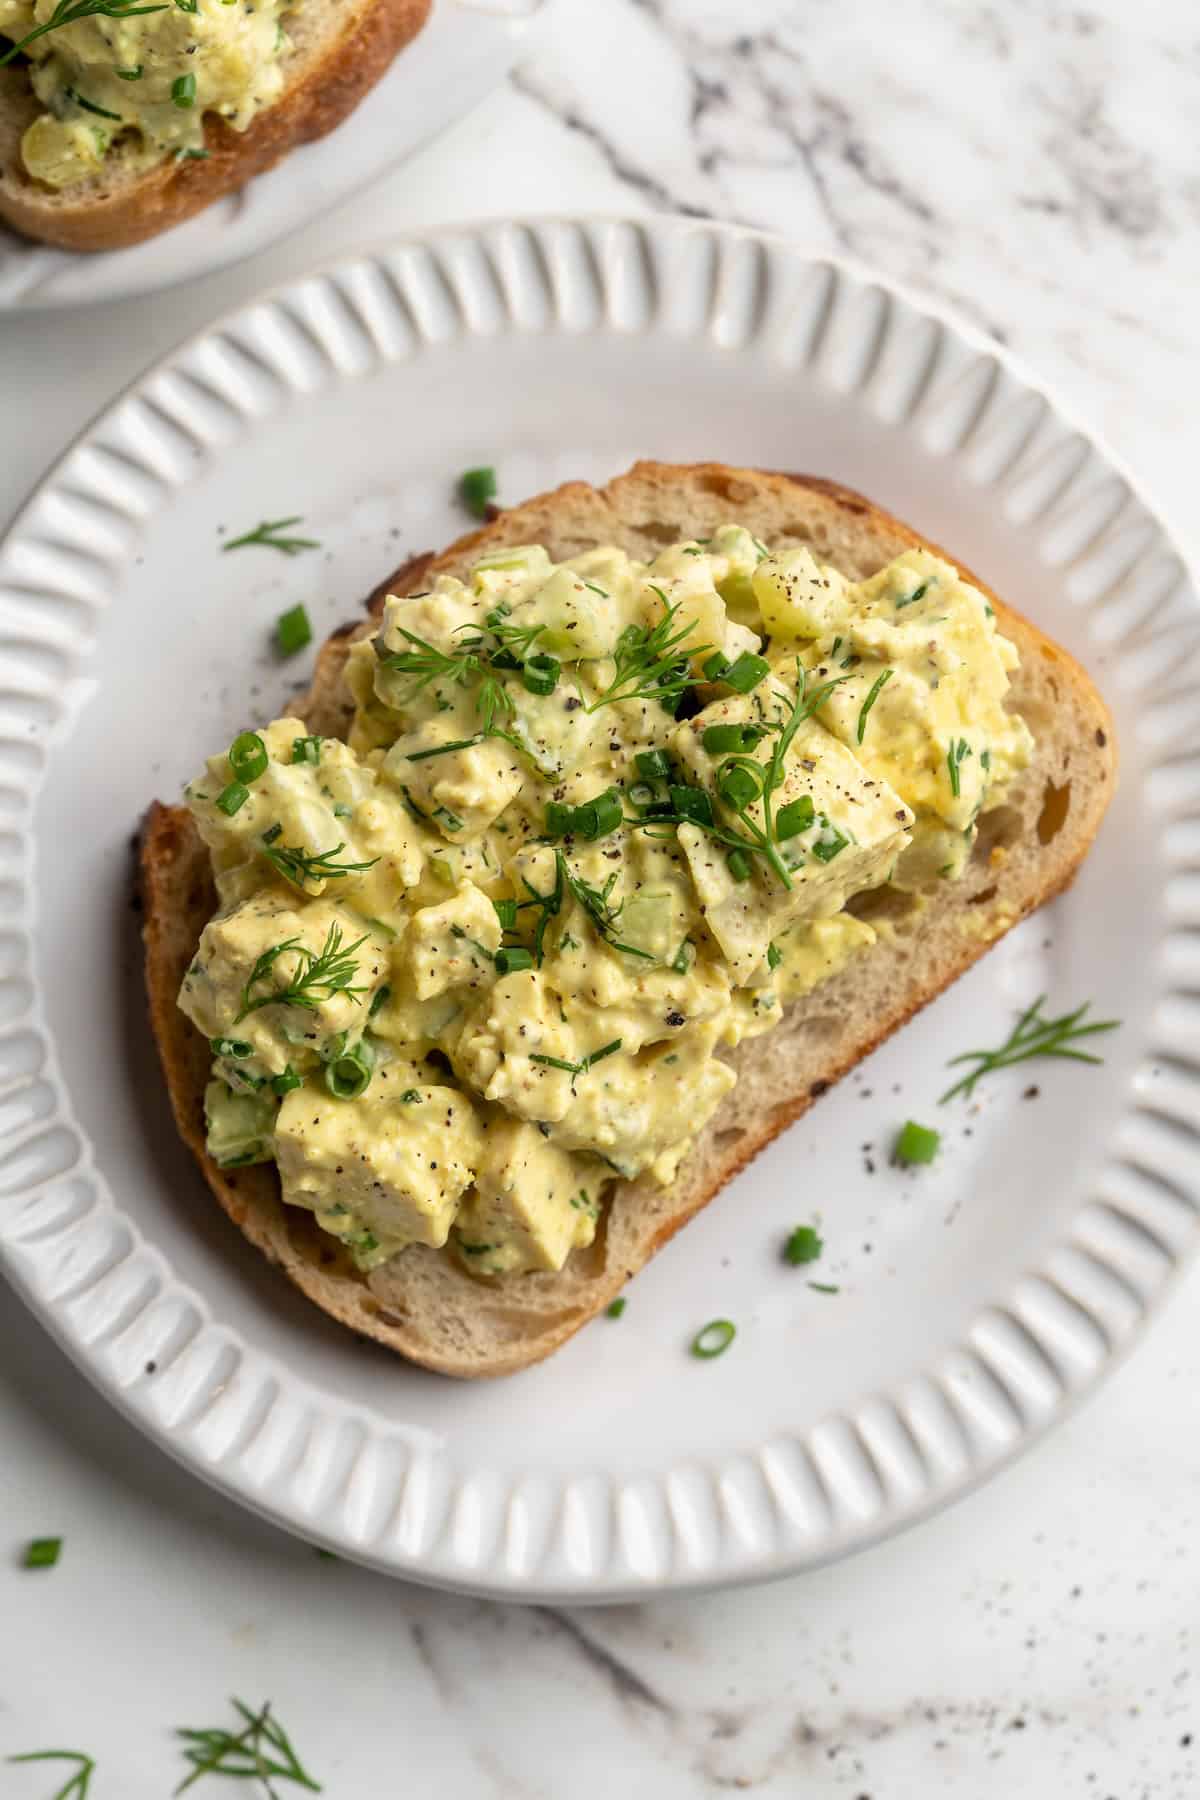
This tofu egg salad is as flavourful and versatile as the original, but it swaps in extra-firm tofu for the hard-boiled eggs! It’s creamy, delicious, and perfect for meal prep lunches.
I don’t know about you, but I struggle with lunches. I always have our dinners planned out, but lunchtime rolls around and I don’t know what to have. Meal prep lunches like chickpea tuna salad and this tofu egg salad make it easier to fend off that lunchtime decision paralysis.
I make a batch of tofu egg salad on Sunday night, pop it in a storage container, and keep it in the fridge for a few days worth of lunches. The first day I might have it as a sandwich, and the second maybe I’ll add it to lettuce wraps or serve it over a bed of greens. The fact that it’s so versatile means it doesn’t feel repetitive or boring, but I still don’t have to spend any time wondering what to eat for lunch!

Why You’ll Love This Tofu Egg Salad Recipe
- Easy to make . Once you prep the herbs and veggies, this vegan egg salad recipe is just a matter of stirring everything together. It’s so simple!
- Packed with protein . I’m always looking for ways to work some extra protein into my day, and since the base of this salad is tofu, it’s a great source of plant protein.
- Rich flavour and contrasting textures . The crumbled tofu, diced tofu, crunchy pickles, creamy vegan mayo, and crisp celery create a nice blend of textures, while fresh herbs, Dijon, relish, and black salt bring so much flavour.
Notes on Ingredients
Scroll down to the recipe card to find the ingredient quantities and recipe instructions.
- Extra-firm tofu – Dice half of it, then crumble the rest.
- Relish
- Celery – Diced finely. Celery adds a nice textural contrast to the soft tofu.
- Pickles – Dice these finely too.
- Herbs – I like to use dill and chives.
- Black salt/kala namak – This salt is worth seeking out; if you can’t find it locally, you can purchase it online.
- Seasonings – Sea salt, ground black pepper, garlic powder, and onion powder.
- Vegan mayo – You can use store-bought for convenience or make your own vegan mayo .
- Dijon mustard
- Turmeric – For that golden colour.
- Nutritional yeast
How to Make Tofu Egg Salad
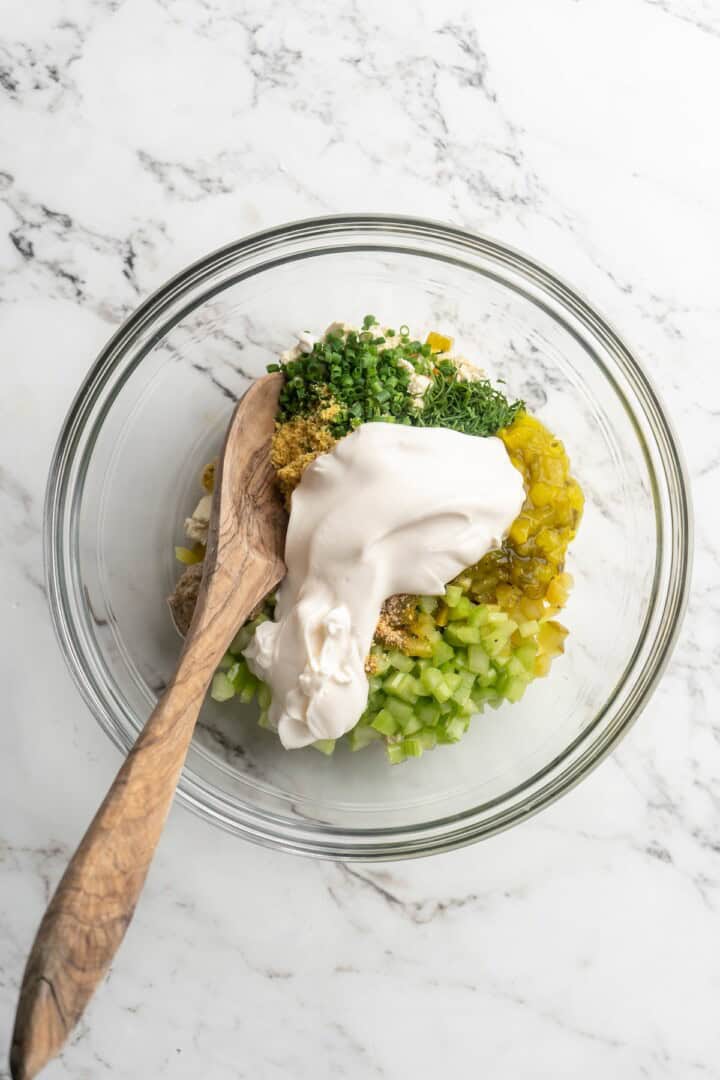
- Combine . Add everything except the diced tofu to a bowl and stir to combine.
- Add the diced tofu . Stir the diced tofu into the bowl.
- Serve . Store the tofu egg salad for meal prep or serve it right away.
Tips for Success
- Press the tofu . To do this, wrap the tofu in a clean kitchen towel (or use paper towels) and place something heavy on top, like a cast iron skillet , for about 30 minutes. This removes excess water from the tofu, allowing it to better absorb flavor. Learn more: How To Cook Tofu 101 + Best Tips on Making the Most Delicious Tofu .
- Don’t overmix . The more you stir, the more the tofu will break apart. Stir just enough to combine.
- Don’t skip the black salt . Kala namak, also known as black salt, is a key ingredient in this vegan egg salad recipe. Its high sulfur content gives it an eggy flavour that mimics traditional egg salad. If you can’t find black salt, you can use regular sea salt but the flavour of your salad will not be eggy.

Ideas for Serving Tofu Egg Salad
- Toast and sandwiches . Add the tofu egg salad to your favorite bread for a classic sandwich or add it to a slice of toast.
- Lettuce cups . For a lighter option, fill crisp lettuce leaves with this tofu salad.
- Salad . Scoop the tofu egg salad onto a bed of greens.
- Pitas and wraps . Stuff pita pockets with this salad or wrap it up into a tortilla with lettuce.
- Crackers . Serve vegan egg salad with your favourite crackers.
How to Store
Store this tofu egg salad in an airtight container in the refrigerator for up to 5 days. Give it a good stir before serving. (I don’t recommend freezing this recipe because the fresh vegetables and herbs will lose their texture and flavour.)
More Easy Vegan Lunch Ideas
- Onigiri
- Fattoush Salad
- Lettuce Wraps
- 15 Minute Vegan Pasta Salad
- Vegan BLT Sandwich
Ingredients
- 1 pound extra firm tofu , pressed for 30 minutes; half diced, half crumbled
- 1 tablespoon relish
- ¼ cup finely diced celery
- ¼ cup finely diced pickles
- 1 tablespoon freshly chopped dill
- 1 tablespoon dried or freshly chopped chives
- ¼ teaspoon black salt/kala namak
- ¼ teaspoon sea salt
- ¼ teaspoon ground black pepper
- ½ teaspoon garlic powder
- ½ teaspoon onion powder
- ½ cup vegan mayonnaise
- 1 teaspoon Dijon mustard
- ⅛ to ¼ teaspoon turmeric
- 1 teaspoon nutritional yeast
Instructions
- Add your crumbled tofu into a bowl with all the seasonings (everything except the diced tofu). Mix everything together thoroughly.
- Add in the diced tofu, stir to combine until it’s coated and enjoy! Serve in a sandwich, on toast, with crackers or by itself.
