This homemade vegan feta cheese is the perfect plant-based feta substitute! With just 6 common ingredients, this tangy, briny tofu feta cheese recipe is easy to make and ready in minutes.
Get ready to put this vegan tofu feta cheese on everything! Years ago, I was skeptical about making “cheese” with tofu, but this is the recipe that changed the game. I was honestly shocked at how deliciously briny this vegan cheese is. The texture is just perfect, and after some serious trial and error, I got the level of flavour that matched the dairy-based feta I used to eat in Greek salads. It’s tangy, salty, and perfectly cheesy.
Why You’ll Love This Vegan Feta Cheese
- Quick and easy. This tofu feta cheese takes 6 common ingredients and a mere 6 minutes to make. It’s super speedy, and it saves a last-minute trip to the grocery store.
- Fresh and tangy. There will always be slight differences between dairy cheese and vegan cheese, but I have to say, this vegan feta is pretty darn close to the original! It’s so fresh, salty, and briny, with the creaminess you look for in classic feta.
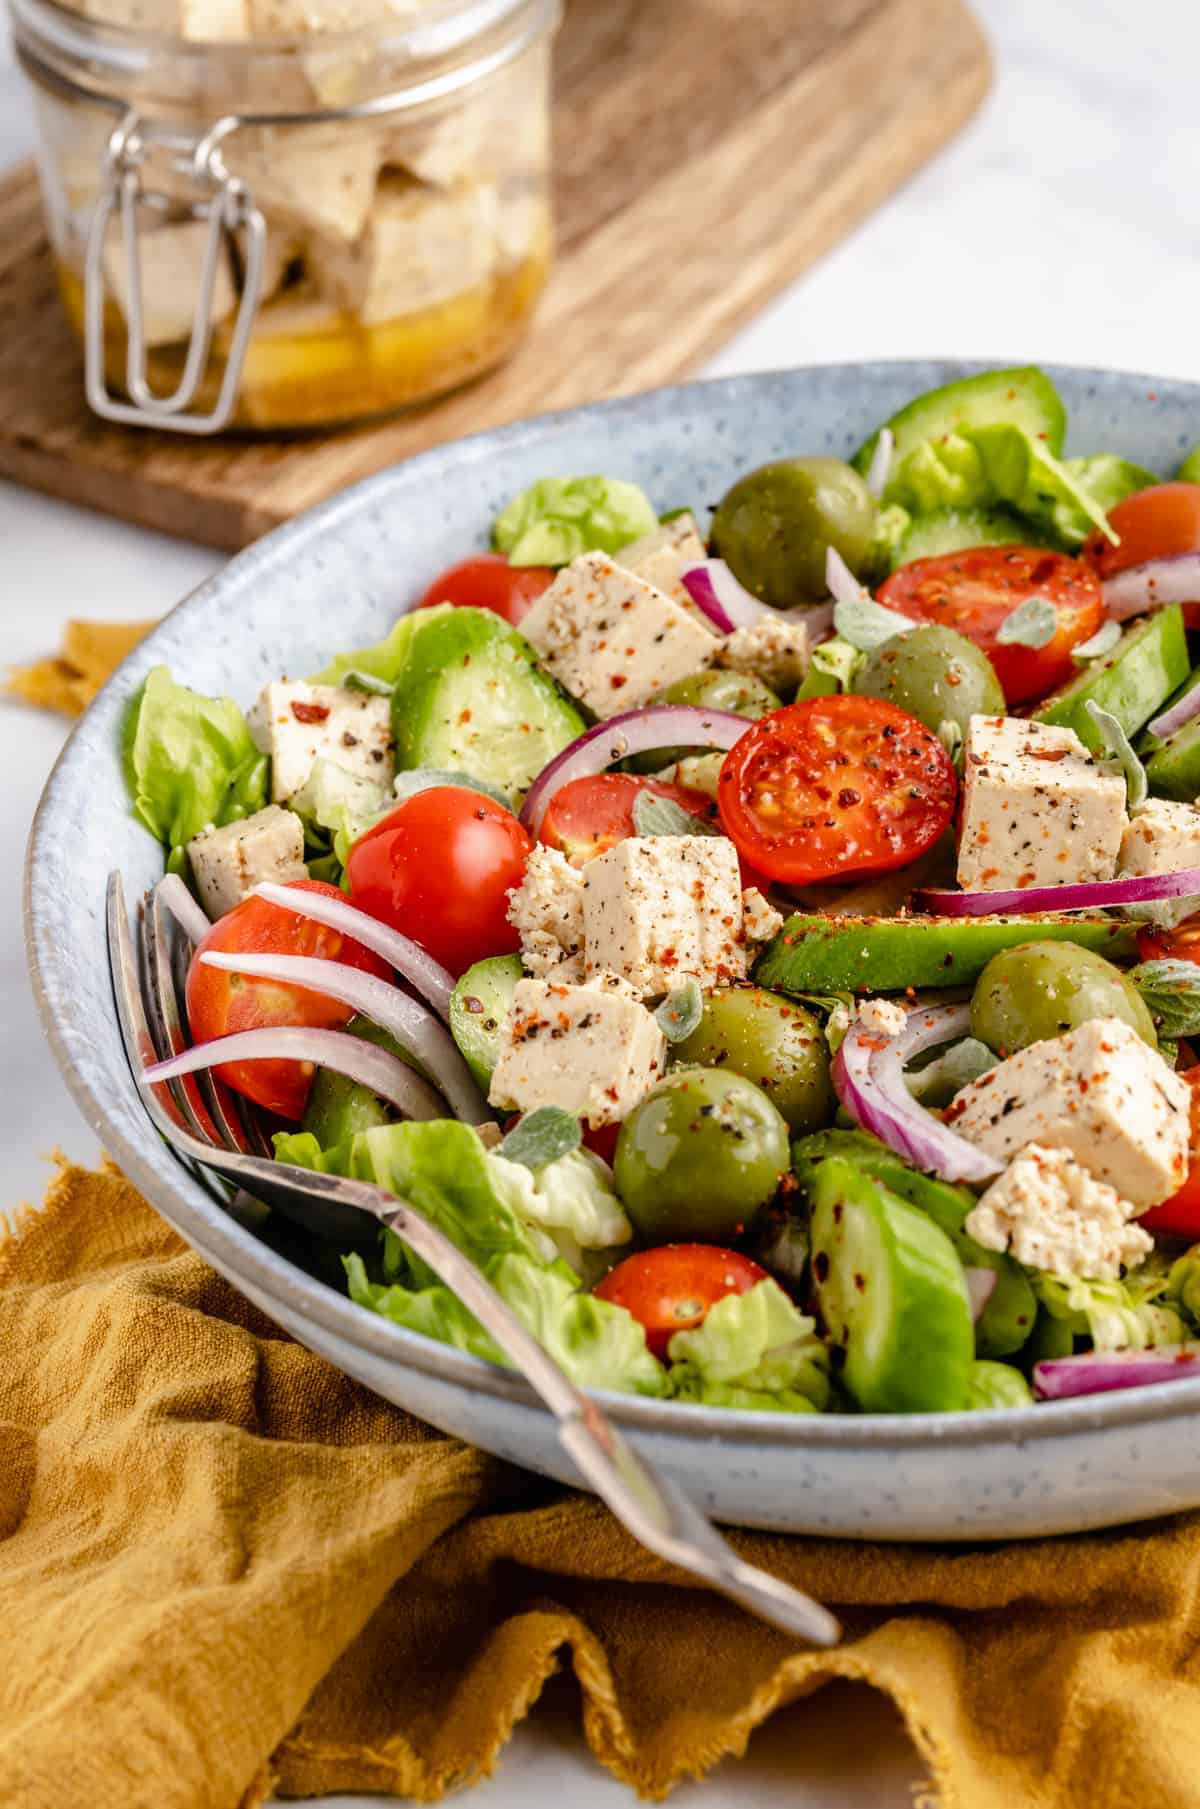
- Versatile. Enjoy salty, tangy vegan feta on salads and sandwiches or in any of your favourite Greek and Mediterranean recipes.
Notes on the Ingredients
These are some notes on the ingredients you’ll need for this homemade tofu feta recipe. Scroll down to the recipe card after the post for the printable ingredients list with amounts and recipe details.
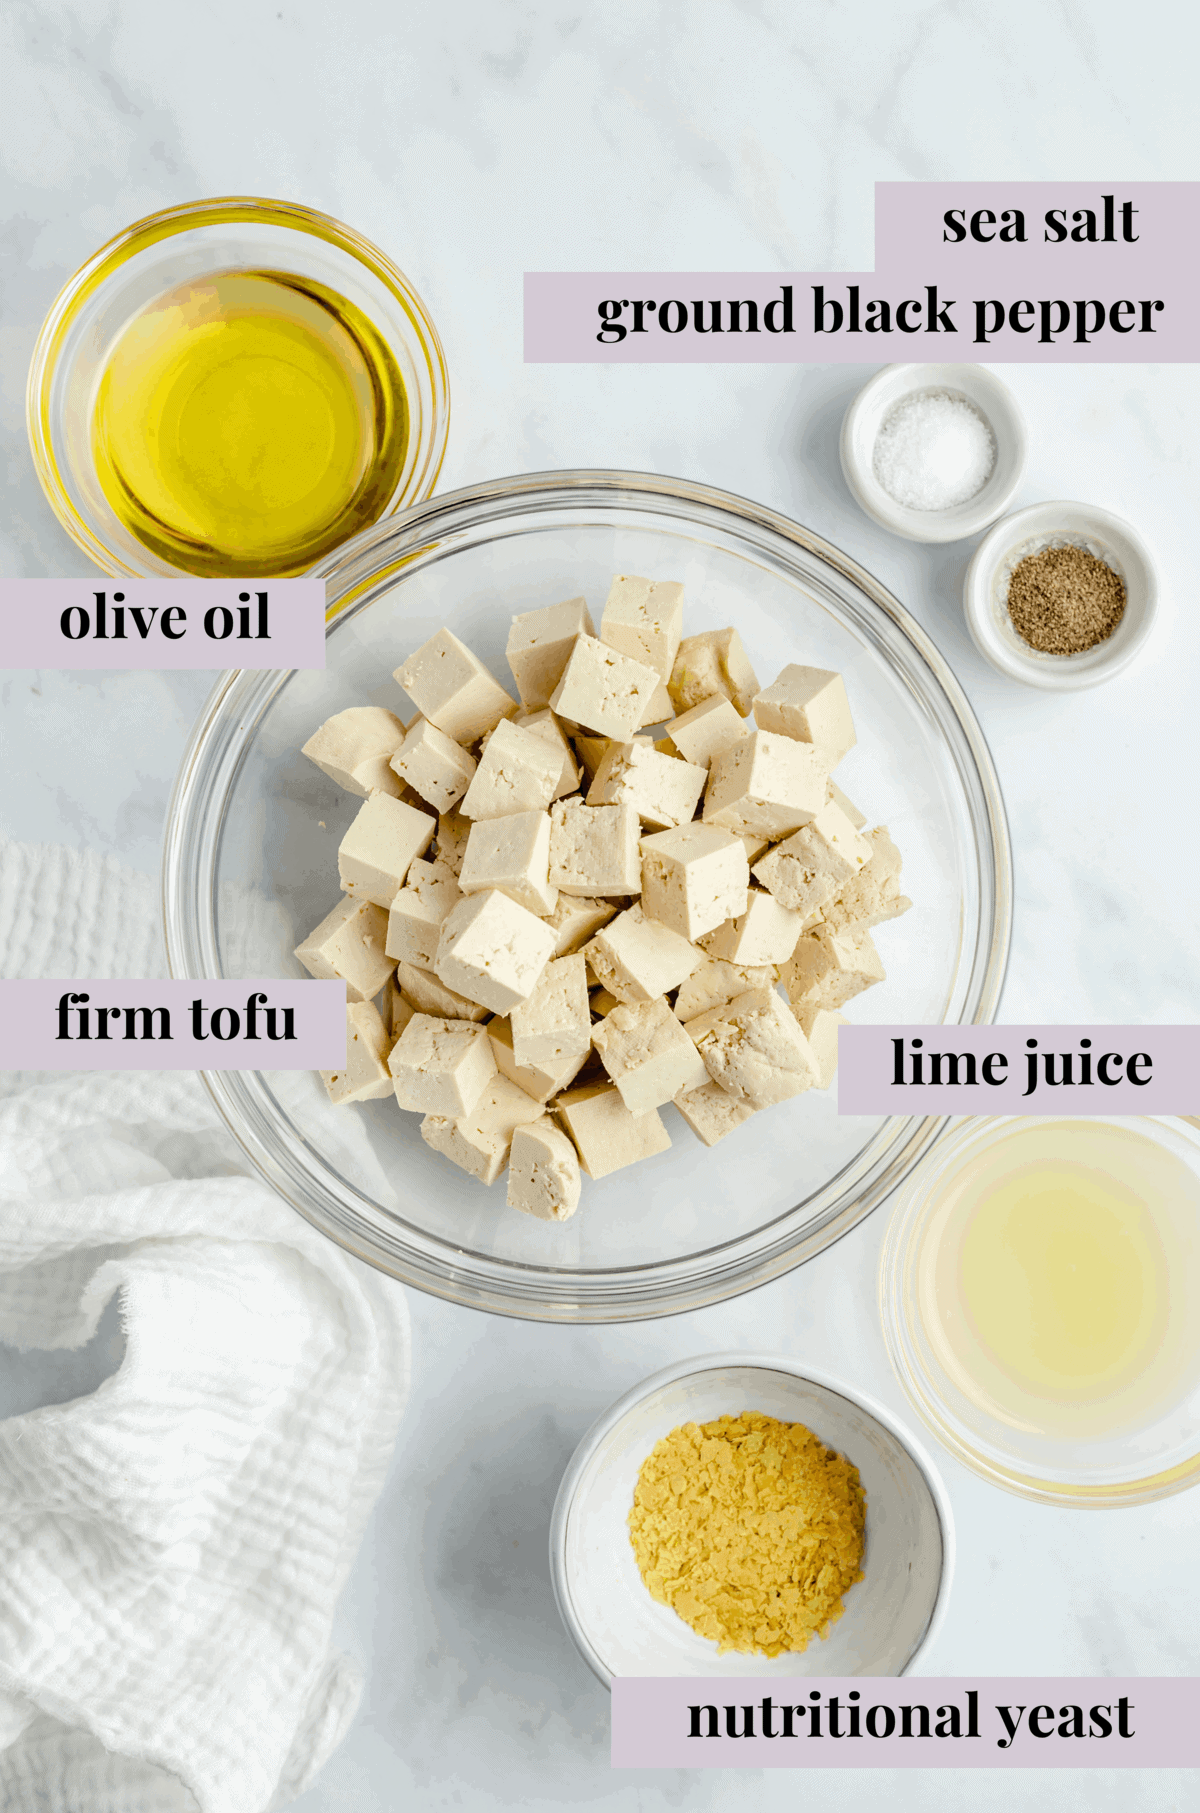
- Firm Tofu – Make sure you drain and press your tofu for at least 30 minutes. Getting your tofu adequately drained helps give your vegan cheese the texture of feta and not overly watery.
- Nutritional Yeast – If you are vegan, nutritional yeast should be in your cooking arsenal. It gives a savory, cheesy flavour to the tofu that helps boost the taste of feta.
- Salt and Pepper
- Lime or Lemon Juice – A squeeze of fresh lemon or lime juice adds a hint of tanginess, like you’d find in traditional feta.
- Olive Oil – I prefer the flavour of olive oil, but you can use another mild-flavoured oil in its place.
How To Make Vegan Feta Cheese
First things first, cut your tofu into small cubes or crumble it (like crumbled feta) and place it in a bowl. Then, follow the steps below to make your vegan feta cheese easily from scratch. You’ll find the printable instructions in the recipe card.
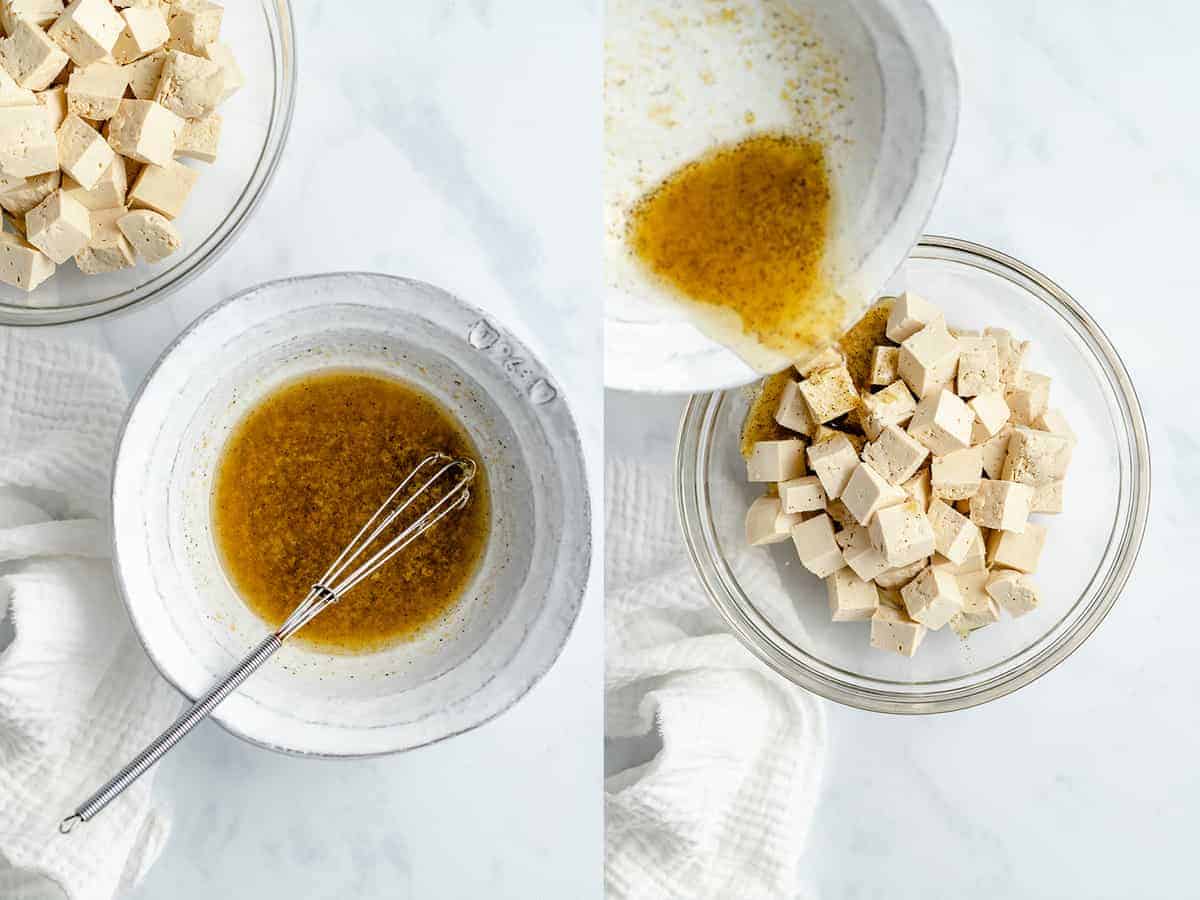
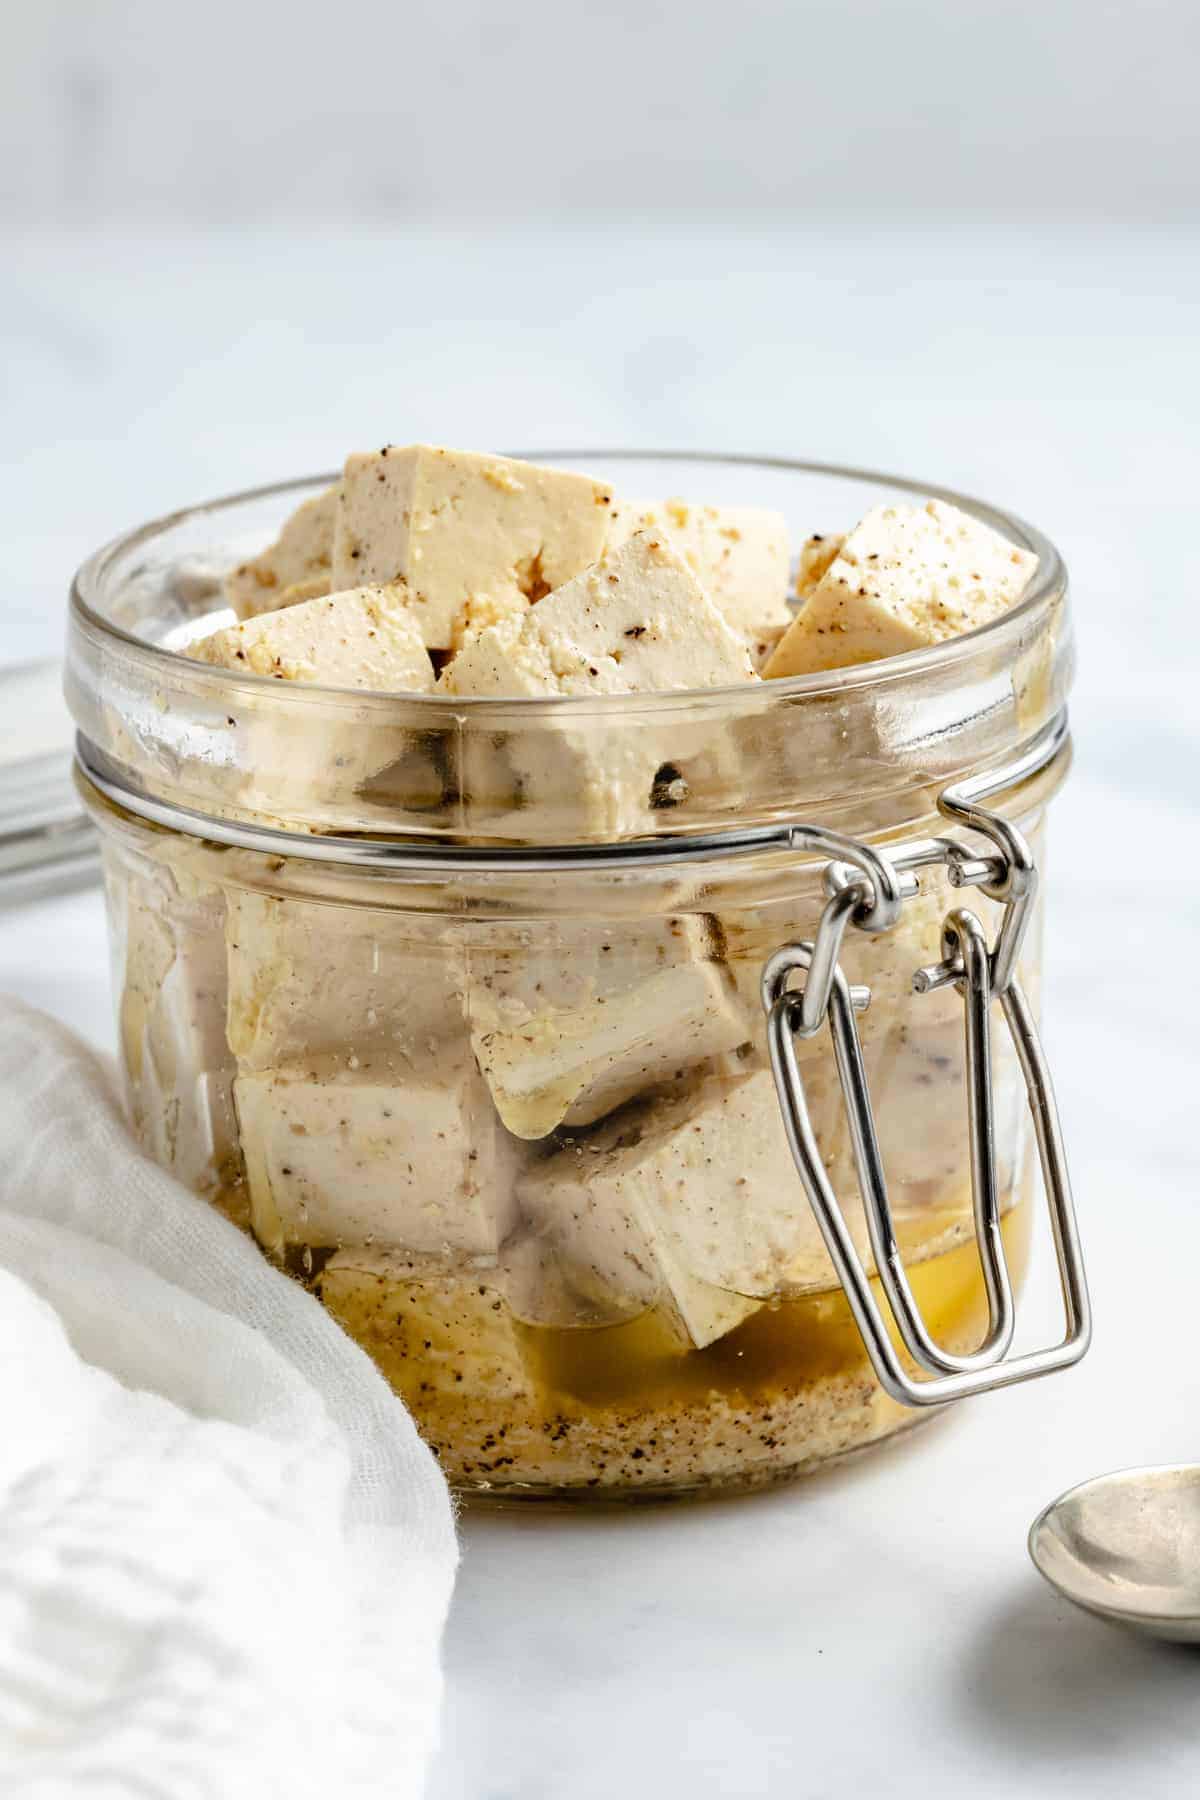
- Combine the ingredients. In a Mason jar (or any largeish jar with a lid), mix the nutritional yeast, pepper, sea salt, lime juice, and olive oil. Shake until that’s well combined. Afterward, pour the mixture over the tofu and gently stir to coat.
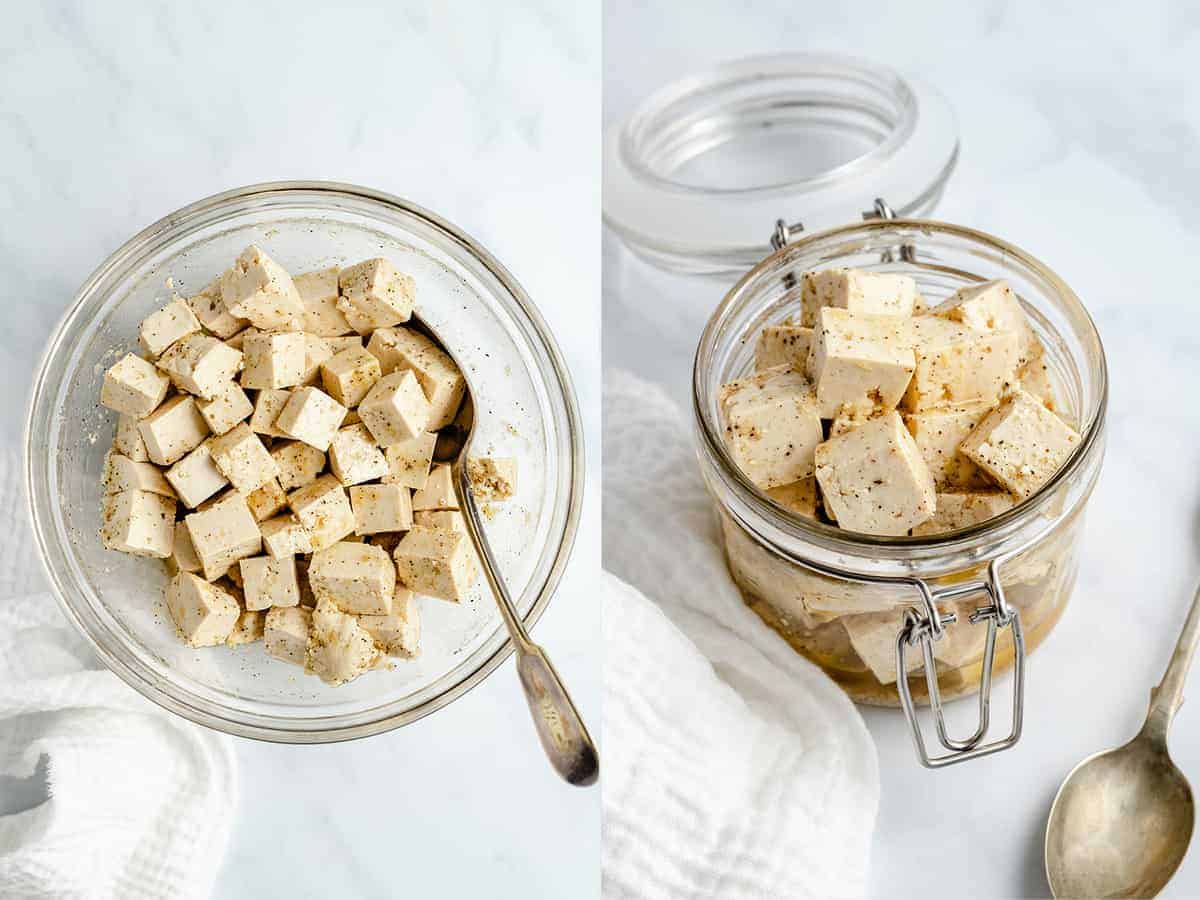
- Soak. Add the tofu back to the mason jar and pour any excess brine still in the bowl over the top. Let the tofu marinate for at least an hour or preferably overnight. Season the finished result to taste, and if you want it more briny, just add a little more lime juice. Enjoy!
Recipe Tips
- Press the tofu first. This is key to achieving that firm “feta” texture. To drain and press your tofu, use a tofu press . If you don’t have one, place the tofu on a towel or some paper towels on a flat surface, like a plate or cutting board. Place more towels or paper towels over the tofu, then place something heavy on top, like a cast-iron skillet. Leave it to drain for a minimum of 30 minutes.
- Adjust to taste. Feel free to add more brine if needed, but I recommend waiting at least an hour for the flavours to soak in first so you don’t end up overdoing it.
- Try it whipped. For another easy variation, try my homemade vegan whipped feta . It’s delicious as a dip or spread!
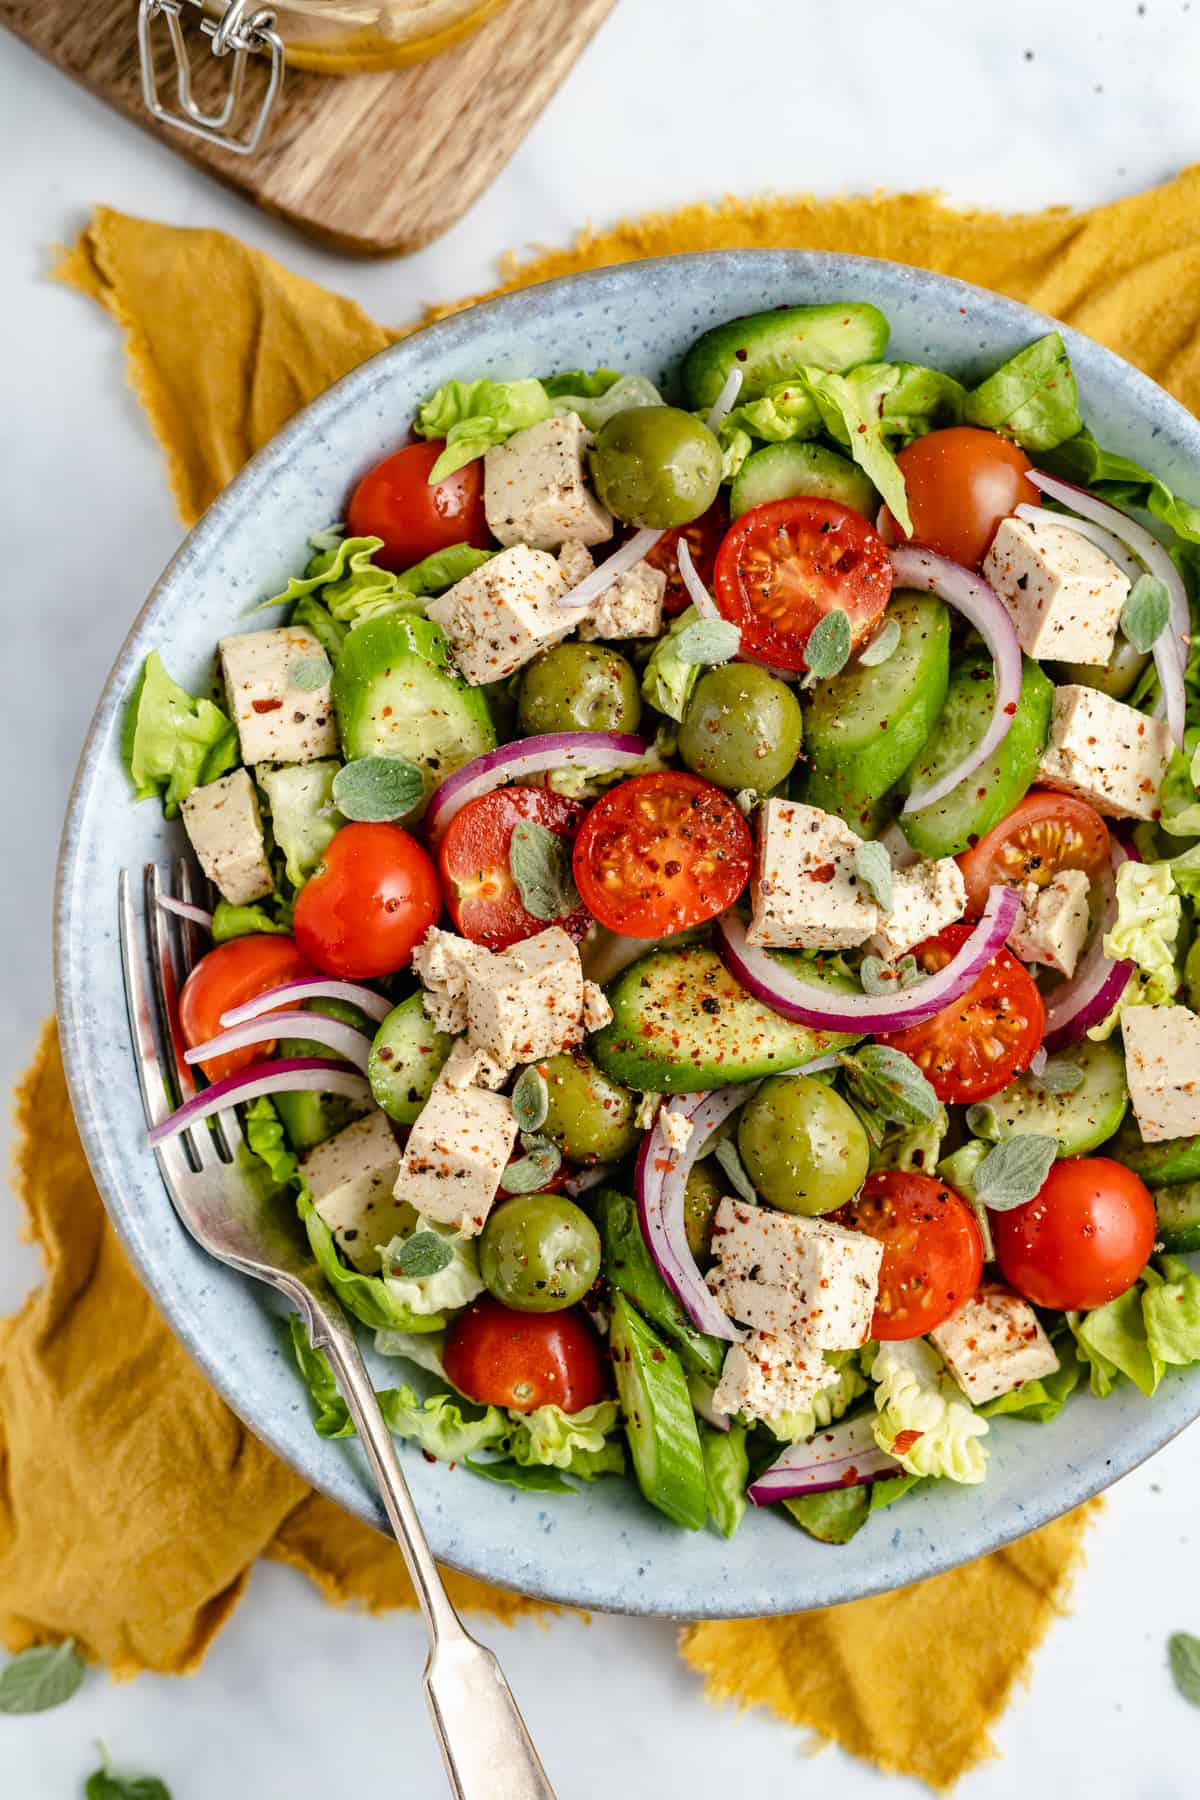
Serving Suggestions
I love serving this easy vegan feta cheese over a Greek salad , this Mediterranean chickpea salad , or any of my favourite summer salad recipes, like this fresh watermelon feta salad or a vegan pasta salad . Or, I’ll use it as a topping on a vegan pizza , and it’s also delicious crumbled over avocado toast for breakfast.
How to Store
I like to store my vegan feta cheese in an airtight container with the marinade so that it continues to soak up the flavour. You can keep it in the fridge for about 5 days.
More Vegan Cheese Recipes
- Vegan Parmesan Cheese
- Vegan Cheese Sauce
- Vegan Ricotta
- The Best Vegan Cream Cheese
Ingredients
- 1 lb block firm tofu , or extra firm tofu (not silken tofu), pressed for at least 30 minutes
- 1 tablespoon nutritional yeast
- ¼ teaspoon ground black pepper
- ½ teaspoon sea salt
- 3 tablespoons lime juice , or lemon juice
- 3 tablespoons olive oil
Instructions
- Either cut your tofu into small cubes or crumbled like crumbled feta and place in a bowl.
- In a mason jar (or any large ish jar with a top) mix the nutritional yeast, pepper, sea salt, lime juice and olive oil. Shake until combined. Pour over the tofu in the bowl and gently stir with a spoon to come to coat all of the tofu.
- Add the tofu back to the mason jar and pour any excess brine still in the bowl over the top.
- Let it marinade for at least an hour, preferably over night. Taste and you can add more lime juice if you want it more brine-y. Enjoy!
Notes
- To drain and press your tofu, use a tofu press , or if you don’t have one, place a towel or some paper towels on a flat surface, like a plate or cutting board. Place more towels or paper towels on top of the tofu, then place something somewhat heavy on top of them, like a cast-iron skillet.
- Feel free to add more brine if needed, but I would say wait at least the hour for the flavours to really soak in so you don’t end up overdoing it!
- I like to store my tofu feta cheese in an airtight container with the marinade so that it continues to soak up the flavour. You can keep it in the fridge for about 5 days.
This homemade vegan feta cheese is the perfect plant-based feta substitute! With just 6 common ingredients, this tangy, briny tofu feta cheese recipe is easy to make and ready in minutes.
Get ready to put this vegan tofu feta cheese on everything! Years ago, I was skeptical about making “cheese” with tofu, but this is the recipe that changed the game. I was honestly shocked at how deliciously briny this vegan cheese is. The texture is just perfect, and after some serious trial and error, I got the level of flavour that matched the dairy-based feta I used to eat in Greek salads. It’s tangy, salty, and perfectly cheesy.
Why You’ll Love This Vegan Feta Cheese
- Quick and easy. This tofu feta cheese takes 6 common ingredients and a mere 6 minutes to make. It’s super speedy, and it saves a last-minute trip to the grocery store.
- Fresh and tangy. There will always be slight differences between dairy cheese and vegan cheese, but I have to say, this vegan feta is pretty darn close to the original! It’s so fresh, salty, and briny, with the creaminess you look for in classic feta.
- Versatile. Enjoy salty, tangy vegan feta on salads and sandwiches or in any of your favourite Greek and Mediterranean recipes.
Notes on the Ingredients
These are some notes on the ingredients you’ll need for this homemade tofu feta recipe. Scroll down to the recipe card after the post for the printable ingredients list with amounts and recipe details.
- Firm Tofu – Make sure you drain and press your tofu for at least 30 minutes. Getting your tofu adequately drained helps give your vegan cheese the texture of feta and not overly watery.
- Nutritional Yeast – If you are vegan, nutritional yeast should be in your cooking arsenal. It gives a savory, cheesy flavour to the tofu that helps boost the taste of feta.
- Salt and Pepper
- Lime or Lemon Juice – A squeeze of fresh lemon or lime juice adds a hint of tanginess, like you’d find in traditional feta.
- Olive Oil – I prefer the flavour of olive oil, but you can use another mild-flavoured oil in its place.
How To Make Vegan Feta Cheese
First things first, cut your tofu into small cubes or crumble it (like crumbled feta) and place it in a bowl. Then, follow the steps below to make your vegan feta cheese easily from scratch. You’ll find the printable instructions in the recipe card.
- Combine the ingredients. In a Mason jar (or any largeish jar with a lid), mix the nutritional yeast, pepper, sea salt, lime juice, and olive oil. Shake until that’s well combined. Afterward, pour the mixture over the tofu and gently stir to coat.
- Soak. Add the tofu back to the mason jar and pour any excess brine still in the bowl over the top. Let the tofu marinate for at least an hour or preferably overnight. Season the finished result to taste, and if you want it more briny, just add a little more lime juice. Enjoy!
Recipe Tips
- Press the tofu first. This is key to achieving that firm “feta” texture. To drain and press your tofu, use a tofu press . If you don’t have one, place the tofu on a towel or some paper towels on a flat surface, like a plate or cutting board. Place more towels or paper towels over the tofu, then place something heavy on top, like a cast-iron skillet. Leave it to drain for a minimum of 30 minutes.
- Adjust to taste. Feel free to add more brine if needed, but I recommend waiting at least an hour for the flavours to soak in first so you don’t end up overdoing it.
- Try it whipped. For another easy variation, try my homemade vegan whipped feta . It’s delicious as a dip or spread!
Serving Suggestions
I love serving this easy vegan feta cheese over a Greek salad , this Mediterranean chickpea salad , or any of my favourite summer salad recipes, like this fresh watermelon feta salad or a vegan pasta salad . Or, I’ll use it as a topping on a vegan pizza , and it’s also delicious crumbled over avocado toast for breakfast.
How to Store
I like to store my vegan feta cheese in an airtight container with the marinade so that it continues to soak up the flavour. You can keep it in the fridge for about 5 days.
More Vegan Cheese Recipes
- Vegan Parmesan Cheese
- Vegan Cheese Sauce
- Vegan Ricotta
- The Best Vegan Cream Cheese
Ingredients
- 1 lb block firm tofu , or extra firm tofu (not silken tofu), pressed for at least 30 minutes
- 1 tablespoon nutritional yeast
- ¼ teaspoon ground black pepper
- ½ teaspoon sea salt
- 3 tablespoons lime juice , or lemon juice
- 3 tablespoons olive oil
Instructions
- Either cut your tofu into small cubes or crumbled like crumbled feta and place in a bowl.
- In a mason jar (or any large ish jar with a top) mix the nutritional yeast, pepper, sea salt, lime juice and olive oil. Shake until combined. Pour over the tofu in the bowl and gently stir with a spoon to come to coat all of the tofu.
- Add the tofu back to the mason jar and pour any excess brine still in the bowl over the top.
- Let it marinade for at least an hour, preferably over night. Taste and you can add more lime juice if you want it more brine-y. Enjoy!
Notes
- To drain and press your tofu, use a tofu press , or if you don’t have one, place a towel or some paper towels on a flat surface, like a plate or cutting board. Place more towels or paper towels on top of the tofu, then place something somewhat heavy on top of them, like a cast-iron skillet.
- Feel free to add more brine if needed, but I would say wait at least the hour for the flavours to really soak in so you don’t end up overdoing it!
- I like to store my tofu feta cheese in an airtight container with the marinade so that it continues to soak up the flavour. You can keep it in the fridge for about 5 days.

Vegan Feta Cheese (Tofu Feta Cheese)
Ingredients
- 1 lb block firm tofu or extra firm tofu (not silken tofu), pressed for at least 30 minutes
- 1 tablespoon nutritional yeast
- ¼ teaspoon ground black pepper
- ½ teaspoon sea salt
- 3 tablespoons lime juice or lemon juice
- 3 tablespoons olive oil
Instructions
- Either cut your tofu into small cubes or crumbled like crumbled feta and place in a bowl.
- In a mason jar (or any large ish jar with a top) mix the nutritional yeast, pepper, sea salt, lime juice and olive oil. Shake until combined. Pour over the tofu in the bowl and gently stir with a spoon to come to coat all of the tofu.
- Add the tofu back to the mason jar and pour any excess brine still in the bowl over the top.
- Let it marinade for at least an hour, preferably over night. Taste and you can add more lime juice if you want it more brine-y. Enjoy!
Notes
- To drain and press your tofu, use a tofu press , or if you don’t have one, place a towel or some paper towels on a flat surface, like a plate or cutting board. Place more towels or paper towels on top of the tofu, then place something somewhat heavy on top of them, like a cast-iron skillet.
- Feel free to add more brine if needed, but I would say wait at least the hour for the flavours to really soak in so you don’t end up overdoing it!
- I like to store my tofu feta cheese in an airtight container with the marinade so that it continues to soak up the flavour. You can keep it in the fridge for about 5 days.
Nutrition
Vegan Feta Cheese (Tofu Feta Cheese) https://jessicainthekitchen.com/vegan-tofu-feta-cheese/ February 22, 2021
This strawberry crisp is sweet, juicy, and so easy to make! It uses only 7 ingredients, most of which are already in your pantry, and makes a delicious, quick vegan dessert.

Vegan strawberry crisp has been my go-to quick, easy dessert for a while. Sometimes I substitute blueberries or even apples for apple crisp , but I always return to strawberries. I love how macerated they get and how they naturally break down to be such a juicy and fruity dessert. The crisp topping is the perfect mix of crispy and buttery, with a hint of sweetness. This is one of those weeknight desserts that comes together with minimal ingredients. You’re going to love it!
Reasons I’m Obsessed With This Strawberry Crisp Recipe
- Sweet and citrusy. Soft, citrus-infused strawberries pair so well with a sweet, crispy oat topping! It’s too good for words.
- Quick and easy. You can prep this dessert in 20 minutes with only 7 ingredients! Then, all you have to do is wait for it to bake and cool.
- The perfect summer dessert for any occasion. Strawberry crisp is the perfect casual dessert for a warm summer night, but you can also double the recipe and serve it for a dinner party. Up to you!

I’ve re-done this recipe to be a completely updated treat of the version I’ve enjoyed, and I’m so happy to be re-making it with Bob’s Red Mill products, and to be a Bob’s Red Mill ambassador.
I’ve loved being an ambassador for so many years and seeing how many of you have converted to using their products. I go into the two products that I use here in more detail below, but I love the high quality, consistency, and taste/texture of all their products. They work perfectly in this crisp, too!
P.S. Do you call it a crisp or a crumble? I call this recipe a crisp, but I also have a great recipe for strawberry crumble you can try!
Notes on Ingredients
Scroll down to the recipe card to find the ingredient quantities and recipe instructions.
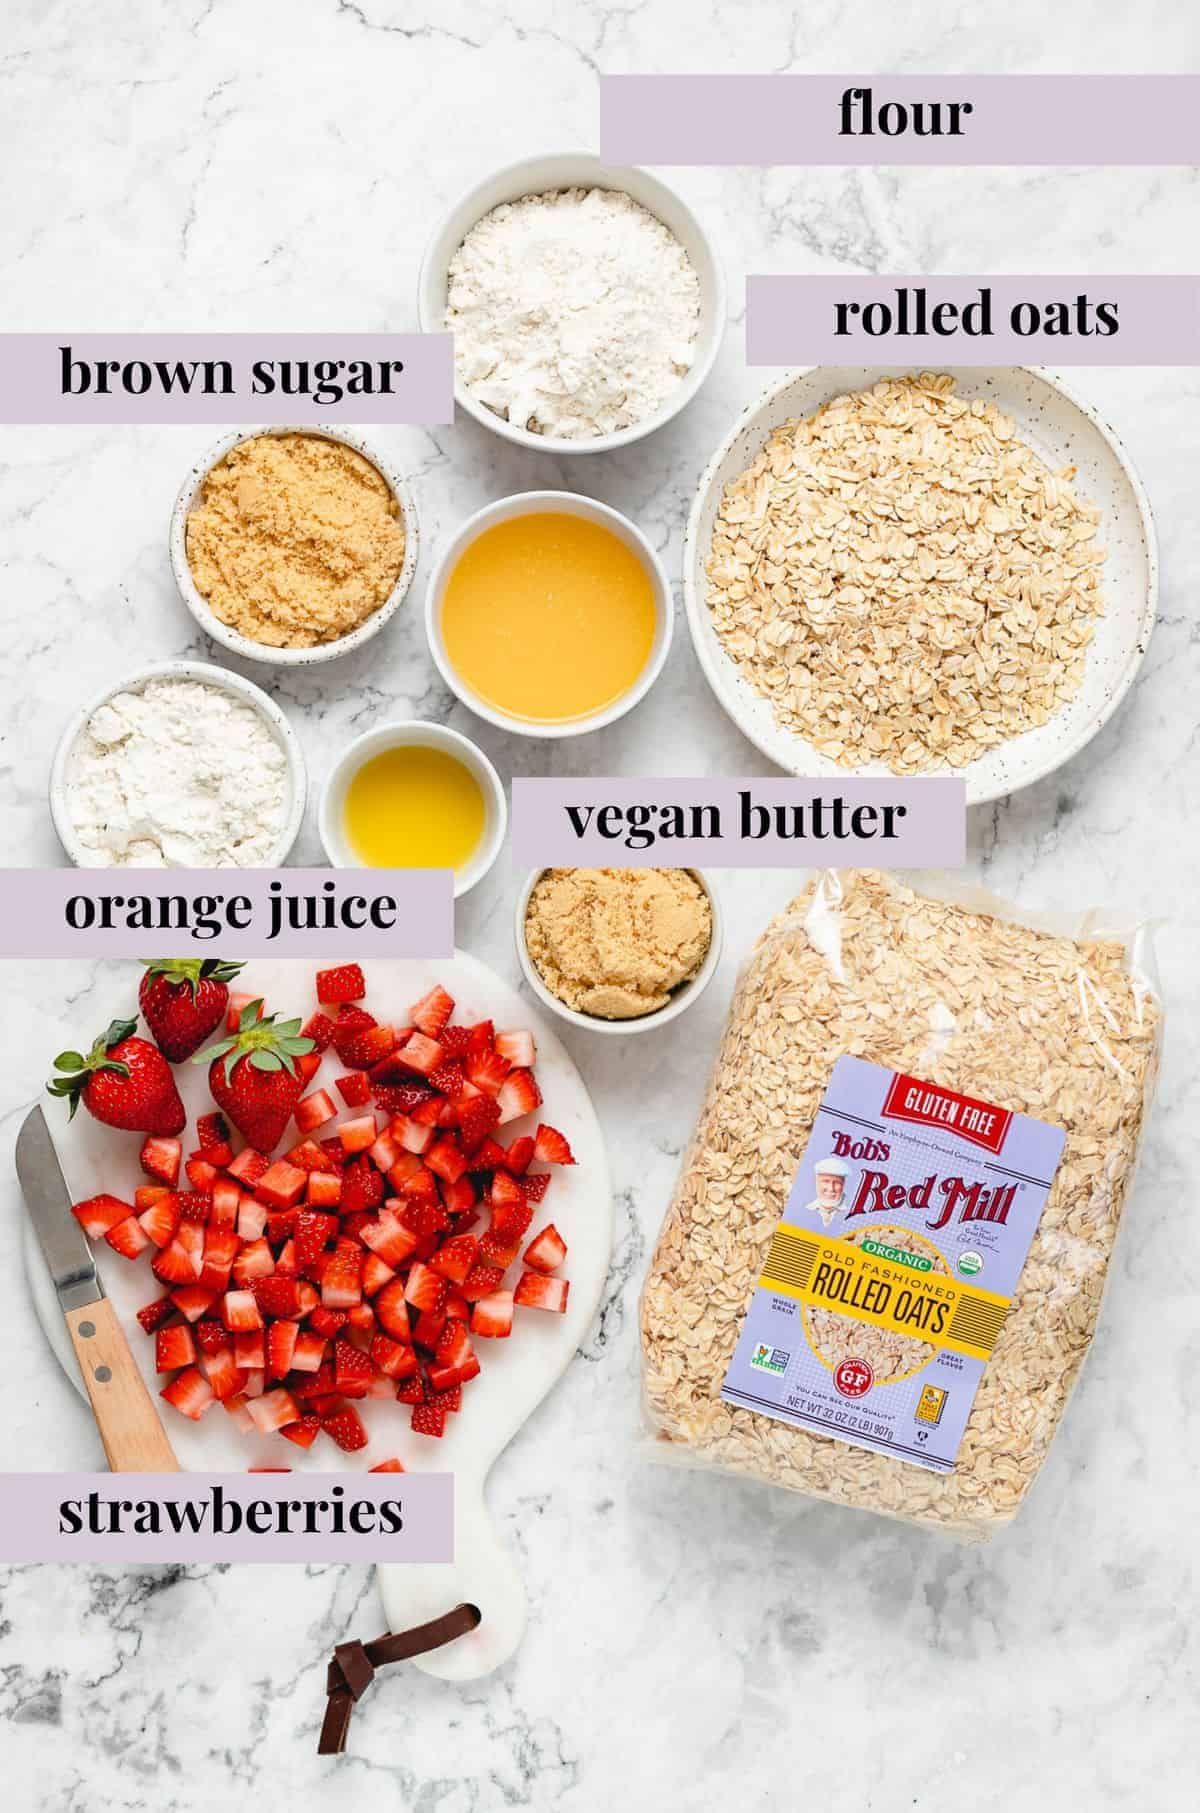
- Brown Sugar – You can also use regular granulated sugar, coconut sugar , or any other kind as long as it’s not liquid.
- Bob’s Red Mill 1-to-1 Gluten Free Baking Flour – My favorite gluten-free flour! I use it to create a nice, thick, juicy filling, and in the topping for the perfect, crunchy crisp.
- Strawberries – You can use either fresh or frozen! I have tips below if you’re using frozen.
- Orange Juice – This adds a bright punch of tangy flavour! You could also use lemon juice (half the amount) or pineapple juice.
- Sea Salt – This brings all the flavours together. If you’re using kosher salt, use a little less so that it’s not too salty (since the granules are smaller).
- Bob’s Red Mill Gluten Free Organic Old Fashioned Rolled Oats – These are my favourite oats! I love that they are certified gluten-free if you need them to be. I recommend sticking to the old-fashioned rolled oats kind so that the texture is correct. If you use quick oats, they might dissolve too quickly while cooking.
- Melted Vegan Butter – Vegan butter helps achieve the desired crisp, buttery consistency of the topping. The one I use is salted. If yours is unsalted, add a pinch of salt. You could also sub in oil, adding a pinch of salt.
Can I Use Frozen Strawberries?
Yes. If you’re using frozen strawberries, let them thaw completely first. Drain off the excess liquid, or add in a few more tablespoons of flour until it resembles the photos.
How to Make Vegan Strawberry Crisp
Ready to see how this easy strawberry crisp comes together? Here’s a step-by-step overview.
- Prepare. Preheat the oven to 375°F/190°C.
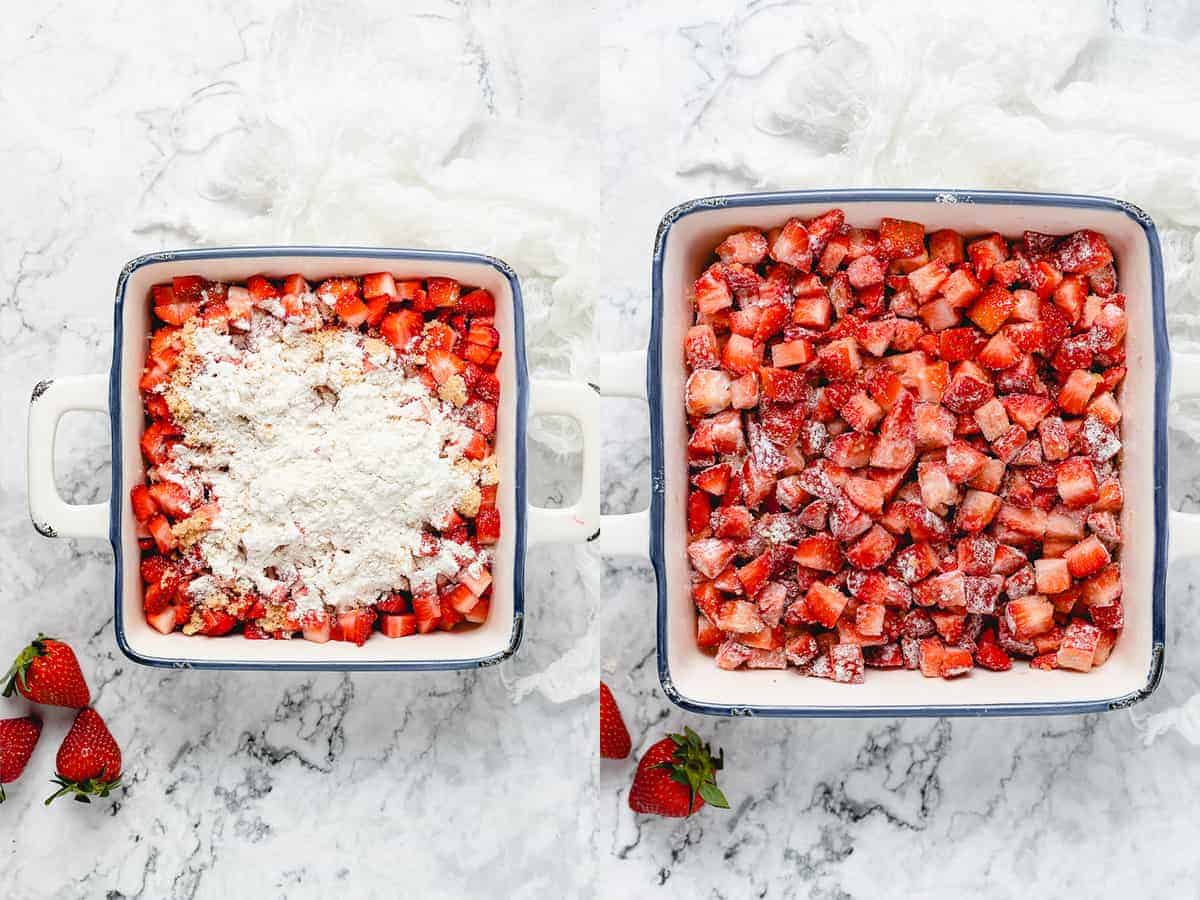
- Coat the strawberries. In your 8×8 baking dish, stir together the sugar, the Bob’s Red Mill 1-to-1 Gluten Free Baking Flour , and the sea salt. Add the strawberries and toss to coat them completely. Allow everything to sit for 10 minutes to bring out the flavor of the strawberries and to thicken their juices.
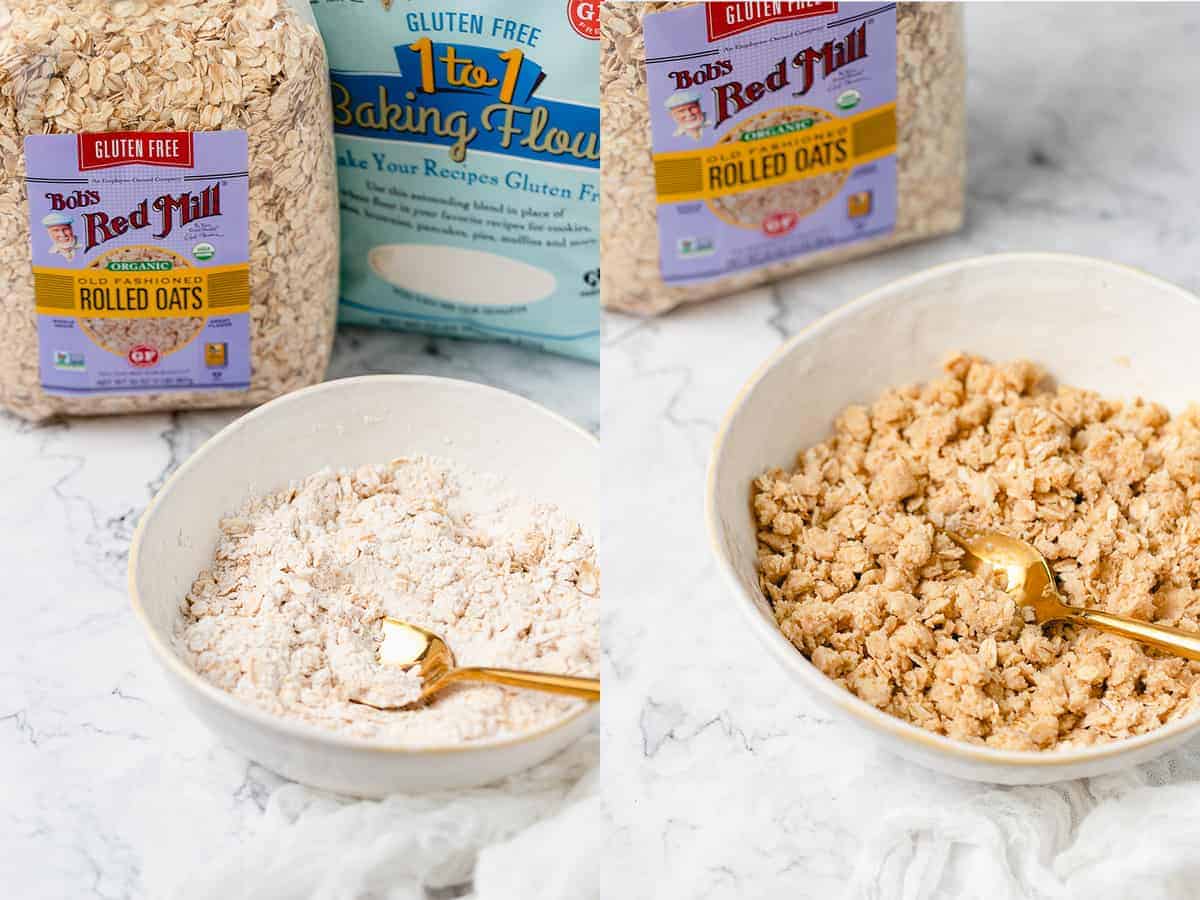
- Make the crisp topping. In another bowl, mix together the Bob’s Red Mill Gluten Free Organic Old Fashioned Rolled Oats , the remaining Bob’s Red Mill 1-to-1 Gluten Free Baking Flour, and the sugar. Pour the melted butter over the sugar and flour, and mix bit by bit until a crumble forms. You can use your fingers to clump it together in bits, too. Don’t over-mix it.
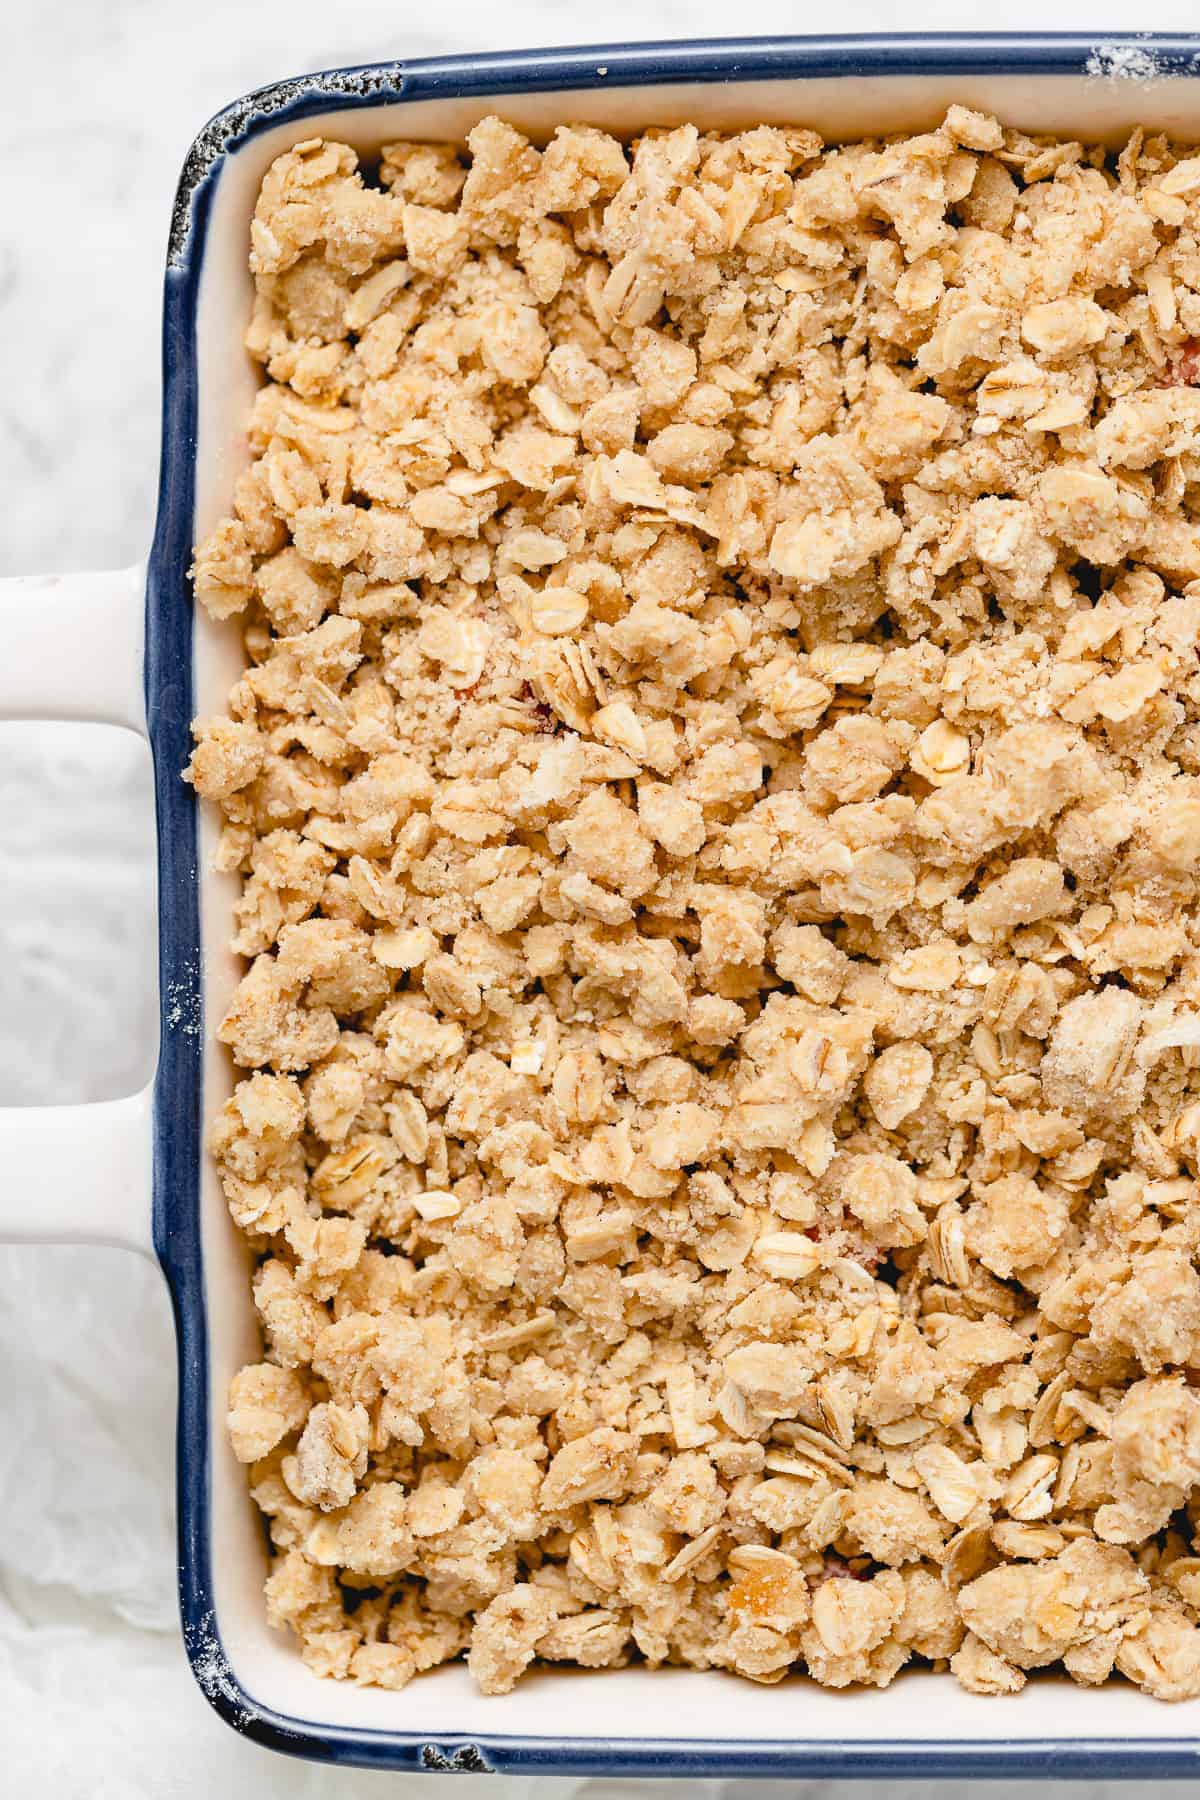
- Assemble. Top the strawberries with the oat flour mixture, covering everything entirely.
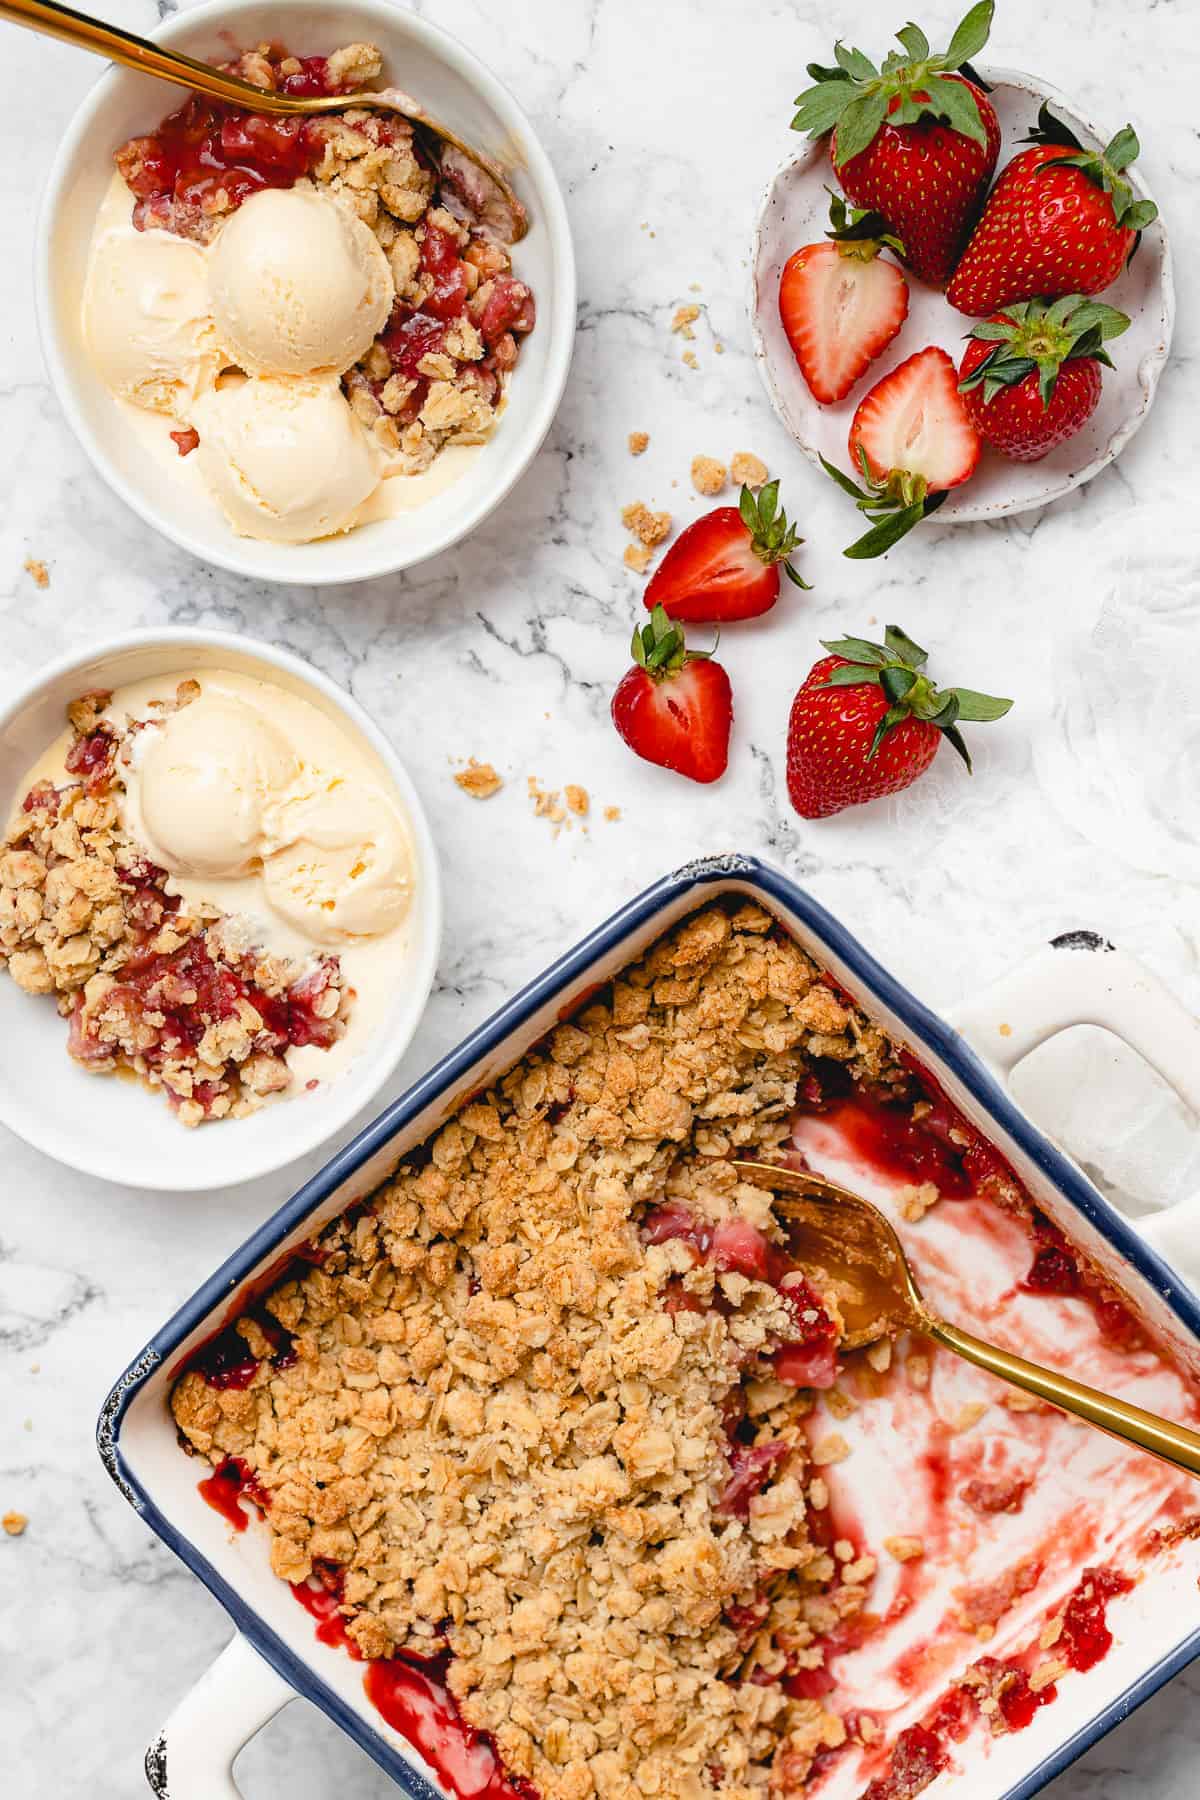
- Bake the crisp. Bake for 30 minutes, then broil on low for a few minutes until the top is golden brown. Allow everything to cool for 10 minutes before serving. Scoop into bowls and serve with ice cream for the best result!
Tips for Success
- Add more sugar if needed. If you’re using very fresh and tart strawberries, feel free to increase the sugar in the filling by 1 or 2 tablespoons. You can always taste a small amount of it after the ten-minute rest period to see if it’ll be sweet enough for you!
- For a thicker crisp. If you want a thicker, crisp, feel free to make a little bit more of the topping to cover it up even more!
- Possible flour substitutions. If you’re not gluten-free, you can use Bob’s Red Mill Unbleached White All Purpose Flour.
- You could also use individual ramekins to make this. I would split it between 4-5 individual ones.
How to Serve Strawberry Crisp
Strawberry crisp is pretty great as-is, but there are a couple of add-ons that you can indulge in if you like! A scoop of my cashew ice cream would taste incredible with this. Cashew whipped cream or coconut whipped cream would be great, too! A serving of fresh fruit on the side (blueberries, raspberries, blackberries, etc.) is always a good idea as well.
Store and Reheat Leftovers
- Refrigerate leftovers. This strawberry crisp recipe will last in your fridge for at least 4 days in an airtight container! Reheat it in the microwave for about 30 seconds, or heat it in the oven at 350ºF until warmed through.
- Freeze it for later. Once completely cooled, you can store this strawberry crisp in an airtight container in the freezer for 2-3 months. Remember to thaw it in the fridge overnight before reheating!
More Easy Strawberry Desserts
- Strawberry Banana Bread
- Strawberry Cream Pie
- Strawberry Granita
- Vegan Strawberry Coconut Ice Cream
Ingredients
Strawberry Filling
- ¼ cup brown sugar , or cane sugar, coconut sugar or white sugar
- 3 tablespoons Bob’s Red Mill Gluten Free 1-to-1 Baking Flour , or Bob’s Red Mill Unbleached White All Purpose Flour if you’re not gluten free
- ¼ teaspoon sea salt
- 2 pounds fresh strawberries , chopped (about 5 cups whole)
- 1 tablespoon orange juice , or pineapple juice
Crisp Topping
- ¾ cup Bob’s Red Mill Gluten Free 1-to-1 Baking Flour , or Bob’s Red Mill Unbleached White All Purpose Flour if you’re not gluten free
- ¾ cup Bob’s Red Mill Gluten Free Old Fashioned Rolled Oats
- 5 tablespoons brown sugar , or cane sugar, coconut sugar or white sugar
- 6 tablespoons melted vegan butter , salted (if using unsalted, add a pinch of sea salt)
Instructions
Strawberry Filling
- Preheat oven to 375°F/190°C.
- In your 8×8 baking dish, stir together the ¼ cup of sugar, 3 tablespoons Bob’s Red Mill 1-to-1 Gluten Free Baking Flour, and the sea salt. Add the strawberries and orange juice and toss to coat completely. Allow to sit for 10 minutes to bring out the flavor of the strawberries and to thicken their juices.
Crisp Topping
- In another bowl, mix together the oats, remaining 3/4 cup Bob’s Red Mill 1-to-1 Gluten Free Baking Flour, and 5 tablespoons sugar. Pour over the melted butter and mix until bit by bit until a crumble forms. You can use your fingers to clump it together in bits too. Don’t over mix it.
- Top the strawberries with the oat flour mixture, covering everything entirely.
Putting It All Together
- Bake for 30 minutes, then broil on low for a few minutes until top is golden brown.
- Allow to cool for 10 minutes before serving. Scoop into bowls and serve with ice cream for the best result!
Notes
- If you’re using very fresh and tart strawberries, feel free to increase the sugar in the filling by 1 or 2 tablespoons. You can always taste a small amount of it after the ten minute rest period to see if it’ll be sweet enough for you!
- If you’re using frozen strawberries, let them thaw completely first. You can drain off the excess liquid, or add in a few more tablespoons of flour until it looks like in the photos.
- If you want a thicker crisp, feel free to make a little bit more to cover it up even more!
- If you’re not gluten free, you can use Bob’s Red Mill Unbleached White All Purpose Flour.
- You could also use individual ramekins to make this – I would split it between 4-5 individual ones.
- A scoop of my Cashew Ice Cream would taste incredible with this!
- To store: This strawberry crisp recipe will last in your fridge for at least 4 days in an airtight container! Reheat it in the microwave for about 30 seconds, or heat it in the oven at 350ºF until warmed through.
- To freeze: Once completely cooled, you can store this strawberry crisp in an airtight container in the freezer for 2-3 months. Remember to thaw it in the fridge overnight before reheating!
