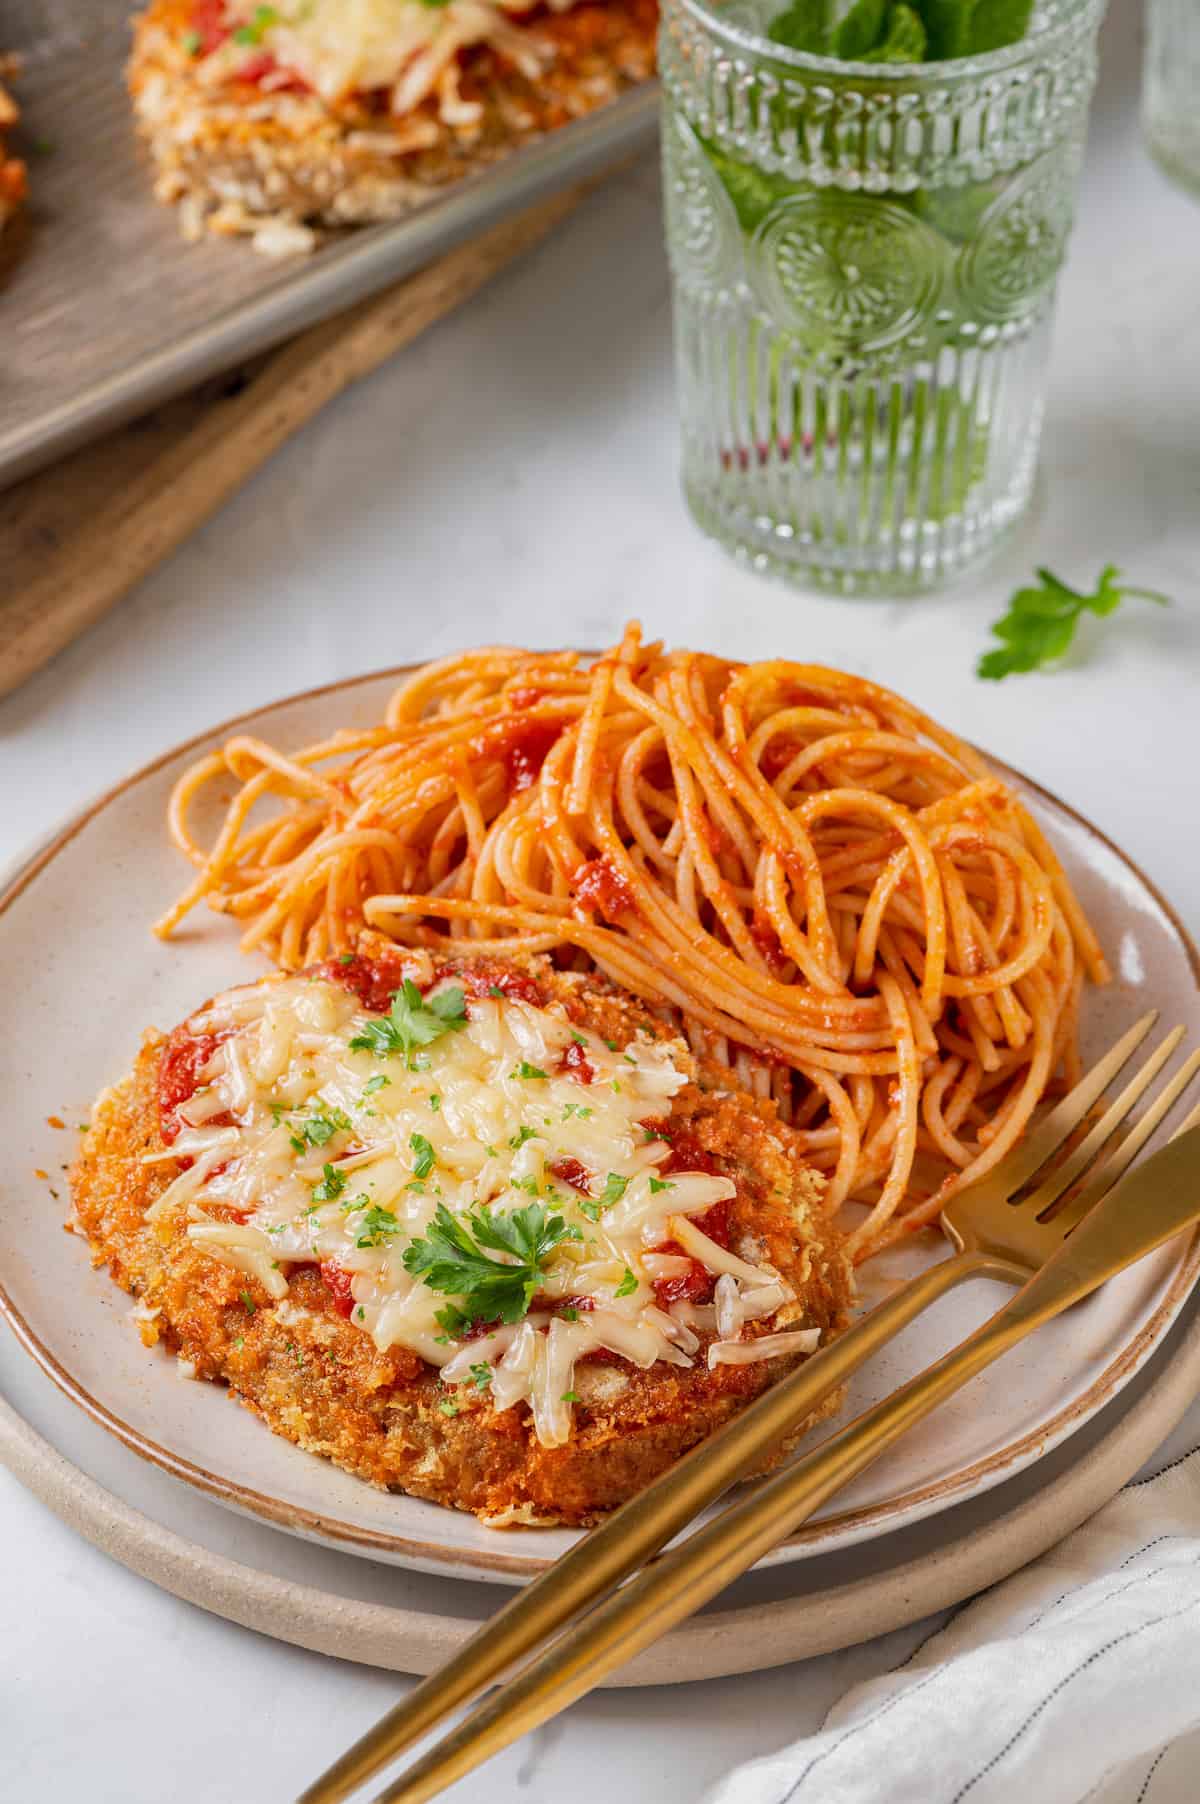
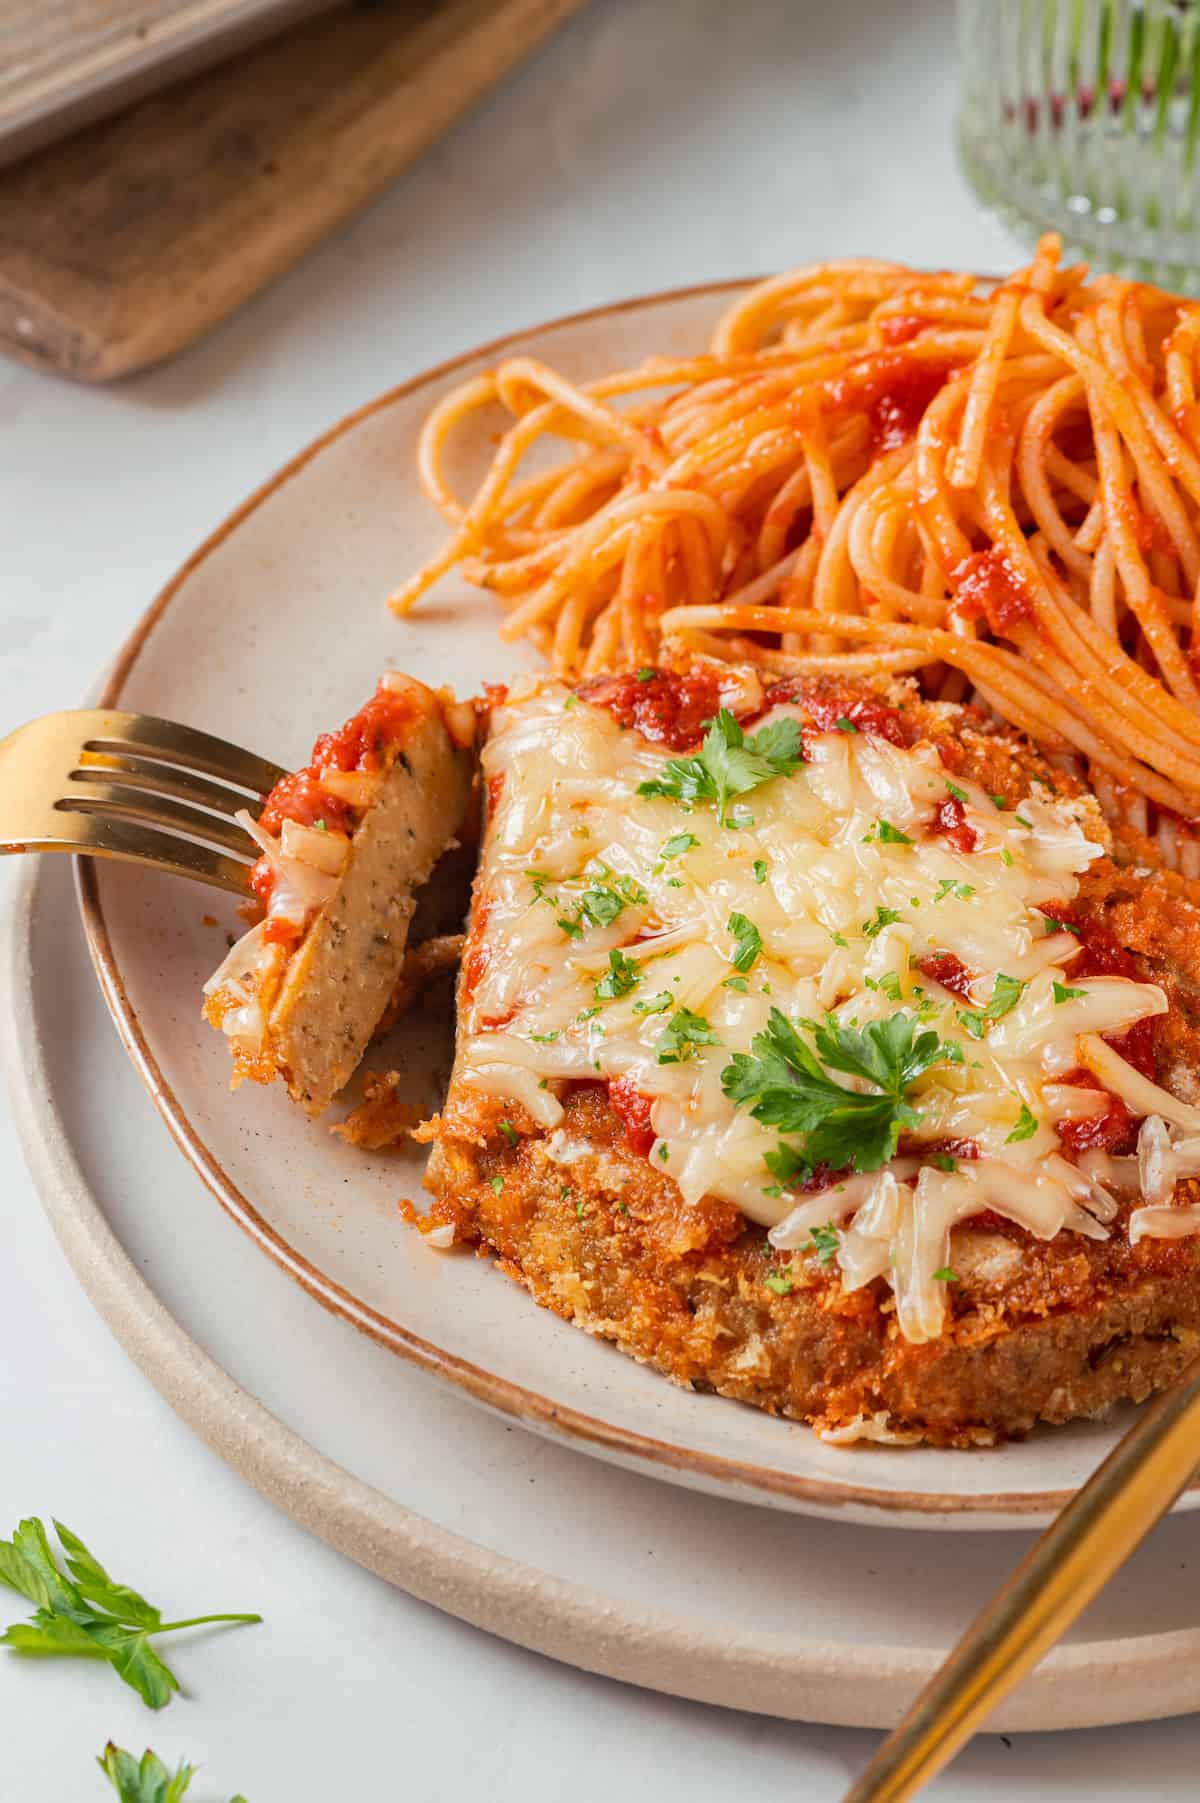
This vegan chicken parmesan has all the savory Italian flavours of the classic dish, minus the meat! Crispy breaded plant-based chicken is smothered with marinara and vegan cheese, then piled onto spaghetti.
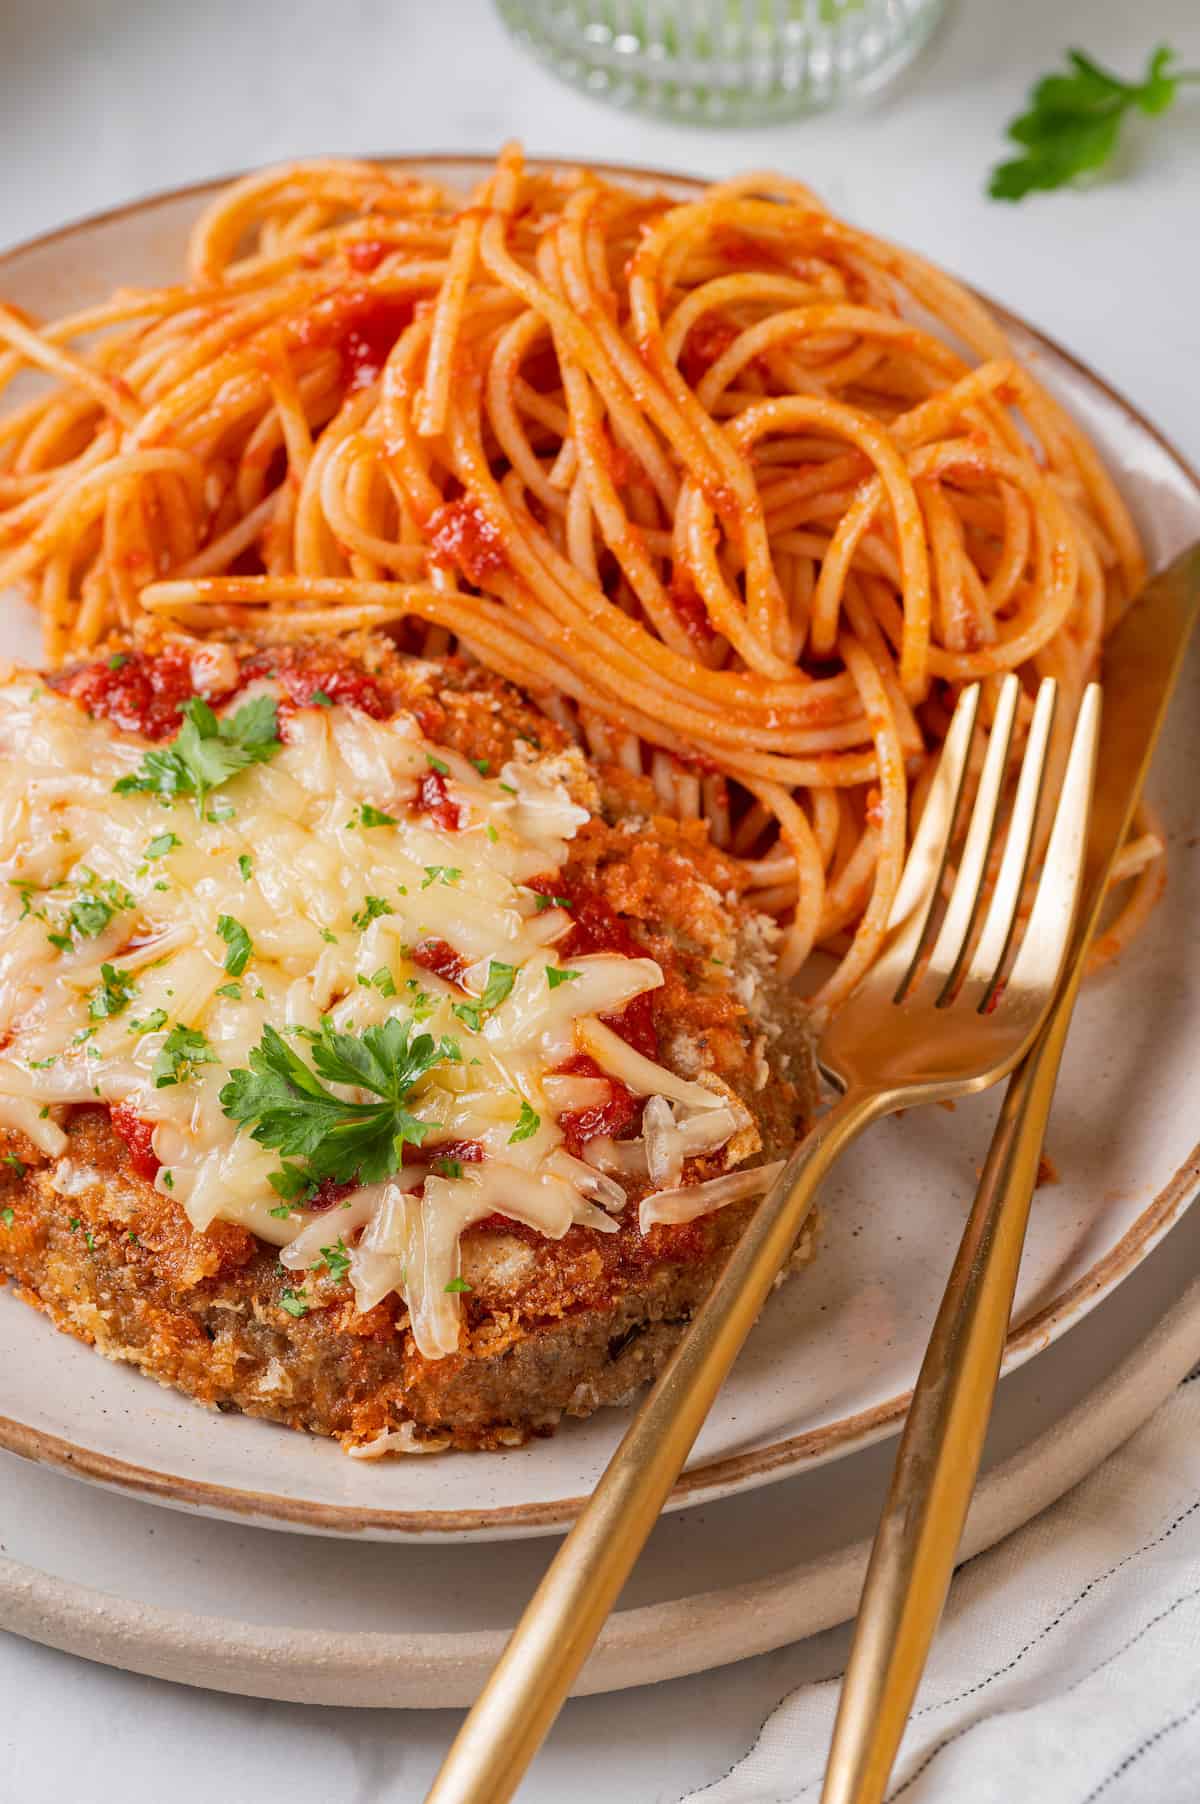
Traditional chicken parmesan is a dish made with breaded fried chicken cutlets topped with marinara sauce and mozzarella cheese. It’s a rich, decadent dinner, and this vegan version is every bit as delicious—but it’s lighter and made with plant-based chicken!
Plant-based chicken has come a long way in recent years. Gone are the days of dry, flavourless frozen slabs of faux chicken—supermarkets are full of great options, and I share some of my favourites below. That said, you can also use my vegan chicken recipe if you prefer to DIY it.
Why You’ll Love This Chicken Parmesan
Here’s why this vegan chicken parmesan belongs on your menu:
- Flavorful. This is a dish that combines all the classic flavors of Italian-American cuisine, but without the use of animal products. If you grew up eating chicken parm, this recipe is total comfort food goodness!
- Easy . Even if you don’t like breading things (I get it!), this recipe is easy because you only have to coat four vegan chicken pieces in breadcrumbs. The rest of the recipe comes together in a snap!
- Satisfying . With pasta, protein-packed vegan chicken, and plenty of plant-based cheese, this is a dinner that’s hearty and filling.

Notes on Ingredients
Scroll down to the recipe card to find the ingredient quantities and recipe instructions.
- Vegan chicken breasts –If you make your own chicken from my recipe, cut or shape one of the loaves into four chicken breasts. Otherwise, use Plant-Based Chicken Breasts by Lightlife or Chik’n Cutlets by Quorn.
- Ground flax or flax meal – This will form a flax egg to help the panko stick.
- Water or plain unsweetened plant milk
- Panko bread crumbs – Use gluten-free panko if needed.
- Garlic powder
- Italian seasoning
- Salt
- Olive oil
- Marinara sauce – Your favourite store-bought brand, or try my homemade marinara sauce .
- Vegan mozzarella cheese – I recommend Daiya, So Delicious, Follow Your Heart, or Violife shreds.
- Fresh basil or Italian parsley
- Cooked spaghetti – Spaghetti is the traditional choice, but you can opt for another pasta shape if you prefer.
How to Make Chicken Parmesan
You’re just a few minutes away from a supremely satisfying Italian-inspired dinner! Here’s what you’ll need to do.
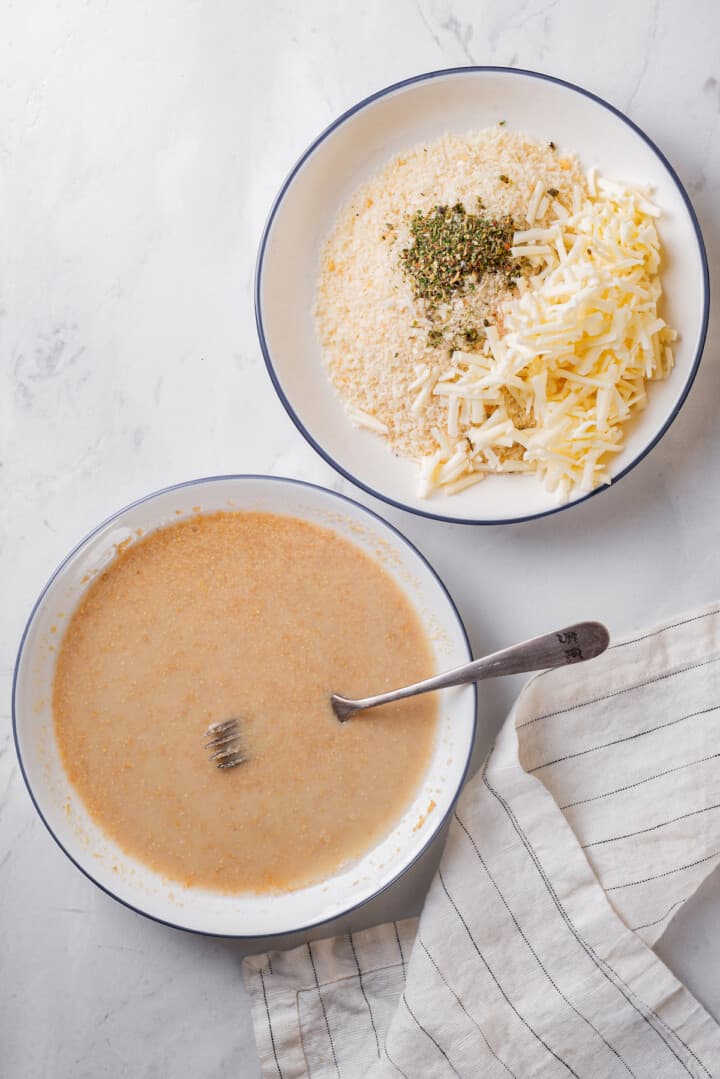
Mix the flax egg . On a large plate, whisk together the ground flax and water or plant milk. Let the mixture thicken for 5 minutes.
Mix the coating . On a second large plate, combine the bread crumbs, garlic powder, Italian seasoning, salt, and 1 cup of the vegan cheese.
Dredge the vegan chicken . Coat both sides of each vegan chicken breast in the flax egg mixture, followed by the panko mixture.
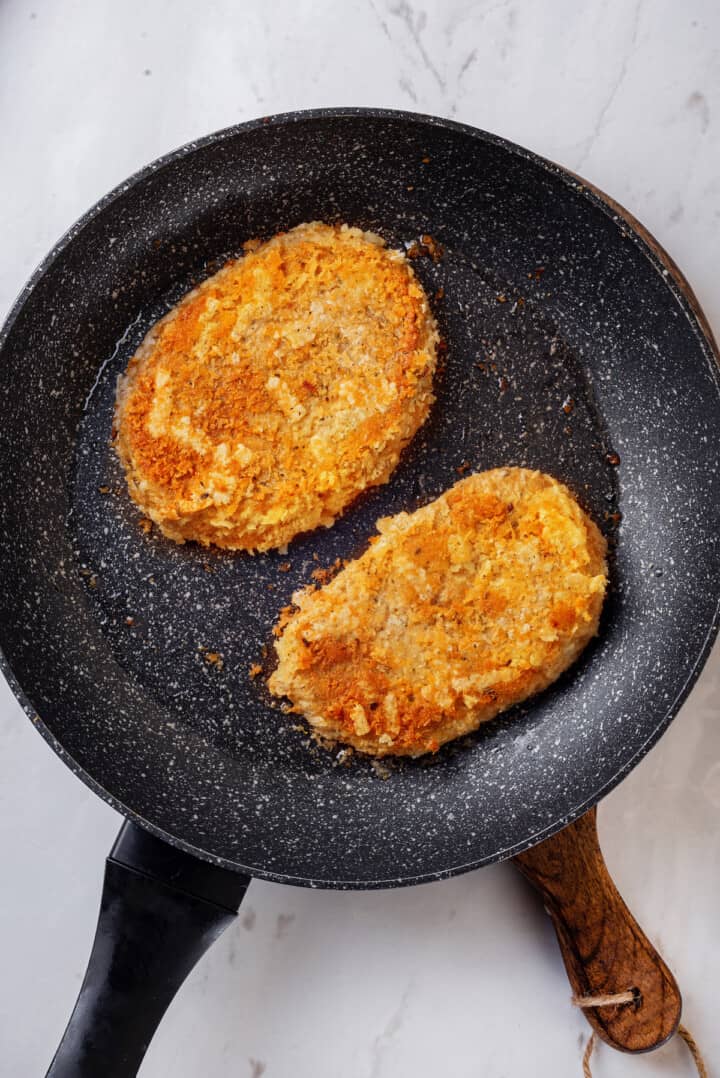
Cook . Set a large skillet over medium heat and add the oil. Once the oil is hot, add the vegan chicken breasts and cook for 7 to 10 minutes, or until golden brown on both sides.
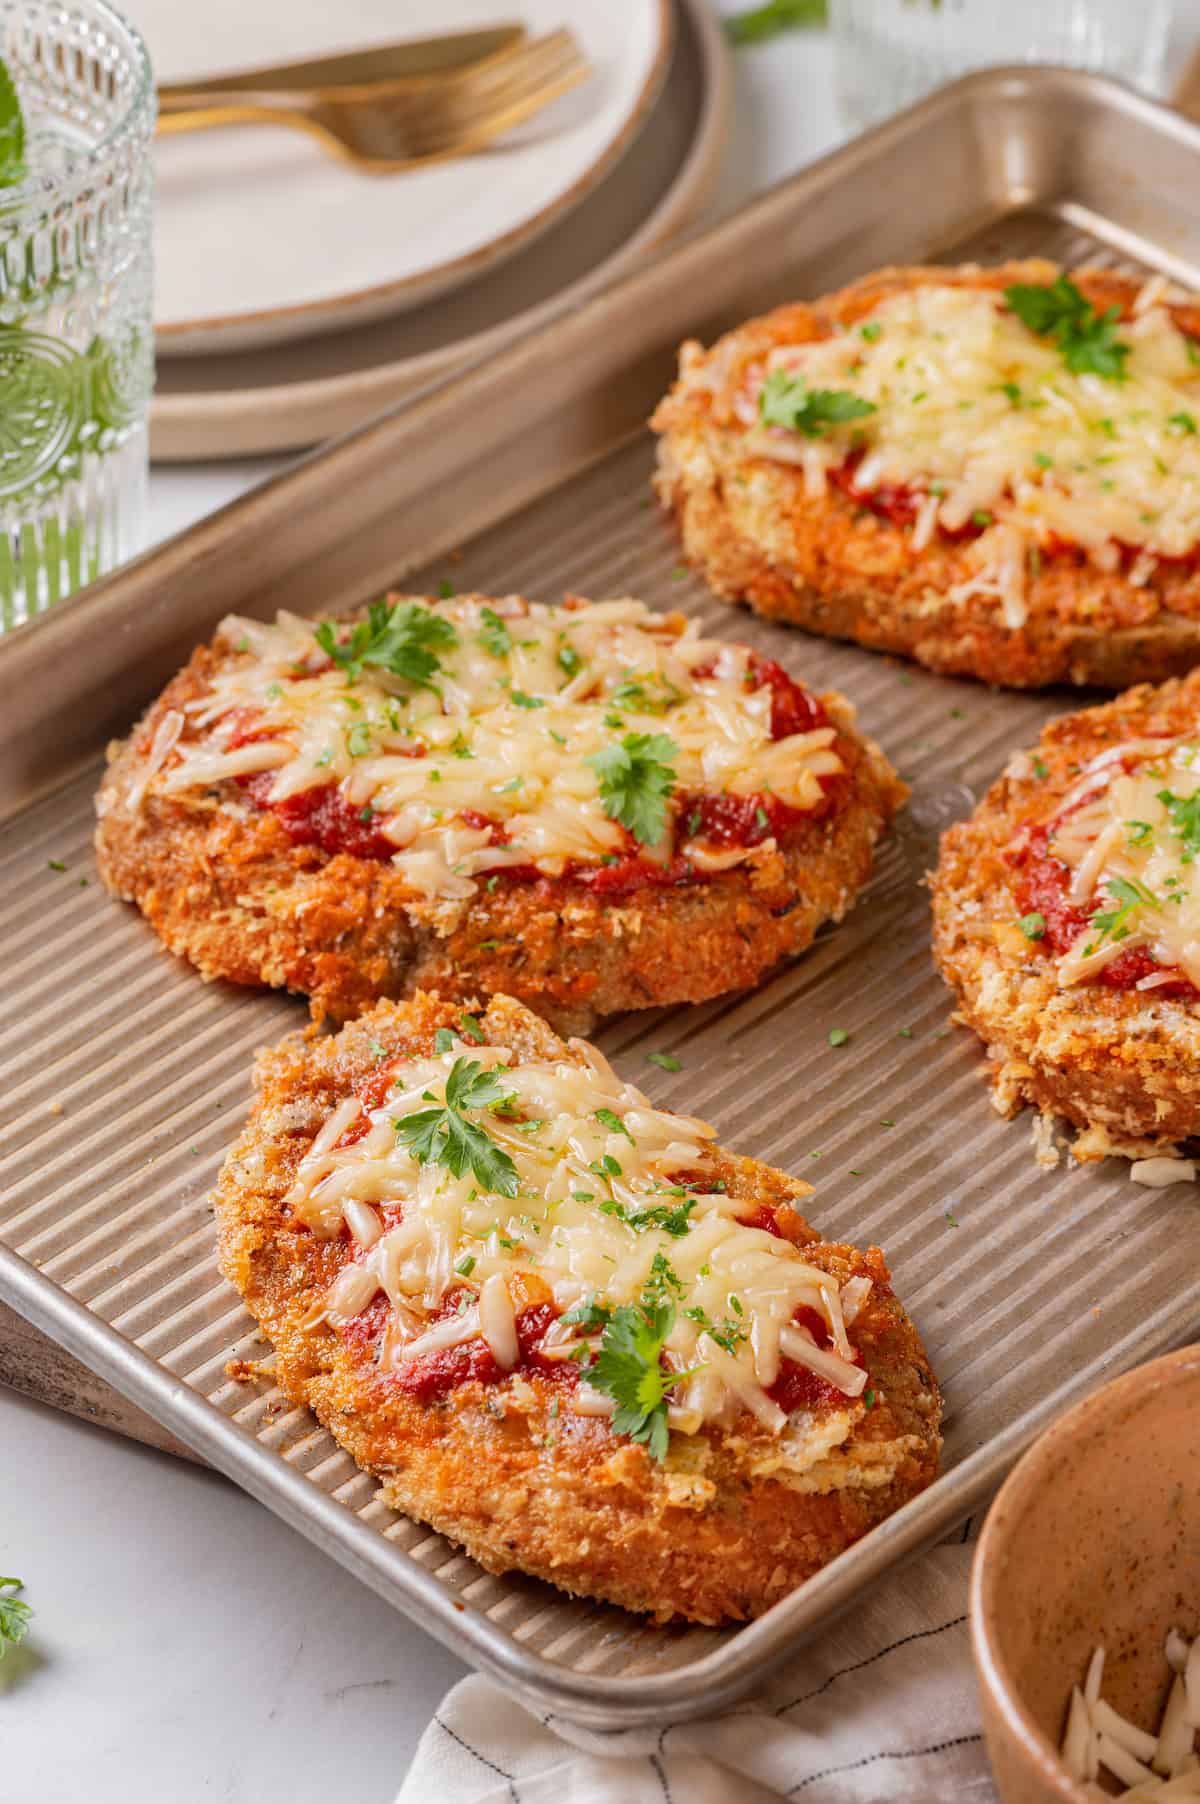
Assemble . Set the oven to broil. Transfer the vegan chicken to a large baking dish or casserole dish. Add 2 heaping tablespoons of marinara sauce onto each cutlet and spread the marinara sauce out slightly. Sprinkle the remaining vegan cheese over the cutlets.
Broil . Place the baking dish in the oven and broil for 5 to 7 minutes, or until the vegan cheese is melted and bubbly.
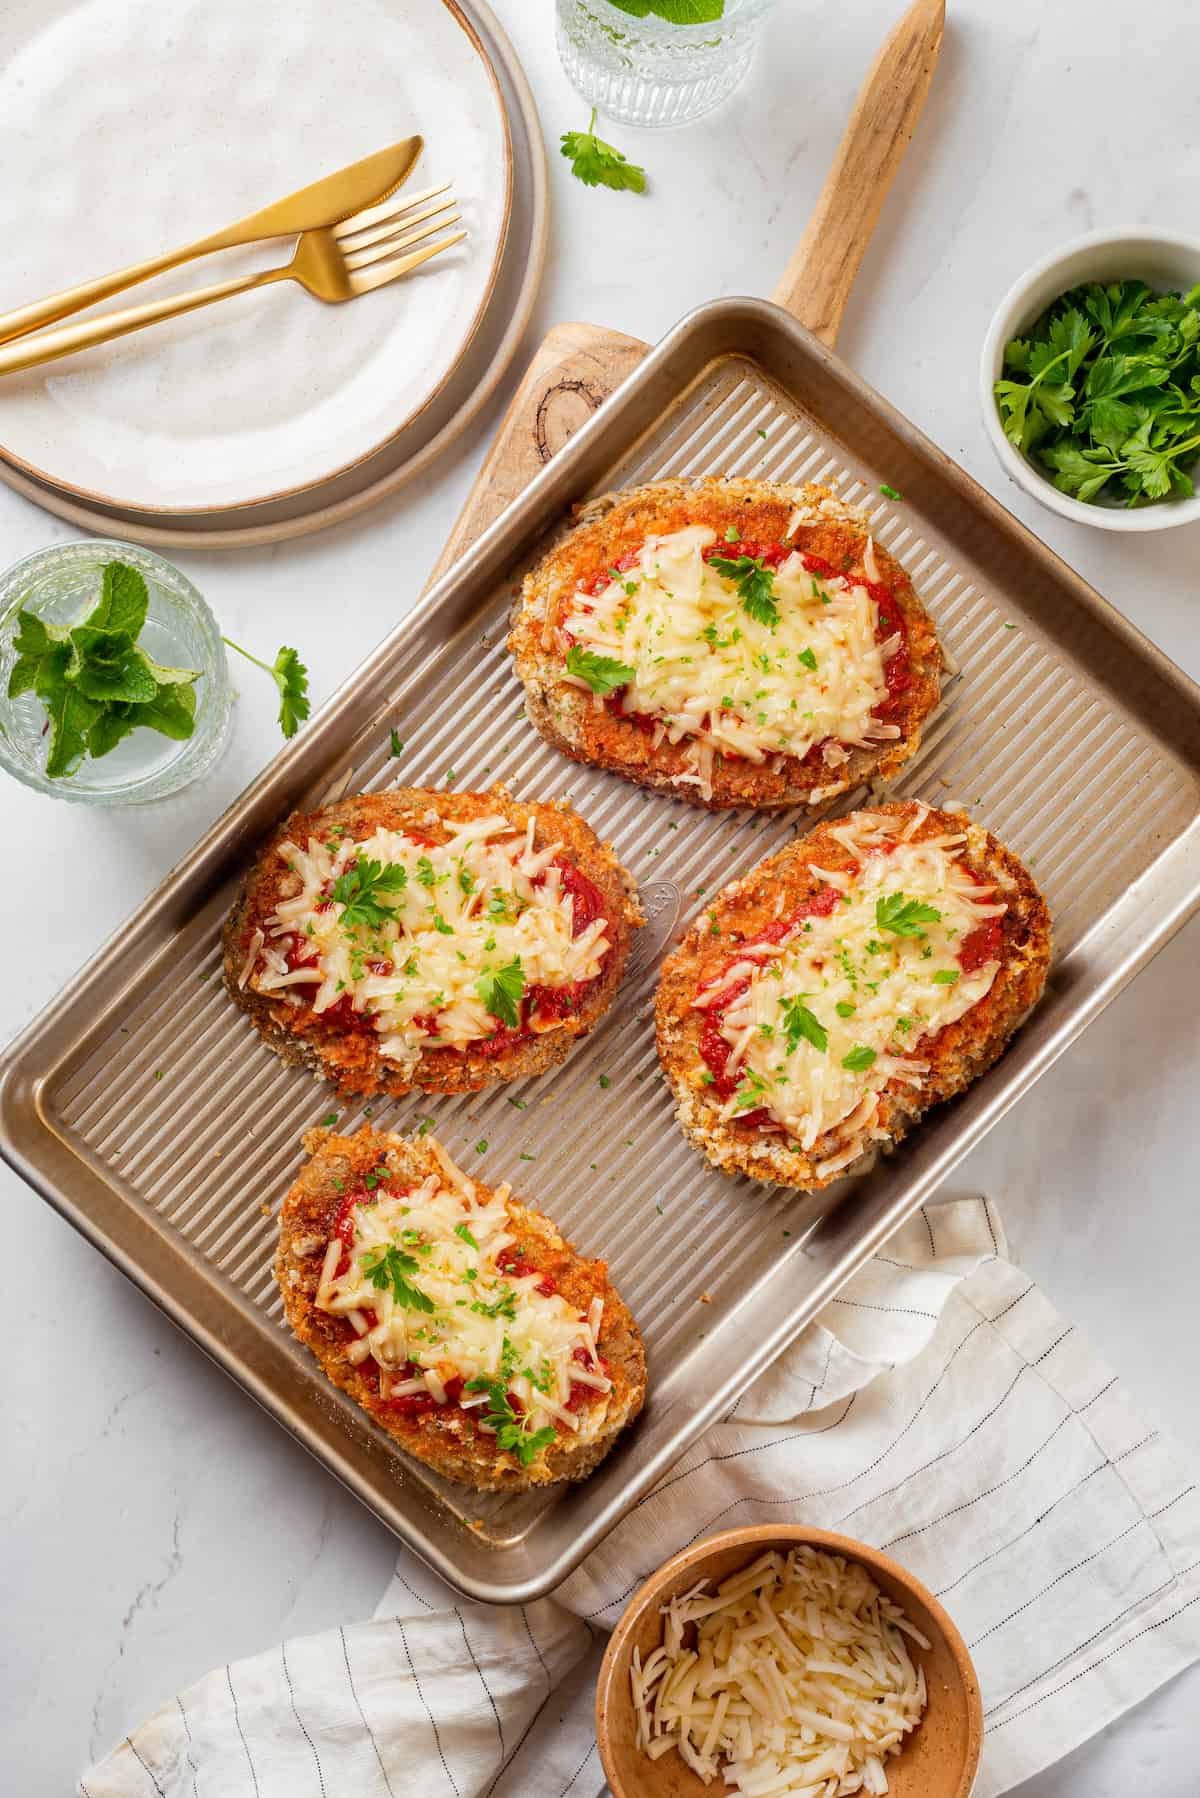
Finish . Sprinkle the vegan chicken parmesan with fresh basil or Italian parsley, then serve over cooked spaghetti with additional marinara sauce.
Tips for Success
These hints and tips will help you make sure your vegan chicken parmesan turns out perfect:
- Let the flax egg gel . The mixture really does need to sit for at least 5 minutes to thicken.
- Thaw the vegan chicken . If you’re using frozen vegan chicken cutlets, let them thaw first. They’ll cook more evenly this way, and they’ll also be easier to coat in the breadcrumb mixture.
- Make sure to keep an eye on the dish while it’s in the oven . You want the cheese to be melted and bubbly without burning. When you’re broiling, burning can happen fast!
Serving Suggestions
Serve vegan chicken parmesan with a side of Balsamic Roasted Vegetables or Air Fryer Green Beans . And don’t forget the Roasted Garlic Bread !
How to Store
Leftovers can be stored in an airtight food-safe container in the fridge for up to 3 days. Reheat it in the microwave, or transfer the leftovers to a small baking dish, cover it with foil, and heat in a 350ºF oven until it’s warmed through.
Can This Recipe Be Frozen?
Yes, this recipe can be frozen. To freeze, place the vegan chicken parmesan in an airtight food safe container or freezer bag and store in the freezer for up to 3 months. When ready to eat, thaw overnight in the fridge, then reheat according to the instructions above.
More Vegan Dinner Ideas
- Vegan Swedish Meatballs
- Creamy Garlic Mushroom Pasta
- Vegan Instant Pot Risotto
- Lemon Pepper Tofu
Ingredients
- 4 vegan chicken breasts , from homemade vegan chicken or store-bought *see product recommendations below
- ¼ cup ground flax , or flax meal (35 grams) + 3⁄4 cup water or plain unsweetened plant milk (200 grams)
- 1 ½ cups panko bread crumbs , 180 grams
- 1 teaspoon garlic powder , 1 gram
- 1 teaspoon Italian seasoning , 0.5 grams
- ¼ teaspoon salt , 1 gram
- ¼ cup olive oil , 56 grams
- 1 (24 ounce) jar marinara sauce , 680 grams
- 2 cups vegan mozzarella cheese , approximately one – 8 ounce bag, divided – see recipe (226 grams) *see product recommendations below
- fresh basil , or Italian parsley
- 16 ounces cooked spaghetti , 453 grams
Instructions
- On a large plate, add the ground flax and water or plant milk and whisk to combine. Set aside for 5 minutes.
- On another large plate, combine the bread crumbs, garlic powder, italian seasoning, salt, and 1 cup of the vegan cheese.
- Coat both sides of a vegan chicken breast in the flax egg mixture then transfer it to the bread crumb mixture and coat again. Repeat with all vegan chicken breasts and set aside.
- Place a large oven-safe skillet over medium heat and add oil. Once heated, add all 4 vegan chicken breasts and cook until golden brown on both sides (approximately 7 – 10 minutes).
- Set the oven to broil. Transfer the cooked breaded vegan chicken to a large baking dish or casserole dish. Add 2 heaping tablespoons (34 grams) of marinara sauce onto each piece of vegan chicken. Spread the marinara sauce out slightly to cover the center of the vegan chicken. Sprinkle the remaining 1 cup of vegan cheese over all vegan chicken breasts.
- Place the baking dish in the oven and broil for 5 – 7 minutes or until the vegan cheese is melted and bubbly. Remove the dish from the oven and sprinkle with fresh basil or italian parsley. Serve over cooked spaghetti with additional marinara sauce if preferred. Store leftovers in an airtight food safe container in the fridge for up to 3 days.
Notes
- Vegan Chicken: Plant-Based Chicken Breasts by Lightlife Chik’n Cutlets by Quorn
- Vegan Cheese: Mozzarella Style Shreds by Daiya Plant-Based Mozzarella Style Shreds by So Delicious Finely Shredded Mozzarella Cheese by Follow Your Heart Vegan Mozzarella Shreds by Violife
- To store : Leftovers can be stored in an airtight food-safe container in the fridge for up to 3 days. Reheat it in the microwave, or transfer the leftovers to a small baking dish, cover it with foil, and heat in a 350ºF oven until it’s warmed through.
- To freeze : Yes, this recipe can be frozen. To freeze, place the vegan chicken parmesan in an airtight food safe container or freezer bag and store in the freezer for up to 3 months. When ready to eat, thaw overnight in the fridge, then reheat according to the instructions above.

Chicken Parmesan
Ingredients
- 4 vegan chicken breasts from homemade vegan chicken or store-bought *see product recommendations below
- ¼ cup ground flax or flax meal (35 grams) + 3⁄4 cup water or plain unsweetened plant milk (200 grams)
- 1 ½ cups panko bread crumbs 180 grams
- 1 teaspoon garlic powder 1 gram
- 1 teaspoon Italian seasoning 0.5 grams
- ¼ teaspoon salt 1 gram
- ¼ cup olive oil 56 grams
- 1 (24 ounce) jar marinara sauce 680 grams
- 2 cups vegan mozzarella cheese approximately one - 8 ounce bag, divided - see recipe (226 grams) *see product recommendations below
- fresh basil or Italian parsley
- 16 ounces cooked spaghetti 453 grams
Instructions
- On a large plate, add the ground flax and water or plant milk and whisk to combine. Set aside for 5 minutes.
- On another large plate, combine the bread crumbs, garlic powder, italian seasoning, salt, and 1 cup of the vegan cheese.
- Coat both sides of a vegan chicken breast in the flax egg mixture then transfer it to the bread crumb mixture and coat again. Repeat with all vegan chicken breasts and set aside.
- Place a large oven-safe skillet over medium heat and add oil. Once heated, add all 4 vegan chicken breasts and cook until golden brown on both sides (approximately 7 - 10 minutes).
- Set the oven to broil. Transfer the cooked breaded vegan chicken to a large baking dish or casserole dish. Add 2 heaping tablespoons (34 grams) of marinara sauce onto each piece of vegan chicken. Spread the marinara sauce out slightly to cover the center of the vegan chicken. Sprinkle the remaining 1 cup of vegan cheese over all vegan chicken breasts.
- Place the baking dish in the oven and broil for 5 - 7 minutes or until the vegan cheese is melted and bubbly. Remove the dish from the oven and sprinkle with fresh basil or italian parsley. Serve over cooked spaghetti with additional marinara sauce if preferred. Store leftovers in an airtight food safe container in the fridge for up to 3 days.
Notes
- Vegan Chicken: Plant-Based Chicken Breasts by Lightlife Chik’n Cutlets by Quorn
- Vegan Cheese: Mozzarella Style Shreds by Daiya Plant-Based Mozzarella Style Shreds by So Delicious Finely Shredded Mozzarella Cheese by Follow Your Heart Vegan Mozzarella Shreds by Violife
- To store : Leftovers can be stored in an airtight food-safe container in the fridge for up to 3 days. Reheat it in the microwave, or transfer the leftovers to a small baking dish, cover it with foil, and heat in a 350ºF oven until it’s warmed through.
- To freeze : Yes, this recipe can be frozen. To freeze, place the vegan chicken parmesan in an airtight food safe container or freezer bag and store in the freezer for up to 3 months. When ready to eat, thaw overnight in the fridge, then reheat according to the instructions above.
Nutrition
Chicken Parmesan https://jessicainthekitchen.com/chicken-parmesan/ August 2, 2023
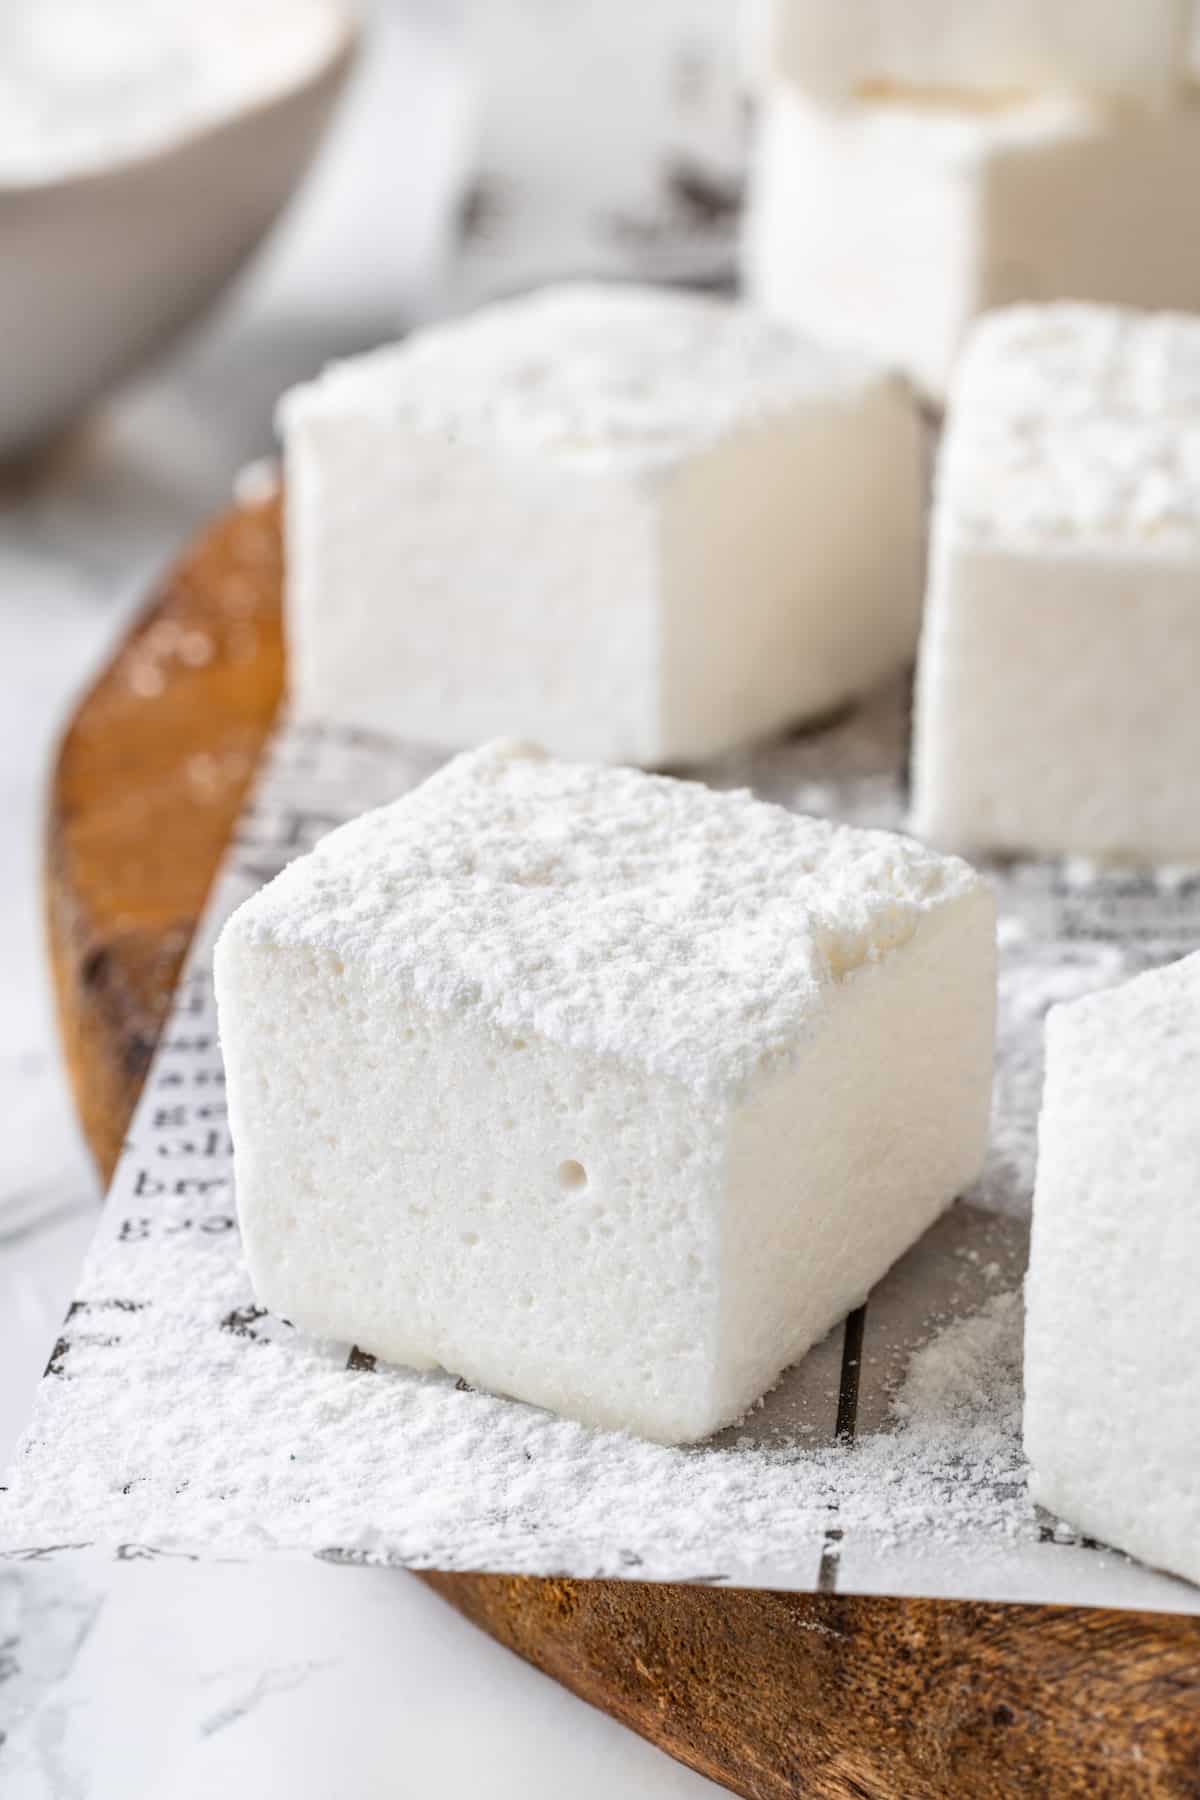
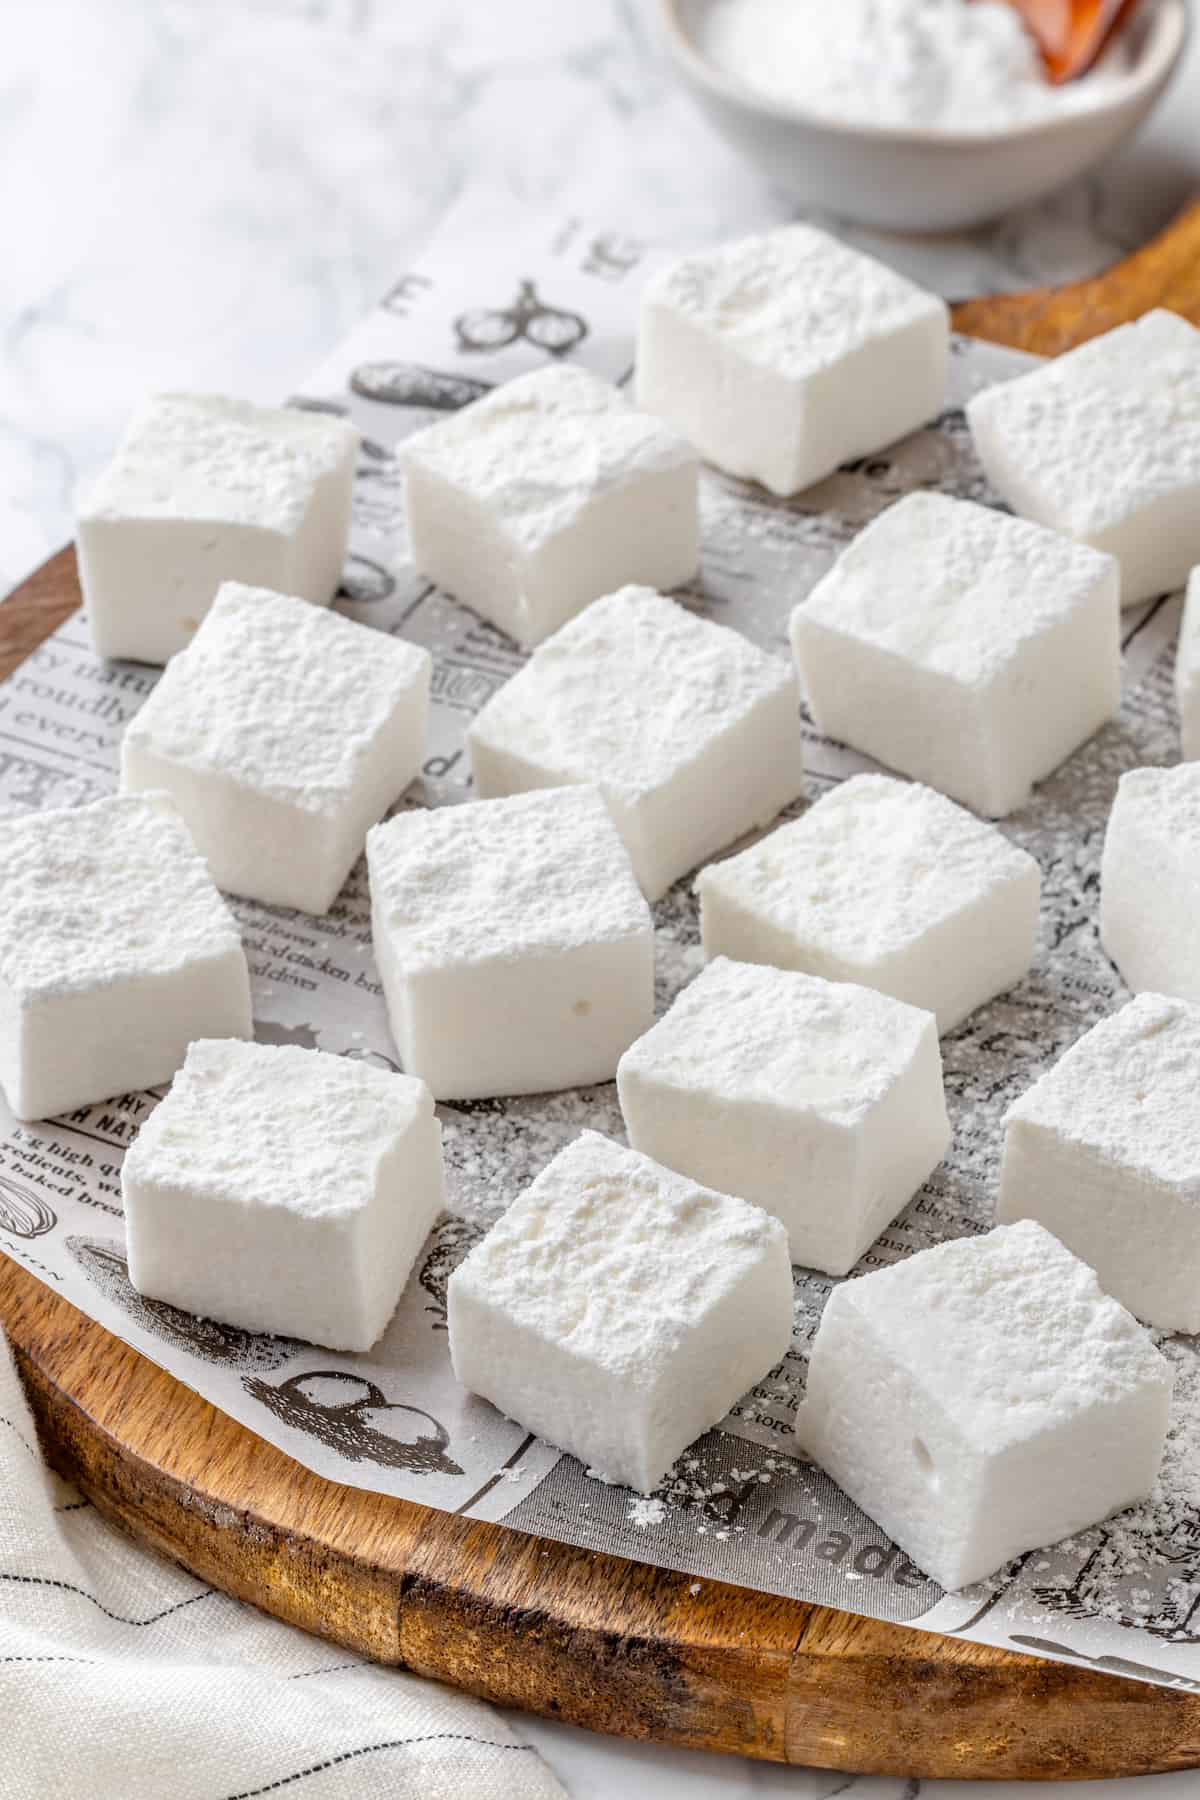
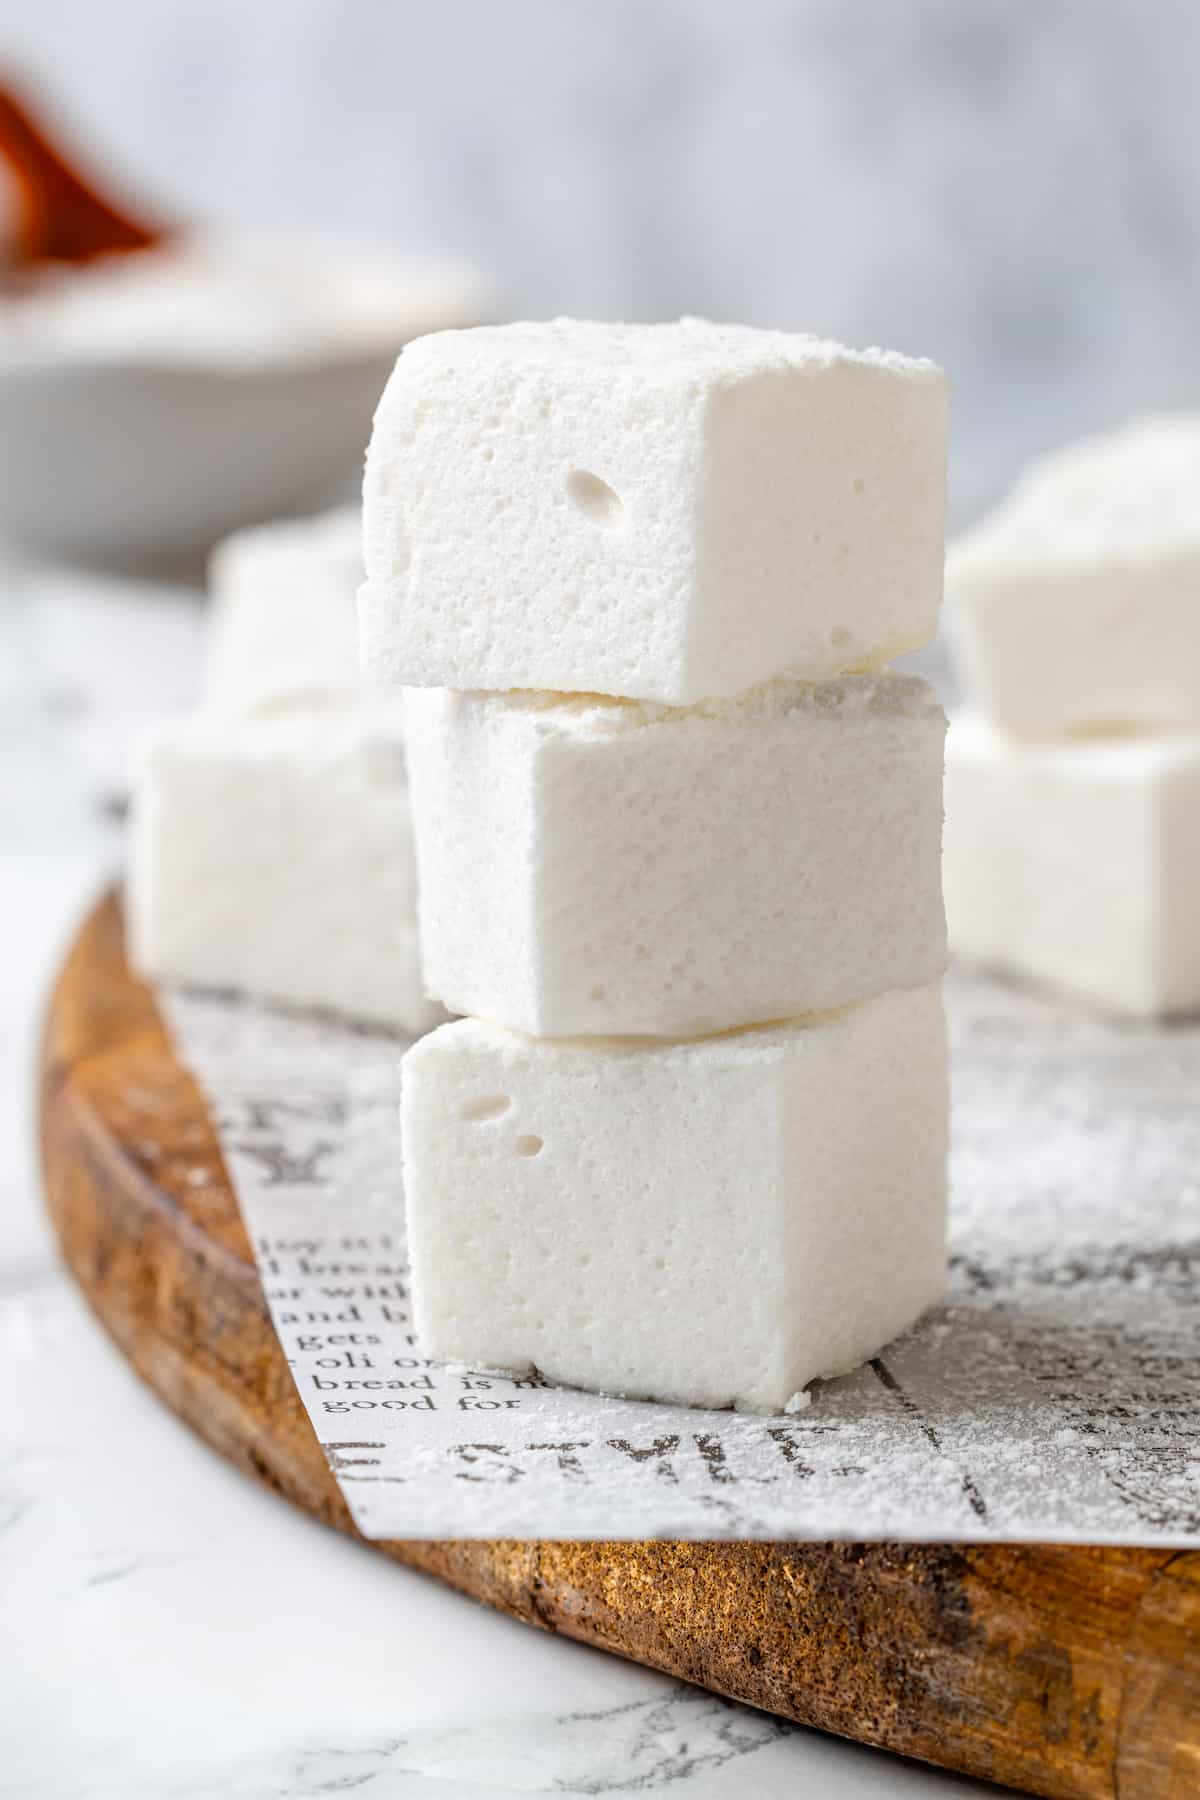
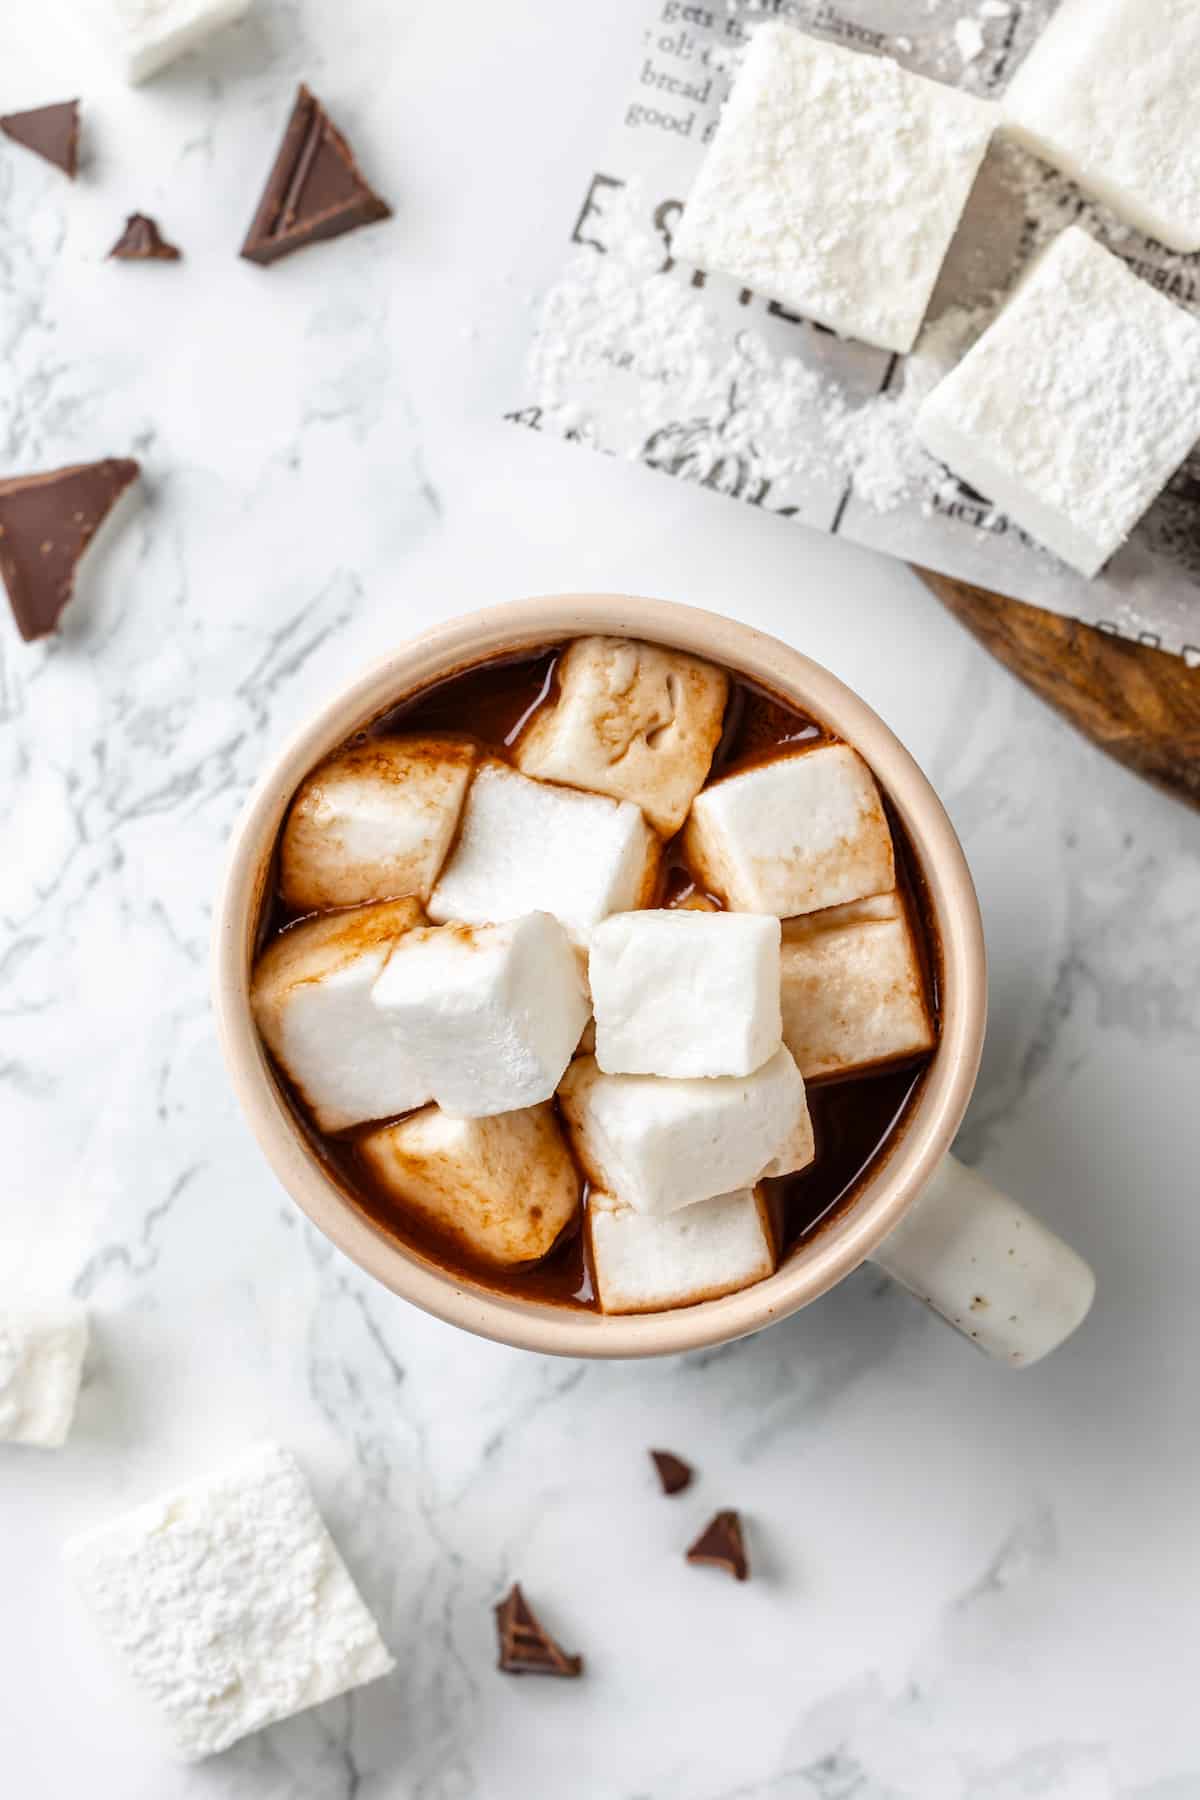
Light, airy, fluffy vegan marshmallows are perfect for adding to hot cocoa, toasting over a campfire, and using in all your favourite recipes! Here’s how to make them.
When you first go vegan, you know you’re giving up dairy, meat, and eggs. But then you start to realize all of the other foods that have sneaky animal ingredients in them. Wait— honey isn’t vegan ?! I can’t eat gummy bears!
For me, one of those disappointments was marshmallows. I mean, what am I going to put in my hot chocolate ?! How will I make Rice Krispie treats?
What Is the Difference Between Vegan Marshmallows and Regular?
Traditional marshmallows are made with gelatin, which is an animal product derived from bones. Vegan marshmallows are made without gelatin—but the exact ingredients they use to replace the gelatin vary from one brand or recipe to the next.
While there are a number of fabulous vegan marshmallows on the market today, homemade marshmallows are always a special treat—they’re lighter, fluffier, and just all-around incredible. I don’t make this recipe every single time I need marshmallows, but I do make it when I want something a little more impressive!
Why This Vegan Marshmallow Recipe Works
Here’s what makes these vegan marshmallows work without the addition of gelatin.
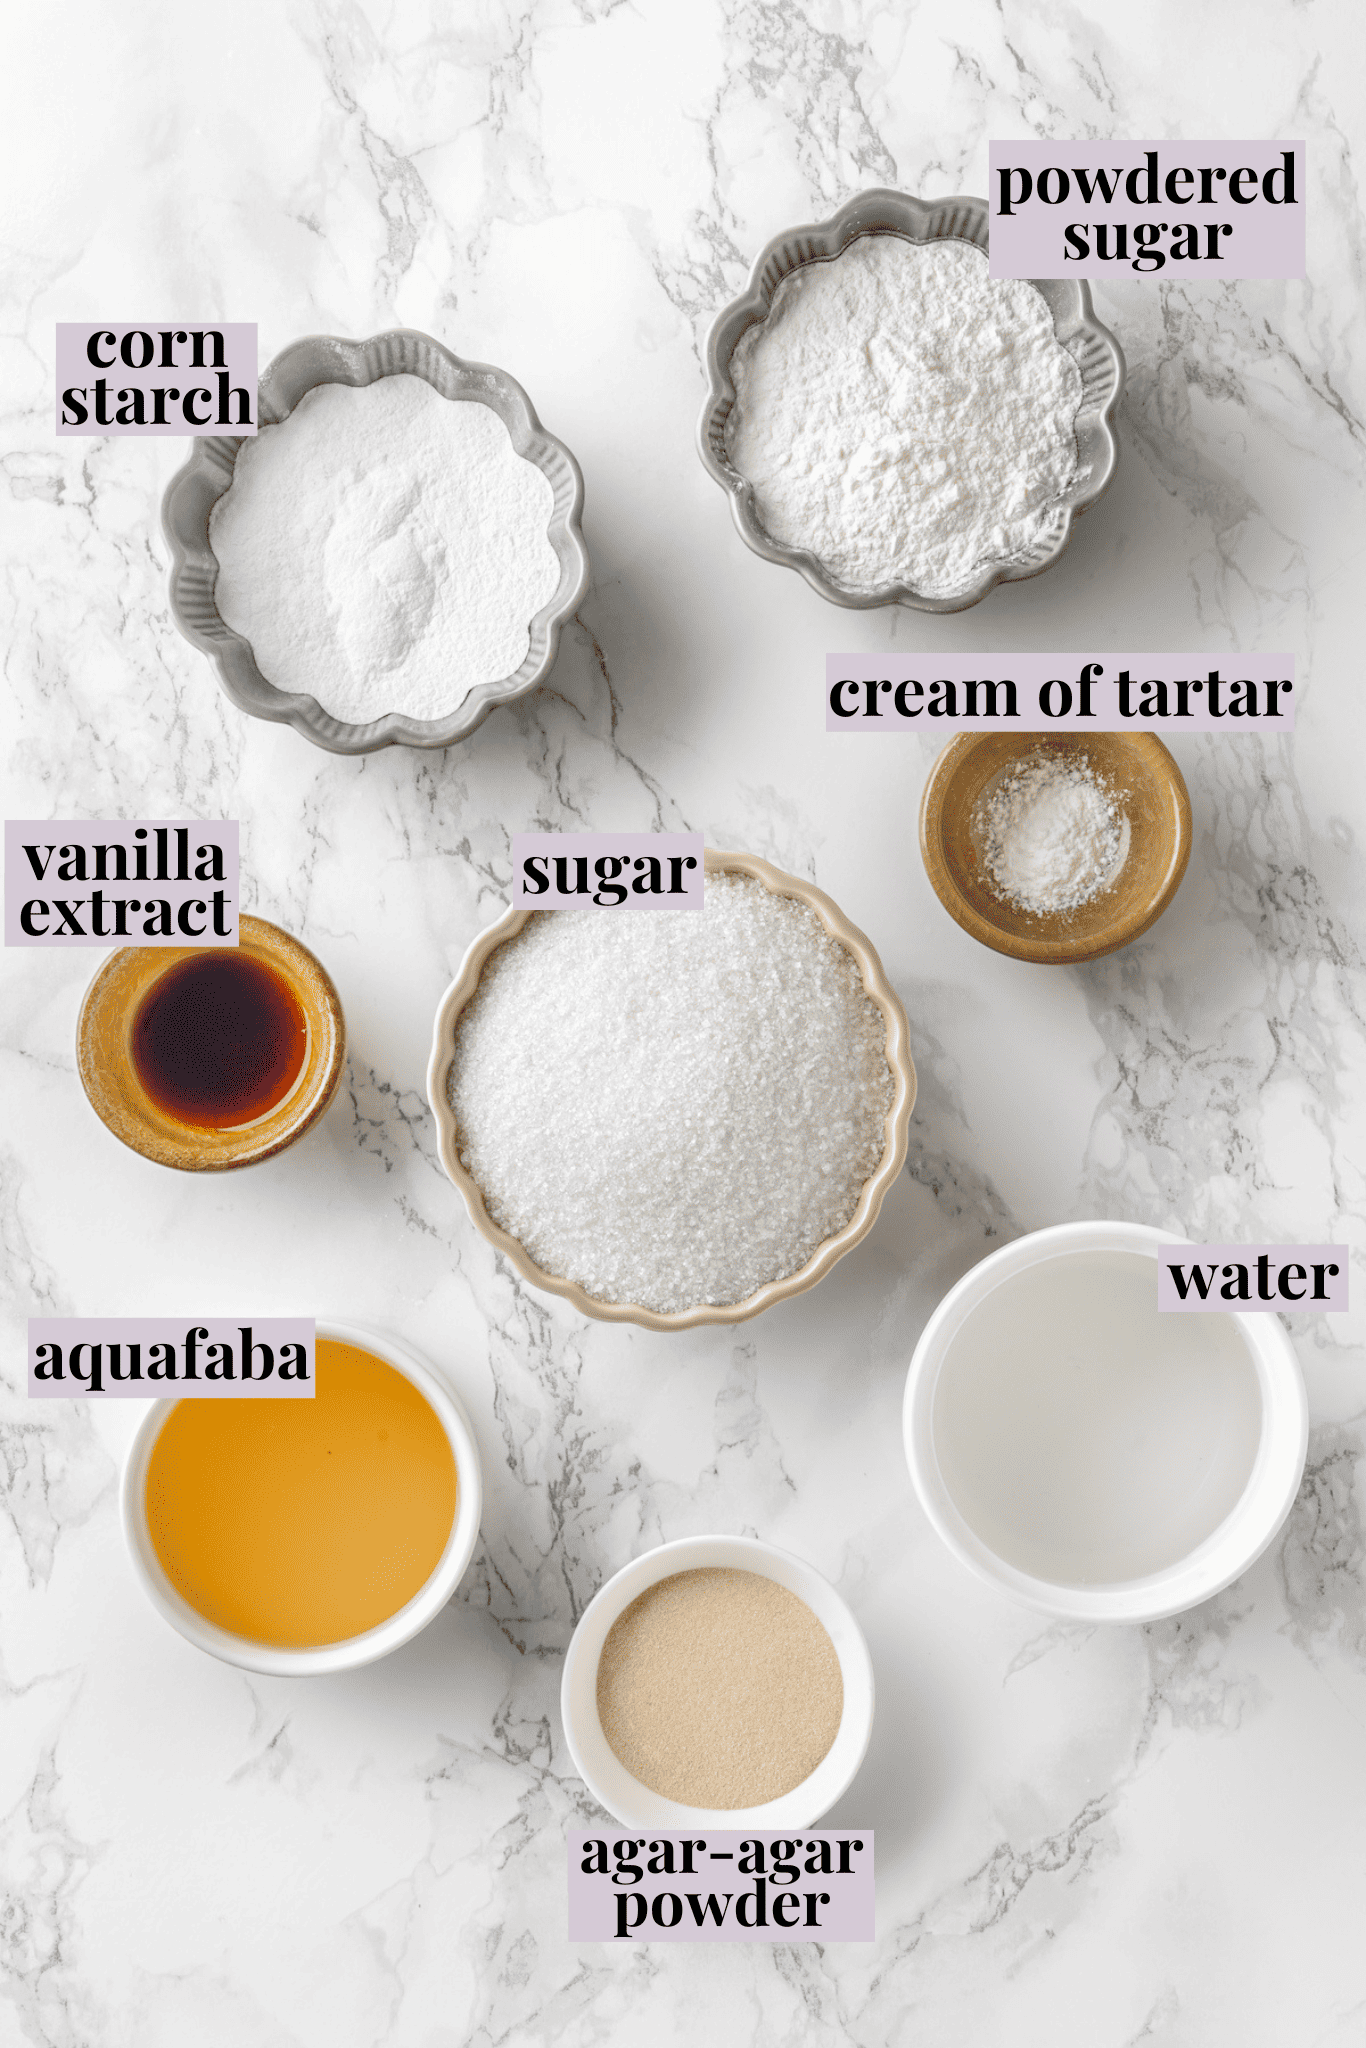
- Agar-agar . Agar-agar is a fantastic gelatin substitute that’s derived from seaweed. It is very powerful, so it’s important to weigh it out!
- Aquafaba . A heavy-hitter in vegan baking, aquafaba can be whipped into the consistency of beaten egg whites and used for vegan marshmallows, Sweet Potato Soufflé , and Vegan Tiramisu .
- Cream of tartar . This helps stabilize the beaten aquafaba so it maintains its light, fluffy texture, rather than deflating.
Notes on Ingredients
Scroll down to the recipe card to find the ingredient quantities and recipe instructions.
- Powdered sugar – A combination of powdered sugar and cornstarch keeps your vegan marshmallows from sticking.
- Cornstarch
- Aquafaba – Chill this before starting the recipe. If you don’t get to chill it, increase your prep times by a few minutes (I note them below in the recipe).
- Cream of tartar – You can usually find this with the herbs and spices at the grocery store.
- Vanilla extract – The flavour most of us associate with marshmallow is actually vanilla!
For the Syrup:
- Granulated sugar
- Water – Use purified or filtered water, not tap water, which can have off flavours.
For the Agar Mixture:
- Agar-agar powder – You can find this at specialty grocers and health food stores; it can also be purchased online. If you can only find agar-agar flakes you can also use this, but it does not measure out to the same amount in teaspoons, so be sure to measure it out.
- Granulated sugar
- Water
What Is Aquafaba?
Aquafaba is a liquid from cooked chickpeas—either chickpeas cooked from dry beans or the liquid poured off of a can. It’s often used in vegan cooking and baking as an inexpensive egg replacer .
How to Make Vegan Marshmallows
Making vegan marshmallows does take a little bit of effort, but trust me: it’s so worth it!

Prepare . Line a 9-inch pan with parchment paper and lightly dust it with powdered sugar and cornstarch. You’ll want to do this first since you want to transfer your marshmallows immediately after you’re finished mixing, else it’ll begin to firm up in your mixing bowl and won’t be that smooth delicate pour.
Whip the aquafaba . Whisk the aquafaba and cream of tartar in the bowl of a stand mixer fitted with the whisk attachment until soft peaks form. (This should take about 10 minutes on medium speed or medium-high speed if you’re not using chilled aquafaba.)
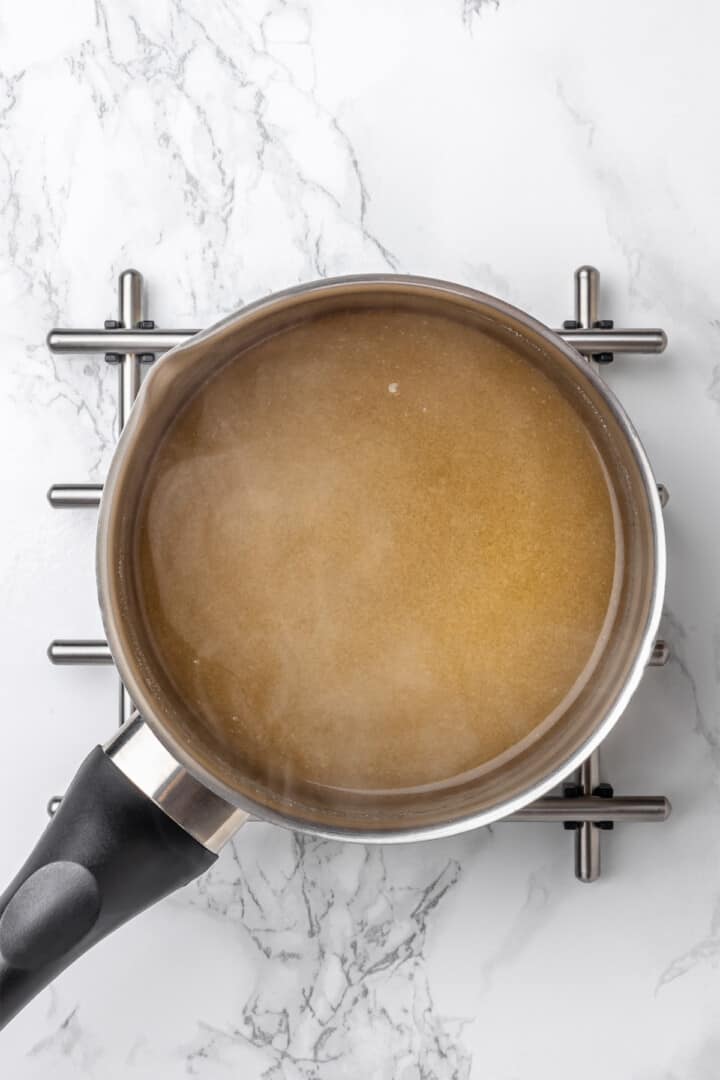
Make the syrup . Combine the sugar and water in a saucepan set over medium-high heat. Bring the mixture to a simmer without stirring and continue to cook until the syrup reaches 240°F.
Add the syrup to the aquafaba . Immediately take the syrup off the heat. Slowly drizzle the syrup into the bowl with the aquafaba while whisking with the mixer. Continue to whisk for about 5 minutes, or until the mixture becomes glossy and stiff peaks form. Add the vanilla.
Make the vegan gelatin mixture . Whisk together the granulated sugar, water, and agar-agar powder in a saucepan set over medium-high heat. Bring to a boil, then whisk continuously for 2 to 3 minutes.
Finish the marshmallow mixture . Turn the mixer back on and slowly pour the agar mixture into the aquafaba mixture. Continue to whisk until the agar is incorporated into the aquafaba mixture, which shouldn’t take more than 1 minute.
Cool . Pour the marshmallow mixture into the prepared pan and spread it evenly. Loosely cover the pan with a kitchen towel and cool for 4 to 6 hours, or until set.
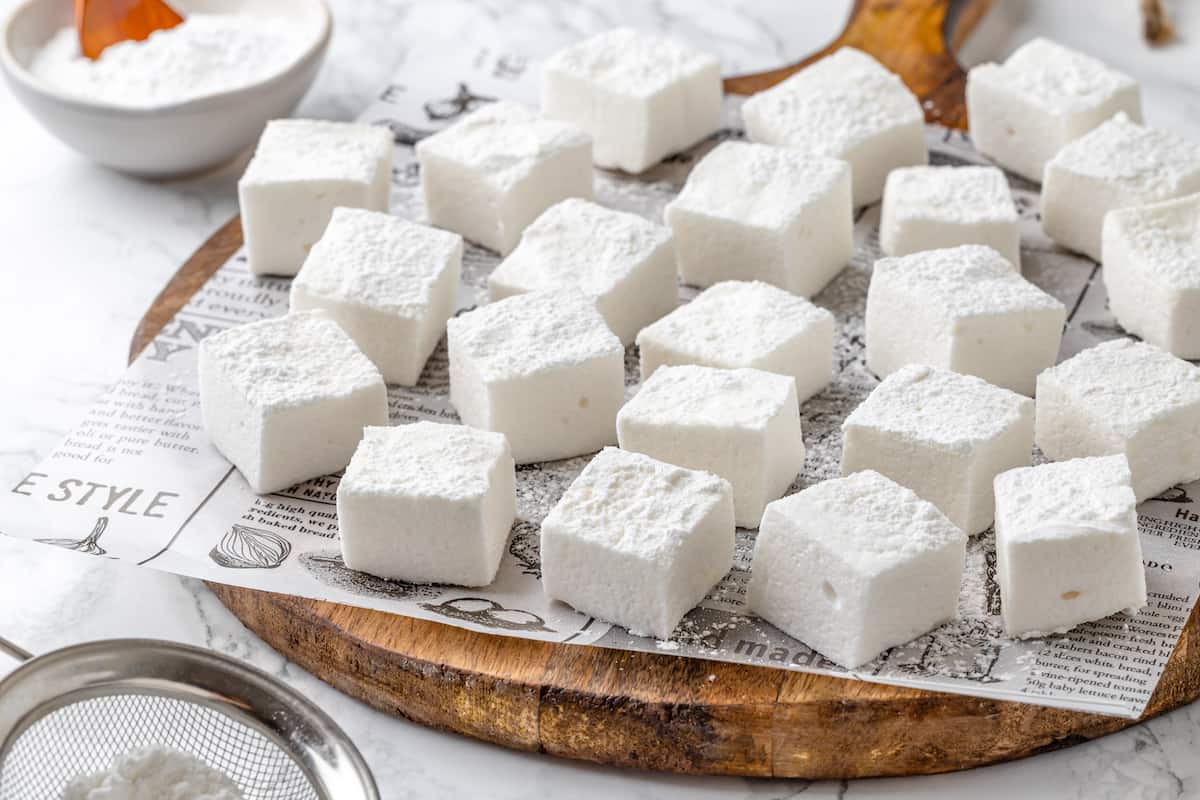
Finish . Once finished setting, dust the tops of the marshmallows with powdered sugar and cornstarch, then cut the marshmallows. If you plan on storing them, you can also roll the sides of the marshmallows in the powdered sugar mixture to prevent sticking.
Tips for Success
These tips will help you make perfect vegan marshmallows!
- Have all your ingredients out and measured before beginning, mise en place style. When making marshmallows, you really want to do each step immediately after the other, not allow things to cool or get cold, which can throw off the final result. Having everything out will help so much with that.
- Don’t over-beat the aquafaba . Overbeating will cause the marshmallow mixture to become too stiff and harden when it sets.
- Be careful when adding the agar mixture into the aquafaba . Adding the agar too quickly can cause the marshmallows to become clumpy and dense. A slow steady or broken up drizzle works best.
- Use a thermometer . There’s no way around it—it’s the only way to know the temperature of your syrup! Check the temperature of your sugar syrup before adding it to the whipped aquafaba. If it’s higher than 240ºF, let it cool a bit before adding.
Variations
You can add all kinds of flavours to your vegan marshmallows! Here are some fun ideas:
- Make birthday cake marshmallows by adding sprinkles.
- Mix in mini chocolate chips for chocolate chip marshmallows.
- Swap the vanilla extract for different flavors. Peppermint extract is fantastic for the holidays!
How to Store
Store your vegan marshmallows in an airtight container in a cool, dry place for up to 2 weeks.
Can Vegan Marshmallows Be Frozen?
Vegan marshmallows can be frozen for up to 3 months in an airtight container or freezer bag. Let them thaw at room temperature before you use them.
More Vegan Basics
- How to Make Vegan Parmesan Cheese
- Vegan Ricotta
- Vegan Heavy Cream Substitute
- How to Make Vegetable Broth with Veggie Scraps
- The Best Vegan Cream Cheese
Ingredients
- ½ cup powdered sugar , for dusting the pan ( 2 oz / 60 grams)
- ½ cup cornstarch , for dusting the pan ( 1.75 oz/ 50 grams)
- ½ cup aquafaba , 118 grams (it is better to use chilled aquafaba) I recommend no salt added aquafaba
- ¼ teaspoon cream of tartar , 1 gram
- 2 teaspoons vanilla extract , 8 grams
For syrup:
- 1 cup granulated sugar , 7 oz / 200 grams
- ⅓ cup water , 80 grams
For agar mixture:
- 4 teaspoons agar-agar powder , 10 grams
- ¼ cup granulated sugar , 50 grams
- ¾ cup water , 180 grams
Instructions
- Prepare a 9-inch pan by lining it with parchment paper and lightly dusting it with a mixture of powdered sugar and cornstarch. This will prevent the marshmallow from sticking. You’ll want to do this first since you want to transfer your marshmallows immediately after you’re finished mixing, else it’ll begin to firm up in your mixing bowl and won’t be that smooth delicate pour.
- In the bowl of a stand mixer fitted with a whisk attachment, pour in the aquafaba and add the cream of tartar. Start whisking at medium speed until the aquafaba forms soft peaks. (This should take about 10 minutes on medium speed or medium-high speed if you’re not using chilled aquafaba.)
- In a saucepan, combine 1 cup of granulated sugar and ⅓ cup of water. Place the saucepan over medium-high heat and let the mixture come to a simmer without stirring. Insert a candy thermometer into the syrup and continue simmering until it reaches 240°F (115°C). It should take approximately 10 minutes.
- Once the sugar syrup reaches the desired temperature, slowly drizzle it into the whipped aquafaba while continuing to whisk. Keep whisking for an additional 5-8 minutes until the aquafaba becomes glossy and stiff peaks form. Add the vanilla extract during this process.
- In a saucepan, combine ¼ cup of granulated sugar, ¾ cup of water, and the agar-agar powder. Mix the ingredients thoroughly. Place the saucepan over medium-high heat and bring it to a boil. Whisk continuously for 2-3 minutes while the mixture simmers.
- Slowly pour the agar mixture into the whipped aquafaba, whisking constantly until the mixture is fully incorporated. Continue to whisk until the agar is incorporated into the aquafaba mixture, which shouldn’t take more than 1 minute.
- Using a spatula, transfer the marshmallow mixture to the prepared pan, spreading it evenly. You won’t get everything out, closer to about 90% out, and don’t try to get it all out because it’ll start to set as it hits the pan and you want to focus on smoothing that part down. If you’re having difficulty spreading the marshmallow fluff into an even texture, slightly wet your hands of the spatula to help you pat it down. Loosely cover the pan with a towel, allowing the marshmallow to set at room temperature for 4-6 hours.
- Once the marshmallow has set, dust the top with the remaining powdered sugar and cornstarch mixture, ensuring a light coating. Loosen up the edges with a dinner knife, then dust a sharp knife with your cornstarch powdered sugar mixture.
- Cut out 36 square marshmallows ( 6 rows, 6 columns) or carefully cut the marshmallow into desired shapes. If desired, roll the cut marshmallows in the sugar-cornstarch mixture, ensuring all sides are coated. Gently tap off any excess mixture. Enjoy!
Notes
- Have all your ingredients out and measured before beginning, mise en place style. When making marshmallows, you really want to do each step immediately after the other, not allow things to cool or get cold, which can throw off the final result. Having everything out will help so much with that.
- Don’ t over-beat the aquafaba . Overbeating will cause the marshmallow mixture to become too stiff and harden when it sets.
- Be careful when adding the agar mixture into the aquafaba . Adding the agar too quickly can cause the marshmallows to become clumpy and dense. A slow steady or broken up drizzle works best.
- Use a thermometer . There’s no way around it—it’s the only way to know the temperature of your syrup! Check the temperature of your sugar syrup before adding it to the whipped aquafaba. If it’s higher than 240ºF, let it cool a bit before adding.
