These Vegan Cheez-Its are everything you love about the classic cheese crackers, minus the cheese! Easy to make, highly snackable, and full of that irresistibly cheesy flavour.
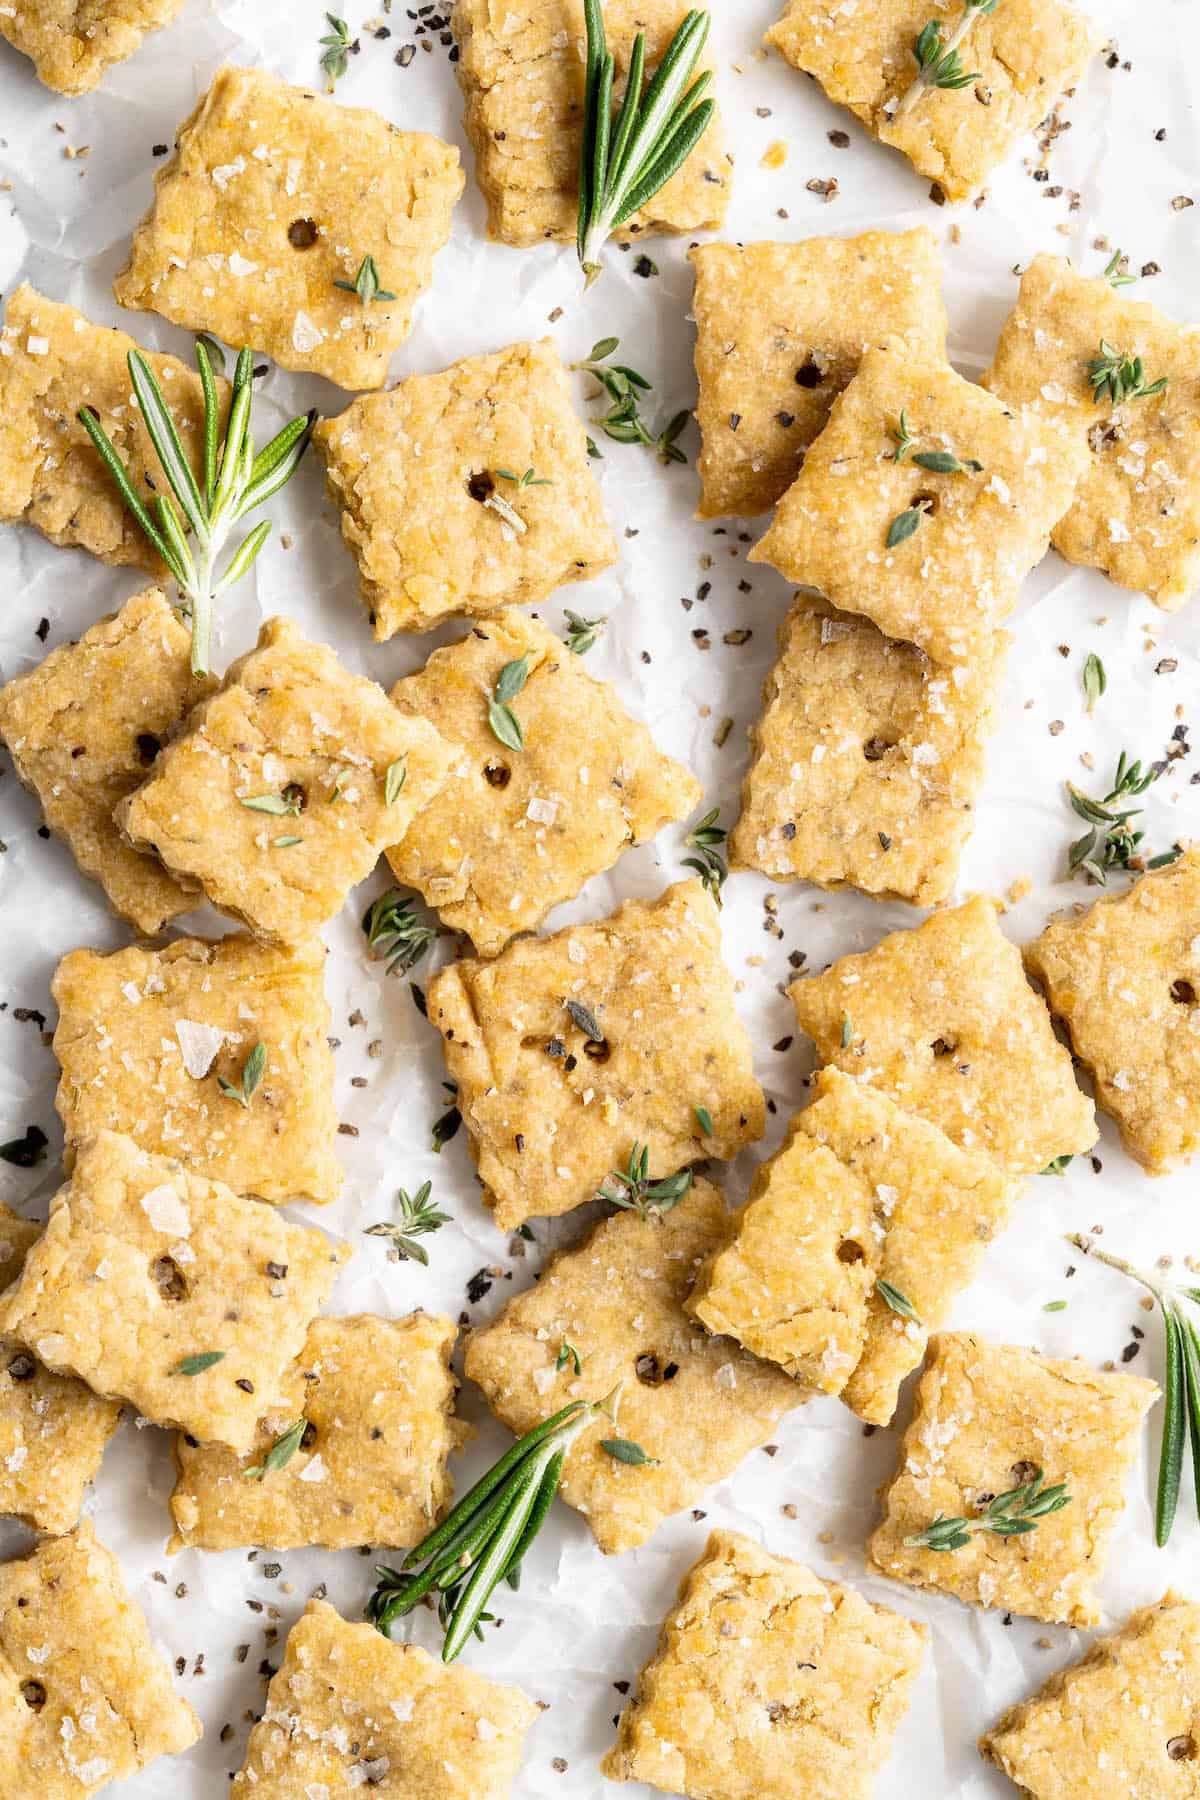
Attention snack lovers! I’ve got a treat for you today! If you love snacks that are crispy, crunchy, and cheesy, then these Vegan Cheez-Its are going to be your new fave. (Bonus: They won’t even turn your fingers orange when you eat them!) You won’t believe how much cheesy flavour we pack into these little vegan cheese crackers.
The secret? Nutritional yeast !
Yep, good ol’ nooch is the key ingredient here, which means you get loads of cheesiness, with some added nutrition, too.

To class things up a bit, I’ve added rosemary for some herbaceous flavour, but you can definitely skip that if you want the traditional Cheez-It experience here.
If you’ve never made homemade crackers before, it’s easier than you might expect. Just make a dough, roll it out super thin, cut the crackers, then bake them to crispy perfection. I cut basic squares here, but you can use small cookie cutters to create shapes, too—just pat together the scraps, roll them out again, and keep cutting.
(Want some more vegan snack ideas? I’ve got ’em! Here’s Three Ways To Make Kale Chips .
Notes on Ingredients
Please note that this is important information on the ingredients and instructions and the FULL recipe with amounts and details can be found DOWN BELOW (scroll to it) in the recipe card.
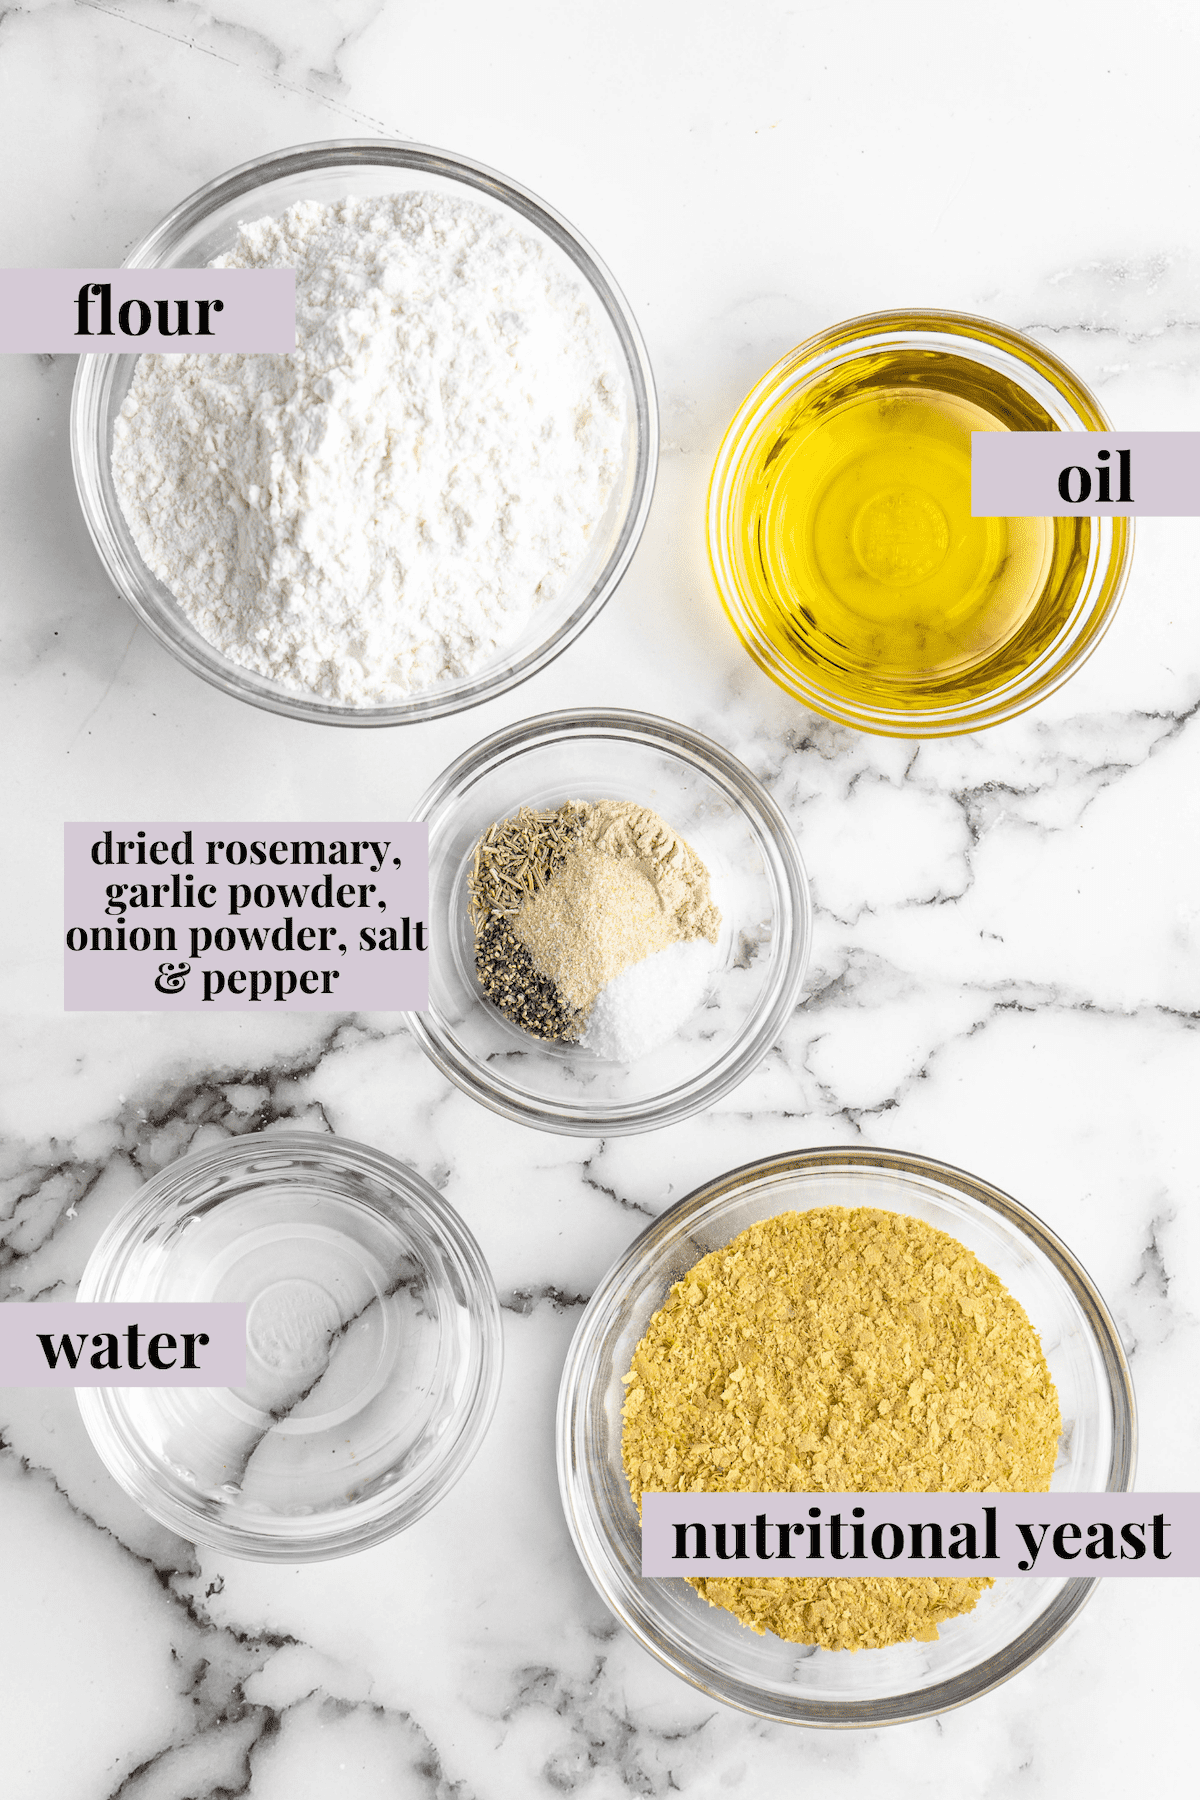
- Nutritional yeast – You can usually find this with the spices at the grocery store; if yours has a bulk section, you might be able to find it there, too.
- All-purpose flour – I used an all-purpose gluten-free baking flour (AKA a measure-for-measure substitute), but if you’re not on a gluten-free diet, regular (wheat) all-purpose flour is just fine.
- Ground black pepper
- Dried rosemary
- Sea salt
- Garlic powder
- Onion powder
- Ice cold water – Pour some water into a glass with ice cubes; once the water is chilled, measure out what you need for the recipe and discard the ice.
- Olive oil
Does nutritional yeast really taste like cheese?
Yes and no. It’s not exactly like cheese, but it does have a cheesy flavour, although it also has a note of nuttiness to it, which reminds me of an aged Parmesan. In fact, I use it to make my favourite vegan Parmesan !
How to Make Vegan Cheez-Its
These vegan cheese crackers take just 30 minutes to make, so you can whip them up whenever you’re craving a crispy, cheesy snack. Here’s what you’ll need to do.
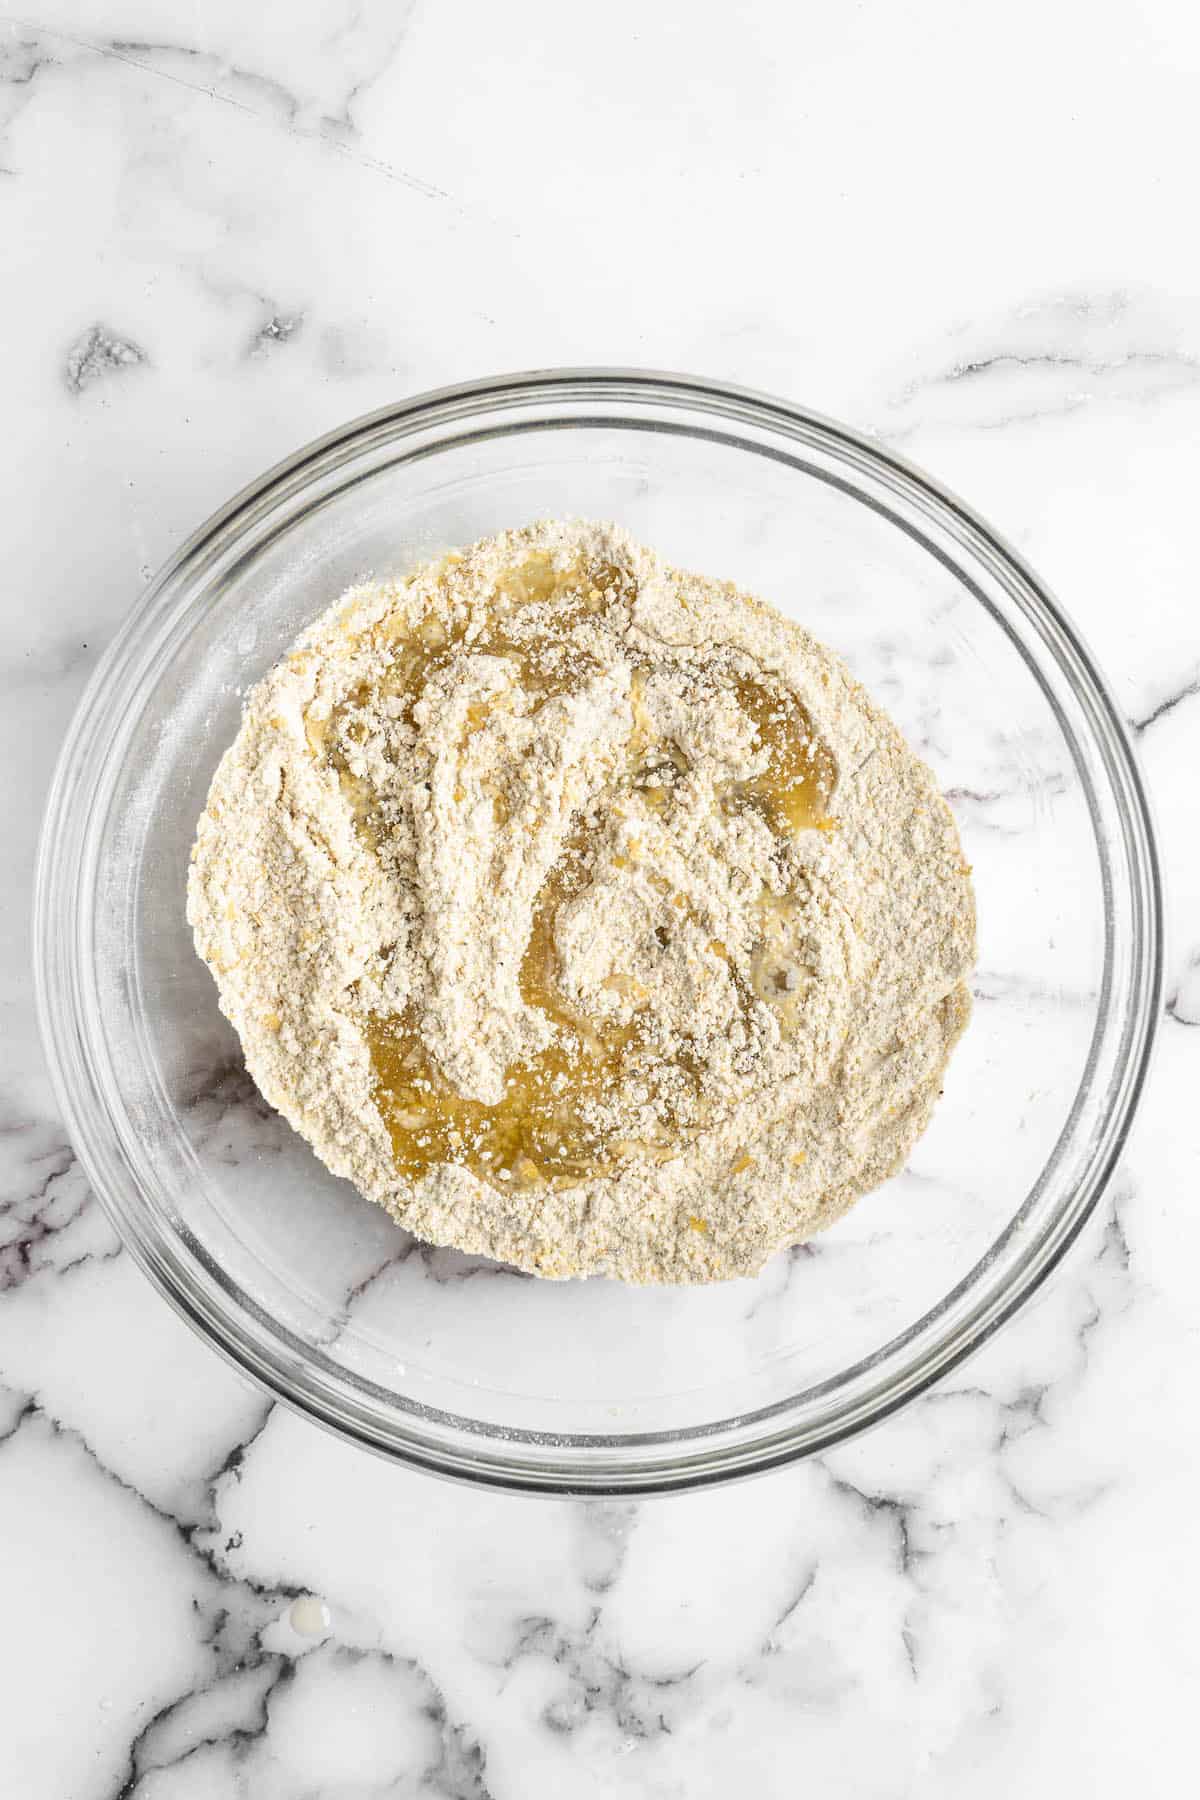
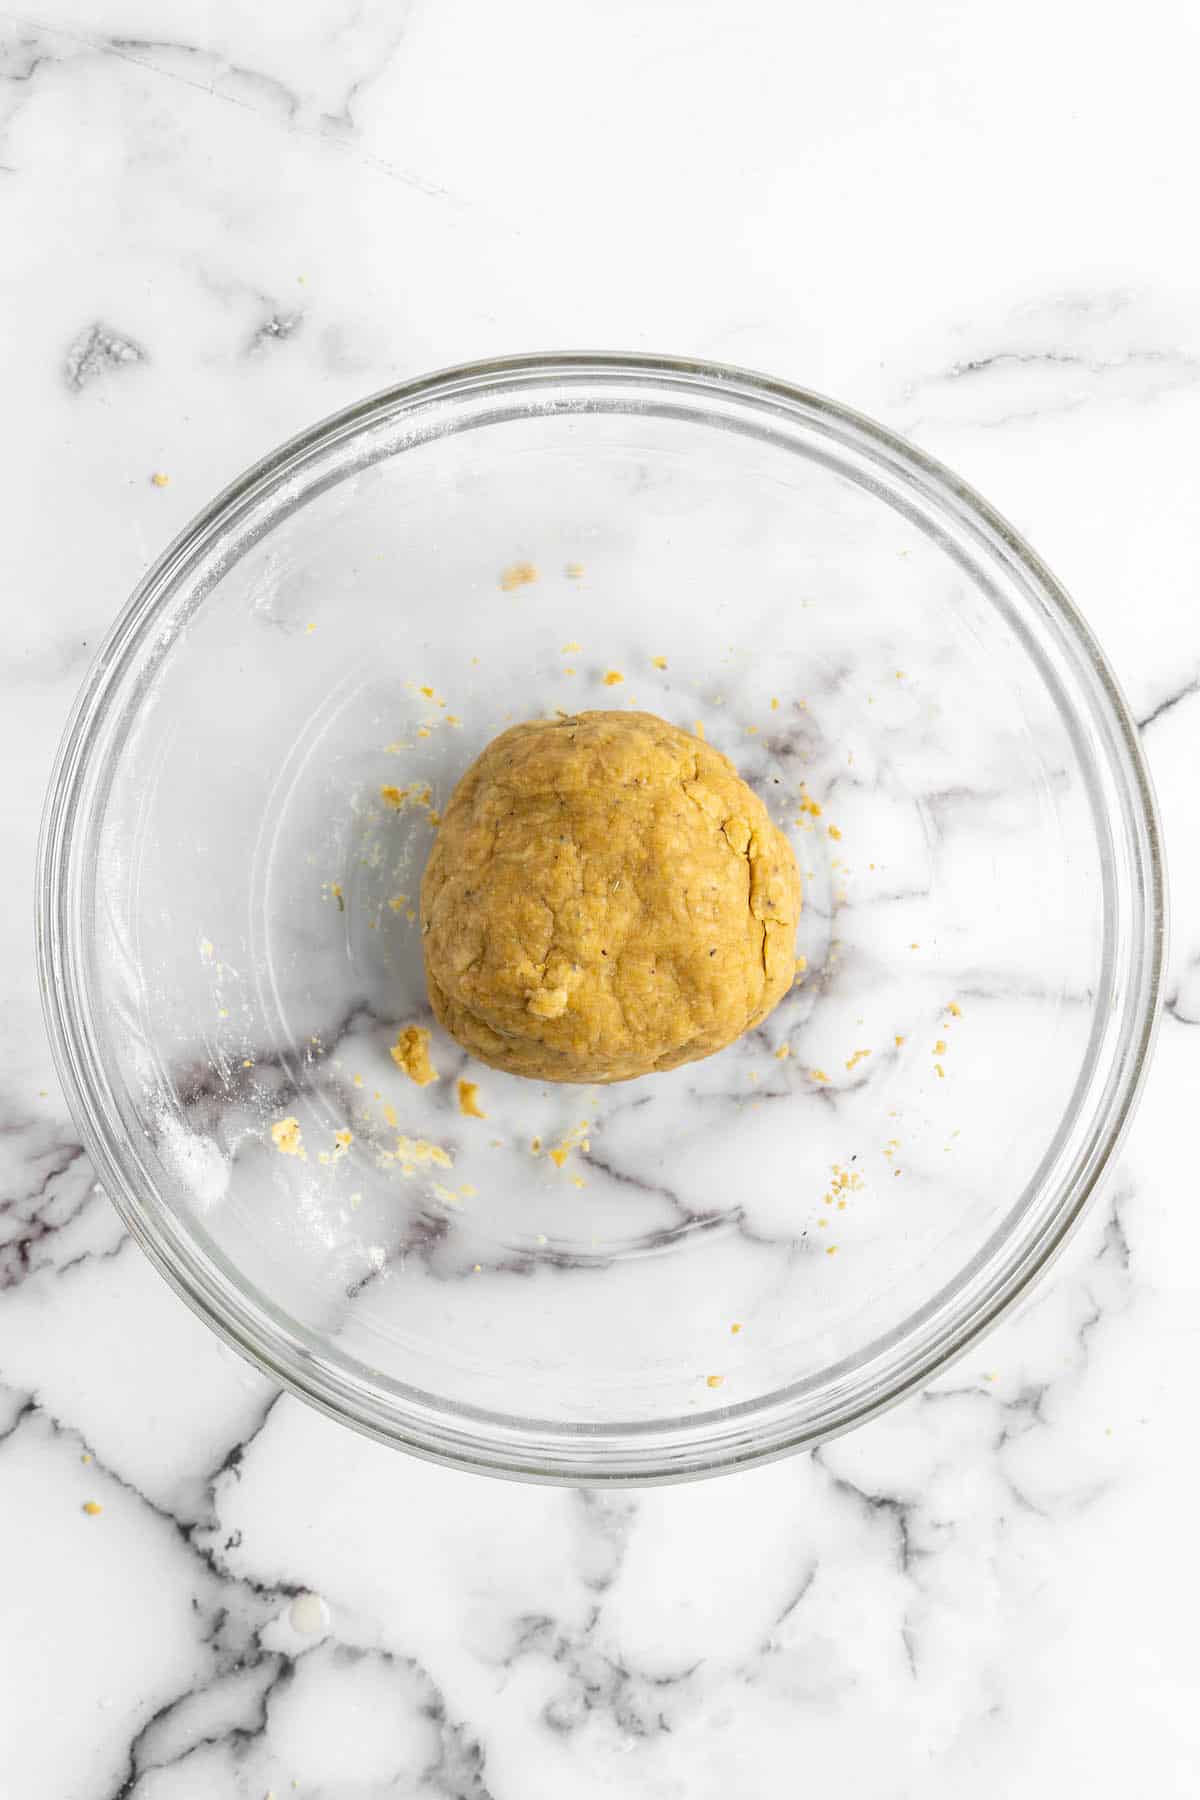
Form the dough. Whisk together the dry ingredients in a large mixing bowl. Add the olive oil and ice water and use your hands to mix everything together until pea-sized crumbs form. Then, press the mixture together to form a dough. Knead for 2 minutes.
Chill . Form the dough into a ball and wrap it in plastic wrap, then freeze it for 10 minutes. Begin preheating your oven to 400°F/200°C.
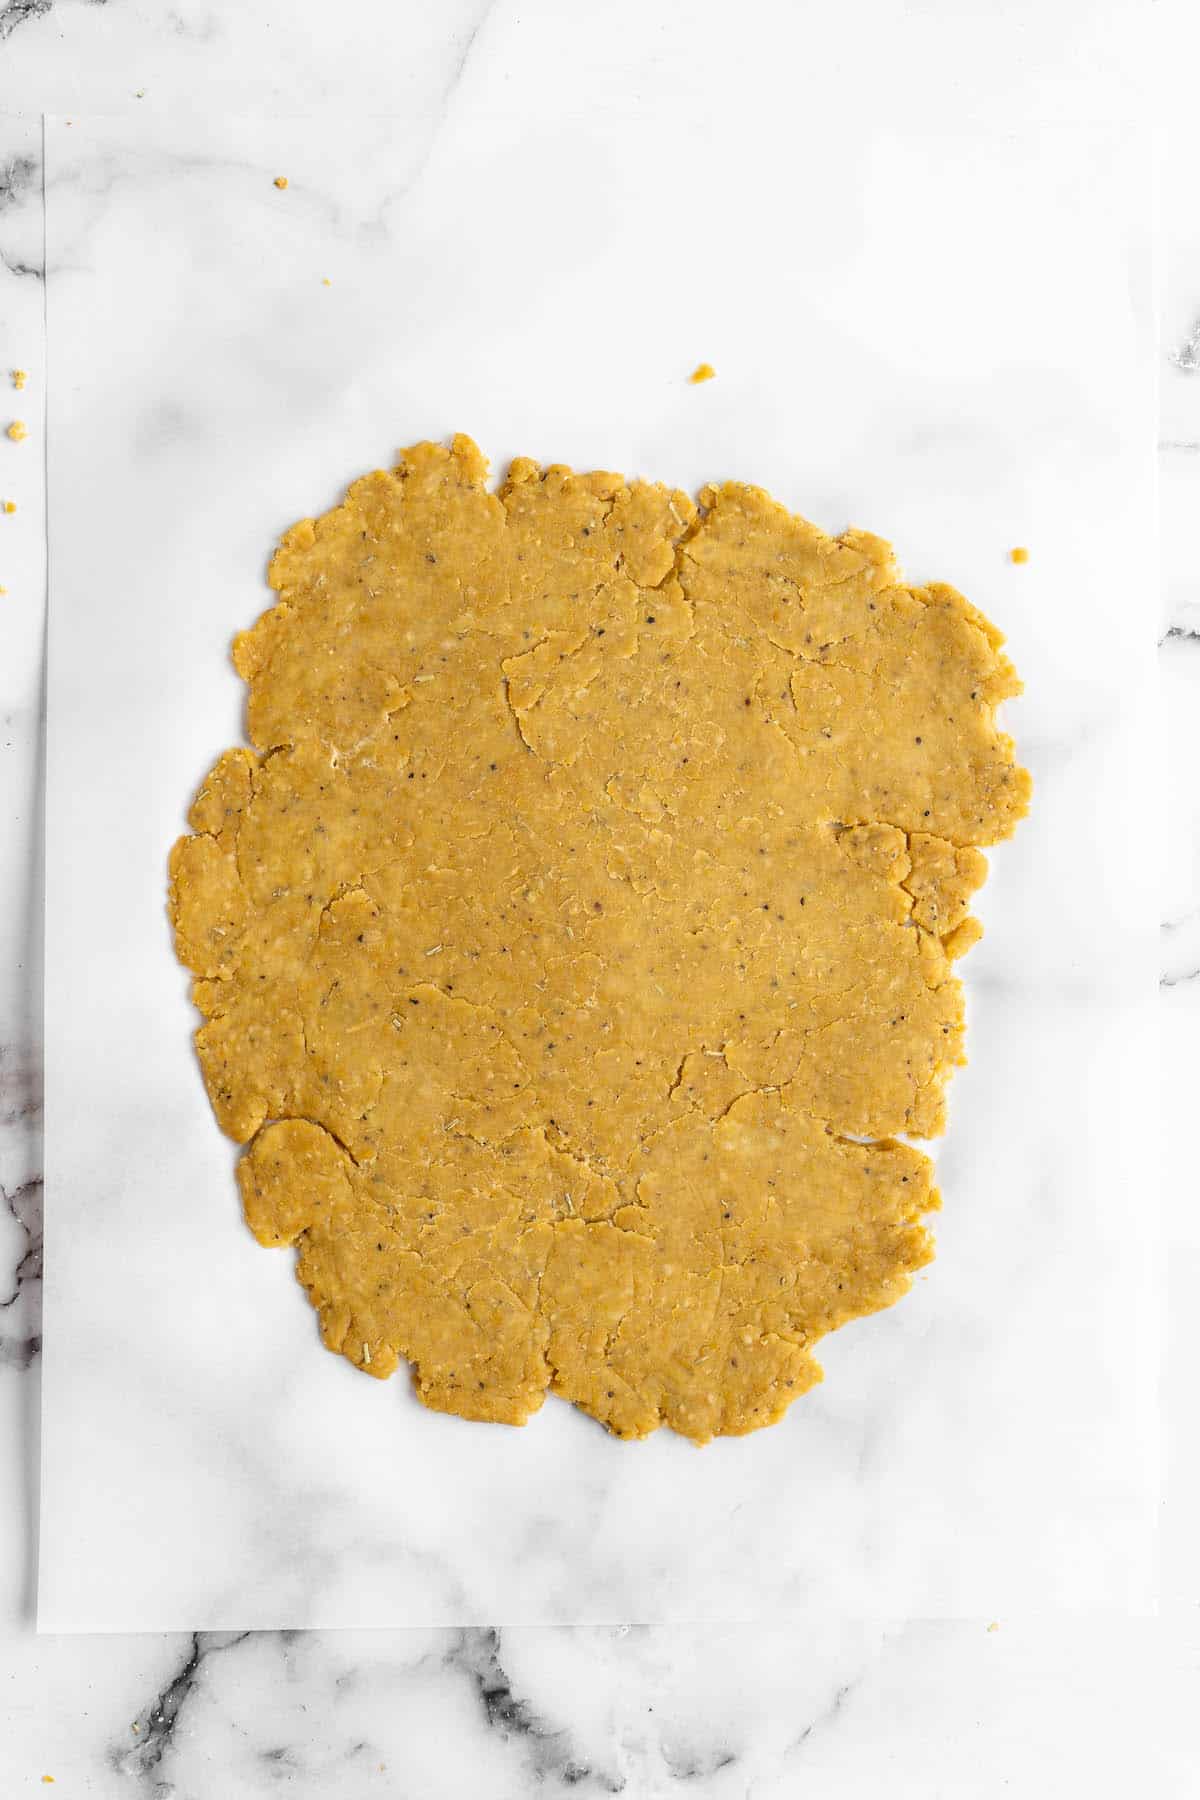
Roll out the dough . Unwrap the dough and place it on a piece of parchment paper. Roll it out to 1/8-inch thick.
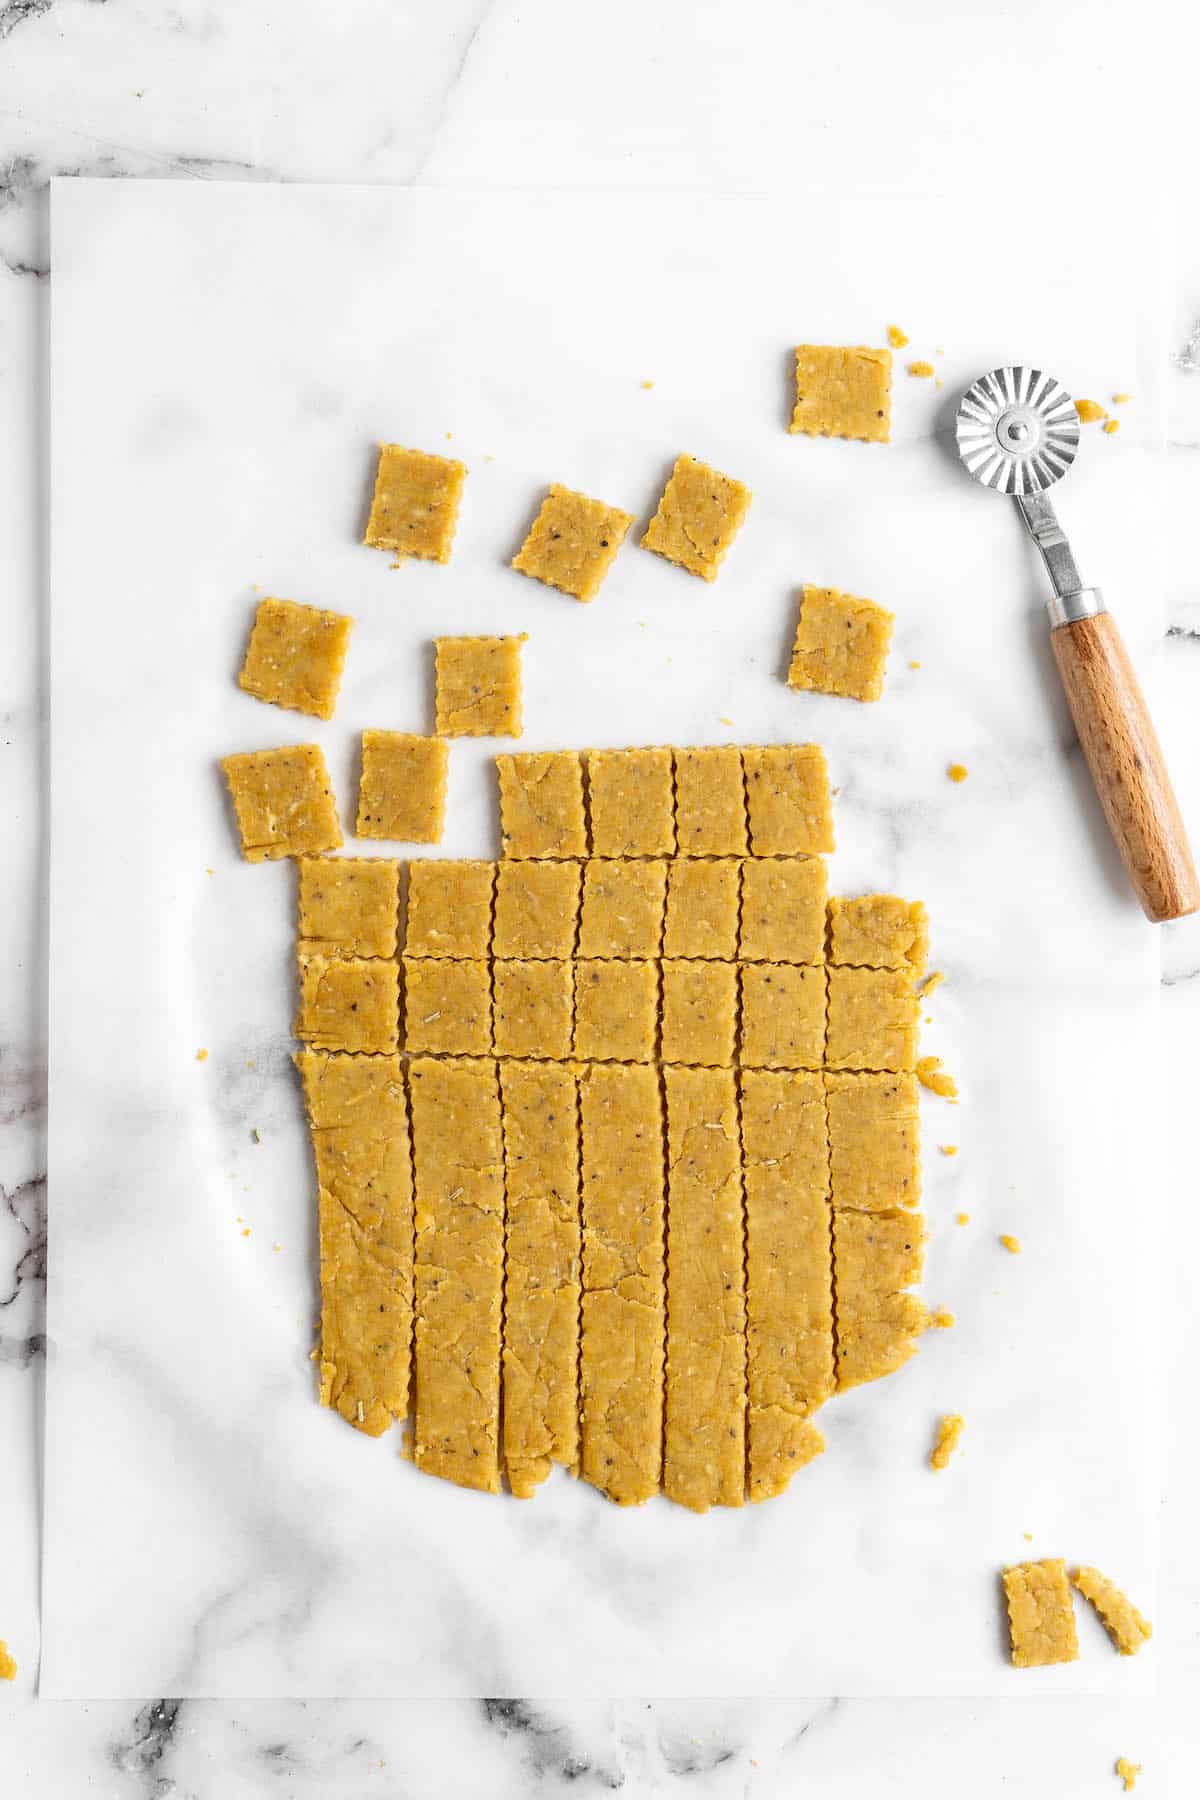
Form the crackers . Use a knife or a pastry cutter to cut the crackers into 1-inch squares and poke a hole into the center of each. Place them on a parchment-lined baking sheet and sprinkle them with salt.
Bake . Place the baking sheet in the oven and bake for 10 to 12 minutes.
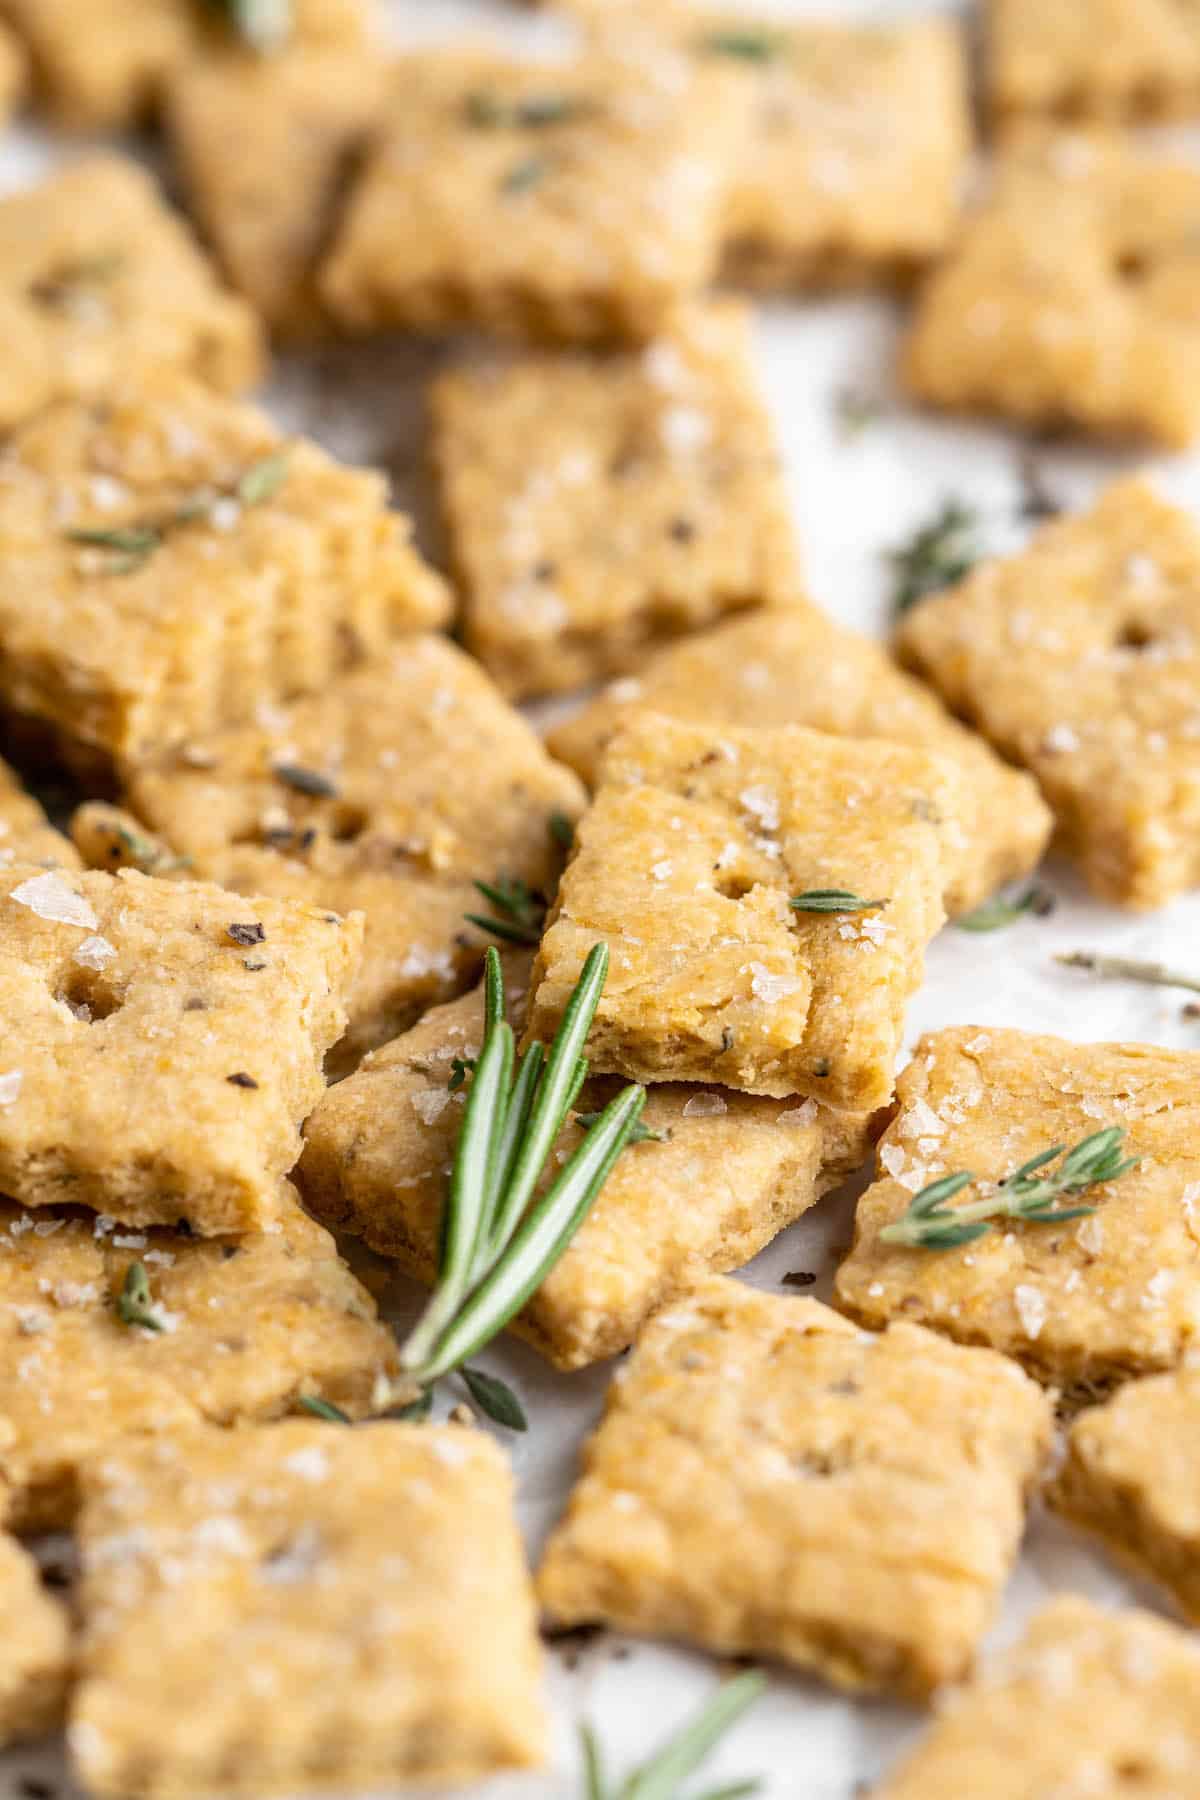
Cool . Let your vegan Cheez-Its cool completely on the baking sheet before serving. As they cool, they’ll get crispier!
Tips for Success
I have some hints and tips to help you make sure your vegan Cheez-Its turn out delicious!
- Measure the ingredients with a kitchen scale . You won’t have to wash as many measuring spoons and cups, and you’ll be certain to have the right proportions.
- Expect a crumbly dough . But if it won’t come together, you can add another tablespoon of water.
- Roll out the dough evenly . It should be 1/8-inch all around, from the center to the edges. If different spots have different thicknesses, your crackers will all finish baking at different times, or some will be doughy on the inside.
Variations
I love the flavour of rosemary in these vegan cheese crackers, but thyme is lovely too. Try smoked paprika or sprinkle the tops of the crackers with everything bagel seasoning. There’s a lot of room to experiment with vegan Cheez-Its as long as you don’t change the dough or overall proportions of the recipe.

How to Store
Store your homemade Vegan Cheez-Its in a sealed airtight container at room temperature. They’ll keep for about a week.
Ingredients
- ½ cup Bob’s Red Mill Nutritional Yeast , 30 g
- 1 cup Bob’s Red Mill Gluten Free All Purpose Baking Flour* , 148 g
- ½ teaspoon freshly ground black pepper , (1.15g) optional
- ½ teaspoon dried rosemary , (1g) optional
- ½ teaspoon sea salt , (2.8g)
- ½ teaspoon garlic powder , (1g)
- ½ teaspoon onion powder , (1g)
- ¼ cup ice cold water , + 1 tablespoon ( 74 mL) if it is looking crumbly
- ¼ cup olive oil , (60mL) or vegan butter, slightly softened
Instructions
- In a large bowl, add all the dry ingredients and stir together. Pour in the olive oil and the ice water and using your hands, mix together into pea sized crumbs until the liquid is incorporated, and then form together with your hands until a dough comes together.
- The dough may look a bit dry and crumbly at first. It can take a while to absorb the liquid. You can add about a tablespoon of water to the dough if after a minute it’s still dry and hard to use.
- Knead the dough together for about two minutes. Wrap the dough with cling wrap and place in the freezer for about 10 minutes while you preheat your oven to 400°F/200°C.
- Remove the dough and using a rolling pin , roll the dough on a parchment paper to less than a ⅛ inch aka, as thin as you can. This will guarantee a nice crispy and flaky cracker. Try and roll it as even as possible as well to ensure the crackers bake evenly.
- Using a knife or a pastry cutter, cut the crackers into 1 inch squares, up and down the dough.
- Poke a decorative hole into each cracker. Remove the crackers one by one and place on a lined parchment, or separate them on the same parchment (I find putting them on a different one much easier), ensuring they aren’t touching. Sprinkle with extra sea salt on top.
- Bake the crackers for 10-12 minutes. If they aren’t totally even, some may bake faster than others at the 10 minute mark, and others will take the full 12 minutes to bake.
- Remove from the oven and let cool completely. If they aren’t crispy as soon as they come out of the oven they will crisp up once cooled. Serve and enjoy!
Notes
These Vegan Cheez-Its are everything you love about the classic cheese crackers, minus the cheese! Easy to make, highly snackable, and full of that irresistibly cheesy flavour.
Attention snack lovers! I’ve got a treat for you today! If you love snacks that are crispy, crunchy, and cheesy, then these Vegan Cheez-Its are going to be your new fave. (Bonus: They won’t even turn your fingers orange when you eat them!) You won’t believe how much cheesy flavour we pack into these little vegan cheese crackers.
The secret? Nutritional yeast !
Yep, good ol’ nooch is the key ingredient here, which means you get loads of cheesiness, with some added nutrition, too.
To class things up a bit, I’ve added rosemary for some herbaceous flavour, but you can definitely skip that if you want the traditional Cheez-It experience here.
If you’ve never made homemade crackers before, it’s easier than you might expect. Just make a dough, roll it out super thin, cut the crackers, then bake them to crispy perfection. I cut basic squares here, but you can use small cookie cutters to create shapes, too—just pat together the scraps, roll them out again, and keep cutting.
(Want some more vegan snack ideas? I’ve got ’em! Here’s Three Ways To Make Kale Chips .
Notes on Ingredients
Please note that this is important information on the ingredients and instructions and the FULL recipe with amounts and details can be found DOWN BELOW (scroll to it) in the recipe card.
- Nutritional yeast – You can usually find this with the spices at the grocery store; if yours has a bulk section, you might be able to find it there, too.
- All-purpose flour – I used an all-purpose gluten-free baking flour (AKA a measure-for-measure substitute), but if you’re not on a gluten-free diet, regular (wheat) all-purpose flour is just fine.
- Ground black pepper
- Dried rosemary
- Sea salt
- Garlic powder
- Onion powder
- Ice cold water – Pour some water into a glass with ice cubes; once the water is chilled, measure out what you need for the recipe and discard the ice.
- Olive oil
Does nutritional yeast really taste like cheese?
Yes and no. It’s not exactly like cheese, but it does have a cheesy flavour, although it also has a note of nuttiness to it, which reminds me of an aged Parmesan. In fact, I use it to make my favourite vegan Parmesan !
How to Make Vegan Cheez-Its
These vegan cheese crackers take just 30 minutes to make, so you can whip them up whenever you’re craving a crispy, cheesy snack. Here’s what you’ll need to do.
Form the dough. Whisk together the dry ingredients in a large mixing bowl. Add the olive oil and ice water and use your hands to mix everything together until pea-sized crumbs form. Then, press the mixture together to form a dough. Knead for 2 minutes.
Chill . Form the dough into a ball and wrap it in plastic wrap, then freeze it for 10 minutes. Begin preheating your oven to 400°F/200°C.
Roll out the dough . Unwrap the dough and place it on a piece of parchment paper. Roll it out to 1/8-inch thick.
Form the crackers . Use a knife or a pastry cutter to cut the crackers into 1-inch squares and poke a hole into the center of each. Place them on a parchment-lined baking sheet and sprinkle them with salt.
Bake . Place the baking sheet in the oven and bake for 10 to 12 minutes.
Cool . Let your vegan Cheez-Its cool completely on the baking sheet before serving. As they cool, they’ll get crispier!
Tips for Success
I have some hints and tips to help you make sure your vegan Cheez-Its turn out delicious!
- Measure the ingredients with a kitchen scale . You won’t have to wash as many measuring spoons and cups, and you’ll be certain to have the right proportions.
- Expect a crumbly dough . But if it won’t come together, you can add another tablespoon of water.
- Roll out the dough evenly . It should be 1/8-inch all around, from the center to the edges. If different spots have different thicknesses, your crackers will all finish baking at different times, or some will be doughy on the inside.
Variations
I love the flavour of rosemary in these vegan cheese crackers, but thyme is lovely too. Try smoked paprika or sprinkle the tops of the crackers with everything bagel seasoning. There’s a lot of room to experiment with vegan Cheez-Its as long as you don’t change the dough or overall proportions of the recipe.
How to Store
Store your homemade Vegan Cheez-Its in a sealed airtight container at room temperature. They’ll keep for about a week.
Ingredients
- ½ cup Bob’s Red Mill Nutritional Yeast , 30 g
- 1 cup Bob’s Red Mill Gluten Free All Purpose Baking Flour* , 148 g
- ½ teaspoon freshly ground black pepper , (1.15g) optional
- ½ teaspoon dried rosemary , (1g) optional
- ½ teaspoon sea salt , (2.8g)
- ½ teaspoon garlic powder , (1g)
- ½ teaspoon onion powder , (1g)
- ¼ cup ice cold water , + 1 tablespoon ( 74 mL) if it is looking crumbly
- ¼ cup olive oil , (60mL) or vegan butter, slightly softened
Instructions
- In a large bowl, add all the dry ingredients and stir together. Pour in the olive oil and the ice water and using your hands, mix together into pea sized crumbs until the liquid is incorporated, and then form together with your hands until a dough comes together.
- The dough may look a bit dry and crumbly at first. It can take a while to absorb the liquid. You can add about a tablespoon of water to the dough if after a minute it’s still dry and hard to use.
- Knead the dough together for about two minutes. Wrap the dough with cling wrap and place in the freezer for about 10 minutes while you preheat your oven to 400°F/200°C.
- Remove the dough and using a rolling pin , roll the dough on a parchment paper to less than a ⅛ inch aka, as thin as you can. This will guarantee a nice crispy and flaky cracker. Try and roll it as even as possible as well to ensure the crackers bake evenly.
- Using a knife or a pastry cutter, cut the crackers into 1 inch squares, up and down the dough.
- Poke a decorative hole into each cracker. Remove the crackers one by one and place on a lined parchment, or separate them on the same parchment (I find putting them on a different one much easier), ensuring they aren’t touching. Sprinkle with extra sea salt on top.
- Bake the crackers for 10-12 minutes. If they aren’t totally even, some may bake faster than others at the 10 minute mark, and others will take the full 12 minutes to bake.
- Remove from the oven and let cool completely. If they aren’t crispy as soon as they come out of the oven they will crisp up once cooled. Serve and enjoy!
Notes

Vegan Cheez-Its
Ingredients
- ½ cup Bob’s Red Mill Nutritional Yeast 30 g
- 1 cup Bob’s Red Mill Gluten Free All Purpose Baking Flour* 148 g
- ½ teaspoon freshly ground black pepper (1.15g) optional
- ½ teaspoon dried rosemary (1g) optional
- ½ teaspoon sea salt (2.8g)
- ½ teaspoon garlic powder (1g)
- ½ teaspoon onion powder (1g)
- ¼ cup ice cold water + 1 tablespoon ( 74 mL) if it is looking crumbly
- ¼ cup olive oil (60mL) or vegan butter, slightly softened
Instructions
- In a large bowl, add all the dry ingredients and stir together. Pour in the olive oil and the ice water and using your hands, mix together into pea sized crumbs until the liquid is incorporated, and then form together with your hands until a dough comes together.
- The dough may look a bit dry and crumbly at first. It can take a while to absorb the liquid. You can add about a tablespoon of water to the dough if after a minute it’s still dry and hard to use.
- Knead the dough together for about two minutes. Wrap the dough with cling wrap and place in the freezer for about 10 minutes while you preheat your oven to 400°F/200°C.
- Remove the dough and using a rolling pin, roll the dough on a parchment paper to less than a ⅛ inch aka, as thin as you can. This will guarantee a nice crispy and flaky cracker. Try and roll it as even as possible as well to ensure the crackers bake evenly.
- Using a knife or a pastry cutter, cut the crackers into 1 inch squares, up and down the dough.
- Poke a decorative hole into each cracker. Remove the crackers one by one and place on a lined parchment, or separate them on the same parchment (I find putting them on a different one much easier), ensuring they aren’t touching. Sprinkle with extra sea salt on top.
- Bake the crackers for 10-12 minutes. If they aren’t totally even, some may bake faster than others at the 10 minute mark, and others will take the full 12 minutes to bake.
- Remove from the oven and let cool completely. If they aren’t crispy as soon as they come out of the oven they will crisp up once cooled. Serve and enjoy!
Notes
Nutrition
Vegan Cheez-Its https://jessicainthekitchen.com/vegan-herbed-parmesan-crackers/ August 5, 2022
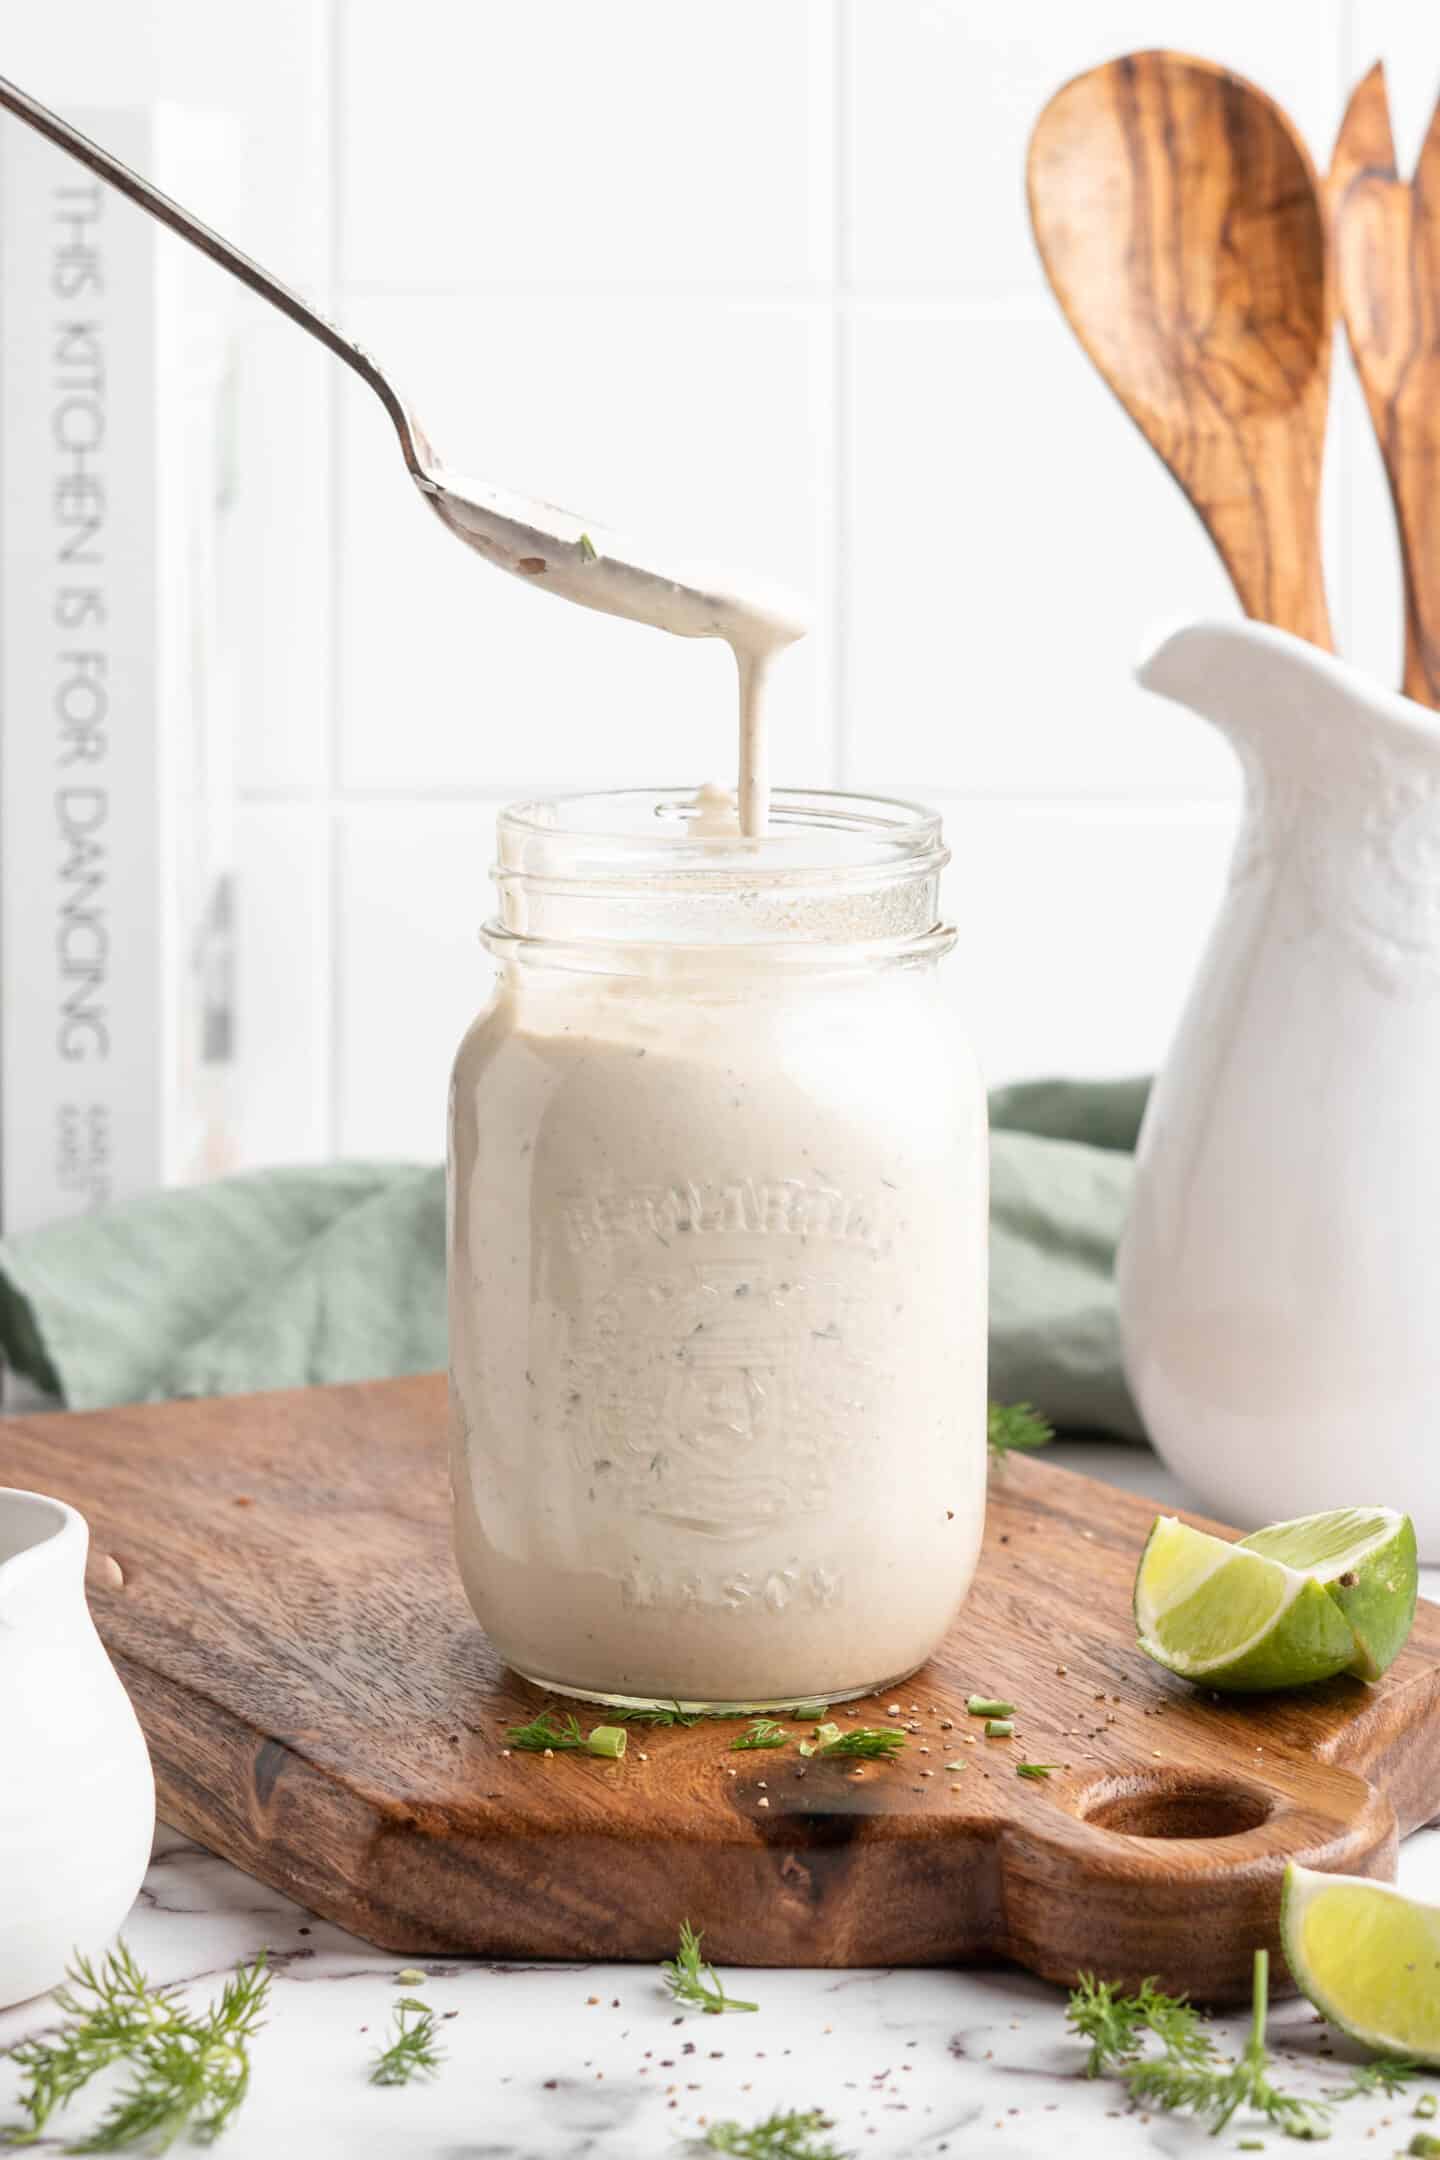
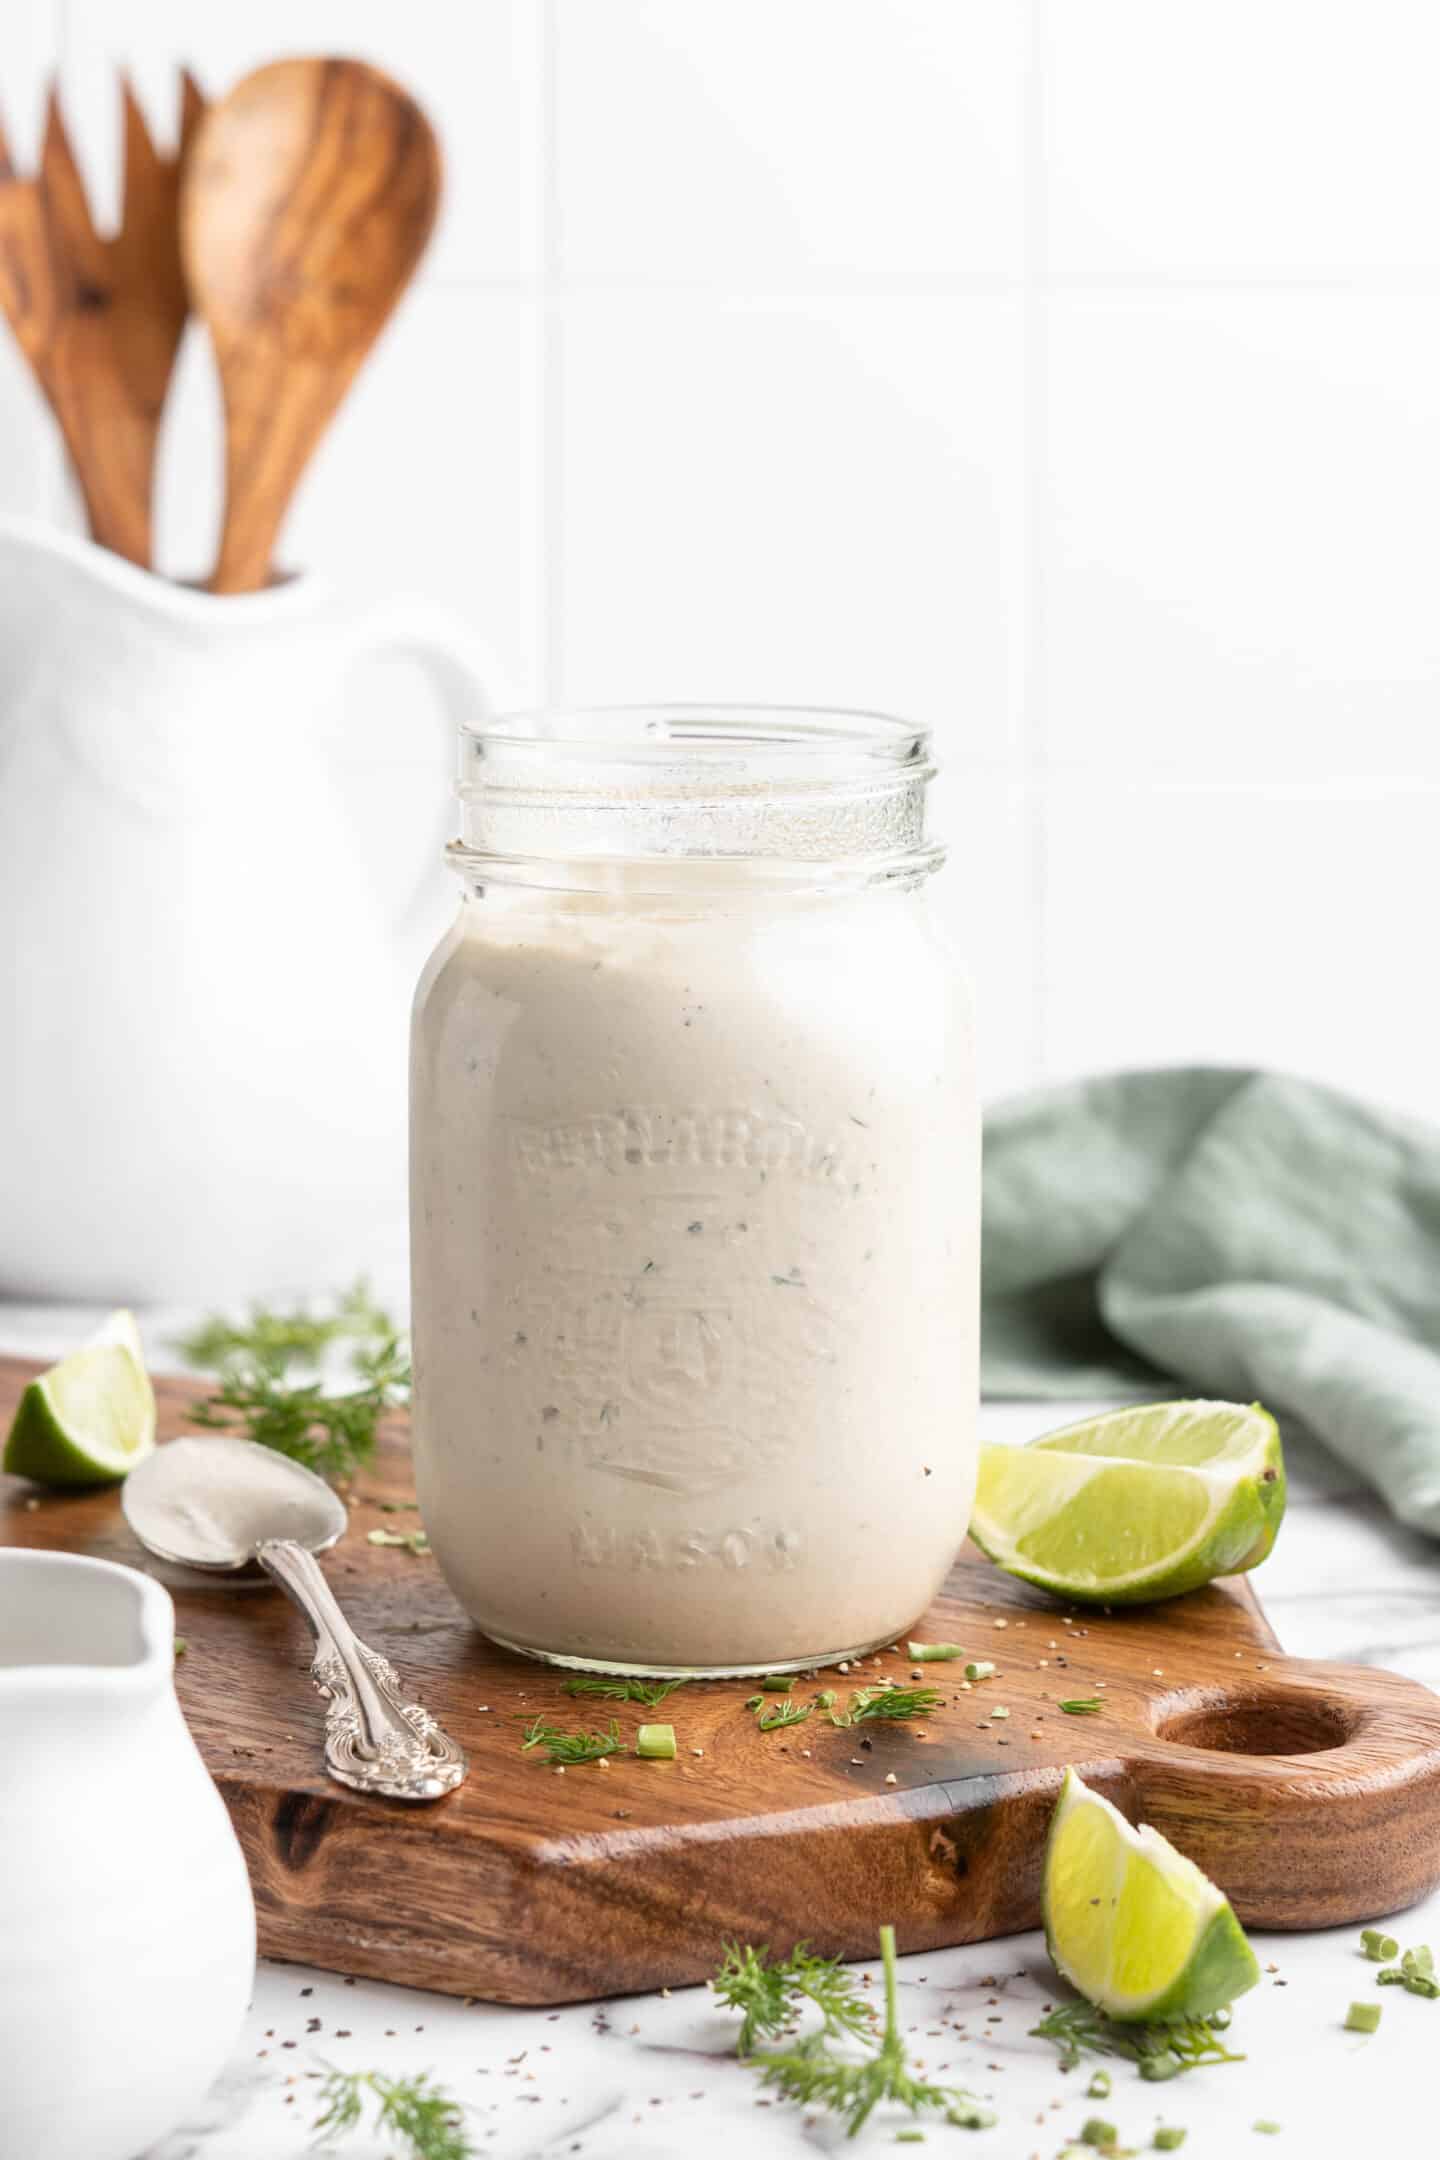
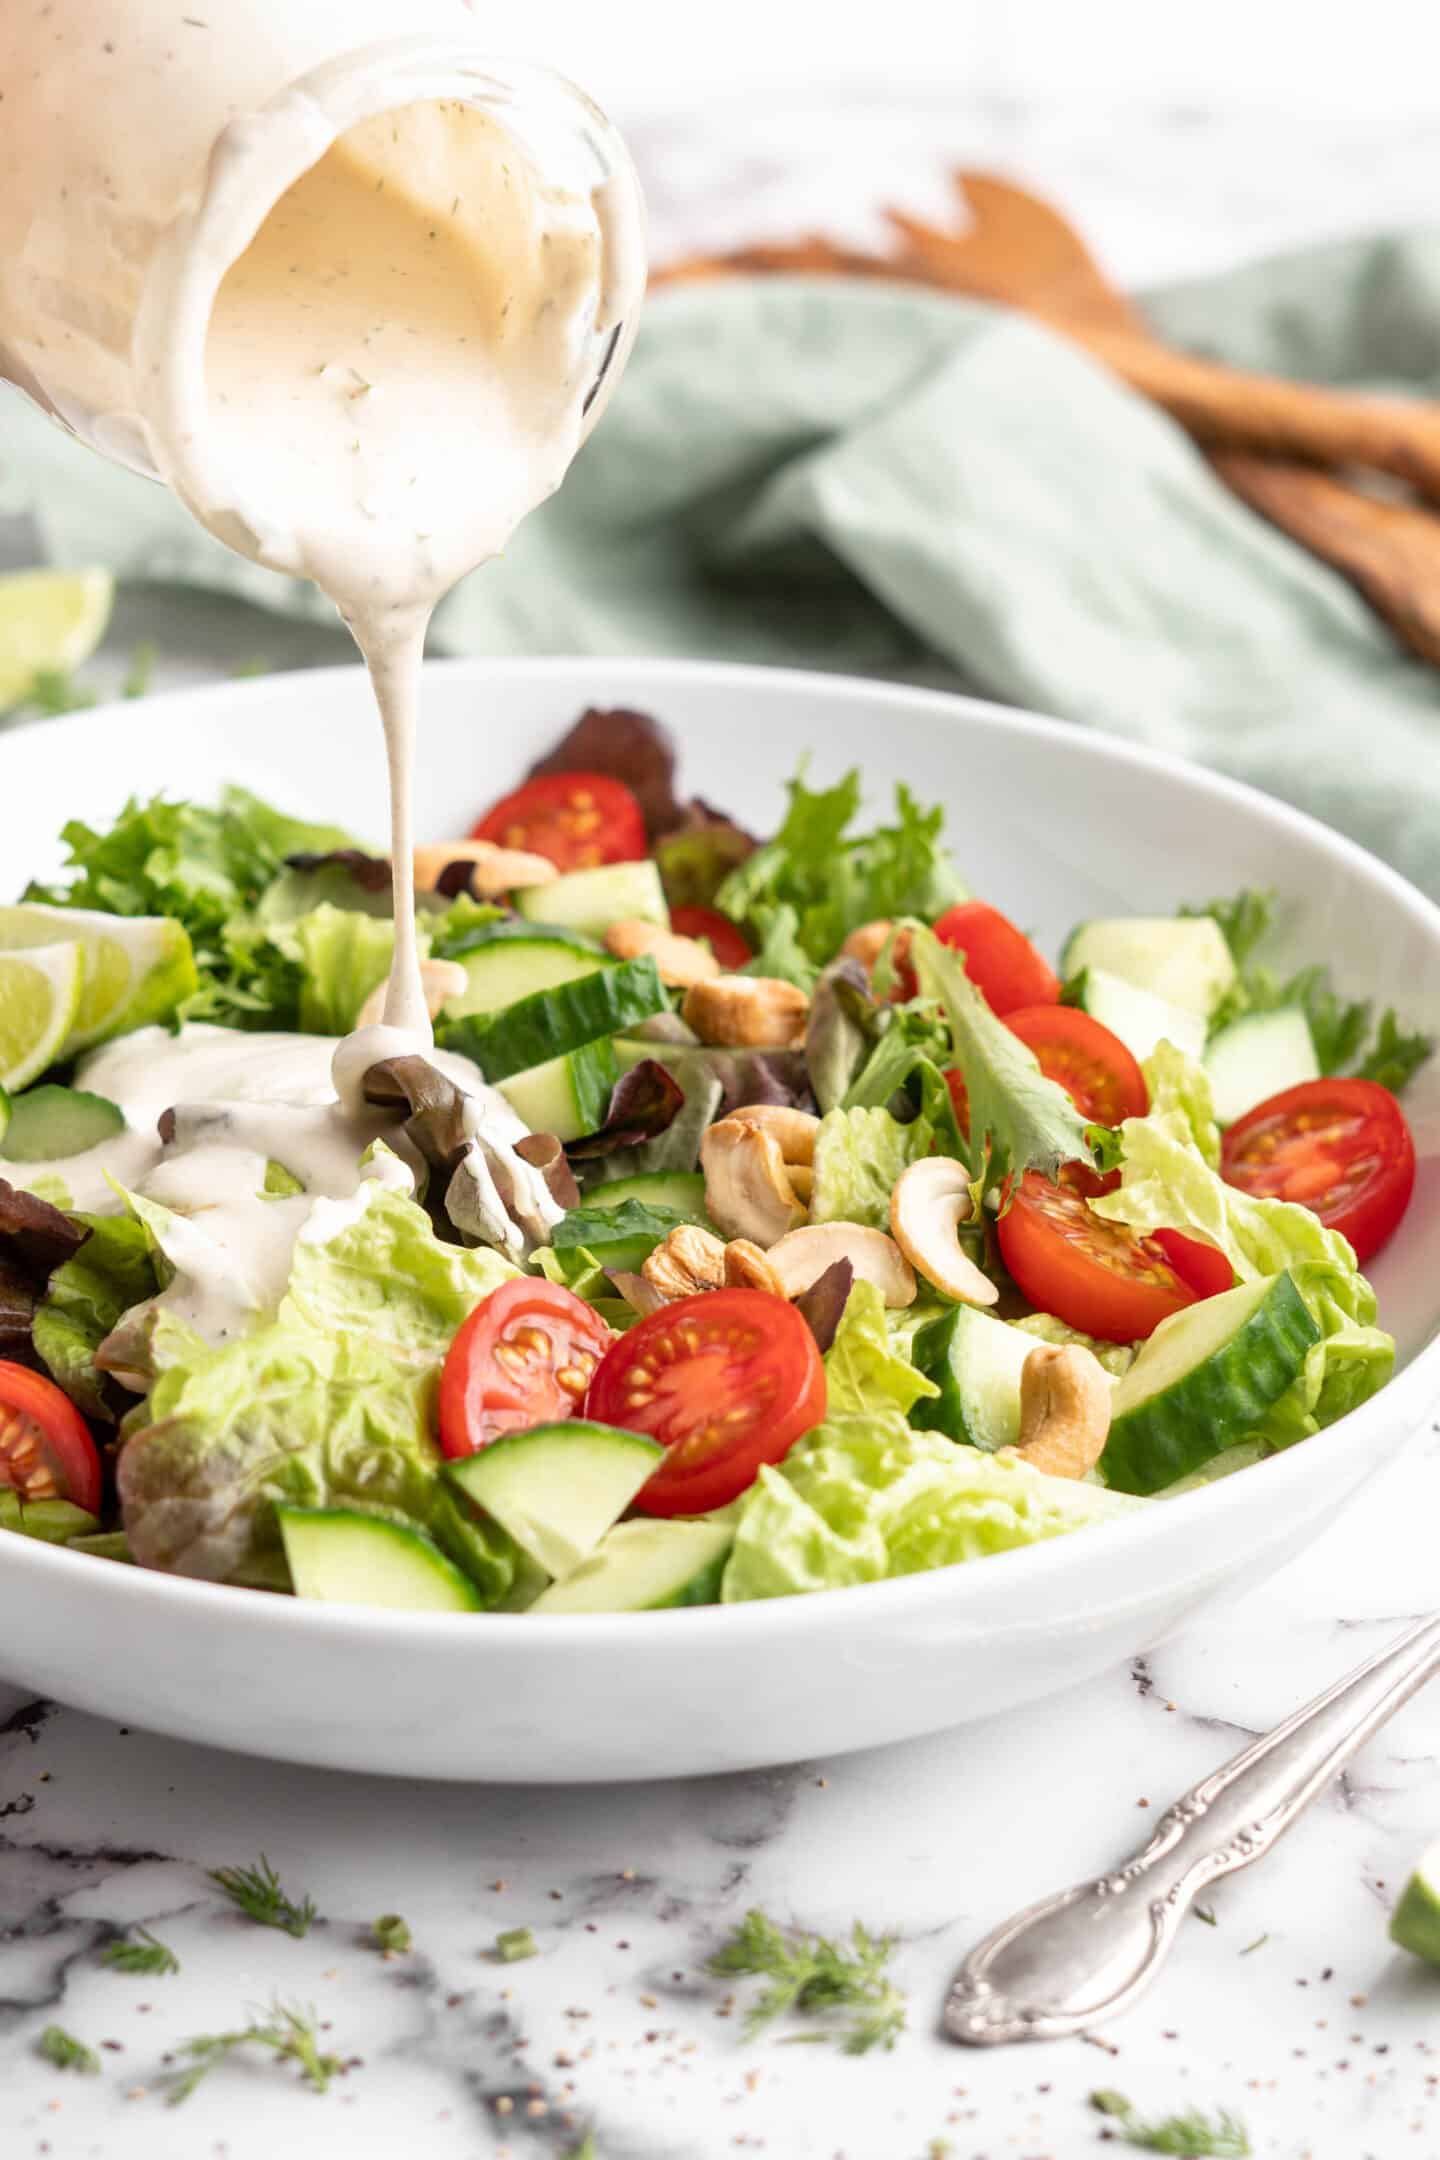
This Vegan Ranch Dressing is just as tangy and creamy as the traditional recipe, but it’s oil-free, dairy-free, and it gets its silky smooth texture from cashews!
After I posted a recipe for Buffalo cauliflower wings , so many readers asked me to share the recipe for the vegan ranch dressing I paired them with, and the answer was: I bought it at the store. (Yep, even food bloggers rely on those store-bought convenience items.)
It turns out, you all really wanted a recipe for homemade vegan ranch dressing, so I rolled up my sleeves and got to work developing a creamy, tangy, dairy-free ranch dressing that was even better than my beloved brand of bottled dressing.
Well, here it is! This from-scratch vegan ranch dressing is unbelievably tasty, with that signature tangy flavour you expect from any decent ranch dip and, of course, that luxuriously creamy texture. Whip it up in minutes and add it to all the things !
(Cashews are one of my favourite tricks for making recipes creamy without dairy! Try my Cashew Milk , Cashew Whipped Cream , and Baked Vegan Mac and Cheese for some more ideas.)
Notes on Ingredients
Please note that this is important information on the ingredients and instructions and the FULL recipe with amounts and details can be found DOWN BELOW (scroll to it) in the recipe card.
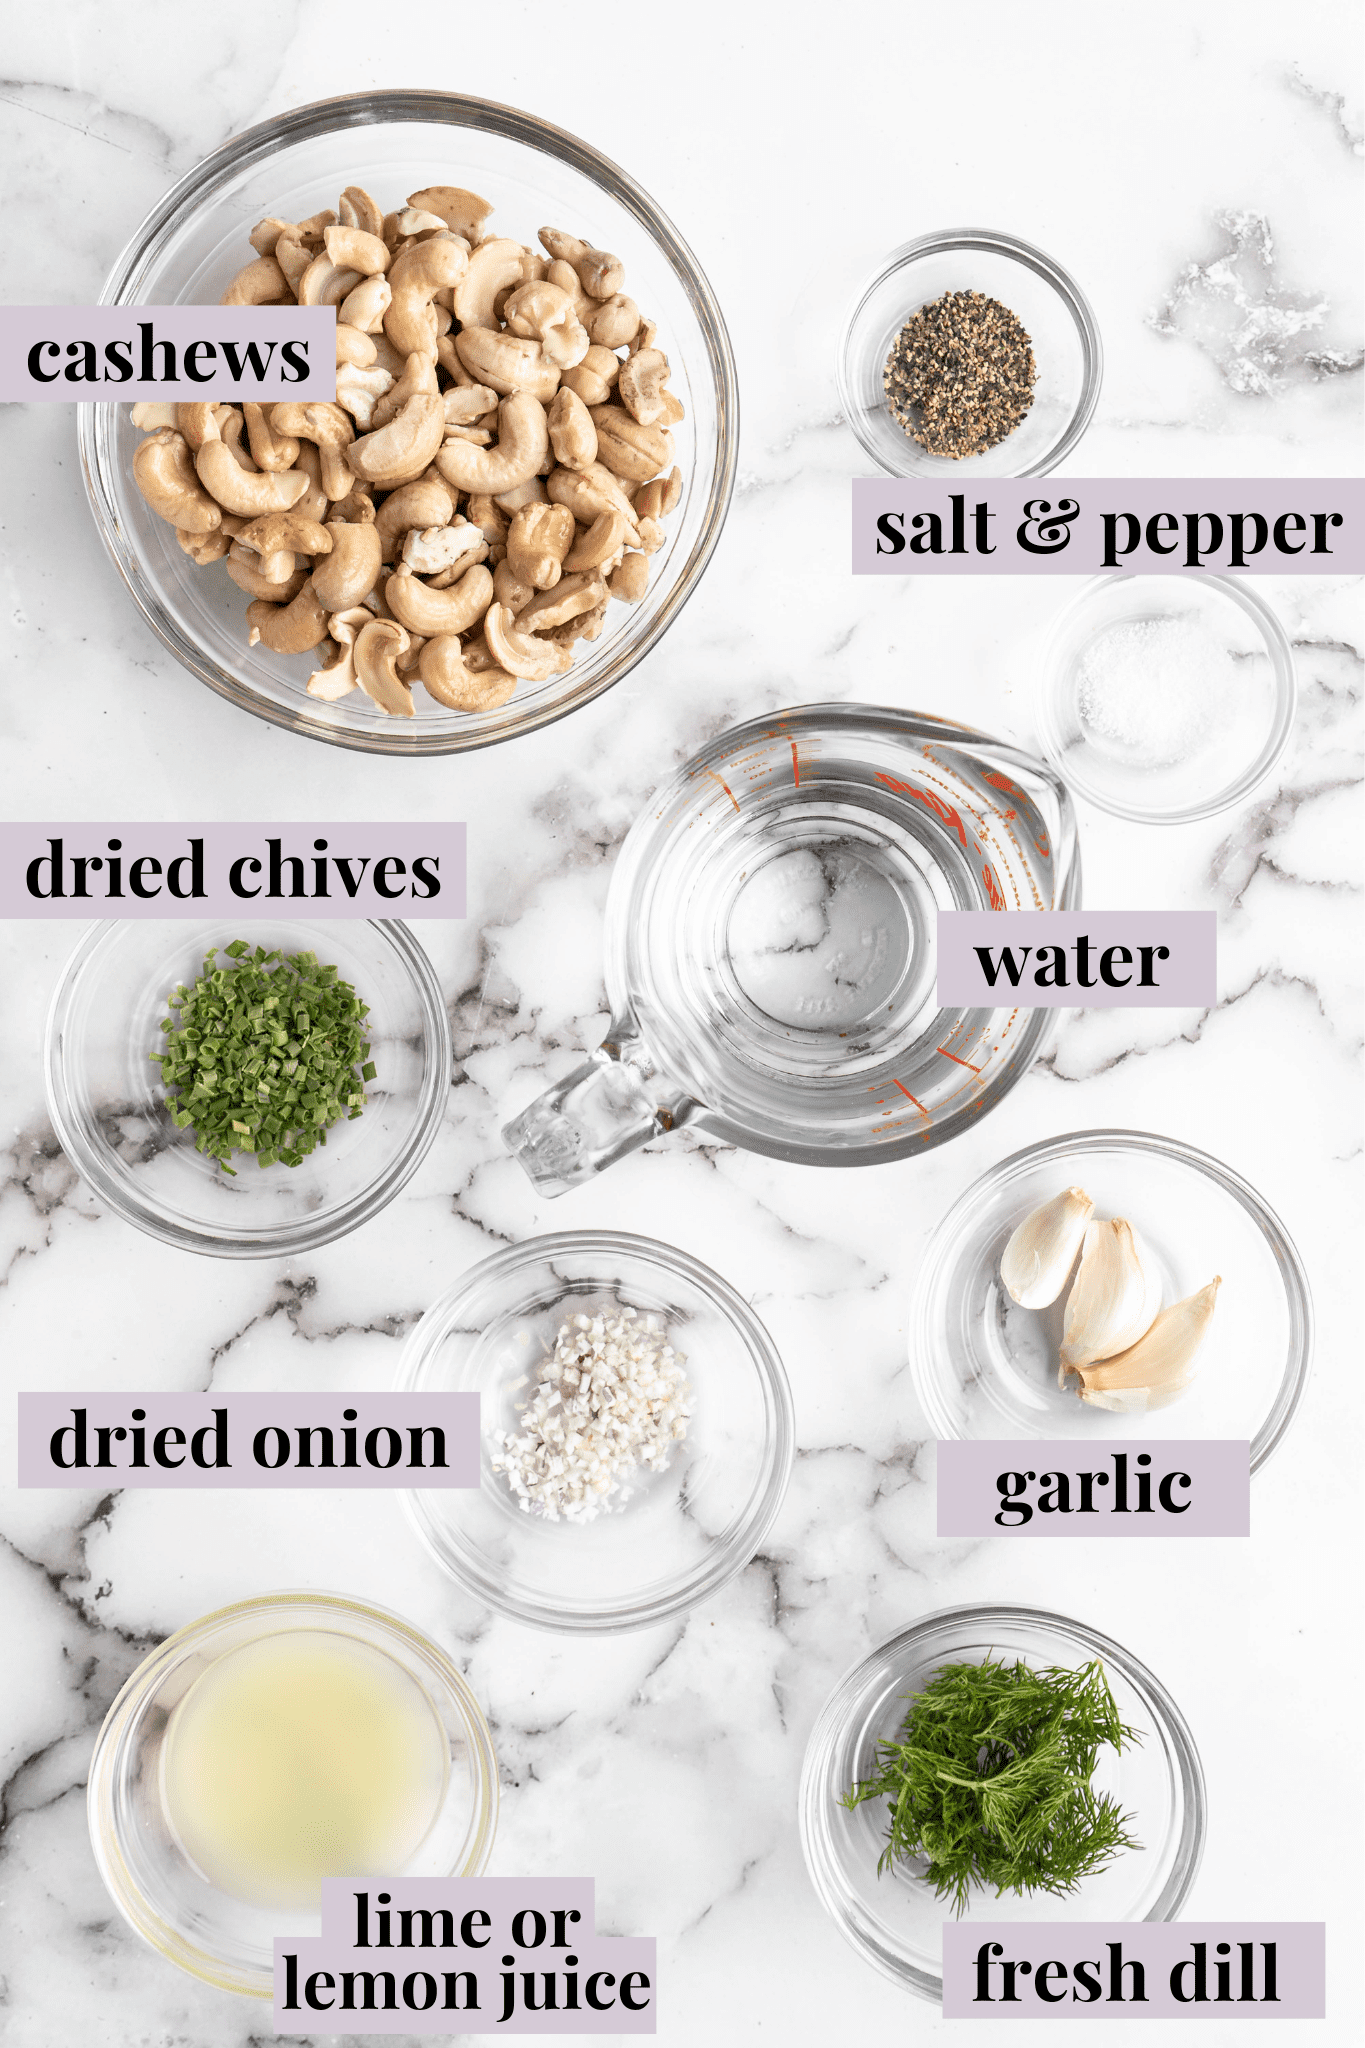
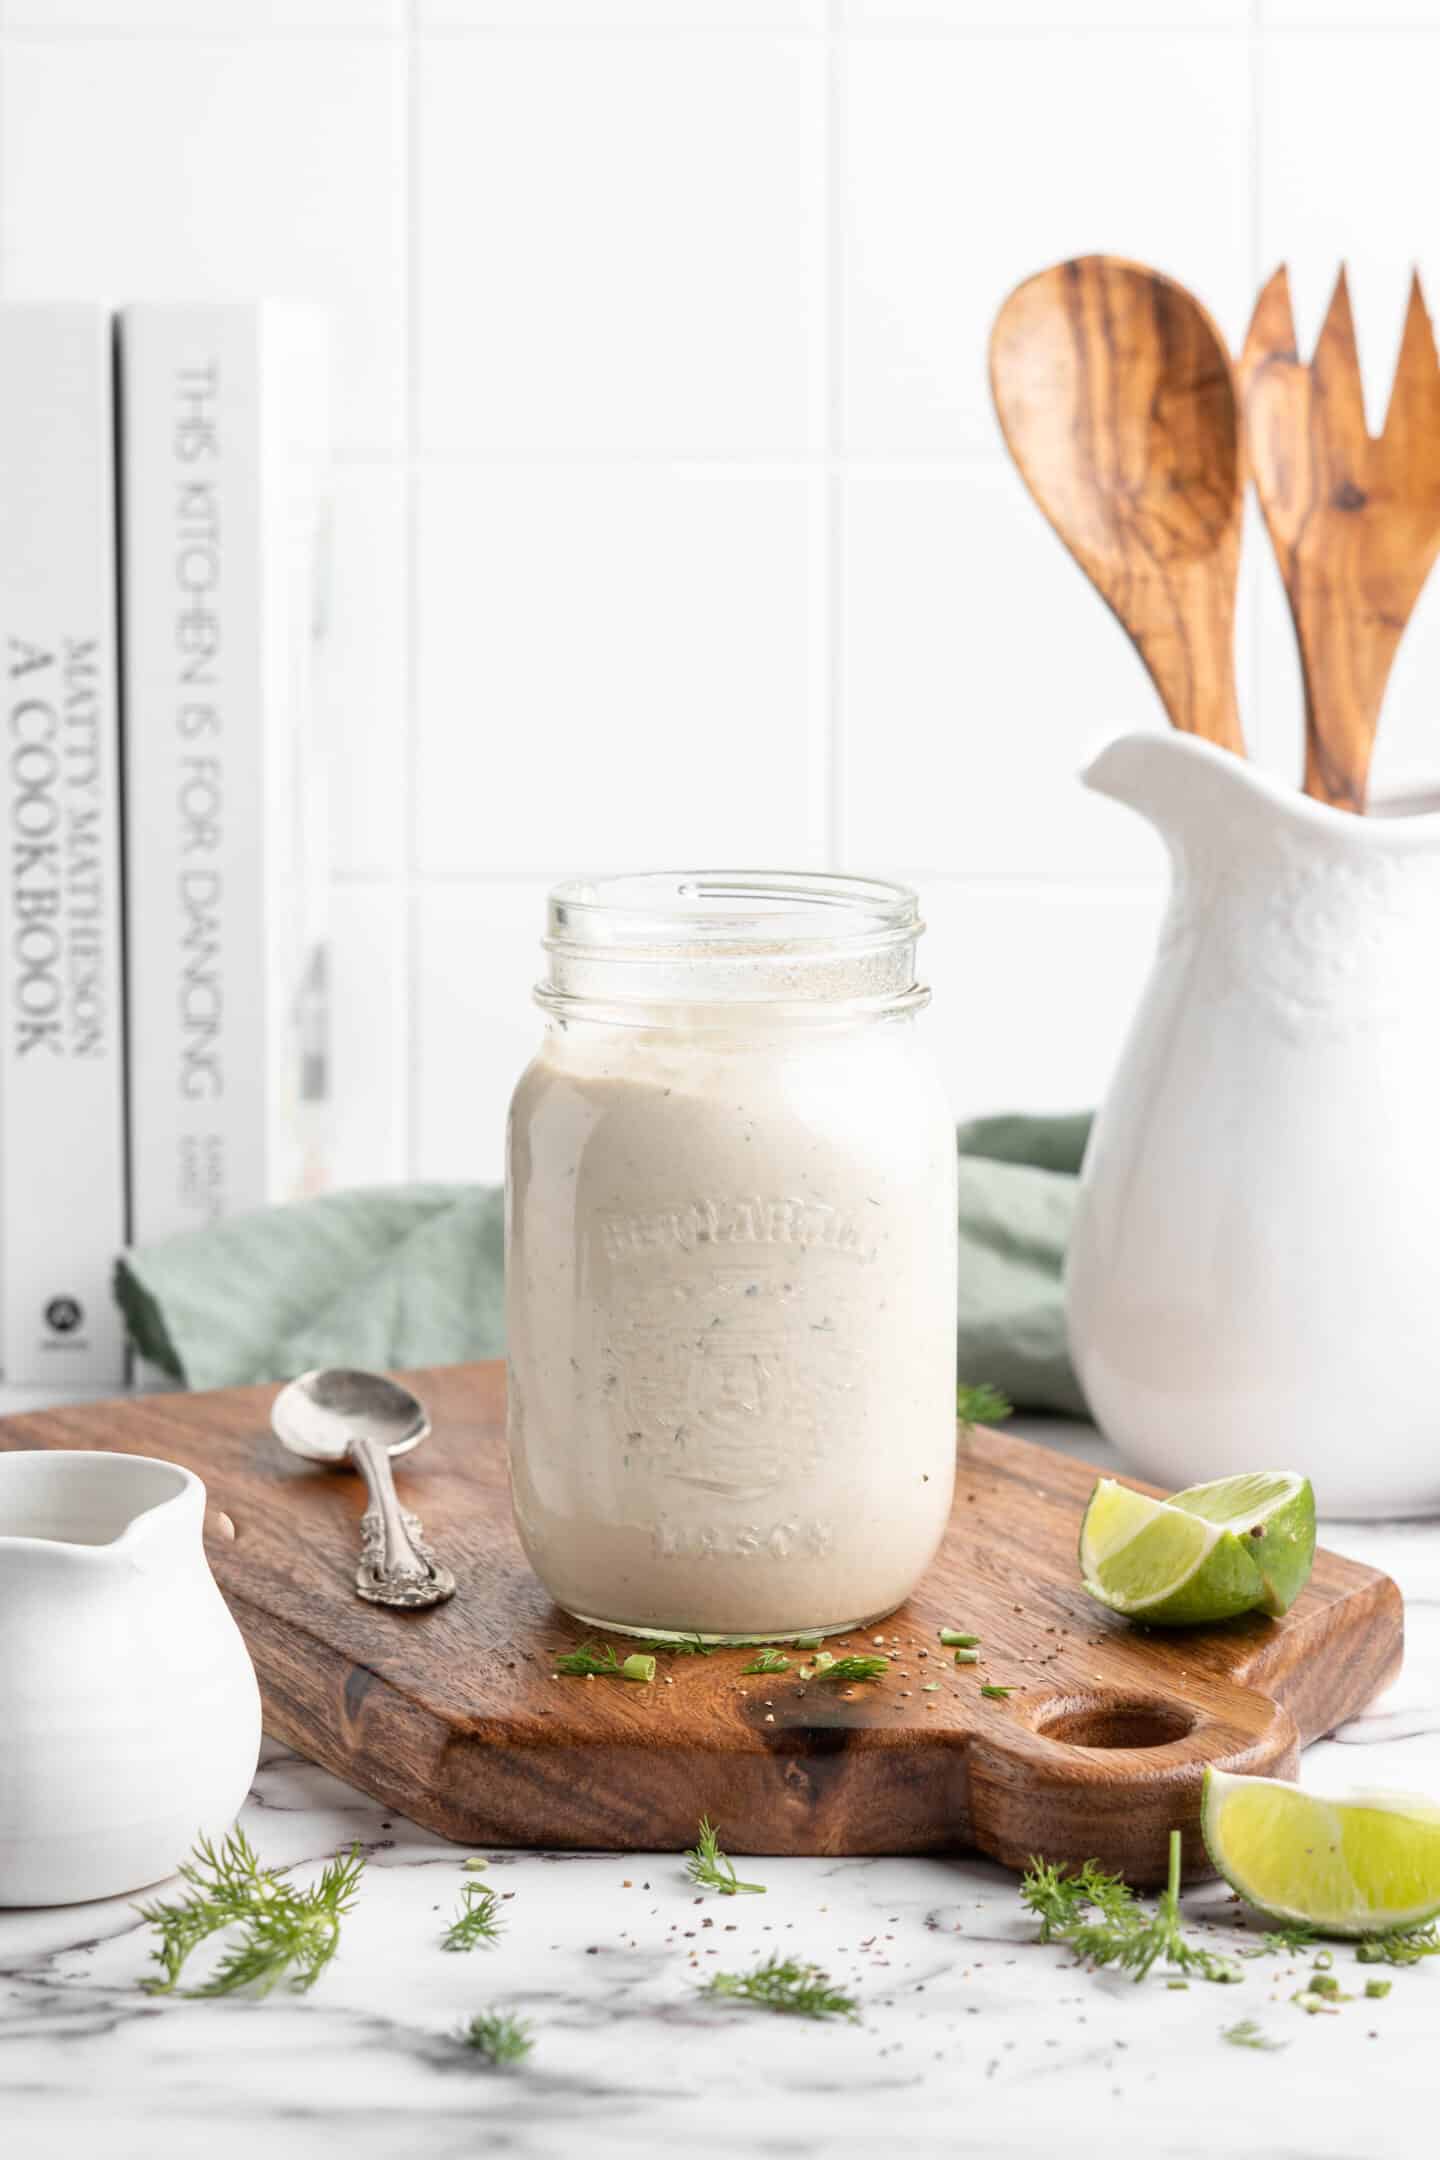
- Raw cashews – Soak these in water overnight; this softens them up so they can be blended into a smooth consistency.
- Water
- Garlic
- Lime or lemon juice – Lemon juice is a more traditional choice, but lime juice is a nice change of pace!
- Dried onion
- Dried chives
- Freshly ground black pepper
- Fresh dill – Fresh dill is miles better than dried dill when you’re making homemade ranch dressing, but dried certainly works too; use one-third the amount.
- Sea salt
How to Make Vegan Ranch Dressing
Here’s how to make your own plant-based ranch at home!
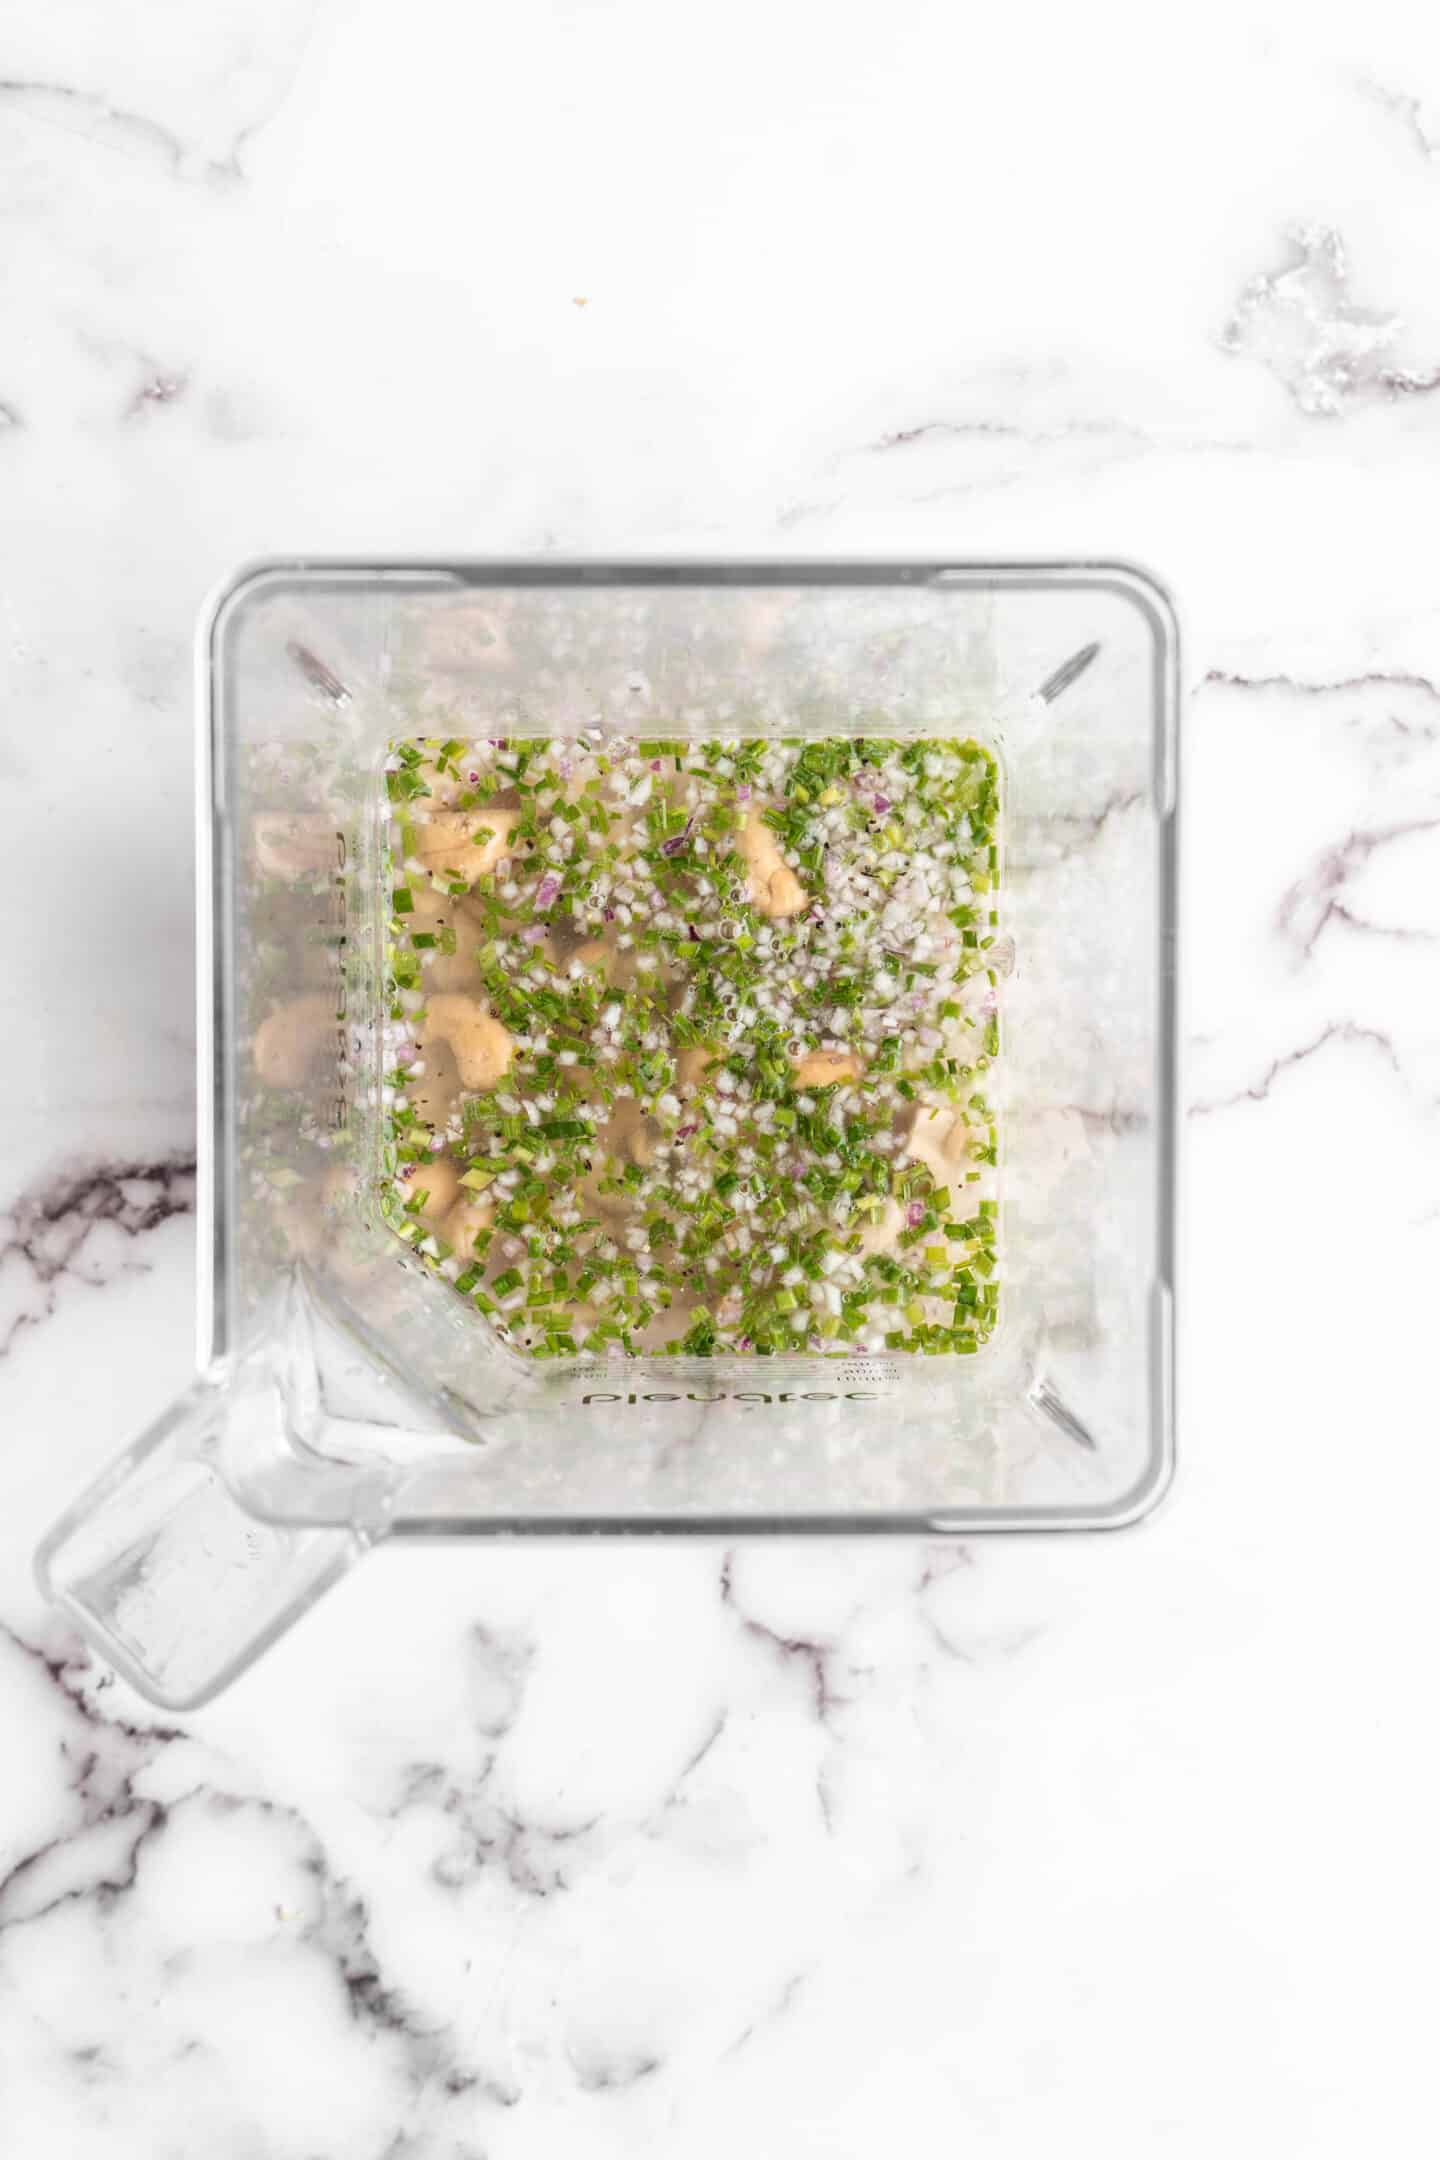
Combine the ingredients. Place all of the ingredients in a high-speed blender .
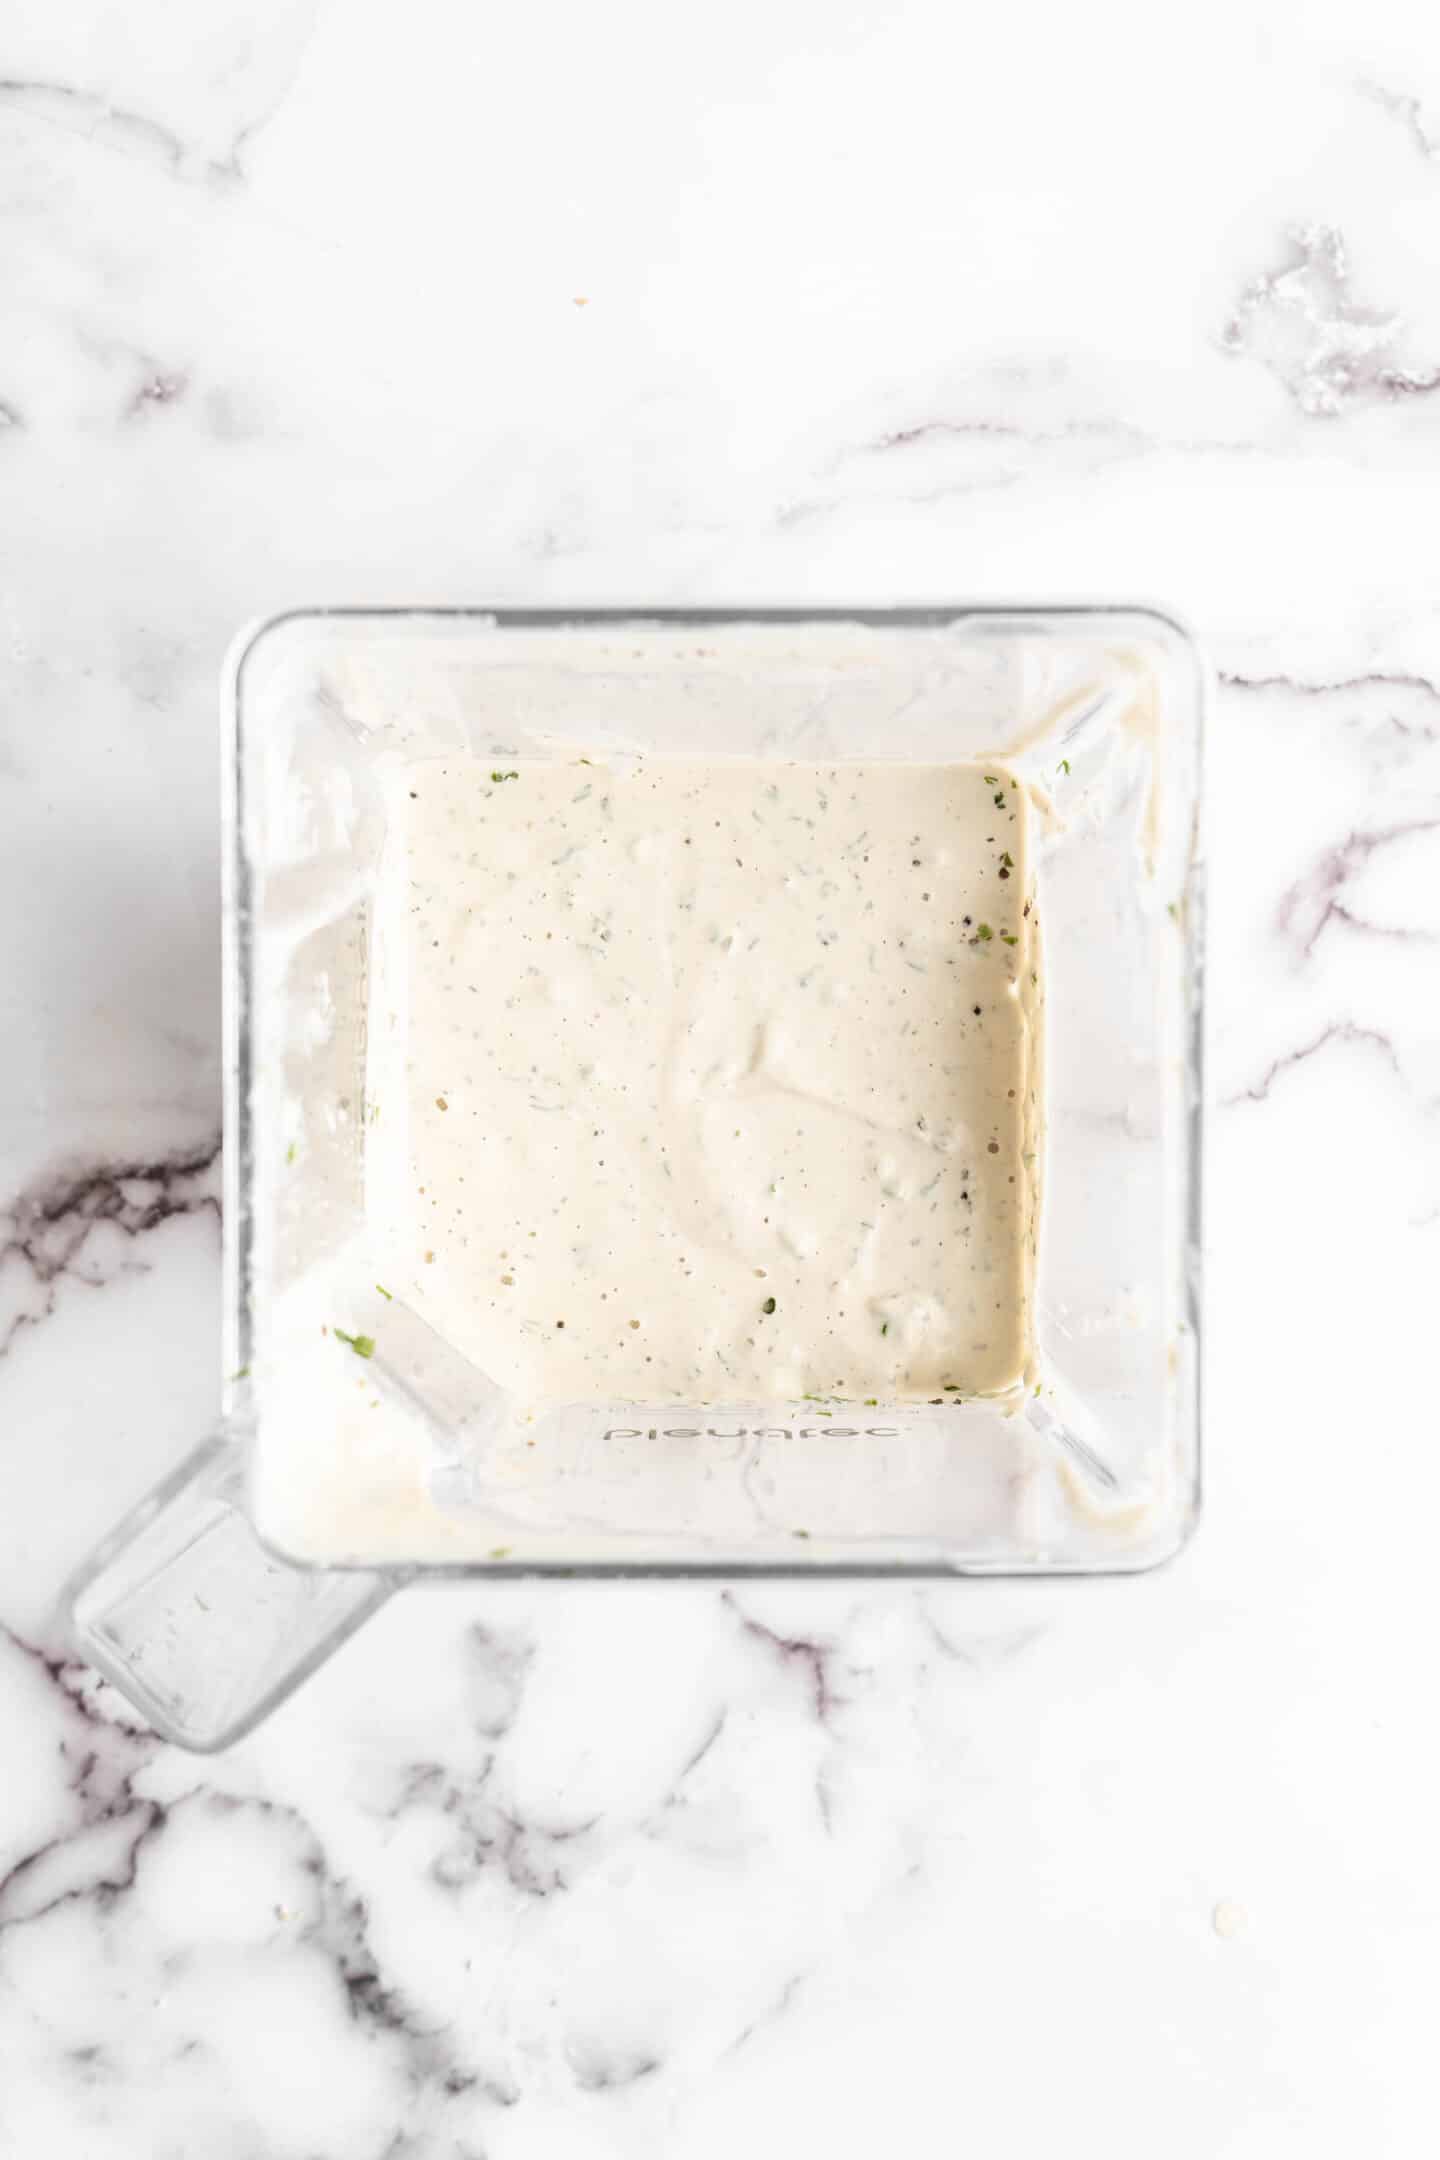
Blend. Turn on the blender and slowly increase the blender speed until it’s running on high. (Or use your blender’s dressing setting if it has one.) Blend the dressing until it’s completely smooth, with no bits of cashews or large chunks of garlic.
Finish. Season to taste; add more water for a thinner dressing, or more lime or lemon juice for a tangier flavour.
Tips for Success
While this vegan ranch dressing is easy, I have a bunch of tips to help you get it just right.
- No blender? No problem! You can make this in a food processor instead, but keep in mind that the texture may not be quite as smooth.
- Add the liquid first. Then layer on the solid ingredients. This helps create a vortex that pulls the solid ingredients to the blade, making it harder for air pockets to form.
- Chill if needed. If your blender is running for a while, the dressing may end up being a little warm. If this happens, just pop it in the fridge until it’s chilled.
- Add the dill later, if desired. If you want that classic white ranch dressing, blend the dressing without the dill, then stir it in later. As written, this recipe will give you a dressing with a slight green hue to it since the dill is blended with everything else.
Variations
There are so many ways to customize vegan ranch dressing. Ranch is often paired with spicy foods to temper their heat, but you can add the heat to the dressing instead by stirring in sriracha or your favourite hot sauce.
You can fancy things up by adding cracked black pepper and nutritional yeast for plant-based peppercorn Parmesan ranch, add more herbs, blend in chipotle for some smoky heat—don’t be afraid to experiment!
Serving Suggestions
Obviously, you can use this vegan ranch dressing on a salad (like my Vegan Crispy Cajun Fried Tofu Salad !), but it’s also amazing as a dip for fresh veggies. If you’re one of those people who likes ranch and pizza, try it with my Cauliflower Pizza Bites . I love it as a topping for Quinoa Burgers too!
How to Store
Store your homemade vegan ranch in the fridge for up to a week. It will thicken when chilled, so let it sit at room temperature for 15 minutes before serving.
Can This Recipe Be Frozen?
Yes, you can freeze this dressing for up to 3 months. Let it thaw in the refrigerator before using it.
Ingredients
- 1 cup raw cashews , soaked overnight in water in a jar (this results in about 1 ¼ cups puffed cashews) and rinsed OR just easily boiled for 5 minutes*
- 3/4 cup fresh water
- 3 garlic cloves , peeled
- 1 tablespoon lime or lemon juice
- 1/2 teaspoon dried onion
- 1 teaspoon dried chives
- 1/4 teaspoon freshly ground black pepper
- 1 1/2 tablespoons fresh dill , chopped
- ½ teaspoon sea salt
Instructions
- In a high speed blender, blend all the ingredients together until blended and completely creamy and incorporated. You can use your blender’s dressing setting or blend for at least 2 minutes or until blended.
- NOTE: the dill may turn it a slight light green hue, so you can always fold this in afterwards finely chopped. Taste and add more salt or lime/lemon juice if necessary. Add more water if you want it runnier . Serve on salads, with buffalo cauliflower wings or on veggie burgers.
- Store it in the fridge for about a week. Before serving on salad, allow it to sit out of the fridge for about 15 minutes first since it can thicken up if you want it runny.
