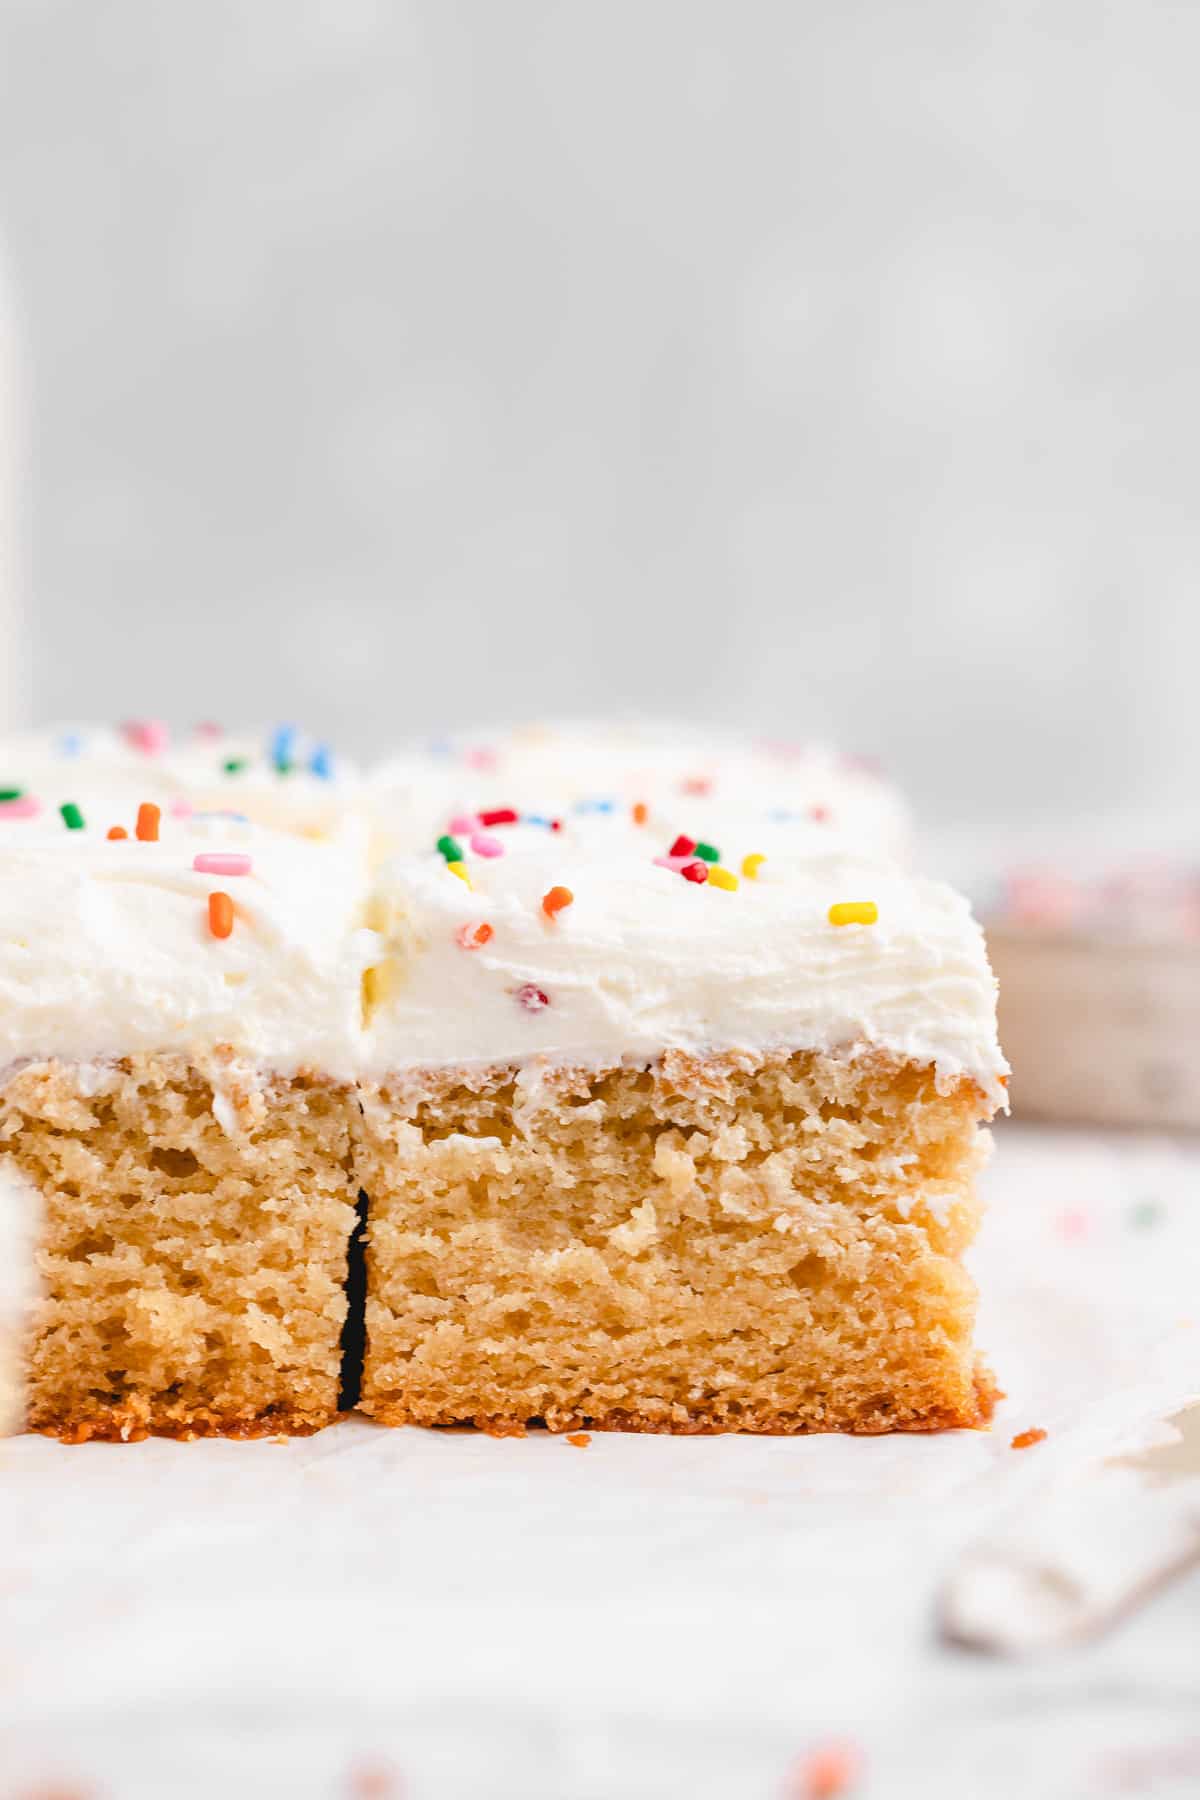
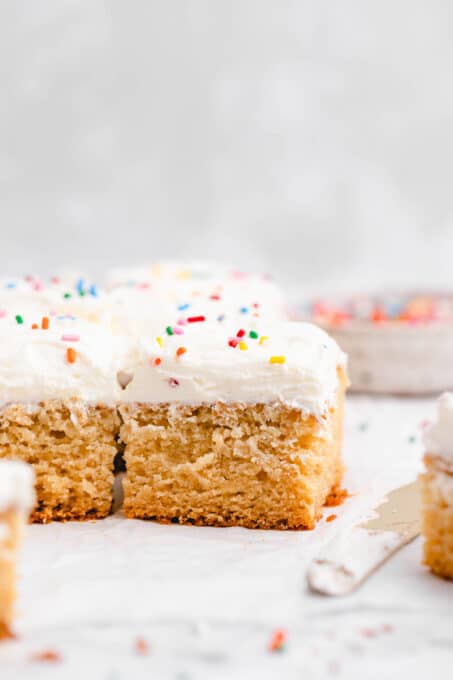
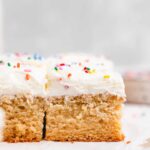
Fluffy Vegan Vanilla Sheet Cake with whipped buttercream frosting may be simple, but it’s also the definition of delicious! This moist, homemade vanilla cake is perfect for parties, an emergency/short-notice dessert, and more!
What Makes this the Best Vegan Vanilla Cake?
- It’s Low-Maintenance: Nothing in the list of ingredients will surprise you. There’s some vanilla extract, some sugar, and a little vegan buttermilk, but no super-secret, hard-to-find ingredients. In fact, you’ve probably got everything you need ready to go in the pantry/refrigerator! That’s one of the beautiful things about this sheet cake recipe – you can make it at a moment’s notice.
- It’s Simple Yet Delicious: This vanilla cake is a pretty safe bet as far as flavors go, without being bland or boring. Even the pickiest of eaters will probably go for a slice of simple yet sweet vanilla sheet cake!
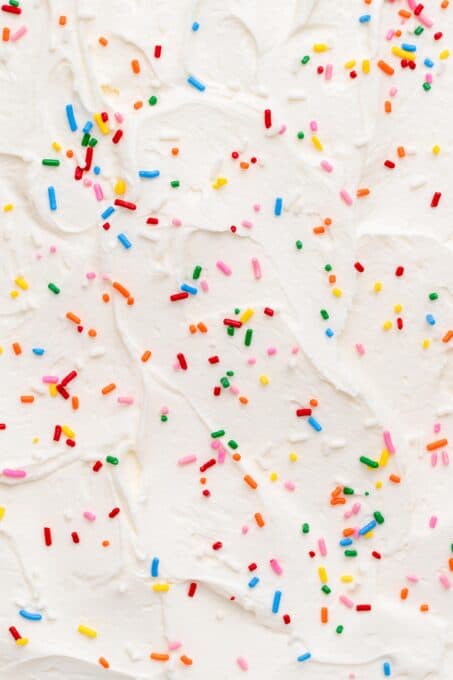
- Easy to Decorate/Customize: Feel free to customize this cake for the current season! Red and green sprinkles would be perfect for the holidays, black and orange for Halloween, red and pink for Valentine’s day, etc. Whatever you like!
- It’s Quick: This cake requires only 10 minutes of prep time before it’s ready for the oven. After that, all you have to do is whip together the frosting, which takes about the same amount of time!
And, before I forget, if you haven’t tried this Chocolate Sheet Cake or this Pumpkin Sheet Cake , add ’em to the must-bake list!
Notes on Ingredients
Please note that this is important information on the ingredients and instructions and the FULL recipe with amounts and details can be found DOWN BELOW (scroll to it) in the recipe card.
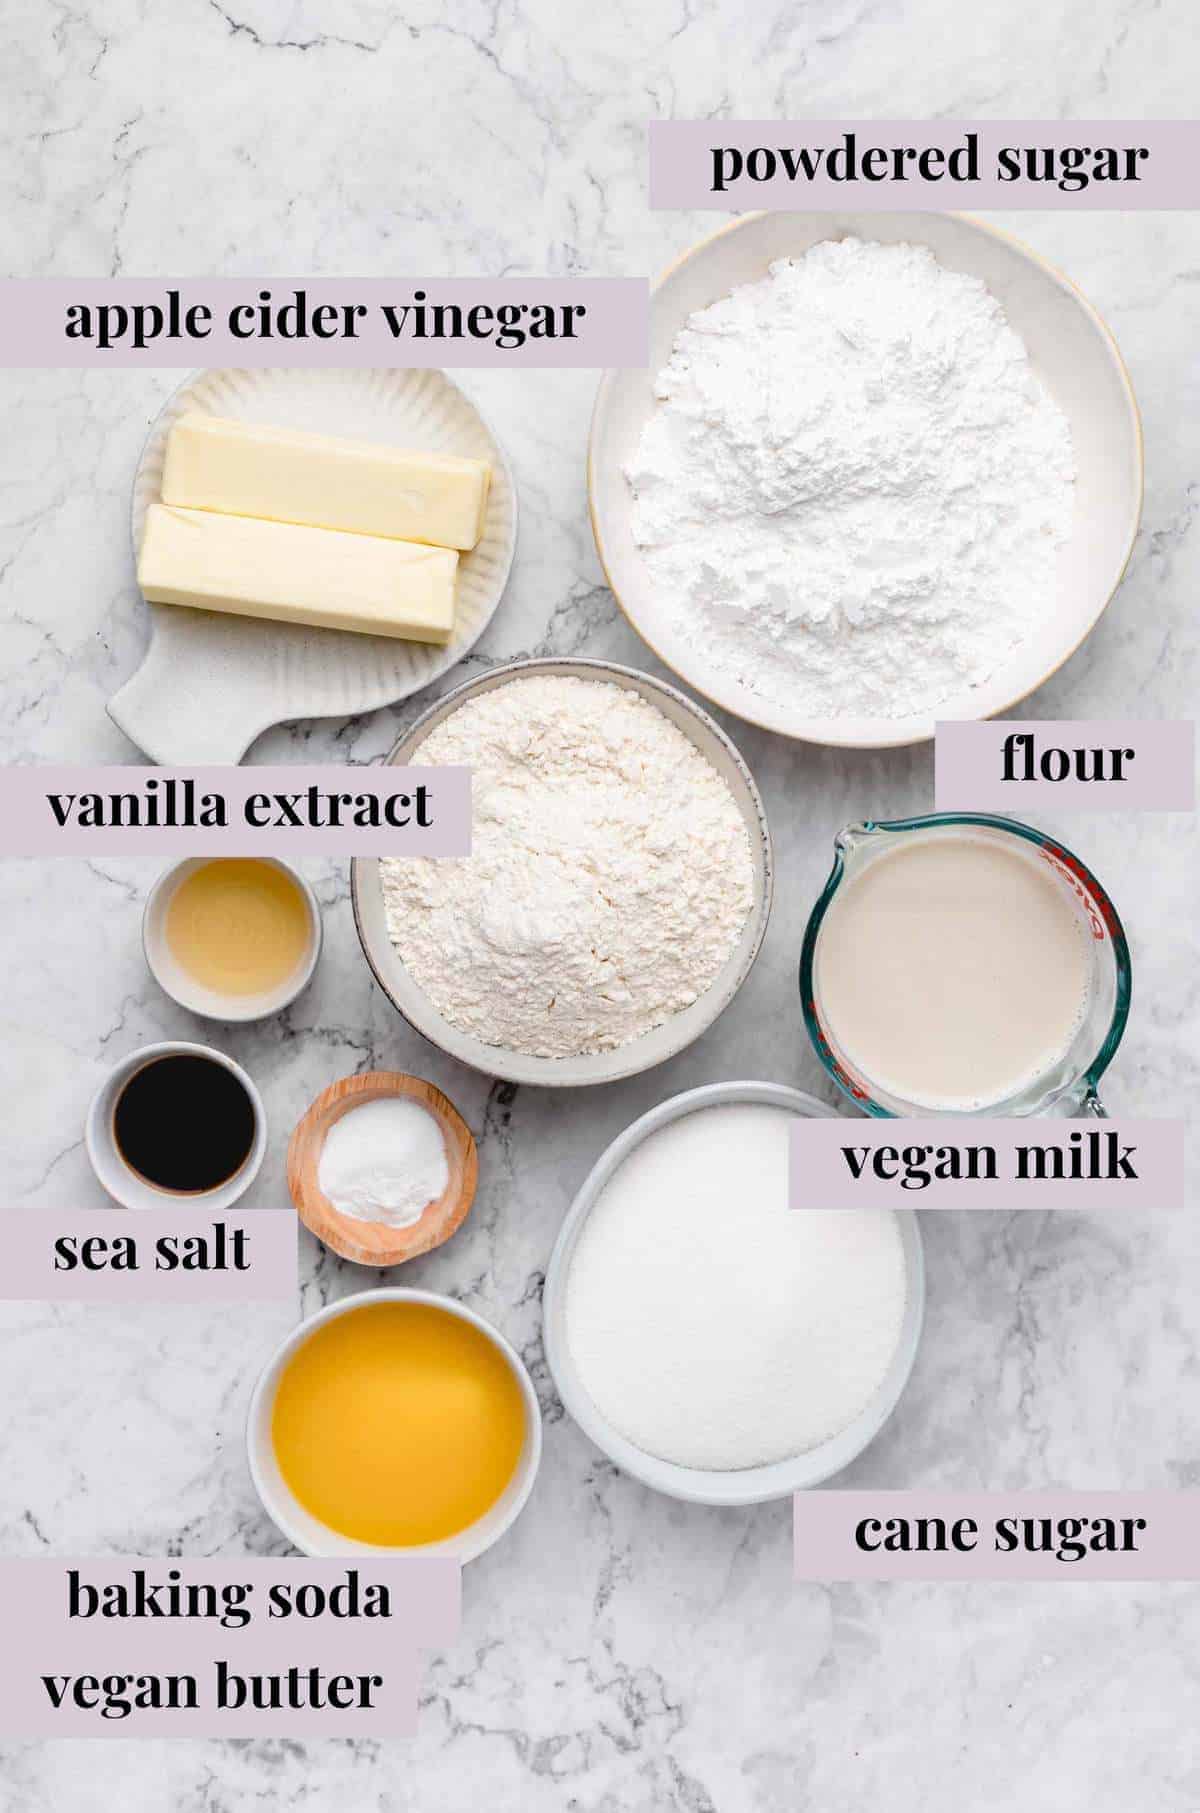
For the Vanilla Sheet Cake
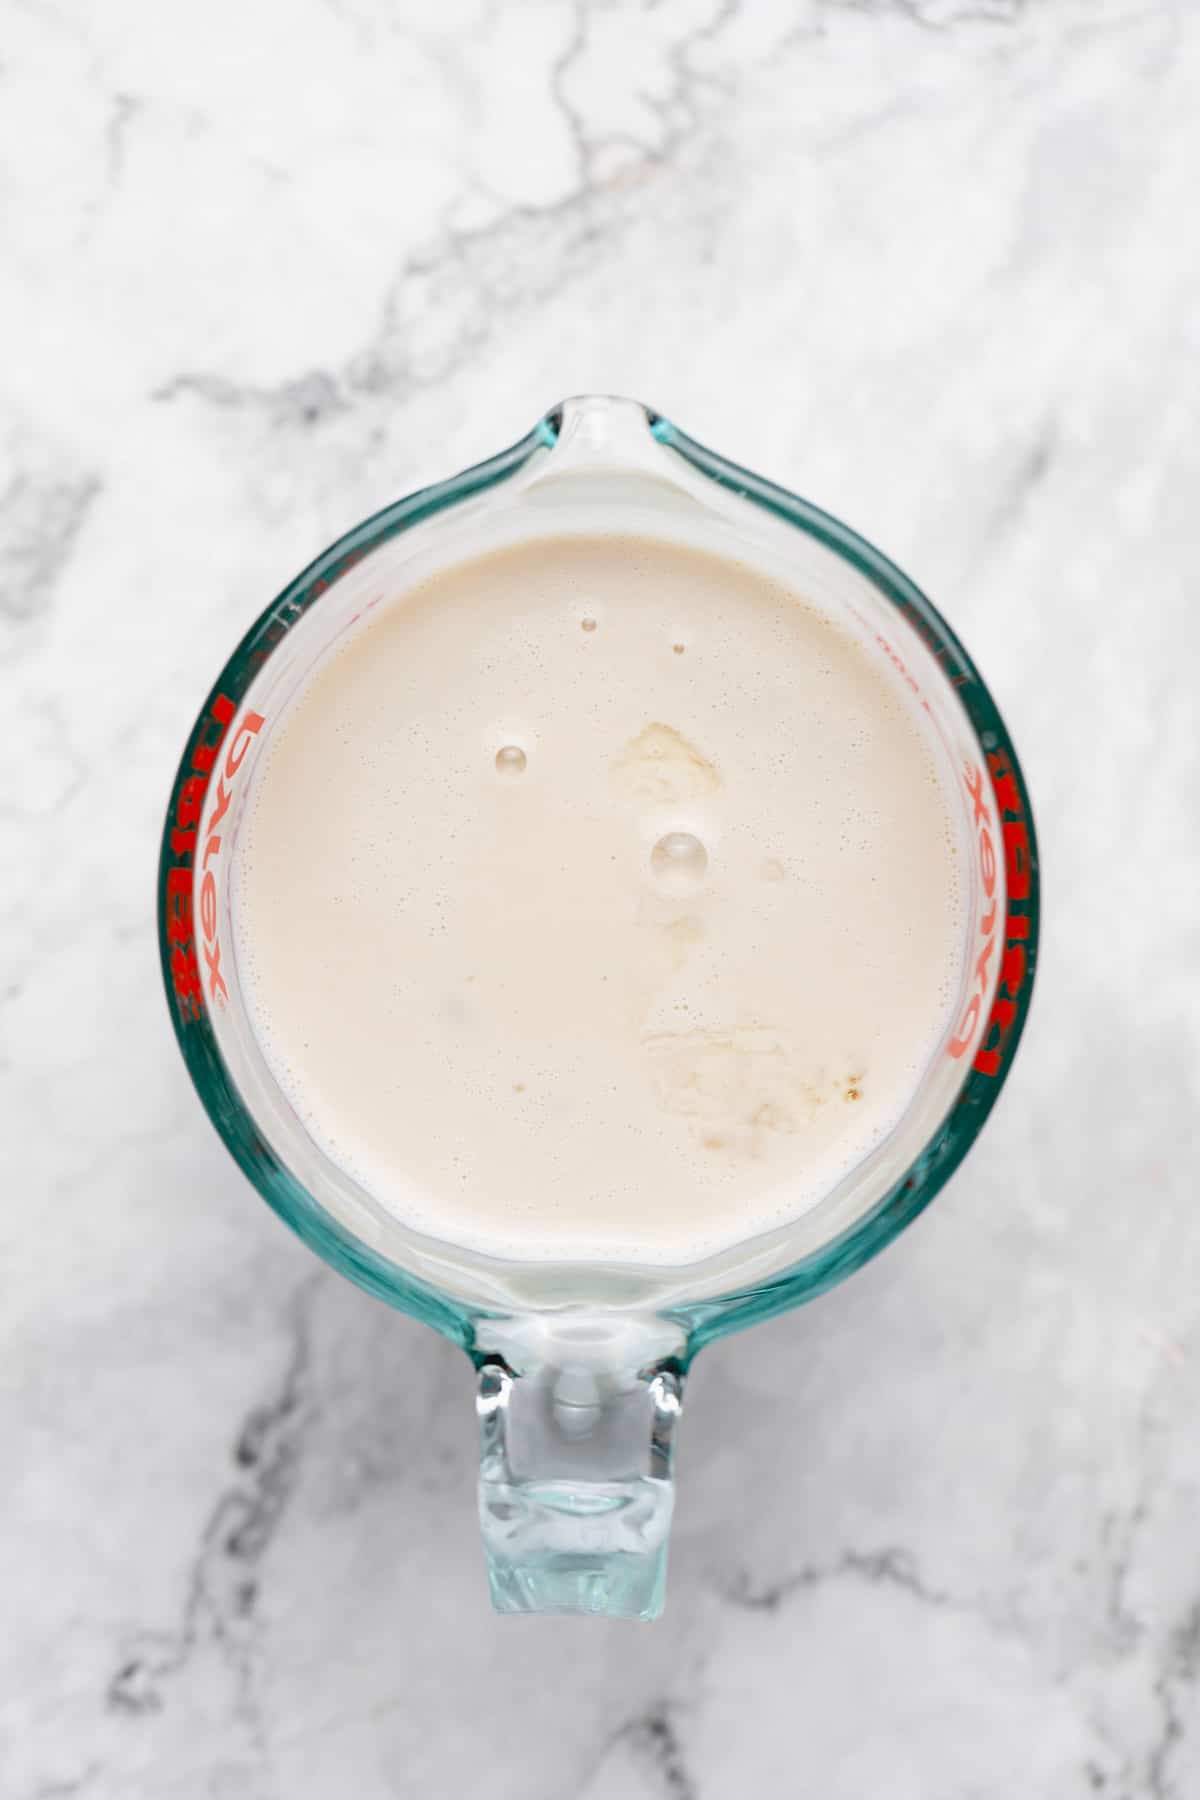
- Vegan Buttermilk: Combine apple cider vinegar with soy milk, or other vegan milk for that classic flavour. Make sure that whatever milk you use is room temperature.
- Sugar: I like to use brown sugar or cane sugar.
- Flour: I’ve only ever used all-purpose flour but you could give gluten-free flour a try, if needed.
- Baking Soda: To help the cake rise.
- Salt: I like to use sea salt for this recipe.
- Butter: Use your favorite brand of vegan butter, melted and cooled. You could use oil, but it’ll be a lot denser.
- Vanilla Extract: To get the sweet vanilla flavor.
For the Whipped Buttercream Frosting
- Powdered Sugar: Sift, then mix this in carefully (in separate portions) so that it doesn’t fly everywhere.
- Vegan Butter: Softened.
- Vanilla Extract: Vanilla bean paste may also work in a pinch.
- Vegan Milk: You may need to add more than what is listed if the frosting is too thick.
- Sea Salt: This is only needed if you’re using unsalted butter.
How to Make a Vegan Vanilla Sheet Cake
Preheat the Oven to 350°F/180°C: Prepare a 9×13 sheet pan (with sides) by greasing and flouring it, or lining it with parchment paper (I usually just grease and flour).
Make the Vegan Buttermilk: In a small bowl or jar, add the apple cider vinegar and the soy milk together and stir to combine. It will curdle. Set aside.
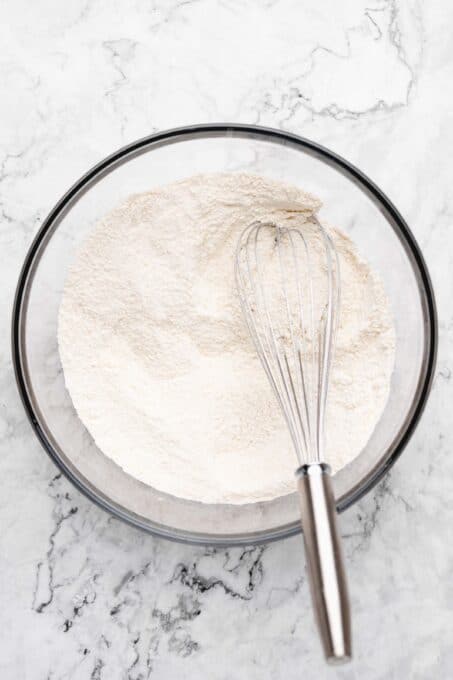
Mix the Batter: Whisk together sugar, flour, baking soda and salt in a large bowl until thoroughly combined. Add milk mixture, melted butter and vanilla. Beat with an electric whisk on medium speed for about 1 to 2 minutes until everything is just combined. Scrape down the sides of the bowl and stir one more time to ensure everything is incorporated. Do not over-mix.
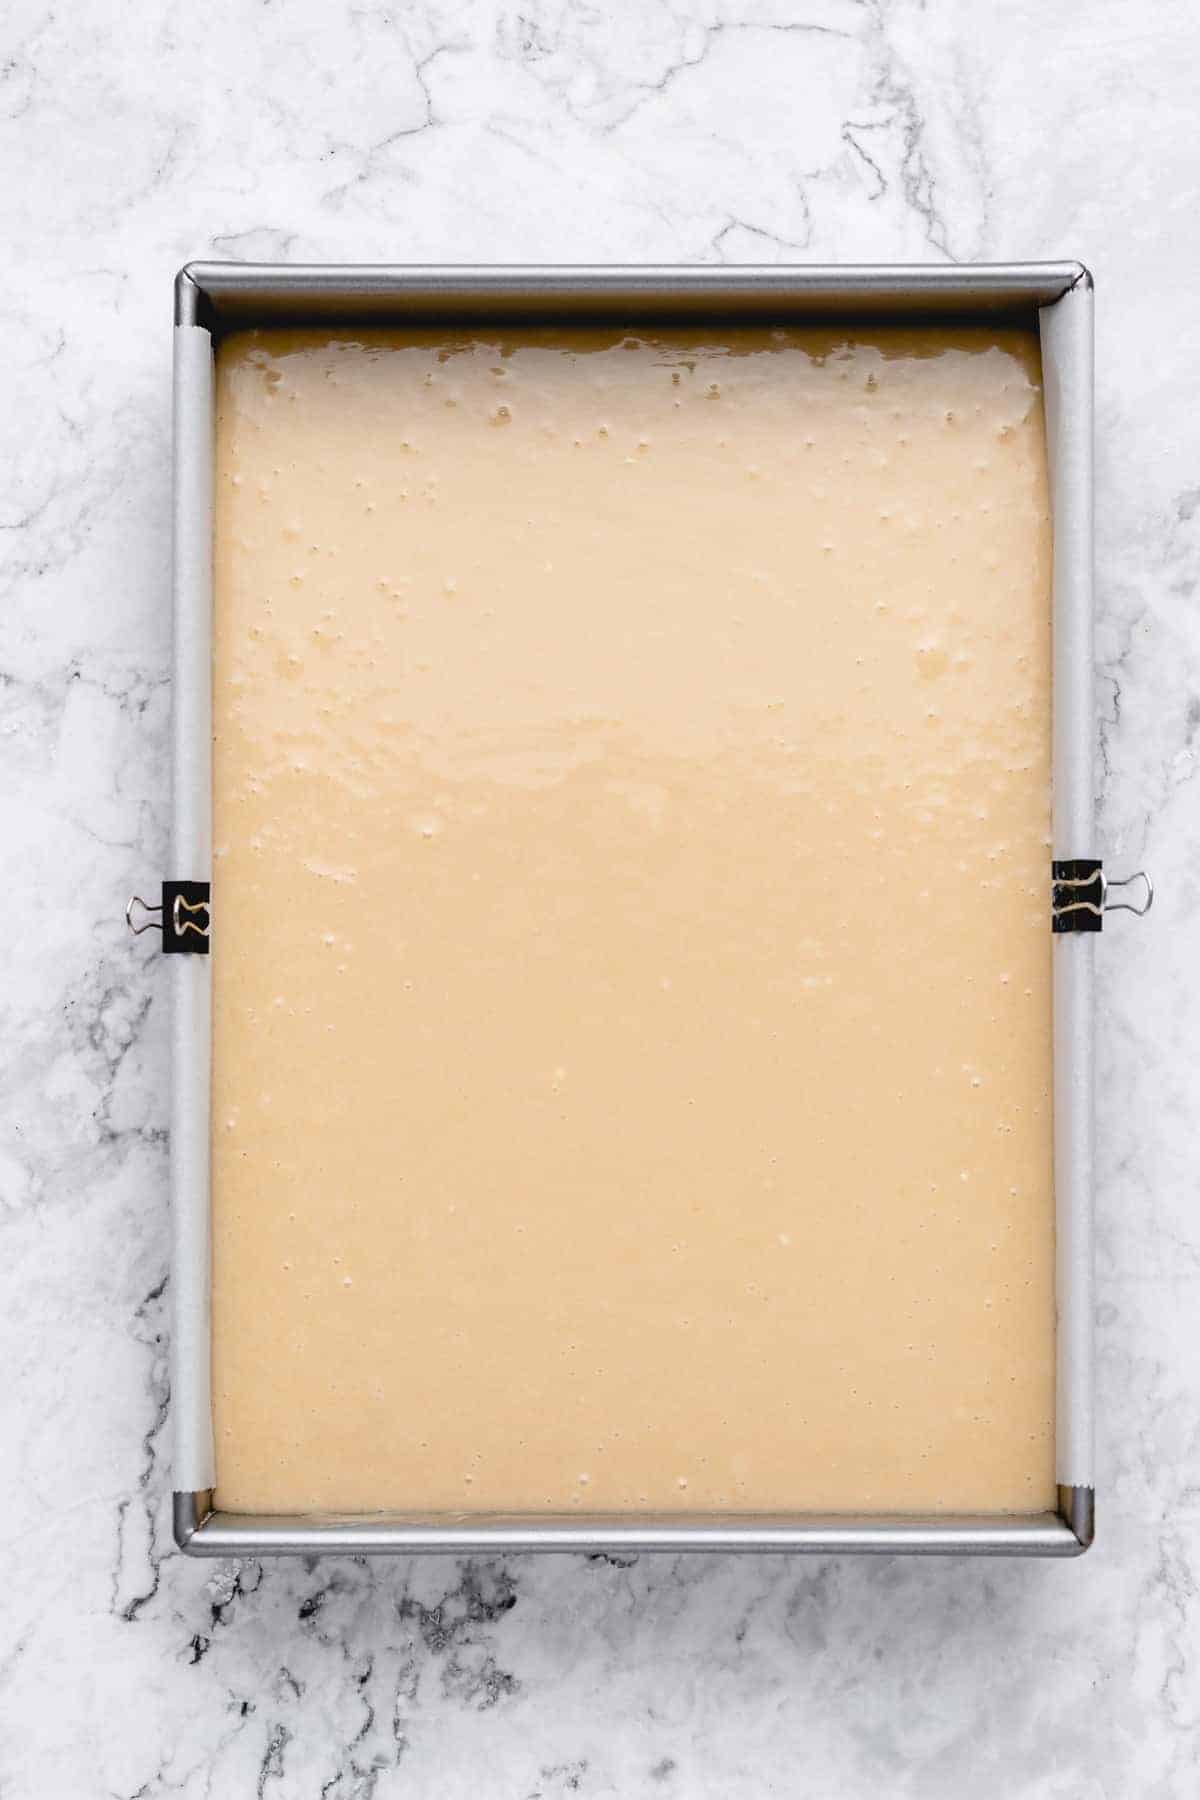
Prepare the Pan: Pour the batter into the pan. Tap on the counter three times lightly to remove any air bubbles.
Bake the Cake: Place the pan in the middle rack of your oven and in the center of that rack. Bake for 33 to 35 minutes until fully baked. Remove from the oven and let it cool completely in the pan.
Cream the Butter: Beat the butter and vanilla for about 2-3 minutes with a stand mixer or a handheld mixer, until fluffy.
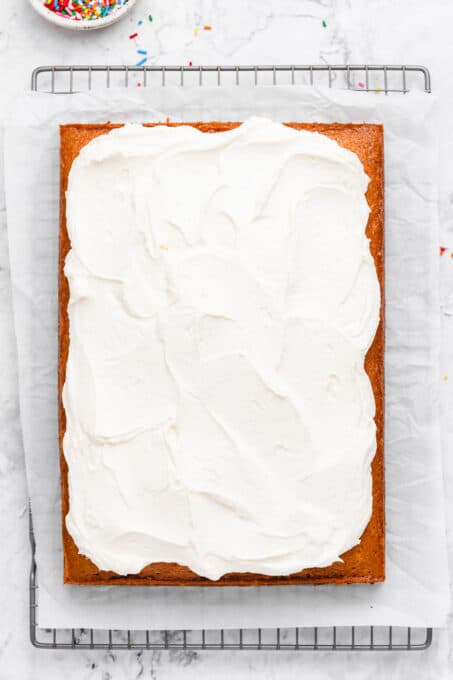
Make Frosting (full instructions in recipe below). Put It All Together: Frost cake and decorate. The frosting will set at room temperature. Enjoy!
Tips for Success
If you’re looking to speed up the cake-making process, you can prepare the frosting while the cake is baking, and then let it sit on the counter until the cake is done. Here are a couple more tips for you, should you need them:
- For a Super Moist Cake: To get the moistest results with your vanilla sheet cake, brush it with simple syrup before putting on the frosting! It’s not necessary but it’s great for helping the cake last several days too.
- Don’t Over-Mix the Batter: Just beat or whisk the batter until everything has been combined. Too much mixing can lead to a cake that comes out dense or tough once baked.
- Weigh the Flour: I highly recommend weighing the flour because that’s the best way to accurately measure it. If you don’t have a scale, though, you can spoon your flour into a measuring cup to avoid packing too much of it into your batter.
- Let the Cake Cool Before Frosting: If the cake is still warm it can melt the buttercream, which will make it runny. To avoid that, let the cake cool completely, or put it in the fridge to speed up the process.

How to Store Homemade Cake
I like to store this vanilla sheet cake in the fridge, where it keeps for about a week. You can also store it in an airtight container at room temperature. It will keep for 2-3 days this way. Either option works, it’s mostly about personal preference!
Can I Freeze This?
Sure! Freeze your cake in an airtight container and eat it within 1-2 months. Make sure the cake is completely cooled before you put it in the freezer.
Ingredients
For the Vanilla Cake
- 2 tablespoons apple cider vinegar
- 2 cups soy milk , or other vegan milk (480mL), room temperature
- 2 cups brown sugar , or cane sugar (400g)
- 3 cups all-purpose flour , (360g)
- 2 teaspoons baking soda , (10g)
- 1 teaspoon sea salt , (2.8g)
- ⅔ cup vegan butter , melted and cooled (150g)
- 1 tablespoon vanilla extract
For the Whipped Buttercream Frosting
- 3-3 ½ cups powdered sugar
- 1 cup vegan butter , , softened
- 1 teaspoon vanilla extract
- 1 tablespoon vegan milk , , add more if needed
- ¼ teaspoon sea salt , , only if using unsalted butter
Instructions
For the Vanilla Cake
- Preheat the oven to 350°F/180°C. Prepare a 9×13 sheet pan (with sides) by greasing & flouring or lining with parchment paper (I usually just grease and flour).
- In a small bowl or jar, add the apple cider vinegar and the soy milk together and stir to combine. It will curdle. Set aside.
- Whisk together sugar, flour, baking soda and salt in a large bowl until thoroughly combined. Add milk mixture, melted butter and vanilla. Beat with an electric whisk on medium speed for about 1 to 2 minutes until everything is just combined. Scrape down the sides of the bowl and stir one more time to ensure everything is incorporated. Do not overmix.
- Pour the batter into the pan. Tap on the counter three times lightly to remove any air bubbles.
- Place the pan in the middle rack of your oven and in the center of that rack. Bake for 33 to 35 minutes until fully baked. Remove from the oven and let it cool completely in the pan.
- After cooled, frost with buttercream frosting and sprinkles (optional!) Enjoy! For an even more moist cake, brush with simple syrup before putting on the frosting!
For the Whipped Buttercream Frosting
- Beat the butter and vanilla for about 2-3 minutes with a stand mixer or a handheld mixer, until fluffy.
- Add 1 cup of powdered sugar. Fold it in with a spatula so it doesn’t fly everywhere, then beat for about 1 minute. Add the rest of the powdered sugar in small increments too, until fully incorporated.
- Add in a 1/2 tablespoon of vegan milk at a time until it reaches your preferred volume and consistency. Add that last ½ cup if you desire.
- Then beat for about 5 minutes, using the spatula to mix everything together every other minute, until the frosting is fluffy, white, smooth and creamy.
Putting It All Together
- Frost cake and decorate. The frosting will set at room temperature. Enjoy!
Notes
Tips for Success
- For a Super Moist Cake: To get the moistest results with your vanilla sheet cake, brush it with simple syrup before putting on the frosting! It’s not necessary but it’s great for helping the cake last several days too.
- Don’t Over-Mix the Batter: Just beat or whisk the batter until everything has been combined. Too much mixing can lead to a cake that comes out dense or tough once baked.
- Weigh the Flour: I highly recommend weighing the flour because that’s the best way to accurately measure it. If you don’t have a scale, though, you can spoon your flour into a measuring cup to avoid packing too much of it into your batter.
- Let the Cake Cool Before Frosting: If the cake is still warm it can melt the buttercream, which will make it runny. To avoid that, let the cake cool completely, or put it in the fridge to speed up the process.
Fluffy Vegan Vanilla Sheet Cake with whipped buttercream frosting may be simple, but it’s also the definition of delicious! This moist, homemade vanilla cake is perfect for parties, an emergency/short-notice dessert, and more!
What Makes this the Best Vegan Vanilla Cake?
- It’s Low-Maintenance: Nothing in the list of ingredients will surprise you. There’s some vanilla extract, some sugar, and a little vegan buttermilk, but no super-secret, hard-to-find ingredients. In fact, you’ve probably got everything you need ready to go in the pantry/refrigerator! That’s one of the beautiful things about this sheet cake recipe – you can make it at a moment’s notice.
- It’s Simple Yet Delicious: This vanilla cake is a pretty safe bet as far as flavors go, without being bland or boring. Even the pickiest of eaters will probably go for a slice of simple yet sweet vanilla sheet cake!
- Easy to Decorate/Customize: Feel free to customize this cake for the current season! Red and green sprinkles would be perfect for the holidays, black and orange for Halloween, red and pink for Valentine’s day, etc. Whatever you like!
- It’s Quick: This cake requires only 10 minutes of prep time before it’s ready for the oven. After that, all you have to do is whip together the frosting, which takes about the same amount of time!
And, before I forget, if you haven’t tried this Chocolate Sheet Cake or this Pumpkin Sheet Cake , add ’em to the must-bake list!
Notes on Ingredients
Please note that this is important information on the ingredients and instructions and the FULL recipe with amounts and details can be found DOWN BELOW (scroll to it) in the recipe card.
For the Vanilla Sheet Cake
- Vegan Buttermilk: Combine apple cider vinegar with soy milk, or other vegan milk for that classic flavour. Make sure that whatever milk you use is room temperature.
- Sugar: I like to use brown sugar or cane sugar.
- Flour: I’ve only ever used all-purpose flour but you could give gluten-free flour a try, if needed.
- Baking Soda: To help the cake rise.
- Salt: I like to use sea salt for this recipe.
- Butter: Use your favorite brand of vegan butter, melted and cooled. You could use oil, but it’ll be a lot denser.
- Vanilla Extract: To get the sweet vanilla flavor.
For the Whipped Buttercream Frosting
- Powdered Sugar: Sift, then mix this in carefully (in separate portions) so that it doesn’t fly everywhere.
- Vegan Butter: Softened.
- Vanilla Extract: Vanilla bean paste may also work in a pinch.
- Vegan Milk: You may need to add more than what is listed if the frosting is too thick.
- Sea Salt: This is only needed if you’re using unsalted butter.
How to Make a Vegan Vanilla Sheet Cake
Preheat the Oven to 350°F/180°C: Prepare a 9×13 sheet pan (with sides) by greasing and flouring it, or lining it with parchment paper (I usually just grease and flour).
Make the Vegan Buttermilk: In a small bowl or jar, add the apple cider vinegar and the soy milk together and stir to combine. It will curdle. Set aside.
Mix the Batter: Whisk together sugar, flour, baking soda and salt in a large bowl until thoroughly combined. Add milk mixture, melted butter and vanilla. Beat with an electric whisk on medium speed for about 1 to 2 minutes until everything is just combined. Scrape down the sides of the bowl and stir one more time to ensure everything is incorporated. Do not over-mix.
Prepare the Pan: Pour the batter into the pan. Tap on the counter three times lightly to remove any air bubbles.
Bake the Cake: Place the pan in the middle rack of your oven and in the center of that rack. Bake for 33 to 35 minutes until fully baked. Remove from the oven and let it cool completely in the pan.
Cream the Butter: Beat the butter and vanilla for about 2-3 minutes with a stand mixer or a handheld mixer, until fluffy.
Make Frosting (full instructions in recipe below). Put It All Together: Frost cake and decorate. The frosting will set at room temperature. Enjoy!
Tips for Success
If you’re looking to speed up the cake-making process, you can prepare the frosting while the cake is baking, and then let it sit on the counter until the cake is done. Here are a couple more tips for you, should you need them:
- For a Super Moist Cake: To get the moistest results with your vanilla sheet cake, brush it with simple syrup before putting on the frosting! It’s not necessary but it’s great for helping the cake last several days too.
- Don’t Over-Mix the Batter: Just beat or whisk the batter until everything has been combined. Too much mixing can lead to a cake that comes out dense or tough once baked.
- Weigh the Flour: I highly recommend weighing the flour because that’s the best way to accurately measure it. If you don’t have a scale, though, you can spoon your flour into a measuring cup to avoid packing too much of it into your batter.
- Let the Cake Cool Before Frosting: If the cake is still warm it can melt the buttercream, which will make it runny. To avoid that, let the cake cool completely, or put it in the fridge to speed up the process.
How to Store Homemade Cake
I like to store this vanilla sheet cake in the fridge, where it keeps for about a week. You can also store it in an airtight container at room temperature. It will keep for 2-3 days this way. Either option works, it’s mostly about personal preference!
Can I Freeze This?
Sure! Freeze your cake in an airtight container and eat it within 1-2 months. Make sure the cake is completely cooled before you put it in the freezer.
Ingredients
For the Vanilla Cake
- 2 tablespoons apple cider vinegar
- 2 cups soy milk , or other vegan milk (480mL), room temperature
- 2 cups brown sugar , or cane sugar (400g)
- 3 cups all-purpose flour , (360g)
- 2 teaspoons baking soda , (10g)
- 1 teaspoon sea salt , (2.8g)
- ⅔ cup vegan butter , melted and cooled (150g)
- 1 tablespoon vanilla extract
For the Whipped Buttercream Frosting
- 3-3 ½ cups powdered sugar
- 1 cup vegan butter , , softened
- 1 teaspoon vanilla extract
- 1 tablespoon vegan milk , , add more if needed
- ¼ teaspoon sea salt , , only if using unsalted butter
Instructions
For the Vanilla Cake
- Preheat the oven to 350°F/180°C. Prepare a 9×13 sheet pan (with sides) by greasing & flouring or lining with parchment paper (I usually just grease and flour).
- In a small bowl or jar, add the apple cider vinegar and the soy milk together and stir to combine. It will curdle. Set aside.
- Whisk together sugar, flour, baking soda and salt in a large bowl until thoroughly combined. Add milk mixture, melted butter and vanilla. Beat with an electric whisk on medium speed for about 1 to 2 minutes until everything is just combined. Scrape down the sides of the bowl and stir one more time to ensure everything is incorporated. Do not overmix.
- Pour the batter into the pan. Tap on the counter three times lightly to remove any air bubbles.
- Place the pan in the middle rack of your oven and in the center of that rack. Bake for 33 to 35 minutes until fully baked. Remove from the oven and let it cool completely in the pan.
- After cooled, frost with buttercream frosting and sprinkles (optional!) Enjoy! For an even more moist cake, brush with simple syrup before putting on the frosting!
For the Whipped Buttercream Frosting
- Beat the butter and vanilla for about 2-3 minutes with a stand mixer or a handheld mixer, until fluffy.
- Add 1 cup of powdered sugar. Fold it in with a spatula so it doesn’t fly everywhere, then beat for about 1 minute. Add the rest of the powdered sugar in small increments too, until fully incorporated.
- Add in a 1/2 tablespoon of vegan milk at a time until it reaches your preferred volume and consistency. Add that last ½ cup if you desire.
- Then beat for about 5 minutes, using the spatula to mix everything together every other minute, until the frosting is fluffy, white, smooth and creamy.
Putting It All Together
- Frost cake and decorate. The frosting will set at room temperature. Enjoy!
Notes
Tips for Success
- For a Super Moist Cake: To get the moistest results with your vanilla sheet cake, brush it with simple syrup before putting on the frosting! It’s not necessary but it’s great for helping the cake last several days too.
- Don’t Over-Mix the Batter: Just beat or whisk the batter until everything has been combined. Too much mixing can lead to a cake that comes out dense or tough once baked.
- Weigh the Flour: I highly recommend weighing the flour because that’s the best way to accurately measure it. If you don’t have a scale, though, you can spoon your flour into a measuring cup to avoid packing too much of it into your batter.
- Let the Cake Cool Before Frosting: If the cake is still warm it can melt the buttercream, which will make it runny. To avoid that, let the cake cool completely, or put it in the fridge to speed up the process.
Vegan Vanilla Sheet Cake
Ingredients
For the Vanilla Cake
- 2 tablespoons apple cider vinegar
- 2 cups soy milk or other vegan milk (480mL), room temperature
- 2 cups brown sugar or cane sugar (400g)
- 3 cups all-purpose flour (360g)
- 2 teaspoons baking soda (10g)
- 1 teaspoon sea salt (2.8g)
- ⅔ cup vegan butter melted and cooled (150g)
- 1 tablespoon vanilla extract
For the Whipped Buttercream Frosting
- 3-3 ½ cups powdered sugar
- 1 cup vegan butter , softened
- 1 teaspoon vanilla extract
- 1 tablespoon vegan milk , add more if needed
- ¼ teaspoon sea salt , only if using unsalted butter
Instructions
For the Vanilla Cake
- Preheat the oven to 350°F/180°C. Prepare a 9×13 sheet pan (with sides) by greasing & flouring or lining with parchment paper (I usually just grease and flour).
- In a small bowl or jar, add the apple cider vinegar and the soy milk together and stir to combine. It will curdle. Set aside.
- Whisk together sugar, flour, baking soda and salt in a large bowl until thoroughly combined. Add milk mixture, melted butter and vanilla. Beat with an electric whisk on medium speed for about 1 to 2 minutes until everything is just combined. Scrape down the sides of the bowl and stir one more time to ensure everything is incorporated. Do not overmix.
- Pour the batter into the pan. Tap on the counter three times lightly to remove any air bubbles.
- Place the pan in the middle rack of your oven and in the center of that rack. Bake for 33 to 35 minutes until fully baked. Remove from the oven and let it cool completely in the pan.
- After cooled, frost with buttercream frosting and sprinkles (optional!) Enjoy! For an even more moist cake, brush with simple syrup before putting on the frosting!
For the Whipped Buttercream Frosting
- Beat the butter and vanilla for about 2-3 minutes with a stand mixer or a handheld mixer, until fluffy.
- Add 1 cup of powdered sugar. Fold it in with a spatula so it doesn’t fly everywhere, then beat for about 1 minute. Add the rest of the powdered sugar in small increments too, until fully incorporated.
- Add in a 1/2 tablespoon of vegan milk at a time until it reaches your preferred volume and consistency. Add that last ½ cup if you desire.
- Then beat for about 5 minutes, using the spatula to mix everything together every other minute, until the frosting is fluffy, white, smooth and creamy.
Putting It All Together
- Frost cake and decorate. The frosting will set at room temperature. Enjoy!
Notes
Tips for Success
- For a Super Moist Cake: To get the moistest results with your vanilla sheet cake, brush it with simple syrup before putting on the frosting! It’s not necessary but it’s great for helping the cake last several days too.
- Don’t Over-Mix the Batter: Just beat or whisk the batter until everything has been combined. Too much mixing can lead to a cake that comes out dense or tough once baked.
- Weigh the Flour: I highly recommend weighing the flour because that’s the best way to accurately measure it. If you don’t have a scale, though, you can spoon your flour into a measuring cup to avoid packing too much of it into your batter.
- Let the Cake Cool Before Frosting: If the cake is still warm it can melt the buttercream, which will make it runny. To avoid that, let the cake cool completely, or put it in the fridge to speed up the process.
Nutrition
Vegan Vanilla Sheet Cake https://jessicainthekitchen.com/vanilla-sheet-cake/ September 29, 2021
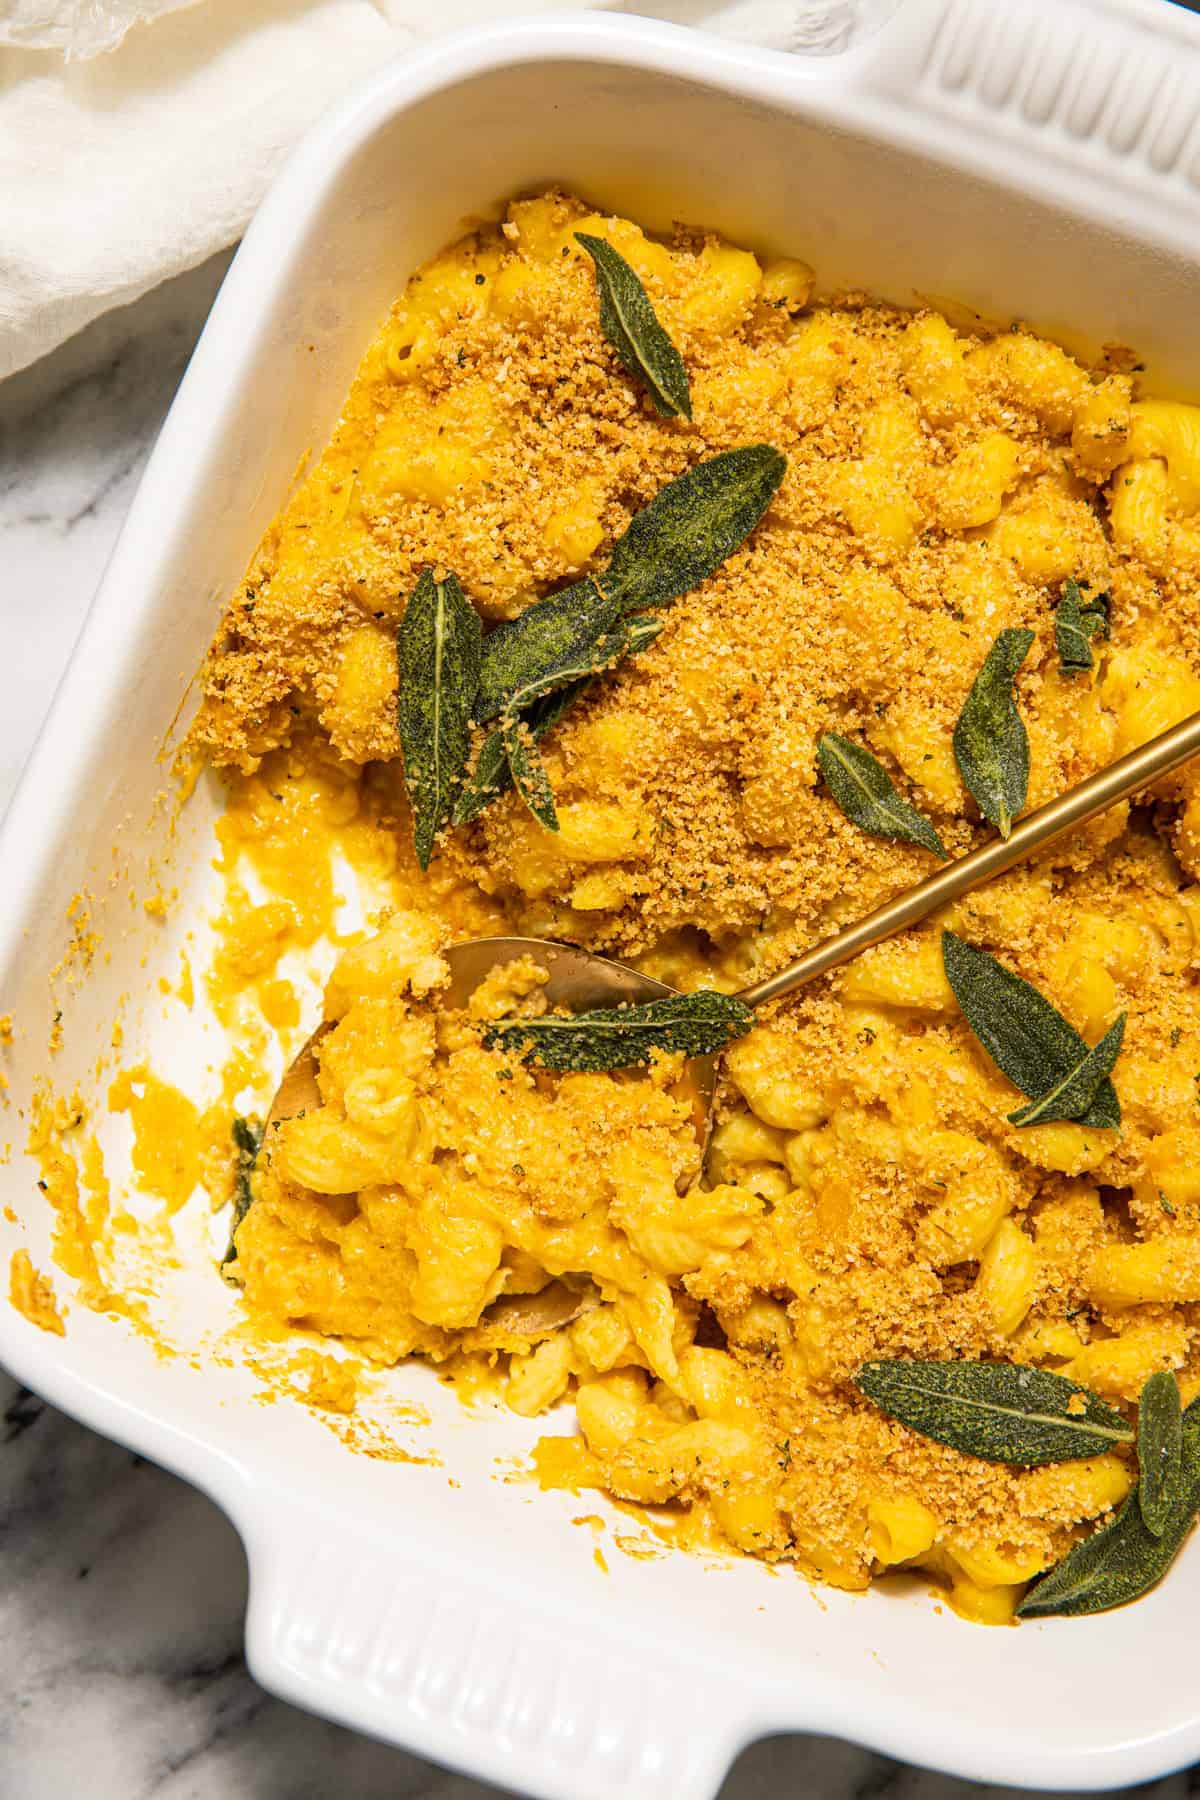
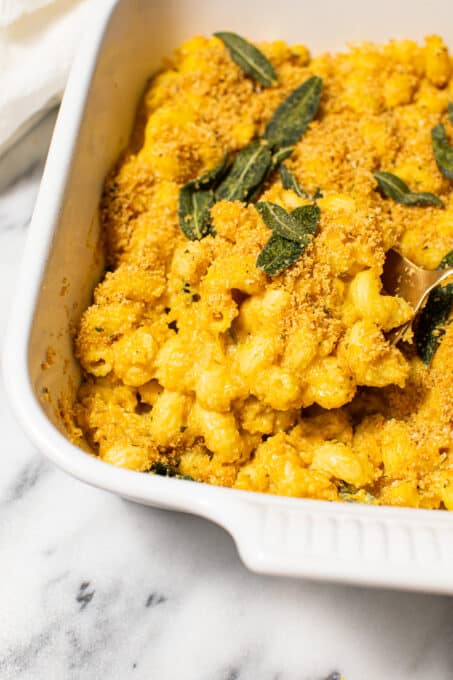
Vegan Butternut Squash Mac and Cheese is a deliciously sweet take on a macaroni and cheese casserole that is so creamy! You’ll love this easy dinner recipe!

Why You’ll Love this Vegan Mac and Cheese
I’ll be honest with you. I’ve never met a mac and cheese that I didn’t like. That said, this vegan macaroni and cheese with butternut squash holds a special place in my heart. Here are a few quick reasons why:
- Butternut Squash is Delicious and Easy to Work With: I’m kind of in love with butternut squash. Okay, really in love. They last practically forever (they can last from 1-3 months) and they’re super easy to cut and peel. Plus, they’re sweet, and even creamier than pumpkin. How could I (and you) not get in on that awesomeness?
- It’s Flavorful: Like I mentioned above, you can cure your sweet AND salty cravings with just one meal! The saltiness of the crisped sage blends perfectly with the rich, subtly sweet butternut, and your tastebuds are the benefactors.
- It’s Quick: You can have this dish piping hot and on the table in just 35 minutes, which makes it a great option for busy weeknights! It also saves really well, meaning you get to enjoy fabulous, flavorful leftovers if needed.
- It’s Comfort Food: I’m pretty sure that mac and cheese in any form qualifies as comfort food. This creamy pasta can be made any time of year, but it’s especially comforting in the fall when it starts to get cold outside!
Notes on Ingredients
Okay, we’re almost there. Before we dive into how to start this “cheesy” masterpiece, let’s go over the essential ingredients. Here’s what you’ll need to gather up:
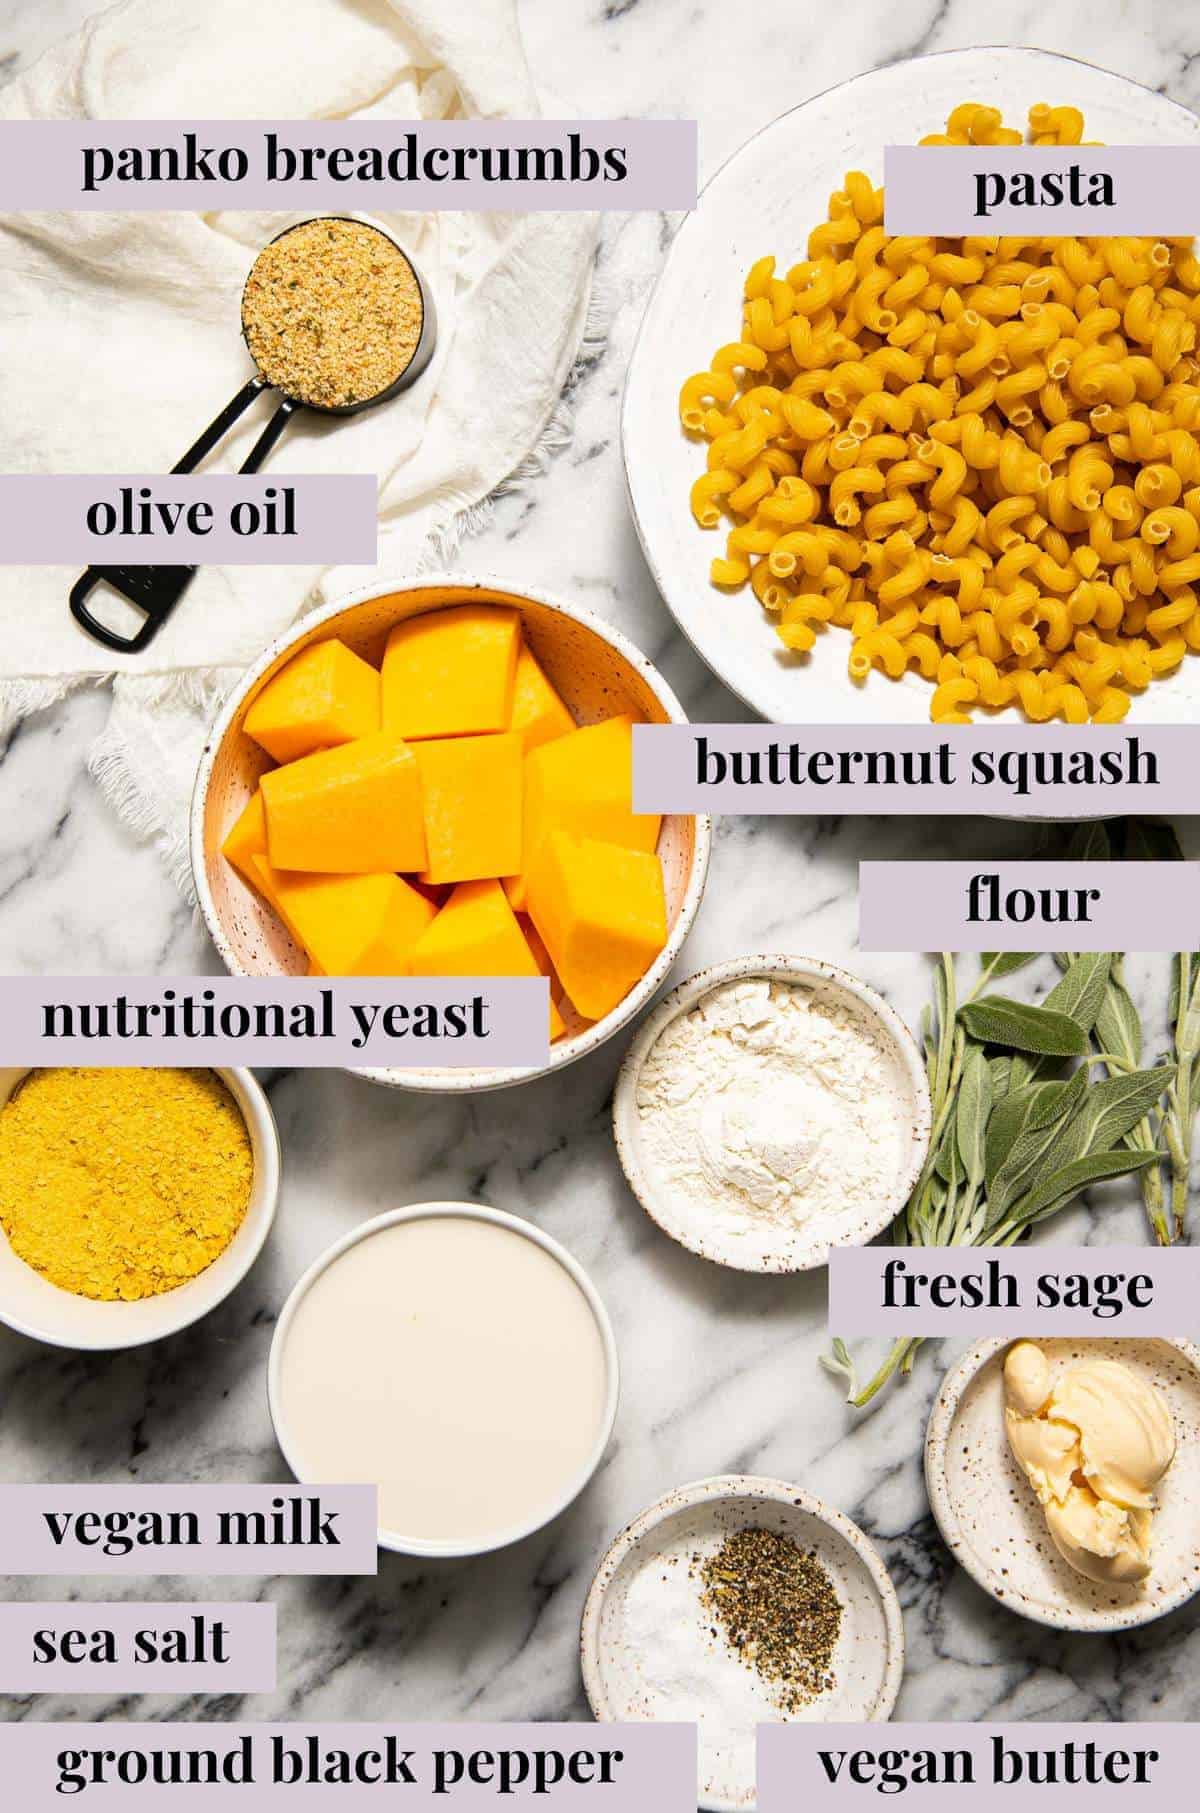
- Sage: Make sure to use fresh sage, and remove the stems before starting.
- Butternut Squash: Medium-sized, peeled, and with seeds removed. Chop it into large chunks before you begin.
- Pasta: You can use regular or gluten free, it doesn’t really matter. I like to use penne, cavatappi, etc.
- Butter: As far as vegan butter goes, I like Earth Balance’s spread. Regular oil also works.
- Flour: Use regular all-purpose flour, or coconut flour , if needed.
- Vegan Milk: Any vegan milk works – soy, almond, coconut, etc.
- Nutritional Yeast : Adds extra protein to the dish.
- Breadcrumbs: I like to use panko breadcrumbs. Gluten free breadcrumbs can be used, if needed.
- Seasoning: Combine sea salt with ground black pepper.
How to Make Butternut Squash Mac and Cheese
Mixing this butternut squash mac and cheese together is no trouble at all. There are a lot of parts to this recipe (i.e. cooking the butternut, the sage, the pasta, and combining all three components), but the steps aren’t overly complex or difficult, as you can see here:
Preheat the Oven to 425°F: Then, bring two pots of salted water to a boil. Add the butternut squash to one, cook for 10 minutes or until fork soft.
Cook the Pasta: Add the pasta to the other pot (cook pasta according to directions on the box). If it’s finished cooking before you have finished the sauce, remove from heat and drain, keeping 1/2 cup pasta water, and let stand until you’re ready to use it.
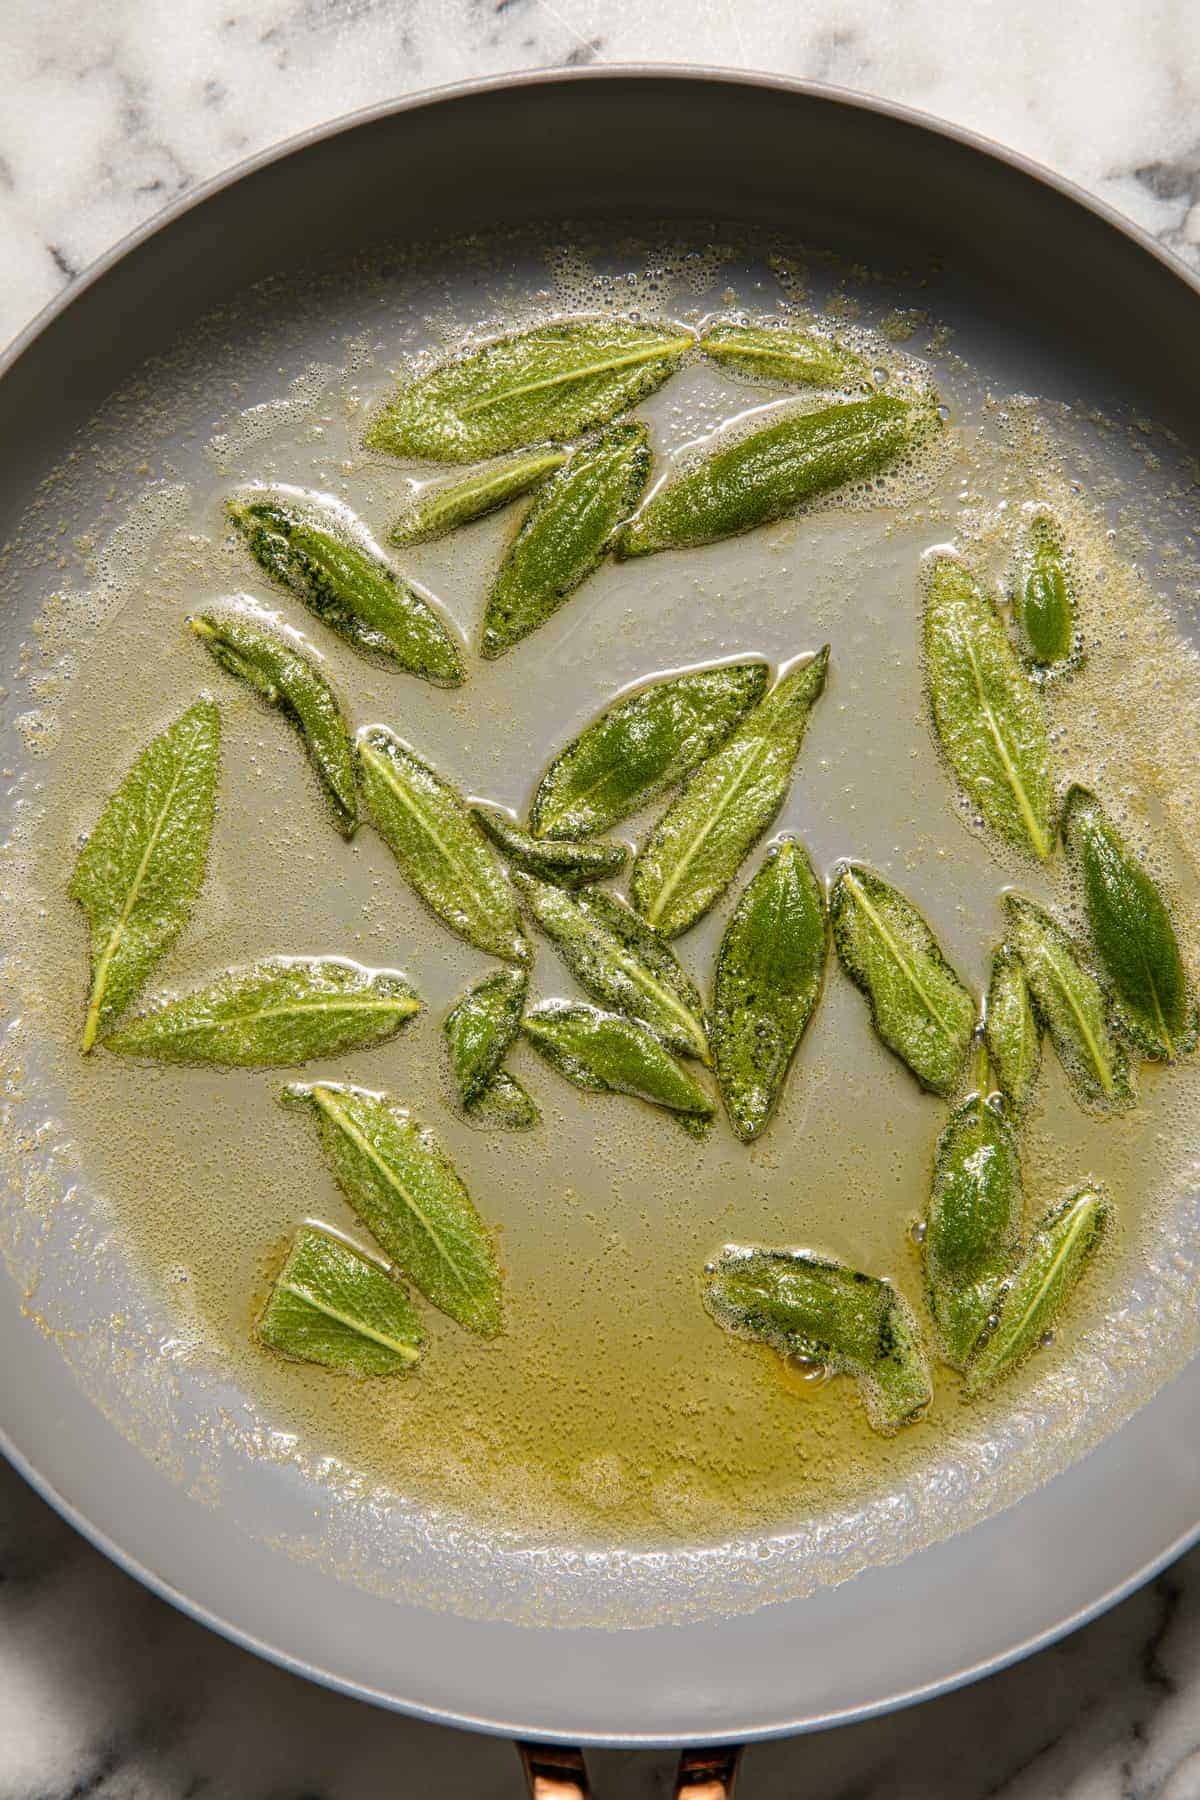
Cook the Sage: In a large pan, melt the vegan butter or coconut oil on medium-high. Add the sage leaves and cook for 1 minute, watching carefully so the butter/oil doesn’t burn, until crispy. Transfer to a paper-towel-lined plate, and season with a pinch of salt and 1/4 teaspoon ground black pepper. Don’t throw out the butter/oil!
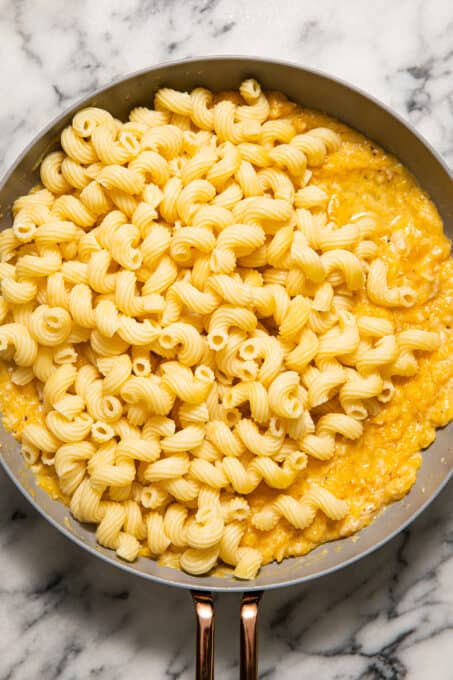
Make the Sauce: In the same pan over medium heat with the leftover butter/oil, add the flour and whisk, then cook for about 1 minute until it comes together. Add vegan milk and whisk until it is lump free. Reduce the heat to low and season with the 1/4 teaspoon salt and 1/4 teaspoon ground black pepper. Simmer for 2 to 3 minutes, stirring until the sauce starts to thicken, then remove from heat.

Mash the Squash: Transfer butternut squash into the sauce and using a fork, mash it into the sauce until combined.

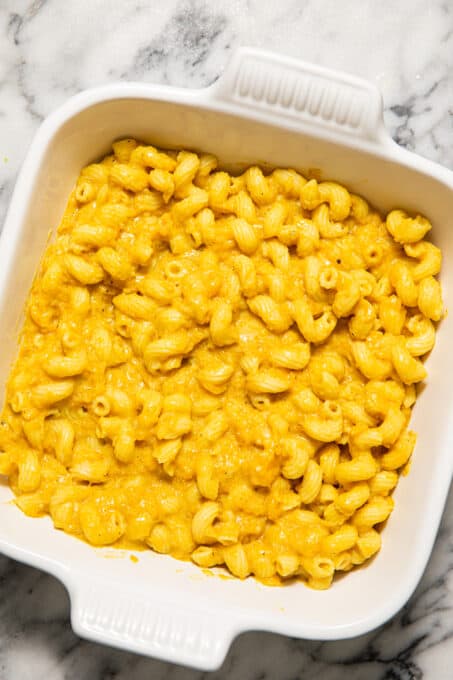
Combine Pasta, Squash, & Sauce: Transfer the drained pasta, reserved pasta water, and nutritional yeast squash and sauce mixture. Stir until well combined.
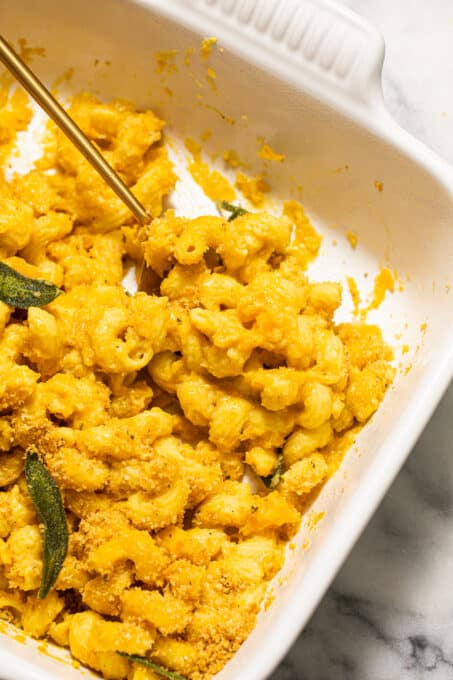
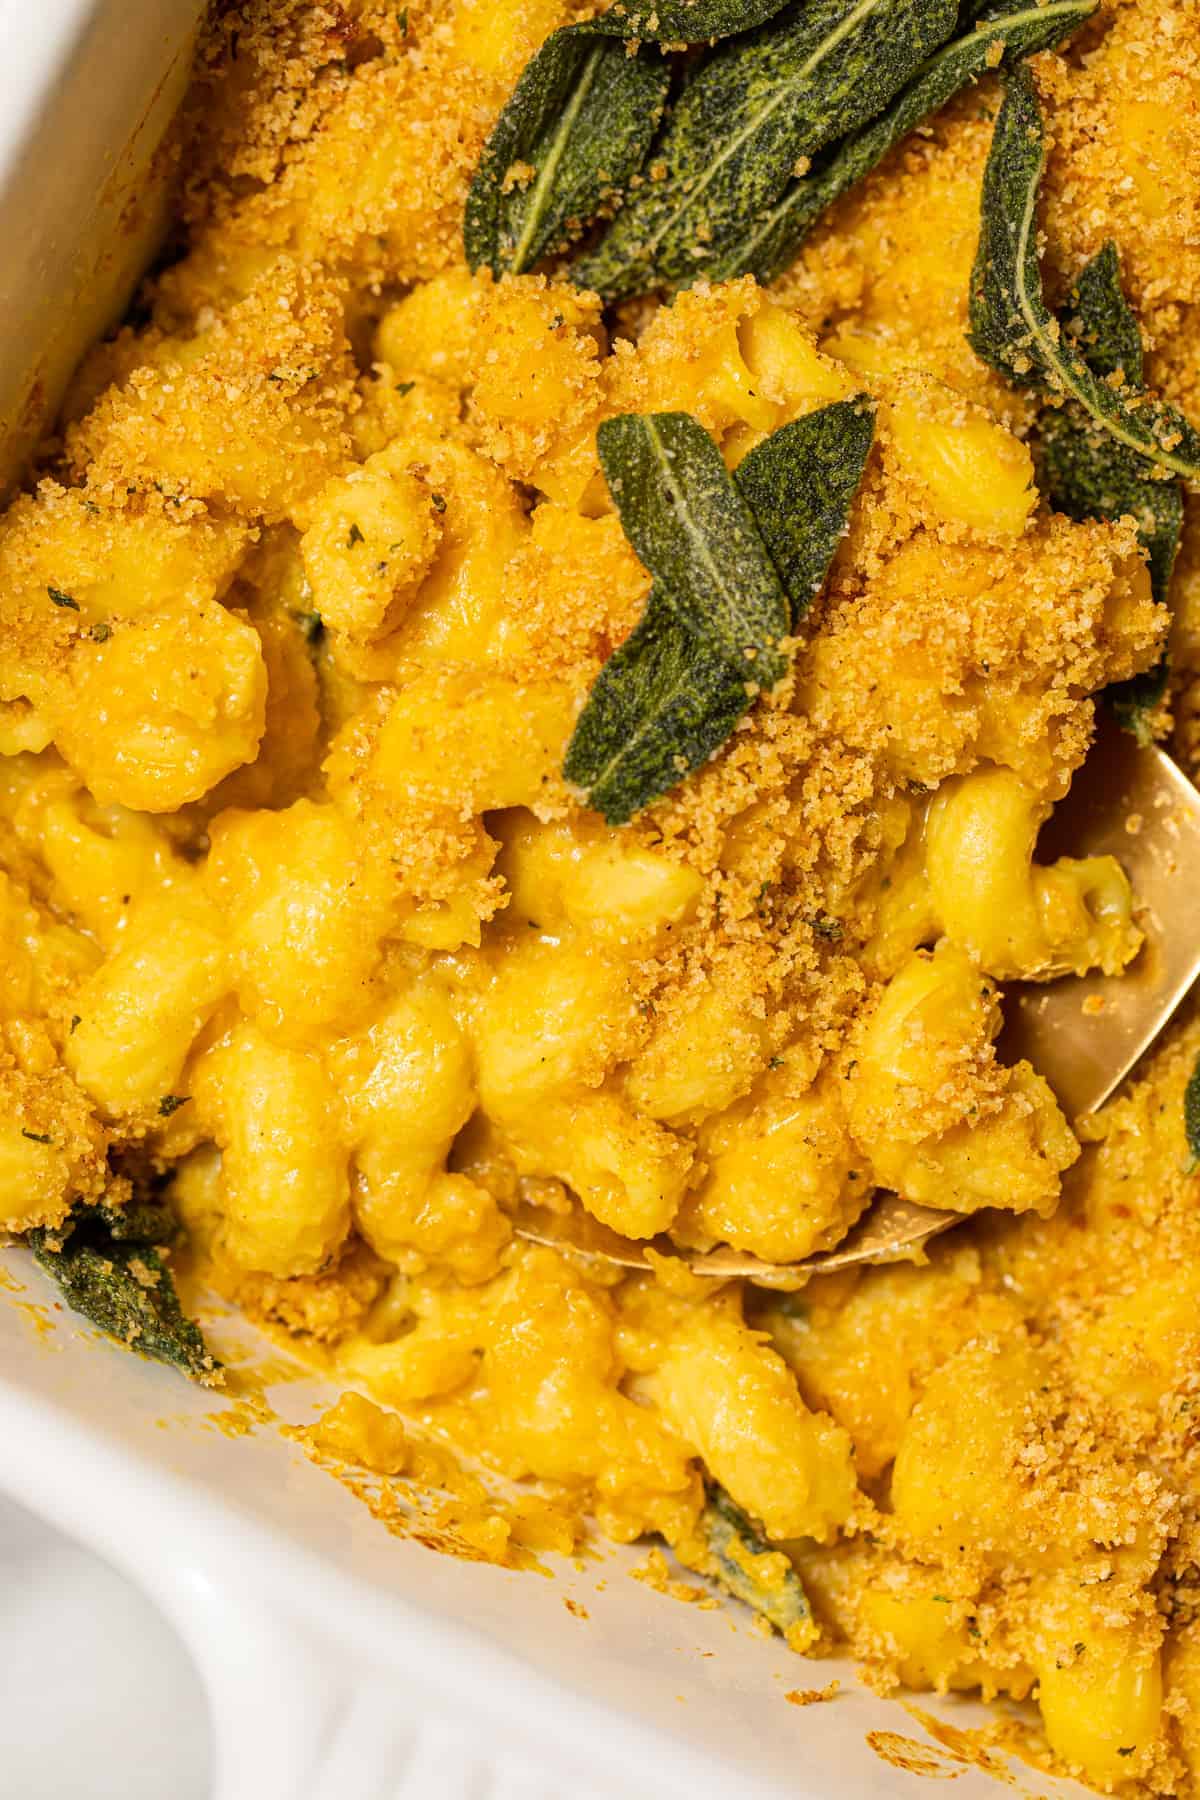
Bake the Mac and Cheese: Transfer the pasta mixture into a greased baking dish. Combine the breadcrumbs and olive oil to moisten them, then season them with remaining salt and pepper. Sprinkle the moistened crumbs in a single layer over the dish. Bake 5 to 7 minutes, or until golden brown and bubbly. Crumble the crispy sage over the top. Enjoy!
Tips for Success
See what I mean? Totally doable, whether you’re looking for a quick mid-week dinner or an indulgent meal that guests will love.
There are, however, a couple of tips on this butternut squash mac and cheese that will make the process even easier:
- How to Mash the Butternut Squash: You can mash it with your wooden spoon, spatula, or fork. It’s that soft. You don’t need any other kind of equipment for this recipe!
- Do I Have to Use Sage? Technically no, but I highly recommend it. The saltiness of the sage and its crispy texture really pull the dish together.
- How to Make this Gluten Free: Simply use gluten free pasta, flour, and panko breadcrumbs, and you’re good to go!
- Peel the Squash: You can use unpeeled butternut squash if you want, but for the creamiest, smoothest results, make sure to peel it!

Serving Suggestions
Wondering what to serve with your butternut mac and cheese? I’ve got a few ideas that might help! This veggie mac and cheese is generally pretty filling, but there are a couple of light sides that I like to include with it sometimes:
- Salad: Usually when I make this meal, a light, leafy green salad on the side is enough to satisfy everybody’s appetites!
- Veggies: Roasted or sautéed vegetables like asparagus, broccoli, mushrooms, and others are great too, because you can mix them in with your creamy pasta!
- Bread: Use slices of crusty bread to soak up some of the creamy butternut sauce – words can’t describe how good!
How to Store and Reheat Leftovers
Store your butternut squash mac and cheese leftovers in an airtight container in the fridge for 4-5 days. To reheat, bake in the oven until warmed through at 425 degrees F, or simply microwave. It may not be quite as creamy as it originally was if you microwave it, but it’ll still taste great!
Can I Freeze This?
Sure! Freeze your mac and cheese in an airtight container for 1-2 months. When you’re ready to enjoy it again, make sure to thaw it overnight in the fridge first before reheating!
Ingredients
- 1 bunch fresh sage , stems removed
- 1/2 medium Butternut Squash , peeled, seeds removed and chopped into large chunks
- 8 ounces pasta , regular or gluten free
- 2 tablespoons vegan butter , I like Earth Balance’s spread or coconut oil
- 2 tablespoons flour , regular or coconut flour if needed
- 1 to 1 ¼ cups vegan milk , any vegan milk works
- ½ cup nutritional yeast
- ¼ cup panko breadcrumbs + 2 teaspoons of olive oil , gluten free if needed
- ¾ teaspoon sea salt
- ¾ teaspoon ground black pepper
Instructions
- Preheat the oven to 425°F. Bring two pots of salted water to a boil. Add the butternut squash to one, cook for 10 minutes or until fork soft.
- Add the pasta to the other (cook pasta according to directions on the box). If it’s finished cooking before you have finished the sauce, removed from heat, drain, keeping 1/2 cup pasta water and let stand until you’re ready to use it.
- In a large pan, melt the vegan butter or coconut oil on medium-high. Add the sage leaves and cook for 1 minute, watching carefully so the butter/oil doesn’t burn, until crispy. Transfer to a paper-towel-lined plate, and season with a pinch of salt and 1/4 teaspoon ground black pepper. Don’t throw out the butter/oil!
- In the same pan over medium heat with the leftover butter/oil, add the flour and whisk, then cook for about 1 minute until it comes together. Add vegan milk and whisk until it is lump free. Reduce the heat to low and season with the 1/4 teaspoon salt and 1/4 teaspoon ground black pepper. Simmer for 2 to 3 minutes, stirring until the sauce starts to thicken, then remove from heat.
- Transfer butternut squash into the sauce and using a fork, mash it into the sauce until combined.
- Transfer the drained pasta, reserved pasta water, and nutritional yeast squash and sauce mixture. Stir until well combined. If the sauce seems a little dry, add in the extra milk a tablespoon at a time until your desired consistency.
- Transfer the pasta mixture into a greased baking dish. Combine the breadcrumbs and olive oil to moisten them, then season them with remaining salt and pepper. Sprinkle the moistened crumbs in a single layer over the dish. Bake 5 to 7 minutes, or until golden brown and bubbly.
- Crumble the crispy sage over the top. Enjoy!
