Learn how to make creamy Vegan Cream Cheese with this easy step-by-step guide! Homemade cream cheese is so rich and smooth. It’s perfect for breakfast bagels, snacks, and more!
Making your own cream cheese probably sounds pretty labor-intensive, but it’s not, I promise! Basically all you need to do is blend the ingredients together, and then patiently wait for the mixture to settle.
But, more on this later. For now, let’s talk about the amazing qualities/versatility of cream cheese!
I love being vegan, but, before this recipe, I’ll admit that I missed being able to enjoy cream cheese! Now, I don’t have to because this Vegan Cream Cheese is just as smooth and delicious as regular cream cheese is. There’s another promise.
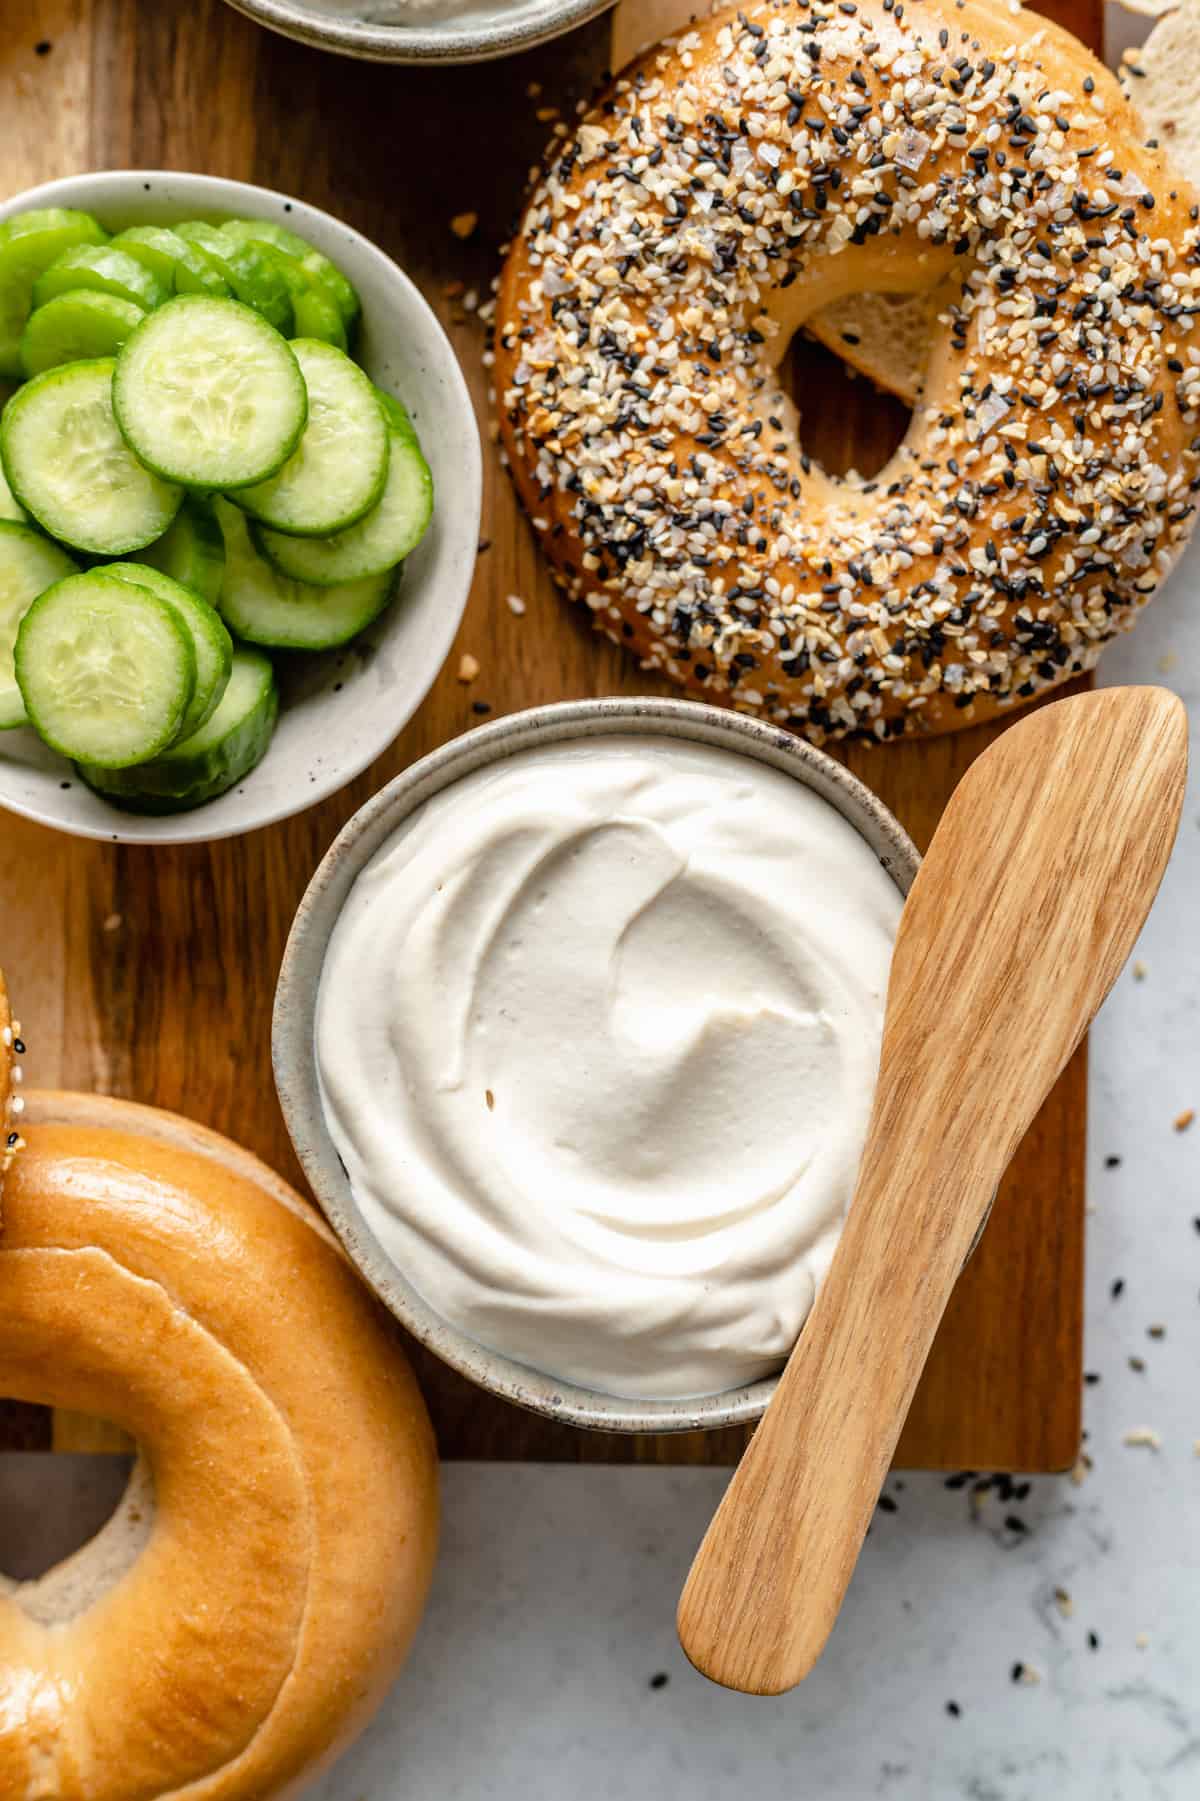
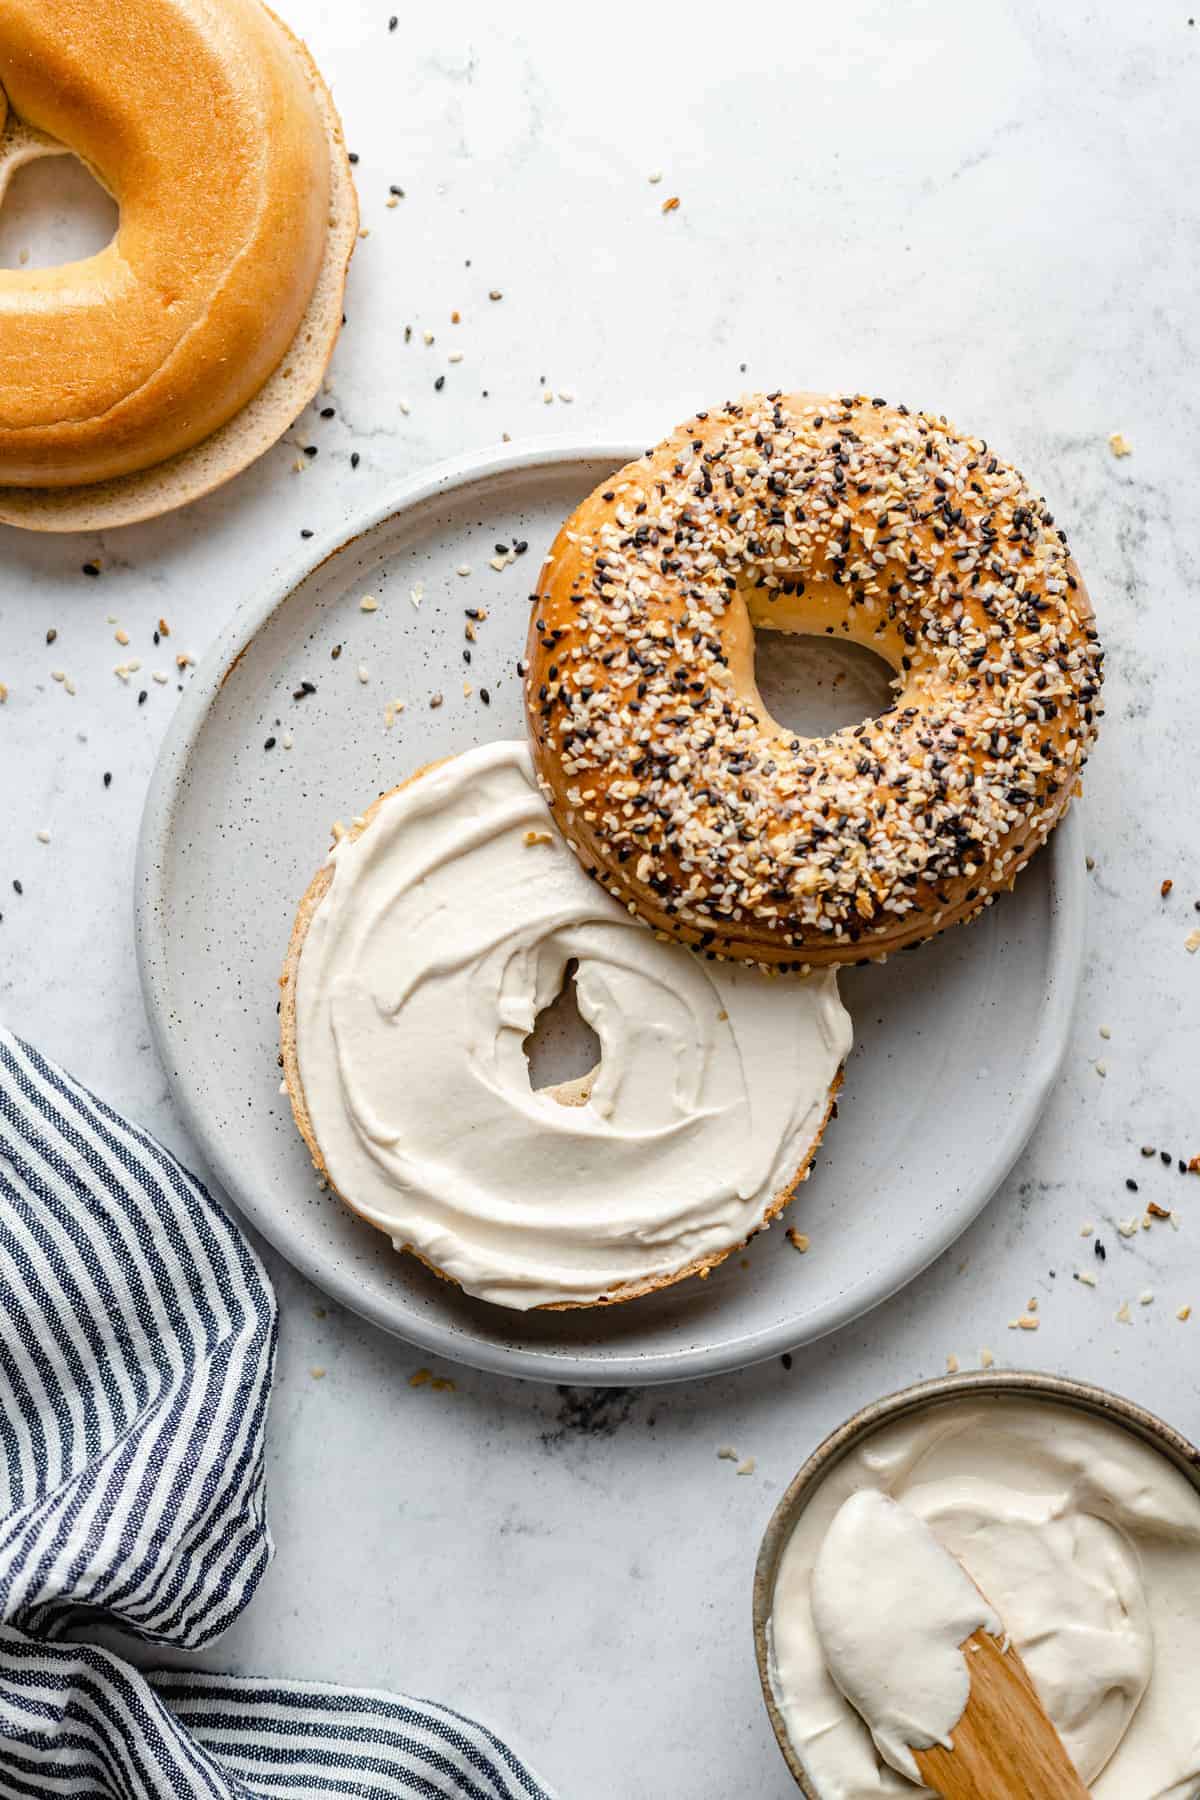
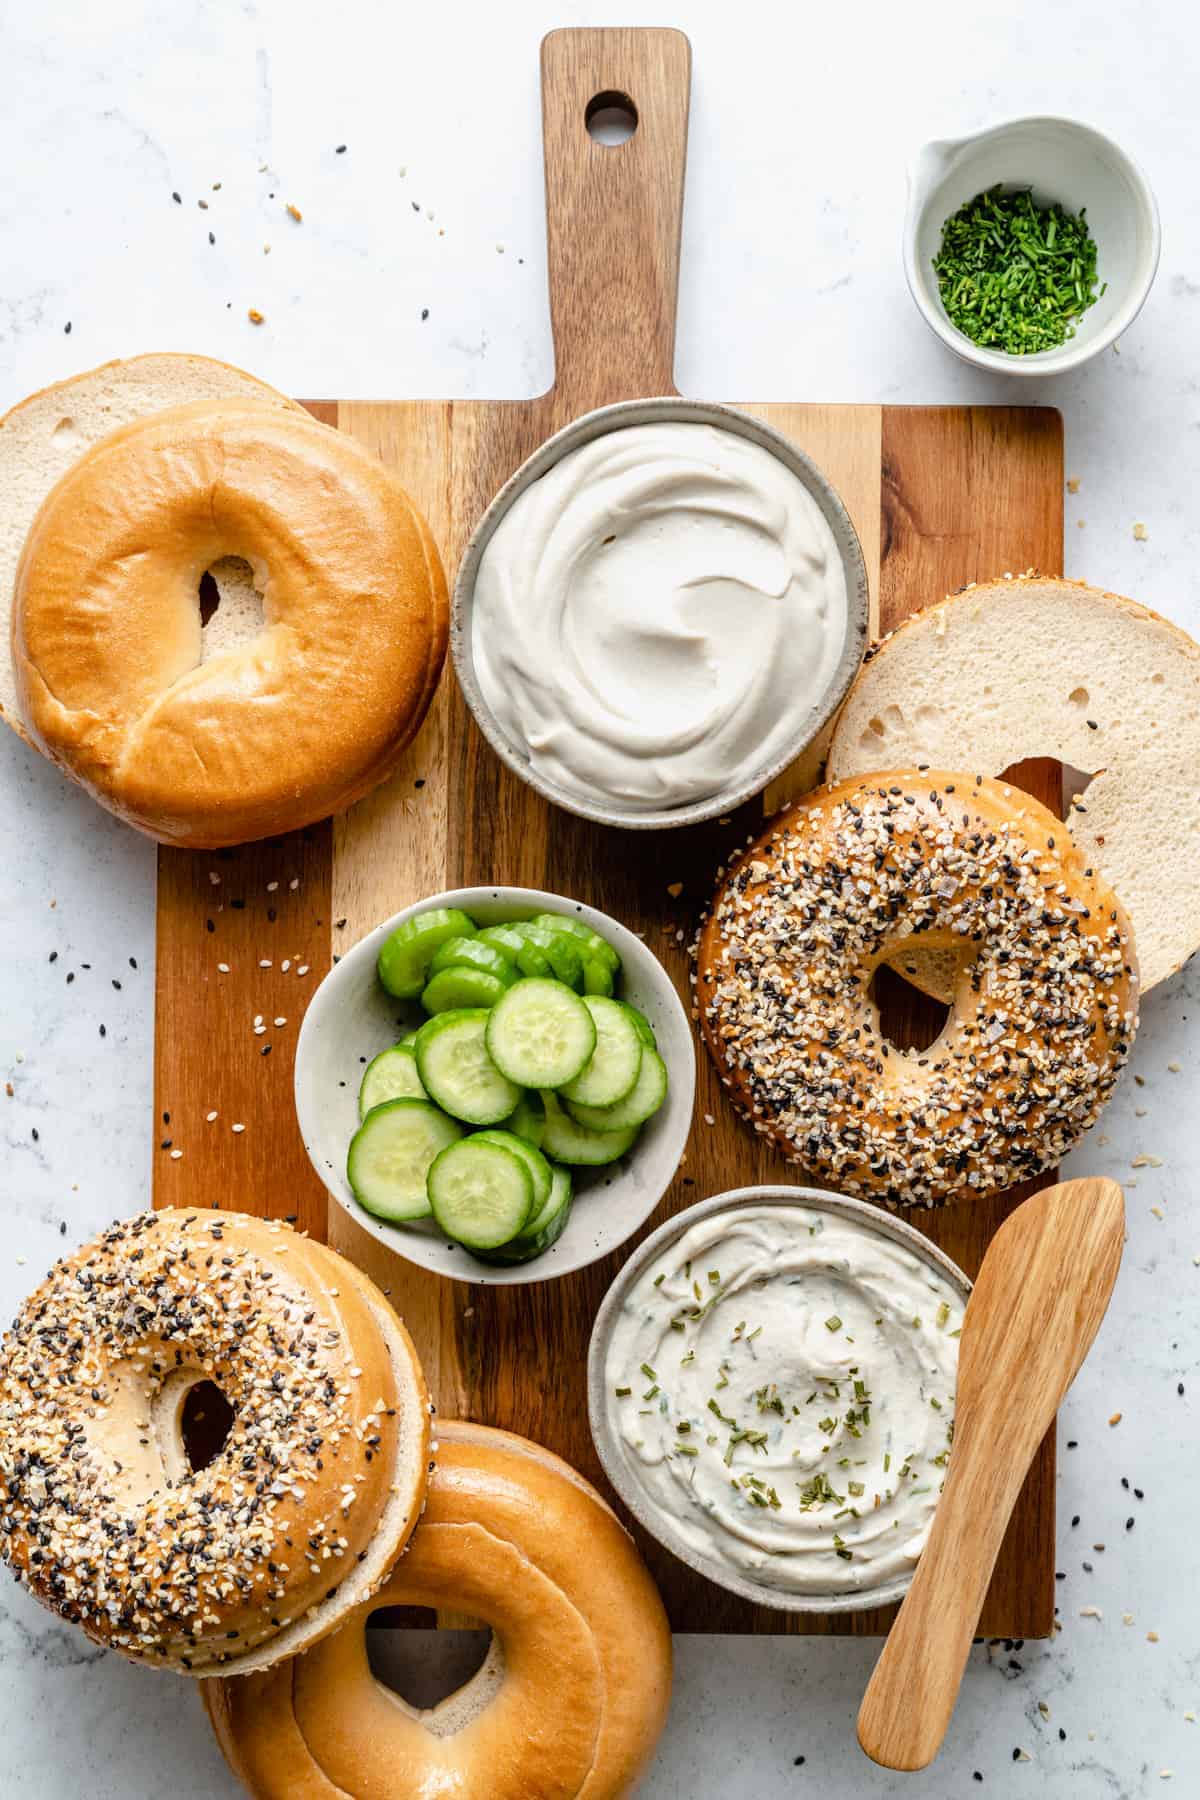
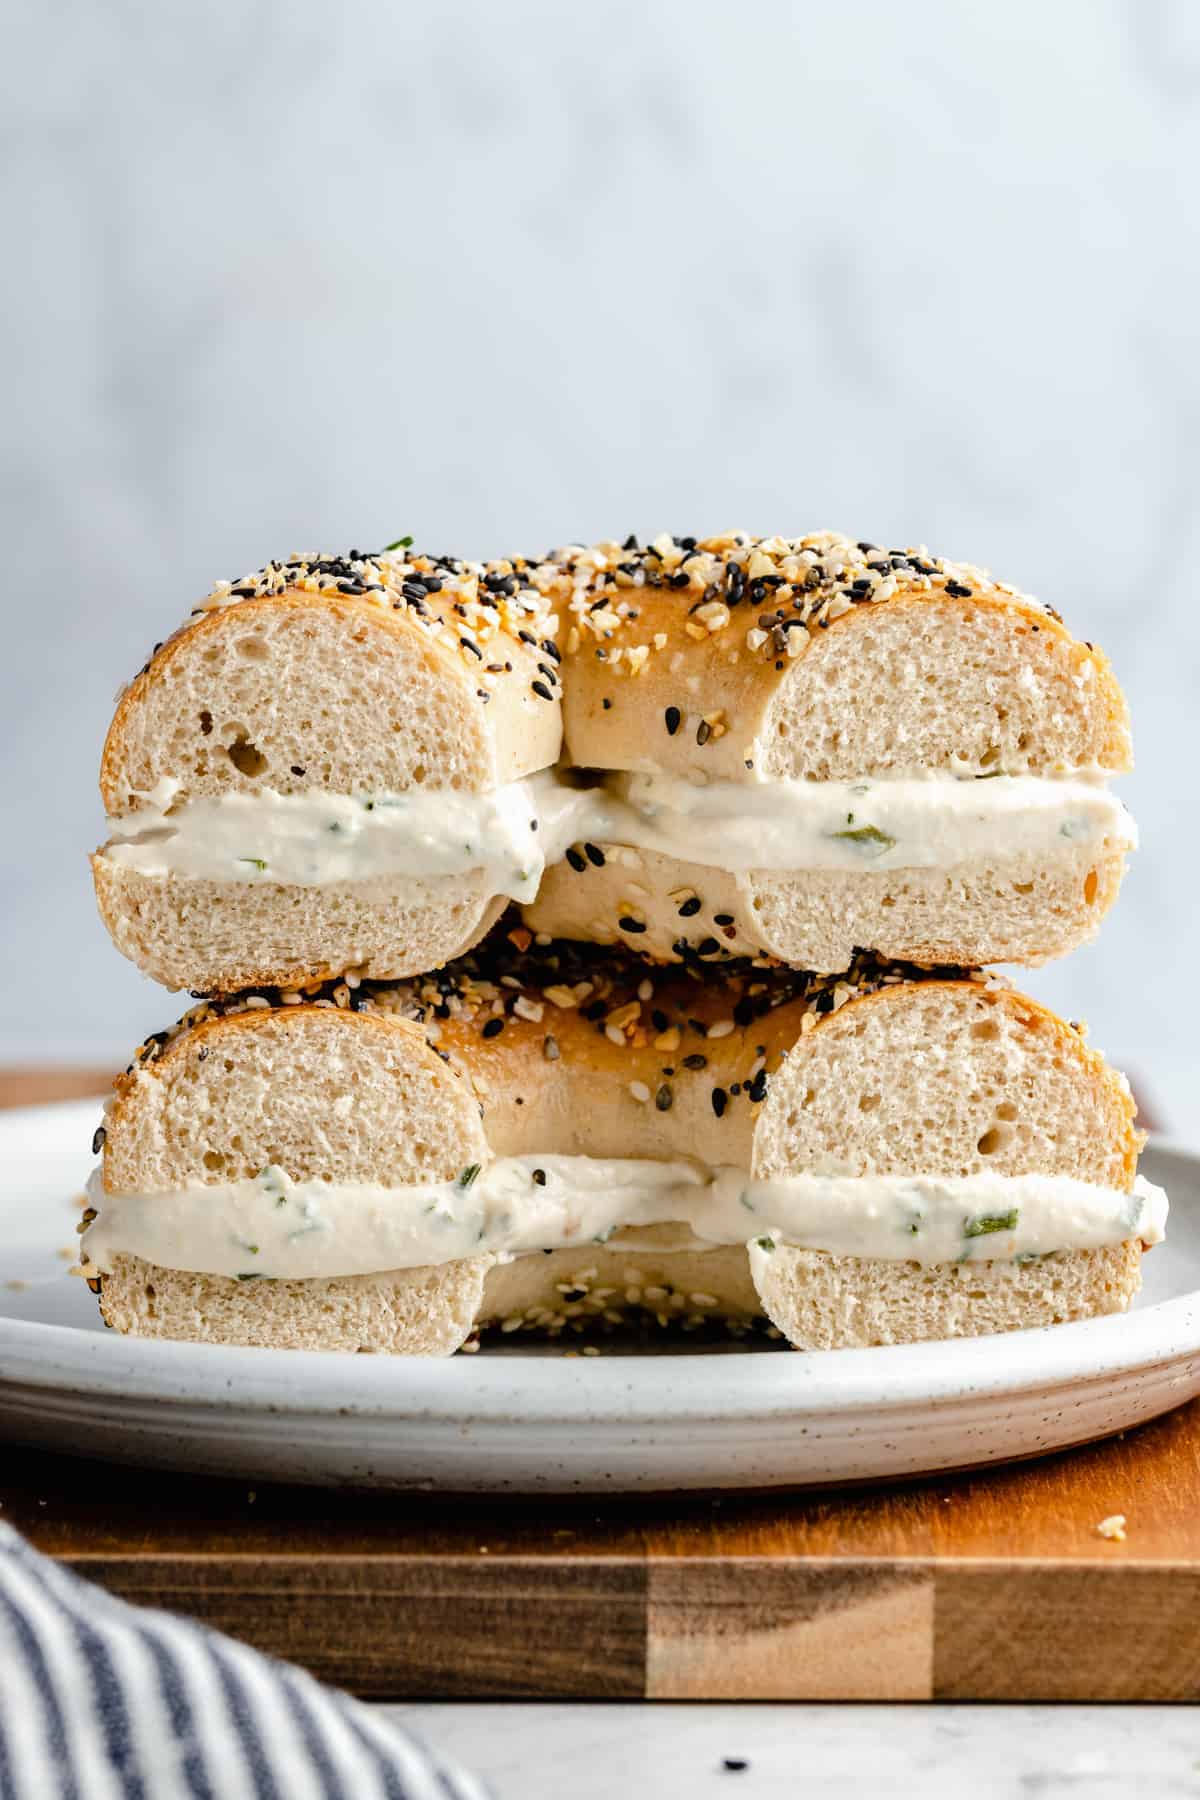
Vegan yogurt and raw cashews combine to create a creamy homemade cream cheese that you can use in pretty much anything! Cheesecakes, frosting, on bagels… you name it, this cream cheese can do it!
Why Make Your Own Cream Cheese?
There are so many reasons to make your own cream cheese. The main reason is because it is SO tasty. You’ll want to eat it right out of the glass/jar. (I did, anyway!) Here are a couple more reasons to keep in mind:
- You Know Exactly What’s In It: The best part of making any meal/recipe yourself is that you know exactly what went into it. This vegan cream cheese is no different, in that regard. There are just 5 simple ingredients in this recipe.
- It’s Easy: I wasn’t kidding when I said basically all you have to do is blend the ingredients. The prep work in this recipe won’t take you more than 5-10 minutes, and then it’s just a matter of waiting while the recipe settles.
- It’s a Low-Cost Recipe: This homemade cream cheese is very budget-friendly! Recipes that keep shopping lists short and include low-cost ingredients (like plain yogurt) are the best. 🙂
Notes on Ingredients
Let’s go over the 5 aforementioned ingredients. They may not seem like they could yield such creamy deliciousness, but I’m here to report that they can!
These are the essentials in question:
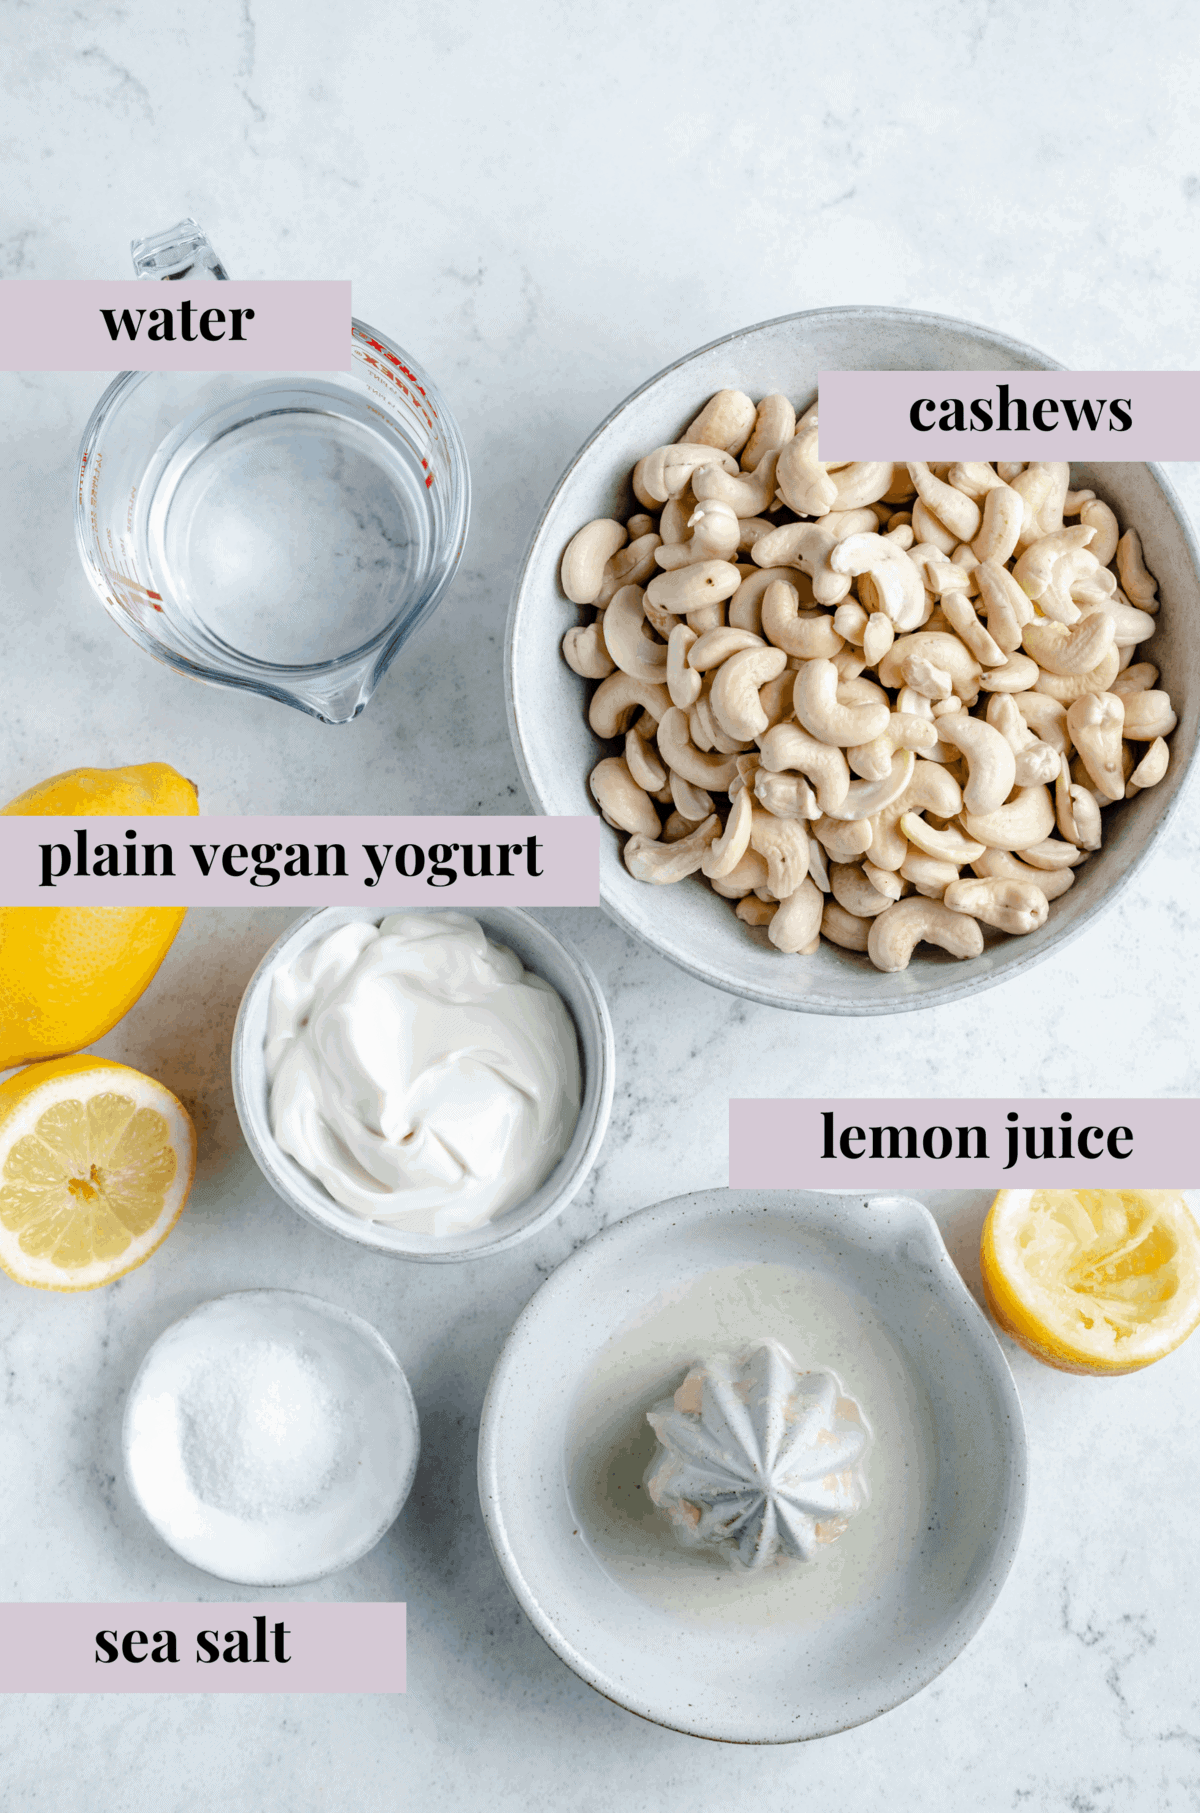
- Raw Cashews: Soak them overnight and then drain and rinse them before starting.
- Water: I usually do room temperature water, but it doesn’t really matter. You just want to ensure it’s filtered water.
- Yogurt: Use any kind of plain vegan yogurt that you have on hand/in your local store. I also have a cashew yogurt recipe you could try here.
- Lemon Juice: Use the juice of a fresh lemon if you can, but freshly bottled works too.
- Sea Salt: To provide/enhance flavor in your cream cheese.
How to Make Vegan Cream Cheese
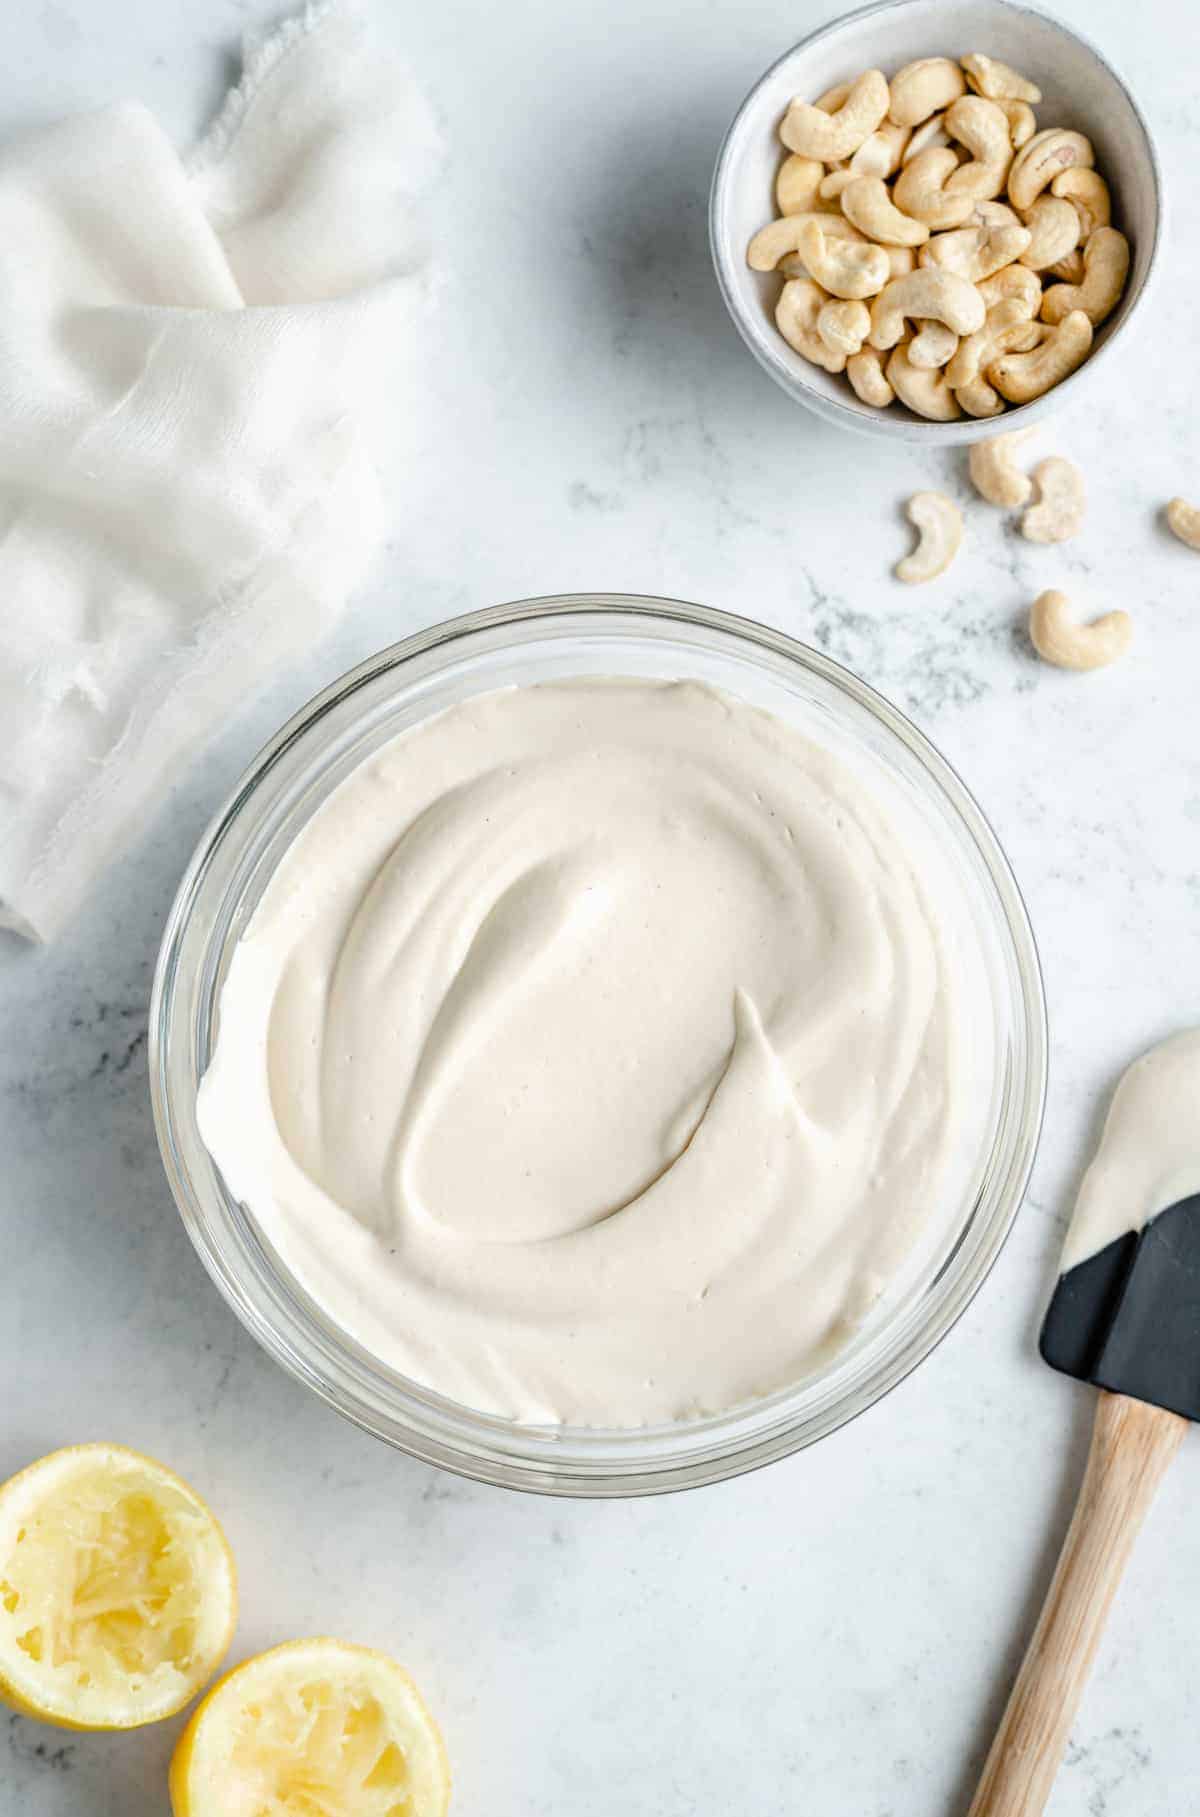
Blend the Ingredients: In a high speed blender , blend all the ingredients together until blended and completely creamy, smooth and incorporated. Scrape down the sides if needed, and blend until combined.

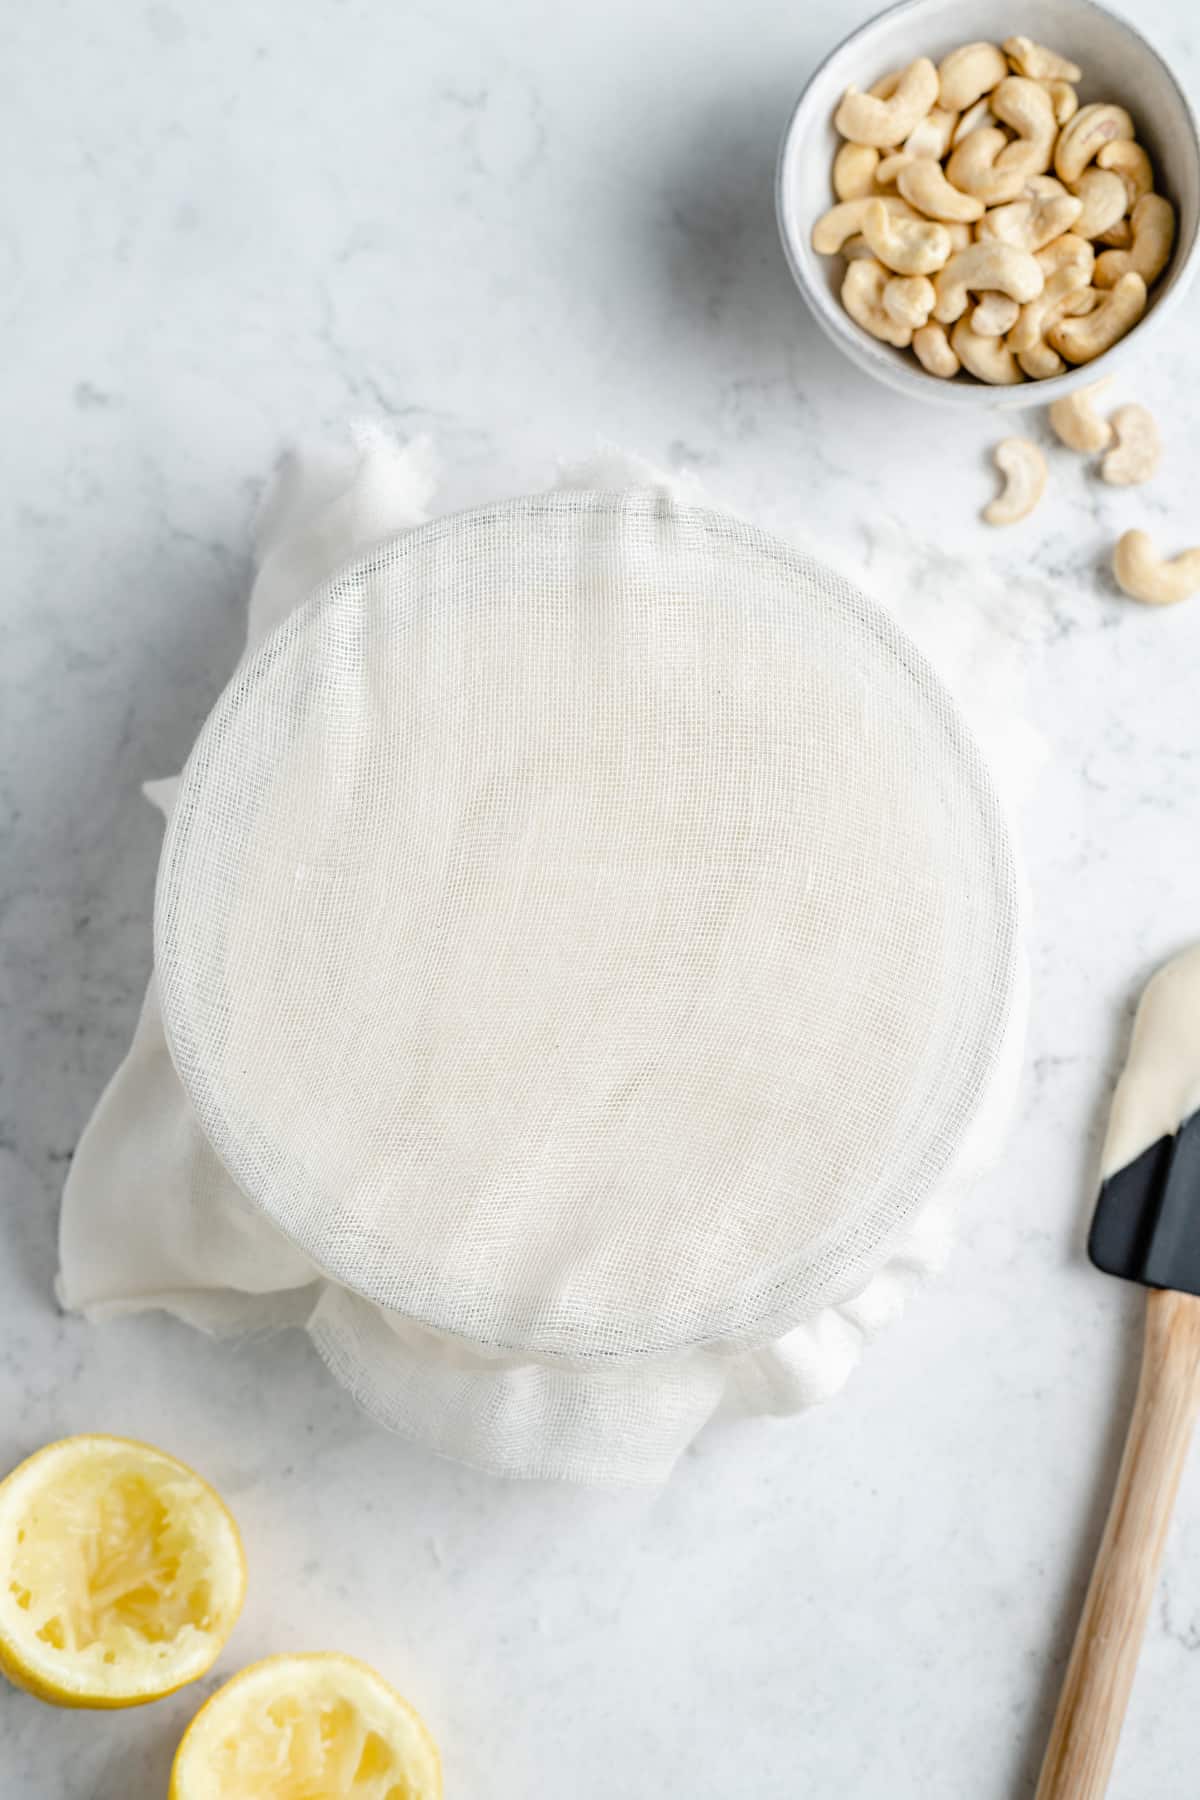
Transfer to a Bowl: Pour the contents into a very clean and dry glass bowl or tall jar using a silicone spatula or wooden spatula (not metal). Smooth it down.
Let the Cream Cheese Sit: Cover the bowl/jar with some cheesecloth or even a clean dry paper towel and secure with a rubber band. Place in a warm, dry place. (See notes below for tips on this.) Leave the cream cheese undisturbed as much as possible for 24-48 hours. I recommend leaving it for the full 48 hours.
Stir the Cream Cheese and Chill It: The mix should be much thicker now and taste a lot cheesier. Stir to combine fully. Cover the jar/bowl or transfer to a new clean jar/bowl and cover and place in your fridge. It should also thicken up in the fridge and you can start using it now!
Taste and Adjust: Taste your cream cheese and add more salt if desired. If you want your cream cheese any thinner, strain/drain it in cheesecloth or paper towel or a fine mesh colander for about 30 minutes to strain off any extra liquid.
Tips for Success
See what I mean about how the majority of this process is just waiting? That said, I do have some extra tips on how to create the best possible homemade vegan cream cheese:
- How to Blend the Ingredients: For the first step, I prefer to use a smaller blender and a tamper to get all of the ingredients mixed in.
- How to Tell if There is Mold on Your Cream Cheese: If you see a small, slightly yellow film on top, that is normal. If you see any pink spots, that is mold and you should discard it all. This will usually happen if some of your equipment isn’t clean, so give it all a good scrub before using.
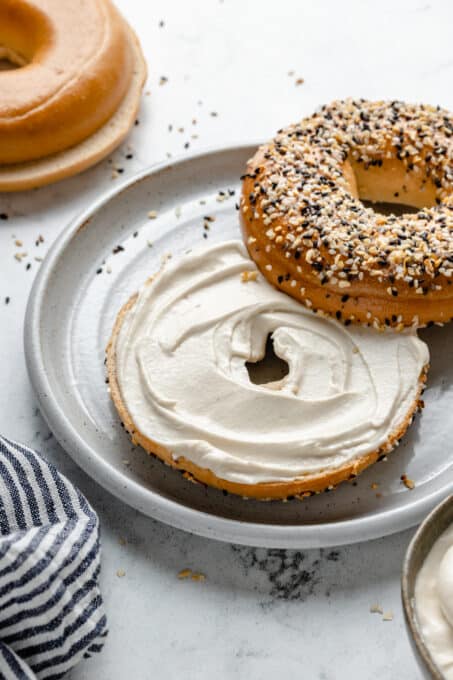
- Chill Your Cream Cheese Before Using: As stated above, this makes the cream cheese nice and thick for spreading on your favorite bagels, crackers, etc.
- Where to Leave Your Cream Cheese for the 24-48 Hours: If you live in a tropical country, you can leave it on your countertop. If you don’t, place it in your oven with the oven OFF and the oven light on (do not place it right after cooking something, this will be too hot).
Variation Ideas
If plain cream cheese isn’t your thing, that’s okay! You can always jazz it up with some add-ins. These are a few of my favorite variations when it comes to cream cheese:
- Swirl in Fruit: I like to add in chopped strawberries sometimes to make strawberry cream cheese! Feel free to try other fruits, too.
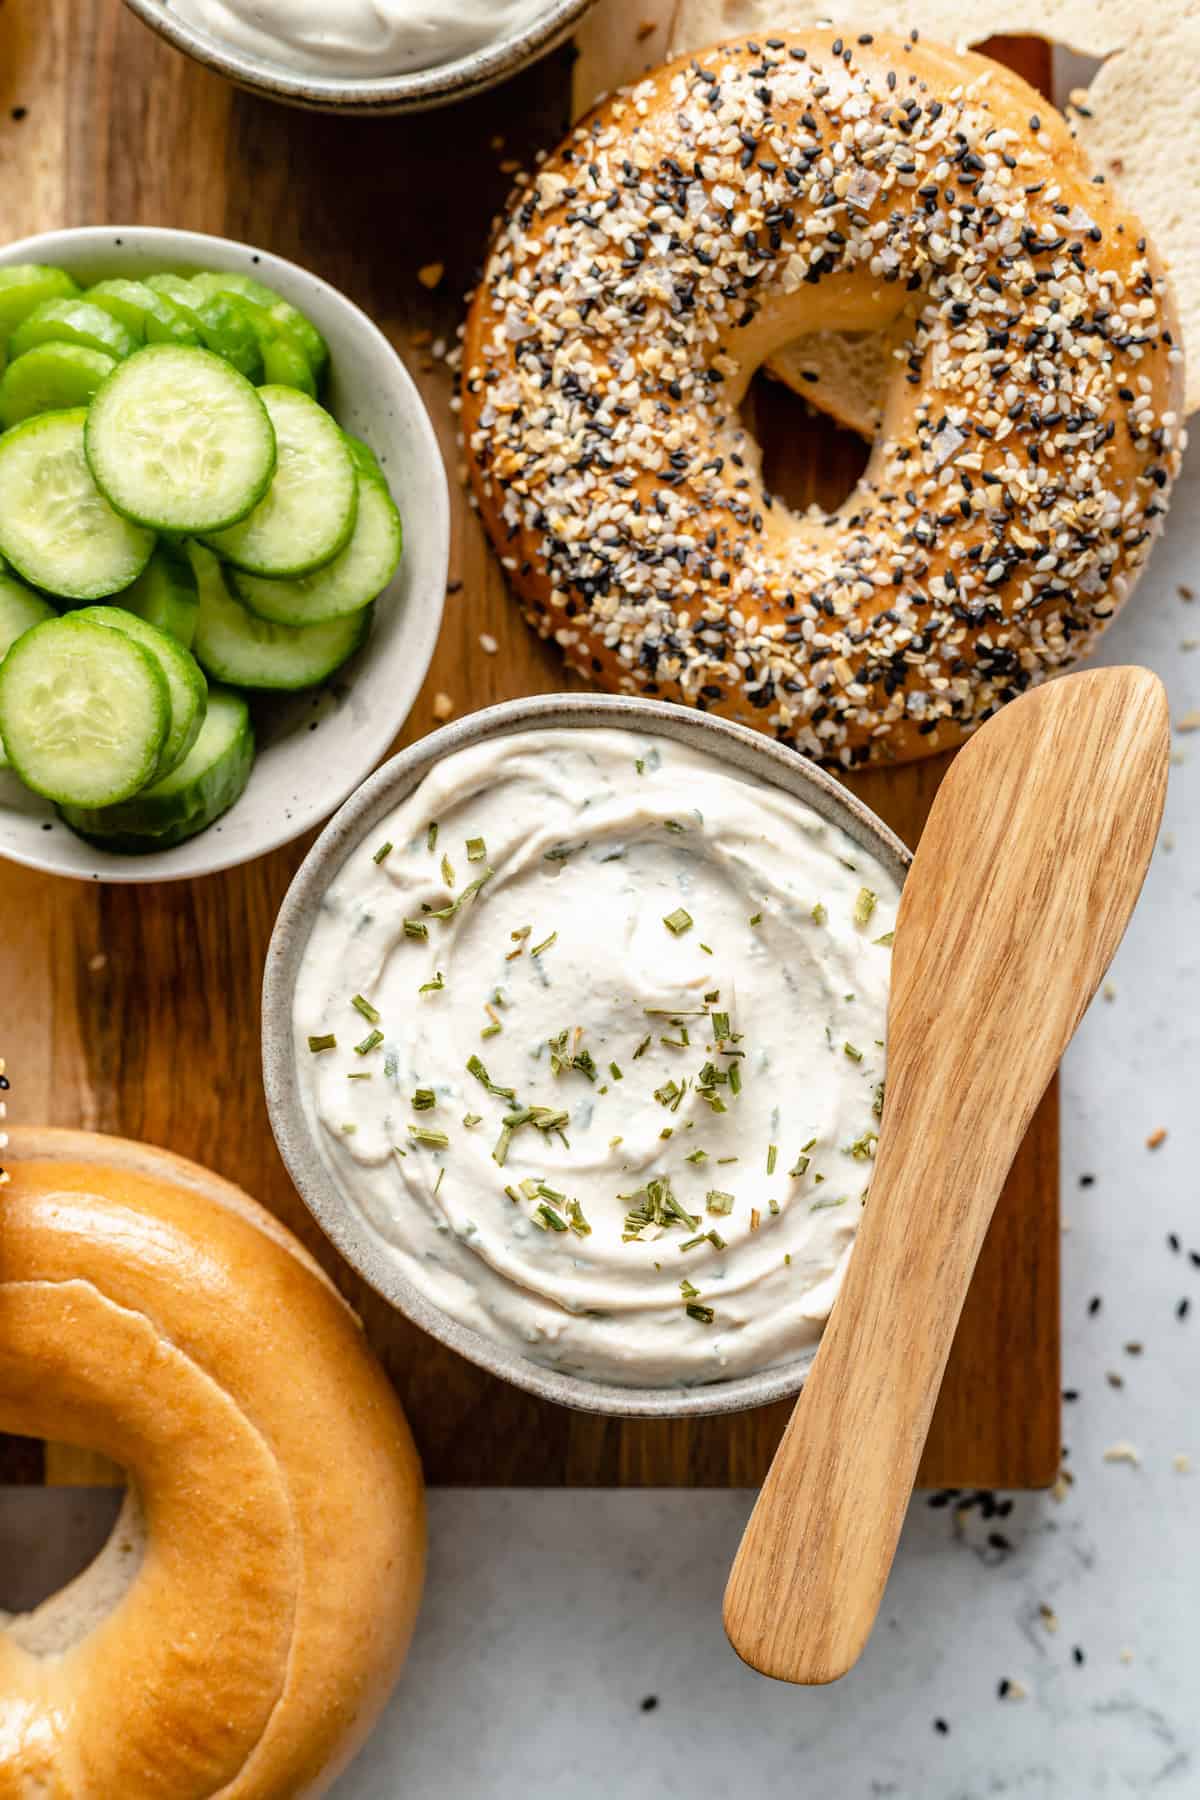
- Do a Chives and Garlic Flavor: Add in 1 tbsp dried chives, 1 teaspoon garlic powder, ½ teaspoon onion powder, and a pinch of salt to swirl in! THIS is my favourite way to enjoy it!
- Make it Cheesy: Adding in some nutritional yeast makes for an even cheesier flavor.
Ways to Use It
There are practically endless ways to use cream cheese in your daily life! Here are a few of my favorite ways:
- In Cheesecakes: Vegan cream cheese can help you make a fabulous vegan cheesecake !
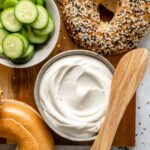
- On Bagels: This smooth, cheesy spread goes great on a toasted bagel, or just a regular piece of toast.
- In Dips: There are some creamy dip recipes that call for cream cheese, so this vegan cream cheese can probably work as a substitute, if needed.
How to Store Homemade Cream Cheese
Keep your homemade cream cheese in an airtight container/jar in the fridge, for up to 5 days. You can also freeze it for a month or so, but note that it will lose some of its creaminess.
Ingredients
- 1 cup raw cashews , soaked overnight, then drained and rinsed
- 2 tablespoons water
- 3 tablespoons plain vegan yogurt
- 1 tablespoons lemon juice
- ½ teaspoon sea salt
Instructions
- In a high speed blender, blend all the ingredients together until blended and completely creamy, smooth and incorporated. Scrape down the sides if needed, and blend to combine. I prefer to use a smaller blender for this, and a tamper to get all of the ingredients mixed in.
- Pour the contents into a very clean and dry glass bowl or tall jar using a silicone spatula or wooden spatula (not metal). Smooth it down.
- Cover the bowl/jar with some cheesecloth or even a clean dry paper towel and secure with a rubber band. Place in a warm, dry place. If you live in a tropical country, you can leave it on your countertop. If you don’t, place it in your oven with the oven OFF and the oven light on (do not place it right after cooking something, this will be too hot). Leave the cream cheese undisturbed as much as possible for 24-48 hours. I recommend leaving it for the full 48 hours.
- If you see a small slightly yellow film on top that is normal. If you see any pink spots, that is mold and you should discard it all. This will usually happen if some of your equipment isn’t clean, so give it all a good scrub before using.
- The mix should be much thicker now and taste a lot cheesier. Stir to combine fully. Cover the jar/bowl or transfer to a new clean jar/bowl and cover and place in your fridge. It should also thicken up in the fridge and you can start using it now!
- Taste your cream cheese and add more salt if desired. If you want your cream cheese any thinner, strain/drain it in cheesecloth or paper towel or a fine mesh colander for about 30 minutes to strain off any extra liquid.
Notes
- How to Blend the Ingredients: For the first step, I prefer to use a smaller blender and a tamper to get all of the ingredients mixed in.
- How to Tell if There is Mold on Your Cream Cheese: If you see a small, slightly yellow film on top, that is normal. If you see any pink spots, that is mold and you should discard it all. This will usually happen if some of your equipment isn’t clean, so give it all a good scrub before using.
- Chill Your Cream Cheese Before Using: As stated above, this makes the cream cheese nice and thick for spreading on your favorite bagels, crackers, etc.
- Where to Leave Your Cream Cheese for the 24-48 Hours: If you live in a tropical country, you can leave it on your countertop. If you don’t, place it in your oven with the oven OFF and the oven light on (do not place it right after cooking something, this will be too hot).
More Vegan Condiments & Spreads
If you like making your own vegan condiments and spreads, take a look at the following recipes:
- Vegan Butter
- Balsamic Glaze
- Hummus
- Coconut Butter
- Creamy Cashew Pea Pesto
The Best Vegan Cream Cheese
Ingredients
- 1 cup raw cashews soaked overnight, then drained and rinsed
- 2 tablespoons water
- 3 tablespoons plain vegan yogurt
- 1 tablespoons lemon juice
- ½ teaspoon sea salt
Instructions
- In a high speed blender, blend all the ingredients together until blended and completely creamy, smooth and incorporated. Scrape down the sides if needed, and blend to combine. I prefer to use a smaller blender for this, and a tamper to get all of the ingredients mixed in.
- Pour the contents into a very clean and dry glass bowl or tall jar using a silicone spatula or wooden spatula (not metal). Smooth it down.
- Cover the bowl/jar with some cheesecloth or even a clean dry paper towel and secure with a rubber band. Place in a warm, dry place. If you live in a tropical country, you can leave it on your countertop. If you don’t, place it in your oven with the oven OFF and the oven light on (do not place it right after cooking something, this will be too hot). Leave the cream cheese undisturbed as much as possible for 24-48 hours. I recommend leaving it for the full 48 hours.
- If you see a small slightly yellow film on top that is normal. If you see any pink spots, that is mold and you should discard it all. This will usually happen if some of your equipment isn’t clean, so give it all a good scrub before using.
- The mix should be much thicker now and taste a lot cheesier. Stir to combine fully. Cover the jar/bowl or transfer to a new clean jar/bowl and cover and place in your fridge. It should also thicken up in the fridge and you can start using it now!
- Taste your cream cheese and add more salt if desired. If you want your cream cheese any thinner, strain/drain it in cheesecloth or paper towel or a fine mesh colander for about 30 minutes to strain off any extra liquid.
Video
Notes
- How to Blend the Ingredients: For the first step, I prefer to use a smaller blender and a tamper to get all of the ingredients mixed in.
- How to Tell if There is Mold on Your Cream Cheese: If you see a small, slightly yellow film on top, that is normal. If you see any pink spots, that is mold and you should discard it all. This will usually happen if some of your equipment isn’t clean, so give it all a good scrub before using.
- Chill Your Cream Cheese Before Using: As stated above, this makes the cream cheese nice and thick for spreading on your favorite bagels, crackers, etc.
- Where to Leave Your Cream Cheese for the 24-48 Hours: If you live in a tropical country, you can leave it on your countertop. If you don’t, place it in your oven with the oven OFF and the oven light on (do not place it right after cooking something, this will be too hot).
Nutrition
The Best Vegan Cream Cheese https://jessicainthekitchen.com/the-best-vegan-cream-cheese/ July 13, 2021
Creamy mushroom risotto is a classic Italian comfort food dish, and it’s so much easier to make than you’d think. This homemade vegan risotto is packed with caramelized mushrooms and is oh-so-good!

This homemade vegan mushroom risotto is rich, savory, buttery… fill in the blank with your favorite culinary adjective. If you’ve never had it before, risotto is an Italian rice dish that is cooked in broth until it is rich and creamy. Mix it in with some vegan Parmesan cheese and caramelized mushrooms, and you’ve got yourself a truly comforting dinner. Serve it as a side dish, or enjoy it as you would a bowl of pasta. As long as you try it, it really doesn’t matter!
About This Vegan Mushroom Risotto Recipe
- You can taste the effort you put into it . Risotto is a dish that requires time and patience, it’s true. But, give it that, and it’ll reward you with the best rice dish you’ve ever had.
- The technique for vegan risotto is simple. Sauté the onions and garlic, add the rice, then add wine and broth, ladle by ladle. Stir in high-quality vegan butter and Parmesan, a little lemon juice, and you’re done! I’ll walk you through the details.
- Pure comfort food . A bowl of creamy rice will warm you up from the inside out, it’ll stick to your ribs, and the seasoning will cure all of your savory cravings. Promise.

Notes on Ingredients
Scroll down to the recipe card to find the ingredient quantities and recipe instructions.
- Oil – Use the cooking oil of your choice! Olive oil, canola oil, avocado oil, etc.
- Rice – I generally stick to using arborio rice, but carnaroli rice will also work well.
- Onion – I like to slice up a white onion, but yellow onions are good too.
- Garlic – Minced or finely diced.
- Dry white wine – I used Sauvignon Blanc for this vegan mushroom risotto.
- Broth – Since it’s vegan risotto, we’ll obviously use vegetable broth . The amount used varies slightly depending on how creamy you want the risotto (see tips below).
- Seasoning – Use a mix of sea salt and freshly ground black pepper.
- Cheese – Gather up some vegan Parmesan cheese—it can be homemade or store-bought. (I used my homemade Parmesan, but Violife makes an amazing vegan Parmesan cheese block.)
- Vegan butter – My favorite vegan butter is Miyokos.
- More seasoning/garnish – Lemon juice or lime juice.
Caramelized Mushrooms
- Mushrooms – Any kind—shiitake would be great here, but I used baby bella. Cleaned and sliced, stems removed.
- Vegan butter – Oil works as a substitute if you like.
- Garnish – Sea salt to taste. You could also boost the flavors with herbs, like dried or fresh thyme.
How to Make Vegan Mushroom Risotto
Making risotto might not be as quick as spaghetti and meatballs , but this traditional Italian dish is worth every minute. My advice? Put a cooking show on, or some French music, and really get into it! You’ll have a blast, and in 40 minutes, you’ll have an elegant dinner to enjoy for your efforts, too. Let’s get cooking.

Heat the broth.
- Warm the broth. First, heat the vegetable broth in a small pan. Set the broth aside, but keep it warm, so it doesn’t reduce the heat of the risotto and affect the texture of the dish.
- Sauté the onion. Meanwhile, sauté the onion with garlic and oil over medium-high heat. Reduce heat, and cook until the onions are translucent and the garlic is fragrant, about 5 minutes.
- Add the rice . Now, stir in the arborio rice and let it toast for 3 minutes, until the edges become slightly translucent. Deglaze the pan with white wine, stirring to allow the rice to absorb the wine.
Add more broth, a little at a time.
- Combine with broth. Once the wine is completely absorbed, add a ladleful (about ¼ cup) of the still-warm broth. Swirl and allow the rice to absorb the broth completely. Repeat, ladle by ladle, until each is completely absorbed, stirring and swirling to help the rice absorb evenly.
- Taste test the rice. After about 12 minutes of cooking, taste your rice. Careful, it’s hot! From there, add ladle by ladle, and when you reach 3 cups in, taste the rice after each ladle. You want your rice to be al dente.
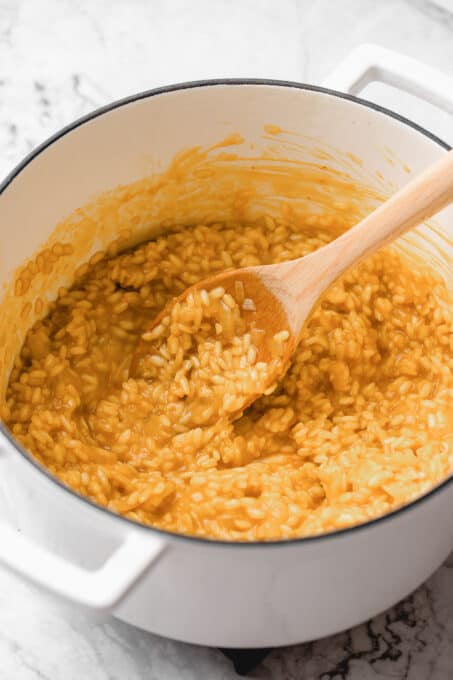
- Season the risotto. Turn off the heat. Stir in the sea salt, black pepper, vegan butter, vegan Parmesan, and the lemon or lime juice. Remove the risotto from the stove while you cook the mushrooms.
Cook the Mushrooms
Add mushrooms and butter to the pan.
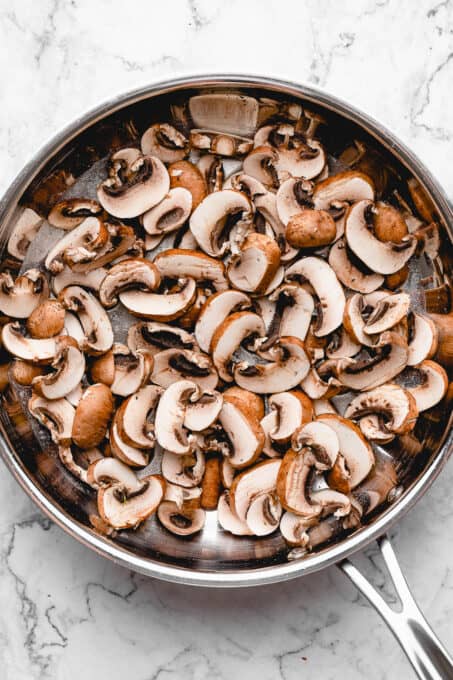
- Cook the mushrooms . Melt vegan butter in a pan over medium-high heat. Add the sliced mushrooms and toss them with the butter. Cook the mushrooms for 3-5 minutes until they begin to caramelize.
- Season the mushrooms. Flip, and cook for another 3-5 minutes, or until the other side is caramelized, too. Lastly, season the mushrooms with sea salt.
- Serve and enjoy. Stir the mushrooms into the risotto, or serve them on top of each bowl. Serve immediately with extra vegan Parmesan cheese. Enjoy!

Tips for the Best Vegan Risotto
- Don’t multi-task . You’re going to want to give this vegan mushroom risotto a lot of love and attention. Slow and steady wins the race here!
- How should I handle the heat while cooking? If your heat seems too high and every time the broth hits the pot, it’s sizzling and evaporating, lower the heat slightly. You want it hot, but not so hot that the rice doesn’t cook properly. I found medium to be the best temperature for mine.
- How much broth should I use? The first time I made this vegan mushroom risotto, I used 4 cups of broth. The second time, I changed nothing ingredient-wise and only used 3 ½ cups, and it came out creamier. I figure that’s because I let the rice soak up the broth properly after each time.
- Don’t overcook . Taste test after 12 minutes of cooking, and every few minutes after that, so you know when your risotto is al dente and creamy. Al dente (Italian for “to the tooth”) means that the rice is tender but still a little chewy.
- Make it in the Instant Pot! If you own a mutlicooker, make vegan Instant Pot mushroom risotto . It’s practically hands-free.

What to Serve With Vegan Mushroom Risotto
- With extra Parmesan . Cook it into the risotto, and then sprinkle some extra on top! Cheesy, creamy rice is totally irresistible.
- With more vegetables. Don’t feel like you have to stick to just mushrooms here. Roasted (or steamed) asparagus is a welcome addition, as are broccoli, chopped peppers, etc.
- Alongside a protein-packed dinner . A great vegan option would be something like this baked tofu or vegan chicken . Don’t forget a side of fluffy vegan garlic Parmesan dinner rolls .

How to Store and Reheat Leftovers
- Refrigerate. If you have leftovers (that’s a big if, my friends), they can easily be stored in the fridge for 3-4 days in an airtight container.
- Reheat. The best way to reheat your vegan mushroom risotto is to put it back in a pan on the stovetop, add a little extra vegetable broth, and heat until it reaches the desired temperature.
More Vegan Side Dishes
- Vegan Biscuits
- Vegan Cornbread
- Garlic Roasted Potatoes
- Mashed Cauliflower
- Grilled Maple Mustard Brussels Sprouts

Ingredients
Risotto
- 1 tablespoon oil of choice
- 1 cup arborio rice
- 1/2 large white onion
- 3 cloves garlic , minced or finely diced
- ½ cup dry white wine , I used Sauvignon Blanc
- 3-4 cups vegetable broth*
- 1/2 teaspoon sea salt
- 1/2 teaspoon freshly ground black pepper
- 2-3 tablespoons vegan Parmesan cheese , homemade or store-bought**
- 1 tablespoon vegan butter***
- 1 tablespoon lemon juice or lime juice
Caramelized Mushrooms
- 8 ounces mushrooms , any kind (shiitake would be great here, I used baby bella), cleaned and sliced, stems removed
- 1-2 tablespoons vegan butter or oil
- sea salt to taste
Instructions
Risotto
- Heat the vegetable broth in a small pan and set aside. Keep warm, you want to keep this warm so that it doesn’t reduce the heat of the risotto and mess with the texture of the dish.
- In a pan over medium high heat, heat the oil. Add in the onion and the garlic, stirring to combine. Reduce heat to medium and cook until the onions are translucent and the garlic is fragrant, about 5 minutes.
- Add in the arborio rice, and stir. Allow the rice to toast for about 3 minutes, until the edges become slightly translucent. Add in the white wine to deglaze the pan. Stir and allow the rice to absorb the wine.
- When the wine is completely absorbed, add in about a ladle or 1/4 cup of the still warm vegetable broth. The pan should be warm enough for the rice to absorb the rice in a few minutes. Swirl and allow the rice to absorb the broth completely.
- Repeat, ladle by ladle (easier to scoop), until each is completely absorbed, stirring and swirling to help the rice absorb evenly. After about 12 minutes of cooking, taste your rice. Careful, it’s hot! From there, add ladle by ladle and when you reach 3 cups in, taste the rice after each ladle. You want your rice to be al dente or whichever texture you desire.
- After the rice has reached al dente, turn off the heat. Add in the sea salt, black pepper, vegan butter, vegan parmesan, and the lemon or lime juice. Stir to combine completely and let it all absorb in with the residual heat, for about 3 minutes. Remove from the stove.
- You can stir the mushrooms in the risotto, or serve them on top of each individually served risotto. Serve immediately with additional vegan parmesan cheese and mushrooms. Enjoy!
Caramelised Mushrooms
- In a pan over medium high heat, melt the vegan butter. Swirl around the pan.
- Add in the slices of mushroom, stirring to combine in the butter. Let the mushrooms sit for about 3-5 minutes until they begin to caramelize. Flip and repeat for about 3-5 minutes until the other side is caramelized too.
- Season with sea salt to taste and serve with or on top of risotto. Enjoy!
