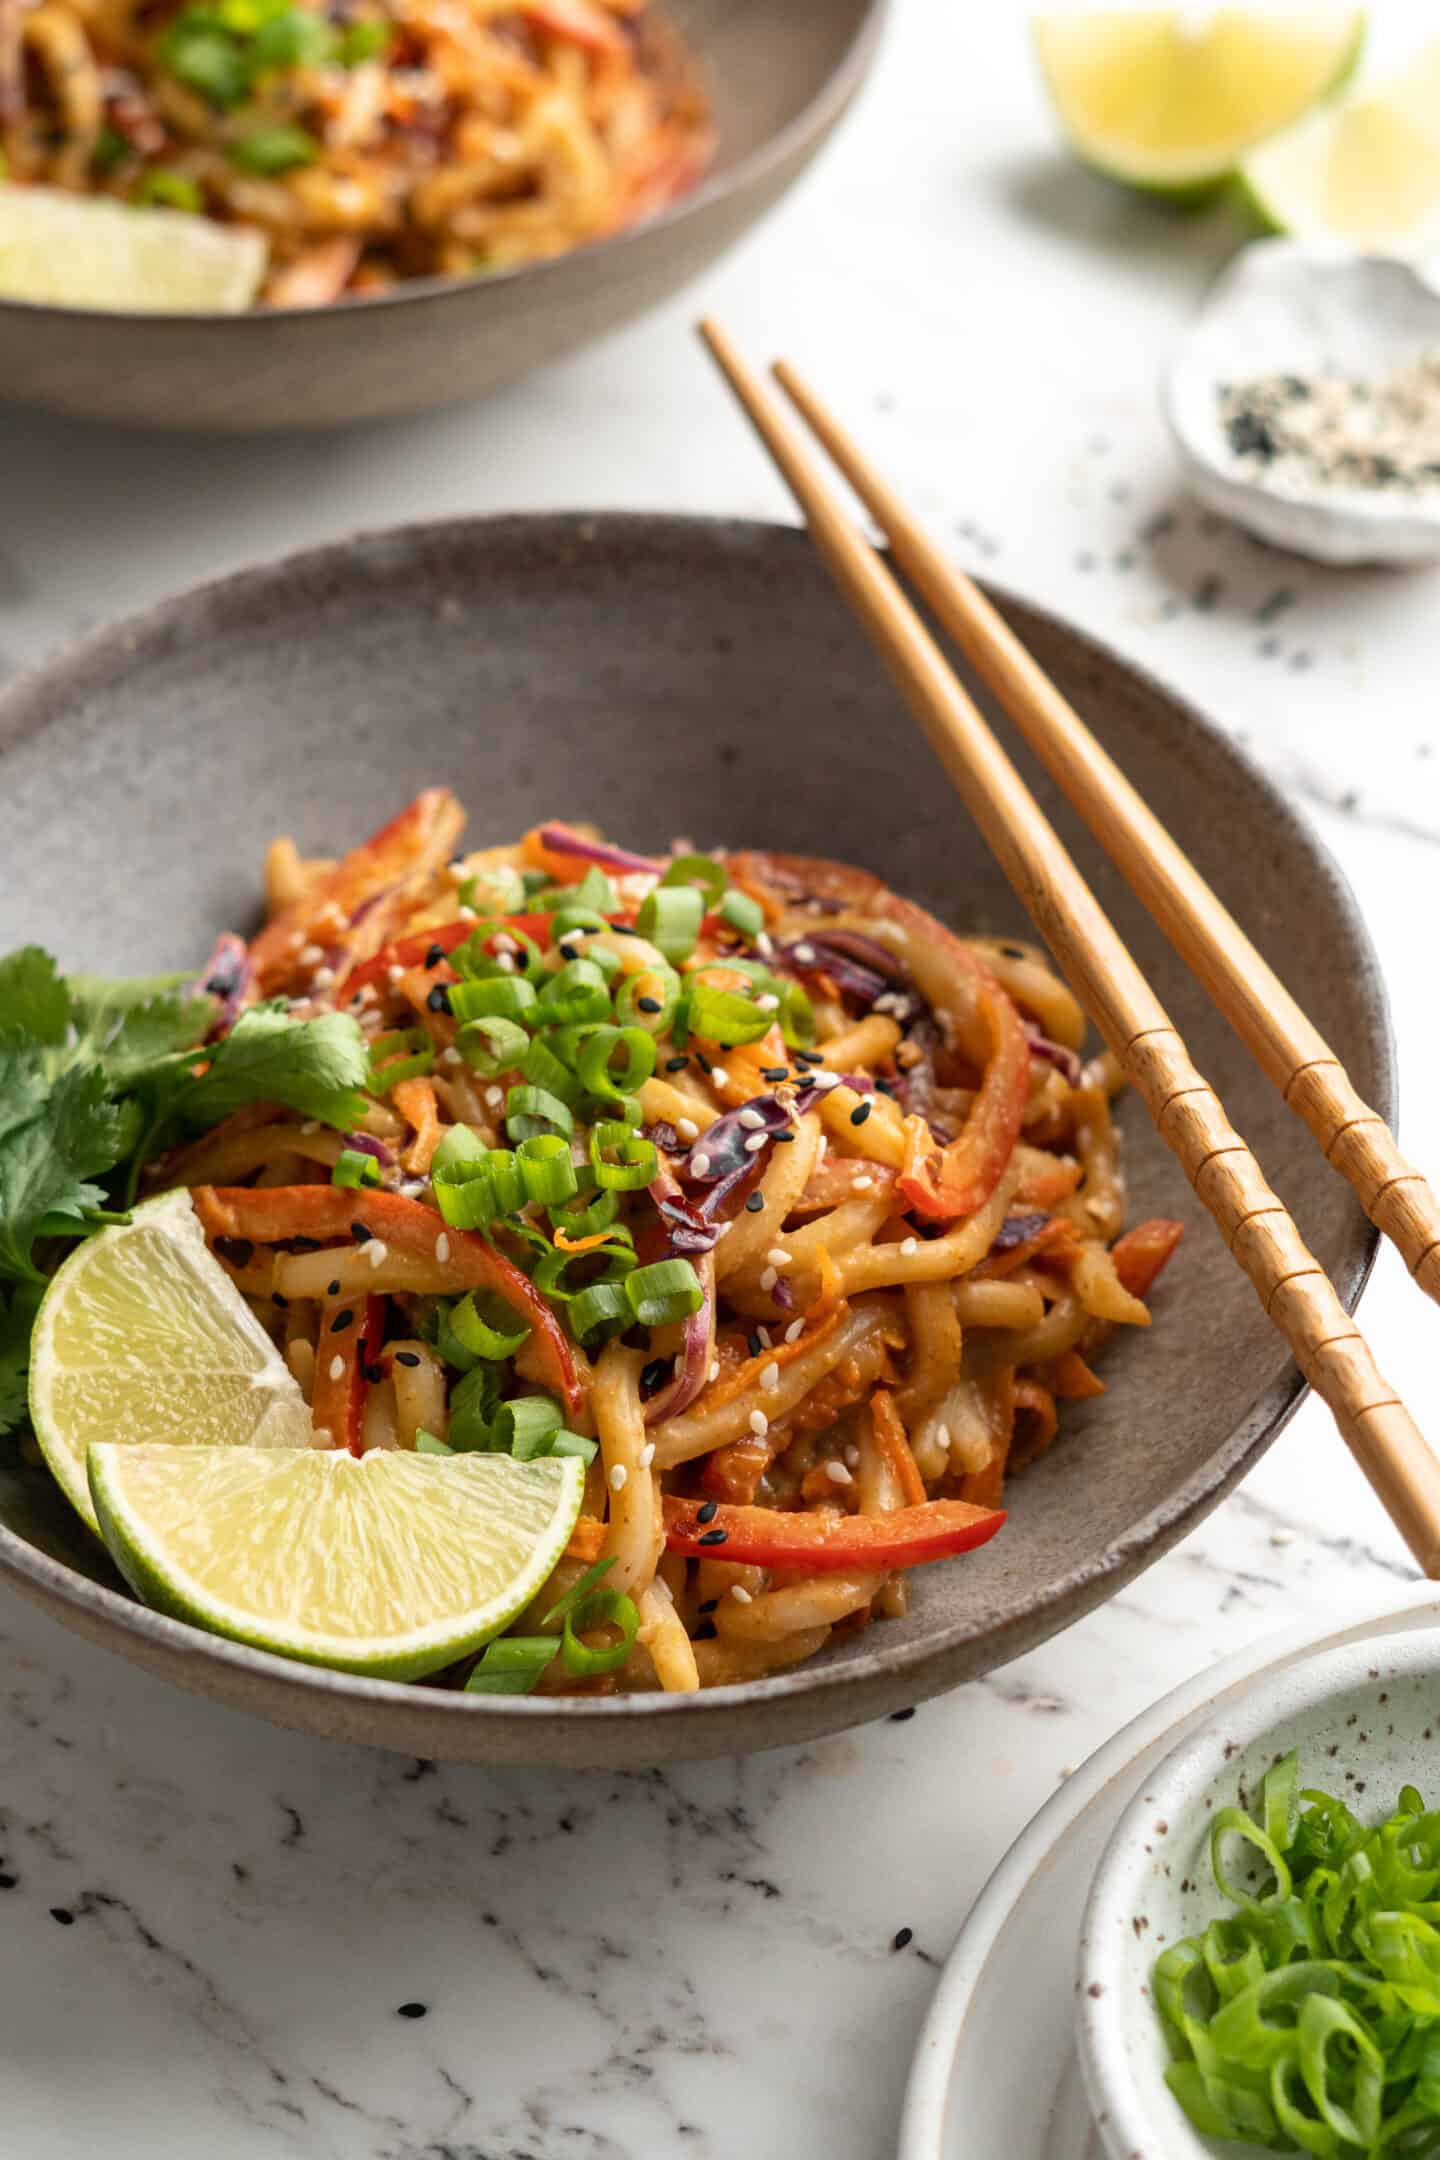
Thai peanut noodles make for a flavourful, effortless lunch. You’ll want to eat the gingery peanut sauce with a spoon!
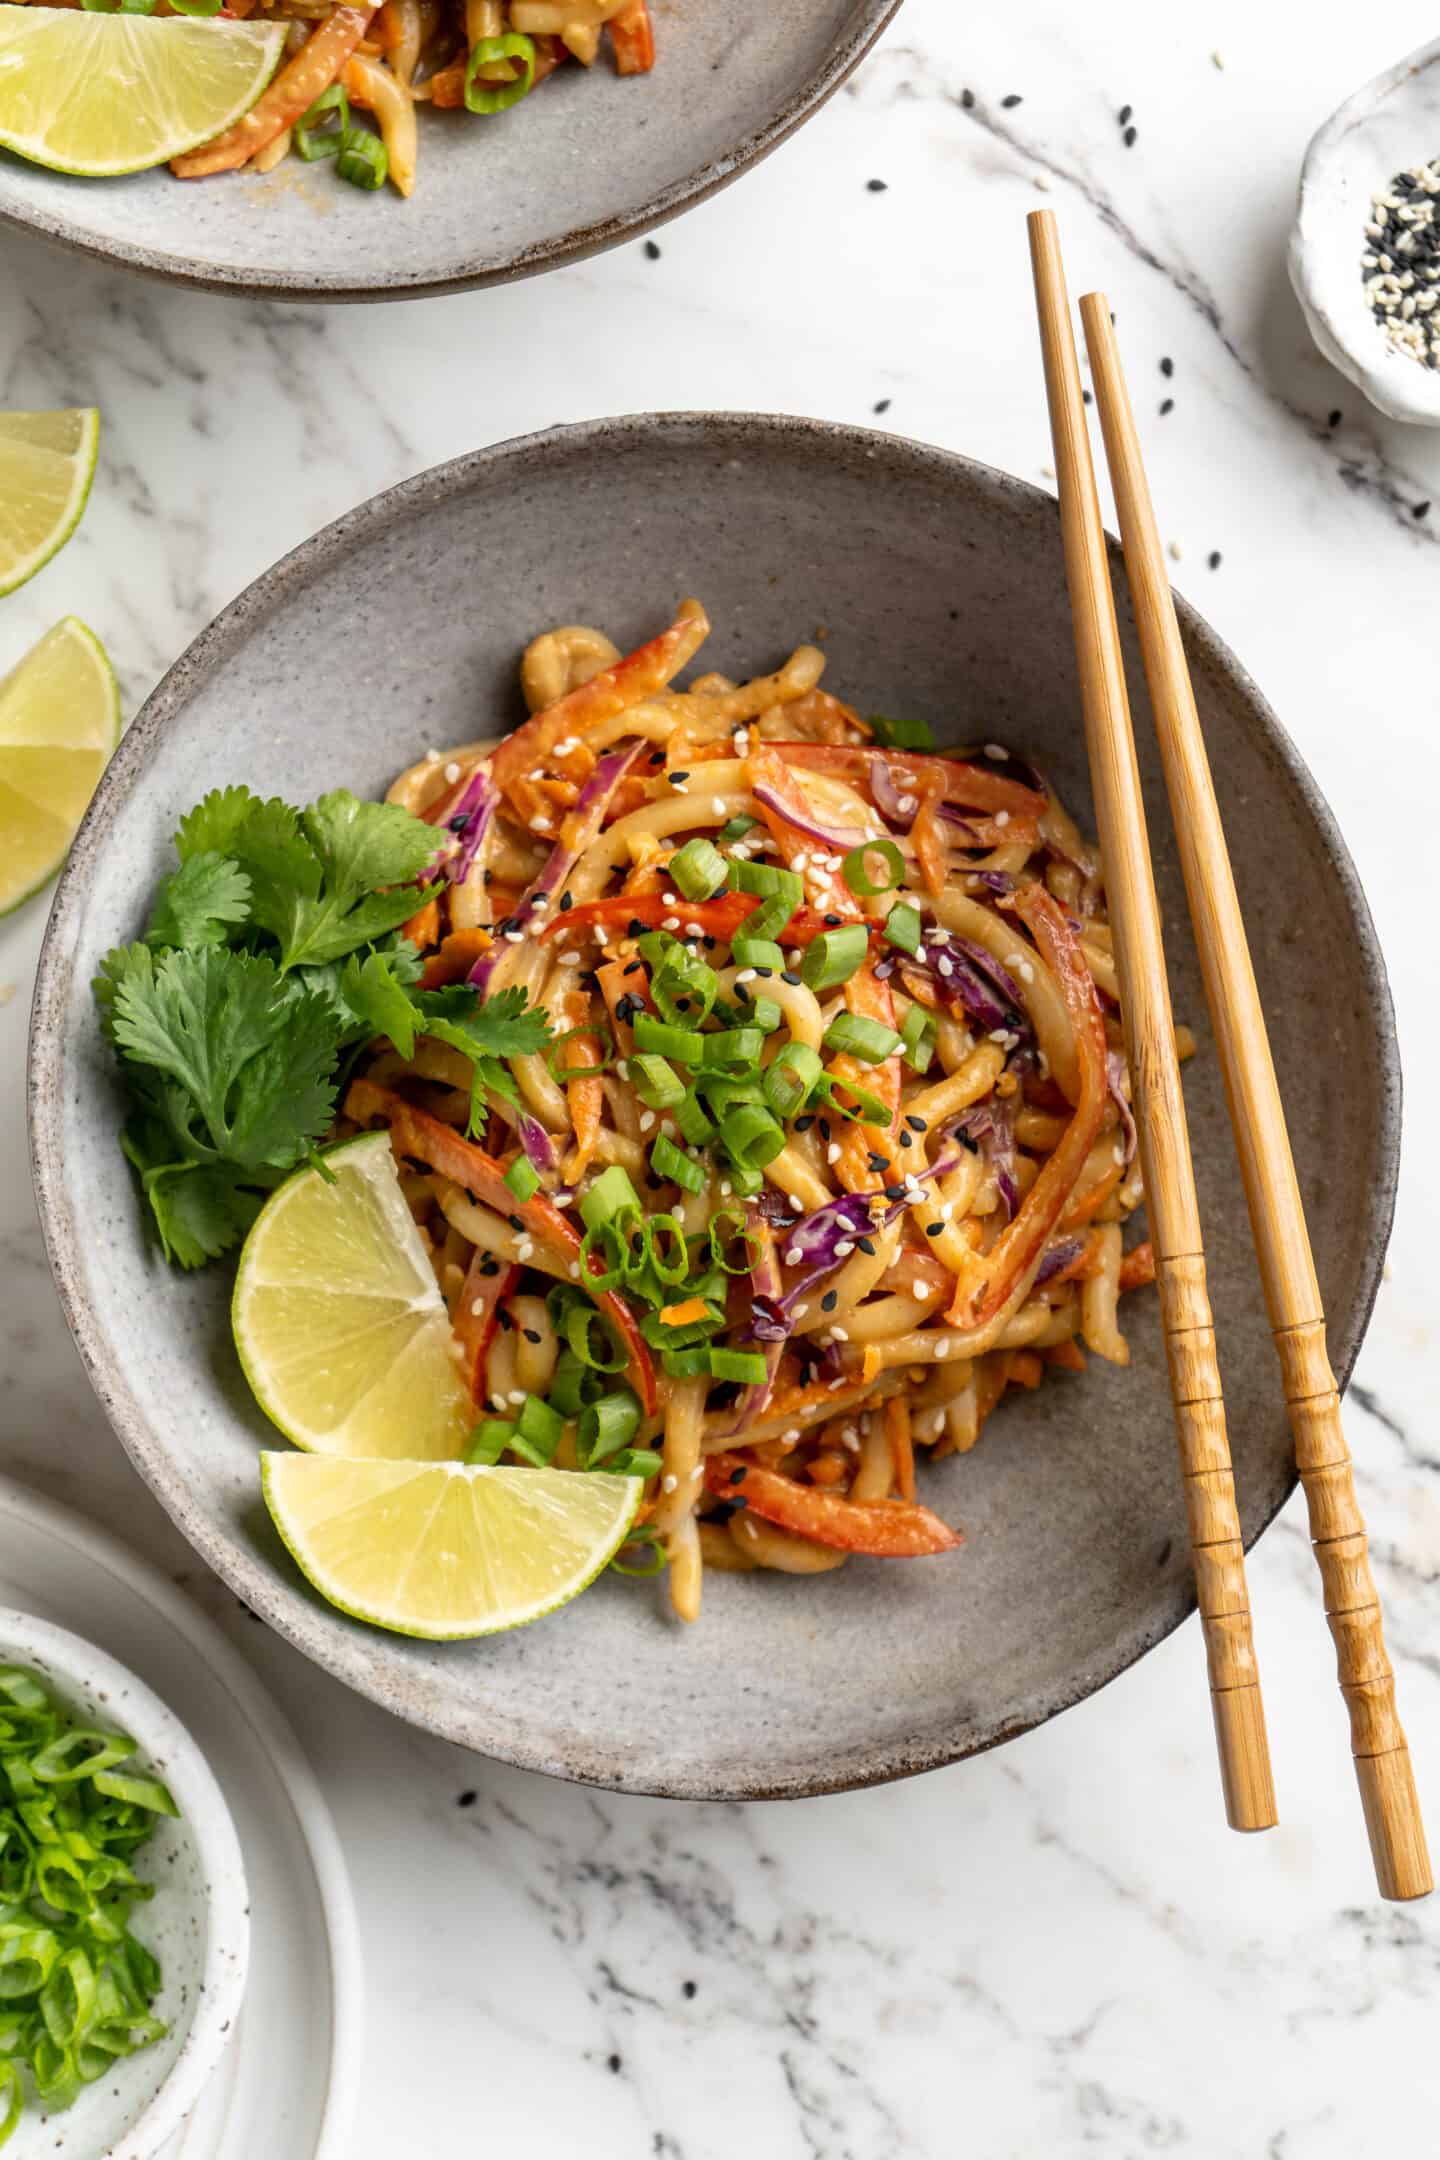
These Thai peanut noodles are something I would have happily packed for lunch in high school and definitely when I was working my day job as an attorney. They’re satisfying and they taste like something you’d buy at a restaurant, but they’re practically effortless to make. Does it get any better than that?!
Just like my sesame noodles and 15-minute quinoa salad , this is a lunch that can be enjoyed warm or cold, which means you don’t have to wait around for the breakroom microwave (or, even worse, cook your noodles in a microwave that just warmed up someone’s leftover salmon—yuck). Personally, I prefer these Thai peanut noodles cold so the veggies stay crisp and crunchy!
Why You’ll Love This Thai Peanut Noodles Recipe
- Great for lunches . Peanut noodles are kid-friendly and adult-approved, which means they’re great for school and work lunches!
- It’s super simple . This noodle salad recipe takes less than 15 minutes to throw together.
- Smooth and creamy peanut sauce . Hello delicious! Peanut sauce is a favorite for good reason—it’s just sweet enough and it’s loaded with big, bold flavours. Here we combine creamy peanut butter with just the right amount of ginger, maple syrup, and red pepper flakes to make it perfectly balanced.
- Loaded with veggies . Crunchy fresh vegetables make this noodle salad a true showstopper. I love adding red peppers, carrots, and cabbage for texture and colour, but you can easily use whatever you happen to have on hand in your crisper drawer.
Notes on Ingredients
Scroll down to the recipe card to find the ingredient quantities and recipe instructions.
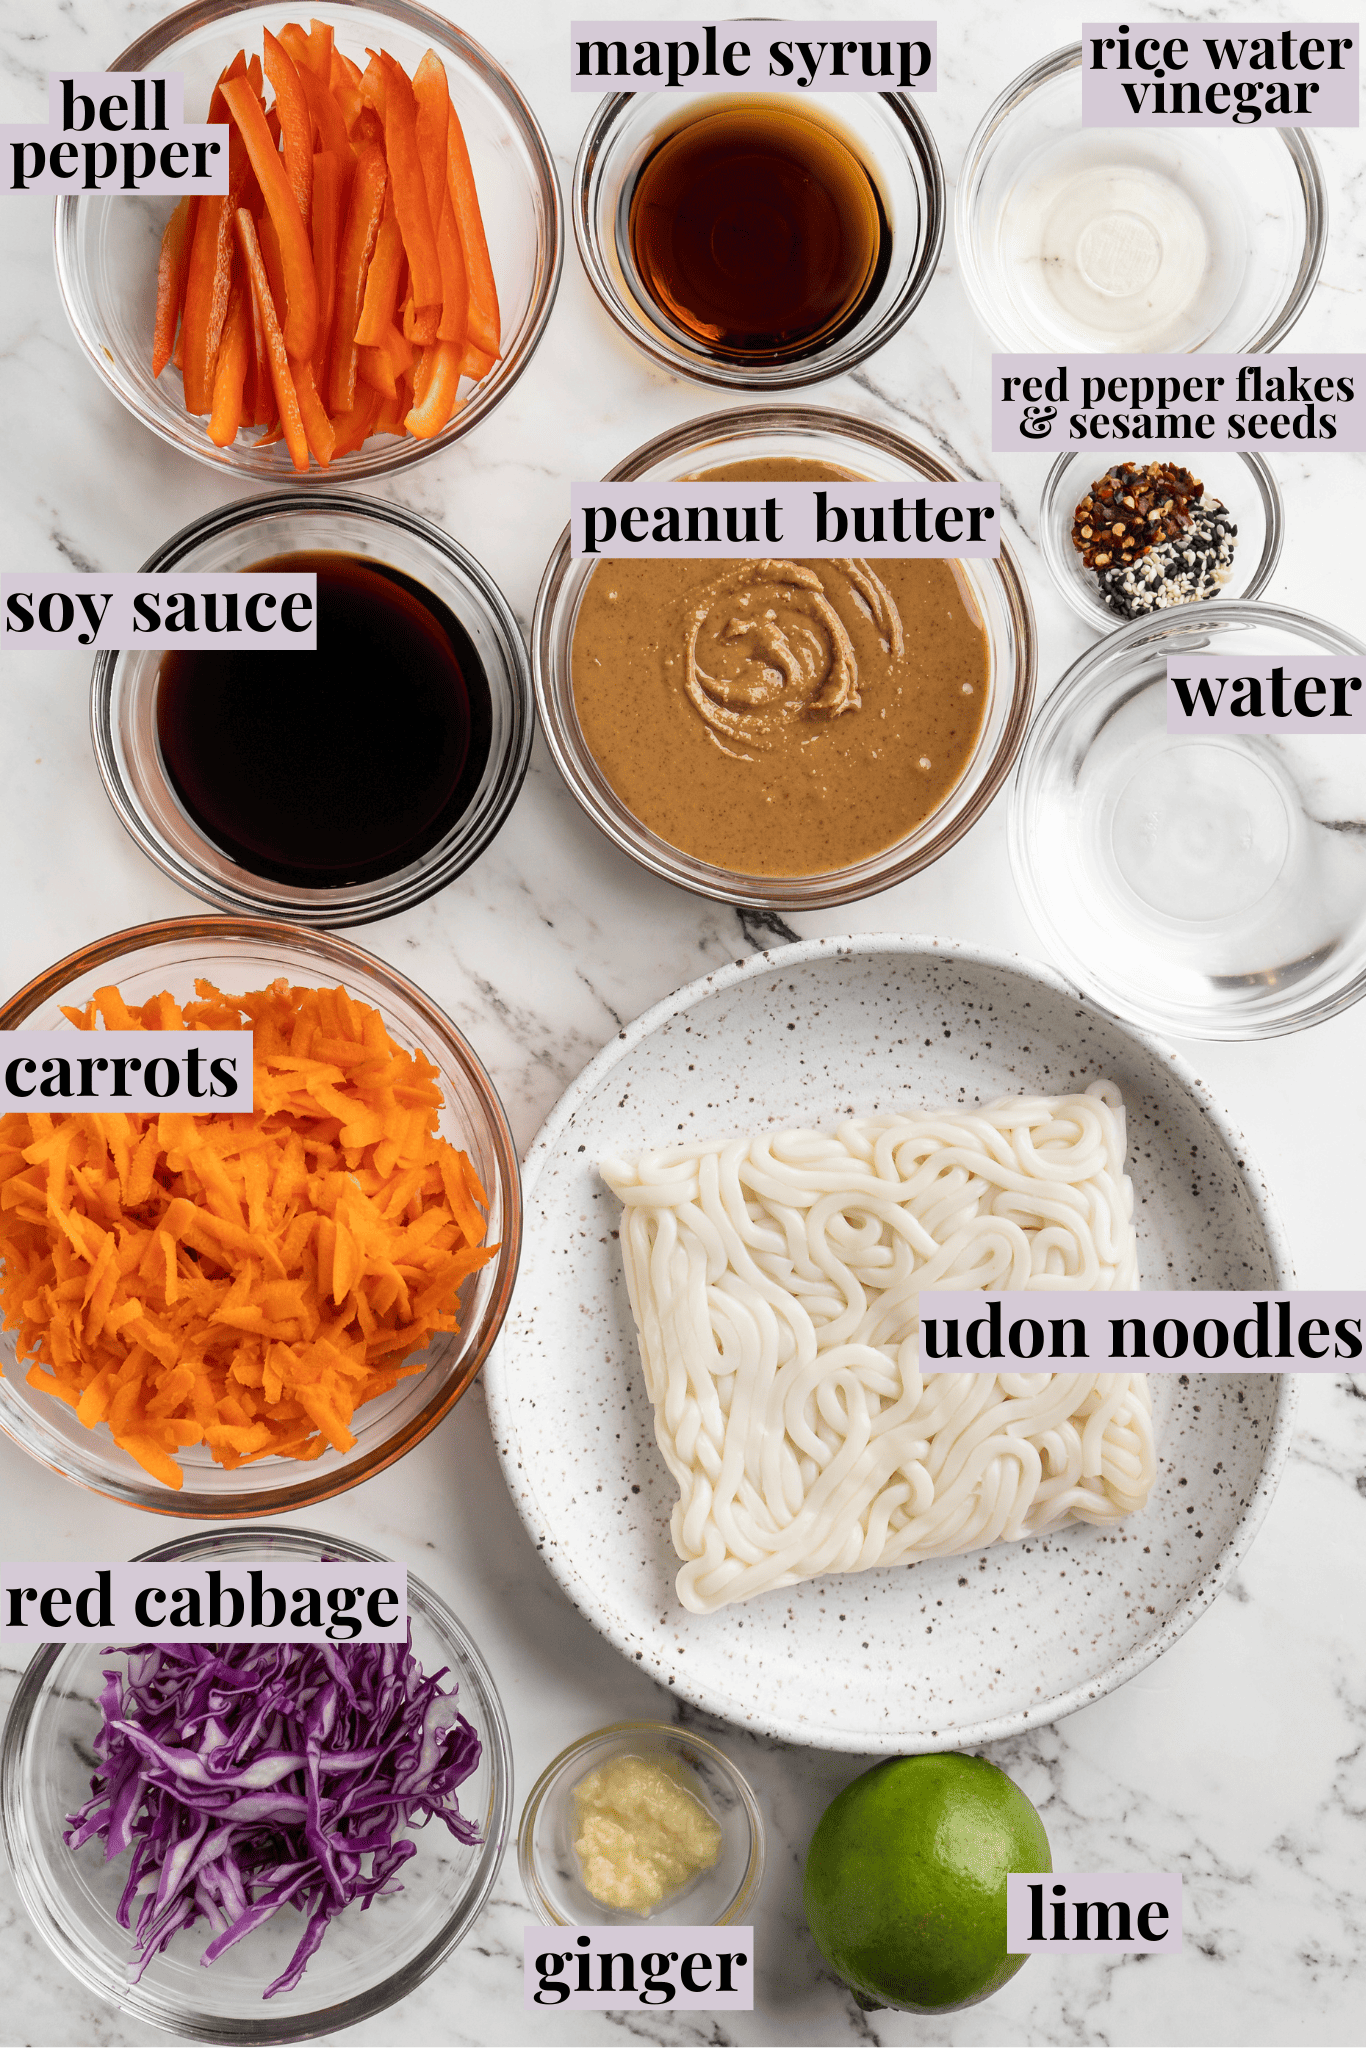
- Noodles – Udon noodles are great, or use soba for a gluten-free option.
- Green or red bell pepper – Green has a bit more bite, while red bell peppers are sweeter.
- Carrot
- Red cabbage – Regular green cabbage is fine too, just not quite as colorful.
For the Peanut Ginger Sauce:
- Fresh ginger
- Maple syrup – Coconut sugar is another option for sweetening this peanut sauce.
- Low-sodium soy sauce – Or tamari or liquid aminos .
- Warm water
- Rice wine vinegar – Make sure you use unseasoned, which isn’t sweetened.
- Sesame seeds
- Natural peanut butter – Use smooth, not crunchy.
- Crushed red pepper flakes
- Lime juice – Optional, for a little extra zip.
- Garnish – Sesame seeds and chopped peanuts.
Can I Substitute Ground Ginger for Fresh?
No, I don’t recommend substituting ground ginger for fresh. Fresh ginger has a much more pungent flavour than ground and will give you the best results in this recipe. However, if you don’t have any fresh ginger on hand, you can use ground ginger as an alternative. Keep in mind that the flavour won’t be quite as intense and vibrant.
How to Make Thai Peanut Noodles
You’re just a few minutes away from enjoying a satisfying peanut noodle salad! Here’s what you need to do.
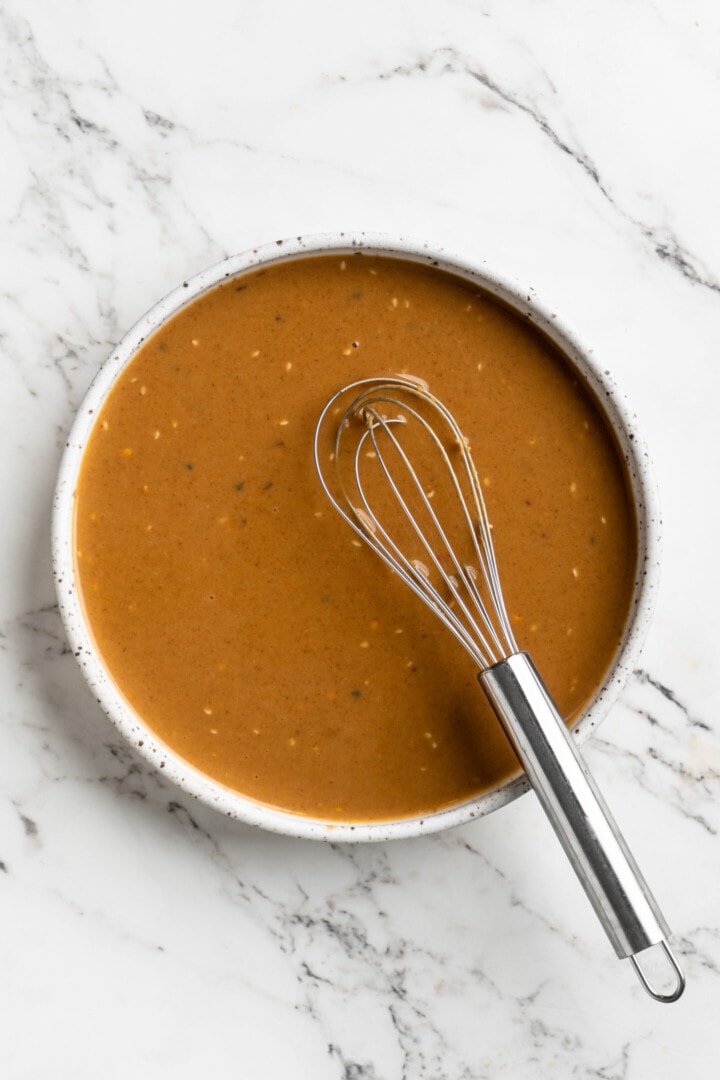
Make the peanut sauce . Whisk the ingredients together until they’re smooth, creamy, and well-combined.
Cook the noodles . Cook the noodles in a pot of salted water according to the package directions. Drain and cool.
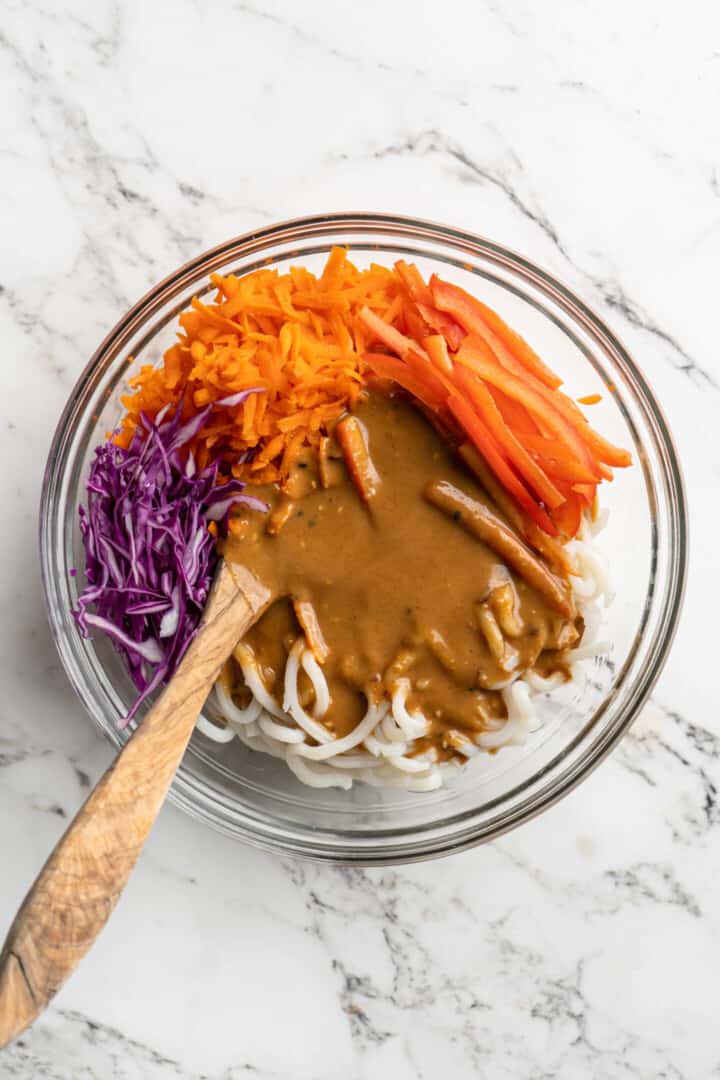
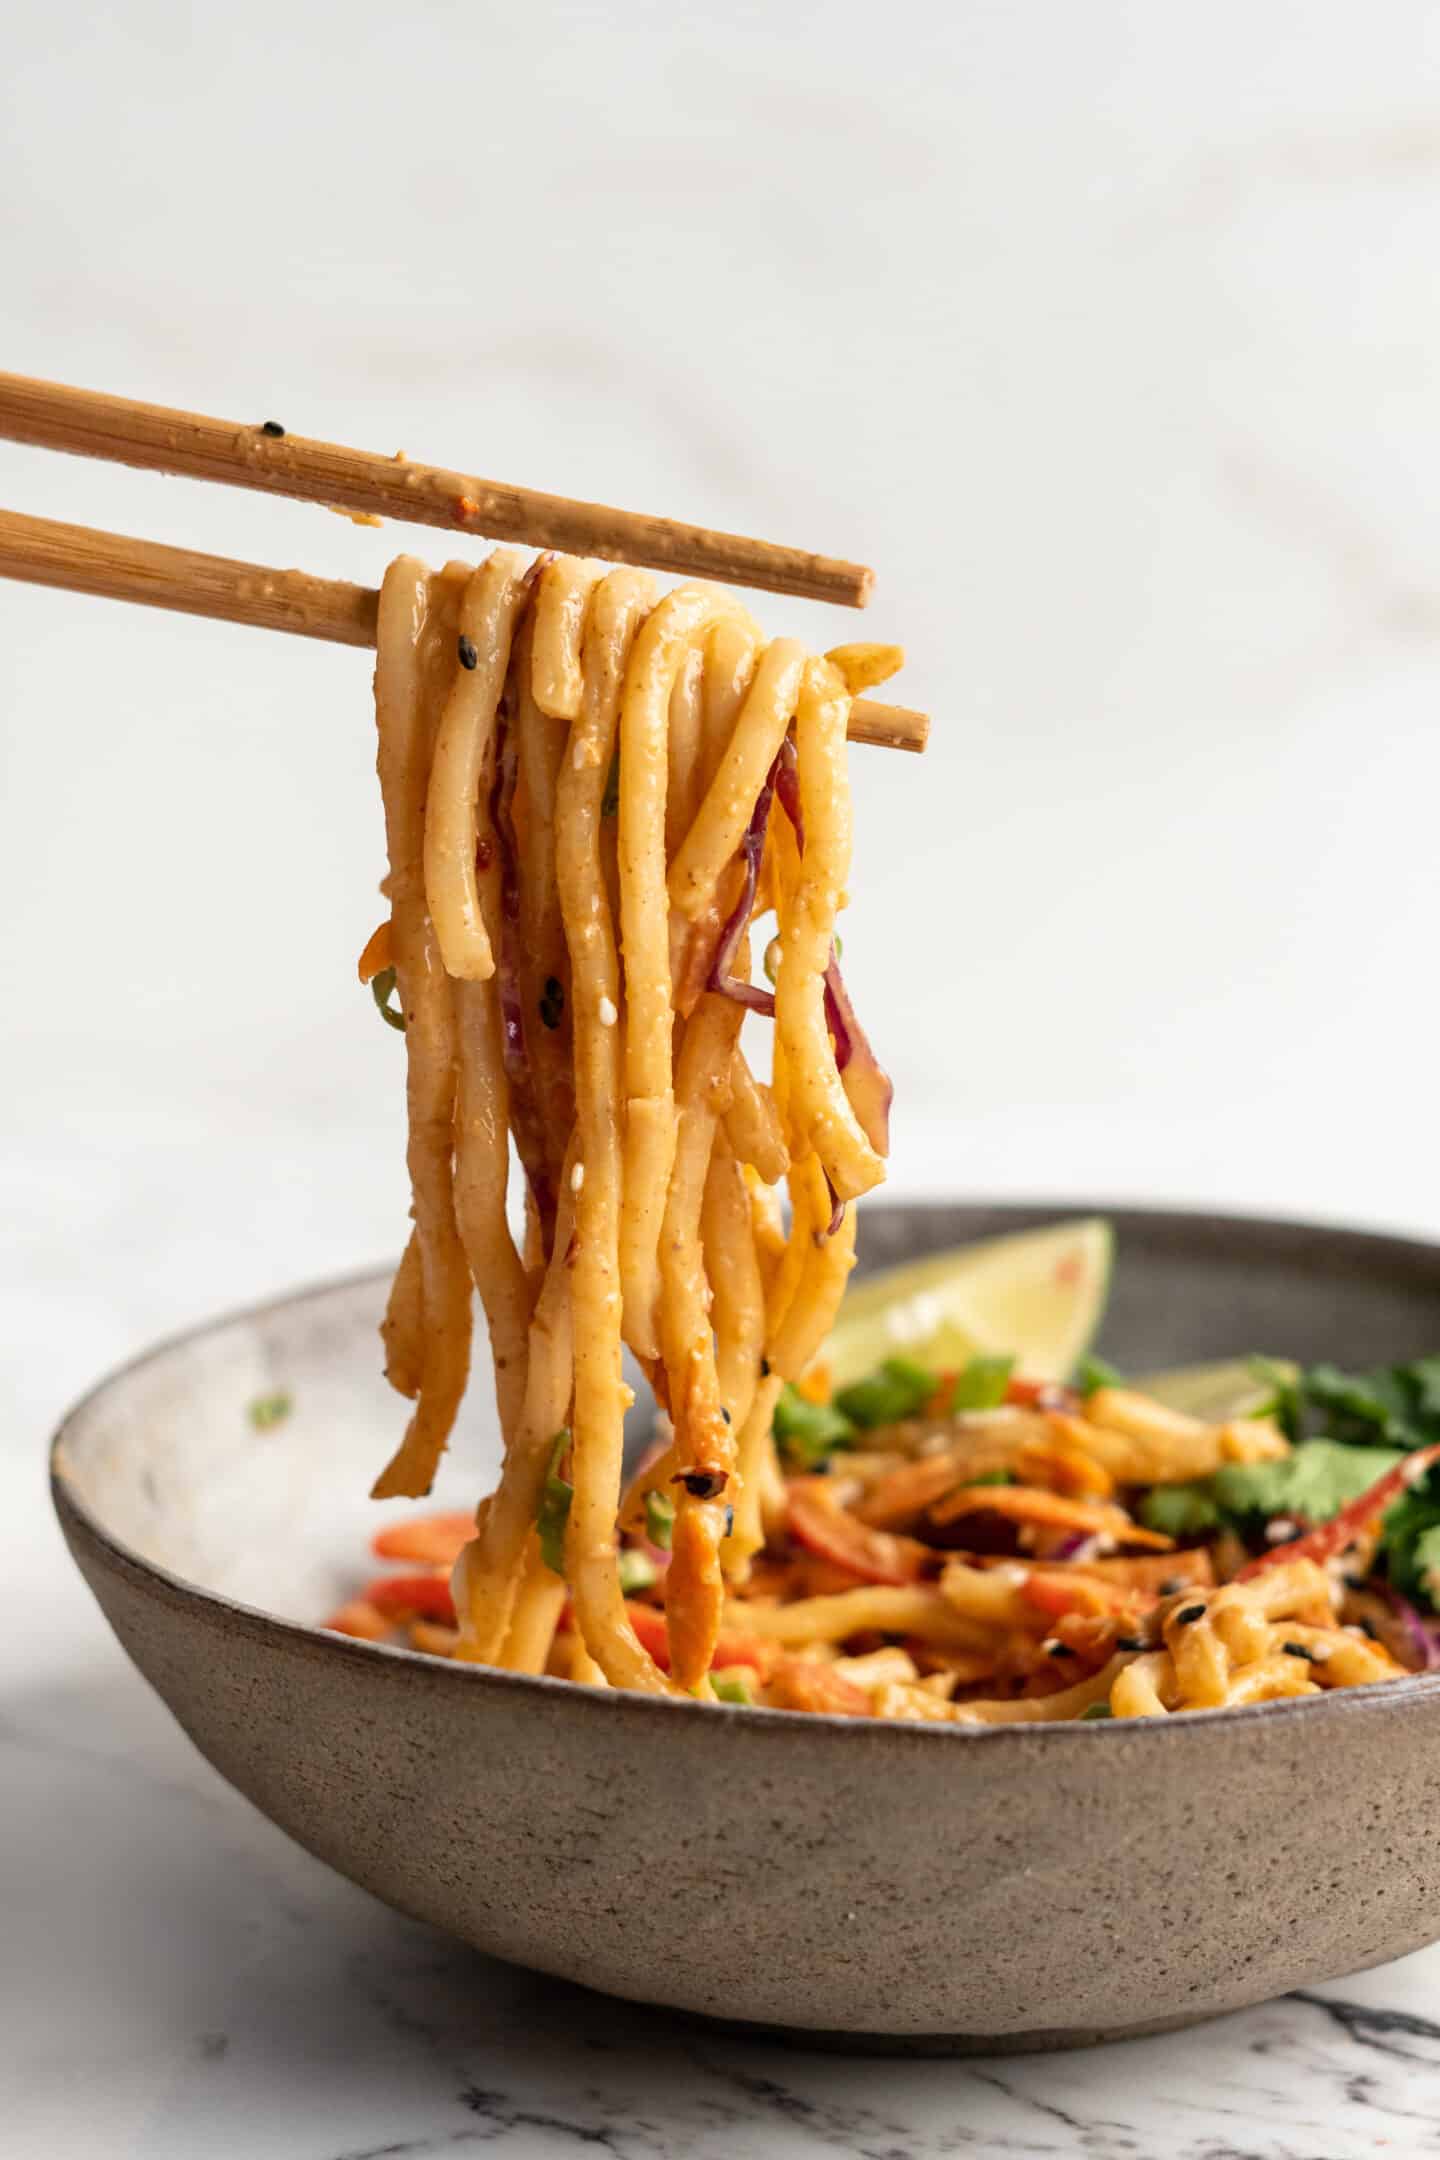
Assemble . Toss together the noodles, veggies, and peanut sauce and season to taste.
Serve . Garnish with sesame seeds and chopped peanuts, then enjoy!
Tips for Success
Follow these additional pointers for perfect Thai peanut noodles:
- Make sure to use the right type of noodles . Udon and soba are both great options for this dish, but you can also experiment with different types of noodles like ramen or somen. Even spaghetti or linguine will work if you don’t have Asian noodles on hand.
- Adjust the heat level . If you’re not a fan of spicy food, you can reduce the amount of crushed red pepper flakes in the sauce. Love your food hot and spicy? Then add some more!
- Whisk the sauce well . It can take some time for peanut sauce to come together! Keep whisking until all the ingredients are well-combined. If it seems too thick, you can add more water a teaspoon or two at a time.
Serving Suggestions
If you want to add some additional garnishes to your Thai peanut noodles, here are some ideas:
- Edamame or marinated tofu for extra protein
- Asian pickled cucumbers
- Fresh herbs like basil, mint, or cilantro
- Crispy wonton strips
- A drizzle of toasted sesame oil
Variations
Looking to switch things up? Here are some ideas for variations on this recipe:
- Use different types of nuts or nut butters in the sauce—try almond butter or cashew butter.
- Make it nut-free (and perfect for school lunches!) by swapping the peanut butter for sunflower seed butter.
- Use fresh lime juice instead of rice wine vinegar.
- Swap the fresh raw vegetables for steamed or sautéed vegetables.
How to Store Leftovers
Store Thai peanut noodles in an airtight container in the fridge for 3 to 4 days.
Can I Freeze This Recipe?
With the fresh vegetables in these Thai peanut noodles, this recipe is best enjoyed when freshly made.
More Easy Vegan Lunch Ideas
- Smashed Chickpea Avocado Sandwich
- Vegan Cobb Salad
- Vegan Poke Bowls
- Curried Chickpea Salad (15 Minutes)
- Vegan BLT Sandwich
Ingredients
Noodle Salad
- 8 ounces noodles , such as udon noodles (soba for gluten free)
- 1 medium green or red bell pepper , 96g , thinly sliced
- 1 large carrot, thinly grated , 106g
- ⅓ cup red cabbage slices , 51g
Peanut Ginger Sauce
- 1/2 teaspoon fresh ginger
- 1 tablespoon maple syrup
- 3 tablespoons low sodium soy sauce
- 3 tablespoons warm water
- 1 tablespoon rice wine vinegar
- 1/2 teaspoon sesame seeds
- 1/3 cup natural peanut butter , smooth
- 1/4 teaspoon crushed red pepper flakes
- Juice ½ lime , optional
- sesame seeds and chopped peanuts , for garnish
Instructions
Peanut Ginger Sauce
- Whisk all the ingredients together in a deep bowl until combined. Set aside until ready to use.
Noodle Salad
- Allow a pot of salted water to come to a boil. Add the noodles and cook and drain and cool according to your package’s directions. Allow noodles to cool completely, and drain off as much water as possible.
- In a large bowl, add the noodles, veggies and the peanut ginger sauce and toss together to combine. Taste and adjust flavour according to your liking. Garnish with sesame seeds and chopped peanuts and enjoy!
Notes
- To store : Store Thai peanut noodles in an airtight container in the fridge for 3 to 4 days.
Thai peanut noodles make for a flavourful, effortless lunch. You’ll want to eat the gingery peanut sauce with a spoon!
These Thai peanut noodles are something I would have happily packed for lunch in high school and definitely when I was working my day job as an attorney. They’re satisfying and they taste like something you’d buy at a restaurant, but they’re practically effortless to make. Does it get any better than that?!
Just like my sesame noodles and 15-minute quinoa salad , this is a lunch that can be enjoyed warm or cold, which means you don’t have to wait around for the breakroom microwave (or, even worse, cook your noodles in a microwave that just warmed up someone’s leftover salmon—yuck). Personally, I prefer these Thai peanut noodles cold so the veggies stay crisp and crunchy!
Why You’ll Love This Thai Peanut Noodles Recipe
- Great for lunches . Peanut noodles are kid-friendly and adult-approved, which means they’re great for school and work lunches!
- It’s super simple . This noodle salad recipe takes less than 15 minutes to throw together.
- Smooth and creamy peanut sauce . Hello delicious! Peanut sauce is a favorite for good reason—it’s just sweet enough and it’s loaded with big, bold flavours. Here we combine creamy peanut butter with just the right amount of ginger, maple syrup, and red pepper flakes to make it perfectly balanced.
- Loaded with veggies . Crunchy fresh vegetables make this noodle salad a true showstopper. I love adding red peppers, carrots, and cabbage for texture and colour, but you can easily use whatever you happen to have on hand in your crisper drawer.
Notes on Ingredients
Scroll down to the recipe card to find the ingredient quantities and recipe instructions.
- Noodles – Udon noodles are great, or use soba for a gluten-free option.
- Green or red bell pepper – Green has a bit more bite, while red bell peppers are sweeter.
- Carrot
- Red cabbage – Regular green cabbage is fine too, just not quite as colorful.
For the Peanut Ginger Sauce:
- Fresh ginger
- Maple syrup – Coconut sugar is another option for sweetening this peanut sauce.
- Low-sodium soy sauce – Or tamari or liquid aminos .
- Warm water
- Rice wine vinegar – Make sure you use unseasoned, which isn’t sweetened.
- Sesame seeds
- Natural peanut butter – Use smooth, not crunchy.
- Crushed red pepper flakes
- Lime juice – Optional, for a little extra zip.
- Garnish – Sesame seeds and chopped peanuts.
Can I Substitute Ground Ginger for Fresh?
No, I don’t recommend substituting ground ginger for fresh. Fresh ginger has a much more pungent flavour than ground and will give you the best results in this recipe. However, if you don’t have any fresh ginger on hand, you can use ground ginger as an alternative. Keep in mind that the flavour won’t be quite as intense and vibrant.
How to Make Thai Peanut Noodles
You’re just a few minutes away from enjoying a satisfying peanut noodle salad! Here’s what you need to do.
Make the peanut sauce . Whisk the ingredients together until they’re smooth, creamy, and well-combined.
Cook the noodles . Cook the noodles in a pot of salted water according to the package directions. Drain and cool.
Assemble . Toss together the noodles, veggies, and peanut sauce and season to taste.
Serve . Garnish with sesame seeds and chopped peanuts, then enjoy!
Tips for Success
Follow these additional pointers for perfect Thai peanut noodles:
- Make sure to use the right type of noodles . Udon and soba are both great options for this dish, but you can also experiment with different types of noodles like ramen or somen. Even spaghetti or linguine will work if you don’t have Asian noodles on hand.
- Adjust the heat level . If you’re not a fan of spicy food, you can reduce the amount of crushed red pepper flakes in the sauce. Love your food hot and spicy? Then add some more!
- Whisk the sauce well . It can take some time for peanut sauce to come together! Keep whisking until all the ingredients are well-combined. If it seems too thick, you can add more water a teaspoon or two at a time.
Serving Suggestions
If you want to add some additional garnishes to your Thai peanut noodles, here are some ideas:
- Edamame or marinated tofu for extra protein
- Asian pickled cucumbers
- Fresh herbs like basil, mint, or cilantro
- Crispy wonton strips
- A drizzle of toasted sesame oil
Variations
Looking to switch things up? Here are some ideas for variations on this recipe:
- Use different types of nuts or nut butters in the sauce—try almond butter or cashew butter.
- Make it nut-free (and perfect for school lunches!) by swapping the peanut butter for sunflower seed butter.
- Use fresh lime juice instead of rice wine vinegar.
- Swap the fresh raw vegetables for steamed or sautéed vegetables.
How to Store Leftovers
Store Thai peanut noodles in an airtight container in the fridge for 3 to 4 days.
Can I Freeze This Recipe?
With the fresh vegetables in these Thai peanut noodles, this recipe is best enjoyed when freshly made.
More Easy Vegan Lunch Ideas
- Smashed Chickpea Avocado Sandwich
- Vegan Cobb Salad
- Vegan Poke Bowls
- Curried Chickpea Salad (15 Minutes)
- Vegan BLT Sandwich
Ingredients
Noodle Salad
- 8 ounces noodles , such as udon noodles (soba for gluten free)
- 1 medium green or red bell pepper , 96g , thinly sliced
- 1 large carrot, thinly grated , 106g
- ⅓ cup red cabbage slices , 51g
Peanut Ginger Sauce
- 1/2 teaspoon fresh ginger
- 1 tablespoon maple syrup
- 3 tablespoons low sodium soy sauce
- 3 tablespoons warm water
- 1 tablespoon rice wine vinegar
- 1/2 teaspoon sesame seeds
- 1/3 cup natural peanut butter , smooth
- 1/4 teaspoon crushed red pepper flakes
- Juice ½ lime , optional
- sesame seeds and chopped peanuts , for garnish
Instructions
Peanut Ginger Sauce
- Whisk all the ingredients together in a deep bowl until combined. Set aside until ready to use.
Noodle Salad
- Allow a pot of salted water to come to a boil. Add the noodles and cook and drain and cool according to your package’s directions. Allow noodles to cool completely, and drain off as much water as possible.
- In a large bowl, add the noodles, veggies and the peanut ginger sauce and toss together to combine. Taste and adjust flavour according to your liking. Garnish with sesame seeds and chopped peanuts and enjoy!
Notes
- To store : Store Thai peanut noodles in an airtight container in the fridge for 3 to 4 days.
Thai Peanut Noodles
Ingredients
Noodle Salad
- 8 ounces noodles such as udon noodles (soba for gluten free)
- 1 medium green or red bell pepper 96g , thinly sliced
- 1 large carrot, thinly grated 106g
- ⅓ cup red cabbage slices 51g
Peanut Ginger Sauce
- 1/2 teaspoon fresh ginger
- 1 tablespoon maple syrup
- 3 tablespoons low sodium soy sauce
- 3 tablespoons warm water
- 1 tablespoon rice wine vinegar
- 1/2 teaspoon sesame seeds
- 1/3 cup natural peanut butter smooth
- 1/4 teaspoon crushed red pepper flakes
- Juice ½ lime optional
- sesame seeds and chopped peanuts for garnish
Instructions
Peanut Ginger Sauce
- Whisk all the ingredients together in a deep bowl until combined. Set aside until ready to use.
Noodle Salad
- Allow a pot of salted water to come to a boil. Add the noodles and cook and drain and cool according to your package’s directions. Allow noodles to cool completely, and drain off as much water as possible.
- In a large bowl, add the noodles, veggies and the peanut ginger sauce and toss together to combine. Taste and adjust flavour according to your liking. Garnish with sesame seeds and chopped peanuts and enjoy!
Notes
- To store : Store Thai peanut noodles in an airtight container in the fridge for 3 to 4 days.
Nutrition
Thai Peanut Noodles https://jessicainthekitchen.com/asian-noodle-salad-with-peanut-ginger-sauce/ August 28, 2023
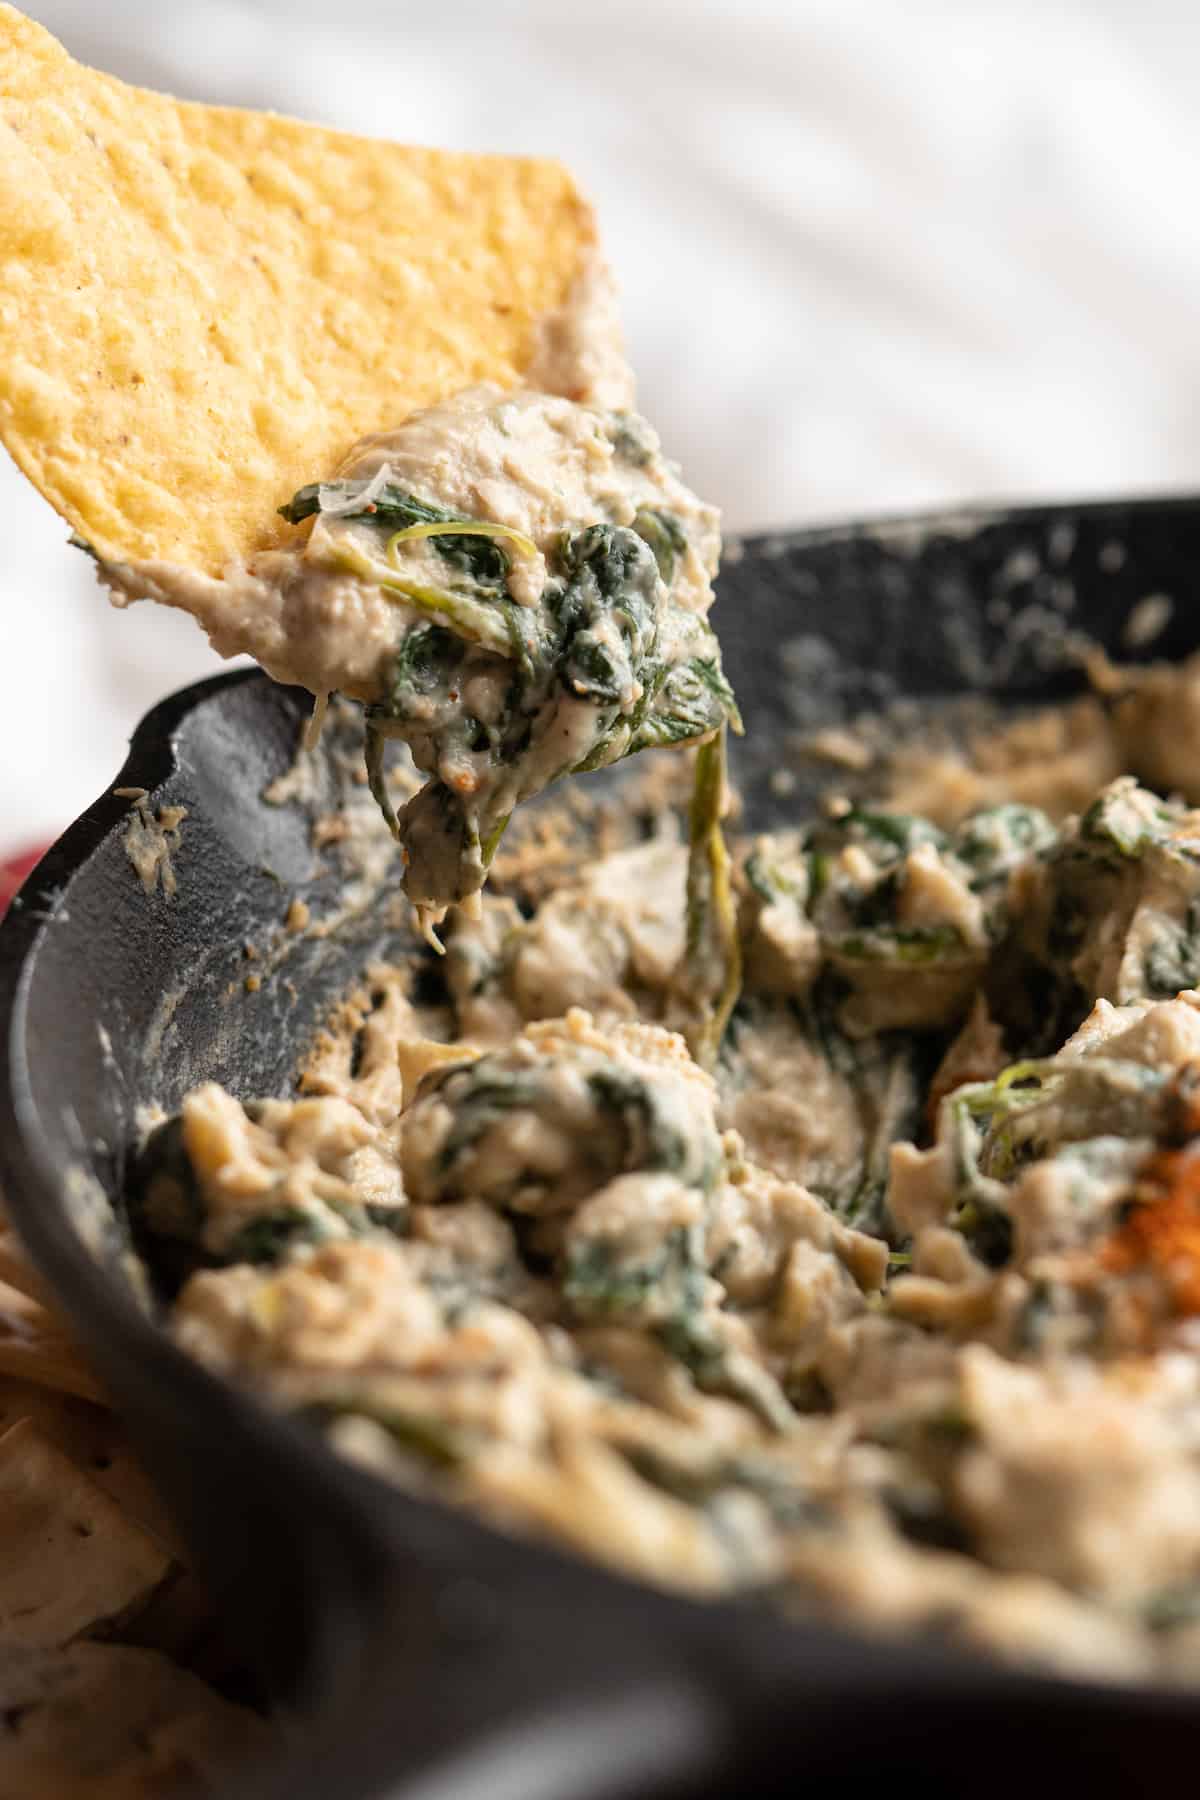
This vegan spinach artichoke dip is warm, creamy, and oh-so-cheesy—perfect for pairing with crusty bread, pita chips, and all your favourite dippers!
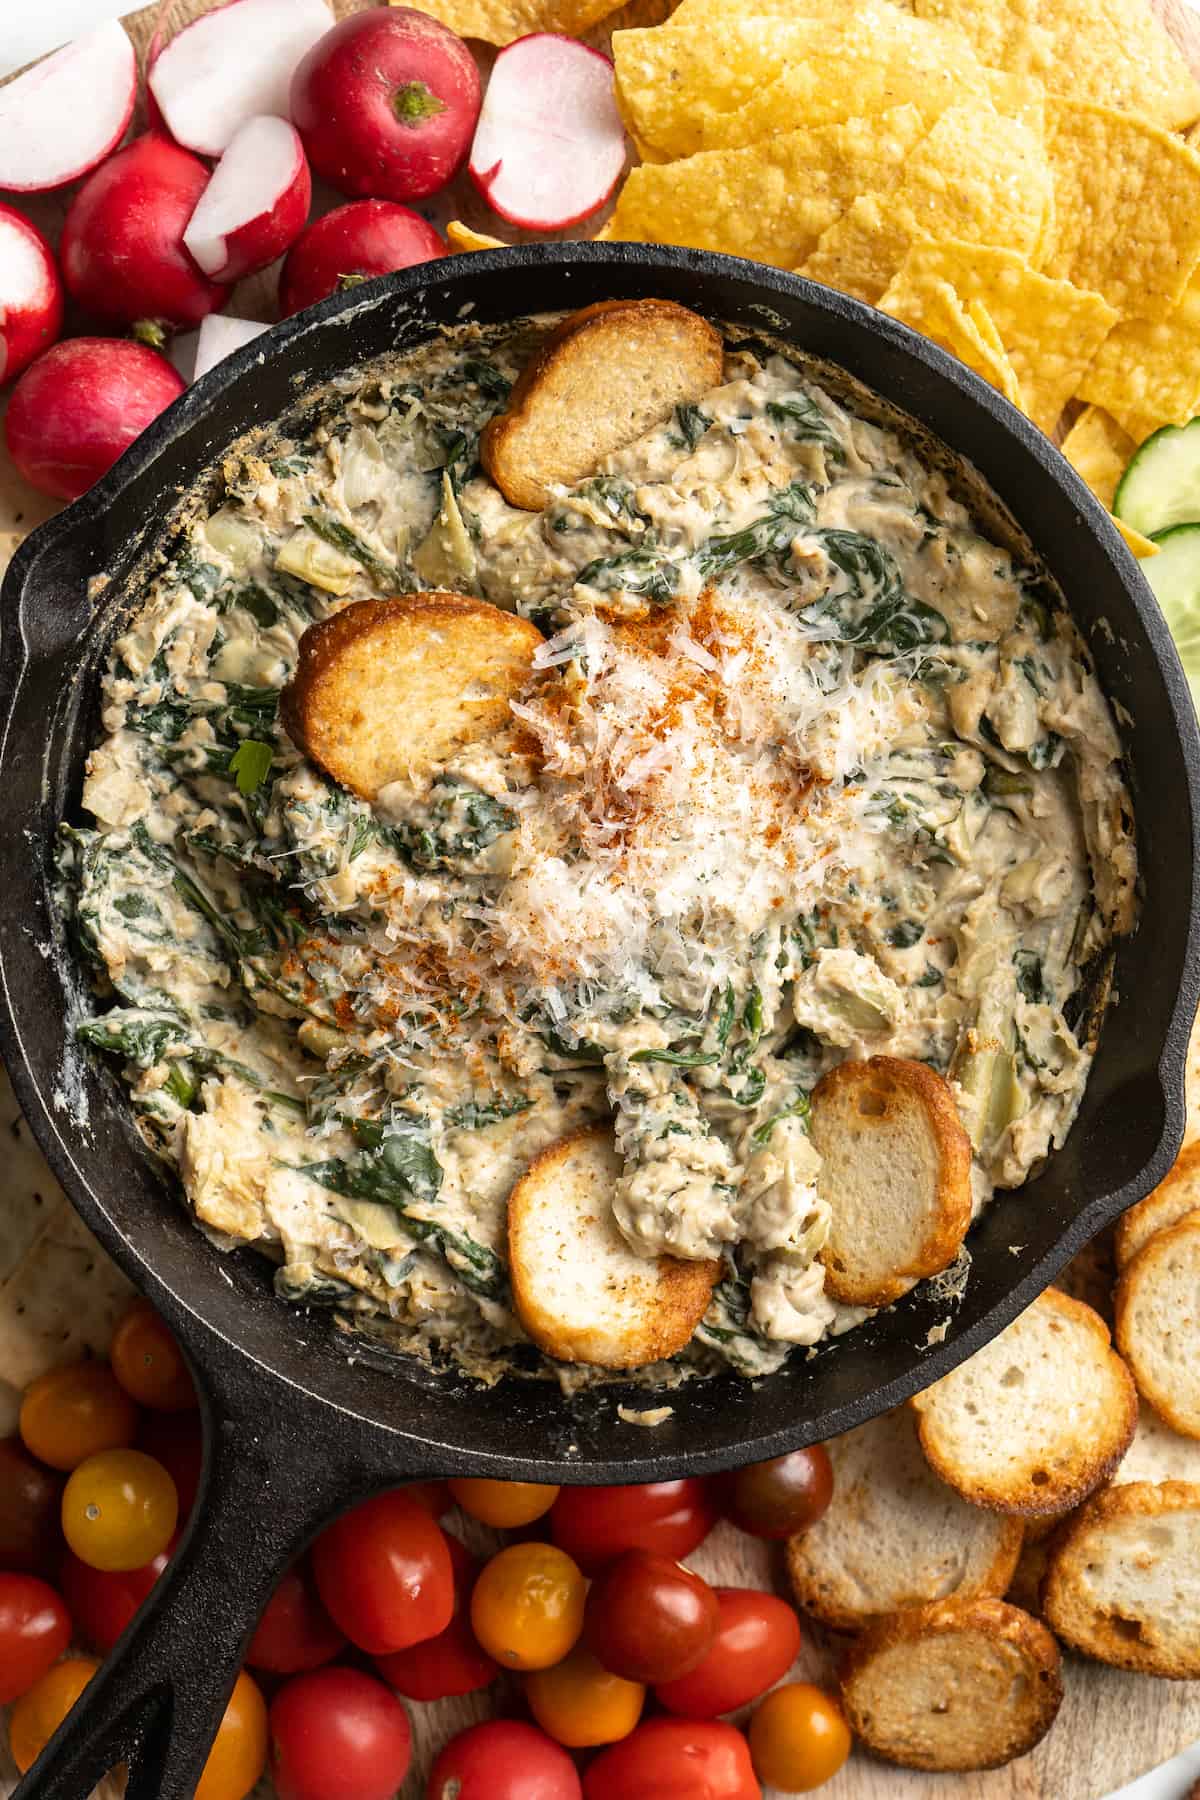
When it comes to crowd-pleasing appetizers, this vegan spinach artichoke dip ranks right up there with Loaded Potato Skins , Buffalo Cauliflower Wings , and Vegan Southwest Egg Rolls . In other words, serve this at a party and you can’t go wrong.
You don’t have to make it for a party, though! When I first came up with this recipe, Gav and I happily ate it by ourselves, then used the leftovers as a creamy, cheesy filling in sandwiches, as a sauce for pasta, and even as a topping for baked potatoes.
While spinach artichoke dip is traditionally made with lots of dairy, it’s easy to give it a vegan revamp with some simple ingredient swaps that still keep it incredibly creamy and delicious.
Why This Vegan Spinach Artichoke Dip Recipe Works
So let’s talk about those simple swaps! Here’s what makes this spinach artichoke dip a winner.
- Rich and creamy . Cashews are the secret ingredient in my Creamy Tomato Pasta and Cauliflower Mac and Cheese , and they’re also a heavy-hitter in this vegan spinach artichoke dip. When pureed, they add a creamy, dairy-like texture to any recipe.
- Surprisingly cheesy . Nutritional yeast and vegan Parm are here to bring the cheesy flavor, while lemon juice gives the dip a little more tang.
- Perfect texture . Tapioca starch acts as a thickener to give this vegan spinach artichoke dip a texture similar to melted cheese.
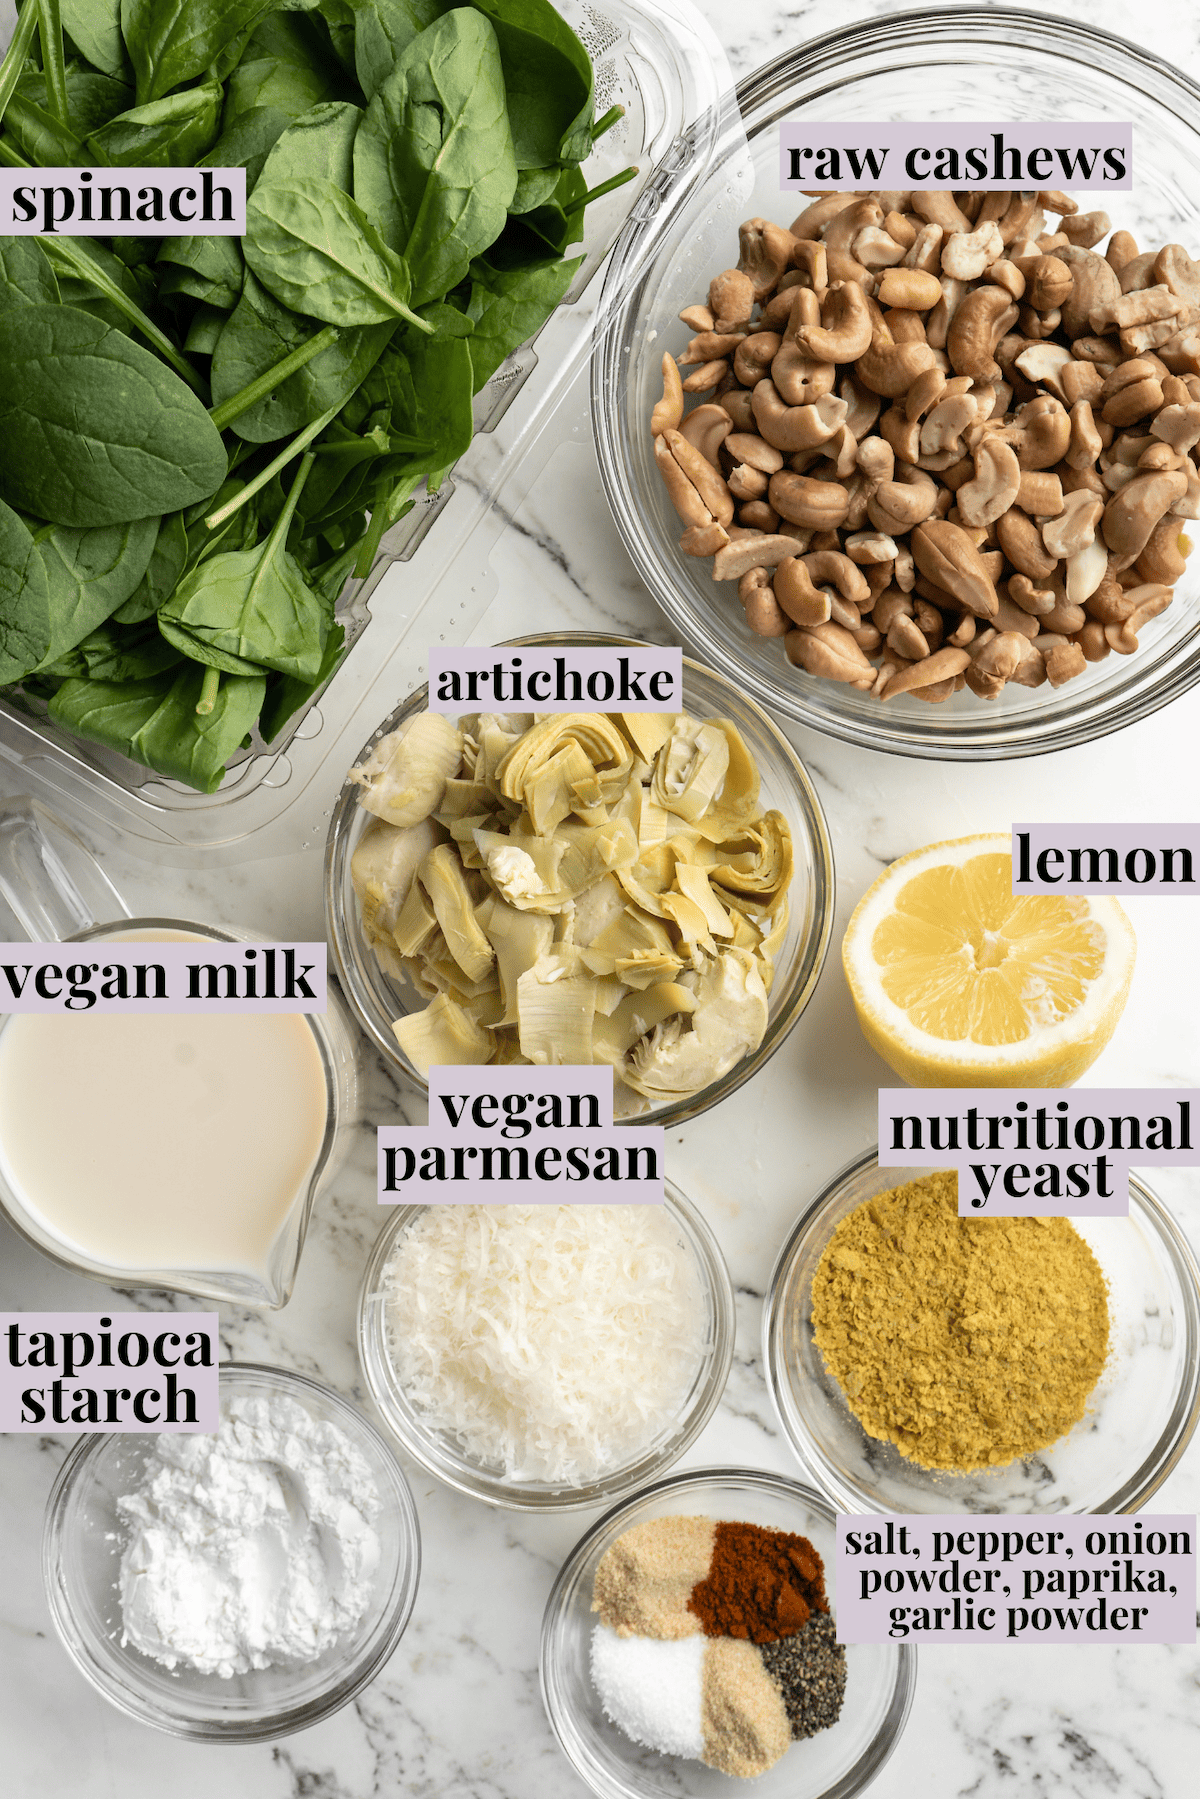
Notes on Ingredients
Scroll down to the recipe card to find the ingredient quantities and recipe instructions.
- Fresh spinach – I like using fresh spinach and wilting it, but thawed frozen spinach can be substituted.
- Artichoke hearts – I recommend using canned artichoke hearts, rather than the oil-packed marinated artichokes.
- Raw cashews – Soak these overnight, then give them a good rinse.
- Vegan milk – Any unsweetened, unflavoured variety you like.
- Sea salt
- Ground black pepper
- Nutritional yeast
- Onion and garlic powder – These add lots of savoury flavour.
- Paprika
- Lemon juice
- Vegan Parmesan cheese – Either store-bought or homemade vegan Parmesan .
- Tapioca starch – An optional ingredient for a cheesy texture.
Does Nutritional Yeast Really Taste Like Cheese?
Nutritional yeast does taste like cheese—and, in particular, it tastes like funky aged cheeses like Parmesan. It’s also nutty, salty, and savoury, making it a fantastic addition to spinach artichoke dip.
How to Make Vegan Spinach Artichoke Dip
Ready for a creamy, cheesy dipping experience? Let’s get started!
Prepare . Preheat your oven to 400°F.
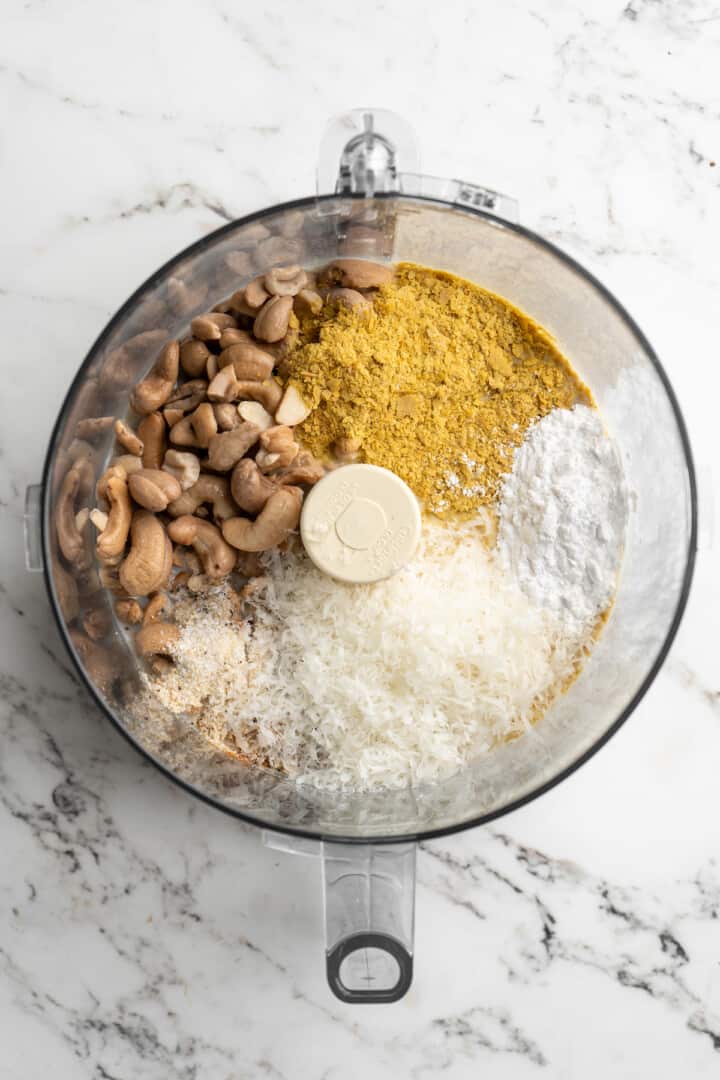
Blend . Add the cashews, vegan milk, salt, pepper, nutritional yeast, onion powder, paprika, garlic powder, lemon juice, vegan Parmesan, and tapioca starch to a blender and blend on high for 2 to 3 minutes, or until completely smooth.
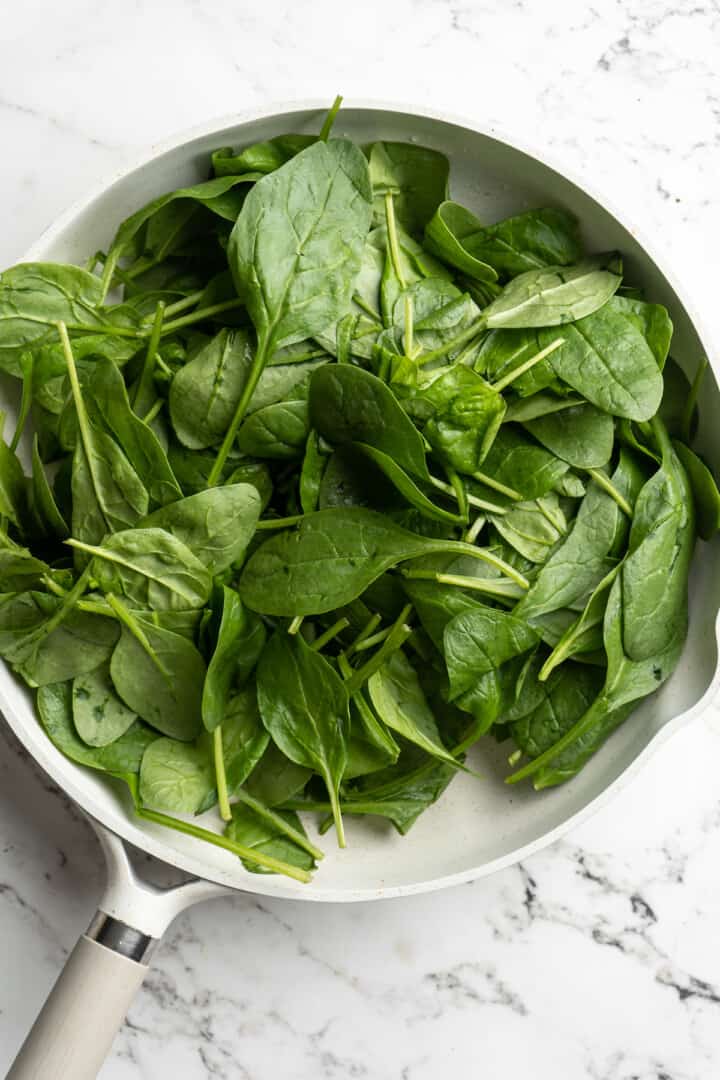
Wilt the spinach . Add the spinach to a pan set over medium heat. Let it cook until it’s wilted, then remove from heat and drain the excess liquid.
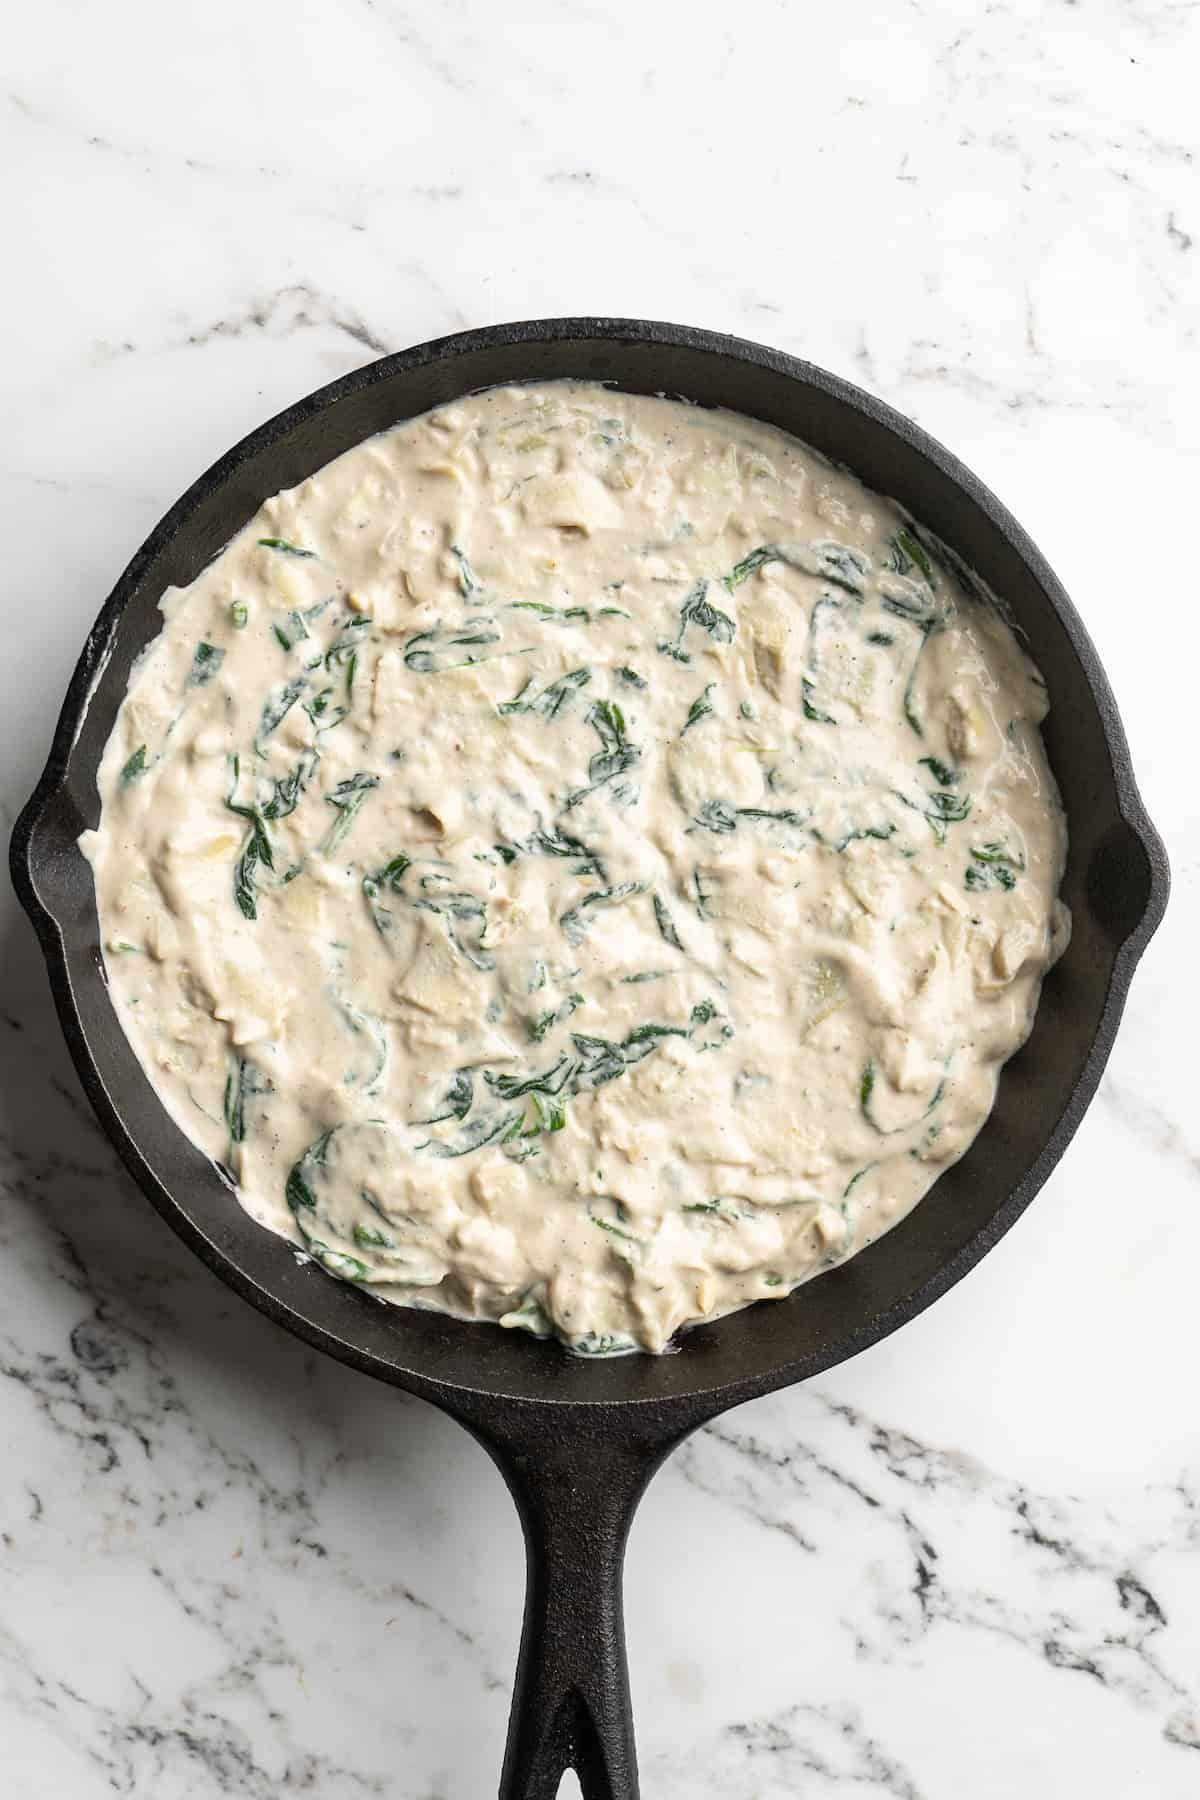
Add the artichokes . Return the pan to medium-high heat and stir the artichokes and a pinch of salt into the spinach. Cook for about 2 minutes.
Assemble . Transfer the spinach artichoke mixture to a baking dish and pour the blended sauce mixture on top. Stir to combine and season to taste.
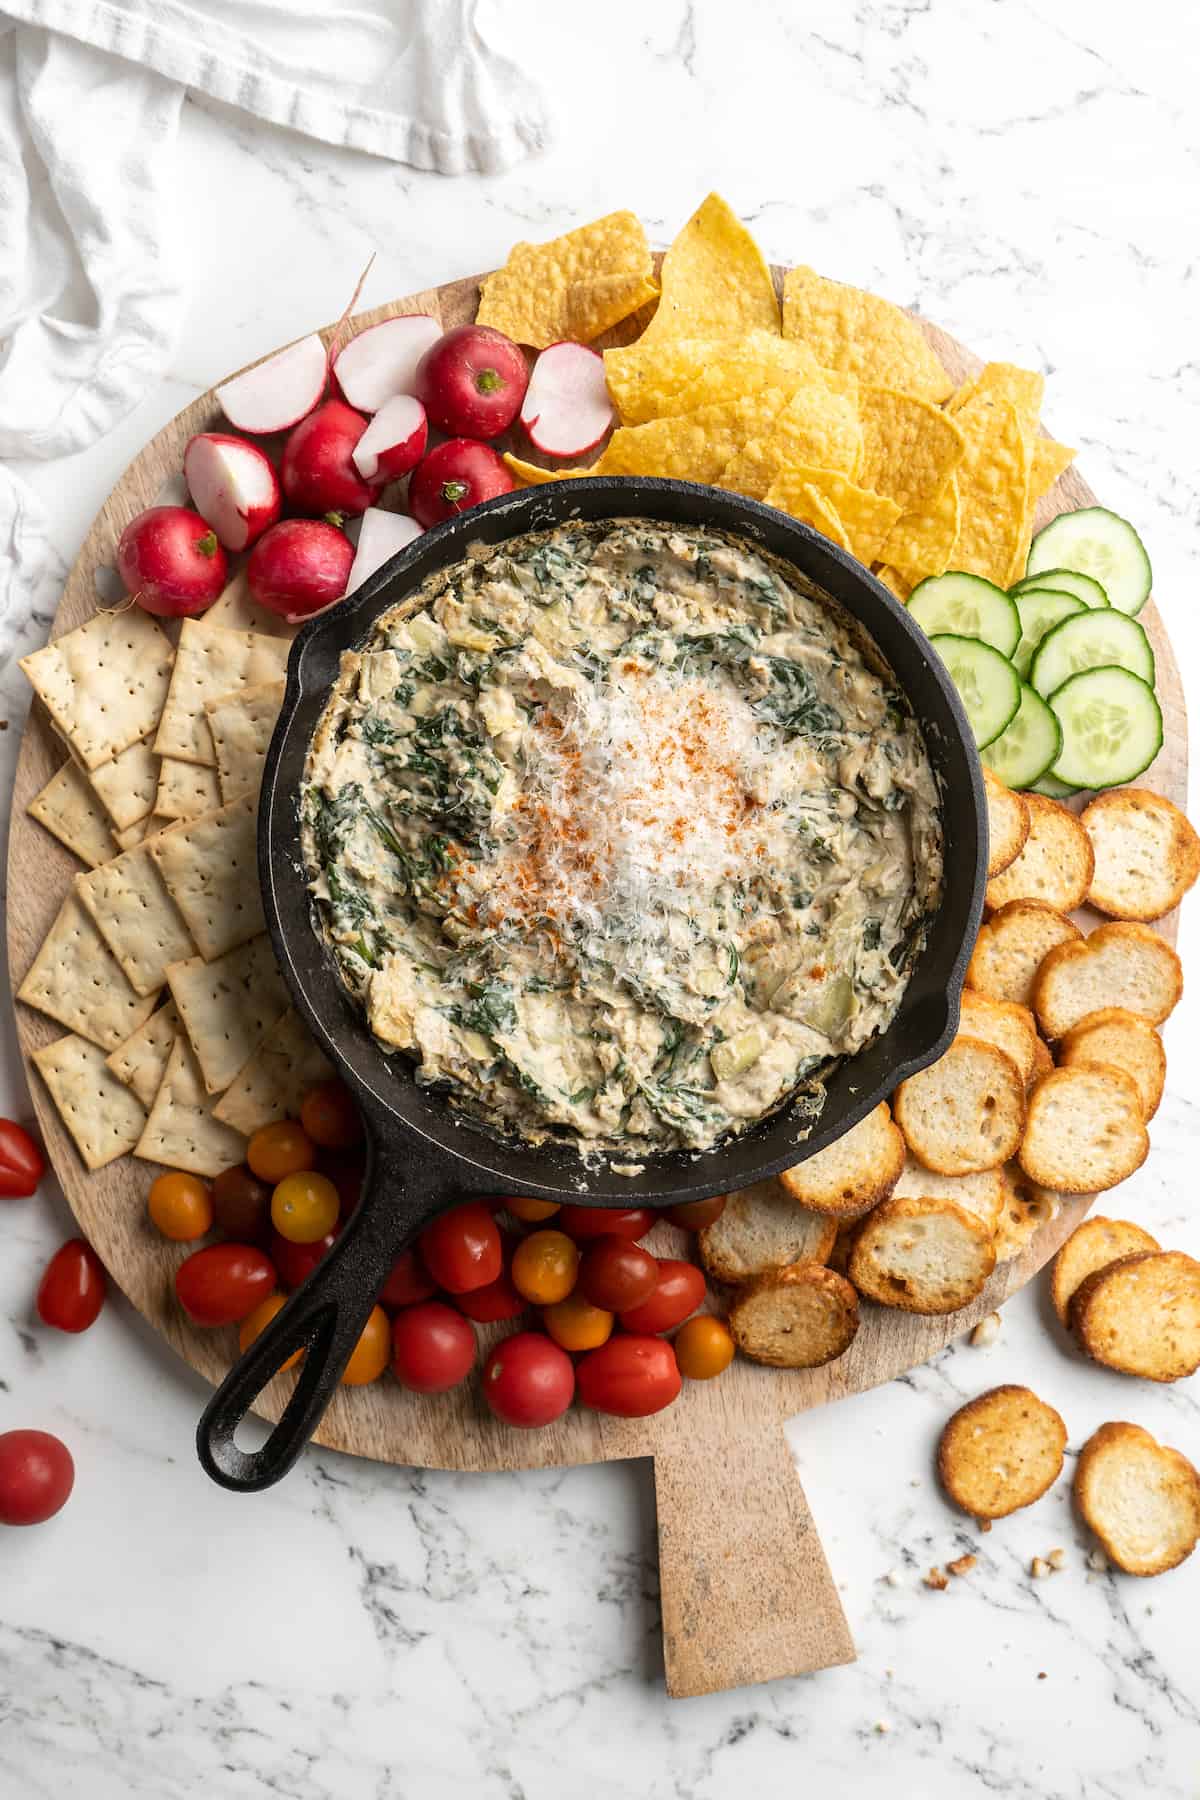
Bake . Place the baking dish in the oven and bake for 20 minutes, or until the top is golden brown. Garnish with additional vegan Parmesan cheese, if desired, then cool slightly and serve.
Tips for Success
These simple pointers will help you make sure your vegan spinach artichoke dip turns out perfect:
- Don’t forget to soak the cashews . Soaking is key to achieving a supremely creamy consistency. You’ll also want to use raw, not roasted, cashews.
- Puree completely smooth . You don’t want bits and chunks of nuts in your spinach artichoke dip! Use a high-speed blender and make sure the mixture is absolutely smooth before you add it to the baking dish.
- Make it in an oven-safe skillet . If you cook the spinach and artichokes in a skillet that’s safe to go in the oven, you can skip the step of transferring the veggies to a baking dish.
- Pop it under the broiler . Although this is optional, it gives your spinach dip a toasty finish. You can add some vegan Parmesan over the top first, or another melty vegan cheese.
Variations
Like crunchy water chestnuts in your spinach artichoke dip? Feel free to add those if you’d like! You can also swap the vegan Parmesan for a vegan shredded cheese—cheddar is great for a more pronounced flavour, or mozzarella for a milder option.
Serving Suggestions
Serve this dip with pita chips , crackers, tortilla chips, breadsticks, on crostini, slathered atop fresh bread , as a veggie burger topping, or tossed with pasta. The possibilities are endless!
How to Store Leftovers
Store leftover vegan spinach artichoke dip in an airtight container in the refrigerator for 3 to 4 days. (You can also make it in advance and store it wrapped in the baking dish.)
Reheat spinach artichoke dip in the microwave or in a 350ºF oven until it’s warmed through, or eat the leftovers as a cold dip.
Can I Freeze This Recipe?
If you’d like to freeze this recipe, store it wrapped in the baking dish or in an airtight container for up to 3 months. Thaw it in the refrigerator, then reheat according to the instructions above.
More Vegan Party Appetizers
- Sambusas
- Vegan Charcuterie Board
- Vegan Whipped Feta Dip
- Air Fryer Veggie Chips
- Perfect Homemade Hummus
Ingredients
- 10 ounces fresh spinach , or frozen spinach, see notes*
- 14 ounces canned artichoke hearts (about 1 can) , (395g) drained, rinsed and chopped
- 1 1/2 cups raw cashews , soaked in water overnight, then rinsed and drained OR just easily boiled for 5 minutes**
- 1 1/2 cups unsweetened vegan milk
- 1 teaspoon sea salt
- 1/2 teaspoon ground black pepper
- 3 tablespoons nutritional yeast
- 1 teaspoon onion powder
- 1/4 teaspoon paprika
- 1 teaspoon garlic powder
- 1 1/2 tablespoons lemon juice
- 3 tablespoons vegan Parmesan cheese
- 2 tablespoons tapioca starch , optional, but great for a cheese pull
Instructions
- Preheat your oven to 400°F/200°C.
- In a blender, add the cashews, vegan milk, sea salt, ground black pepper, nutritional yeast, onion powder, paprika, garlic powder, lemon juice, vegan parmesan cheese and optional tapioca starch. Blend on high for about 2 to 3 minutes until completely smooth. Set aside.
- In a pan over medium heat, add the fresh spinach and wilt down if it’s fresh until fully wilted, about 5 minutes. Remove from heat and drain the excess water that comes off.
- Turn the pan back on to medium-high heat, place the spinach back in the pan, and add the artichokes to the pan with a pinch of salt and stir together for about 2 minutes.
- Turn heat off and add the spinach artichoke mix to your baking dish (I used about a 9" x 5" oval dish). Pour the blended sauce mixture on top, and stir to combine. Taste and add more salt if needed.
- Bake for 20 minutes until golden and cheesy, and you can broil for a few minutes if desired too. Remove from oven, sprinkle optionally with extra vegan parmesan cheese, allow to cool slightly, then serve! Enjoy!
