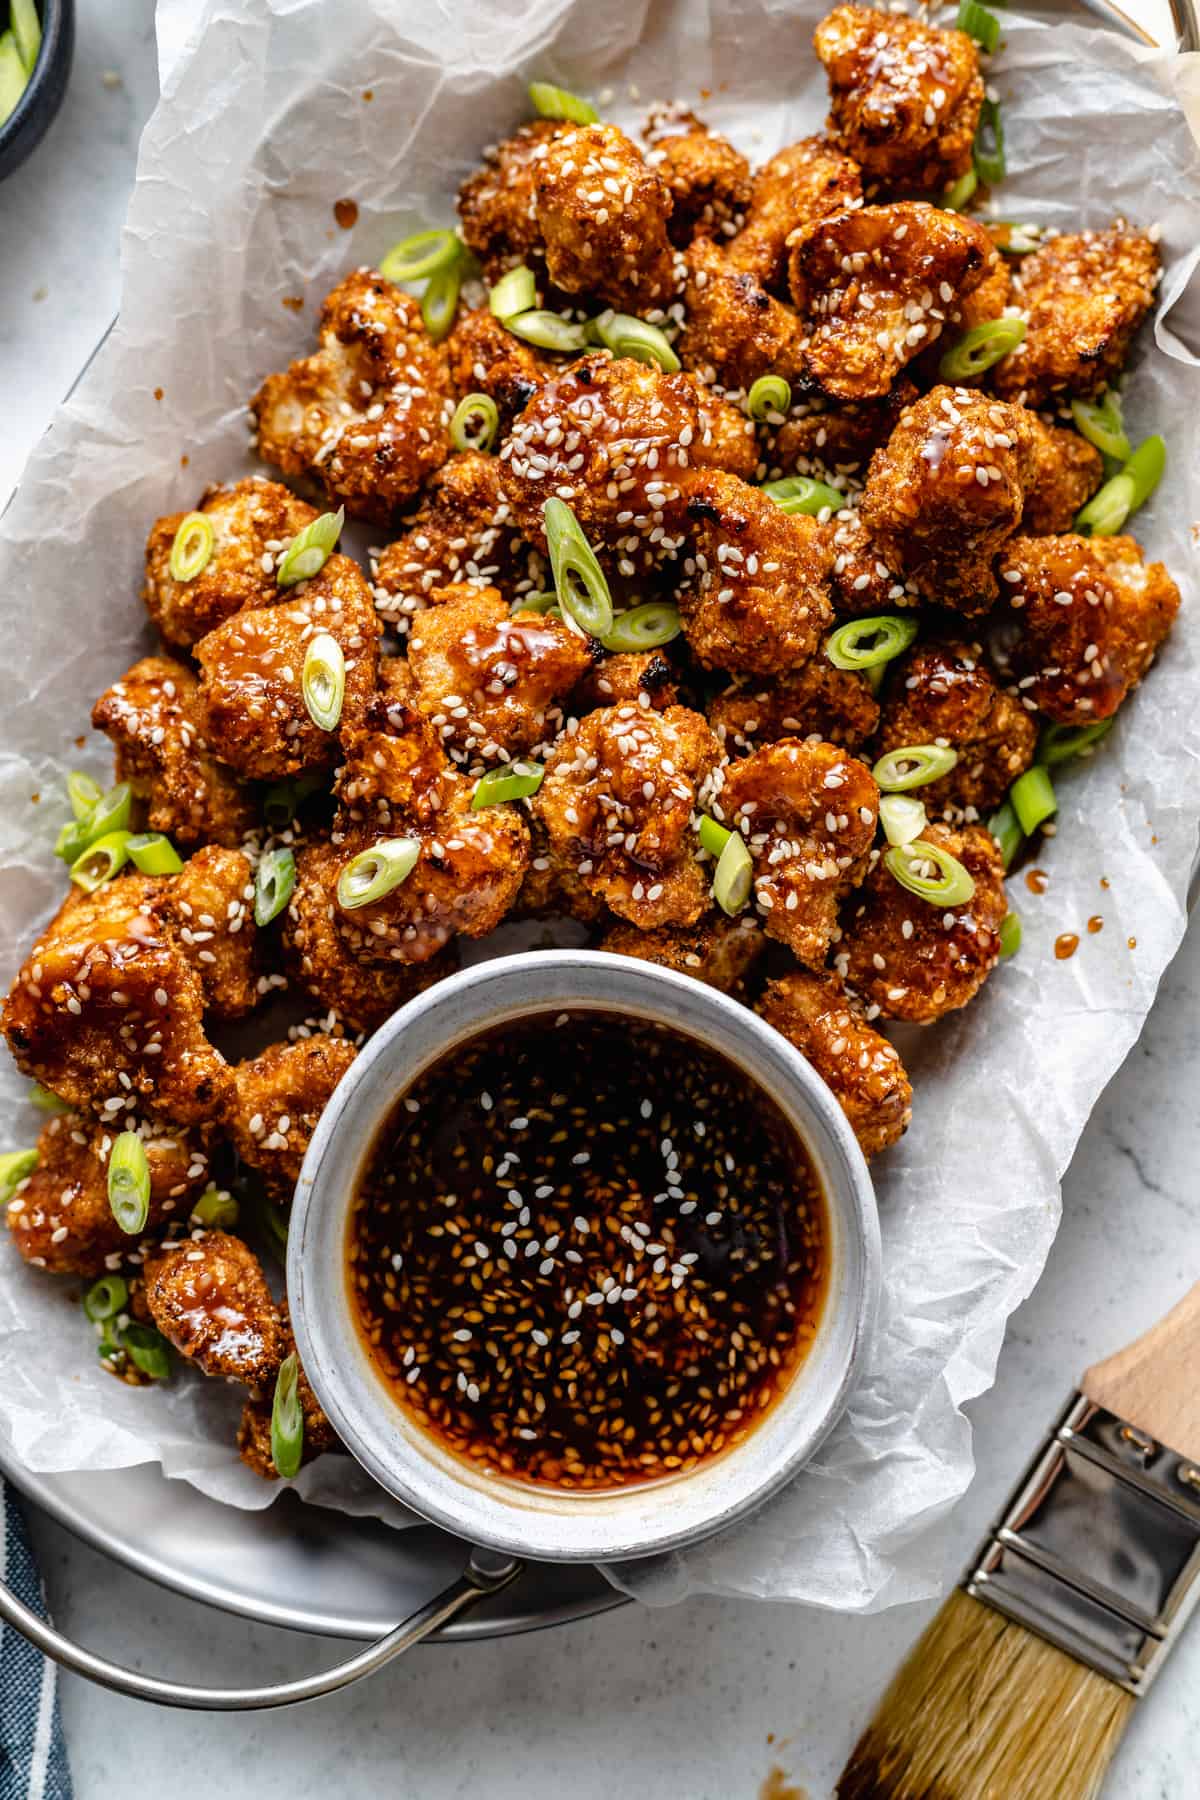
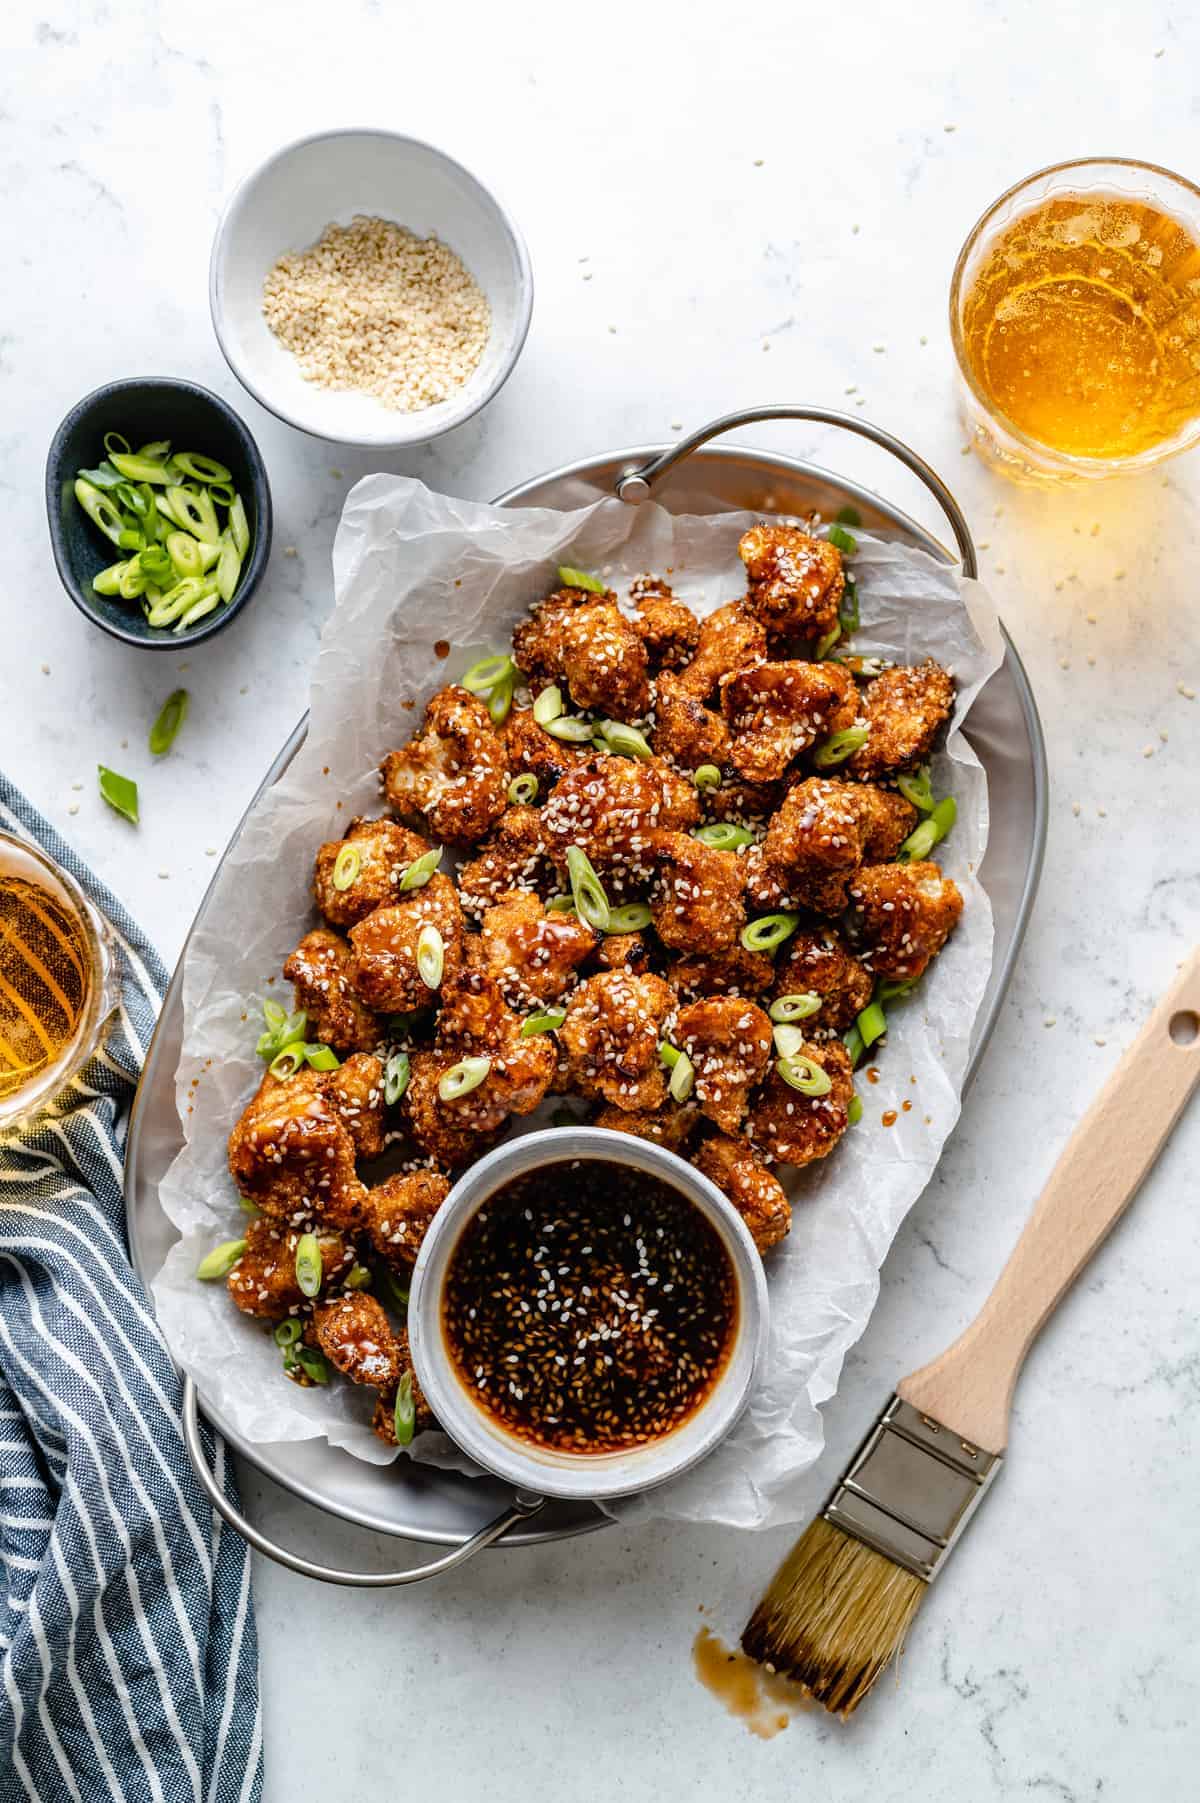
These Sticky Sesame Cauliflower Wings are the best veggie wings I’ve ever had! Loaded with maple-sesame flavor and the perfect amount of heat, they are the best game day snack for vegans!
Estimated reading time: 10 minutes
Vegan Sticky Sesame Cauliflower Wings? YES please!
Confession time: Every time I make these, quite a few don’t make it to the end plate. I kinda-sorta-maybe devoured them seconds after they came out of the oven. Oops. Happily so, though, burning the roof of my mouth and smiling in deep satisfaction as I went.
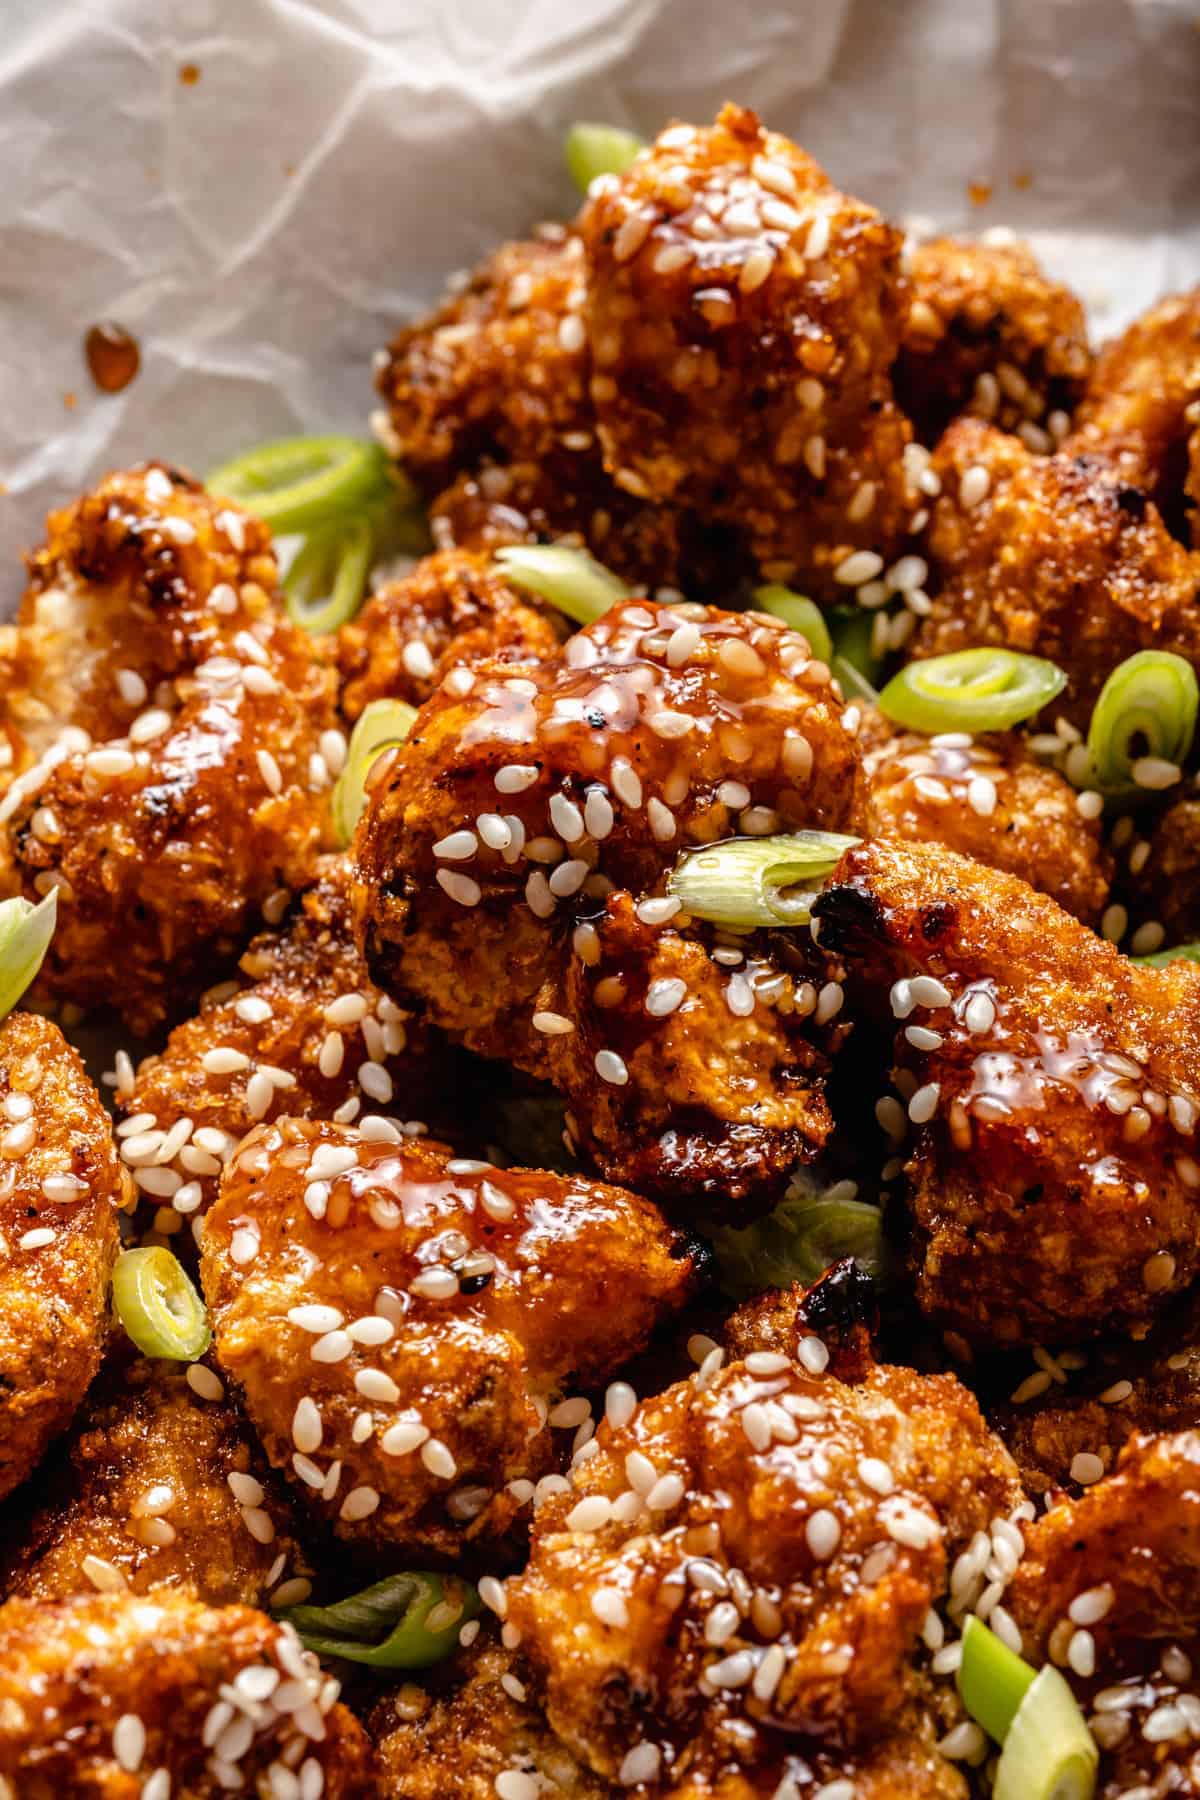
Cauliflower wings taste JUST like regular wings. I’ve had vegan and meat-eater friends alike amazed at the taste and texture. Without sauce, they are crispy-crunchy on the outside and soft on the inside. With sauce, they are EVEN better, and may or may not cause the best flavor explosion ever. Ever, ever.
I decided to go with a sweet and spicy sesame sauce for these wings, and they came out exquisitely sticky and unbelievably divine. The spice has just the right amount of kick, and the sweet sesame flavor takes this tasty experience right over the top.
What Makes These the Best Cauliflower Wings?
Picking THE best thing about cauliflower wings is an impossible task. There are just too many amazing qualities about these vegan wings. Here are a few of the most important ones:
- Cauliflower wings are great for a meal or as a snack. And the best part? You can gobble up basically a million of these without any guilt. So whether it’s a super bowl party, or just time for a casual appetizer, these cauliflower wings are perfect!
- They’re also completely gluten-free. So, you can serve these to all your guests despite their dietary specifications. PRETTY sure that qualifies as a hostess win!
- These wings are incredibly easy to make. Batter them up, bake them, dip ’em in sauce, and bake again for just 5 more minutes. Your entire house will smell like amazing and if you’re anything like me, you’ll be sitting in front of the oven counting down. Promise me you’ll make these? You do not want to miss out on how amazing these are.
Notes on the Ingredients
These wings have a fair amount of ingredients to them, so stick with me! We’ve covered how good these wings are, but I don’t know if we’ve done the sauce justice yet.
It’s a maple ginger sauce, made with maple syrup and ground ginger. Needless to say, it is SO good. Talk about the ultimate spicy-sweet combination.
For the Wings
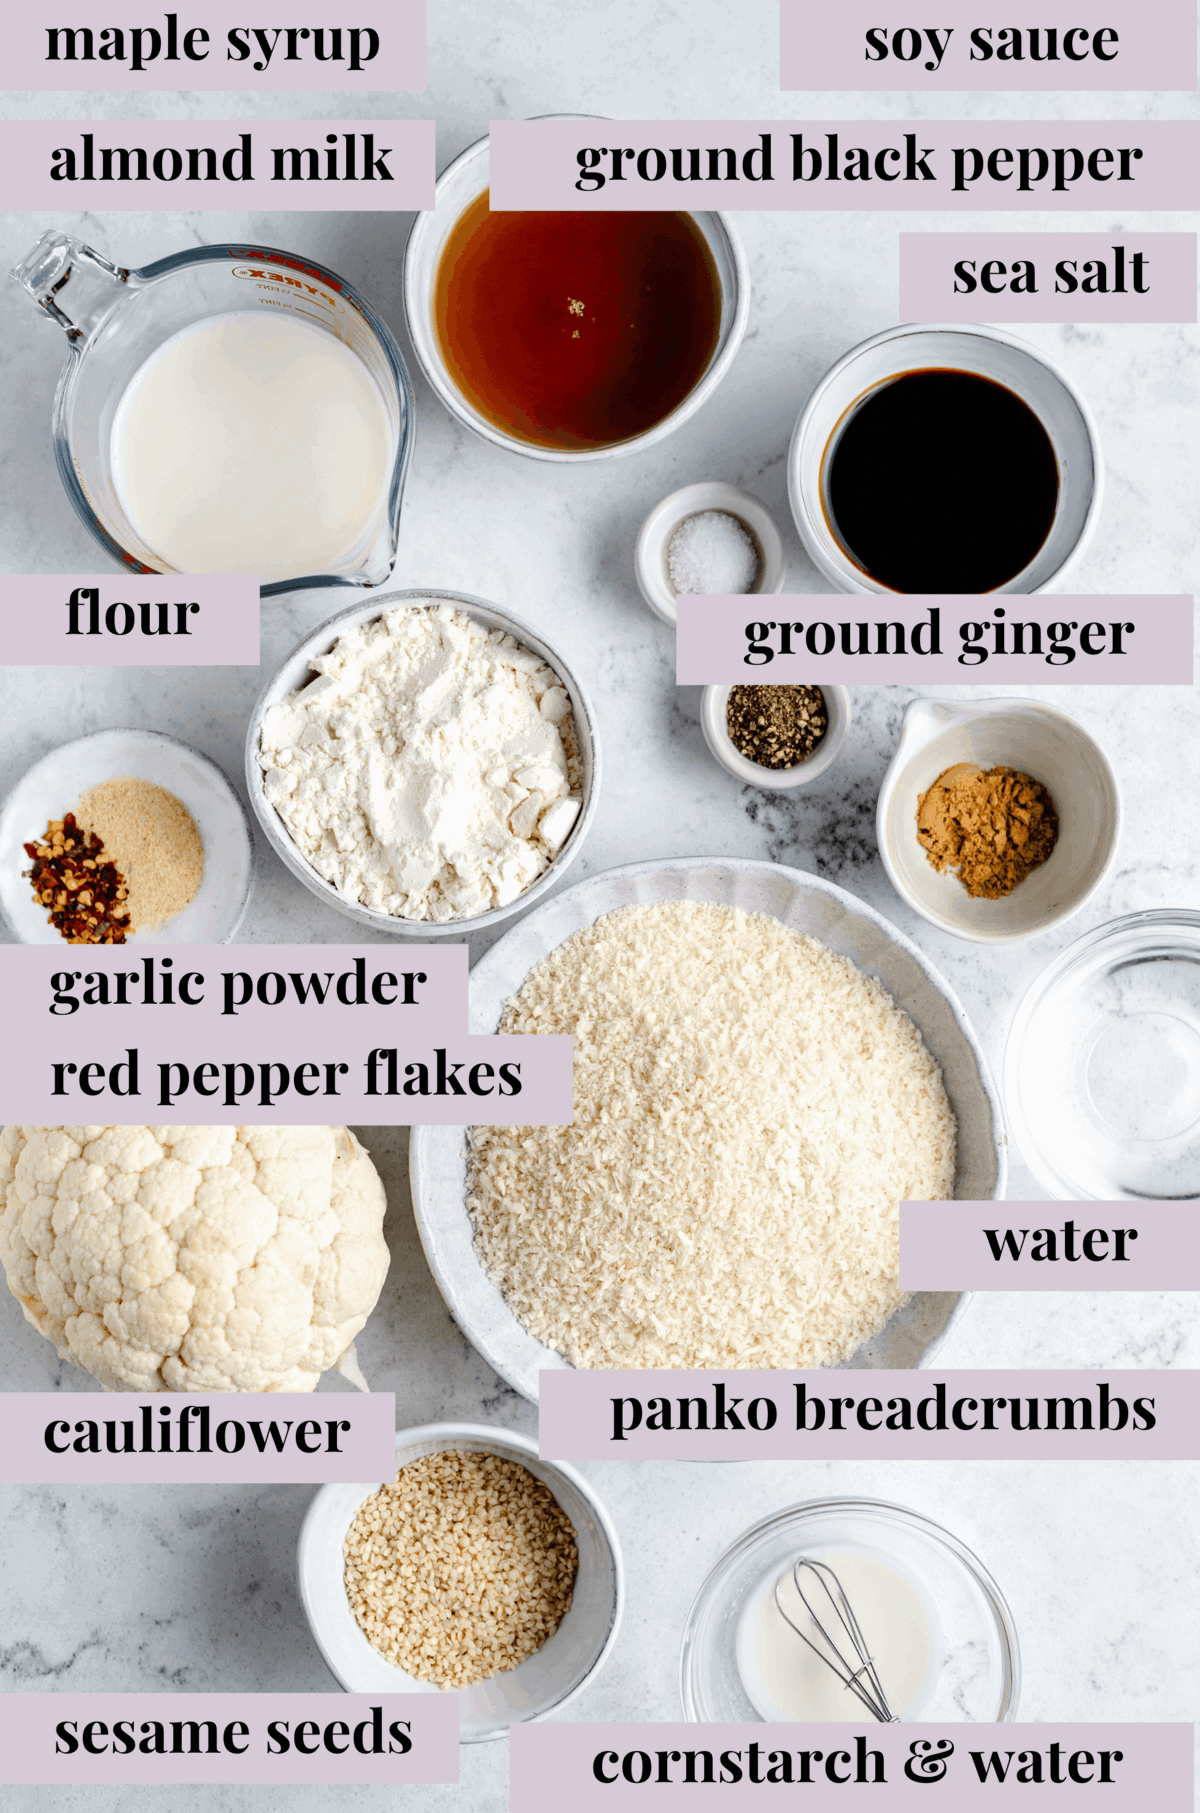
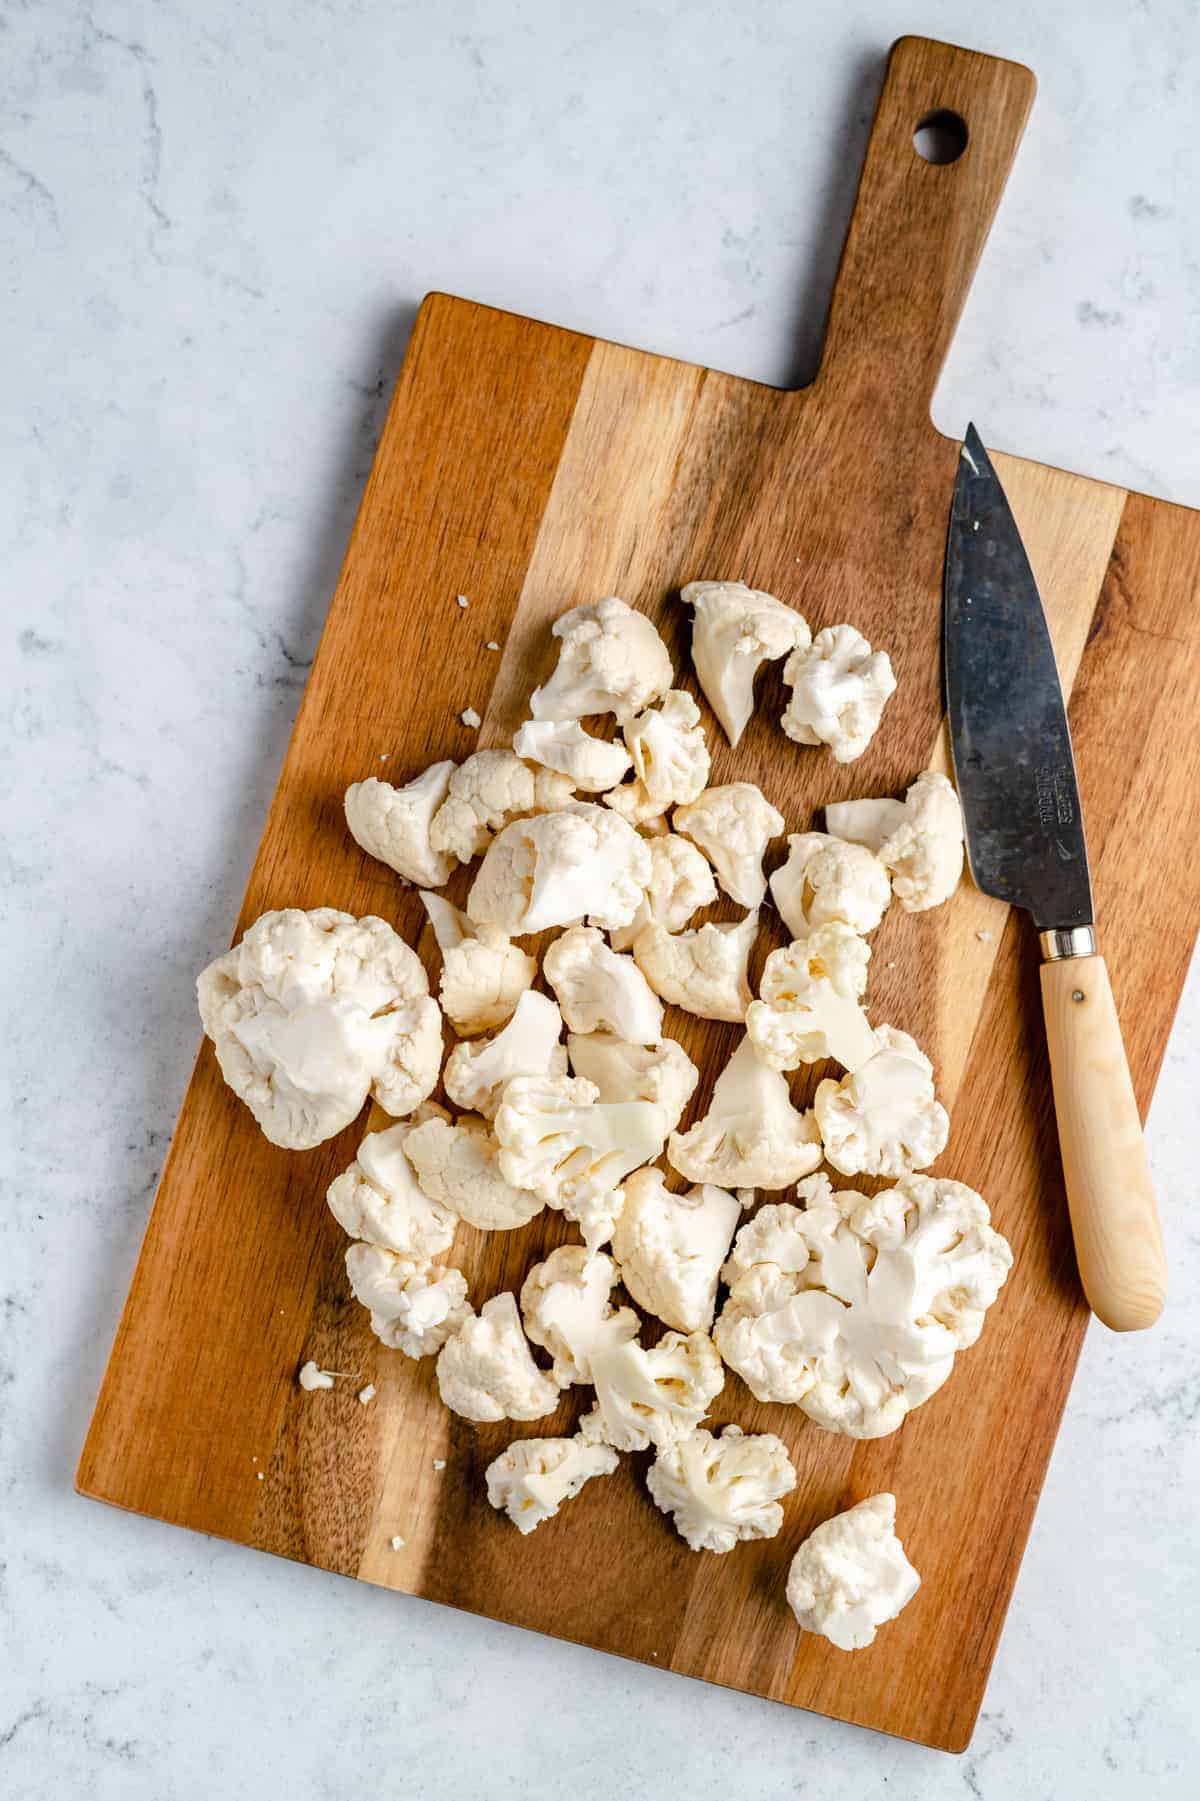
- Cauliflower: You’ll need just 1 small head cauliflower.
- Flour: I like to use all purpose gluten free flour to make sure that these wings are gluten free, but you can certainly use regular all purpose flour. (See tips below for more info.)
- Vegan Milk: My go-to is unsweetened almond milk – use a vegan milk that won’t interfere with the other flavors in this meal.
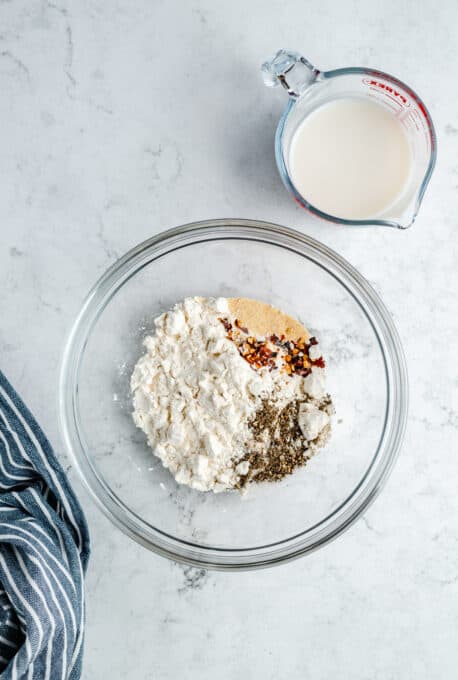
- Seasoning: Round up some sea salt, ground black pepper, garlic powder, and crushed red pepper flakes (leave out if you don’t like spice).
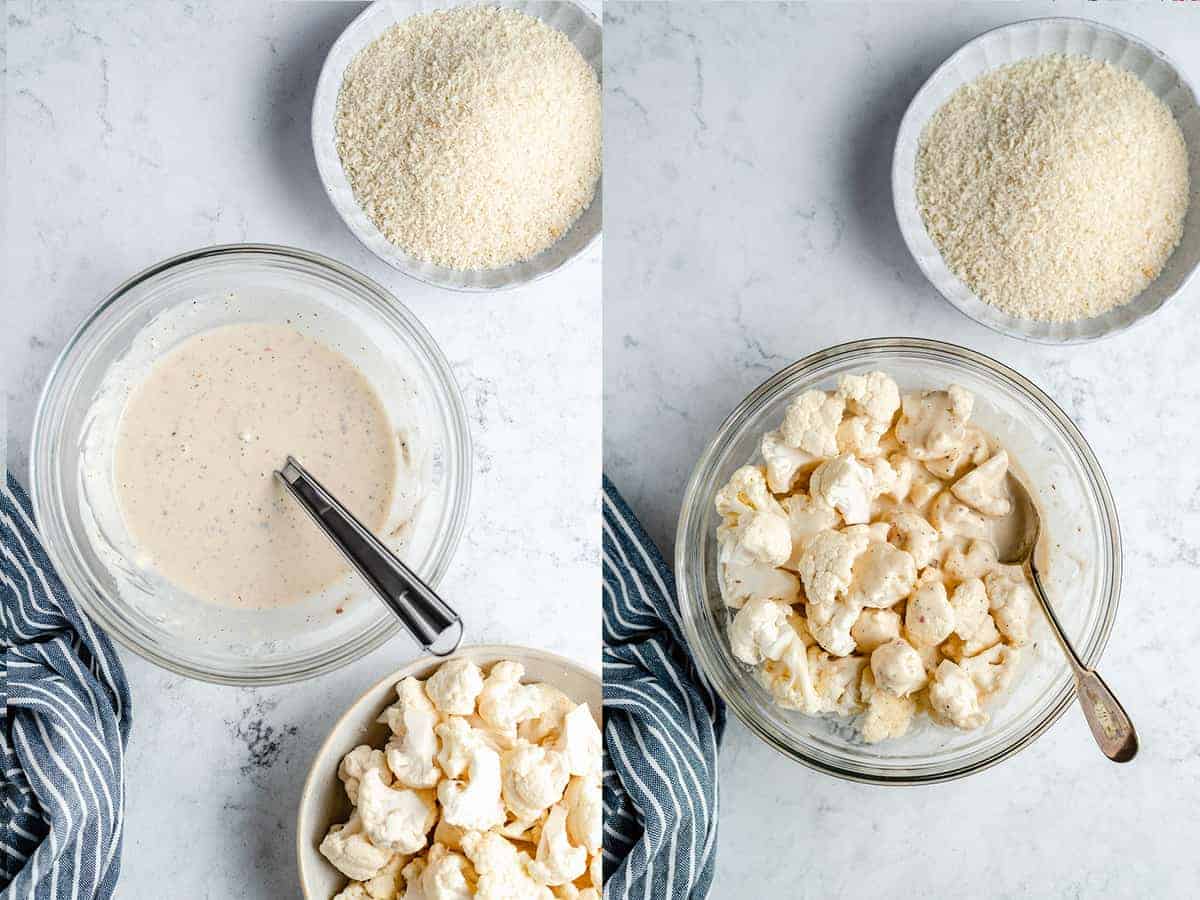
- Breadcrumbs: Use crispy/panko gluten free breadcrumbs seasoned with salt & pepper.
For the Sauce
- Maple Syrup: I recommend using pure maple syrup – it offers the strongest flavor!
- Low Sodium Soy Sauce: Or liquid aminos / coconut aminos . (See more info in tips section.)
- Sesame Seeds: These will go in the sauce, but can also be used as a garnish at the end, along with chopped scallions.
- Seasoning: Use ground black pepper and ground ginger.
- Cornstarch Slurry: Cornstarch and water mix together separately from the rest of the ingredients in a small bowl for a cornstarch slurry.
- Water
How to Make Sticky Cauliflower Wings
Sticky cauliflower wings are a breeze to whip together. They’ll take you 15 minutes to prep for the oven, and you can have them plated with the dip in just under 45 minutes. Nobody wants to spend all day in the kitchen on game day, or any day, and with these wings you don’t have to!
For the Wings
Preheat Oven to 450•F/230•C: Prepare a baking sheet by lining it with a silicone baking sheet or greased foil.
Prepare a Baking Sheet: Line a pan with a silicone baking sheet or greased foil. Using a knife, remove florets from the cauliflower (aka cut off the leaves and don’t use the stems). Chop the cauliflower into smaller pieces to resemble the size of the wings.
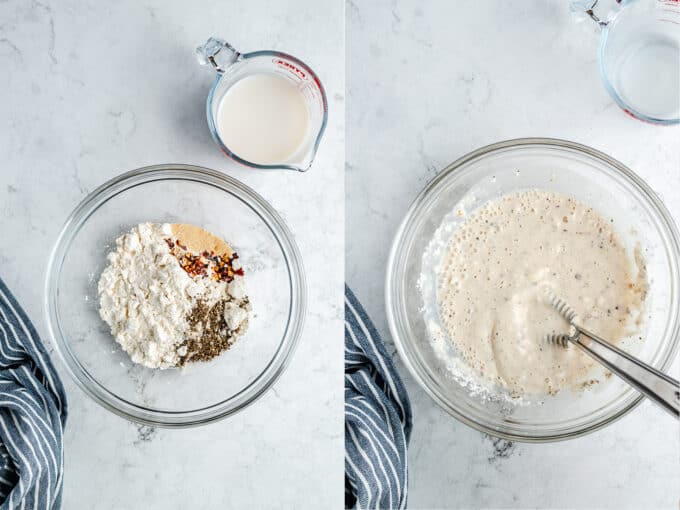
Whisk Together the Batter: In a separate bowl, whisk the gluten-free flour, almond milk, salt, ground black pepper and garlic powder in a bowl to make the batter. If the batter is too thick, feel free to thin it out with some more milk. In a separate bowl, place the breadcrumbs. Line it up beside the batter bowl.
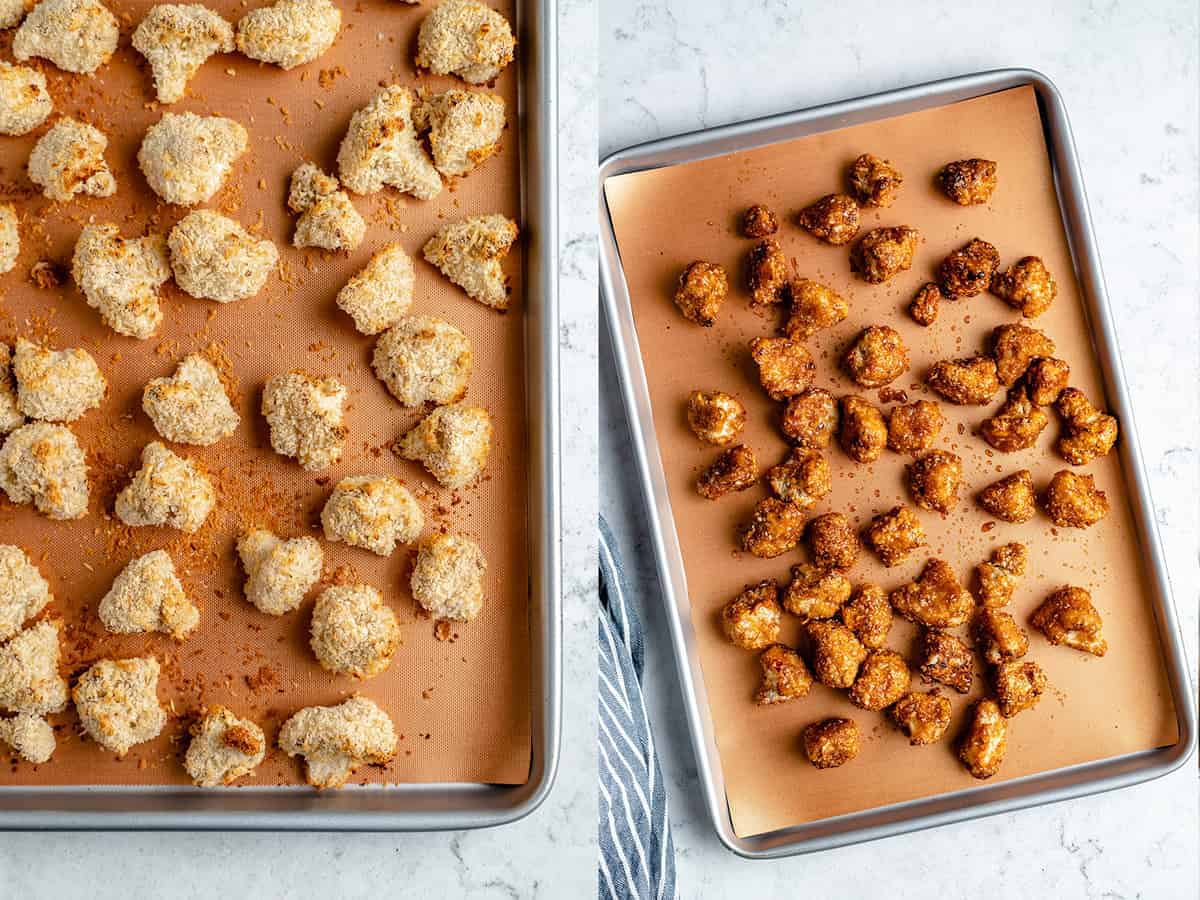
Coat the Cauliflower Florets: Toss the cauliflower in the batter mixture (you can add them all at once), using a spatula or spoon to coat them all. Transfer them to the breadcrumbs (you can do this in two or three batches) to coat completely.
Then place onto the baking sheet, giving each wing enough space. Repeat until all of the wings are coated.

Bake for 22 Minutes: Please ensure your oven is completely preheated and hot. While baking, prepare the ingredients for the sauce by whisking together.
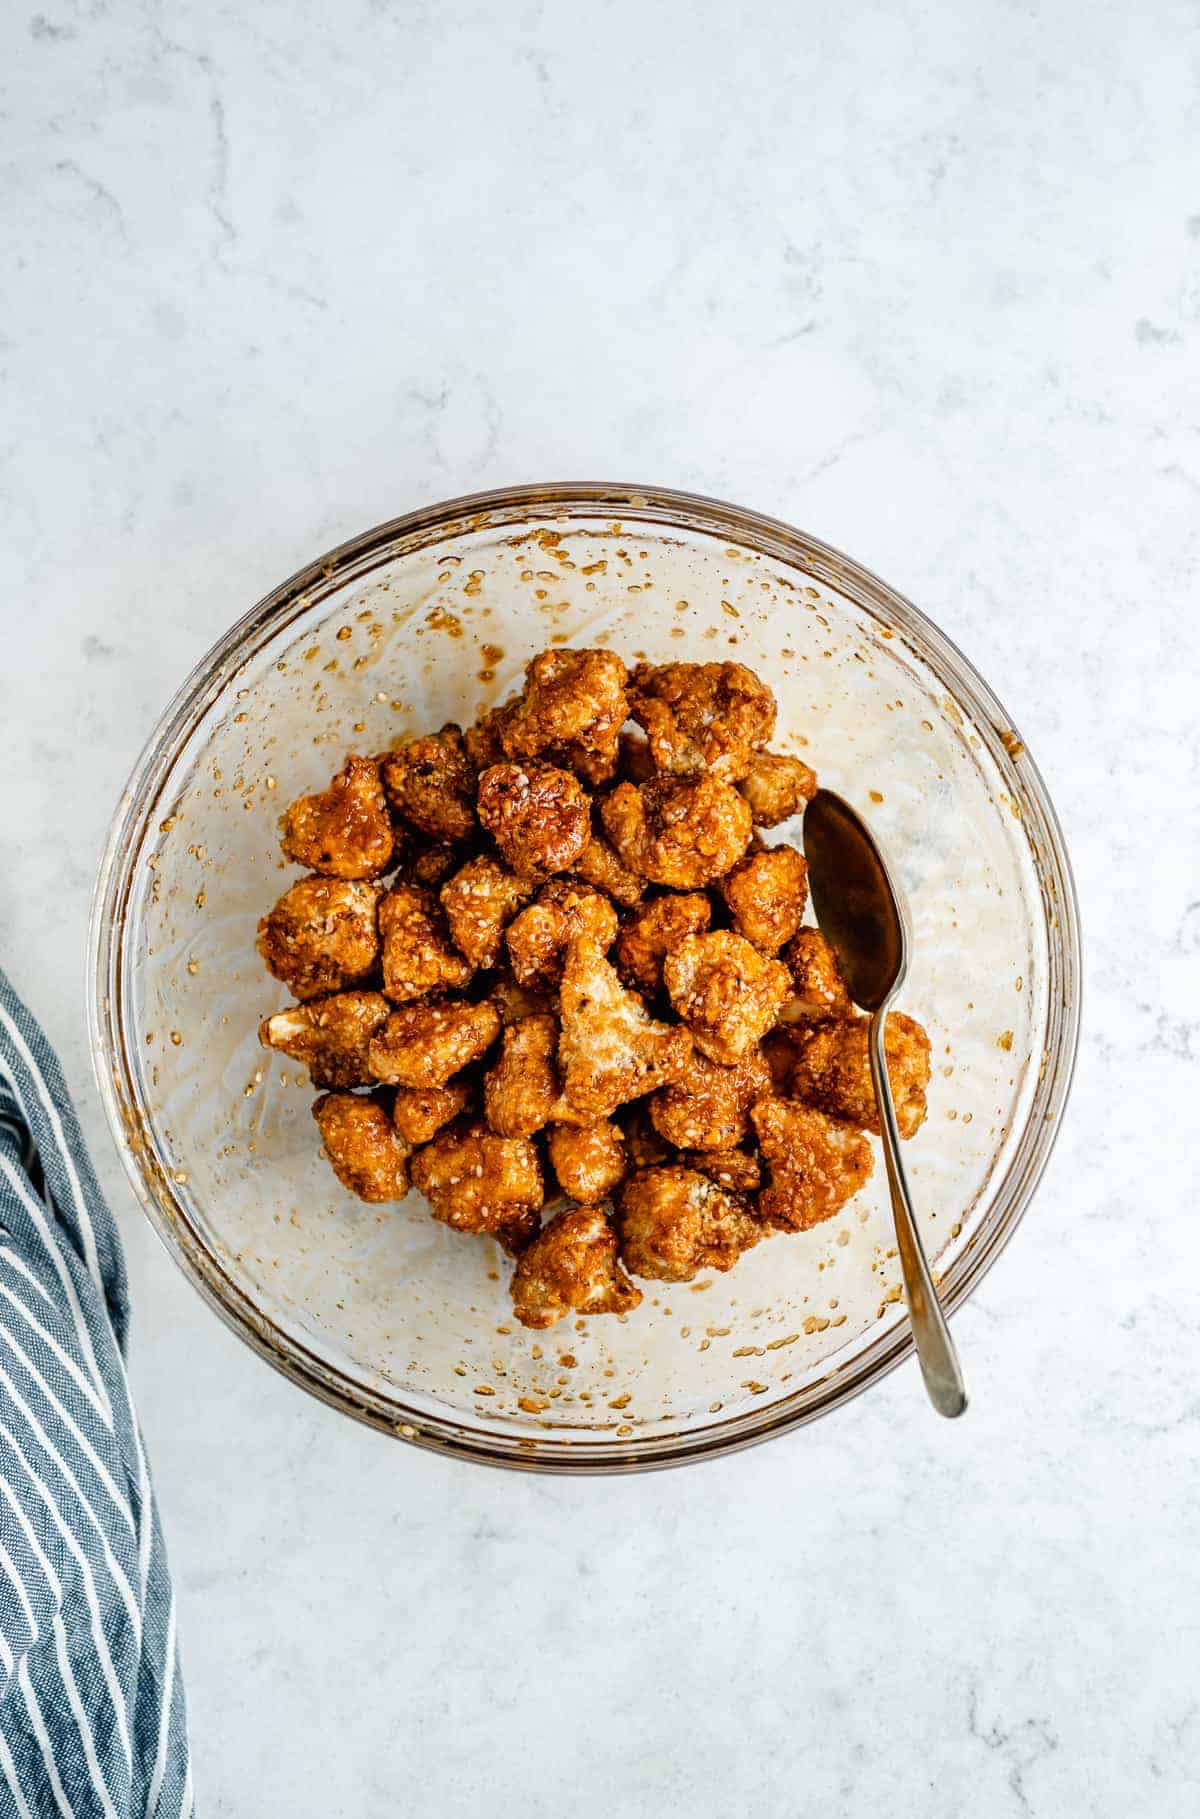
Remove from Oven: Toss the wings in the sauce (I like to use a spatula to move them around to get properly coated) then using tongs or a spoon, remove and place back on the baking sheet. Bake for another 5 minutes for the sauce to soak into the wings. Remove from oven and serve immediately. Enjoy!
For the Sauce
Make the Sauce: In a pan over medium-high heat, mix all the sauce ingredients. Whisk together to help dissolve the cornstarch slurry. Bring to a boil, then a simmer for about 5 minutes until the sauce begins to thicken up. Whisk frequently so the cornstarch doesn’t thicken up in spots but instead mixes evenly throughout the sauce. Taste test and add more sugar/soy if you want it sweeter or saltier. Remove from heat and allow to cool until needed. It’ll also thicken up as it cools!
Tips for Success
Not too bad of a process, right? These wings look super impressive – but they don’t require all that much effort! I won’t tell your guests that, though, if you don’t tell mine. 😉 Here are a couple of tips that will make this process even easier:
- What can I substitute for liquid aminos? I usually don’t recommend substitutions, but you can substitute liquid aminos for tamari equally. If you want to substitute soy sauce, I recommend a reduced-sodium soy sauce to ensure the sauce isn’t too salty (since we using a lot of it). If you’re using regular soy sauce, you’ll need to taste test the sauce first before putting on the wings and possibly add more maple syrup to balance it out.
- When preparing the baking sheet… Don’t use olive oil. Greasing the baking sheet with olive oil is not a good idea since it will burn the bottom of your wings.
- The batter will only adhere to the cauliflower wings dry. So, if for any reason you wet your cauliflower, it has to be 100% dry for the batter to stick.
- More on flour substitutes. You can use regular or whole wheat flour and regular breadcrumbs if you’re not gluten free. Some gluten free flours are thicker than others, so if your batter seems way too thick, add in a few tablespoons of milk to thin it out a little if necessary. I use Bob’s Red Mill All Purpose GF (NOT Baking) Flour.
- Do I have to use breadcrumbs? Yes! The breadcrumbs make the cauliflower wings crispy before the sauce goes on. I’ve made these without the breadcrumbs before, and it doesn’t work without the breading. IF you’re NOT gluten-free, you can use regular panko breadcrumbs. These are the gluten-free breadcrumbs I use . Otherwise, I just make them myself (day-old bread in a food processor/ blender , then toast it).
Serving Suggestions
You can serve these wings with pretty much ANYTHING. Not kidding. I’ve made these with fries, noodles, rice… even in a sandwich! Here are some more ideas to get those creative culinary wheels turning:
- As-Is: If you’re running short on time, just enjoy these wings as-is, without the sauce. Don’t get me wrong, I LOVE this sauce, but it’s not technically necessary to enjoy these wings!
- Rice or Noodles: These wings go great with white or brown rice, either works, and I love them with noodles too! You could also go double the cauliflower and whip up some cauliflower rice.
- Salad: Sprinkle some cauliflower wings over the top of a light green salad, and you’ve got a lunch that can’t be beat!
- More Cauliflower Wings: Wings two ways! Try these BBQ Cauliflower Wings alongside your sticky sesame cauliflower wings for the ultimate game day appetizer platter. Other loves are my Buffalo Cauliflower Wings , General Tso Wings and my Orange Cauliflower Bites .
How to Store and Reheat Extras
You can store these cauliflower wings in an airtight Tupperware container in your fridge for up to 4 days. Reheat them in an oven until warmed through. If you’ve got a toaster oven, that’ll work too.
Can I Freeze These?
Drawing on personal experience, I think these wings taste best fresh. I wouldn’t recommend freezing these as the batter may get soggy.
Ingredients
- 1 head of cauliflower , regular, may have to double for a large head
- 1 cup all purpose gluten free flour mix , or regular flour if you’re not gluten free
- 1 cup non-dairy milk , unsweetened or original flavour
- ½ teaspoon sea salt
- ¾ teaspoon ground black pepper
- 1 teaspoon garlic powder
- ½ teaspoon crushed red pepper flakes , 1 teaspoon if you want it very spicy, leave out if you don’t like spice
- 2 cups crispy/panko gluten free breadcrumbs , seasoned with salt & pepper
Sauce
- ⅔ cup maple syrup , (10 tablespoons)
- 6 tablespoons low sodium soy sauce , or liquid aminos
- 1 teaspoon sesame seeds
- 1/2 teaspoon ground black pepper
- 1/2 teaspoon ground ginger
- 2 teaspoons cornstarch + 2 teaspoons water , mix together separately from the rest of ingredients in a small bowl for a cornstarch slurry
- ½ cup water
- chopped scallions & sesame seeds , for garnish
Instructions
- Preheat oven to 450°F/230°C. Prepare a baking sheet by lining it with a silicone baking sheet or greased foil.
- Prepare a baking sheet by lining it with a silicone baking sheet or greased foil. Using a knife, remove florets from the cauliflower (aka cut off the leaves and don’t use the stems). Chop the cauliflower into smaller pieces to resemble the size of the wings.
- In a separate bowl, whisk the gluten-free flour, almond milk, salt, ground black pepper and garlic powder in a bowl to make the batter. If the batter is too thick, feel free to thin it out with some more milk. In a separate bowl, place the breadcrumbs. Line it up beside the batter bowl.
- Toss the cauliflower in the batter mixture (you can add them all at once), using a spatula or spoon to coat them all. Transfer them to the breadcrumbs (you can do this in two or three batches) to coat completely, then place onto the baking sheet, giving each wing enough space. Repeat until all of the wings are coated.
- Bake for 22 minutes. Please ensure your oven is completely preheated and hot. While baking, prepare the ingredients for the sauce by whisking together.
- Remove from oven. Toss the wings gently in the cooked and cooled down sauce which is below (I like to use a spatula to move them around to get properly coated) then using tongs or a spoon, remove and place back on the baking sheet. Bake for another 5 minutes for the sauce to soak into the wings.
- Remove from oven and serve immediately. Enjoy!
Maple Ginger Sauce
- After you put the cauliflower in, you can start making the sauce. In a pan over medium-high heat, mix all the sauce ingredients. Whisk together to help dissolve the cornstarch slurry. Bring to a boil, then a simmer for about 5 minutes until the sauce begins to thicken up. Whisk frequently so the cornstarch doesn’t thicken up in spots but instead mixes evenly throughout the sauce. Taste test and add more sugar/soy if you want it sweeter or saltier. Remove from heat and allow to cool until needed. It’ll also thicken up as it cools!
Notes
These Sticky Sesame Cauliflower Wings are the best veggie wings I’ve ever had! Loaded with maple-sesame flavor and the perfect amount of heat, they are the best game day snack for vegans!
Estimated reading time: 10 minutes
Vegan Sticky Sesame Cauliflower Wings? YES please!
Confession time: Every time I make these, quite a few don’t make it to the end plate. I kinda-sorta-maybe devoured them seconds after they came out of the oven. Oops. Happily so, though, burning the roof of my mouth and smiling in deep satisfaction as I went.
Cauliflower wings taste JUST like regular wings. I’ve had vegan and meat-eater friends alike amazed at the taste and texture. Without sauce, they are crispy-crunchy on the outside and soft on the inside. With sauce, they are EVEN better, and may or may not cause the best flavor explosion ever. Ever, ever.
I decided to go with a sweet and spicy sesame sauce for these wings, and they came out exquisitely sticky and unbelievably divine. The spice has just the right amount of kick, and the sweet sesame flavor takes this tasty experience right over the top.
What Makes These the Best Cauliflower Wings?
Picking THE best thing about cauliflower wings is an impossible task. There are just too many amazing qualities about these vegan wings. Here are a few of the most important ones:
- Cauliflower wings are great for a meal or as a snack. And the best part? You can gobble up basically a million of these without any guilt. So whether it’s a super bowl party, or just time for a casual appetizer, these cauliflower wings are perfect!
- They’re also completely gluten-free. So, you can serve these to all your guests despite their dietary specifications. PRETTY sure that qualifies as a hostess win!
- These wings are incredibly easy to make. Batter them up, bake them, dip ’em in sauce, and bake again for just 5 more minutes. Your entire house will smell like amazing and if you’re anything like me, you’ll be sitting in front of the oven counting down. Promise me you’ll make these? You do not want to miss out on how amazing these are.
Notes on the Ingredients
These wings have a fair amount of ingredients to them, so stick with me! We’ve covered how good these wings are, but I don’t know if we’ve done the sauce justice yet.
It’s a maple ginger sauce, made with maple syrup and ground ginger. Needless to say, it is SO good. Talk about the ultimate spicy-sweet combination.
For the Wings
- Cauliflower: You’ll need just 1 small head cauliflower.
- Flour: I like to use all purpose gluten free flour to make sure that these wings are gluten free, but you can certainly use regular all purpose flour. (See tips below for more info.)
- Vegan Milk: My go-to is unsweetened almond milk – use a vegan milk that won’t interfere with the other flavors in this meal.
- Seasoning: Round up some sea salt, ground black pepper, garlic powder, and crushed red pepper flakes (leave out if you don’t like spice).
- Breadcrumbs: Use crispy/panko gluten free breadcrumbs seasoned with salt & pepper.
For the Sauce
- Maple Syrup: I recommend using pure maple syrup – it offers the strongest flavor!
- Low Sodium Soy Sauce: Or liquid aminos / coconut aminos . (See more info in tips section.)
- Sesame Seeds: These will go in the sauce, but can also be used as a garnish at the end, along with chopped scallions.
- Seasoning: Use ground black pepper and ground ginger.
- Cornstarch Slurry: Cornstarch and water mix together separately from the rest of the ingredients in a small bowl for a cornstarch slurry.
- Water
How to Make Sticky Cauliflower Wings
Sticky cauliflower wings are a breeze to whip together. They’ll take you 15 minutes to prep for the oven, and you can have them plated with the dip in just under 45 minutes. Nobody wants to spend all day in the kitchen on game day, or any day, and with these wings you don’t have to!
For the Wings
Preheat Oven to 450•F/230•C: Prepare a baking sheet by lining it with a silicone baking sheet or greased foil.
Prepare a Baking Sheet: Line a pan with a silicone baking sheet or greased foil. Using a knife, remove florets from the cauliflower (aka cut off the leaves and don’t use the stems). Chop the cauliflower into smaller pieces to resemble the size of the wings.
Whisk Together the Batter: In a separate bowl, whisk the gluten-free flour, almond milk, salt, ground black pepper and garlic powder in a bowl to make the batter. If the batter is too thick, feel free to thin it out with some more milk. In a separate bowl, place the breadcrumbs. Line it up beside the batter bowl.
Coat the Cauliflower Florets: Toss the cauliflower in the batter mixture (you can add them all at once), using a spatula or spoon to coat them all. Transfer them to the breadcrumbs (you can do this in two or three batches) to coat completely.
Then place onto the baking sheet, giving each wing enough space. Repeat until all of the wings are coated.
Bake for 22 Minutes: Please ensure your oven is completely preheated and hot. While baking, prepare the ingredients for the sauce by whisking together.
Remove from Oven: Toss the wings in the sauce (I like to use a spatula to move them around to get properly coated) then using tongs or a spoon, remove and place back on the baking sheet. Bake for another 5 minutes for the sauce to soak into the wings. Remove from oven and serve immediately. Enjoy!
For the Sauce
Make the Sauce: In a pan over medium-high heat, mix all the sauce ingredients. Whisk together to help dissolve the cornstarch slurry. Bring to a boil, then a simmer for about 5 minutes until the sauce begins to thicken up. Whisk frequently so the cornstarch doesn’t thicken up in spots but instead mixes evenly throughout the sauce. Taste test and add more sugar/soy if you want it sweeter or saltier. Remove from heat and allow to cool until needed. It’ll also thicken up as it cools!
Tips for Success
Not too bad of a process, right? These wings look super impressive – but they don’t require all that much effort! I won’t tell your guests that, though, if you don’t tell mine. 😉 Here are a couple of tips that will make this process even easier:
- What can I substitute for liquid aminos? I usually don’t recommend substitutions, but you can substitute liquid aminos for tamari equally. If you want to substitute soy sauce, I recommend a reduced-sodium soy sauce to ensure the sauce isn’t too salty (since we using a lot of it). If you’re using regular soy sauce, you’ll need to taste test the sauce first before putting on the wings and possibly add more maple syrup to balance it out.
- When preparing the baking sheet… Don’t use olive oil. Greasing the baking sheet with olive oil is not a good idea since it will burn the bottom of your wings.
- The batter will only adhere to the cauliflower wings dry. So, if for any reason you wet your cauliflower, it has to be 100% dry for the batter to stick.
- More on flour substitutes. You can use regular or whole wheat flour and regular breadcrumbs if you’re not gluten free. Some gluten free flours are thicker than others, so if your batter seems way too thick, add in a few tablespoons of milk to thin it out a little if necessary. I use Bob’s Red Mill All Purpose GF (NOT Baking) Flour.
- Do I have to use breadcrumbs? Yes! The breadcrumbs make the cauliflower wings crispy before the sauce goes on. I’ve made these without the breadcrumbs before, and it doesn’t work without the breading. IF you’re NOT gluten-free, you can use regular panko breadcrumbs. These are the gluten-free breadcrumbs I use . Otherwise, I just make them myself (day-old bread in a food processor/ blender , then toast it).
Serving Suggestions
You can serve these wings with pretty much ANYTHING. Not kidding. I’ve made these with fries, noodles, rice… even in a sandwich! Here are some more ideas to get those creative culinary wheels turning:
- As-Is: If you’re running short on time, just enjoy these wings as-is, without the sauce. Don’t get me wrong, I LOVE this sauce, but it’s not technically necessary to enjoy these wings!
- Rice or Noodles: These wings go great with white or brown rice, either works, and I love them with noodles too! You could also go double the cauliflower and whip up some cauliflower rice.
- Salad: Sprinkle some cauliflower wings over the top of a light green salad, and you’ve got a lunch that can’t be beat!
- More Cauliflower Wings: Wings two ways! Try these BBQ Cauliflower Wings alongside your sticky sesame cauliflower wings for the ultimate game day appetizer platter. Other loves are my Buffalo Cauliflower Wings , General Tso Wings and my Orange Cauliflower Bites .
How to Store and Reheat Extras
You can store these cauliflower wings in an airtight Tupperware container in your fridge for up to 4 days. Reheat them in an oven until warmed through. If you’ve got a toaster oven, that’ll work too.
Can I Freeze These?
Drawing on personal experience, I think these wings taste best fresh. I wouldn’t recommend freezing these as the batter may get soggy.
Ingredients
- 1 head of cauliflower , regular, may have to double for a large head
- 1 cup all purpose gluten free flour mix , or regular flour if you’re not gluten free
- 1 cup non-dairy milk , unsweetened or original flavour
- ½ teaspoon sea salt
- ¾ teaspoon ground black pepper
- 1 teaspoon garlic powder
- ½ teaspoon crushed red pepper flakes , 1 teaspoon if you want it very spicy, leave out if you don’t like spice
- 2 cups crispy/panko gluten free breadcrumbs , seasoned with salt & pepper
Sauce
- ⅔ cup maple syrup , (10 tablespoons)
- 6 tablespoons low sodium soy sauce , or liquid aminos
- 1 teaspoon sesame seeds
- 1/2 teaspoon ground black pepper
- 1/2 teaspoon ground ginger
- 2 teaspoons cornstarch + 2 teaspoons water , mix together separately from the rest of ingredients in a small bowl for a cornstarch slurry
- ½ cup water
- chopped scallions & sesame seeds , for garnish
Instructions
- Preheat oven to 450°F/230°C. Prepare a baking sheet by lining it with a silicone baking sheet or greased foil.
- Prepare a baking sheet by lining it with a silicone baking sheet or greased foil. Using a knife, remove florets from the cauliflower (aka cut off the leaves and don’t use the stems). Chop the cauliflower into smaller pieces to resemble the size of the wings.
- In a separate bowl, whisk the gluten-free flour, almond milk, salt, ground black pepper and garlic powder in a bowl to make the batter. If the batter is too thick, feel free to thin it out with some more milk. In a separate bowl, place the breadcrumbs. Line it up beside the batter bowl.
- Toss the cauliflower in the batter mixture (you can add them all at once), using a spatula or spoon to coat them all. Transfer them to the breadcrumbs (you can do this in two or three batches) to coat completely, then place onto the baking sheet, giving each wing enough space. Repeat until all of the wings are coated.
- Bake for 22 minutes. Please ensure your oven is completely preheated and hot. While baking, prepare the ingredients for the sauce by whisking together.
- Remove from oven. Toss the wings gently in the cooked and cooled down sauce which is below (I like to use a spatula to move them around to get properly coated) then using tongs or a spoon, remove and place back on the baking sheet. Bake for another 5 minutes for the sauce to soak into the wings.
- Remove from oven and serve immediately. Enjoy!
Maple Ginger Sauce
- After you put the cauliflower in, you can start making the sauce. In a pan over medium-high heat, mix all the sauce ingredients. Whisk together to help dissolve the cornstarch slurry. Bring to a boil, then a simmer for about 5 minutes until the sauce begins to thicken up. Whisk frequently so the cornstarch doesn’t thicken up in spots but instead mixes evenly throughout the sauce. Taste test and add more sugar/soy if you want it sweeter or saltier. Remove from heat and allow to cool until needed. It’ll also thicken up as it cools!
Notes
Sticky Sesame Vegan Cauliflower Wings
Ingredients
- 1 head of cauliflower regular, may have to double for a large head
- 1 cup all purpose gluten free flour mix or regular flour if you’re not gluten free
- 1 cup non-dairy milk unsweetened or original flavour
- ½ teaspoon sea salt
- ¾ teaspoon ground black pepper
- 1 teaspoon garlic powder
- ½ teaspoon crushed red pepper flakes 1 teaspoon if you want it very spicy, leave out if you don’t like spice
- 2 cups crispy/panko gluten free breadcrumbs seasoned with salt & pepper
Sauce
- ⅔ cup maple syrup (10 tablespoons)
- 6 tablespoons low sodium soy sauce or liquid aminos
- 1 teaspoon sesame seeds
- 1/2 teaspoon ground black pepper
- 1/2 teaspoon ground ginger
- 2 teaspoons cornstarch + 2 teaspoons water mix together separately from the rest of ingredients in a small bowl for a cornstarch slurry
- ½ cup water
- chopped scallions & sesame seeds for garnish
Instructions
- Preheat oven to 450°F/230°C. Prepare a baking sheet by lining it with a silicone baking sheet or greased foil.
- Prepare a baking sheet by lining it with a silicone baking sheet or greased foil. Using a knife, remove florets from the cauliflower (aka cut off the leaves and don’t use the stems). Chop the cauliflower into smaller pieces to resemble the size of the wings.
- In a separate bowl, whisk the gluten-free flour, almond milk, salt, ground black pepper and garlic powder in a bowl to make the batter. If the batter is too thick, feel free to thin it out with some more milk. In a separate bowl, place the breadcrumbs. Line it up beside the batter bowl.
- Toss the cauliflower in the batter mixture (you can add them all at once), using a spatula or spoon to coat them all. Transfer them to the breadcrumbs (you can do this in two or three batches) to coat completely, then place onto the baking sheet, giving each wing enough space. Repeat until all of the wings are coated.
- Bake for 22 minutes. Please ensure your oven is completely preheated and hot. While baking, prepare the ingredients for the sauce by whisking together.
- Remove from oven. Toss the wings gently in the cooked and cooled down sauce which is below (I like to use a spatula to move them around to get properly coated) then using tongs or a spoon, remove and place back on the baking sheet. Bake for another 5 minutes for the sauce to soak into the wings.
- Remove from oven and serve immediately. Enjoy!
Maple Ginger Sauce
- After you put the cauliflower in, you can start making the sauce. In a pan over medium-high heat, mix all the sauce ingredients. Whisk together to help dissolve the cornstarch slurry. Bring to a boil, then a simmer for about 5 minutes until the sauce begins to thicken up. Whisk frequently so the cornstarch doesn’t thicken up in spots but instead mixes evenly throughout the sauce. Taste test and add more sugar/soy if you want it sweeter or saltier. Remove from heat and allow to cool until needed. It’ll also thicken up as it cools!
Video
Notes
Nutrition
Sticky Sesame Vegan Cauliflower Wings https://jessicainthekitchen.com/sticky-sesame-cauliflower-wings/ June 1, 2021
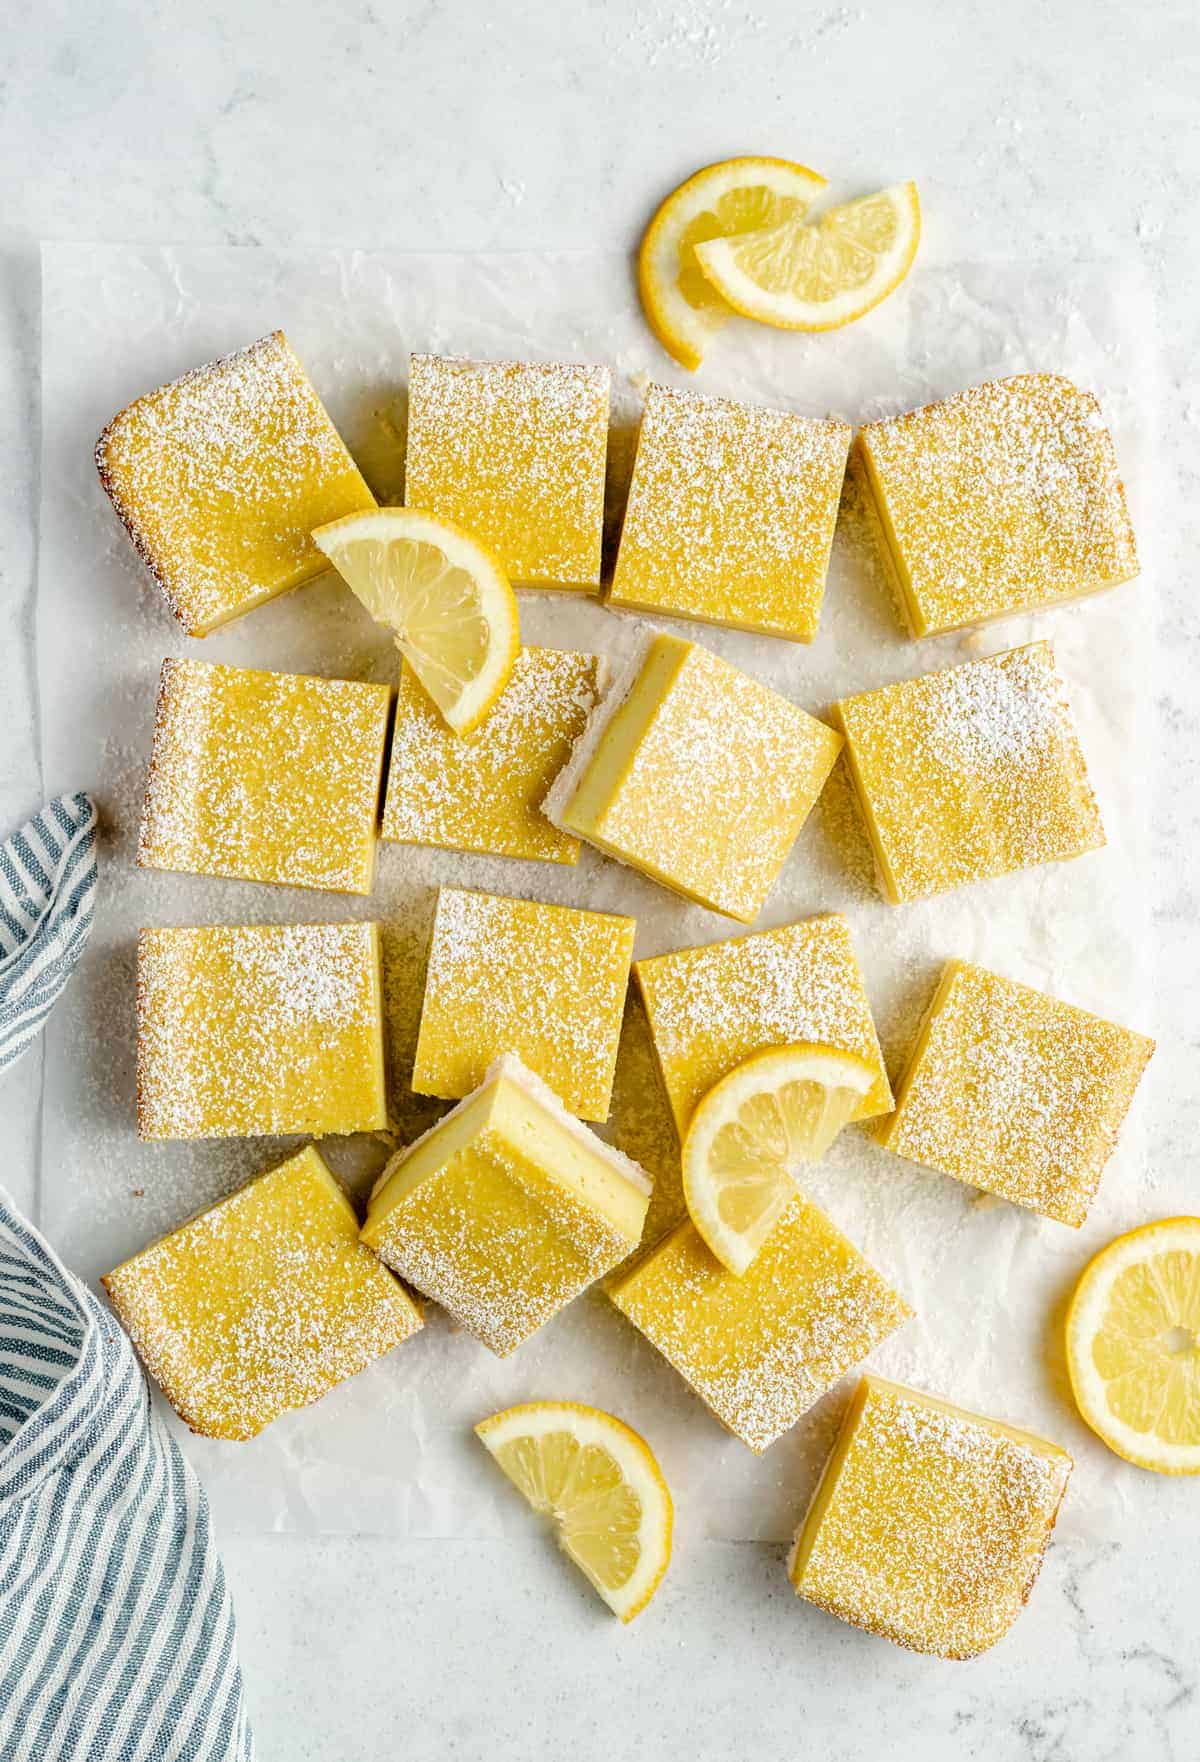
Vegan lemon bars are a bright and zesty dessert made with a tender shortbread crust and a rich and tangy lemon filling. You’d never guess that these easy lemon squares are vegan!

Vegan lemon bars, or lemon squares, have been highly requested (endless requests) since I began Jessica in the Kitchen. After making them myself, I finally understand why. These vegan lemon squares are DIVINE! These zesty dessert bars are equal parts bright, tart, and sweet, and they will blow your mind. The filling is a variation of my easy vegan lemon curd . You don’t have to be vegan to appreciate how good these are, either!
Why You’ll Have These Vegan Lemon Bars On Repeat
- A dessert for all occasions. Their fresh, zesty flavor makes them the perfect treat for summer, even though I will definitely be making them year-round.
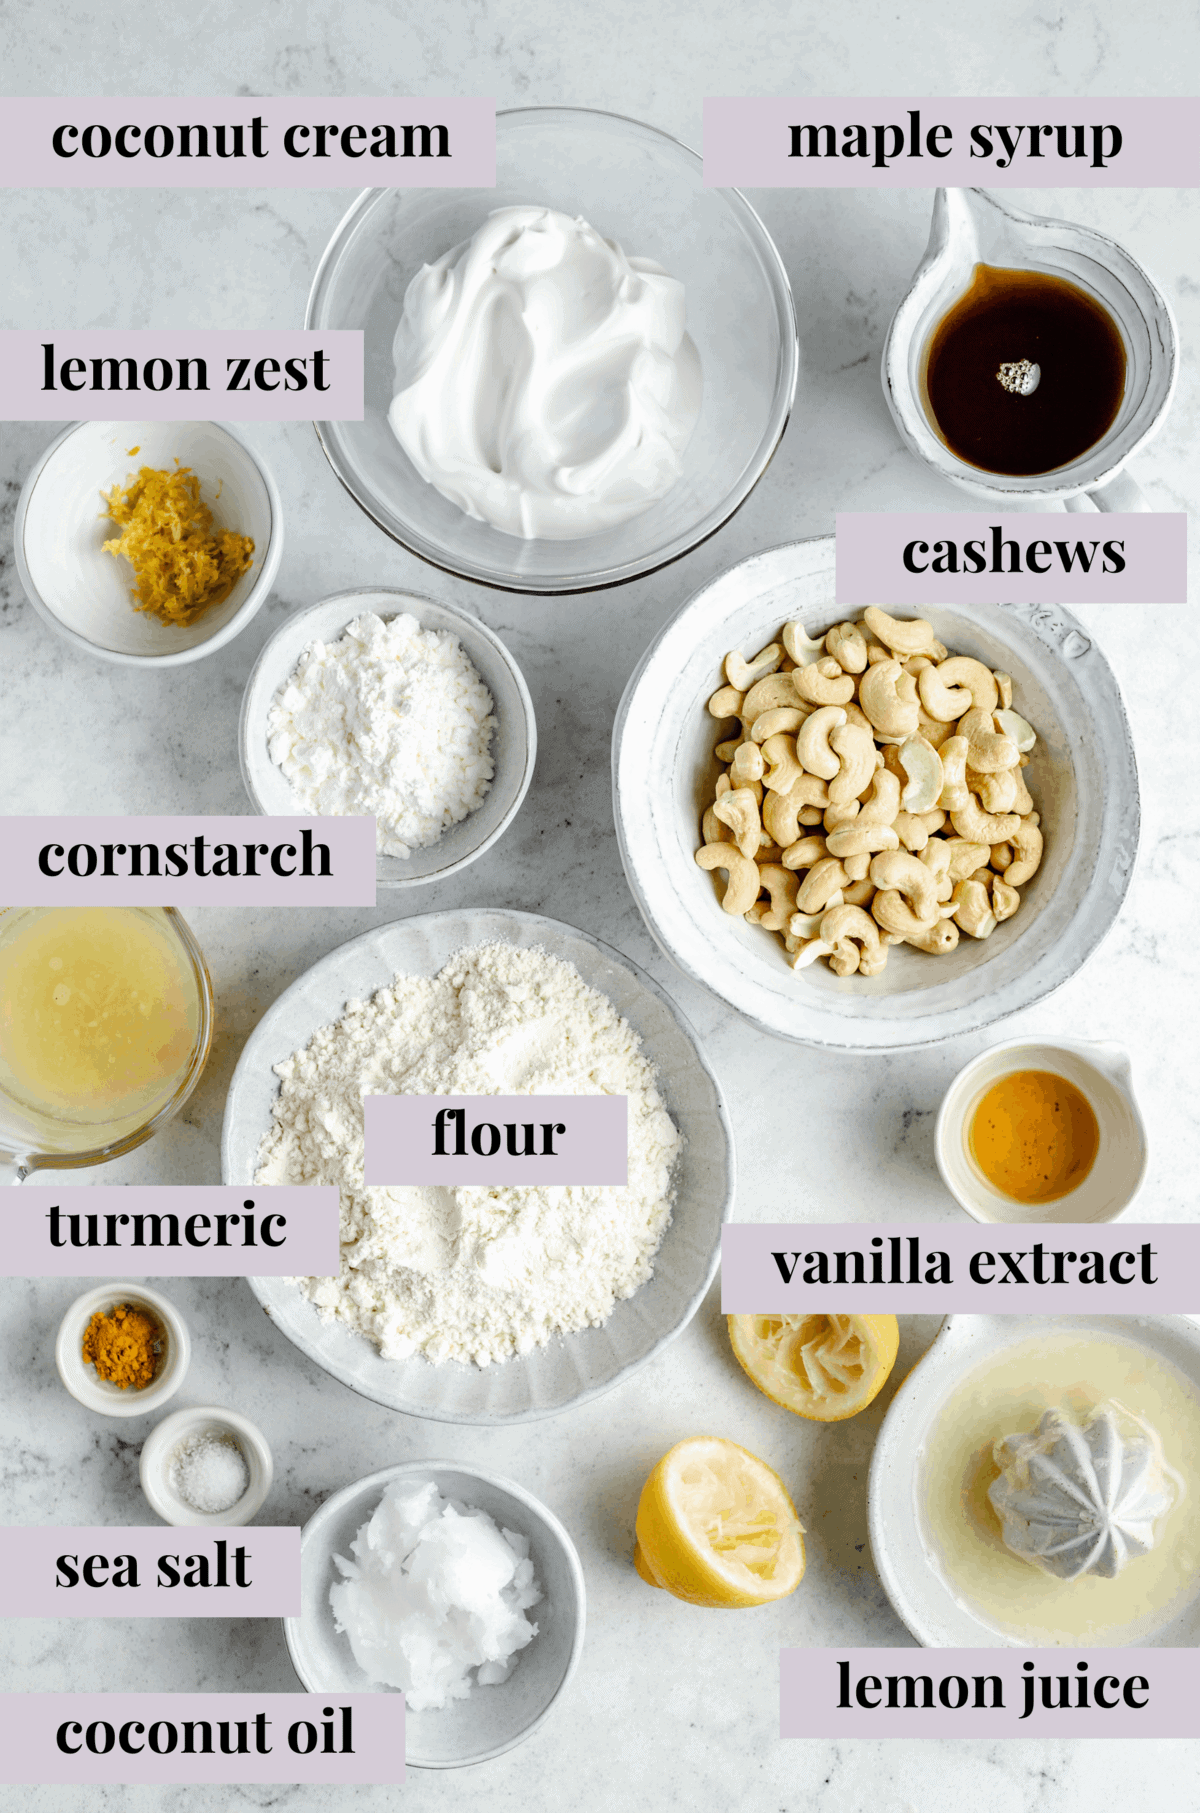
- Real lemon flavor. I make the filling with real lemon juice and zest. Ingredients like coconut cream and soaked cashews make the texture rich, creamy, and curd-like.
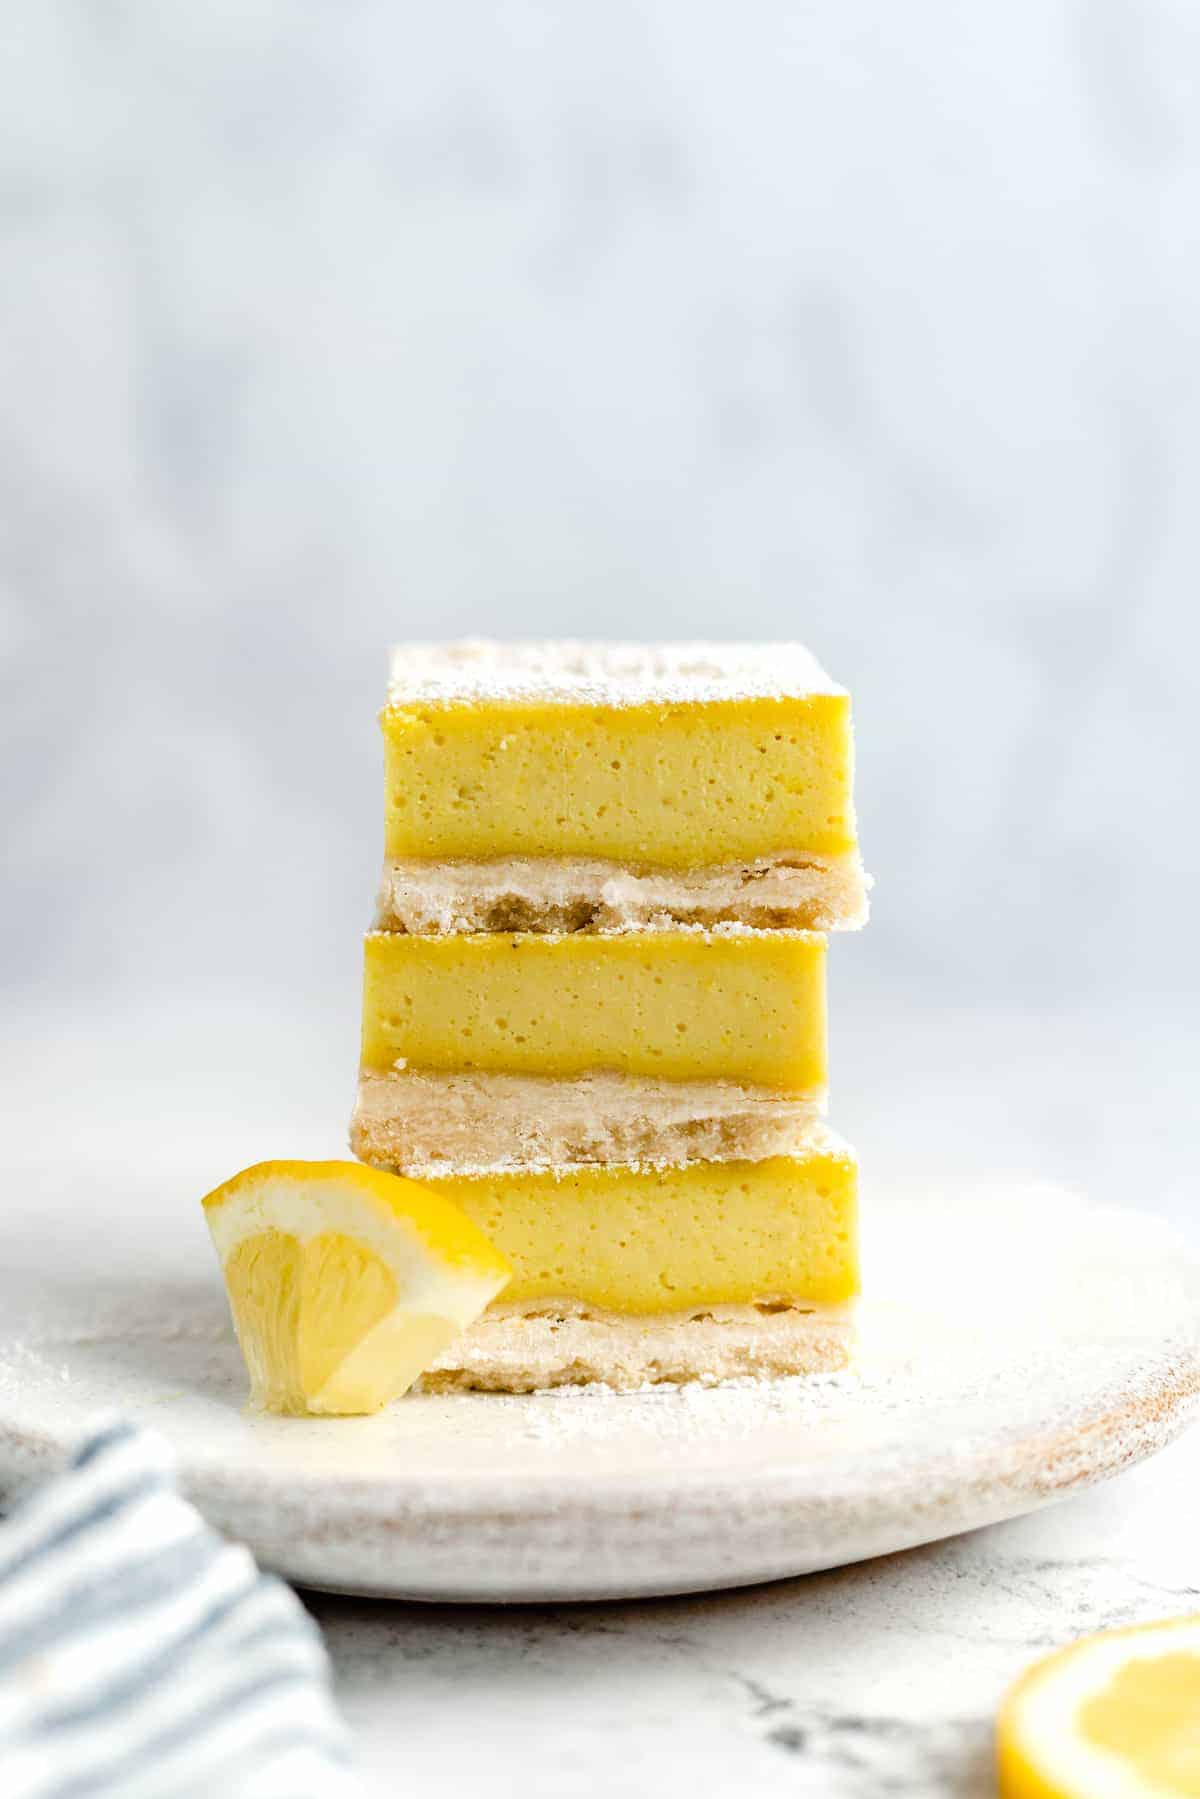
- Perfect texture. The moment you sink your teeth into the buttery shortbread crust topped with the soft and sweet, lemony filling, you’ll know why I love these bars so much.
Notes on the Ingredients
Let’s talk ingredients! I wanted the baking process to be easy (i.e., not having to use different kinds of sugar between the crust and the filling), so I included maple syrup into the shortbread crust recipe, too.
For the Shortbread Crust
- Flour – I used all-purpose flour, but you can use gluten-free if needed.
- Maple Syrup – As I mentioned above, this will add sweetness to the dessert without you having to use a bunch of other sugars.
- Oil – Keep in mind you may have to use a little extra if the crust looks too dry.
For the Lemon Filling
- Cashews – You’ll need raw, unsalted cashews. Soak them in hot water for at least 1 hour before starting.
- Coconut Cream – From a tin of coconut cream or milk. Use the thick creamy part, NOT the coconut water.
- Cornstarch – To thicken up the filling so that it will sit properly on top of the crust.
- Lemon Juice and Zest – They are lemon bars, after all. I recommend using the juice and zest of a fresh lemon.
- Maple Syrup
- Vanilla Extract – To add sweetness that will complement the maple syrup.
- Sea Salt – To balance and enhance the sweet flavor of these bars.
- Turmeric – Turmeric is my easy trick to brighten up the yellow color in these lemon bars.
How to Make Vegan Lemon Bars
Making these vegan maple lemon bars won’t take you long at all. There are just 3 easy steps that you’ll need to follow to complete the shortbread crust, and then you can get started on the filling!
Shortbread Crust
- Prepare for baking. Preheat the oven to 350°F/180°C. Line an 8×8 baking dish with parchment paper, so that the paper hangs over the side for easy removal.
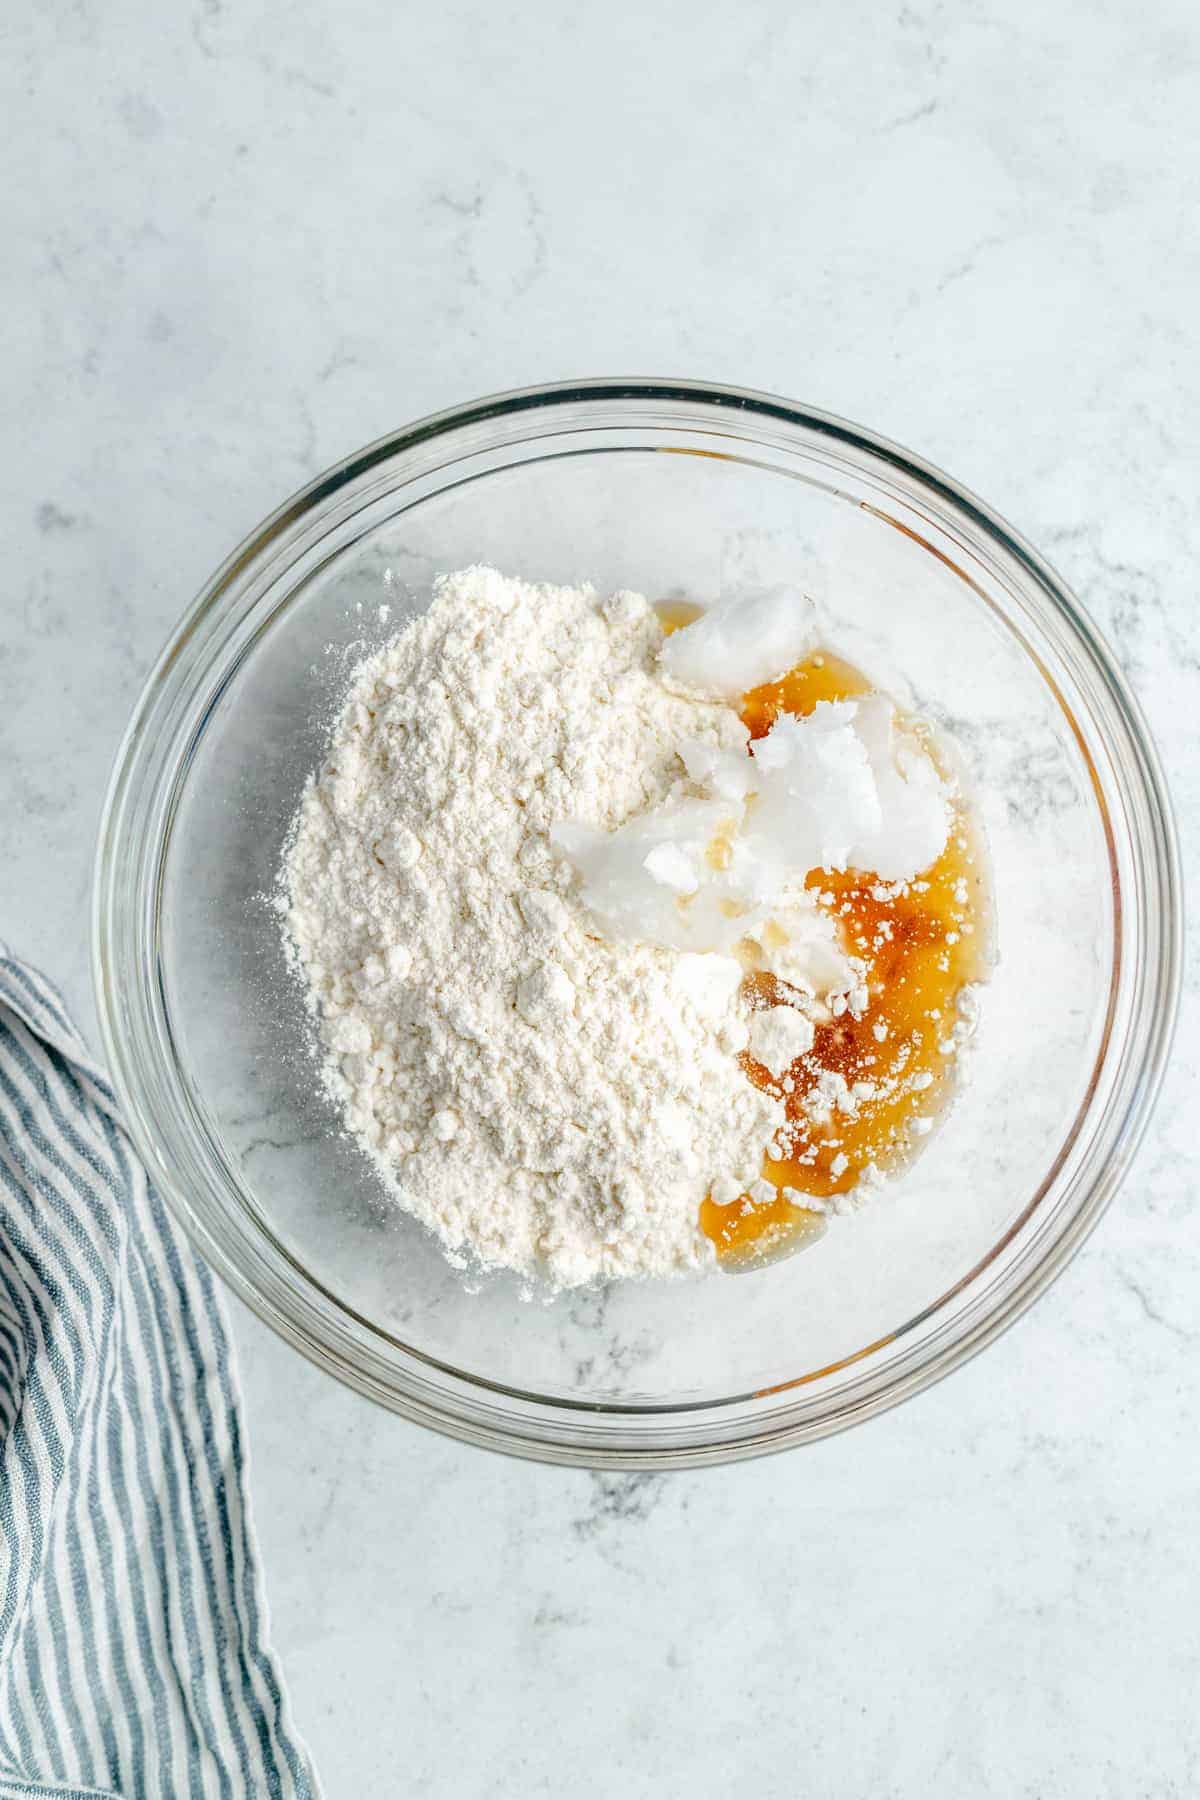
Combine the crust ingredients.
- Combine the ingredients. Next, mix the crust ingredients with a spatula or your hands until it’s crumbly. Then, press the crust evenly into the baking dish. You may need to add an extra tablespoon of oil if the crust is too dry.
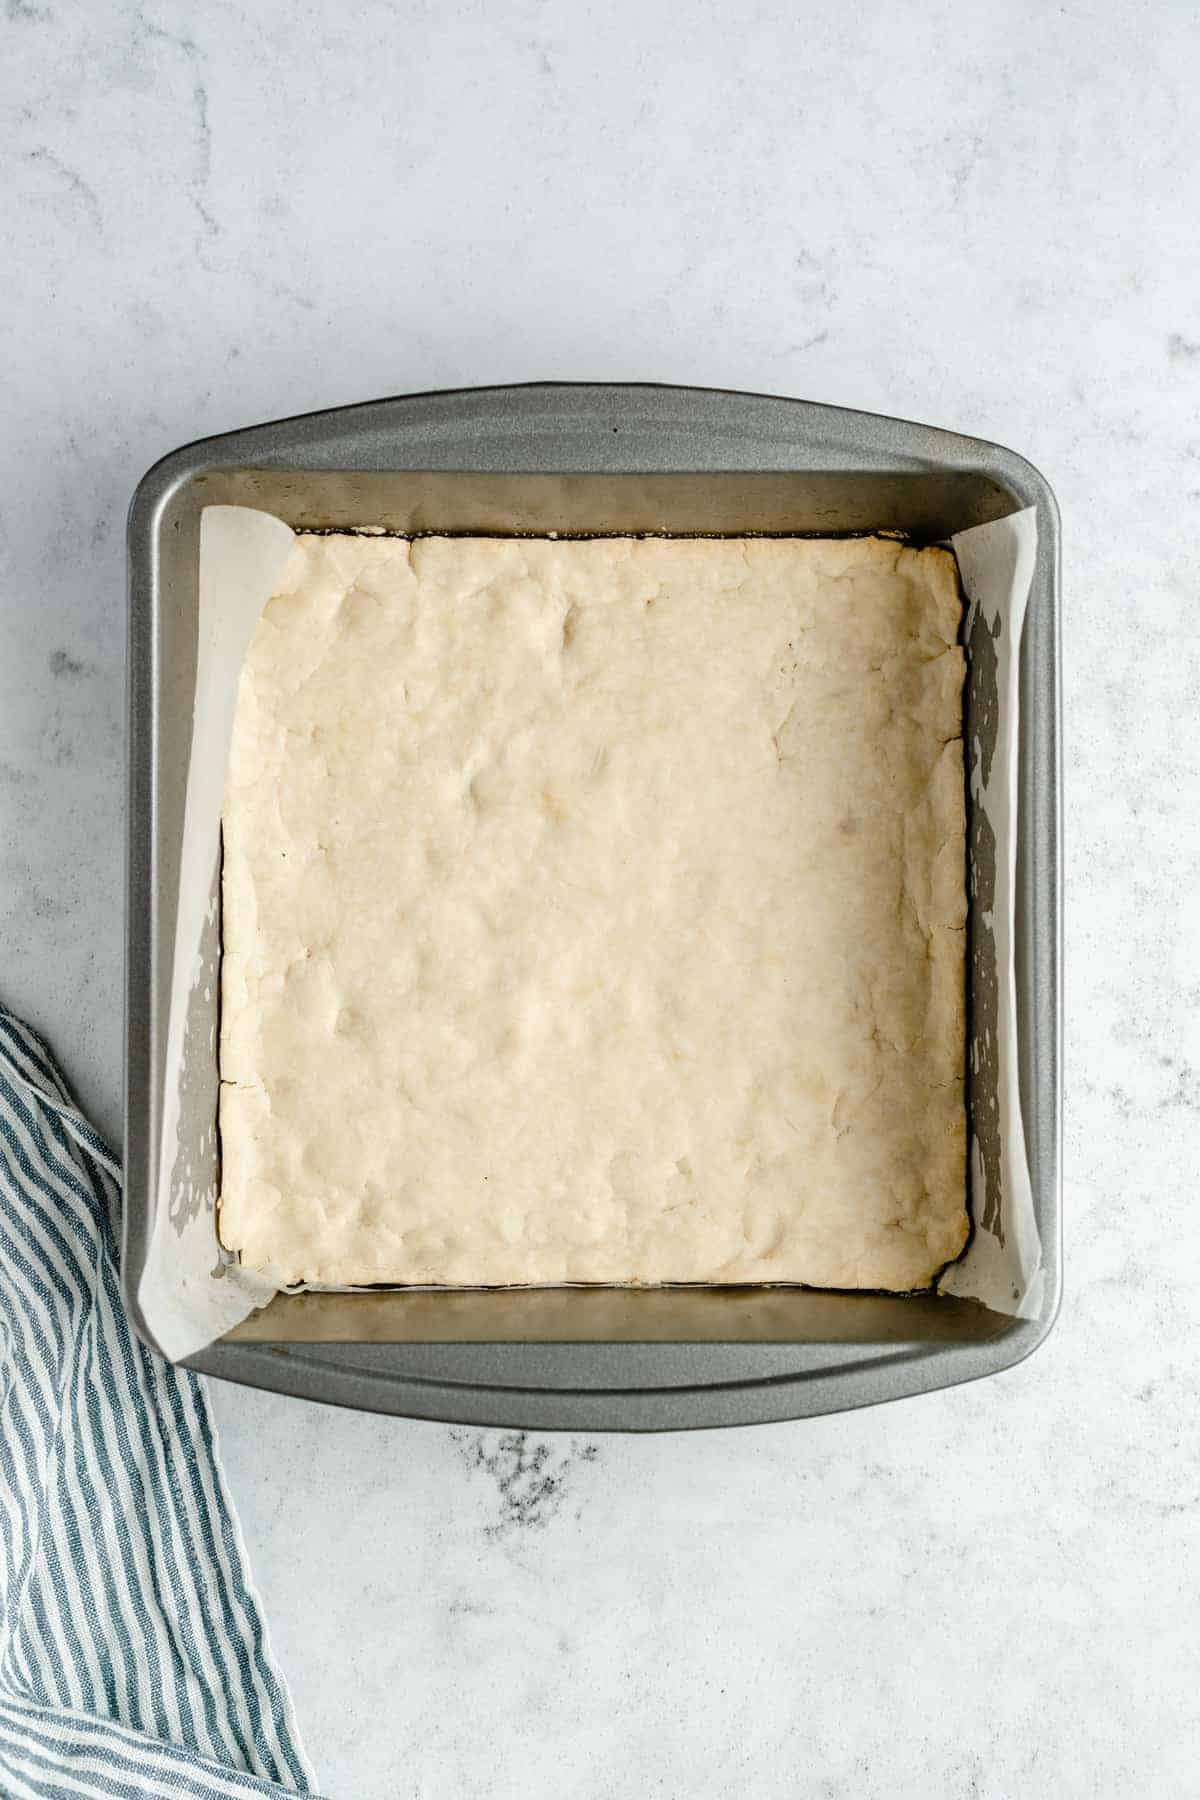
Press the crust into the pan.
- Bake the crust. Lastly, bake the crust at 350ºF for 10 minutes, uncovered. Afterward, allow the crust to cool completely before adding the batter for the lemon filling on top.
Vegan Lemon Curd Filling
- Combine the ingredients. Add the filling ingredients to a high-powered blender . Add the turmeric ⅛ teaspoon at a time, and add more to taste (it doesn’t add any taste, only colour).
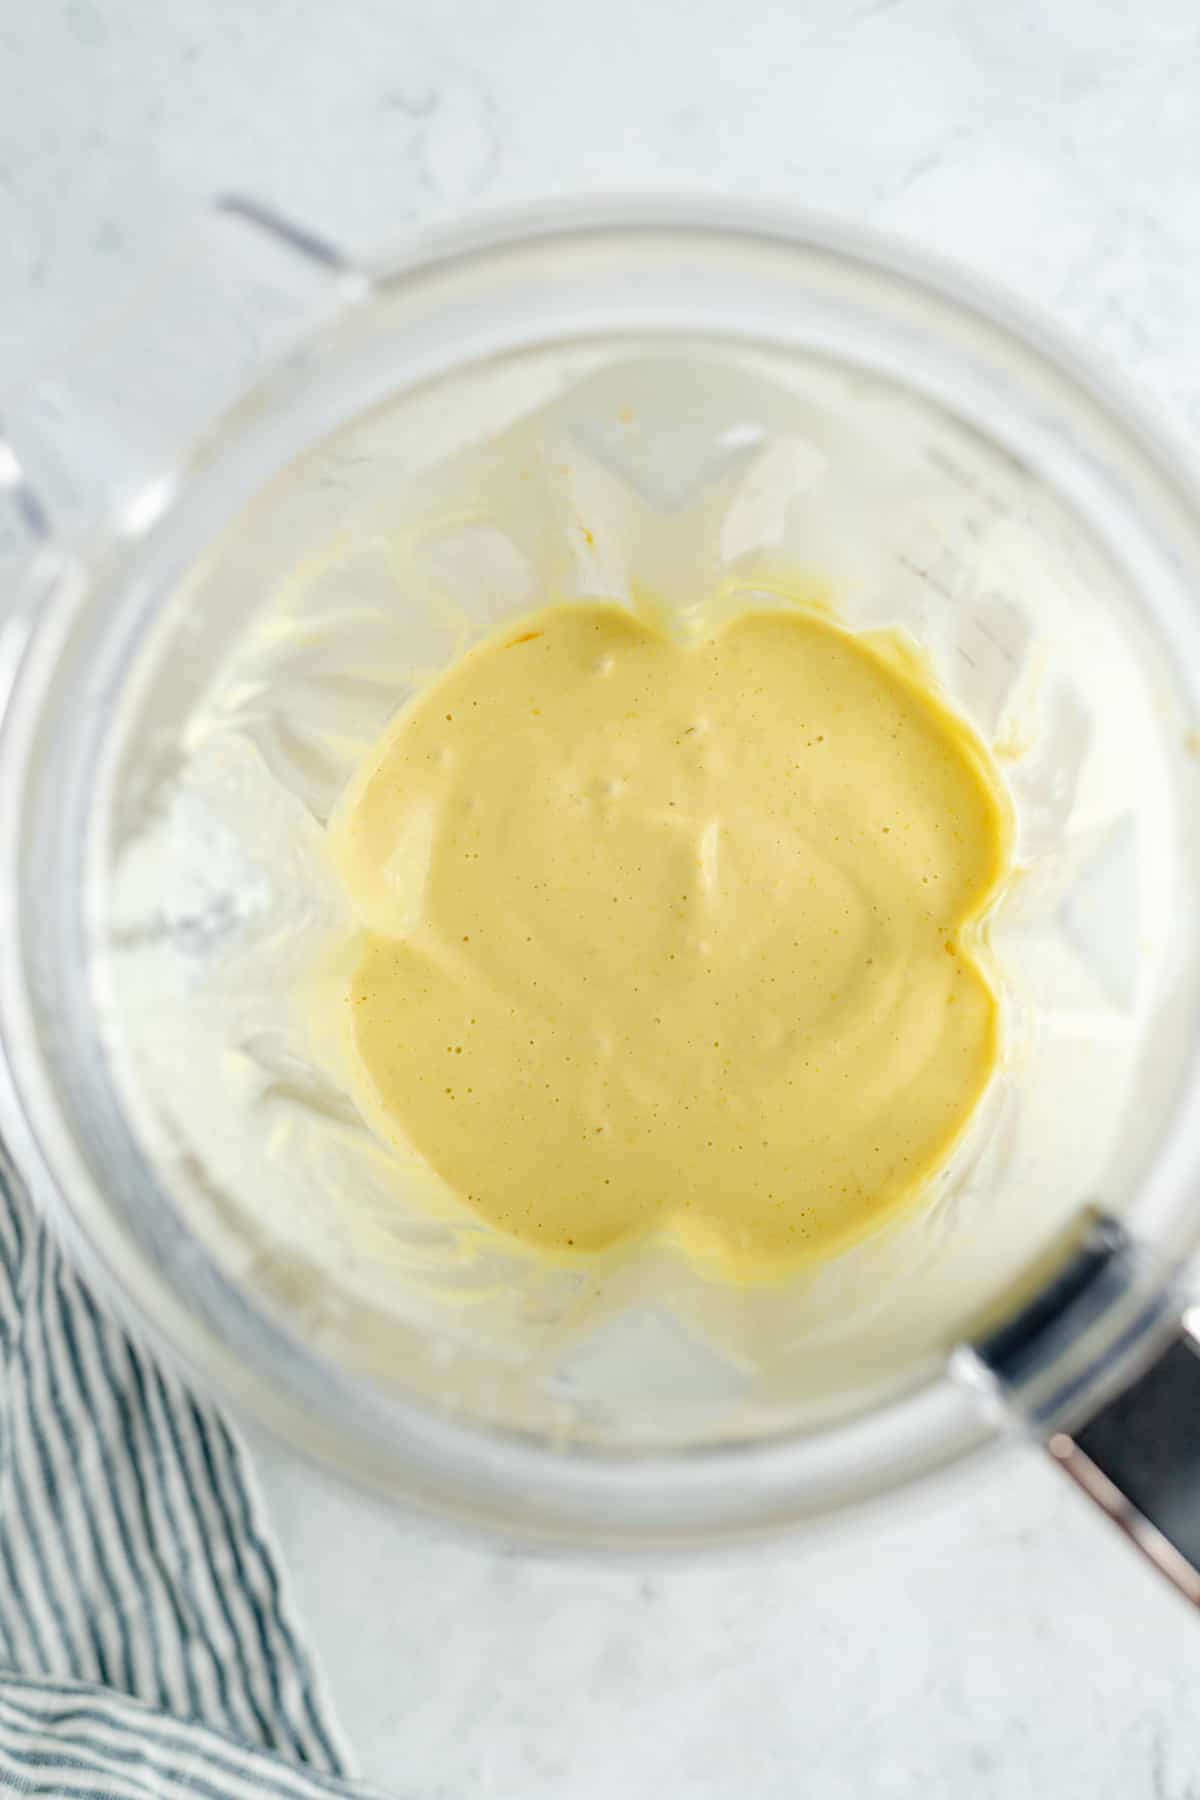
Blend the lemon filling.
- Blend. Blend the ingredients until the mixture is very smooth. If you’re not using a high-powered blender, blend a second time to ensure all of the cashew pieces are completely blended. Taste test, and adjust if necessary.
- Fill the crust. Once the crust has cooled, pour the filling on top. Tap the pan lightly against the counter to remove any trapped air bubbles.
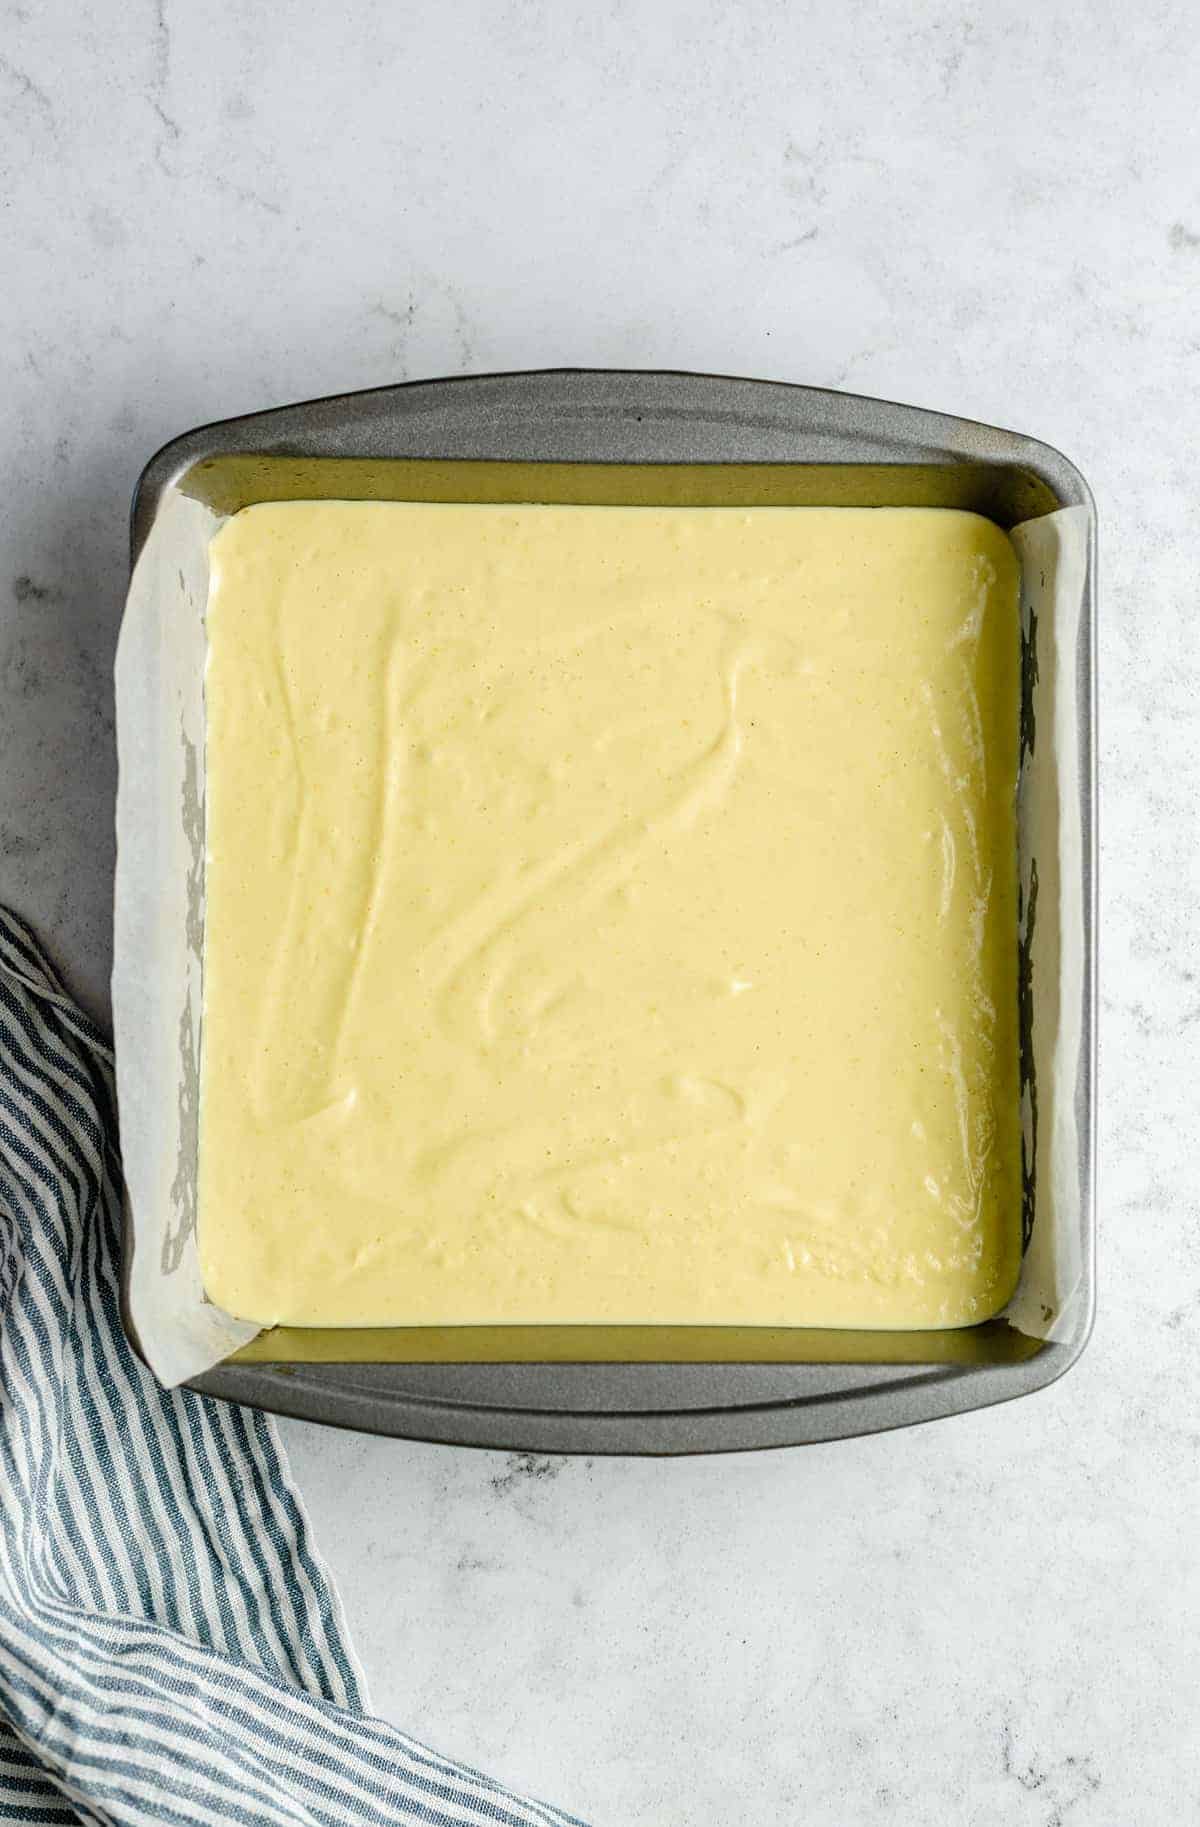
Spread evenly.
- Bake. Bake the lemon bars at 350ºF for 23 to 25 minutes, until the centre is set. Allow the bars to cool completely on the counter for about 1 hour, and then chill them in the fridge for at least 4 hours before serving. Top with powdered sugar (optional), cut into bars, and enjoy!!
Recipe Tips
- Let them chill in the fridge. I know it’s tempting to dig in right away, but these bars need to be fully set before you cut into them. Trust me. When I made them, I let them cool for a few hours and then set them in the fridge overnight. Although 4 hours in the fridge should be enough time. They’ll have the right consistency and be even more delectable.
- If you can’t find coconut cream , this is my easy trick! Place 1 can (14 ounces) of full-fat coconut milk in the fridge overnight. The following day, scoop the solids of the coconut cream out of the can, then pour off (or save for later) the coconut water left behind. The cream from a 14-ounce can should come to about ¾ cup every time.
- Use kitchen tools to press the crust into the pan. You can use the back of a spoon or the bottom of a measuring cup to press the crust tightly into the bottom of the pan. The crust will seem a bit sticky because of the maple syrup, so doing it by hand can be a challenge.
- These are taste-test friendly. This is probably my favorite thing about making vegan lemon bars. The filling doesn’t contain any eggs or raw ingredients! Figuring out how tangy or sweet you want these bars really comes down to personal preference, so you get to taste while you bake. Just make sure you have enough lemon filling at the end to cover the crust.
Optional Toppings and Variations
- Sprinkle some powdered sugar over the tops. It looks pretty and adds a little extra sweetness.
- Top the bars with a dollop of coconut whipped cream when serving.
- Garnish with strawberries, raspberries, or blueberries, or add homemade strawberry jam or raspberry syrup.
- Decorate the bars with lemon slices. Cut circular slices of lemon, place one on top of each bar, and dust with a little powdered sugar.
How to Store Lemon Bars
- Refrigerate. I like to store these lemon bars in an airtight or covered container in the fridge for up to a week. Now, I’ve never had them last to the end of the week, but that’s your hypothetical expiration date!
- Freeze. Freeze these lemon bars between layers of parchment paper in an airtight container or freezer-safe bag for 1-2 months. Thaw them overnight in the fridge before enjoying again.
More Lemon Desserts
- Lemon Blueberry Bundt Cake
- Lemon Blueberry Bread
- Vegan Lemon Poppyseed Muffins
- Vegan Lemon Loaf
Ingredients
Crust
- 1 cup flour , (148g) gluten free if needed
- 2 tablespoons maple syrup , (30mL)
- ¼ cup oil , (60mL) + 1 extra tablespoon if it looks too dry
Lemon Filling
- 1 cup raw unsalted cashews , (148g) , soaked in hot water for at least 1 hour OR just easily boiled for 5 minutes*
- ¾ cup coconut cream , (180g) from a tin of full fat coconut cream or milk – the thick creamy part, NOT the coconut water**
- 3 tablespoons cornstarch , (30g)
- ½ cup lemon juice , (120mL)
- ¼ cup + 1 tablespoon maple syrup , (60mL)
- 2 teaspoons vanilla extract , (10mL)
- ⅛ teaspoon of sea salt , ( 0.15g )
- ⅛ to ¼ teaspoon turmeric , ( 0.4g to 0.8g ) for colour
- 1 teaspoon lemon zest , 1g
Instructions
Crust
- Preheat the oven to 350°F/175°C.
- Line an 8×8 baking dish with parchment paper, so that the paper hangs over the side for easy removal.
- Mix all of the crust ingredients together with a spatula or your hands, until it sticks together. Press evenly into the baking dish. You can use a spoon or the bottom of a measuring cup to help you. It’ll seem a bit sticky because of the maple syrup. Add the extra tablespoon of oil if it is too dry.
- Bake for 10 minutes uncovered. Remove from oven and allow to cool completely before adding the batter for the lemon filling on top.
Lemon Filling
- In a high powered blender, add all of the lemon filling ingredients. For the turmeric, start with ⅛ teaspoon then add more if you desire (it doesn’t add any taste, only colour).
- Blend all of the ingredients together until the mixture is very smooth. If you’re not using a high powered blender, blend another time to ensure all of the cashew pieces are completely blended. Taste test, and adjust if necessary
- Once the crust has cooled, pour the filling on top. Tap on the counter lightly to remove any bubbles.
- Bake for 23 to 25 minutes, until the centre is set. Allow to cool on the counter until completely cooled (about an hour), and then place in the fridge for at least 4 hours to set.
- Top with powdered sugar (optional), cut into bars, and serve. Enjoy!!
