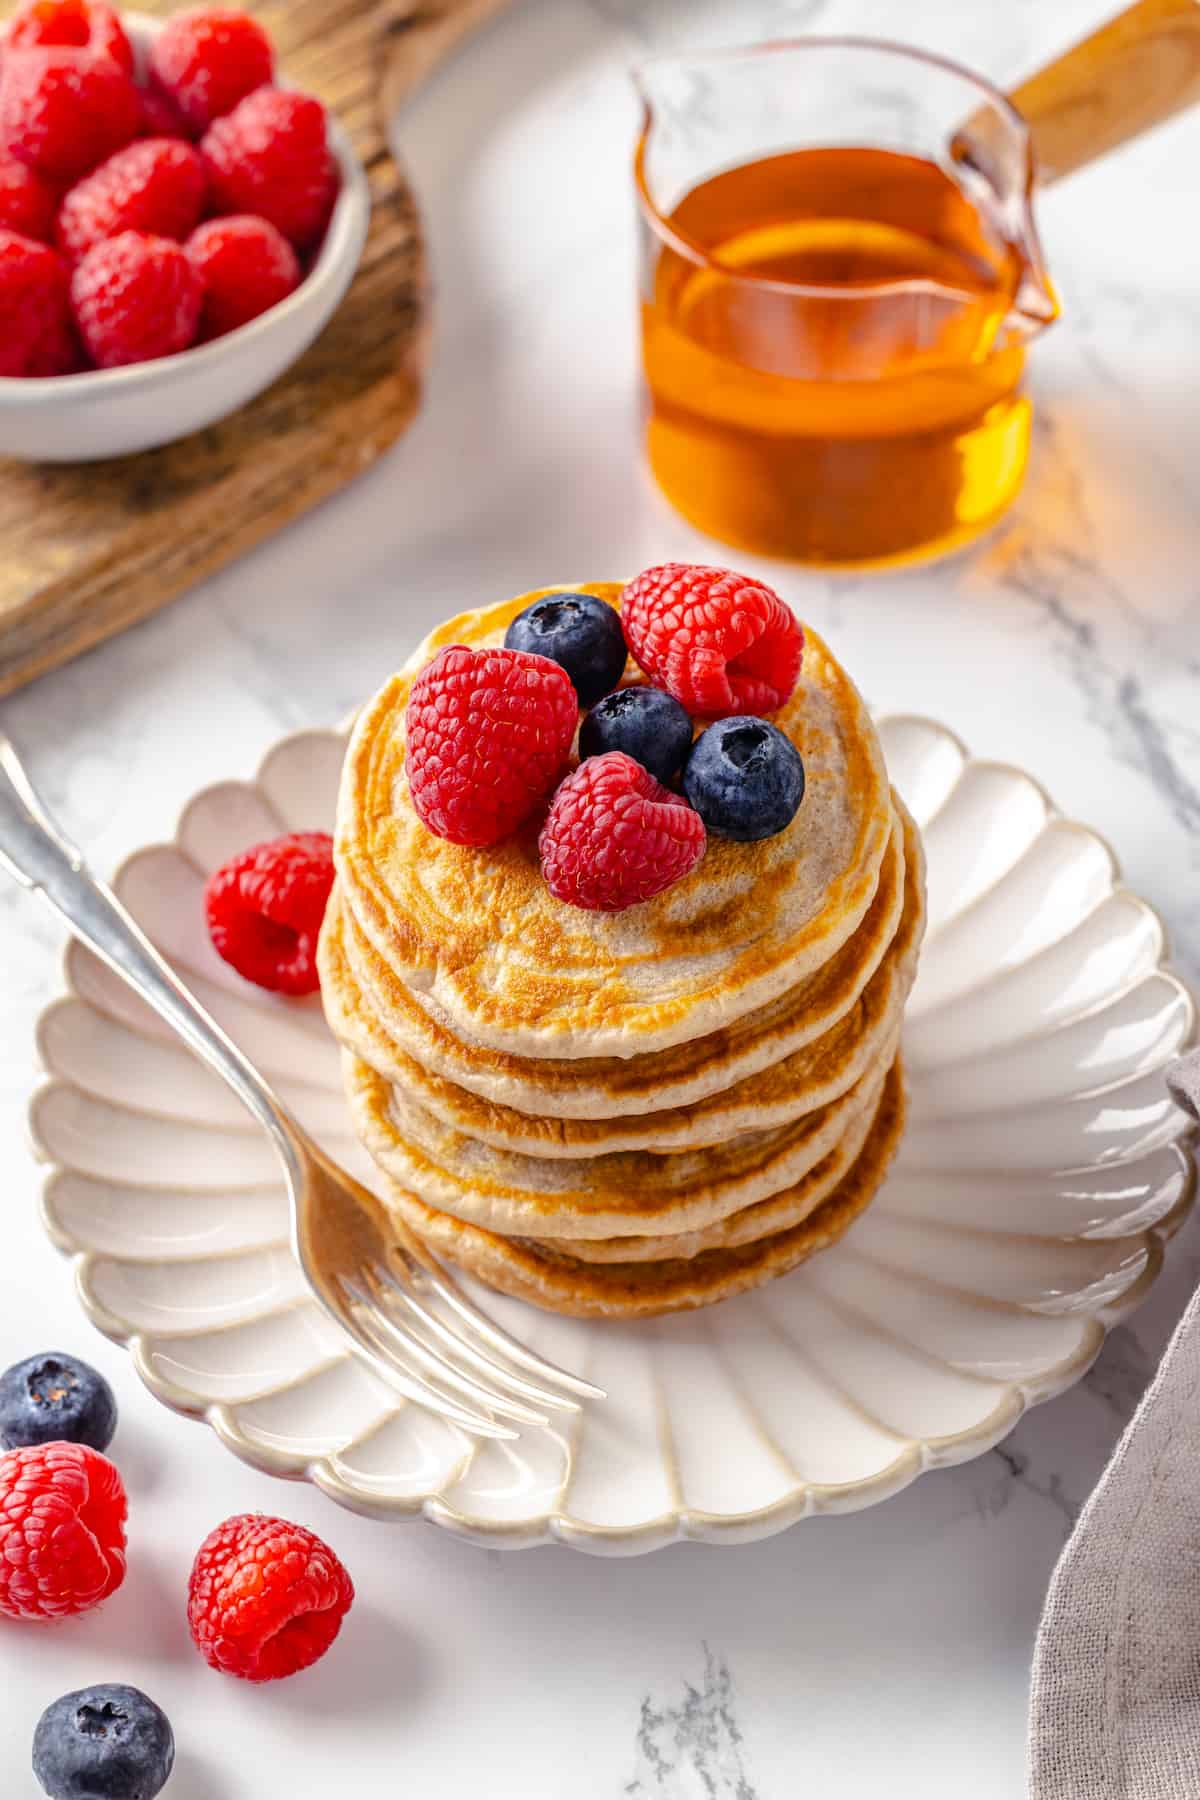
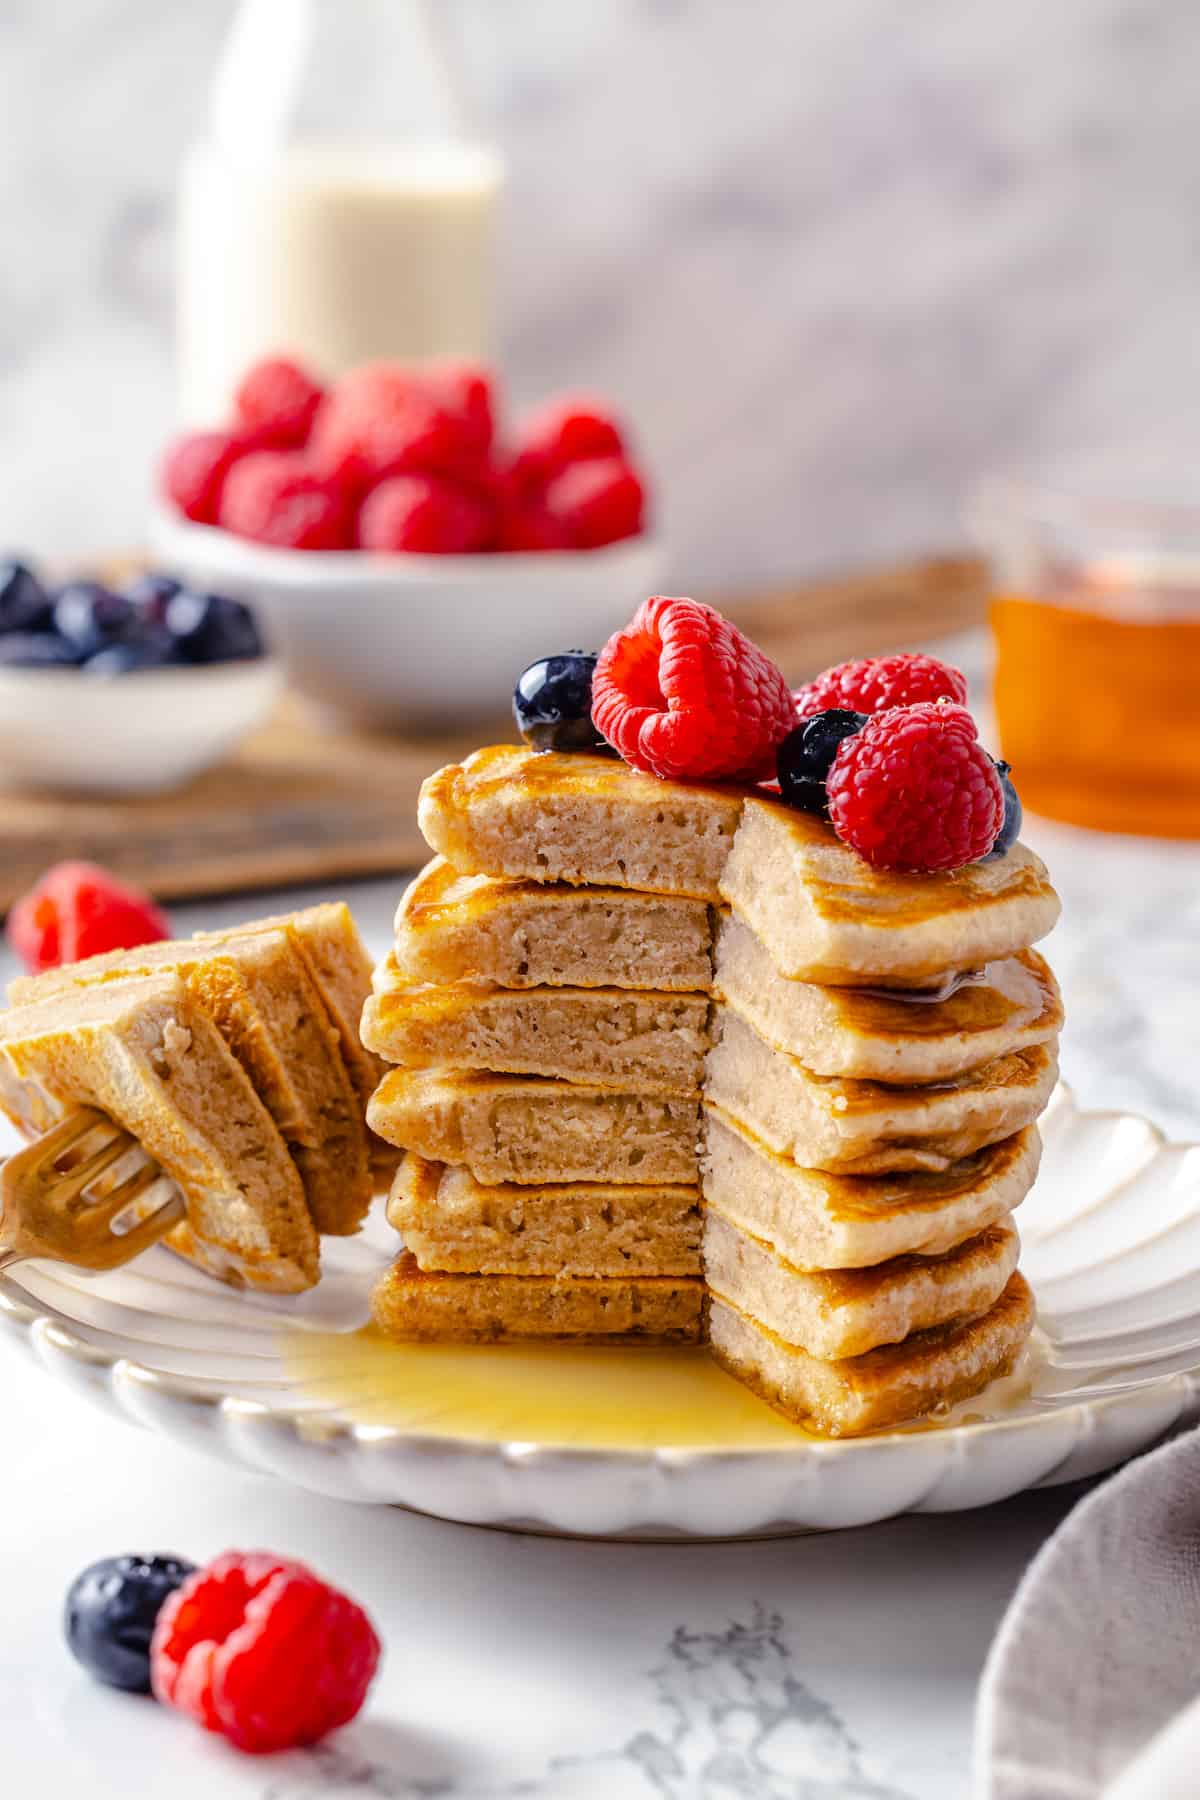
Silver dollar pancakes are a fun, kid-friendly breakfast that’s delicious enough to be enjoyed by the whole family. They’re soft, fluffy, and perfect for soaking up syrup and toppings!
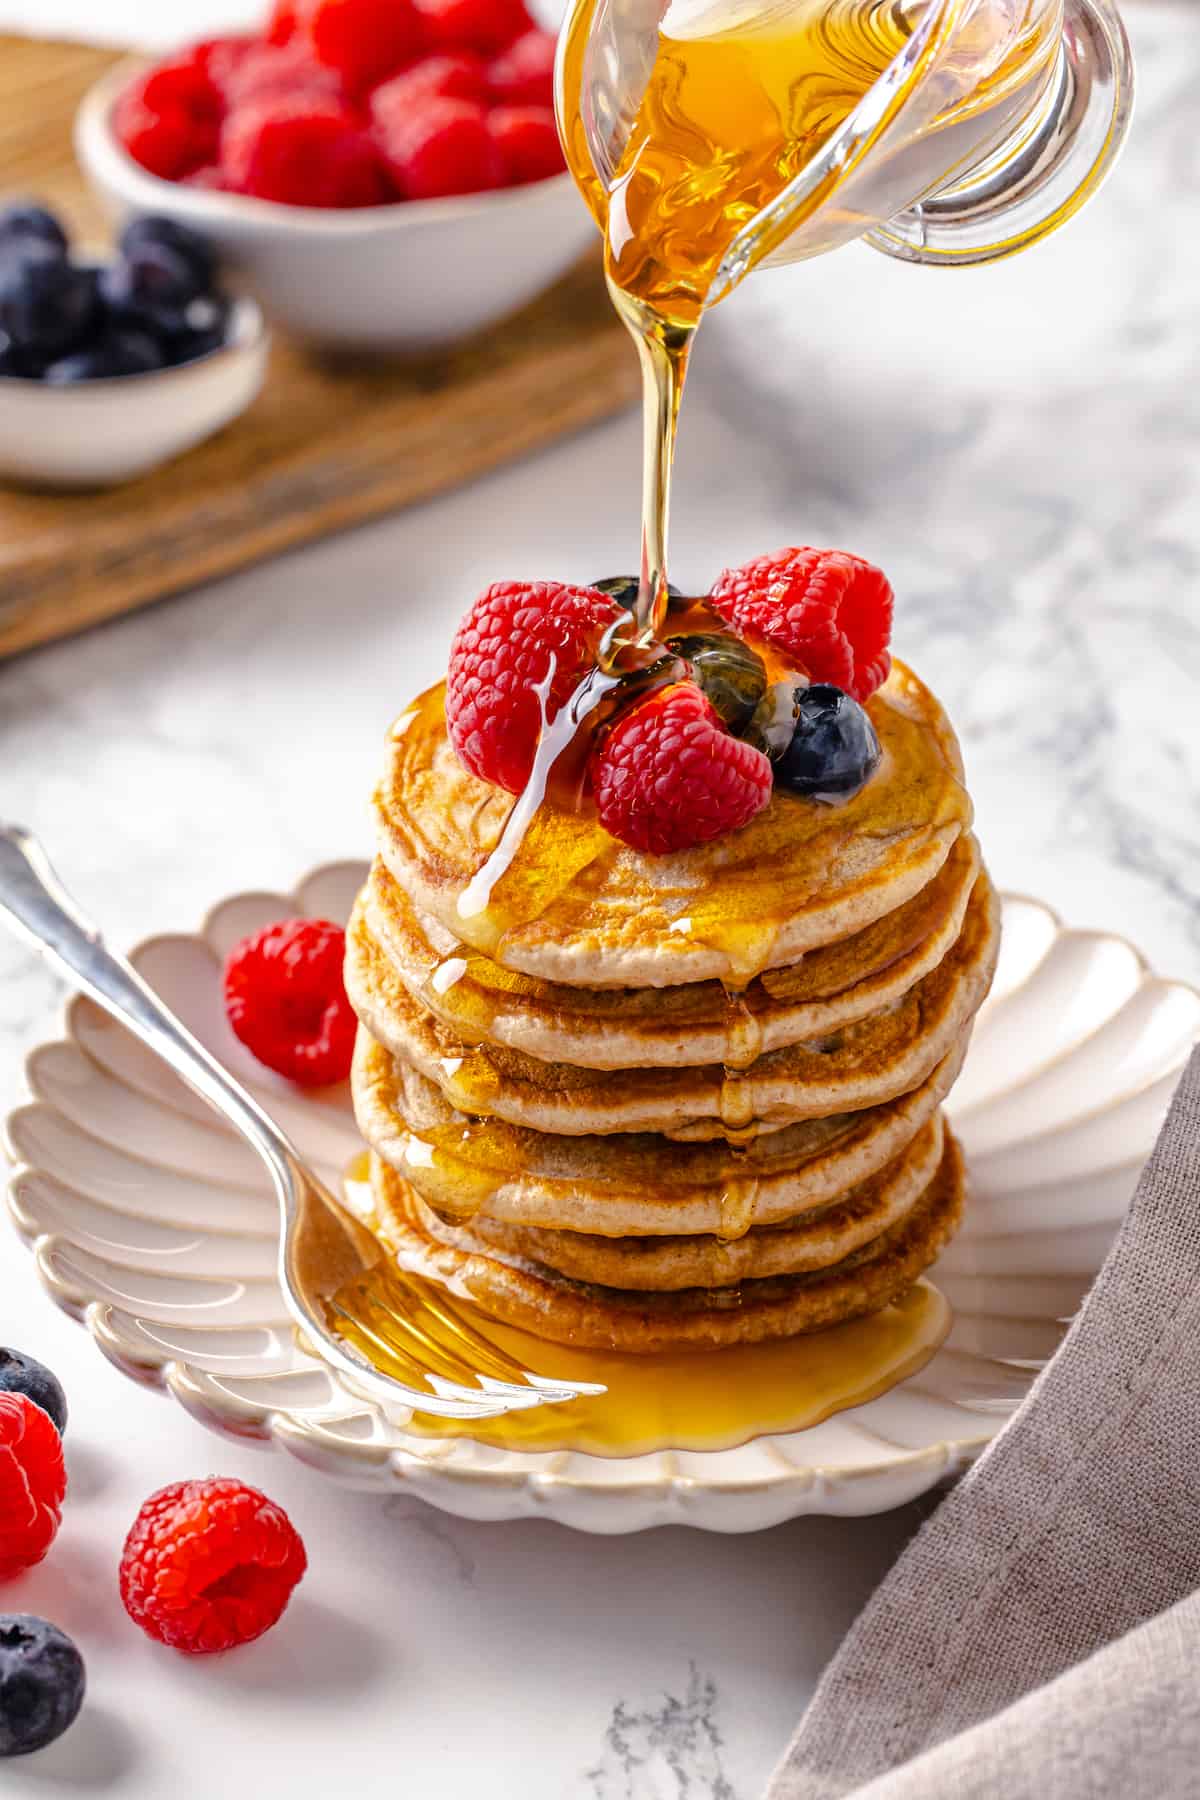
If flipping pancakes always leads to disaster, it’s time to try your hand at silver dollar pancakes. These pancakes are practically fail-proof because they’re small enough to fit entirely on a spatula and the smaller size means they’re rarely uncooked when you flip them. Plus, they cook up quickly, making them perfect for busy mornings.
These mini vegan pancakes are not only quick and easy to make, but also well-suited for little hands, so they’re a great option for toddlers. The size is perfect for self-feeding, which is an important milestone—and it also gives you a break because you don’t need to cut big pancakes into bite-sized pieces!
Why You’ll Love This Silver Dollar Pancake Recipe
- Light and fluffy . These pancakes are incredibly soft and airy thanks to the baking powder and vinegar. The acid in the vinegar reacts with the baking powder to create air bubbles, making this duo an excellent vegan egg substitute .
- Kid-friendly . With their small size and simple flavour, these pancakes are perfect for little ones to enjoy.
- Quick and easy . This silver dollar pancake recipe comes together in just 15 minutes, making it a great option for busy mornings or lazy weekends.
Notes on Ingredients
Scroll down to the recipe card to find the ingredient quantities and recipe instructions.
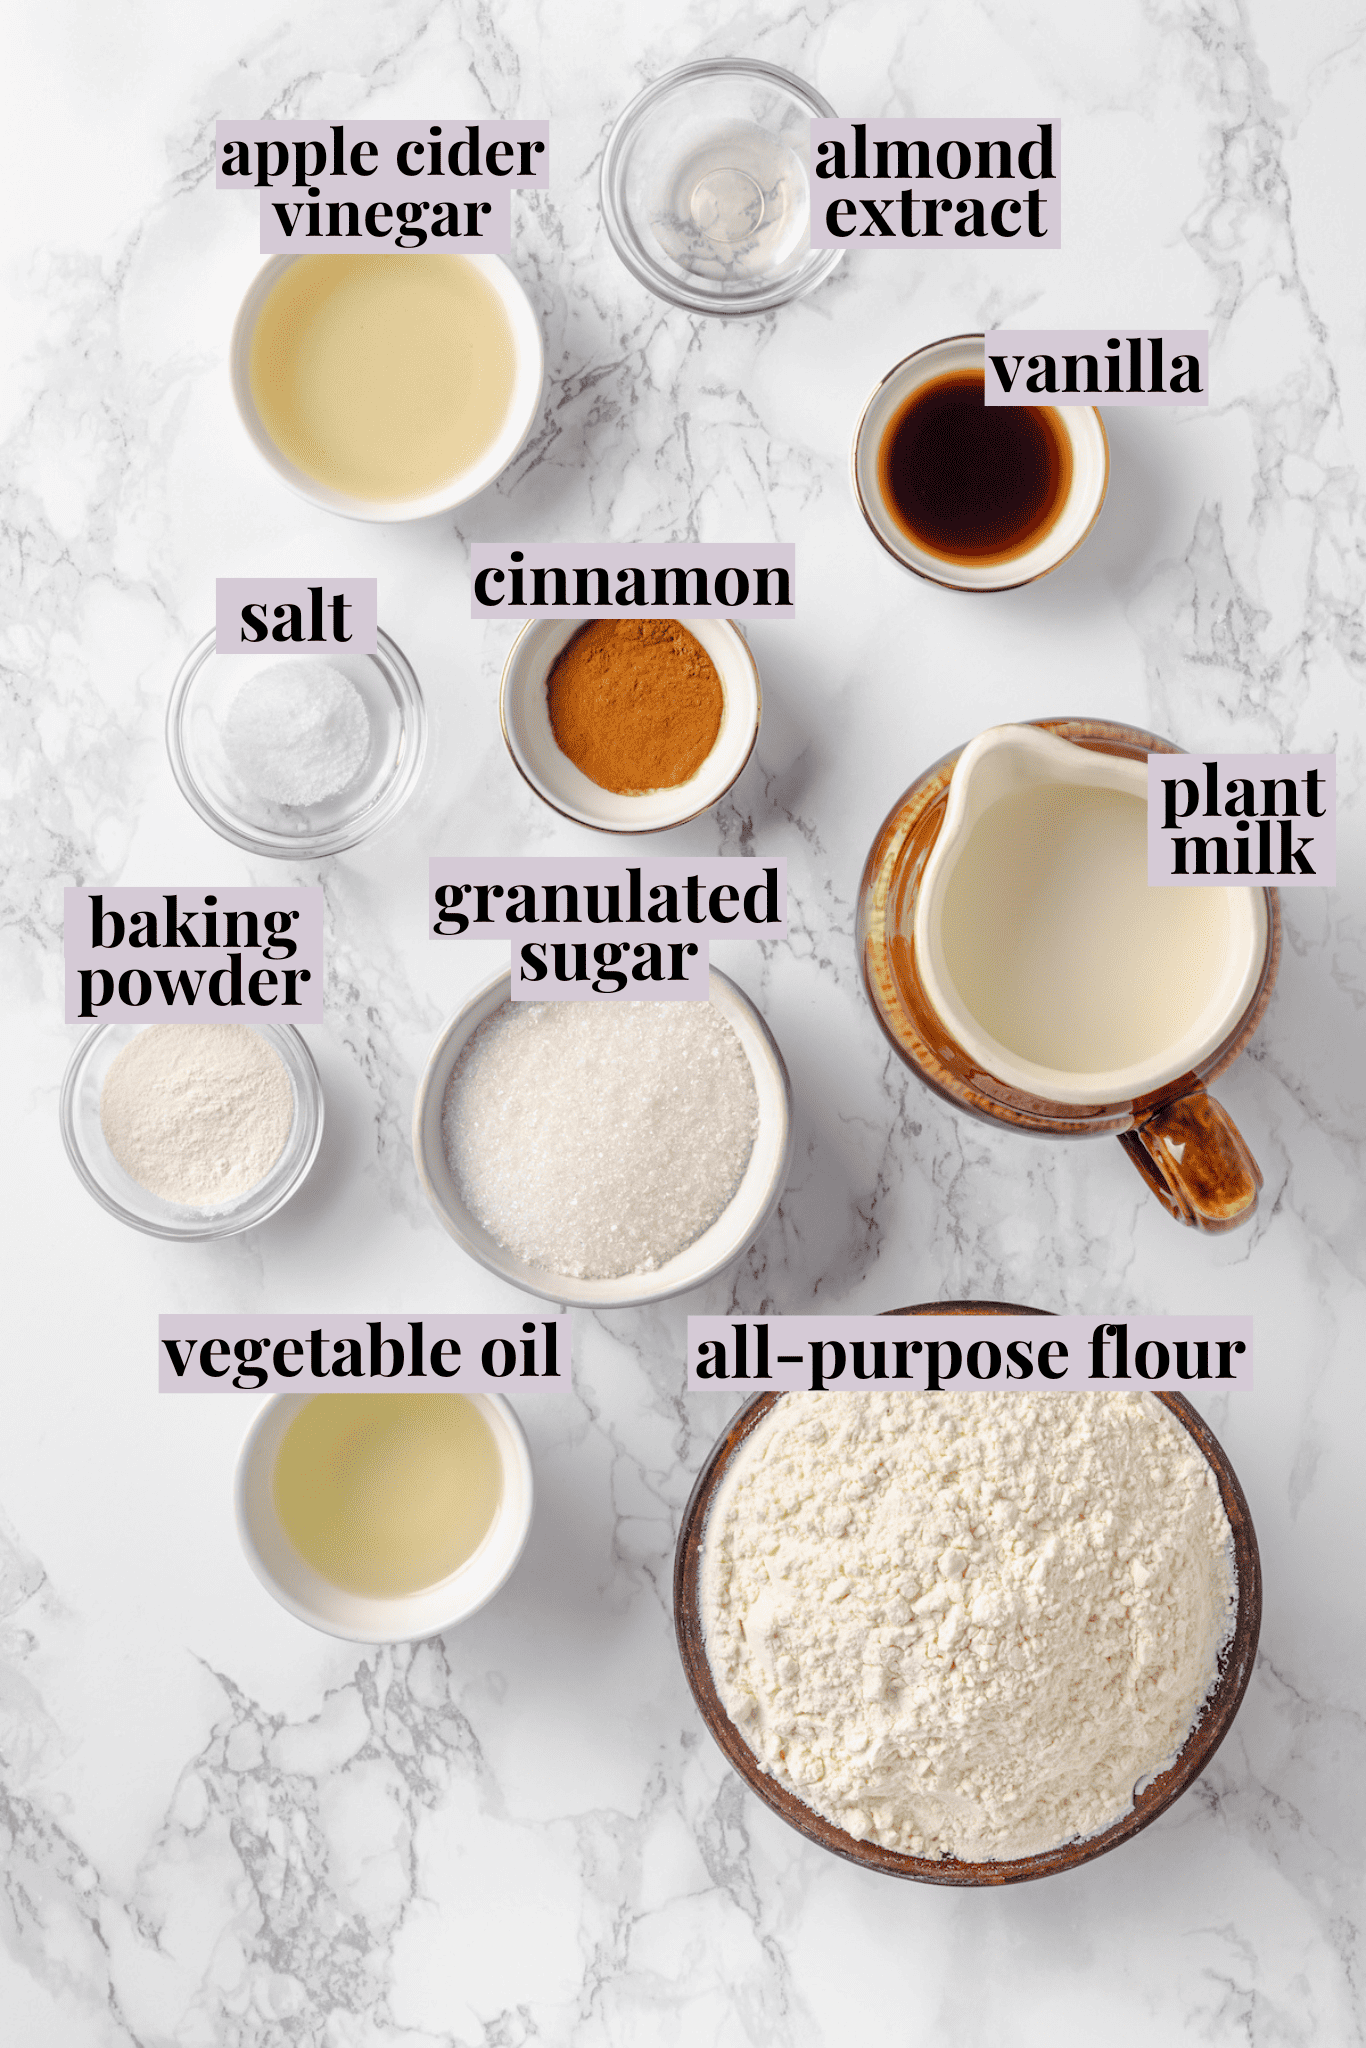
- All-purpose flour – Be sure to lightly spoon the flour into measuring cups, rather than scooping.
- Granulated sugar – I add just enough sugar to make these pancakes palatable without having to add syrup.
- Baking powder
- Salt
- Cinnamon – For a subtle, warm flavour.
- Plant milk – Use an unsweetened, unflavoured variety.
- Apple cider vinegar – White vinegar is also fine.
- Vanilla extract – Use a high-quality pure vanilla extract, not imitation.
- Almond extract – You can substitute extra vanilla extract instead, but almond extract has a wonderful aroma and flavour that makes these silver dollar pancakes extra special.
- Vegetable oil
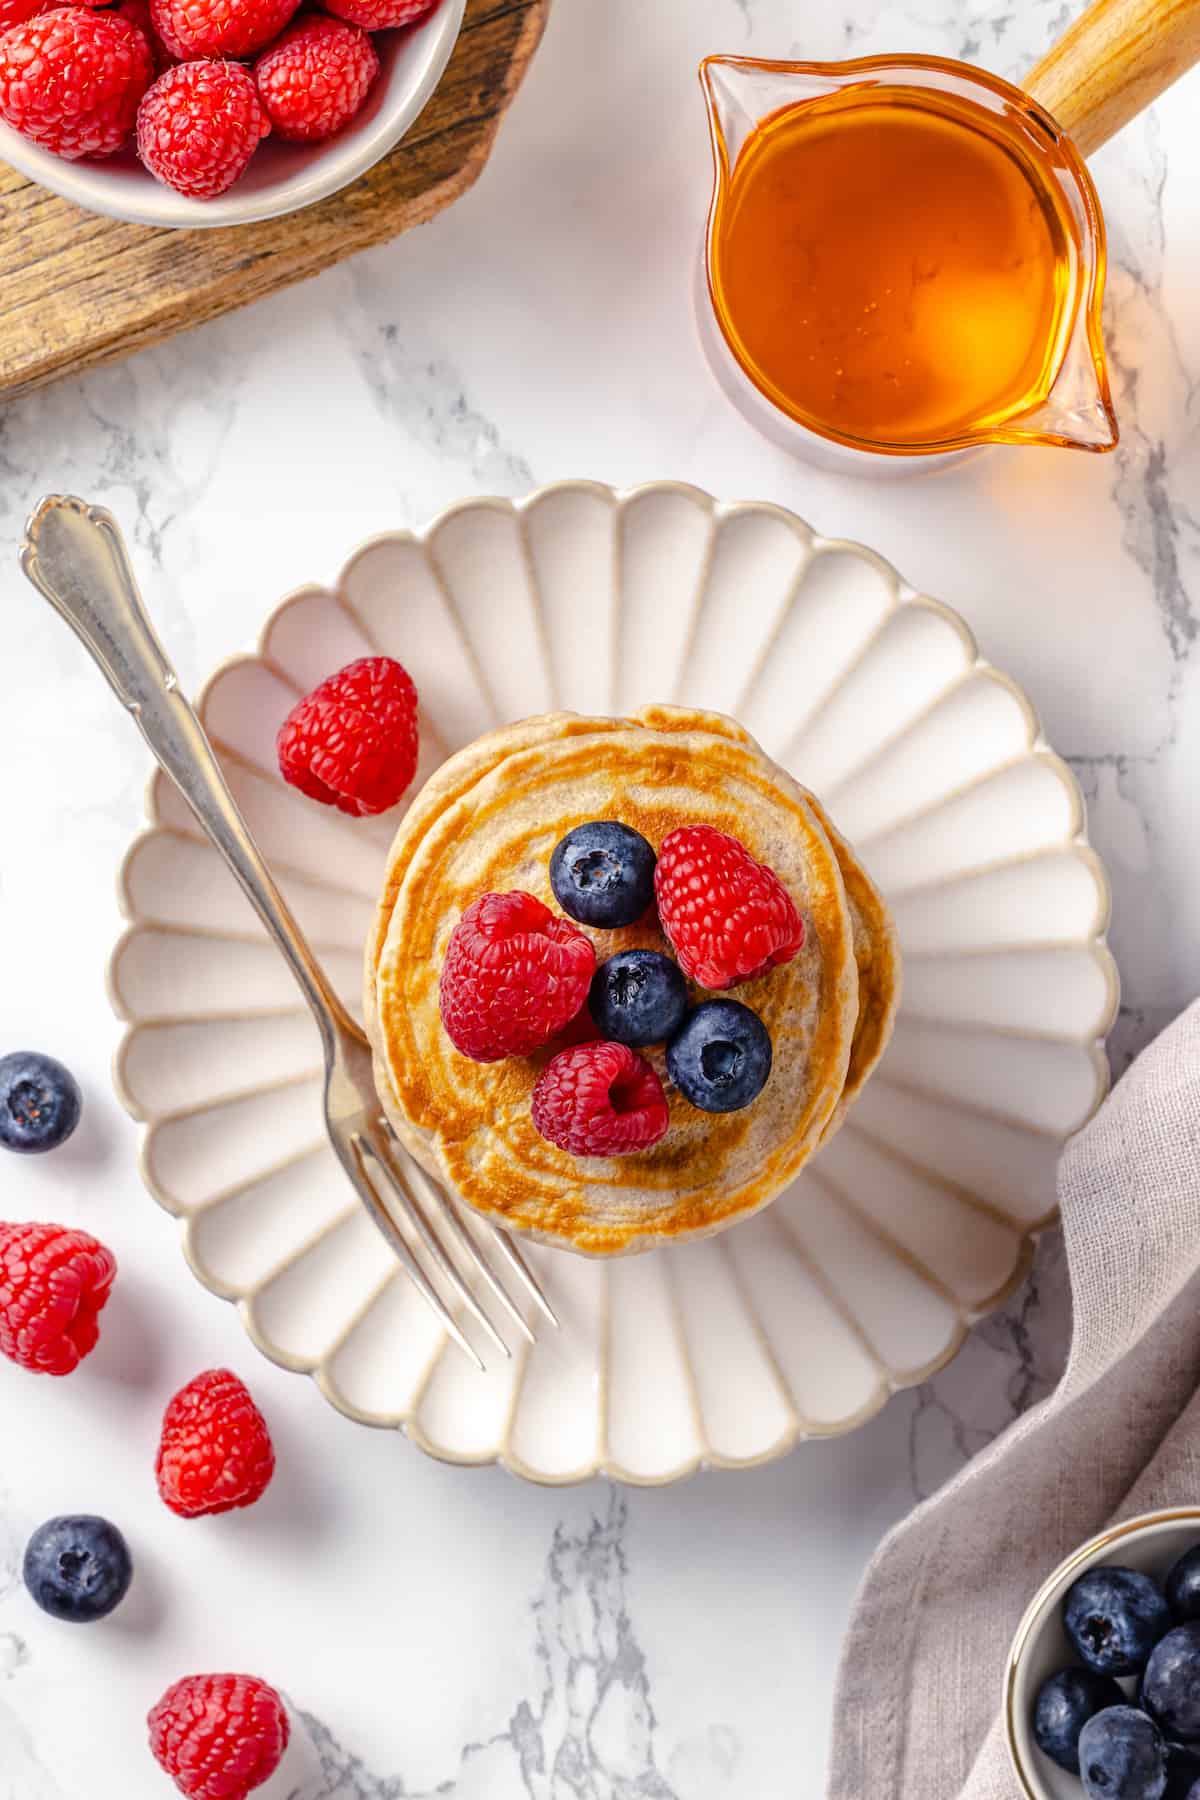
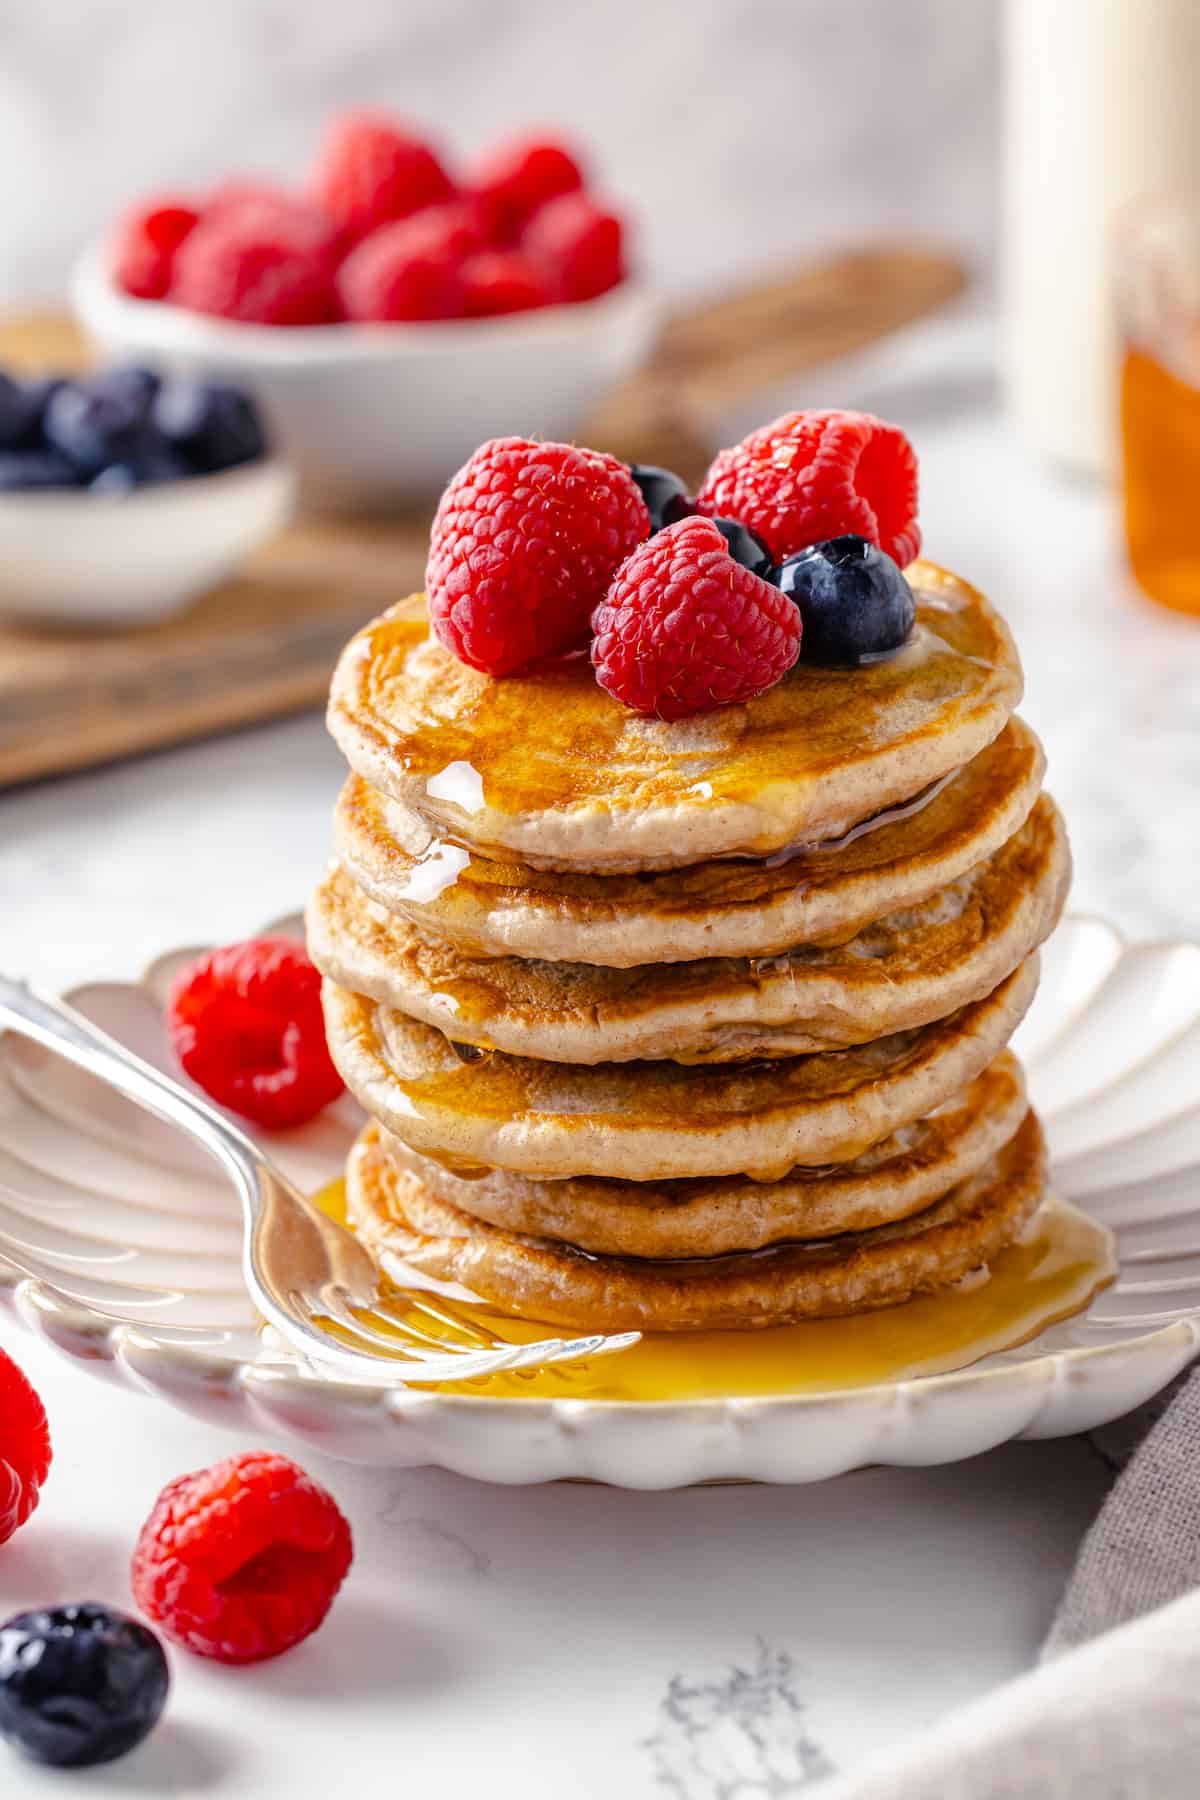
Topping Ideas
- Maple syrup
- Vegan yogurt
- Fresh berries, sliced bananas, diced peaches, or other fruit
- Vegan butter
- Jam
- Coconut whipped cream
- Cashew cream
How to Make Silver Dollar Pancakes

- Combine the dry ingredients. In a large mixing bowl, whisk together the flour, sugar, baking powder, salt, and cinnamon.
- Add the wet ingredients. Whisk the plant milk, apple cider vinegar, vanilla extract, almond extract, and vegetable oil into the bowl with the dry ingredients.
- Prepare. Heat a non-stick pan over medium heat and grease the pan with vegetable oil.
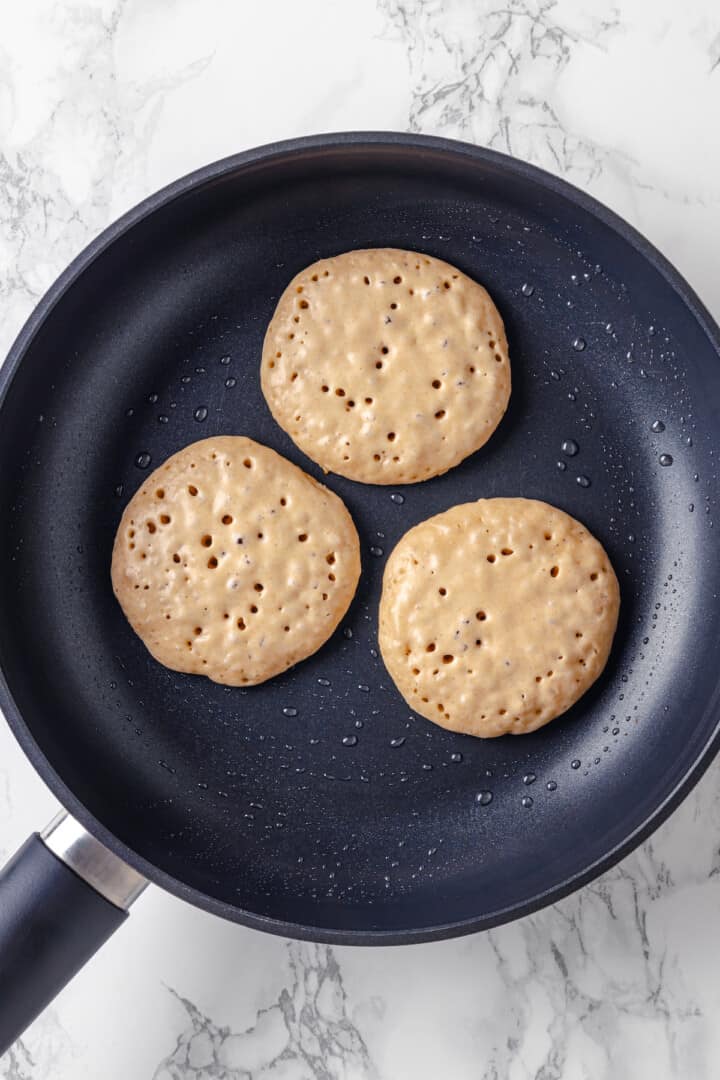
- Cook the pancakes . Pour several 1-tablespoon portions of batter into the pan, leaving space between each. Cook the pancakes until they bubble slightly and just start to set around the edges, then flip and cook the other side for 15-20 seconds. Repeat with remaining batter.
- Serve. Plate the pancakes and serve with maple syrup, fresh berries, or any other desired toppings.
Tips for Success
- Look for the bubbles . When it’s time to flip the pancakes, look for bubbles forming on the surface. If they form, pop, and a small hole is left behind, it’s a sign that the pancakes are ready to be flipped.
- Don’t overmix . Overmixing can result in tough, dense pancakes. For light and fluffy results, mix just until the ingredients are combined.
- Keep them warm . If you’re preparing a large batch of pancakes, keep them warm in the oven at 200°F while you finish cooking the rest of the batter.
Variations
- Add chocolate chips . Because these are small pancakes, you’ll want to use mini chocolate chips or a chopped chocolate bar. Simply sprinkle the chips onto the pancakes when they are cooking on the first side.
- Make them gluten-free . Swap out the all-purpose flour for your favourite gluten-free blend.
- Fold in some fruit . Finely chopped apples or strawberries make a delicious addition to these pancakes. Simply fold them into the batter before cooking.
Serving Suggestions
These pancakes make adorable little sandwiches for school lunches! Smear sunflower seed butter and jam on them instead of using bread. They’re also great for a grab-and-go breakfast—they’re sweet enough that you don’t need syrup, especially if you add chocolate chips or fruit.
How to Store Leftovers
Place the cooled silver dollar pancakes in an airtight container and store them in the refrigerator for up to 3 days. When you’re ready to eat them, reheat the pancakes in the microwave in 20-second intervals until they are warm throughout, or toast them in a toaster oven for a slightly crispier texture.
Can I Freeze This Recipe?
For longer storage, you can freeze silver dollar pancakes for up to 3 months. Store them in an airtight container or freezer bag and reheat them according to the instructions above.
More Vegan Pancake Recipes
- Pumpkin Pancakes
- Gluten-Free Vegan Strawberry Pancakes
- Vegan Gingerbread Pancakes
- Easy Vegan Blueberry Pancakes
- Fluffy Vanilla Pancakes with Blueberry Sauce
Ingredients
- 2 cups all-purpose flour , 240 grams
- ¼ cup granulated sugar , 50 grams
- 1 tablespoon baking powder , 14 grams
- ½ teaspoons salt , 3 grams
- 1 teaspoon cinnamon , 2 grams
- 2 cups + 2 tablespoons plant milk , 503 ml
- 2 tablespoons apple cider vinegar , 30 ml
- 1 teaspoon vanilla extract , 5 ml
- ¼ teaspoon almond extract , 1 ml
- 1 ½ tablespoons vegetable oil (plus more for the pan) , 22 ml
- Maple syrup , for serving
- Fresh berries , for serving
Instructions
- In a large mixing bowl, whisk together the flour, sugar, baking powder, salt, and cinnamon.
- Whisk the plant milk, apple cider vinegar, vanilla extract, almond extract, and vegetable oil into the dry ingredients. Do not over-mix.
- Heat a non-stick pan over medium heat and grease the pan with vegetable oil. Pour several 1-tablespoon portions of batter into the pan, leaving plenty of space between them. Allow the pancakes to cook until they bubble slightly and just start to set around the edges. Flip and cook for an additional 15-20 seconds before removing them from the pan. Repeat this process until you are out of batter.
- Serve warm with maple syrup and/or fresh berries.
Notes

Silver Dollar Pancakes
Ingredients
- 2 cups all-purpose flour 240 grams
- ¼ cup granulated sugar 50 grams
- 1 tablespoon baking powder 14 grams
- ½ teaspoons salt 3 grams
- 1 teaspoon cinnamon 2 grams
- 2 cups + 2 tablespoons plant milk 503 ml
- 2 tablespoons apple cider vinegar 30 ml
- 1 teaspoon vanilla extract 5 ml
- ¼ teaspoon almond extract 1 ml
- 1 ½ tablespoons vegetable oil (plus more for the pan) 22 ml
- Maple syrup for serving
- Fresh berries for serving
Instructions
- In a large mixing bowl, whisk together the flour, sugar, baking powder, salt, and cinnamon.
- Whisk the plant milk, apple cider vinegar, vanilla extract, almond extract, and vegetable oil into the dry ingredients. Do not over-mix.
- Heat a non-stick pan over medium heat and grease the pan with vegetable oil. Pour several 1-tablespoon portions of batter into the pan, leaving plenty of space between them. Allow the pancakes to cook until they bubble slightly and just start to set around the edges. Flip and cook for an additional 15-20 seconds before removing them from the pan. Repeat this process until you are out of batter.
- Serve warm with maple syrup and/or fresh berries.
Notes
Nutrition
Silver Dollar Pancakes https://jessicainthekitchen.com/silver-dollar-pancakes/ February 16, 2024
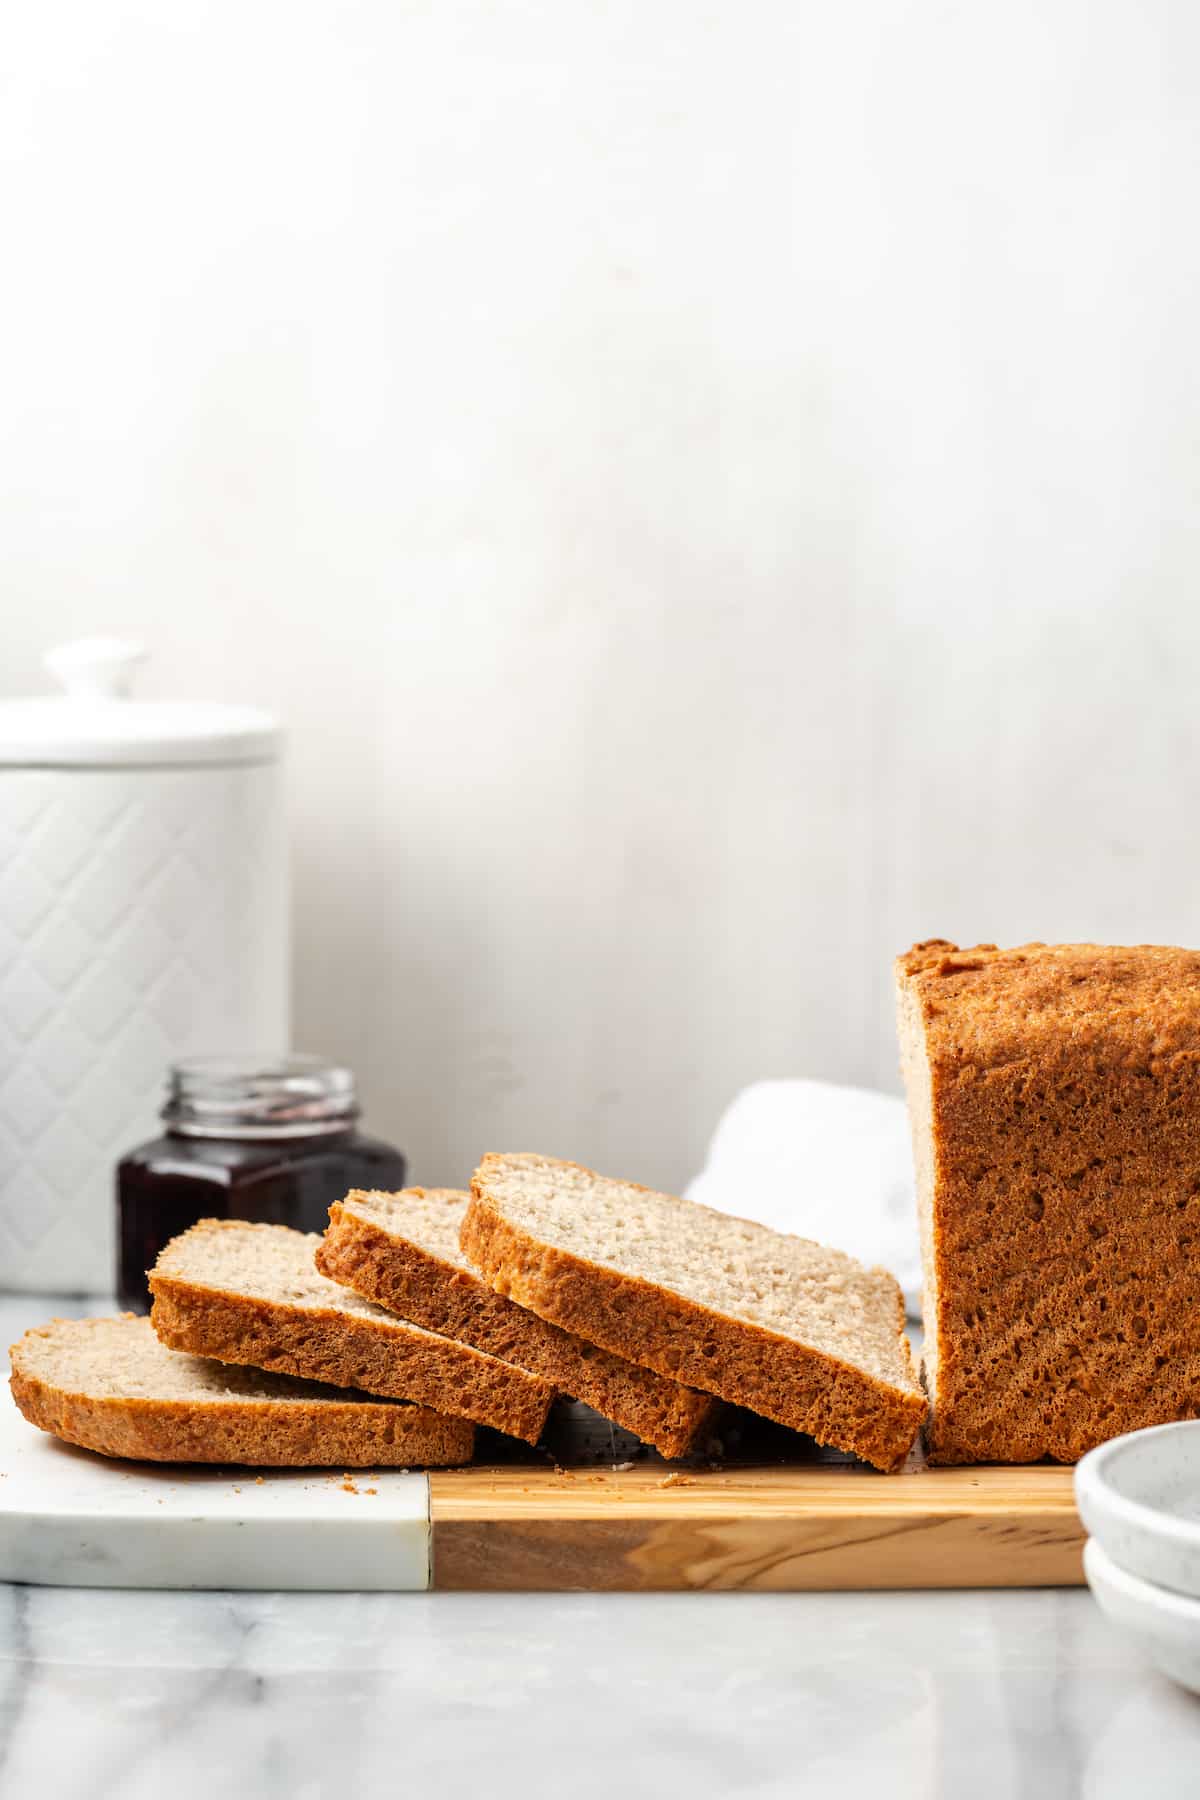
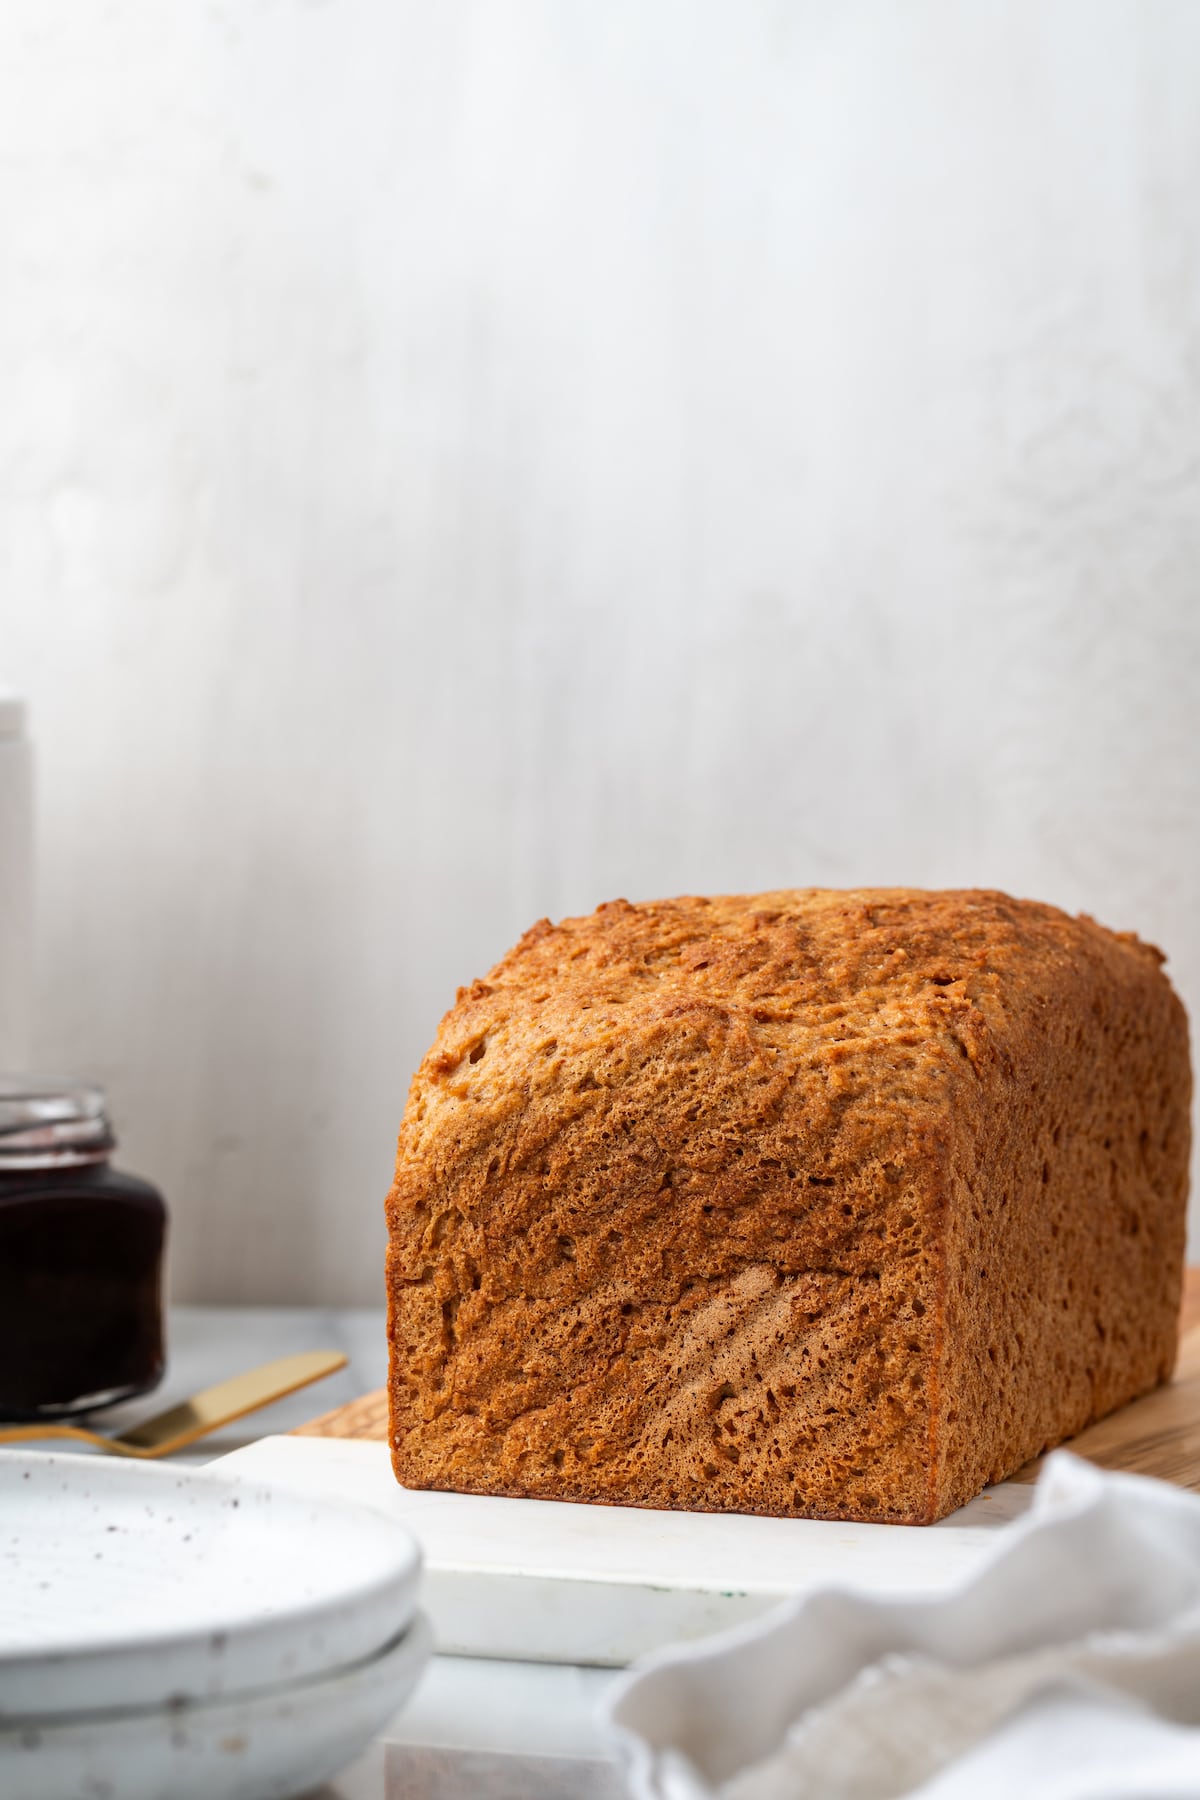
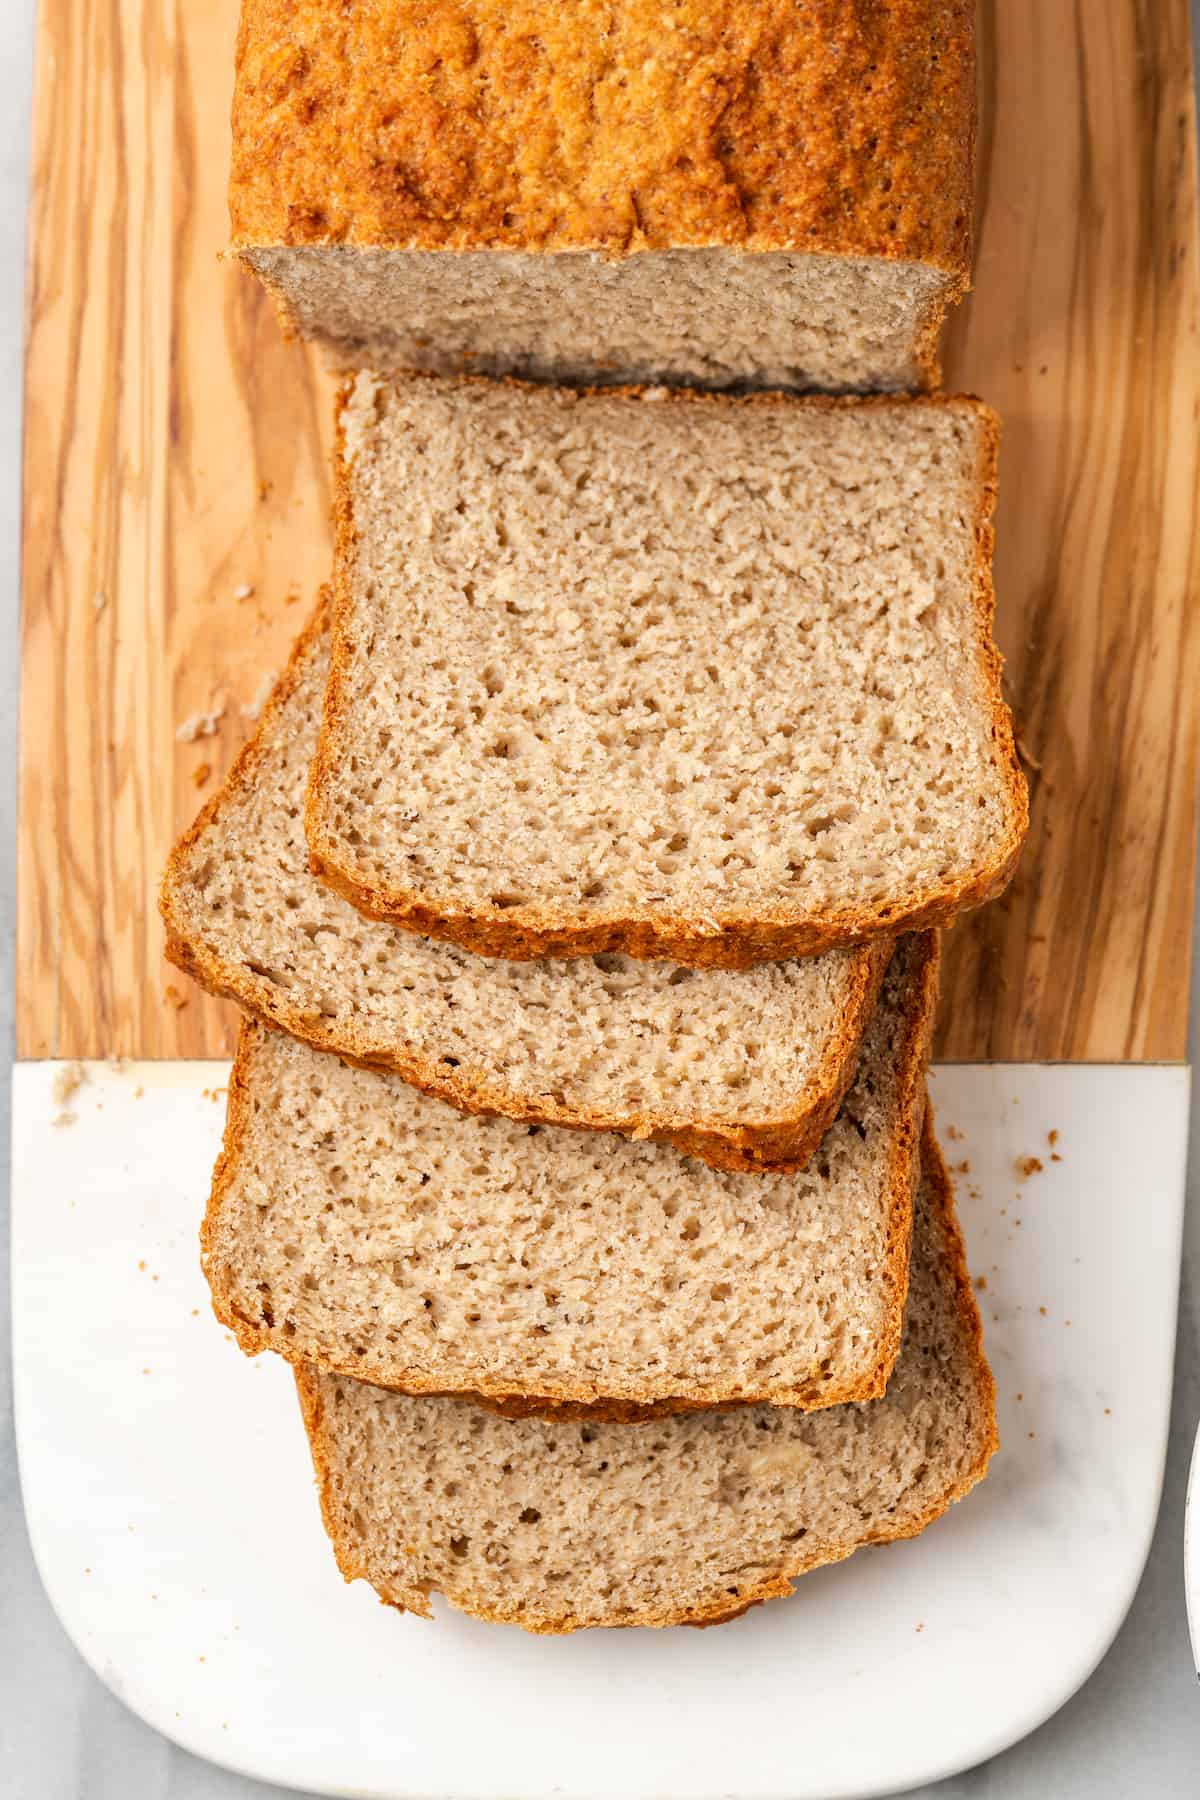
This gluten-free sandwich bread won’t disappoint! A custom gluten-free flour blend yields a soft, tender bread that’s still sturdy enough to stand up to any sandwich filling.
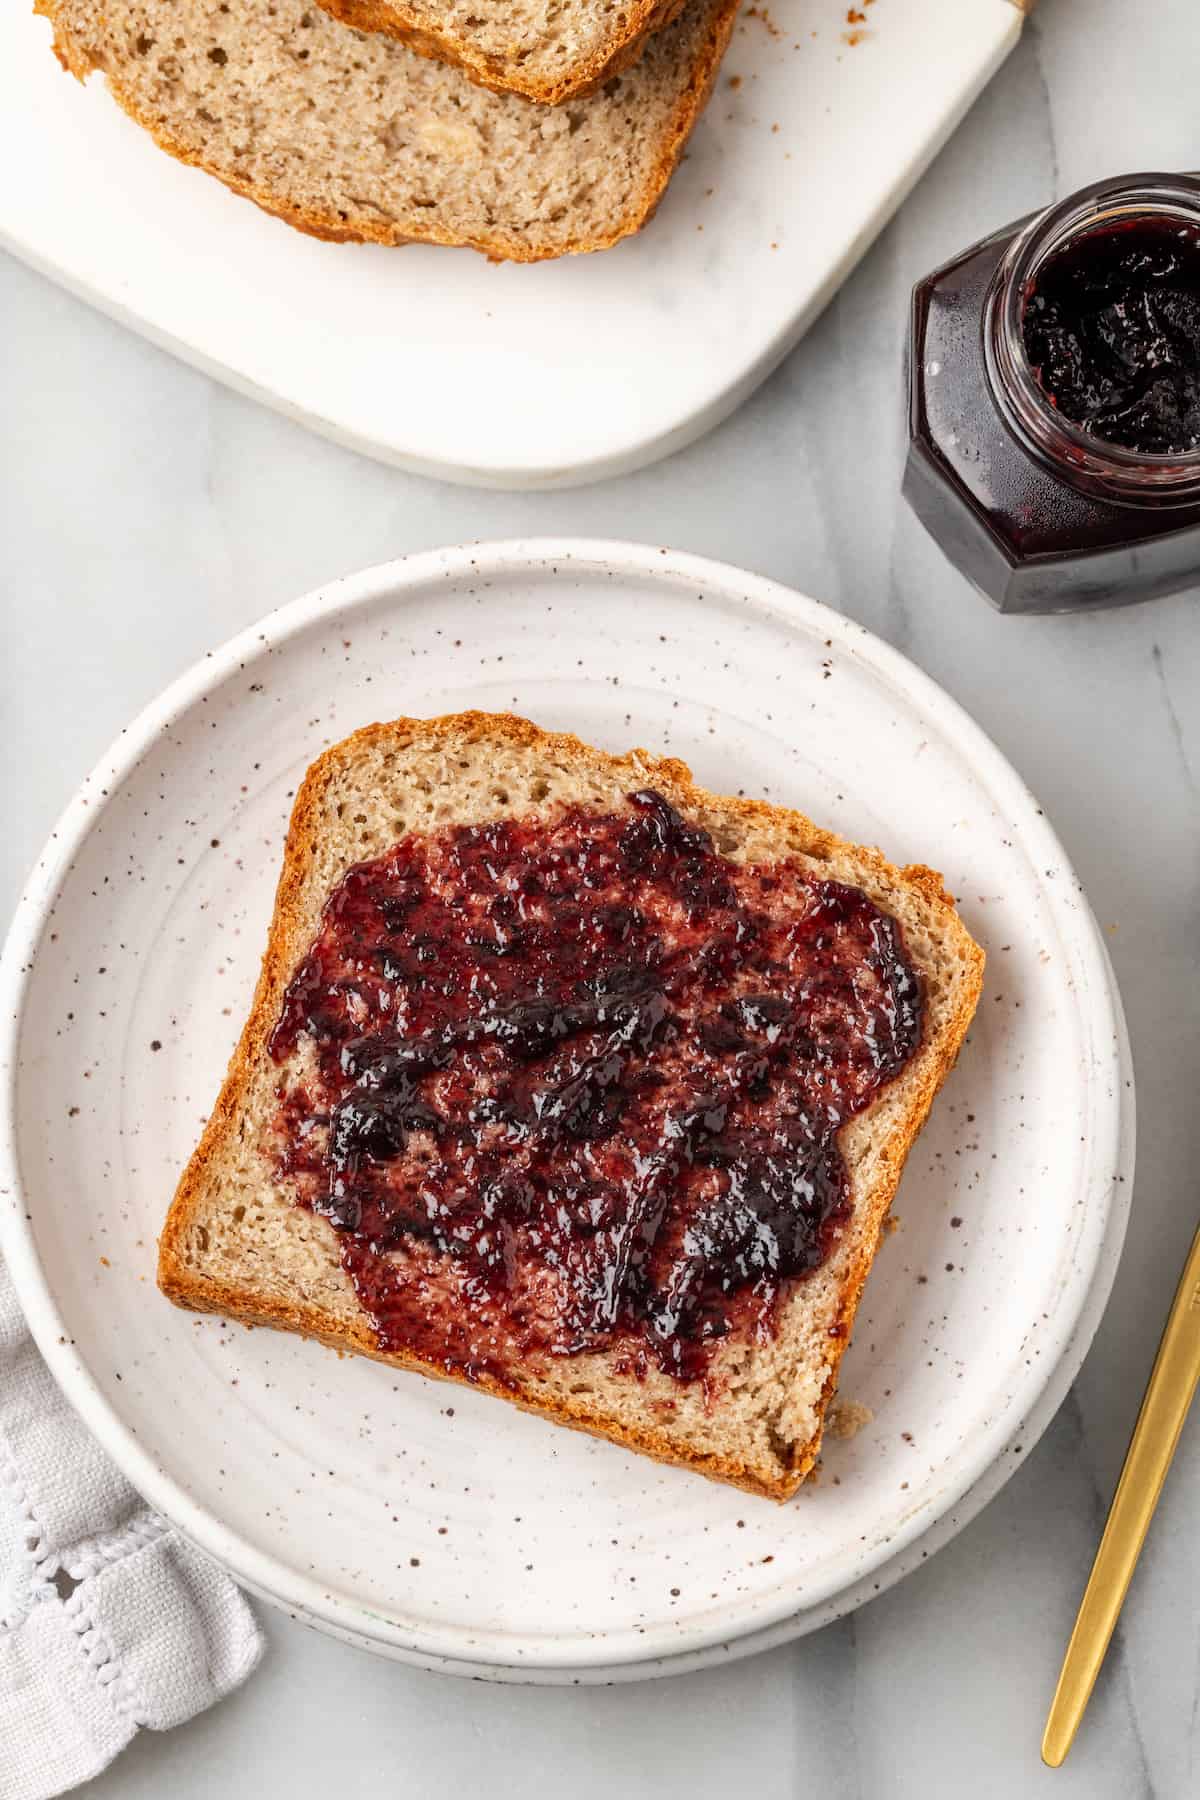
Although in theory you can use any bread to make sandwiches, a sandwich bread is ideal. It’s the right size, the right texture, and the perfect flavour to complement (rather than compete with!) your fillings. But finding a vegan and gluten-free sandwich bread recipe you actually want to eat can be difficult.
Until now! This gluten-free sandwich bread has everything you want in a sandwich loaf, but it’s also made without wheat, butter, milk, or eggs. Rather than relying on a store-bought gluten-free flour, I’ve formulated a mixture specifically designed to yield the perfect sandwich bread.
While there are some specialty ingredients here, know that each one plays a critical role in this recipe, so it’s important not to make changes!
Why You’ll Love This Gluten-Free Sandwich Bread Recipe
- Pillowy soft . While some gluten-free sandwich breads are dry and crumbly, this recipe yields a loaf that’s soft and tender, making it the perfect base for your favourite sandwich fillings.
- Easy to make . Yeast breads can be difficult to master, but a basic sandwich bread like this one is a great place to start if you’re new to baking with yeast.
- Gluten-free and vegan . Many gluten-free breads rely on eggs for structure, but this sandwich bread recipe is both plant-based and gluten-free. (Learn more: Is Yeast Vegan? )
Notes on Ingredients
Scroll down to the recipe card to find the ingredient quantities and recipe instructions.
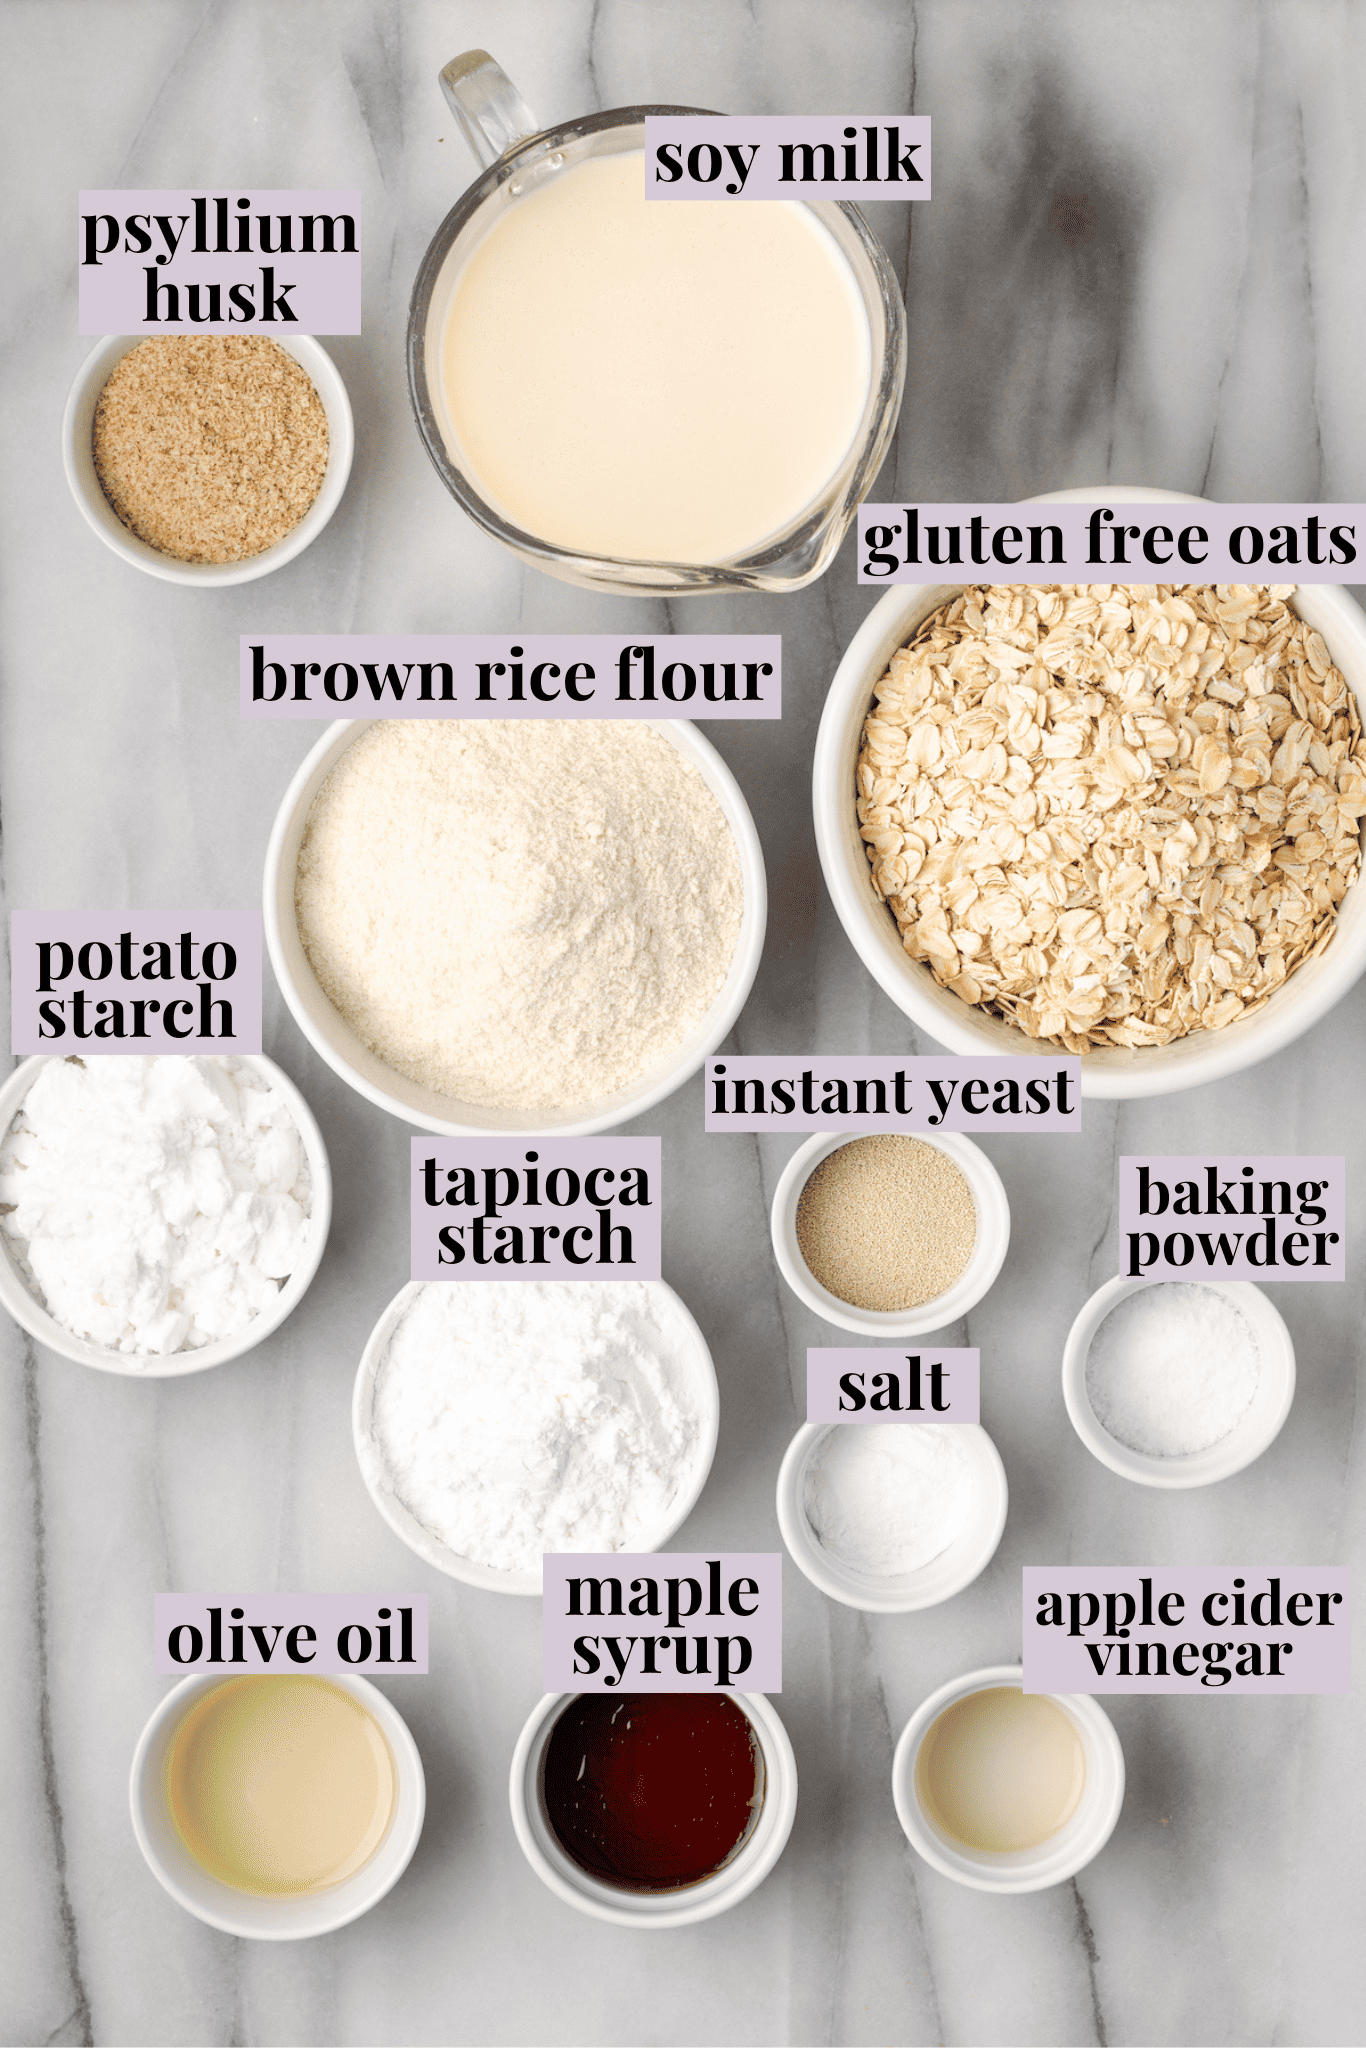
- Gluten-free oats – Not all oats are gluten-free, as some are processed using the same equipment as wheat. Make sure the oats you use are gluten-free certified.
- Psyllium husk – This is a binder that adds some elasticity to the dough.
- Soy milk – Soy milk has a higher protein content than most other plant milks, which is why it’s my choice for this gluten-free sandwich bread. Be sure yours is unflavoured and unsweetened.
- Brown rice flour – This adds a mildly nutty flavour reminiscent of whole wheat sandwich bread.
- Potato and tapioca starches – These starches improve the texture of the finished bread and also help make the dough more elastic.
- Instant yeast – If your yeast has been sitting in the pantry for a while, be sure it hasn’t expired. Here’s how to test yeast to see if it’s still good .
- Salt
- Baking powder – Baking powder is a staple in quick breads, but we add it to this sandwich bread for an extra boost.
- Maple syrup – Sandwich bread usually has a subtle sweetness to it and we use maple syrup to achieve that here.
- Olive oil
- Apple cider vinegar – White vinegar also works if that’s what you have on hand.
What Is a Pullman Pan?
A Pullman pan is a loaf pan with a sliding lid. It’s designed to create perfectly square bread slices, as the bread bakes with the cover on. The straight sides and tight-fitting lid produce bread with a fine crumb and a tender, uniform texture. For this gluten-free sandwich bread, we’re utilizing the Pullman pan solely for its tall, straight sides, so the cover isn’t needed and you’ll get a traditional domed top on your loaf.
How to Make Gluten-Free Sandwich Bread
- Make oat flour . Process the oats in a high speed blender until they resemble flour.
- Thicken the psyllium . Warm the soy milk and whisk it with the psyllium husk in a small bowl or liquid measuring cup. Set aside to thicken.
- Mix the dry ingredients . Stir the brown rice flour, oat flour, potato starch, tapioca starch, baking powder, and salt in the bowl of a stand mixer fitted with the hook attachment. Add the instant yeast and mix again.
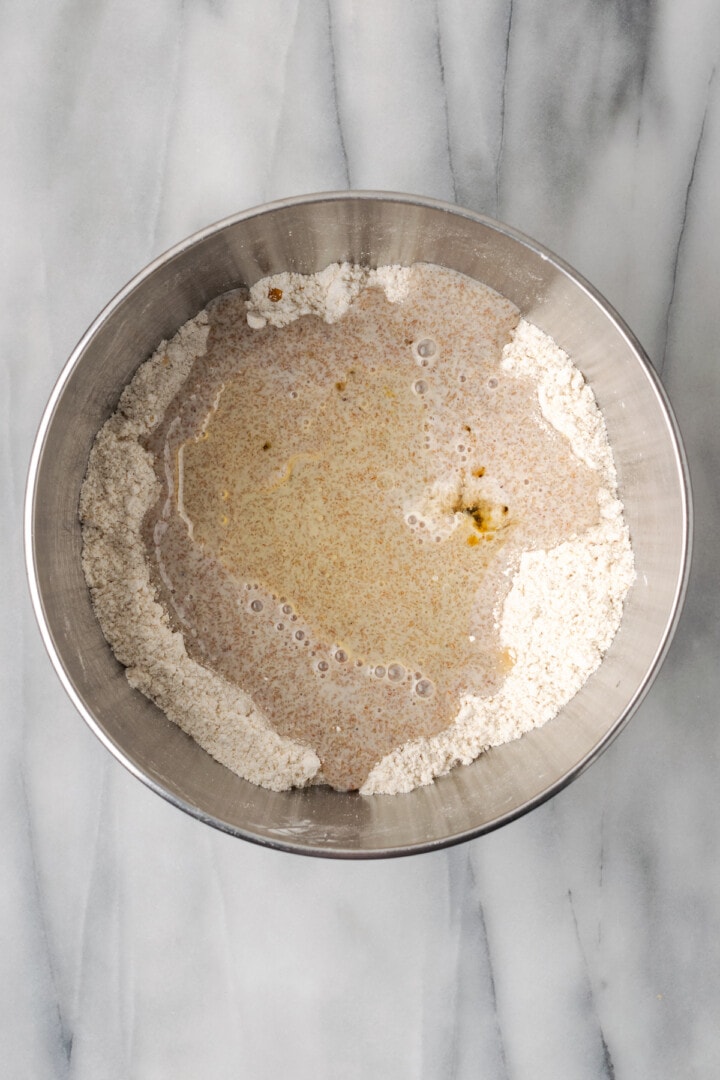
- Combine the wet and dry ingredients . Mix the psyllium gel, maple syrup, olive oil, and vinegar into the flour mixture on low speed until the dry ingredients are incorporated. Scrape down the bowl as needed. Once the flour is incorporated, increase the speed to medium-low and mix for 5 minutes.
- Rest . Allow the dough to rest for 10 minutes in the bowl.
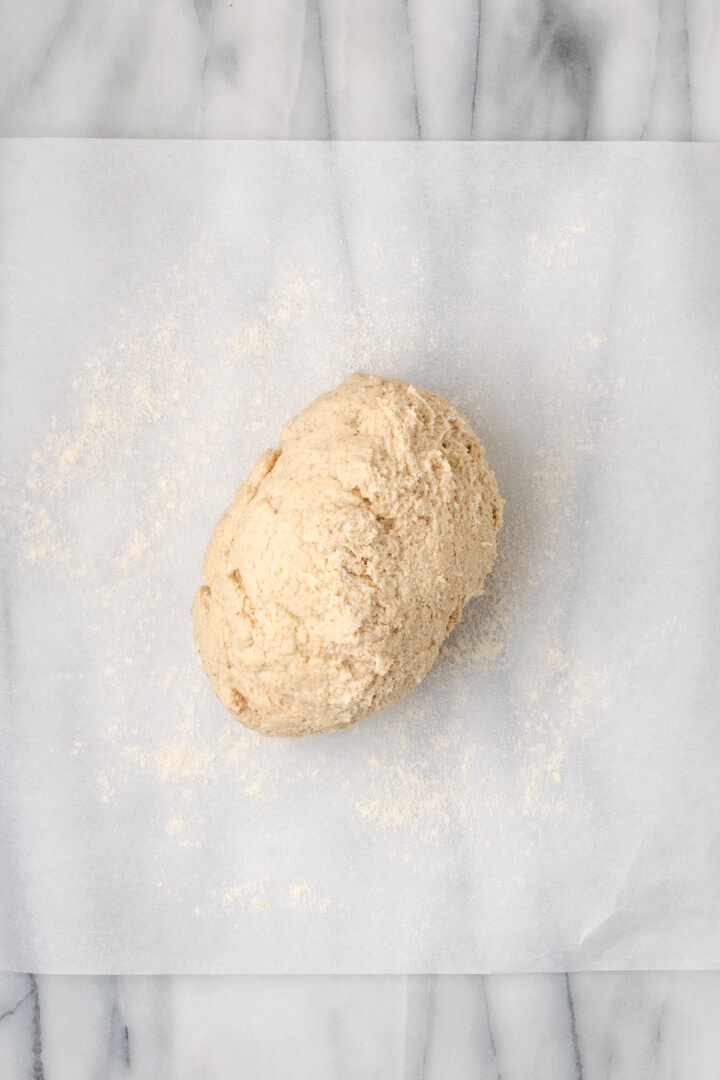
- Knead . Turn the dough out onto a lightly floured surface. Knead gently a few times until you can form it into a smooth circle. Pat the dough into a rectangle shape as wide as your bread pan, then roll the dough into a log, tuck the ends under, and place it into a Pullman pan.
- Rise . Cover the dough and leave it to rise in a warm place for about an hour, or until it has doubled in size.
- Prepare . Place a pan of water on the bottom rack of your oven while it preheats to 400ºF.
- Bake . Place the loaf pan in the preheated oven. Reduce the temperature to 375ºF and bake for 30 minutes. Remove the pan of water and bake for another 20-30 minutes, or until the internal temperature reaches 205ºF.
- Cool . Remove the loaf from the oven and allow it to cool before slicing; it will take at least 4 hours.
Tips for Success
- Don’t use a regular bread pan . I would strongly advise against using any pan other than a Pullman pan for this bread. A regular loaf pan has shorter sides that won’t provide sufficient height to support the loaf as it rises and bakes. I use a 1-pound Pullman loaf pan that measures approximately 8.38 x 4.8 x 4.5 inches on the outside and 7.5 x 4 x 4.4 inches on the inside.
- Let it cool completely . Overnight cooling is best! If you slice into this gluten-free sandwich bread too soon, the inside will be gummy.
- Make the crust softer . If your bread feels too crusty on the outside, you can place it in a closed bread bag and the outside will soften.
Serving Suggestions
Use this gluten-free sandwich bread for all the things! You can’t beat a classic PB&J, or try it for making a vegan BLT sandwich or smashed chickpea avocado sandwich . It’s also great for:
- Vegan Pumpkin French Toast
- Avocado Toast
- Overnight Baked French Toast Casserole
How to Store
This bread is best right after it’s sliced, but it will stay fresh for 2-3 days at room temperature in an airtight container or plastic bag.
Can I Freeze This Recipe?
Once the bread has cooled, slice the loaf. Wrap it in two layers of plastic wrap, then place it inside a freezer bag. Freeze for up to 2 months. To thaw, remove the bread from the freezer and leave it on your kitchen counter until it’s no longer frozen.
More Vegan Yeasted Bread Recipes
- Vegan Japanese Milk Bread
- Garlic and Rosemary Focaccia Bread
- No Knead Bread (Dutch Oven Bread)
- Gluten Free Focaccia Bread with Garlic, Rosemary and Tomatoes
- Vegan Cinnamon Rolls
Ingredients
- 1 ½ cups gluten-free oats , 144 grams
- 3 tablespoons psyllium husk , 18 grams
- 1 ¾ cups + 1 tablespoon soy milk , 435 ml
- 1 cup brown rice flour , 160 grams
- 6 tablespoons potato starch , 72 grams
- 6 tablespoons tapioca starch , 60 grams
- 2 ½ teaspoons instant yeast
- 2 teaspoon salt
- 1 teaspoon baking powder
- 3 tablespoons maple syrup
- 2 tablespoon olive oil
- 1 teaspoon apple cider vinegar
Instructions
- Add the gluten-free oats to a high speed blender. Process until they resemble flour. It’s fine if there are a few larger pieces of oats in the oat flour.
- Warm the soy milk to 110ºF/43ºC. Combine the psyllium husk with the soy milk in a small bowl or measuring cup. Mix well and set aside. It will begin to thicken and resemble runny oatmeal.
- Combine the brown rice flour, oat flour, potato starch, tapioca starch, baking powder and salt in the bowl of a stand mixer fitted with the hook attachment. Stir together until well mixed. Then add the instant yeast and mix again.
- Add the psyllium gel, maple syrup, olive oil and vinegar to the flour mixture. Stir on low speed until the dry ingredients are incorporated. You may need to scrape down the bowl a few times. Once all of the flour is incorporated, increase the speed to medium low and mix for 5 minutes.
- Once the mixing time has elapsed, allow the dough to rest for 10 minutes in the bowl.
- Turn the dough out onto a lightly floured surface. Knead the dough gently a few times until you can form it into a smooth circle. Pat the dough out into a rectangle shape as wide as your bread pan. Then roll the dough up into a log, tucking the ends under, and place it into a Pullman pan.
- Cover the dough and leave it to rise in a warm place for about an hour or until it has doubled in size.
- Place a pan of water on the bottom rack of your oven. Preheat the oven to 400ºF / 204ºC.
- Once the dough has risen, place it in the preheated oven. Immediately reduce the temperature to 375ºF / 190ºC. Bake at 375ºF / 190ºC for 30 minutes with steam (do not open the door during this time). Remove the steam pan and bake for another 20-30 minutes at 375ºF / 190ºC. The final internal temperature should be at least 205ºF / 96ºC on an instant read thermometer.
- Remove the loaf from the oven and allow it to cool completely before slicing; it will take 4 hours or more. Overnight cooling is best. If you slice it too soon, the inside will be gummy. If your bread feels too crisp on the outside, place it in a closed bread bag and the outside will soften.
