Roasted Sweet Potato Soup tastes absolutely creamy, is loaded with flavour and is made in your oven! The ingredients are roasted then put right into your blender , so NO time is spent hovering over the stove. It’s one of easiest soups you’ll ever make.
Soup on a SHEET PAN. If you’ve been here for a while then you know that I first tried this crazy easy recipe for my Roasted Carrot Soup . MAN – that recipe video has amassed almost a million views and it tastes absolutely amazing. Needless to say, it became a real hit with you guys and I wanted to experiment with it again. After all, my combined love for soup and easy weeknight meals basically demanded that I try that method again.
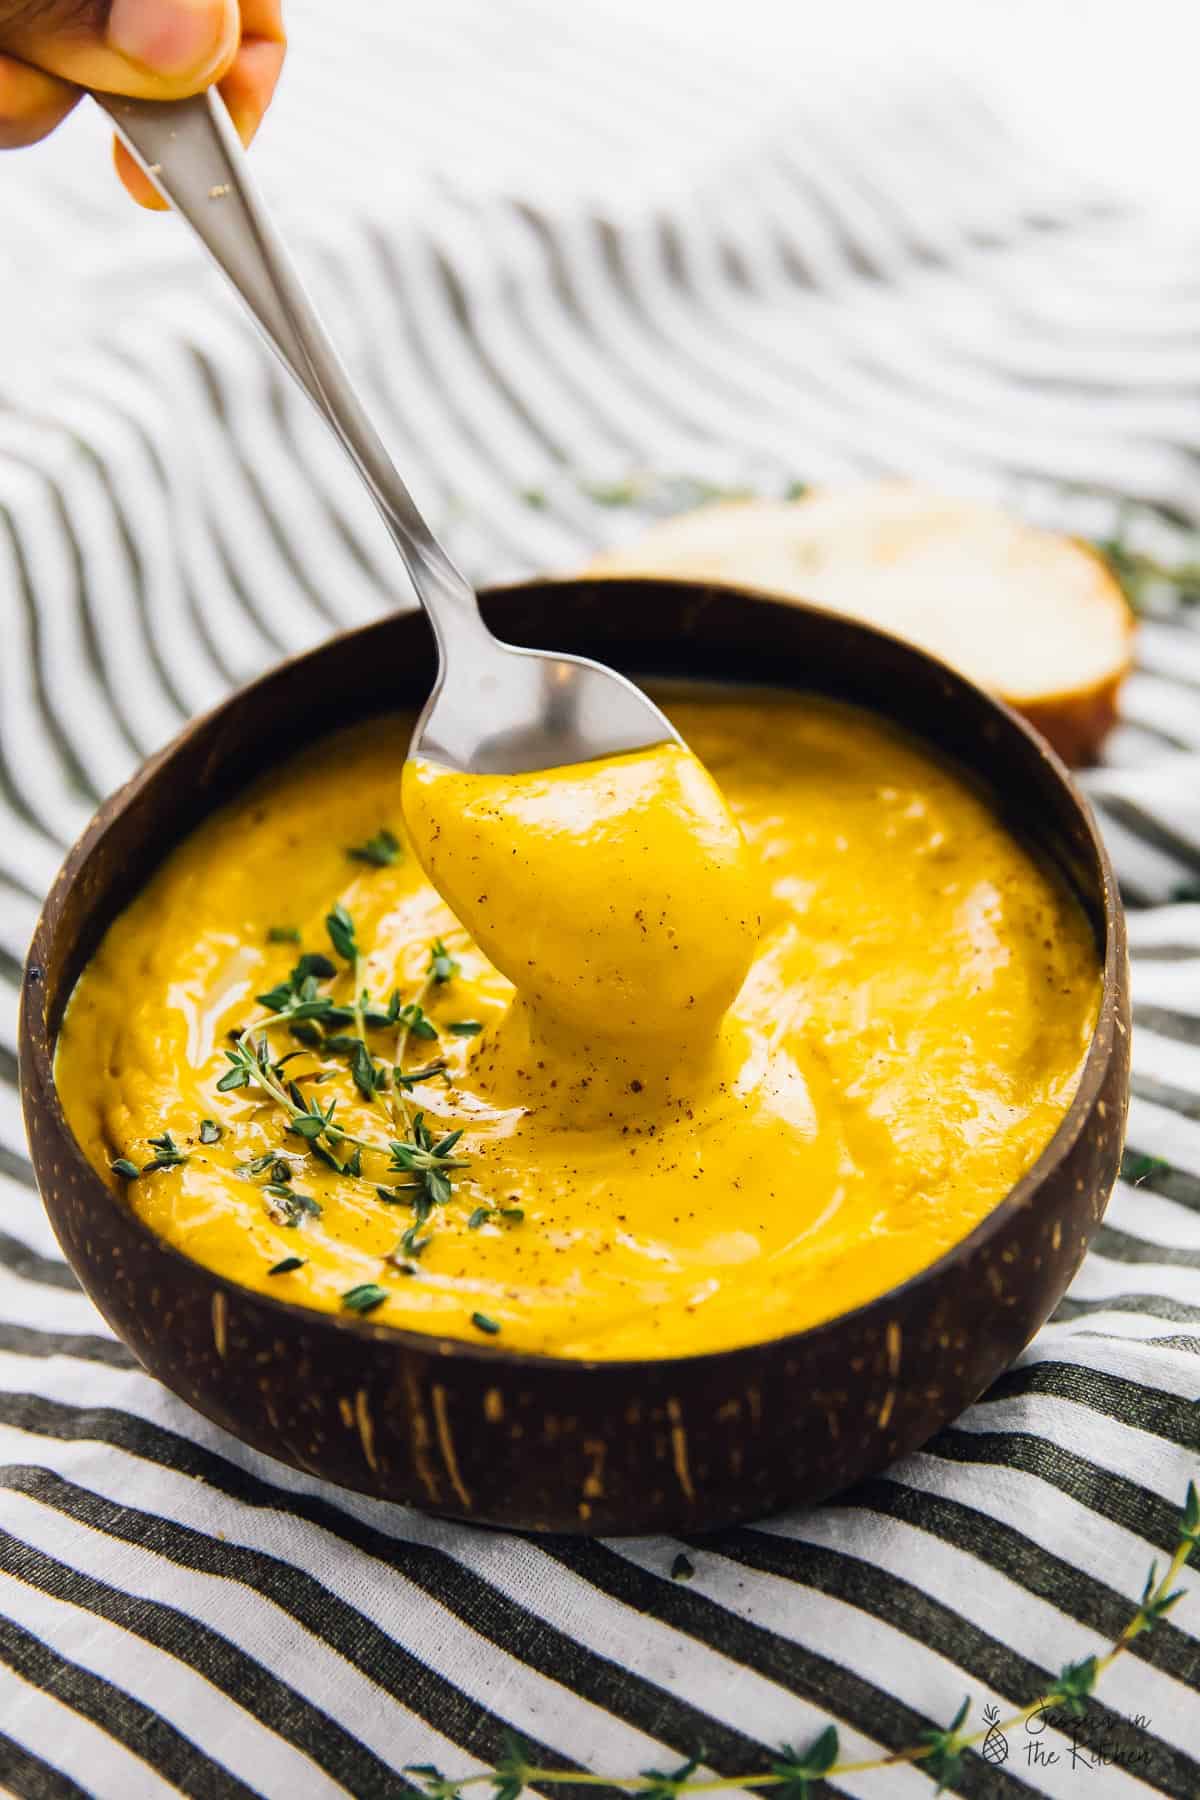
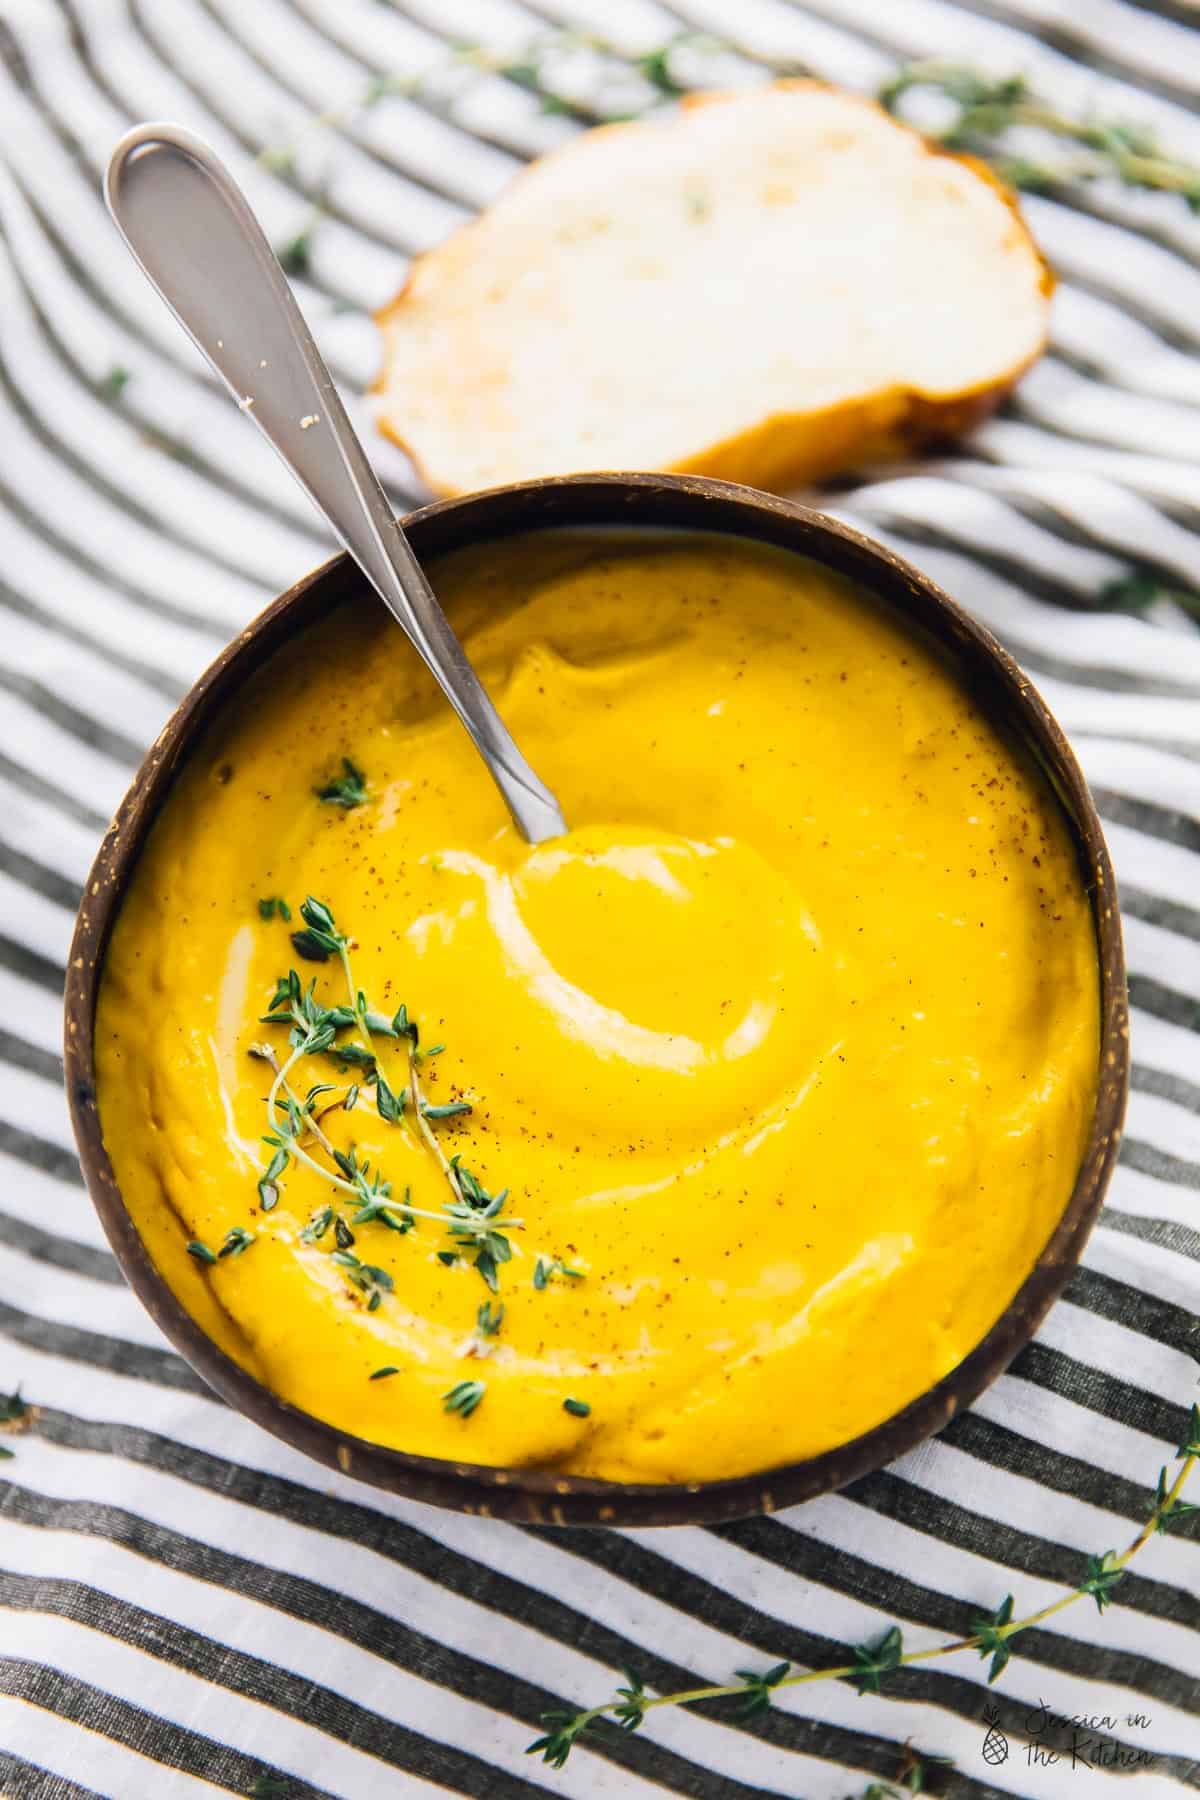
Spoiler alert: it works perfectly here. It’s almost criminal how easy this soup is to prep. This Roasted Sweet Potato Soup is kinda sweet, really creamy, super smooth and loaded with so much flavour. The roasting of the vegetables brings out all of their beautiful flavours and aromas. It’s beautifully spiced thanks to the cinnamon and the nutmeg, and has a subtle spiciness thanks to the black pepper added before roasting. Once blended, it becomes silky smooth and all the flavours meld together. This is one soup you’re going to want to make again and again.
In case you’re still curious as how easy it is: Let me break down the method for you. I promise after you read it – you’re going to want to meal prep this pronto.
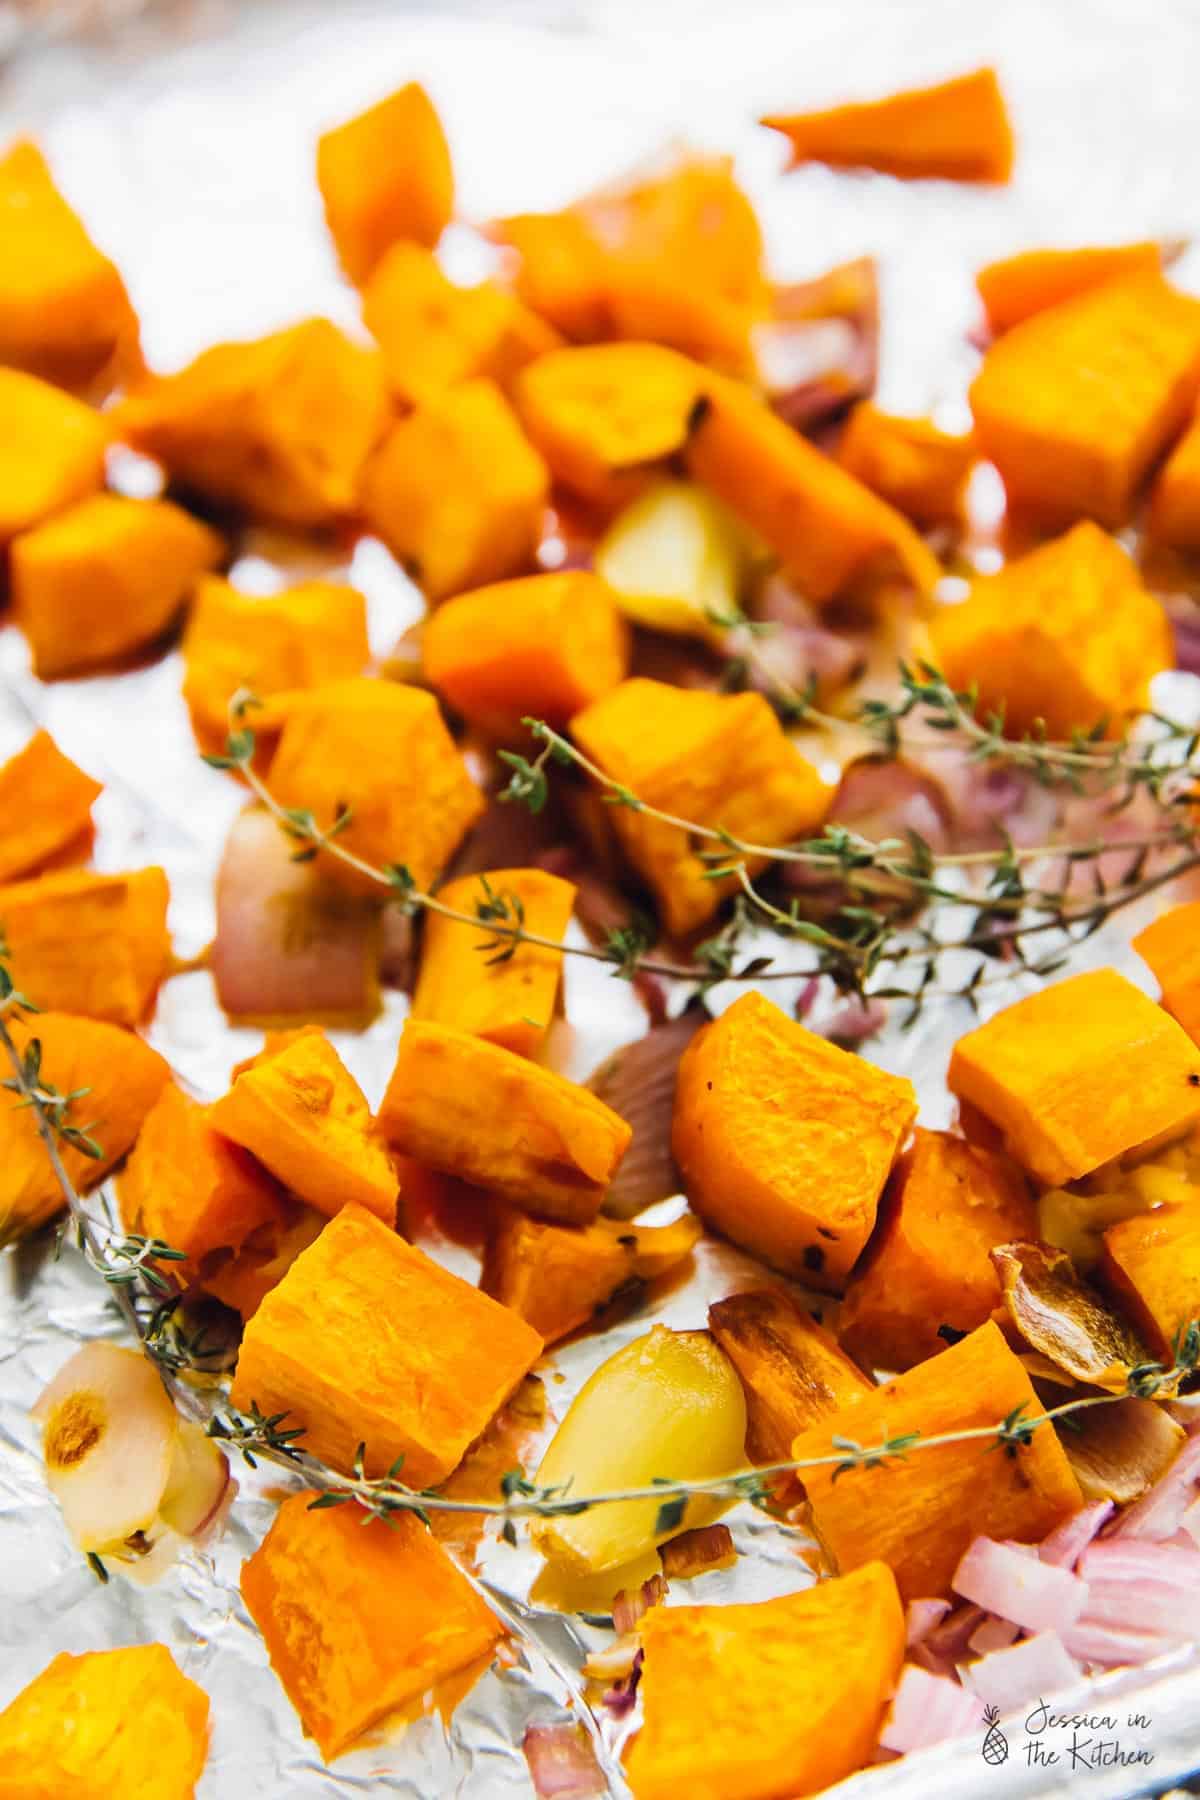
Add the sweet potato cubes to a lined baking sheet. Add in the onions and garlic and mix it all up with coconut oil. Sprinkle over a little bit of salt and pepper (or sans that – up to you). Roast – then add it to a blender with some spices, coconut milk and hot broth and bam – Roasted Sweet Potato Soup. Easy, right?
It’s good to know that on top of the flavour, you’ll feel so warm, comforted and satisfied while eating this this beauty. This soup is even so pretty I would definitely serve it as an appetiser at Thanksgiving.

I’ve already made this twice in one week because of the small list of ingredients and the ease to make it. It’s also easily doubled if you’re prepping for a large group or want to store some for lots of meal prep. Speaking of which – this freezes like a beaut. Okay okay, I’ve said enough. It’s time to get cooking. Welcome to your new favourite soup. Enjoy, friends!
Ingredients
- 1 ½ tablespoons coconut or olive oil
- 1.5 pounds 680g sweet potato, peeled and cubed
- ½ medium red onion , chopped into large pieces
- 3 large garlic cloves , skins smashed but left on
- 2 sprigs thyme
- ¼ teaspoon sea salt
- 3 cups very hot vegetable broth*
- 1 1/2 cups 400g coconut milk (or 1 can)
- ½ teaspoon cinnamon
- ¼ teaspoon nutmeg
Instructions
- Preheat oven to 425 degrees F/218 degrees C.
- On a large sheet pan prepared with a silicone mat, parchment or greased foil, add the cubed sweet potatoes and the onions. Drizzle the oil over the vegetables. Season with a grinding of fresh sea salt and ground black pepper. Rub the seasonings and oil into the vegetables and spread out. Add the garlic and thyme sprigs alongside the vegetables at this point.
- Roast for 25 to 30 minutes, turning halfway, until veggies are roasted and sweet potatoes are cooked through.
- Remove from oven and remove the skins from the garlic.
- In a large blender, add all the remaining ingredients with the vegetables (if your thyme isn’t dried out, you can pick the leaves off the stems and add that in too). Ensure that the broth is very hot. If you’re not using large blender (holds at least 6 cups) then do this in increments.
- Using the soup setting on your blender, or a very powerful blend option, blend until creamy and smooth. My blender automatically blends for about 3 minutes continuously.
- Taste and add salt and pepper to taste if necessary.
- Top with garnish (I used some thyme leaves that I removed from their stems and some extra cinnamon).
- Serve into bowls and enjoy!
Notes
Roasted Sweet Potato Soup tastes absolutely creamy, is loaded with flavour and is made in your oven! The ingredients are roasted then put right into your blender , so NO time is spent hovering over the stove. It’s one of easiest soups you’ll ever make.
Soup on a SHEET PAN. If you’ve been here for a while then you know that I first tried this crazy easy recipe for my Roasted Carrot Soup . MAN – that recipe video has amassed almost a million views and it tastes absolutely amazing. Needless to say, it became a real hit with you guys and I wanted to experiment with it again. After all, my combined love for soup and easy weeknight meals basically demanded that I try that method again.
Spoiler alert: it works perfectly here. It’s almost criminal how easy this soup is to prep. This Roasted Sweet Potato Soup is kinda sweet, really creamy, super smooth and loaded with so much flavour. The roasting of the vegetables brings out all of their beautiful flavours and aromas. It’s beautifully spiced thanks to the cinnamon and the nutmeg, and has a subtle spiciness thanks to the black pepper added before roasting. Once blended, it becomes silky smooth and all the flavours meld together. This is one soup you’re going to want to make again and again.
In case you’re still curious as how easy it is: Let me break down the method for you. I promise after you read it – you’re going to want to meal prep this pronto.
Add the sweet potato cubes to a lined baking sheet. Add in the onions and garlic and mix it all up with coconut oil. Sprinkle over a little bit of salt and pepper (or sans that – up to you). Roast – then add it to a blender with some spices, coconut milk and hot broth and bam – Roasted Sweet Potato Soup. Easy, right?
It’s good to know that on top of the flavour, you’ll feel so warm, comforted and satisfied while eating this this beauty. This soup is even so pretty I would definitely serve it as an appetiser at Thanksgiving.
I’ve already made this twice in one week because of the small list of ingredients and the ease to make it. It’s also easily doubled if you’re prepping for a large group or want to store some for lots of meal prep. Speaking of which – this freezes like a beaut. Okay okay, I’ve said enough. It’s time to get cooking. Welcome to your new favourite soup. Enjoy, friends!
Ingredients
- 1 ½ tablespoons coconut or olive oil
- 1.5 pounds 680g sweet potato, peeled and cubed
- ½ medium red onion , chopped into large pieces
- 3 large garlic cloves , skins smashed but left on
- 2 sprigs thyme
- ¼ teaspoon sea salt
- 3 cups very hot vegetable broth*
- 1 1/2 cups 400g coconut milk (or 1 can)
- ½ teaspoon cinnamon
- ¼ teaspoon nutmeg
Instructions
- Preheat oven to 425 degrees F/218 degrees C.
- On a large sheet pan prepared with a silicone mat, parchment or greased foil, add the cubed sweet potatoes and the onions. Drizzle the oil over the vegetables. Season with a grinding of fresh sea salt and ground black pepper. Rub the seasonings and oil into the vegetables and spread out. Add the garlic and thyme sprigs alongside the vegetables at this point.
- Roast for 25 to 30 minutes, turning halfway, until veggies are roasted and sweet potatoes are cooked through.
- Remove from oven and remove the skins from the garlic.
- In a large blender, add all the remaining ingredients with the vegetables (if your thyme isn’t dried out, you can pick the leaves off the stems and add that in too). Ensure that the broth is very hot. If you’re not using large blender (holds at least 6 cups) then do this in increments.
- Using the soup setting on your blender, or a very powerful blend option, blend until creamy and smooth. My blender automatically blends for about 3 minutes continuously.
- Taste and add salt and pepper to taste if necessary.
- Top with garnish (I used some thyme leaves that I removed from their stems and some extra cinnamon).
- Serve into bowls and enjoy!
Notes

Roasted Sweet Potato Soup (Easy Sheet Pan Soup!)
Ingredients
- 1 ½ tablespoons coconut or olive oil
- 1.5 pounds 680g sweet potato, peeled and cubed
- ½ medium red onion chopped into large pieces
- 3 large garlic cloves skins smashed but left on
- 2 sprigs thyme
- ¼ teaspoon sea salt
- 3 cups very hot vegetable broth*
- 1 1/2 cups 400g coconut milk (or 1 can)
- ½ teaspoon cinnamon
- ¼ teaspoon nutmeg
Instructions
- Preheat oven to 425 degrees F/218 degrees C.
- On a large sheet pan prepared with a silicone mat, parchment or greased foil, add the cubed sweet potatoes and the onions. Drizzle the oil over the vegetables. Season with a grinding of fresh sea salt and ground black pepper. Rub the seasonings and oil into the vegetables and spread out. Add the garlic and thyme sprigs alongside the vegetables at this point.
- Roast for 25 to 30 minutes, turning halfway, until veggies are roasted and sweet potatoes are cooked through.
- Remove from oven and remove the skins from the garlic.
- In a large blender, add all the remaining ingredients with the vegetables (if your thyme isn’t dried out, you can pick the leaves off the stems and add that in too). Ensure that the broth is very hot. If you’re not using large blender (holds at least 6 cups) then do this in increments.
- Using the soup setting on your blender, or a very powerful blend option, blend until creamy and smooth. My blender automatically blends for about 3 minutes continuously.
- Taste and add salt and pepper to taste if necessary.
- Top with garnish (I used some thyme leaves that I removed from their stems and some extra cinnamon).
- Serve into bowls and enjoy!
Notes
Nutrition
Roasted Sweet Potato Soup (Easy Sheet Pan Soup!) https://jessicainthekitchen.com/roasted-sweet-potato-soup-easy-sheet-pan-soup/ September 12, 2019
These no-bake pumpkin protein balls need only 8 ingredients and 10 minutes to make! They’re vegan and gluten-free, and the perfect quick breakfast or snack. You can even make these energy bites without a food processor!
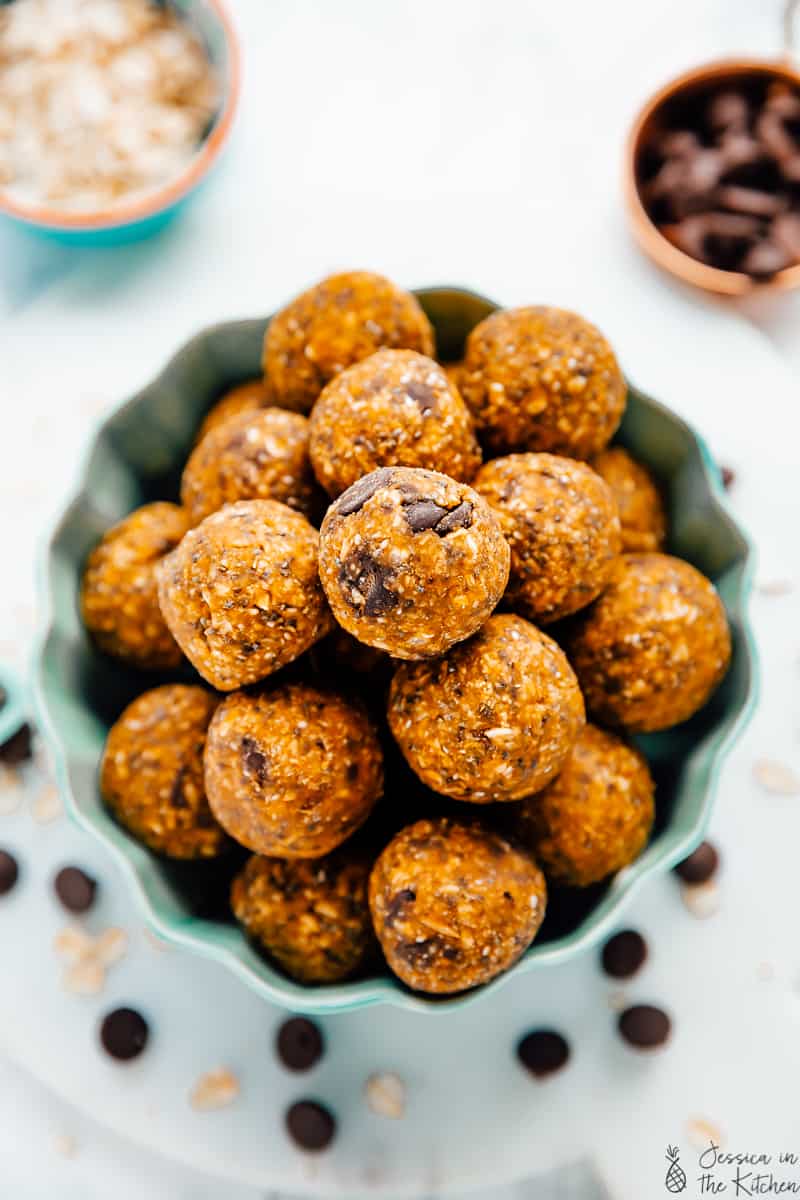
Pumpkin season is here and I’m all about turning a can of pumpkin purée into all sorts of delicious treats from pumpkin cheesecake to these festive pumpkin protein balls. Let me tell you, I love energy bites (or energy balls, depending on who you ask). I’m on a secret mission to have a protein ball recipe in every flavour for every season (Christmas, I’m coming for you), and to make each one just as delicious as the last!
Why I Love These Pumpkin Protein Balls
- Full of flavor. First and foremost, these pumpkin energy balls are chewy, sweet, and filled with tasty ingredients. Yummy fresh pumpkin puree, sweet maple syrup, creamy peanut butter, AND chocolate? Automatically delicious.
- Budget-friendly. I make this recipe without dates (which can be pricey) and sweeten my pumpkin protein balls with maple syrup instead.
- Protein packed. Whenever I need a protein boost, I’ll make a batch of these easy homemade energy bites. They’re the perfect size to satisfy a craving for something sweet, and they always fill me up.
- Quick and easy. These protein balls come together in the blender in minutes. Energy bites have always been amongst my favourite recipes for this reason. They’re versatile and quick to make.
- Convenient. These are great for a quick breakfast, dessert, or lunchbox snack, and they freeze really well. They even store well outside of the fridge, too.
Looking for more pumpkin breakfast recipes? Try my pumpkin chia pudding or pumpkin overnight oats too.
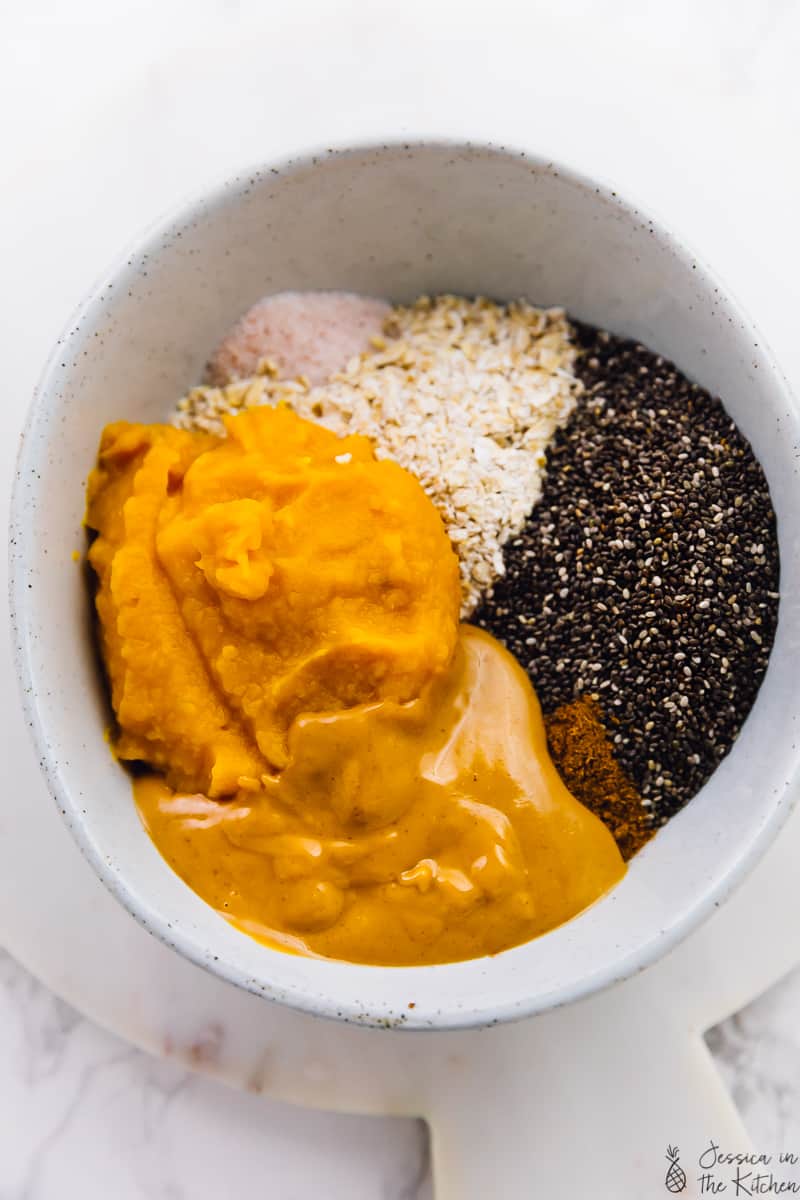
Notes on Ingredients
These pumpkin energy balls are basically the protein ball version of my pumpkin chocolate chip oatmeal breakfast cookies . They use a lot of the same ingredients! Here are some notes. Scroll to the recipe card for a printable list with amounts.
- Oats – I recommend using old-fashioned oats or rolled oats, and you can swap them for each other. Since we’ll be grinding the oats into “flour” you can also skip that step and use your favorite gluten-free flour with a similar texture, like almond flour.
- Pumpkin Spice – I love the smell and flavour of pumpkin pie spice, but you can use cinnamon instead or any mix of warm fall spices like nutmeg, ginger, and allspice.
- Chia Seeds – You can swap the chia seeds for flax seeds, just like in my original pumpkin chocolate chip oatmeal breakfast cookies. You can also leave them out altogether if you prefer.
- Peanut Butter – You can swap the peanut butter for any other nut butter or nut butter alternative, such as sunflower seeds.
- Maple Syrup – Or a similar liquid sweetener, like agave nectar or date syrup.
- Chocolate chips – Feel free to swap the chocolate chips for another add-in, like dried cranberries, pumpkin seeds, or any kind of nut, and you can add in anything you want here, too! You can also skip the add-ins if you’d like.

How to Make Pumpkin Protein Balls
Making these pumpkin protein balls is incredibly easy. All you do is toss everything into the blender and hit go. Here are the quick steps:
- Make the dough. Starting with the oats, pulse them in a blender until they’re finely ground. Add the rest of the ingredients (apart from the chocolate chips) and blend to make a thick dough.
- Add chocolate chips. Lastly, add the chocolate chips to the blender and pulse a few times to roughly incorporate those into the dough.
- Shape the balls. Afterward, use your hands to roll the mixture into balls. You should end up with about 20 energy balls.
- Chill. Place the finished protein balls into the fridge to chill for an hour, and enjoy!

Recipe Tips
- The dough can be sticky. If you find it tricky to handle, try chilling the protein ball dough in the fridge for 15-30 minutes before shaping it into balls. A small cookie scoop also makes it easier to portion the dough into balls.
- Fix dry dough. If the mixture is too dry and starts to crumble as you roll it, simply add a little more pumpkin, or a splash of water to help loosen it up. On the other hand, if your dough is too wet, add more oats.
- Don’t have a food processor? No worries. It’s totally possible to “grind” the oats by hand in this recipe since they don’t need to be a super fine powder. Rub the oats between your hands and work them into crumbs. Afterward, use your hands or a spatula to mix the dough, and continue with the rest of the recipe as directed.

How to Store
- Refrigerate. Keep these pumpkin protein balls airtight in a ziplock bag or container in the fridge. They’ll last for 2 weeks, or maybe even longer!
- Freeze. These protein balls freeze well. Place them in a freezer-safe ziplock bag and freeze them for up to 3 months. Thaw on the counter for 30 minutes or in the fridge before serving.
More Pumpkin Recipes To Try
- Pumpkin Granola
- Vegan Pumpkin Cheesecake
- Soft Pumpkin Cookies
- Pumpkin Cream Cheese Muffins
- Pumpkin Pancakes
Ingredients
- 2 1/4 cups old fashioned or rolled quick oats
- 1/2 teaspoon fine sea salt
- 1 teaspoon pumpkin spice
- 1/4 cup chia seeds
- 1/2 cup pumpkin puree
- 1/4 cup organic peanut butter
- 1/4 cup maple syrup
- 1/3 cup vegan chocolate chips
Instructions
- Grind the oats for about 1 minute in a food processor, until they’re almost ground down.
- Add in all the other ingredients minus the chocolate chips and mix until incorporated and the mixture begins to turn into a dough. It should be slightly sticky and very thick.
- Add in the chocolate chips and pulse about 15 times until the chips are smaller and incorporated throughout the energy bites.
- Roll the mixture into round balls using a tablespoon measurer until the entire mixture is rolled out, into about 20-22 bites.
- Place in the fridge for at least an hour to set, then enjoy!
Notes
- This recipe is gluten-free and vegan.
- Don’t have a food processor? That’s fine! Grind the oats with your hands until they are broken up into fine pieces. You don’t need them super fine like flour for this recipe. Afterward, mix all the ingredients with your hands or a spatula until they’re well combined. Roll the balls and continue with the rest of the recipe as written.
- Storage: You can store these pumpkin balls in the fridge in a zipped bag or airtight Tupperware container for at least 2 weeks.
- Freezing: These bites freeze very well. Just place them in a freezer-safe ziplock bag until ready to use. Thaw on the counter for 30 minutes or in the fridge until ready to use.
