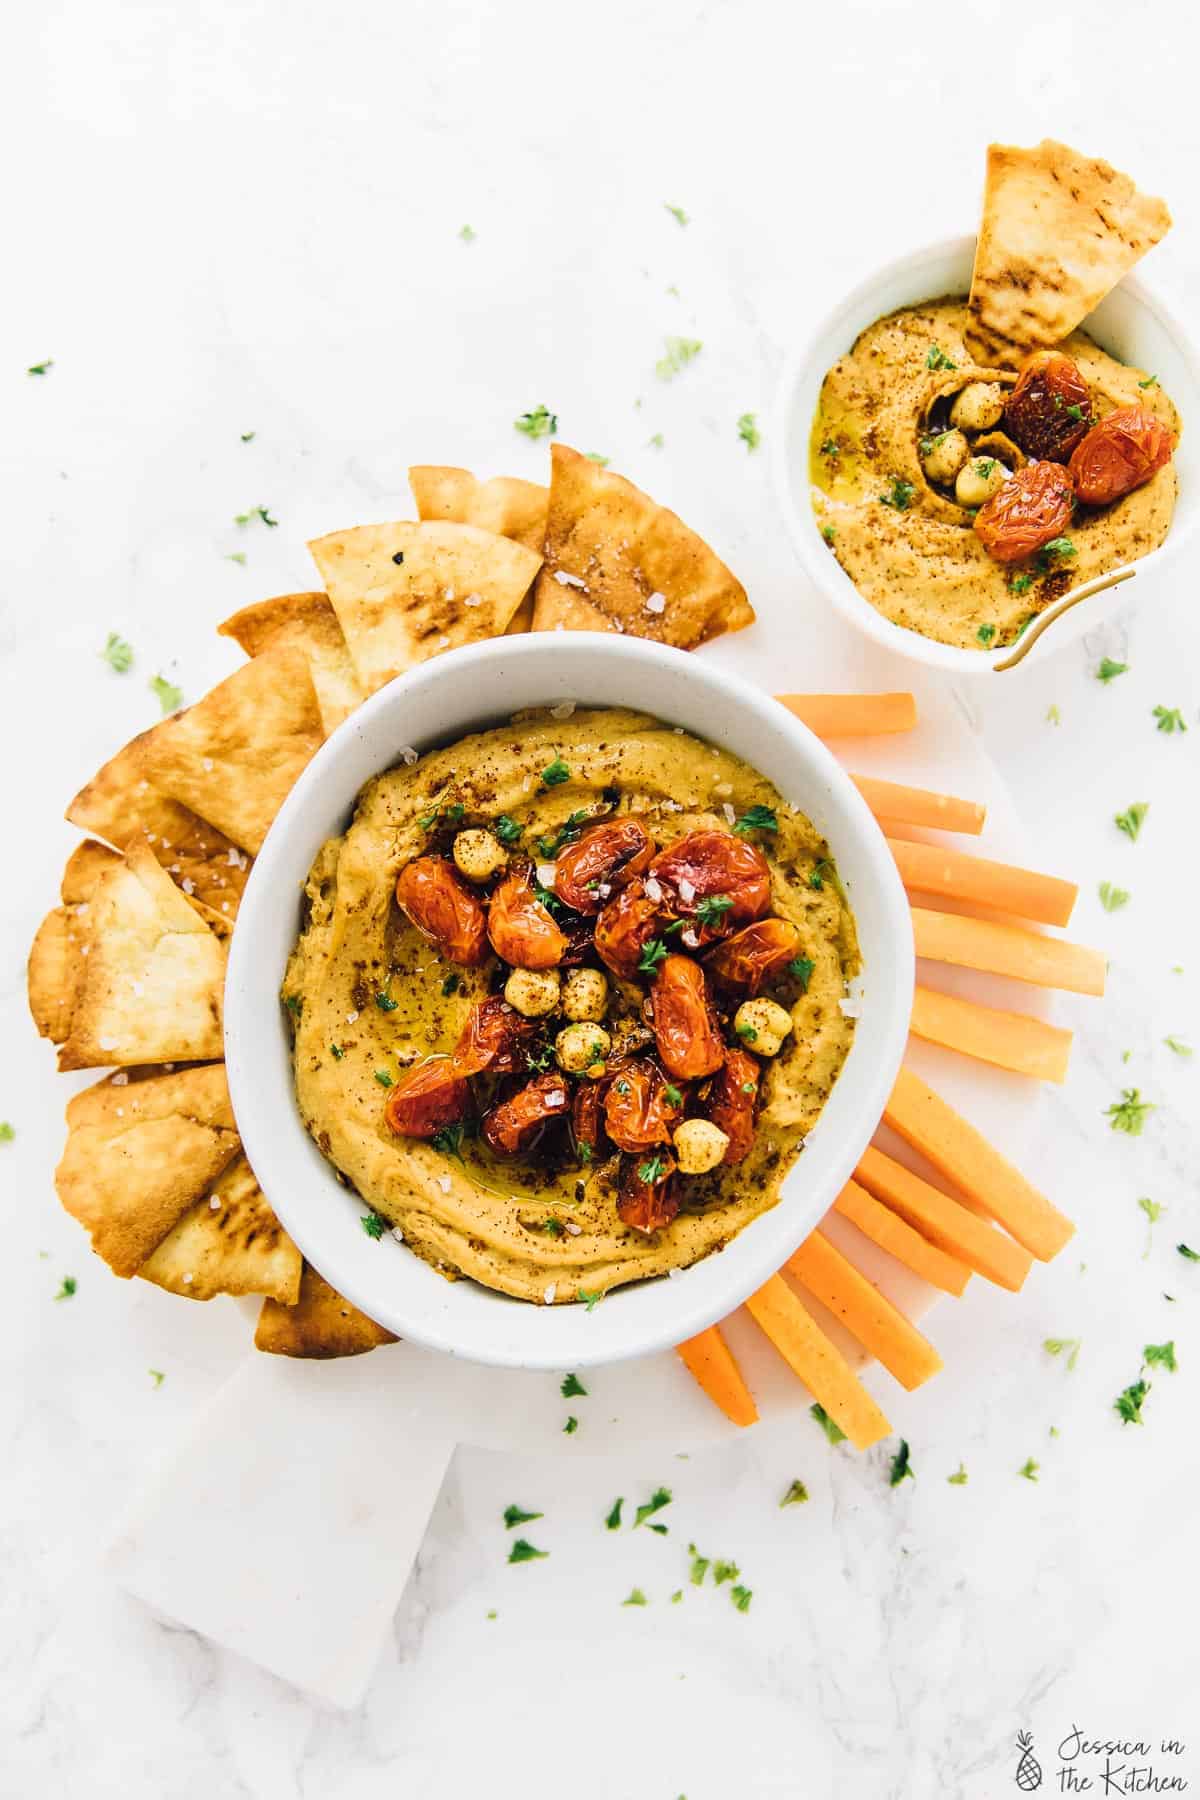
This roasted red pepper hummus isn’t just a dip—it’s a total multitasker! Whether you use it as a spread for sandwiches, add a scoop to salads, or dip veggies in it, you’ll love the sweet and spicy flavour and smooth, creamy texture.

When I say that this roasted red pepper hummus is good, I mean it is so tasty that when I first developed the recipe, I ate it with crackers for dinner a few nights in a row. In addition to the red peppers, I add roasted cherry tomatoes, which add to the peppers’ sweetness but contribute some acidity to the mix too, which makes the flavours really pop. Harissa adds a kick, while roasted garlic brings in a lot of depth. This is NOT your average roasted red pepper hummus recipe, friends!
Why This Roasted Red Pepper Hummus Is a Must-Make
If you’re looking for a crowd-pleasing appetizer or a flavourful snack, this roasted red pepper hummus checks all the boxes!
- Much tastier than store-bought . There are so many layers of flavour here, from the sweetness of the roasted red peppers to the smoky heat of the harissa, which you’ll also know from my Baked Carrot Fries with Harissa Tahini Dip . Plus, making your own hummus allows you to adjust it to your liking, so you can make it tangier, spicier, more savoury, etc.
- Super versatile . While hummus is most known as a dip for pitas and veggies, I love using this roasted red pepper hummus on veggie sandwiches and wraps, adding a scoop to meal bowls, and jazzing up salads (like this Fattoush Salad ).
- Perfect for meal prep . This roasted red pepper hummus is great for meal prepping because it lasts in the fridge for up to a week. You can make a big batch and portion it out for snacks and meals all week long!
Notes on Ingredients
Here are the key ingredients you’ll need to make roasted red pepper hummus. Scroll down to the recipe card to find the ingredient quantities and recipe instructions.
- Red bell peppers – I’ve also made this recipe with yellow and orange bell peppers, which work equally well. I just like the colour of red peppers better!
- Cherry tomatoes – These get caramelised and even sweeter when roasted, but they also add some acidity.
- Cooked chickpeas – You can use canned chickpeas or start with dried chickpeas and cook them. If you’d like, you can add extra chickpeas as a garnish too.
- Water
- Olive oil
- Sea salt and black pepper
- Lime juice – Lemon juice can be used instead if you prefer.
- Ground harissa – This has a smoky, spicy kick. If you want the smokiness without the heat, you can use smoked paprika instead.
- Tahini – Here’s How To Make Tahini at home.
- Roasted garlic – Or you can use Air Fryer Roasted Garlic if you have an air fryer .
How to Make Roasted Red Pepper Hummus
Follow these steps to make this flavourful hummus at home!
- Prepare . Preheat your oven to 400°F and line a baking sheet with a silicone mat or greased parchment paper.
- Oil the veggies . Slice the peppers in half, remove the tops, and place them cut-side down on the prepared baking sheet. Add the cherry tomatoes and toss everything with the oil.
- Bake . Place the pan in the oven and bake for 40 minutes, or until the peppers are tender and tomatoes are blistered. Let the veggies cool.
- Blend . Reserve the roasted tomatoes. Add the rest of the ingredients, along with the roasted red peppers, to a food processor and process until smooth.
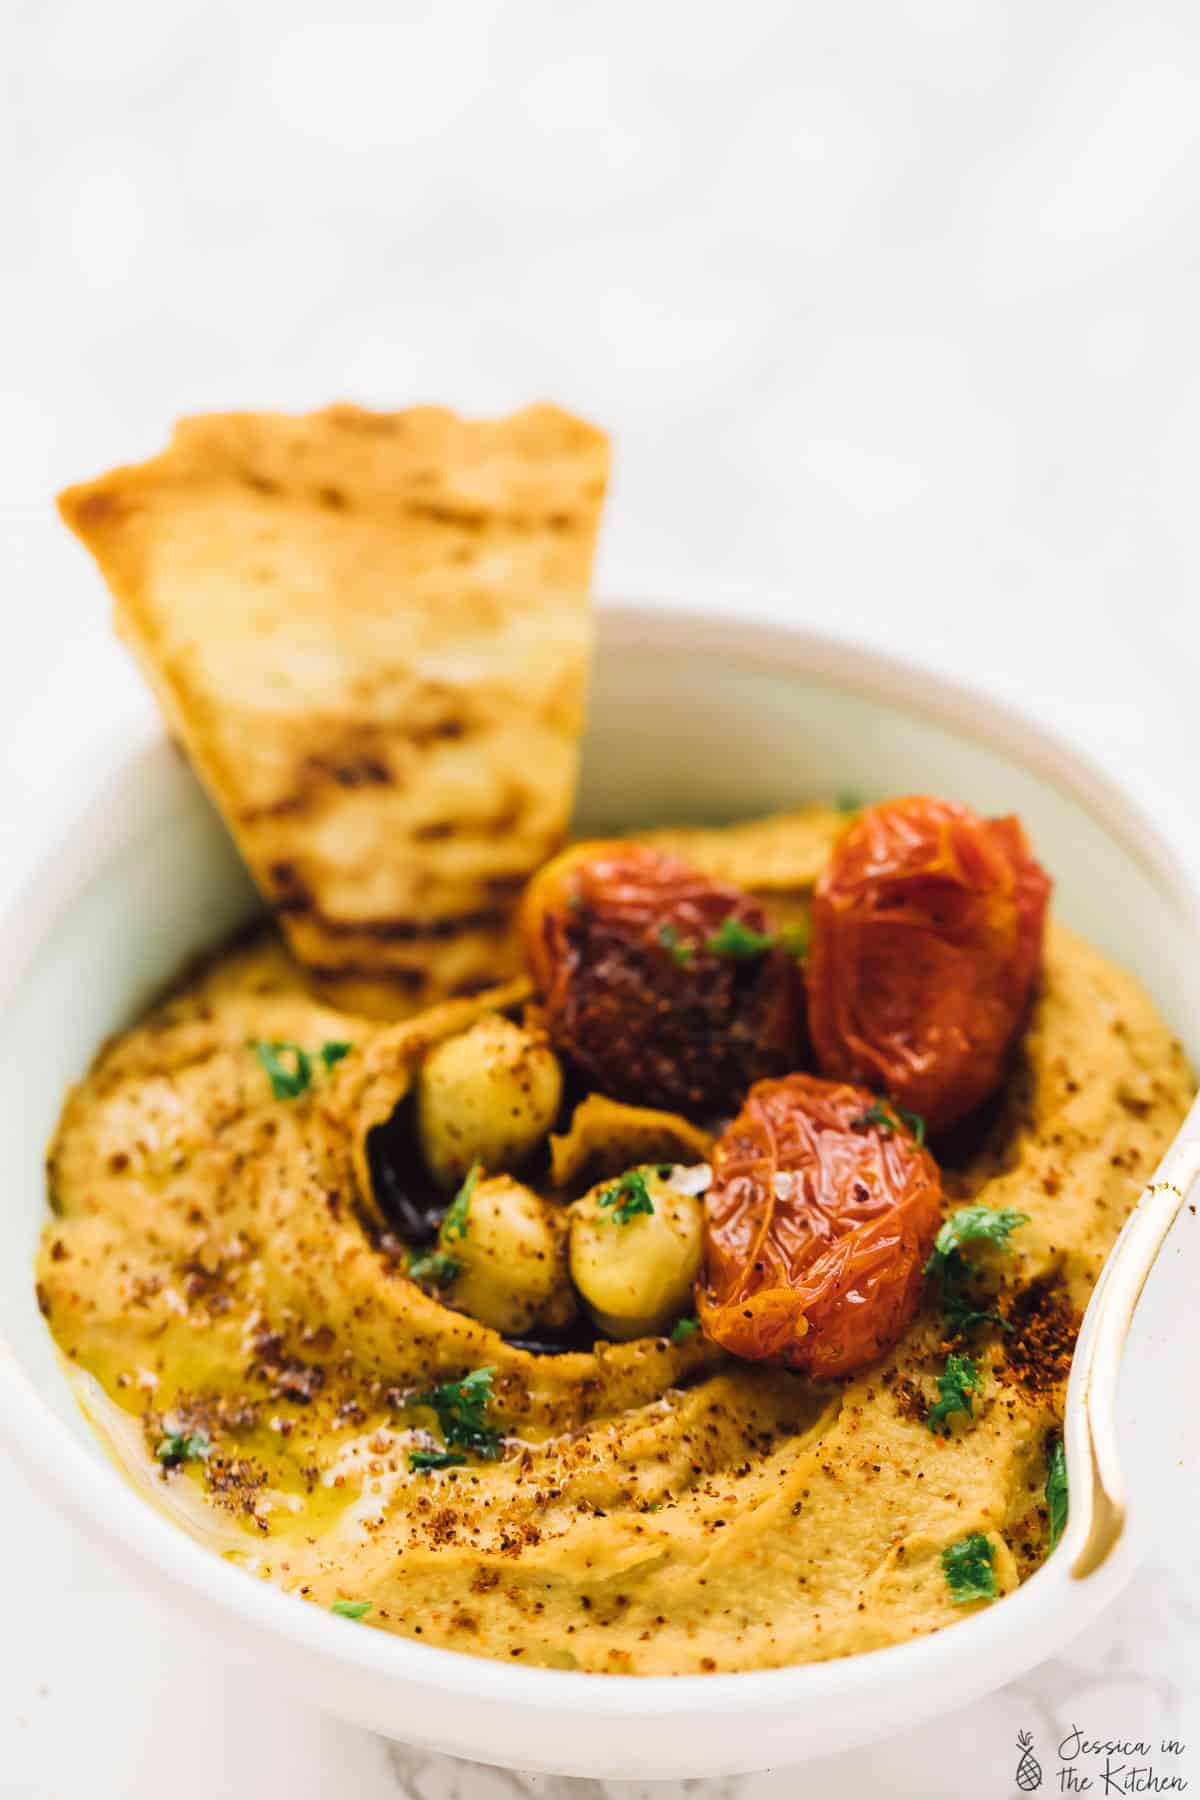
- Serve . Scoop the hummus into a bowl. Drizzle with olive oil and add the roasted tomatoes and extra chickpeas on top.

Tips and Variations
- Adjust the flavours and consistency to your tastes . Feel free to increase or decrease the salt, harissa, oil or lime juice in the recipe by tasting and adjusting accordingly.
- Get a head start . You can roast the tomatoes, garlic, and red peppers ahead of time—they’ll last in the fridge for 2 days before you make the hummus.
- Add toppings and garnishes . Along with the roasted tomatoes and chickpeas, you can add toppings like kalamata olives, Tofu Feta , fresh herbs, toasted pine nuts, etc. Feel free to get creative!
Serving Suggestions
Create a mezze platter with your roasted red pepper hummus, Baba Ghanoush , Grilled Vegetables , and Crispy Homemade Falafel . You can also use this hummus as a spread for burgers and sandwiches, like this Falafel Burger . Or just keep it simple and serve it with Homemade Pita Chips !
How to Store Leftovers
- Refrigerator : You can store roasted red pepper hummus in an airtight container in the fridge for up to 5 days.
- Freezer : You can also freeze this hummus for later. Transfer it to a freezer bag or airtight container and freeze for up to 3 months. Thaw in the refrigerator before serving.
More Hummus Recipes
- Perfect Homemade Hummus
- Beet Hummus
- Roasted Cauliflower Hummus
- Hummus Pasta
Ingredients
- 2-3 red bell peppers
- 1 cup cherry tomatoes , 150 g
- 1 ½ cups cooked chickpeas , 240 g
- ¼ cup water , 60 ml
- ¼ cup olive oil , 60 ml
- ¾ teaspoon sea salt , 4.5 g
- ½ teaspoon ground black pepper , 1 g
- Juice of two limes
- 2 tablespoons ground harissa , 18 g
- ¼ cup tahini , 60 g
- 4 cloves roasted garlic
- Additional chickpeas , for topping
Instructions
- Preheat oven to 400 degrees F. Line a baking sheet with a silicone mat or greased parchment paper.
- Slice the tops of the bell peppers and then in half, placing cut sides down . Also place the whole unsliced cherry tomatoes on the baking sheet. Drizzle generously with oil and rub in.
- Bake for 40 minutes until the peppers are soft and the tomatoes are shrivelled and cooked through.
- Remove from oven and allow to cook. In a food processor or a blender , add all the ingredients except the tomatoes and the extra chickpeas on top. Blend until completely smooth.
- Pour/scoop into a serving bowl. Drizzle with more olive oil and top with tomatoes and extra chickpeas. Serve with pita chips and enjoy!
Notes
- Refrigerator : You can store roasted red pepper hummus in an airtight container in the fridge for up to 5 days.
- Freezer : You can also freeze this hummus for later. Transfer it to a freezer bag or airtight container and freeze for up to 3 months. Thaw in the refrigerator before serving.

Roasted Red Pepper Hummus
Ingredients
- 2-3 red bell peppers
- 1 cup cherry tomatoes 150 g
- 1 ½ cups cooked chickpeas 240 g
- ¼ cup water 60 ml
- ¼ cup olive oil 60 ml
- ¾ teaspoon sea salt 4.5 g
- ½ teaspoon ground black pepper 1 g
- Juice of two limes
- 2 tablespoons ground harissa 18 g
- ¼ cup tahini 60 g
- 4 cloves roasted garlic
- Additional chickpeas for topping
Instructions
- Preheat oven to 400 degrees F. Line a baking sheet with a silicone mat or greased parchment paper.
- Slice the tops of the bell peppers and then in half, placing cut sides down . Also place the whole unsliced cherry tomatoes on the baking sheet. Drizzle generously with oil and rub in.
- Bake for 40 minutes until the peppers are soft and the tomatoes are shrivelled and cooked through.
- Remove from oven and allow to cook. In a food processor or a blender, add all the ingredients except the tomatoes and the extra chickpeas on top. Blend until completely smooth.
- Pour/scoop into a serving bowl. Drizzle with more olive oil and top with tomatoes and extra chickpeas. Serve with pita chips and enjoy!
Notes
- Refrigerator : You can store roasted red pepper hummus in an airtight container in the fridge for up to 5 days.
- Freezer : You can also freeze this hummus for later. Transfer it to a freezer bag or airtight container and freeze for up to 3 months. Thaw in the refrigerator before serving.
Nutrition
Roasted Red Pepper Hummus https://jessicainthekitchen.com/roasted-red-pepper-hummus/ July 7, 2025
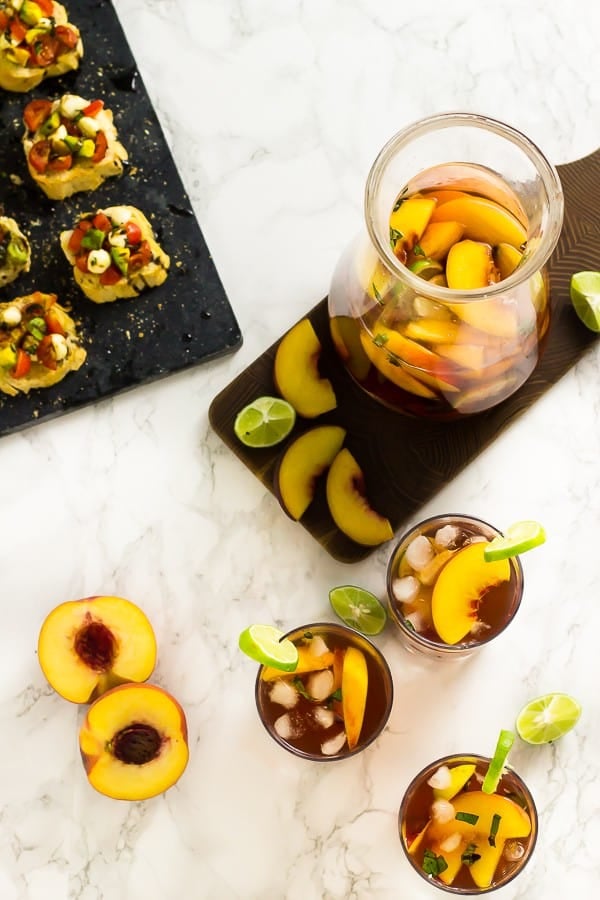
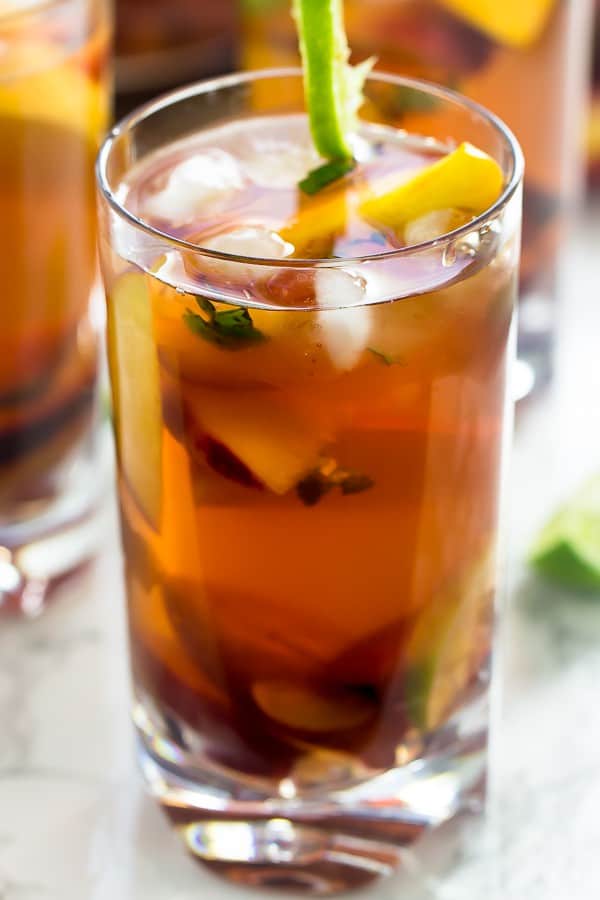
Peach sangria is summer in a glass! Made with white wine, it’s light, refreshing, and the combination of peaches, plums, grapes, and basil infuse it with so much flavour.

Happy Sangria Day! Now, I don’t mean National Sangria Day, which is December 20. I think every day could (and should) be sangria day when you’ve got this peach sangria recipe at the ready. It is so delicious, so fresh with the basil and summer fruits, and it’s a total crowd pleaser. Make this for your next party and watch it disappear fast!
Why Peach Sangria Is the Ultimate Summer Party Starter
If you’re looking for a refreshing, fruity summer drink, look no further! Here’s why this peach sangria is it:
- Light and thirst-quenching . Now, I love a good red wine sangria too (like my Fall Apple Cider Sangria Recipe ), but when it’s summertime, I’m all about white sangrias, which just feel lighter and more refreshing in the heat.
- Flexible ingredients . One of the best things about peach sangria is that you can make it your own by adding different types of fruit or even other types of alcohol, like rosé (inspired by my Rosé Sangria !) or a splash of peach schnapps for a little extra peach flavour.
- Easy to make for big groups . Sangria is a great option for parties because it can be made in large batches in advance. Because you want to be able to enjoy your party, not play bartender all night!
Notes on Ingredients
Here are the ingredients you’ll need to pick up for this peach sangria recipe. Scroll down to the recipe card to find the ingredient quantities and recipe instructions.
- Sugar – You can use cane sugar or coconut sugar .
- Water
- White wine – I use a combination of crisp, dry white wine and a lightly sweet wine. For a dry white wine, try Chardonnay, Sauvignon Blanc, or Pinot Grigio. Riesling, Moscato, and Gewürztraminer are examples of sweet white wines.
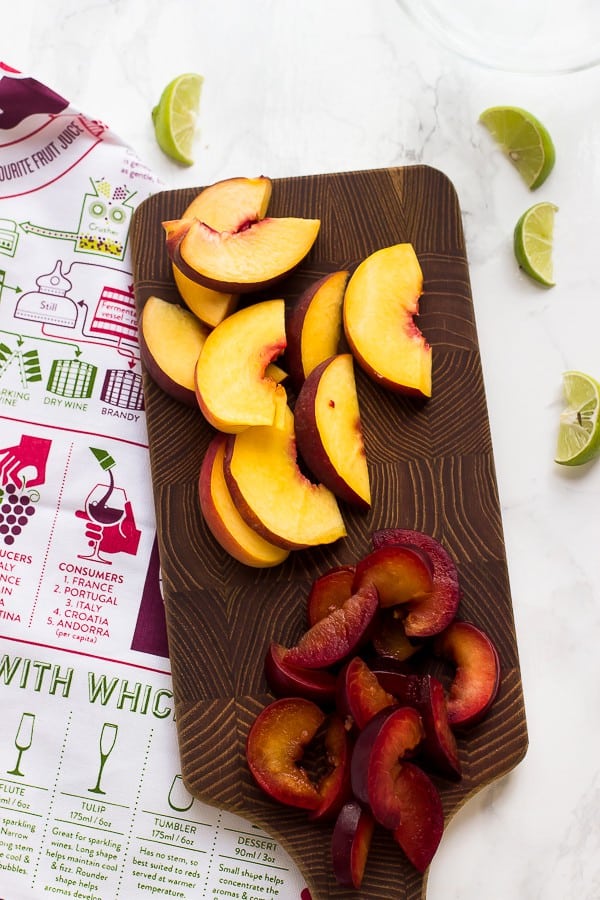
- Basil – This adds a fresh, herbal note and it pairs so well with fresh peaches!
- Peaches – Be sure they are ripe and juicy, otherwise they won’t add much flavour to your sangria.
- Black plums
- Grapes – Slice these in half so they infuse the sangria with flavour.
- Limes – Thin lime slices add a citrusy pop.
How to Make Peach Sangria
It’s so easy to make your own sangria! Here’s what you’ll need to do.
- Make simple syrup . Heat the water and sugar in a pot until it comes to a boil. Simmer for 1 minute, or until the sugar dissolves, and let the mixture cool.
- Combine . Add all of the ingredients, along with the simple syrup, to a large pitcher. Stir to combine.
- Chill . Refrigerate for at least 4 hours, or up to overnight before serving.
Tips and Variations
- Switch up the fruit . Nectarines are a great swap for peaches, you can use apricots or pluots instead of plums, and cherries are an excellent sub for grapes if you want to go all in on the stone fruit. Make this recipe your own!
- Try other herbs . Yes, the herbs are customisable too! Thyme, rosemary, or mint would all work well instead of the basil.
- Make it fizzy . For a refreshing, bubbly twist, top off glasses of sangria with club soda or sparkling water.
- Make it ahead of time—but not too far ahead of time . Sangria is a great make-ahead drink for parties and gatherings, but I’d say after a day in the fridge, it’s not as pretty as you want if you’re serving it for a party.
Serving Suggestions
I love serving this peach sangria alongside simple party apps like a Vegan Charcuterie Board or Vegan Whipped Feta Dip with an assortment of crisp veggies. Or, for a meal, it would pair well with these Crispy Beer-Battered Vegan Fish Tacos or my Quinoa Stone Fruit Salad .
How to Store Leftovers
Peach sangria will last up to 2 days in an airtight pitcher. Store it in the refrigerator and stir it before serving.
More Cocktail Recipes
- Kir Royale
- Mango Mojito
- Pineapple Coconut Rum Cocktail
- Peach Bellini
Ingredients
- 1/2 cup cane/coconut sugar , 100 g
- 1/2 cup water , 120 ml
- 4 cups dry white wine , 1 bottle ( 960 ml)
- 4 cups lightly sweet wine , I used 1 bottle Zinfandel ( 960 ml)
- 2 tablespoons basil , chopped, 6 g
- 2 peaches , sliced
- 2-3 black plums , sliced
- 1/2 cup grapes , sliced, 75 g
- 2 limes , sliced
Instructions
- In a pot over high heat, stir the water and sugar until it comes to a boil. Boil together until they form a simple syrup for about 1 minute. Remove from heat and set aside to cool.
- In a jug, mix all the other ingredients together. Add the simple syrup and swirl to sweeten the sangria.
- You can sneak in a sip now, but refrigerate for 4 hours to overnight for the flavours to meld together properly and be smoother.
