This Roasted Cauliflower Soup uses only a handful of ingredients, but it’s still super creamy and flavourful. Even better, it’s easy enough to whip up for a weeknight dinner!

WATCH THE VIDEO TO SEE HOW IT’S MADE:
You’d think soup would be easy, but so many soup recipes have you gathering a dozen or more ingredients, simmering on the stovetop for an hour or two—who has time for that on a weeknight?! This Roasted Cauliflower Soup isn’t one of those fussy soups, though. It requires only a few ingredients, it’s mostly hands-off, and you’ll have homemade soup ready to eat in under an hour.
And not just any soup! The most delicious cauliflower soup you’ve ever had because instead of simply boiling the cauliflower in broth, it’s roasted first. Hello flavour! When cauliflower is roasted, it takes on a subtly nutty taste, with caramelised edges and a tender interior. To amp up the flavour even more, I roast the cauliflower with garlic and add that to the soup, too. This alone is enough to make for an incredible meal, but I highly recommend going the extra mile and adding some crispy chickpeas , tempeh bacon , or homemade croutons as a topping at the end.
Notes on Ingredients
Please note that this is important information on the ingredients and instructions and the FULL recipe with amounts and details can be found DOWN BELOW (scroll to it) in the recipe card.
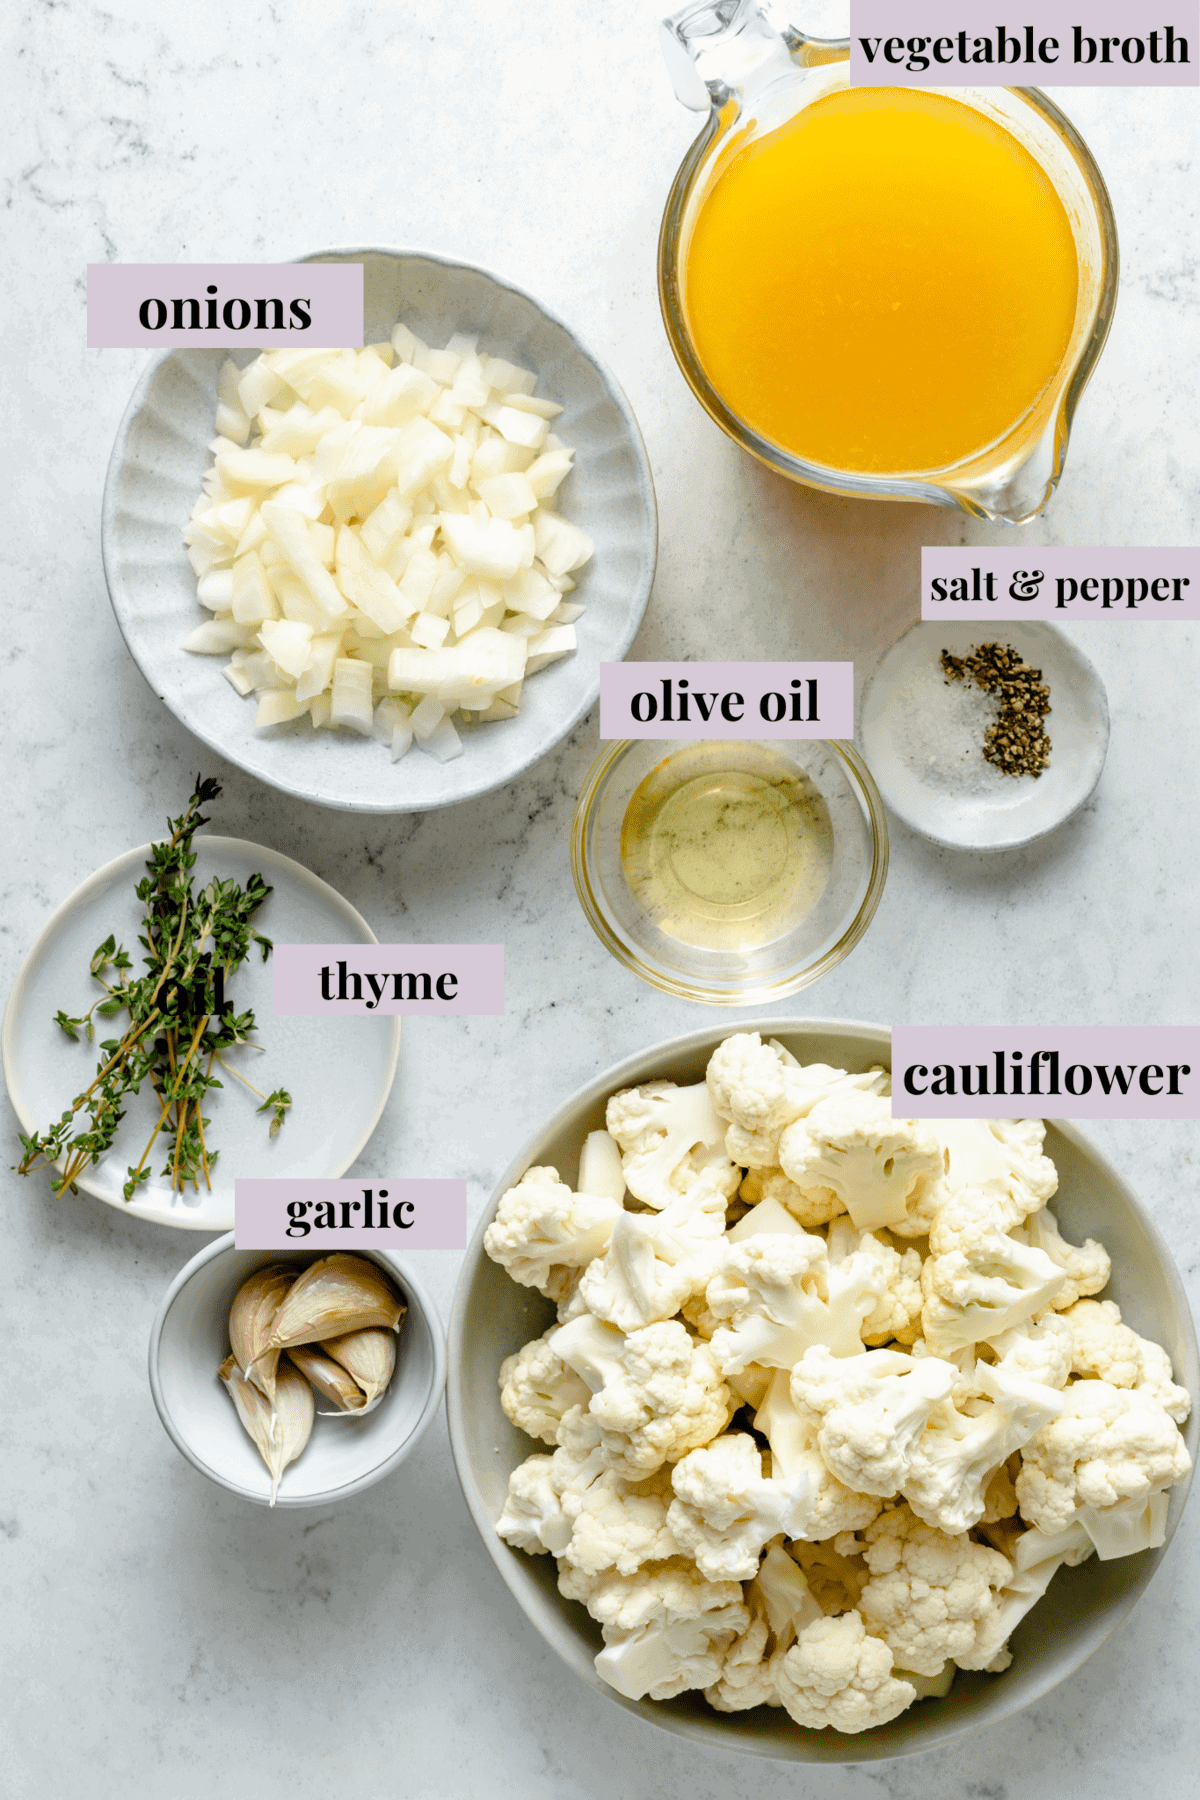
- Cauliflower
- Olive oil
- Salt
- Pepper
- Garlic – Smash the cloves while they’re still in the skins. Or, if you have roasted garlic on hand in the fridge, use that.
- Vidalia onion – Another variety of sweet onion will work, too.
- Thyme
- Vegetable broth – Here’s how to make your own vegetable broth .
How to Make Roasted Cauliflower Soup
Because the cauliflower needs to be roasted first, you can make this recipe in two steps: roast the cauliflower one day, and make the soup the next. Or you can double the roasted cauliflower and have half for dinner the first night and save the rest for soup!
Prepare. Preheat your oven to 450ºF and line a baking sheet with a silicone mat or parchment paper.
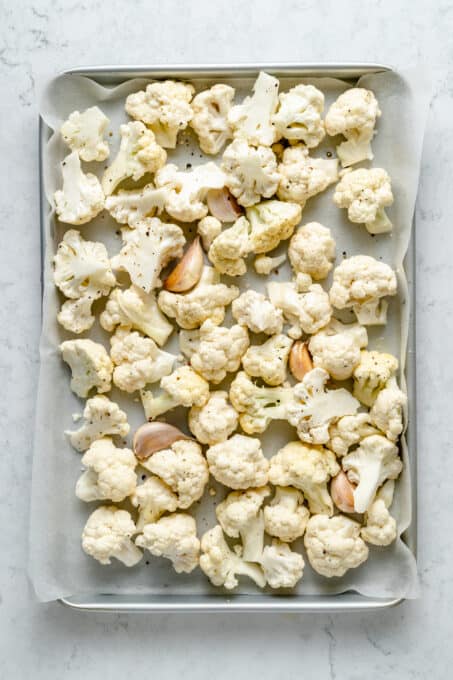
Roast the cauliflower. Place the cauliflower florets on the prepared baking sheet and toss them with olive oil, salt, and pepper. Add the smashed garlic cloves and roast for 15 minutes. Once cooled enough to handle, remove the garlic skins.

Sauté the onion. Warm a half tablespoon of olive oil in a large pot set over medium-high heat. Add the onions and cook for about 8 minutes, or until lightly browned.
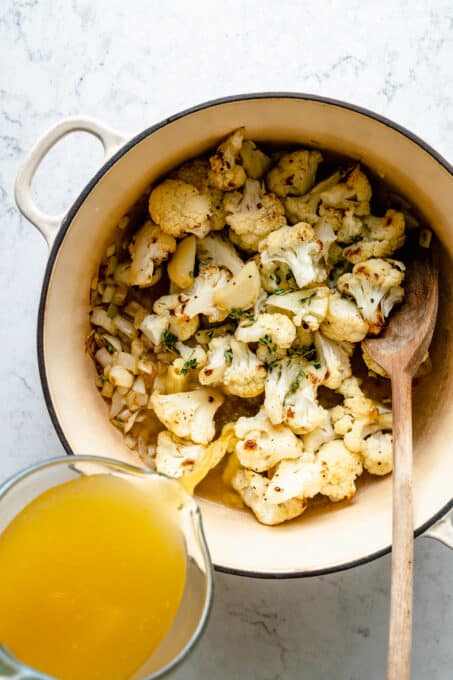
Cook the soup. Add the roasted cauliflower, garlic, 2 sprigs of thyme, and vegetable broth to the pot with the onion. Bring the mixture to a boil, then reduce heat to a simmer for 15 minutes.
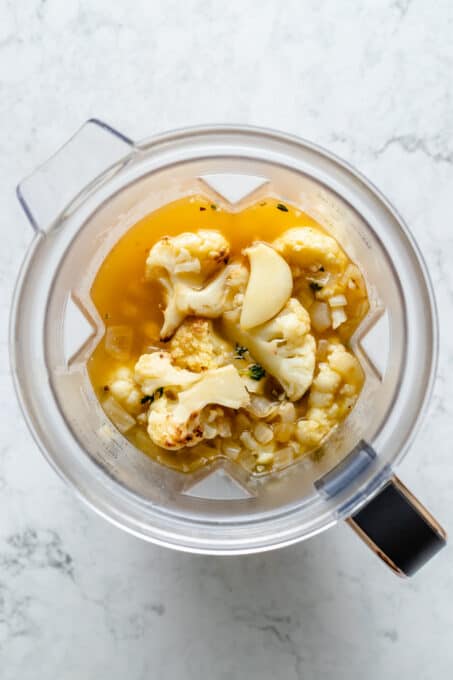
Blend. Use an immersion blender to puree the soup in the pot, or let the soup cool and transfer it to a blender to puree it. Season to taste with salt and pepper.

Serve. Divide the soup into bowls and top with additional cauliflower, crushed red pepper, thyme, and a drizzle of coconut milk, if desired.
Tips for Success
This soup is a cinch to make, but these hints and tips will make it even better!
- Blending safely. The soup needs to cool before you transfer it to a blender. If needed, you can pour it back into the pot after blending and reheat it a bit before serving.
- Adding texture. If you like a chunkier cauliflower soup, you can reserve some of the roasted cauliflower and stir that into the soup after pureeing.
- Creamier soup. You can also add coconut milk or cashew cream for a richer, creamier soup.

How to Store Leftovers
This soup keeps well in the fridge! Refrigerate Roasted Cauliflower Soup in an airtight container for up to 5 days.
Can This Recipe Be Frozen?
Yes, you can freeze cauliflower soup in an airtight container or freezer bag for up to 3 months. It can be reheated from frozen or you can let it thaw in the refrigerator, then warm it up on the stovetop or in the microwave.

Ingredients
Roasted Cauliflower Soup – Vegan, Incredibly Easy
- 1 large head cauliflower , de-stemmed and florets broken up
- 1 1/2 tablespoon olive oil
- salt & pepper to taste
- 5 cloves garlic , smashed with skins still on
- 1/2 large vidalia onion
- 2-3 sprigs thyme , stems removed
- 4 1/2 cups vegetable broth
Instructions
Roasted Cauliflower Soup – Vegan, Incredibly Easy
- Preheat oven to 450 degrees F. Line a baking sheet with a silicone mat.
- Add the cauliflower to the baking sheet and 1 tablespoon olive oil, about ½ teaspoon salt and grind some pepper over it all. Using your hands, mixing it all in, massaging the ingredients into the cauliflower. Add the smashed garlic (skins still on) on the baking sheet. The skins help to prevent it burning; you’ll remove thee afterwards. Roast for 15 minutes. I like to reserve a few pieces after roasting to top the soup with.
- Meanwhile, in a large high sided pot over medium high heat, sauté the onions in the ½ tablespoon olive oil until fragrant and browning, about 8 minutes, stirring infrequently.
- Add the roasted cauliflower, the garlic (skins remove), 2 sprigs of thyme and vegetable broth. Mix together with spatula.
- Bring to a boil, then reduce to a simmer for 15 minutes. Remove from heat and stir once more. If using an immersion blender, blend the soup together. If using a high powered blender, let cool slightly and add slowly to blender. Press the “soup” setting or blend on high until soup is thoroughly mixed and incorporated, at least 1 minute. Be careful that your soup is not too hot to crack your blender. Taste and salt and pepper to taste.
- Pour into bowls and top optionally with extra cauliflower, crushed red peppers, extra thyme and a drizzle of coconut milk. Enjoy!
Notes
This Roasted Cauliflower Soup uses only a handful of ingredients, but it’s still super creamy and flavourful. Even better, it’s easy enough to whip up for a weeknight dinner!
WATCH THE VIDEO TO SEE HOW IT’S MADE:
You’d think soup would be easy, but so many soup recipes have you gathering a dozen or more ingredients, simmering on the stovetop for an hour or two—who has time for that on a weeknight?! This Roasted Cauliflower Soup isn’t one of those fussy soups, though. It requires only a few ingredients, it’s mostly hands-off, and you’ll have homemade soup ready to eat in under an hour.
And not just any soup! The most delicious cauliflower soup you’ve ever had because instead of simply boiling the cauliflower in broth, it’s roasted first. Hello flavour! When cauliflower is roasted, it takes on a subtly nutty taste, with caramelised edges and a tender interior. To amp up the flavour even more, I roast the cauliflower with garlic and add that to the soup, too. This alone is enough to make for an incredible meal, but I highly recommend going the extra mile and adding some crispy chickpeas , tempeh bacon , or homemade croutons as a topping at the end.
Notes on Ingredients
Please note that this is important information on the ingredients and instructions and the FULL recipe with amounts and details can be found DOWN BELOW (scroll to it) in the recipe card.
- Cauliflower
- Olive oil
- Salt
- Pepper
- Garlic – Smash the cloves while they’re still in the skins. Or, if you have roasted garlic on hand in the fridge, use that.
- Vidalia onion – Another variety of sweet onion will work, too.
- Thyme
- Vegetable broth – Here’s how to make your own vegetable broth .
How to Make Roasted Cauliflower Soup
Because the cauliflower needs to be roasted first, you can make this recipe in two steps: roast the cauliflower one day, and make the soup the next. Or you can double the roasted cauliflower and have half for dinner the first night and save the rest for soup!
Prepare. Preheat your oven to 450ºF and line a baking sheet with a silicone mat or parchment paper.
Roast the cauliflower. Place the cauliflower florets on the prepared baking sheet and toss them with olive oil, salt, and pepper. Add the smashed garlic cloves and roast for 15 minutes. Once cooled enough to handle, remove the garlic skins.
Sauté the onion. Warm a half tablespoon of olive oil in a large pot set over medium-high heat. Add the onions and cook for about 8 minutes, or until lightly browned.
Cook the soup. Add the roasted cauliflower, garlic, 2 sprigs of thyme, and vegetable broth to the pot with the onion. Bring the mixture to a boil, then reduce heat to a simmer for 15 minutes.
Blend. Use an immersion blender to puree the soup in the pot, or let the soup cool and transfer it to a blender to puree it. Season to taste with salt and pepper.
Serve. Divide the soup into bowls and top with additional cauliflower, crushed red pepper, thyme, and a drizzle of coconut milk, if desired.
Tips for Success
This soup is a cinch to make, but these hints and tips will make it even better!
- Blending safely. The soup needs to cool before you transfer it to a blender. If needed, you can pour it back into the pot after blending and reheat it a bit before serving.
- Adding texture. If you like a chunkier cauliflower soup, you can reserve some of the roasted cauliflower and stir that into the soup after pureeing.
- Creamier soup. You can also add coconut milk or cashew cream for a richer, creamier soup.
How to Store Leftovers
This soup keeps well in the fridge! Refrigerate Roasted Cauliflower Soup in an airtight container for up to 5 days.
Can This Recipe Be Frozen?
Yes, you can freeze cauliflower soup in an airtight container or freezer bag for up to 3 months. It can be reheated from frozen or you can let it thaw in the refrigerator, then warm it up on the stovetop or in the microwave.
Ingredients
Roasted Cauliflower Soup – Vegan, Incredibly Easy
- 1 large head cauliflower , de-stemmed and florets broken up
- 1 1/2 tablespoon olive oil
- salt & pepper to taste
- 5 cloves garlic , smashed with skins still on
- 1/2 large vidalia onion
- 2-3 sprigs thyme , stems removed
- 4 1/2 cups vegetable broth
Instructions
Roasted Cauliflower Soup – Vegan, Incredibly Easy
- Preheat oven to 450 degrees F. Line a baking sheet with a silicone mat.
- Add the cauliflower to the baking sheet and 1 tablespoon olive oil, about ½ teaspoon salt and grind some pepper over it all. Using your hands, mixing it all in, massaging the ingredients into the cauliflower. Add the smashed garlic (skins still on) on the baking sheet. The skins help to prevent it burning; you’ll remove thee afterwards. Roast for 15 minutes. I like to reserve a few pieces after roasting to top the soup with.
- Meanwhile, in a large high sided pot over medium high heat, sauté the onions in the ½ tablespoon olive oil until fragrant and browning, about 8 minutes, stirring infrequently.
- Add the roasted cauliflower, the garlic (skins remove), 2 sprigs of thyme and vegetable broth. Mix together with spatula.
- Bring to a boil, then reduce to a simmer for 15 minutes. Remove from heat and stir once more. If using an immersion blender, blend the soup together. If using a high powered blender, let cool slightly and add slowly to blender. Press the “soup” setting or blend on high until soup is thoroughly mixed and incorporated, at least 1 minute. Be careful that your soup is not too hot to crack your blender. Taste and salt and pepper to taste.
- Pour into bowls and top optionally with extra cauliflower, crushed red peppers, extra thyme and a drizzle of coconut milk. Enjoy!
Notes

Roasted Cauliflower Soup
Ingredients
Roasted Cauliflower Soup - Vegan, Incredibly Easy
- 1 large head cauliflower de-stemmed and florets broken up
- 1 1/2 tablespoon olive oil
- salt & pepper to taste
- 5 cloves garlic smashed with skins still on
- 1/2 large vidalia onion
- 2-3 sprigs thyme stems removed
- 4 1/2 cups vegetable broth
Instructions
Roasted Cauliflower Soup - Vegan, Incredibly Easy
- Preheat oven to 450 degrees F. Line a baking sheet with a silicone mat.
- Add the cauliflower to the baking sheet and 1 tablespoon olive oil, about ½ teaspoon salt and grind some pepper over it all. Using your hands, mixing it all in, massaging the ingredients into the cauliflower. Add the smashed garlic (skins still on) on the baking sheet. The skins help to prevent it burning; you’ll remove thee afterwards. Roast for 15 minutes. I like to reserve a few pieces after roasting to top the soup with.
- Meanwhile, in a large high sided pot over medium high heat, sauté the onions in the ½ tablespoon olive oil until fragrant and browning, about 8 minutes, stirring infrequently.
- Add the roasted cauliflower, the garlic (skins remove), 2 sprigs of thyme and vegetable broth. Mix together with spatula.
- Bring to a boil, then reduce to a simmer for 15 minutes. Remove from heat and stir once more. If using an immersion blender, blend the soup together. If using a high powered blender, let cool slightly and add slowly to blender. Press the “soup” setting or blend on high until soup is thoroughly mixed and incorporated, at least 1 minute. Be careful that your soup is not too hot to crack your blender. Taste and salt and pepper to taste.
- Pour into bowls and top optionally with extra cauliflower, crushed red peppers, extra thyme and a drizzle of coconut milk. Enjoy!
Video
Notes
Nutrition
Roasted Cauliflower Soup https://jessicainthekitchen.com/roasted-cauliflower-soup-blender/ March 11, 2022
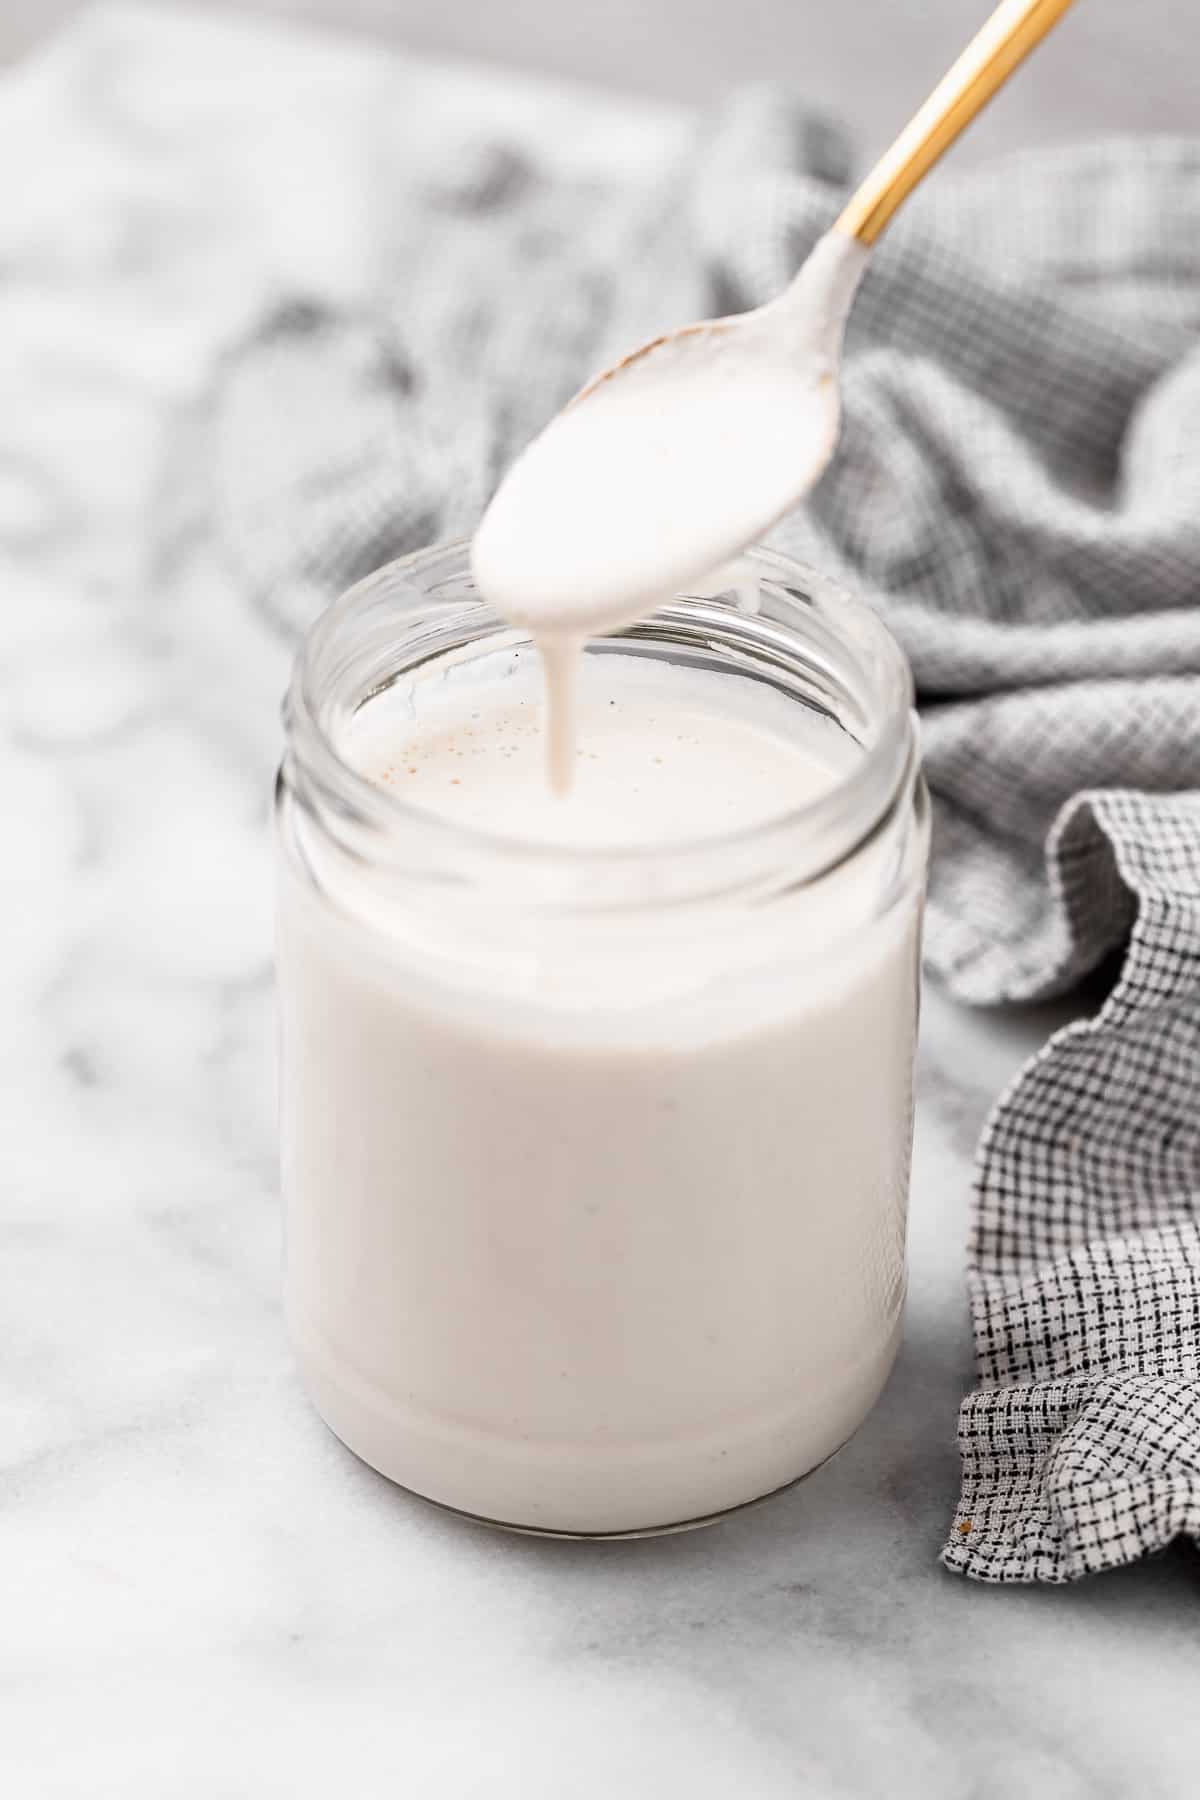
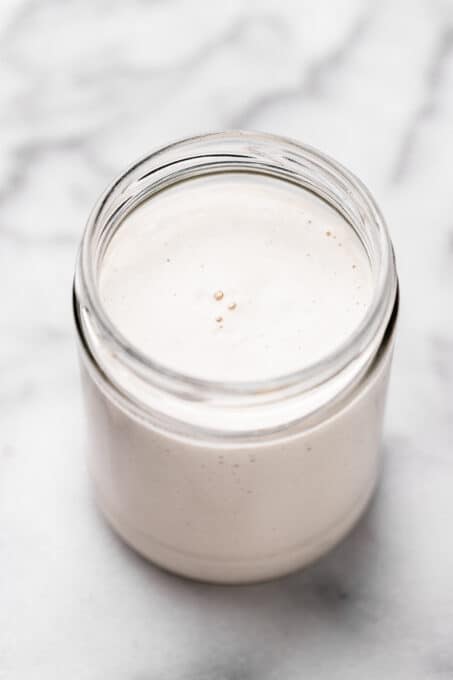
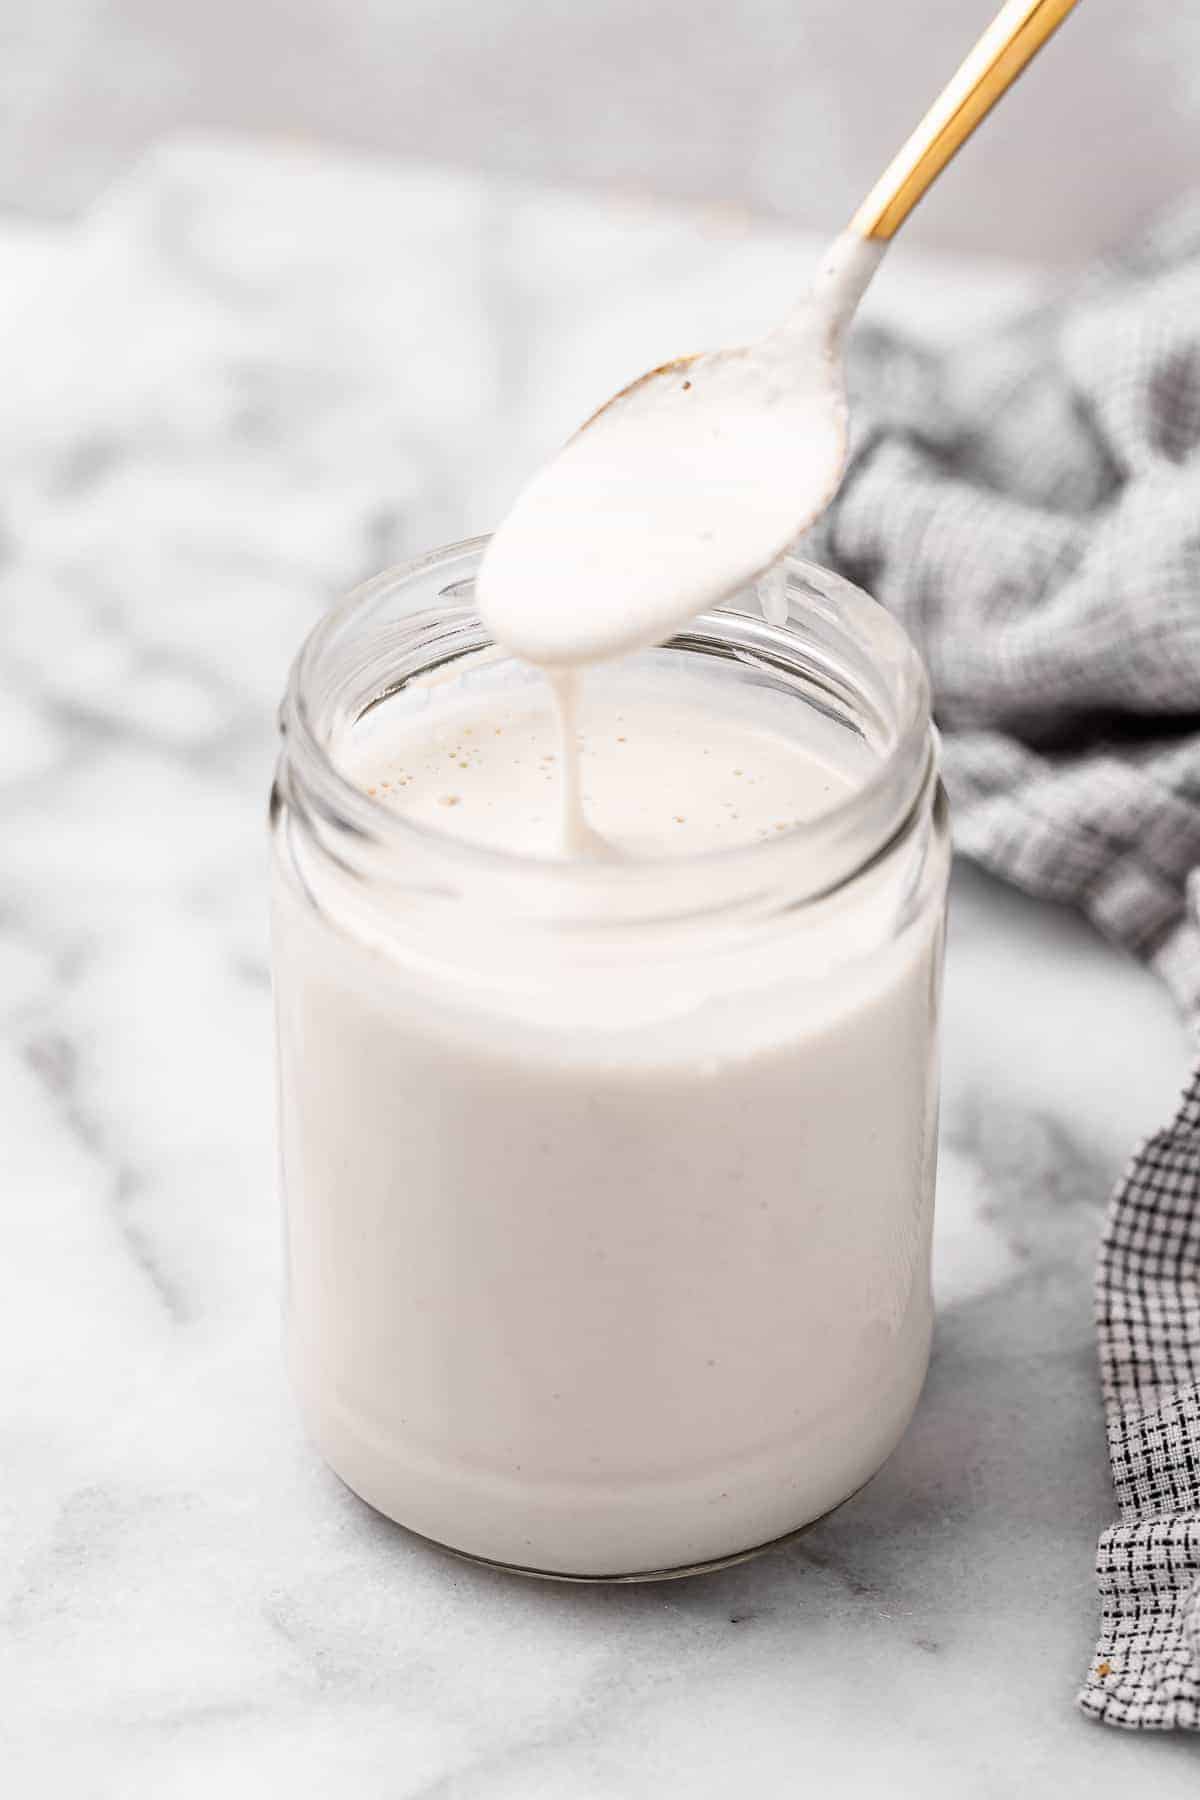
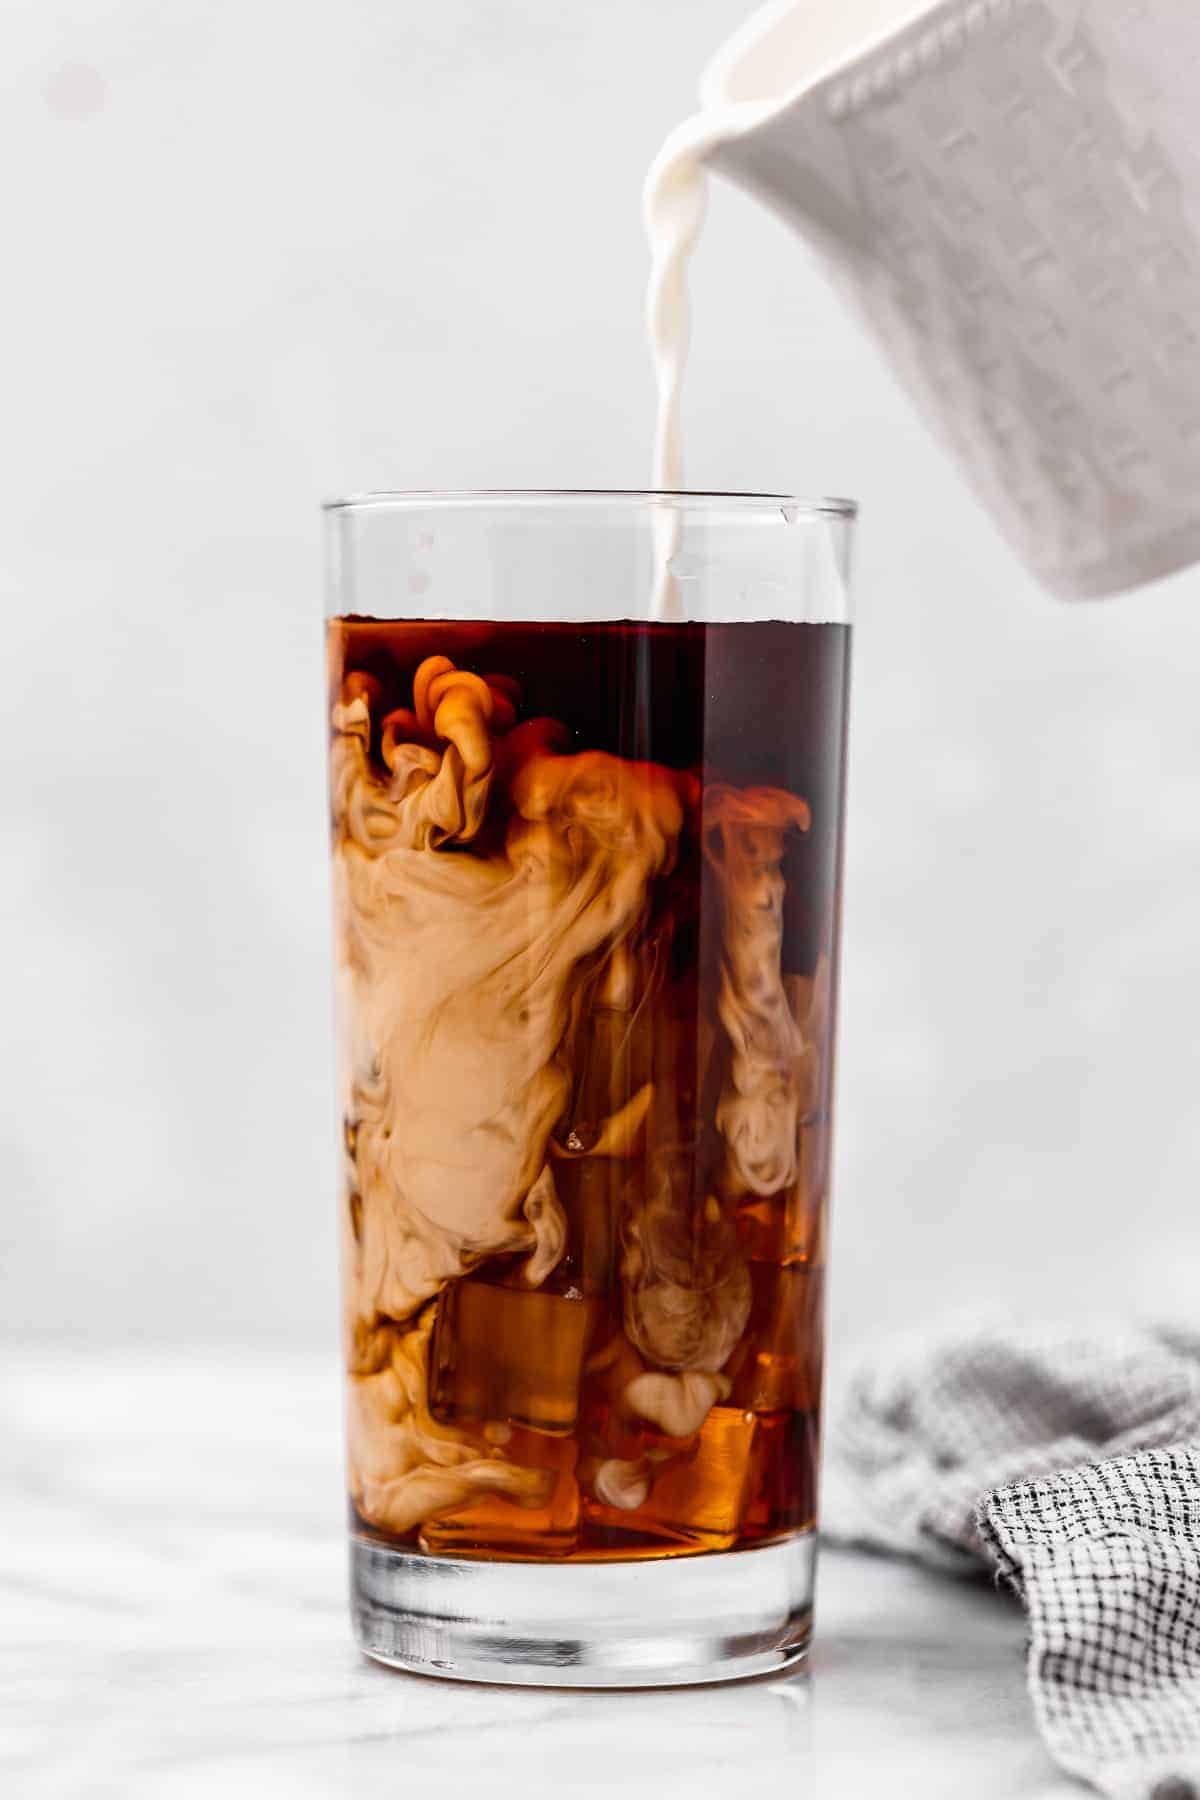
This vegan heavy cream substitute is smooth and velvety, perfect for adding a creamy texture to coffee, sauces, soups, and more. Bonus: you only need three ingredients to make it!
In a world where there are vegan substitutes for everything from ham to eggs and sour cream, it’s surprising to me that it’s so hard to find a good vegan heavy cream substitute. There’s one widely-available brand in stores that I can think of, and if it’s not sold at your local grocery store, you’re out of luck.
Well, the good news is that it’s easy to make vegan heavy cream at home—and it only requires a few basic ingredients!
By combining soaked cashews, filtered water, and a bit of sea salt, then blitzing them in the blender until the mixture is silky smooth, you can create the best plant-based heavy cream right at home, in a matter of minutes. (Yep, add this to the list of amazing things you can do with cashews, right along with Cashew Milk .) Unlike other nuts, cashews will blend completely, which means there’s no need to fuss with a nut milk bag or cheesecloth to strain the liquid.
Now, it’s important to note that this heavy cream substitute can’t do everything that dairy-based heavy cream can do. It’s terrific for adding a creamy texture to soups and sauces, for making homemade chocolate truffles, and even for your morning cup of coffee, but you can’t beat it into whipped cream for topping desserts. For that, you’ll need my vegan whipped cream recipe !
Notes on Ingredients
Please note that this is important information on the ingredients and instructions and the FULL recipe with amounts and details can be found DOWN BELOW (scroll to it) in the recipe card.
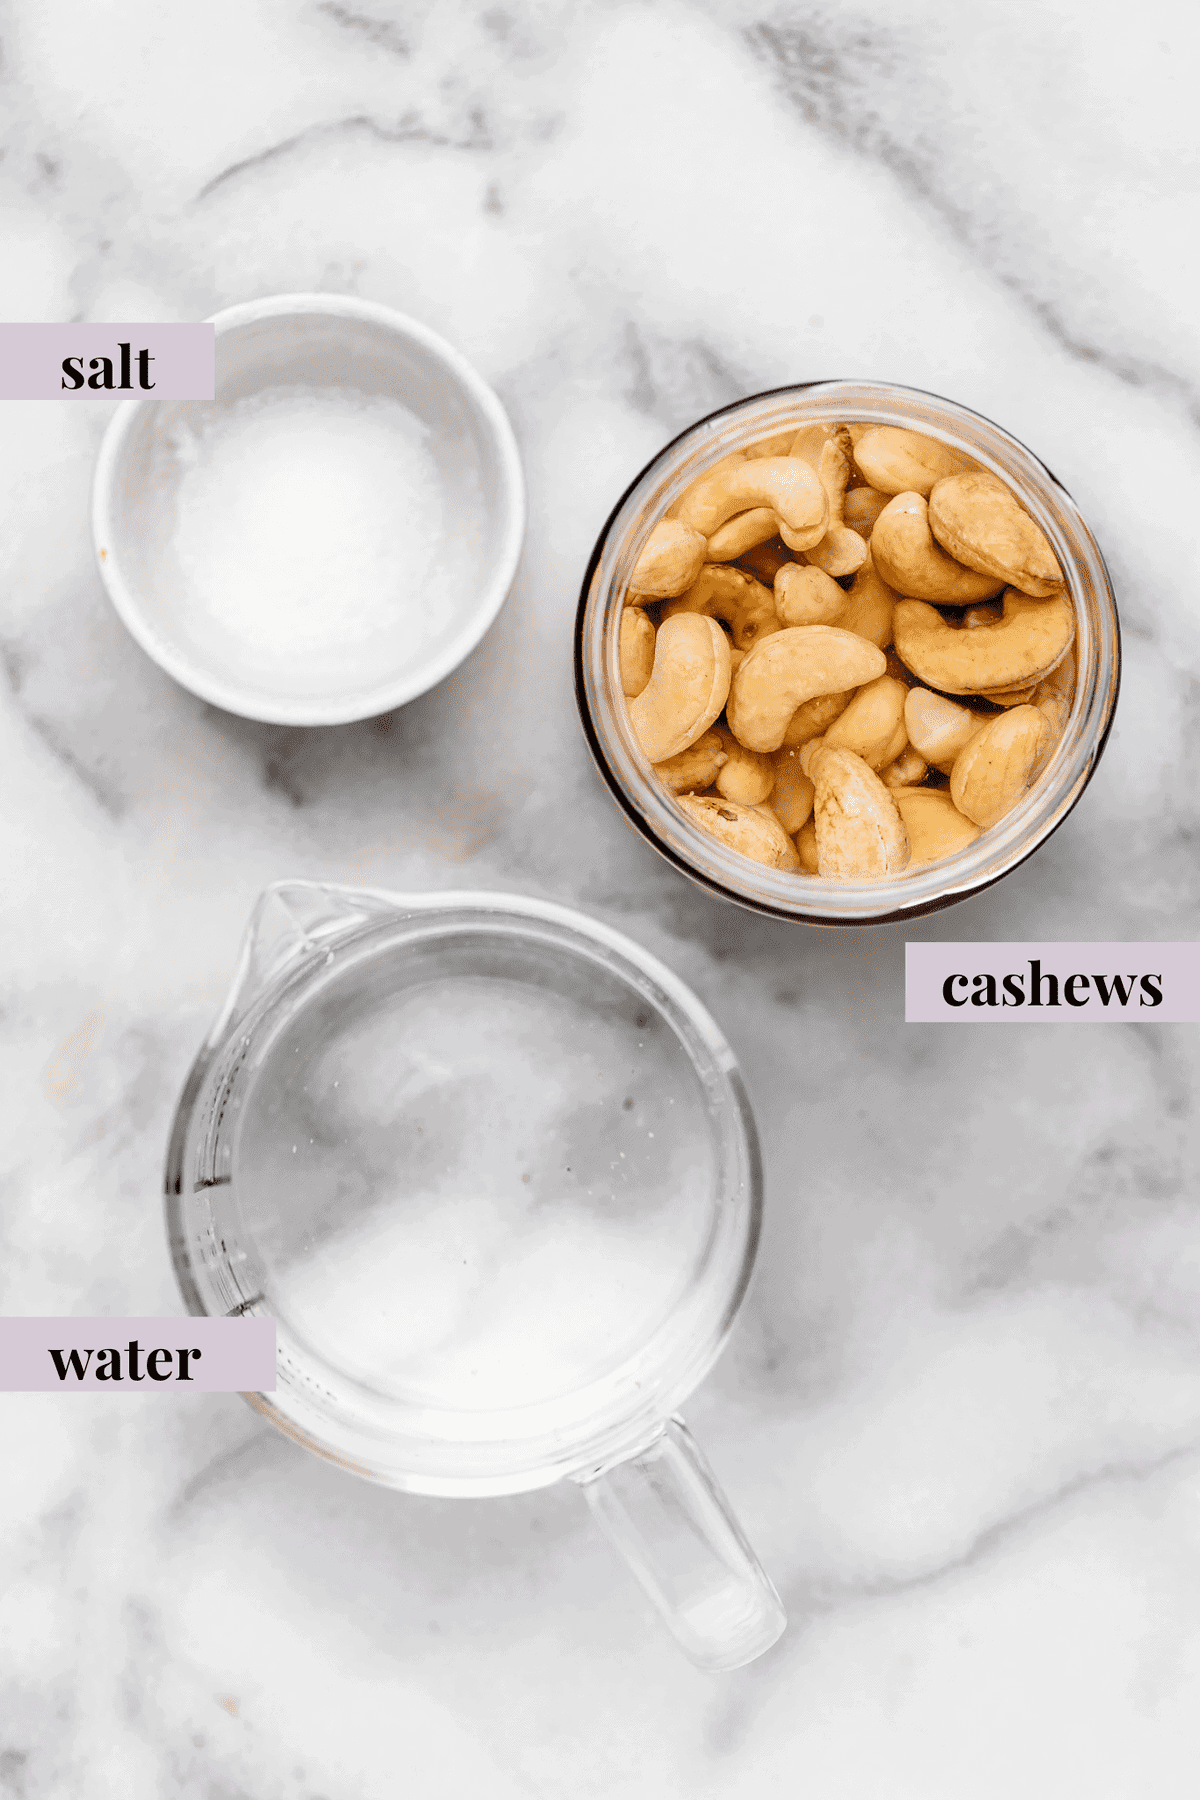
- Raw cashews – It’s important that they’re raw, not roasted.
- Filtered water – Plant-based milk can be used instead.
- Sea salt
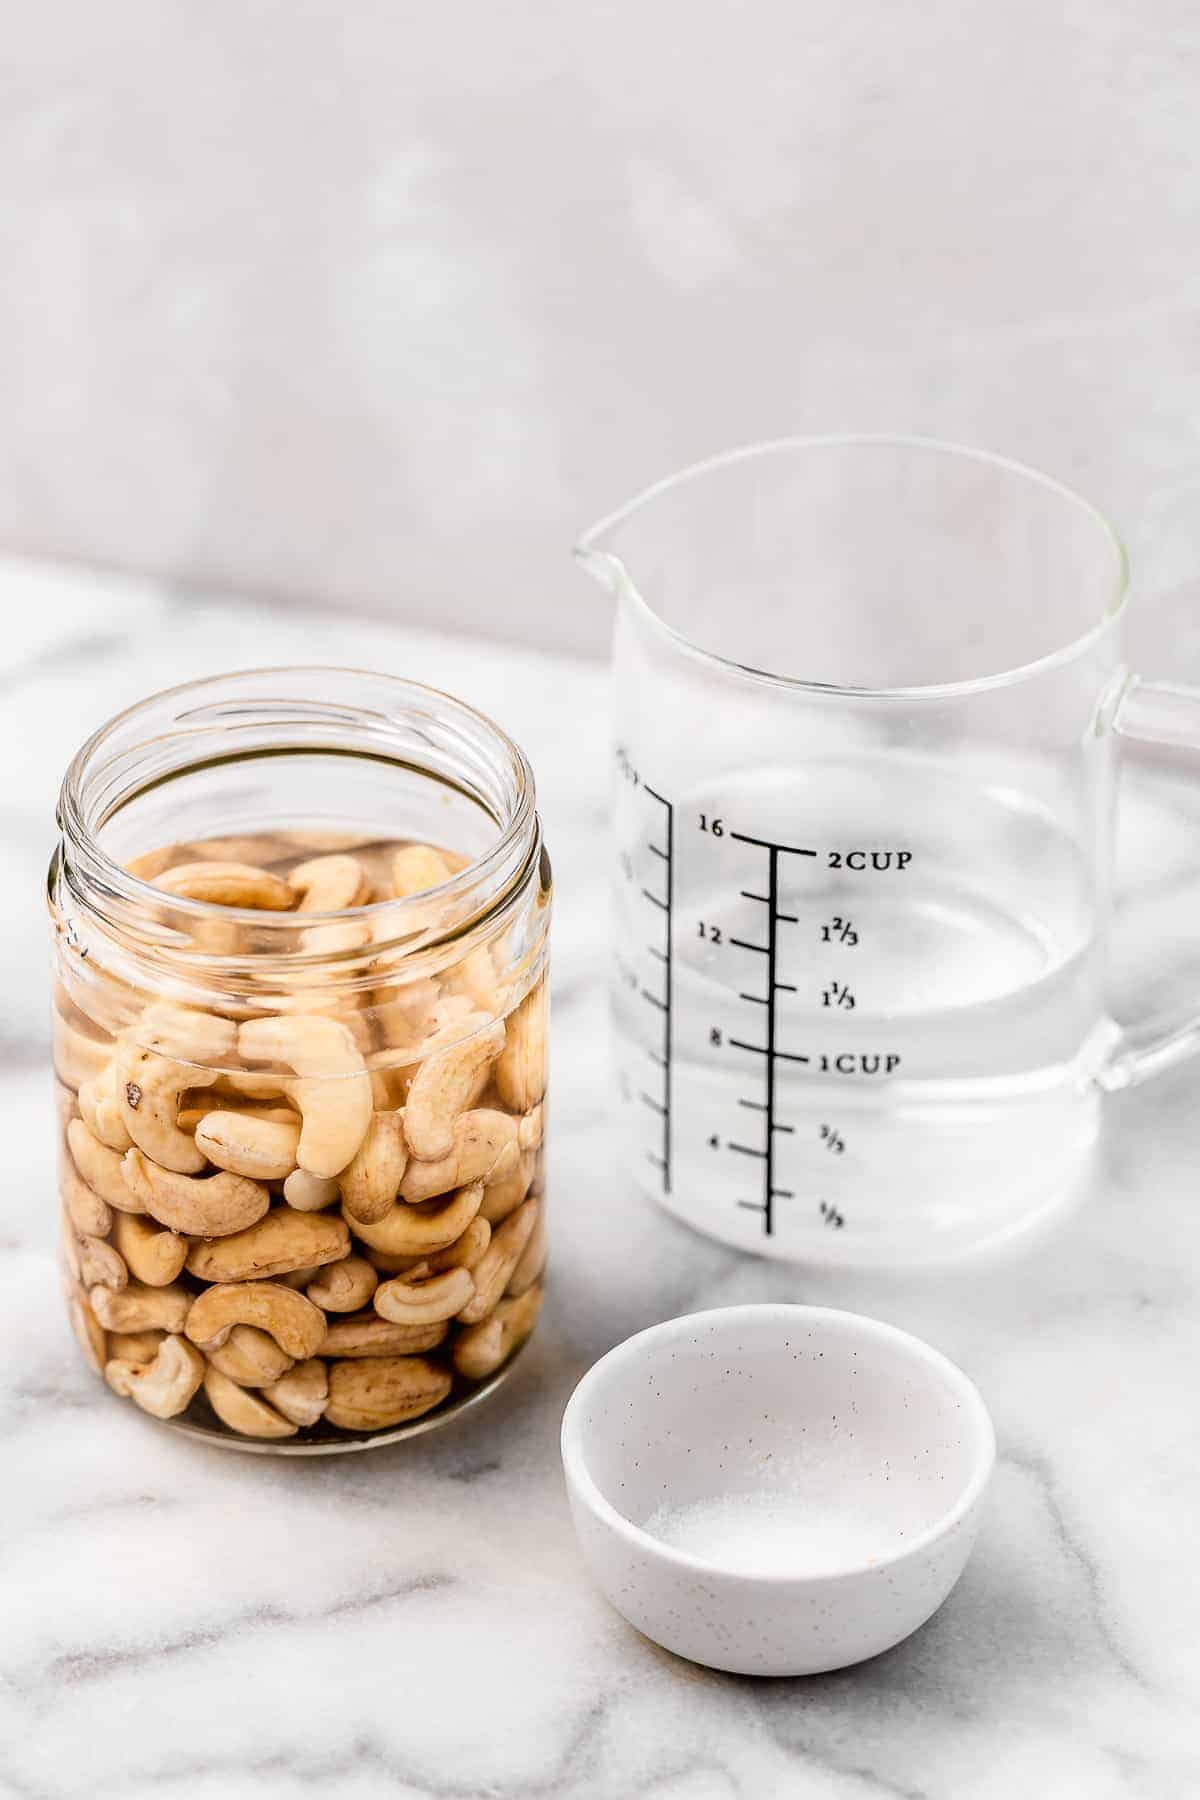
How to Soak Cashews
You’ll need to soak the cashews for this recipe, which is key to making them blend into a smooth, creamy liquid. The best way to do this is to place the cashews in a jar of water overnight, then drain and rinse them. If you’re short on time, you can soak the cashews in boiling water for an hour, or boil the cashews themselves for 5 to 10 minutes.
How to Make Vegan Heavy Cream Substitute
Once you’ve soaked the cashews, it only takes a few more minutes to make vegan heavy cream!
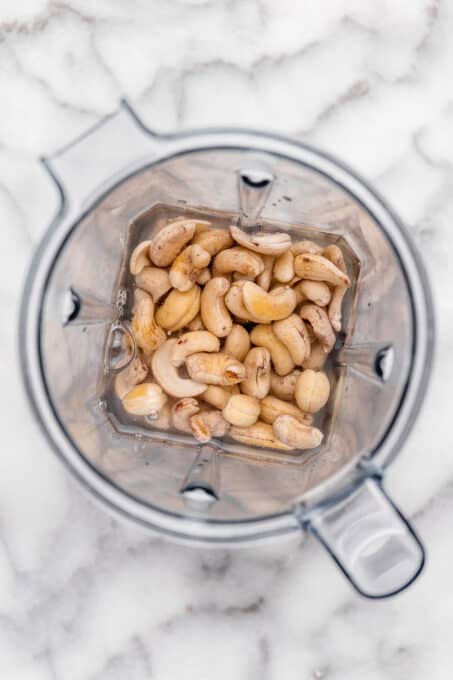
Blend. Place the drained and rinsed cashews, filtered water, and salt in a high speed blender. Blend on high until the mixture is thick and creamy; scrape down the sides of the blender or add more water if needed.
Finish . If you’d like, you can add seasonings and flavourings—for example, if you’re using your plant-based heavy cream for coffee, you can add vanilla extract. Pour the heavy cream into a bottle or storage container and refrigerate.
How to Store
Refrigerate your heavy cream in an airtight bottle or container for 3 to 4 days and give it a good shake before you use it.
Can I Freeze This Recipe?
Yes, you can freeze vegan heavy cream for up to 3 months. I recommend freezing it in an ice cube tray, then popping the cubes in a freezer bag. Then you’ll have perfectly portioned heavy cream whenever you need it! Warm it a few seconds at a time in the microwave or in a small saucepan on the stovetop.
Ideas for Using Vegan Heavy Cream
Here are my favorite ways to use this recipe:
- As vegan creamer for my Iced Matcha Latte .
- To make a luxurious, extra-creamy Vegan Hot Chocolate .
- To add a creaminess to pureed vegetable soups, like my Roasted Carrot Ginger Soup .
- For rich, vegan pasta dishes like Creamy Tomato Pasta .
Ingredients
- 1 cup raw cashews , soaked overnight in water in a jar and rinsed OR just easily boiled for 5 minutes – see instructions * (this results in about 1 ¼ cups puffed cashews)
- 1 ¼ cup filtered water , or plant based milk
- ¼ teaspoon sea salt
Instructions
- If you’re low on time (like I always am) you can soak your cashews in boiling hot water for about 1 hour, or boil them for about 5-10 minutes first. This helps your cashews to produce a silky texture and to be totally dissolved. This is crucial because ideally whatever you’re replacing you don’t want to be tasting cashew pieces!
- In a high speed blender, blend all the ingredients together until blended and completely creamy and incorporated. Scrape down the sides if needed, and blend until combined. Be sure to add extra water if needed to reach the desired consistency that you’re looking for.
- At this point, add in any extra flavourings or seasonings that you have, and blend again or stir together to combine. This is also just a great base recipe to always have on hand! Enjoy!
