This ramen noodle salad recipe is ALL about the texture—crunchy noodles and almonds, crisp cabbage and carrots, and tender edamame make it a standout. A sweet, tangy, and zippy ginger dressing brings it all together!
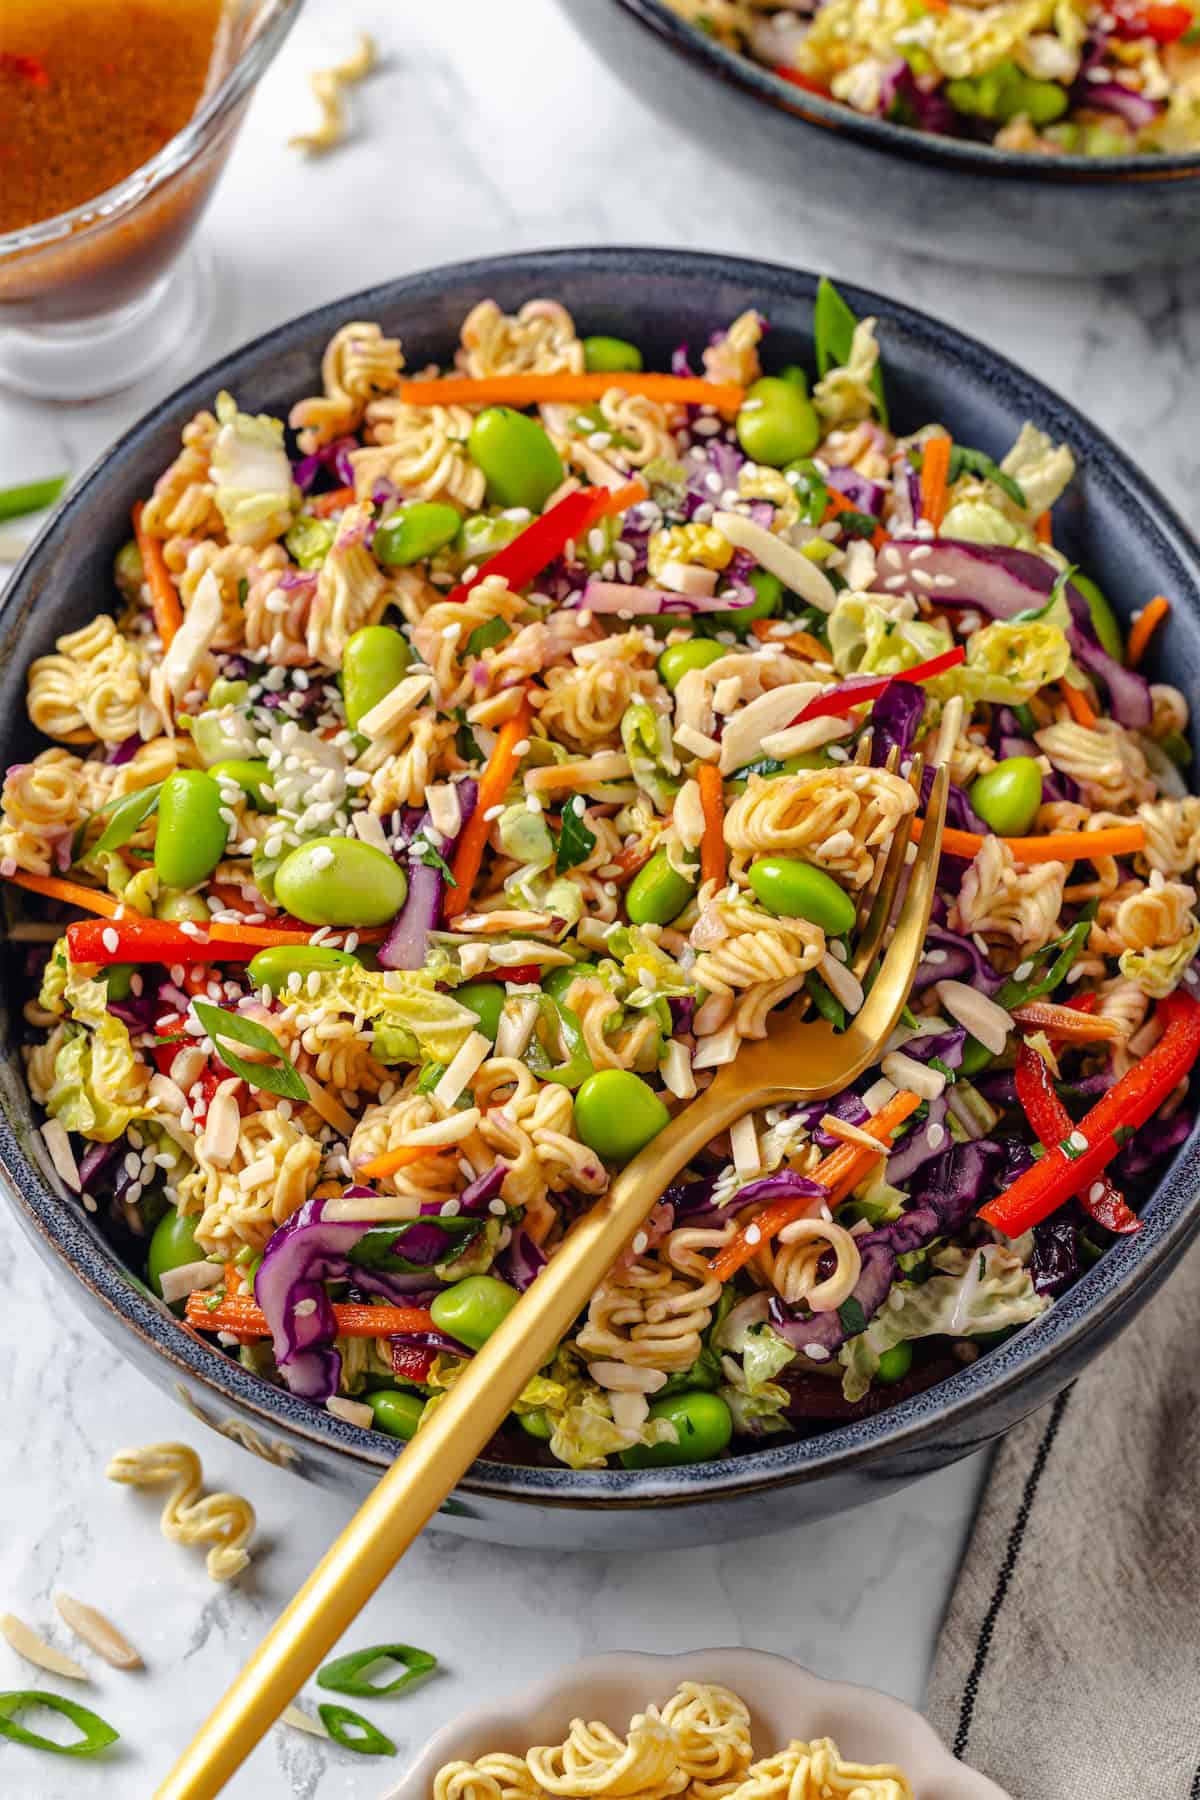
Ramen noodle salad is a potluck favourite, but I thought: why save it for big parties? This is a salad that deserves to be eaten anytime, anyplace! So my vegan ramen noodle salad is designed to serve four, which means it’s perfect for meal prep lunches and weeknight dinners. It’s got the same crisp-and-crunchy texture of the original, a fabulous dressing with the perfect balance of sweet, savory, and tangy, and it’s easy to customise with your favourite veggies or add a plant-based protein to make it extra filling. (If you love ramen, be sure to check out my Spicy Ramen and Peanut Butter Ramen too!)
Why I Can’t Get Enough of This Ramen Noodle Salad
I’ve been making this on Sunday nights and portioning it out into meal prep containers to have for lunch during the week. Here’s why I love it:
- Stands up well to storage . Some salads go limp and lifeless on you after a few hours in the fridge, but this ramen noodle salad holds up quite well. The cabbage and carrots stay crunchy much longer than typical salad greens!
- Quick to throw together . There’s no cooking needed and the prep time for this salad is minimal, making it perfect when you need a meal in a hurry.
- Versatile . As mentioned before, you can easily customise this salad by adding your favourite vegetables or proteins. You can also serve it as a side for Asian-inspired dishes like Vegan Katsu Curry .
Notes on Ingredients
Here’s a breakdown of the key ingredients for this ramen noodle salad recipe. Scroll down to the recipe card to find the ingredient quantities and recipe instructions.
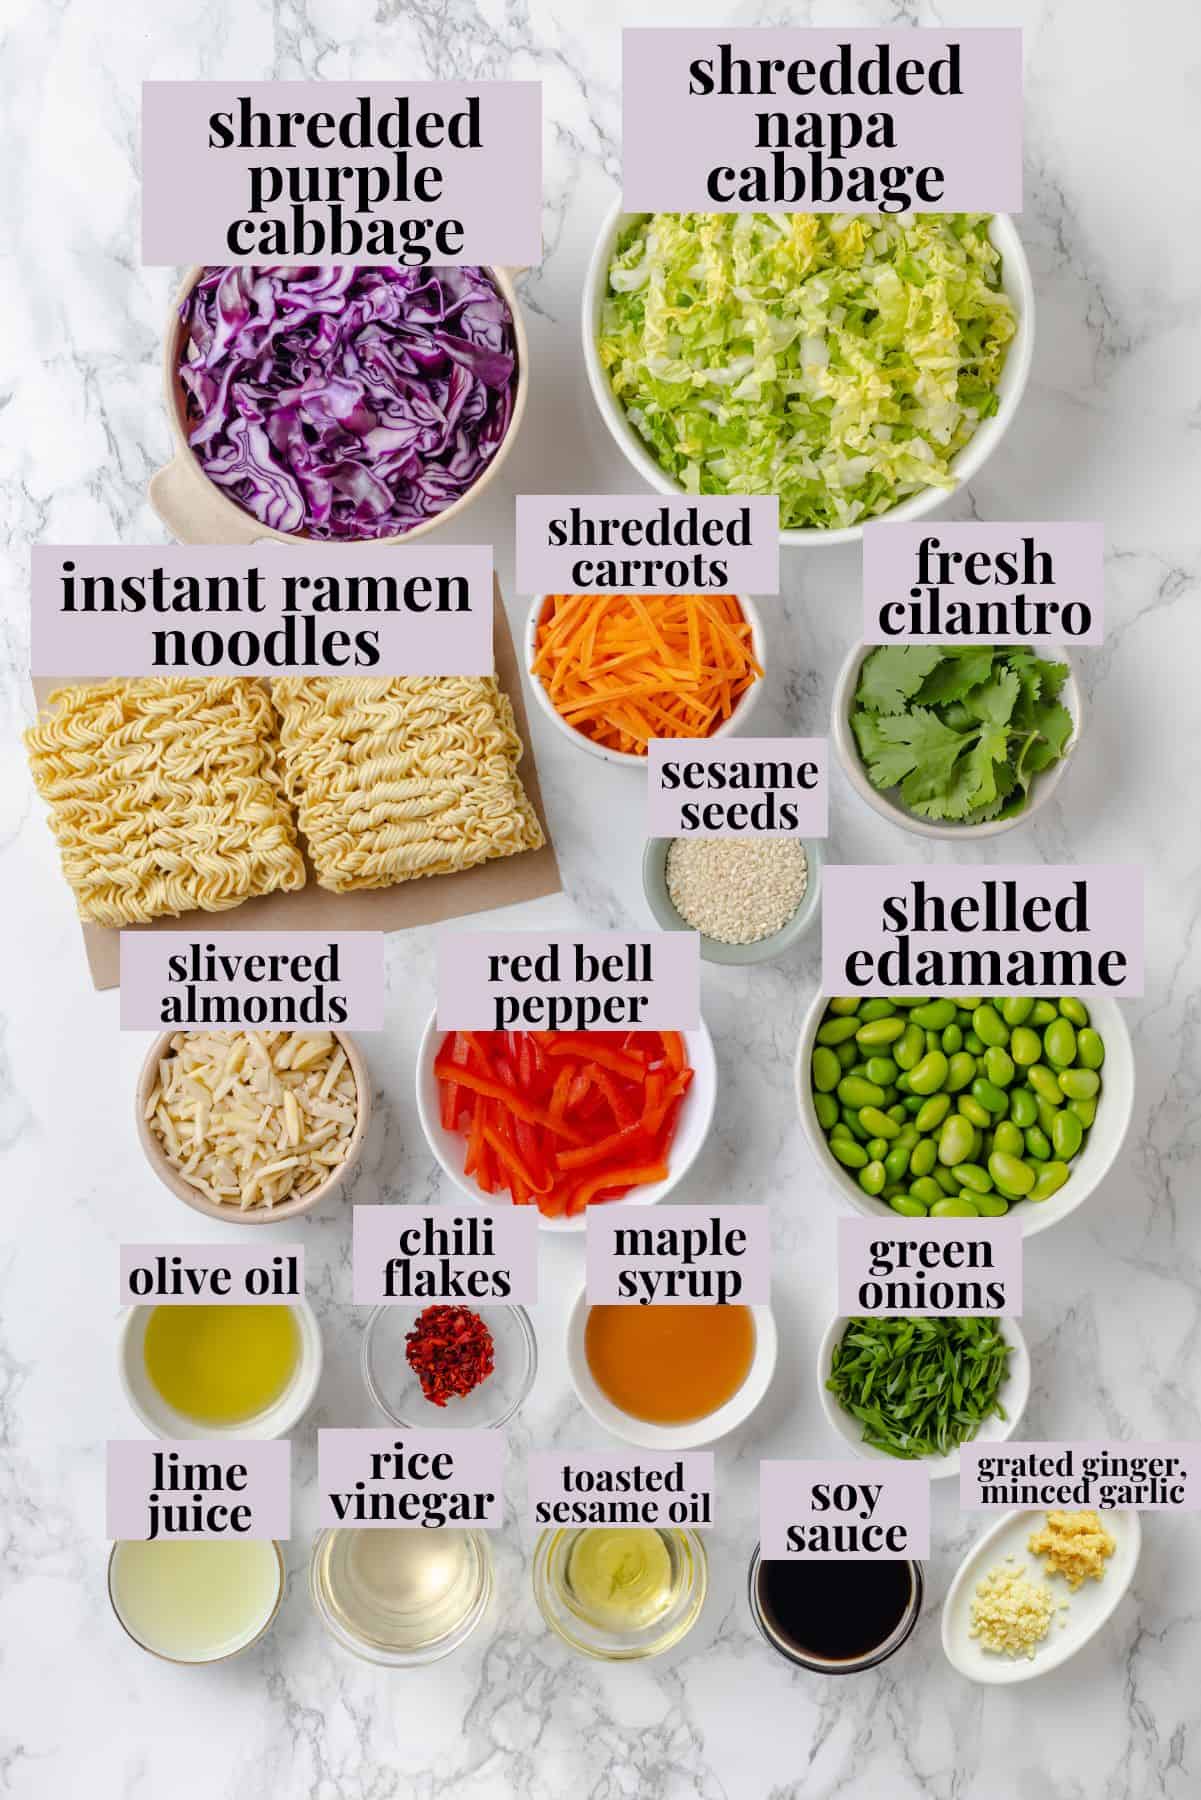
- Instant ramen noodles – Discard the seasoning—we don’t need it here!
- Cabbage – I use a combination of purple cabbage and Napa cabbage.
- Shelled edamame – You can sometimes find fresh edamame in the produce section; otherwise, just pick up a bag of frozen edamame.
- Veggies – I add carrots, red bell pepper, and green onions.
- Fresh cilantro
- Slivered almonds
- Sesame seeds – Black or white sesame seeds both work.
For the Dressing:
- Rice vinegar – Also known as rice wine vinegar.
- Soy sauce – Tamari or liquid aminos also work.
- Maple syrup
- Toasted sesame oil – Be sure to use toasted, not regular sesame oil. Toasted has a fabulous nutty flavour!
- Olive oil
- Lime juice – Use freshly squeezed lime juice, not bottled.
- Fresh ginger and garlic – A one-two punch for warmth and bold flavour.
- Chili flakes or sriracha (optional)
Variations
- Add a protein . While the edamame is a great source of plant-protein in this recipe, you can also add Vegan Chicken or Crispy Air Fryer Tofu .
- Switch up the veggies . I like using carrots and red bell peppers because they stand up well to storage, but if you’re eating this right away, cucumbers would be excellent too.
- Give it some extra sweetness . Some ramen noodle salad recipes call for canned mandarin oranges. Feel free to give it a try!
How to Make Ramen Noodle Salad
This simple step-by-step guide will show you the process of making this ramen noodle salad recipe.
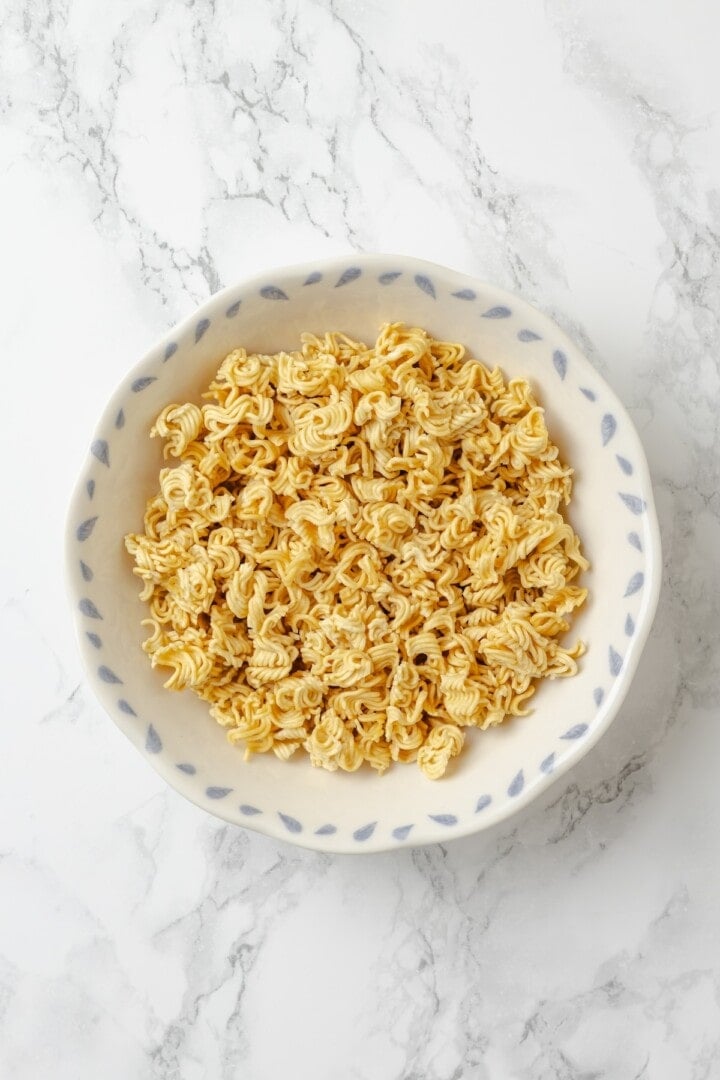
Break the ramen into small pieces.
- Prepare the ramen. Break the dry ramen noodles into bite-sized pieces.
- Toast the almonds. Toast the almonds in a dry skillet over medium heat for 2–3 minutes, or until they’re golden and fragrant.
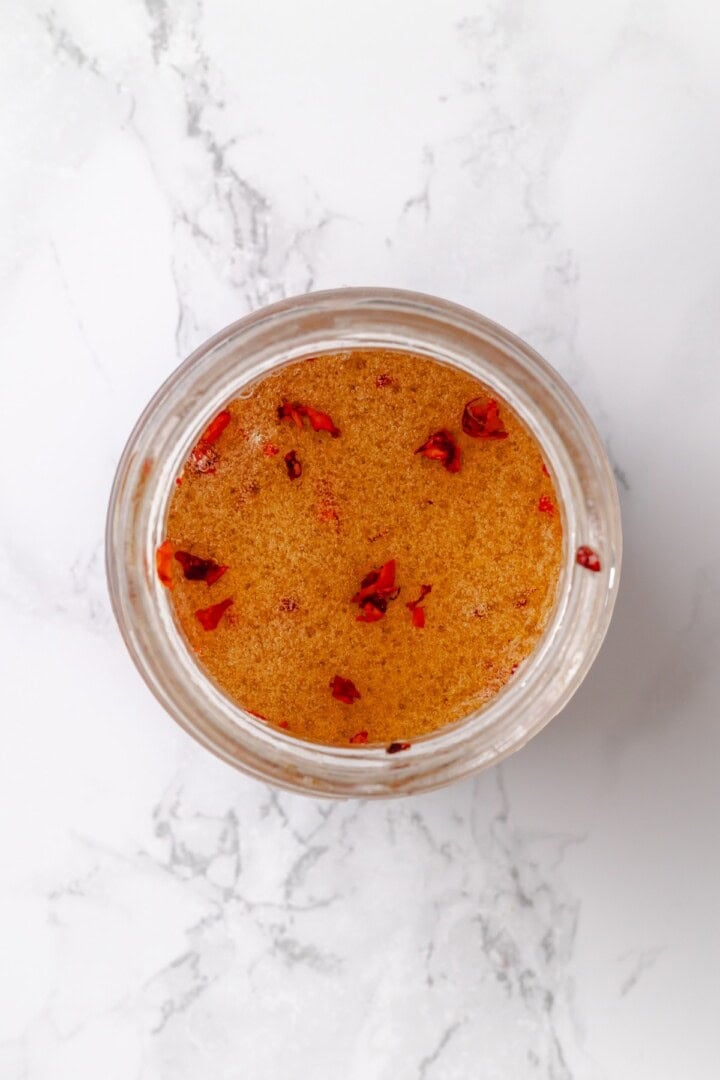
Make the dressing.
- Make the dressing. Whisk together all the ingredients in a small bowl.
- Assemble the salad. Add the ramen, cabbage, edamame, carrots, bell pepper, green onions, and cilantro to a large bowl.
Add the dressing and toss.
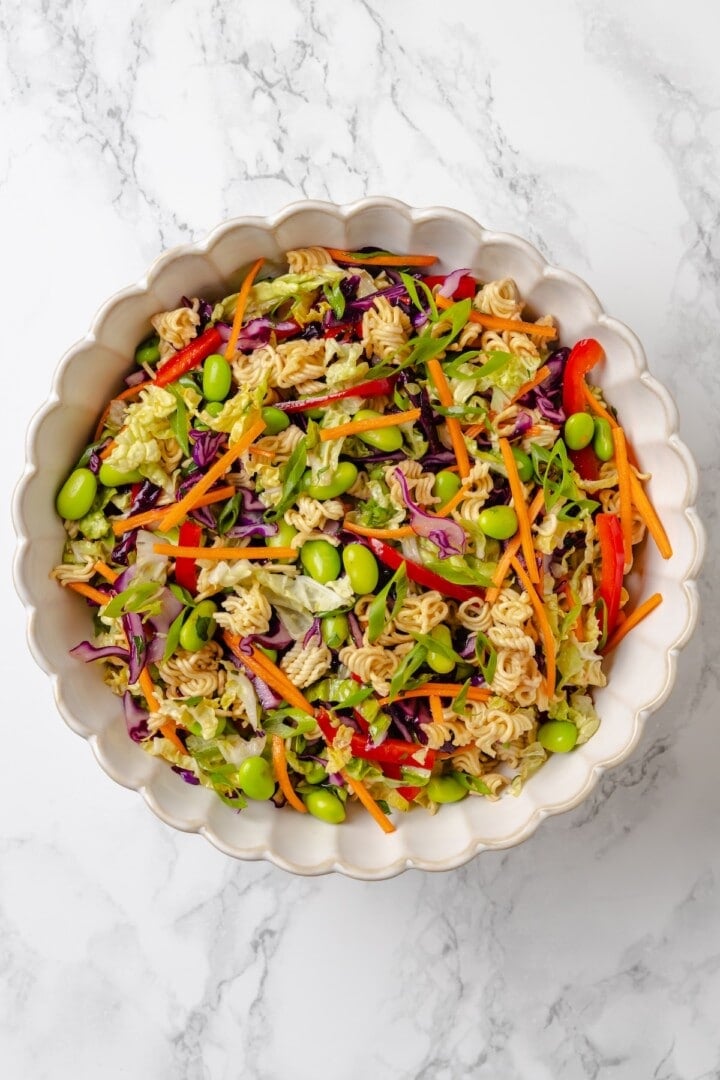
- Dress the salad. Pour the dressing into the bowl with the salad, toss, and let it sit 15–30 minutes (or chill up to 1 hour) to soften noodles slightly.
- Serve. Add the toasted almonds and sesame seeds, then serve.
Tips for Success
- Avoid getting noodles all over your counter . I break up the dry ramen noodles into smaller pieces while they are still in the package, then carefully open the package and pour them into the bowl. If there are still some larger pieces, I break them up right in the bowl.
- Thaw the edamame fast . If you’re using frozen edamame, you can thaw them quickly by placing them in a bowl of hot water for a few minutes, then draining.
- Be careful when toasting the nuts . They can burn quickly! As soon as they’re fragrant and have darkened slightly, transfer them to a bowl or plate. Leaving them in the pan, even after you remove them from the heat, can burn them.

Serving Suggestions
You can serve this ramen noodle salad on its own for a light meal or make it a side dish for Air Fryer Orange Tofu or another dish with Asian flavours. I also love it as an addition to meal bowls, like this Nourishing Vegan Buddha Bowl .
How to Store
- Meal prep : If you’re meal prepping this salad, I recommend keeping the dressing and almonds separate and then assembling 15 minutes before serving.
- Leftovers : This salad can be stored in an airtight container in the refrigerator for about 3 days. The noodles will soften once you’ve added the dressing, but the salad is still fabulous!
More Tasty Vegan Salads
- Farro Salad
- Fattoush Salad
- Beet “Feta” Salad
- Orzo Pasta Salad
Ingredients
- 2 packs instant ramen noodles , discard seasoning packets – 6 ounces / 170 grams
- 2 cups shredded purple cabbage , 150 grams
- 2 cups shredded napa cabbage , 150 grams
- 1 cup shelled edamame , (Cooked) thawed if frozen – 150 grams
- ½ cup shredded carrots , 60 grams
- ½ red bell pepper , thinly sliced – 60 grams
- 2 green onions , thinly sliced – 20 grams
- ½ cup chopped fresh cilantro , 8 grams
- ½ cup slivered almonds , toasted – 60 grams
- 1 tablespoon sesame seeds , for garnish – 9 grams
For the Dressing:
- ¼ cup rice vinegar , 60 milliliters
- 2 tablespoons soy sauce , 30 milliliters
- 1 tablespoon maple syrup , 15 milliliters
- 1 tablespoon toasted sesame oil , 15 milliliters
- 2 tablespoons olive oil , 30 milliliters
- 1 tablespoon lime juice , 15 milliliters
- 1 teaspoon grated fresh ginger , 2 grams
- 1 clove garlic , finely minced – 3 grams
- ½ teaspoon chili flakes or sriracha , optional, to taste – 1 gram
Instructions
- Break the dry ramen noodles into bite-sized pieces and set aside.
- Toast the almonds (if not already toasted): In a dry skillet over medium heat, toast the slivered almonds for 2–3 minutes, stirring often until golden and fragrant. Let cool.
- In a small bowl or jar, whisk together the rice vinegar, soy sauce, maple syrup, sesame oil, olive oil, lime juice, ginger, garlic, and chili flakes or sriracha, if using.
- In a large mixing bowl, combine the broken dry ramen noodles, purple cabbage, napa cabbage, edamame, carrots, bell pepper, green onions, and cilantro.
- Pour the dressing over the salad and toss well to coat. Let it sit for at least 15–30 minutes (or chill up to 1 hour). This softens the noodles just slightly while keeping their crunch.
- Sprinkle it with toasted almonds and sesame seeds right before serving for a crunchy finish.
Notes
- Meal prep : If you’re meal prepping this salad, I recommend keeping the dressing and almonds separate and then assembling a few minutes before serving.
- Leftovers : This salad can be stored in an airtight container in the refrigerator for about 3 days. The noodles will soften once you’ve added the dressing, but the salad is still fabulous!

Ramen Noodle Salad Recipe
Ingredients
- 2 packs instant ramen noodles discard seasoning packets – 6 ounces / 170 grams
- 2 cups shredded purple cabbage 150 grams
- 2 cups shredded napa cabbage 150 grams
- 1 cup shelled edamame (Cooked) thawed if frozen – 150 grams
- ½ cup shredded carrots 60 grams
- ½ red bell pepper thinly sliced – 60 grams
- 2 green onions thinly sliced – 20 grams
- ½ cup chopped fresh cilantro 8 grams
- ½ cup slivered almonds toasted – 60 grams
- 1 tablespoon sesame seeds for garnish – 9 grams
For the Dressing:
- ¼ cup rice vinegar 60 milliliters
- 2 tablespoons soy sauce 30 milliliters
- 1 tablespoon maple syrup 15 milliliters
- 1 tablespoon toasted sesame oil 15 milliliters
- 2 tablespoons olive oil 30 milliliters
- 1 tablespoon lime juice 15 milliliters
- 1 teaspoon grated fresh ginger 2 grams
- 1 clove garlic finely minced – 3 grams
- ½ teaspoon chili flakes or sriracha optional, to taste – 1 gram
Instructions
- Break the dry ramen noodles into bite-sized pieces and set aside.
- Toast the almonds (if not already toasted): In a dry skillet over medium heat, toast the slivered almonds for 2–3 minutes, stirring often until golden and fragrant. Let cool.
- In a small bowl or jar, whisk together the rice vinegar, soy sauce, maple syrup, sesame oil, olive oil, lime juice, ginger, garlic, and chili flakes or sriracha, if using.
- In a large mixing bowl, combine the broken dry ramen noodles, purple cabbage, napa cabbage, edamame, carrots, bell pepper, green onions, and cilantro.
- Pour the dressing over the salad and toss well to coat. Let it sit for at least 15–30 minutes (or chill up to 1 hour). This softens the noodles just slightly while keeping their crunch.
- Sprinkle it with toasted almonds and sesame seeds right before serving for a crunchy finish.
Notes
- Meal prep : If you’re meal prepping this salad, I recommend keeping the dressing and almonds separate and then assembling a few minutes before serving.
- Leftovers : This salad can be stored in an airtight container in the refrigerator for about 3 days. The noodles will soften once you’ve added the dressing, but the salad is still fabulous!
Nutrition
Ramen Noodle Salad Recipe https://jessicainthekitchen.com/ramen-noodle-salad-recipe/ June 13, 2025
This chocolate mousse pie starts with a crisp Oreo crust, is filled with the most decadent vegan mousse, and finishes with fluffy coconut cream for a dessert that’s absolutely irresistible!

I am all about no-bake desserts like No-Bake Peanut Butter Pie and Mango Coconut Chia Seed Pudding in the summertime. And this chocolate mousse pie is ALMOST a no-bake dessert—you just need to bake the crust for 8 minutes, which barely even counts! Like my Avocado Chocolate Mousse , avocados are the secret ingredient that delivers a rich, decadent texture without the dairy. It’s absolutely divine and it makes this chocolate mousse pie a total crowd-pleaser—for vegans and non-vegans alike!
Why This Chocolate Mousse Pie Is a Must-Make for Summer
This chocolate mousse pie is the perfect summer dessert! Here’s why:
- Cool and creamy . This pie is chilled and served cold, which makes it the ideal treat for hot summer days. (This Chocolate Avocado Ice Cream is always a hit too!)
- Intensely chocolatey . Chocolate mousse pie is rich, decadent, and completely irresistible. The addition of melted dark chocolate in the mousse layer makes it divine!
- Perfect for any occasion . Whether you’re going to a backyard barbecue, having friends over for some drinks on the patio, or just want to treat yourself to something sweet, this vegan chocolate mousse pie is perfection.

Notes on Ingredients
Here are some tips and insights on the ingredients you’ll need for this delectable vegan chocolate mousse pie. Scroll down to the recipe card to find the ingredient quantities and recipe instructions.
Oreo Crust :
- Oreo cookies – Regular, not double-stuffed. (Oreo cookies are surprisingly vegan!)
- Vegan butter – I use my homemade Vegan Butter , but store-bought is fine.
Avocado Chocolate Mousse Filling :
- Avocados – Use Hass avocados for this recipe.
- Dark chocolate – I recommend 60% dark chocolate for a filling that’s deeply rich without being bitter.
- Coconut oil
- Unsweetened cocoa powder – Be sure to use cocoa powder, not hot cocoa mix, which is sweetened.
- Agave nectar – You can use Date Syrup as an alternative.
- Full-fat coconut milk
- Vanilla extract
- Salt
Whipped Coconut Cream Topping :
- Coconut milk
- Powdered sugar – Don’t have it on hand? Here’s Homemade Powdered Sugar .
- Vanilla extract
- Dark chocolate – You can make your own dark chocolate shavings by running a vegetable peeler down the side of a chocolate bar.
- Oreo cookies – Optional, for garnish.
A Note About the Coconut Cream
To get the coconut cream needed for this chocolate mousse pie, you’ll start with canned coconut milk. Make sure it’s full-fat, as that is what gives you the creamy texture needed for this recipe. Place the can in the refrigerator overnight to allow the cream to separate from the liquid. When you’re starting the recipe, open the can and scoop out only the thick coconut cream on top. You can save the remaining liquid for making smoothies!
How to Make Chocolate Mousse Pie
This visual guide will walk you through the steps of making this vegan chocolate mousse pie.
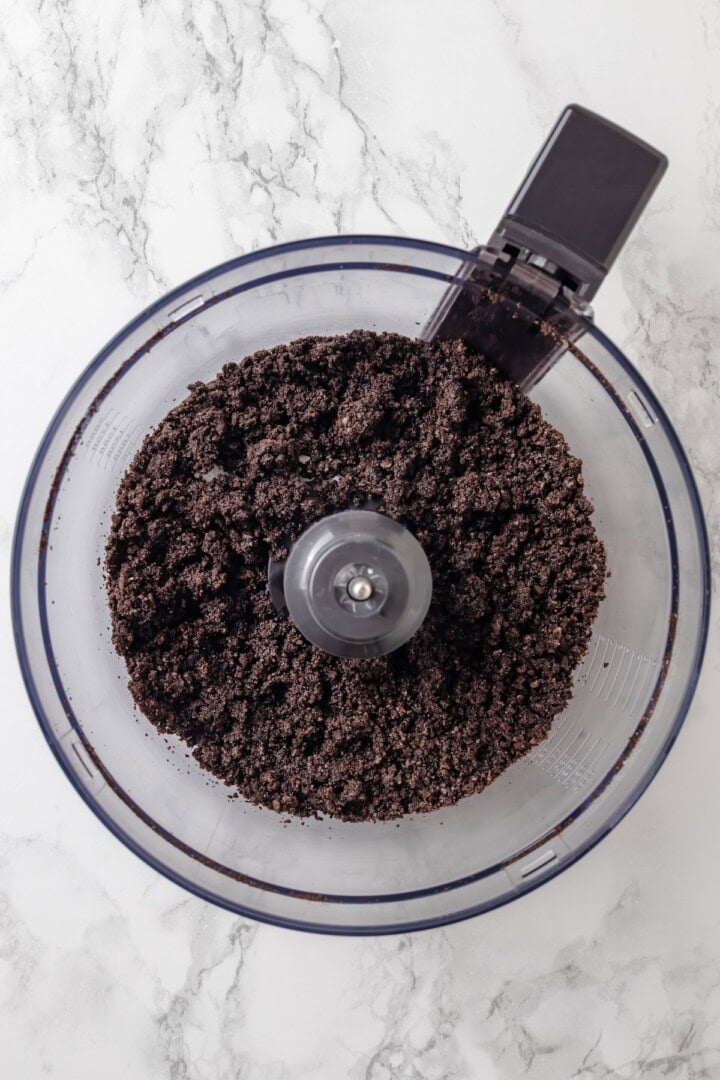
Make the Oreo crumbs.
- Make the crust . Crush the Oreos into fine crumbs, mix them with the vegan butter, and press this mixture into a pie dish. Bake in a 350ºF oven for 8–10 minutes and cool completely.
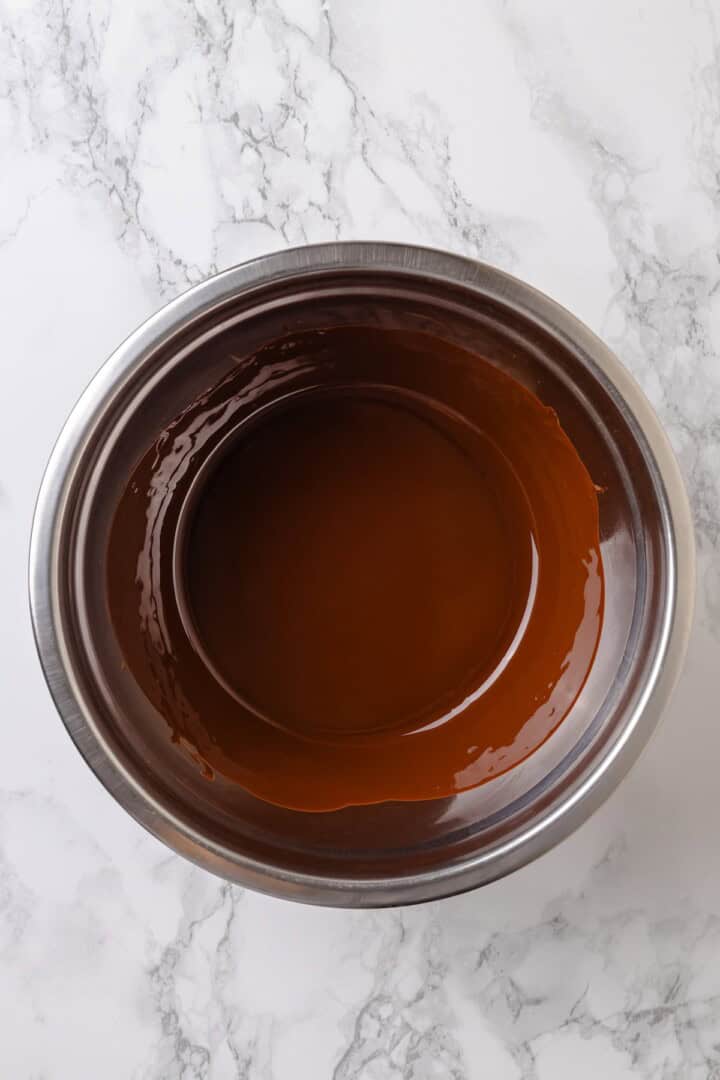
Melt the chocolate.
- Melt the chocolate . Combine the dark chocolate and coconut oil in a double boiler or microwave-safe bowl and melt until smooth.
- Make the filling . Blend the avocados and coconut cream until there are no lumps, then add the melted chocolate mixture, cocoa powder, agave nectar, vanilla, and salt. Blend until creamy.
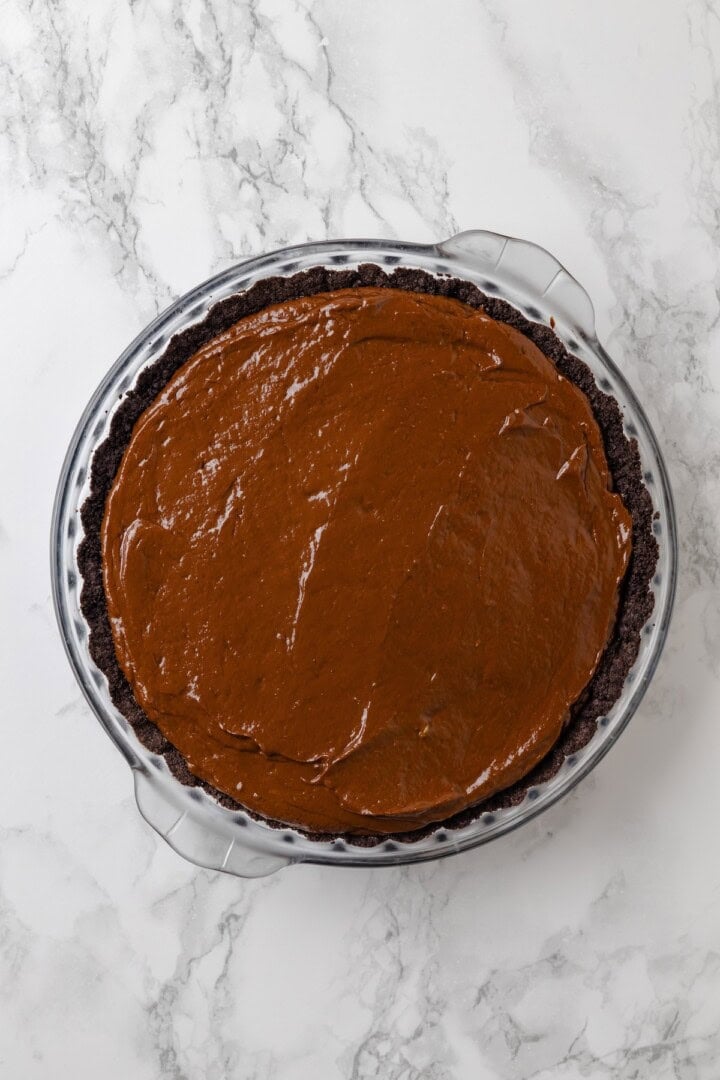
Fill the crust and chill.
- Chill . Pour the filling into the Oreo crust. Smooth the top, cover, and refrigerate for at least 4 hours.
- Make the whipped cream . Whip the chilled coconut cream with powdered sugar and vanilla until fluffy.
- Finish . Spread or pipe the whipped cream onto the pie. Add the shaved chocolate and/or Oreos, then serve.
Tips for Success
- Use ripe avocados . Make sure the avocados are ripe for a creamy and smooth mousse texture. Firm or underripe avocados can lead to a lumpy consistency, which isn’t what we want here!
- Let the crust cool before filling it . Allow the crust to cool completely before adding the mousse to prevent the filling from melting or separating.
- Chill before serving . Refrigerate the pie for the full 4 hours (or longer) to allow it to set properly. If you try to rush the process, it won’t be sliceable.
- Take a shortcut . If you’d like, you can swap the homemade coconut whipped cream topping for a store-bought vegan whipped cream.

How to Store
- Refrigerator : Cover the chocolate mousse pie with plastic wrap or store it in an airtight container and place it in the refrigerator. It can last up to 3-4 days.
- Freezer : If you want to freeze your pie for later, wrap it tightly with plastic wrap and then a layer of foil, or place smaller portions in a freezer-safe container. Freeze for up to 2 months and thaw in the refrigerator before serving.
More Vegan Desserts for Chocolate Lovers
- Chocolate Chia Pudding
- Gluten Free Brownies
- Chocolate Lava Cake
- Vegan Chocolate Cake
Ingredients
For the Oreo Crust:
- 24 Oreo cookies , regular, not double-stuffed – about 245 grams
- 5 tablespoons melted vegan butter , 70 grams
For the Avocado Chocolate Mousse Filling:
- 4 large ripe Hass avocados , about 8 ounces each, 800 grams total
- 8 ounces dark chocolate , 60% – 226 grams chocolate
- 3 tablespoons coconut oil , 42 grams
- ¾ cup unsweetened cocoa powder , 50 grams
- ⅓ cup agave nectar , 80 millilitres
- 1 can full fat coconut milk , 14 ounces/ 396 grams (scoop out the solid coconut cream from the chilled can)
- 1 teaspoon vanilla extract , 4.2 grams
- A pinch of salt
For the Whipped Coconut Cream Topping:
- 1 can full-fat coconut milk or coconut cream , 14 ounces/ 396 grams (scoop out the solid coconut cream from the chilled can if you’re using coconut milk)
- 2 tablespoons powdered sugar , 16 grams
- ½ teaspoon vanilla extract , 2.1 grams
- Shaved dark chocolate and additional Oreo cookies for garnish , optional
Instructions
Prepare and Bake the Oreo Crust:
- Preheat the oven to 350°F (175°C).
- Crush Oreos in a food processor until they form fine crumbs.
- Mix with melted vegan butter until evenly combined.
- Press firmly into the bottom and sides of a 9-inch pie dish (23 cm).
- Bake for 8–10 minutes, then let cool completely.
Make the Avocado Chocolate Mousse Filling:
- Melt the dark chocolate and coconut oil together, either using a double boiler or in 30-second bursts in the microwave, stirring in between. Let cool slightly.
- In a food processor or high-speed blender , blend the avocados with coconut cream until smooth.
- Add the melted chocolate mixture, cocoa powder, agave nectar, vanilla extract, and a pinch of salt.
- Blend until completely smooth and creamy. Scrape down sides as needed.
- Pour the mousse filling into the cooled Oreo crust and smooth the top.
- Cover and refrigerate for at least 4 hours, or until fully set.
Make the Coconut Whipped Cream:
- Scoop out the solid coconut cream from the chilled can (discard or reserve the liquid).
- Whip with powdered sugar and vanilla until fluffy.
- Spread or pipe on top of the chilled pie just before serving. Decorate with shaved chocolate and additional oreo cookies if desired.
Notes
- Chill the coconut milk cans in the refrigerator overnight so the coconut cream solidifies.
- Refrigerator : Cover the chocolate mousse pie with plastic wrap or store it in an airtight container and place it in the refrigerator. It can last up to 3-4 days.
- Freezer : If you want to freeze your pie for later, wrap it tightly with plastic wrap and then a layer of foil, or place smaller portions in a freezer-safe container. Freeze for up to 2 months and thaw in the refrigerator before serving.
