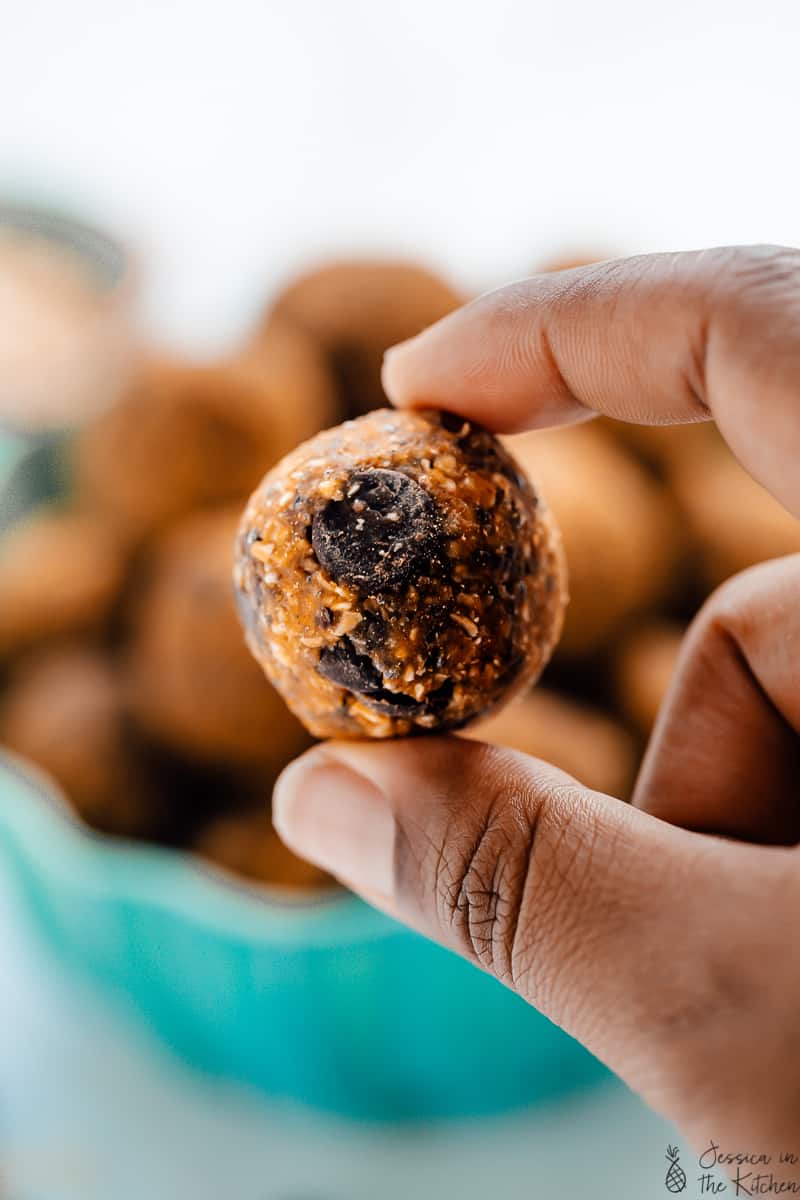
These no-bake pumpkin protein balls need only 8 ingredients and 10 minutes to make! They’re vegan and gluten-free, and the perfect quick breakfast or snack. You can even make these energy bites without a food processor!
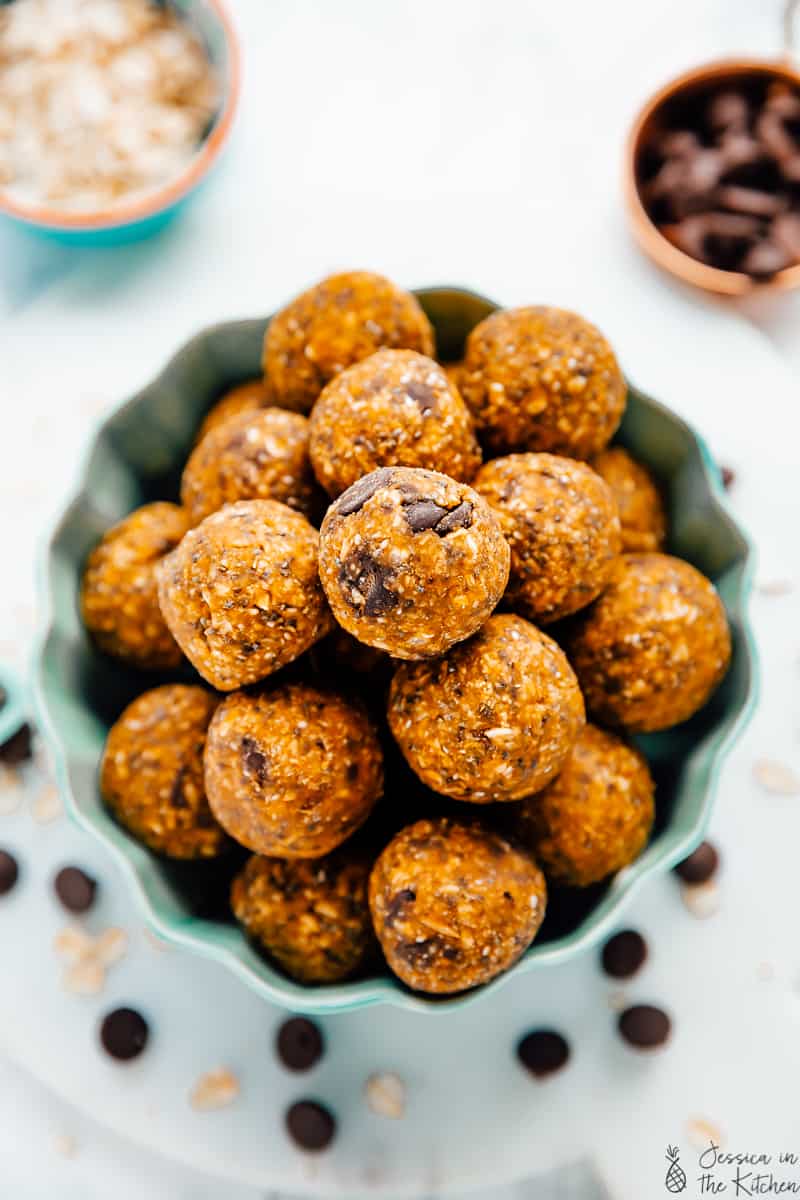
Pumpkin season is here and I’m all about turning a can of pumpkin purée into all sorts of delicious treats from pumpkin cheesecake to these festive pumpkin protein balls. Let me tell you, I love energy bites (or energy balls, depending on who you ask). I’m on a secret mission to have a protein ball recipe in every flavour for every season (Christmas, I’m coming for you), and to make each one just as delicious as the last!
Why I Love These Pumpkin Protein Balls
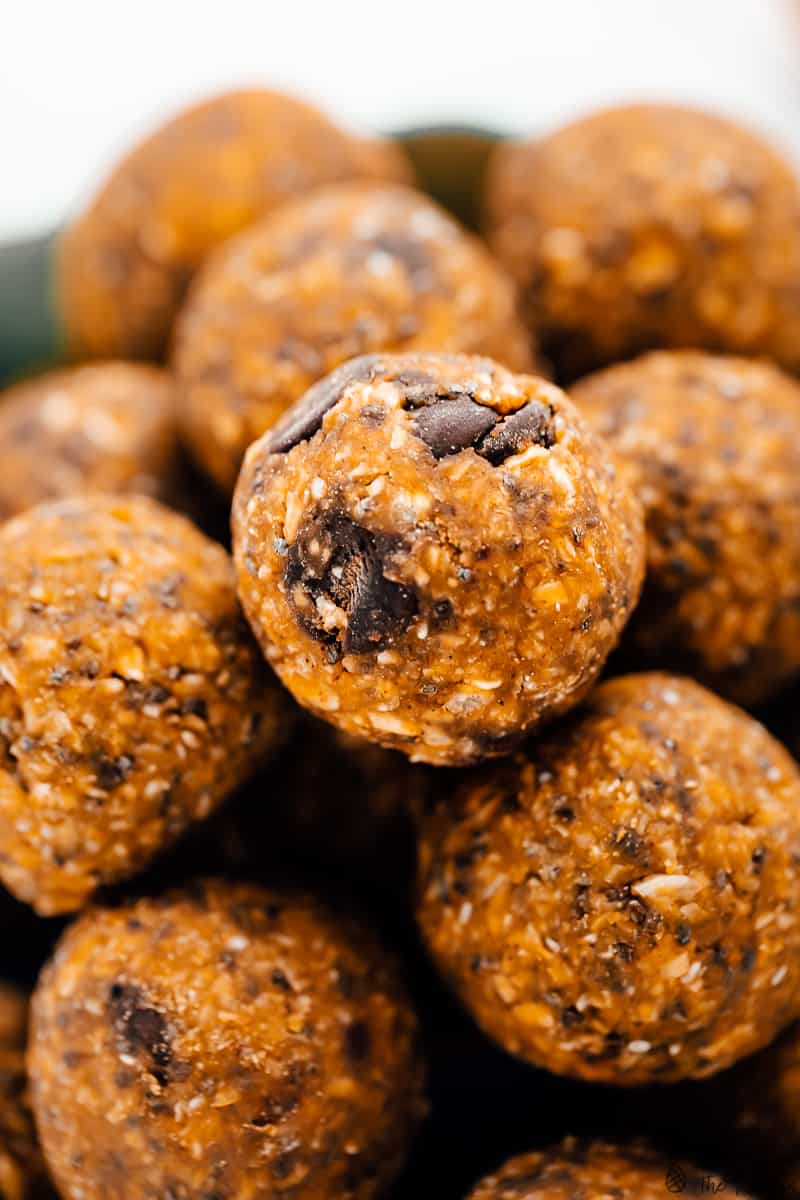
- Full of flavor. First and foremost, these pumpkin energy balls are chewy, sweet, and filled with tasty ingredients. Yummy fresh pumpkin puree, sweet maple syrup, creamy peanut butter, AND chocolate? Automatically delicious.
- Budget-friendly. I make this recipe without dates (which can be pricey) and sweeten my pumpkin protein balls with maple syrup instead.
- Protein packed. Whenever I need a protein boost, I’ll make a batch of these easy homemade energy bites. They’re the perfect size to satisfy a craving for something sweet, and they always fill me up.
- Quick and easy. These protein balls come together in the blender in minutes. Energy bites have always been amongst my favourite recipes for this reason. They’re versatile and quick to make.
- Convenient. These are great for a quick breakfast, dessert, or lunchbox snack, and they freeze really well. They even store well outside of the fridge, too.
Looking for more pumpkin breakfast recipes? Try my pumpkin chia pudding or pumpkin overnight oats too.
Notes on Ingredients
These pumpkin energy balls are basically the protein ball version of my pumpkin chocolate chip oatmeal breakfast cookies . They use a lot of the same ingredients! Here are some notes. Scroll to the recipe card for a printable list with amounts.
- Oats – I recommend using old-fashioned oats or rolled oats, and you can swap them for each other. Since we’ll be grinding the oats into “flour” you can also skip that step and use your favorite gluten-free flour with a similar texture, like almond flour.
- Pumpkin Spice – I love the smell and flavour of pumpkin pie spice, but you can use cinnamon instead or any mix of warm fall spices like nutmeg, ginger, and allspice.
- Chia Seeds – You can swap the chia seeds for flax seeds, just like in my original pumpkin chocolate chip oatmeal breakfast cookies. You can also leave them out altogether if you prefer.
- Peanut Butter – You can swap the peanut butter for any other nut butter or nut butter alternative, such as sunflower seeds.
- Maple Syrup – Or a similar liquid sweetener, like agave nectar or date syrup.
- Chocolate chips – Feel free to swap the chocolate chips for another add-in, like dried cranberries, pumpkin seeds, or any kind of nut, and you can add in anything you want here, too! You can also skip the add-ins if you’d like.
How to Make Pumpkin Protein Balls
Making these pumpkin protein balls is incredibly easy. All you do is toss everything into the blender and hit go. Here are the quick steps:
- Make the dough. Starting with the oats, pulse them in a blender until they’re finely ground. Add the rest of the ingredients (apart from the chocolate chips) and blend to make a thick dough.
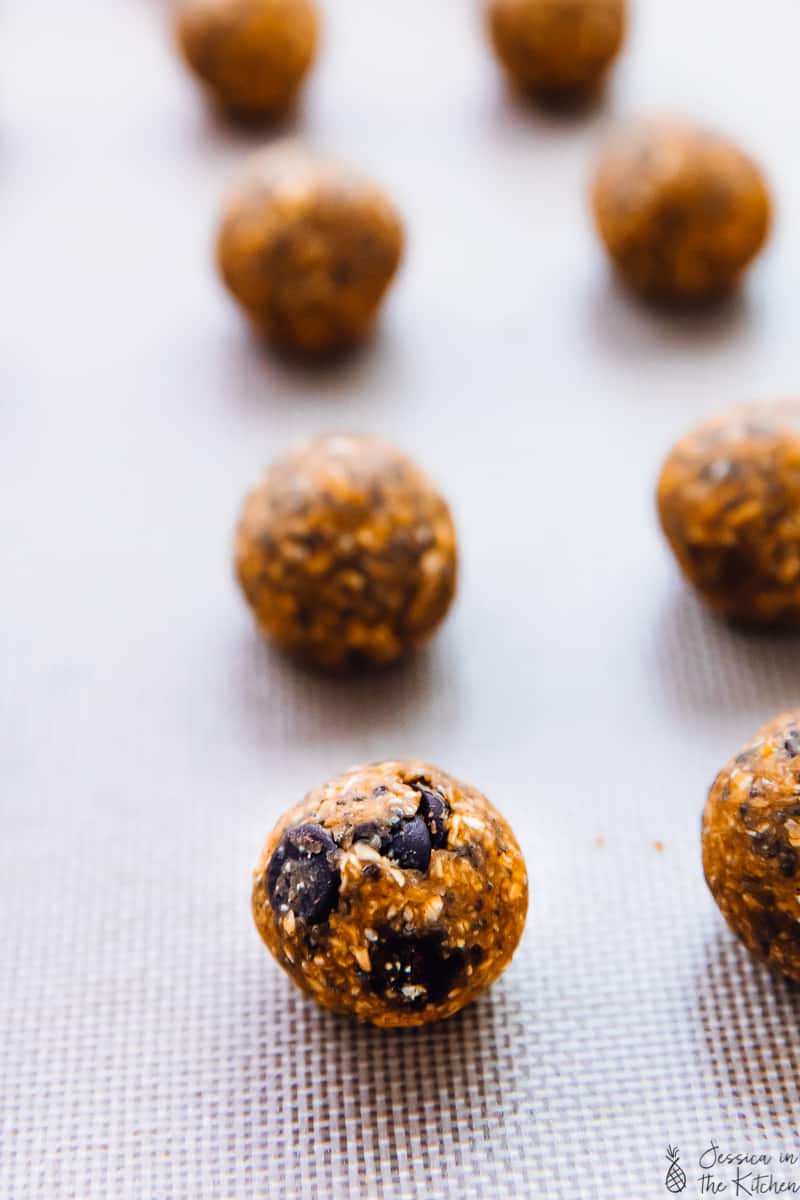
- Add chocolate chips. Lastly, add the chocolate chips to the blender and pulse a few times to roughly incorporate those into the dough.
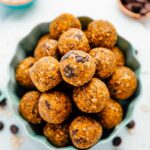
- Shape the balls. Afterward, use your hands to roll the mixture into balls. You should end up with about 20 energy balls.
- Chill. Place the finished protein balls into the fridge to chill for an hour, and enjoy!
Recipe Tips
- The dough can be sticky. If you find it tricky to handle, try chilling the protein ball dough in the fridge for 15-30 minutes before shaping it into balls. A small cookie scoop also makes it easier to portion the dough into balls.
- Fix dry dough. If the mixture is too dry and starts to crumble as you roll it, simply add a little more pumpkin, or a splash of water to help loosen it up. On the other hand, if your dough is too wet, add more oats.
- Don’t have a food processor? No worries. It’s totally possible to “grind” the oats by hand in this recipe since they don’t need to be a super fine powder. Rub the oats between your hands and work them into crumbs. Afterward, use your hands or a spatula to mix the dough, and continue with the rest of the recipe as directed.
How to Store
- Refrigerate. Keep these pumpkin protein balls airtight in a ziplock bag or container in the fridge. They’ll last for 2 weeks, or maybe even longer!
- Freeze. These protein balls freeze well. Place them in a freezer-safe ziplock bag and freeze them for up to 3 months. Thaw on the counter for 30 minutes or in the fridge before serving.
More Pumpkin Recipes To Try
- Pumpkin Granola
- Vegan Pumpkin Cheesecake
- Soft Pumpkin Cookies
- Pumpkin Cream Cheese Muffins
- Pumpkin Pancakes
Ingredients
- 2 1/4 cups old fashioned or rolled quick oats
- 1/2 teaspoon fine sea salt
- 1 teaspoon pumpkin spice
- 1/4 cup chia seeds
- 1/2 cup pumpkin puree
- 1/4 cup organic peanut butter
- 1/4 cup maple syrup
- 1/3 cup vegan chocolate chips
Instructions
- Grind the oats for about 1 minute in a food processor, until they’re almost ground down.
- Add in all the other ingredients minus the chocolate chips and mix until incorporated and the mixture begins to turn into a dough. It should be slightly sticky and very thick.
- Add in the chocolate chips and pulse about 15 times until the chips are smaller and incorporated throughout the energy bites.
- Roll the mixture into round balls using a tablespoon measurer until the entire mixture is rolled out, into about 20-22 bites.
- Place in the fridge for at least an hour to set, then enjoy!
Notes
- This recipe is gluten-free and vegan.
- Don’t have a food processor? That’s fine! Grind the oats with your hands until they are broken up into fine pieces. You don’t need them super fine like flour for this recipe. Afterward, mix all the ingredients with your hands or a spatula until they’re well combined. Roll the balls and continue with the rest of the recipe as written.
- Storage: You can store these pumpkin balls in the fridge in a zipped bag or airtight Tupperware container for at least 2 weeks.
- Freezing: These bites freeze very well. Just place them in a freezer-safe ziplock bag until ready to use. Thaw on the counter for 30 minutes or in the fridge until ready to use.
These no-bake pumpkin protein balls need only 8 ingredients and 10 minutes to make! They’re vegan and gluten-free, and the perfect quick breakfast or snack. You can even make these energy bites without a food processor!
Pumpkin season is here and I’m all about turning a can of pumpkin purée into all sorts of delicious treats from pumpkin cheesecake to these festive pumpkin protein balls. Let me tell you, I love energy bites (or energy balls, depending on who you ask). I’m on a secret mission to have a protein ball recipe in every flavour for every season (Christmas, I’m coming for you), and to make each one just as delicious as the last!
Why I Love These Pumpkin Protein Balls
- Full of flavor. First and foremost, these pumpkin energy balls are chewy, sweet, and filled with tasty ingredients. Yummy fresh pumpkin puree, sweet maple syrup, creamy peanut butter, AND chocolate? Automatically delicious.
- Budget-friendly. I make this recipe without dates (which can be pricey) and sweeten my pumpkin protein balls with maple syrup instead.
- Protein packed. Whenever I need a protein boost, I’ll make a batch of these easy homemade energy bites. They’re the perfect size to satisfy a craving for something sweet, and they always fill me up.
- Quick and easy. These protein balls come together in the blender in minutes. Energy bites have always been amongst my favourite recipes for this reason. They’re versatile and quick to make.
- Convenient. These are great for a quick breakfast, dessert, or lunchbox snack, and they freeze really well. They even store well outside of the fridge, too.
Looking for more pumpkin breakfast recipes? Try my pumpkin chia pudding or pumpkin overnight oats too.
Notes on Ingredients
These pumpkin energy balls are basically the protein ball version of my pumpkin chocolate chip oatmeal breakfast cookies . They use a lot of the same ingredients! Here are some notes. Scroll to the recipe card for a printable list with amounts.
- Oats – I recommend using old-fashioned oats or rolled oats, and you can swap them for each other. Since we’ll be grinding the oats into “flour” you can also skip that step and use your favorite gluten-free flour with a similar texture, like almond flour.
- Pumpkin Spice – I love the smell and flavour of pumpkin pie spice, but you can use cinnamon instead or any mix of warm fall spices like nutmeg, ginger, and allspice.
- Chia Seeds – You can swap the chia seeds for flax seeds, just like in my original pumpkin chocolate chip oatmeal breakfast cookies. You can also leave them out altogether if you prefer.
- Peanut Butter – You can swap the peanut butter for any other nut butter or nut butter alternative, such as sunflower seeds.
- Maple Syrup – Or a similar liquid sweetener, like agave nectar or date syrup.
- Chocolate chips – Feel free to swap the chocolate chips for another add-in, like dried cranberries, pumpkin seeds, or any kind of nut, and you can add in anything you want here, too! You can also skip the add-ins if you’d like.
How to Make Pumpkin Protein Balls
Making these pumpkin protein balls is incredibly easy. All you do is toss everything into the blender and hit go. Here are the quick steps:
- Make the dough. Starting with the oats, pulse them in a blender until they’re finely ground. Add the rest of the ingredients (apart from the chocolate chips) and blend to make a thick dough.
- Add chocolate chips. Lastly, add the chocolate chips to the blender and pulse a few times to roughly incorporate those into the dough.
- Shape the balls. Afterward, use your hands to roll the mixture into balls. You should end up with about 20 energy balls.
- Chill. Place the finished protein balls into the fridge to chill for an hour, and enjoy!
Recipe Tips
- The dough can be sticky. If you find it tricky to handle, try chilling the protein ball dough in the fridge for 15-30 minutes before shaping it into balls. A small cookie scoop also makes it easier to portion the dough into balls.
- Fix dry dough. If the mixture is too dry and starts to crumble as you roll it, simply add a little more pumpkin, or a splash of water to help loosen it up. On the other hand, if your dough is too wet, add more oats.
- Don’t have a food processor? No worries. It’s totally possible to “grind” the oats by hand in this recipe since they don’t need to be a super fine powder. Rub the oats between your hands and work them into crumbs. Afterward, use your hands or a spatula to mix the dough, and continue with the rest of the recipe as directed.
How to Store
- Refrigerate. Keep these pumpkin protein balls airtight in a ziplock bag or container in the fridge. They’ll last for 2 weeks, or maybe even longer!
- Freeze. These protein balls freeze well. Place them in a freezer-safe ziplock bag and freeze them for up to 3 months. Thaw on the counter for 30 minutes or in the fridge before serving.
More Pumpkin Recipes To Try
- Pumpkin Granola
- Vegan Pumpkin Cheesecake
- Soft Pumpkin Cookies
- Pumpkin Cream Cheese Muffins
- Pumpkin Pancakes
Ingredients
- 2 1/4 cups old fashioned or rolled quick oats
- 1/2 teaspoon fine sea salt
- 1 teaspoon pumpkin spice
- 1/4 cup chia seeds
- 1/2 cup pumpkin puree
- 1/4 cup organic peanut butter
- 1/4 cup maple syrup
- 1/3 cup vegan chocolate chips
Instructions
- Grind the oats for about 1 minute in a food processor, until they’re almost ground down.
- Add in all the other ingredients minus the chocolate chips and mix until incorporated and the mixture begins to turn into a dough. It should be slightly sticky and very thick.
- Add in the chocolate chips and pulse about 15 times until the chips are smaller and incorporated throughout the energy bites.
- Roll the mixture into round balls using a tablespoon measurer until the entire mixture is rolled out, into about 20-22 bites.
- Place in the fridge for at least an hour to set, then enjoy!
Notes
- This recipe is gluten-free and vegan.
- Don’t have a food processor? That’s fine! Grind the oats with your hands until they are broken up into fine pieces. You don’t need them super fine like flour for this recipe. Afterward, mix all the ingredients with your hands or a spatula until they’re well combined. Roll the balls and continue with the rest of the recipe as written.
- Storage: You can store these pumpkin balls in the fridge in a zipped bag or airtight Tupperware container for at least 2 weeks.
- Freezing: These bites freeze very well. Just place them in a freezer-safe ziplock bag until ready to use. Thaw on the counter for 30 minutes or in the fridge until ready to use.
Pumpkin Protein Balls
Ingredients
- 2 1/4 cups old fashioned or rolled quick oats
- 1/2 teaspoon fine sea salt
- 1 teaspoon pumpkin spice
- 1/4 cup chia seeds
- 1/2 cup pumpkin puree
- 1/4 cup organic peanut butter
- 1/4 cup maple syrup
- 1/3 cup vegan chocolate chips
Instructions
- Grind the oats for about 1 minute in a food processor, until they’re almost ground down.
- Add in all the other ingredients minus the chocolate chips and mix until incorporated and the mixture begins to turn into a dough. It should be slightly sticky and very thick.
- Add in the chocolate chips and pulse about 15 times until the chips are smaller and incorporated throughout the energy bites.
- Roll the mixture into round balls using a tablespoon measurer until the entire mixture is rolled out, into about 20-22 bites.
- Place in the fridge for at least an hour to set, then enjoy!
Video
Notes
- This recipe is gluten-free and vegan.
- Don’t have a food processor? That’s fine! Grind the oats with your hands until they are broken up into fine pieces. You don’t need them super fine like flour for this recipe. Afterward, mix all the ingredients with your hands or a spatula until they’re well combined. Roll the balls and continue with the rest of the recipe as written.
- Storage: You can store these pumpkin balls in the fridge in a zipped bag or airtight Tupperware container for at least 2 weeks.
- Freezing: These bites freeze very well. Just place them in a freezer-safe ziplock bag until ready to use. Thaw on the counter for 30 minutes or in the fridge until ready to use.
Nutrition
Pumpkin Protein Balls https://jessicainthekitchen.com/pumpkin-energy-bites/ September 24, 2019
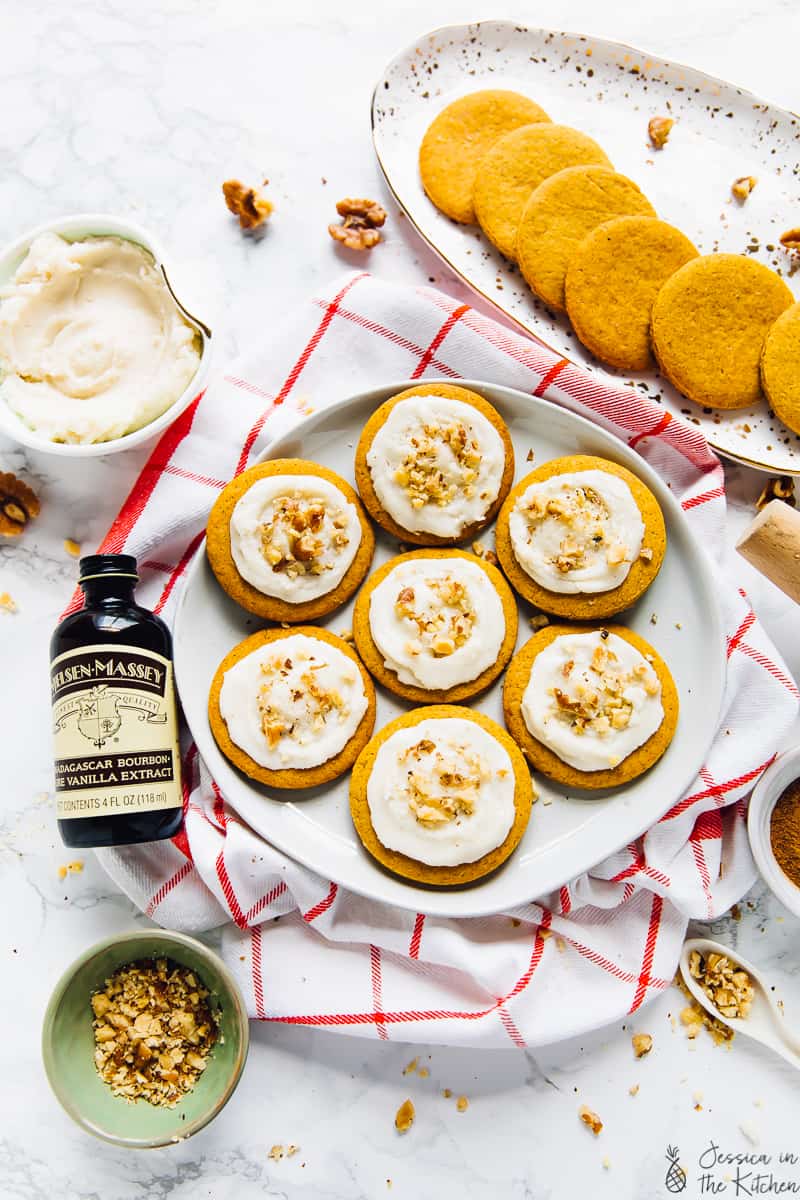
These Rolled Pumpkin Spice Cookies are the perfect holiday cookie!! They’re deliciously spiced, easy to make, vegan and have the perfect texture!
It’s official: my lifetime love for pumpkin has grown even more this season. I think as soon as it hit September 1, I grabbed my first small container of pumpkin purée, thinking I wouldn’t need much. A week later and four containers later, I realised it was time to just buy some pumpkin. I followed my handy dandy homemade pumpkin purée recipe to whip up a whole batch to keep me stocked for the season. Needless to say – I love pumpkin, and I LOVE these Vegan Rolled Pumpkin Spice Cookies!
I wanted to try out something different with these cookies. I haven’t made rolled cookies in a while – not since my Jessiker Bakes day running an at-home bakery. Wow, those were some interesting times. I had every single baking device possible, and soooo many cookie cutters! Every shape, every size, every category. There’s just something fun and festive about pressing shapes into rolled cookie dough. I also loved a good solid sugar cookie. The type that is soft but also chewy. With these cookies, I knew what I was looking for and so the creations began.
Not that long after, I had created a beautifully spiced (all the pumpkin spice) sugar cookie that was a delicious mix of crunchy, slightly soft on top and chewy. I went out of my way to ensure that this batter was so easy that you could easily whip it up twice in a week while watching a tv show – which is, exactly what I did. Trust me, one bite and you’re all in.
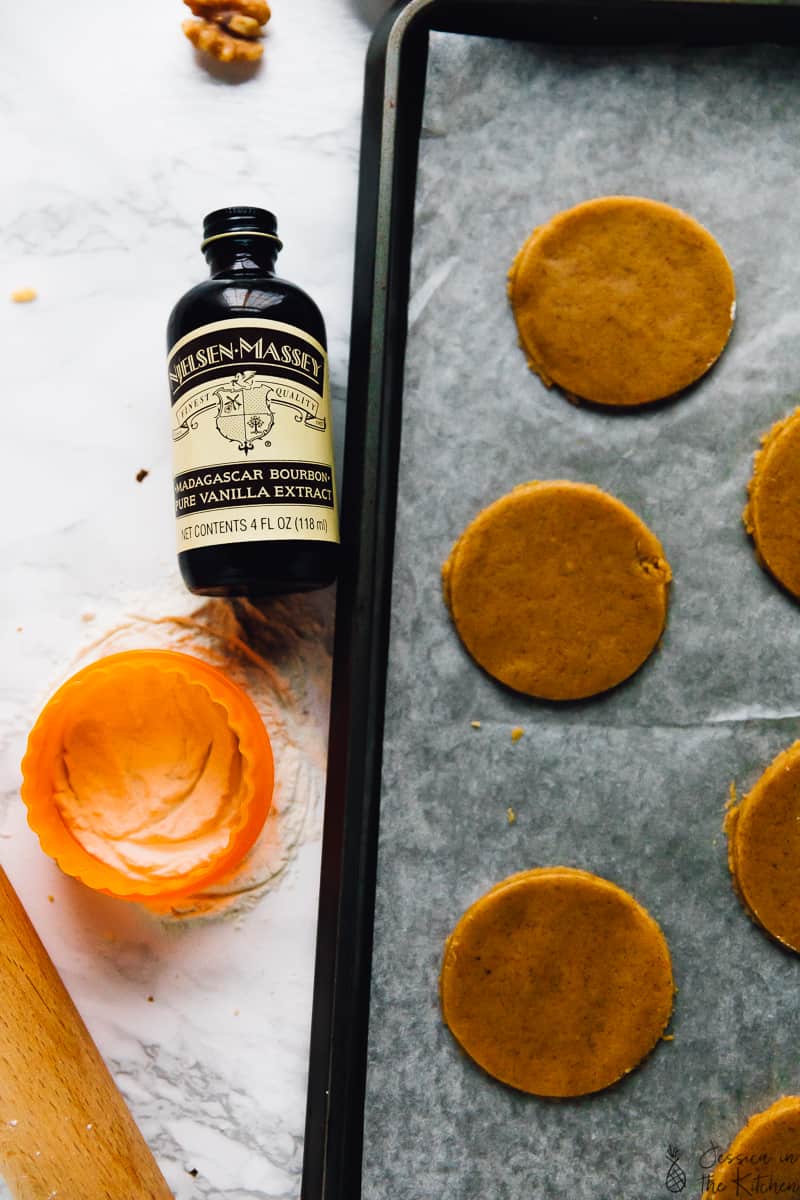
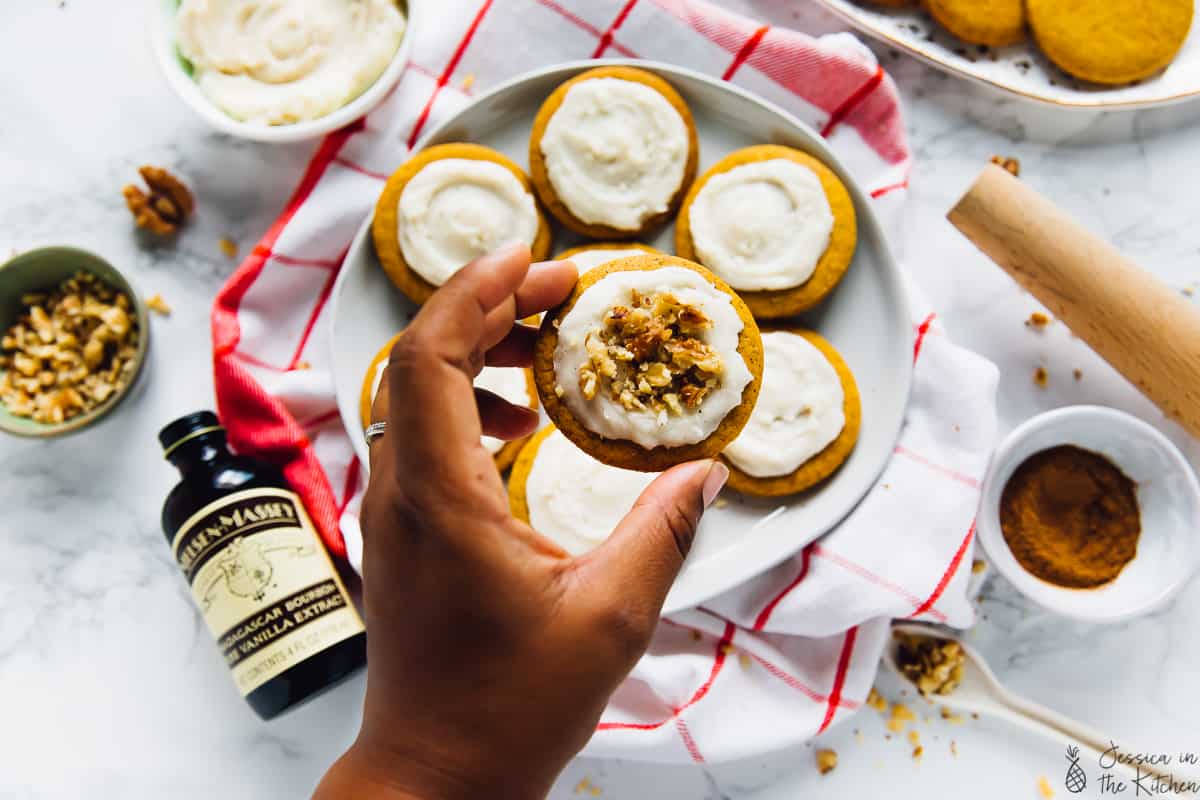
Let’s talk ingredients. These pumpkin spice cookies also have actual pumpkin in there! It’s my go-to ingredient to make everything thick and soft. From chocolate chip cookies , to cornbread to even pumpkin quinoa chili . There’s only 1/4 cup in there so it doesn’t taste like pumpkin, but it sure helps with the texture of the cookies. In combination with my usual mix of cookie ingredients, I used my favourite vanilla extract, Nielsen-Massey Vanillas .
I opted specifically for their Madagascar Bourbon Pure Vanilla Extract . If you’ve been a reader here before, then you know that I LOVE this vanilla extract. I love their dedication to high-quality ingredients and products – including but not limited to hand-picked vanilla beans, cold extraction process, while being all-natural, Non-GMO Project verified, vegan and gluten free. I also love the sweet and creamy flavour that this specific vanilla extract lends to these cookies. I’ve shared before about how it was the first one I ever used back when I had my baking business, and decided to stick with it, even keeping my massive (empty) bottle of it for quite some time.
I’m especially loving Nielsen-Massey’s Better Your Bake campaign. Baking has been in my family for generations. With my grandma having her own catering business, and my mom always making Christmas cake every season and so many more memories. No wonder I fell in love – it’s in my blood! Gav even jokes that he knows when it’s holiday season because I seem to bake constantly, just because . That being said, it helps that I’ve learned many of the basics and so it comes easily and naturally to me. Nielsen-Massey’s Better Your Bake campaign is designed to help you master the basics of baking, so that you can get straight to the enjoying (and all the taste testing, of course).
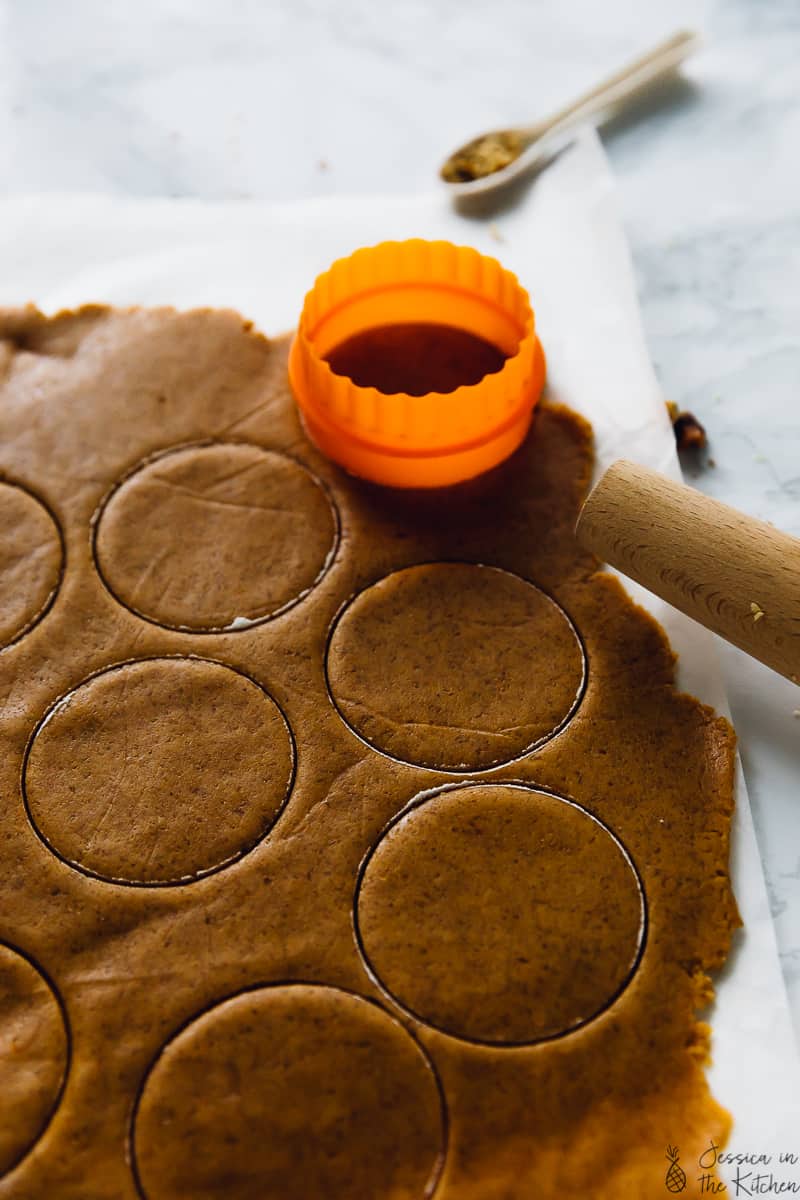
One of my favourite parts of baking is that I feel like I can get lost in the rhythm of it. It allows me to free my mind of overthinking in that moment, and instead just focus on the mindfullness of the process. To this date, I’ve baked over 500 times, so clearly I’ve been loving the benefits of it! Nielsen-Massey did a six-part series sharing lots of baking basics for you to master, complete with step-by-step videos. You can head over to betteryourbake.com to follow along. I decided to cover “ How to Roll Cookie Dough ” because – who doesn’t love cookies? I go step by step in these photos, and in the instructions below.
All in all, this cookie dough will be whipped up in just a few minutes, rested, rolled then baked. It’s the perfect new cookie dough to make for this holiday season and beyond. If you aren’t already following me on IG, I also detailed it last week in video format over on my stories. It’s an easy to follow method that’ll guarantee your cookie dough won’t be sticking to your rolling pin ever. Seriously, always roll your cookies like this!
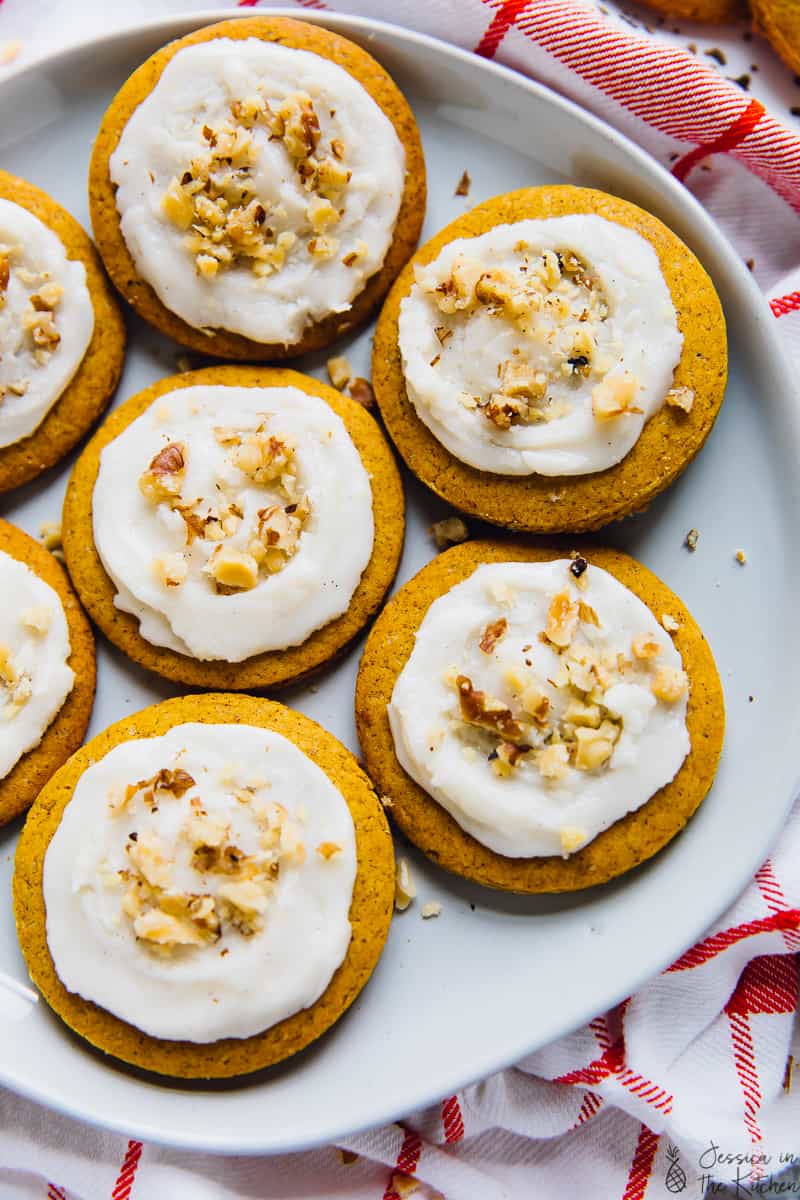
I kept it pretty simple for you! But, be sure to spruce these cookies up even more with maybe a pumpkin shape, or even icing sugar on the cookies. Either way they’ll taste absolutely delicious and will be perfect for the holiday season. Eat up and enjoy friends!
Ingredients
- 1 1/2 cups flour of choice , regular all-purpose flour or gluten-free flour mix (192g)
- 1 teaspoon pumpkin spice
- 1 teaspoon baking powder
- 1/4 teaspoon baking soda
- 1/4 teaspoon sea salt
- 1/4 cup vegan butter , (56g)
- 1/2 cup cane sugar , or brown sugar, coconut sugar or any granulated sugar, (105.3g)
- 1 teaspoon Nielsen-Massey Madagascar Bourbon Pure Vanilla Extract
- 1/4 cup pumpkin purée , (112.5g)
Instructions
- Preheat oven to 350°F/180°C. Line a baking sheet and cut two sheets of parchment paper to fit the baking sheet. Set aside for now.
- In a small bowl, add the flour, baking powder and baking soda, pumpkin spice and sea salt. Whisk together thoroughly. Set aside.
- In a large bowl, add the vegan butter and the brown sugar. With a standing mixer or a hand mix, beat together until thoroughly incorporated, about 5 minutes. Add in the Nielsen-Massey Madagascar Bourbon Pure Vanilla Extract and the pumpkin puree. Blend until thoroughly incorporated, scraping down sides, for about 3 minutes. Add the flour mixture to the wet in two batches and mix with mixer until incorporated. Scrape down the sides to gather all the dough and gently fold in.
- Form dough into a large ball and cover with reusable wrap. Place in the fridge for at least 30 minutes to set up.
- Place the two sheets of parchment paper on the counter (put baking sheet aside for now) and place slightly chilled cookie dough between the two sheets of parchment paper. Press down slightly. Using your rolling pin, roll the cookie dough from the centre, rolling away from your body, back and forth. Repeat, rotating the parchment paper about 45 degrees to help with rolling and to ensure even rolling, until the cookie dough is flat and about 1/4” thick.
- When all rolled out, place the parchments on the baking sheet and back into the fridge for about 20 minutes to hold the shape.
- Remove baking sheet from fridge and peel off the top layer of parchment paper. Set out a small amount of flour on the counter and press your clean cookie dough cutter into it. This will help to ensure the cookie cutter does not stick to the dough.
- Press firmly into the dough, cutting out your cookies. When all the cookies have been stamped, remove the excess dough. You can flatten this and make even more cookies from it! Leave a bit of space in between each cookie.
- Bake for 10-12 minutes: 10 for slightly softer, 12 for firmer. Remove and let cool slightly. Serve with frosting and chopped walnuts or cookies and enjoy!
