These no bake carrot cake energy bites pack all the cozy, warmly spiced flavours of classic carrot cake into an easy, grab-and-go snack. You only need 7 ingredients for this naturally vegan and gluten-free treat!

These carrot cake energy bites are inspired by my very favourite dessert, vegan carrot cake . Because as much as I may wish carrot cake was on the menu every single day, it’s not exactly practical. These chewy little energy bites (and my carrot cake pancakes !) help me get my fix in a more wholesome way. The spices really help create that signature carrot cake flavour, but this recipe is loaded with feel-good ingredients.
Why These Carrot Cake Energy Bites Are Little Balls of Bliss
I love keeping Tupperware containers of energy bites in the fridge (these gingerbread energy bites are awesome too!). They’re the perfect two-bite dessert when you’re craving something sweet, you can use them as a grab-and-go breakfast, and they’re a great post-workout snack.
- No baking required. Everything comes together in the food processor for a quick treat. No muss, no fuss!
- Carrot cake flavour, in a more wholesome package. You get all the warm spices and sweet flavour (and even some carrots!) without the gobs and gobs of sugar and frosting.
- Naturally sweetened. Dates provide rich caramel-like sweetness with no added sugar, and they’re sticky so they help with the binding too.
- Wholesome ingredients. You’ve got nuts, fruit, and even veggies in the mix!
Notes on Ingredients
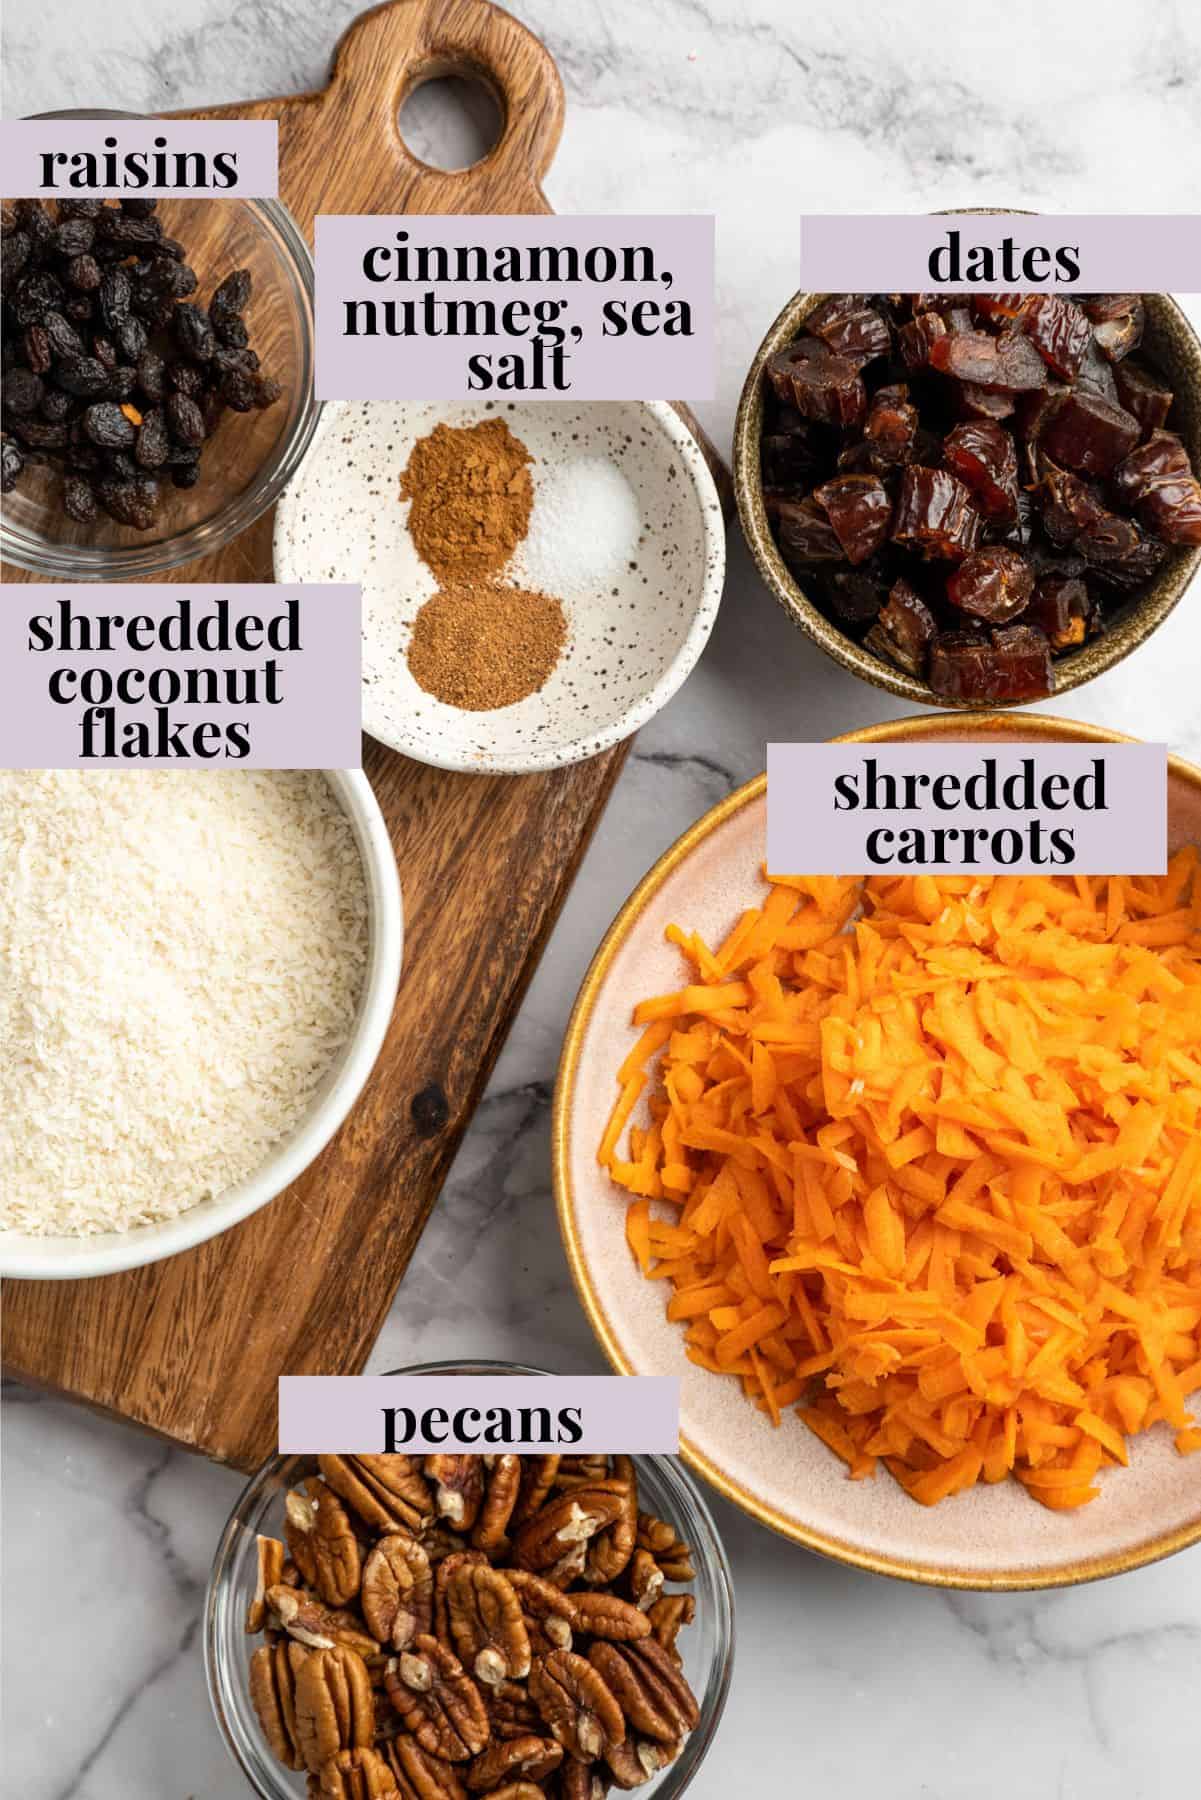
Here are the ingredients you’ll need for my no bake carrot cake energy bites. Scroll down to the recipe card to find the ingredient quantities and recipe instructions.
- Pecans – These are rich and buttery, forming an awesome base for our carrot cake energy bites. Feel free to swap in walnuts or another nut if you’d like, or pepitas for a nut-free version.
- Dates – Be sure to pit them! (If you’ve ever forgotten to pit a date before using it in a recipe, well, you’ll never forget to do it again…)
- Shredded carrots – These also work with the dates to add a little sweetness.
- Seasonings – Cinnamon and nutmeg, plus sea salt for balance.
- Shredded coconut flakes – For texture in the bites and for coating.
- Raisins – Optional, because I know not everyone’s a fan. But if you love carrot cake with raisins, go ahead and add them to your energy bites too!
How to Make No Bake Carrot Cake Energy Bites
Let’s get rolling! (Literally—you’ll be rolling the energy bites.) Here’s what you’ll need to do.
Make the mixture.
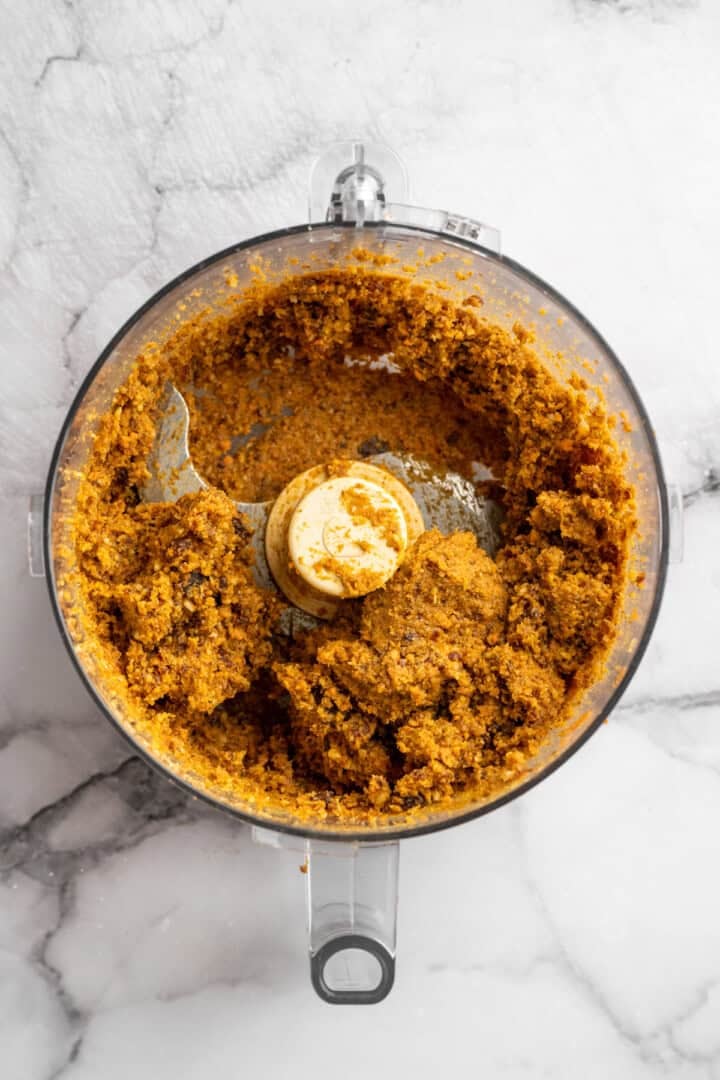
- Pulse the ingredients. Add the pecans, dates, carrots, spices, salt, and half the coconut to a food processor and blend until a dough forms.
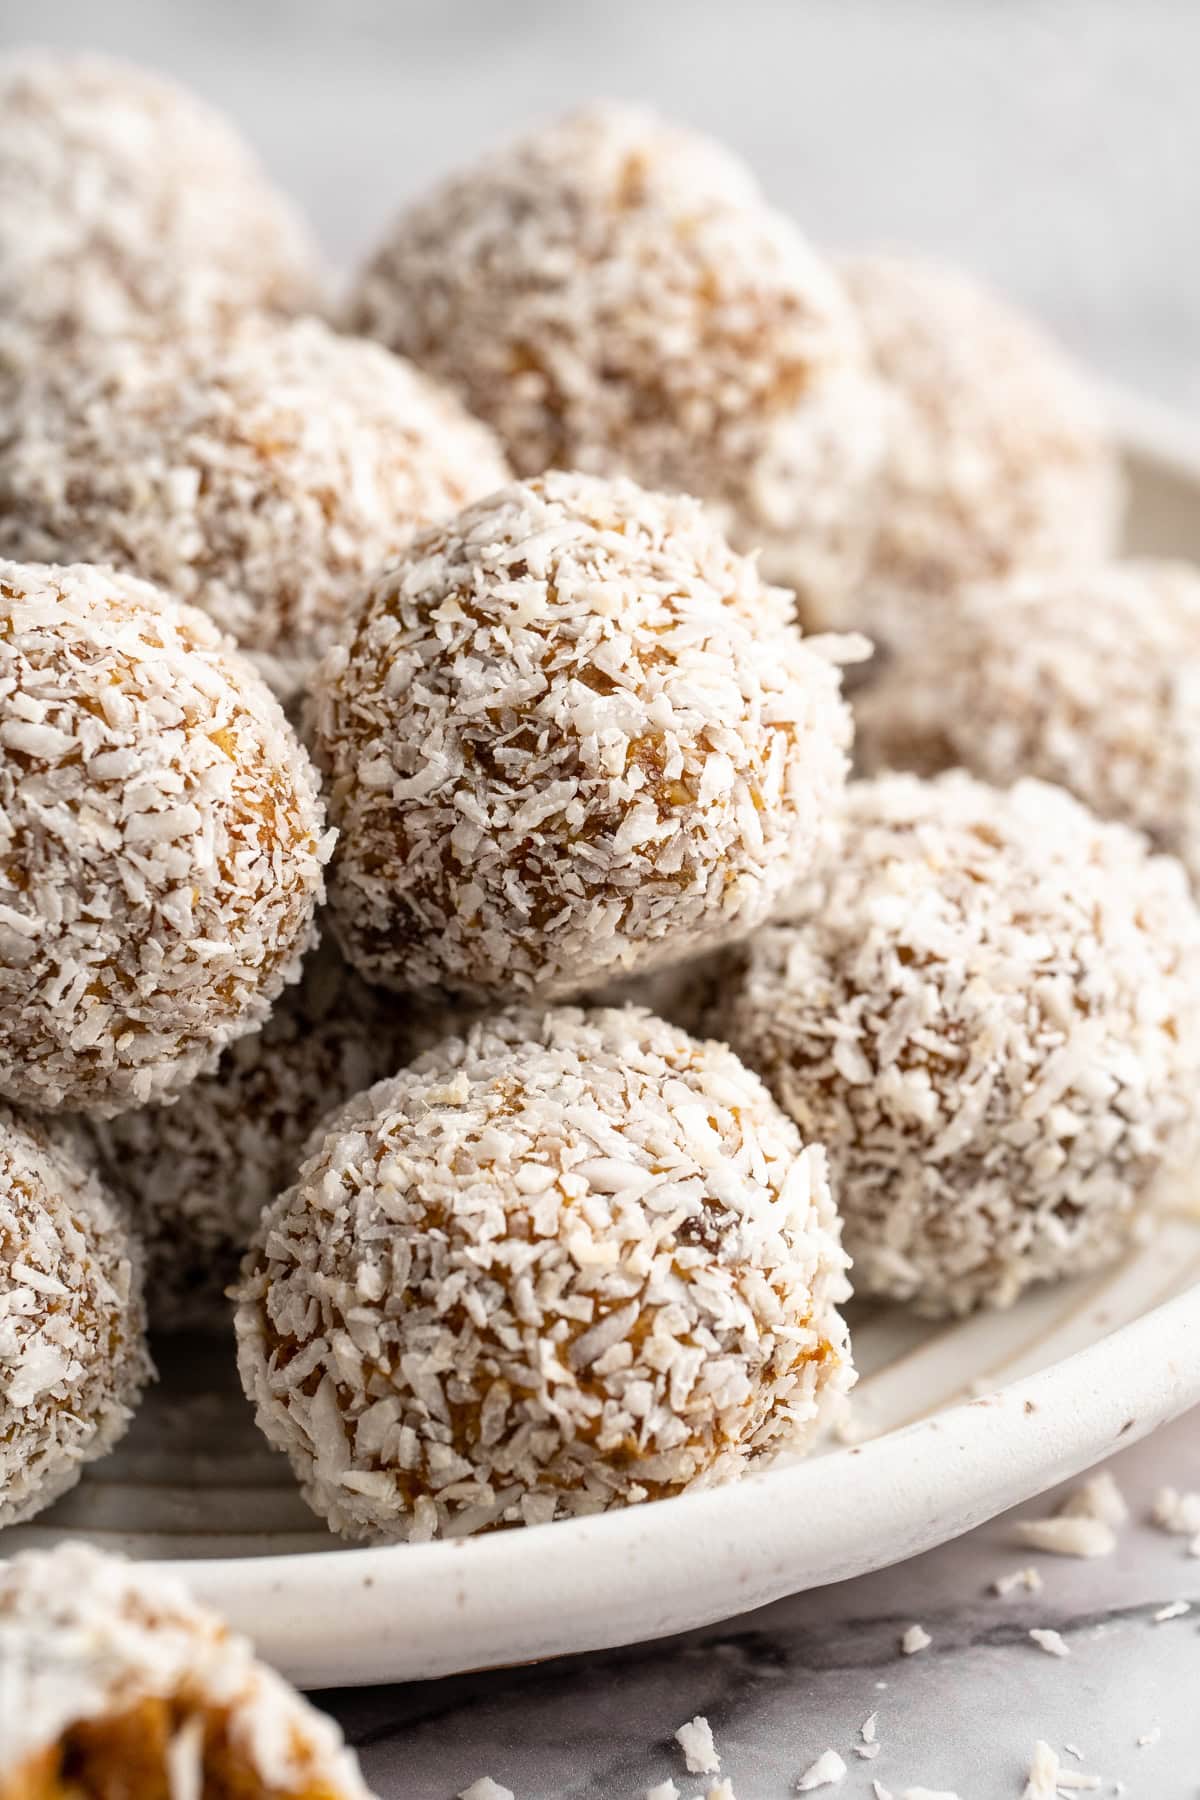
- Shape the bites. Roll the mixture into bite-sized balls using damp hands or plastic wrap.
- Coat with coconut. Roll each ball in the remaining shredded coconut.
- Chill to set. Refrigerate for at least one hour before serving.
Tips and Variations
- Adjust the moisture as needed. If the mixture feels dry or doesn’t come together when you pinch it between your fingers, pulse in 1–2 teaspoons of water or coconut oil.
- Try other mix-ins. Dried cranberries or minced dried pineapple can be swapped in for the raisins.
- Add some extra protein. For a protein boost, mix in a tablespoon or two of vanilla protein powder; you may also need to add some water or coconut oil too.
- Turn them into bars. Press the mixture into a square baking dish lined with parchment paper. Chill for about an hour, then slice into bars or squares.
Proper Storage
- Refrigerator: Store these no bake energy bites in an airtight container in the refrigerator for up to 1 week.
- Freezer: These bites can also be frozen for up to 3 months; thaw in the fridge before eating or eat them straight out of the freezer.
More Vegan Snack Recipes
- Apple Chips
- Protein Bars
- Pretzel Bites
- Vegan Spinach Artichoke Dip
Ingredients
- 1 cup pecans , 120g
- 1 cup dates , Medjool or regular, chopped, 160g
- 2 cups shredded carrots , 220g
- 1/2 teaspoon cinnamon , 1.3g
- 1/2 teaspoon nutmeg , 1.1g
- 1/4 teaspoon sea salt , 1.4g
- 1 cup shredded coconut flakes , 80g (half for the bites, half for rolling)
- 1/4 cup raisins , 40g
Instructions
- Add the pecans, dates, shredded carrots, cinnamon, nutmeg, sea salt and half of the shredded coconut flakes to your food processor. Pulse everything together until incorporated and the mixture begins to turn into a dough, about 1 minute. Scrap down the sides if necessary.
- Using a sheet of cling-film (Saran Wrap), shape the mixture into round balls by wrapping and rolling until all the mixture is finished. If you don’t want to use cling-film, dampen your hands and use your wet hands to roll the balls.
- Roll the balls in the remaining shredded coconut flakes.
- Place in the fridge for at least an hour to set properly, then enjoy!
Notes
- Refrigerator : Store these carrot cake energy bites in an airtight container in the refrigerator for up to 1 week.
- Freezer : These bites can also be frozen for up to 3 months; thaw in the fridge before eating or eat them straight out of the freezer.
These no bake carrot cake energy bites pack all the cozy, warmly spiced flavours of classic carrot cake into an easy, grab-and-go snack. You only need 7 ingredients for this naturally vegan and gluten-free treat!
These carrot cake energy bites are inspired by my very favourite dessert, vegan carrot cake . Because as much as I may wish carrot cake was on the menu every single day, it’s not exactly practical. These chewy little energy bites (and my carrot cake pancakes !) help me get my fix in a more wholesome way. The spices really help create that signature carrot cake flavour, but this recipe is loaded with feel-good ingredients.
Why These Carrot Cake Energy Bites Are Little Balls of Bliss
I love keeping Tupperware containers of energy bites in the fridge (these gingerbread energy bites are awesome too!). They’re the perfect two-bite dessert when you’re craving something sweet, you can use them as a grab-and-go breakfast, and they’re a great post-workout snack.
- No baking required. Everything comes together in the food processor for a quick treat. No muss, no fuss!
- Carrot cake flavour, in a more wholesome package. You get all the warm spices and sweet flavour (and even some carrots!) without the gobs and gobs of sugar and frosting.
- Naturally sweetened. Dates provide rich caramel-like sweetness with no added sugar, and they’re sticky so they help with the binding too.
- Wholesome ingredients. You’ve got nuts, fruit, and even veggies in the mix!
Notes on Ingredients
Here are the ingredients you’ll need for my no bake carrot cake energy bites. Scroll down to the recipe card to find the ingredient quantities and recipe instructions.
- Pecans – These are rich and buttery, forming an awesome base for our carrot cake energy bites. Feel free to swap in walnuts or another nut if you’d like, or pepitas for a nut-free version.
- Dates – Be sure to pit them! (If you’ve ever forgotten to pit a date before using it in a recipe, well, you’ll never forget to do it again…)
- Shredded carrots – These also work with the dates to add a little sweetness.
- Seasonings – Cinnamon and nutmeg, plus sea salt for balance.
- Shredded coconut flakes – For texture in the bites and for coating.
- Raisins – Optional, because I know not everyone’s a fan. But if you love carrot cake with raisins, go ahead and add them to your energy bites too!
How to Make No Bake Carrot Cake Energy Bites
Let’s get rolling! (Literally—you’ll be rolling the energy bites.) Here’s what you’ll need to do.
Make the mixture.
- Pulse the ingredients. Add the pecans, dates, carrots, spices, salt, and half the coconut to a food processor and blend until a dough forms.
- Shape the bites. Roll the mixture into bite-sized balls using damp hands or plastic wrap.
- Coat with coconut. Roll each ball in the remaining shredded coconut.
- Chill to set. Refrigerate for at least one hour before serving.
Tips and Variations
- Adjust the moisture as needed. If the mixture feels dry or doesn’t come together when you pinch it between your fingers, pulse in 1–2 teaspoons of water or coconut oil.
- Try other mix-ins. Dried cranberries or minced dried pineapple can be swapped in for the raisins.
- Add some extra protein. For a protein boost, mix in a tablespoon or two of vanilla protein powder; you may also need to add some water or coconut oil too.
- Turn them into bars. Press the mixture into a square baking dish lined with parchment paper. Chill for about an hour, then slice into bars or squares.
Proper Storage
- Refrigerator: Store these no bake energy bites in an airtight container in the refrigerator for up to 1 week.
- Freezer: These bites can also be frozen for up to 3 months; thaw in the fridge before eating or eat them straight out of the freezer.
More Vegan Snack Recipes
- Apple Chips
- Protein Bars
- Pretzel Bites
- Vegan Spinach Artichoke Dip
Ingredients
- 1 cup pecans , 120g
- 1 cup dates , Medjool or regular, chopped, 160g
- 2 cups shredded carrots , 220g
- 1/2 teaspoon cinnamon , 1.3g
- 1/2 teaspoon nutmeg , 1.1g
- 1/4 teaspoon sea salt , 1.4g
- 1 cup shredded coconut flakes , 80g (half for the bites, half for rolling)
- 1/4 cup raisins , 40g
Instructions
- Add the pecans, dates, shredded carrots, cinnamon, nutmeg, sea salt and half of the shredded coconut flakes to your food processor. Pulse everything together until incorporated and the mixture begins to turn into a dough, about 1 minute. Scrap down the sides if necessary.
- Using a sheet of cling-film (Saran Wrap), shape the mixture into round balls by wrapping and rolling until all the mixture is finished. If you don’t want to use cling-film, dampen your hands and use your wet hands to roll the balls.
- Roll the balls in the remaining shredded coconut flakes.
- Place in the fridge for at least an hour to set properly, then enjoy!
Notes
- Refrigerator : Store these carrot cake energy bites in an airtight container in the refrigerator for up to 1 week.
- Freezer : These bites can also be frozen for up to 3 months; thaw in the fridge before eating or eat them straight out of the freezer.

No Bake Carrot Cake Energy Bites
Ingredients
- 1 cup pecans 120g
- 1 cup dates Medjool or regular, chopped, 160g
- 2 cups shredded carrots 220g
- 1/2 teaspoon cinnamon 1.3g
- 1/2 teaspoon nutmeg 1.1g
- 1/4 teaspoon sea salt 1.4g
- 1 cup shredded coconut flakes 80g (half for the bites, half for rolling)
- 1/4 cup raisins 40g
Instructions
- Add the pecans, dates, shredded carrots, cinnamon, nutmeg, sea salt and half of the shredded coconut flakes to your food processor. Pulse everything together until incorporated and the mixture begins to turn into a dough, about 1 minute. Scrap down the sides if necessary.
- Using a sheet of cling-film (Saran Wrap), shape the mixture into round balls by wrapping and rolling until all the mixture is finished. If you don’t want to use cling-film, dampen your hands and use your wet hands to roll the balls.
- Roll the balls in the remaining shredded coconut flakes.
- Place in the fridge for at least an hour to set properly, then enjoy!
Notes
- Refrigerator : Store these carrot cake energy bites in an airtight container in the refrigerator for up to 1 week.
- Freezer : These bites can also be frozen for up to 3 months; thaw in the fridge before eating or eat them straight out of the freezer.
Nutrition
No Bake Carrot Cake Energy Bites https://jessicainthekitchen.com/carrot-cake-energy-bites-no-bake/ February 9, 2026
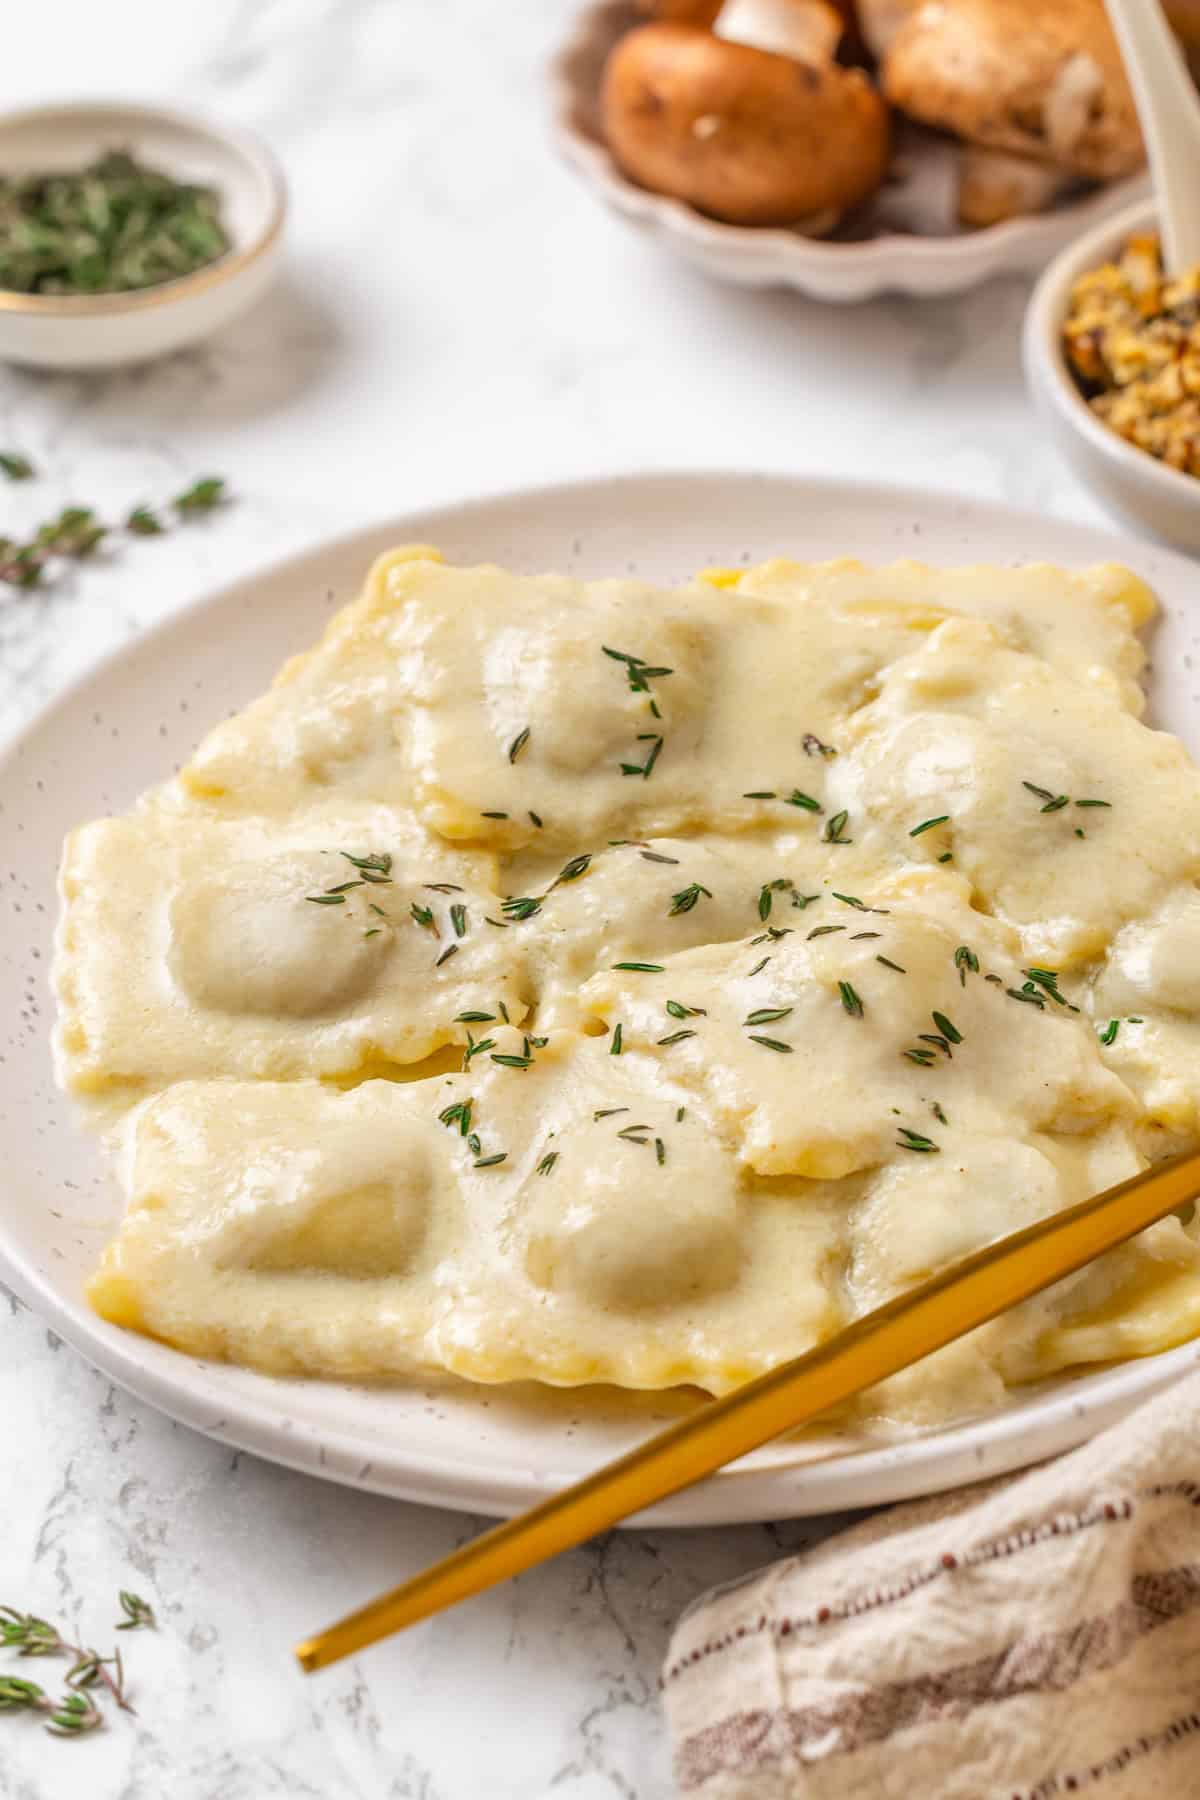
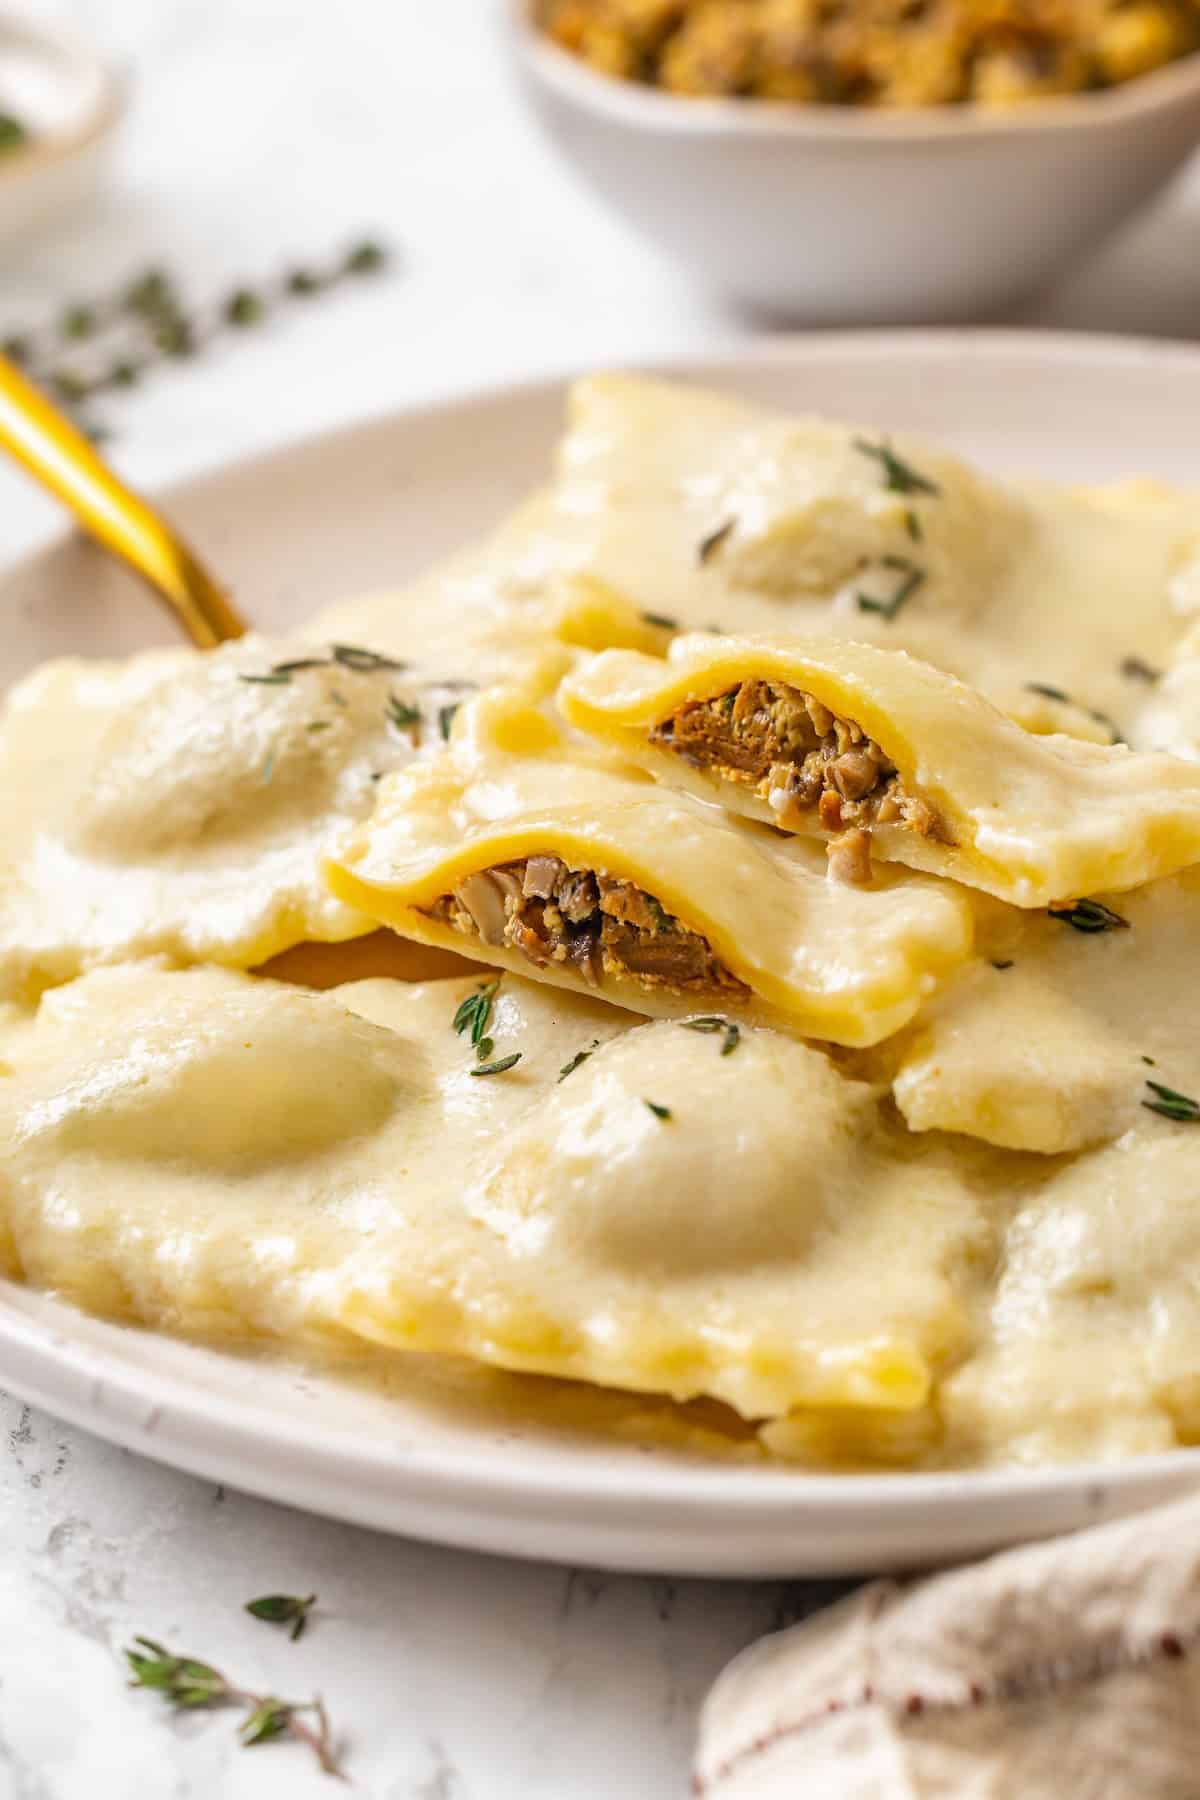
Savoury, umami mushrooms and creamy ricotta make a mouthwatering filling for this mushroom ravioli! Pair it with a vegan Parmesan sauce for a restaurant-worthy dinner.
After I made butternut squash ravioli , I dreamed of all the other flavours of ravioli I could make. (Yep, you can tell I’m a food blogger by the fact that I daydream about ravioli fillings.) Next up? Mushroom ravioli! Friends, I definitely made the right choice because this ravioli is divine! It has an earthy blend of porcini and cremini mushrooms and creamy vegan ricotta, then it’s finished with a rich cashew-based Parmesan sauce. Close your eyes, take a bite, and you’ll think you’re at a restaurant!
Why This Mushroom Ravioli Is the Perfect Date Night Dinner
If you don’t have plans for Valentine’s Day, light some candles and make this mushroom ravioli! Here’s what makes this recipe a standout.
- Deep, savoury flavor. Dried porcini mushrooms add lots of umami flavour which, along with the cremini mushrooms, garlic, and nutritional yeast , makes the filling taste rich and complex.
- Creamy without dairy. Vegan ricotta in the filling and raw cashews in the sauce give this recipe decadent dairy vibes, but in vegan form.
- Perfect for a special occasion. This dish looks and tastes impressive. You won’t believe you made it yourself!
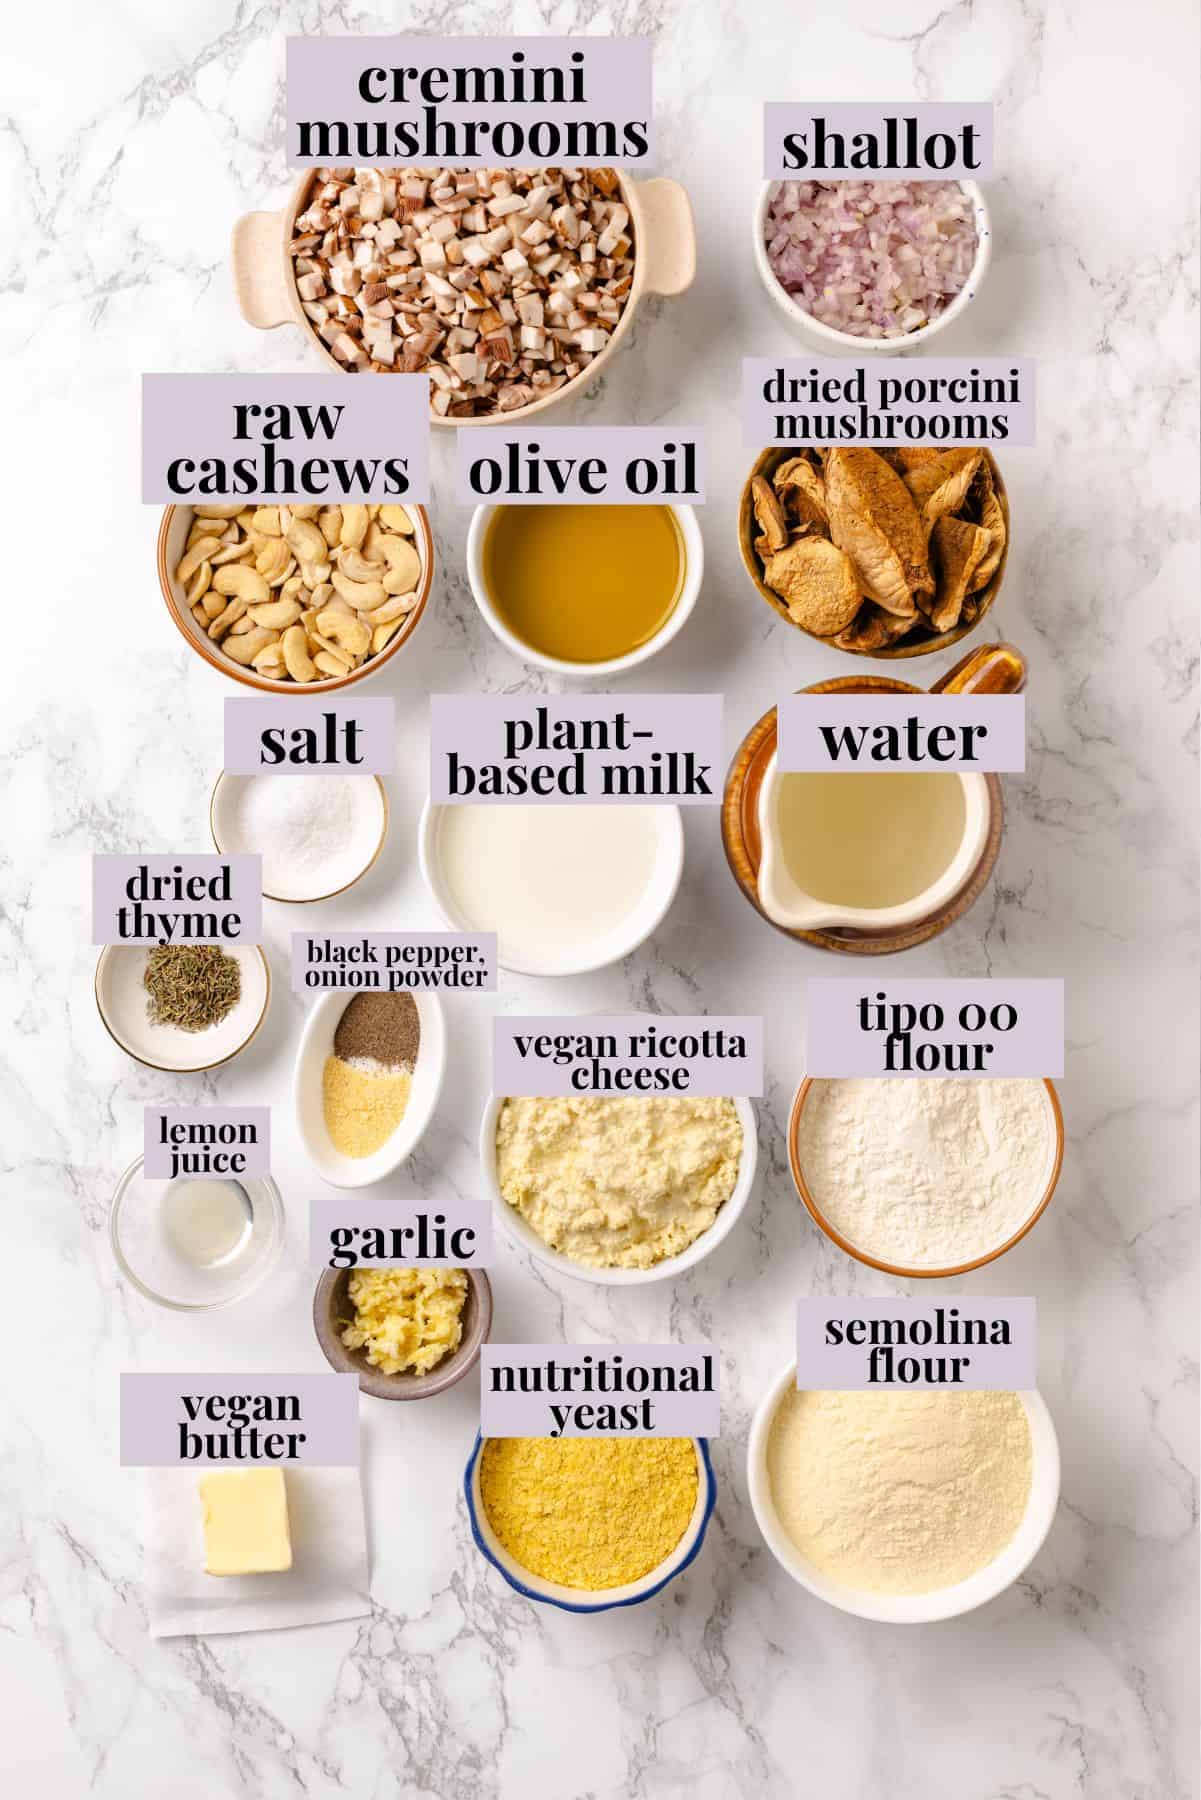
Notes on Ingredients
There are a few different components for this mushroom ravioli recipe; here’s what you’ll need for each. Scroll down to the recipe card to find the ingredient quantities and recipe instructions.
Pasta Dough:
- Flour – A combination of semolina and 00 flour, which creates a smooth, silky dough that’s easy to roll out.
- Salt
- Olive oil – Oil helps make the dough tender without egg.
- Water
Mushroom Filling:
- Dried porcini mushrooms – Using dried mushrooms adds a BIG mushroom punch.
- Cremini mushrooms – Also known as baby bella mushrooms.
- Shallot and garlic – These add layers of flavour. Be sure to mince the shallot so it blends easily into the filling.
- Sea salt and black pepper
- Dried thyme – Thyme is a fantastic pairing with mushrooms, but rosemary or sage also work well.
- Vegan ricotta – You can use store-bought or homemade vegan ricotta .
- Nutritional yeast – Nutritional yeast is nice for adding cheesy flavour without the price of store-bought vegan Parmesan.
Creamy “Parmesan” Sauce:
- Raw cashews – Soak these in hot water for 20 minutes so they puree smoothly.
- Plant milk – Make sure it’s unsweetened and unflavoured.
- Nutritional yeast
- Vegan butter and olive oil – You can use my homemade vegan butter or store-bought.
- Garlic
- Onion powder
- Lemon juice – This helps cut through the richness. Use freshly squeezed lemon juice for the best flavour, not bottled!
- Salt and pepper
How to Make Mushroom Ravioli
Although there are a few steps to this recipe, each one is easy! Here’s what you’ll need to do.
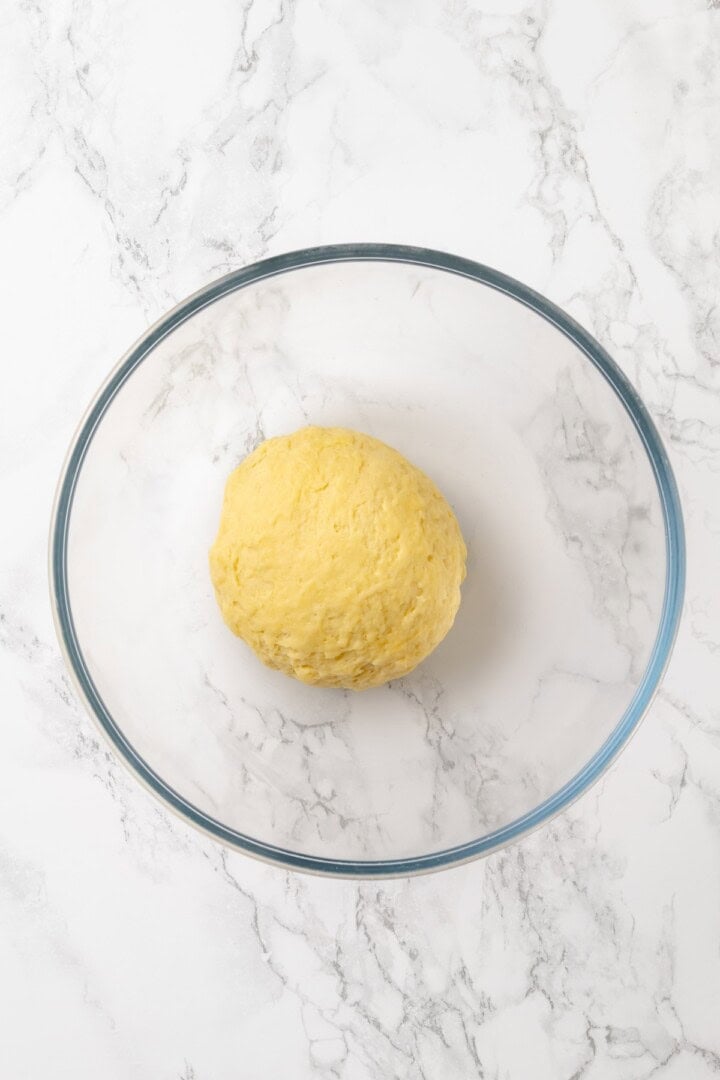
Make the dough.
- Make the pasta dough. Mix the flours and salt in a large bowl, then add the oil and water. Knead on a floured surface until the dough is smooth. Wrap and rest for 30 minutes.
- Rehydrate the porcini. Soak the porcini in boiling water for 15 minutes. Reserve 2 tablespoons of liquid, then drain the rest and chop the mushrooms.
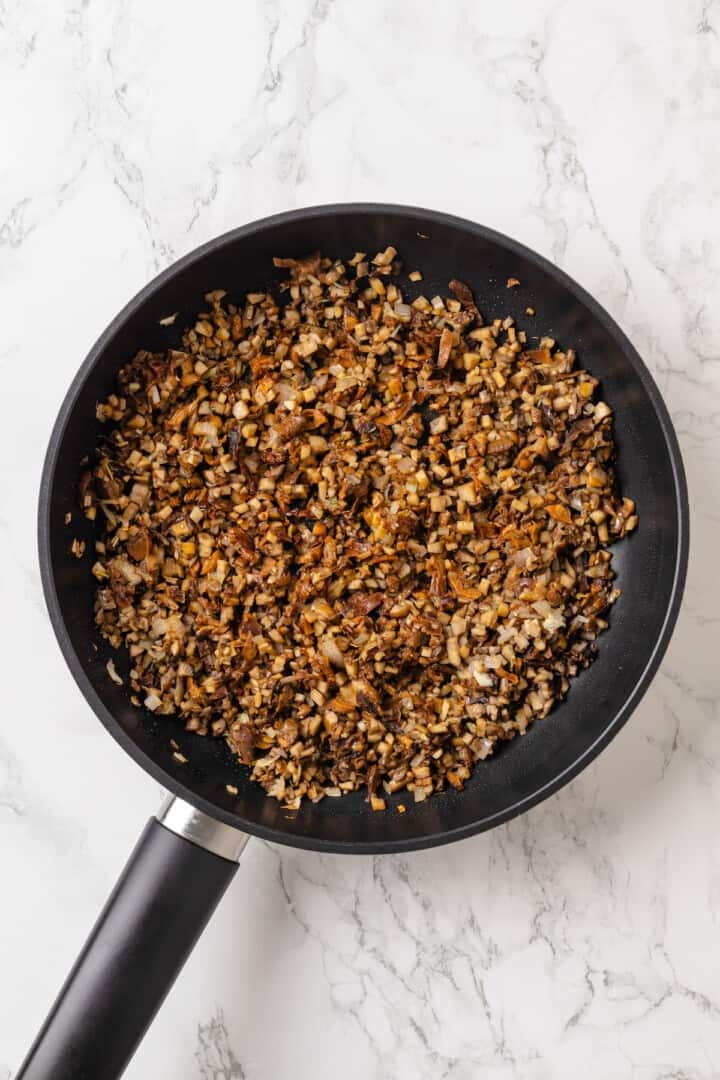
Sauté the mushrooms and aromatics.
- Start the filling. Sauté the mushrooms, then add the garlic and shallot once the mushrooms are browned. After 2 minutes, add the porcini, reserved liquid, salt, pepper, and thyme.
- Finish the filling. Transfer the mushroom mixture to a bowl and stir in the ricotta and nutritional yeast.
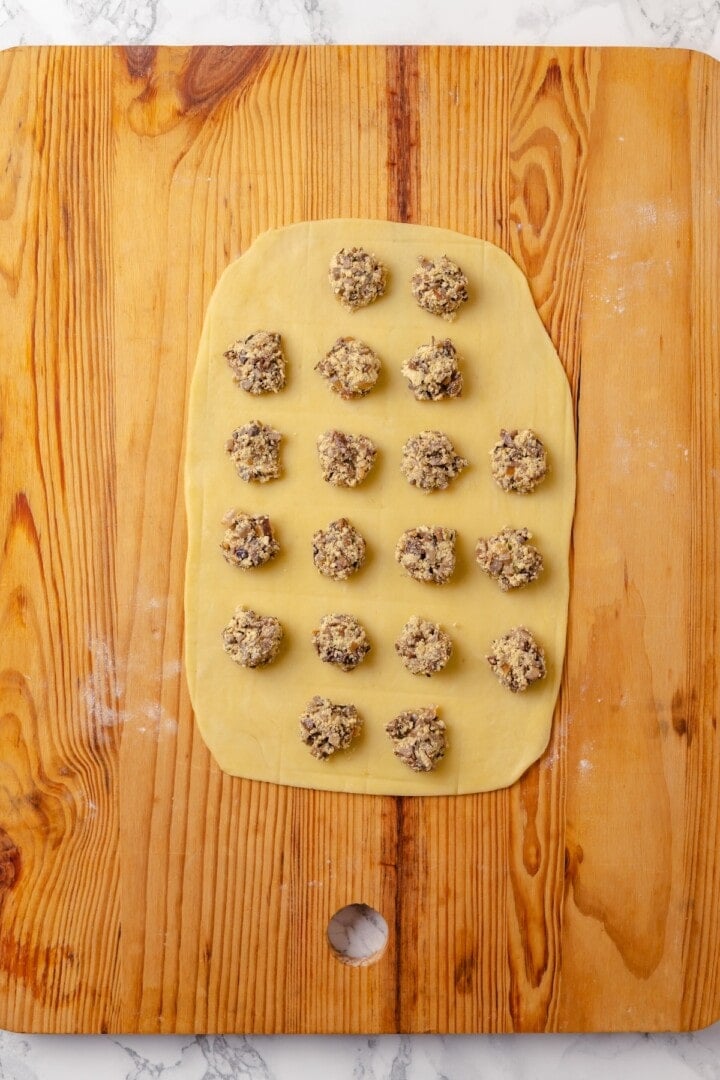
Roll out the pasta and add the filling.
- Assemble the ravioli. Roll out the dough. Add small mounds of filling to the sheet, then brush around the filling with water. Press a second sheet of pasta over the top, then cut the ravioli. Press the edges to seal.
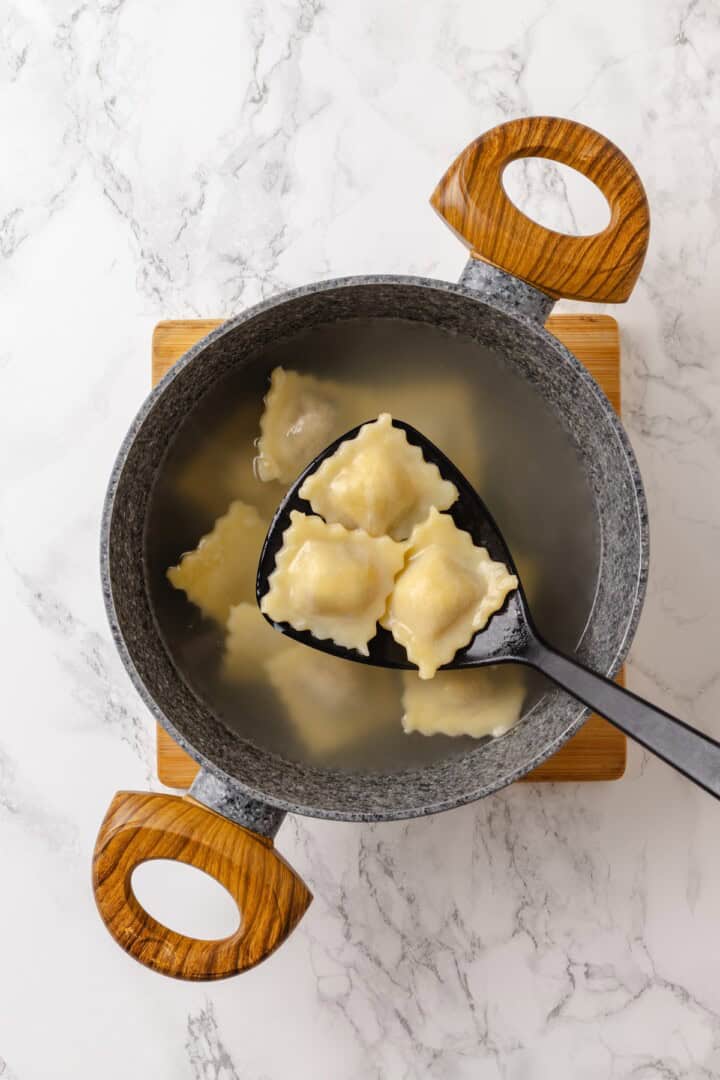
Boil the ravioli.
- Cook the pasta. Boil the ravioli until tender and floating; reserve 1/4 cup of the cooking water.
- Start the sauce. Blend the cashews with the plant milk, nutritional yeast, onion powder, and lemon juice.
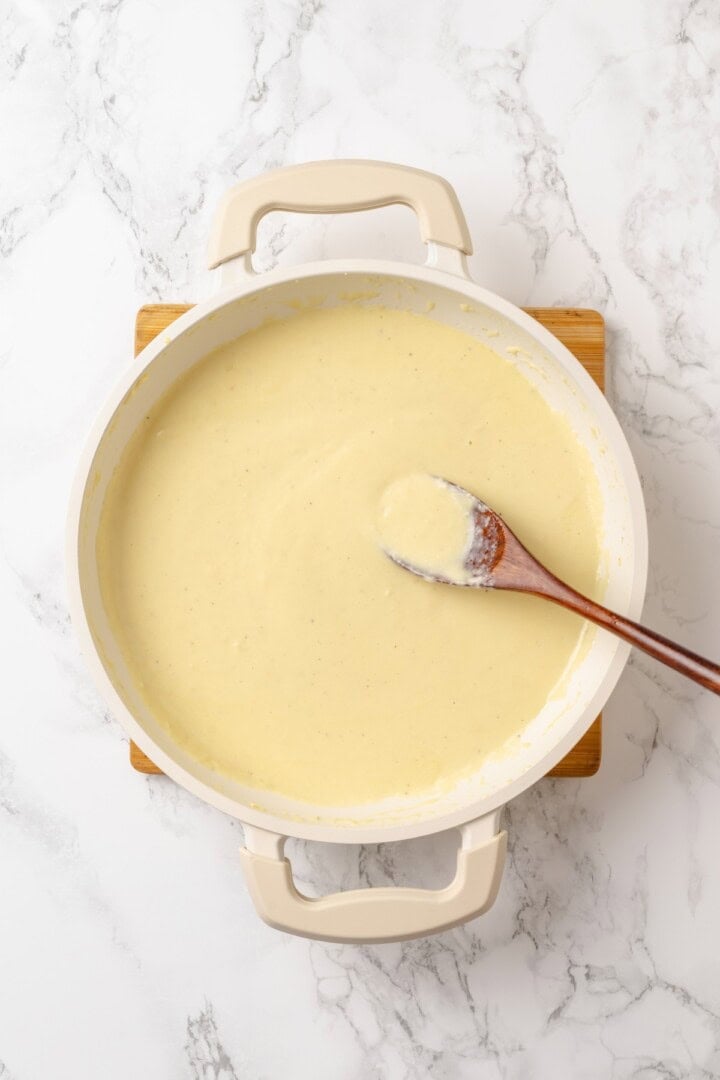
Make the vegan Parmesan sauce.
- Finish the sauce. Melt the vegan butter and olive oil in a skillet over medium heat. Sauté the garlic for 30 seconds, then add the cashew mixture. Cook until thickened.
- Put it together. Add the ravioli to the pan of sauce and gently toss to coat. Serve with fresh thyme, if desired.
Mushroom Ravioli Variations
I have a few variations to make this recipe a little easier or change up the flavour.
- Skip making the dough from scratch. Wonton wrappers are a classic shortcut alternative to pasta for homemade ravioli; they’re thinner and don’t have the same “chew,” but they’ll save you some time if that’s a priority. You can also sometimes find sheets of pasta in the refrigerated section at the grocery store.
- Add spinach. Stir a bag of baby spinach into the mushrooms and let it wilt for a spinach mushroom filling.
- Change up the sauce. You can make a brown butter sauce with my homemade vegan butter (yes, it browns!), but even marinara sauce would work here. Or just toss the ravioli in melted butter and finish with a shower of vegan Parmesan .
Serving Suggestions
Make it a meal by serving your mushroom ravioli with roasted garlic bread or a simple salad like this easy vegan Caesar salad . You could also plate the ravioli with a veggie side like air fryer asparagus or balsamic roasted vegetables .
Storage and Reheating
- Ravioli : You can assemble the mushroom ravioli and refrigerate it for up to 4 days or freeze it for up to 3 months before cooking. You can cook it directly from frozen.
- Once cooked and assembled : Store the cooked ravioli and sauce in an airtight container in the refrigerator for up to 3 days. Reheat gently on the stovetop or in the microwave.
More Vegan Pasta Recipes
- Pasta Carbonara
- Rasta Pasta
- Lemon Pasta
- Pasta Primavera
Ingredients
For the Pasta Dough
- ¾ cup semolina flour , 122 g
- ¾ cup tipo 00 flour , 81 g
- ⅓ teaspoon salt , 2 g
- 2 ½ tablespoons olive oil , 37 mL
- ¼ cup water , plus more if needed – 59 mL
For the Mushroom Filling
- 1 ounce dried porcini mushrooms , 28 g
- 1 cup boiling water , for soaking porcini – 240 mL
- 2 tablespoons olive oil , 30 mL
- 8 ounces cremini mushrooms , finely chopped – 225 g
- 1 small shallot , finely diced – 40 g
- 3 cloves garlic , minced – 9 g
- ½ teaspoon sea salt , 3 g
- ¼ teaspoon black pepper , 1 g
- ½ teaspoon dried thyme , 1 g
- ¾ cup vegan ricotta , 180 g
- 2 tablespoons nutritional yeast , 14 g
For the Creamy “Parmesan” Sauce
- ½ cup raw cashews , soaked in hot water for 20 minutes – 70 g
- 1 cup unsweetened plant milk , 240 mL
- 2 tablespoons nutritional yeast , 14 g
- 1 tablespoon vegan butter , 14 g
- 1 tablespoon olive oil , 15 mL
- 1 clove garlic , minced – 3 g
- ¼ teaspoon onion powder , 1 g
- ½ teaspoon lemon juice , 3 mL
- ½ teaspoon sea salt , or to taste – 3 g
- Pinch of white or black pepper , 0.25 g
Instructions
Make the Pasta Dough
- In a large bowl, combine the semolina flour, tipo 00 flour, and salt. Add the olive oil and water, mixing until a shaggy dough forms. Add a little more water if needed. Knead the dough on a lightly floured surface for 8–10 minutes until smooth and elastic. Wrap tightly and let rest at room temperature for at least 30 minutes.
Make the Mushroom Filling
- Rehydrate the porcini: Place the dried porcini mushrooms in a small bowl and cover with boiling water. Let soak for 15 minutes. Drain, reserving 2 tablespoons of the soaking liquid, and finely chop the porcini.
- Cook the mushrooms: Heat the olive oil in a large skillet over medium heat. Add the cremini mushrooms and cook for 5–6 minutes until their moisture evaporates and they begin to brown.
- Add aromatics: Add the shallot and garlic and cook for 2 minutes. Stir in the chopped porcini, reserved soaking liquid, salt, black pepper, and dried thyme. Cook for 2–3 minutes until fragrant. Remove from heat and let cool slightly.
- Finish the filling: Transfer the mushroom mixture to a bowl. Add the vegan ricotta and nutritional yeast and mix until well combined. Taste and adjust seasoning if needed.
Assemble the Ravioli
- Roll out the rested pasta dough into thin sheets using a pasta machine or rolling pin . Lay one sheet on a lightly floured surface and place small mounds of filling (about 2 teaspoons each) evenly spaced. Brush around the filling with a little water. Top with another pasta sheet and gently press around each mound to remove air. Cut into ravioli and press the edges firmly to seal.
- Bring a large pot of salted water to a gentle boil. Cook the ravioli for 3–4 minutes, or until they float and the pasta is tender. Reserve ¼ cup of pasta water, then drain.
Make the Creamy “Parmesan” Sauce
- Drain and rinse the soaked cashews. Blend the cashews with plant milk, nutritional yeast, onion powder, and lemon juice until completely smooth.
- In a saucepan, melt the vegan butter with olive oil over medium heat. Add the garlic and sauté for about 30 seconds. Pour in the cashew mixture and cook, stirring constantly, for 3–5 minutes until lightly thickened. Season with salt and pepper. Loosen with a splash of reserved pasta water if needed.
Serve
- Add the cooked ravioli to the sauce and gently toss to coat. Serve immediately, optionally garnished with fresh thyme.
Notes
- Ravioli : You can assemble the mushroom ravioli and refrigerate it for up to 4 days or freeze it for up to 3 months before cooking. You can cook it directly from frozen.
- Once cooked and assembled : Store the cooked ravioli and sauce in an airtight container in the refrigerator for up to 3 days. Reheat gently on the stovetop or in the microwave.
