Toss out the seasoning packet and make this spicy Kimchi Ramen instead! It’s still ridiculously easy, but adding tofu, kimchi, and shiitakes makes it a satisfying, flavour-packed meal.

If you thought you left behind your ramen years when you graduated from college, it’s time to give it a second look. Ramen is EVERYWHERE lately because it allows you to start with an affordable ingredient and jazz it up into something that feels a little more adult than noodles + a seasoning packet. Like my Spicy Ramen and Peanut Butter Ramen , this kimchi ramen has you discard the seasoning and then add a TON of good stuff for more flavour and satisfaction. In addition to the kimchi, I add tofu and mushrooms too, which makes ramen into a more filling meal.
Why Kimchi Ramen Is My New Favourite Weekday Lunch
I’m always on the hunt for easy lunch options and this kimchi ramen has been on frequent rotation lately. Here’s why:
- Quick and easy . This kimchi ramen recipe is done in less than 30 minutes, with only a few more steps than if you made it following the package directions with the seasoning packet.
- Spicy and flavourful . Gochugaru adds heat, but it also has a subtle smokiness to it too, while the kimchi is tangy, spicy, umami, and a little bit sweet. It makes these noodles irresistible!
- A meal in a bowl . Between the noodles, kimchi, mushrooms, and tofu, this ramen recipe is a satisfying meal. You don’t need anything else to complete it!
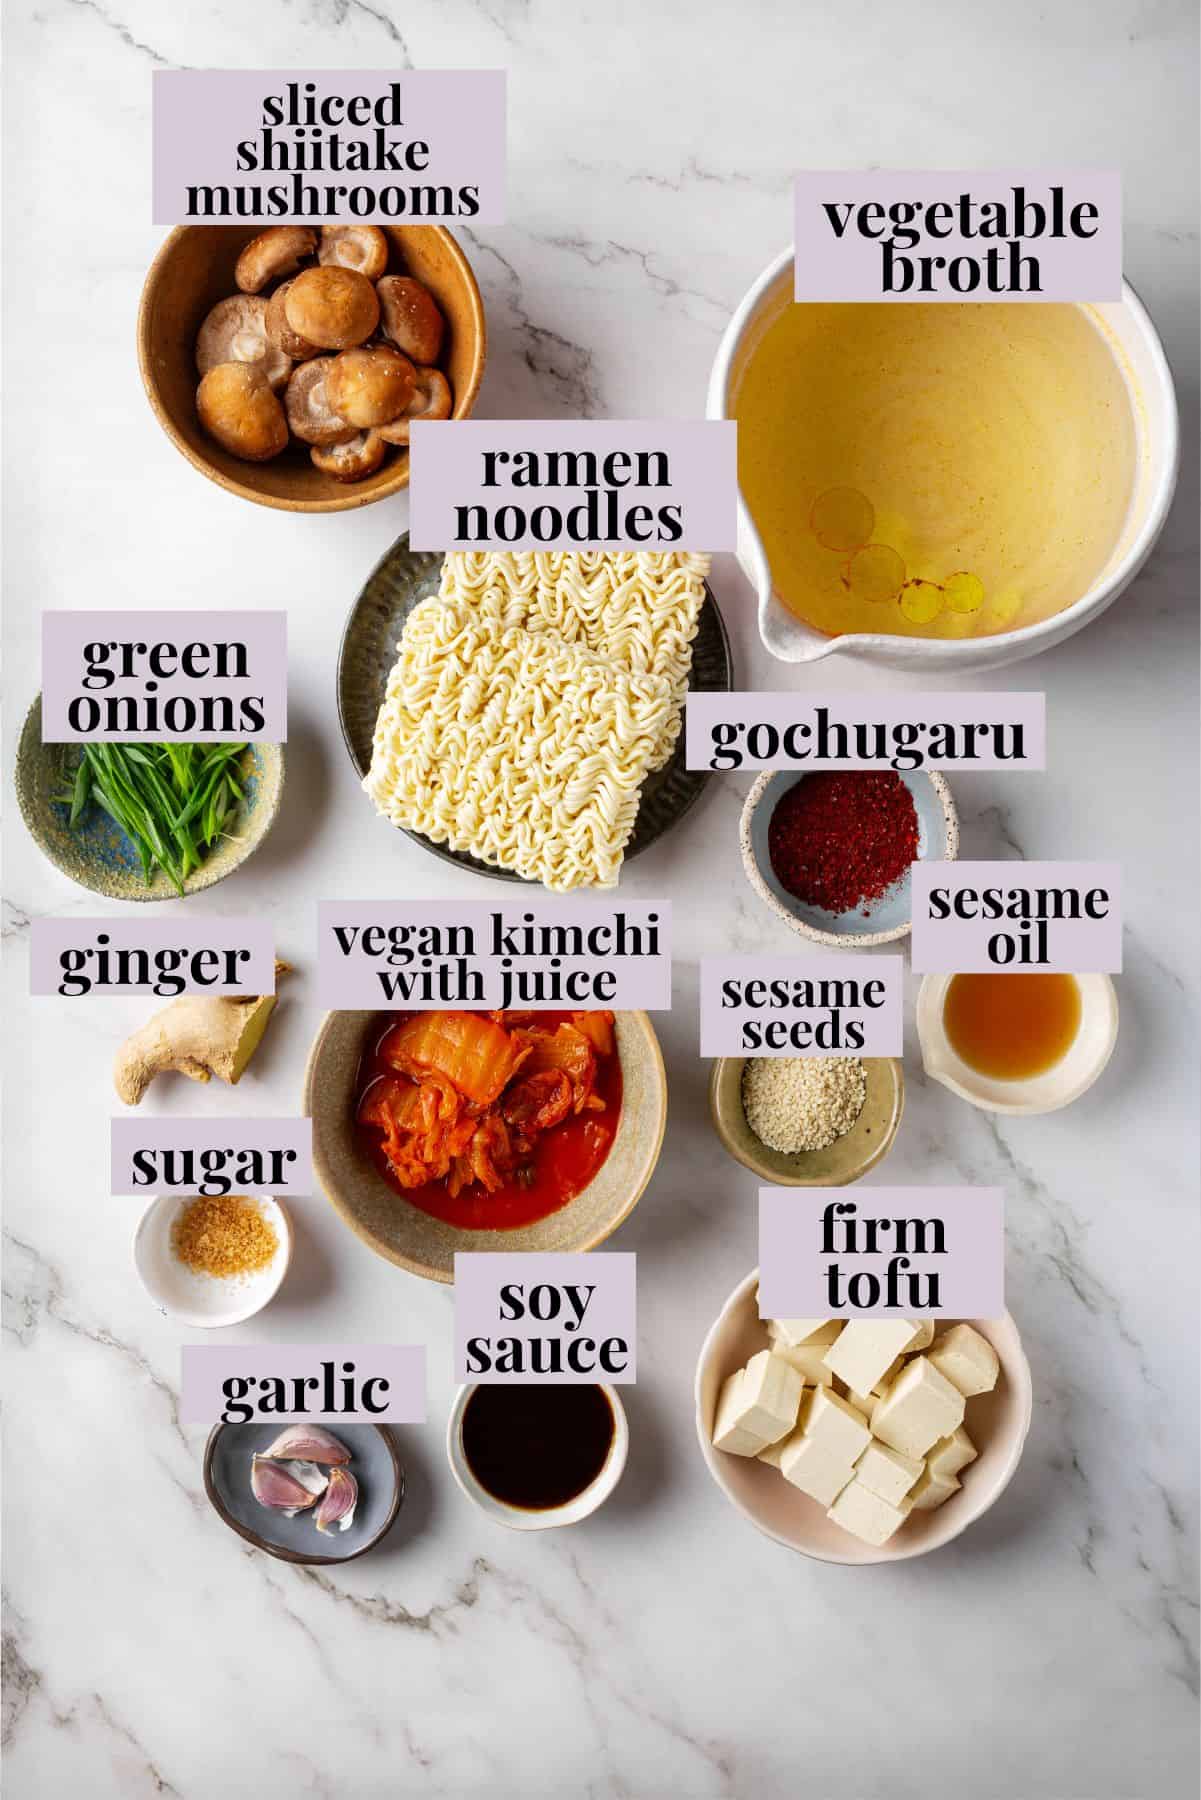
Notes on Ingredients
Here are some notes on the ingredients you’ll need to make kimchi ramen. Scroll down to the recipe card to find the ingredient quantities and recipe instructions.
- Sesame oil
- Garlic and ginger – Use fresh, not dried and ground, for the most dynamic flavour.
- Gochugaru – Feel free to adjust the amount to your tastes, but note that although it looks similar to cayenne, it’s not nearly as spicy!
- Soy sauce – Tamari or coconut aminos also work in this recipe.
- Vegan kimchi – Kimchi is commonly made with fish sauce and shrimp, so be sure to read the label.
- Sugar
- Shiitake mushrooms – Discard the stems, which are too tough to eat.
- Vegetable broth – I like to use my Homemade Vegetable Broth .
- Ramen noodles – You’ll only use the noodles, not the seasoning packets. (If you don’t like to waste, you can save the seasonings for popcorn.)
- Firm tofu – This will need to be cooked. Here are some options: Fried Tofu or Crispy Air Fryer Tofu .
- Green onions
- Sesame seeds – Optional, for serving.
What Is Gochugaru?
Gochugaru is a Korean red chili powder made from dried ground red chili peppers. It’s a key ingredient in kimchi and gochujang, giving both their red colour and spicy flavour. You’ll find that gochugaru has a little more depth than cayenne, with some subtle sweetness, smokiness, and fruitiness. The heat level can vary between different brands, so I recommend adding a smaller amount to your ramen, then taste and add more as needed!
How to Make Kimchi Ramen
You’re just a few steps away from this tasty kimchi ramen! Here’s what you’ll need to do.

Cook the aromatics.
- Sauté the aromatics . Warm the sesame oil in a pot over medium heat, then add the garlic and ginger and sauté until fragrant. Stir in the gochugaru and soy sauce; cook for 30 seconds more.
- Simmer . Stir in the chopped kimchi, sugar, shiitakes, and broth. Bring to a simmer and cook for 6 to 8 minutes, or until the mushrooms are tender.

Add the ramen.
- Add the noodles . Drop the noodles into the broth and cook until they’re tender, for the time indicated on the package.
- Add tofu and serve . Stir in the tofu, then divide everything into bowls and garnish with green onions and sesame seeds.
Variation Ideas
While this is the way I’ve been making kimchi ramen, it’s definitely not the only way! Here are a few more ideas for inspiration.
- Swap out the tofu . You can skip it altogether, or try something different like Vegan Chicken , tempeh, or even chickpeas.
- Try different mushrooms . Maitake mushrooms would be delicious, or add delicate enoki mushrooms just before serving.
- Veg it up . Stir in spinach, toss in some cabbage or bean sprouts, or use some of your zucchini harvest. You can totally get creative, friends!

Serving Suggestions
This is a meal on its own, but if you want to get some extra servings out of it (since it only serves 2), you can pair it with something else. My Vegan Potstickers , Vegan Dumplings With Dipping Sauce , or Fresh Summer Rolls would be great starters, or serve my Quinoa Salad with Sesame Ginger Dressing on the side.
How to Store and Reheat Leftovers
- Refrigerator : Transfer leftovers to an airtight container and refrigerate for up to 3 days.
- Freezer : You can also freeze leftover kimchi ramen in an airtight container or freezer bag for up to 3 months. Thaw in the refrigerator before reheating.
- To reheat : Warm up your ramen in a pan over medium heat or in the microwave.

More Asian-Inspired Soup Recipes
- Thai Coconut Curry Soup
- Easy Roasted Carrot Ginger Soup
- Vegan Coconut Curry Lentil Soup
Ingredients
- 1 tablespoon sesame oil , 15 mL
- 3 cloves garlic , minced – 9 g
- 1 teaspoon freshly grated ginger , 2 g
- 1 to 2 teaspoons gochugaru , adjust to taste – 2 to 4 g
- 2 tablespoons soy sauce , 30 mL
- ½ cup chopped vegan kimchi with juice , 120 g
- ¼ teaspoon sugar
- 1 cup sliced shiitake mushrooms , 90 g
- 3 cups vegetable broth , 720 mL
- 5 ounces ramen noodles , about 2 blocks, discard seasoning – 140 g
- ½ block firm tofu , cubed and pan-fried or air-fried until golden – 200 g
- 2 green onions , sliced – 20 g
- Sesame seeds , optional for serving
Instructions
- Heat sesame oil in a medium pot over medium heat. Add garlic and ginger. Sauté for 1 minute until fragrant.
- Stir in gochugaru and soy sauce. Let it bloom in the hot oil for about 30 seconds to release its flavor.
- Add chopped kimchi (with juice), sugar, sliced shiitake mushrooms, and vegetable broth. Bring to a simmer and cook for 6 to 8 minutes, until mushrooms are tender.
- Add ramen noodles to the broth and cook according to package instructions (usually 3 to 4 minutes), until tender.
- Stir in the tofu and let everything warm through. Divide into bowls, top with sliced green onions and sesame seeds, and serve hot.
Notes
- Refrigerator : Transfer leftovers to an airtight container and refrigerate for up to 3 days.
- Freezer : You can also freeze leftover kimchi ramen in an airtight container or freezer bag for up to 3 months. Thaw in the refrigerator before reheating.
- To reheat : Warm up your ramen in a pan over medium heat or in the microwave.

Kimchi Ramen
Ingredients
- 1 tablespoon sesame oil 15 mL
- 3 cloves garlic minced – 9 g
- 1 teaspoon freshly grated ginger 2 g
- 1 to 2 teaspoons gochugaru adjust to taste – 2 to 4 g
- 2 tablespoons soy sauce 30 mL
- ½ cup chopped vegan kimchi with juice 120 g
- ¼ teaspoon sugar
- 1 cup sliced shiitake mushrooms 90 g
- 3 cups vegetable broth 720 mL
- 5 ounces ramen noodles about 2 blocks, discard seasoning – 140 g
- ½ block firm tofu cubed and pan-fried or air-fried until golden – 200 g
- 2 green onions sliced – 20 g
- Sesame seeds optional for serving
Instructions
- Heat sesame oil in a medium pot over medium heat. Add garlic and ginger. Sauté for 1 minute until fragrant.
- Stir in gochugaru and soy sauce. Let it bloom in the hot oil for about 30 seconds to release its flavor.
- Add chopped kimchi (with juice), sugar, sliced shiitake mushrooms, and vegetable broth. Bring to a simmer and cook for 6 to 8 minutes, until mushrooms are tender.
- Add ramen noodles to the broth and cook according to package instructions (usually 3 to 4 minutes), until tender.
- Stir in the tofu and let everything warm through. Divide into bowls, top with sliced green onions and sesame seeds, and serve hot.
Notes
- Refrigerator : Transfer leftovers to an airtight container and refrigerate for up to 3 days.
- Freezer : You can also freeze leftover kimchi ramen in an airtight container or freezer bag for up to 3 months. Thaw in the refrigerator before reheating.
- To reheat : Warm up your ramen in a pan over medium heat or in the microwave.
Nutrition
Kimchi Ramen https://jessicainthekitchen.com/kimchi-ramen/ August 15, 2025
Garlic Fries are impossible to resist, especially when they’re loaded with minced garlic, grated vegan Parmesan, and fresh parsley. I share methods for frying and for baking, but either way, they’re crispy and divine!

When you put a plate of fries in front of me, I turn into one of those emojis with heart eyes. Truffle Fries ? Yes! Loaded Nacho Fries ? I’m there! And these garlic fries? I could eat them all day, every day! These fries are for the garlic lovers. (And maybe not the best idea for a first date. But Gav and I have been together long enough that garlic breath is a non-issue.) I add FOUR cloves of garlic, so that pungent, savoury flavour is big and bold.
Why You Need These Garlic Fries in Your Life
These fries are guaranteed to be a hit. Here’s why you’ll love them:
- Two cooking options . Deep frying makes these garlic fries next-level crispy (it’s also great for Crispy Homemade Falafel !), but for me, it’s more of a special occasion cooking method, so I’ve included a baking option too.
- Mega garlicky . We’re not holding back! Rather than using garlic powder for these garlic fries, I used fresh garlic cloves, which makes the garlic flavour a whole lot sassier.
- Cheesy too . Instead of resting on my laurels, I wanted to up the ante even more—plus I totally loved how the vegan Parm tasted in my recipe for truffle fries—so I added cheese to these garlic fries too, making them extra delicious.

Notes on Ingredients
If you’ve made my truffle fries, you’ll find the ingredients are very similar! Scroll down to the recipe card to find the ingredient quantities and recipe instructions.
- Russet potatoes – Russets are starchy and fluffy on the inside; you can also use Yukon Gold potatoes for a creamier option.
- Vegetable oil or olive oil
- Garlic – Mince the garlic very finely or push it through a garlic press.
- Vegan Parmesan cheese – While you can use homemade Vegan Parmesan Cheese , I prefer store-bought because it melts.
- Fresh parsley – Or, for something different, use fresh minced rosemary.
- Sea salt and black pepper
For Serving :
- Garlic aioli – Combine Vegan Mayo + minced garlic + lemon juice.
- Extra Parmesan
- More chopped parsley
How to Make Garlic Fries
As mentioned above, there are two cooking methods for these fries; here’s a quick overview of each.

Cut and soak the fries.
- Prep the potatoes . Cut the potatoes into 1/4-inch-thick fries and soak them in a bowl of cold water for 30 minutes. Drain and pat dry.
- Deep fry . Heat the vegetable oil in a deep pot until it reaches 350ºF. Fry the potatoes in batches for 8 to 10 minutes, or until they’re golden and crisp. Transfer to a paper towel-lined sheet pan with a slotted spoon.
- Or bake . Toss the fries with olive oil, salt, and pepper. Spread them into a single layer on a baking sheet and bake at 425ºF for 20 to 25 minutes, flipping halfway through the cooking time.

Cook the garlic.
- Cook the garlic . Warm the garlic in olive oil over low heat for a minute or two; your goal isn’t to brown it, but to cut some of the raw flavour.
- Season . Toss the fries in a bowl with the garlic, vegan Parmesan, parsley, salt, and pepper, then serve with garlic aioli.
Tips for Perfect Homemade Fries
Whether you’re making Air Fryer Shoestring Fries or these garlic fries, these tips will help you make them amazing.
- Make sure they’re cut evenly . It’s not possible to be super precise since potatoes aren’t perfect rectangles, but do make sure your cuts are fairly even so your fries finish cooking at the same time.
- Don’t skip the soaking . It’s especially important if you’re using russet potatoes, which are starchier to begin with. Soaking in cold water gets some of that starch out, which makes your fries crispier.
- Rub them with the oil if you’re baking . I like to use my hands to toss the fries with oil to make sure every bit is well-coated. This helps them get crispy and golden brown.

Serving Suggestions
You can serve these garlic fries as an appetizer or snack, or as a side dish for burgers, sandwiches, and more. I love them with classic Veggie Burgers , and their garlicky flavour makes them amazing with my Vegan Chicken Parm Sandwich !
How to Store and Reheat Leftovers
- Refrigerator : Transfer the garlic fries to an airtight container and refrigerate for up to 4 days. I don’t recommend freezing this recipe.
- To reheat : Place the fries on a baking sheet and heat at 450ºF for a few minutes, until warmed through and re-crisped. They’ll never be as crispy as fresh, but they’ll be good enough!

More Vegan Potato Recipes
- Mashed Potato Casserole
- Loaded Potato Salad
- Garlic Roasted Potatoes
- Loaded Potato Skins
Ingredients
- 2 large russet potatoes , or Yukon Gold for a creamier texture – about 500 g
- 2 cups vegetable oil , for frying or see baking method below – 480 mL
- 1 ½ tablespoons olive oil , for tossing – 22 mL
- 4 cloves garlic , finely minced – 12 g
- ¼ cup grated vegan Parmesan cheese , 25 g
- 1 tablespoon finely chopped fresh parsley , 4 g
- ½ teaspoon sea salt , or to taste – 2.5 g
- ½ teaspoon black pepper , 1 g
For Serving:
- Garlic aioli , vegan mayo + minced garlic + lemon juice to taste
- Extra Parmesan
- More chopped parsley
Instructions
Prep the Potatoes
- Wash and peel the potatoes.
- Cut into thin fries, about ¼-inch thick. Try to keep them uniform for even cooking.
- Place the cut fries in a bowl of cold water and soak for at least 30 minutes (or up to 2 hours) to remove excess starch.
- Drain the potatoes well, then pat them completely dry using a clean kitchen towel or paper towels.
Deep-Frying Method
- In a deep pot or Dutch oven, heat the oil to 350°F (175°C). Use a thermometer for accuracy.
- Fry the potatoes in batches for 8–10 minutes until golden and crisp.
- Remove with a slotted spoon and drain on a paper towel-lined tray.
Baking Method (Alternative)
- Preheat to 425°F (218°C). Line a baking sheet with parchment paper.
- Toss the dried potatoes with 1 ½ tablespoons olive oil, salt, and pepper.
- Spread them in a single layer on the baking sheet, avoiding overcrowding.
- Bake for 20–25 minutes, flipping halfway, until crispy and golden.
Garlic Seasoning
- While the fries are cooking, gently sauté the minced garlic in a small skillet with a splash of olive oil over low heat for 1–2 minutes, just until fragrant. Do not let it brown, as it will taste bitter
- Place the hot fries in a large bowl.
- Add the garlic, vegan Parmesan, parsley, and an extra pinch of salt and pepper. Toss to coat evenly.
Serve & Enjoy
- Serve immediately with garlic aioli or your favorite dipping sauce.
- Garnish with more vegan Parmesan and chopped parsley, if desired.
Notes
- Refrigerator : Transfer the garlic fries to an airtight container and refrigerate for up to 4 days. I don’t recommend freezing this recipe.
- To reheat : Place the fries on a baking sheet and heat at 450ºF for a few minutes, until warmed through and re-crisped. They’ll never be as crispy as fresh, but they’ll be good enough!
