Roasting garlic is the best way to bring out its sweet, caramelized flavour. Once you know how to roast garlic, you’ll be using it in all of your cooking! Roasted garlic is super simple to make, easy to store, and delicious in loads of dishes. You’ll see!
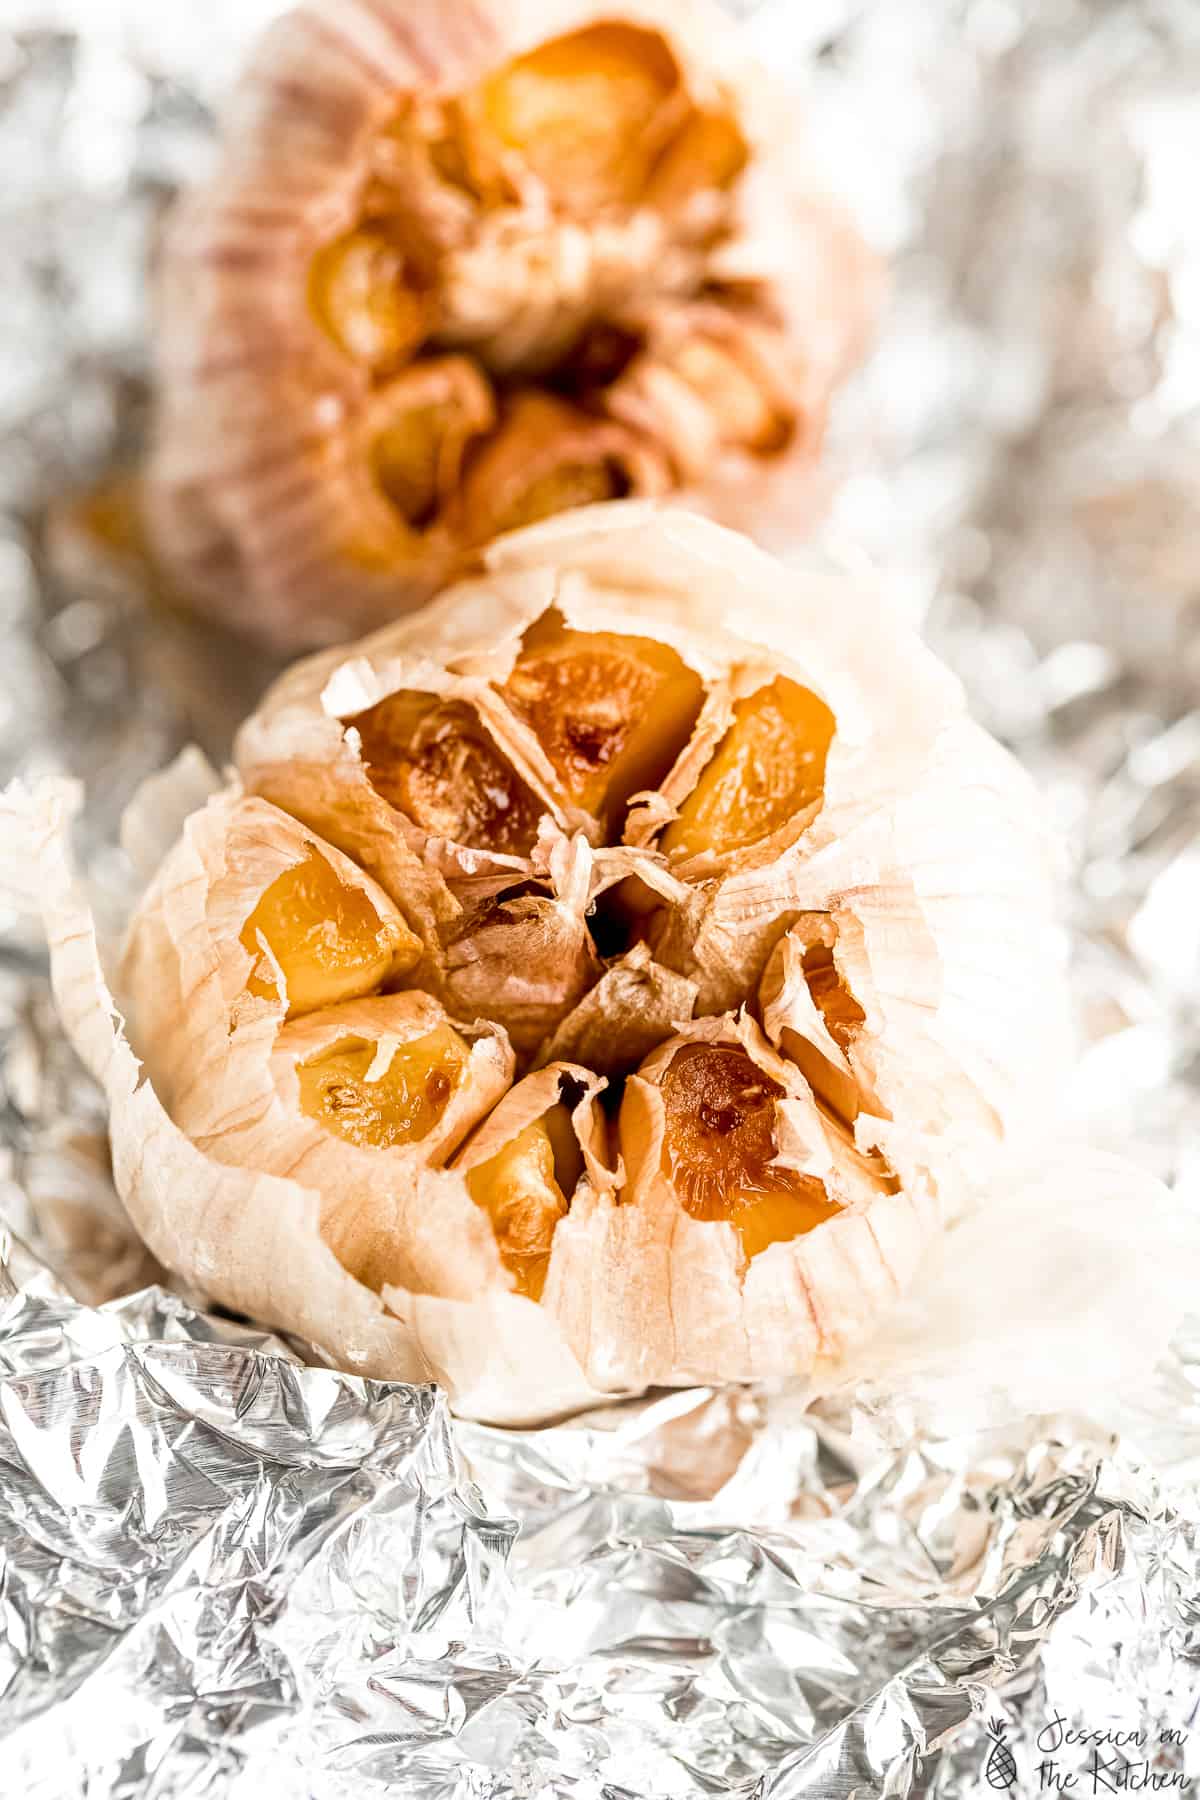
Oven-roasted garlic is easily one of my top five favourite foods! As if garlic wasn’t incredible enough, roasting brings out its flavours like you wouldn’t believe. What does roasted garlic taste like? So glad you asked. Imagine rich, buttery cloves with the smooth, mellow flavours of garlic. That harsh, pungent bite of raw garlic is gone, and in its place is garlic that’s softened, caramelized, and something you can add to countless recipes or spread over toast on its own.
Why You Should Roast Garlic in the Oven
- It’s SO easy. I’ll show you how to roast a garlic bulb in the oven using the easiest method. All you need is aluminum foil and good-quality olive oil.
- An easy way to deepen the flavours. While you can use regular garlic in recipes where I call for roasted garlic (like baba ghanoush ), roasted garlic just adds that much more flavour.
- It stores like a dream. Roasted garlic lasts a long time in the fridge, and you can roast several heads of garlic at once, keeping them on hand for whenever you need them.
Roasting Garlic Bulbs vs. Garlic Cloves
I love roasting whole garlic bulbs with the skin on. It saves the time it takes to peel the garlic, plus, I find it further locks in the flavour. Of course, if you’d like to roast garlic cloves without the skins instead, that’s more than fine, too. Either way, for this simple recipe, you will need:
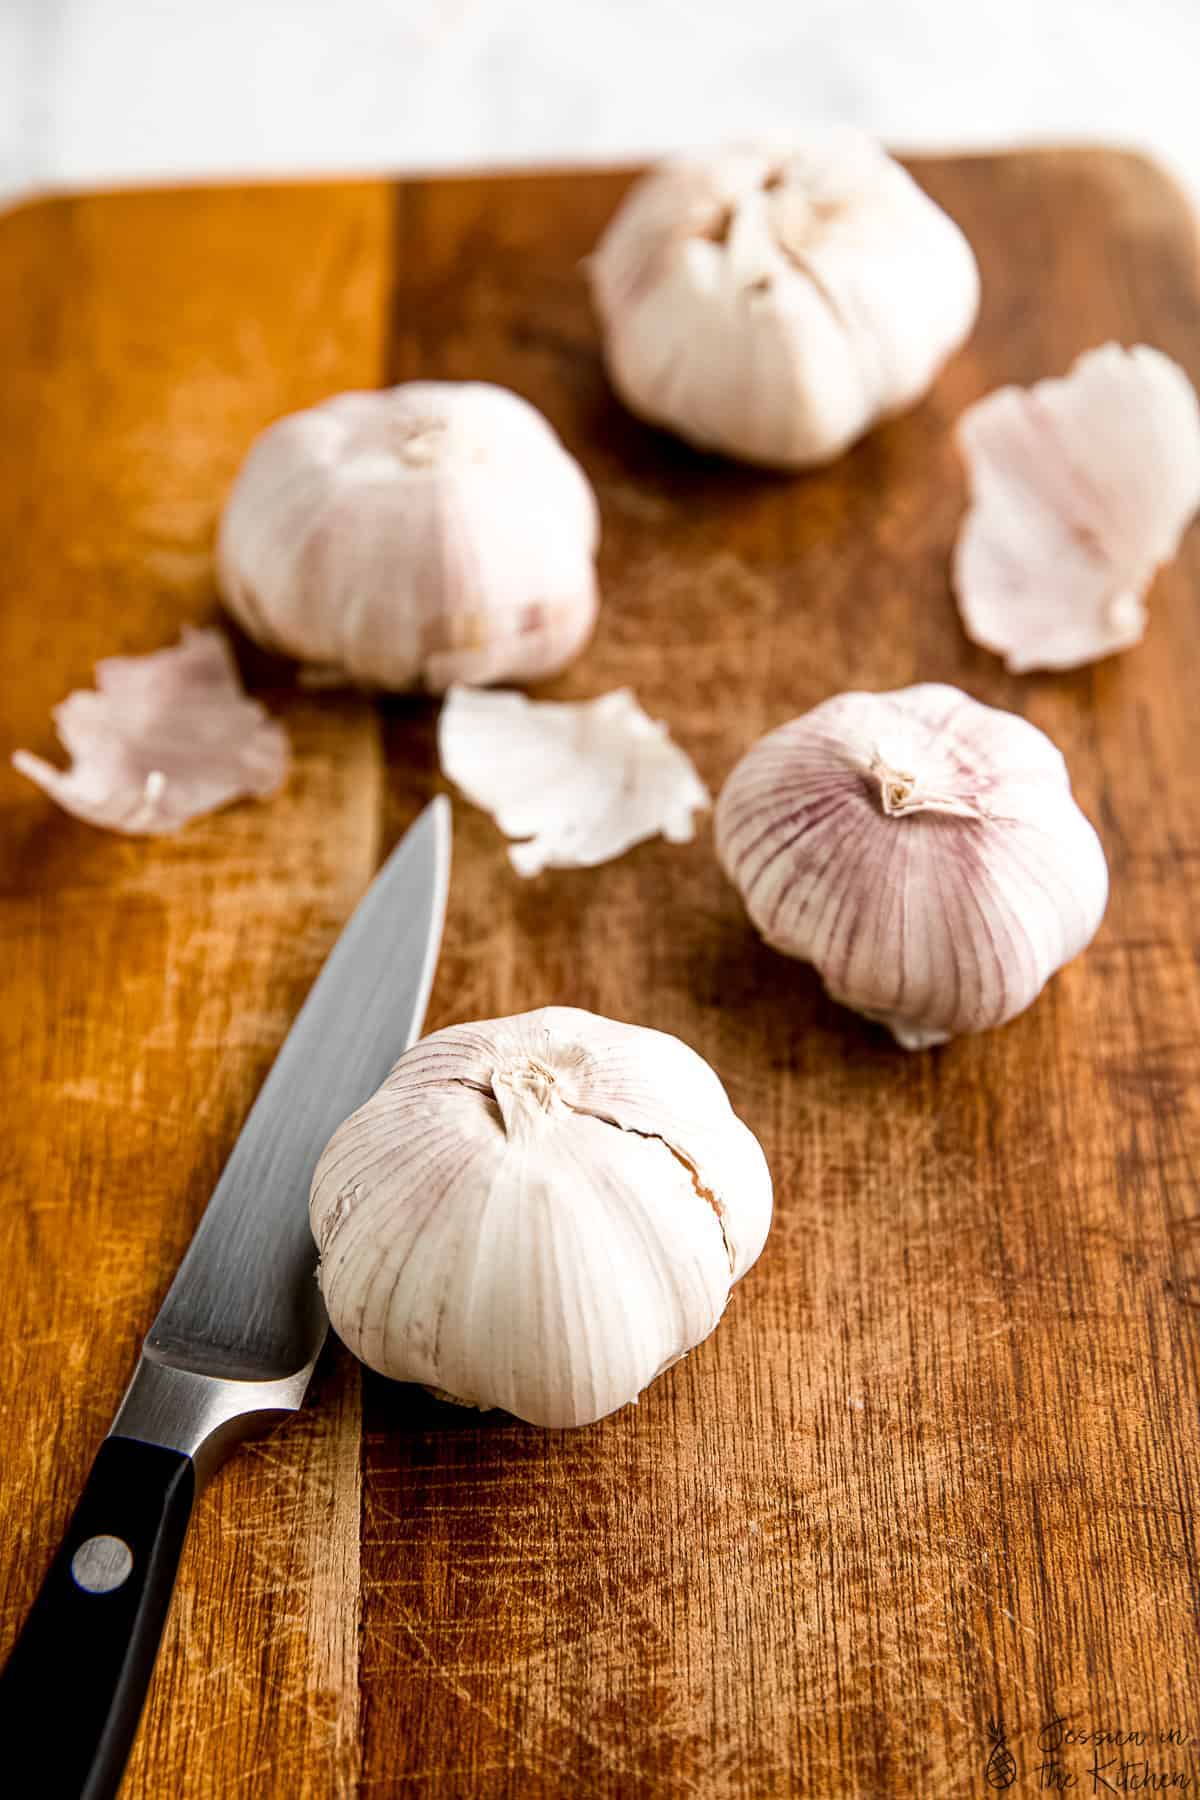
- Garlic – Make sure to use fresh garlic. Look for firm, plump bulbs that are heavy for their size without any green shoots sprouting up. The papery skin should be tight, not shriveled. If the cloves inside are mushy, that’s a sign that your garlic has gone off, and you’ll need to seek out a fresh bulb.
- Olive oil – A high-quality olive oil adds a rich flavor to your roasted garlic.
How to Roast Garlic
Roasting garlic is so easy. I think the hardest part is waiting for it to be done! These are the quick steps to follow to get your fresh garlic ready for the oven.
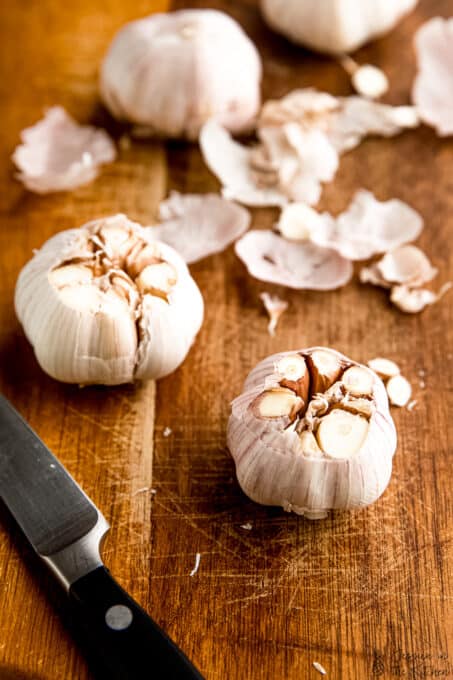
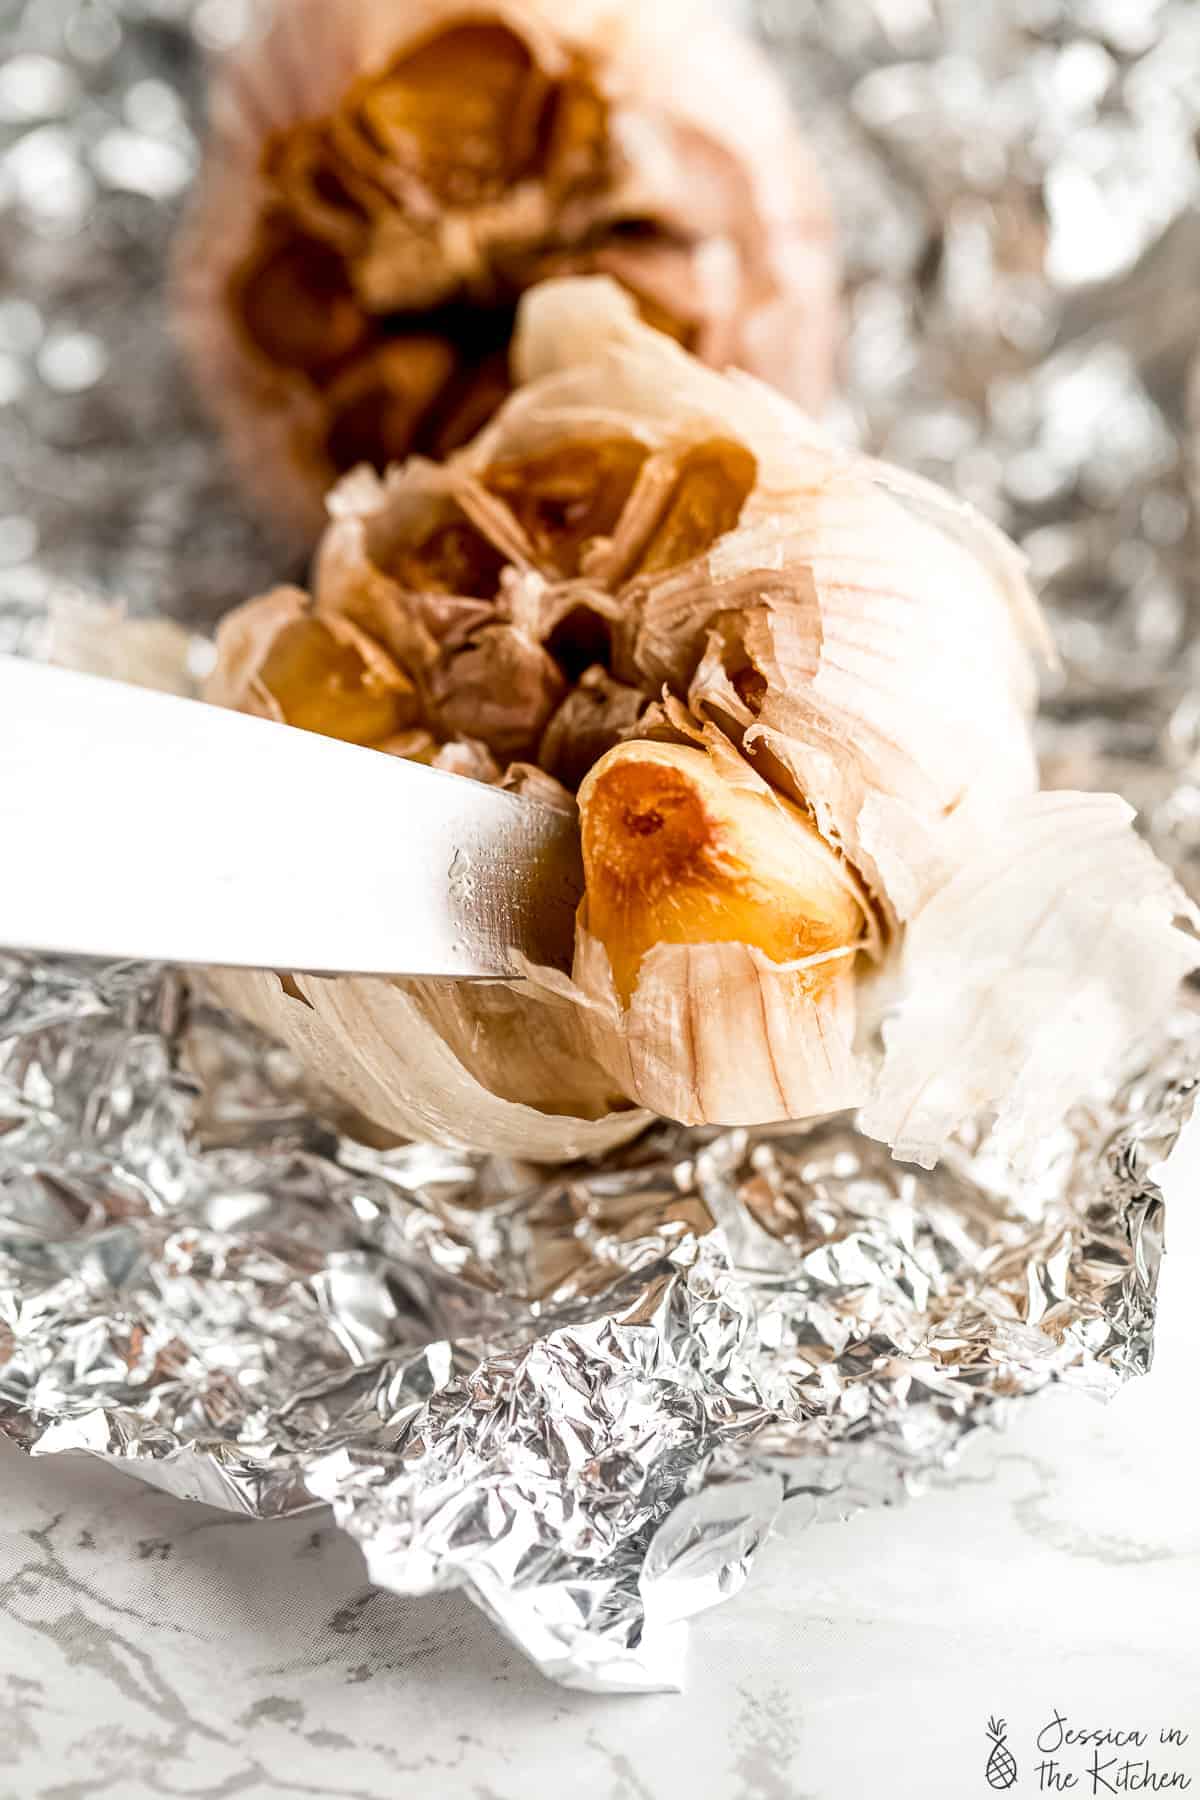
- Prepare the garlic for roasting. Preheat your oven to 450°F/230°C. Cut the top off of the garlic head, exposing all of the garlic cloves inside. Next, place the garlic head onto a piece of foil and drizzle olive oil over the top.
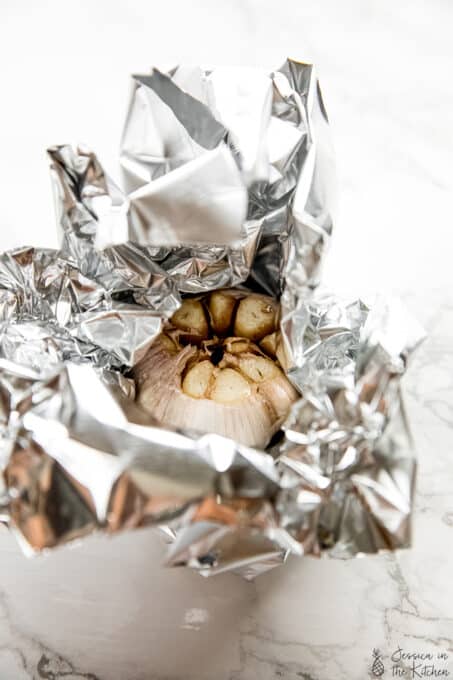
- Seal the garlic in the foil. Now, fold the foil up and around the garlic. Make sure it’s tightly sealed.
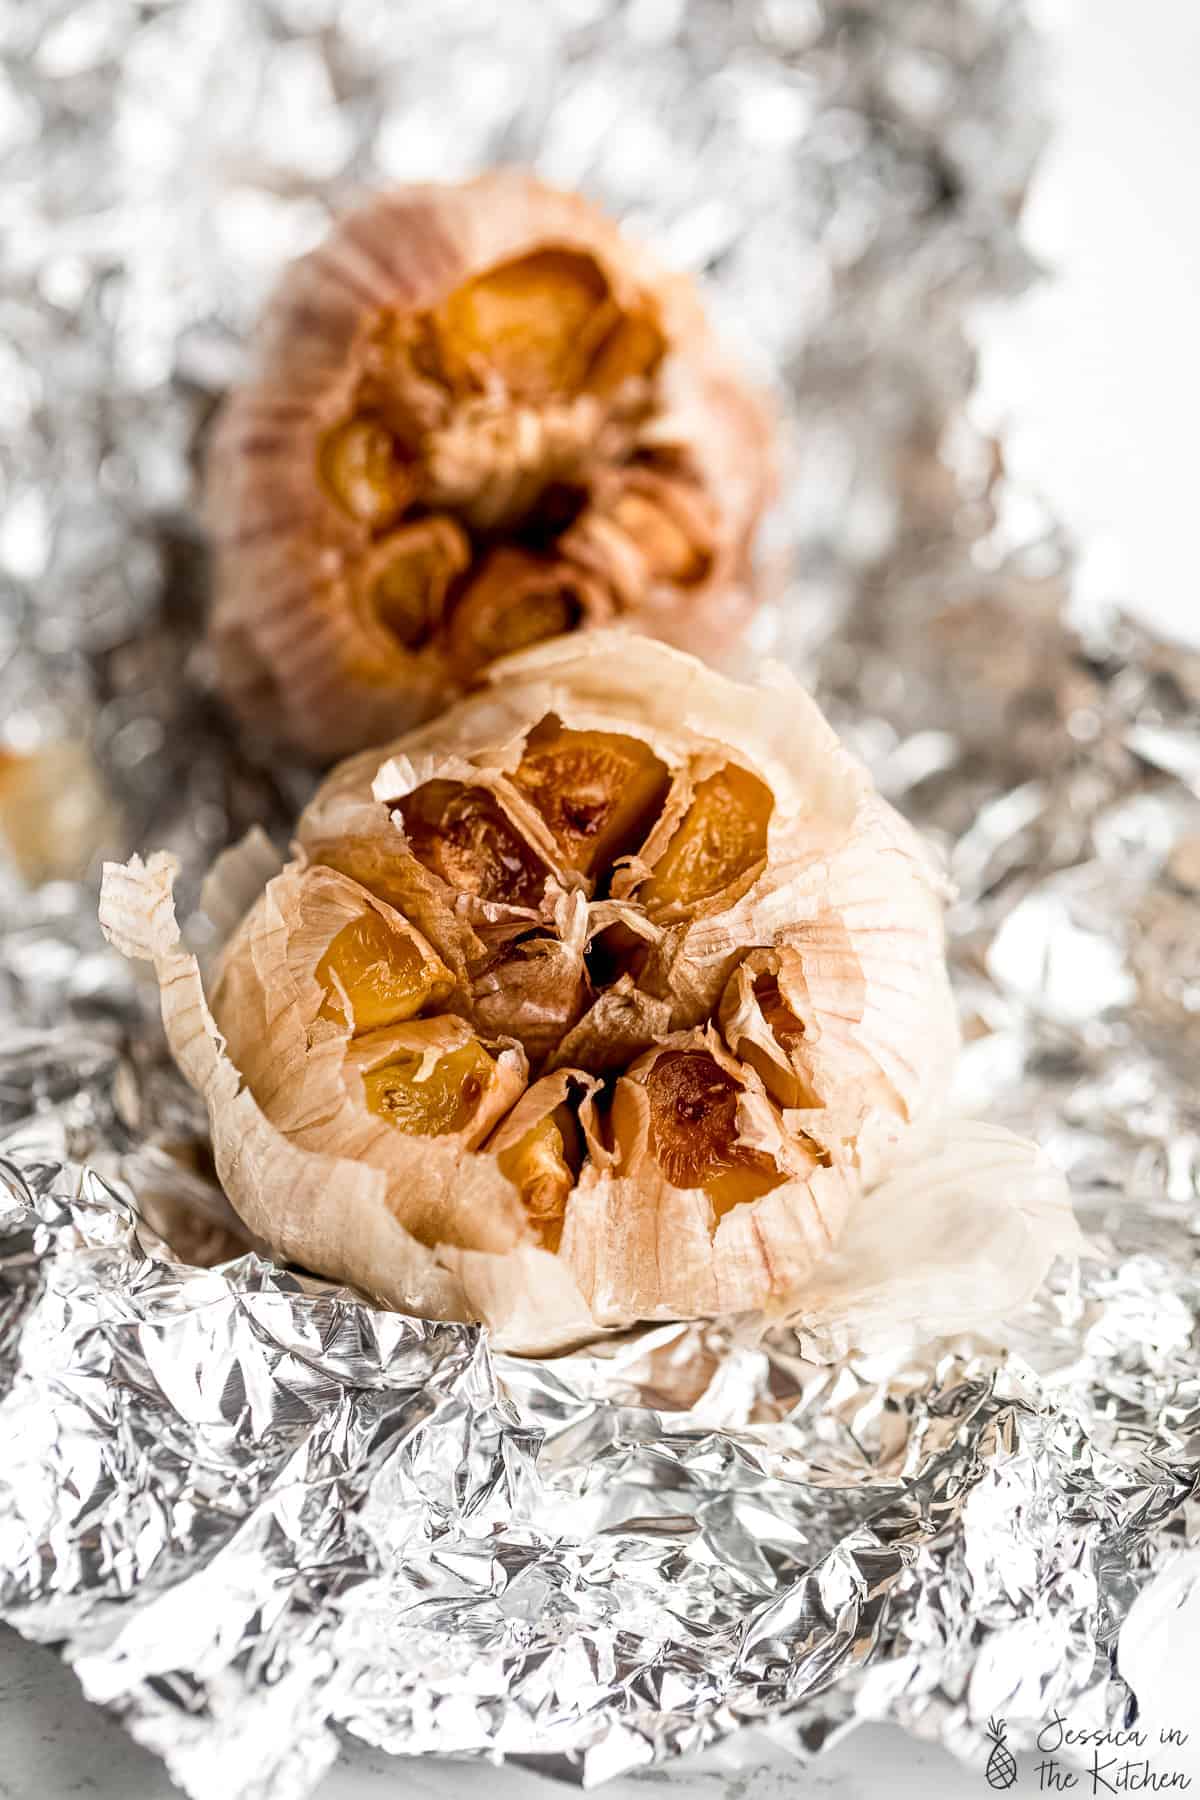
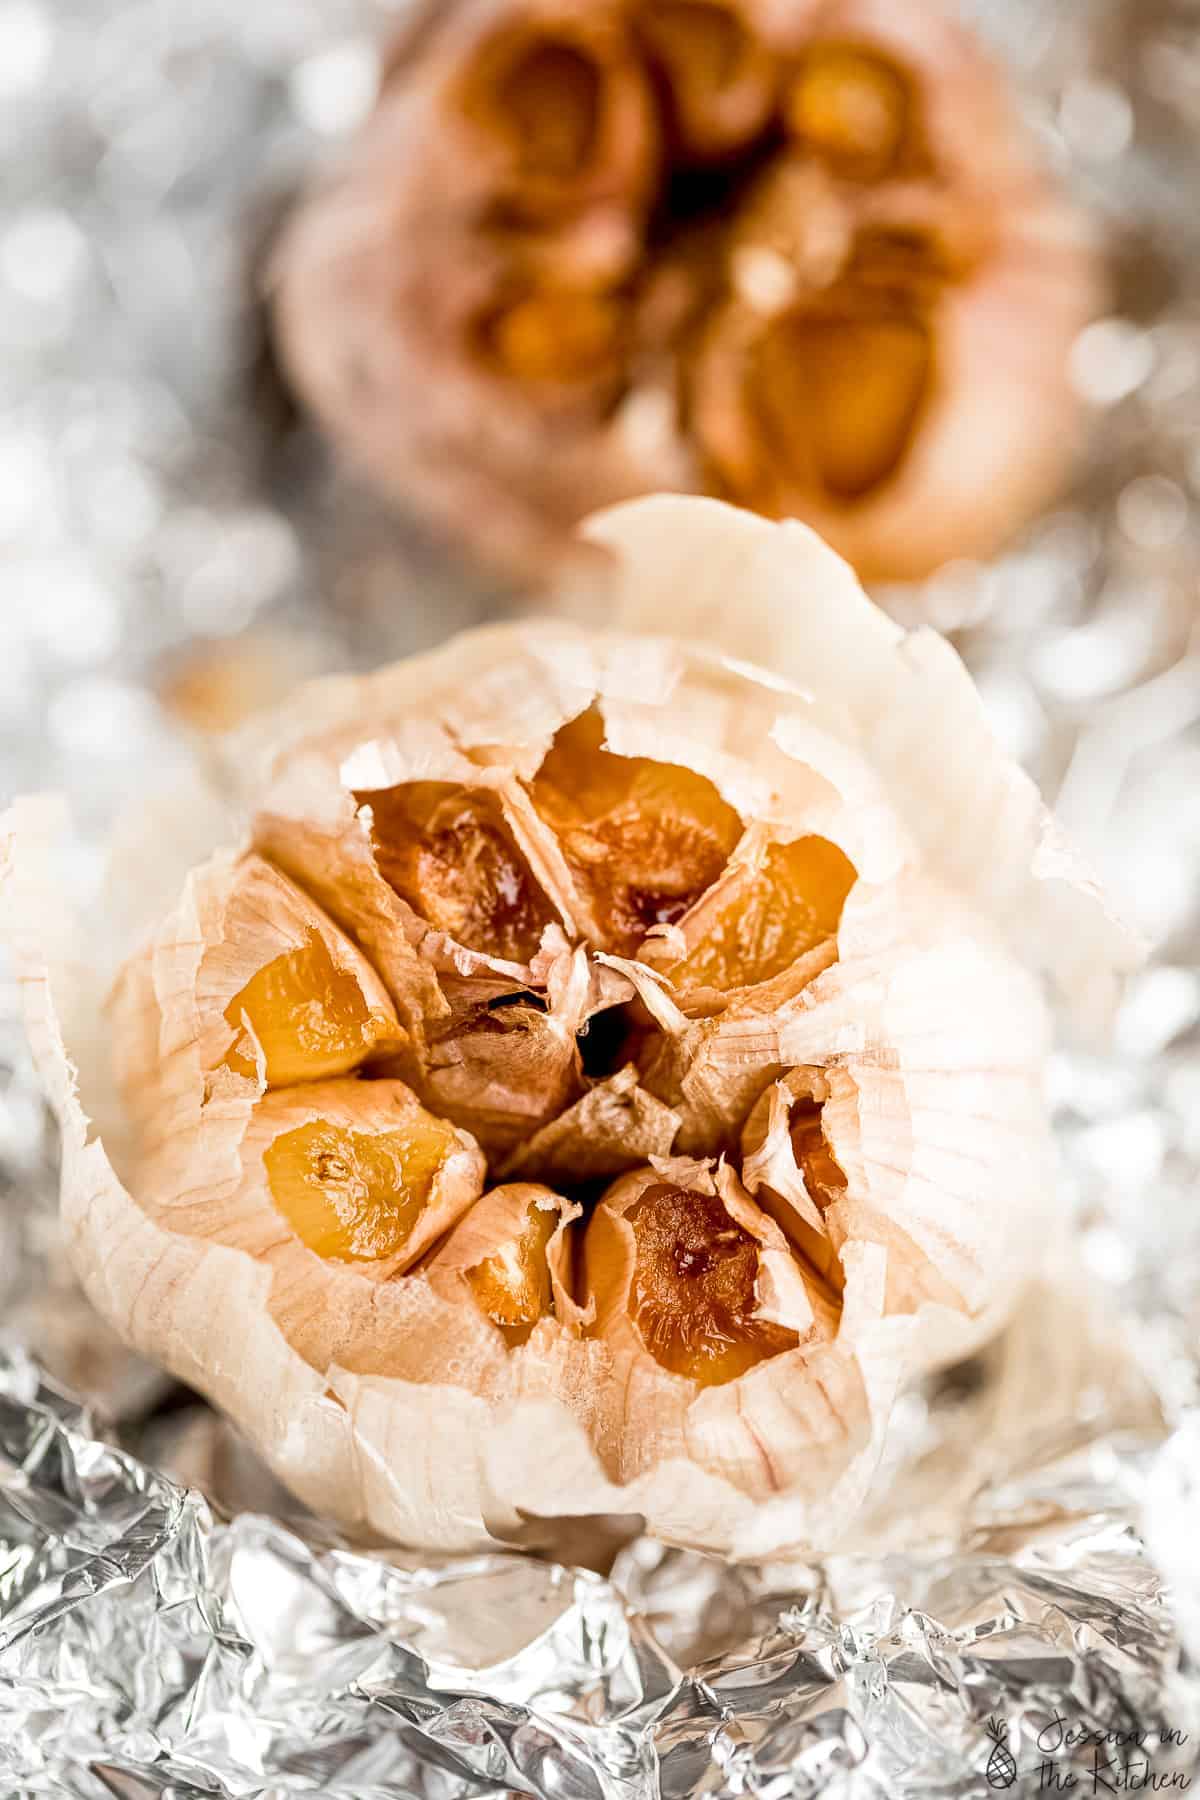
- Roast . Place the wrapped garlic head directly onto the rack in your oven. Roast for about 45 minutes, or until you peek inside to find that the cloves are lightly browned, tender, and velvety.
Use the Air Fryer
If you own an air fryer , you can use it to roast whole garlic bulbs, too. Prepare the bulbs in foil as written. Air fry the garlic at 380°F/193°C for about 25 minutes. Afterward, leave the garlic to cool inside the closed air fryer for 5-10 minutes before removing it. Check out my air fryer roasted garlic for detailed instructions.
Cooling and Peeling Roasted Garlic
Let the garlic cool for at least 10 minutes, or until you can comfortably touch it. If you’d like to keep the roasted cloves whole, carefully peel away the skins. Alternatively, squeeze the cloves out of the skins and into a small bowl. You can mash them with a fork to use the roasted garlic as a paste.
Success Tips
- Use fresh garlic. Or if not, ensure you don’t have any rotten garlic cloves in the bunch. If you cut the garlic head and see any cloves that are brown, remove them before roasting.
- Don’t rush it. I know we all look for shortcuts, but just like caramelised onions , there isn’t really a way to speed up the garlic roasting process that doesn’t cut corners on the end result. The good news is that if you make a bunch of roasted garlic all at the same time, you’ll have it on hand when you need it!
- Putting your roasted garlic to use. My favourite way to use roasted garlic is to slather it on a piece of crusty bread. You can also spread it on sandwiches, burgers, and crackers, or stir it into jarred pasta sauce.
Ways to Use Roasted Garlic in Recipes
Sweet, caramelized oven-roasted garlic is delicious mashed and spread over roasted garlic bread , or, if you’re looking for a recipe that uses roasted garlic, here are a few to try:
- Use it in the sauce for my garlic alfredo pasta .
- Add roasted garlic paste to this homemade roasted garlic tomato sauce .
- Combine roasted garlic, fresh basil leaves, olive oil, walnuts, and vegan parmesan to make easy homemade basil pesto .
- Build the flavours in a cozy roasted cauliflower soup .
- Blend roasted garlic into authentic homemade hummus or white bean dip .
How to Store Roasted Garlic
- Refrigerate. You can store roasted garlic in the refrigerator in an airtight container for about 4 days.
- Freeze it for later. Freezing is the best way to store roasted garlic so you have it on hand when you need it! To freeze, you can spread the roasted cloves on a baking sheet. Once they are frozen, store them in a sealed plastic bag. You can also mash the roasted garlic and freeze it in an ice cube tray. Store the cubes in a sealed plastic bag or an airtight container and thaw them as needed. Roasted garlic can be frozen for up to 3 months.
More Easy Roasting Recipes
- Balsamic Roasted Vegetables
- Crispy Roasted Chickpeas
- Garlic Roasted Potatoes
- Maple Glazed Roasted Carrots
- Whole Roasted Cauliflower
Ingredients
- 1 head of garlic , or more
- 1 teaspoon olive oil , per head
Instructions
- Preheat oven to 450 ° F/ 230° C.
- Cut off the top of the head of garlic, with the cloves still connected, but just enough to expose them a bit. You want all the cloves slightly exposed.
- Place in some foil and drizzle a little bit of olive oil over the top.
- Wrap the foil around the garlic, and roast for 45 minutes in the oven until your cloves are soft and velvety.
- Remove from oven, and allow them to cool for about 5-10 minutes until cooled to touch.
- Remove softened cloves from the skin if using in a recipe with a knife or a tiny spoon or squeeze the cloves out. If not using immediately, refrigerate for up to 4 days (or freeze). Enjoy!
Notes
- Use fresh garlic. Or if not, ensure you don’t have any rotten garlic cloves in the bunch.
- I know we all look for shortcuts (I get it, trust me), but just like caramelised onions, there is basically no way to speed up the roasted garlic process. You could technically heat up cloves with the skin still on until they’re black, but I’ve found that just sticking a head of roasted garlic into your oven is the easiest way to get it done. Plus chances are, you’re going to want more than you need so you can use it in other recipes.
- To store: Refrigerate in an airtight container for up to 4 days.
- To freeze: Spread the roasted cloves on a baking sheet. Once frozen, store in a sealed plastic bag. You can also mash roasted garlic and freeze it in an ice cube tray. Store the cubes in a sealed plastic bag or airtight container and thaw them as needed. Roasted garlic can be frozen for up to 3 months.

How to Roast Garlic
Ingredients
- 1 head of garlic or more
- 1 teaspoon olive oil per head
Instructions
- Preheat oven to 450 ° F/ 230° C.
- Cut off the top of the head of garlic, with the cloves still connected, but just enough to expose them a bit. You want all the cloves slightly exposed.
- Place in some foil and drizzle a little bit of olive oil over the top.
- Wrap the foil around the garlic, and roast for 45 minutes in the oven until your cloves are soft and velvety.
- Remove from oven, and allow them to cool for about 5-10 minutes until cooled to touch.
- Remove softened cloves from the skin if using in a recipe with a knife or a tiny spoon or squeeze the cloves out. If not using immediately, refrigerate for up to 4 days (or freeze). Enjoy!
Notes
- Use fresh garlic. Or if not, ensure you don’t have any rotten garlic cloves in the bunch.
- I know we all look for shortcuts (I get it, trust me), but just like caramelised onions, there is basically no way to speed up the roasted garlic process. You could technically heat up cloves with the skin still on until they’re black, but I’ve found that just sticking a head of roasted garlic into your oven is the easiest way to get it done. Plus chances are, you’re going to want more than you need so you can use it in other recipes.
- To store: Refrigerate in an airtight container for up to 4 days.
- To freeze: Spread the roasted cloves on a baking sheet. Once frozen, store in a sealed plastic bag. You can also mash roasted garlic and freeze it in an ice cube tray. Store the cubes in a sealed plastic bag or airtight container and thaw them as needed. Roasted garlic can be frozen for up to 3 months.
Nutrition
How to Roast Garlic https://jessicainthekitchen.com/how-to-roast-garlic-roasted-garlic/ December 24, 2021
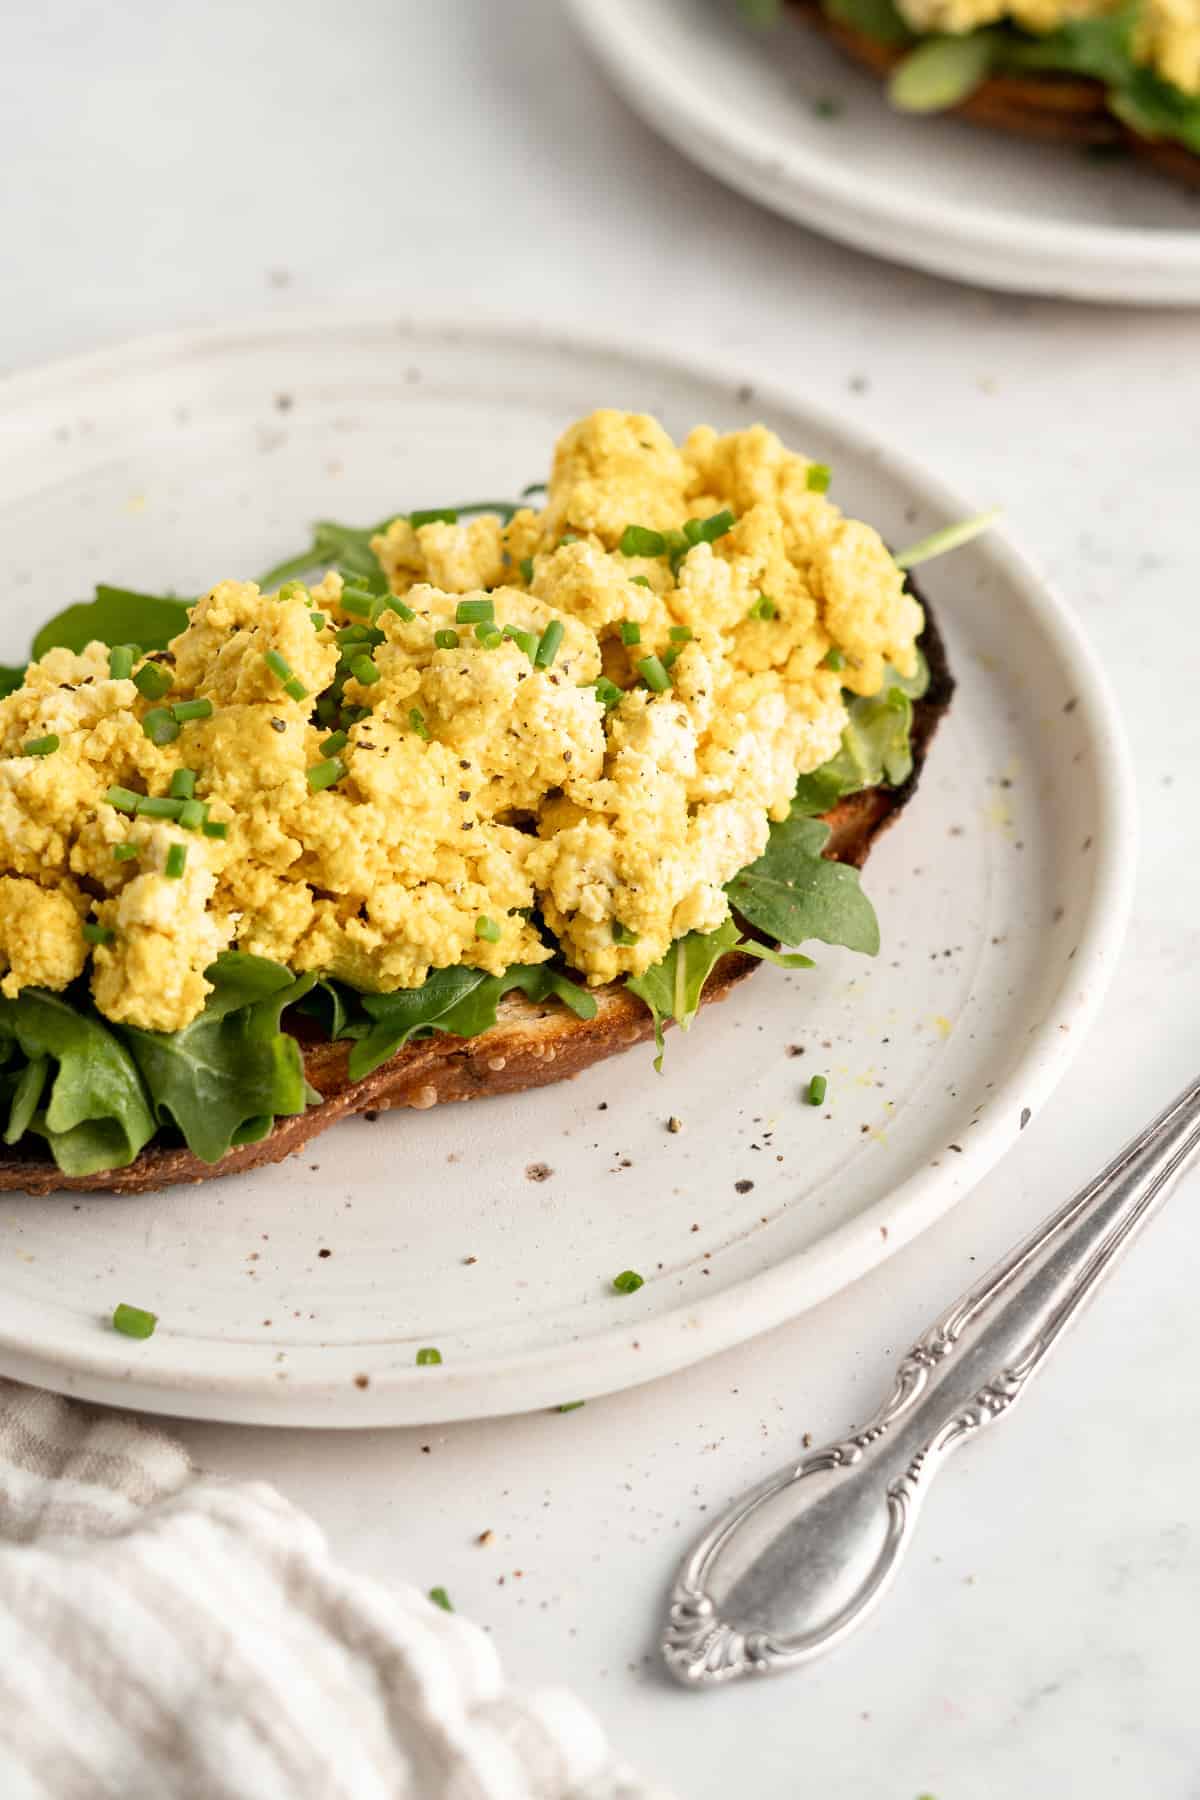
Vegan Tofu Scramble is a vegan version of scrambled eggs, and one of my all-time favorite breakfasts! This easy tofu recipe is loaded with flavor and great for meal prep!
When it comes to tofu, I’ve been around the block and back again. Twice.
Before we get started, if tofu is something that intimidates you, I highly suggest reading my how to cook tofu 101 post first. You’ll feel way more comfortable working with it, and then you can look forward to whipping up this beauty of a recipe! But, if you’re already seasoned in the art of cooking tofu, let’s talk Tofu Scramble.
Vegan Tofu Scramble, let me write the ways I love you!
These ‘eggs’ are: fluffy, exquisitely-seasoned, near-foolproof, and absolutely delicious (because I’ve run out of more descriptive adjectives)! Thanks to the addition of ingredients like nutritional yeast , turmeric, and kala namak, it has a very eggy taste – you won’t even remember that you’re not eating ‘real’ scrambled eggs!
I can’t count how many times I’ve made this dish. It’s one of my favorite breakfast recipes and is so easy to pull together. These vegan scrambled eggs are perfect for those mornings when you don’t have a lot of time, and even better for those when you do. They’re also 100% customizable to the seasonings that you have in your pantry, so they’re like a magical, flavor-shifting breakfast. What could be better?
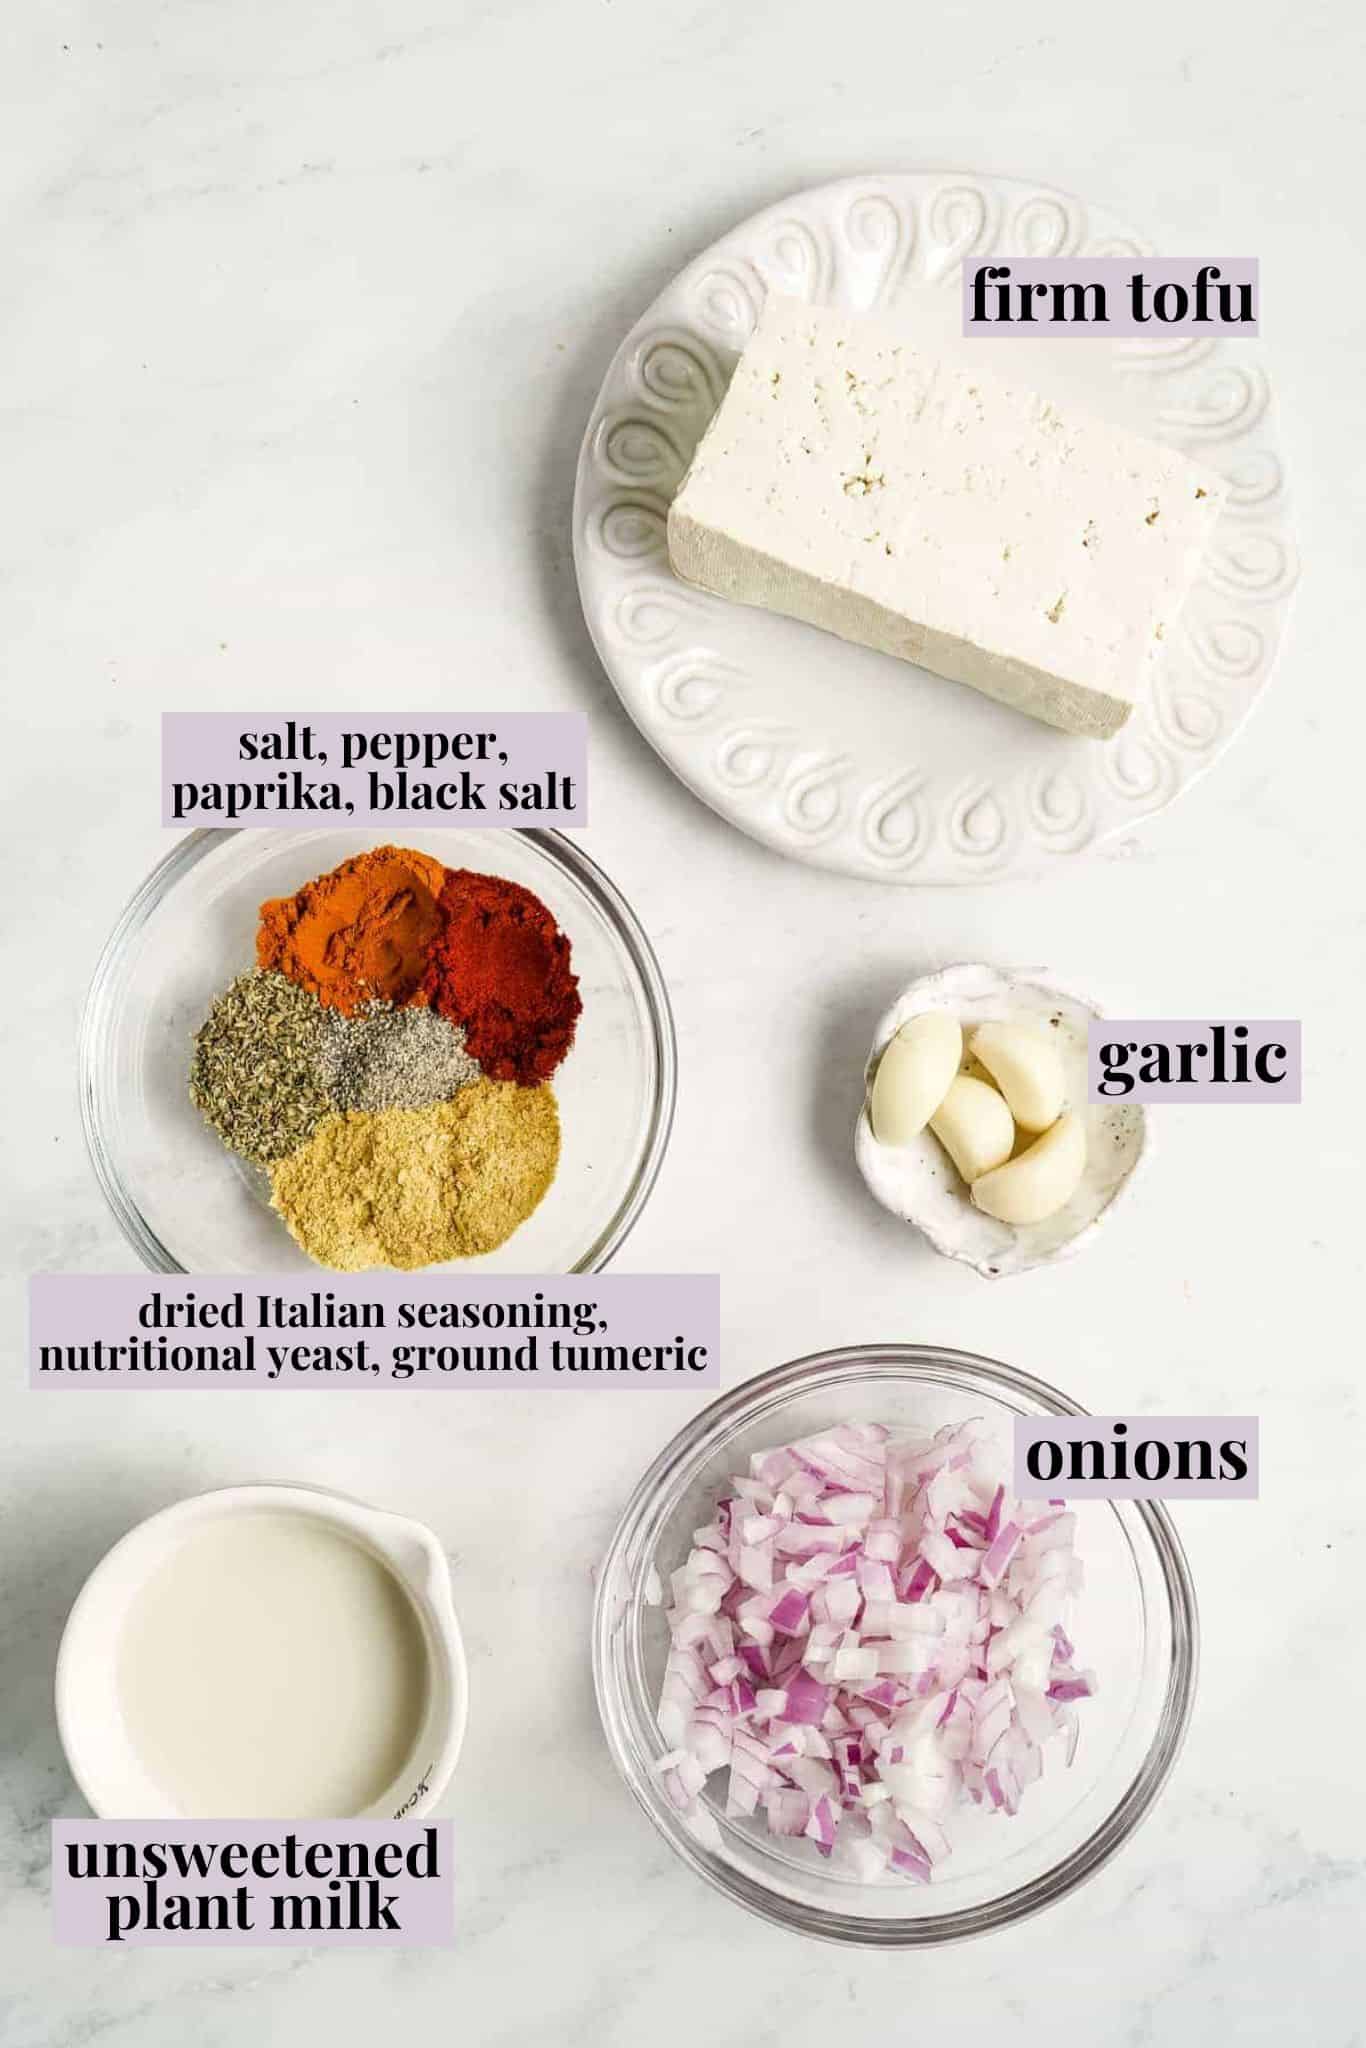
Notes on Ingredients
You would think that there would be about 3 ingredients to a tofu scramble, but this is not so. In order to get the best results with your vegan egg breakfast, you’ll need a number of seasonings and a couple of other add-ins:
- Coconut Oil: Or any other cooking oil that you prefer (canola, olive, avocado, etc.).
- Onion: I like to dice up a medium red onion for this recipe.
- Garlic: Minced, for extra flavor.
- Tofu: Make sure the tofu that you use is pressed – see section below for more info on what kind to use.
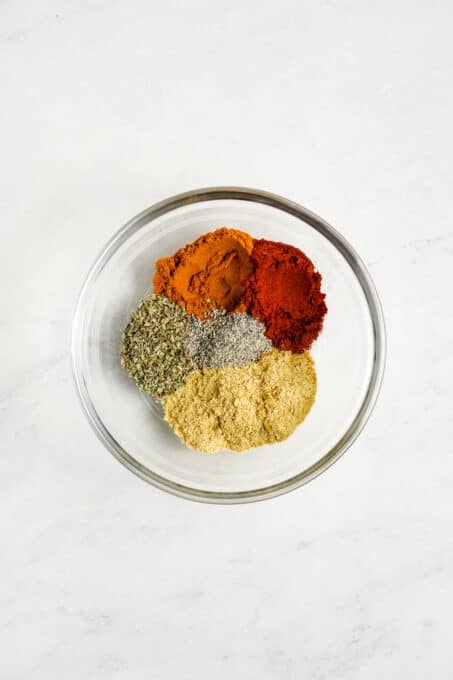
- Spices/Seasonings: Mix ground turmeric, paprika, sea salt, ground black pepper, nutritional yeast , and dried Italian seasoning (or dried oregano or parsley).
- Milk: I like to use unsweetened soy milk or almond milk.
- Black Salt: Aka kala namak – this is optional, but adds great eggy flavor.
What Kind of Tofu Should I Use?
It’s important to use the right kind of tofu when making these scrambled eggs. Personally, I love using firm or extra firm tofu here. I would avoid using silken tofu in this recipe, if possible.
How to Make Tofu Scramble
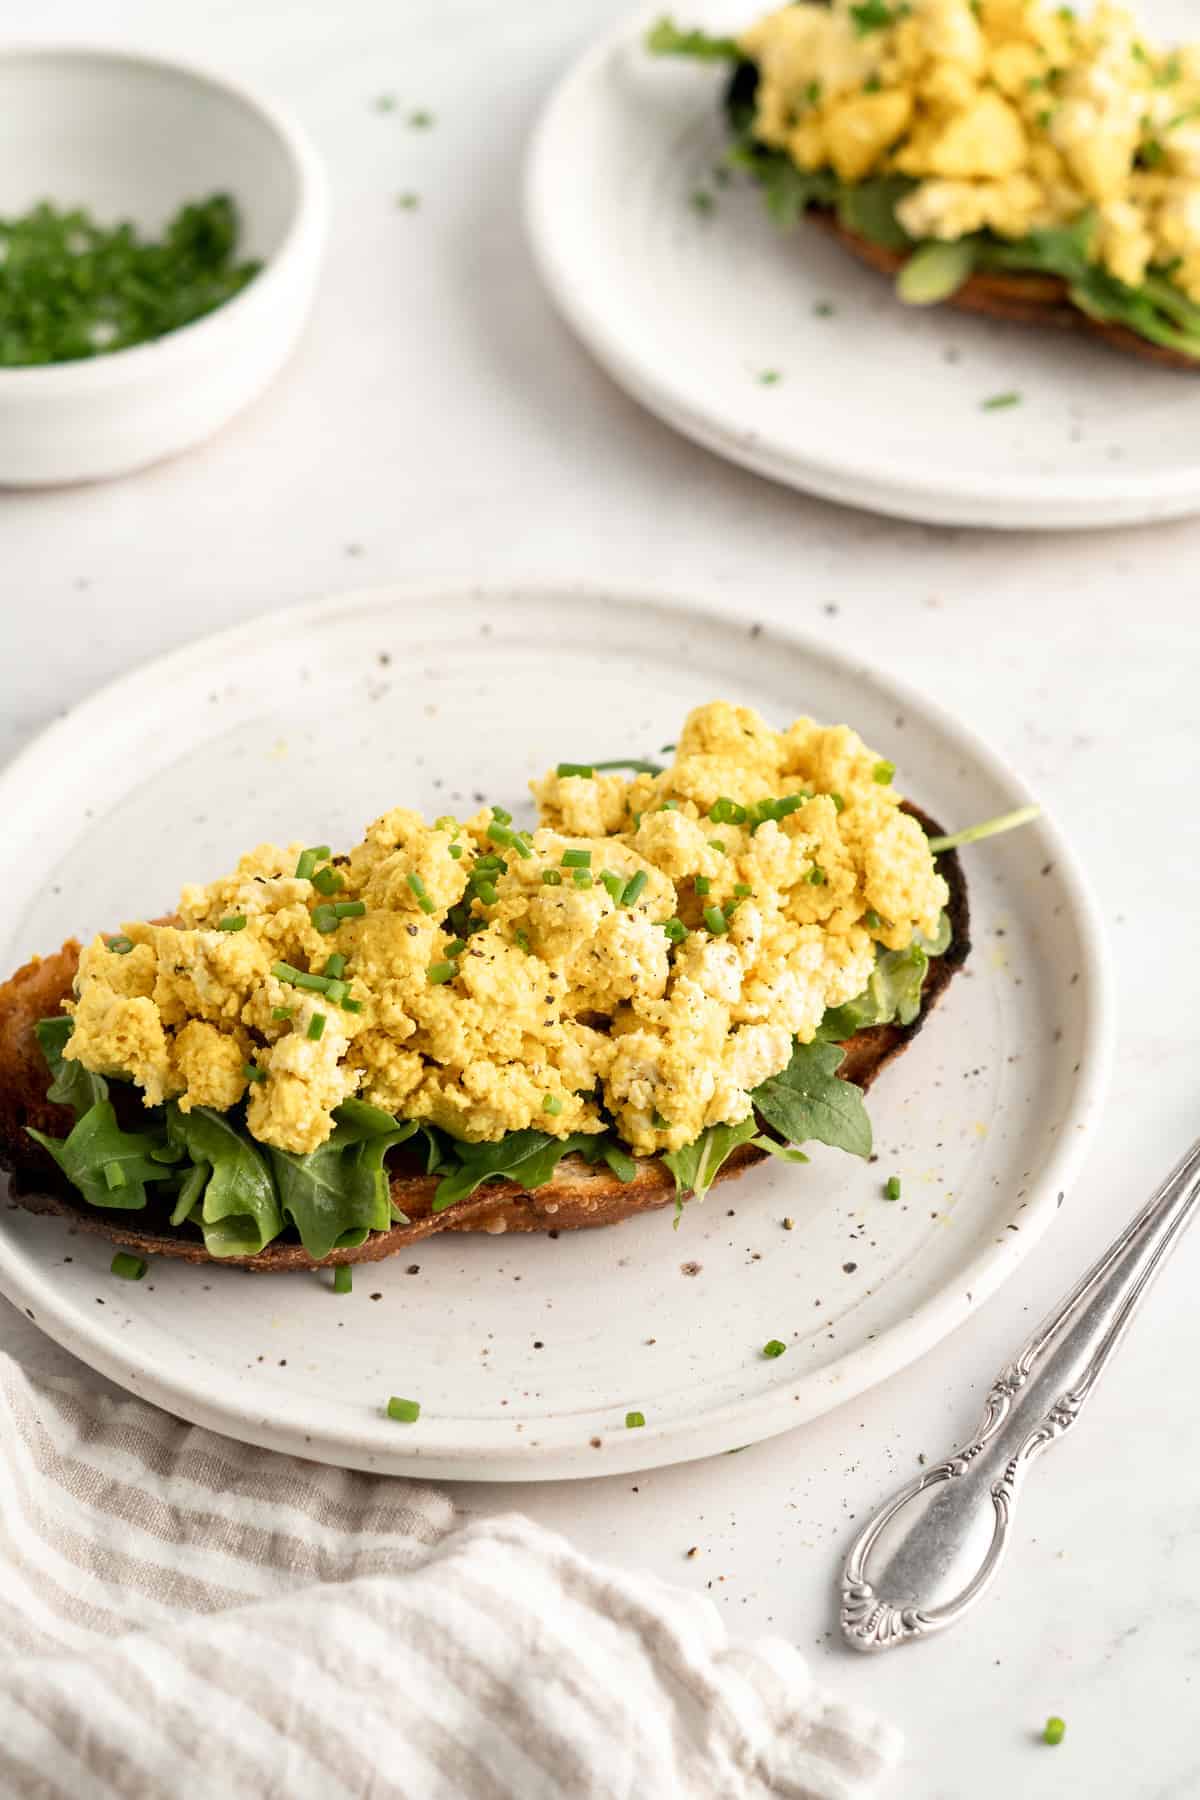
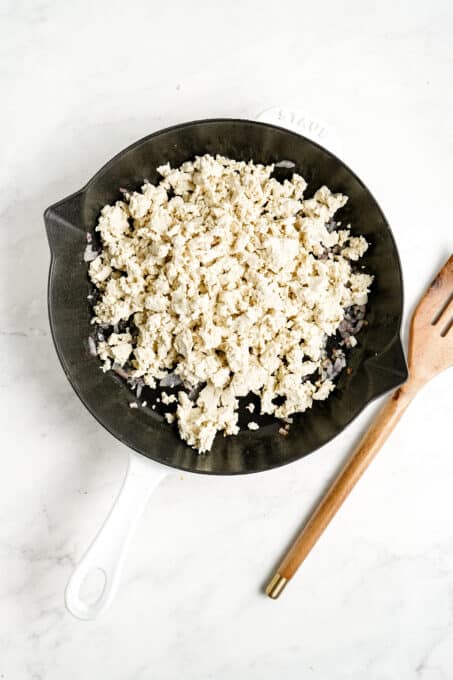
Making vegan tofu scramble starts with sautéing down your onions and garlic, and then you’ll crumble in the pressed tofu. You literally crumble in the tofu using your hands until it resembles the texture in the photos. Easy, right?
Anyway, here’s the whole process, explained in a step-by-step guide:
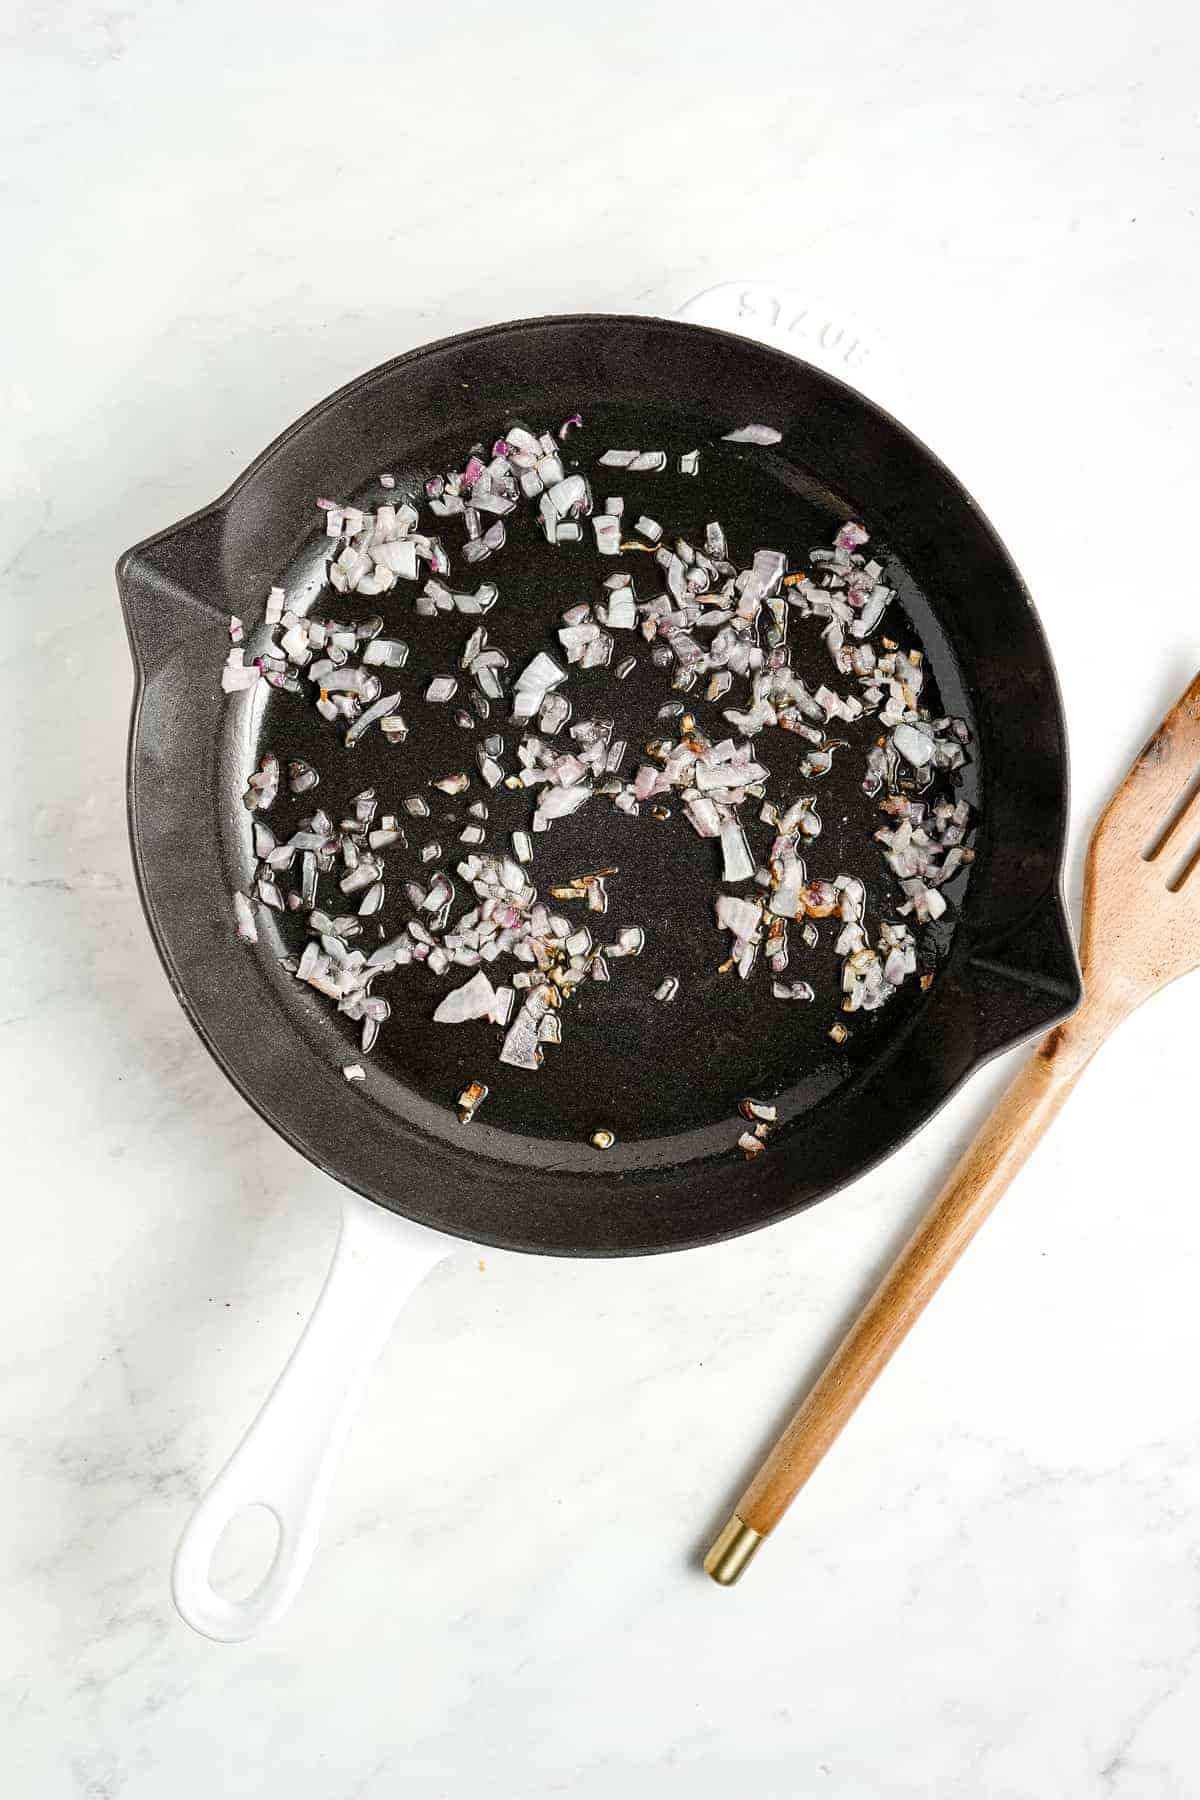
Sauté the Onion and Garlic: In a pan over medium heat, heat the coconut oil. Add in the onions and the garlic, and sauté for about 5 minutes. They should be fragrant and translucent at this point.
Add in the Tofu: Take the pressed tofu block in your hand and crumble it into the pan with your hands. Mix all the seasonings in a bowl and sprinkle them over the tofu mixture.
Stir to Combine: Stir until the seasonings are fully incorporated – this takes about a minute. Reduce the heat to low and add in the milk, stirring thoroughly to combine. With regard to texture, you want it to get saucy.
Cook: Cook for about 5-8 minutes, stirring occasionally. Feel free to add more milk a tablespoon at a time to get it more ‘saucy’ if you desire. Taste test and add any more seasonings that you want.
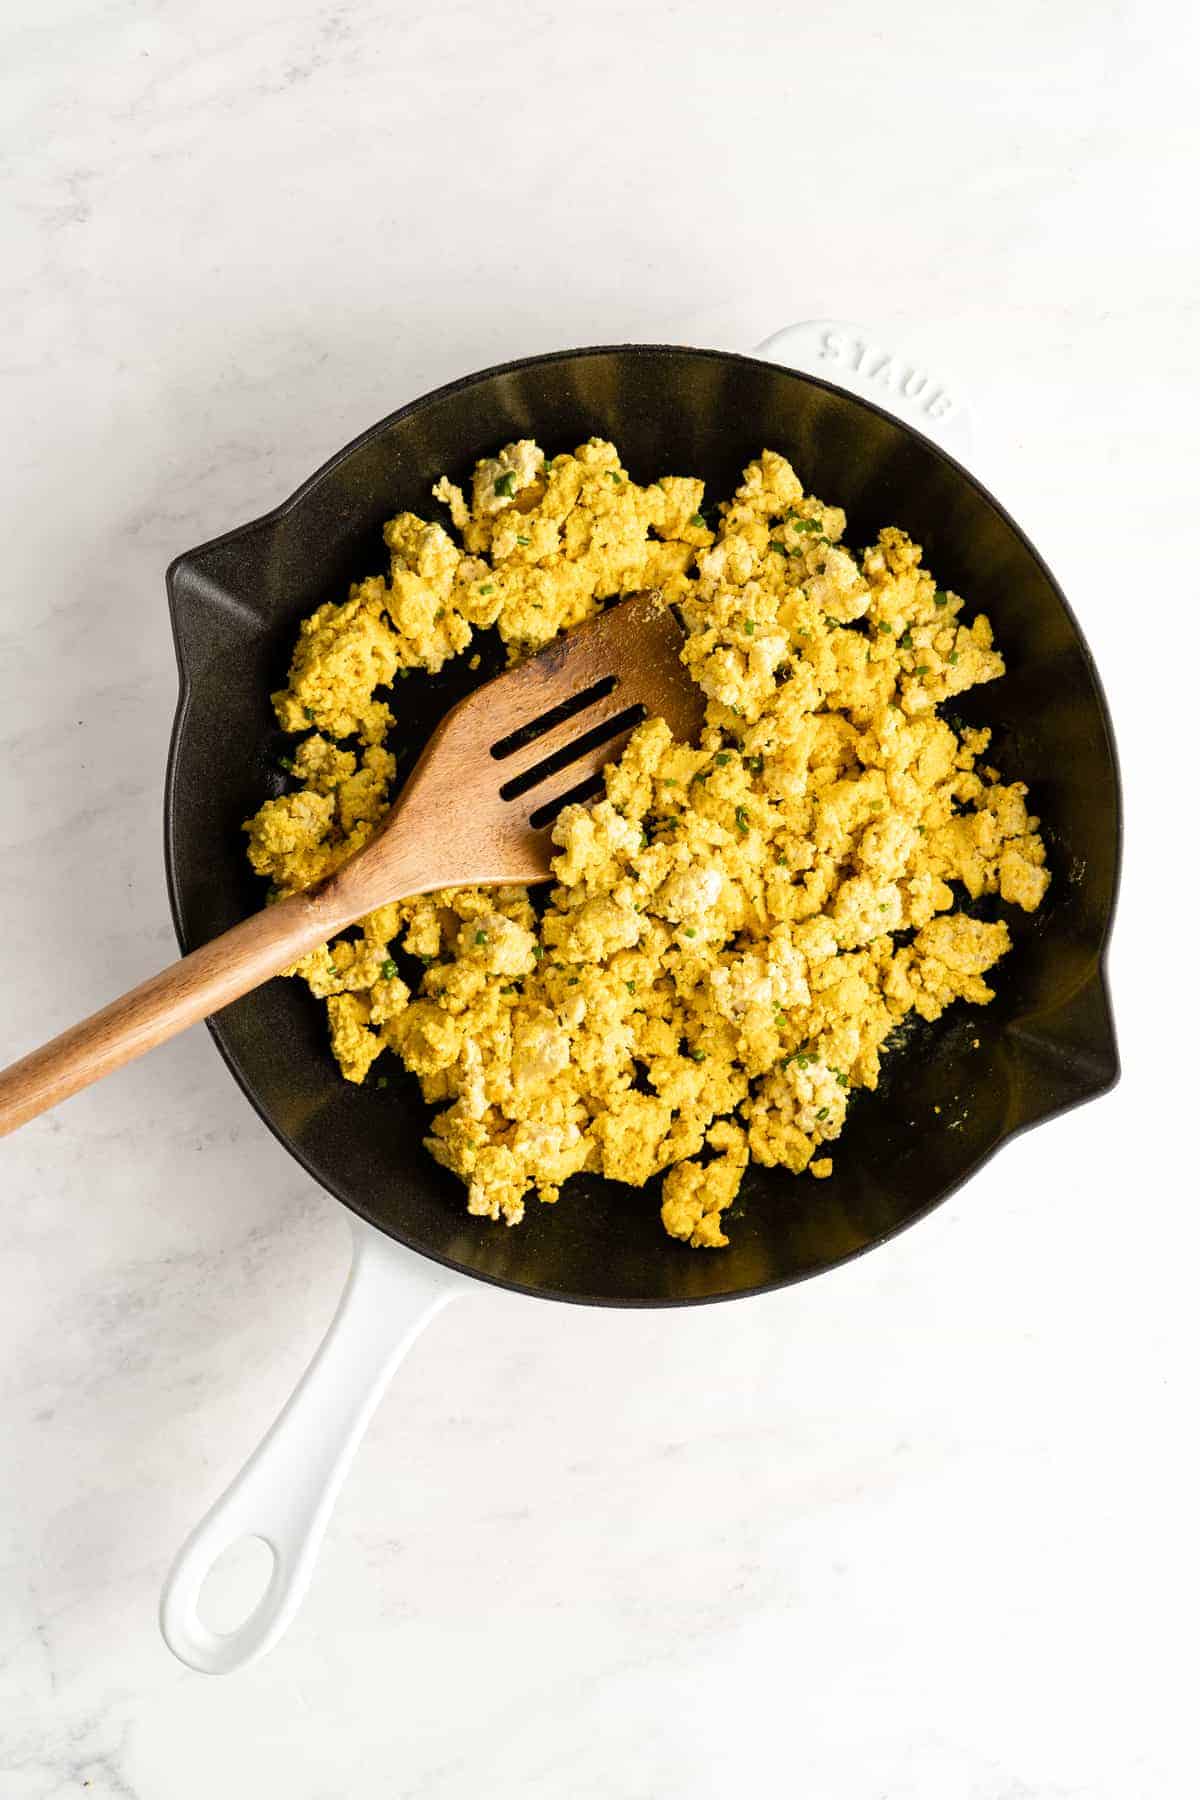
Remove From Heat: Sprinkle the kala namak (optional if you don’t have it) over the scrambled tofu and stir to combine one last time. Serve as you’d like and enjoy!
Tips for Success
When you think quick breakfast, a bowl of cereal or maybe oatmeal is probably the first thing that comes to mind. But, now you have this easy vegan tofu scramble for busy mornings as well. Here are some tips on how to get the best results:
- Keep the Tofu Cooking at a Regulated Temperature: Don’t turn up your heat too high, but keep it at a temperature that keeps everything slightly simmering. That way, you don’t end up overcooking the seasonings, or drying out the tofu/milk you added in.
- For the Fluffiest Tofu: If you feel that your tofu isn’t looking fluffy like the perfect scrambled eggs should, add a little more milk. I’ve also found that adding in a lit bit of vegan cream cheese (about a tablespoon) adds to the fluffiness/creaminess factor!
- Add Some Heat: I love adding my Scotch Bonnet Pepper Hot Sauce to this to take it up several notches!
- Make It Your Own! Feel free to stir in veggies, more salt, or even more black pepper!

Variation Ideas
You don’t have to enjoy your tofu scramble the same way every time! In fact, I often like to switch up the flavors for fun, and so I don’t feel like I’m eating the same thing all the time. If you need some inspiration on how to do that, I’ve got a few ideas:
- Vegetables: If you can sauté it, it’ll work. Throw in something like kale, spinach, broccoli, tomatoes, mushrooms, peppers, cauliflower, etc.
- Salsa: Mixing in salsa or pico de gallo with your scramble is a great idea – homemade and store-bought versions will both work!
- Cheese: Any kind of vegan shredded cheese would be a delicious add-in to this tofu scramble.
Serving Suggestions for Tofu Scramble
If you need something more to supplement your tofu scramble with in order to get the day started, I get it! Here are some ideas on what to pair it with:
- Avocado Toast : Regular toast is fine too, but I love how the creamy avocado pairs with the fluffy scrambled tofu!
- Tacos: Who doesn’t love breakfast tacos ? Grab some tortillas and sautéed veggies, and make some delicious tacos/burritos.
- Smoky White Beans : Scrambled tofu is complemented really well by a side of smoky beans.
- Waffles : Waffles and eggs, pancakes and eggs, whatever you like – it’s all good as long as they’re fluffy and hot off the griddle!
How to Store and Reheat Leftovers
I’ve found that you can refrigerate this vegan tofu scramble in an airtight container for up to 3 days. When you want to reheat the tofu (and other veggies if you added them), put it in a skillet/pan over low heat, add a splash of extra milk, and cook until it is fluffy again, and warmed through.
Can I Freeze This?
Yes! It might be weird to think of scrambled eggs as freezer-friendly, but this scrambled tofu definitely is. It can be frozen in an airtight container for about a month if you like.
Ingredients
- 2 teaspoons coconut oil , or any oil
- ½ medium red onion , finely diced
- 4 cloves garlic , minced
- 1 (16 ounce) block firm tofu , or extra firm tofu, pressed
- 1 teaspoon ground turmeric
- 1 teaspoon paprika
- 1 tablespoon nutritional yeast , (feel free to add more)
- ½ teaspoon dried Italian seasoning , or dried oregano or parsley
- ¾ teaspoon sea salt
- ¼ teaspoon ground black pepper
- 6 tablespoons unsweetened soy milk , or almond milk, up to ½ cup or more
- ¼ teaspoon black salt aka kala namak , optional, but adds great eggy flavour
Instructions
- In a pan over medium heat, heat the coconut oil. Add in the onions and the garlic, and sauté for about 5 minutes until translucent and fragrant.
- Take the pressed tofu block in your hand and crumble it into the pan with your hands.
- Mix all the seasonings (turmeric, paprika, nutritional yeast, Italian seasoning, sea salt and ground black pepper) in a bowl. Sprinkle the seasonings over the tofu mixture.
- Stir to combine, until the seasonings are fully incorporated, about 1 minute. Reduce heat to low and add in the milk and stir again to thoroughly combine. You want it to get saucy.
- Cook for about 5-8 minutes, stirring occasionally. Feel free to add more milk a tablespoon at a time to get it more ‘saucy’ if you desire. Taste test and add any more seasonings that you want.
- Remove from heat. Sprinkle the kala namak (optional if you don’t have it) over the scrambled tofu and stir to combine one last time. Serve as you’d like and enjoy!
Notes
- Keep the Tofu Cooking at a Regulated Temperature: Don’t turn up your heat too high, but keep it at a temperature that keeps everything slightly simmering. That way, you don’t end up overcooking the seasonings, or drying out the tofu/milk you added in.
- For the Fluffiest Tofu: If you feel that your tofu isn’t looking fluffy like the perfect scrambled eggs should, add a little more milk. I’ve also found that adding in a lit bit of vegan cream cheese (about a tablespoon) adds to the fluffiness/creaminess factor!
- Add Some Heat: I love adding my Scotch Bonnet Pepper Hot Sauce to this to take it up several notches!
- Make It Your Own! Feel free to stir in veggies, more salt, or even more black pepper!
- Storage: I’ve found that you can refrigerate this tofu scramble in an airtight container for up to 3 days. When you want to reheat the tofu (and other veggies if you added them), put it in a skillet/pan over low heat, add a splash of extra milk, and cook until it is fluffy again, and warmed through. This tofu can also be frozen in an airtight container for about a month if you like.
More Easy Tofu Recipes
Looking for more simple yet flavor-packed tofu meals? If so, I’ve got a few to choose from!
- Crispy Teriyaki Tofu
- Easy Baked Tofu (Meal Prep)
- General Tso Tofu
- Vegan Butter Chicken
- Orange Air Fryer Tofu
