Want to make your tofu taste better but don’t know where to start? Today I’m going to show you how to cook tofu and also share some incredibly helpful tips for making the MOST delicious tofu you ever have!
Cooking tofu can feel a bit tricky at first, but once you master it, you’ll wonder how you ever lived without this versatile, protein-packed ingredient. Whether you’re craving crispy tofu for stir-fries, silky tofu for soups, or marinated tofu bursting with flavour, there’s a method for every dish.
What I love most about tofu is how it transforms into whatever you want it to be — it’s like a blank canvas for your favourite spices, sauces, and marinades. The trick is knowing how to prepare and cook it to bring out its best texture and taste.
If you’ve ever struggled with soggy tofu or bland bites, don’t worry — I’ve got you covered. This guide breaks down everything you need to know, from pressing tofu to achieve the perfect crispiness to seasoning it for maximum flavour. After this, you’ll be a tofu pro in no time!
Firstly, What is Tofu?
Tofu, also known as bean curd, is a food made from soy beans. Tofu is often seen as a vegan meat replacement and can be used in everything from vegan meat replacements to cheesecakes to puddings to vegan ‘eggs’ and so much more. One of the things that is asked a lot in relation to tofu is whether it is “real”. Yes, it definitely is.
Tofu can get a bad wrap but it is DELICIOUS. It’s versatile, easy to use, meal prep friendly, and freezer friendly too. Tofu is also high in protein so it’s an excellent vegan source for complete proteins.
In fact, Tofu is your FRIEND. So instead of dwelling on all the reasons tofu may have been wrong to you in the past, let’s focus on all the ways to get it right. When you cook tofu properly AND are using the correct tofu, trust me, you’ll be so glad you added it to your recipes!
Different Types of Tofu – Regular Tofu vs. Silken Tofu
Understanding the different types of tofu is key to cooking it well. Whether you’re using it as a meat replacement, adding it to soups, or blending it into desserts, knowing which type to use makes all the difference. Let’s break it down:
Regular Tofu
If you’re using tofu as a meat replacement, you’ll want to buy regular tofu, which comes in medium, firm, or extra-firm varieties—not silken tofu.
- Soft Block Tofu: Soft block tofu is similar to silken tofu and works well in recipes like creamy soups or blended sauces. It has a delicate texture but slightly more structure than silken.
- Medium Block Tofu: This tofu is perfect for dishes like miso soup. It’s firmer than silken or soft tofu, but still retains a tender texture that works well in brothy recipes.
- Firm/Extra-Firm Block Tofu: This is the go-to tofu for most recipes where you want a hearty, meat-like texture. It’s my favourite and a staple in my kitchen. Firm and extra-firm tofu are typically sold in water-filled packages.
Silken Tofu
Silken tofu is quite different from regular tofu in both texture and preparation. Unlike regular tofu, it doesn’t need to be refrigerated and is usually sold in shelf-stable boxes with very little water surrounding it. Silken tofu has a delicate, custard-like consistency that cannot be pressed, although it can be gently drained if necessary.
One confusing aspect of silken tofu is the labeling—you’ll often see terms like “soft,” “firm,” or “extra-firm” on the packaging. These don’t refer to the same firmness levels as regular tofu but rather the slight variations within the silken tofu category itself.
Silken tofu is perfect for recipes where you want a smooth, creamy texture. It works beautifully in smoothies, puddings, cheesecakes, and other blended dishes, adding a luscious, silky consistency that’s hard to replicate with other types of tofu.
Press Your Tofu – Pressing vs Draining
Pressing tofu is a game-changer when it comes to making it flavorful and satisfying. By pressing out the excess liquid, you create space for the tofu to absorb marinades and seasonings properly. If you skip this step and try marinating tofu that hasn’t been pressed, the liquid inside will block the flavors from soaking in, leaving your tofu bland and unseasoned, no matter how long you marinate it.
To get the best results, press your tofu for about 30 minutes. This allows enough time to remove as much liquid as possible, ensuring your tofu can fully absorb your marinades and achieve that golden, crispy texture when cooked. Shortening this step might be tempting, but if you want perfectly crispy tofu, it’s worth the time!
How to Press Tofu
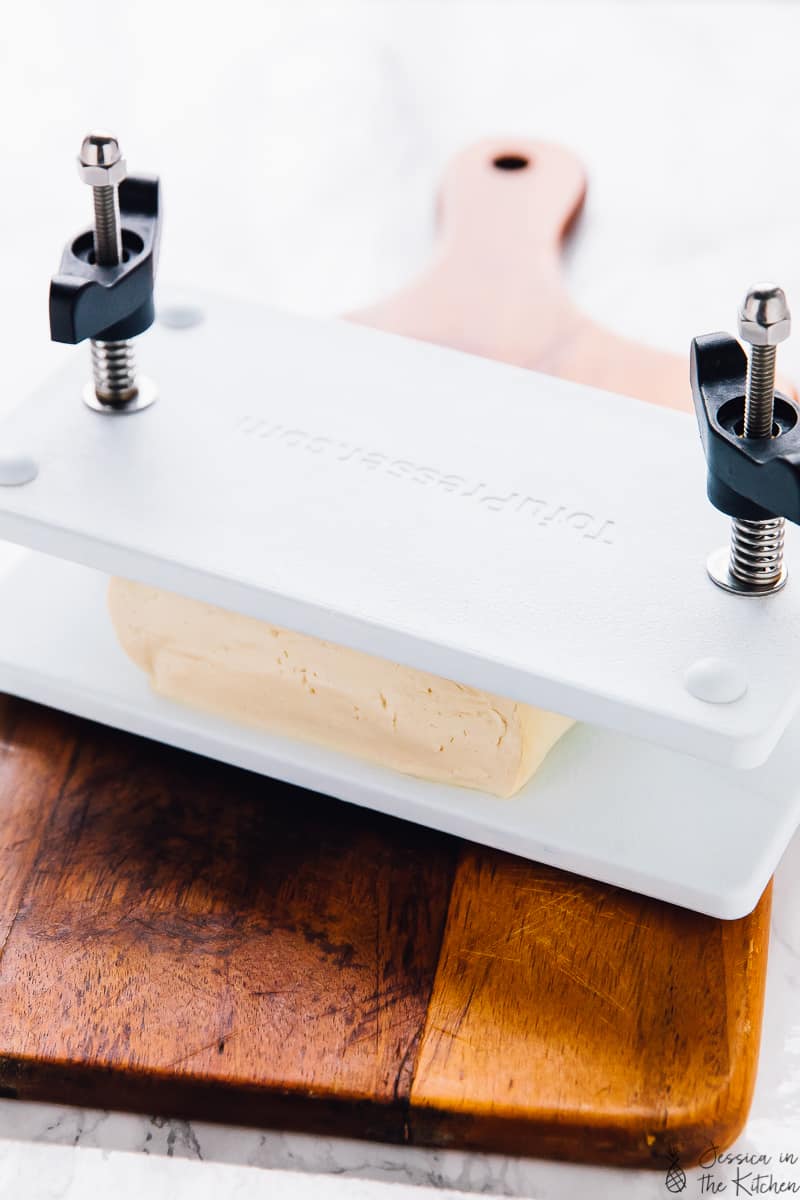
- With a tofu press : A tofu press is a very simple mechanism that basically screws your tofu into press to press out the liquid. You can adjust it to any level of pressing that you want, and it works wonders. It tastes the fear out of everything on top of your tofu toppling over, and for someone like me who uses tofu so often, it’s paid for itself. Prices range from $20-$30, but it’s probably going to last you for life. Pressing tofu for us now takes less than 5 minutes to set up from cutting up the tofu bag to putting it in the press.
- Use heavy kitchen items: The second method is stacking heavy items on top of your tofu to remove the liquid. To press tofu this way, remove from the bag or package and wrap in a kitchen towel. Place a heavy pot (such as a cast iron) on top of the tofu or a stack of heavy books that can balance on top. Press for at least 30 minutes. You can press tofu a day or two ahead of time, and place in an airtight tupperware container in your fridge.
Draining Your Tofu
There are some recipes where you don’t want to press your tofu as much, or you’re using silken tofu for example. In this case, you’ll want to just wrap it in a kitchen towel or paper towel to drain excess liquid from your tofu. This is not the method I recommend when using tofu as a meat replacement.
Season Your Tofu – No, Really
You HAVE to season tofu. Stop treating it like a piece of meat (haha get it).
No, tofu’s base flavour is not delicious. That isn’t its job though . Tofu is there as a base for you to manipulate. Tofu is a blank slate and that’s exactly what I love about it. It needs and wants seasoning, marinading, flavour and proper cooking so that it can become anything you want. You can’t just salt and pepper the outside of tofu and expect it to taste amazing. That was my very first realisation about tofu that made the biggest difference for the way I cooked it.
There are two main ways to add flavour to your tofu: you can marinate it (which is what I’ll show you how to do below), or you can toss it with a bunch of dry seasonings.
Marinate It
One of the best ways to infuse tofu with flavour quickly and all throughout the tofu is to marinate it. You can literally use any meat marinades for tofu, just pump up the flavours. Remember that tofu tastes like nothing, so it’s up to you to really get those flavours singing.
You can marinate tofu for anywhere from 15 minutes to overnight. You again want to use extra-firm tofu here so it doesn’t fall apart and so it really soaks it all up.

Here’s a quick look at what I like to use for my favourite marinade. I’ve included the full recipe in the recipe card below, if you want to print it out!
- Light soy sauce – Don’t use regular soy sauce, but you can use liquid aminos , tamari or coconut aminos .
- Rice wine vinegar
- Sesame oil
- Agave
- Seasonings – Garlic powder, onion powder, smoked paprika, and black pepper.
- Water
You’ll also need 1lb of tofu, some oil for cooking it in, and possibly cornstarch if you want to make it extra crispy. (More on that below.)
Coat It in Dry Seasonings
You can also use your favourite potent seasoning mix and coat your tofu in it.
Pre-season it, then let it soak in a sauce to soak up flavours. My Slow Cooker Tofu Butter Chicken wasn’t even pre-seasoned, but it was well pressed, and so it truly soaked up the flavours of that sauce. Alternatively, my stove top Tofu Butter Chicken is pressed, coated with cornstarch and a lot of seasonings, then pan fried, then steeped in sauce. Both taste absolutely incredible. It’s all about what method you want to use, when.
Using Cornstarch & Other Tofu Tips
As I mentioned earlier, coating tofu in cornstarch is my go-to trick for achieving the crispiest exterior with minimal effort. It’s a simple, no-fuss alternative to breading, which can sometimes feel like a time-consuming chore. The cornstarch method delivers quick, effective results without compromising on that golden, crunchy texture.
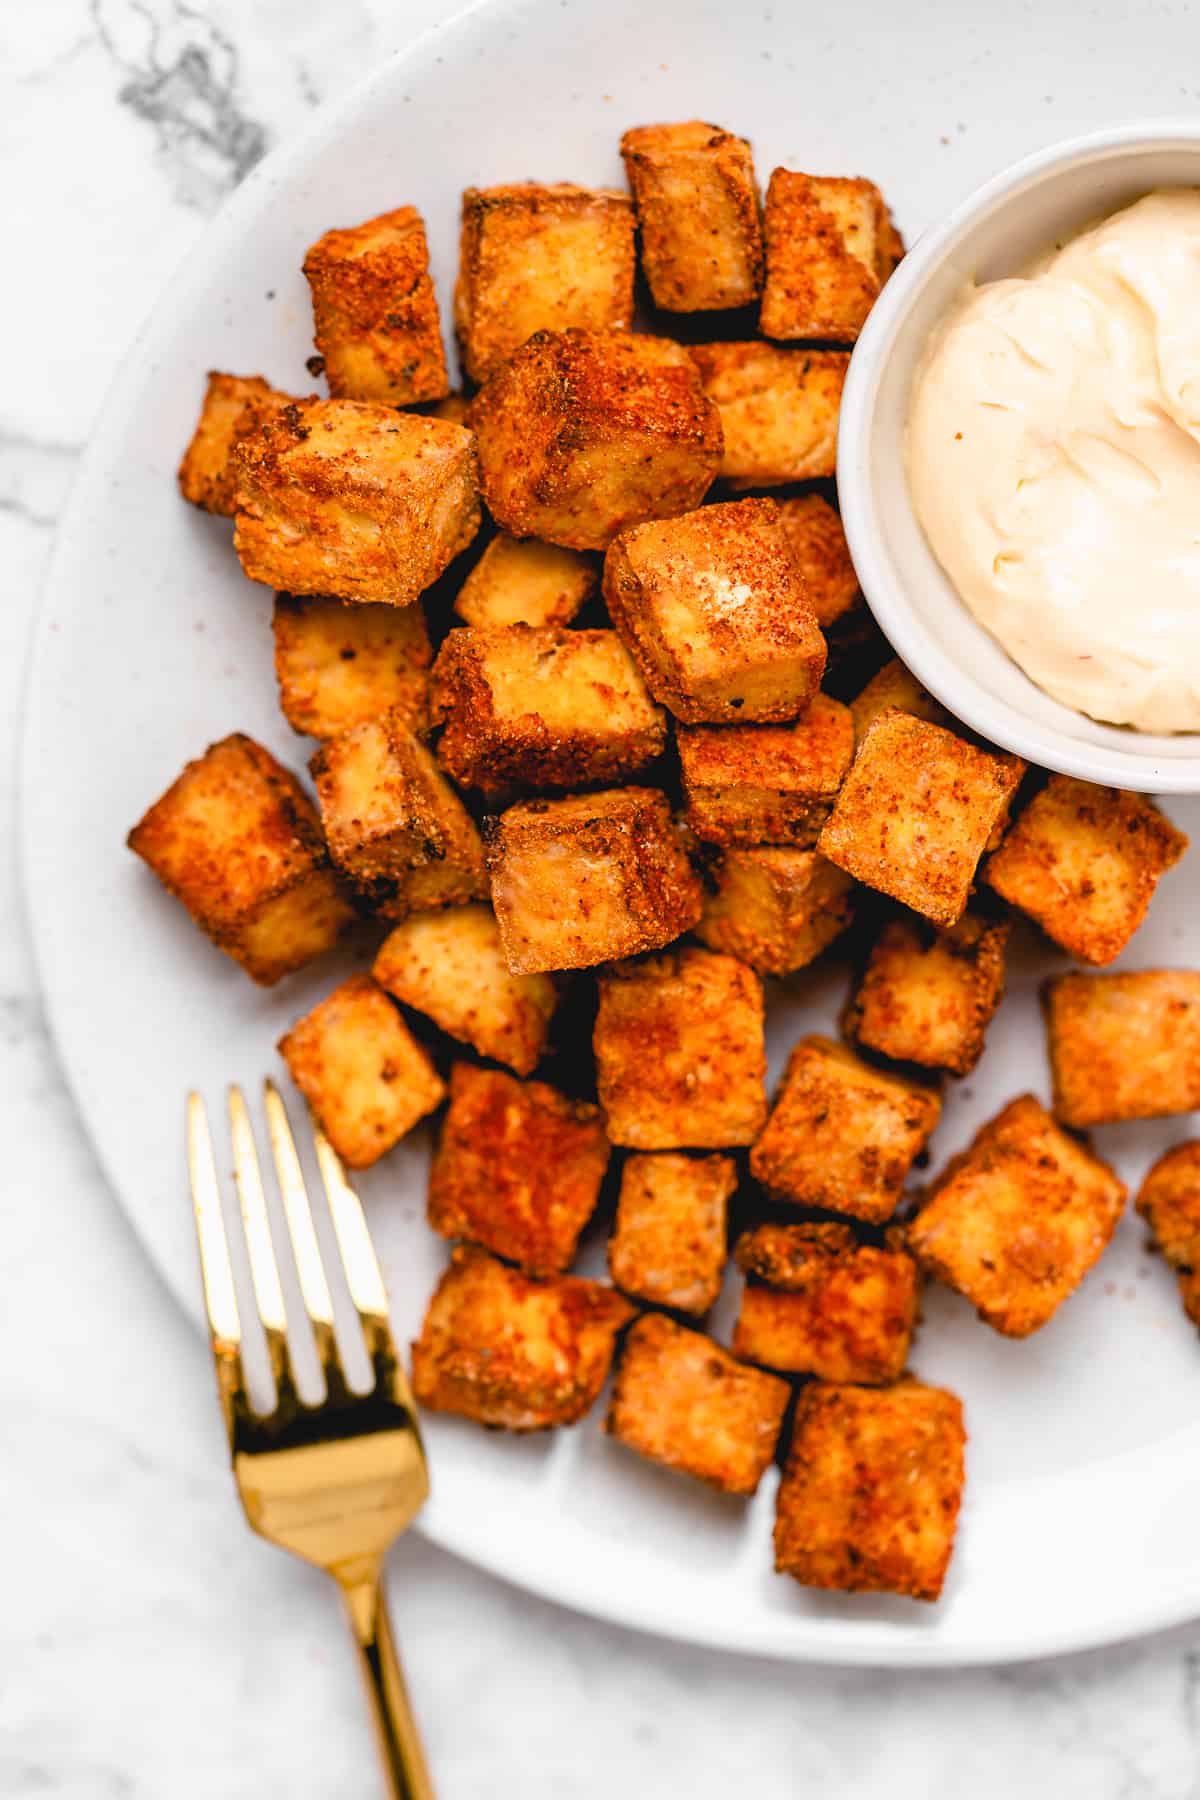
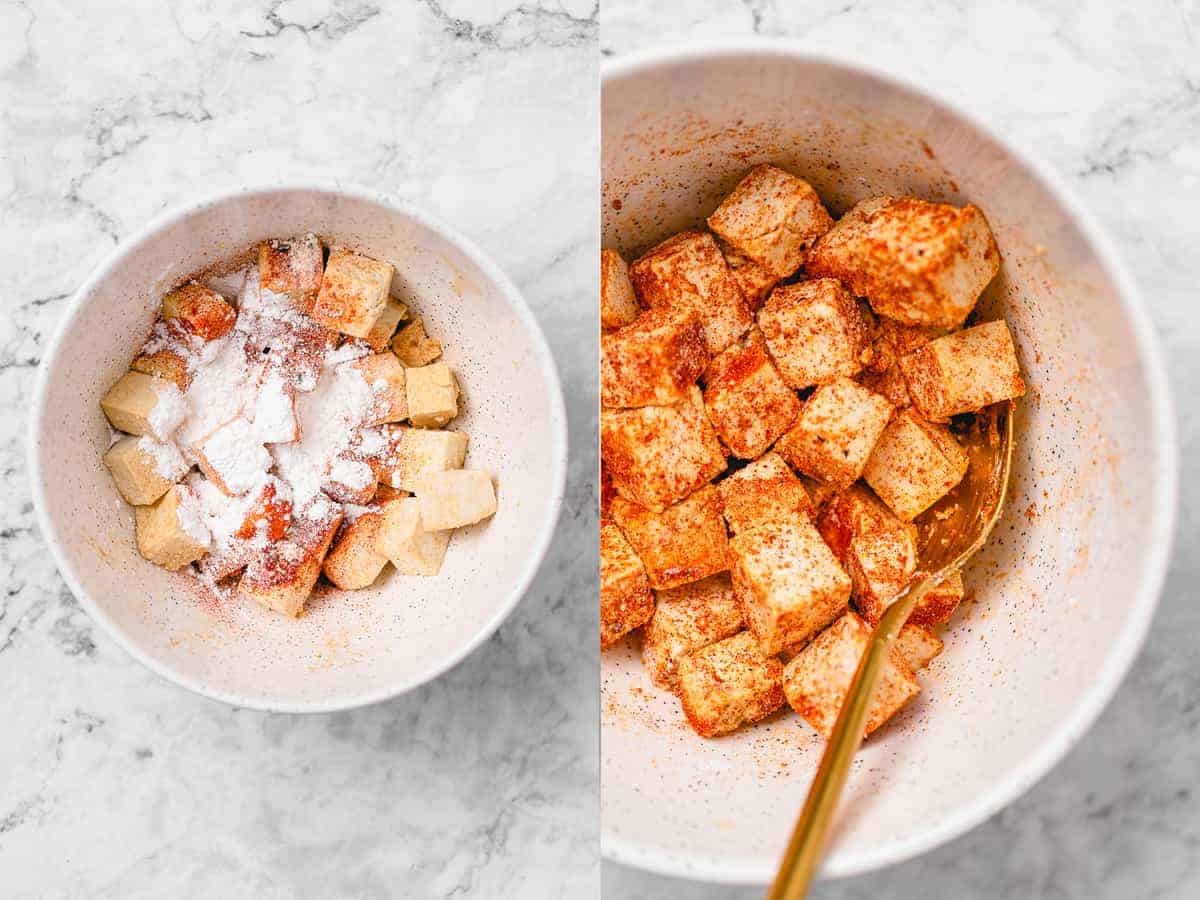
For crispy baked tofu, here’s how I do it: Preheat your oven to 400°F (200°C). Start by pressing the tofu and cutting it into cubes. Toss the cubes in a mix of garlic, black pepper, salt (or your favourite seasonings), liquid aminos, and a drizzle of olive oil. Once seasoned, add a generous coating of cornstarch and mix everything together to ensure the tofu is evenly coated. Bake on a parchment-lined sheet for about 20 minutes, or until the edges are perfectly crispy. Cornstarch not only adds crunch but also helps absorb any excess moisture, making it a key ingredient for crispy tofu.
Another important tip: tofu thrives at high heat! Whether you’re pan-frying or baking, starting with high heat helps to crisp up the exterior beautifully. Once you’ve achieved that golden crust, you can lower the heat to finish cooking if needed.
With these tips, getting crispy, flavour-packed tofu is easier than ever!
My Favourite Ways to Use Tofu
- Tofu and Veggie Stir Fry in Sweet Ginger Sauce
- Marinated Tofu Recipe
- Baked Tofu
- Air Fryer Tofu
- Easy Vegan Quiche
- Vegan Quiche Cups
- Tofu Butter Chicken
- Slow Cooker Tofu Butter Chicken
- Tofu Scramble
- Vegan Crispy Cajun Fried Chicken with Maple Mustard Dressing
Ingredients
- 1 lb block of tofu , pressed for at least 30 minutes and cut into 1-inch pieces
Marinade Recipe
- 1/4 cup light soy sauce , don’t use regular soy sauce (you can always used liquid aminos, tamari or coconut aminos
- 3 tablespoons rice wine vinegar
- 2 teaspoons sesame oil
- 4 teaspoons agave
- 1 teaspoon garlic powder
- 1 teaspoon onion powder
- 1/4 teaspoon black pepper
- 1/4 teaspoon paprika , (preferably smoked)
- 2 tablespoons water
Rest of Recipe
- 2 teaspoons oil , (any oil)
- 1 teaspoon cornstarch
Instructions
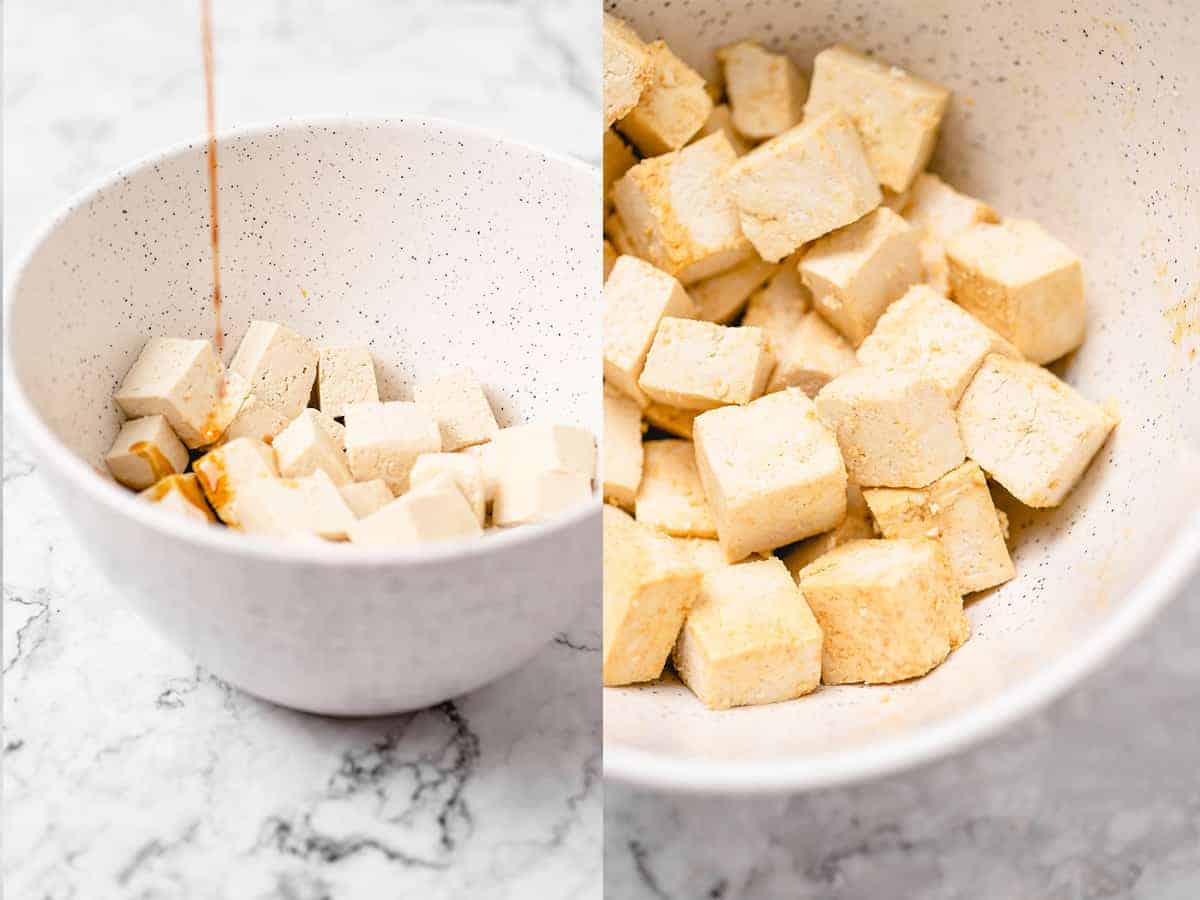
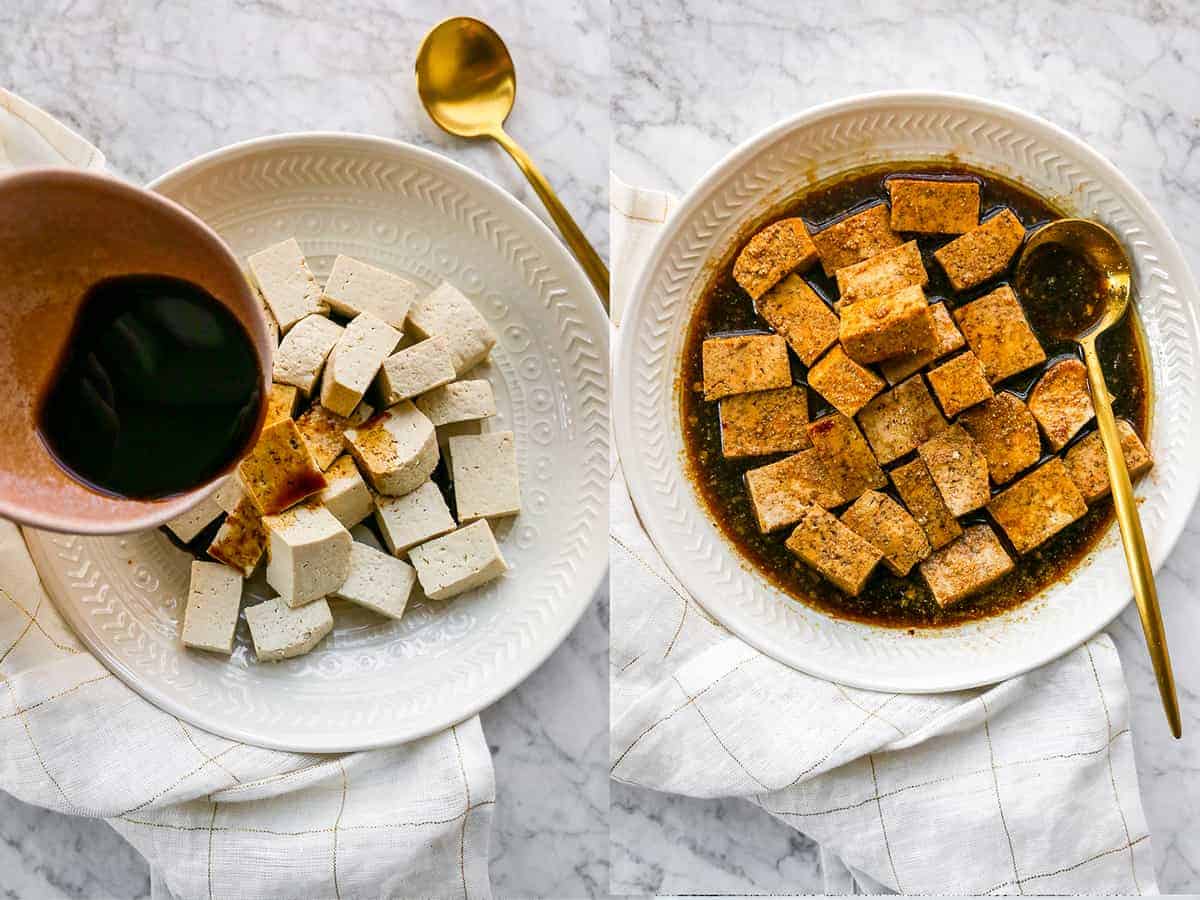
- In a medium-size bowl place the pressed and cubed tofu. Add the soy sauce and toss to coat. Add in all of the other marinade ingredients (rice wine vinegar, sesame oil, agave, garlic powder, onion powder, black pepper, paprika and water) and toss to thoroughly combine. Ensure all the pieces are coated and let the tofu sit in the marinade for at least 30 minutes, up to 2 days.
Rest of the Recipe
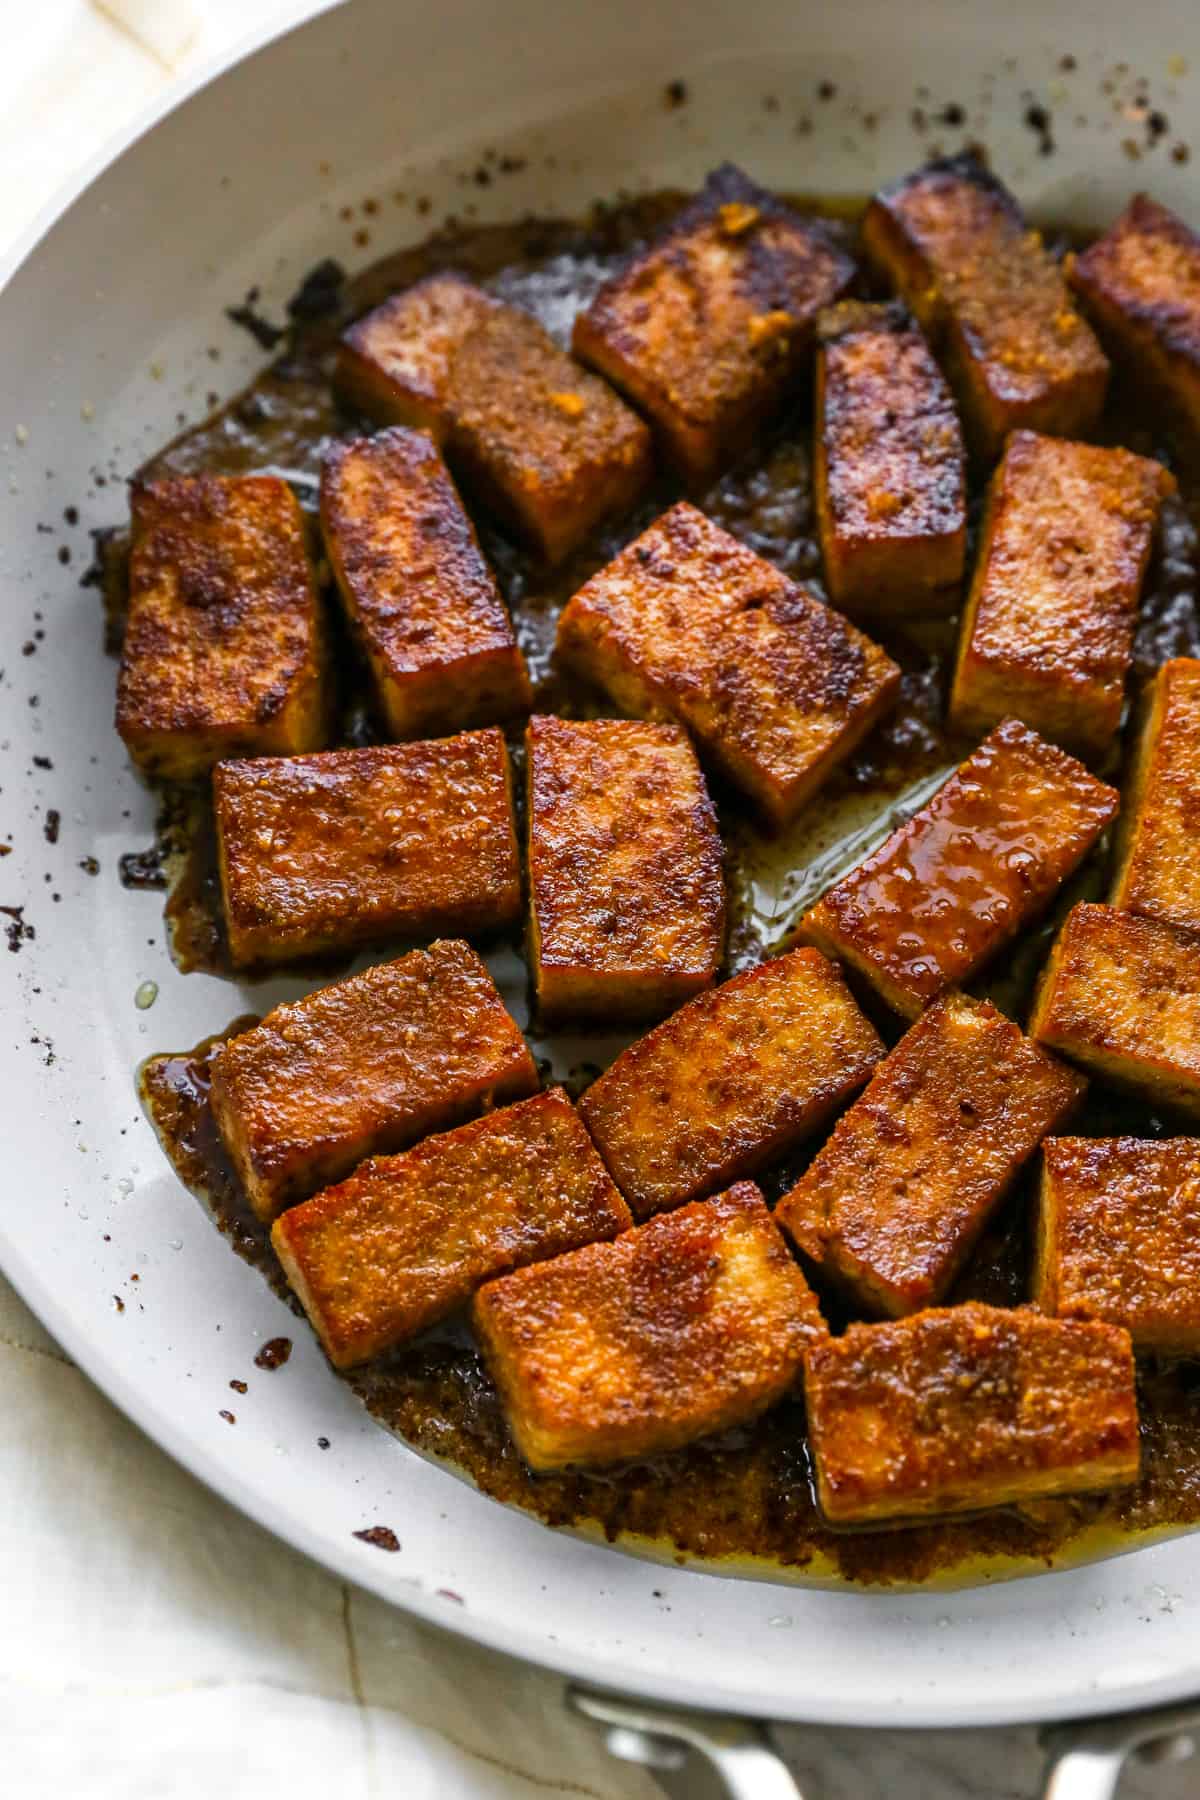
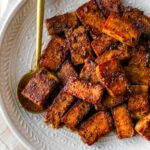
- In a pan over medium high heat, add the oil. Once hot, scoop your tofu out of the leftover marinade (do not toss your marinade) and add into the pan. Crisp up your tofu on each side for about 2-3 minutes on each side, until all sides are crisped up and browned.
- While your tofu is cooking, add 1 teaspoon of cornstarch to the marinade and whisk vigorously to combine.
- Once tofu is finished cooking. Turn off the heat. Immediately add in your marinade and stir to combine. The residual heat will heat through the sauce and cook off the cornstarch. Stir to combine and let it all sit together for at least 2 minutes. Remove from the stove, serve and enjoy!
Notes
- Allowing the marinade to sit on the tofu for at least 30 minutes really makes a massive difference to penetrating the tofu and giving it a deep flavour. Marinated tofu really is the best!
- Make sure you’re not buying silken tofu! That will yield the wrong texture and will break apart if you try and press it. Check out my Tofu 101 post for more, or watch my tofu 101 IG series .
- If you want to bake the tofu instead, I recommend following my Baked Tofu post instructions – 400°F for 20 minutes, flipping in between. I would still recommend doing the marinade with cornstarch step afterwards (just heat up the pan a bit and add the tofu right after it comes out of the oven).
- How to press tofu: I cover this in detail in my How to Cook Tofu 101 post ! The prep time includes the time to press the tofu
- Often times tofu sticks in your pan if you’re trying to flip it too early, the heat is too low, or your non-stick coating is gone. If your tofu is sticking, consider one of these and adjust accordingly – it’s usually that you’re trying to flip it too quickly!
This post was originally published in 2019, and has been updated with new photos and information in 2021.
Want to make your tofu taste better but don’t know where to start? Today I’m going to show you how to cook tofu and also share some incredibly helpful tips for making the MOST delicious tofu you ever have!
Cooking tofu can feel a bit tricky at first, but once you master it, you’ll wonder how you ever lived without this versatile, protein-packed ingredient. Whether you’re craving crispy tofu for stir-fries, silky tofu for soups, or marinated tofu bursting with flavour, there’s a method for every dish.
What I love most about tofu is how it transforms into whatever you want it to be — it’s like a blank canvas for your favourite spices, sauces, and marinades. The trick is knowing how to prepare and cook it to bring out its best texture and taste.
If you’ve ever struggled with soggy tofu or bland bites, don’t worry — I’ve got you covered. This guide breaks down everything you need to know, from pressing tofu to achieve the perfect crispiness to seasoning it for maximum flavour. After this, you’ll be a tofu pro in no time!
Firstly, What is Tofu?
Tofu, also known as bean curd, is a food made from soy beans. Tofu is often seen as a vegan meat replacement and can be used in everything from vegan meat replacements to cheesecakes to puddings to vegan ‘eggs’ and so much more. One of the things that is asked a lot in relation to tofu is whether it is “real”. Yes, it definitely is.
Tofu can get a bad wrap but it is DELICIOUS. It’s versatile, easy to use, meal prep friendly, and freezer friendly too. Tofu is also high in protein so it’s an excellent vegan source for complete proteins.
In fact, Tofu is your FRIEND. So instead of dwelling on all the reasons tofu may have been wrong to you in the past, let’s focus on all the ways to get it right. When you cook tofu properly AND are using the correct tofu, trust me, you’ll be so glad you added it to your recipes!
Different Types of Tofu – Regular Tofu vs. Silken Tofu
Understanding the different types of tofu is key to cooking it well. Whether you’re using it as a meat replacement, adding it to soups, or blending it into desserts, knowing which type to use makes all the difference. Let’s break it down:
Regular Tofu
If you’re using tofu as a meat replacement, you’ll want to buy regular tofu, which comes in medium, firm, or extra-firm varieties—not silken tofu.
- Soft Block Tofu: Soft block tofu is similar to silken tofu and works well in recipes like creamy soups or blended sauces. It has a delicate texture but slightly more structure than silken.
- Medium Block Tofu: This tofu is perfect for dishes like miso soup. It’s firmer than silken or soft tofu, but still retains a tender texture that works well in brothy recipes.
- Firm/Extra-Firm Block Tofu: This is the go-to tofu for most recipes where you want a hearty, meat-like texture. It’s my favourite and a staple in my kitchen. Firm and extra-firm tofu are typically sold in water-filled packages.
Silken Tofu
Silken tofu is quite different from regular tofu in both texture and preparation. Unlike regular tofu, it doesn’t need to be refrigerated and is usually sold in shelf-stable boxes with very little water surrounding it. Silken tofu has a delicate, custard-like consistency that cannot be pressed, although it can be gently drained if necessary.
One confusing aspect of silken tofu is the labeling—you’ll often see terms like “soft,” “firm,” or “extra-firm” on the packaging. These don’t refer to the same firmness levels as regular tofu but rather the slight variations within the silken tofu category itself.
Silken tofu is perfect for recipes where you want a smooth, creamy texture. It works beautifully in smoothies, puddings, cheesecakes, and other blended dishes, adding a luscious, silky consistency that’s hard to replicate with other types of tofu.
Press Your Tofu – Pressing vs Draining
Pressing tofu is a game-changer when it comes to making it flavorful and satisfying. By pressing out the excess liquid, you create space for the tofu to absorb marinades and seasonings properly. If you skip this step and try marinating tofu that hasn’t been pressed, the liquid inside will block the flavors from soaking in, leaving your tofu bland and unseasoned, no matter how long you marinate it.
To get the best results, press your tofu for about 30 minutes. This allows enough time to remove as much liquid as possible, ensuring your tofu can fully absorb your marinades and achieve that golden, crispy texture when cooked. Shortening this step might be tempting, but if you want perfectly crispy tofu, it’s worth the time!
How to Press Tofu
- With a tofu press : A tofu press is a very simple mechanism that basically screws your tofu into press to press out the liquid. You can adjust it to any level of pressing that you want, and it works wonders. It tastes the fear out of everything on top of your tofu toppling over, and for someone like me who uses tofu so often, it’s paid for itself. Prices range from $20-$30, but it’s probably going to last you for life. Pressing tofu for us now takes less than 5 minutes to set up from cutting up the tofu bag to putting it in the press.
- Use heavy kitchen items: The second method is stacking heavy items on top of your tofu to remove the liquid. To press tofu this way, remove from the bag or package and wrap in a kitchen towel. Place a heavy pot (such as a cast iron) on top of the tofu or a stack of heavy books that can balance on top. Press for at least 30 minutes. You can press tofu a day or two ahead of time, and place in an airtight tupperware container in your fridge.
Draining Your Tofu
There are some recipes where you don’t want to press your tofu as much, or you’re using silken tofu for example. In this case, you’ll want to just wrap it in a kitchen towel or paper towel to drain excess liquid from your tofu. This is not the method I recommend when using tofu as a meat replacement.
Season Your Tofu – No, Really
You HAVE to season tofu. Stop treating it like a piece of meat (haha get it).
No, tofu’s base flavour is not delicious. That isn’t its job though . Tofu is there as a base for you to manipulate. Tofu is a blank slate and that’s exactly what I love about it. It needs and wants seasoning, marinading, flavour and proper cooking so that it can become anything you want. You can’t just salt and pepper the outside of tofu and expect it to taste amazing. That was my very first realisation about tofu that made the biggest difference for the way I cooked it.
There are two main ways to add flavour to your tofu: you can marinate it (which is what I’ll show you how to do below), or you can toss it with a bunch of dry seasonings.
Marinate It
One of the best ways to infuse tofu with flavour quickly and all throughout the tofu is to marinate it. You can literally use any meat marinades for tofu, just pump up the flavours. Remember that tofu tastes like nothing, so it’s up to you to really get those flavours singing.
You can marinate tofu for anywhere from 15 minutes to overnight. You again want to use extra-firm tofu here so it doesn’t fall apart and so it really soaks it all up.
Here’s a quick look at what I like to use for my favourite marinade. I’ve included the full recipe in the recipe card below, if you want to print it out!
- Light soy sauce – Don’t use regular soy sauce, but you can use liquid aminos , tamari or coconut aminos .
- Rice wine vinegar
- Sesame oil
- Agave
- Seasonings – Garlic powder, onion powder, smoked paprika, and black pepper.
- Water
You’ll also need 1lb of tofu, some oil for cooking it in, and possibly cornstarch if you want to make it extra crispy. (More on that below.)
Coat It in Dry Seasonings
You can also use your favourite potent seasoning mix and coat your tofu in it.
Pre-season it, then let it soak in a sauce to soak up flavours. My Slow Cooker Tofu Butter Chicken wasn’t even pre-seasoned, but it was well pressed, and so it truly soaked up the flavours of that sauce. Alternatively, my stove top Tofu Butter Chicken is pressed, coated with cornstarch and a lot of seasonings, then pan fried, then steeped in sauce. Both taste absolutely incredible. It’s all about what method you want to use, when.
Using Cornstarch & Other Tofu Tips
As I mentioned earlier, coating tofu in cornstarch is my go-to trick for achieving the crispiest exterior with minimal effort. It’s a simple, no-fuss alternative to breading, which can sometimes feel like a time-consuming chore. The cornstarch method delivers quick, effective results without compromising on that golden, crunchy texture.
For crispy baked tofu, here’s how I do it: Preheat your oven to 400°F (200°C). Start by pressing the tofu and cutting it into cubes. Toss the cubes in a mix of garlic, black pepper, salt (or your favourite seasonings), liquid aminos, and a drizzle of olive oil. Once seasoned, add a generous coating of cornstarch and mix everything together to ensure the tofu is evenly coated. Bake on a parchment-lined sheet for about 20 minutes, or until the edges are perfectly crispy. Cornstarch not only adds crunch but also helps absorb any excess moisture, making it a key ingredient for crispy tofu.
Another important tip: tofu thrives at high heat! Whether you’re pan-frying or baking, starting with high heat helps to crisp up the exterior beautifully. Once you’ve achieved that golden crust, you can lower the heat to finish cooking if needed.
With these tips, getting crispy, flavour-packed tofu is easier than ever!
My Favourite Ways to Use Tofu
- Tofu and Veggie Stir Fry in Sweet Ginger Sauce
- Marinated Tofu Recipe
- Baked Tofu
- Air Fryer Tofu
- Easy Vegan Quiche
- Vegan Quiche Cups
- Tofu Butter Chicken
- Slow Cooker Tofu Butter Chicken
- Tofu Scramble
- Vegan Crispy Cajun Fried Chicken with Maple Mustard Dressing
Ingredients
- 1 lb block of tofu , pressed for at least 30 minutes and cut into 1-inch pieces
Marinade Recipe
- 1/4 cup light soy sauce , don’t use regular soy sauce (you can always used liquid aminos, tamari or coconut aminos
- 3 tablespoons rice wine vinegar
- 2 teaspoons sesame oil
- 4 teaspoons agave
- 1 teaspoon garlic powder
- 1 teaspoon onion powder
- 1/4 teaspoon black pepper
- 1/4 teaspoon paprika , (preferably smoked)
- 2 tablespoons water
Rest of Recipe
- 2 teaspoons oil , (any oil)
- 1 teaspoon cornstarch
Instructions
- In a medium-size bowl place the pressed and cubed tofu. Add the soy sauce and toss to coat. Add in all of the other marinade ingredients (rice wine vinegar, sesame oil, agave, garlic powder, onion powder, black pepper, paprika and water) and toss to thoroughly combine. Ensure all the pieces are coated and let the tofu sit in the marinade for at least 30 minutes, up to 2 days.
Rest of the Recipe
- In a pan over medium high heat, add the oil. Once hot, scoop your tofu out of the leftover marinade (do not toss your marinade) and add into the pan. Crisp up your tofu on each side for about 2-3 minutes on each side, until all sides are crisped up and browned.
- While your tofu is cooking, add 1 teaspoon of cornstarch to the marinade and whisk vigorously to combine.
- Once tofu is finished cooking. Turn off the heat. Immediately add in your marinade and stir to combine. The residual heat will heat through the sauce and cook off the cornstarch. Stir to combine and let it all sit together for at least 2 minutes. Remove from the stove, serve and enjoy!
Notes
- Allowing the marinade to sit on the tofu for at least 30 minutes really makes a massive difference to penetrating the tofu and giving it a deep flavour. Marinated tofu really is the best!
- Make sure you’re not buying silken tofu! That will yield the wrong texture and will break apart if you try and press it. Check out my Tofu 101 post for more, or watch my tofu 101 IG series .
- If you want to bake the tofu instead, I recommend following my Baked Tofu post instructions – 400°F for 20 minutes, flipping in between. I would still recommend doing the marinade with cornstarch step afterwards (just heat up the pan a bit and add the tofu right after it comes out of the oven).
- How to press tofu: I cover this in detail in my How to Cook Tofu 101 post ! The prep time includes the time to press the tofu
- Often times tofu sticks in your pan if you’re trying to flip it too early, the heat is too low, or your non-stick coating is gone. If your tofu is sticking, consider one of these and adjust accordingly – it’s usually that you’re trying to flip it too quickly!
This post was originally published in 2019, and has been updated with new photos and information in 2021.
How to Cook Tofu
Ingredients
- 1 lb block of tofu pressed for at least 30 minutes and cut into 1-inch pieces
Marinade Recipe
- 1/4 cup light soy sauce don’t use regular soy sauce (you can always used liquid aminos, tamari or coconut aminos
- 3 tablespoons rice wine vinegar
- 2 teaspoons sesame oil
- 4 teaspoons agave
- 1 teaspoon garlic powder
- 1 teaspoon onion powder
- 1/4 teaspoon black pepper
- 1/4 teaspoon paprika (preferably smoked)
- 2 tablespoons water
Rest of Recipe
- 2 teaspoons oil (any oil)
- 1 teaspoon cornstarch
Instructions
- In a medium-size bowl place the pressed and cubed tofu. Add the soy sauce and toss to coat. Add in all of the other marinade ingredients (rice wine vinegar, sesame oil, agave, garlic powder, onion powder, black pepper, paprika and water) and toss to thoroughly combine. Ensure all the pieces are coated and let the tofu sit in the marinade for at least 30 minutes, up to 2 days.
Rest of the Recipe
- In a pan over medium high heat, add the oil. Once hot, scoop your tofu out of the leftover marinade (do not toss your marinade) and add into the pan. Crisp up your tofu on each side for about 2-3 minutes on each side, until all sides are crisped up and browned.
- While your tofu is cooking, add 1 teaspoon of cornstarch to the marinade and whisk vigorously to combine.
- Once tofu is finished cooking. Turn off the heat. Immediately add in your marinade and stir to combine. The residual heat will heat through the sauce and cook off the cornstarch. Stir to combine and let it all sit together for at least 2 minutes. Remove from the stove, serve and enjoy!
Video
Notes
- Allowing the marinade to sit on the tofu for at least 30 minutes really makes a massive difference to penetrating the tofu and giving it a deep flavour. Marinated tofu really is the best!
- Make sure you’re not buying silken tofu! That will yield the wrong texture and will break apart if you try and press it. Check out my Tofu 101 post for more, or watch my tofu 101 IG series .
- If you want to bake the tofu instead, I recommend following my Baked Tofu post instructions - 400°F for 20 minutes, flipping in between. I would still recommend doing the marinade with cornstarch step afterwards (just heat up the pan a bit and add the tofu right after it comes out of the oven).
- How to press tofu: I cover this in detail in my How to Cook Tofu 101 post ! The prep time includes the time to press the tofu
- Often times tofu sticks in your pan if you’re trying to flip it too early, the heat is too low, or your non-stick coating is gone. If your tofu is sticking, consider one of these and adjust accordingly - it’s usually that you’re trying to flip it too quickly!
Nutrition
How to Cook Tofu https://jessicainthekitchen.com/how-to-cook-tofu-101-tips-on-making-the-most-delicious-tofu/ May 27, 2021
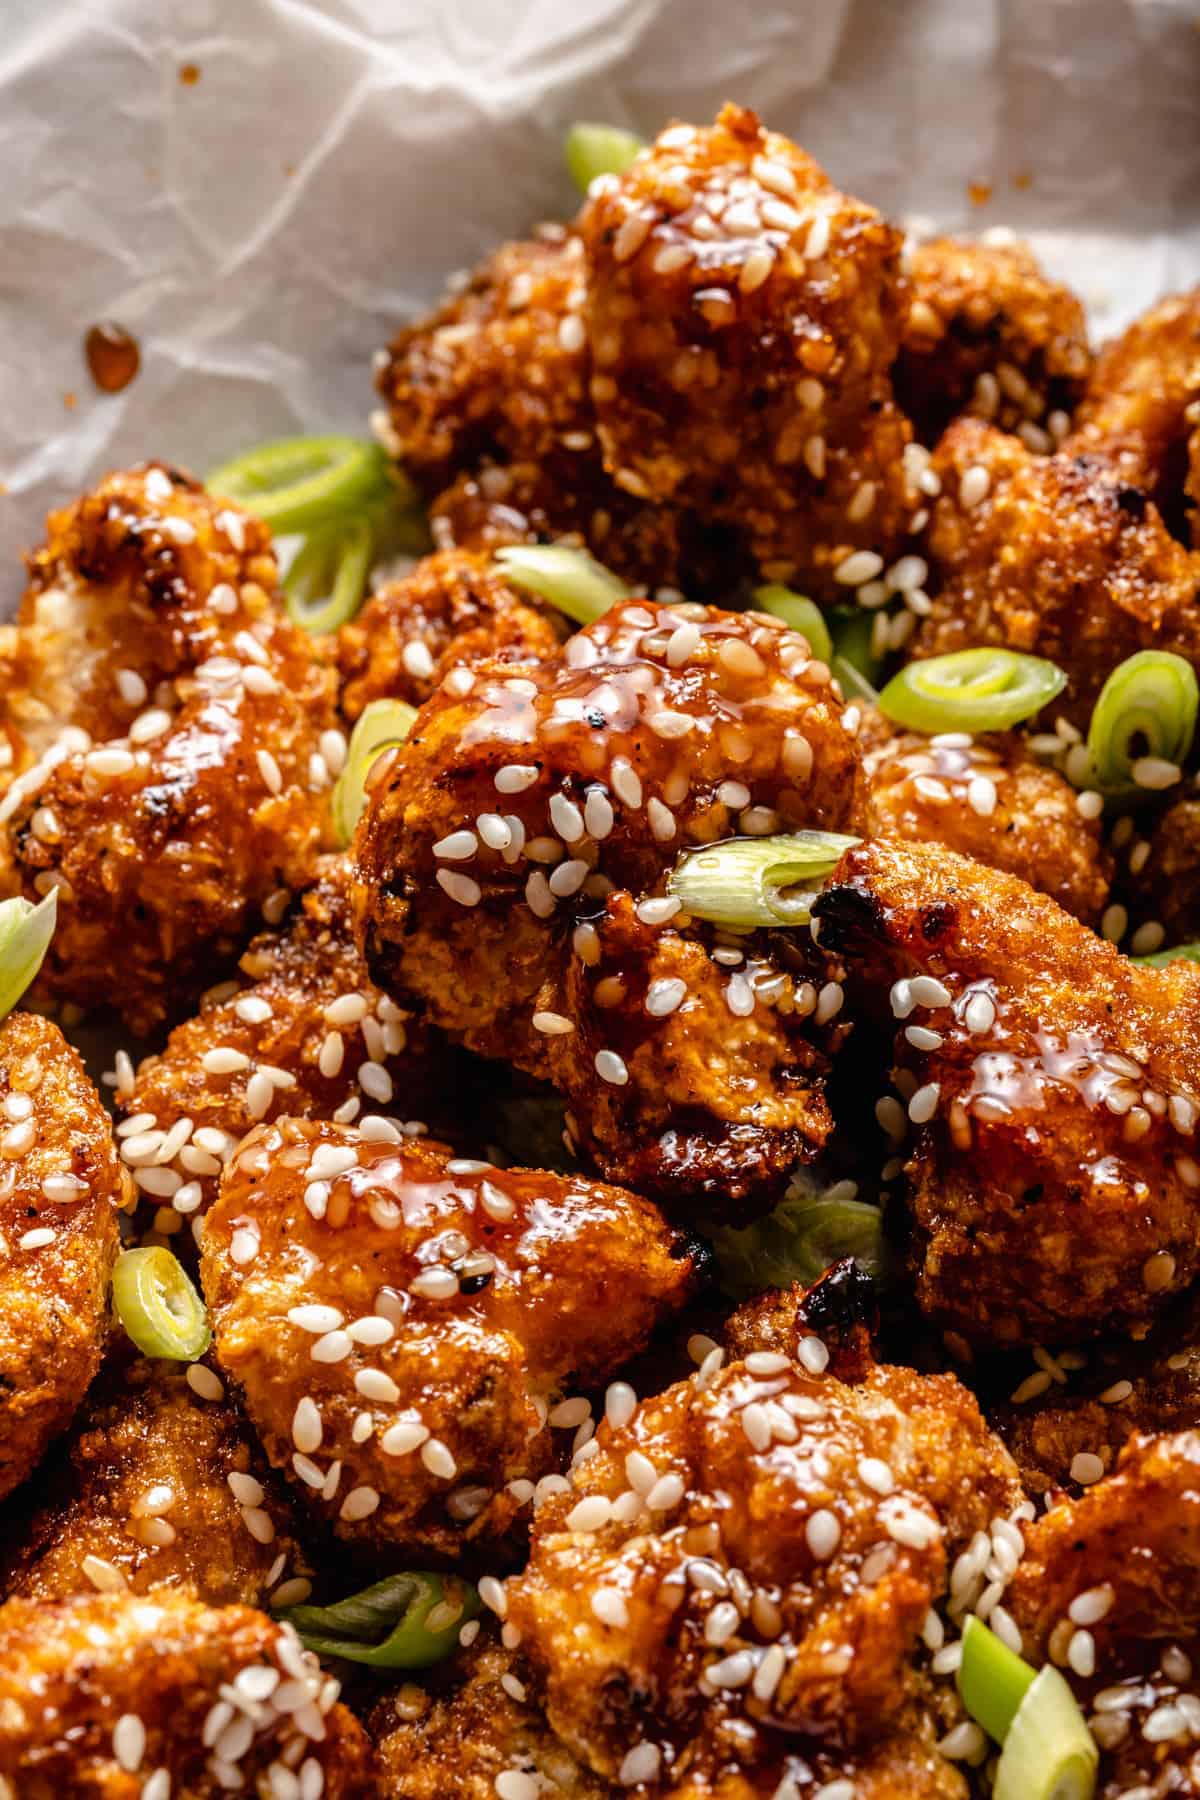
These Sticky Sesame Cauliflower Wings are the best veggie wings I’ve ever had! Loaded with maple-sesame flavor and the perfect amount of heat, they are the best game day snack for vegans!
Estimated reading time: 10 minutes
Vegan Sticky Sesame Cauliflower Wings? YES please!
Confession time: Every time I make these, quite a few don’t make it to the end plate. I kinda-sorta-maybe devoured them seconds after they came out of the oven. Oops. Happily so, though, burning the roof of my mouth and smiling in deep satisfaction as I went.
Cauliflower wings taste JUST like regular wings. I’ve had vegan and meat-eater friends alike amazed at the taste and texture. Without sauce, they are crispy-crunchy on the outside and soft on the inside. With sauce, they are EVEN better, and may or may not cause the best flavor explosion ever. Ever, ever.
I decided to go with a sweet and spicy sesame sauce for these wings, and they came out exquisitely sticky and unbelievably divine. The spice has just the right amount of kick, and the sweet sesame flavor takes this tasty experience right over the top.
What Makes These the Best Cauliflower Wings?
Picking THE best thing about cauliflower wings is an impossible task. There are just too many amazing qualities about these vegan wings. Here are a few of the most important ones:
- Cauliflower wings are great for a meal or as a snack. And the best part? You can gobble up basically a million of these without any guilt. So whether it’s a super bowl party, or just time for a casual appetizer, these cauliflower wings are perfect!
- They’re also completely gluten-free. So, you can serve these to all your guests despite their dietary specifications. PRETTY sure that qualifies as a hostess win!
- These wings are incredibly easy to make. Batter them up, bake them, dip ’em in sauce, and bake again for just 5 more minutes. Your entire house will smell like amazing and if you’re anything like me, you’ll be sitting in front of the oven counting down. Promise me you’ll make these? You do not want to miss out on how amazing these are.
Notes on the Ingredients
These wings have a fair amount of ingredients to them, so stick with me! We’ve covered how good these wings are, but I don’t know if we’ve done the sauce justice yet.
It’s a maple ginger sauce, made with maple syrup and ground ginger. Needless to say, it is SO good. Talk about the ultimate spicy-sweet combination.
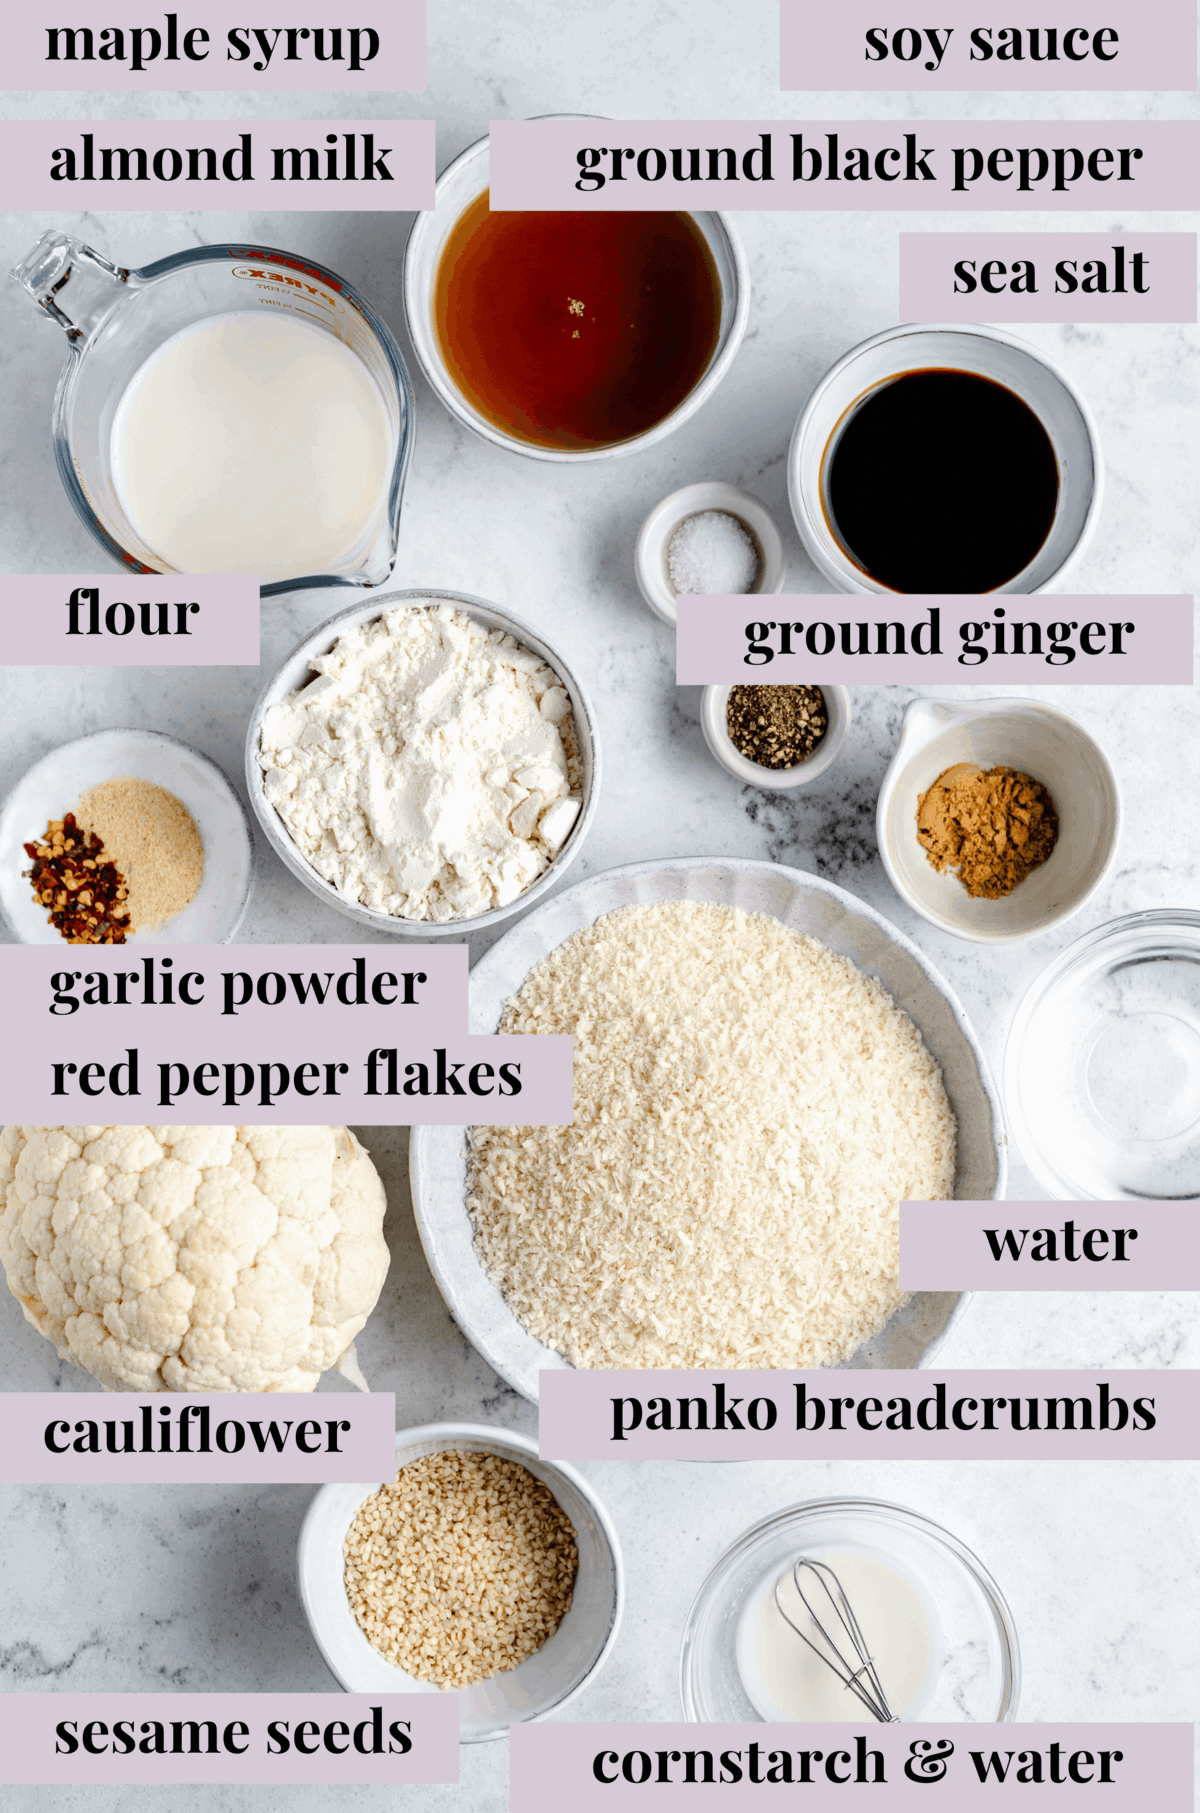
For the Wings
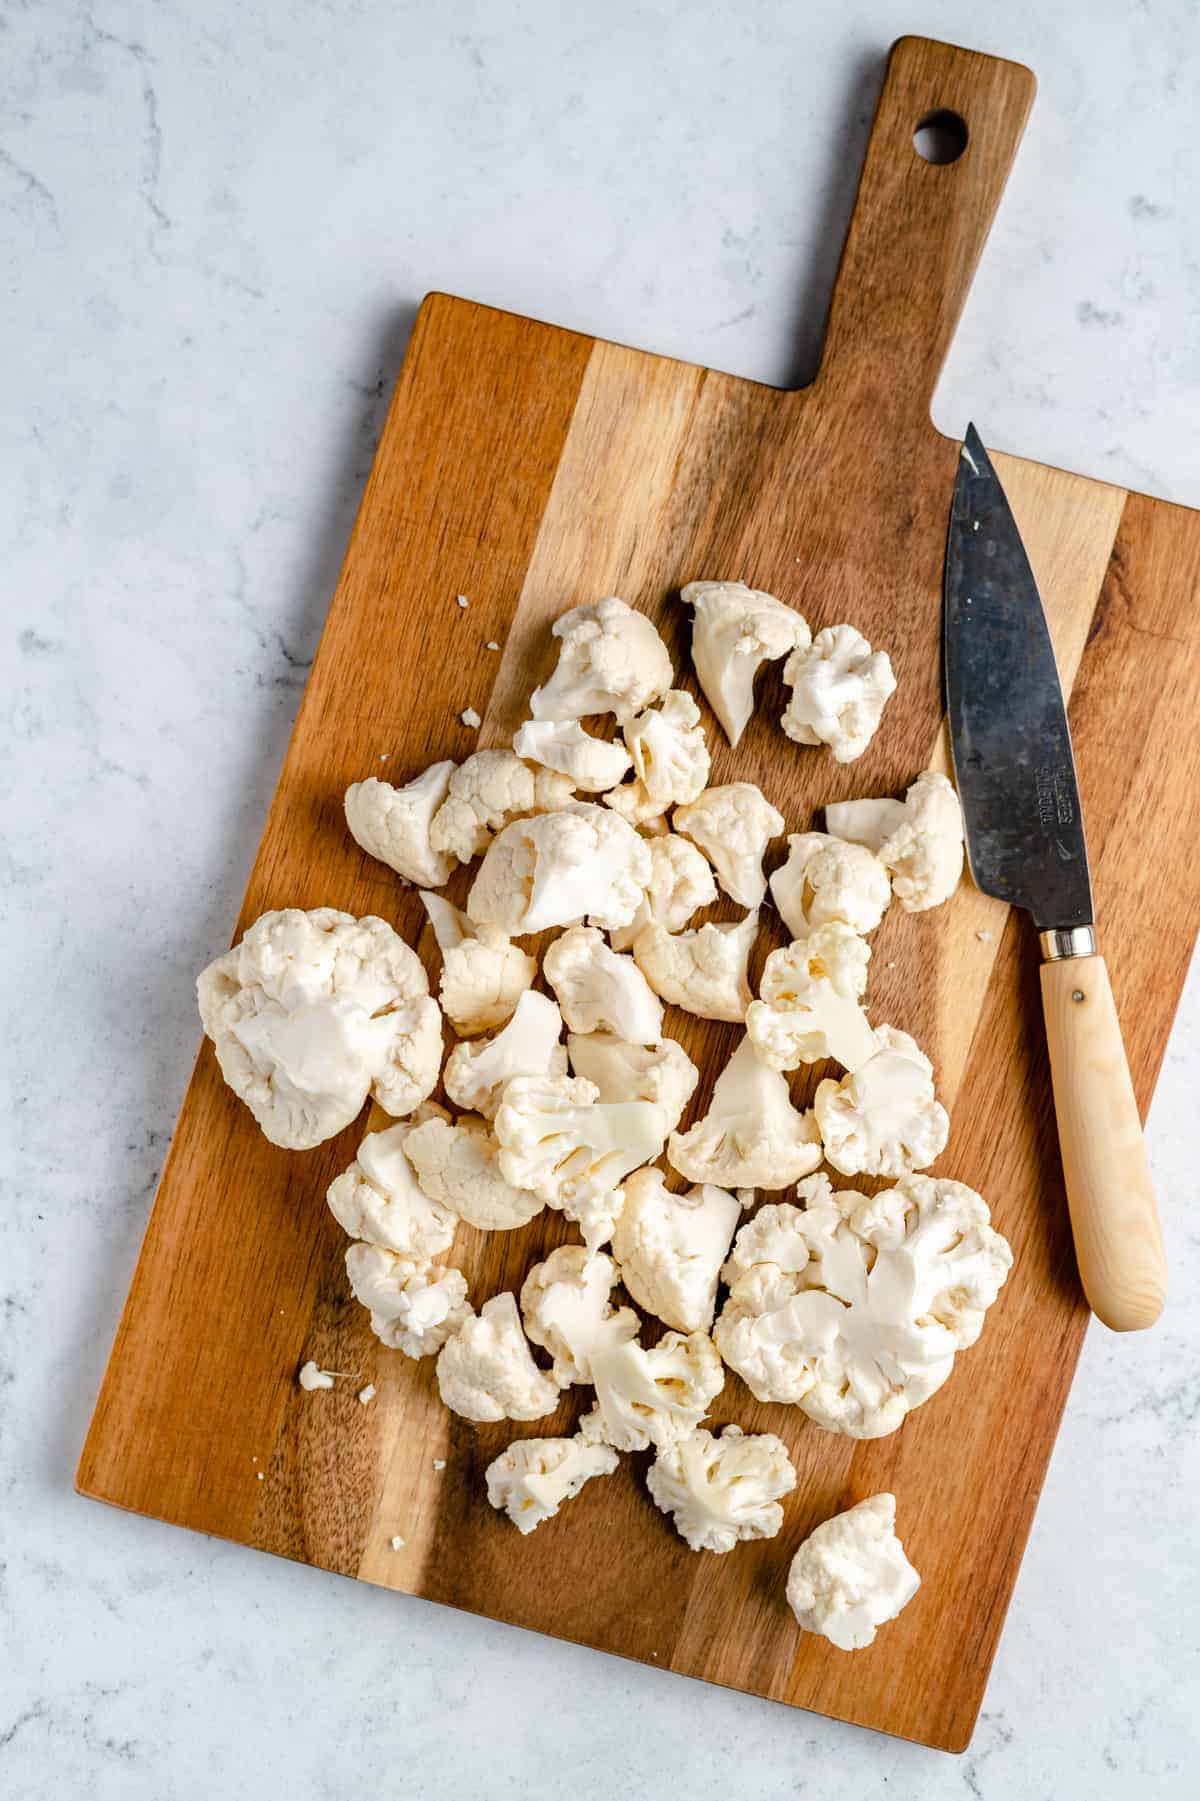
- Cauliflower: You’ll need just 1 small head cauliflower.
- Flour: I like to use all purpose gluten free flour to make sure that these wings are gluten free, but you can certainly use regular all purpose flour. (See tips below for more info.)
- Vegan Milk: My go-to is unsweetened almond milk – use a vegan milk that won’t interfere with the other flavors in this meal.
- Seasoning: Round up some sea salt, ground black pepper, garlic powder, and crushed red pepper flakes (leave out if you don’t like spice).
- Breadcrumbs: Use crispy/panko gluten free breadcrumbs seasoned with salt & pepper.
For the Sauce
- Maple Syrup: I recommend using pure maple syrup – it offers the strongest flavor!
- Low Sodium Soy Sauce: Or liquid aminos / coconut aminos . (See more info in tips section.)
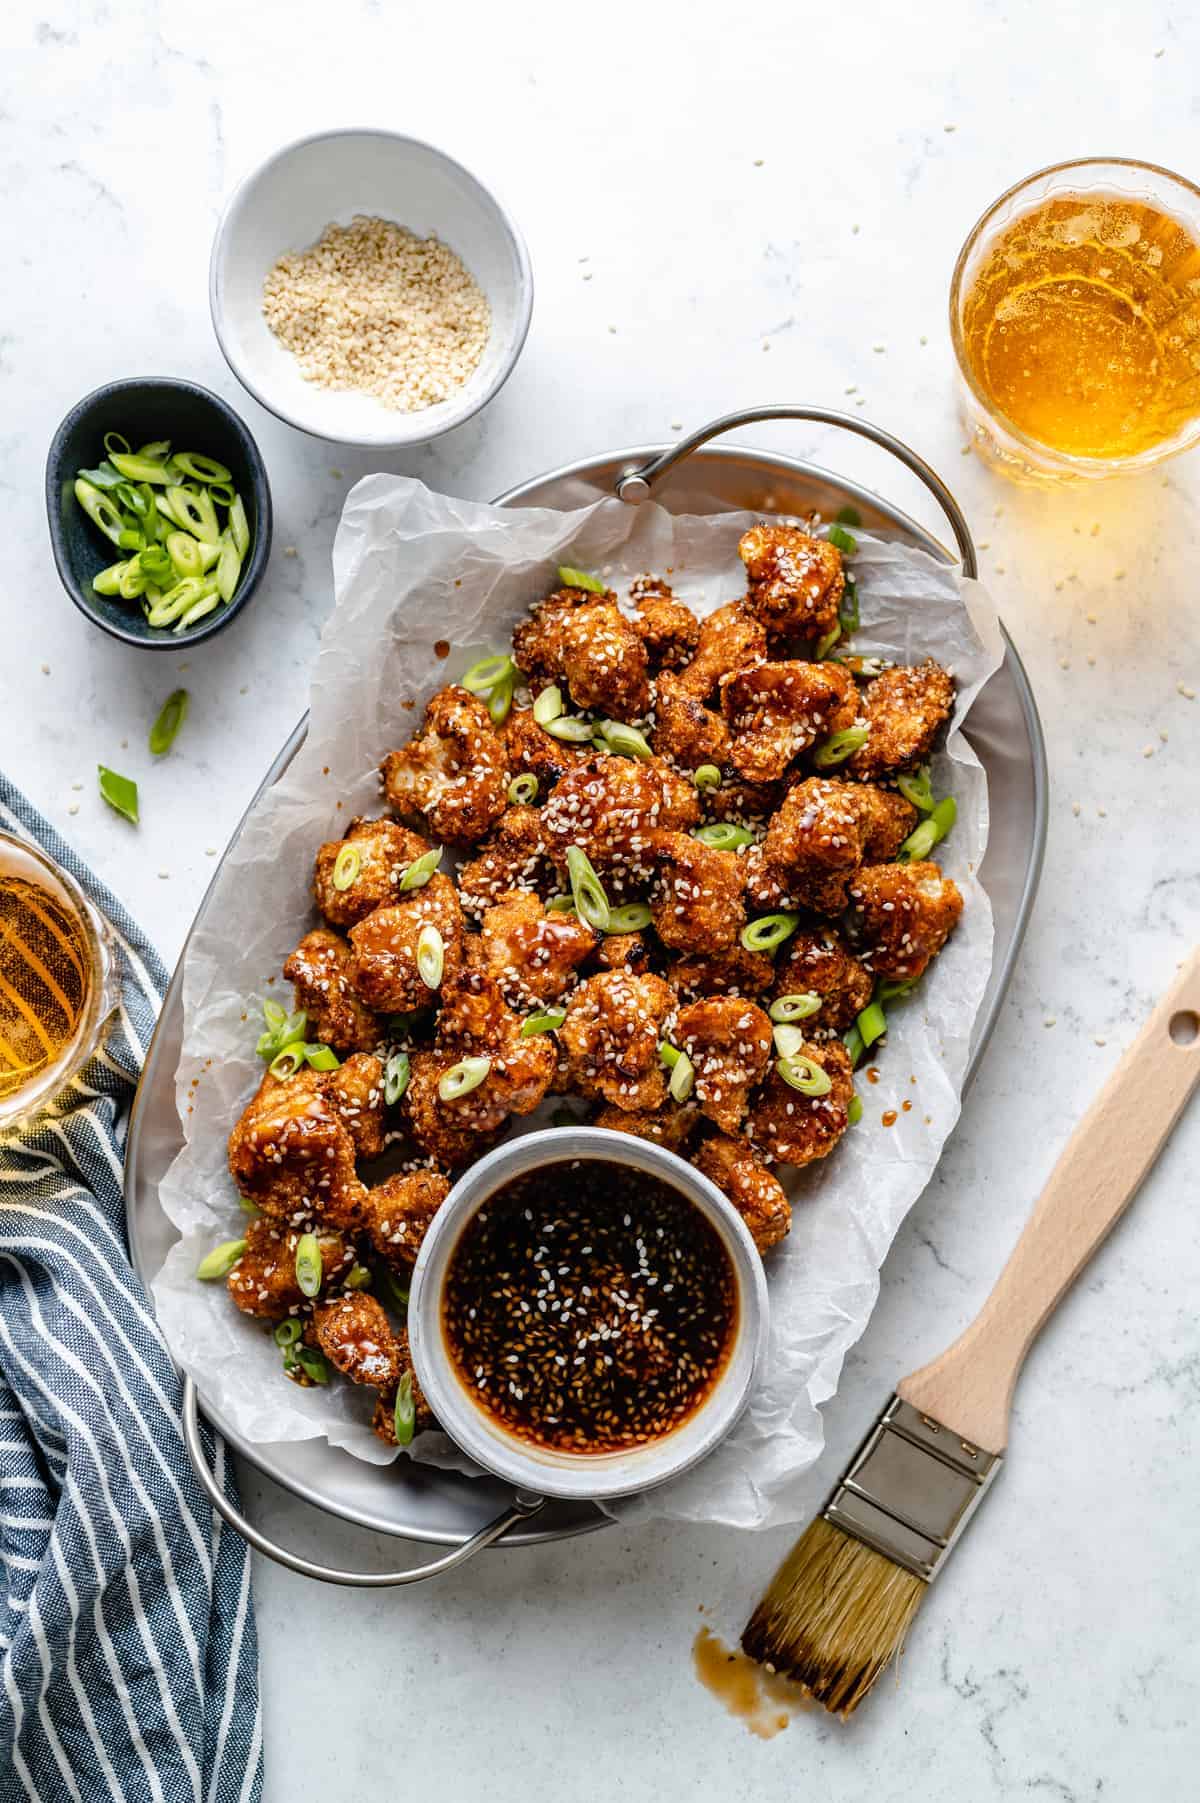
- Sesame Seeds: These will go in the sauce, but can also be used as a garnish at the end, along with chopped scallions.
- Seasoning: Use ground black pepper and ground ginger.
- Cornstarch Slurry: Cornstarch and water mix together separately from the rest of the ingredients in a small bowl for a cornstarch slurry.
- Water
How to Make Sticky Cauliflower Wings
Sticky cauliflower wings are a breeze to whip together. They’ll take you 15 minutes to prep for the oven, and you can have them plated with the dip in just under 45 minutes. Nobody wants to spend all day in the kitchen on game day, or any day, and with these wings you don’t have to!
For the Wings
Preheat Oven to 450•F/230•C: Prepare a baking sheet by lining it with a silicone baking sheet or greased foil.
Prepare a Baking Sheet: Line a pan with a silicone baking sheet or greased foil. Using a knife, remove florets from the cauliflower (aka cut off the leaves and don’t use the stems). Chop the cauliflower into smaller pieces to resemble the size of the wings.
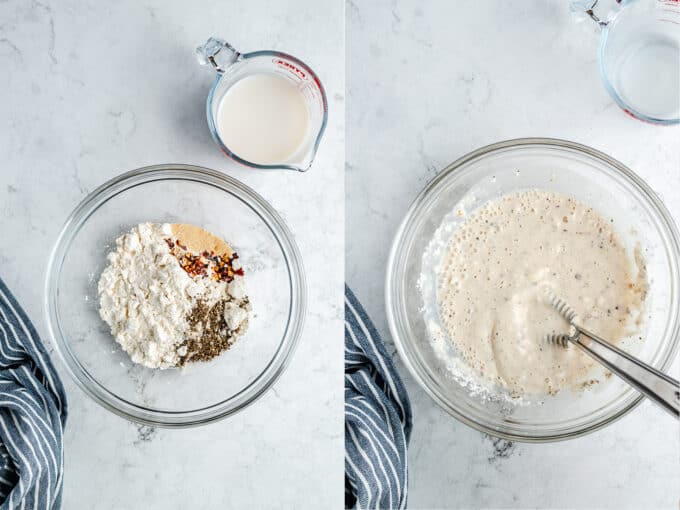
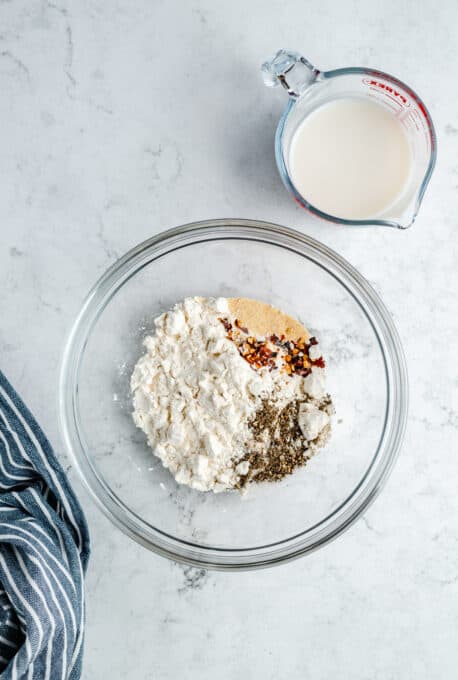
Whisk Together the Batter: In a separate bowl, whisk the gluten-free flour, almond milk, salt, ground black pepper and garlic powder in a bowl to make the batter. If the batter is too thick, feel free to thin it out with some more milk. In a separate bowl, place the breadcrumbs. Line it up beside the batter bowl.
Coat the Cauliflower Florets: Toss the cauliflower in the batter mixture (you can add them all at once), using a spatula or spoon to coat them all. Transfer them to the breadcrumbs (you can do this in two or three batches) to coat completely.
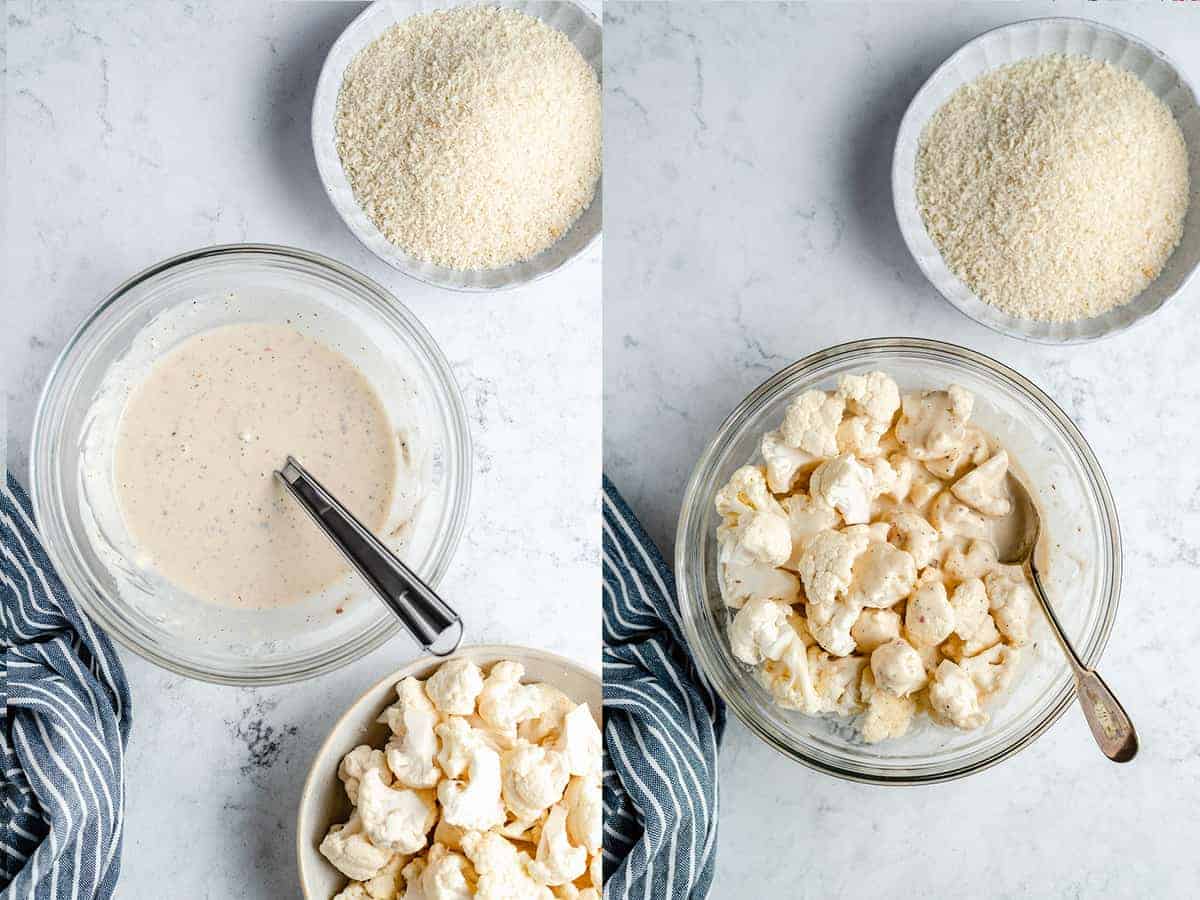
Then place onto the baking sheet, giving each wing enough space. Repeat until all of the wings are coated.

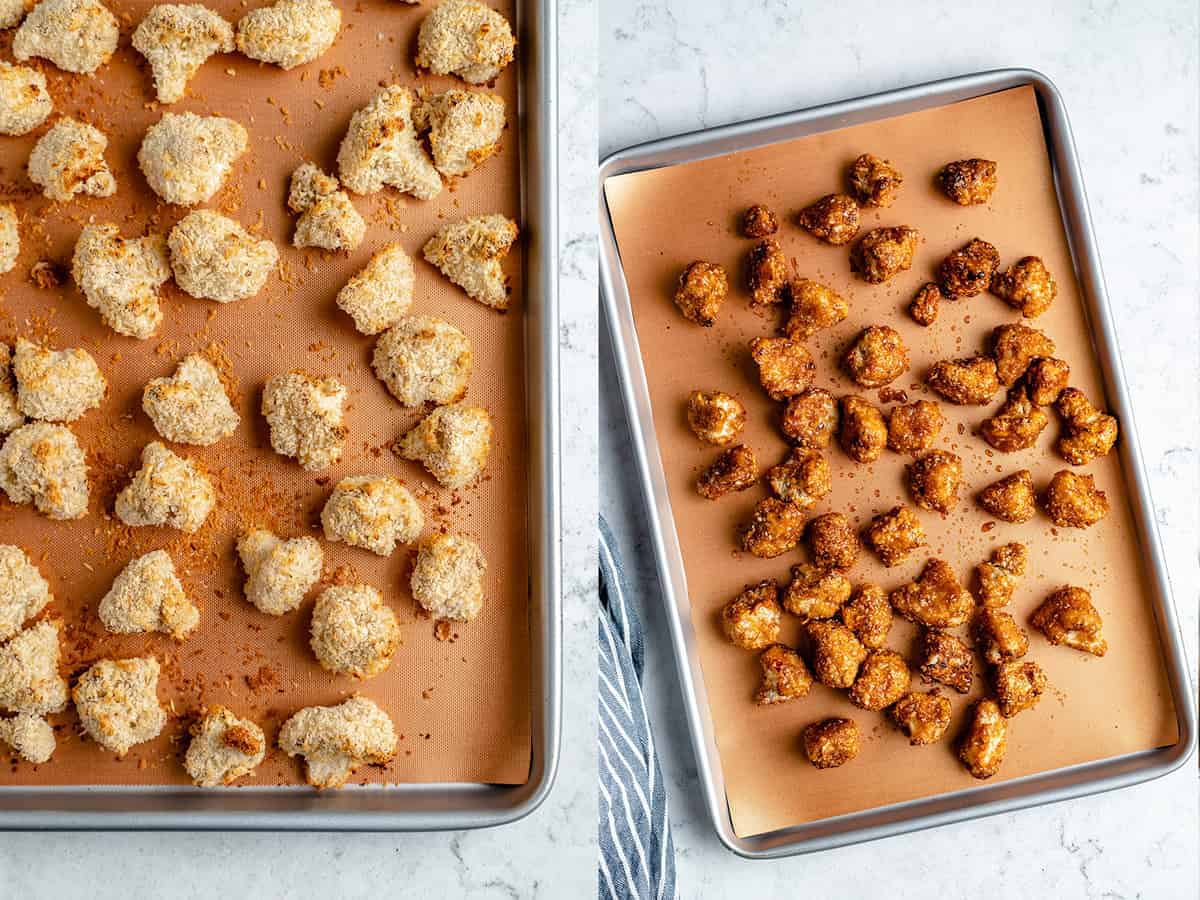
Bake for 22 Minutes: Please ensure your oven is completely preheated and hot. While baking, prepare the ingredients for the sauce by whisking together.
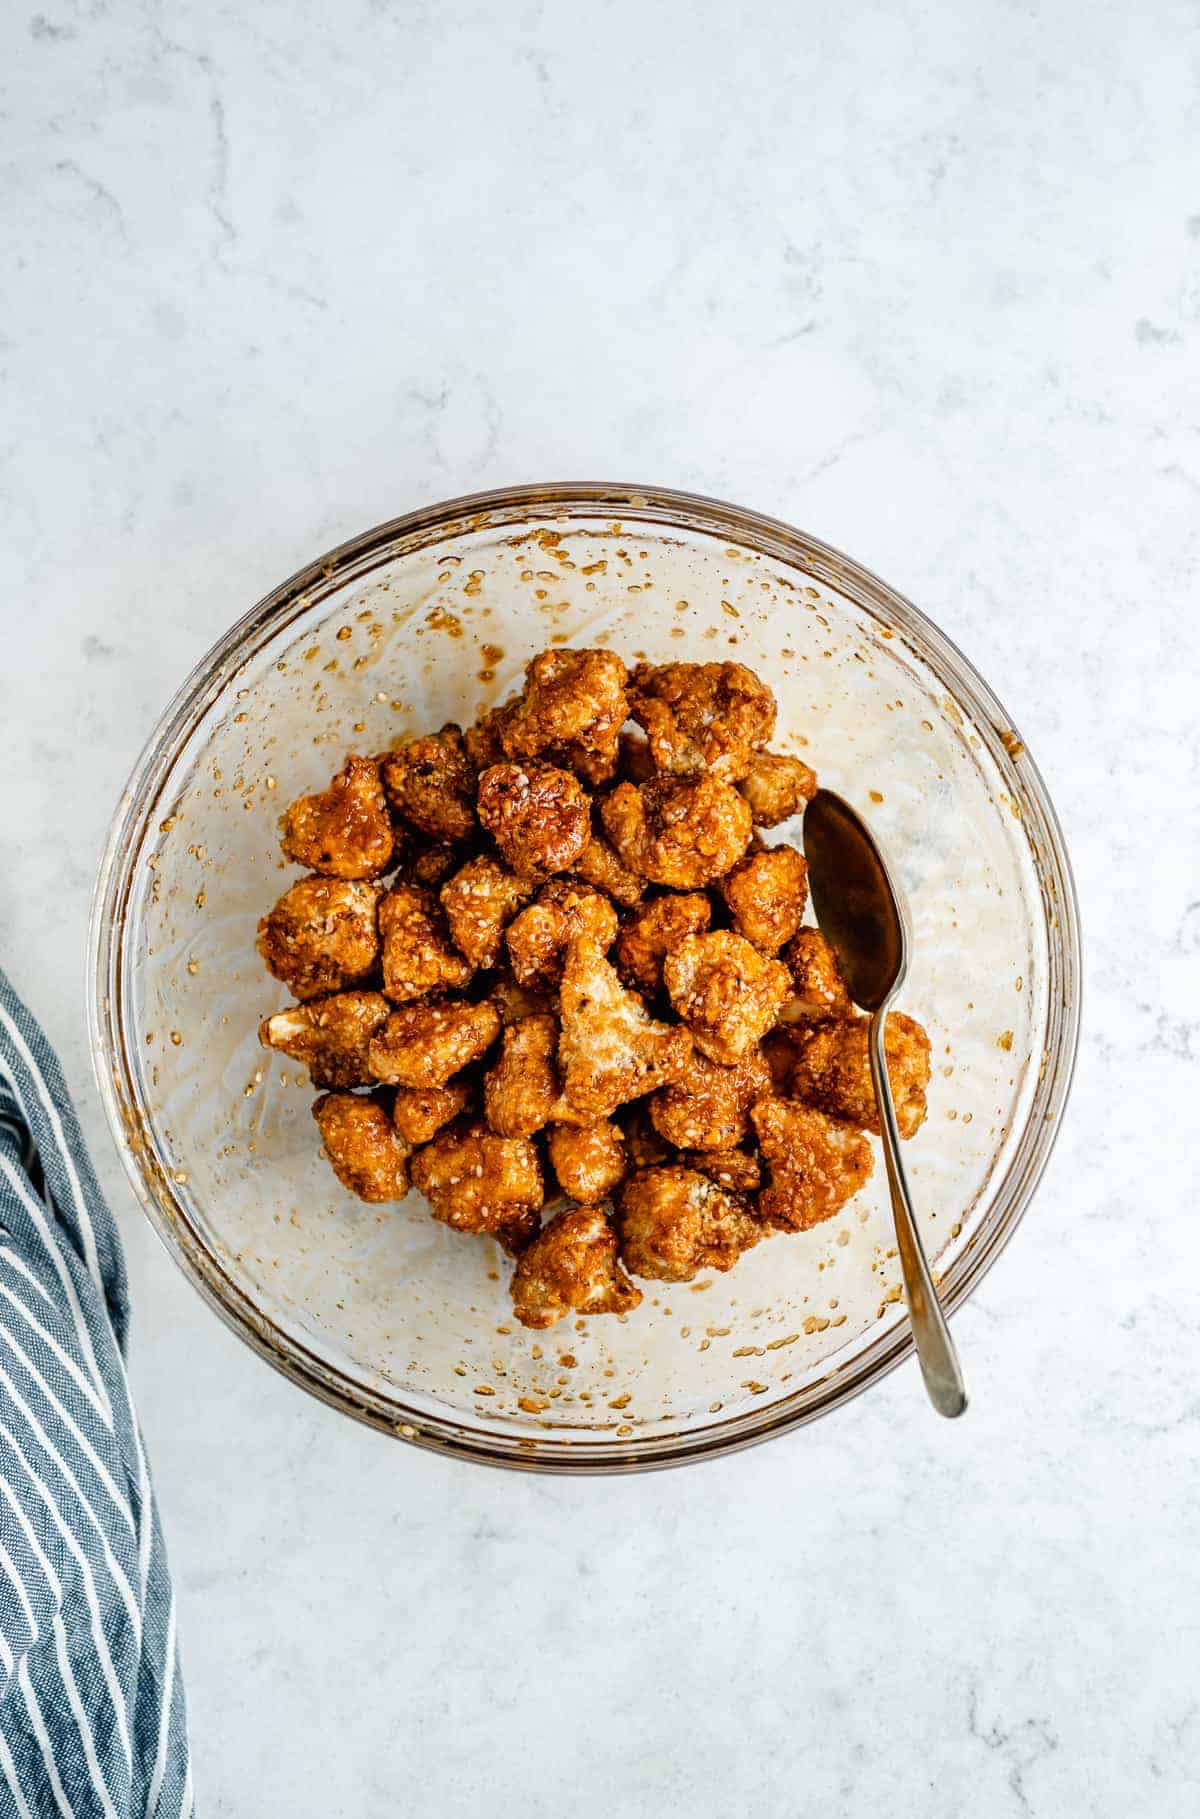
Remove from Oven: Toss the wings in the sauce (I like to use a spatula to move them around to get properly coated) then using tongs or a spoon, remove and place back on the baking sheet. Bake for another 5 minutes for the sauce to soak into the wings. Remove from oven and serve immediately. Enjoy!
For the Sauce
Make the Sauce: In a pan over medium-high heat, mix all the sauce ingredients. Whisk together to help dissolve the cornstarch slurry. Bring to a boil, then a simmer for about 5 minutes until the sauce begins to thicken up. Whisk frequently so the cornstarch doesn’t thicken up in spots but instead mixes evenly throughout the sauce. Taste test and add more sugar/soy if you want it sweeter or saltier. Remove from heat and allow to cool until needed. It’ll also thicken up as it cools!
Tips for Success
Not too bad of a process, right? These wings look super impressive – but they don’t require all that much effort! I won’t tell your guests that, though, if you don’t tell mine. 😉 Here are a couple of tips that will make this process even easier:
- What can I substitute for liquid aminos? I usually don’t recommend substitutions, but you can substitute liquid aminos for tamari equally. If you want to substitute soy sauce, I recommend a reduced-sodium soy sauce to ensure the sauce isn’t too salty (since we using a lot of it). If you’re using regular soy sauce, you’ll need to taste test the sauce first before putting on the wings and possibly add more maple syrup to balance it out.
- When preparing the baking sheet… Don’t use olive oil. Greasing the baking sheet with olive oil is not a good idea since it will burn the bottom of your wings.
- The batter will only adhere to the cauliflower wings dry. So, if for any reason you wet your cauliflower, it has to be 100% dry for the batter to stick.
- More on flour substitutes. You can use regular or whole wheat flour and regular breadcrumbs if you’re not gluten free. Some gluten free flours are thicker than others, so if your batter seems way too thick, add in a few tablespoons of milk to thin it out a little if necessary. I use Bob’s Red Mill All Purpose GF (NOT Baking) Flour.
- Do I have to use breadcrumbs? Yes! The breadcrumbs make the cauliflower wings crispy before the sauce goes on. I’ve made these without the breadcrumbs before, and it doesn’t work without the breading. IF you’re NOT gluten-free, you can use regular panko breadcrumbs. These are the gluten-free breadcrumbs I use . Otherwise, I just make them myself (day-old bread in a food processor/ blender , then toast it).
Serving Suggestions
You can serve these wings with pretty much ANYTHING. Not kidding. I’ve made these with fries, noodles, rice… even in a sandwich! Here are some more ideas to get those creative culinary wheels turning:
- As-Is: If you’re running short on time, just enjoy these wings as-is, without the sauce. Don’t get me wrong, I LOVE this sauce, but it’s not technically necessary to enjoy these wings!
- Rice or Noodles: These wings go great with white or brown rice, either works, and I love them with noodles too! You could also go double the cauliflower and whip up some cauliflower rice.
- Salad: Sprinkle some cauliflower wings over the top of a light green salad, and you’ve got a lunch that can’t be beat!
- More Cauliflower Wings: Wings two ways! Try these BBQ Cauliflower Wings alongside your sticky sesame cauliflower wings for the ultimate game day appetizer platter. Other loves are my Buffalo Cauliflower Wings , General Tso Wings and my Orange Cauliflower Bites .
How to Store and Reheat Extras
You can store these cauliflower wings in an airtight Tupperware container in your fridge for up to 4 days. Reheat them in an oven until warmed through. If you’ve got a toaster oven, that’ll work too.
Can I Freeze These?
Drawing on personal experience, I think these wings taste best fresh. I wouldn’t recommend freezing these as the batter may get soggy.
Ingredients
- 1 head of cauliflower , regular, may have to double for a large head
- 1 cup all purpose gluten free flour mix , or regular flour if you’re not gluten free
- 1 cup non-dairy milk , unsweetened or original flavour
- ½ teaspoon sea salt
- ¾ teaspoon ground black pepper
- 1 teaspoon garlic powder
- ½ teaspoon crushed red pepper flakes , 1 teaspoon if you want it very spicy, leave out if you don’t like spice
- 2 cups crispy/panko gluten free breadcrumbs , seasoned with salt & pepper
Sauce
- ⅔ cup maple syrup , (10 tablespoons)
- 6 tablespoons low sodium soy sauce , or liquid aminos
- 1 teaspoon sesame seeds
- 1/2 teaspoon ground black pepper
- 1/2 teaspoon ground ginger
- 2 teaspoons cornstarch + 2 teaspoons water , mix together separately from the rest of ingredients in a small bowl for a cornstarch slurry
- ½ cup water
- chopped scallions & sesame seeds , for garnish
Instructions
- Preheat oven to 450°F/230°C. Prepare a baking sheet by lining it with a silicone baking sheet or greased foil.
- Prepare a baking sheet by lining it with a silicone baking sheet or greased foil. Using a knife, remove florets from the cauliflower (aka cut off the leaves and don’t use the stems). Chop the cauliflower into smaller pieces to resemble the size of the wings.
- In a separate bowl, whisk the gluten-free flour, almond milk, salt, ground black pepper and garlic powder in a bowl to make the batter. If the batter is too thick, feel free to thin it out with some more milk. In a separate bowl, place the breadcrumbs. Line it up beside the batter bowl.
- Toss the cauliflower in the batter mixture (you can add them all at once), using a spatula or spoon to coat them all. Transfer them to the breadcrumbs (you can do this in two or three batches) to coat completely, then place onto the baking sheet, giving each wing enough space. Repeat until all of the wings are coated.
- Bake for 22 minutes. Please ensure your oven is completely preheated and hot. While baking, prepare the ingredients for the sauce by whisking together.
- Remove from oven. Toss the wings gently in the cooked and cooled down sauce which is below (I like to use a spatula to move them around to get properly coated) then using tongs or a spoon, remove and place back on the baking sheet. Bake for another 5 minutes for the sauce to soak into the wings.
- Remove from oven and serve immediately. Enjoy!
Maple Ginger Sauce
- After you put the cauliflower in, you can start making the sauce. In a pan over medium-high heat, mix all the sauce ingredients. Whisk together to help dissolve the cornstarch slurry. Bring to a boil, then a simmer for about 5 minutes until the sauce begins to thicken up. Whisk frequently so the cornstarch doesn’t thicken up in spots but instead mixes evenly throughout the sauce. Taste test and add more sugar/soy if you want it sweeter or saltier. Remove from heat and allow to cool until needed. It’ll also thicken up as it cools!
