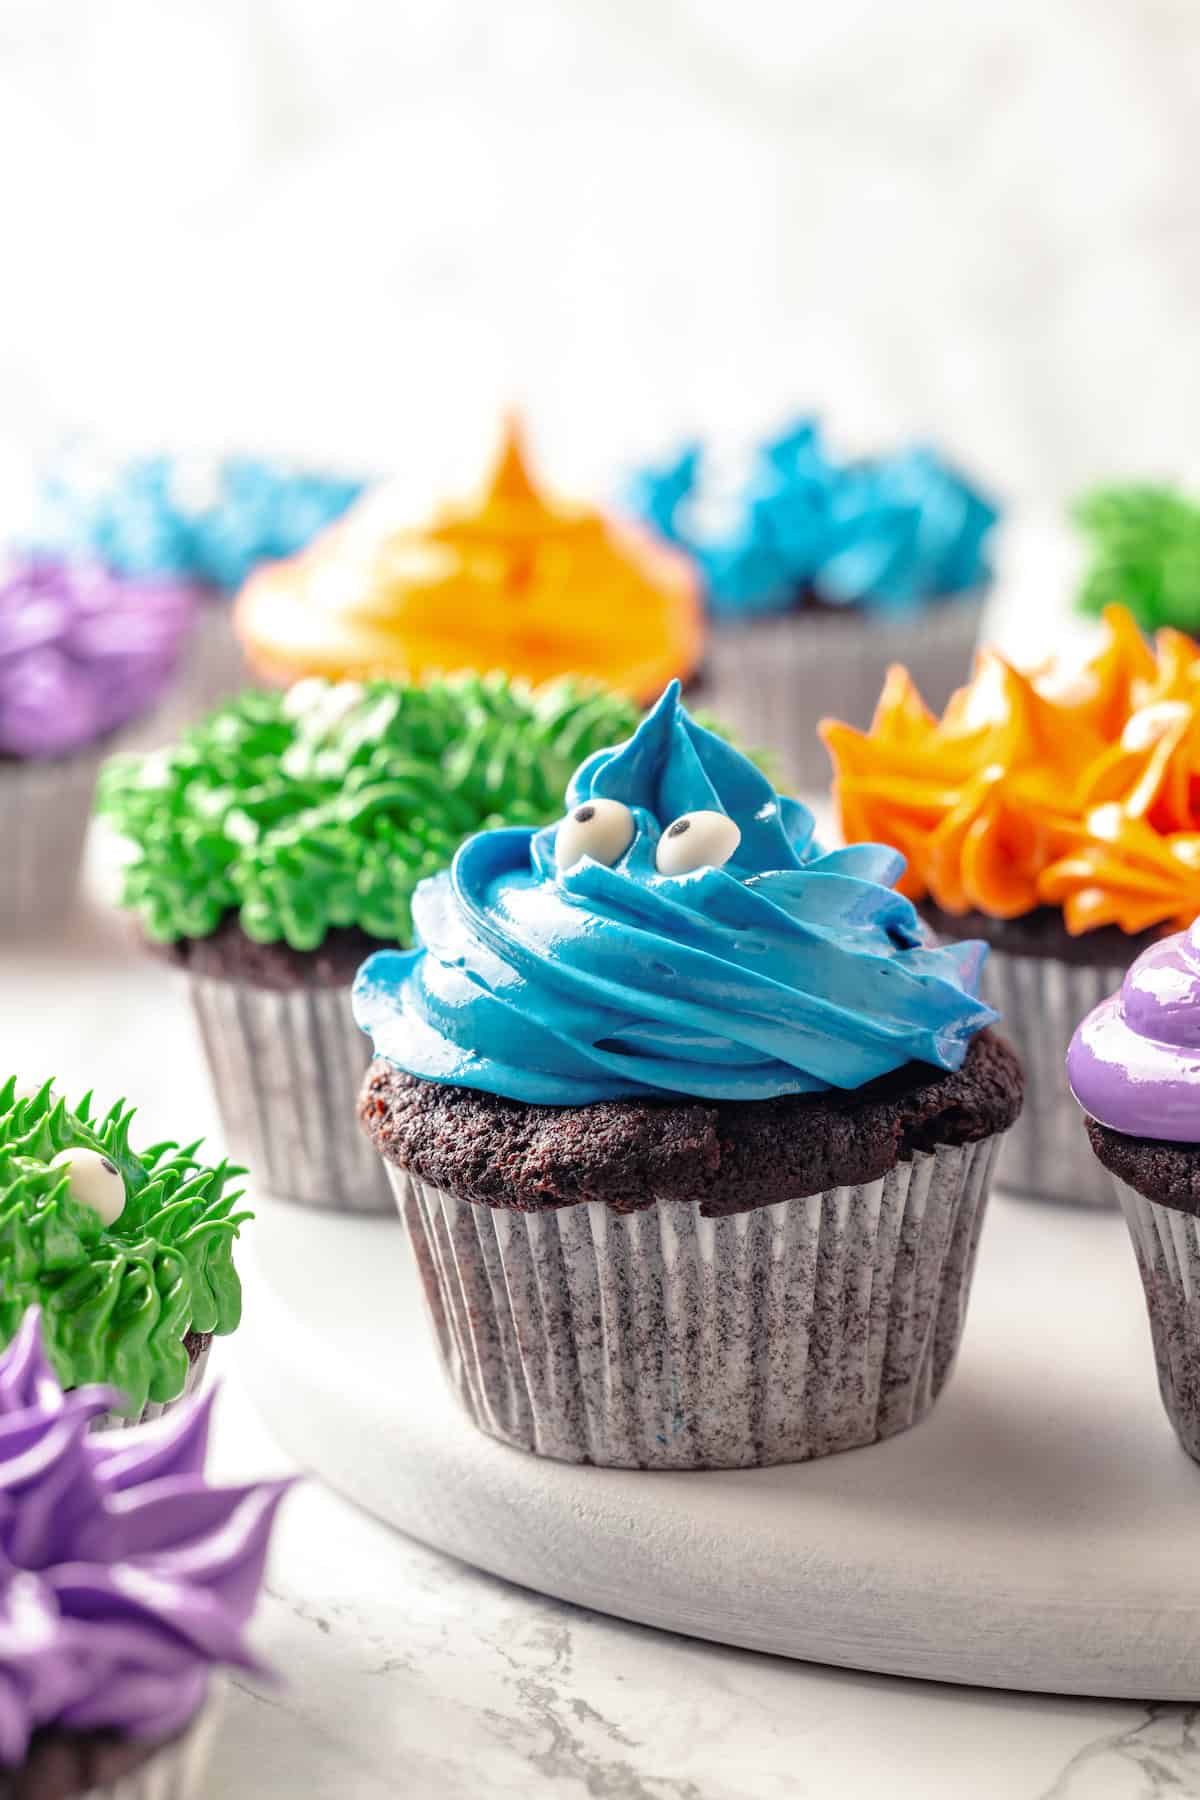
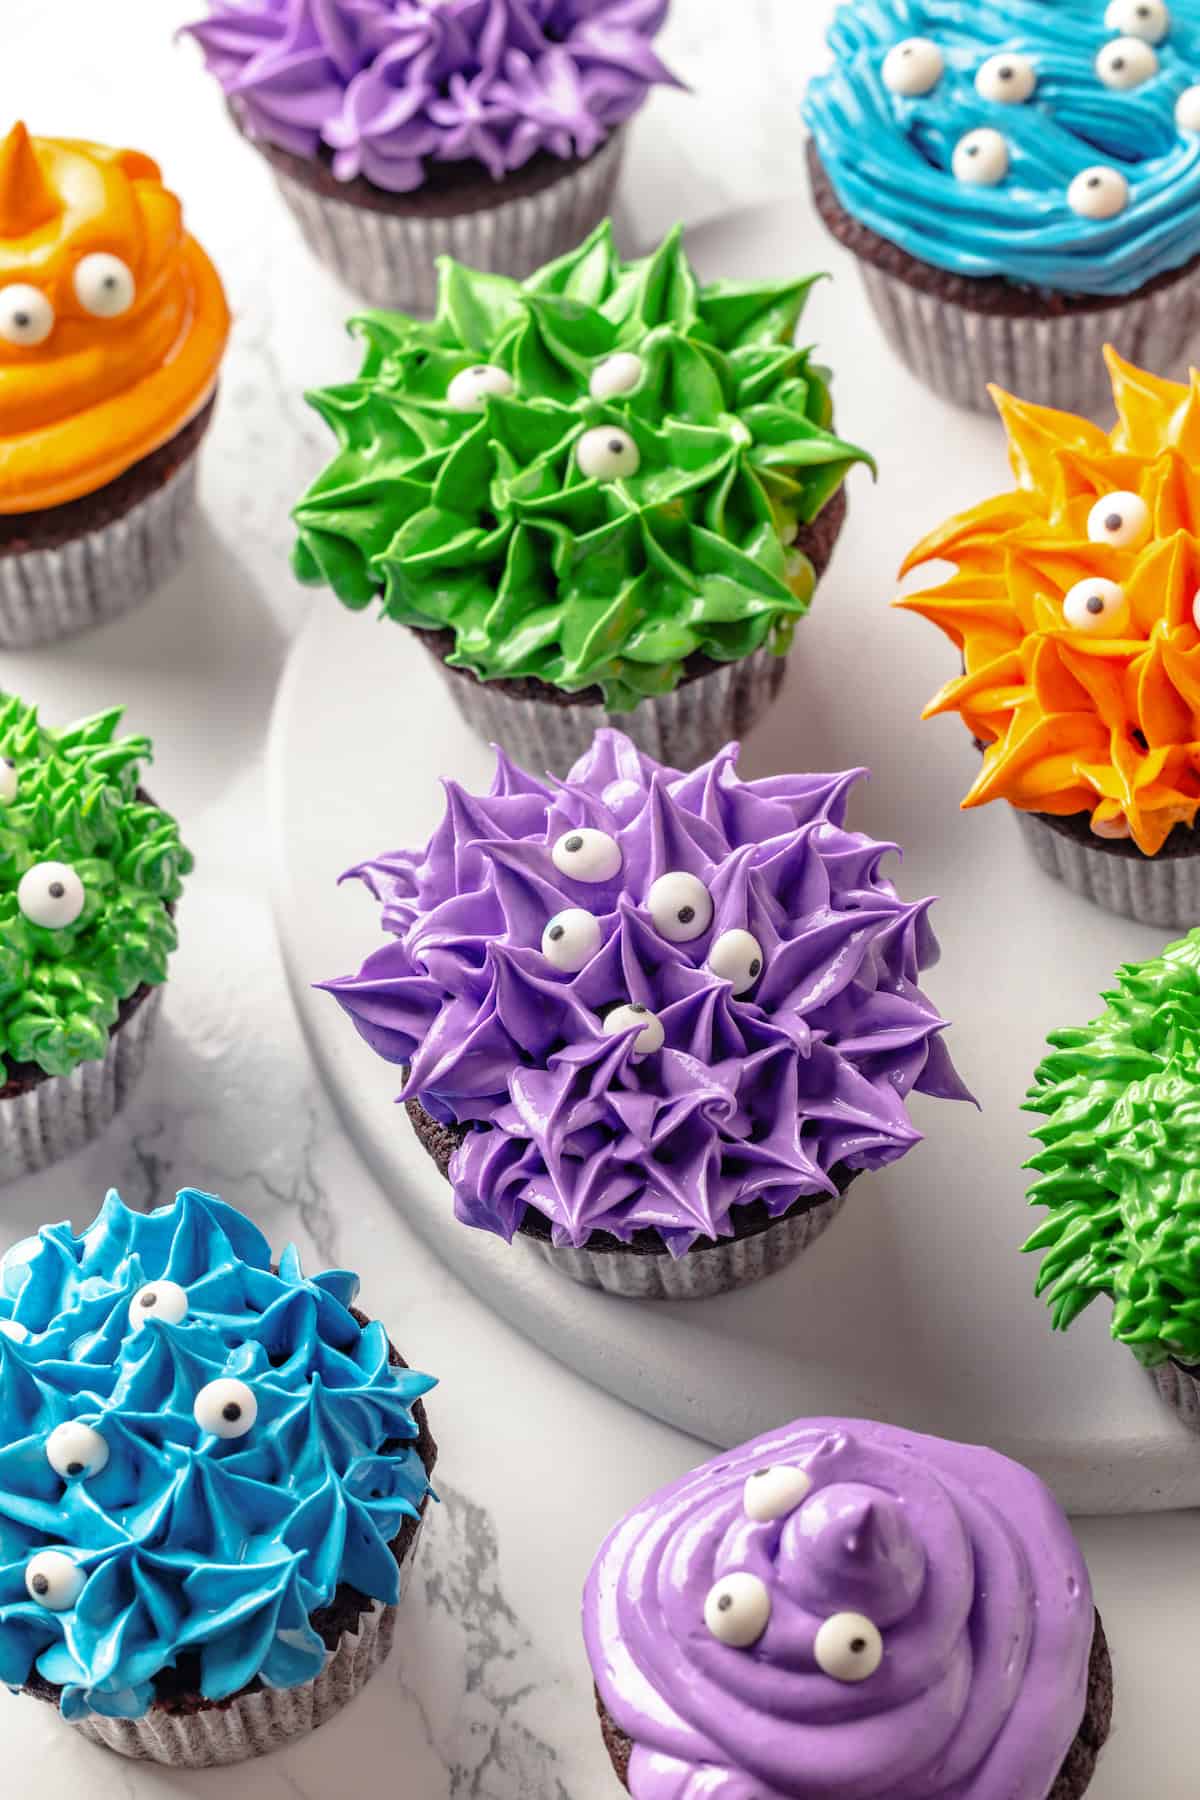
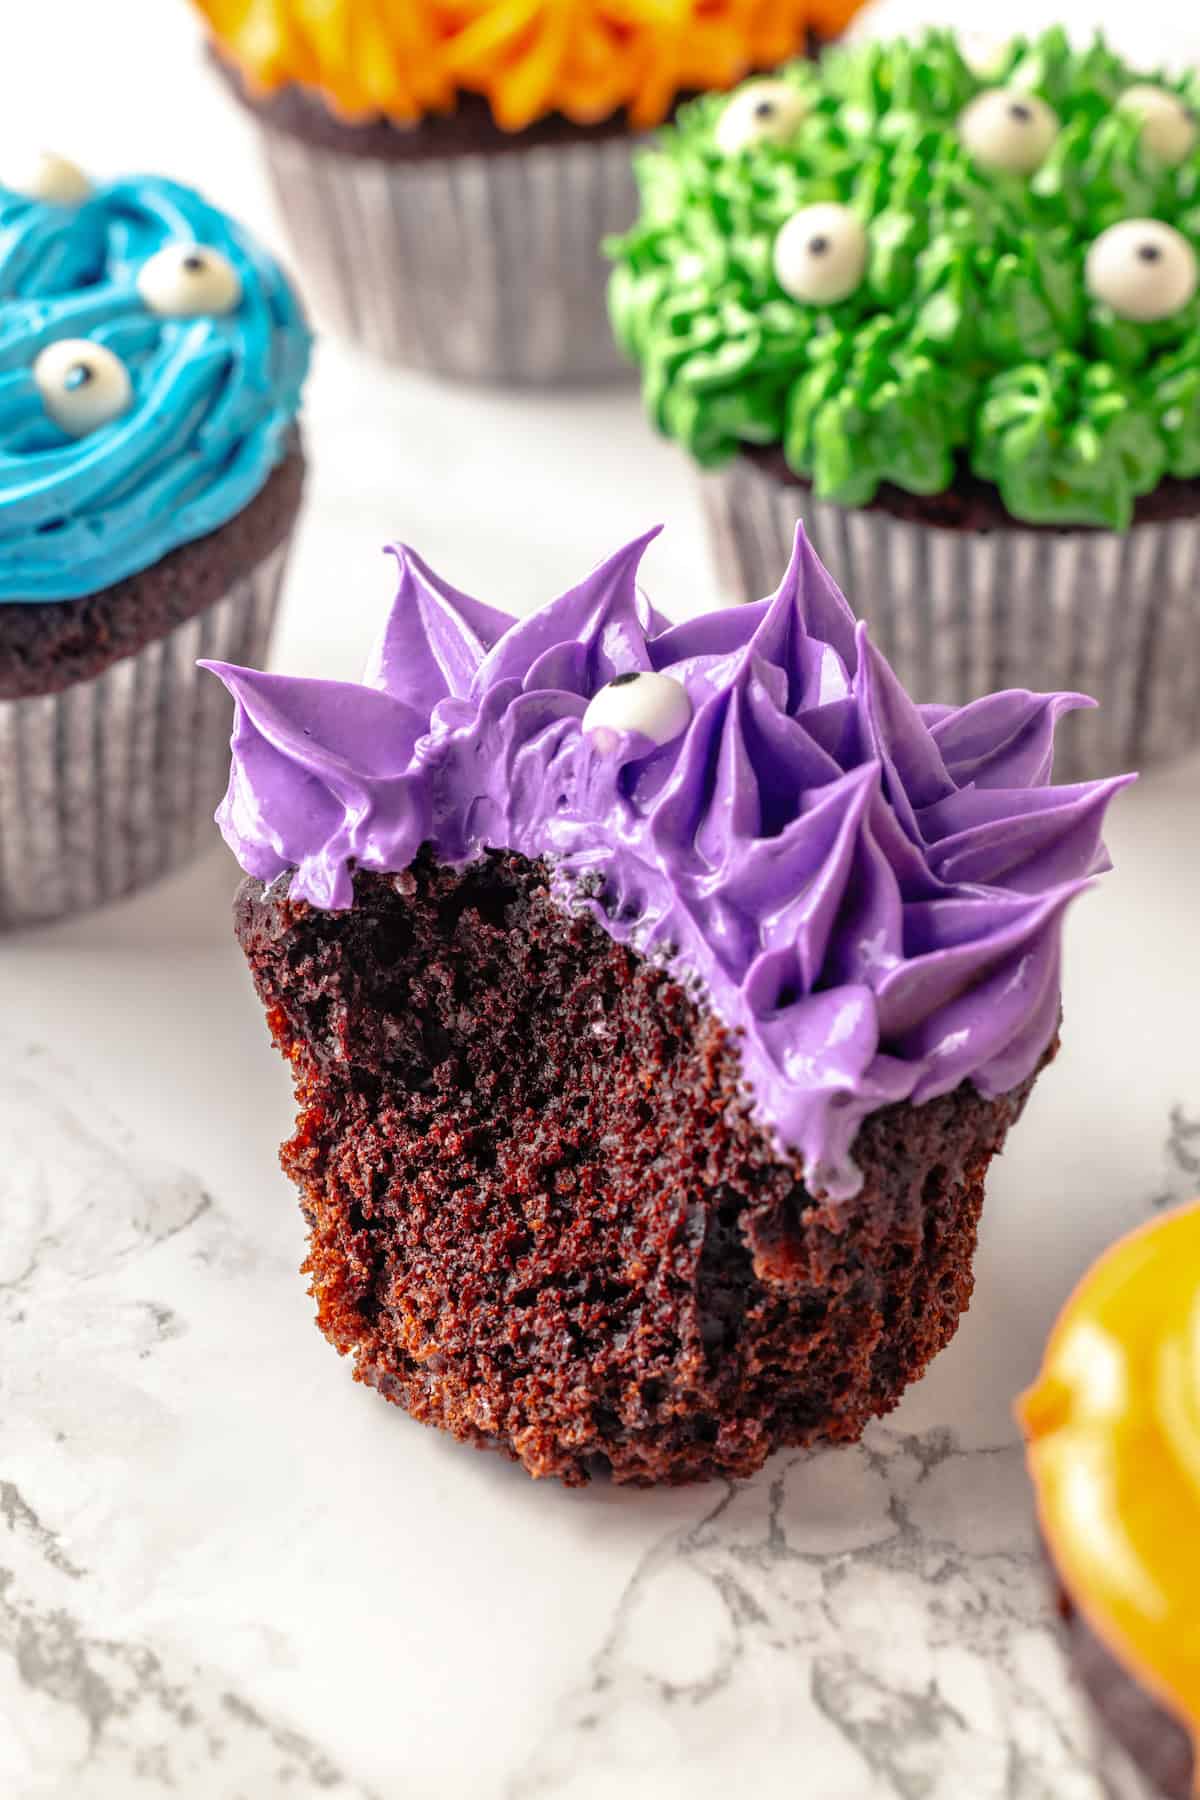
These Halloween cupcakes are topped with furry frosting monsters in a variety of colours, and you’ll never guess that they’re plant-based. Moist chocolate cake and rich vegan buttercream make them taste as good as they look!
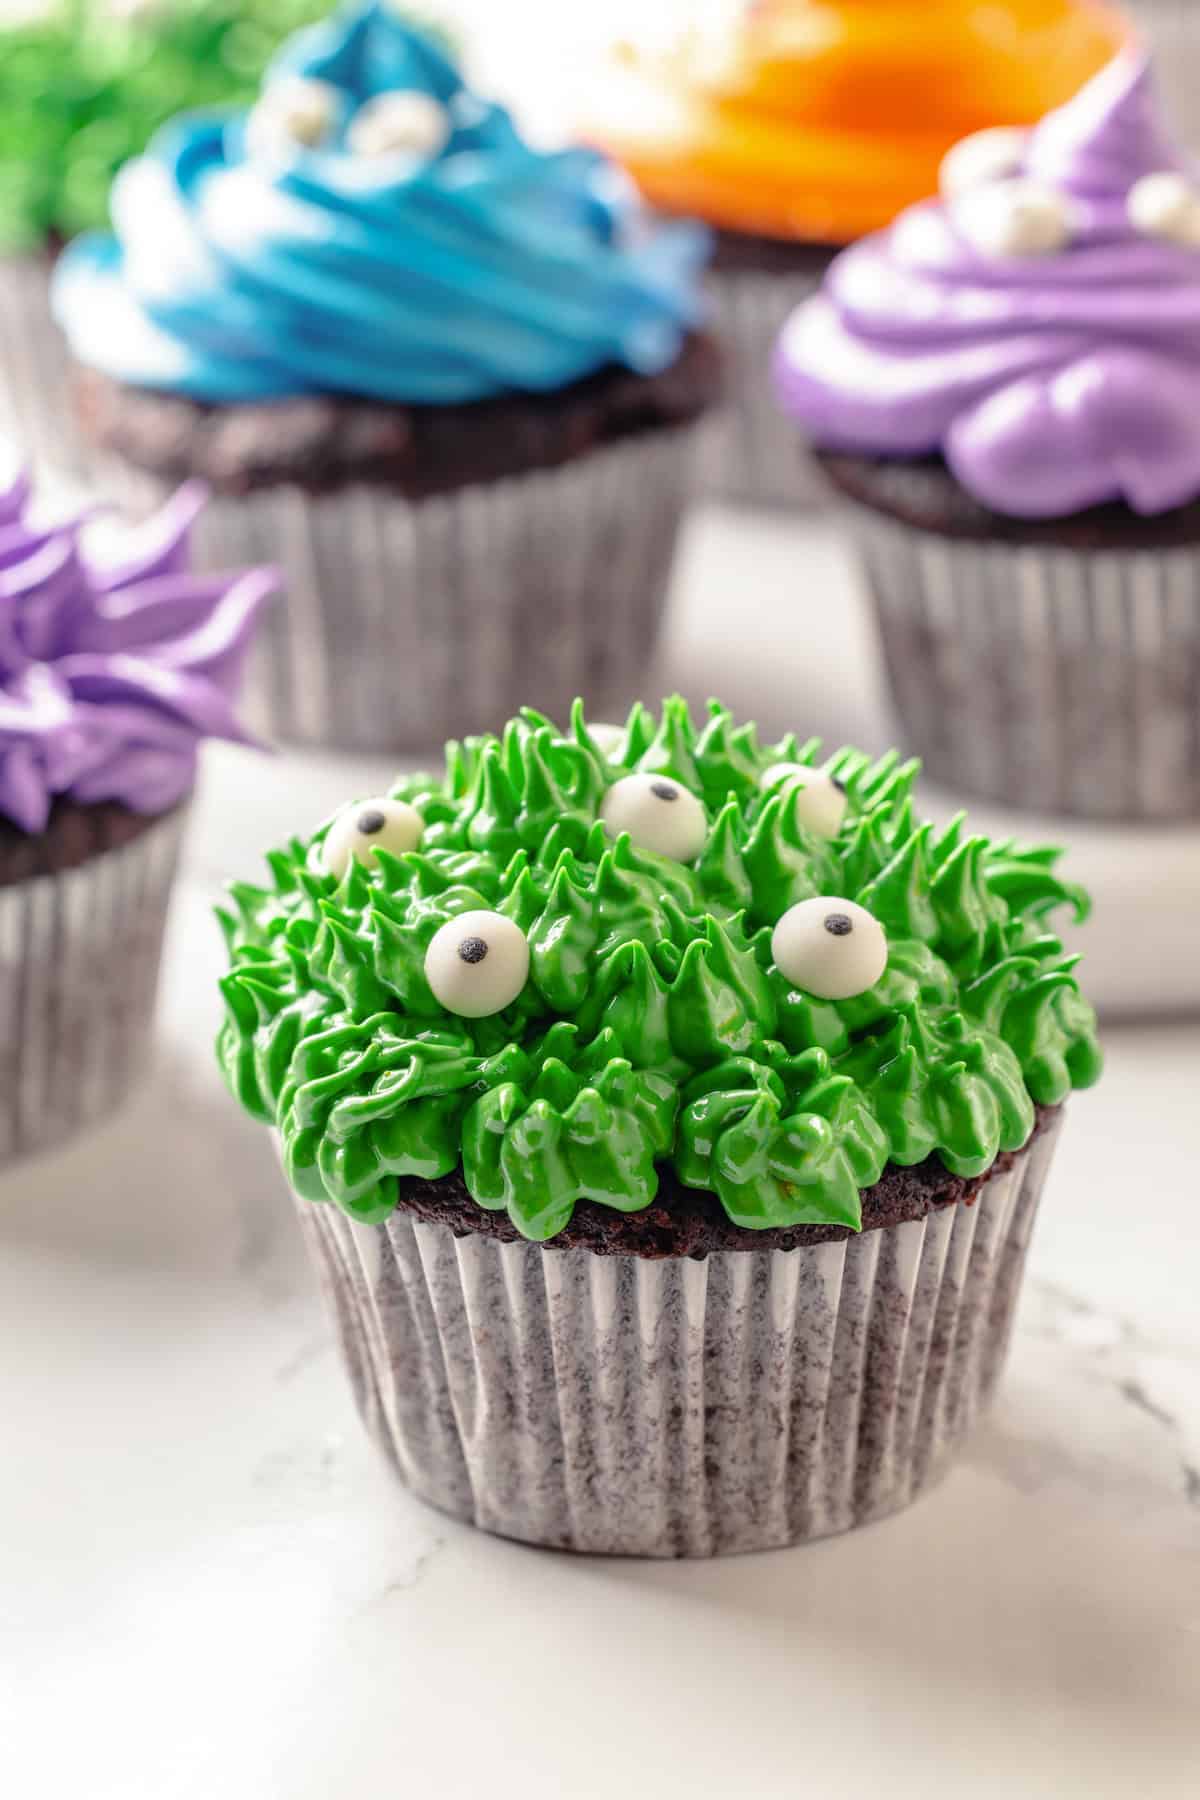
Halloween is just around the corner, which means the time to start planning your spooky treats is now! While I love vegan pumpkin cupcakes and vegan chocolate cupcakes , this year I wanted to dust off some of my old cake decorating skills (I used to own a bakery, after all!) and make decorated cupcakes for the holiday. The result is these cute Halloween cupcakes!
Why You’ll Love This Halloween Cupcake Recipe
- Easy for everyone . You don’t need to be an expert with a piping bag to make these Halloween cupcakes! The decorating is quite simple, and you can even enlist your kids to help.
- Delicious . The rich buttercream frosting and tender chocolate cupcakes make these Halloween treats totally irresistible. They’ll be a hit at any party!
- Adorable . These Halloween cupcakes are fun for young kids because they’re not too spooky—these monsters look pretty sweet if you ask me!
Notes on Ingredients
Scroll down to the recipe card to find the ingredient quantities and recipe instructions.
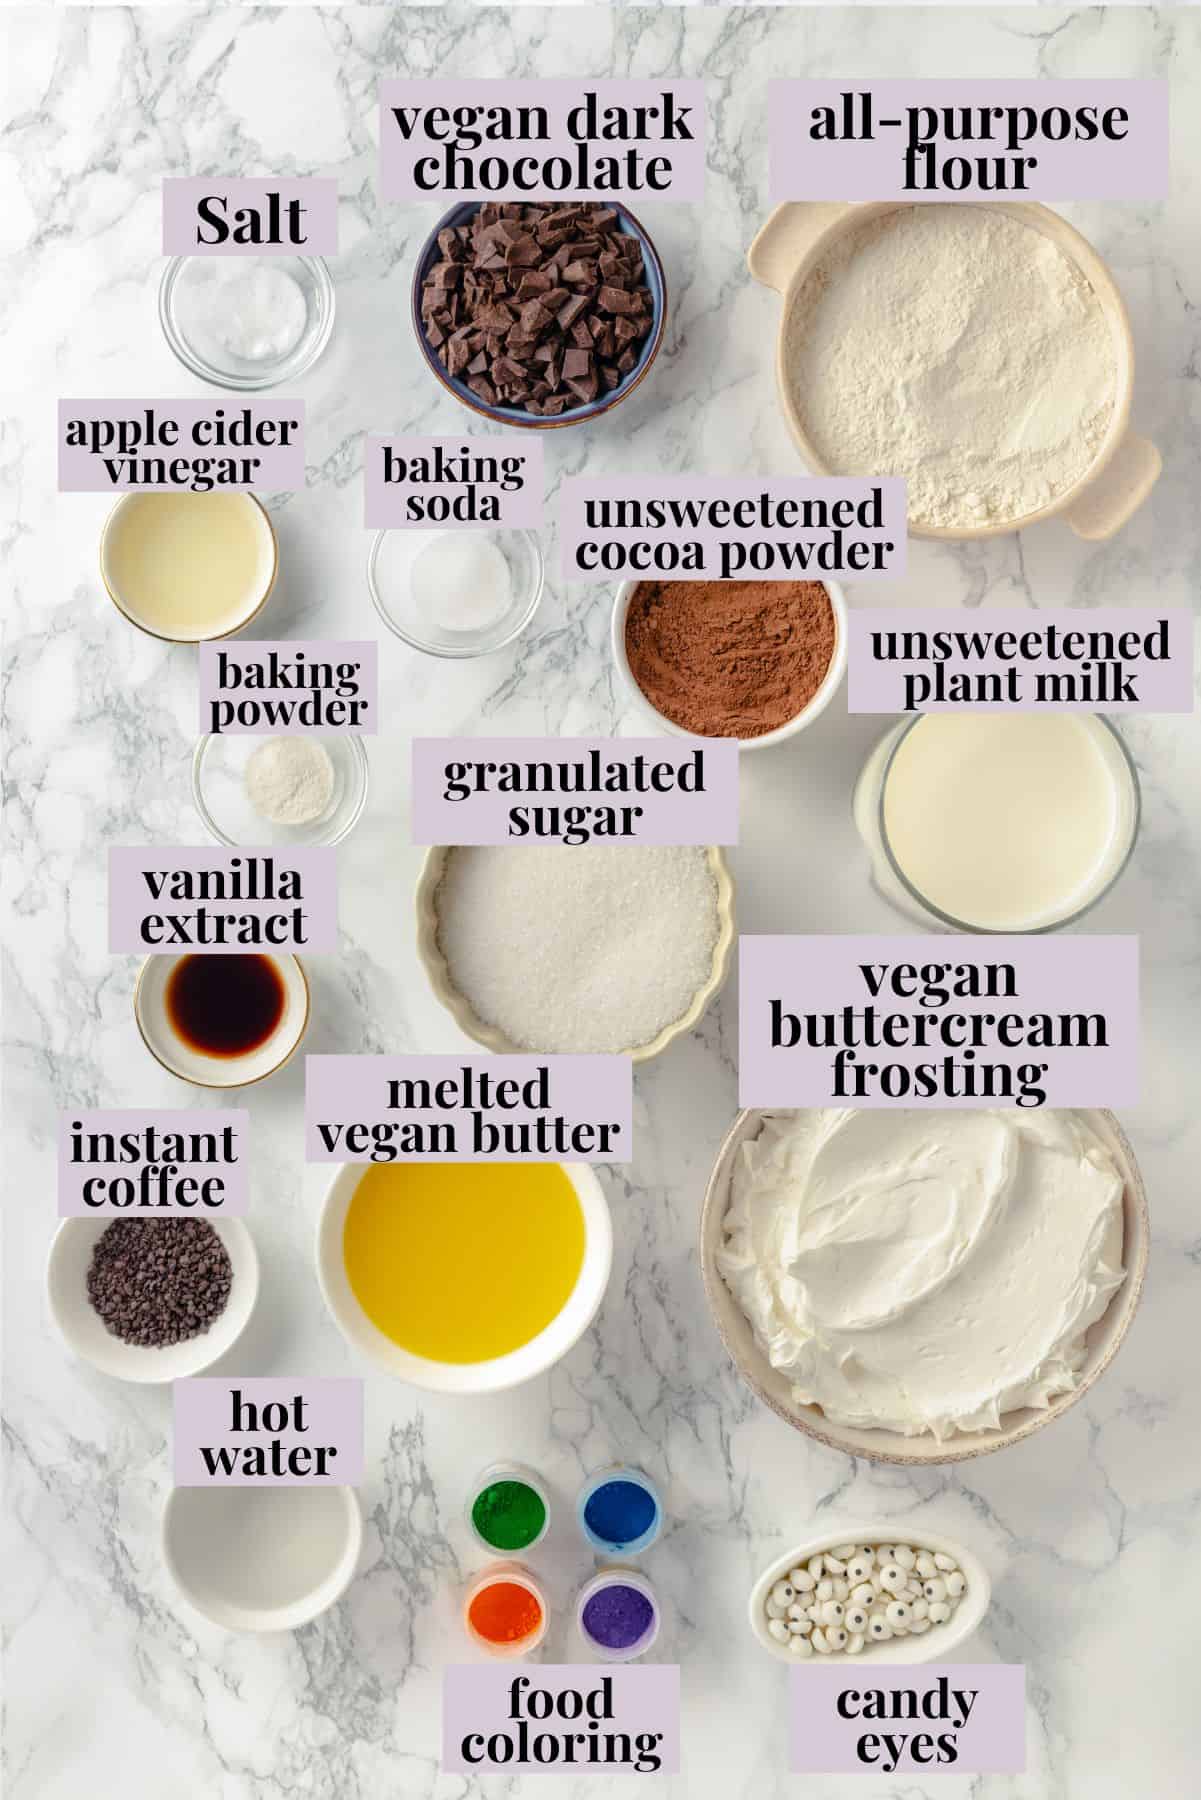
For the Cupcakes:
- All-purpose flour – Lightly spoon this into the measuring cup or, for best results, weigh the flour.
- Granulated sugar
- Unsweetened cocoa powder – Be sure to use cocoa powder, not hot cocoa mix, which is sweetened.
- Baking soda and baking powder
- Salt
- Plant-based milk – You can use any kind you like as long as it’s unsweetened and unflavoured.
- Vegan butter – Melt this before you get started. Melted coconut oil also works.
- Apple cider vinegar – Vinegar helps make the cupcakes light and fluffy.
- Vanilla extract
- Hot water and instant coffee – Coffee helps create a more intense chocolate flavour.
- Vegan dark chocolate
For Decoration:
- Vegan buttercream frosting – I use my vegan buttercream frosting recipe.
- Food colouring – I used green, blue, purple, and orange, but you can use any colours you like.
- Candy eyes – If you can’t find these, you can make them with white and black frosting.
How to Make Halloween Cupcakes
Mix dry ingredients.
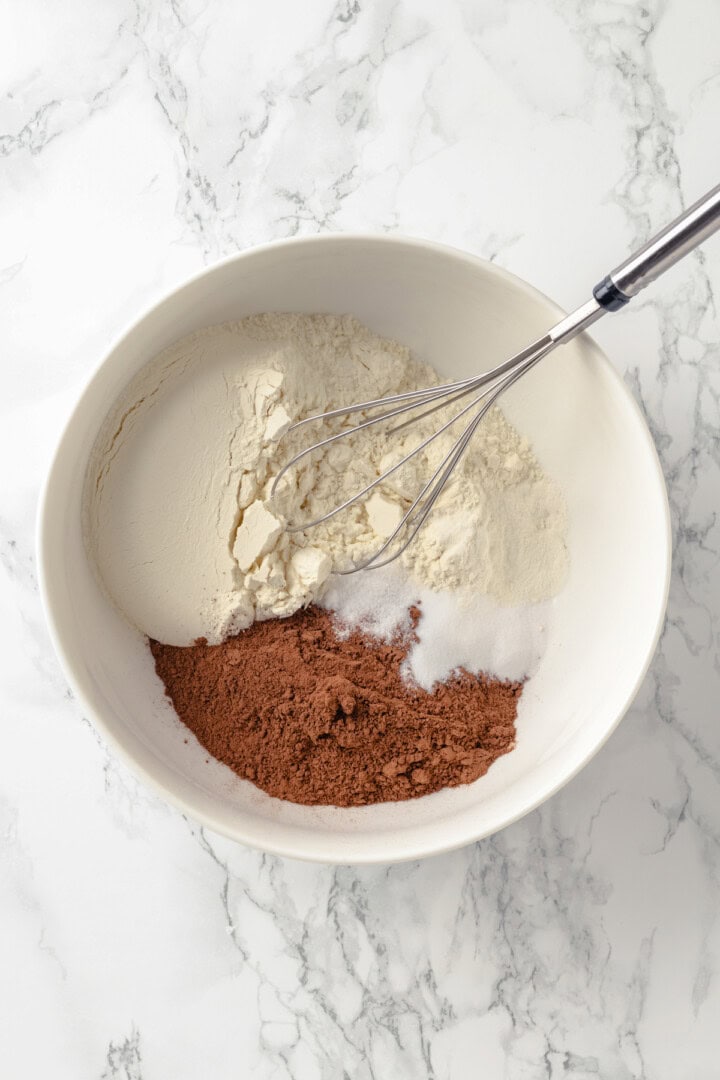
- Mix the dry ingredients . Sift the flour, sugar, cocoa powder, baking soda, baking powder, and salt into a large mixing bowl.
- Combine the wet ingredients . Whisk the plant milk, vegan butter, apple cider vinegar, and vanilla extract in another bowl.
- Finish the batter . Slowly mix the wet ingredients into the bowl of dry ingredients, then add the coffee mixture. Fold in the chopped chocolate.
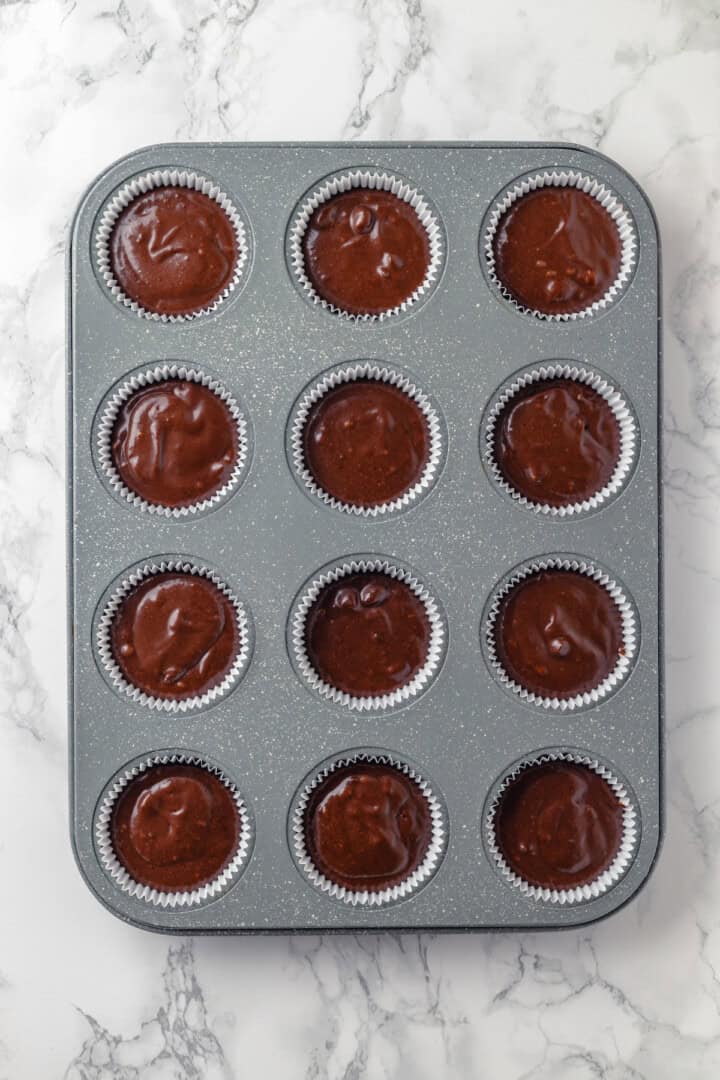
Fill cupcakes.
- Bake . Pour the batter into a cupcake pan with liners and bake in a 350ºF oven for 20 to 22 minutes, or until a toothpick inserted into the middle comes out clean.
- Cool . Let the cupcakes cool in the pan for 5 minutes, then transfer to a wire rack to finish cooling.
- Prepare the frosting . Make the frosting according to the recipe instructions. Divide it into bowls and add food coloring to each. Scoop the frosting into piping bags fitted with different tips.
- Frost the cupcakes . Hold the piping bag at a 90-degree angle to the cupcake; start piping from the outside and work your way to the center. Gently press the eyes into the frosting.
- Enjoy!

Tips for Success
- Don’t over-mix the batter . If you do, you’ll over-work the gluten in the flour, which can result in dense cupcakes.
- Practice before you start . If you’ve never used piping tips before, experiment on a plate or piece of parchment paper first to get the hang of it.
- Work quickly . The frosting can start to get warm and not hold its shape well if you’re holding the piping bag for a while. If needed, pop it in the fridge for a bit to chill it again.
Variations
- Use a different cake flavour . Any kind of vegan cupcake will work. You could try my vegan carrot cupcakes , vegan red velvet cupcakes or vegan vanilla cupcakes .
- Try cream cheese frosting . I love this vegan cream cheese frosting !
- Make them sparkly . A sprinkle of sanding sugar or edible glitter will make these Halloween cupcakes extra fun.
- Make them gluten-free . Use a gluten-free flour blend in place of all-purpose flour for a gluten-free version of these Halloween cupcakes.
How to Store
Store your Halloween cupcakes in an airtight container in the refrigerator for 3 to 4 days. Let them come to room temperature before enjoying.
Can I Freeze This Recipe?
If you want to make the cupcakes in advance, bake and freeze the unfrosted cupcakes for up to 2 months. Make sure to wrap them well and put them in a freezer-safe container. Then, thaw them at room temperature on the day you plan to decorate: whip up your frosting, decorate as desired and serve!
More Halloween Treats
- Vegan Pumpkin Cookies (Soft Batch)
- Vegan Marshmallows
- Pumpkin Chocolate Chip Muffins
- Vegan Peanut Butter Cups
- 4-Ingredient Salted Caramel Chocolate Cups (Vegan and No Bake)
Ingredients
For the Cupcakes:
- 1 ½ cups all-purpose flour , 173 g
- 1 cup granulated sugar , 200 g
- ½ cup unsweetened cocoa powder , 50 g
- 1 teaspoon baking soda
- ½ teaspoon baking powder
- ½ teaspoon salt
- 1 cup unsweetened plant-based milk , 240 ml
- ½ cup melted vegan butter , (or melted coconut oil) 115 g
- 1 tablespoon apple cider vinegar
- 1 teaspoon vanilla extract
- ¼ cup hot water +1 tablespoon instant coffee mixed in until dissolved , stir these together right before you need it so it’s still hot
- ½ cup vegan dark chocolate , chopped, 70 g
For Decoration:
- 1 batch vegan buttercream frosting
- Food colouring , green, blue, purple, orange, or any “monster” colours
- Piping bags and assorted tips , (grass tip, round tip, star tip)
- Candy eyes
Instructions
- Preheat your oven to 350°F (175°C) and line a cupcake/muffin pan with cupcake liners.
- In a large mixing bowl, sift together the flour, sugar, cocoa powder, baking soda, baking powder, and salt.
- In another bowl, whisk together the plant based milk, melted butter, apple cider vinegar, and vanilla extract until well combined.
- Slowly pour the wet ingredients into the dry ingredients, mixing until just combined.
- Gradually add the hot water and coffee mix to the batter, mixing until smooth. The batter will be thin. Gently fold in the chopped chocolate.
- Pour the batter evenly into the cupcake liners, filling each about 3⁄4 full. Bake for 20-22 minutes, or until a toothpick inserted into the center comes out clean.
- Let the cupcakes cool in the pan for about 5 minutes, then transfer them to a wire rack to cool completely before frosting.
- Prepare the Frosting : Divide the frosting into separate bowls based on how many colours you want to use.
- Add food colouring to each bowl and mix until you reach the desired shades. Aim for vibrant, bold colors.
- Fill Piping Bags : Use different piping tips to create various monster textures. For shaggy fur, use a grass tip. For spiky fur, use a star tip. A round tip can be used for smooth, round shapes. Fill each bag with a different coloured frosting.
- Hold the piping bag at a 90-degree angle to the cupcake. Apply pressure to the bag and pipe fur or spikes starting from the outside and working your way inward. For a more chaotic monster look, pipe the frosting in random patterns and directions.
- Press candy eyes into the frosting. Add one for a cyclops monster or multiple for a goofy look.
Notes

Halloween Cupcakes
Ingredients
For the Cupcakes:
- 1 ½ cups all-purpose flour 173 g
- 1 cup granulated sugar 200 g
- ½ cup unsweetened cocoa powder 50 g
- 1 teaspoon baking soda
- ½ teaspoon baking powder
- ½ teaspoon salt
- 1 cup unsweetened plant-based milk 240 ml
- ½ cup melted vegan butter (or melted coconut oil) 115 g
- 1 tablespoon apple cider vinegar
- 1 teaspoon vanilla extract
- ¼ cup hot water +1 tablespoon instant coffee mixed in until dissolved stir these together right before you need it so it’s still hot
- ½ cup vegan dark chocolate chopped, 70 g
For Decoration:
- 1 batch vegan buttercream frosting
- Food colouring green, blue, purple, orange, or any “monster” colours
- Piping bags and assorted tips (grass tip, round tip, star tip)
- Candy eyes
Instructions
- Preheat your oven to 350°F (175°C) and line a cupcake/muffin pan with cupcake liners.
- In a large mixing bowl, sift together the flour, sugar, cocoa powder, baking soda, baking powder, and salt.
- In another bowl, whisk together the plant based milk, melted butter, apple cider vinegar, and vanilla extract until well combined.
- Slowly pour the wet ingredients into the dry ingredients, mixing until just combined.
- Gradually add the hot water and coffee mix to the batter, mixing until smooth. The batter will be thin. Gently fold in the chopped chocolate.
- Pour the batter evenly into the cupcake liners, filling each about 3⁄4 full. Bake for 20-22 minutes, or until a toothpick inserted into the center comes out clean.
- Let the cupcakes cool in the pan for about 5 minutes, then transfer them to a wire rack to cool completely before frosting.
- Prepare the Frosting : Divide the frosting into separate bowls based on how many colours you want to use.
- Add food colouring to each bowl and mix until you reach the desired shades. Aim for vibrant, bold colors.
- Fill Piping Bags : Use different piping tips to create various monster textures. For shaggy fur, use a grass tip. For spiky fur, use a star tip. A round tip can be used for smooth, round shapes. Fill each bag with a different coloured frosting.
- Hold the piping bag at a 90-degree angle to the cupcake. Apply pressure to the bag and pipe fur or spikes starting from the outside and working your way inward. For a more chaotic monster look, pipe the frosting in random patterns and directions.
- Press candy eyes into the frosting. Add one for a cyclops monster or multiple for a goofy look.
Video
Notes
Nutrition
Halloween Cupcakes https://jessicainthekitchen.com/halloween-cupcakes/ September 20, 2024
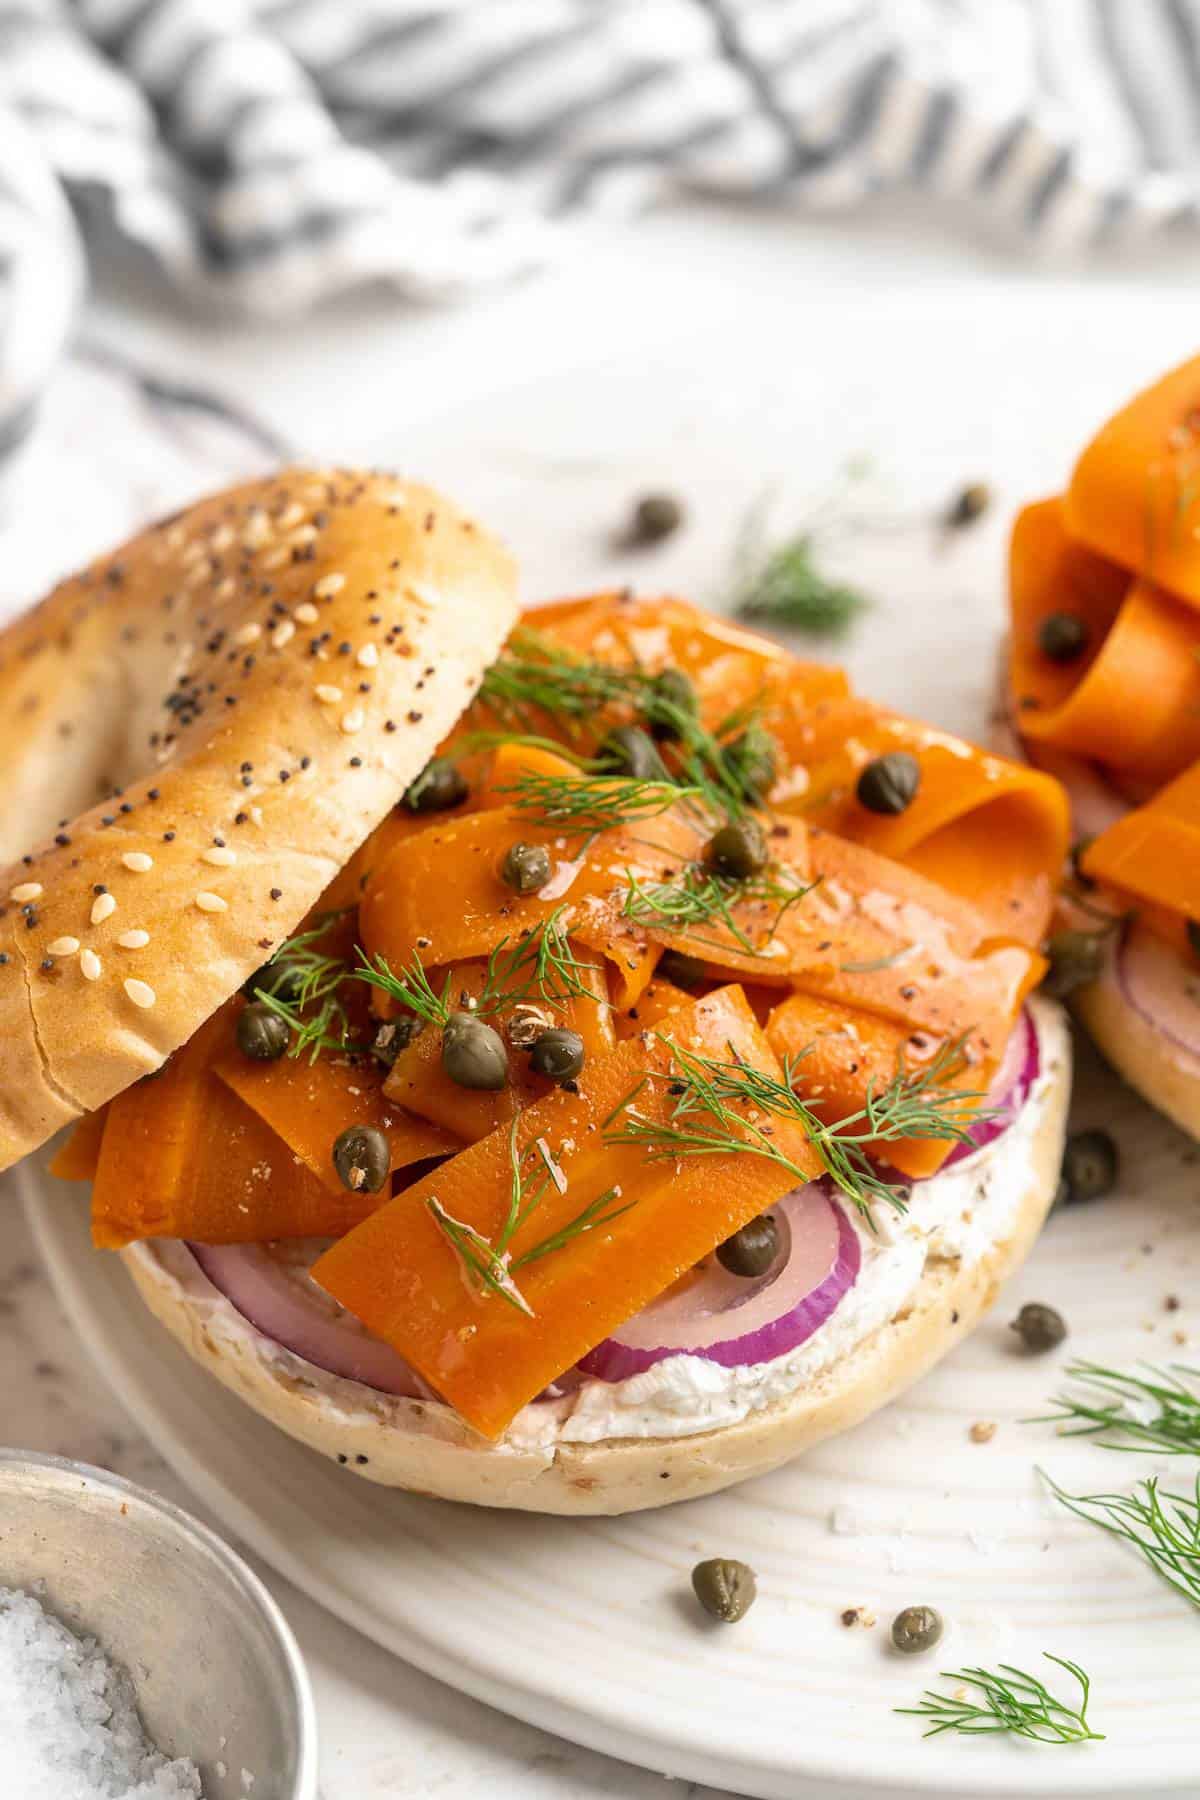
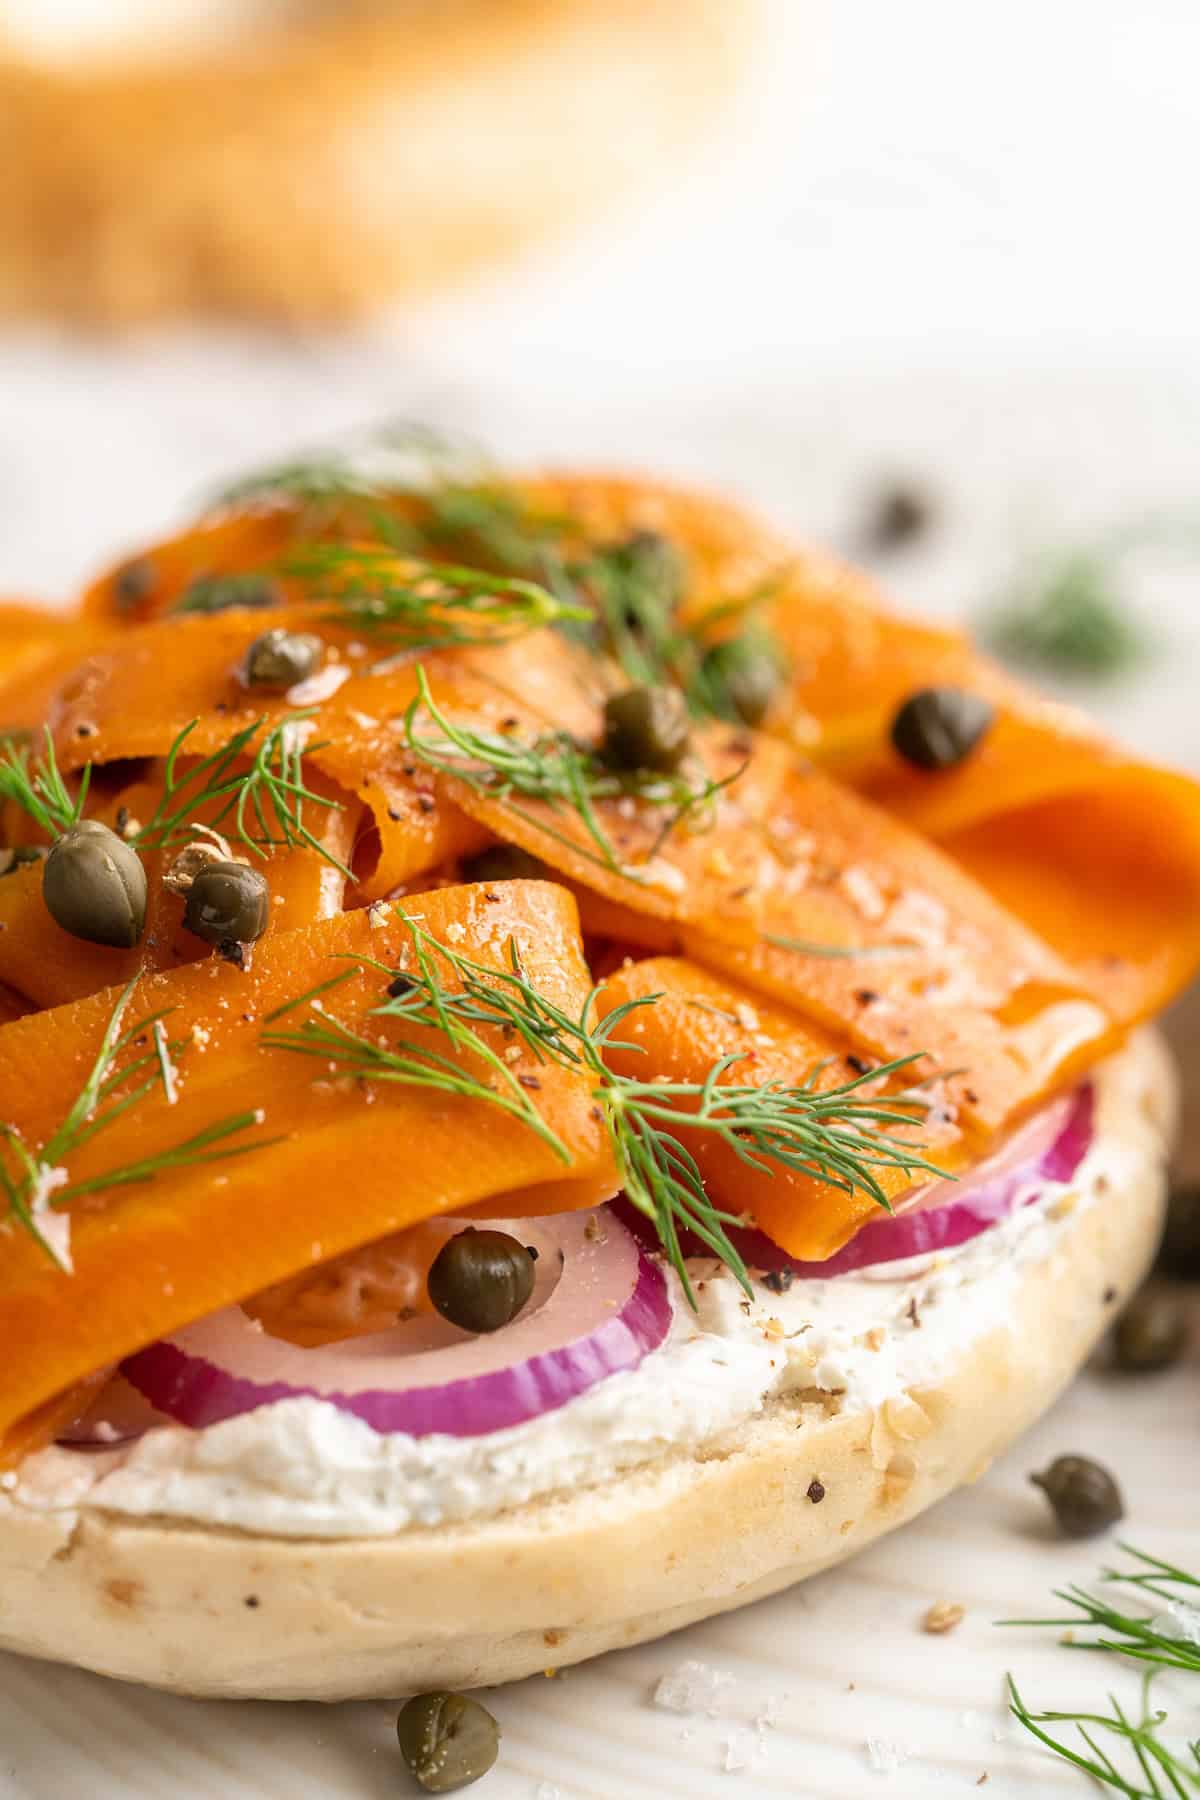
Give your next bagel an upgrade with this carrot lox recipe! It tastes surprisingly authentic and it’s super easy to make.
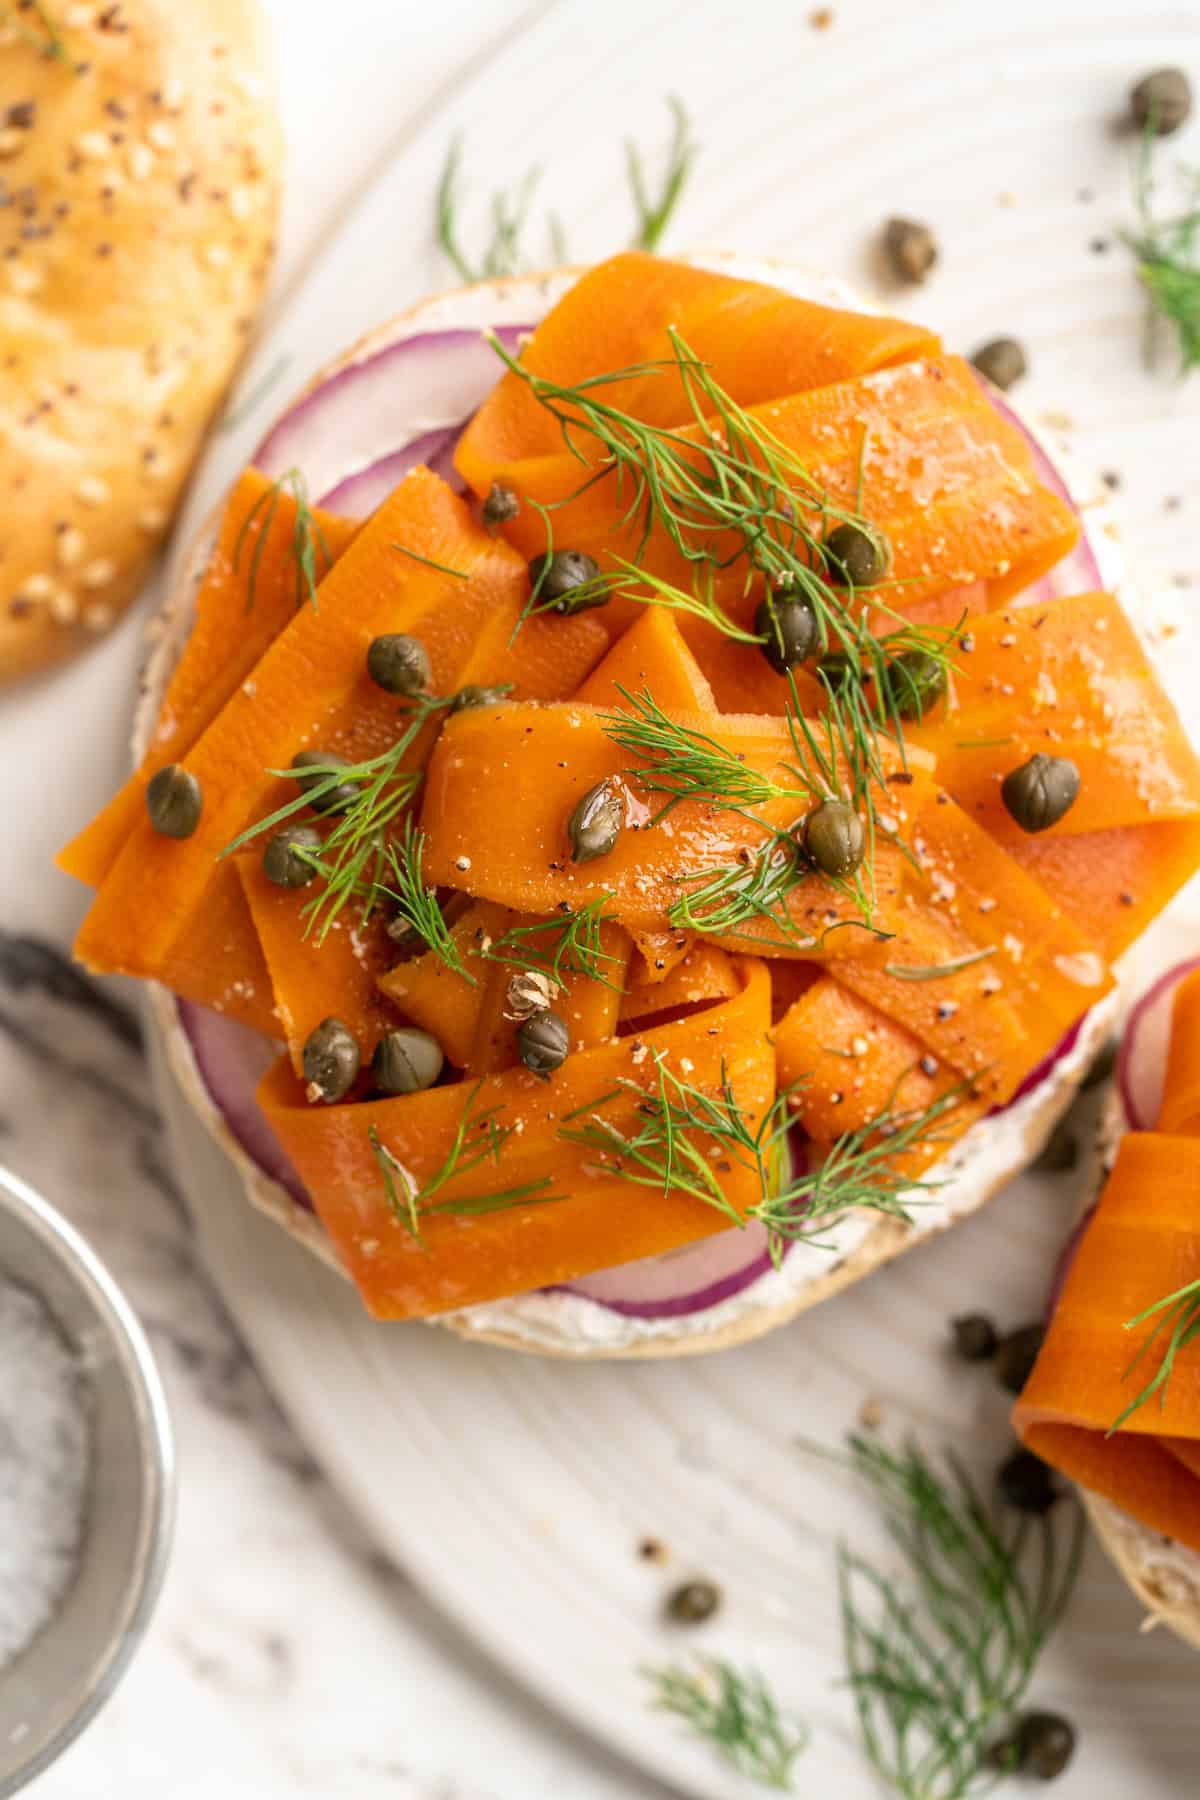
Remember when carrot hot dogs were all over vegan social media? Carrot lox proves that carrots aren’t just for stuffing into buns and topping with ketchup and mustard when it comes to using them as a meat swap. This carrot lox is incredibly delicious!
Made by marinating thinly sliced carrots in a mixture of vinegar and seaweed (for that fishy flavour!), this carrot lox reminds me a little bit of the watermelon tuna I like to add to my vegan poke bowls . And like that vegan tuna, making carrot lox is a cinch!
Why You’ll Love This Carrot Lox Recipe
- Your bagel has never tasted better . If your bagel feels like it’s missing a little something since you’ve gone vegan, all you need is some vegan cream cheese and this carrot lox recipe to take your breakfast game to the next level.
- So easy to make . It’s really just a matter of thinly slicing the carrots, bringing them to a boil in the brine, and letting them pickle. That’s it!
- A natural seafood sub . If you like to avoid store-bought substitutes with long lists of ingredients, you’ll appreciate this simple carrot lox recipe, which uses whole food ingredients to replicate the flavour of salmon.
Notes on Ingredients
Scroll down to the recipe card to find the ingredient quantities and recipe instructions.
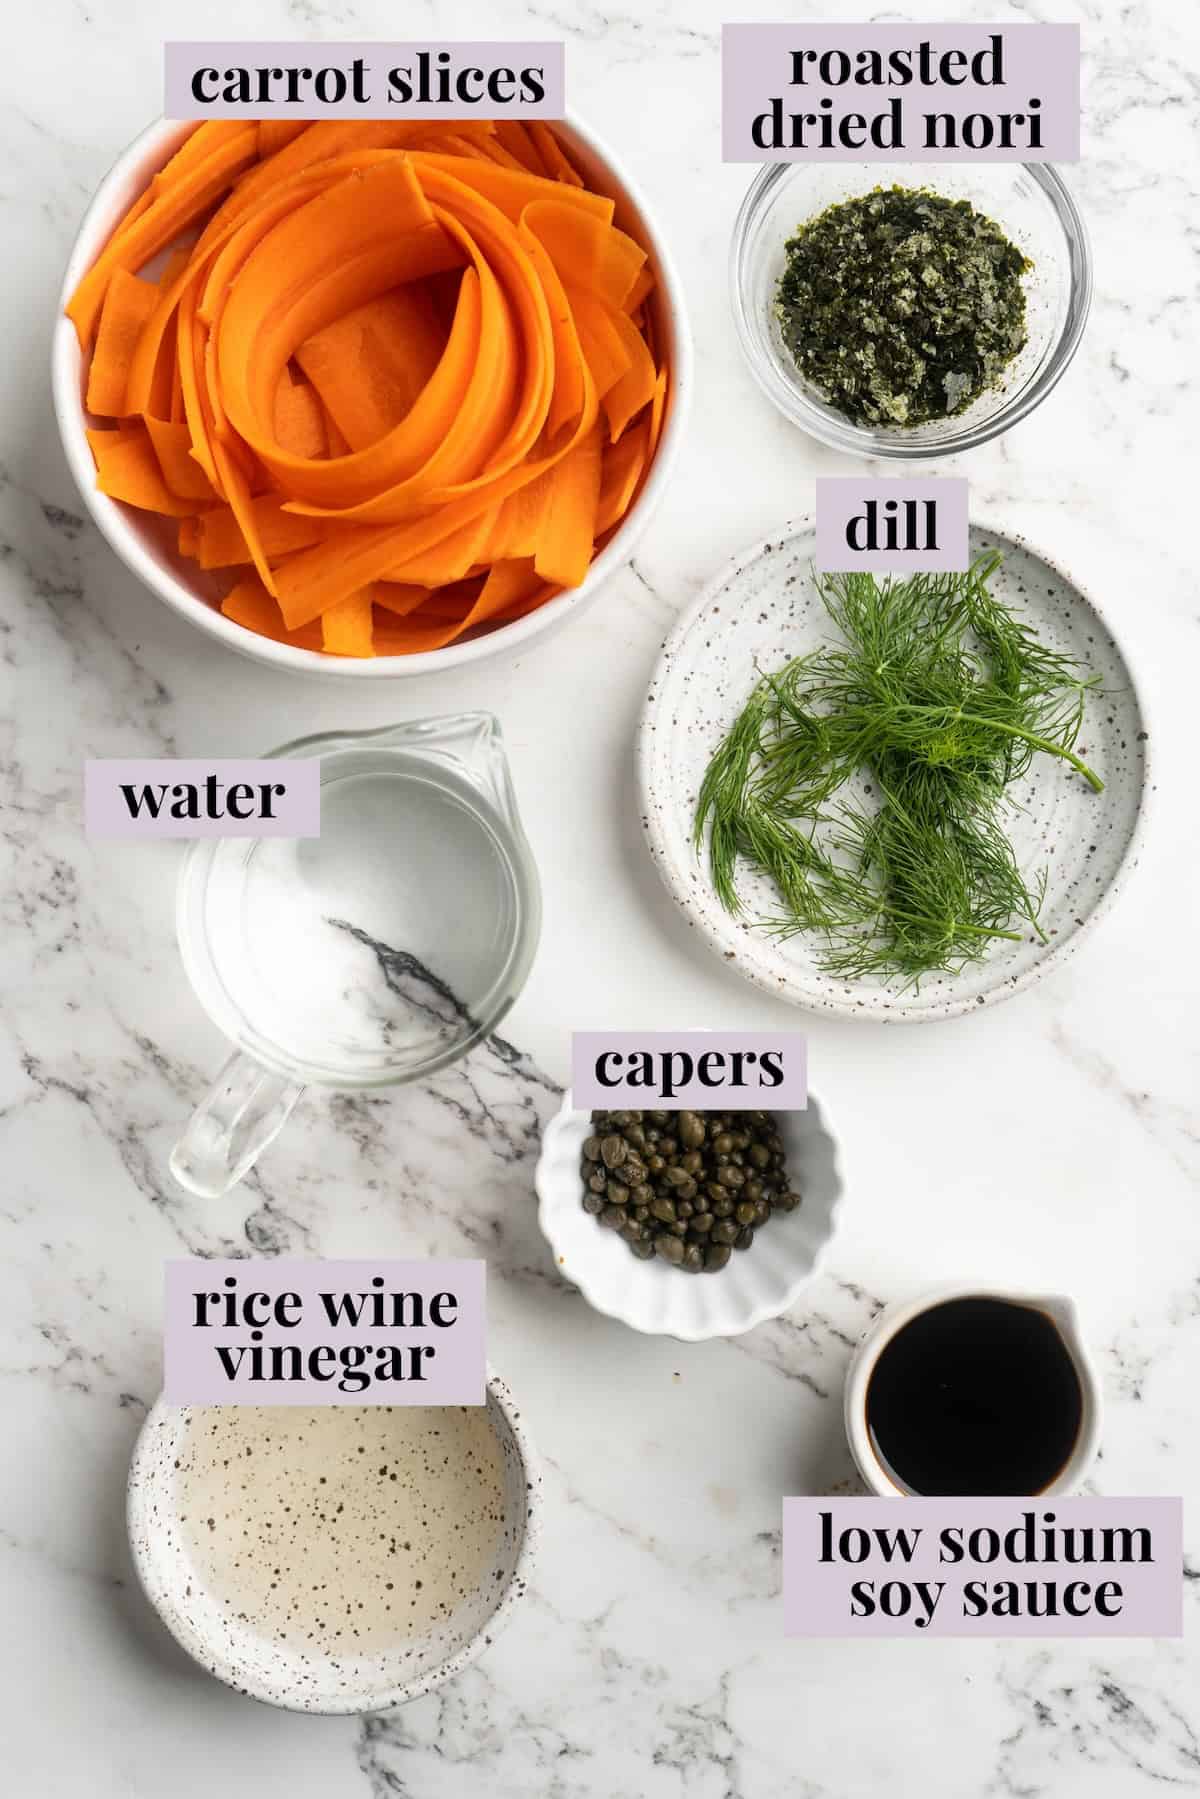
- Carrot slices – I recommend using fairly large carrots so you can get nice, thick slices.
- Water
- Rice wine vinegar – Make sure you use plain rice wine vinegar, not seasoned; the seasoned kind has added sugar.
- Soy sauce – Swap in tamari sauce for a gluten-free carrot lox recipe.
- Dried nori sheet – For seafood flavour.
- Dill and capers – To complete the authentic lox experience!
How to Make Carrot Lox
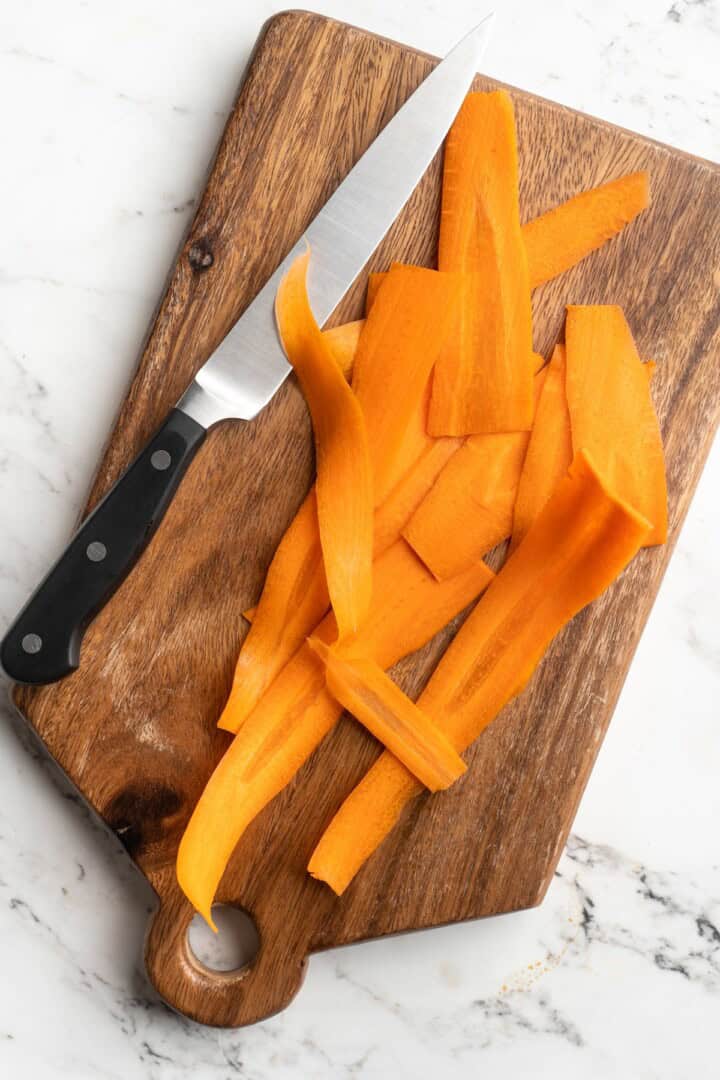
Slice carrots lengthwise.
- Prepare . Wash, scrub, and dry the carrots, then slice them lengthwise.
- Simmer . Combine all of the ingredients except the dill and capers in a saucepan. Bring to a boil, then simmer for 5 minutes.
- Cool . Remove from heat and cool to room temperature.
- Pickle . Transfer to an airtight container, making sure the carrots are fully submerged in the liquid. Refrigerate for 24 to 48 hours.
- Serve . Let the carrot lox come to room temperature and serve with dill and capers.
Tips for Success
- Slice the carrot carefully . A mandoline slicer is best, but you can also use a vegetable peeler if you don’t have one. If you use a knife, be very careful!
- Marinate for at least 24 hours . The longer you marinate the carrot lox, the more flavourful and tender it will be.
- Add some smoky flavour . Traditional lox is sometimes smoked in addition to being brined. For some smokiness, add a small amount of liquid smoke to the brining liquid.
More Ways to Use Carrot Lox
- Wraps and sandwiches . Add carrot lox to your favorite wraps and sandwiches.
- Sushi roll and onigiri . Tuck carrot lox into the middle of onigiri or sushi rolls.
- Salads . Add some fishy flavour to this vegan Nicoise salad .
- Vegan charcuterie . Place a bowl of vegan lox on your next vegan charcuterie board .
How to Store
This carrot lox recipe will stay fresh for one to two weeks in the refrigerator when stored in a jar or other airtight container.
Can I Freeze This Recipe?
I don’t recommend it. Freezing and thawing will change the texture of the carrots, making them mushy. It’s best to enjoy this carrot lox recipe fresh.
More Vegan Seafood Recipes
- Vegan Chickpea Tuna Salad
- Crispy Beer-Battered Vegan Fish Tacos
- Vegan Crab Cakes (Happy Hearts “Crab” Cakes) from Sweet Potato Soul
- Vegan Fish Sticks (with Vegan Tartar Sauce)
- Vegan Ackee and Saltfish (Jamaican Breakfast Feast)
Ingredients
- 2 cups carrot slices
- 1 ½ cups water
- 2 ¼ tablespoons rice wine vinegar
- 3 ½ tablespoons soy sauce , low sodium
- 1 roasted dried nori sheet , crumbled
- For serving: dill and capers
Instructions
- Scrub, wash and clean your carrots, then dry thoroughly. With a mandoline or a very sharp knife, slice your carrot thinly lengthwise (along the length of the carrot).
- In a pot, add the carrot slices, water, rice wine vinegar, soy sauce, and roasted dried nori sheet crumbles. Stir to combine.
- Bring everything to a boil then simmer vigorously for 5 minutes. Remove from heat and allow to cool to room temperature.
- Add everything into a jar or a tupperware container with a cover, ensuring the carrots are covered by the liquid mixture.
- Cover and allow to marinate in the fridge for at least 24 hours, preferably up to 48 hours for the best texture.
- Remove from the fridge, and enjoy as desired! You can let it sit out a bit to come back closer to room temperature and on bagels with dill and capers and cream cheese. Enjoy!
