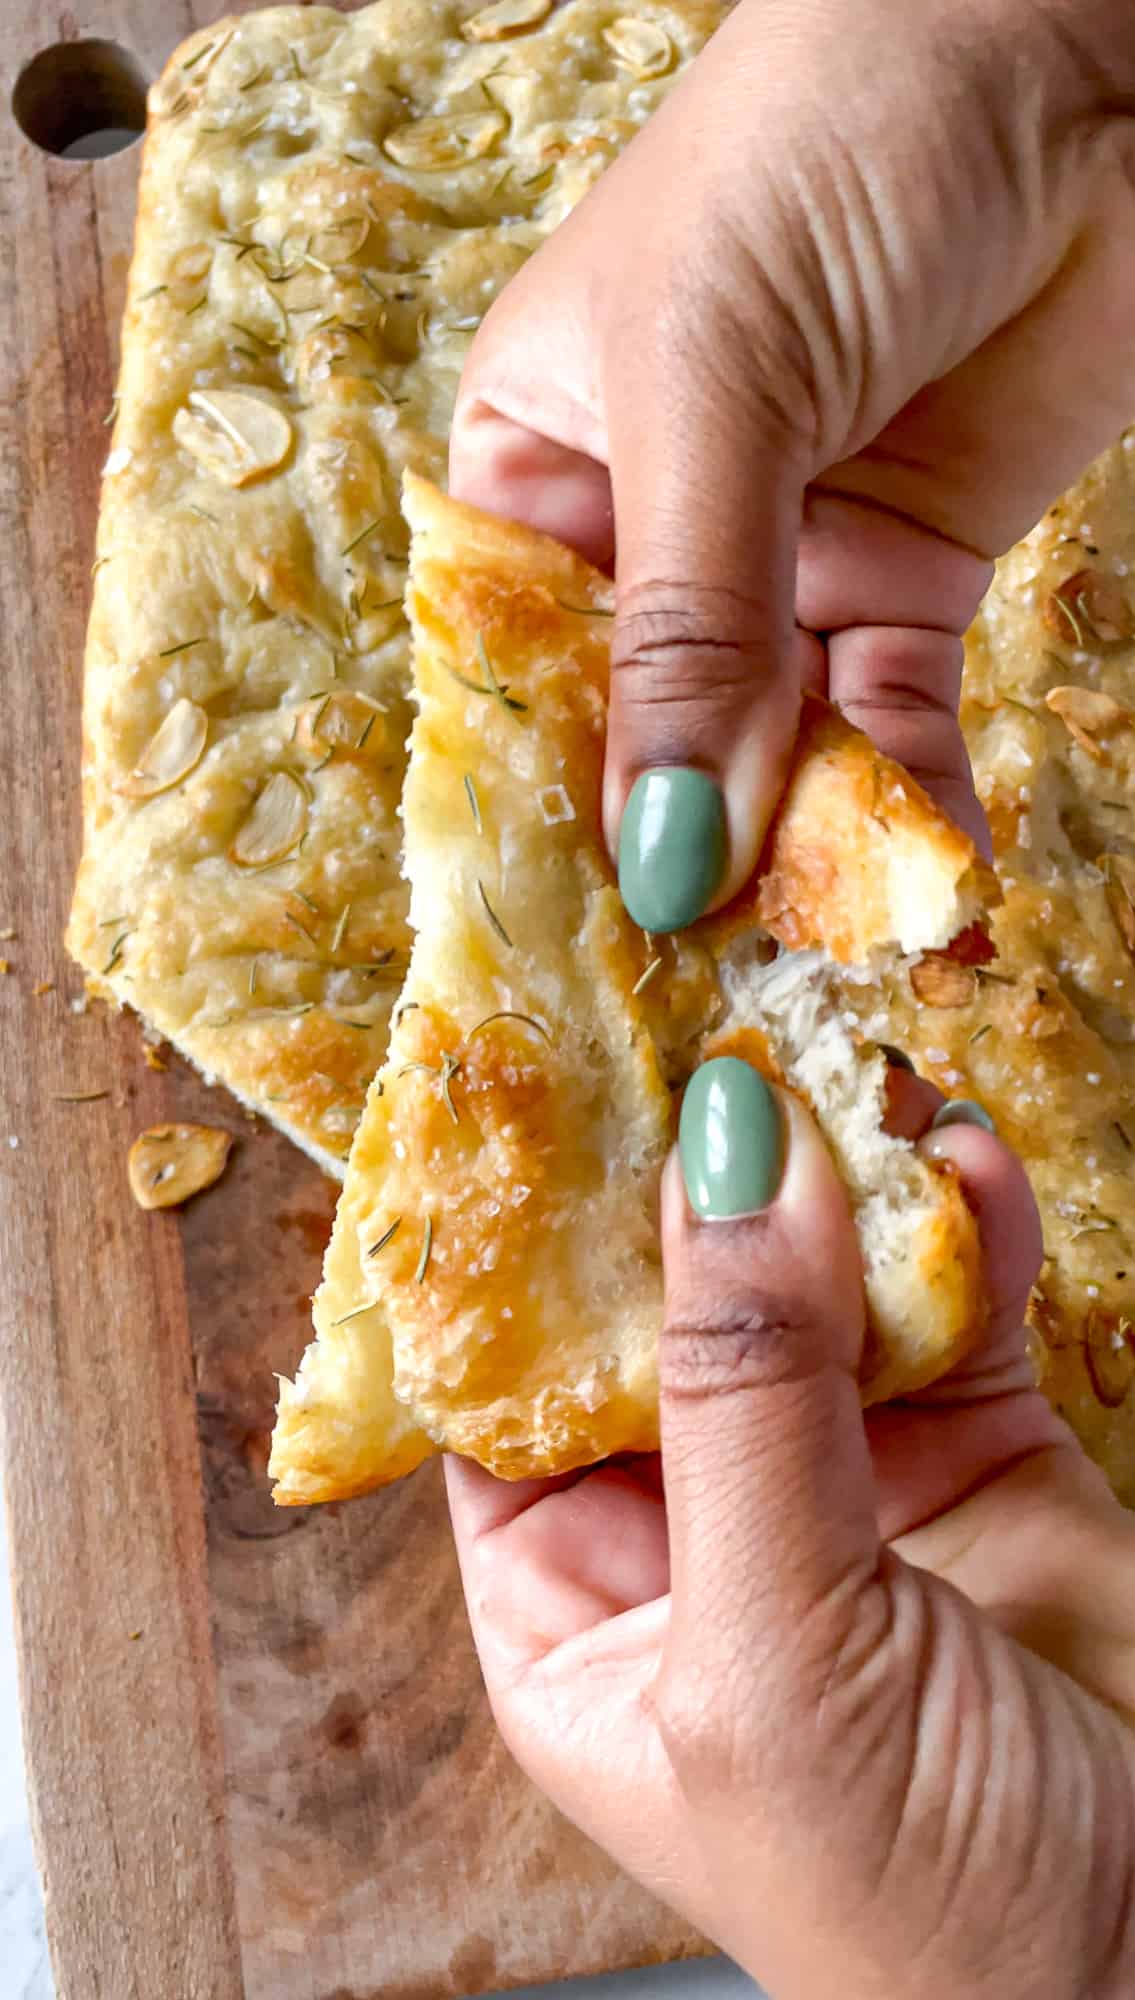
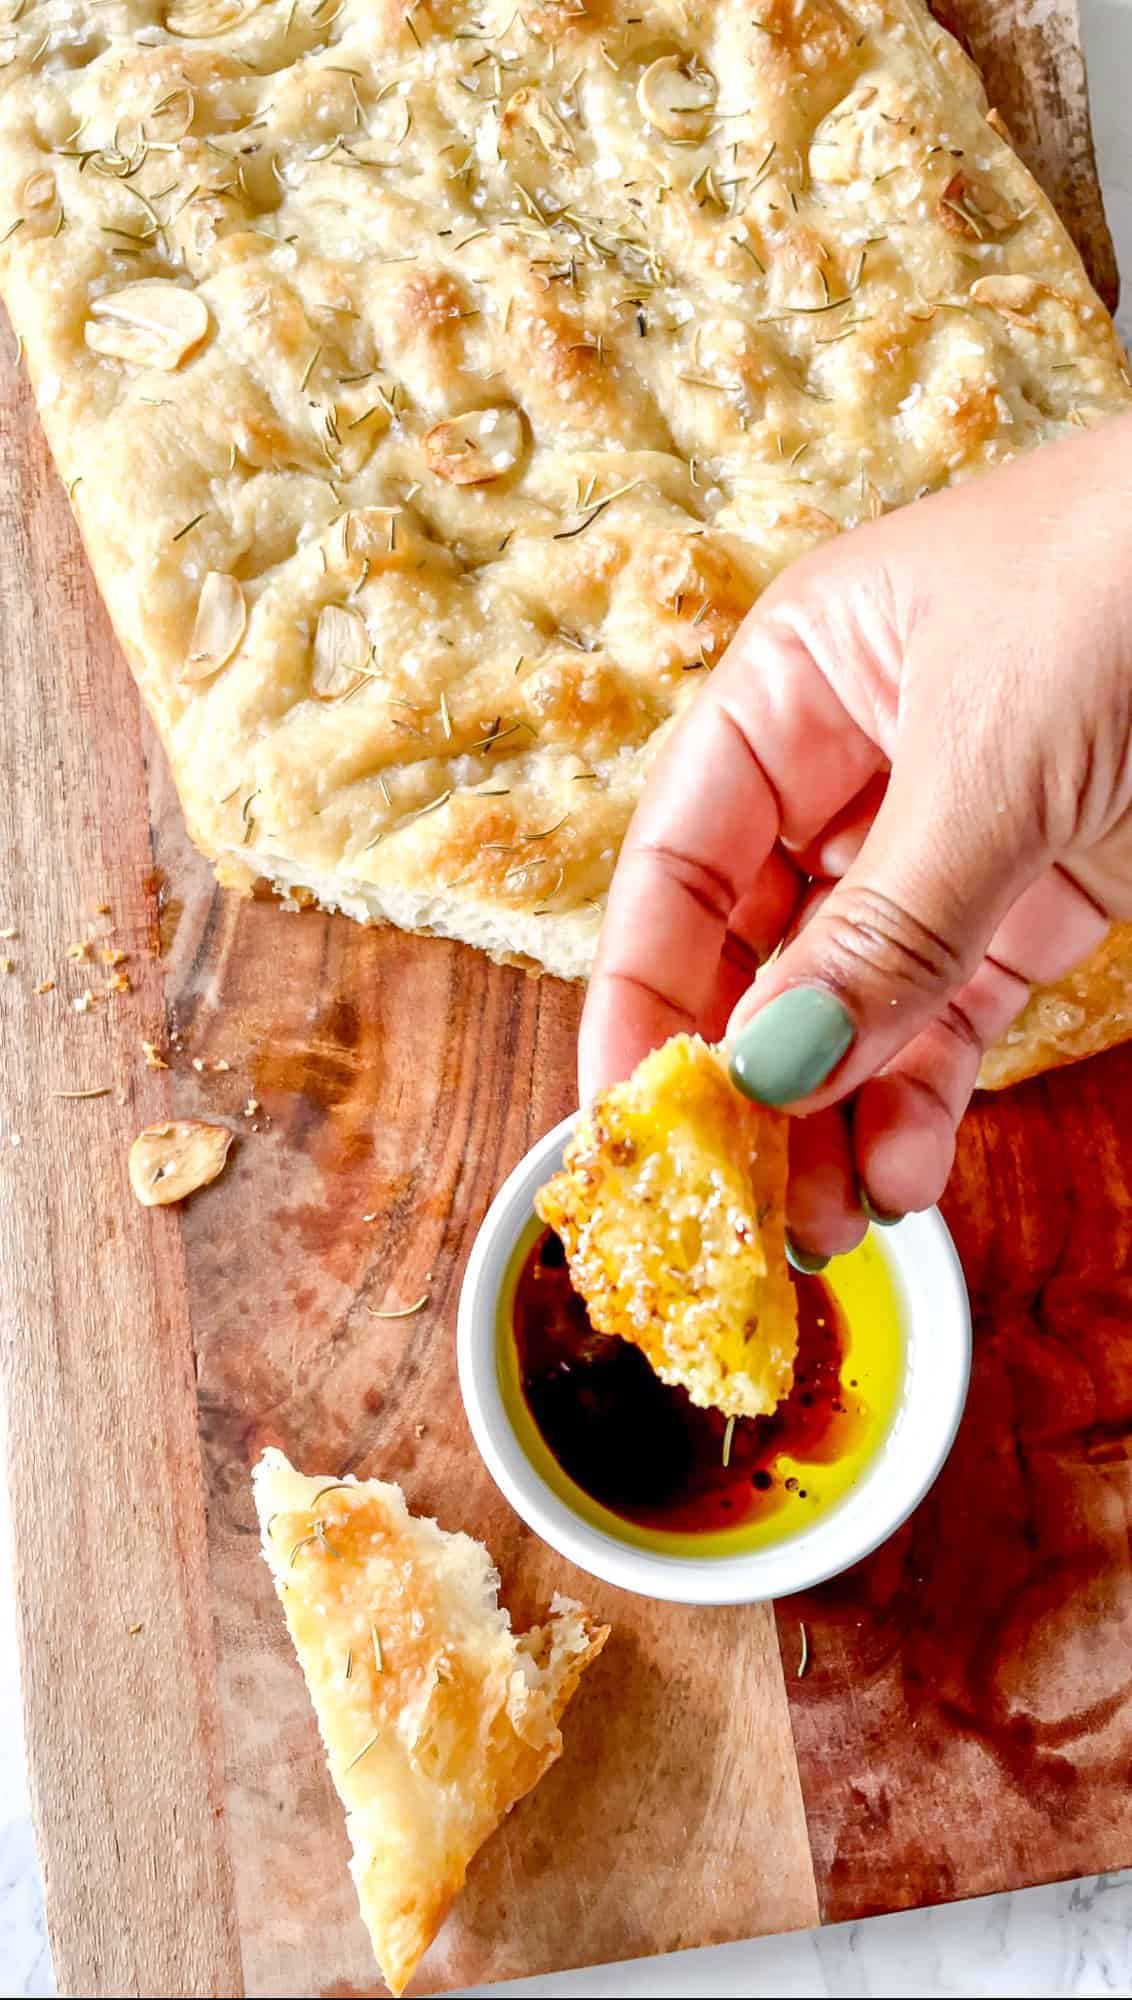
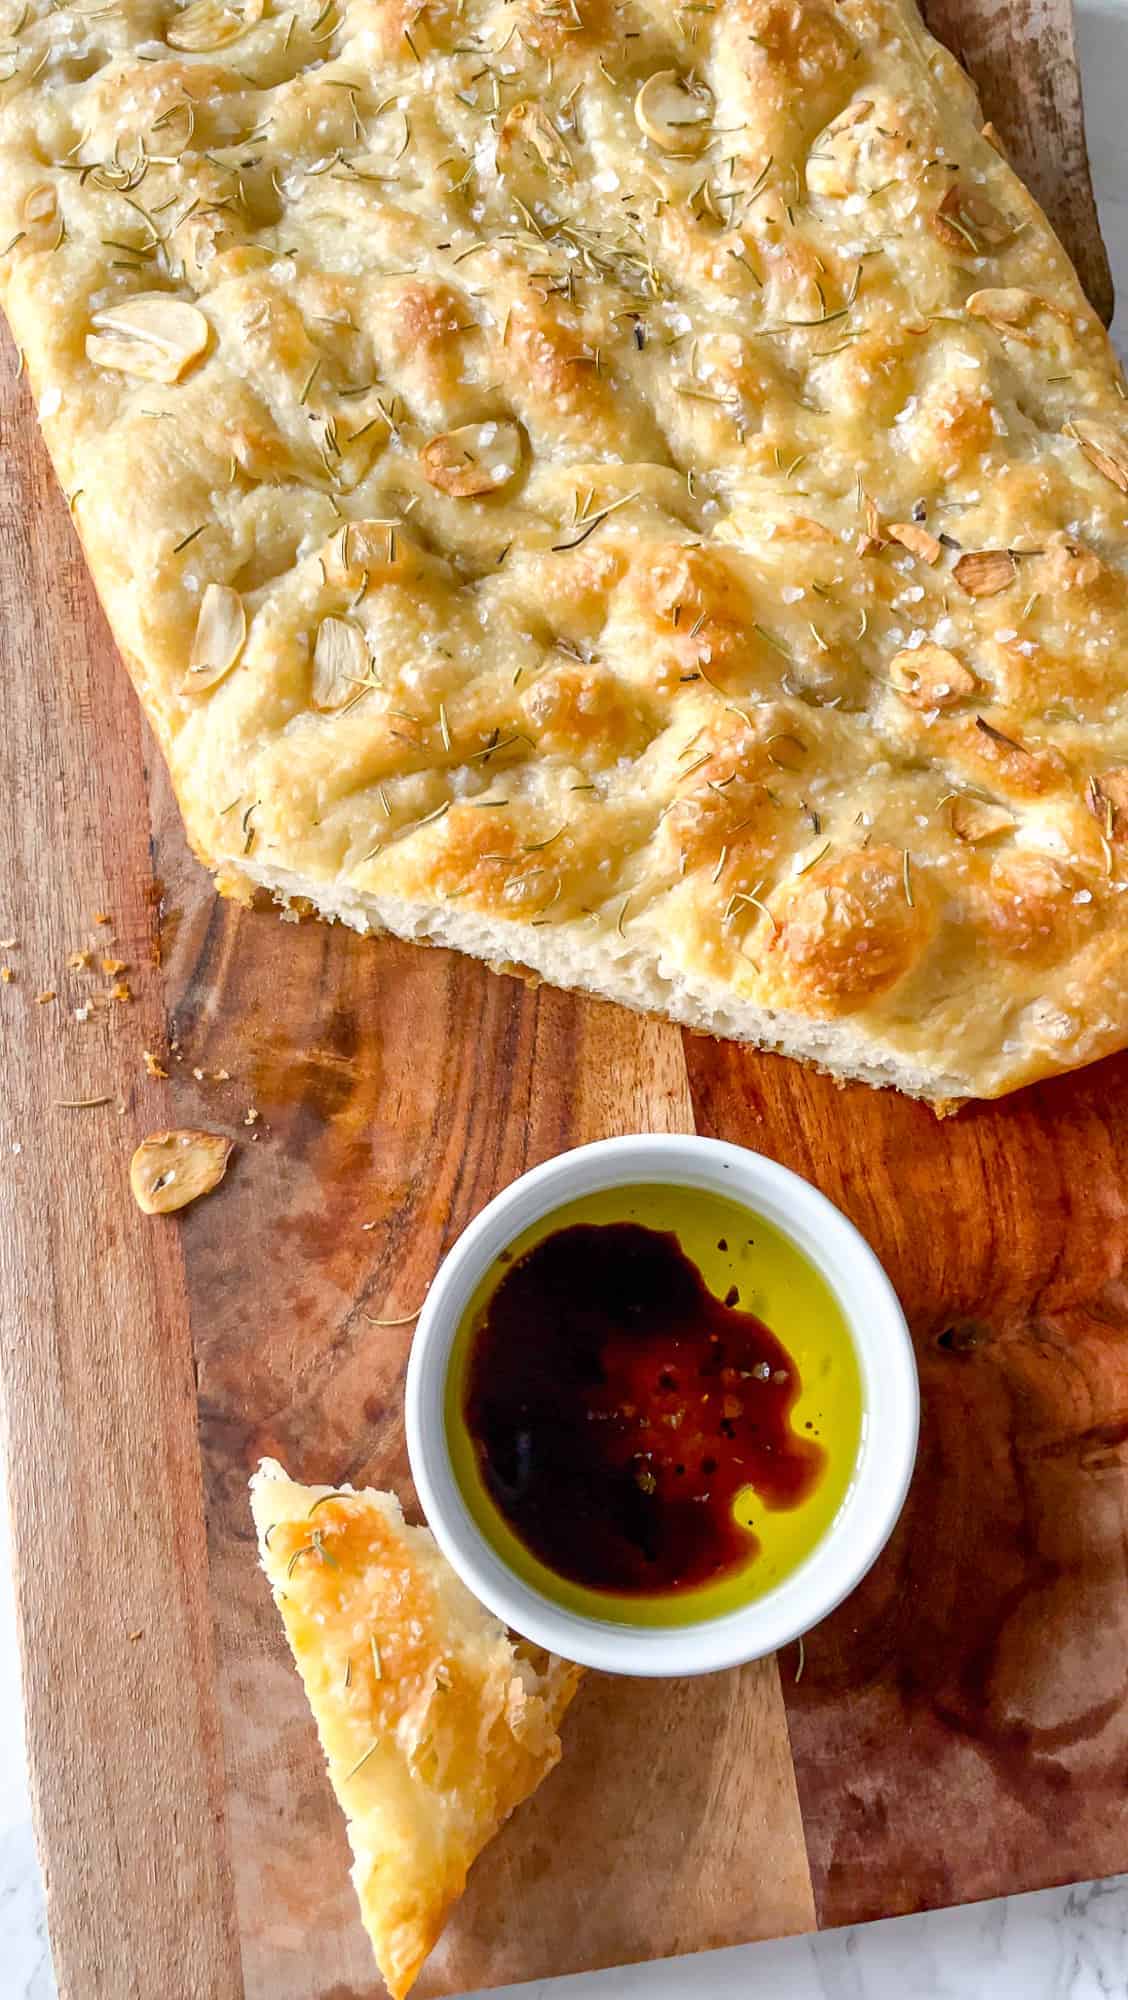
This Garlic and Rosemary Focaccia Bread is the BEST I’ve ever had! The focaccia is the perfect of crunchy & flaky on the outside and pillowy soft on the inside. Perfect for dipping in olive oil and balsamic vinegar or making a sandwich out of it.
If you’re looking for an easy and satisfying bread to make at home, might I suggest focaccia? With a pillowy, chewy inside and slightly crunchy exterior, focaccia is one of the most satisfying kinds of bread to make and eat. It’s naturally vegan and there are so many delicious ways to use it.
This recipe was inspired by a garlic focaccia we used to buy all the time – until I figured out how to make it at home. Needless to say, this bread didn’t last 24 hours in my household.
UPDATE: When I first made this focaccia in 2014, I had it as a very quick rise time bread. I’ve since updated the rise time to be two rises. It still tastes amazing if you rise it for only 2 hours, but the flavor and texture develops incredibly after a 24-hour fridge rise (or 8 hours on the counter rise). I highly recommend doing it this way!
What is Focaccia?
Focaccia is a kind of flatbread from Italy. It is similar to a pizza crust and in some places is called “pizza bianca” for that reason. You can add all sorts of flavorings to your focaccia bread, then serve it alongside soup or turn it into sandwiches. You can even get creative and make focaccia art bread with fresh veggies.
What Makes This Recipe So Good?
This beauty rises for 8 hours on the counter, or 24 hours in the fridge overnight. This produces a pillowy, spongy (in the BEST way) focaccia that is just waiting to be dipped in olive oil and balsamic vinegar or turned into a sandwich. The bread is brushed with olive oil before baking to maintain its moisture, then sprinkled with sea salt to add a contrasting flavor. Roasted garlic and dry rosemary round out the flavor profile. I’m telling you, this bread is so, so good!
Notes on the Ingredients
Please note that this is important information on the ingredients and instructions and the FULL recipe with amounts and details can be found DOWN BELOW (scroll to it) in the recipe card.
- Flour – I use all-purpose flour in my recipe, but you can also use bread flour.
- Instant Yeast – Ensure your yeast is fresh !
- Sugar – This is to feed the yeast (you can read more about it here ) so don’t skip it! You could also use maple syrup or any kind of granulated sugar. This doesn’t make the bread sweet at all.
- Sea Salt – What’s focaccia without sea salt?!
- Water – You want to ensure your water isn’t too hot or you will kill your yeast, but not too cold not to activate it. You want it warm enough to touch but not burning (if your hand can’t handle it, neither can the yeast).
- Extra Virgin Olive Oil – This is my favourite oil for this focaccia bread. I don’t recommend cutting it down – it adds moisture, it helps to make the bread crusty and flaky too.
- Dried Italian Seasoning & Dried Rosemary
How to Make Focaccia Bread (Step by Step)
Please note that this is important information on the ingredients and instructions and the FULL recipe with amounts and details can be found DOWN BELOW (scroll to it) in the recipe card.
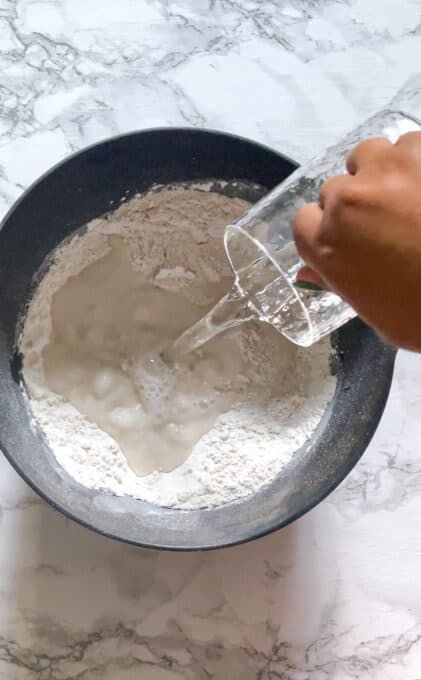
Mix the dry ingredients. Combine flour, dry yeast, sugar, and salt in a large mixing bowl and stir until blended.
Warm the water with some of the oil. Combine water and 2 tablespoons olive oil in a 2-cup glass measuring cup OR microwave-safe bowl. Microwave on HIGH in 15-second increments until very warm but not hot to the touch (120° to 130°F).
Add the warmed water-oil mixture to the flour mixture.
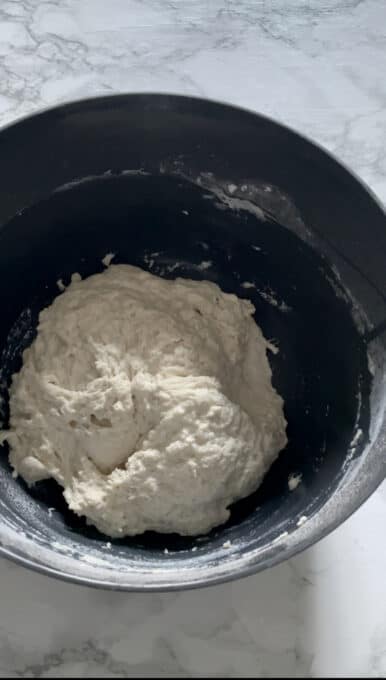
First rise. Fold over dough a few times, and then place in an oiled bowl (you can use ½ tablespoon of the olive oil) and cover. Allow it to rise 6-8 hours on the counter, over 18-24 hours overnight in the fridge.
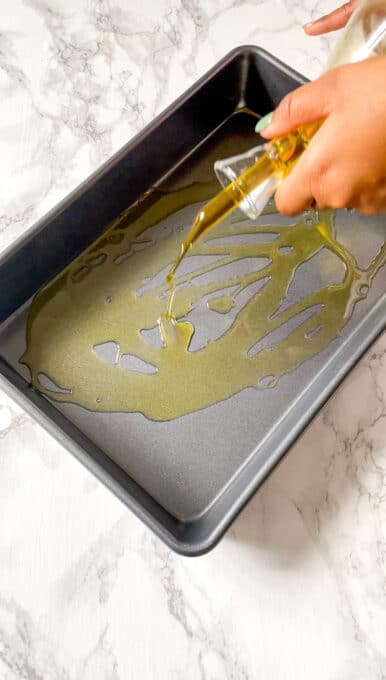
Prep your baking pan. Generously oil a 13 x 9-inch pan and then pour the dough in. (Don’t worry if the dough isn’t even or filling the corners.)
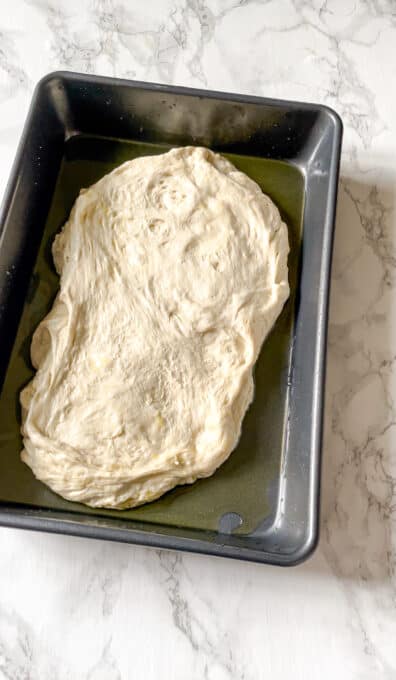
Spread the dough out into the pan. Cover with towel; let rise in a warm place until it spreads naturally and rises again, about 2 hours.
Preheat oven to 400°F/200°C.
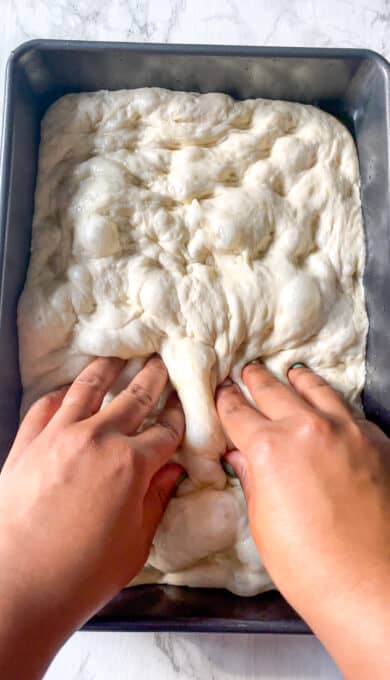
Add the divits. Using your lightly oiled finger, dimple the focaccia bread all over.
Add the seasonings. Add the garlic pieces into a few of the holes evenly all over and sprinkle the Italian seasoning and dried rosemary all over too. Drizzle the sea salt over top. Drizzle the remaining 2 tablespoons of olive oil over the dough.
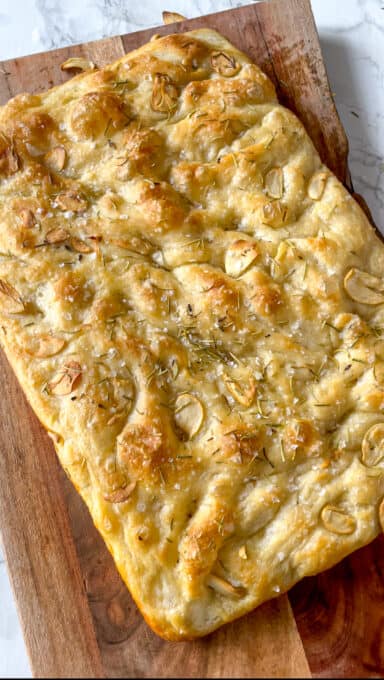
Bake for 30 minutes until golden brown on top. Remove from the oven. Cool slightly and top with more salt if desired, cut and serve with extra oil + balsamic vinegar for dipping. Enjoy!
Tips for Success
- Rise Time – I know it’s tempting to skip the rise time, but let me count the ways it makes a massive difference! You can reduce it to only a 2 hour rise time, and a 30 minute second rise and it’ll great
- Checking Your Yeast is Fresh – You would never want to do all of that work just for your bread not to rise! Ensure your yeast is fresh !
- Serve with a dip – If you’re like me, as amazing as this bread is by itself, you’ll want to include a olive oil and balsamic vinegar dip – equal parts, swirled together and drizzled over the bread.
- Don’t skimp on the olive oil – especially if you want that crispy bottom and that mix of crispy flaky and soft in one bite.
- Use coarse sea salt or flaky sea salt on the exterior – if you have the option, I highly recommend larger sea salt granules on the outside of the bread such as flaky sea salt or coarse larger sea salt. More bite, more flavour nuance and it’s prettier too!
How to Store
Focaccia is at its absolute best when it is fresh from the oven. If you need to store extras, you can place the cooled focaccia in an airtight container and store it on the counter for up to 2 days. If the bread gets soft while stored, you can crisp it up a bit by placing it in an oven heated to 350F for about 5 minutes.
More Bread Recipes
- No Knead Dutch Oven Bread
- Naan Bread
- Gluten Free Focaccia Bread
Ingredients
- 3 ¼ cups all-purpose flour , or Gluten Free Focaccia Bread for gluten free
- 2 ¼ teaspoons instant yeast , (or 1 packet)
- 1 tablespoon sugar
- 1 teaspoon salt
- 1 ½ cups water
- 4 ½ tablespoons extra virgin olive oil , + more for greasing the pan
- 3 cloves garlic , thinly sliced
- 1 teaspoon dried italian seasoning
- ½ teaspoon dried rosemary
- ¼ teaspoon sea salt
Instructions
- Combine flour, dry yeast, sugar and salt in a large mixing bowl and stir until blended.
- Combine water and 2 tablespoons olive oil in a 2-cup glass measuring cup OR microwave-safe bowl. Microwave on HIGH in 15 second increments until very warm but not hot to the touch (120° to 130°F). Add to flour mixture.
- Fold over dough a few times, and then place in an oiled bowl (you can use ½ tablespoon of the olive oil) and cover. Allow to rise 6-8 hours on the counter, OR for 18-24 hours overnight in the fridge.
- Generously oil a 13 x 9-inch pan and then pour the dough in. (Don’t worry if the dough isn’t even or filling the corners.) Cover with towel; let rise in warm place until it spreads naturally and rises again, about 2 hours.
- Preheat oven to 400°F/200°C.
- Using your lightly oiled finger, dimple the focaccia bread all over. Add the garlic pieces into a few of the holes evenly all over and sprinkle the italian seasoning and dried rosemary all over too. Drizzle the sea salt over too. Drizzle the remaining 2 tablespoons olive oil over the dough.
- Bake for 30 minutes until golden brown on top. Remove from the oven. Cool slightly and top with more salt if desired, cut and serve with extra oil + balsamic vinegar for dipping. Enjoy!
Notes
This Garlic and Rosemary Focaccia Bread is the BEST I’ve ever had! The focaccia is the perfect of crunchy & flaky on the outside and pillowy soft on the inside. Perfect for dipping in olive oil and balsamic vinegar or making a sandwich out of it.
If you’re looking for an easy and satisfying bread to make at home, might I suggest focaccia? With a pillowy, chewy inside and slightly crunchy exterior, focaccia is one of the most satisfying kinds of bread to make and eat. It’s naturally vegan and there are so many delicious ways to use it.
This recipe was inspired by a garlic focaccia we used to buy all the time – until I figured out how to make it at home. Needless to say, this bread didn’t last 24 hours in my household.
UPDATE: When I first made this focaccia in 2014, I had it as a very quick rise time bread. I’ve since updated the rise time to be two rises. It still tastes amazing if you rise it for only 2 hours, but the flavor and texture develops incredibly after a 24-hour fridge rise (or 8 hours on the counter rise). I highly recommend doing it this way!
What is Focaccia?
Focaccia is a kind of flatbread from Italy. It is similar to a pizza crust and in some places is called “pizza bianca” for that reason. You can add all sorts of flavorings to your focaccia bread, then serve it alongside soup or turn it into sandwiches. You can even get creative and make focaccia art bread with fresh veggies.
What Makes This Recipe So Good?
This beauty rises for 8 hours on the counter, or 24 hours in the fridge overnight. This produces a pillowy, spongy (in the BEST way) focaccia that is just waiting to be dipped in olive oil and balsamic vinegar or turned into a sandwich. The bread is brushed with olive oil before baking to maintain its moisture, then sprinkled with sea salt to add a contrasting flavor. Roasted garlic and dry rosemary round out the flavor profile. I’m telling you, this bread is so, so good!
Notes on the Ingredients
Please note that this is important information on the ingredients and instructions and the FULL recipe with amounts and details can be found DOWN BELOW (scroll to it) in the recipe card.
- Flour – I use all-purpose flour in my recipe, but you can also use bread flour.
- Instant Yeast – Ensure your yeast is fresh !
- Sugar – This is to feed the yeast (you can read more about it here ) so don’t skip it! You could also use maple syrup or any kind of granulated sugar. This doesn’t make the bread sweet at all.
- Sea Salt – What’s focaccia without sea salt?!
- Water – You want to ensure your water isn’t too hot or you will kill your yeast, but not too cold not to activate it. You want it warm enough to touch but not burning (if your hand can’t handle it, neither can the yeast).
- Extra Virgin Olive Oil – This is my favourite oil for this focaccia bread. I don’t recommend cutting it down – it adds moisture, it helps to make the bread crusty and flaky too.
- Dried Italian Seasoning & Dried Rosemary
How to Make Focaccia Bread (Step by Step)
Please note that this is important information on the ingredients and instructions and the FULL recipe with amounts and details can be found DOWN BELOW (scroll to it) in the recipe card.
Mix the dry ingredients. Combine flour, dry yeast, sugar, and salt in a large mixing bowl and stir until blended.
Warm the water with some of the oil. Combine water and 2 tablespoons olive oil in a 2-cup glass measuring cup OR microwave-safe bowl. Microwave on HIGH in 15-second increments until very warm but not hot to the touch (120° to 130°F).
Add the warmed water-oil mixture to the flour mixture.
First rise. Fold over dough a few times, and then place in an oiled bowl (you can use ½ tablespoon of the olive oil) and cover. Allow it to rise 6-8 hours on the counter, over 18-24 hours overnight in the fridge.
Prep your baking pan. Generously oil a 13 x 9-inch pan and then pour the dough in. (Don’t worry if the dough isn’t even or filling the corners.)
Spread the dough out into the pan. Cover with towel; let rise in a warm place until it spreads naturally and rises again, about 2 hours.
Preheat oven to 400°F/200°C.
Add the divits. Using your lightly oiled finger, dimple the focaccia bread all over.
Add the seasonings. Add the garlic pieces into a few of the holes evenly all over and sprinkle the Italian seasoning and dried rosemary all over too. Drizzle the sea salt over top. Drizzle the remaining 2 tablespoons of olive oil over the dough.
Bake for 30 minutes until golden brown on top. Remove from the oven. Cool slightly and top with more salt if desired, cut and serve with extra oil + balsamic vinegar for dipping. Enjoy!
Tips for Success
- Rise Time – I know it’s tempting to skip the rise time, but let me count the ways it makes a massive difference! You can reduce it to only a 2 hour rise time, and a 30 minute second rise and it’ll great
- Checking Your Yeast is Fresh – You would never want to do all of that work just for your bread not to rise! Ensure your yeast is fresh !
- Serve with a dip – If you’re like me, as amazing as this bread is by itself, you’ll want to include a olive oil and balsamic vinegar dip – equal parts, swirled together and drizzled over the bread.
- Don’t skimp on the olive oil – especially if you want that crispy bottom and that mix of crispy flaky and soft in one bite.
- Use coarse sea salt or flaky sea salt on the exterior – if you have the option, I highly recommend larger sea salt granules on the outside of the bread such as flaky sea salt or coarse larger sea salt. More bite, more flavour nuance and it’s prettier too!
How to Store
Focaccia is at its absolute best when it is fresh from the oven. If you need to store extras, you can place the cooled focaccia in an airtight container and store it on the counter for up to 2 days. If the bread gets soft while stored, you can crisp it up a bit by placing it in an oven heated to 350F for about 5 minutes.
More Bread Recipes
- No Knead Dutch Oven Bread
- Naan Bread
- Gluten Free Focaccia Bread
Ingredients
- 3 ¼ cups all-purpose flour , or Gluten Free Focaccia Bread for gluten free
- 2 ¼ teaspoons instant yeast , (or 1 packet)
- 1 tablespoon sugar
- 1 teaspoon salt
- 1 ½ cups water
- 4 ½ tablespoons extra virgin olive oil , + more for greasing the pan
- 3 cloves garlic , thinly sliced
- 1 teaspoon dried italian seasoning
- ½ teaspoon dried rosemary
- ¼ teaspoon sea salt
Instructions
- Combine flour, dry yeast, sugar and salt in a large mixing bowl and stir until blended.
- Combine water and 2 tablespoons olive oil in a 2-cup glass measuring cup OR microwave-safe bowl. Microwave on HIGH in 15 second increments until very warm but not hot to the touch (120° to 130°F). Add to flour mixture.
- Fold over dough a few times, and then place in an oiled bowl (you can use ½ tablespoon of the olive oil) and cover. Allow to rise 6-8 hours on the counter, OR for 18-24 hours overnight in the fridge.
- Generously oil a 13 x 9-inch pan and then pour the dough in. (Don’t worry if the dough isn’t even or filling the corners.) Cover with towel; let rise in warm place until it spreads naturally and rises again, about 2 hours.
- Preheat oven to 400°F/200°C.
- Using your lightly oiled finger, dimple the focaccia bread all over. Add the garlic pieces into a few of the holes evenly all over and sprinkle the italian seasoning and dried rosemary all over too. Drizzle the sea salt over too. Drizzle the remaining 2 tablespoons olive oil over the dough.
- Bake for 30 minutes until golden brown on top. Remove from the oven. Cool slightly and top with more salt if desired, cut and serve with extra oil + balsamic vinegar for dipping. Enjoy!
Notes

Garlic and Rosemary Focaccia Bread
Ingredients
- 3 ¼ cups all-purpose flour or Gluten Free Focaccia Bread for gluten free
- 2 ¼ teaspoons instant yeast (or 1 packet)
- 1 tablespoon sugar
- 1 teaspoon salt
- 1 ½ cups water
- 4 ½ tablespoons extra virgin olive oil + more for greasing the pan
- 3 cloves garlic thinly sliced
- 1 teaspoon dried italian seasoning
- ½ teaspoon dried rosemary
- ¼ teaspoon sea salt
Instructions
- Combine flour, dry yeast, sugar and salt in a large mixing bowl and stir until blended.
- Combine water and 2 tablespoons olive oil in a 2-cup glass measuring cup OR microwave-safe bowl. Microwave on HIGH in 15 second increments until very warm but not hot to the touch (120° to 130°F). Add to flour mixture.
- Fold over dough a few times, and then place in an oiled bowl (you can use ½ tablespoon of the olive oil) and cover. Allow to rise 6-8 hours on the counter, OR for 18-24 hours overnight in the fridge.
- Generously oil a 13 x 9-inch pan and then pour the dough in. (Don’t worry if the dough isn’t even or filling the corners.) Cover with towel; let rise in warm place until it spreads naturally and rises again, about 2 hours.
- Preheat oven to 400°F/200°C.
- Using your lightly oiled finger, dimple the focaccia bread all over. Add the garlic pieces into a few of the holes evenly all over and sprinkle the italian seasoning and dried rosemary all over too. Drizzle the sea salt over too. Drizzle the remaining 2 tablespoons olive oil over the dough.
- Bake for 30 minutes until golden brown on top. Remove from the oven. Cool slightly and top with more salt if desired, cut and serve with extra oil + balsamic vinegar for dipping. Enjoy!
Video
Notes
Nutrition
Garlic and Rosemary Focaccia Bread https://jessicainthekitchen.com/garlic-focaccia-bread-recipe/ August 23, 2021
These easy vegan stuffed peppers are made Tex-Mex Style with rice or quinoa, black beans, and corn. They are very filling and perfect for quick weeknight dinners and meatless meal prep.

Vegan stuffed peppers are my ultimate convenience lunch or easy weeknight dinner. They’re quick to prepare (set those kitchen timers to 30 minutes!), great to take on the go, and extra flavorful. My recipe has a delicious, savory, slightly spicy meatless filling made from quinoa (or rice), tender corn, black beans, marinara sauce, and melty vegan mozzarella. Try these for your next weekly dinner and I guarantee you’ll love them!
What Makes These Stuffed Peppers Impossible to Resist
- Easy to find ingredients. You more than likely have the ingredients for these meatless stuffed peppers in your pantry and fridge already.
- Flavorful stuffing. Quinoa is filling, foolproof, and easy to make. I love the Southwestern vibes it brings to these spicy, savory stuffed peppers, and recipes like my quinoa enchilada skillet . It’s the perfect filling, but if you don’t have it, rice works great here, too.
- Customizable. I make these vegan stuffed peppers Tex-Mex-style. You can season the filling and adapt the ingredients any way you’d like. And if you love stuffed peppers as much as I do, try this (easily adaptable) stuffed pepper casserole , too.
- Great for meal prep. These vegan stuffed bell peppers store well in the fridge. Hello, meal prep magic!!
Notes on Ingredients
Alrighty, let’s get into the key ingredients for these vegan stuffed peppers. As I mentioned above, I bet you already have a bunch of them. Scroll to the recipe card for the printable recipe with the full amounts.
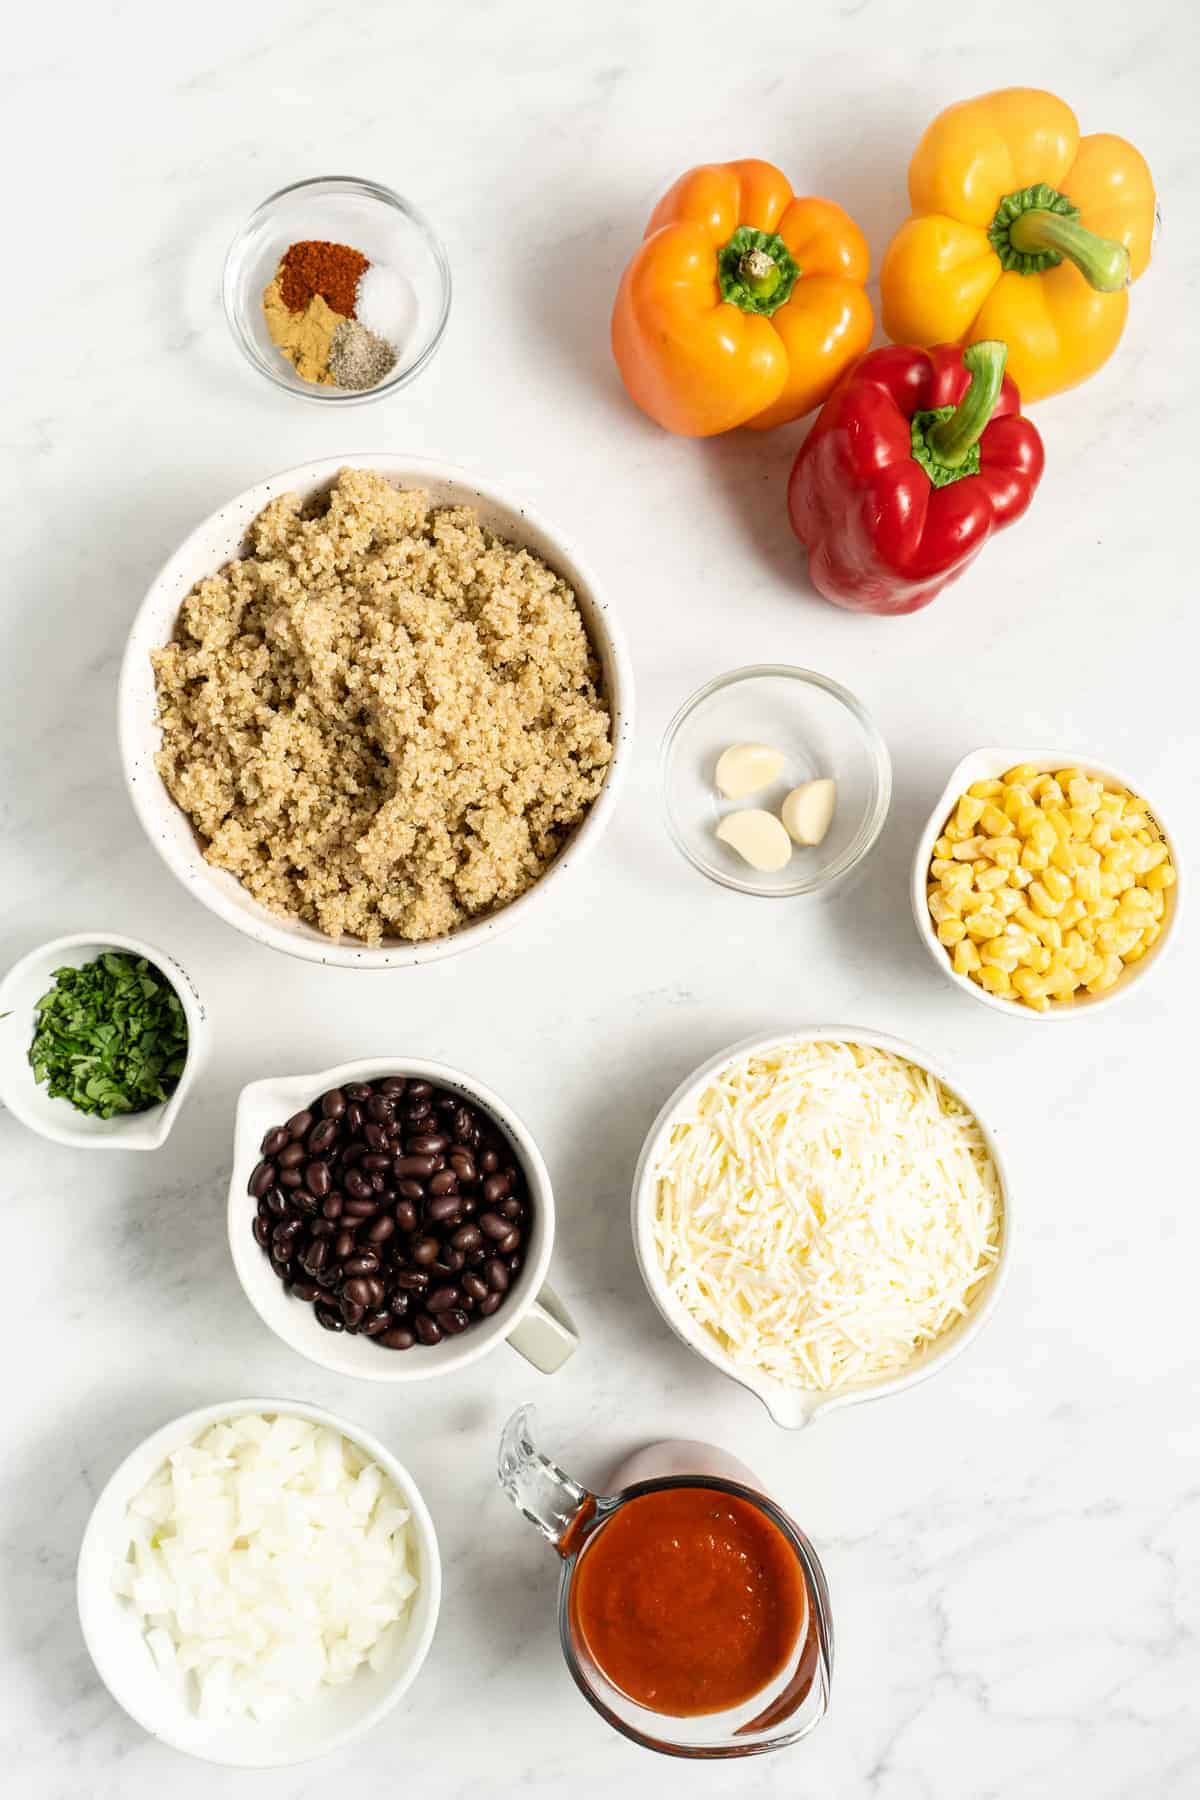
- Bell Peppers – I like to use red, orange, and yellow. You can use all one color, do a mix, etc. Whatever you feel like!
- Coconut Oil – You can use other cooking oils like olive oil and canola oil, too.
- Onion and Garlic – I tend to use white or yellow onion. Minced garlic adds great savory flavor. Otherwise, you can substitute 1/4 teaspoon of garlic powder per fresh clove. Jalapeños would also taste amazing in the filling!
- Black Beans – I love the texture that canned black beans add to these peppers. Other good choices are pinto beans, navy beans, and kidney beans.
- Corn Kernels – Another great Tex-Mex style addition! You could also shave the kernels from leftover corn on the cob or Mexican elote .
- Seasoning – I throw in some ground cumin, sea salt, freshly ground black pepper, and chopped parsley, plus chili powder for a touch of heat. Feel free to substitute another seasoning, like cayenne, taco seasoning, or Cajun spice.
- Cooked Quinoa – I have an in-depth tutorial on how to cook quinoa if you need it. White or brown rice is an easy substitution for this if you need it.
- Marinara Sauce – Use homemade marinara sauce or choose your favorite jarred sauce from the store.
- Vegan Cheese – I love to add vegan mozzarella shreds for a cheesy topping. Vegan cheddar would also work well.
How to Make Vegan Stuffed Peppers
These stuffed peppers are as easy as mixing all the ingredients in a skillet over heat, softening the onions and garlic, and then stuffing the peppers. Seriously, easy as pie. Well, savory pie. Here are more in-depth instructions for the best vegan stuffed peppers:

Prepare the peppers.
- Prepare for baking. Preheat the oven to 350ºF. Meanwhile, slice the tops off the bell peppers, and remove the insides and seeds. Arrange the hollowed-out peppers in a casserole dish upright, tightly packed against each other so they don’t tip.
- Sauté the aromatics. Heat the coconut oil in a skillet over medium-high heat. Add the onions and garlic, and sauté until slightly translucent. This usually takes about 5 minutes.
Combine the filling ingredients.
- Mix the filling . Next, stir in the black beans, corn, seasonings, and quinoa. Add the marinara sauce and a fistful of vegan cheese. Stir again to combine, and let the mixture sit until the cheese has melted slightly. Take the skillet off the heat.

Stuff the peppers.
- Stuff the peppers. Spoon the filling into the peppers, packing it tightly. Sprinkle more cheese on top of the peppers.
- Bake. Bake the stuffed peppers at 350ºF for 40 minutes, until the tops are golden brown. You can also lightly broil the tops for a minute or two, if you like. Keep a close eye so they don’t burn!
Can I Grill These?
Sure! To cook these vegan stuffed peppers on the grill, first, grill the empty peppers for 5-10 minutes until they’re softened. Then, take them off the grill, stuff them with the filling, and return the peppers to the grill over medium heat for 15-20 minutes. Sprinkle the cheese over towards the end of the cooking time.

Recipe Tips
- Cook the quinoa ahead of time. You can totally make the quinoa right before you stuff the peppers, but the night before works too, and saves time the next day. Either way, it’s easy and tastes great with all the other ingredients.
- Texture tip: I love my peppers soft, but still intact. If you want them to be super soft and buttery, you can blanch the peppers in hot water before and then drain them. It’s totally up to you!
- Switch up the flavors. That’s one of the best parts about stuffed peppers. They can be made Spanish, Mediterranean, Tex-Mex, pizza, or even Cuban-style . It’s totally up to you!
- Make them “meaty”. Stir vegan taco meat into the quinoa for a heartier, but still meatless, stuffed peppers.

Optional Toppings
Vegan mozzarella is by far my favorite topping for these vegan stuffed peppers. It’s so gooey and delicious! However, you definitely have options:
- Add a dollop of vegan sour cream or vegan yogurt .
- A sprinkle of Italian seasoning or chopped parsley.
- Restaurant-style blender salsa .
- Taco toppings like avocado slices, diced tomatoes, etc.
What to Serve With Vegan Stuffed Peppers
I used large bell peppers for these, and one of them can easily serve a single person for dinner. That said, there’s no reason you can’t bring in some tasty additions to make it a fuller meal! Serve these vegan stuffed peppers with Tex-Mex dishes like vegan fajitas , chips and guacamole , or a refreshing, sharing-style cucumber and tomato salad . These Southwest egg rolls make a great starter, washed down with a peach sangria .

How to Store and Reheat Leftovers
- Refrigerate. Store leftover quinoa-stuffed peppers in an airtight Tupperware container for 3-4 days.
- Reheat. To reheat, pop them in the microwave or the oven at 350ºF until warmed through.
- Freeze. Freeze your leftover peppers in an airtight container for 2-3 months. Let them thaw overnight in the fridge before digging in again!
More Vegan Dinner Recipes
- Sticky Sesame Cauliflower Wings
- Slow Cooker Vegan Chili
- Cheesy Taco Pasta
- Baked Vegan Mac and Cheese
- Vegan Pizza
Ingredients
Easy Quinoa Stuffed Peppers (Tex Mex Style)
- 6 large bell peppers
- 1 tablespoon coconut oil , or olive oil or any oil
- ½ large onion , diced
- 3 cloves garlic , minced
- 1 ¾ cups black beans , or 1 can
- 1 cup corn kernels
- ½ teaspoon chili powder
- 1 teaspoon ground cumin
- ½ teaspoon sea salt
- ½ teaspoon freshly ground black pepper
- ½ cup chopped parsley
- 3 cups cooked quinoa , or cooked rice
- 1 cup marinara sauce
- 2 cups vegan mozzarella shreds , reserve ½ cup for the tops
Instructions
Easy Quinoa Stuffed Peppers (Tex Mex Style)
- Preheat your oven to 350℉/180℃. Set aside a casserole dish for the bell peppers.
- Slice the tops off of the bell peppers, and remove the insides and seeds. Place in casserole dish upright, tightly packed against each other. Set aside. Keep the tops to put on top once they’re stuffed to go back into the oven.
- In a skillet over medium high heat, heat the oil. Add in the onions and garlic and sauté until slightly translucent, about 5 minutes.
- Add in the black beans, corn, chili powder, ground cumin, sea salt, black pepper, parsley and quinoa. Stir to combine. Add the marinara sauce and 1 ½ cups of the cheese on top in the pan. Stir again to combine and let sit until cheese has melted slightly, about 3 minutes. Remove from heat.
- Stuff each of the peppers with the mixture, packing them tightly. Sprinkle the cheese on top of the peppers. Top with the bell pepper tops.
- Bake for 40 minutes until tops are golden brown. You can also optionally lightly broil the tops.
- Enjoy!
Notes
- Make the Quinoa/Rice Ahead: You can totally make the quinoa right before you make the peppers, but the night before works too, and saves time the next day. Either way, it’s easy and tastes great with all the other ingredients.
- Texture Tip: I love my peppers soft, but still intact. If you want them to be super soft and buttery, you can blanch the peppers in hot water before and then drain them. It’s totally up to you!
- Can I Grill These? Sure! Cooking the peppers for 40 minutes is more to soften the peppers than anything, but you could also do this on a grill if you want. Beautifully charred skin would go SO well with these.
- Switch Up the Flavors: That’s one of the best parts about stuffed peppers – they can be made Spanish, Tex Mex, pizza, or even Cuban style. It’s totally up to you!
- Diet Questions: This recipe is vegan and gluten free.
- To Store: You can store these peppers in an airtight Tupperware container in the fridge.
- To Reheat: You can reheat these in the microwave or in the oven at 350 until warmed through.
