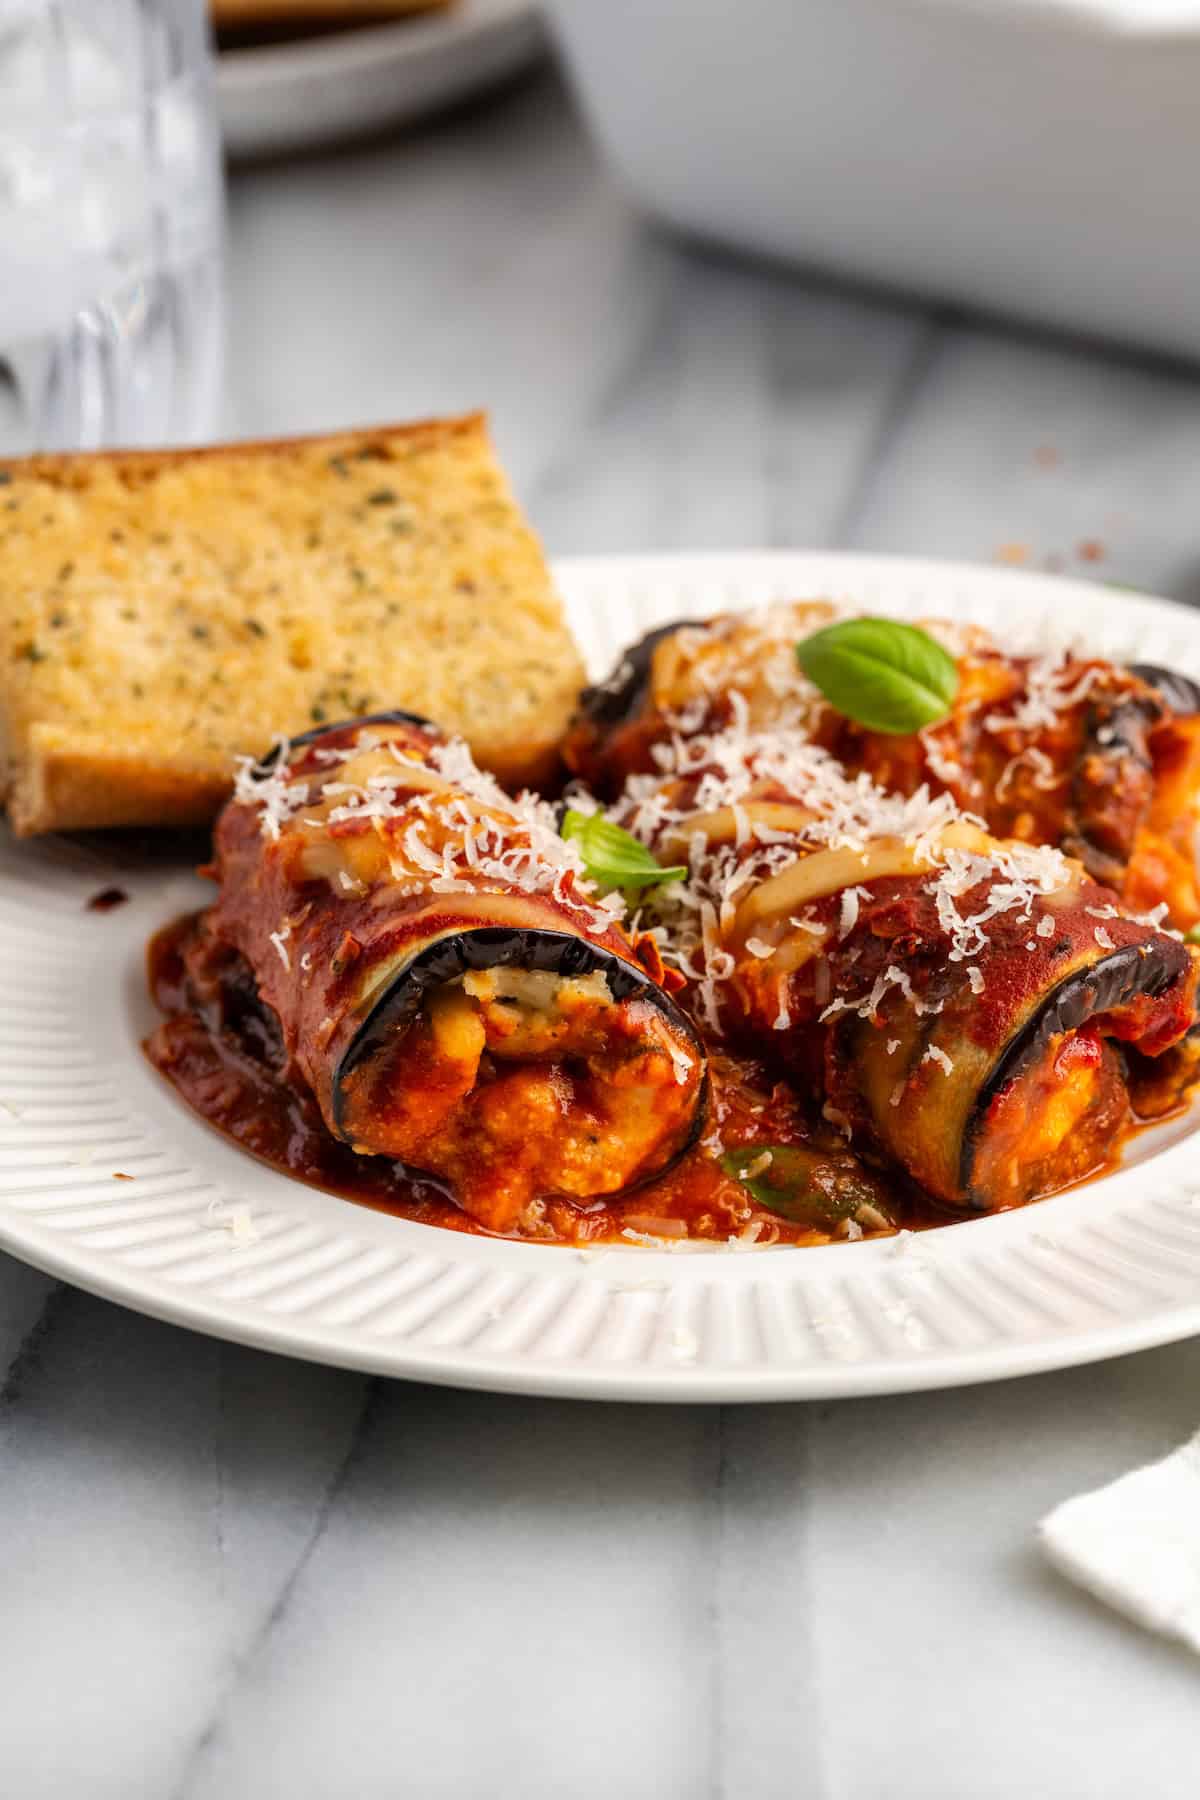
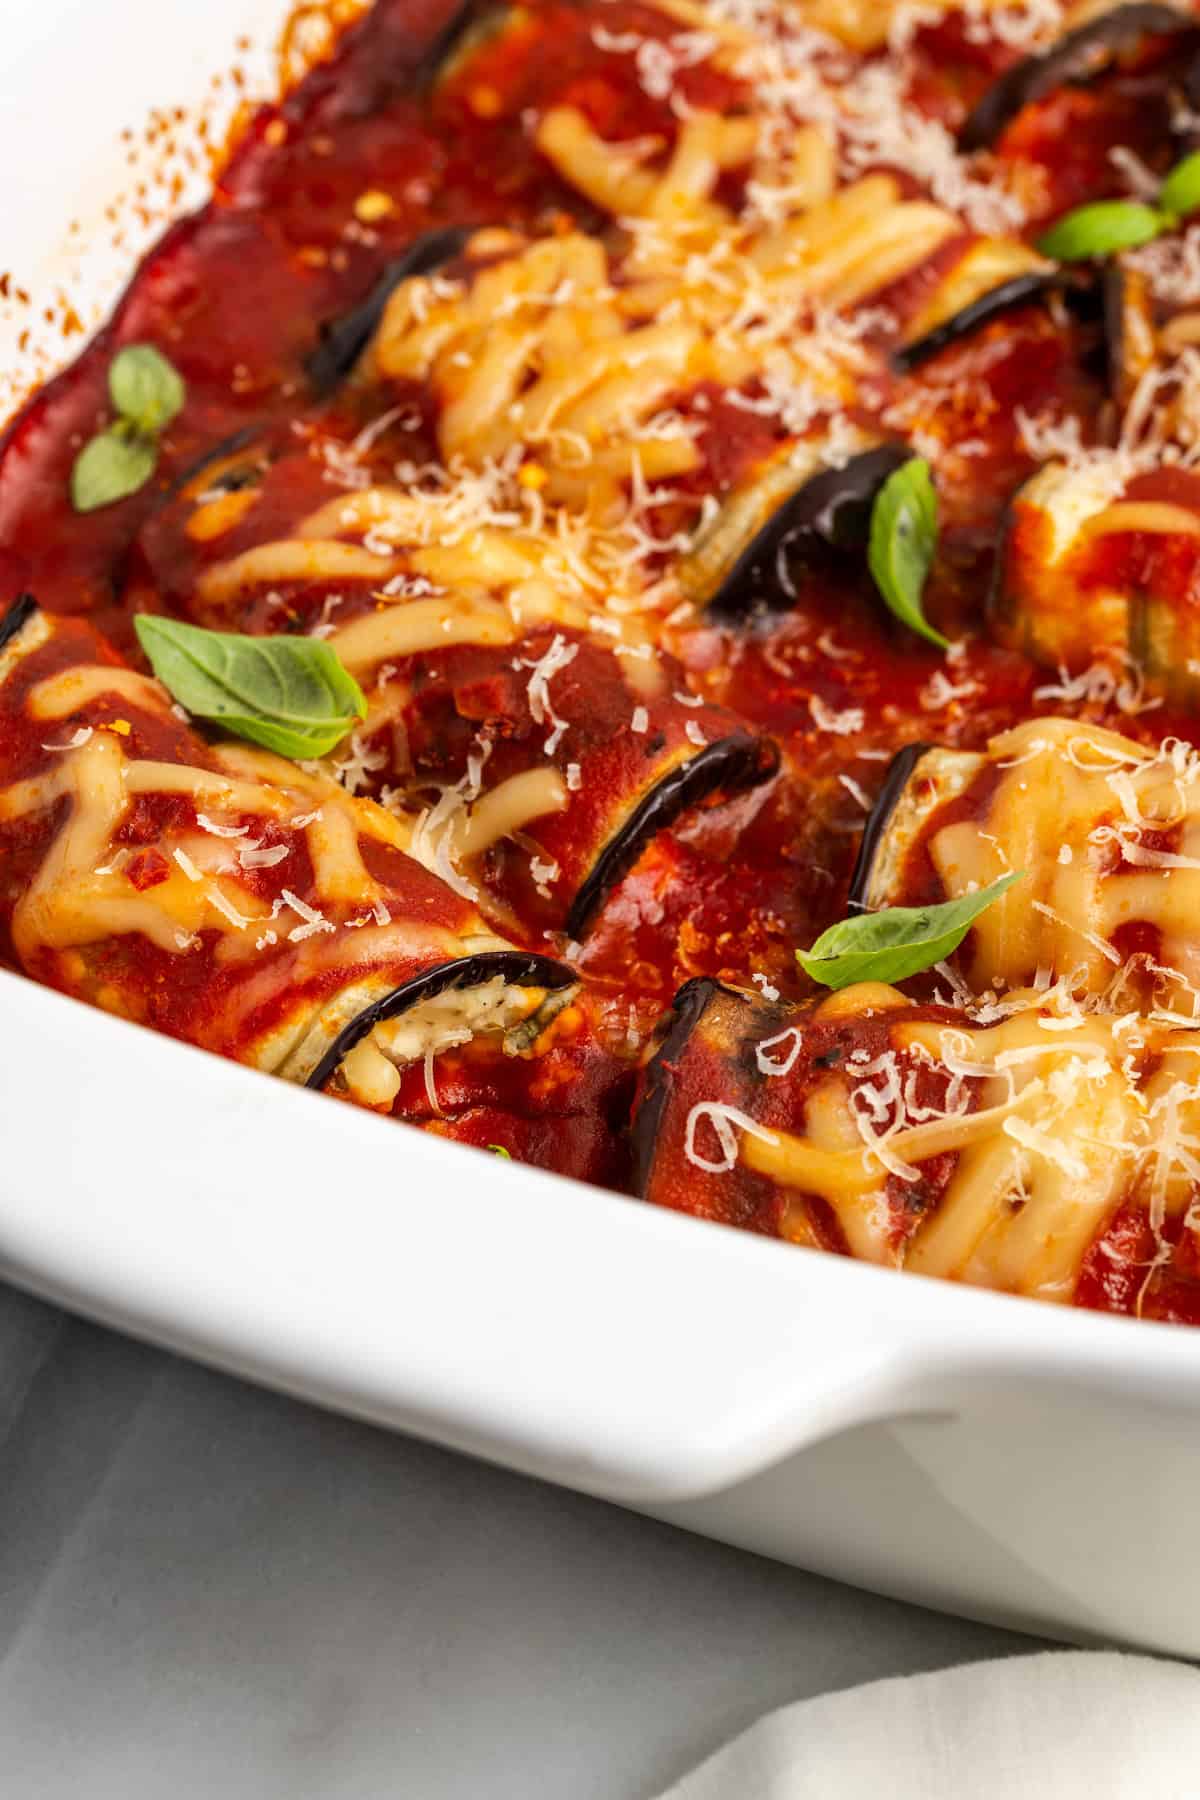
Tender roasted eggplant is rolled up with vegan cheeses and fresh basil then smothered in tomato sauce to make this hearty eggplant rollatini recipe. It’s fantastic for meal prep too!
If you’ve ever had lasagna roll-ups before, eggplant rollatini is almost the same thing, but the lasagna noodles are swapped for eggplant. This makes eggplant rollatini a little bit lighter in the carb department, and a little more flavourful thanks to the roasted eggplant. It’s plenty cheesy, super easy, and guaranteed to be a hit with vegans and non-vegans alike!
Why You’ll Love This Eggplant Rollatini Recipe
- So many meal prep options . You can roast the eggplant in advance; you can make the filling in advance. You can assemble the whole recipe ahead of time and either freeze it or pop it in the fridge for later. However you want to prep it, it’s going to work out perfectly!
- Ideal for special occasions . Eggplant rollatini is easy enough for a weeknight dinner, but it’s also a great option for a dinner party or holiday gathering because it looks fancy and tastes like something special.
- Cheesy vegan goodness . This recipe is SO cheesy, but without any dairy! The combination of vegan mozzarella, Parmesan, and ricotta creates the perfect texture and taste—you will forget it’s plant-based!
Notes on Ingredients
Scroll down to the recipe card to find the ingredient quantities and recipe instructions.
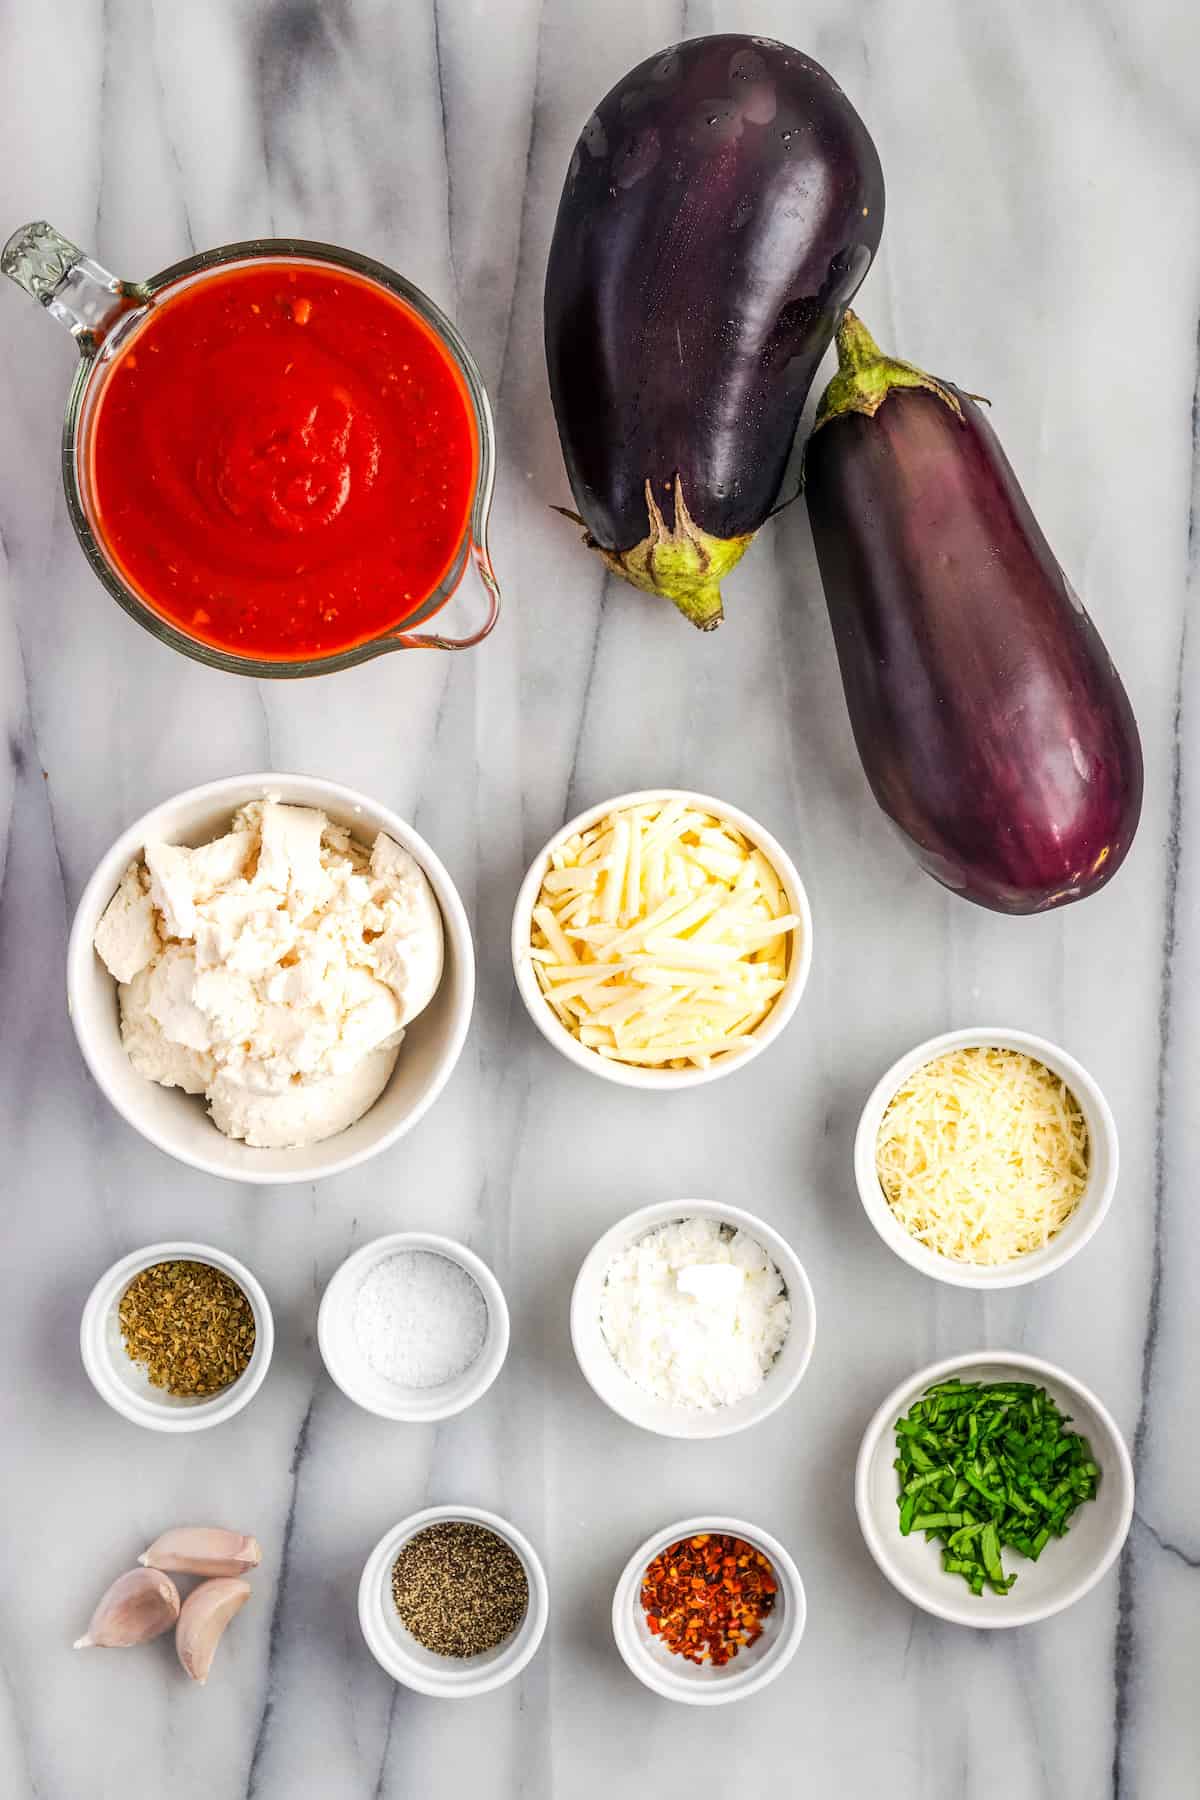
- Eggplant – Look for eggplant that’s roughly the same shape from top to bottom for even rolls.
- Kosher salt
- Olive oil
- Tomato sauce – I like to use my homemade tomato sauce .
- Vegan ricotta cheese – I used Kite Hill brand, but homemade vegan ricotta works too.
- Vegan Parmesan cheese – I used Violife, but you could also use my vegan Parmesan cheese recipe.
- Vegan mozzarella cheese
- Cornstarch
- Fresh basil leaves – Fresh basil is much more flavourful than dried!
- Garlic
- Seasonings – Dried oregano, kosher salt, black pepper, and red pepper flakes.
How to Make Eggplant Rollatini
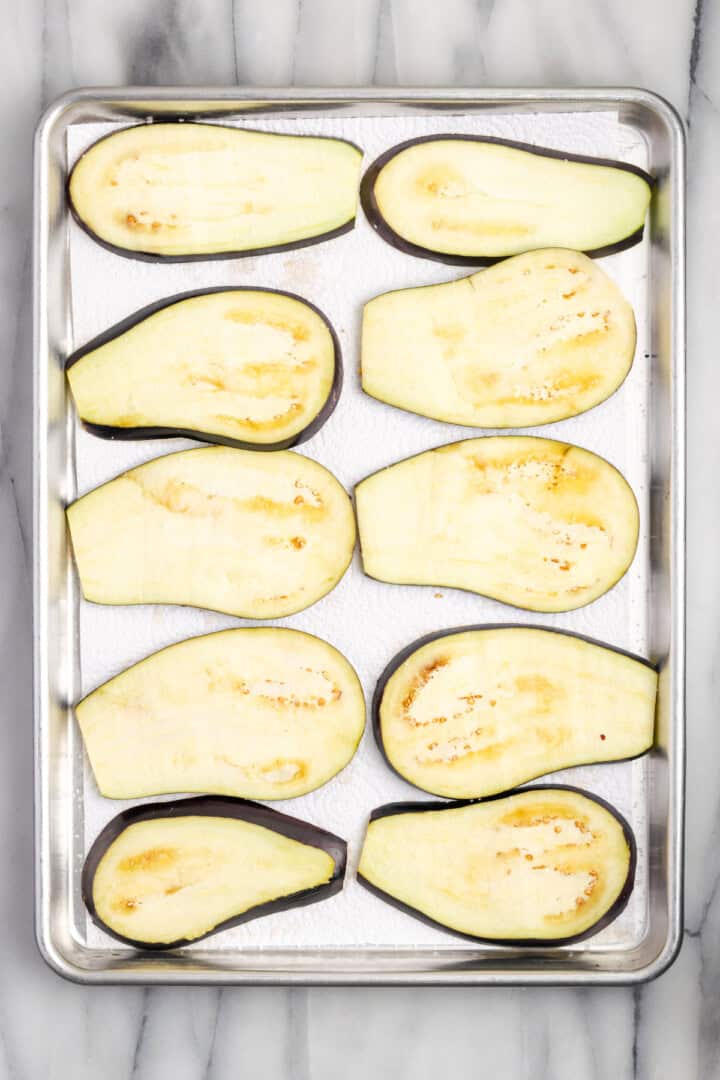
- Prep the eggplant . Slice it lengthwise, then place it on a paper-towel-lined baking sheet. Sprinkle with salt and let sit for 15 minutes, then blot dry.
- Roast . Set the eggplant on a greased baking sheet and spray the tops with oil. Bake in a 400ºF oven for 10 minutes.
- Make the filling . Stir together the ricotta, Parmesan cheese, 1⁄4 cup of mozzarella, cornstarch, basil, garlic, and seasonings in a mixing bowl.
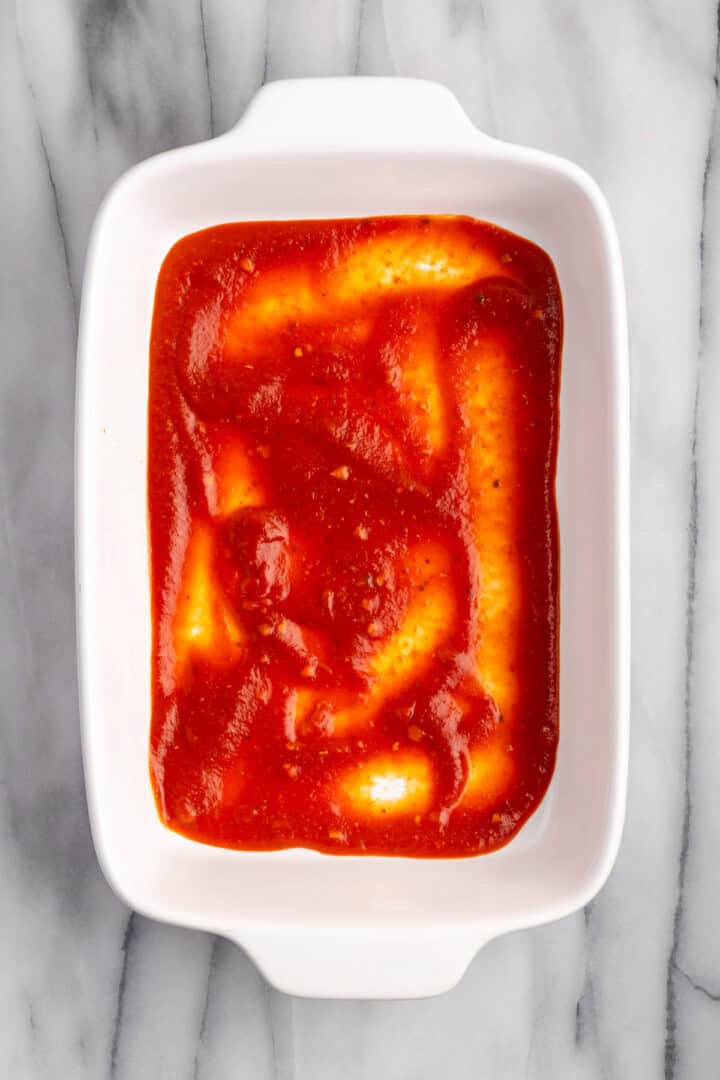
- Assemble . Spread a cup of tomato sauce in the bottom of a baking dish. Roll the filling into the eggplant slices and place the rolls seam-side-down in the dish. Add the remaining sauce and cheese.
- Bake . Cover the dish with foil and bake for 30 minutes, then uncover and bake for 10 minutes more.
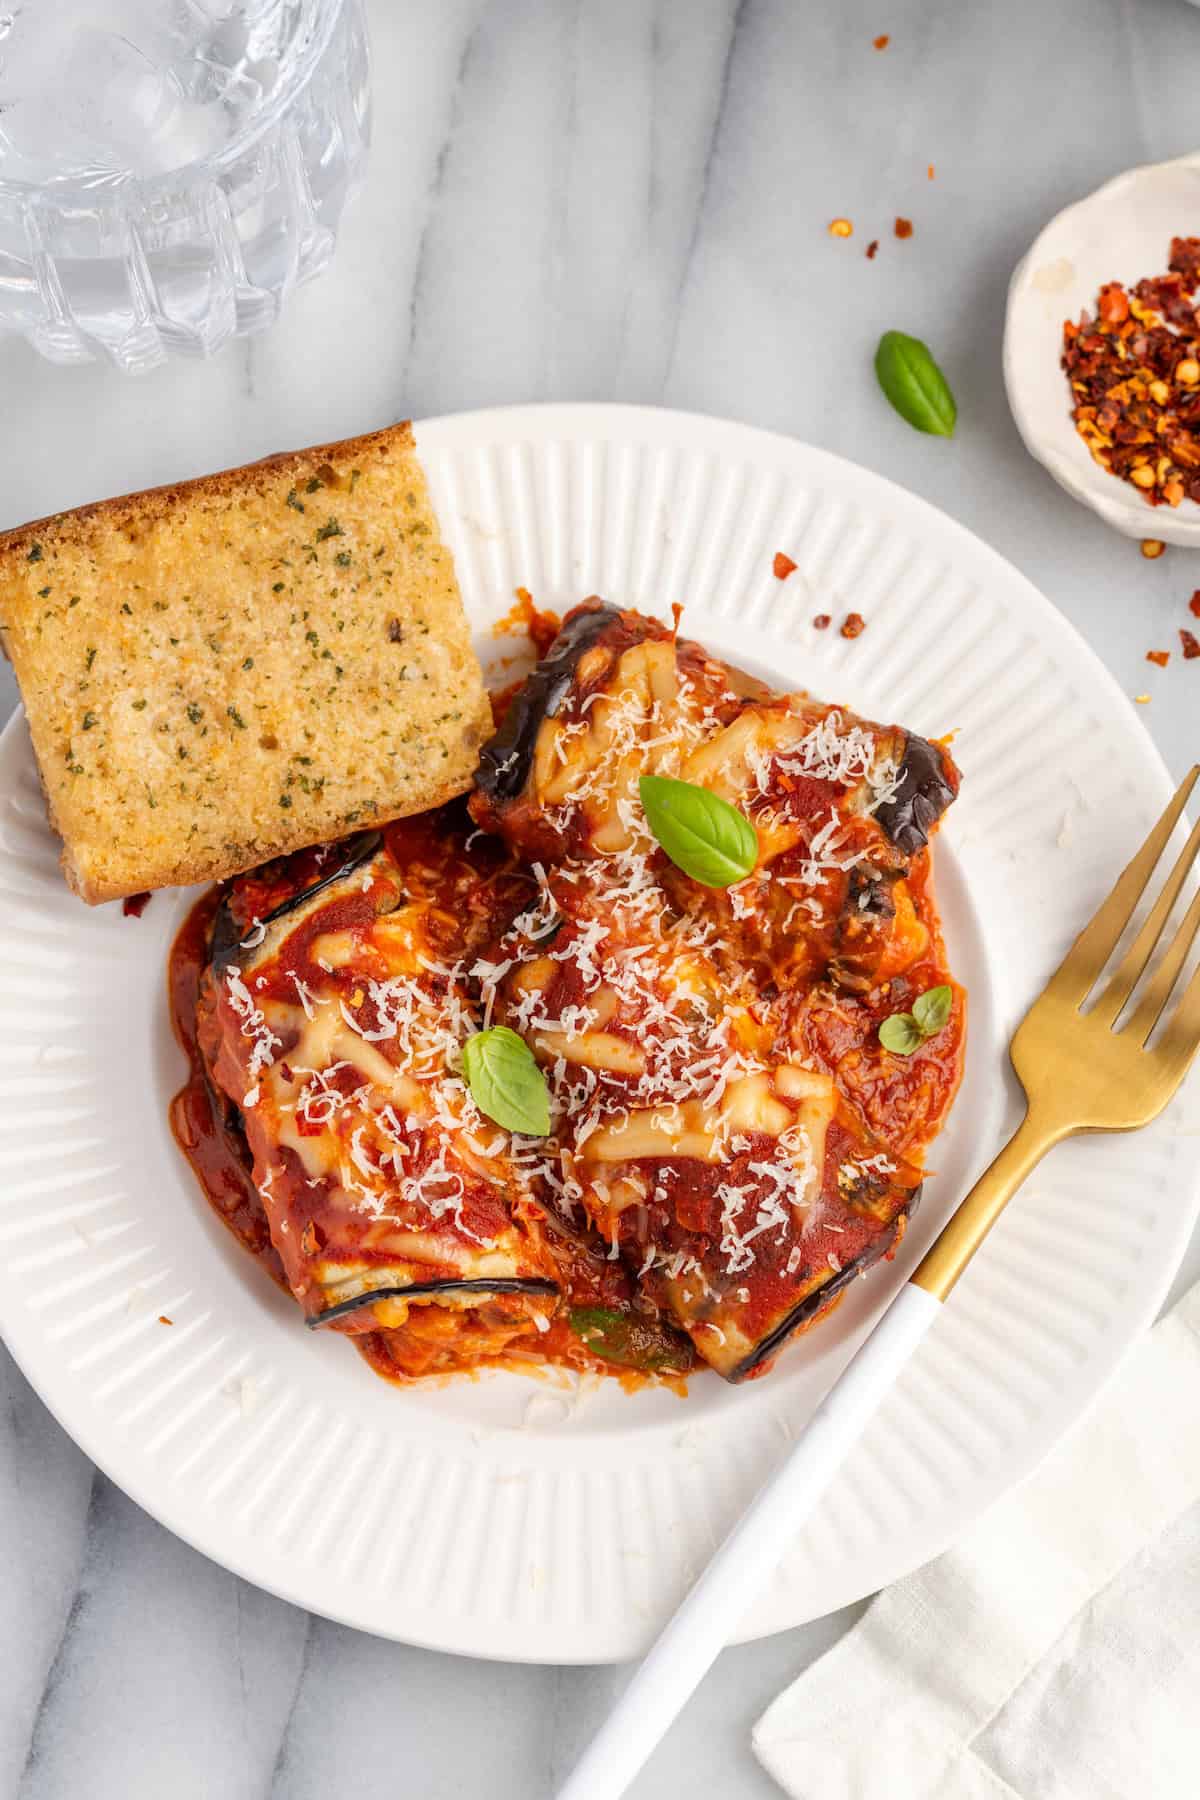
- Finish . Rest for 5 to 10 minutes, then serve with additional vegan Parmesan cheese and basil.

Tips and Variations
- Choose firm, shiny eggplants . Look for eggplants with smooth, unblemished skin that feel heavy for their size. This indicates they are fresh and ripe.
- Cut even slices. This can be difficult when you’re cutting eggplant from top to bottom, but a mandoline slicer can help.
- Don’t overfill the eggplant . If you do, the filling will spill out when you roll it up and your eggplant rolls will have trouble staying together!
- Add pesto . Stir basil pesto into the ricotta filling for even more basil flavor.
Serving Suggestions
Pair eggplant rollatini with a fresh salad and some crusty bread for a satisfying vegan dinner. It’s also great with homemade garlic and rosemary focaccia bread , olive bread , and roasted garlic bread .
How to Store Leftovers
Transfer leftover eggplant rollatini to an airtight container and keep it in the refrigerator for up to 4 days. Large portions can be reheated covered in a 350ºF oven, while smaller portions can be heated up in the microwave.
Can I Freeze This Recipe?
To freeze eggplant rollatini, transfer leftovers to an airtight container or freezer bag and freeze for up to 3 months. Thaw overnight in the refrigerator before reheating.

More Italian-Inspired Recipes
- Vegan Chicken Parmesan
- The Best Vegan Lasagna
- Arrabbiata Sauce
- Baked Eggplant Parmesan
- Vegan Stuffed Shells
Ingredients
- 2 large eggplant ( 1 ½ pounds) , 681 grams
- Kosher salt
- Olive oil
- 2 ½ cups tomato sauce ( 24 ounces) , 680 grams
- 1 cup vegan ricotta cheese , I used Kite Hill brand, 227 grams
- ¼ cup vegan Parmesan cheese , grated; I used Violife brand, 16 grams
- ½ cup vegan mozzarella cheese , divided; I used Violife brand, 56 grams
- 2 tablespoons cornstarch , 16 grams
- 2 tablespoons fresh basil leaves , chopped
- 3 cloves garlic , minced
- 1 teaspoon dried oregano
- ½ teaspoon kosher salt
- ½ teaspoon black pepper
- ¼ teaspoon red pepper flakes
Instructions
- Preheat the oven to 400ºF / 205ºC.
- Remove stems from eggplant and cut into 1⁄4-inch slices lengthwise. Place paper towels on a baking sheet and lay the eggplant slices on the paper towels. Sprinkle both sides with kosher salt and leave to sweat for 15 minutes. After the resting time has elapsed, blot the eggplant dry with paper towels.
- Spray a baking sheet with olive oil (or other non-stick cooking spray). Lay the dried eggplant slices on the baking sheet in a single layer. Spray the tops with oil.
- Bake in the preheated oven for 10 minutes. Remove from the oven and set aside to cool for 10 minutes.
- While the eggplant is cooling, prepare the filling by mixing the ricotta cheese, parmesan cheese, 1⁄4 cup of the mozzarella cheese, cornstarch, basil, garlic, oregano, salt, black pepper, and red pepper flakes in a large mixing bowl.
- Pour 1 cup of the tomato sauce in the bottom of a 9×13 baking dish and spread it into an even layer.
- Working with one piece of eggplant at a time, spread about 2 tablespoons of filling over the eggplant. Then roll the eggplant slice up into a spiral. Place it with the seam side down on the sauce in the baking dish. Repeat with the remaining slices of eggplant and filling.
- Spoon the remaining sauce over the eggplant rolls and sprinkle with the remaining mozzarella cheese.
- Cover the casserole dish with aluminum foil and bake for 30 minutes in the preheated oven. Remove the foil and bake for an additional 10 minutes. Remove from the oven and rest for 5-10 minutes before serving.
- Garnish with additional grated parmesan cheese and fresh basil.
Notes
- To store : Transfer leftover eggplant rollatini to an airtight container and keep it in the refrigerator for up to 4 days. Large portions can be reheated covered in a 350ºF oven, while smaller portions can be heated up in the microwave.
- To freeze : Transfer leftover eggplant rollatini to an airtight container and keep it in the refrigerator for up to 4 days. Large portions can be reheated covered in a 350ºF oven, while smaller portions can be heated up in the microwave.

Eggplant Rollatini
Ingredients
- 2 large eggplant ( 1 ½ pounds) 681 grams
- Kosher salt
- Olive oil
- 2 ½ cups tomato sauce ( 24 ounces) 680 grams
- 1 cup vegan ricotta cheese I used Kite Hill brand, 227 grams
- ¼ cup vegan Parmesan cheese grated; I used Violife brand, 16 grams
- ½ cup vegan mozzarella cheese divided; I used Violife brand, 56 grams
- 2 tablespoons cornstarch 16 grams
- 2 tablespoons fresh basil leaves chopped
- 3 cloves garlic minced
- 1 teaspoon dried oregano
- ½ teaspoon kosher salt
- ½ teaspoon black pepper
- ¼ teaspoon red pepper flakes
Instructions
- Preheat the oven to 400ºF / 205ºC.
- Remove stems from eggplant and cut into 1⁄4-inch slices lengthwise. Place paper towels on a baking sheet and lay the eggplant slices on the paper towels. Sprinkle both sides with kosher salt and leave to sweat for 15 minutes. After the resting time has elapsed, blot the eggplant dry with paper towels.
- Spray a baking sheet with olive oil (or other non-stick cooking spray). Lay the dried eggplant slices on the baking sheet in a single layer. Spray the tops with oil.
- Bake in the preheated oven for 10 minutes. Remove from the oven and set aside to cool for 10 minutes.
- While the eggplant is cooling, prepare the filling by mixing the ricotta cheese, parmesan cheese, 1⁄4 cup of the mozzarella cheese, cornstarch, basil, garlic, oregano, salt, black pepper, and red pepper flakes in a large mixing bowl.
- Pour 1 cup of the tomato sauce in the bottom of a 9x13 baking dish and spread it into an even layer.
- Working with one piece of eggplant at a time, spread about 2 tablespoons of filling over the eggplant. Then roll the eggplant slice up into a spiral. Place it with the seam side down on the sauce in the baking dish. Repeat with the remaining slices of eggplant and filling.
- Spoon the remaining sauce over the eggplant rolls and sprinkle with the remaining mozzarella cheese.
- Cover the casserole dish with aluminum foil and bake for 30 minutes in the preheated oven. Remove the foil and bake for an additional 10 minutes. Remove from the oven and rest for 5-10 minutes before serving.
- Garnish with additional grated parmesan cheese and fresh basil.
Notes
- To store : Transfer leftover eggplant rollatini to an airtight container and keep it in the refrigerator for up to 4 days. Large portions can be reheated covered in a 350ºF oven, while smaller portions can be heated up in the microwave.
- To freeze : Transfer leftover eggplant rollatini to an airtight container and keep it in the refrigerator for up to 4 days. Large portions can be reheated covered in a 350ºF oven, while smaller portions can be heated up in the microwave.
Nutrition
Eggplant Rollatini https://jessicainthekitchen.com/eggplant-rollatini/ August 26, 2024
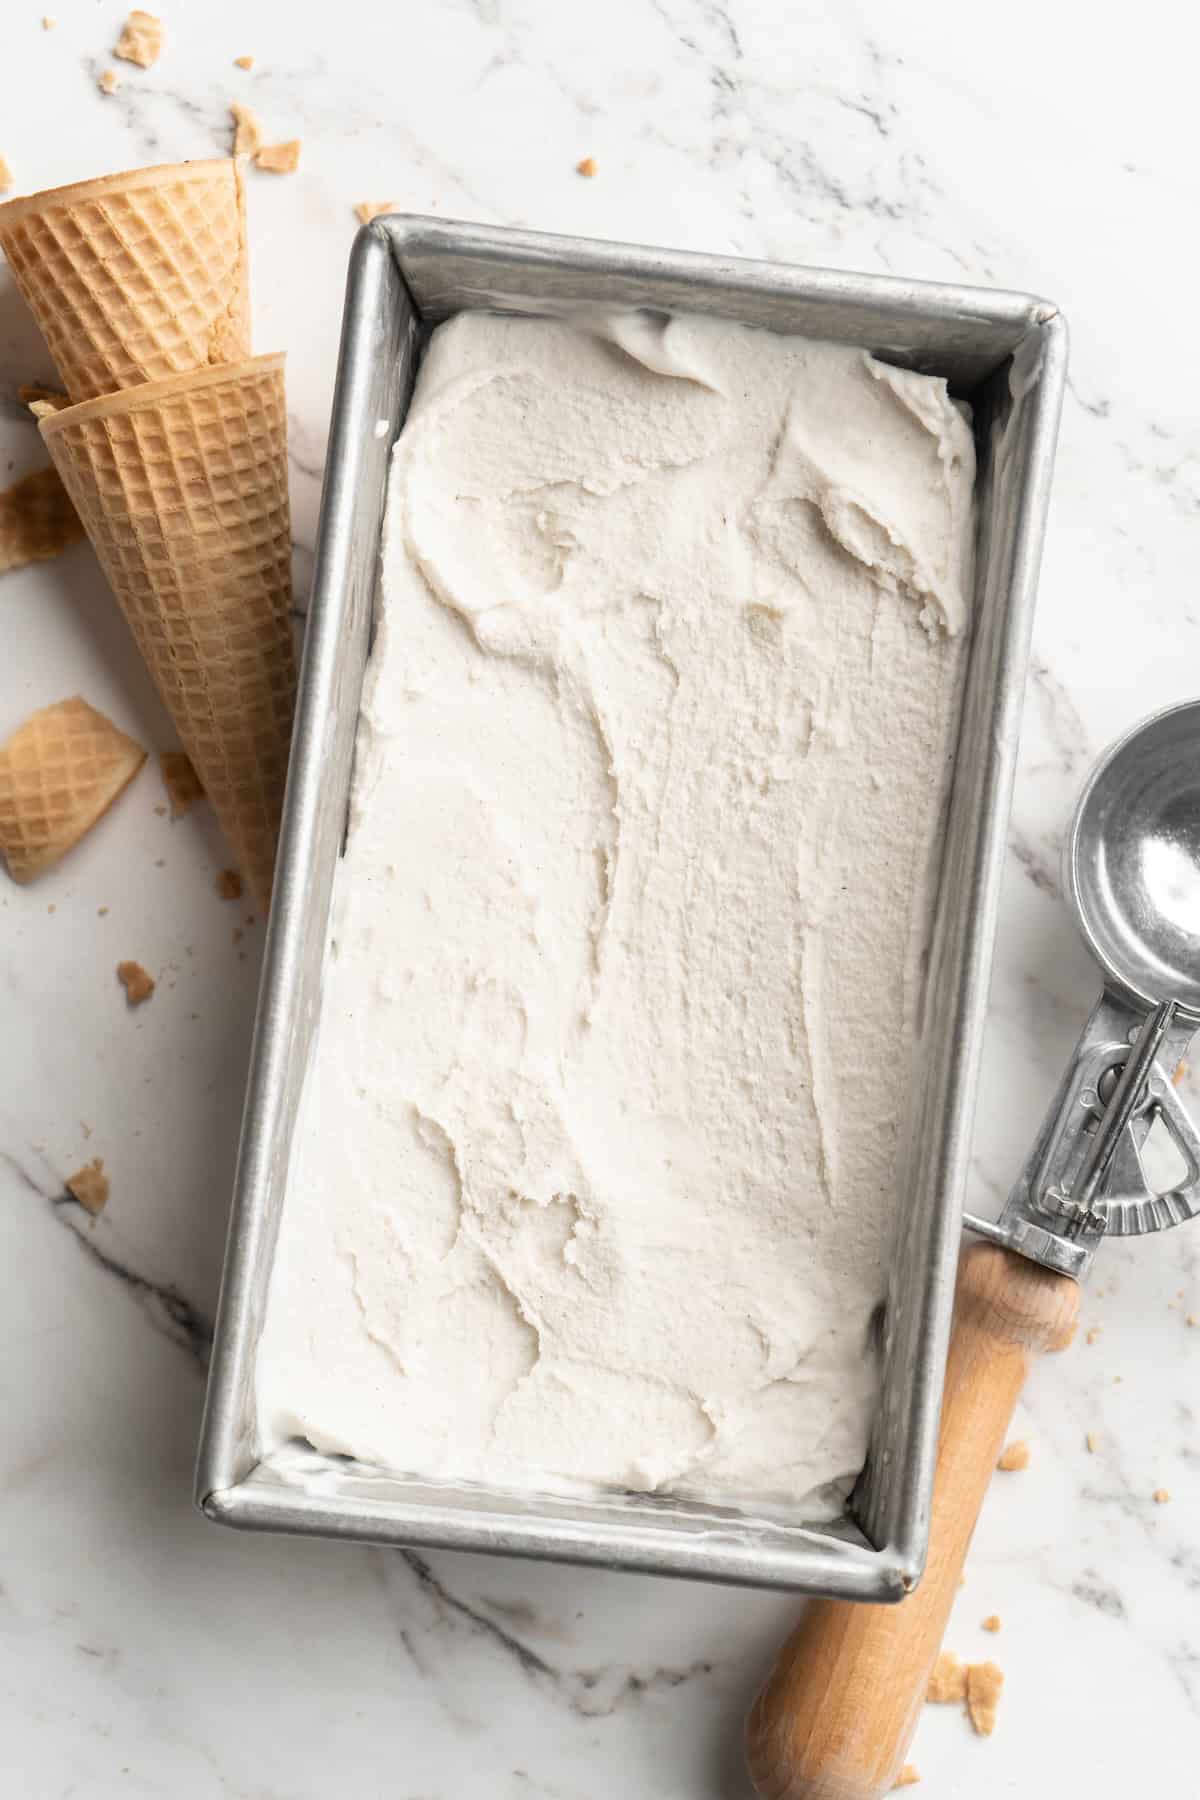
This vanilla vegan ice cream recipe is rich, creamy, and incredibly easy to make with only 5 ingredients!

I’ve made many vegan ice cream recipes over the years—even chocolate avocado ice cream ! Yet somehow, I never made my favourite flavour: vanilla bean.
Yes friends, I’m that girl who loves vanilla ice cream. In a world with thousands of ice cream flavours, my top choice is vanilla bean. Something about that classic flavour gets me every time—especially when it’s this vegan ice cream, which has the most fabulously rich cashew and coconut base.

Why You’ll Love This Vegan Ice Cream Recipe
- Creamy and smooth . Some vegan ice creams have a texture that’s thin and flat, but the cashew and coconut ensure that this recipe is super rich, decadent, and creamy.
- Easy to make . Skipping the egg-based custard makes this ice cream easier to make than the classic version. Woo hoo!
- Incredible flavour . Real vanilla extract or bean makes all the difference here. A true vanilla ice cream like this one is a real treat.
Notes on Ingredients
Scroll down to the recipe card to find the ingredient quantities and recipe instructions.
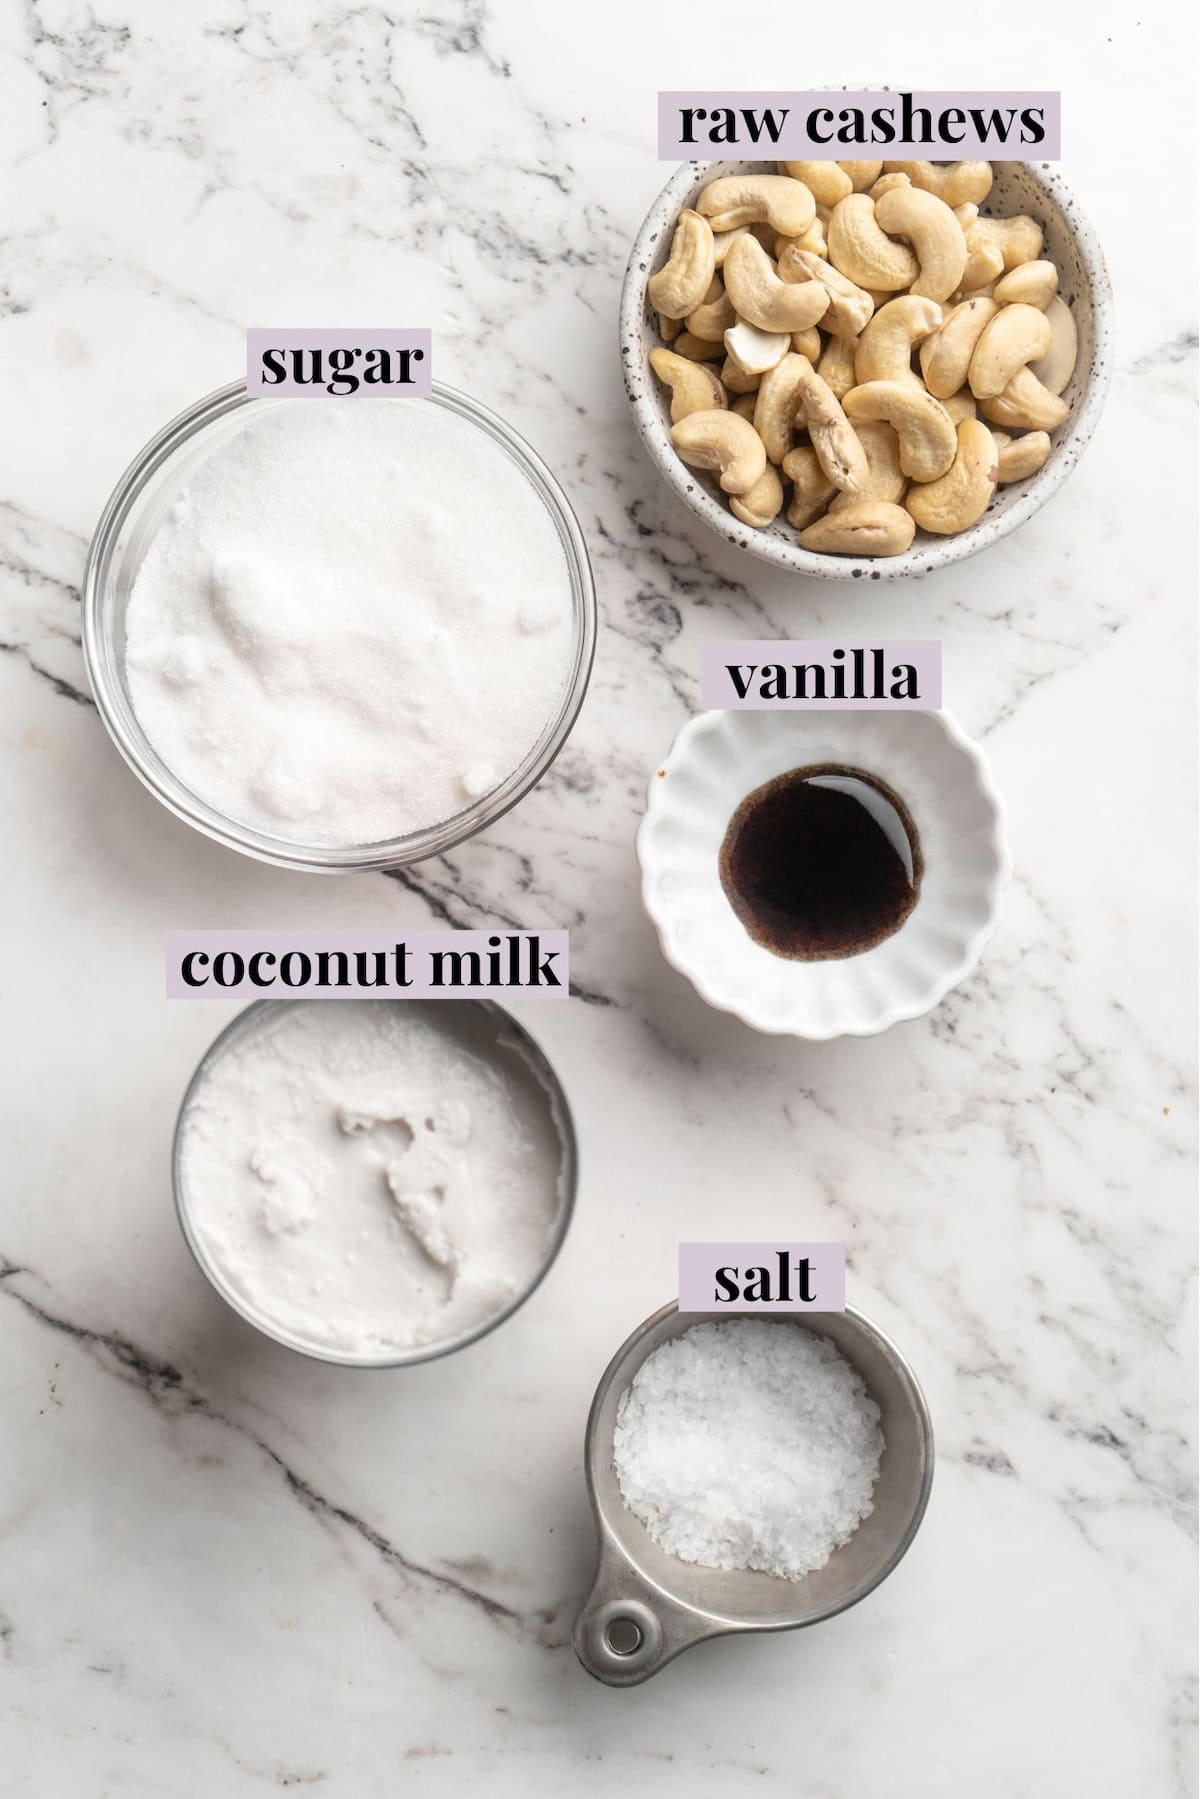
- Cashews – Soaking the cashews overnight is essential, as this allows them to puree into a completely smooth mixture. If you forget, you can boil the cashews with just enough water to cover them for 5 minutes. Drain, cool, and proceed!
- Coconut Milk –Use full-fat coconut milk, not lite or coconut milk powder.
- Vanilla – Vanilla bean paste is my go-to for this recipe because I love flecks of vanilla bean in my ice cream. You can also use a few vanilla beans or vanilla extract in equal amounts.
- Sugar – If you want a slightly less sweet ice cream, use ½ cup.
- Sea salt – A pinch of sea salt is a flavour enhancer and balances the sweetness.
How to Make Vegan Ice Cream
- Prepare . Soak the cashews and freeze your ice cream maker drum ahead of time.
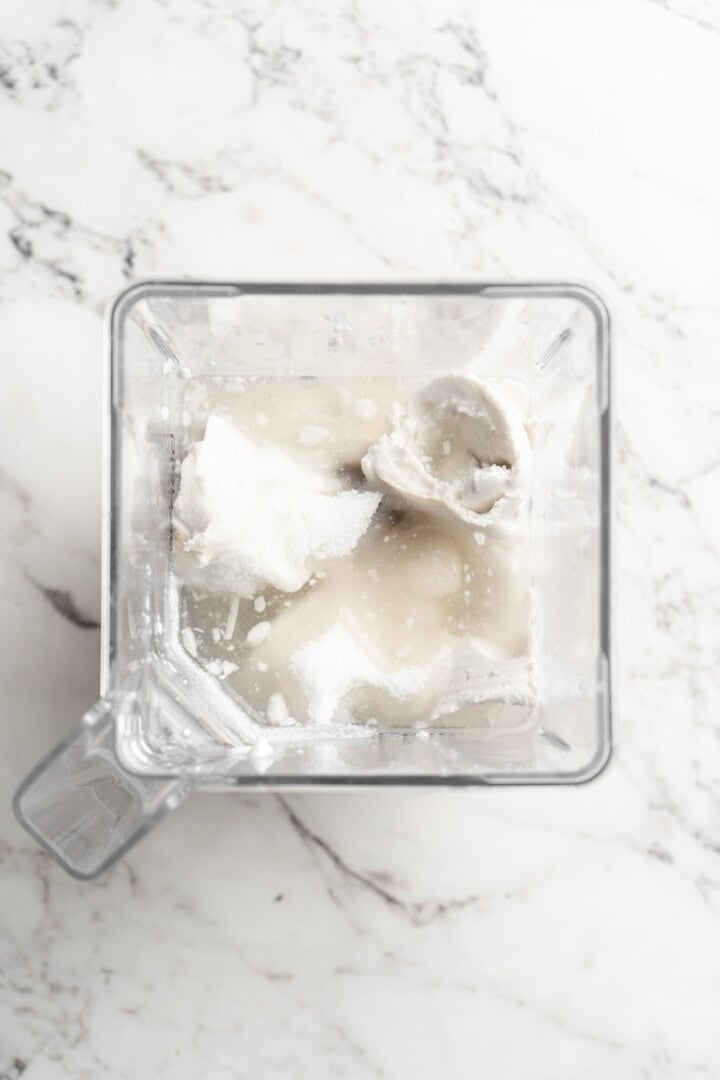
- Make the ice cream mixture . Blend all of the ingredients until completely smooth.
- Chill . Refrigerate the ice cream mixture for at least 4 hours.
- Churn the ice cream . Follow the instructions for your ice cream machine.
- Freeze . Transfer the ice cream into a container or loaf pan. Cover and freeze for at least 4 hours.
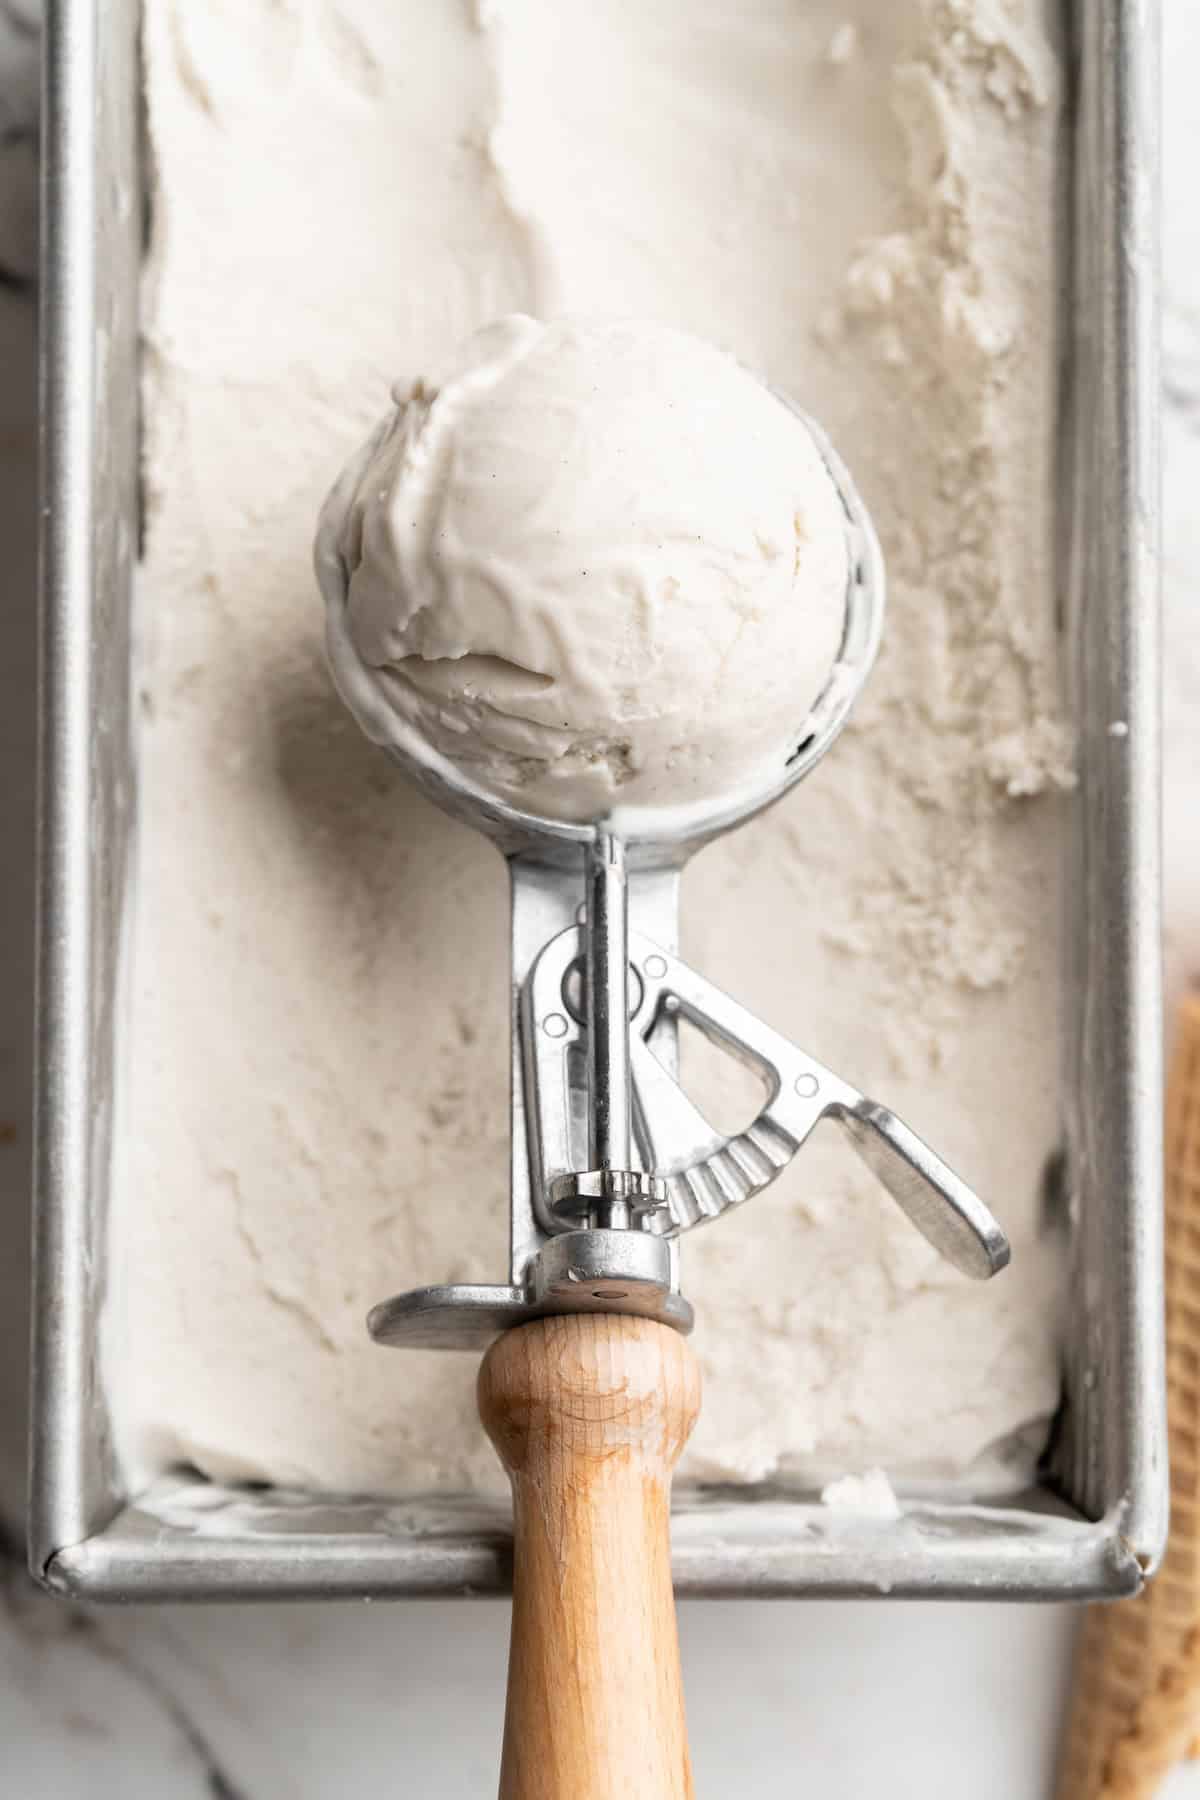
- Serve . Let the ice cream sit at room temperature for 5 minutes, then scoop and serve.
Tips for Success
- Freeze the ice cream maker drum ahead of time . I freeze it for at least 7 hours, but 24 hours is best. It can be tempting to shorten this time but it’s necessarily to get the mixture cold enough to turn it into ice cream. I just leave my base in the freezer, which means it’s always ready!
- Don’t skip chilling the ice cream mixture . I also tested this recipe with not chilling at all, chilling for 10 minutes, and chilling overnight. Chilling for at least 4 hours makes a difference—the vegan ice cream is creamier, freezes faster in the ice cream maker, and is even easier to scoop.
- Make sure the room is cold . If you live in a hot climate like I do, I recommend doing this in the coolest part of your house or turning on your AC if you have one. This ensures the mixture solidifies properly.
- Try some add-ins . Swirl jam, caramel, chopped peanut butter cups , and other add-ins into the soft ice cream after adding it to the storage container, but before freezing.
My Favourite Ways to Serve Vegan Ice Cream
- With a (generous!) drizzle of easy vegan caramel sauce
- Sprinkled with pumpkin granola on top
- Sandwiched between two air fryer chocolate chip cookies
- Scooped on top of warm slice of vegan apple pie
How to Store
Cover this vegan ice cream very tightly to prevent ice particles from forming. It will keep in the freezer for up to 2 weeks.

More Vegan Ice Cream Recipes
- Peanut Butter Ice Cream
- Grilled Peaches with Coconut Ice Cream
- Vegan Mango Ice Cream (3 Ingredients)
- 2-Ingredient Vegan Blueberry Ice Cream
- Vegan Strawberry Coconut Ice Cream (No Churn)
Ingredients
- 1 cup raw cashews , soaked in water overnight or boiled for 5 minutes*, drained
- 2 (13.4 ounce) cans full fat coconut milk
- 1 tablespoon vanilla bean paste , or extract or 1 vanilla bean
- ⅔ cup cane sugar , or other organic granulated sugar
- ½ teaspoon sea salt
Instructions
- Ensure your cashews are completely soaked from before. Also ensure your ice cream maker freezer base is in the freezer for at least 7 to 24 hours before (preferably 24 hours) . If you just keep it in your freezer, then it’s always ready!
- In a high speed blender , blend the soaked cashews, coconut milk, vanilla bean paste, cane sugar and the sea salt together until completely smooth, about 2-4 minutes on high speed depending on your blender. You want to ensure it’s 100% smooth, so feel free to blend longer until you’re sure all the cashews are blended out. If that means you need to blend longer, definitely blend until fully smooth.
- Pour mixture into a bowl, container or leave in the blender and cover. Sometimes the mixture can get hot while blending. Place it in the fridge for 4 hours in the coldest spot, up to 2 days if you don’t plan to make the ice cream immediately.
- Remove from the fridge. Set up your ice cream machine and place the ice cream maker freezer base into the machine and pour the ice cream mixture in. Prepare according to manufacturer settings, for about 20-25 minutes of churning. The mixture should be thick and smooth. If you’re not using an ice cream maker, check out my chocolate avocado post for no churn instructions.
- Scoop the soft serve ice cream into a container (I use a loaf pan) and smooth down. Place plastic wrap or a reusable wrap or parchment or wax paper flat against the ice cream, then wrap the outside of the pan too. You want to ensure it’s all protected from ice crystals. Place in the freezer for at least 4 hours to set up, even overnight if you desire. You can also enjoy it immediately like soft serve!
- After at least 4 hours in the freezer, remove container from freezer and allow it to sit for at least 5 minutes on the counter (like you would store bought ice cream). Scoop, serve and enjoy!
Notes
- You can easily boil your cashews with just enough water covering them for 5 minutes. Drain, let cool, and proceed! This way you can make the recipe the same day.
- I used an ice cream maker to make this recipe. Ensure your ice cream maker base is ready! It can be tempting to shorten this time but it’s necessarily to get the mixture cold enough to turn it into ice cream. I just leave my base in the freezer, which means it’s always ready!
- It’s important to use full fat coconut milk. Don’t use lite. Also remember we are using the full can of coconut milk. Also, do not substitute coconut milk powder. It isn’t creamy enough and will result in icy ice cream.
- Don’t rush your ice cream base (the actual mixture) chilling time. I made it after 10 minutes in the freezer, and after a few hours in the fridge and after whole night in the fridge. The last two were far more creamy, set much faster in the ice cream maker, and were much easier to scoop. I highly recommend chilling the cashew cream for the right length of time.
- If you live in a hot climate (like I do) I recommend doing this in the coolest part of your house or turning on your AC if you have one. This ensures the mixture solidifies properly.
- Always cover your finished ice cream as per the recipe, otherwise ice particles will form in it and result in some small ice chunks.
- If you’re not using an ice cream maker; follow my tips from my chocolate avocado ice cream to get the best texture.
- Cover this vegan ice cream very tightly to prevent ice particles from forming. It will keep in the freezer for up to 2 weeks.
