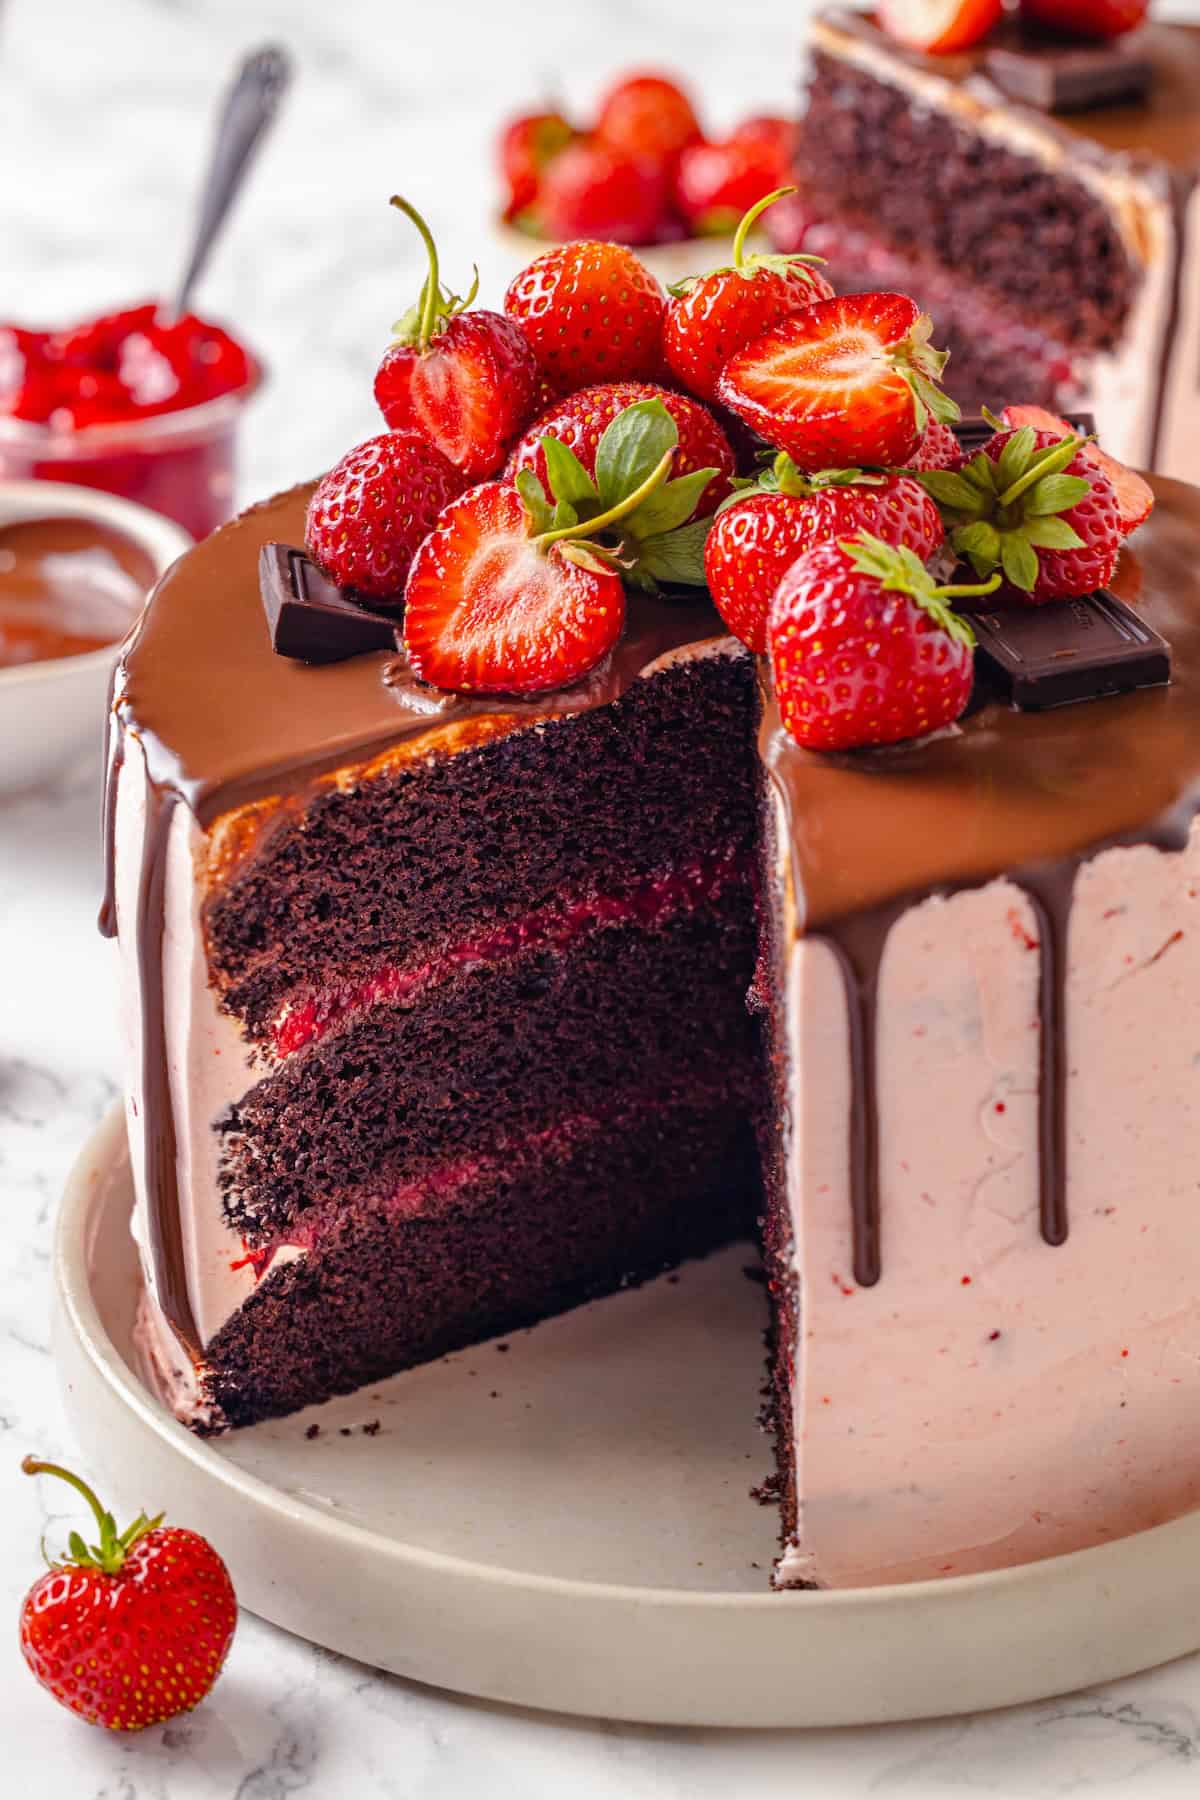
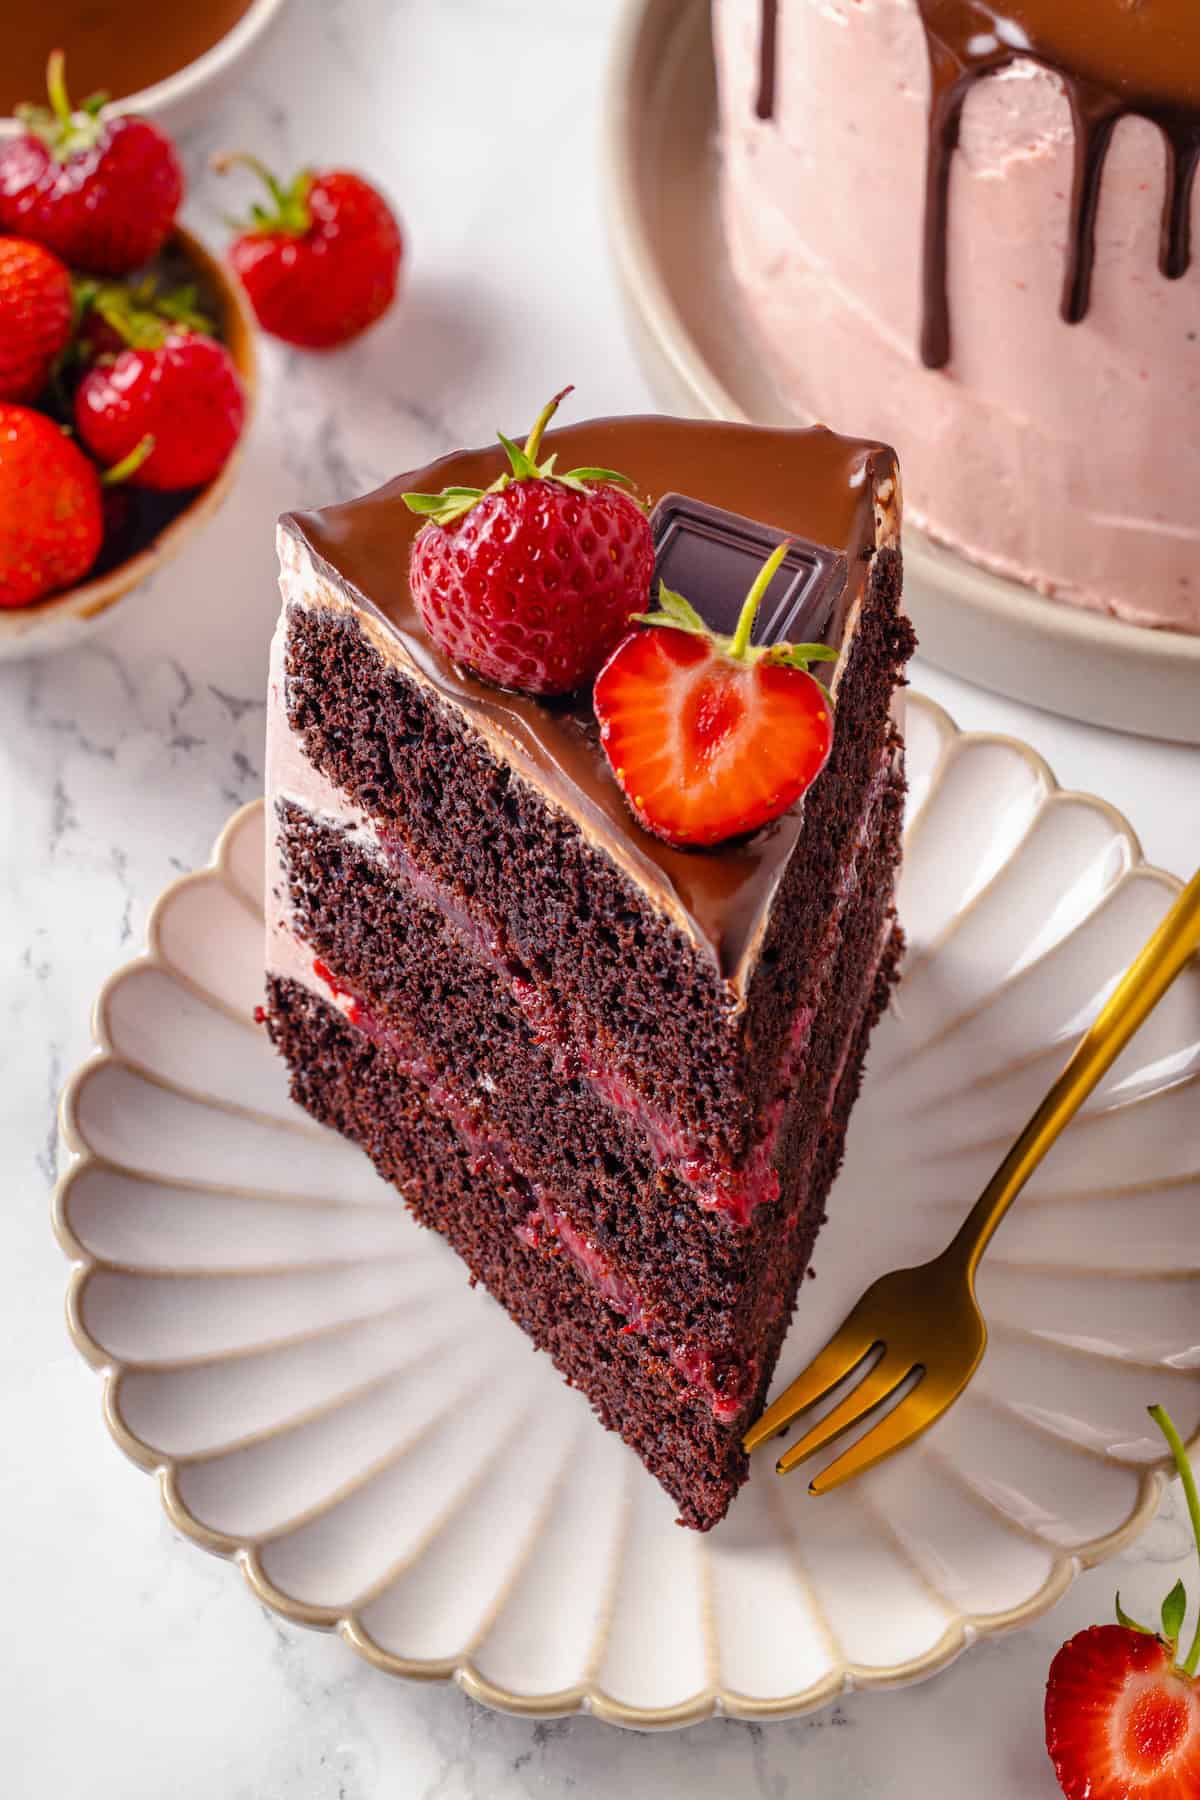
Layers of rich vegan chocolate cake, a jammy strawberry filling, fluffy strawberry buttercream, and chocolate ganache make this Chocolate Strawberry Cake the best cake to bake for any special occasion or celebration!
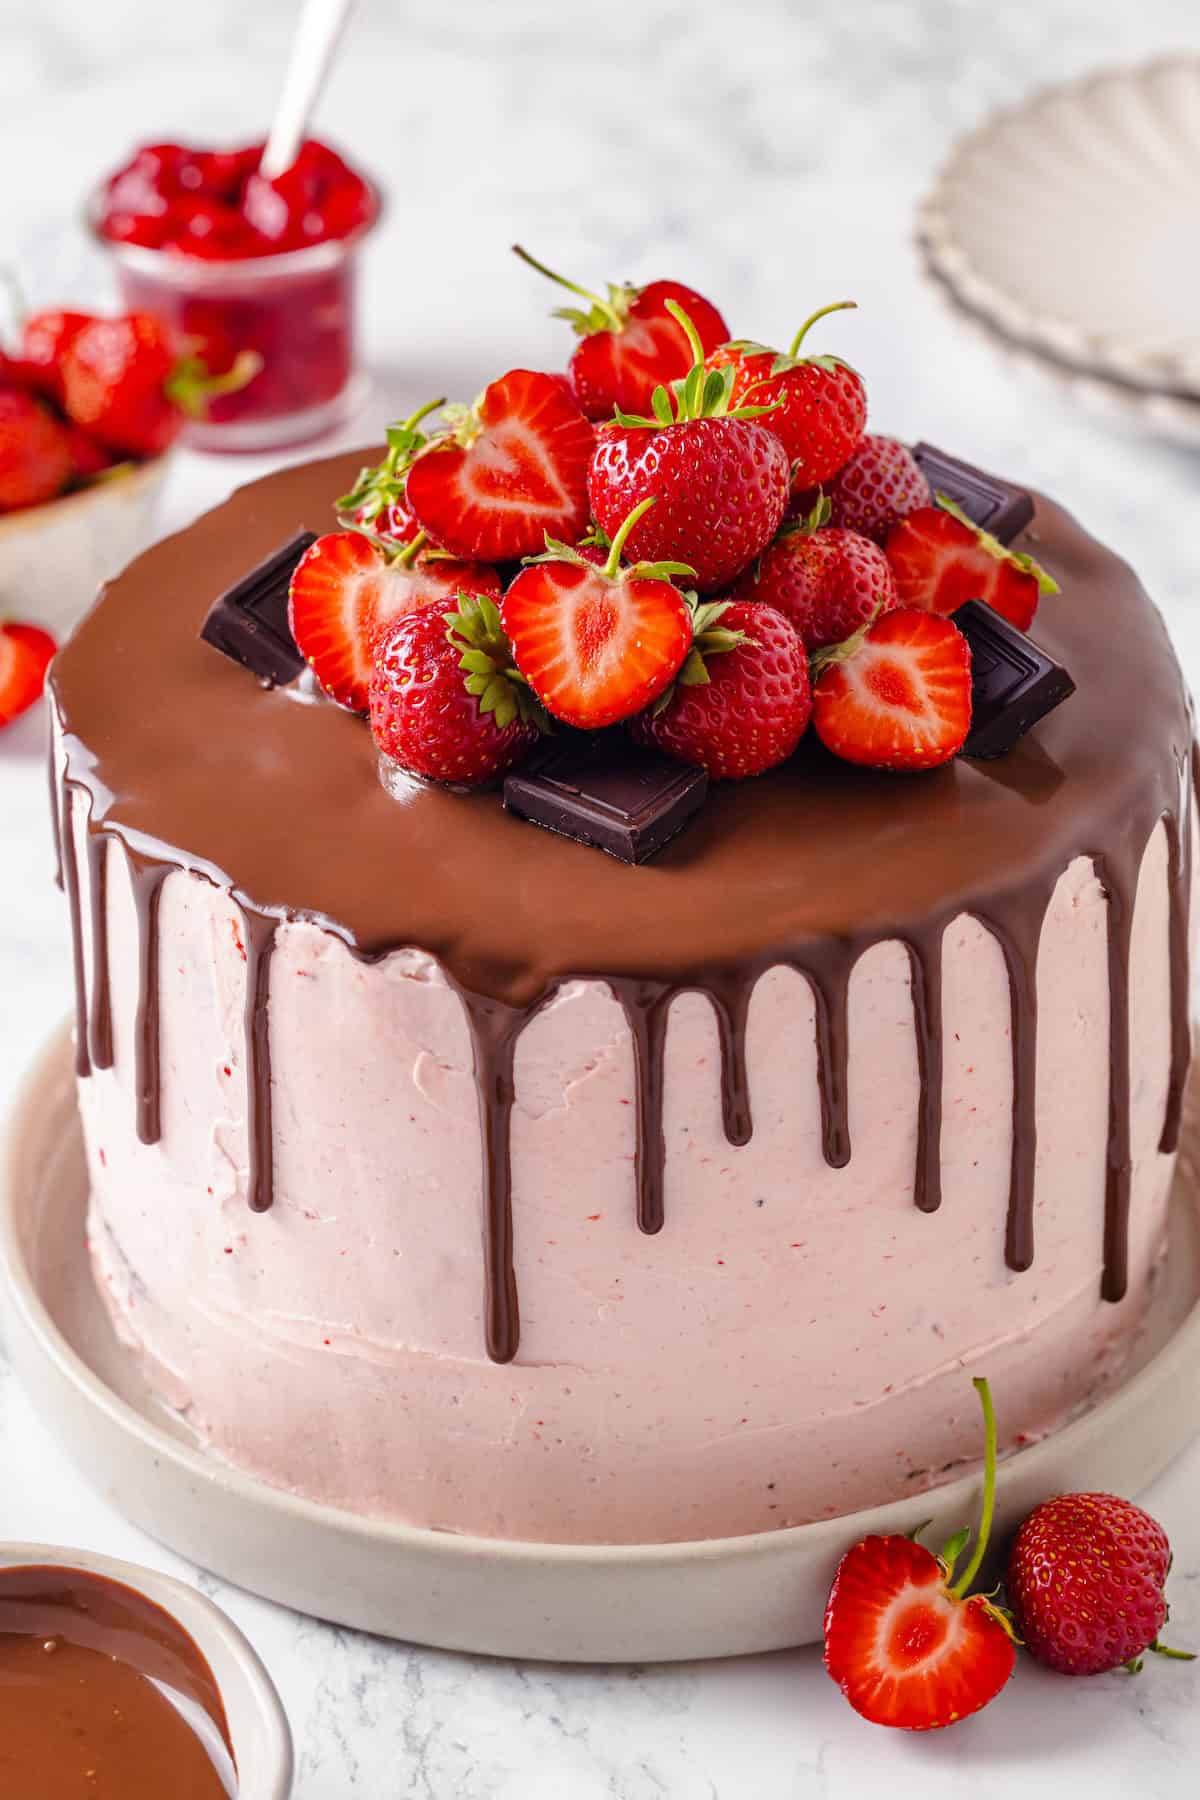
If you want to bake a cake that will impress everyone—we’re talking lots of oohs and ahhs when you bring it out—this chocolate strawberry cake is the ONE. It’s beautiful and decadent, and of course, it’s absolutely delicious. Who can resist that combination of strawberries and chocolate? No one!
Why You Need to Make This Chocolate Strawberry Cake for Your Next Party
Everyone will want to know your baking secrets! (You’ll tell them you got the recipe from Jessica in the Kitchen, right?!) Here’s what makes it such a winner.
- Easily (and deliciously) vegan . This recipe has an easy egg substitute (apple cider vinegar reacts with the baking soda for lift) and there’s nothing else special you need to do to make it vegan, other than buying plant-based butter and milk. And it tastes just like a typical cake so non-vegans will love it too!
- Bakery-style look without the fuss . Drizzling ganache over the cake gives it a professional look without having to do any intricate piping and decorating.
- Timeless flavour . Strawberries and chocolate just work together, plain as that! I love how the real-fruit Strawberry Cake Filling complements the rich chocolate layers and ganache.
Notes on Ingredients
Many of the items you’ll need for this chocolate strawberry cake are pantry staples! Scroll down to the recipe card to find the ingredient quantities and recipe instructions.
Strawberry Filling:
- Strawberries – Frozen or fresh will both work.
- Sugar
- Lemon juice – Freshly squeezed juice is best. It makes the flavour of the filing pop!
- Cornstarch – This is crucial for thickening the filling. Don’t skip it!
- Water
- Vanilla extract
Cake:
- Apple cider vinegar – Or white vinegar. This helps give the cake its light, fluffy texture.
- Soy milk – Let this come to room temperature. I like to use soy milk when baking cakes because the higher fat and protein help with the cake texture. That said, if you have a soy allergy, you can use another vegan milk.
- All-purpose flour
- Unsweetened cocoa powder – You can use natural cocoa powder for a more classic chocolate cake flavour, or Dutch process cocoa, which has a more intense flavour.
- Baking powder
- Baking soda
- Sea salt
- Brown sugar or cane sugar – Brown sugar has notes of caramel.
- Vegan butter – Melt this, then let it cool a bit before adding it to the recipe. You can use my homemade Vegan Butter if you’d like!
- Vanilla extract – Vanilla bean paste will also work.
- Hot coffee – Using brewed coffee intensifies the chocolate flavour of the cake. It does not make the cake taste like coffee!
Strawberry Buttercream Frosting:
- Vegan butter – Soften this to room temperature so it’s easy to beat into a fluffy frosting.
- Powdered sugar – Don’t have it on hand? Make Homemade Powdered Sugar !
- Vanilla extract
- Strawberry filling
- Vegan milk – Just make sure it’s unflavoured.
Chocolate Ganache:
- Canned coconut cream – Let this come to room temperature. If you can’t find canned coconut cream, use canned coconut milk; refrigerate it overnight, then scoop out the cream from the top of the can and let that come to room temperature.
- Dark chocolate – I recommend 70% cacao.
Decoration:
- Fresh strawberries – You’re using them for decoration, so make sure they look perfect!
How to Make Chocolate Strawberry Cake
This is a cake that’s easy to make in phases if you don’t have a single long stretch of time to get everything done from start to finish. You can prep the filling and cake layers the day before, then make the frosting and assemble the next day.
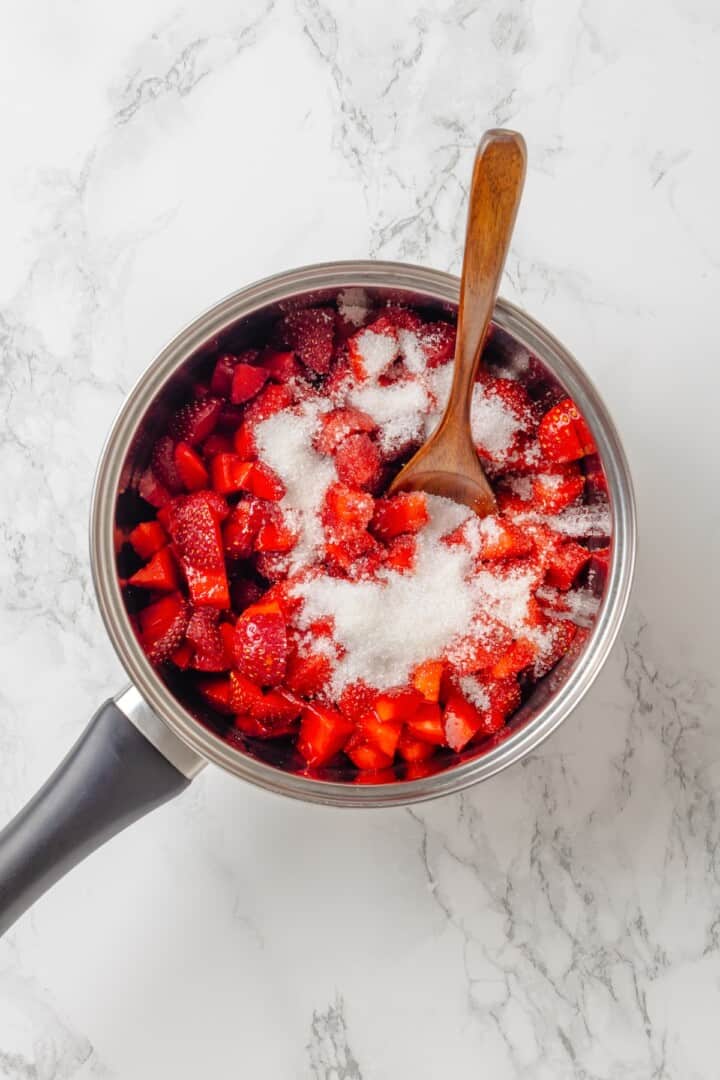
Combine the berries, sugar, and lemon juice in pan.
- Start the strawberry filling. Add the berries and sugar to a pan set over medium heat. Cook for 4 to 5 minutes, then stir in the lemon juice and cook a few minutes more, until the strawberries are breaking down.
- Thicken it . Whisk the cornstarch and water in a small bowl, then stir this into the strawberry mixture. Cook a minute or two more until it thickens. Remove from heat, add the vanilla if you’re using it, and cool. Reserve 1/4 cup to whip into the frosting.
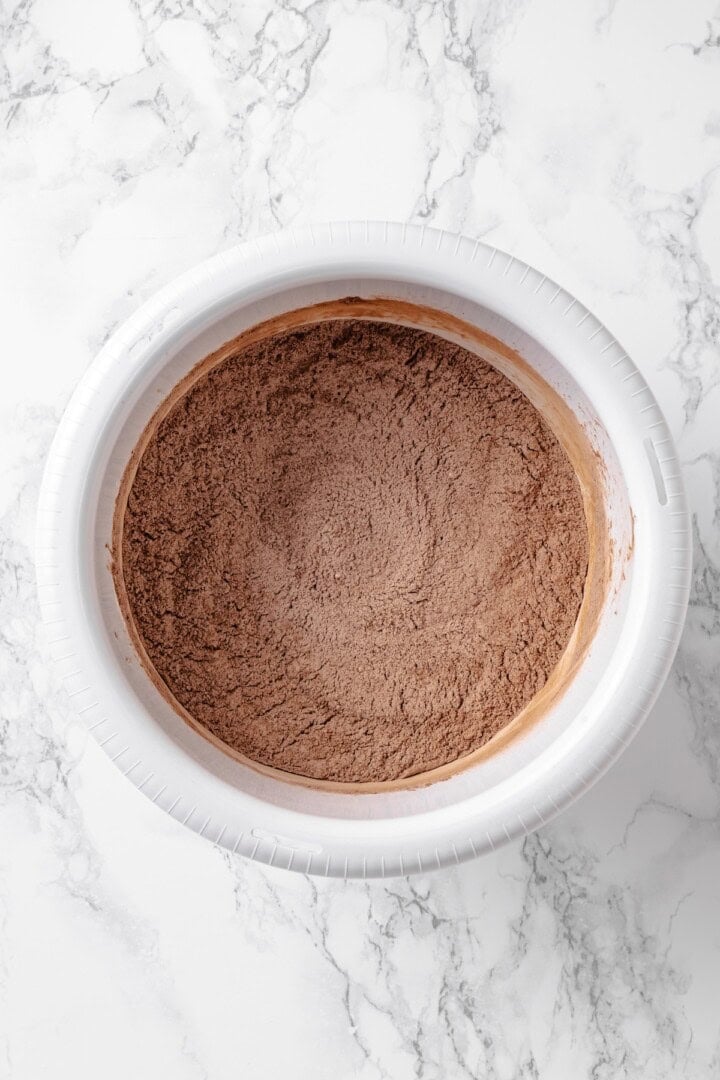
Mix the dry cake ingredients.
- Make the vegan buttermilk. Whisk together the vinegar and soy milk and set it aside to thicken.
- Whisk together the dry ingredients. Mix the flour, cocoa powder, baking powder, baking soda, salt, and sugar in a bowl.
- Finish the batter . Beat in the vegan buttermilk, melted vegan butter, and vanilla extract on medium speed until just combined. Slowly whisk in the hot coffee.
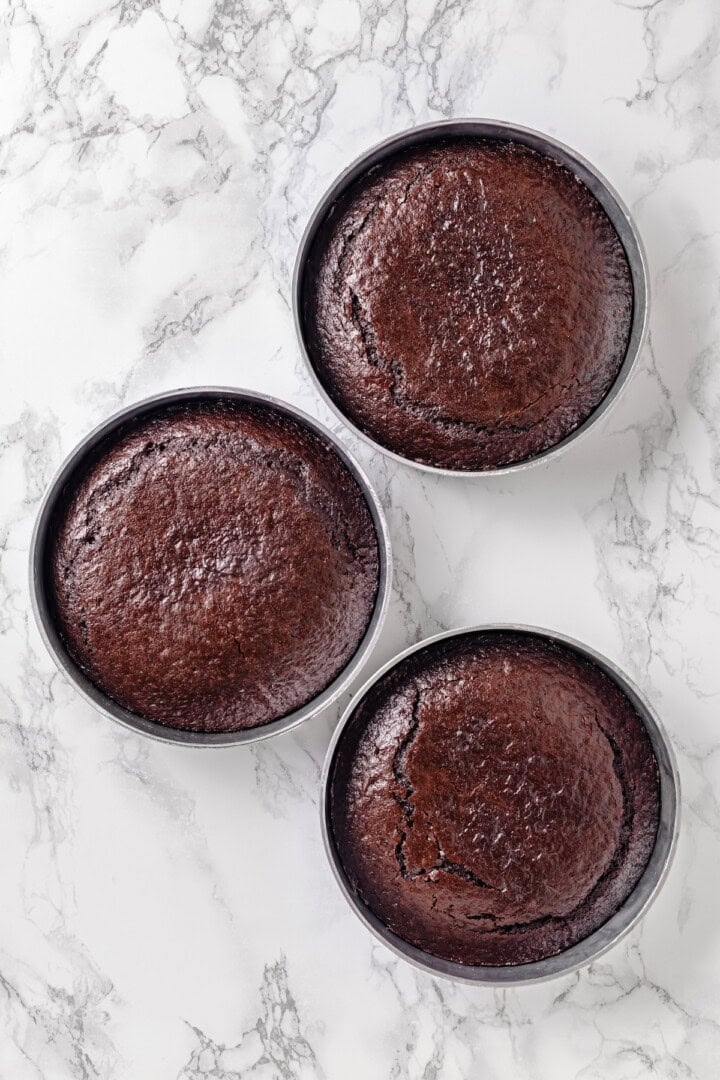
Bake the cake layers.
- Bake . Divide the batter into round cake pans that have been greased and lined with parchment. Bake at 350ºF for 40 minutes, or until a toothpick inserted into the middle comes out clean. Cool completely before removing from the pans.
- Make the frosting . Beat the vegan butter and once it’s creamy, beat in the powdered sugar. Add the vanilla extract and strawberry filling and continue to beat. If the frosting is too thick, add vegan milk a tablespoon at a time.
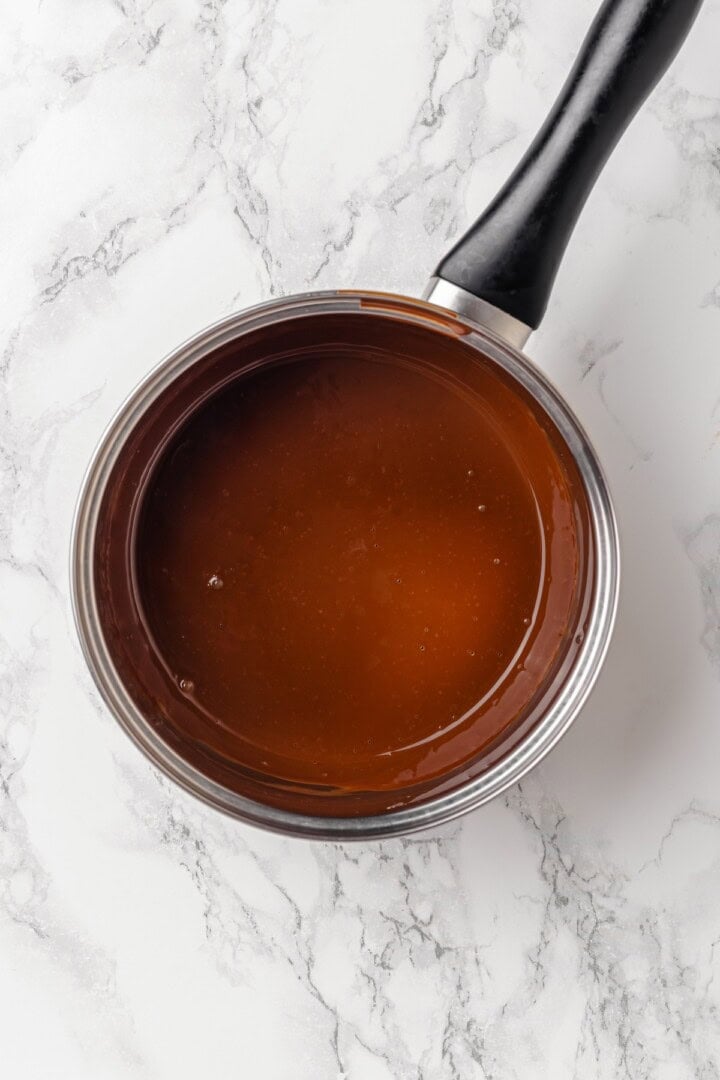
Make the ganache.
- Make the chocolate ganache. Heat the coconut cream until it steams. Remove from heat and add the chopped chocolate. Let the mixture sit for a minute or two, then whisk together until glossy. Cool slightly.
- Assemble . Spread the strawberry filling over the first layer, then repeat with the second layer. Add the third layer, then frost and drizzle the ganache over the top. Decorate with the fresh strawberries. Set for an hour before slicing and serving.
Tips and Variations
I’ve got a few pointers and some variation ideas for this chocolate strawberry cake.
- Even out the layers . If the cake layers are domed after baking, level them with a serrated knife. If you layer them without leveling first, your cake will have a big hump in the middle!
- Use an offset spatula for the frosting . If you don’t have one, a bench scraper works too. You need that large, flat surface to create a smooth finish.
- Dry the strawberries well . Make sure the strawberries for garnish are dried well. Otherwise, they’ll ruin the ganache and frosting and you don’t want that!
- Cook until the filling is thick . Keep in mind that it will thicken a bit as it cools, but you do want that filling to be THICK (much thicker than Strawberry Jam !) so it sits on top of the cake layers rather than sinking in.
- Try another frosting . You can use my Vegan Cream Cheese Frosting , or skip the ganache and go with Vegan Chocolate Frosting .
How to Store
- Room temperature : Store this chocolate strawberry cake at room temperature for up to a day—and only if it’s not hot in your kitchen. (If it is hot in your kitchen, refrigerate it!)
- Refrigerator : Loosely cover the cake with plastic wrap or transfer leftovers to an airtight container. It will keep in the refrigerator for 3 to 4 days. (If you’re making this ahead for a party, I don’t recommend storing it for more than a day or two for maximum freshness.)
- Freezer : It’s best to freeze the layers and filling separately if you’re freezing for advance prep. But if you’re freezing leftovers, wrap the slices individually in plastic wrap, then place the slices in a freezer bag or airtight container. They’ll keep for up to 3 months; thaw in the refrigerator before serving.
More Vegan Cake Recipes
- Vegan Carrot Cake
- No-Bake Strawberry Icebox Cake
- Lemon Blueberry Bundt Cake
- Pistachio Cake
Ingredients
For the Strawberry Filling:
- 3 cups fresh strawberries , hulled and chopped – 450 g
- ⅓ cup granulated sugar , 100 g
- 1 tablespoon lemon juice , 15 mL
- 1 tablespoon cornstarch , 8 g
- 1 tablespoon water , 15 mL
- ½ teaspoon vanilla extract , (optional), 2.5 mL
For the Cake:
- 1 ½ tablespoons apple cider vinegar , or white vinegar – 22 mL
- 1 cup soy milk , room temperature – 240 mL
- 3 cups all-purpose flour , 360 g
- 1 cup unsweetened cocoa powder , 80 g
- 2 teaspoons baking powder , 8 g
- 2 teaspoons baking soda , 8 g
- 1 teaspoon sea salt , 6 g
- 2 cups brown sugar or cane sugar , 400 g
- ⅔ cup vegan butter , melted and cooled – 150 g
- 1 teaspoon vanilla extract , 5 mL
- 1 cup hot coffee , 240 mL
For the Strawberry Buttercream Frosting:
- 1 cup vegan butter , softened – 226 g
- 2 cups powdered sugar , 240 g
- 1 teaspoon vanilla extract , 5 mL
- ¼ cup prepared strawberry filling , 60 mL
- 1 tablespoon vegan milk , as needed – 15 mL
For the Chocolate Ganache:
- ⅓ cup canned coconut cream , room temperature – 80 mL
- 2 ounces dark chocolate , 70% cocoa, finely chopped – 57 g
For Decoration:
- Whole fresh strawberries
Instructions
Prepare the Strawberry Filling
- In a medium saucepan over medium heat, combine the chopped strawberries and sugar. Cook, stirring frequently, for about 4–5 minutes, until the strawberries begin releasing their juices
- Stir in the lemon juice and continue to cook for another 2 minutes. Gently mash some of the strawberries with a spoon or potato masher to help break them down.
- In a small bowl, stir together the cornstarch and water until smooth. Pour into the strawberry mixture and cook for another 1–2 minutes, stirring, until thickened.
- Remove from heat and stir in the vanilla extract, cool completely. Reserve ¼ cup for the frosting.
Make the Cake Layers
- In a small bowl or jar, stir together the apple cider vinegar and soy milk. Let sit for 5–10 minutes until it curdles slightly.
- In a large bowl, whisk together the flour, cocoa powder, baking powder, baking soda, salt, and sugar.
- Add the vegan buttermilk, melted vegan butter, and vanilla extract. Beat on medium speed for 1–2 minutes until just combined. Scrape down the sides and stir again to ensure everything is incorporated.
- Slowly pour in the hot coffee and whisk gently until the batter is smooth. Batter will be thin.
- Preheat oven to 350°F (175°C). Grease and line three 8-inch (20 cm) cake pans with parchment paper.
- Divide the batter evenly among the pans. Bake for 40 minutes, or until a toothpick inserted in the center comes out clean.
- Cool the cakes completely in the pans before removing.
Make the Strawberry Buttercream Frosting
- In a large bowl, beat the softened vegan butter until creamy. Gradually add powdered sugar and beat until light and fluffy.
- Mix in the vanilla extract and reserved ¼ cup strawberry filling.
- If the frosting is too thick, add 1 tablespoon vegan milk and beat until smooth and spreadable.
Make the Chocolate Ganache
- In a small saucepan, heat the coconut cream just until steaming. Remove from heat and add the chopped chocolate. Let sit for 1–2 minutes, then whisk until glossy and smooth. Let cool slightly before using.
Assemble the Cake
- If the cake layers are domed, level them with a serrated knife.
- Place one layer on a serving plate or cake stand. Spread a generous layer of strawberry filling over the top.
- Add the second cake layer and repeat with more strawberry filling.
- Top with the final cake layer. Frost the entire cake with the strawberry buttercream.
- Drizzle the cooled ganache over the top, letting it drip slightly down the sides.
- Decorate with whole fresh strawberries.
- Let the cake set for at least 1 hour before slicing.
Notes
- Room temperature : Store this chocolate strawberry cake at room temperature for a day—and only if it’s not hot in your kitchen.
- Refrigerator : Loosely cover the cake with plastic wrap or transfer leftovers to an airtight container. It will keep in the refrigerator for 3 to 4 days. (If you’re making this ahead for a party, I don’t recommend storing it for more than a day or two for maximum freshness.)
- Freezer : It’s best to freeze the layers and filling separately if you’re freezing for advance prep. But if you’re freezing leftovers wrap the slices individually in plastic wrap, then place the slices in a freezer bag or airtight container. They’ll keep for up to 3 months; thaw in the refrigerator before serving.

Chocolate Strawberry Cake
Ingredients
For the Strawberry Filling:
- 3 cups fresh strawberries hulled and chopped – 450 g
- ⅓ cup granulated sugar 100 g
- 1 tablespoon lemon juice 15 mL
- 1 tablespoon cornstarch 8 g
- 1 tablespoon water 15 mL
- ½ teaspoon vanilla extract (optional), 2.5 mL
For the Cake:
- 1 ½ tablespoons apple cider vinegar or white vinegar – 22 mL
- 1 cup soy milk room temperature – 240 mL
- 3 cups all-purpose flour 360 g
- 1 cup unsweetened cocoa powder 80 g
- 2 teaspoons baking powder 8 g
- 2 teaspoons baking soda 8 g
- 1 teaspoon sea salt 6 g
- 2 cups brown sugar or cane sugar 400 g
- ⅔ cup vegan butter melted and cooled – 150 g
- 1 teaspoon vanilla extract 5 mL
- 1 cup hot coffee 240 mL
For the Strawberry Buttercream Frosting:
- 1 cup vegan butter softened – 226 g
- 2 cups powdered sugar 240 g
- 1 teaspoon vanilla extract 5 mL
- ¼ cup prepared strawberry filling 60 mL
- 1 tablespoon vegan milk as needed – 15 mL
For the Chocolate Ganache:
- ⅓ cup canned coconut cream room temperature – 80 mL
- 2 ounces dark chocolate 70% cocoa, finely chopped – 57 g
For Decoration:
- Whole fresh strawberries
Instructions
Prepare the Strawberry Filling
- In a medium saucepan over medium heat, combine the chopped strawberries and sugar. Cook, stirring frequently, for about 4–5 minutes, until the strawberries begin releasing their juices
- Stir in the lemon juice and continue to cook for another 2 minutes. Gently mash some of the strawberries with a spoon or potato masher to help break them down.
- In a small bowl, stir together the cornstarch and water until smooth. Pour into the strawberry mixture and cook for another 1–2 minutes, stirring, until thickened.
- Remove from heat and stir in the vanilla extract, cool completely. Reserve ¼ cup for the frosting.
Make the Cake Layers
- In a small bowl or jar, stir together the apple cider vinegar and soy milk. Let sit for 5–10 minutes until it curdles slightly.
- In a large bowl, whisk together the flour, cocoa powder, baking powder, baking soda, salt, and sugar.
- Add the vegan buttermilk, melted vegan butter, and vanilla extract. Beat on medium speed for 1–2 minutes until just combined. Scrape down the sides and stir again to ensure everything is incorporated.
- Slowly pour in the hot coffee and whisk gently until the batter is smooth. Batter will be thin.
- Preheat oven to 350°F (175°C). Grease and line three 8-inch (20 cm) cake pans with parchment paper.
- Divide the batter evenly among the pans. Bake for 40 minutes, or until a toothpick inserted in the center comes out clean.
- Cool the cakes completely in the pans before removing.
Make the Strawberry Buttercream Frosting
- In a large bowl, beat the softened vegan butter until creamy. Gradually add powdered sugar and beat until light and fluffy.
- Mix in the vanilla extract and reserved ¼ cup strawberry filling.
- If the frosting is too thick, add 1 tablespoon vegan milk and beat until smooth and spreadable.
Make the Chocolate Ganache
- In a small saucepan, heat the coconut cream just until steaming. Remove from heat and add the chopped chocolate. Let sit for 1–2 minutes, then whisk until glossy and smooth. Let cool slightly before using.
Assemble the Cake
- If the cake layers are domed, level them with a serrated knife.
- Place one layer on a serving plate or cake stand. Spread a generous layer of strawberry filling over the top.
- Add the second cake layer and repeat with more strawberry filling.
- Top with the final cake layer. Frost the entire cake with the strawberry buttercream.
- Drizzle the cooled ganache over the top, letting it drip slightly down the sides.
- Decorate with whole fresh strawberries.
- Let the cake set for at least 1 hour before slicing.
Notes
- Room temperature : Store this chocolate strawberry cake at room temperature for a day—and only if it’s not hot in your kitchen.
- Refrigerator : Loosely cover the cake with plastic wrap or transfer leftovers to an airtight container. It will keep in the refrigerator for 3 to 4 days. (If you’re making this ahead for a party, I don’t recommend storing it for more than a day or two for maximum freshness.)
- Freezer : It’s best to freeze the layers and filling separately if you’re freezing for advance prep. But if you’re freezing leftovers wrap the slices individually in plastic wrap, then place the slices in a freezer bag or airtight container. They’ll keep for up to 3 months; thaw in the refrigerator before serving.
Nutrition
Chocolate Strawberry Cake https://jessicainthekitchen.com/chocolate-strawberry-cake/ September 3, 2025
This classic French Bread recipe will have you making crusty, bakery-style loaves right at home! My easy recipe is a great one for beginners, but seasoned bakers will love it too.

French bread is light and fluffy in the middle, with a chewy, crusty exterior. And it’s not the same as a baguette! Baguettes have a crispier crust, and they have that classic baguette shape—French bread is a proper loaf that you can make sandwiches out of. This vegan French bread recipe is simple as can be and, much like my No Knead Bread , it’s a recipe anyone can make. Nothing beats homemade bread!
Why It’s Worth It to Make Your Own French Bread
Sure, you could go to the bakery and pick up a loaf. But my recipe is even better!
- Makes two loaves . Because if you’re going to take the time to make your own bread, you want it to be worth it! You can freeze the extra loaf or be the best friend ever and give away the second loaf.
- Easy to make . This French bread recipe isn’t complicated to make—it’s made with yeast , not fussy sourdough, and it doesn’t require specialised ingredients or equipment. (My Olive Bread is super easy too!)
- The freshest bread . Seriously, it doesn’t get any fresher than this! And fresh bread is the most delicious bread.

Notes on Ingredients
You don’t need all that much to make this French bread recipe! Scroll down to the recipe card to find the ingredient quantities and recipe instructions.
- Warm water – It should be about 110°F, or lukewarm if you don’t have a thermometer.
- Sugar
- Instant yeast – Learn more: Is Yeast Vegan?
- Olive oil
- All-purpose flour – Or bread flour, which has higher protein and will give you a chewier bread.
- Kosher salt
How to Make This French Bread Recipe
As promised, this recipe is easy as far as homemade breads go. Let’s get started!

Activate the yeast.
- Activate the yeast . Whisk the water, sugar, and yeast in a mixing bowl and let sit for 5 minutes, or until foamy.
- Make the dough . Add the remaining ingredients to the yeast mixture. Use a dough hook to mix on low speed; if you don’t have a stand mixer, mix with a wooden spoon until a shaggy dough forms.
- Knead . Knead on medium speed or on a lightly floured surface by hand for 8 to 10 minutes, or until the dough is elastic and smooth.

Form into a ball.
- Rise . Shape the dough into a ball and set it in a large bowl that’s lightly coated in oil. Cover and let the dough rise for 60 to 90 minutes, or until it doubles in size.
- Shape the loaves . Gently deflate the dough by lightly punching down, then divide it into two equal portions. Shape each portion into a log and pinch the seams and ends.

Shape, rise again, then score.
- Rise again . Set the loaves seam-side-down on a parchment-lined baking sheet. Loosely cover and let the loaves rise for 30 to 40 minutes, or until about doubled in size. Near the end of the rising time, start preheating the oven to 425ºF and set an empty baking dish on the bottom rack.
- Bake . Score the loaves and place them in the oven. Pour a cup of hot water into the pan below and close the oven door. Bake for 25 to 30 minutes, or until the loaves reach 200ºF on an instant-read thermometer.
- Cool . Let the loaves cool on a wire rack for at least 20 minutes before slicing and serving.
My Best Tips for Baking Your Own Bread
Follow these additional pointers and you’ll be well on your way to enjoying the perfect loaf of French bread!
- Make sure your yeast works . If it’s been sitting in your pantry for a while, it may be past its prime. You’ll know this if it doesn’t foam in the first step of the recipe. (Learn more: How to Test Yeast to See if it’s Still Good .)
- Watch the dough, not the clock . Your best indicator of when the dough is done rising is to look at its appearance, rather than just setting a timer and going by that. The temperature in your kitchen can affect how long it takes the dough to rise, so it could be ready sooner or take a little longer.
- Don’t cut into it right away . Freshly baked bread is tempting, but it’s still “baking” inside even after you take it out of the oven. If you cut into it too soon, the center is likely to be gummy.

How to Use Your French Bread
I bet you have plenty of ideas! When I’ve got a loaf of this homemade French bread on hand, the first thing I do with it is slather a slice with Vegan Butter or Strawberry Jam . This loaf is also excellent for making sandwiches, like my Vegan BLT Sandwich .
If it starts to go stale, don’t despair! Fresh bread doesn’t last a week or two like store-bought bread does, which is how you know it’s legit. Use those stale slices to make Vegan French Toast .
Proper Storage
- Room temperature : Let the bread cool completely, then store it in a breadbox or paper bag (a plastic bag works too, but the crust will be softer). It’ll last 4 to 5 days at room temperature.
- Freezer : You can freeze this French bread in a freezer bag for up to 3 months. Thaw at room temperature before serving. If you want to use a slice at a time, slice the bread before freezing it.

More Homemade Bread Recipes
- Gluten-Free Dinner Rolls
- Vegan Japanese Milk Bread
- Gluten-Free Sandwich Bread
- Gluten-Free Focaccia
Ingredients
- 1 ¾ cups warm water , about 110°F – 350 g
- 1 tablespoon sugar , 13 g
- 2 ½ teaspoons instant yeast , 1 packet – about 7 g
- 3 tablespoons olive oil , 45 mL
- 4 ½ cups all-purpose or bread flour , 558 g
- 2 teaspoons kosher salt , 8 g
Instructions
- In a large mixing bowl (or the bowl of a stand mixer), combine the warm water, sugar, and yeast. Let sit for 5 minutes until foamy. (If you’re sure your instant yeast is fresh, you can skip this step—proofing is optional but helpful.)
- Add the olive oil, flour, and salt to the yeast mixture. Mix with a dough hook on low speed (or stir with a sturdy spoon) until a shaggy dough forms. Knead on medium speed (or by hand on a lightly floured surface) for 8–10 minutes, until the dough is smooth and elastic.
- Shape the dough into a ball and place it in a lightly oiled bowl. Cover with plastic wrap or a clean kitchen towel. Let rise in a warm spot for 1 to 1½ hours, or until doubled in size.
- Punch down the dough and divide it in half. On a lightly floured surface, shape each half into a tight log about 12–14 inches (30–36 cm) long. Pinch the seams and ends to seal.
- Place the loaves seam side down on a parchment-lined baking sheet. Cover and let rise for 30–40 minutes, or until puffy but not over-proofed—they should roughly double in size.
- Preheat the oven to 425°F (220°C). Place an empty baking dish or metal pan on the bottom rack to create steam later.
- Use a sharp knife or lame to score each loaf with 3–4 diagonal slashes. Quickly place the loaves in the oven and pour 1 cup of hot water into the pan on the bottom rack to generate steam. Close the oven door immediately. Bake for 25–30 minutes, or until the loaves are golden brown and sound hollow when tapped on the bottom. The internal temperature should reach about 200°F (93°C).
- Transfer the loaves to a wire rack and let cool for at least 20 minutes before slicing.
Notes
- Room temperature : Let the bread cool completely, then store it in a breadbox or paper bag (a plastic bag works too, but the crust will be softer). It’ll last 4 to 5 days at room temperature.
- Freezer : You can freeze this French bread in a freezer bag for up to 3 months. Thaw at room temperature before serving. If you want to use a slice at a time, slice the bread before freezing it.
