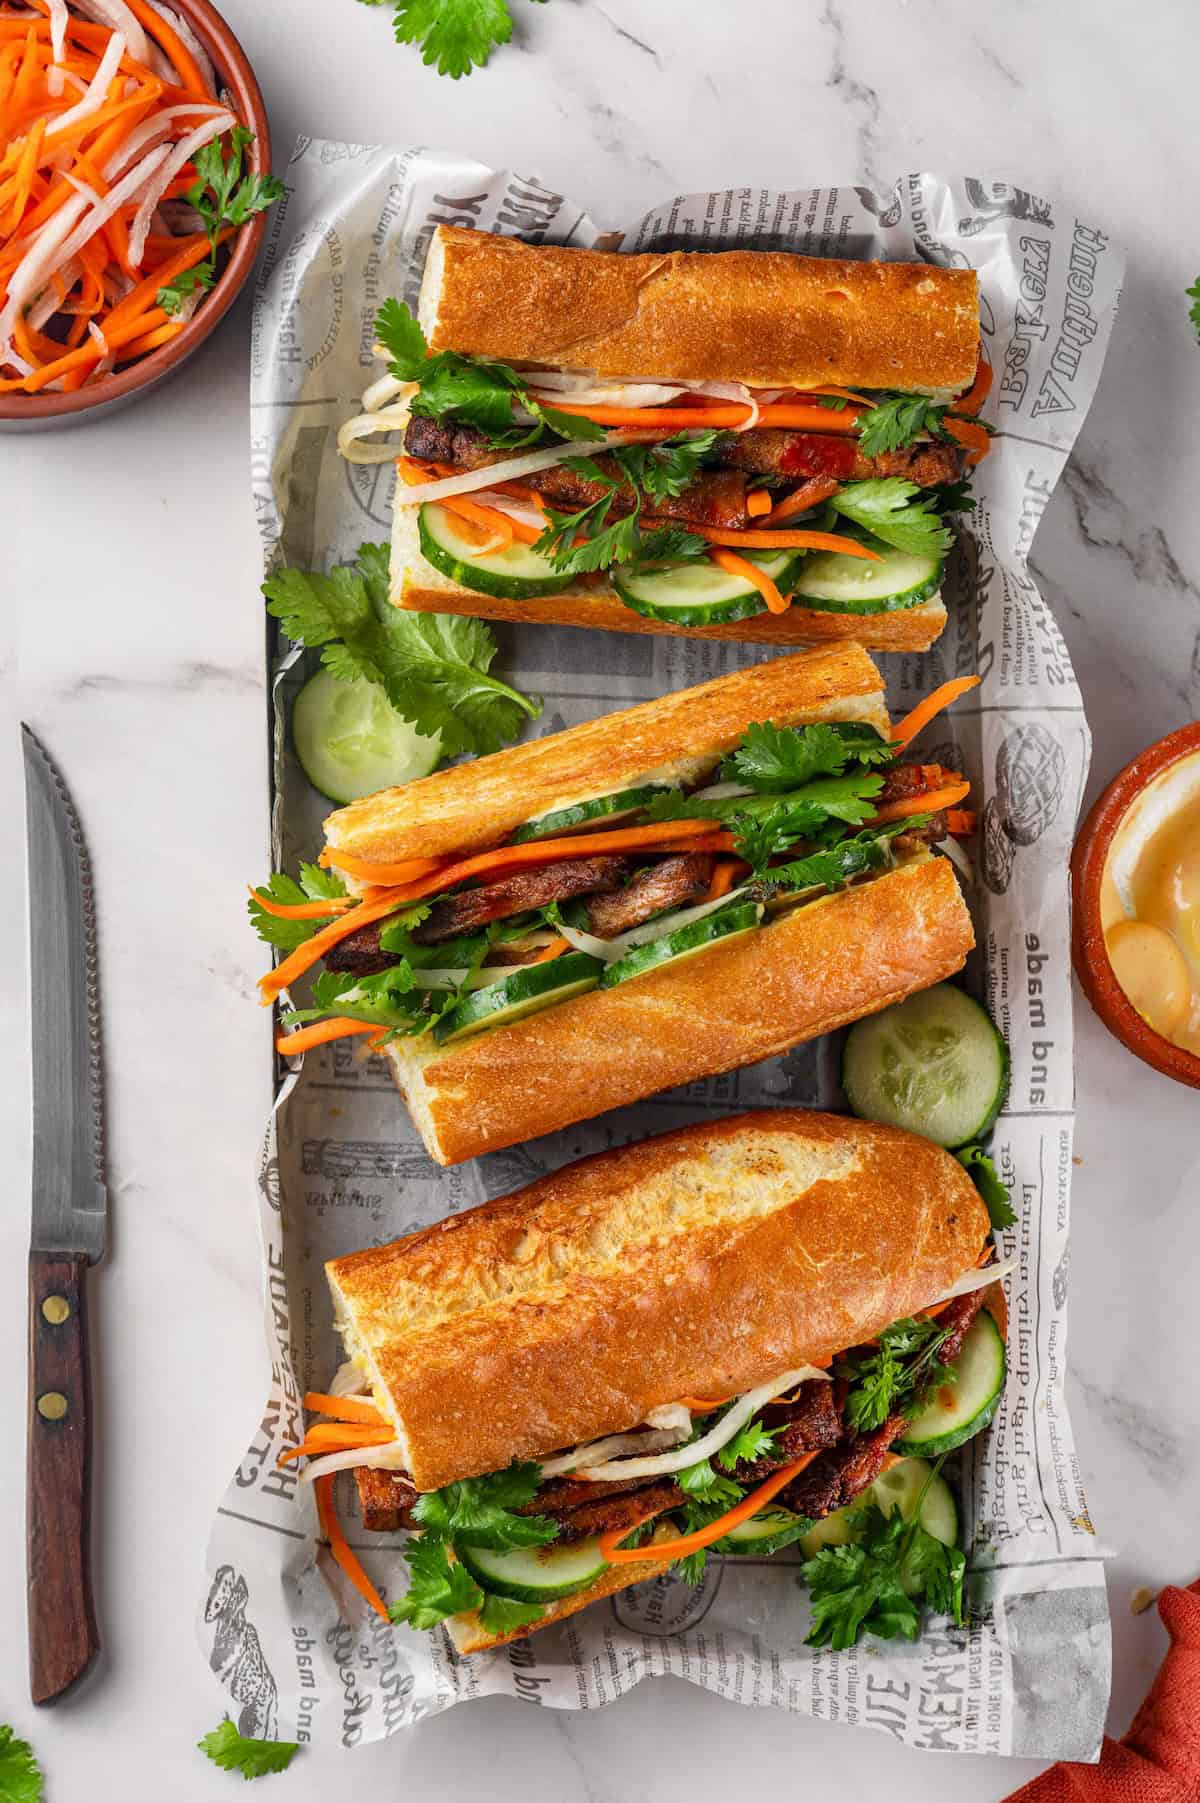
Crispy air fried tofu is layered with crunchy pickled veggies and mayo on crusty baguettes to make this fresh and flavourful vegan Tofu Banh Mi recipe. The perfect plant-based lunch!
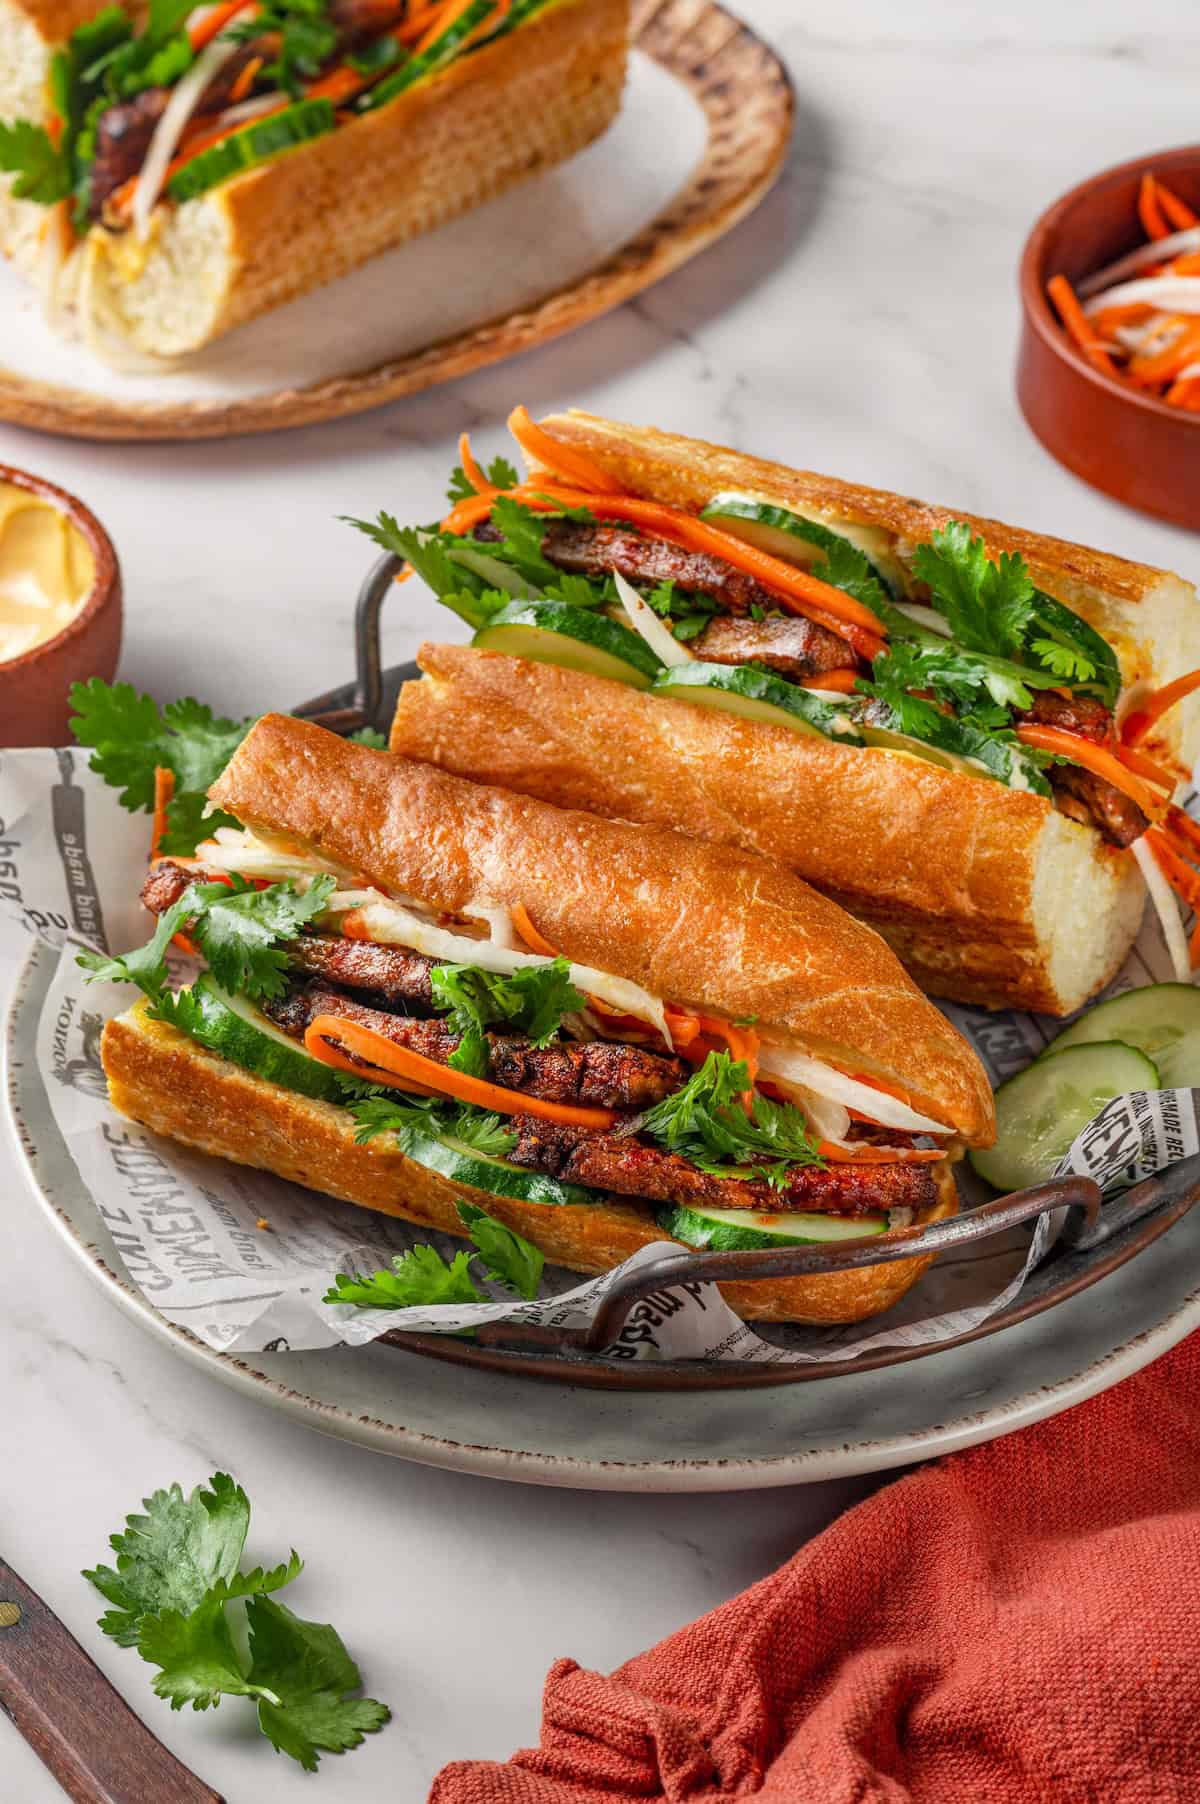
I’ve tried quite a few vegan banh mi recipes over the years, but I was never quite satisfied with the texture or flavour. So naturally, I decided to take things into my own hands and develop this tofu banh mi! And what better way to make it than to use Air Fryer Tofu as the protein! Air fried tofu has totally been my favourite lately, and it’s seasoned to perfection, then cooked until crispy for this vegan banh mi. This is SUCH a fantastic way to use air fryer tofu, I must say. To this base, we add pickled veggies, cucumber, cilantro, and Vegan Mayo —spicy if you like, plain if you don’t. The result is a sandwich that’s bursting with freshness and flavour!
Why This Vegan Banh Mi Belongs on Your Menu
If you’re looking to switch up your sandwich game, this tofu banh mi is exactly what you need! It’s something a little different to liven up your menu. Here’s why I love it.
- Super satisfying . Between the protein and all those beautiful fresh veggies, this tofu banh mi recipe is filling so you won’t be hungry a few hours after eating.
- Divine flavours . The tofu is full of savoury, umami flavour, you’ve got the sweet-and-tangy pickled veggies, spicy mayo—oh, I’m getting hungry again just thinking about it! If you like your food to have BIG flavours, you will flip for this sandwich.
- So many textures . There are just as many textures as there are flavours in this recipe! The bread is crisp on the outside and tender on the side, and so is the air fried tofu. Then the pickled vegetables and cucumbers add a lot of crunch to every bite.
Notes on Ingredients
This is such a great recipe to make after a trip to the farmers’ market! Most of what you’ll need are pantry staples and fresh vegetables. Scroll down to the recipe card to find the ingredient quantities and recipe instructions.
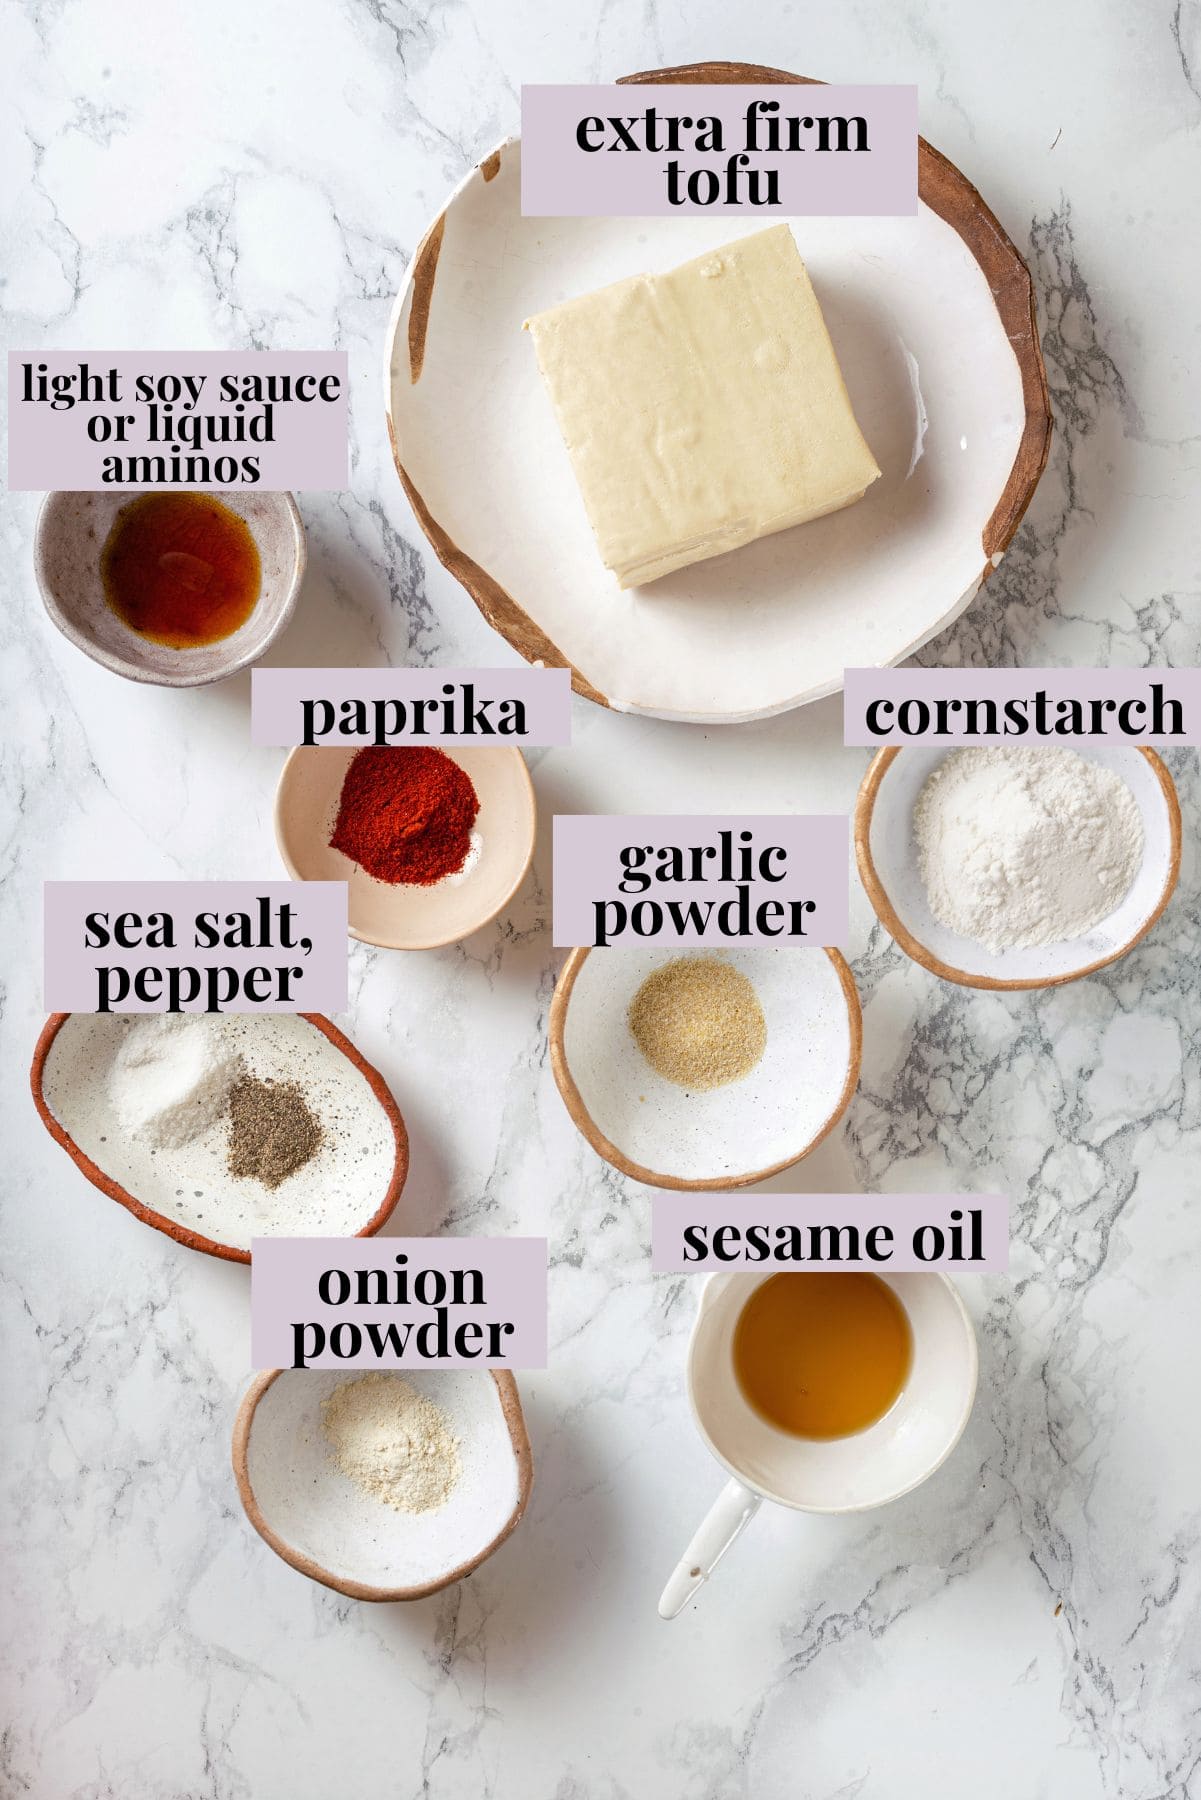
Crispy Sliced Tofu:
- Extra-firm tofu – Press the tofu, then slice it. Learn more: How To Cook Tofu .
- Light soy sauce or liquid aminos – You can also use tamari, which is gluten-free.
- Seasonings – Garlic powder, onion powder, paprika, and sea salt.
- Cornstarch – This helps give the tofu a crispy exterior.
- Sesame oil
- Ground black pepper
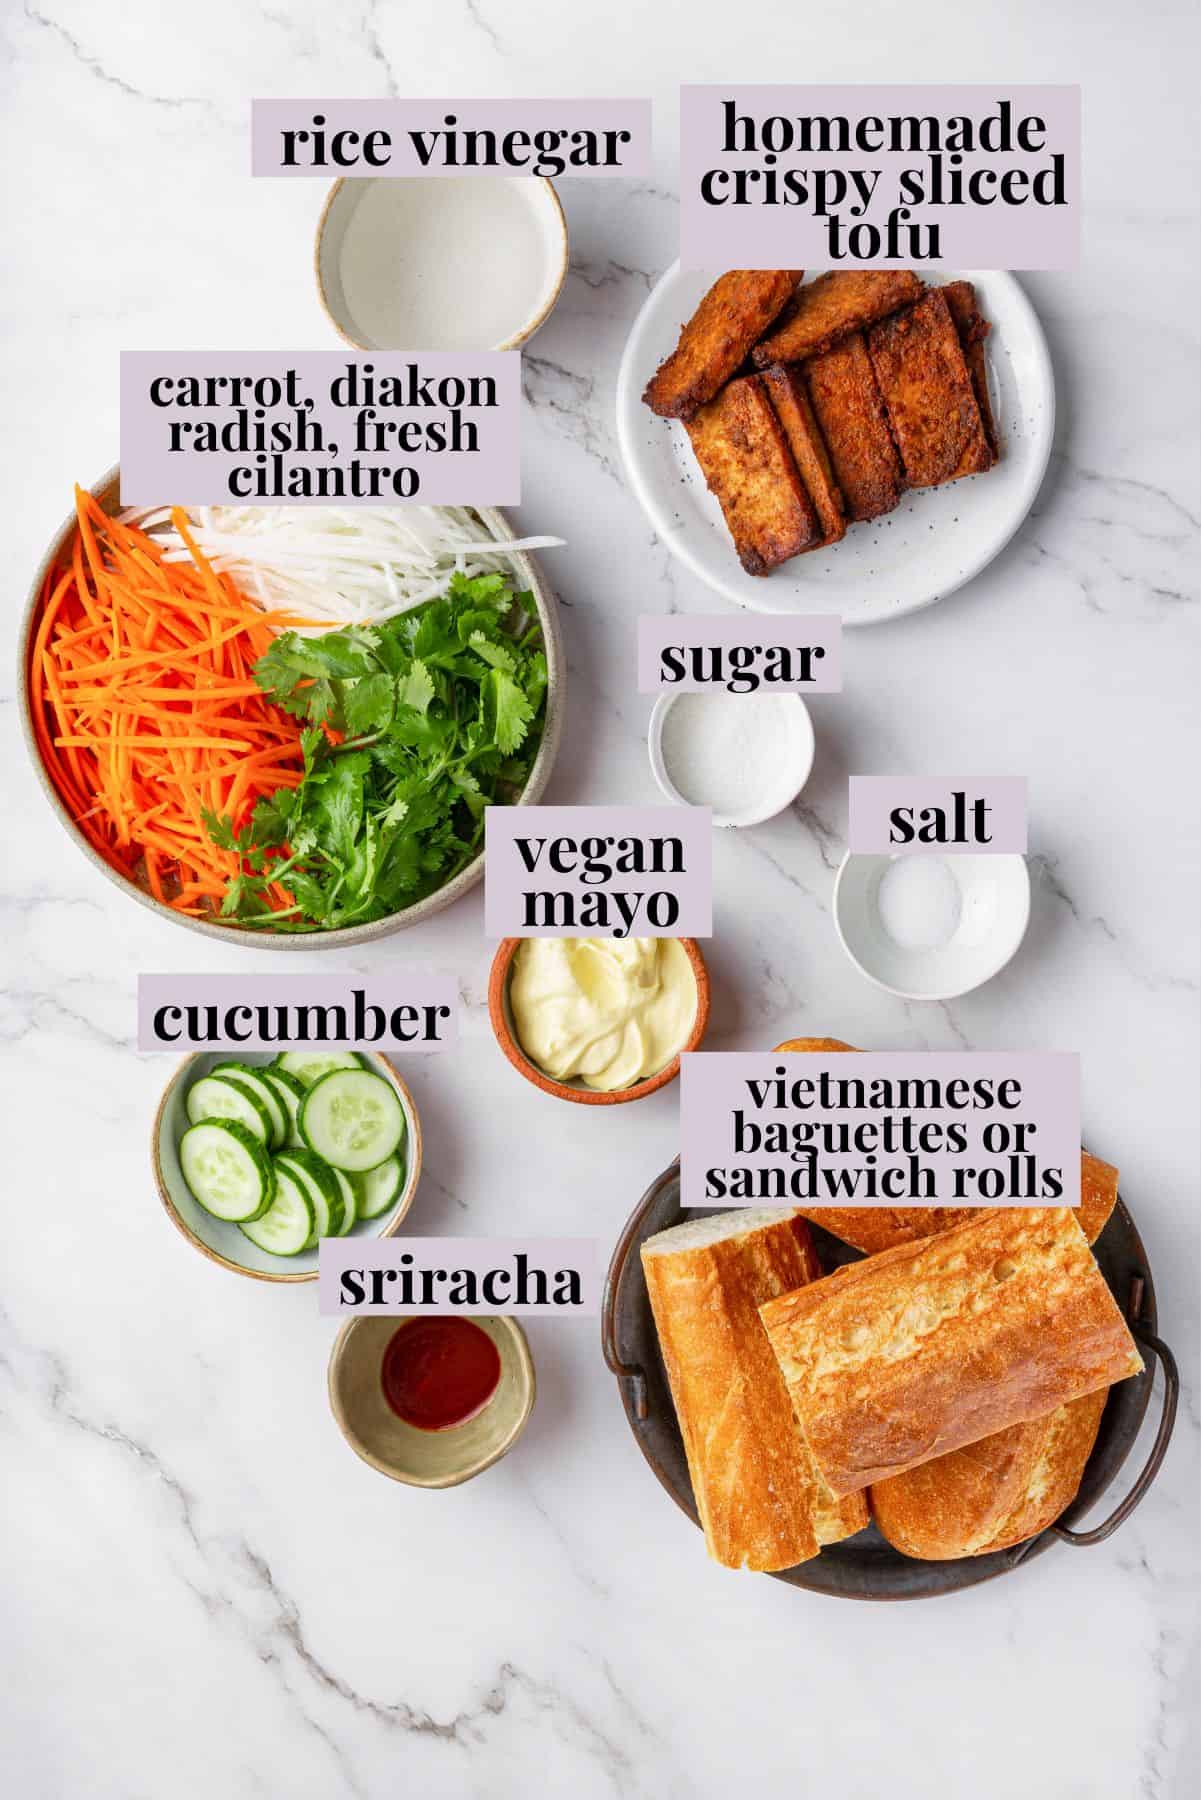
Pickled Veggies:
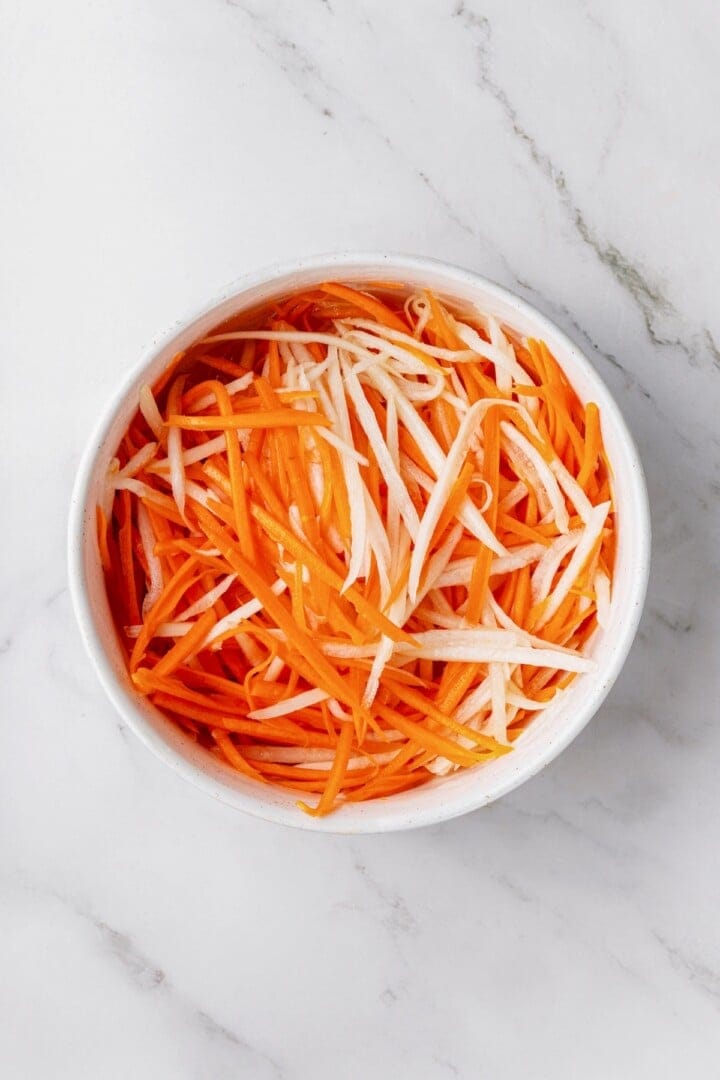
- Veggies – I use carrot and daikon radish in this tofu banh mi.
- Rice vinegar – Make sure it’s unseasoned, which means it doesn’t have added sugar. (We’ll be adding our own!)
- Sugar
- Salt
Assembly:
- Vietnamese baguettes or sandwich rolls – If you can’t find Vietnamese baguettes locally, basically what you want is something that’s crisp on the outside.
- Vegan mayonnaise
- Sriracha – You can adjust the amount to your tastes or just skip it.
- Cucumber
- Fresh cilantro – If you’re not a cilantro fan, you can use basil or mint; I recommend using less because they have a stronger flavor.
How to Make a Tofu Banh Mi
I can’t wait for you to try this vegan banh mi recipe! But first, you’ve got to make it. Here’s what you’ll need to do.
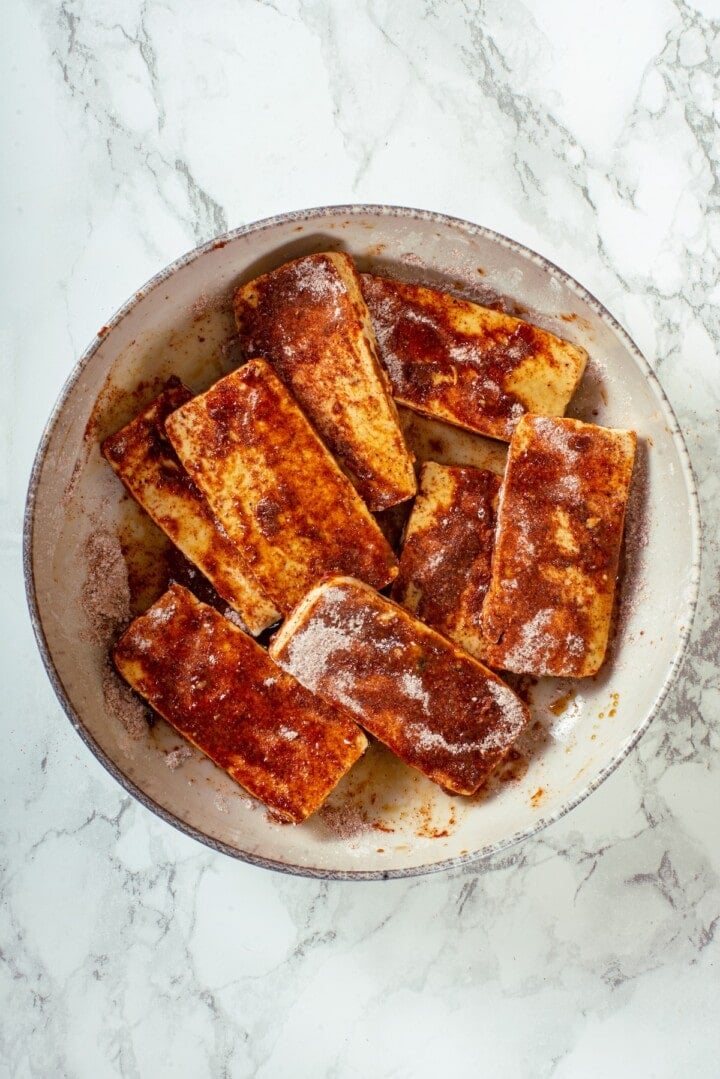
Season the tofu.
- Season the tofu . Toss the tofu with the soy sauce, followed by the seasonings, cornstarch, and oil.
- Air fry . Add the tofu to your air fryer basket and cook for 10 minutes, flipping halfway through.
Make the pickled veggies.
- Pickle the vegetables . Whisk together the vinegar, sugar, and salt in a bowl until the sugar dissolves. Add the carrot and radish and let sit for 15 minutes at room temperature, or up to a few hours in the refrigerator.
- Assemble . Stir together the mayo and sriracha. Spread it on both sides of the bread, then add the tofu, pickled veggies, cucumber, and cilantro to the banh mi.
Tips and Variations
These additional tips will help you make sure this tofu banh mi recipe turns out perfect!
- Bake the tofu . Don’t have an air fryer? No problem! You can follow the method in my Easy Baked Tofu recipe.
- Use a mandoline slicer . I find this is the best way to julienne vegetables. If you don’t have one, you can thinly slice the radishes and carrots instead, which is easier to do with a knife.
- Make it extra spicy . Top your tofu banh mi with chili crisp for some more heat and a little crunch!
Serving Suggestions
I enjoy this tofu banh mi recipe while the tofu is still warm, but you can let the tofu cool completely, then assemble your sandwiches for a chilled version that works well for picnics and work lunches. Serve your sandwiches alongside Sweet Potato Chips or Air Fryer Shoestring Fries .
How to Store
Wrap the assembled tofu banh mi in plastic wrap or foil and refrigerate for up to 2 days. If you haven’t assembled the sandwiches, the tofu and pickled veggies will last up to 3 days in separate airtight containers, and the spicy mayo will last a week.
I recommend eating leftovers chilled or take out the tofu, heat it, and then tuck it back into the banh mi.
More Vegan Sandwiches
- Chopped Cheese Sandwich
- Vegan BLT Sandwich
- Vegan Chicken Parm Sandwich
- Smashed Chickpea Avocado Sandwich
Ingredients
For the Crispy Sliced Tofu:
- 1 block extra firm tofu, pressed and sliced into ¼-inch slabs , 16 oz. or 450 g
- ½ tablespoon light soy sauce or liquid aminos , 7.5 mL
- 1 teaspoon garlic powder , 3 g
- ½ teaspoon onion powder , 1.5 g
- 1 teaspoon paprika , 2 g
- ½ teaspoon sea salt , 3 g
- 2 teaspoons cornstarch , plus up to 2 more for extra crisp – 5 to 10 g
- 1 teaspoon sesame oil , or other oil – 5 mL
- ¼ teaspoon ground black pepper , 0.5 g
For the Pickled Veggies:
- 1 medium carrot , julienned
- 1 small daikon radish , julienned
- ½ cup rice vinegar , 120 mL
- 1 tablespoon sugar , 12 g
- ½ teaspoon salt , 3 g
For Assembly:
- 4 Vietnamese baguettes or sandwich rolls – about 6-inch each
- ½ cup vegan mayonnaise , 120 mL
- 1 tablespoon sriracha , optional, for spicy mayo – 15 mL
- 1 small cucumber , thinly sliced
- 1 bunch fresh cilantro
Instructions
Prepare the Tofu
- Press the tofu for at least 30 minutes to remove moisture, then slice into thin slabs about ¼ inch thick.
- In a medium bowl, toss tofu slices with soy sauce to coat.
- Add garlic powder, onion powder, paprika, salt, black pepper, cornstarch, and sesame oil. Gently toss to coat each piece evenly.
- Place slices in a single layer in your air fryer basket. Air fry at 400°F (200°C) for 10 to 15 minutes, flipping or shaking halfway through, until crispy and golden.
- Transfer to a plate and let cool slightly while you prepare the rest.
Make the Pickled Veggies
- Combine vinegar, sugar, and salt in a bowl. Stir until dissolved.
- Add julienned carrot and daikon radish. Let sit at room temperature for at least 15 minutes (or refrigerate up to a few hours).
Assemble the Banh Mi
- Slice baguettes lengthwise, leaving a hinge. Optional: Lightly toast the baguette under the broiler for 1–2 minutes until just crisp.
- Mix vegan mayo with sriracha if using, and spread on both sides of the bread.
- Layer in:
- A few slices of crispy tofu
- Pickled vegetables (drained)
- Fresh cucumber slices
- Fresh cilantro
- Enjoy immediately while the tofu is warm.
Notes

Tofu Banh Mi
Ingredients
For the Crispy Sliced Tofu:
- 1 block extra firm tofu, pressed and sliced into ¼-inch slabs 16 oz. or 450 g
- ½ tablespoon light soy sauce or liquid aminos 7.5 mL
- 1 teaspoon garlic powder 3 g
- ½ teaspoon onion powder 1.5 g
- 1 teaspoon paprika 2 g
- ½ teaspoon sea salt 3 g
- 2 teaspoons cornstarch plus up to 2 more for extra crisp – 5 to 10 g
- 1 teaspoon sesame oil or other oil – 5 mL
- ¼ teaspoon ground black pepper 0.5 g
For the Pickled Veggies:
- 1 medium carrot julienned
- 1 small daikon radish julienned
- ½ cup rice vinegar 120 mL
- 1 tablespoon sugar 12 g
- ½ teaspoon salt 3 g
For Assembly:
- 4 Vietnamese baguettes or sandwich rolls – about 6-inch each
- ½ cup vegan mayonnaise 120 mL
- 1 tablespoon sriracha optional, for spicy mayo – 15 mL
- 1 small cucumber thinly sliced
- 1 bunch fresh cilantro
Instructions
Prepare the Tofu
- Press the tofu for at least 30 minutes to remove moisture, then slice into thin slabs about ¼ inch thick.
- In a medium bowl, toss tofu slices with soy sauce to coat.
- Add garlic powder, onion powder, paprika, salt, black pepper, cornstarch, and sesame oil. Gently toss to coat each piece evenly.
- Place slices in a single layer in your air fryer basket. Air fry at 400°F (200°C) for 10 to 15 minutes, flipping or shaking halfway through, until crispy and golden.
- Transfer to a plate and let cool slightly while you prepare the rest.
Make the Pickled Veggies
- Combine vinegar, sugar, and salt in a bowl. Stir until dissolved.
- Add julienned carrot and daikon radish. Let sit at room temperature for at least 15 minutes (or refrigerate up to a few hours).
Assemble the Banh Mi
- Slice baguettes lengthwise, leaving a hinge. Optional: Lightly toast the baguette under the broiler for 1–2 minutes until just crisp.
- Mix vegan mayo with sriracha if using, and spread on both sides of the bread.
- Layer in:
- A few slices of crispy tofu
- Pickled vegetables (drained)
- Fresh cucumber slices
- Fresh cilantro
- Enjoy immediately while the tofu is warm.
Notes
Nutrition
Tofu Banh Mi https://jessicainthekitchen.com/tofu-banh-mi/ August 6, 2025
A smoky, savoury seasoning blend makes these Breakfast Potatoes delectable! I’ll show you how to get them perfectly crispy on the stovetop.
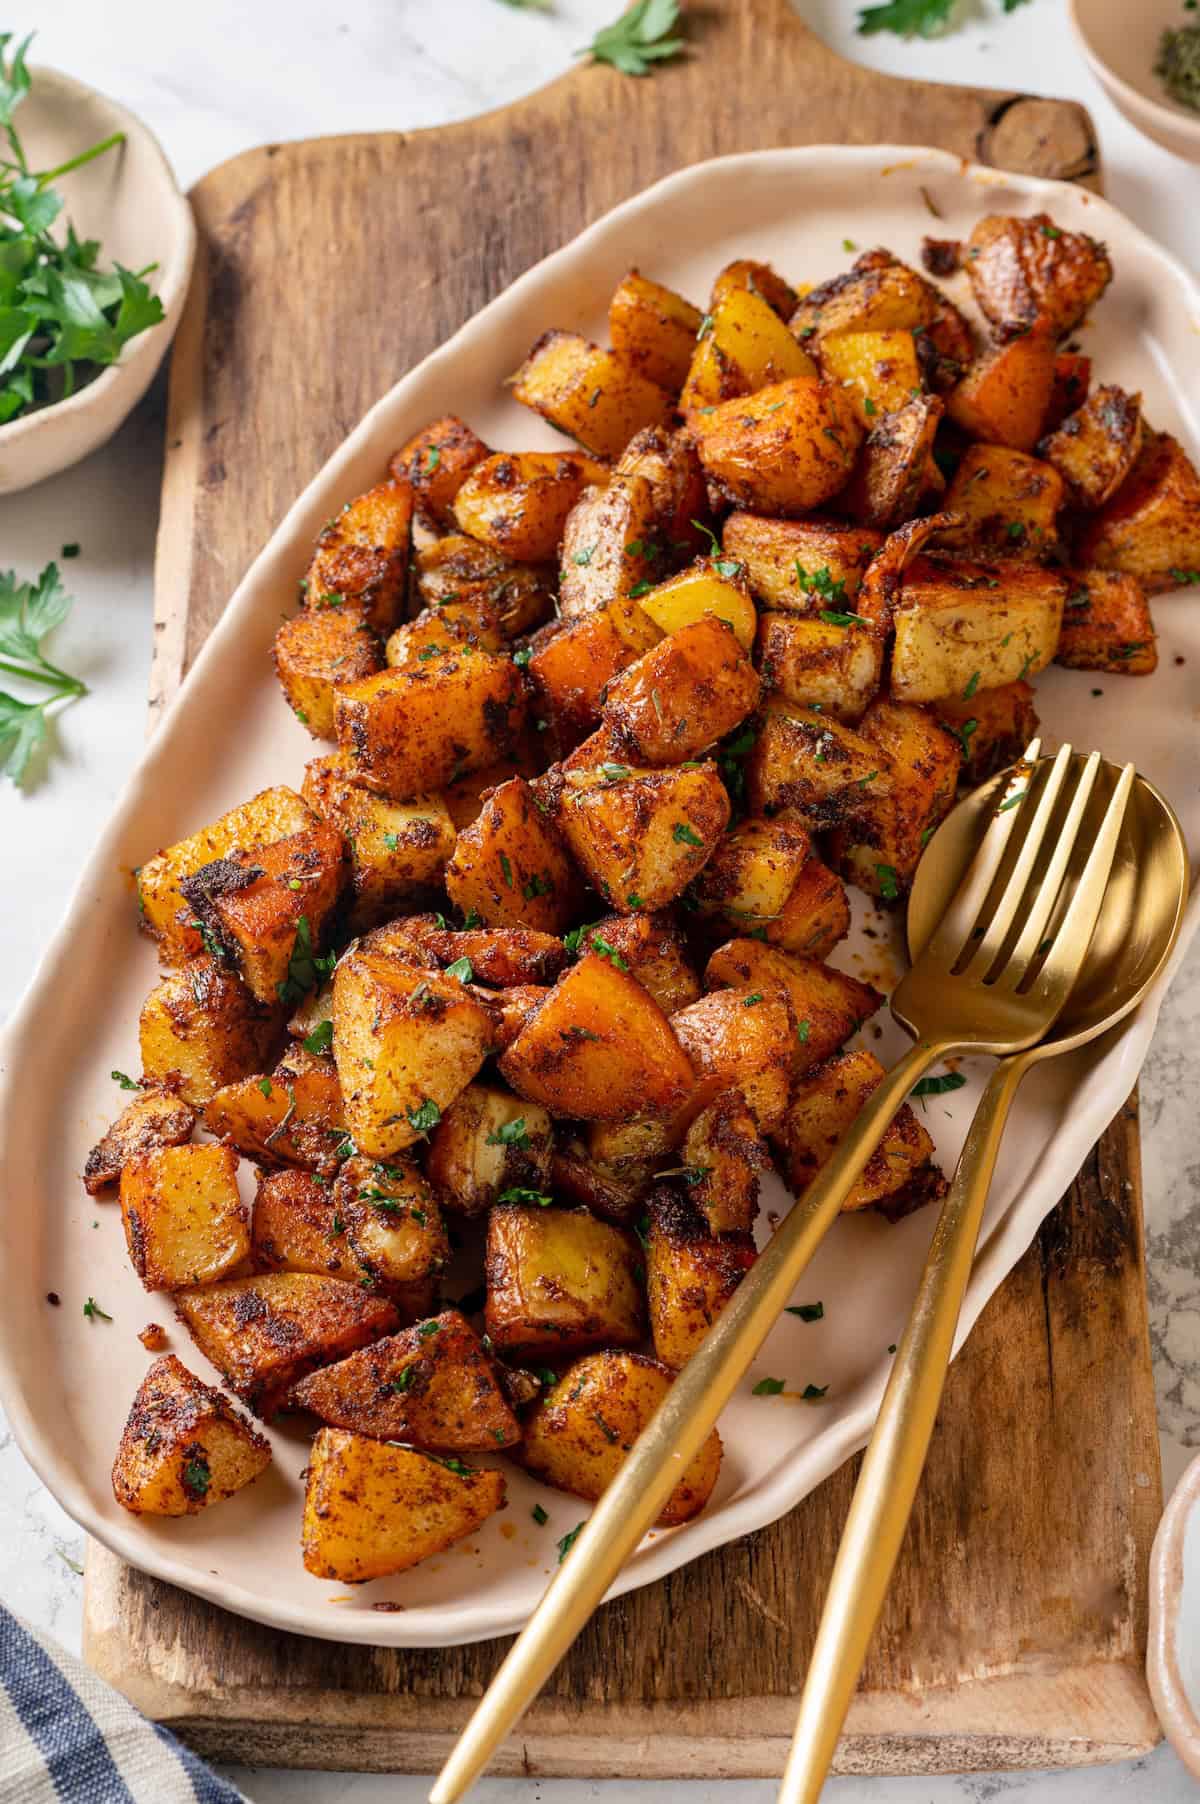
Potatoes are total comfort food, but sometimes you need your fix in the morning, when Mashed Potatoes just won’t work. Enter: breakfast potatoes! This is the perfect recipe to pair with a Fluffy Tofu Scramble . The potatoes are ultra-crispy (psst—follow my tips and I promise they won’t be soggy!), seasoned with the most divine blend of herbs and spices, and so good, you’ll want to eat them all day long.
Why Your Mornings Will Be Even Better With These Crispy Potatoes on Your Plate
Sometimes you wake up and you’re raring to go. And other times, you just need the promise of crispy breakfast potatoes to get you out of bed, you know what I mean? Here’s what makes these potatoes the best!
- The perfect seasoning blend . Potatoes are starchy and mild in flavour, so to bring out their best, you’ve got to jazz them up. So I add a blend of seasonings that’s smoky, deeply savoury, and a little bit herbaceous. It makes these breakfast potatoes DELICIOUS!
- Crispy, not soggy . You ever make breakfast potatoes or Hash Browns and they end up soggy and mushy? Yeah, me too. But since then, I’ve learned the secret to making sure skillet potatoes turn out crispy and brown!
- Cooked ALL the way through . The other problem I’ve found with cooking potatoes in a skillet is that it can be hard to get them tender on the inside. I’ve got a trick to prevent this from happening too, so your potatoes are fluffy and tender in the middle, crispy on the outside. Perfection!
Notes on Ingredients
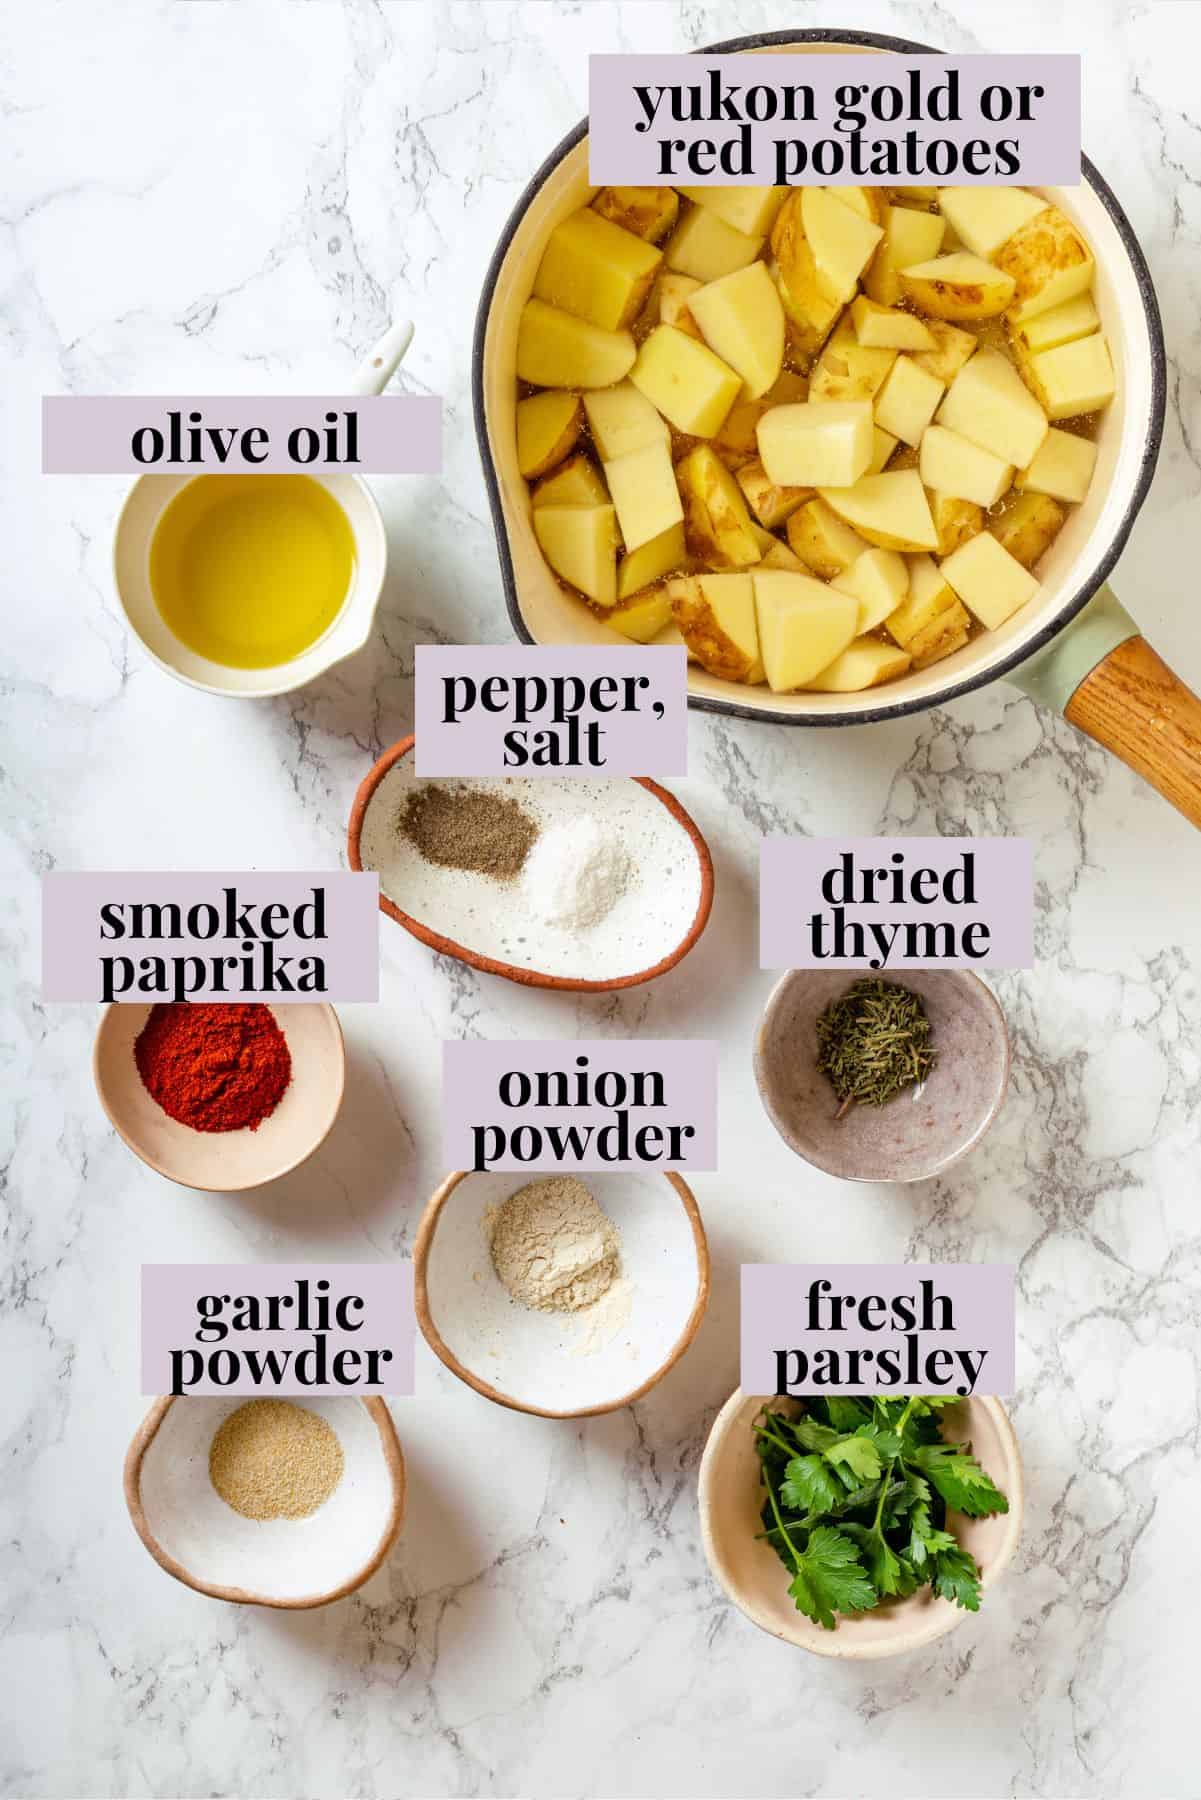
Most of what you need for this recipe is in your spice cabinet! Scroll down to the recipe card to find the ingredient quantities and recipe instructions.
- Olive oil – Or another oil you like to use for cooking.
- Potatoes – I use Yukon gold or red potatoes, which have lower starch content than russet potatoes.
- Seasonings – Smoked paprika, garlic powder, onion powder, dried thyme, salt, and pepper.
- Parsley – Optional, for garnish. I like using Italian parsley, which has more flavor than curly parsley.
How to Make Skillet Breakfast Potatoes
Get ready for the best breakfast potatoes you’ve ever had! Here’s what you’ll need to do.
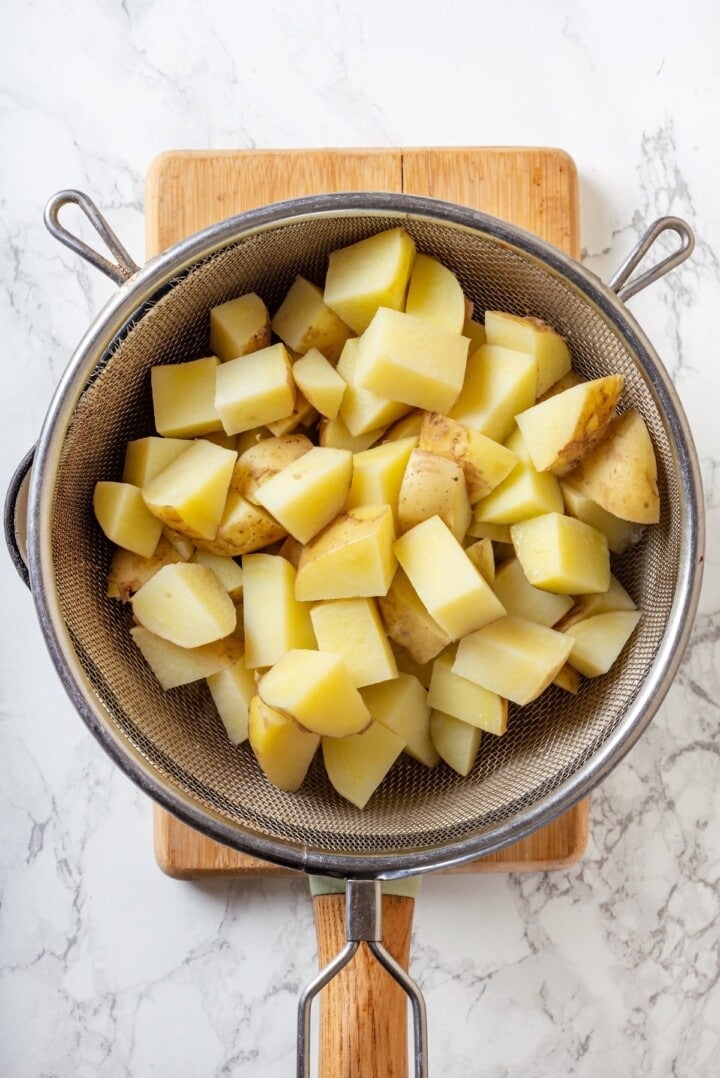
Parboil the potatoes and drain.
- Parboil the potatoes . Place the potatoes in a pot with cold water and salt. Bring to a boil and cook for 5 to 6 minutes, then drain. Put the drained potatoes back in the pot; the hot pot will dry the potatoes a bit.
- Heat the skillet . Set a large nonstick or well-seasoned cast iron skillet over medium heat. Once it’s hot, add the olive oil.
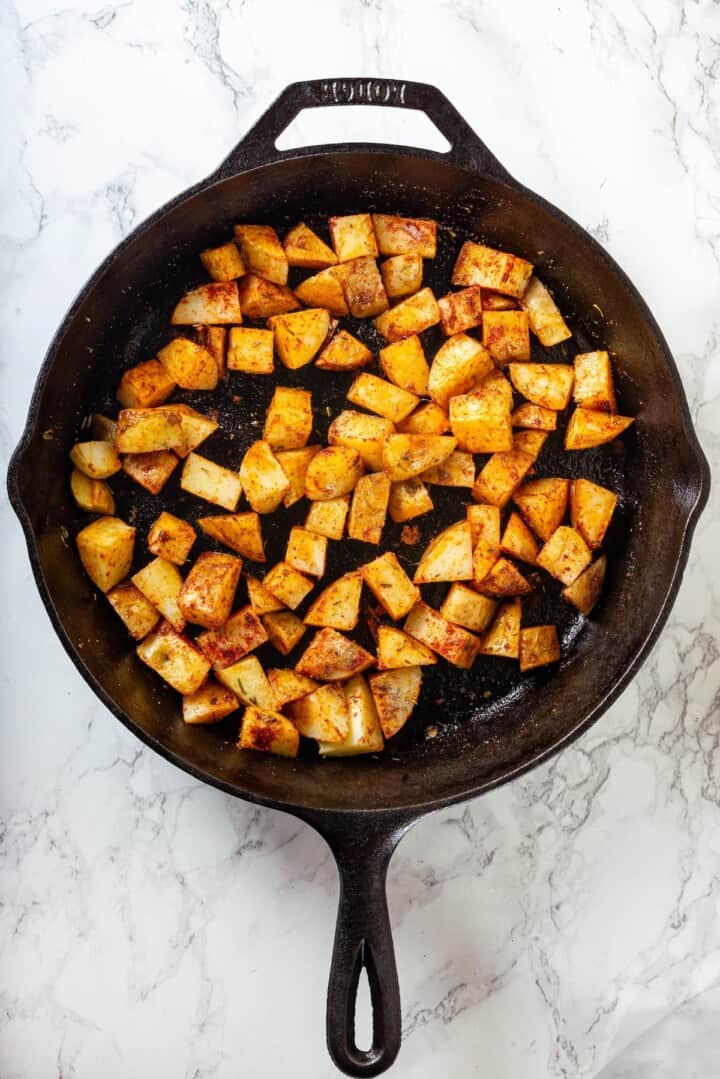
- Add the potatoes. Place the potatoes in the skillet in an even layer. Do NOT disturb them; just let them cook for 5 to 7 minutes without stirring or flipping.
Flip the potatoes.
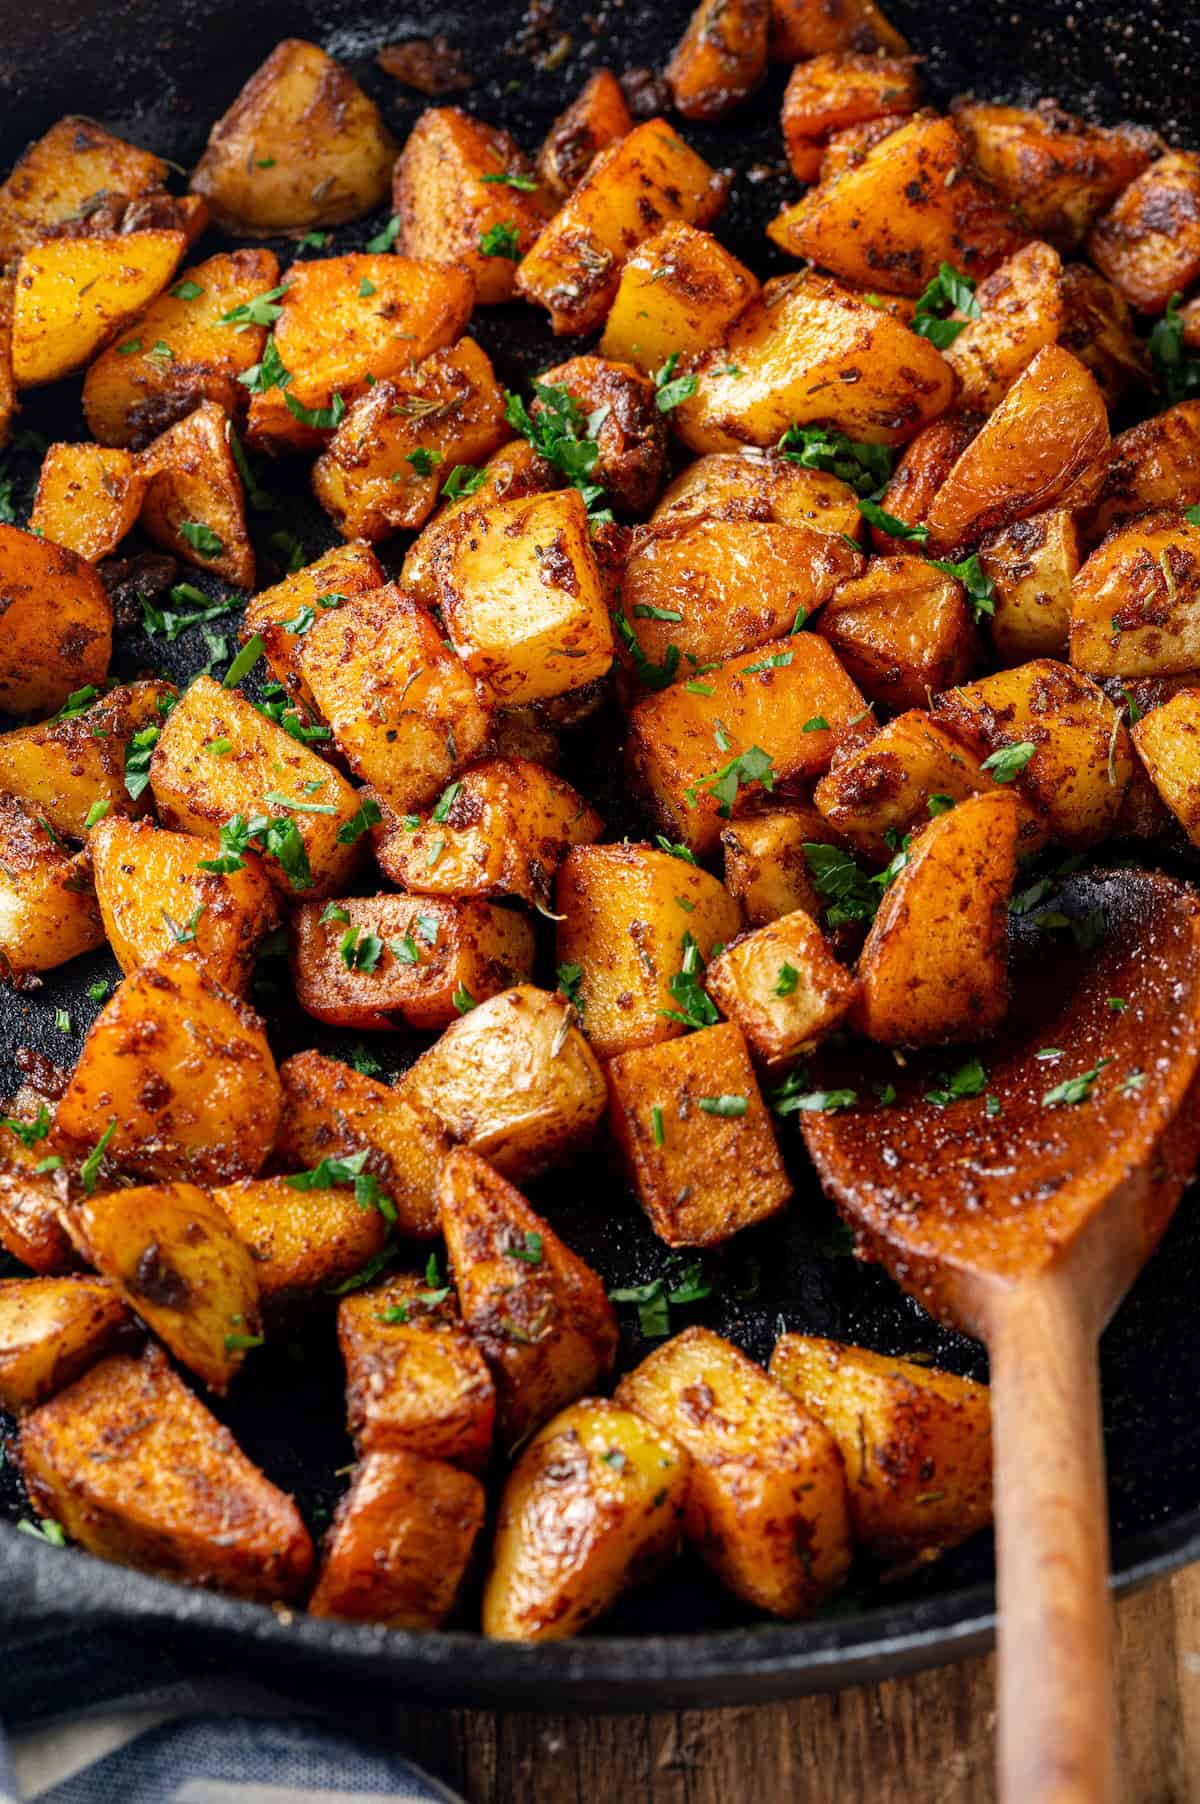
- Flip . Once the potatoes are browned on the bottom, sprinkle the seasonings over the top. Toss to coat and cook for 10 to 15 minutes more, or until they’re uniformly crispy and brown.
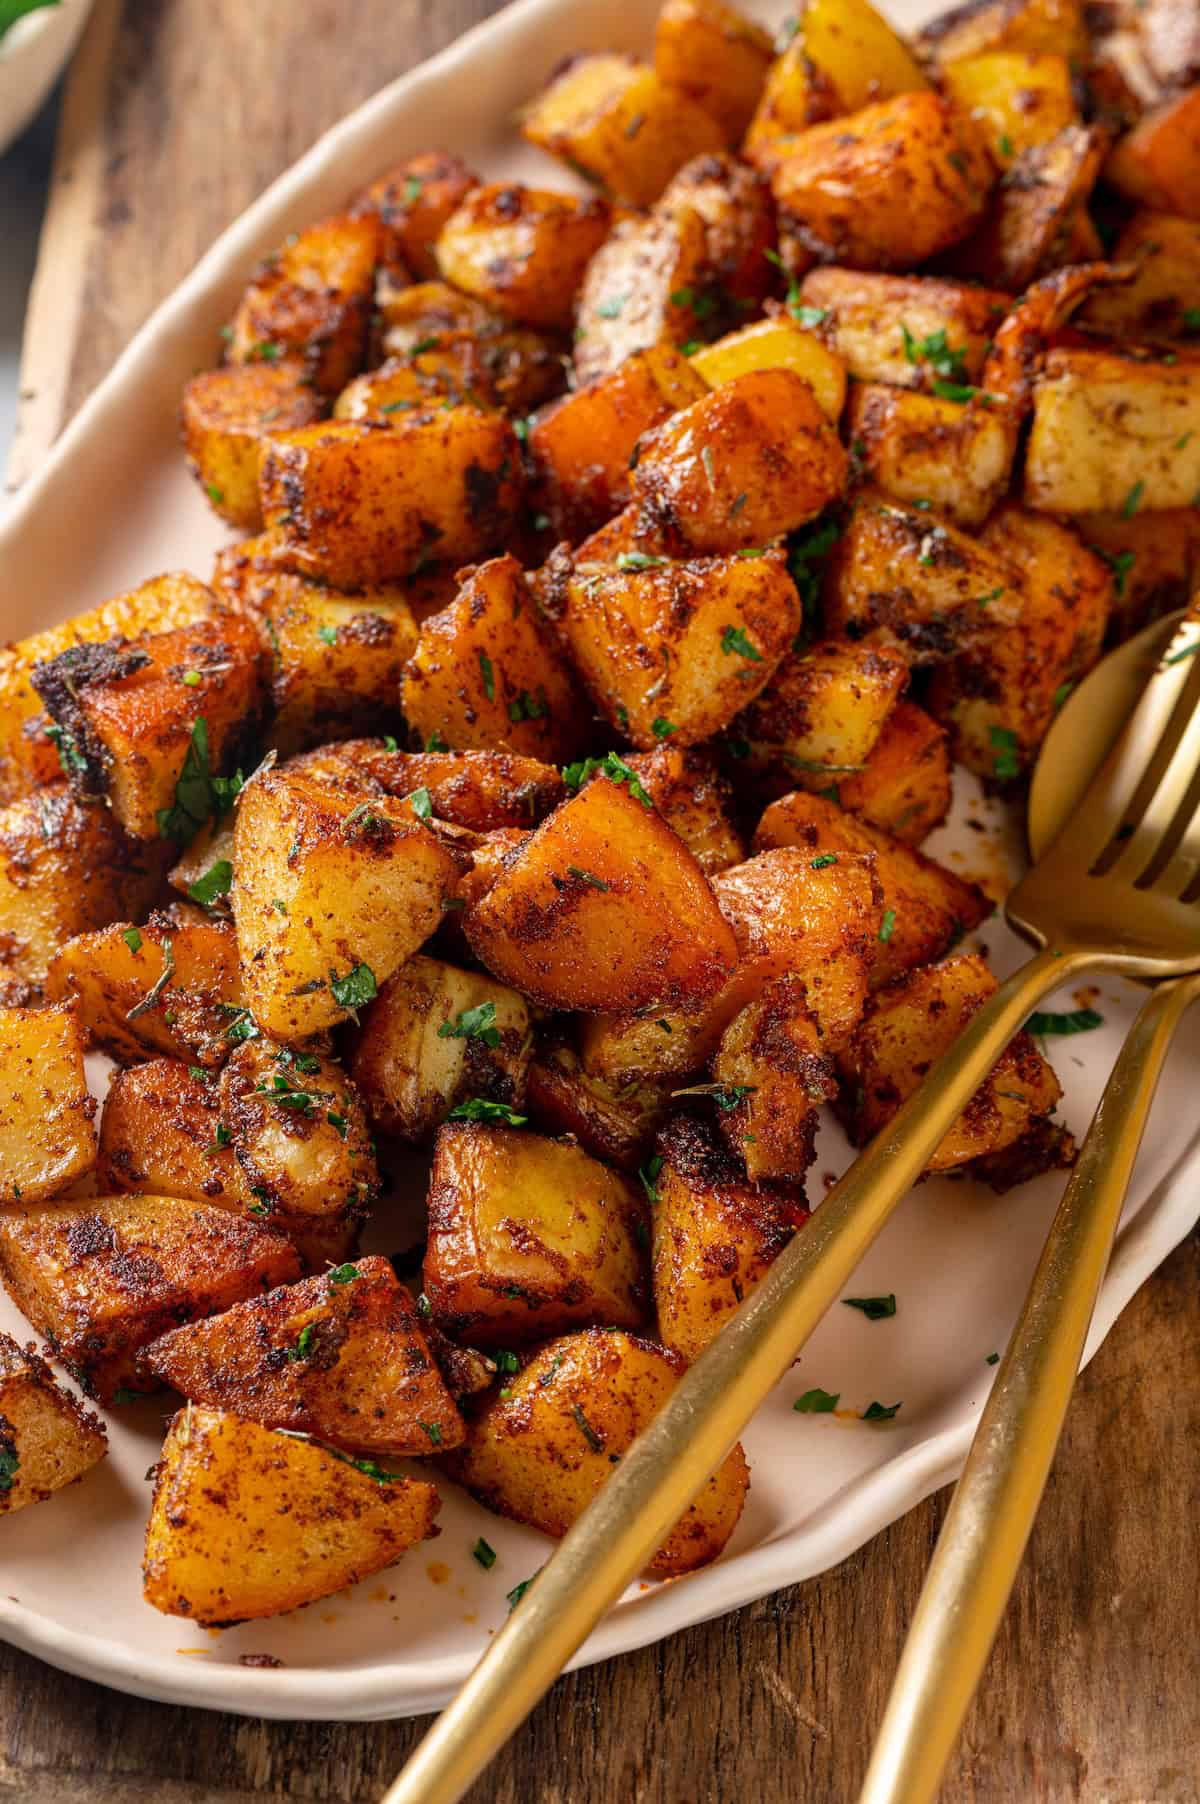
- Serve . Season to taste. Garnish with parsley and serve.
Tips for Making Your Potatoes Ultra-Crispy (But Tender Inside!)
As promised, here are my secrets for making the best breakfast potatoes.
- Don’t skip the parboiling . It’s an optional step, but if you love your potatoes fluffy and soft inside, it’s totally worth it. Just make sure you add the potatoes back to the pot so the excess water can cook off; if the potatoes are dry when you add them to the oil, they’ll crisp up better.
- Make sure the skillet is hot . The number one culprit when skillet potatoes end up soggy is a pan that’s not sufficiently heated. When the pan isn’t hot enough, the potatoes absorb the oil, which makes them mushy. With a blazing hot pan, the potatoes are instantly seared when you add them, which creates a barrier that keeps them from absorbing more oil.
- Do not disturb . Although it’s tempting to stir or lift the potatoes to check the bottoms, leaving them undisturbed helps them get crispy and also keeps them from sticking to the pan.
- Use the right pan . A well-seasoned cast iron skillet is ideal, but if you don’t have one, use a nonstick skillet.
Variations
Here are a few ways you can switch up this recipe.
- Change the seasonings . You can use any you like! Cajun seasoning, Old Bay, and even seasoning salt works well.
- Use sweet potatoes . They don’t get quite as crisp as regular potatoes, but oh, they are delicious! You can also use half sweet potatoes and half Yukon gold or red.
- Make it a breakfast potato hash . Crumble your favourite vegan breakfast sausage into the pan near the end of the cooking time.
Serving Suggestions
I like to serve breakfast potatoes with a savoury pairing like my Southwestern Tofu Scramble , Tofu Bacon , or Vegan Quiche . Of course, they’re also great to balance sweet breakfast foods like Vegan Waffles and Banana Pancakes .
How to Store and Reheat
- Refrigerator : Transfer leftovers to an airtight container and refrigerate for up to 4 days.
- Freezer : Freeze breakfast potatoes in an airtight container or freezer bag for up to 3 months. Note that sometimes potatoes can become mealy when frozen, but if you parboil your breakfast potatoes as described above, they should freeze well. Thaw in the refrigerator before reheating.
- To reheat : Warm leftovers in a skillet with oil set over medium-high heat. The microwave also works, but they won’t be as crispy.
More Vegan Ways to Make Potatoes
- Mashed Potato Casserole
- Loaded Potato Skins
- Duchess Potatoes
- Parmesan Crusted Potatoes
Ingredients
- 2 tablespoons olive oil , 30 mL
- 4 medium Yukon gold or red potatoes , diced into ½-inch cubes – about 1 ½ lbs. / 680 g
- 1 teaspoon smoked paprika , 2 g
- ½ teaspoon garlic powder , 1 g
- ½ teaspoon onion powder , 1 g
- ½ teaspoon dried thyme , 1 g
- Salt and black pepper , to taste
- 1 tablespoon chopped fresh parsley , optional for garnish – 4 g
Instructions
- Parboil the potatoes (recommended for best texture): Place diced potatoes in a saucepan and cover with cold salted water. Bring to a boil and cook for 5–6 minutes, just until barely tender. Drain and allow to steam dry for 2–3 minutes.
- Heat the olive oil in a large nonstick or cast iron skillet over medium heat.
- Add the potatoes to the skillet in an even layer. Press down gently and let them cook undisturbed for 5–7 minutes, until golden brown on the bottom.
- Sprinkle the potatoes with smoked paprika, garlic powder, onion powder, thyme, salt, and pepper. Toss to coat and continue cooking for another 10–15 minutes, flipping occasionally, until crisp and browned on all sides.
- Taste and adjust seasoning. Sprinkle with fresh parsley if using, and serve hot.
Notes
- Refrigerator : Transfer leftovers to an airtight container and refrigerate for up to 4 days.
- Freezer : Freeze these potatoes in an airtight container or freezer bag for up to 3 months. Note that sometimes potatoes can become mealy when frozen, but if you parboil your breakfast potatoes as described above, they should freeze well. Thaw in the refrigerator before reheating.
- To reheat : Warm leftovers in a skillet with oil set over medium-high heat. The microwave also works, but they won’t be as crispy.
