Crispy rice is a delight! In this vegan recipe, I use it to make little cakes that are topped with spicy “tuna” made with tomatoes. Let’s dig in!

If you’ve been scrolling through foodie content on Instagram and TikTok lately, you’ve probably noticed that crispy rice is having a moment. It’s served as a fancy appetizer at trendy restaurants, it’s tossed into salads, and, well, it’s everywhere right now. I wanted to get in on the fun, but with a vegan spin, so I topped crispy rice cakes with a homemade plant-based tuna made from tomatoes. (In the past, I’ve made Watermelon Tuna and Vegan Chickpea Tuna Salad .) It’s amazing, if I do say so myself!
Why You’re Going to Want These Crispy Rice Cakes on Your Menu
This is a dish that’s made to impress! Here’s why it’s such a hit.
- Contrasting textures . While crispy rice is delicious on its own, I love it in this recipe because it makes the perfect base for the succulent vegan tuna.
- A little bit fancy . Whether you make this recipe as a light dinner or a party appetizer, it has some sophistication to it—like something you’d find at a high-end sushi restaurant.
- Endless customisation options . Not into vegan tuna? Use these crispy rice cakes as a base for any toppings you like!
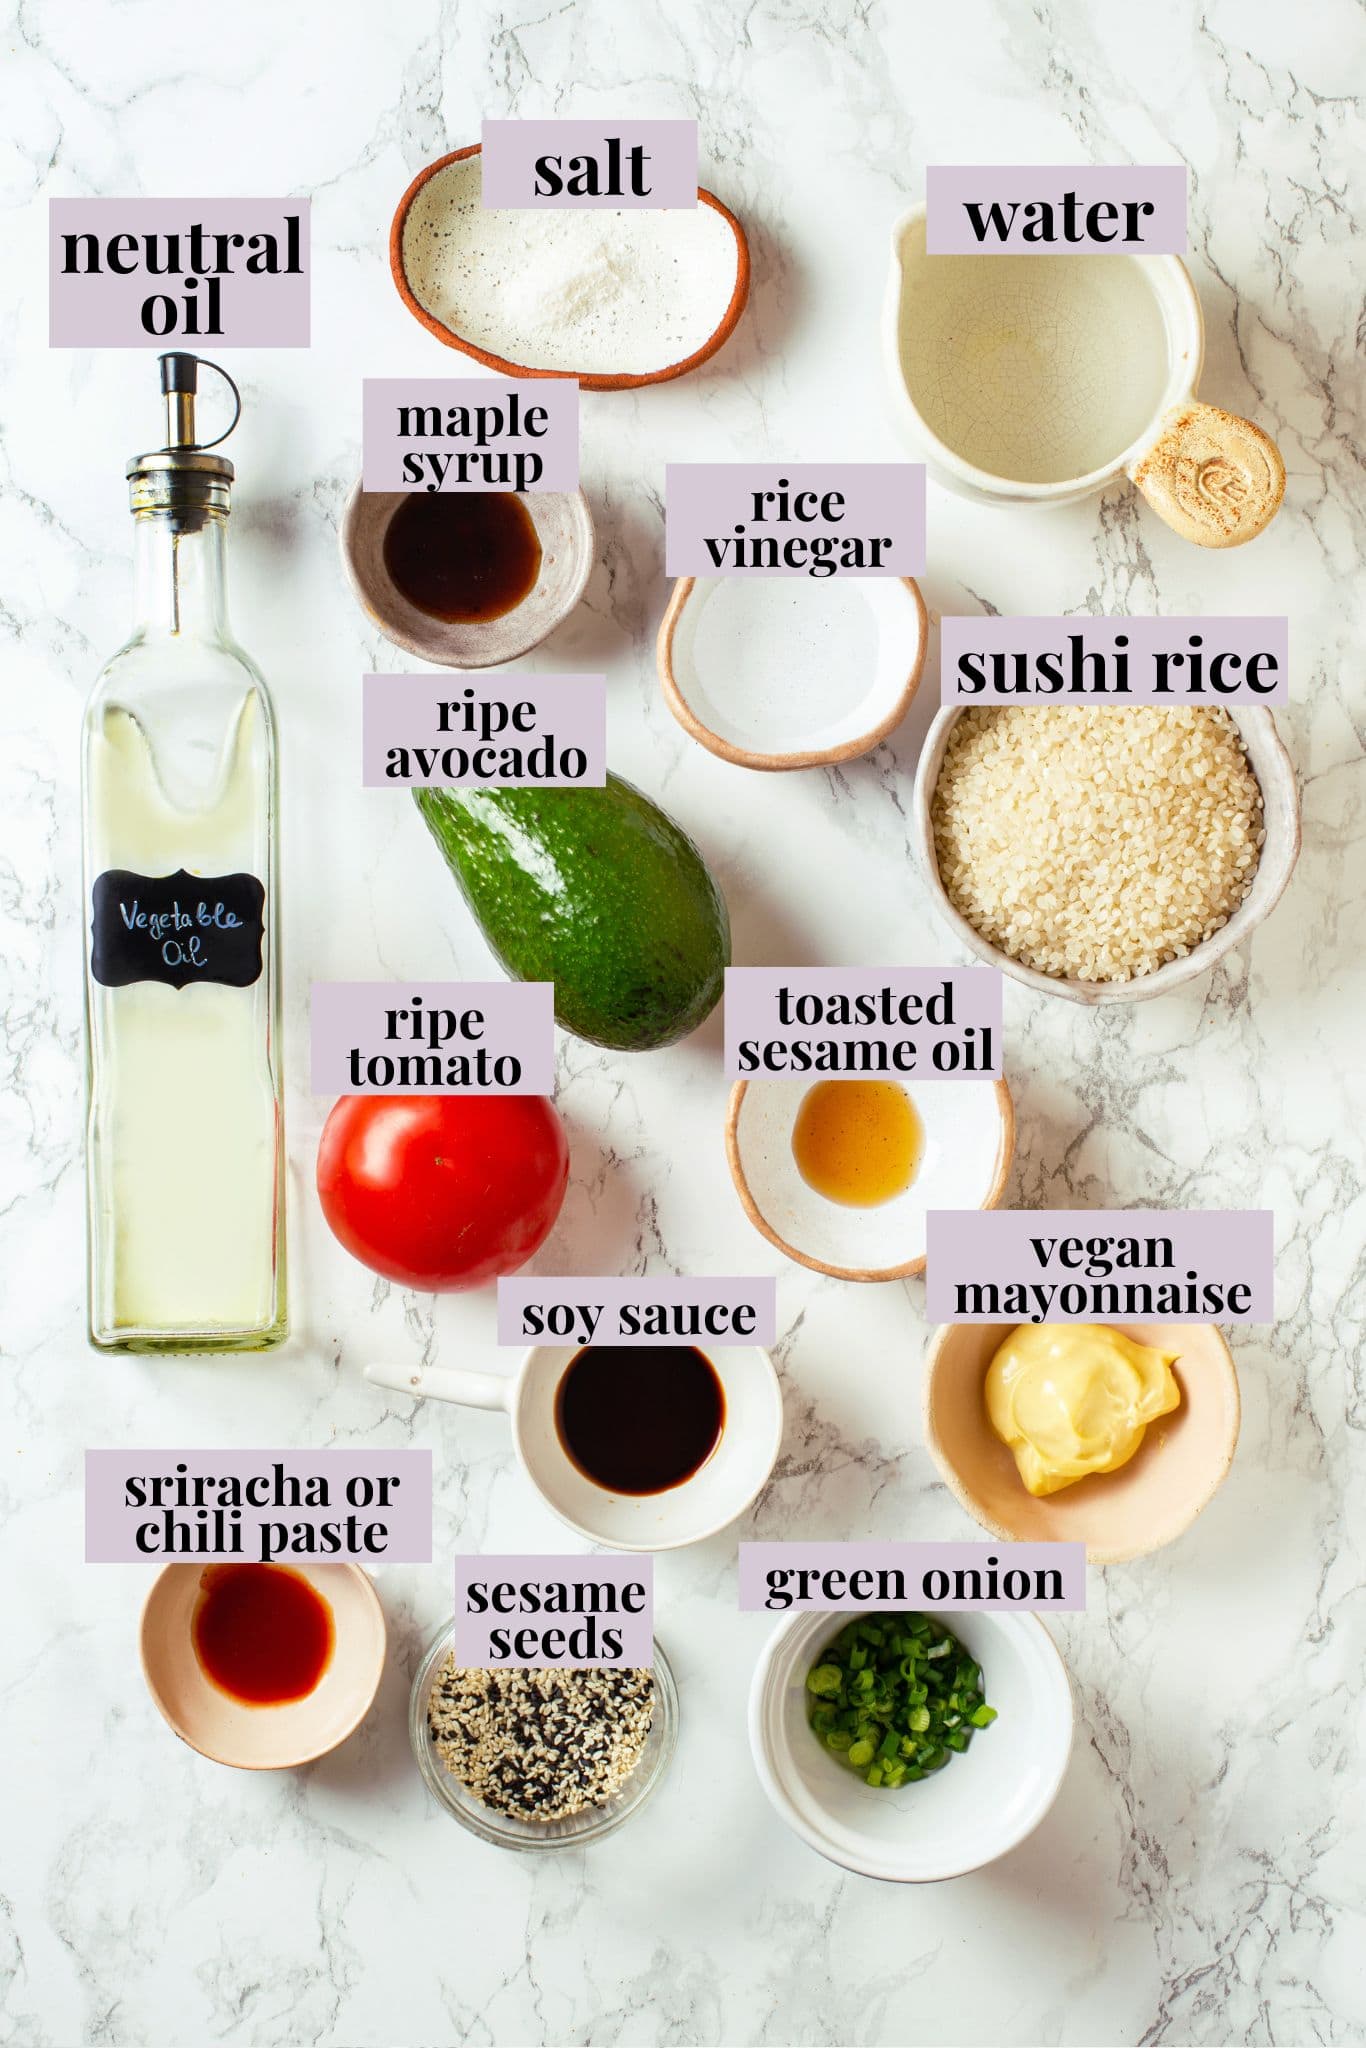
Notes on Ingredients
Here are the key ingredients you’ll need to make these crispy rice cakes. Scroll down to the recipe card to find the ingredient quantities and recipe instructions.
For the Crispy Rice Cakes
- Sushi rice – A must for making sushi and these crispy rice cakes. It has a sticky texture that helps it hold together when compacted.
- Water
- Rice vinegar – Adds a tangy flavor to the rice. You may also see this labeled as rice wine vinegar, but it’s the same thing.
- Maple syrup – I like to use maple syrup to sweeten the rice, but sugar is fine too and a little more traditional.
- Salt
- Neutral oil – Avocado, canola, or any other oil you like to cook with.
For the toppings:
- Avocado
- Tomato – Ripe and finely diced, this is the vegan “tuna” in our recipe.
- Vegan mayonnaise – I like to use my Vegan Mayo recipe.
- Sriracha or chili paste – You can adjust the amount to your tastes, or omit it for a milder option!
- Soy sauce – Tamari works as a gluten-free alternative.
- Toasted sesame oil – Adds a nutty, rich aroma. Don’t use regular sesame oil; it’s not the same!
- Green onion
How to Make Crispy Rice Cakes
There are a few steps to this recipe, but they are all very easy!
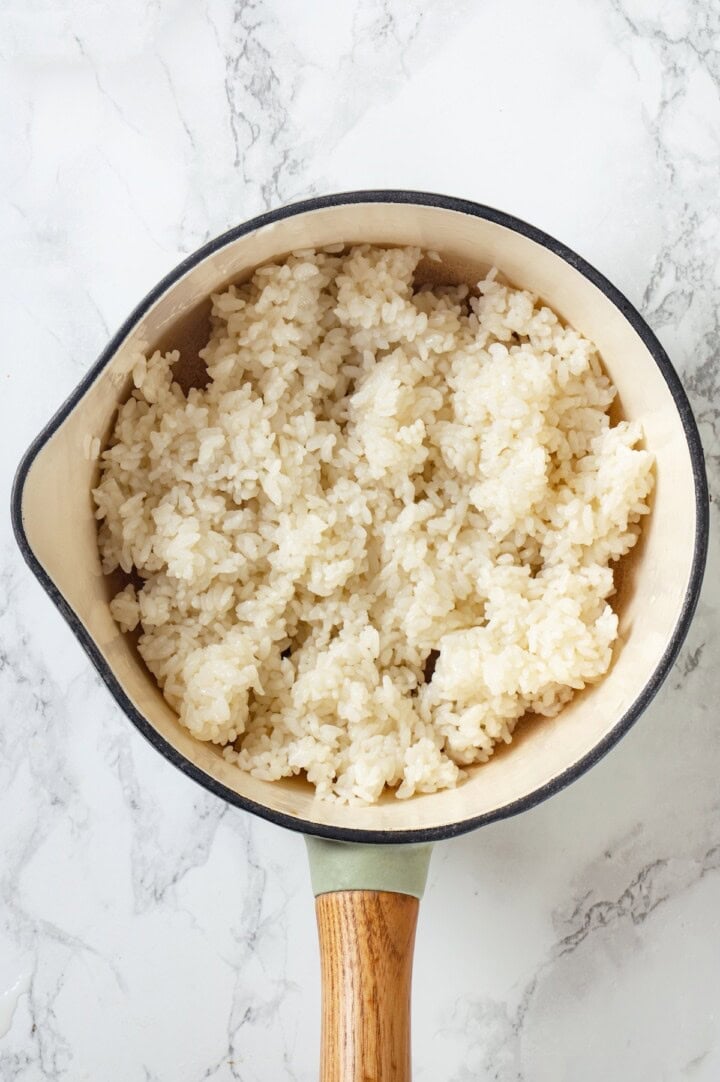
Cook the rice.
- Cook the rice . Rinse the rice until the water runs clear. Bring it to a boil with the water, then simmer covered for 15 minutes. Cool for 10 minutes.
- Season and chill . Whisk together the vinegar, maple syrup, and salt and fold it into the rice. Press the rice into an 8-inch parchment-lined pan and chill for 1 hour.
- Shape and fry . Cut the rice into 15 rectangles, then fry them in the oil over medium heat for 3 to 4 minutes per side, until crispy. Transfer the cooked cakes to paper towels to absorb the excess oil.

Make the “tuna” topping.
- Make the vegan tuna . Blanch the tomato for 30 seconds, then peel and dice it. Stir it together with the vegan mayo, sriracha, soy sauce, sesame oil, and green onion.
- Assemble . Top the crispy rice cakes with sliced avocado, spicy tomato “tuna,” and green onion. Serve immediately.
Tips for Success
Here are some additional tips to ensure your crispy rice cakes turn out perfect every time.
- Make sure the rice holds its shape . Press the rice firmly into the pan to compact it, which helps it hold its shape when slicing and frying.
- Keep the rice from sticking . Use a non-stick skillet or well-seasoned cast iron skillet to prevent the rice cakes from sticking to the pan.
- Get the oil HOT . Make sure the oil is sufficiently hot before frying the rice cakes. If it’s not hot, they will simply absorb the oil and get mushy, rather than crispy.
Variations
You can top these crispy rice cakes with a variety of toppings. For a different spin, top them with steamed broccoli and drizzle them with Thai Peanut Sauce , or break them up into pieces and add them to an Asian-inspired salad for a crispy alternative to croutons.

How to Store and Reheat
- Refrigerator : Because of the fresh avocado, these crispy rice cakes are best eaten right after assembling. If you do have leftovers, they’ll last a day or so in the refrigerator, but the avocado will brown a bit.
- To reheat : Rather than reheating them, I simply eat them cold, but if you want to warm up the rice cakes, I suggest scraping off the toppings, reheating in a nonstick skillet to re-crisp the rice, and then adding the toppings back.
More Recipes for Sushi Lovers
- Vegan Sushi
- Onigiri
- Vegan Poke Bowls
Ingredients
For the Crispy Rice Cakes:
- 1 cup sushi rice , 200 grams
- 1 ¼ cups water , 300 milliliters
- 2 tablespoons rice vinegar , 30 milliliters
- 1 teaspoon maple syrup , 5 milliliters
- ½ teaspoon salt , 2 grams
- Neutral oil for frying , like avocado or canola – as needed
Topping:
- 1 large ripe tomato , peeled and finely diced – about 100 grams
- 1 tablespoon vegan mayonnaise , 15 milliliters
- 1 teaspoon sriracha or chili paste , 5 milliliters
- ½ teaspoon soy sauce , 2.5 milliliters
- ½ teaspoon toasted sesame oil , 2.5 milliliters
- 1 teaspoon finely chopped green onion , 2 grams, plus more for garnish
- 1 ripe avocado , thinly sliced
Instructions
Cook and Chill the Rice:
- Rinse the sushi rice thoroughly until water runs clear.
- In a pot, combine rice and water. Bring to a boil, reduce heat, cover, and simmer for 15 minutes.
- Remove from heat, keep covered for 10 minutes.
- In a small bowl, mix rice vinegar, maple syrup, and salt. Fold gently into warm rice.
- Line a square 8 inch pan with parchment paper. Press the rice into a flat, even layer about ½ inch (1.25 cm) thick. Make sure to press firmly.
- Chill for at least 1 hour, or until firm enough to cut.
Shape and Fry the Rice Cakes:
- Cut the chilled rice into 15 rectangles or squares.
- Heat neutral oil in a nonstick skillet over medium heat.
- Fry rice pieces for 3–4 minutes per side until golden and crispy. Drain on paper towels.
Make the Spicy Tomato “Tuna”:
- Blanch the tomato for 30 seconds in boiling water, then peel and finely dice.
- In a bowl, mix the tomato with vegan mayo, sriracha, soy sauce, sesame oil, and green onion.
Assemble the cakes:
- Top each rice cake with 2-3 slices of avocado.
- Spoon a generous dollop of the spicy tomato “tuna” mixture on top of the avocado.
- Garnish with additional chopped green onion.
- Serve immediately for the best texture.
Notes
- Refrigerator : Because of the fresh avocado, these crispy rice cakes are best eaten right after assembling. If you do have leftovers, they’ll last a day or so in the refrigerator, but the avocado will brown a bit.
- To reheat : Rather than reheating them, I simply eat them cold, but if you want to warm up the rice cakes, I suggest scraping off the toppings, reheating in a nonstick skillet to re-crisp the rice, and then adding the toppings back.

Crispy Rice Cakes
Ingredients
For the Crispy Rice Cakes:
- 1 cup sushi rice 200 grams
- 1 ¼ cups water 300 milliliters
- 2 tablespoons rice vinegar 30 milliliters
- 1 teaspoon maple syrup 5 milliliters
- ½ teaspoon salt 2 grams
- Neutral oil for frying like avocado or canola – as needed
Topping:
- 1 large ripe tomato peeled and finely diced – about 100 grams
- 1 tablespoon vegan mayonnaise 15 milliliters
- 1 teaspoon sriracha or chili paste 5 milliliters
- ½ teaspoon soy sauce 2.5 milliliters
- ½ teaspoon toasted sesame oil 2.5 milliliters
- 1 teaspoon finely chopped green onion 2 grams, plus more for garnish
- 1 ripe avocado thinly sliced
Instructions
Cook and Chill the Rice:
- Rinse the sushi rice thoroughly until water runs clear.
- In a pot, combine rice and water. Bring to a boil, reduce heat, cover, and simmer for 15 minutes.
- Remove from heat, keep covered for 10 minutes.
- In a small bowl, mix rice vinegar, maple syrup, and salt. Fold gently into warm rice.
- Line a square 8 inch pan with parchment paper. Press the rice into a flat, even layer about ½ inch (1.25 cm) thick. Make sure to press firmly.
- Chill for at least 1 hour, or until firm enough to cut.
Shape and Fry the Rice Cakes:
- Cut the chilled rice into 15 rectangles or squares.
- Heat neutral oil in a nonstick skillet over medium heat.
- Fry rice pieces for 3–4 minutes per side until golden and crispy. Drain on paper towels.
Make the Spicy Tomato “Tuna”:
- Blanch the tomato for 30 seconds in boiling water, then peel and finely dice.
- In a bowl, mix the tomato with vegan mayo, sriracha, soy sauce, sesame oil, and green onion.
Assemble the cakes:
- Top each rice cake with 2-3 slices of avocado.
- Spoon a generous dollop of the spicy tomato “tuna” mixture on top of the avocado.
- Garnish with additional chopped green onion.
- Serve immediately for the best texture.
Notes
- Refrigerator : Because of the fresh avocado, these crispy rice cakes are best eaten right after assembling. If you do have leftovers, they’ll last a day or so in the refrigerator, but the avocado will brown a bit.
- To reheat : Rather than reheating them, I simply eat them cold, but if you want to warm up the rice cakes, I suggest scraping off the toppings, reheating in a nonstick skillet to re-crisp the rice, and then adding the toppings back.
Nutrition
Crispy Rice Cakes https://jessicainthekitchen.com/crispy-rice/ July 18, 2025
These Salted Chocolate Chip Tahini Cookies will totally blow you away! They’re soft, chewy and have a nutty, subtle tahini flavour that’s impossible to resist.

Classic Vegan Chocolate Chip Cookies are good, but add some tahini and flaky sea salt to the mix and whoa . These Salted Chocolate Chip Tahini Cookies will knock your socks off. Consider them the high-end, adultier (that’s not a word, but you know what I mean) version of the chocolate chip cookie, with nutty and salty flavours to balance the sweet.
Why I Adore These Upgraded Chocolate Chip Cookies
These cookies prove you definitely can make a good thing even better. Here’s what makes this recipe so divine!
- Gluten-free—or not . You have options! As written, this recipe is gluten-free, but you can use regular all-purpose flour if you’d like. And, of course, they’re vegan too.
- Soft, chewy, and chocolatey . While I love developing all my recipes, baking has my heart. I used to run my own bakery before I was a food blogger! So you can be confident knowing that the texture of the dough is ON POINT and the flavour is rich and decadent. Everything you want in a chocolate chip cookie and more!
- Nuanced flavour . Let’s talk about the “and more.” A classic chocolate chip cookie is simple, but these salted chocolate chip tahini cookies have layers of flavour, with the tahini lending them an earthy nuttiness that adds a lovely complexity.
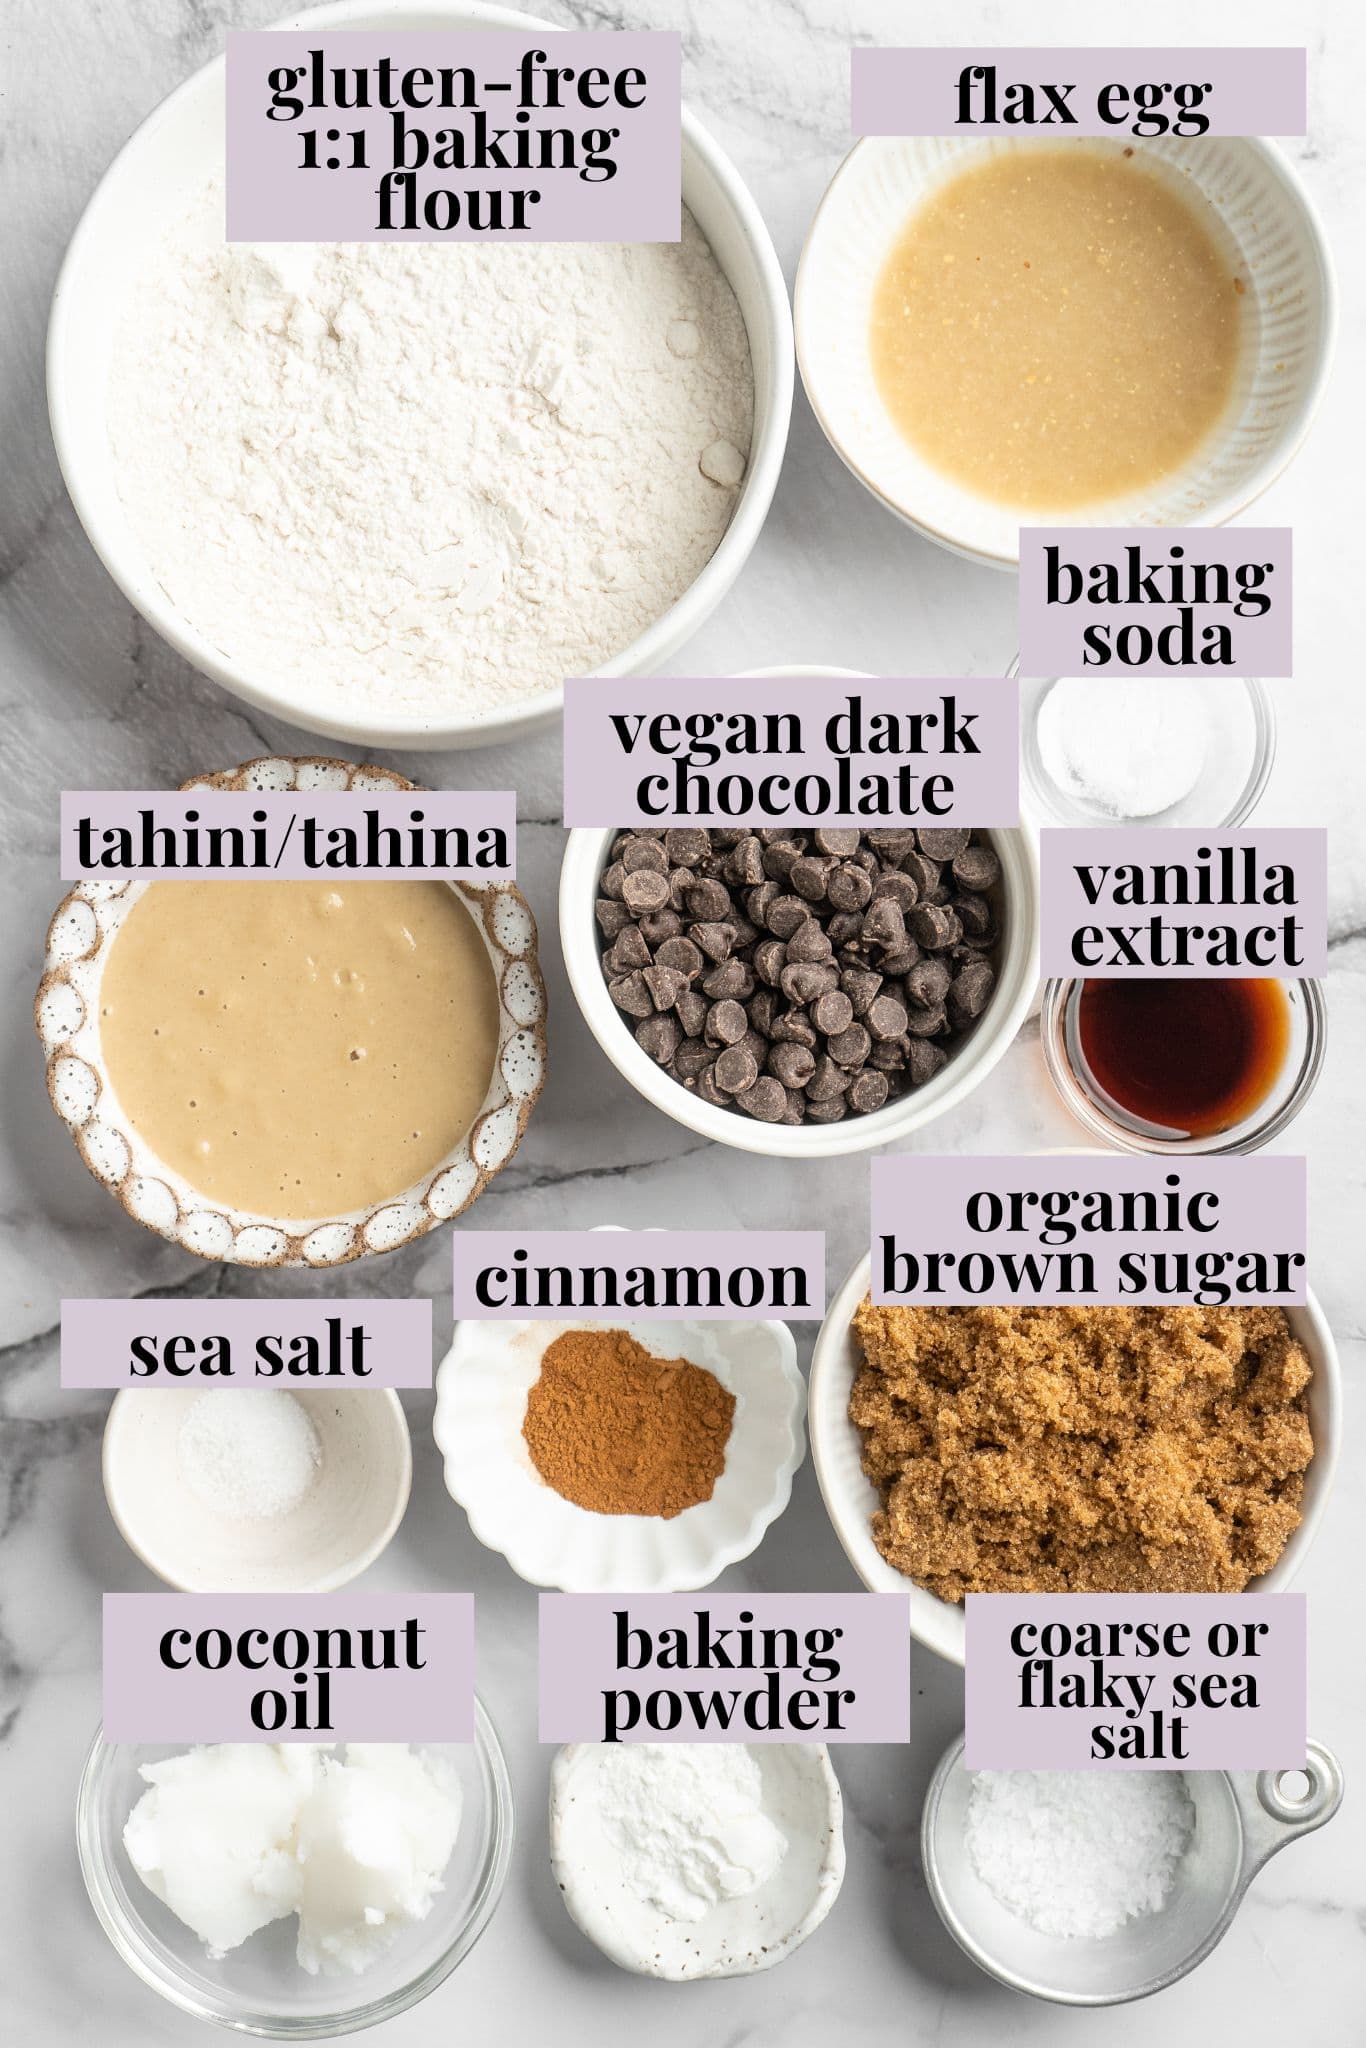
Notes on Ingredients
Here’s what you’ll need to make these salted chocolate chip tahini cookies. Scroll down to the recipe card to find the ingredient quantities and recipe instructions.
- Gluten-free flour – Or swap in the same amount of regular all-purpose flour.
- Baking powder and baking soda
- Cinnamon – For a little cozy warmth in the dough.
- Sea salt – You’ll need some for the dough and some flaky salt for sprinkling onto the cookies after they bake.
- Brown sugar – You can use either light or dark brown.
- Tahini
- Flax egg – Here’s how to make a flax egg .
- Vanilla extract
- Coconut oil
- Vegan dark chocolate – I like chopping up a good dark chocolate bar for this recipe, but chocolate chunks or chips also work.
A Note About Tahini
Tahini (also known as tahina) is sesame seed paste, or kind of like a sesame seed butter. If you’re like me, maybe you’ve tasted tahini straight out of the jar and you weren’t impressed. Bitter. Grainy. Not good. I couldn’t understand why this was supposed to make my hummus better!
But then I traveled to the Middle East and realized that tahini should be nutty, buttery, and 100% smooth. Imagine my shock and surprise when I tasted real tahini for the first time. I say all of this because the right tahini is what will make the difference in your cookies. Get one that’s very runny, smooth, and has a nutty flavour.

How to Make Tahini Chocolate Chip Cookies
Here’s a quick look at how to make these vegan cookies. Don’t forget to scroll down to the recipe card for a printable list.
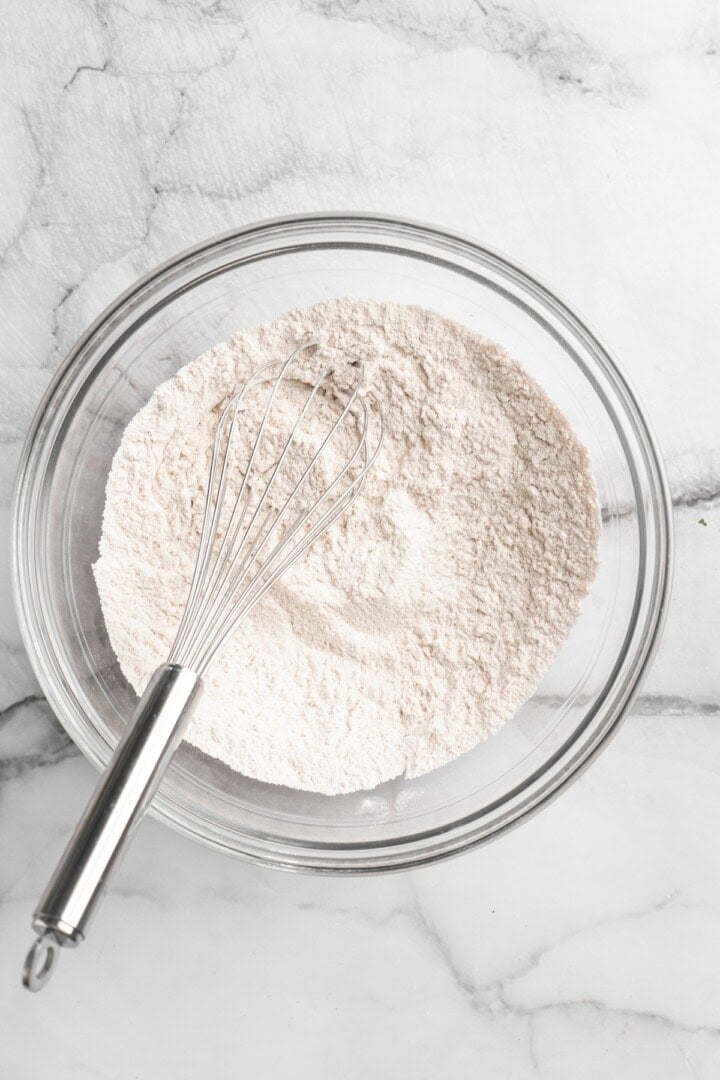
Mix the dry ingredients.
- Mix the dry ingredients. In a small bowl, whisk together the gluten-free flour, baking powder, baking soda, cinnamon, and sea salt. Set aside.
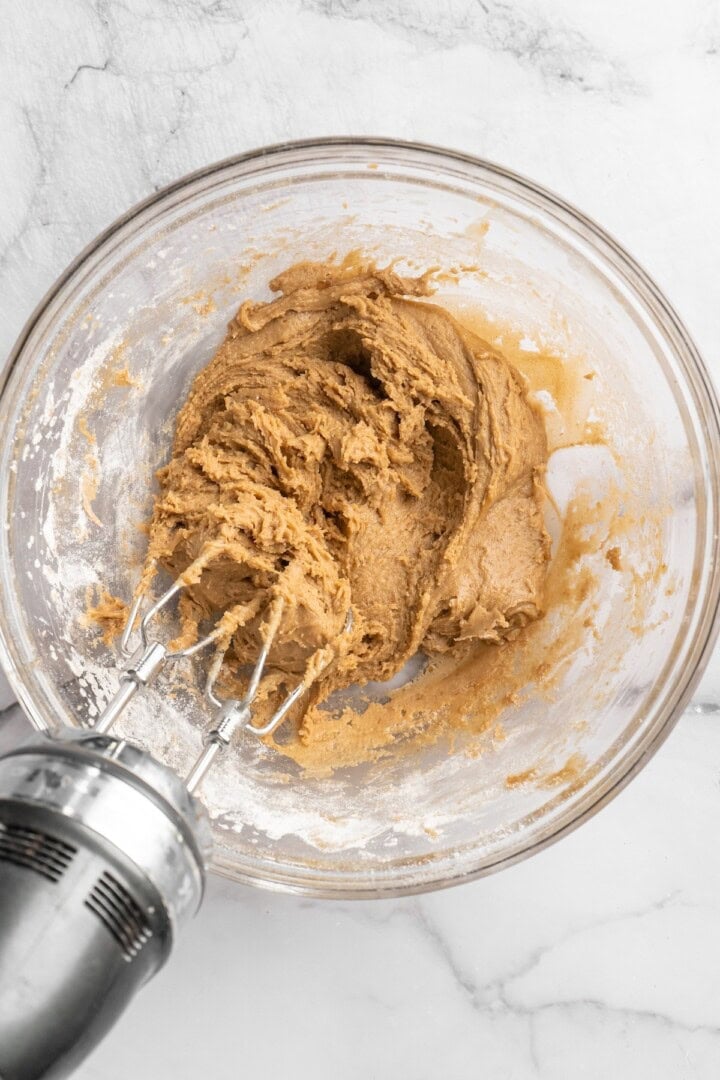
- Whip the wet ingredients. In a large bowl or stand mixer, combine the brown sugar, tahini, flax egg, vanilla extract, and melted coconut oil. Mix for about 5 minutes, until the mixture is smooth and fluffy. Scrape down the sides as needed.
Combine wet and dry ingredients.
- Combine wet and dry. Add the dry ingredients to the wet in two batches, mixing until just combined. Scrape down the sides to make sure everything is incorporated.
- Fold in the chocolate. Gently stir in the chocolate chunks with a spatula.
- Chill the dough. Form the dough into a ball and wrap in plastic wrap or place in a sealed container. Chill in the fridge for at least 2 hours.
- Preheat the oven. Set your oven to 350°F (175°C) and line two baking sheets with parchment or silpat mats.

Form the cookies.
- Form the cookies. Scoop 1-tablespoon portions of dough and roll into balls about 2 inches wide. Place on baking sheets with about an inch of space between each cookie.
- Bake. Bake for 10 minutes, then remove from the oven. The cookies may look slightly underbaked but will continue to set as they cool.
- Finish cooling. Let cookies cool on the baking sheet for 10 minutes before transferring to a wire rack. Sprinkle with flaky sea salt while still warm, if using.
Tips for The Best Tahini Cookies
- Use good chocolate . Chocolate chunks and chocolate chips are great, but I highly recommend using a high percentage dark chocolate bar . Not only does the dark chocolate pair beautifully with the salt and the tahini, you’ll get fabulous pools of chocolate in your cookies.
- Don’t skip the chilling . Those two hours in the fridge help develop the flavour and keep the cookies from spreading on the pan. If you have time, overnight or even 24 hours of chilling is even better.
- Under-bake them a bit . The cookies continue to “bake” while they cool. Under-baking them yields a soft, chewy, and all-around divine cookie.
- Enjoy them warm . These cookies are best warm out of the oven, cooled just for 10 minutes, but of course, they are still delicious after that.

How to Store
- Room temperature : Let the cookies cool completely, then transfer them to an airtight container. Store at room temperature for up to 5 days.
- Freezing the cookies : Transfer the cooled chocolate chip tahini cookies to an airtight container or freezer bag and freeze for up to 3 months. Let them thaw at room temperature or warm them in the microwave for that fresh-from-the-oven experience.
- Freezing the dough : Roll the dough into balls, then place them on a parchment-lined sheet pan. Freeze until the dough is solid, then place the balls of dough in an airtight container or freezer bag. The dough will keep in the freezer for up to 3 months and you can enjoy as many or as few freshly baked cookies as you like! Follow the recipe for baking, but add a few extra minutes to the baking time to account for the dough being frozen.
More Vegan Cookie Recipes
- Brownie Cookies
- Peanut Butter Cookies
- Chai Sugar Cookies
- Kitchen Sink Cookies
Ingredients
- 1 cup Gluten Free 1-to-1 Baking Flour , 148 g
- 1 teaspoon baking powder , 4.8 g
- ¼ teaspoon baking soda , 1.2 g
- ½ teaspoon cinnamon , 1.3 g
- ¼ teaspoon sea salt , 1.5 g
- ½ cup organic brown sugar , 96 g
- ¼ cup tahini/tahina , 56 g
- 1 flax egg*
- ½ teaspoon vanilla extract , 2.4 g
- 2 tablespoons coconut oil , 27 g
- coarse or flaky sea salt , for sprinkling on top
- ½ cup chopped vegan dark chocolate , or chocolate chunks/chips
Instructions
- In a small bowl, add the Bob’s Red Mill Gluten Free 1-to-1 Baking Flour, baking powder and baking soda, cinnamon and sea salt. Whisk together thoroughly. Set aside.
- In a large bowl of a stand mixer, add the brown sugar, tahini, flax egg, vanilla extract and the coconut oil. A mixer (stand or by hand) really helps to whip the ingredients, especially the tahini, for that soft and chewy texture. Turn the mixer on and thoroughly incorporated, about 5 minutes, scraping down the sides, until it’s nice and fluffy.
- Add the dry ingredients to the wet in two batches, and mix with mixer until incorporated. Scrape down the sides to gather all the dough and gently fold in. Fold in the chocolate chunks.
- Form dough into a large ball and cover with Saran wrap or a reusable wrap, or even place in a large reusable zipped bag. Place in the fridge for at least 2 hours to chill thoroughly.
- Preheat oven to 350 degrees F/175 C. Line two baking sheets with silpat mats or parchment paper. Remove Saran Wrap and scoop 1 tablespoon out of the dough for each cookie. Roll slightly between fingers to form a ball that’s about 2 inches in diameter. Add a dough ball, pressing down all around, and leave about an inch of space between each cookie.
- Bake for 10 minutes then remove cookie sheets from the oven and onto the counter. Sprinkle with the flaky sea salt. It may look slightly underbaked, but will cook as it cools. Remove from the sheets after 10 minutes of cooling, then to a wire rack to finish cooling. I started to eat mine now – they taste so divine when a little warm! Enjoy!
Notes
- Room temperature: Let the cookies cool completely, then transfer them to an airtight container. Store at room temperature for up to 5 days.
- Freezing the cookies : Transfer the cooled chocolate chip tahini cookies to an airtight container or freezer bag and freeze for up to 3 months. Let them thaw at room temperature or warm them in the microwave for that fresh-from-the-oven experience.
- Freezing the dough: Roll the dough into balls, then place them on a parchment-lined sheet pan. Freeze until the dough is solid, then place the balls of dough in an airtight container or freezer bag. The dough will keep in the freezer for up to 3 months and you can enjoy as many or as few freshly baked cookies as you like! Follow the recipe for baking, but add a few extra minutes to the baking time to account for the dough being frozen.
- *Flax egg recipe: 1 tablespoon flax seeds + 3 tablespoons of water, mixed and refrigerated for 15 minutes
- Prep time doesn’t include the 2 hours chill time.
