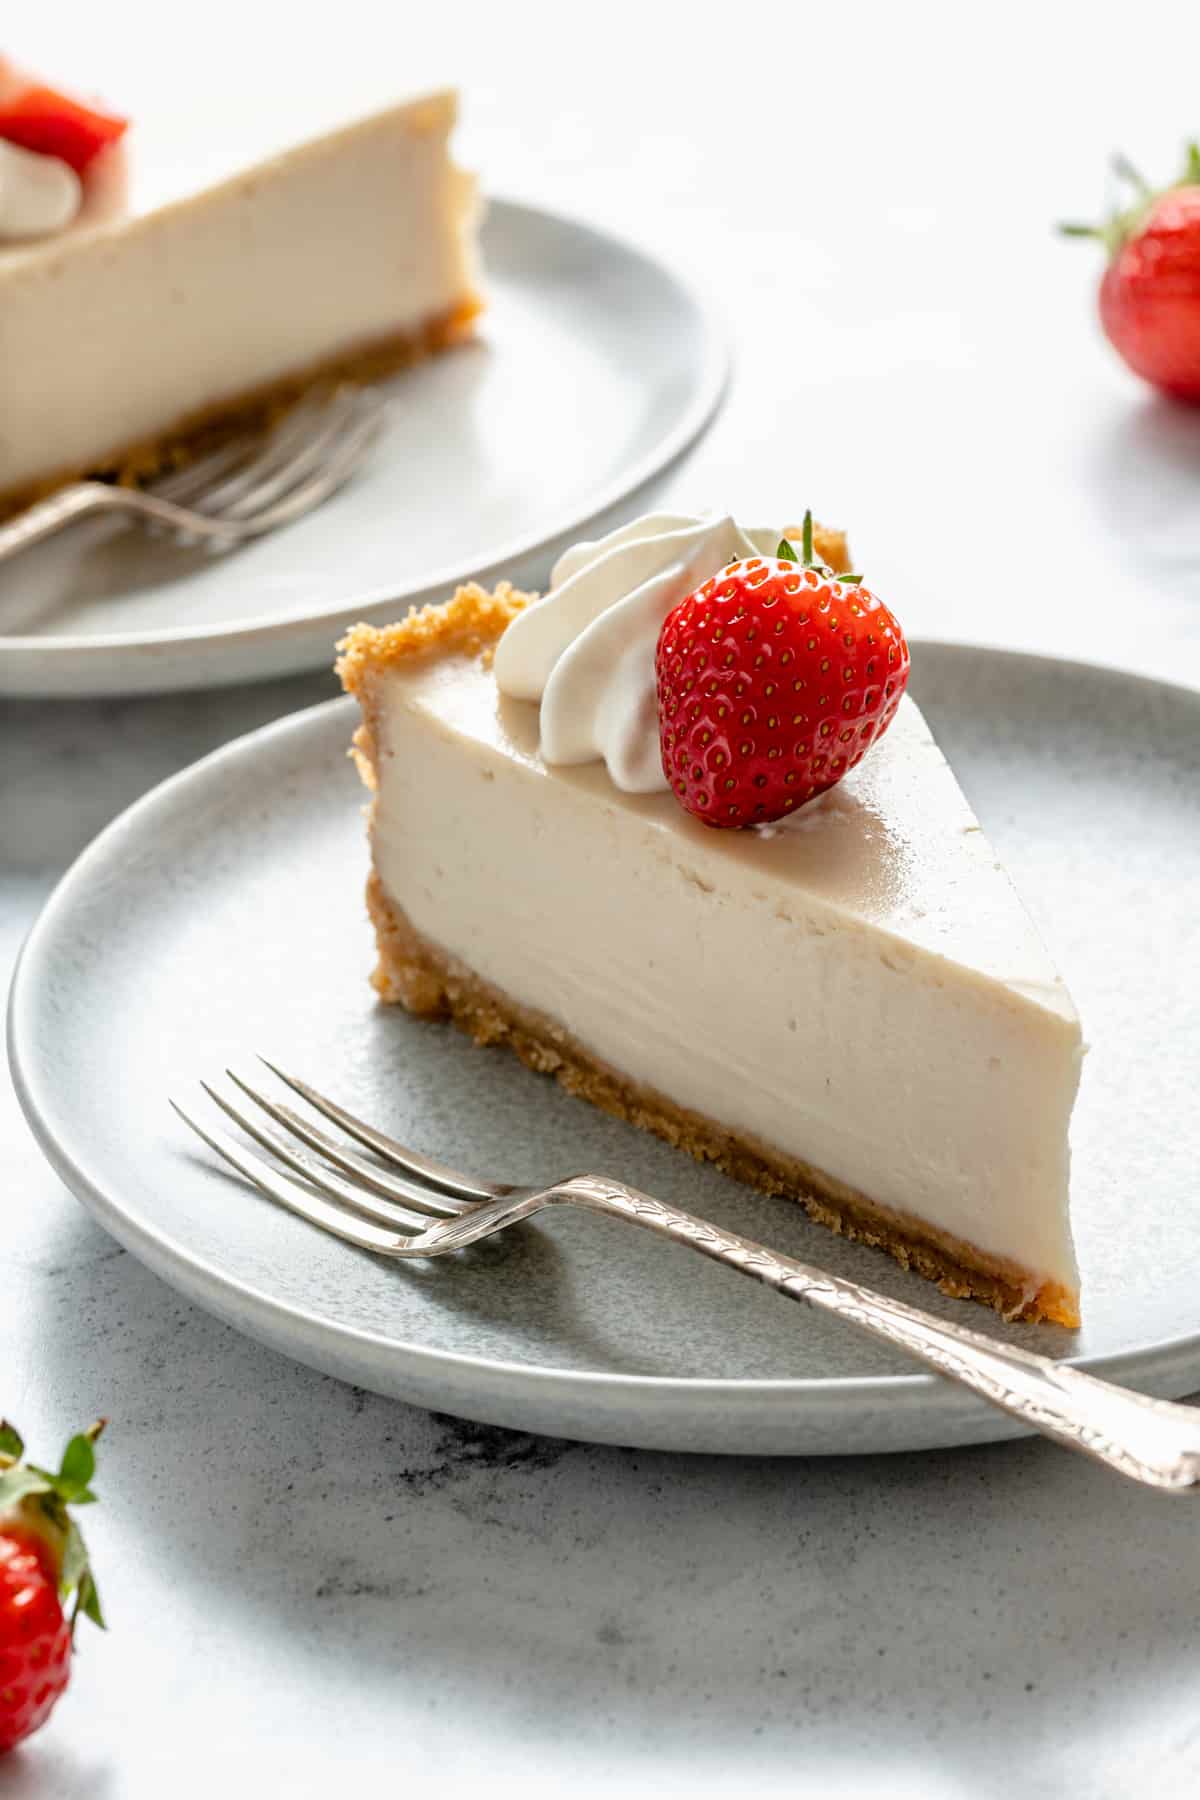
Creamy Vegan Cheesecake is baked, made with simply ingredients and tastes identical to regular cheesecake. It is an elegant dessert that will always please a crowd, but it’s also casual enough for an after-dinner weeknight dessert. So, whether you’re vegan or not, this rich vanilla cheesecake is not to be missed.
I don’t know about you, but I love, love, love cheesecakes. Yes, that’s right. Love times three. They are one of my favourite desserts of all time. But cheesecakes – like this Creamy Vegan Cheesecake recipe that I’m introducing you to today – are deserving of such love! Now, this is not the first cheesecake we’ve done on this blog. Remember Pumpkin Cheesecake ? While these are totally tasty (and worth a try if you haven’t made them yet!), they aren’t baked cheesecakes. Vegan baked cheesecakes are like the queens of vegan cheesecakes. The texture is absolutely incredible and reminds me so much of the cheesecake I loved before going vegan. Plus after you master this base, you can easily customise it with more toppings to fit your tastes!

What Makes this Vegan Cheesecake So Good?
The word ‘cheesecake’ and the word ‘good’ just go together. It’s simply a fact that cheesecakes (if made correctly) are amazing.
But, in fairness, there are a LOT of cheesecake recipes making their way around the internet. So… what makes this specific one good?
- It’s Simple: Well, the process is a little tricky, but there’s a step-by-step guide that will break it all down – so no worries there! What I meant was, there are only 9 ingredients in this whole recipe, most of which are probably in your kitchen/pantry right now.
- It’s Rich and Creamy: You might have seen ‘vegan’ and thought that this can’t taste like an authentic cheesecake. But it does. It really, truly does. The cheesecake filling is so creamy and velvety, and the crust is slightly crispy, firm, and a touch crumbly. In other words, if I put a ‘traditional’ cheesecake in front of you, next to this one, you wouldn’t be able to tell the difference!
- It’s Customizable: I already kind of touched on this, but I wanted to mention it again! I love that this cake is flavorful and sweet all on its own, but can also be adjusted with bolder flavors. Feel free to add fresh fruit, homemade sauces, and more. (See serving suggestions below for ideas!)
Notes on Ingredients
I could talk about cheesecakes forever, but I’ll cut myself off here because we’ve got a dessert to make!
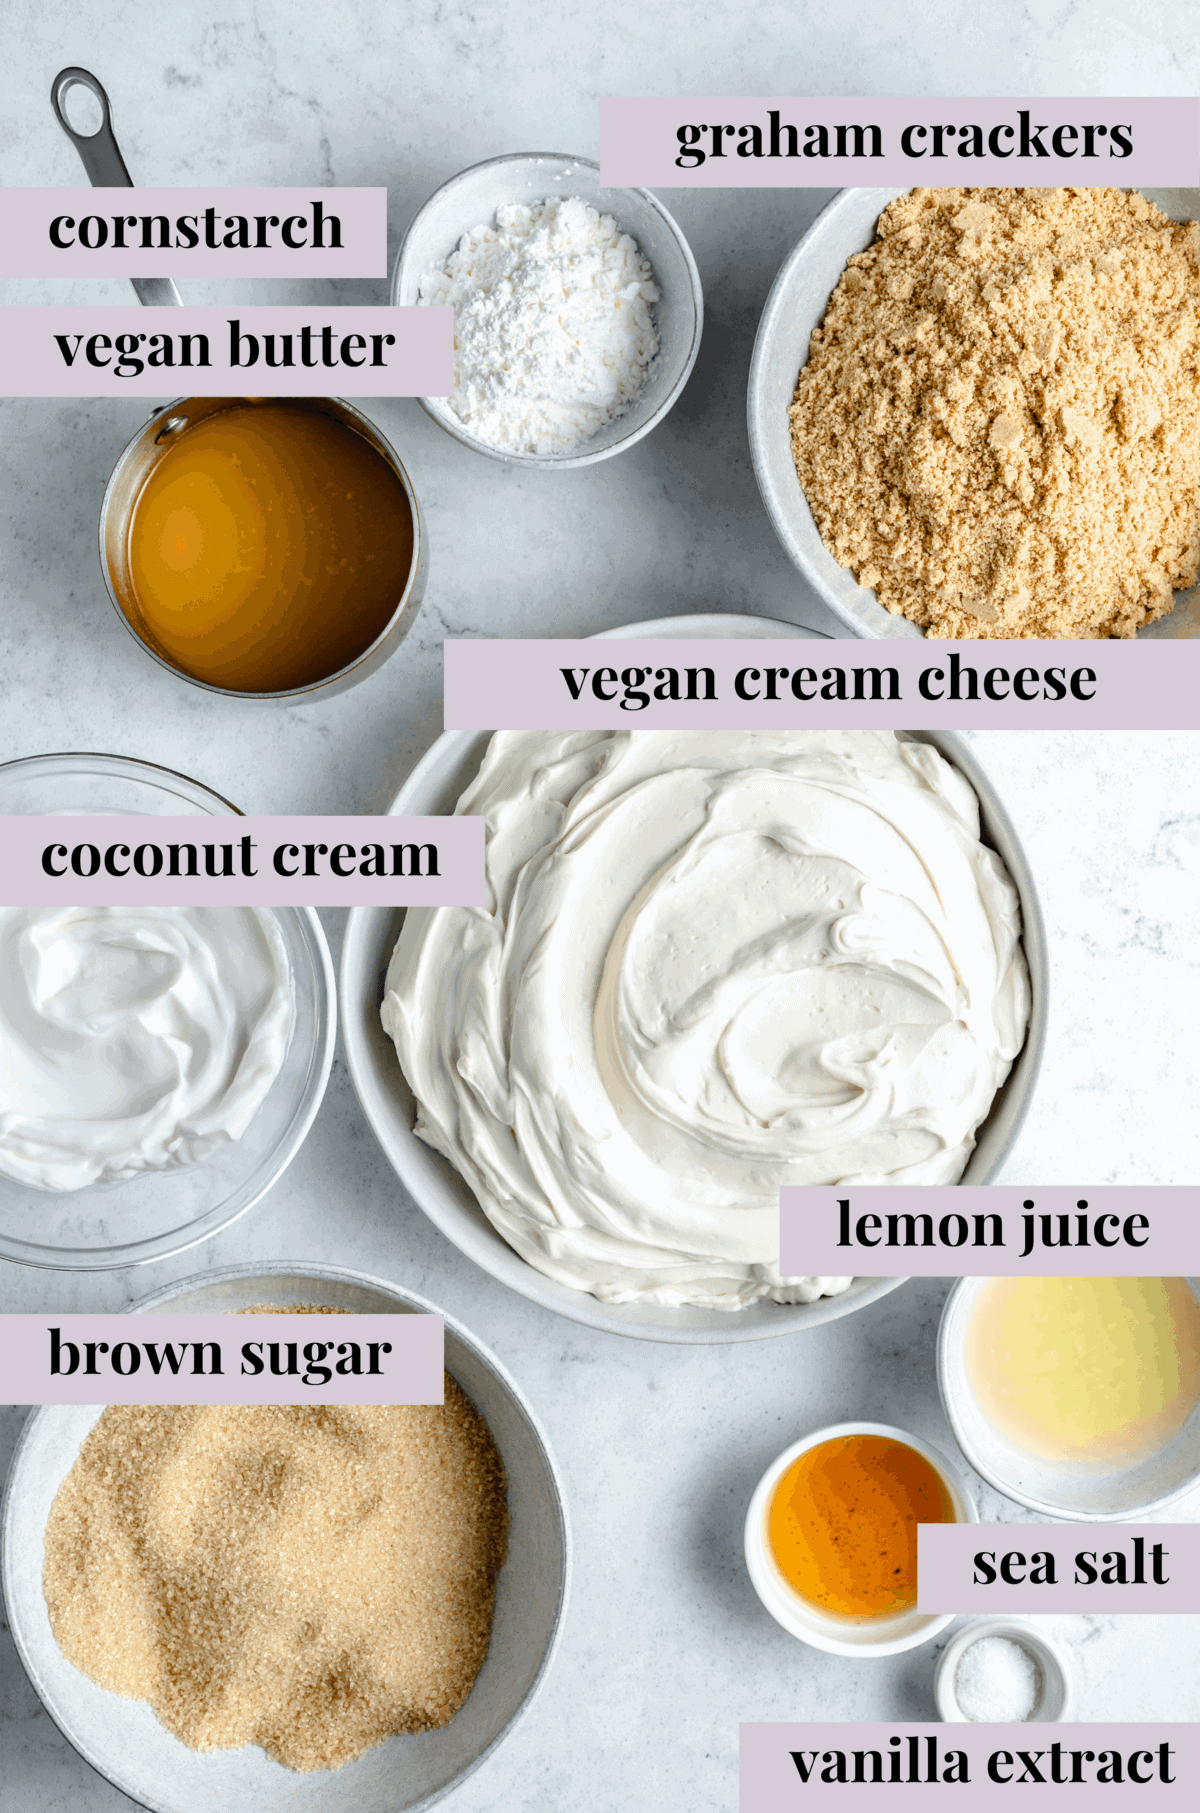
Let’s go over cheesecake ingredients for a minute. Like I mentioned above, there are only 9, and they’re pretty standard:
For the Crust
- Graham Crackers: You can also use digestive biscuits if you can’t find vegan graham crackers – I used digestive biscuits. We’re making a quintessential cheesecake crust!
- Brown Sugar: Feel free to add an extra tablespoon if you prefer a much sweeter crust.
- Vegan Butter: Salted or unsalted is fine, melted.
- Salt: Add a pinch of sea salt if you’re using unsalted butter.
For the Filling
- Vegan Cream Cheese: Let it come to room temperature before starting, and use blocks of cream cheese rather than a spread (although if you can only find a plain spread, that will work too but the cheesecake might crack (just cover it with toppings!).
- Brown Sugar: White granulated sugar can be used as a substitute, but I prefer to use brown sugar.
- Cornstarch: this acts as an egg replacer and helps to keep the cheesecake nice and firm.
- Coconut Cream: the thick white part from the can (you do not taste the coconut flavour at all)
- Vanilla Extract: To add some sweetness!
- Lemon Juice: if you love that incredible cheesecake tang, don’t skip this (don’t skip it anyway!). Freshly squeezed or freshly squeezed bottle is best here.
- Sea Salt: To enhance the sweetness. Highly recommend cutting this amount down if you’re using table salt.
How to Make Vegan Cheesecake
Okay, here’s where the real magic happens. I’m not going to lie to you, making a cheesecake takes some time and effort, but it’s so worth it.
First you’ll form the crust, then you’ll form the cheesecake’s filling, and finally you’ll put it all together to bake. That’s a bit of an oversimplification, but you’ll see what I mean:
Preheat the Oven: Adjust an oven rack to the lower-middle position and preheat the oven to 350°F/180°C.
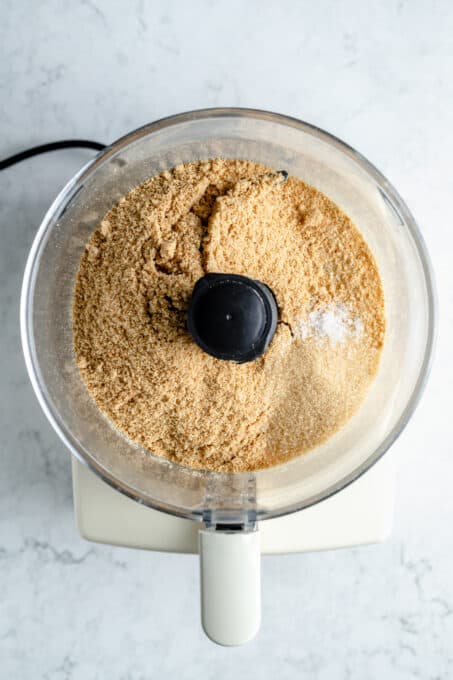
Form the Graham Cracker Crust: In a food processor, process the graham crackers/digestive biscuits and the sugar until you have fine crumbs. Add the butter while pulsing, bit by bit, for about 10 1-second pulses.
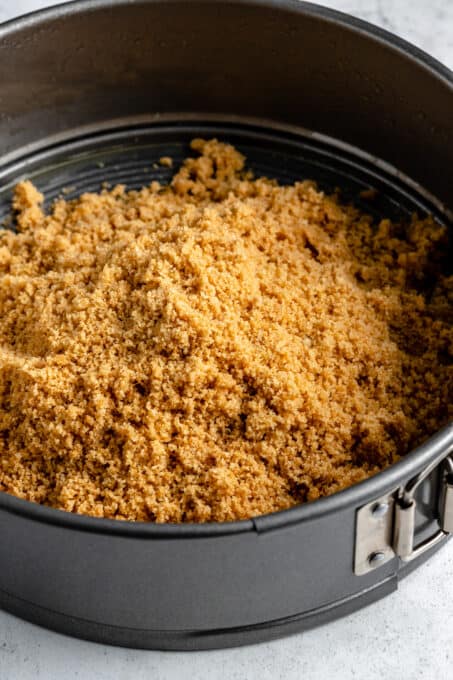
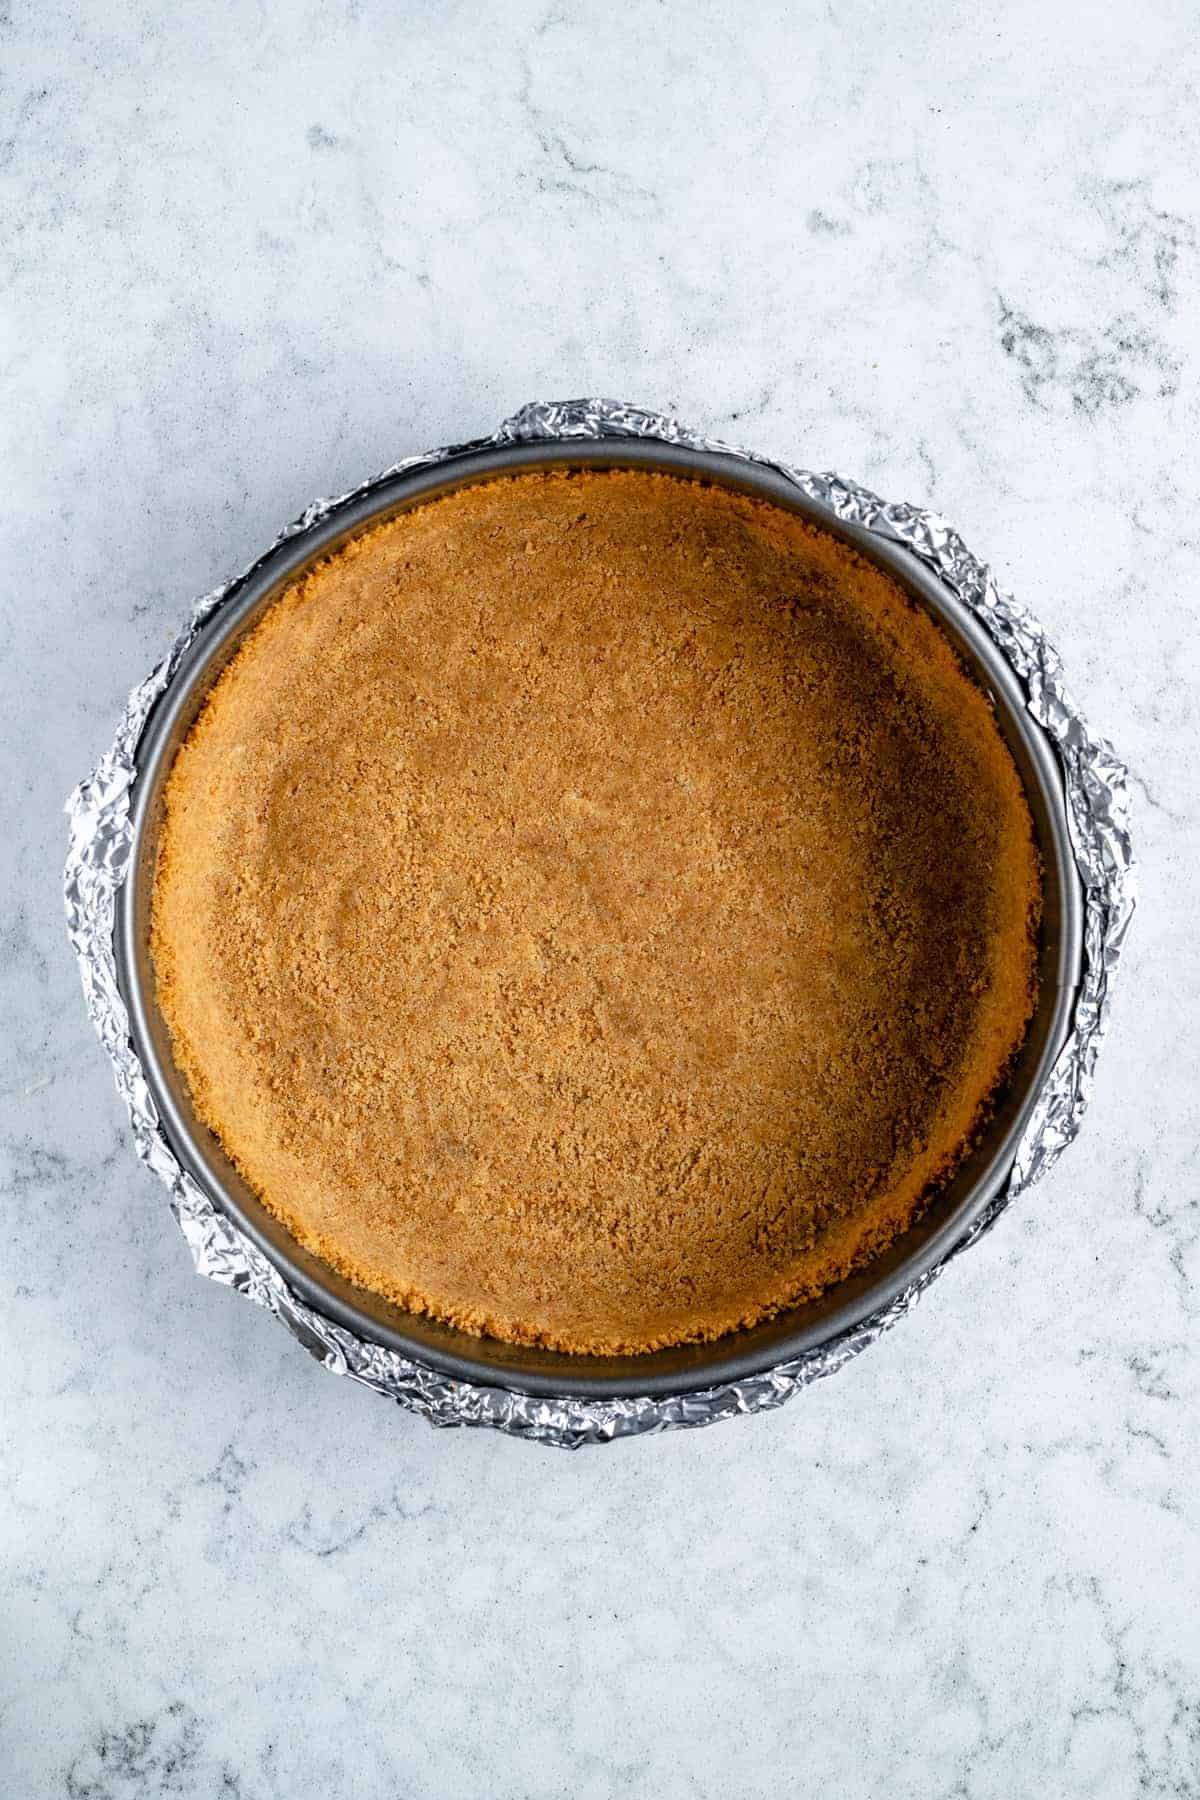
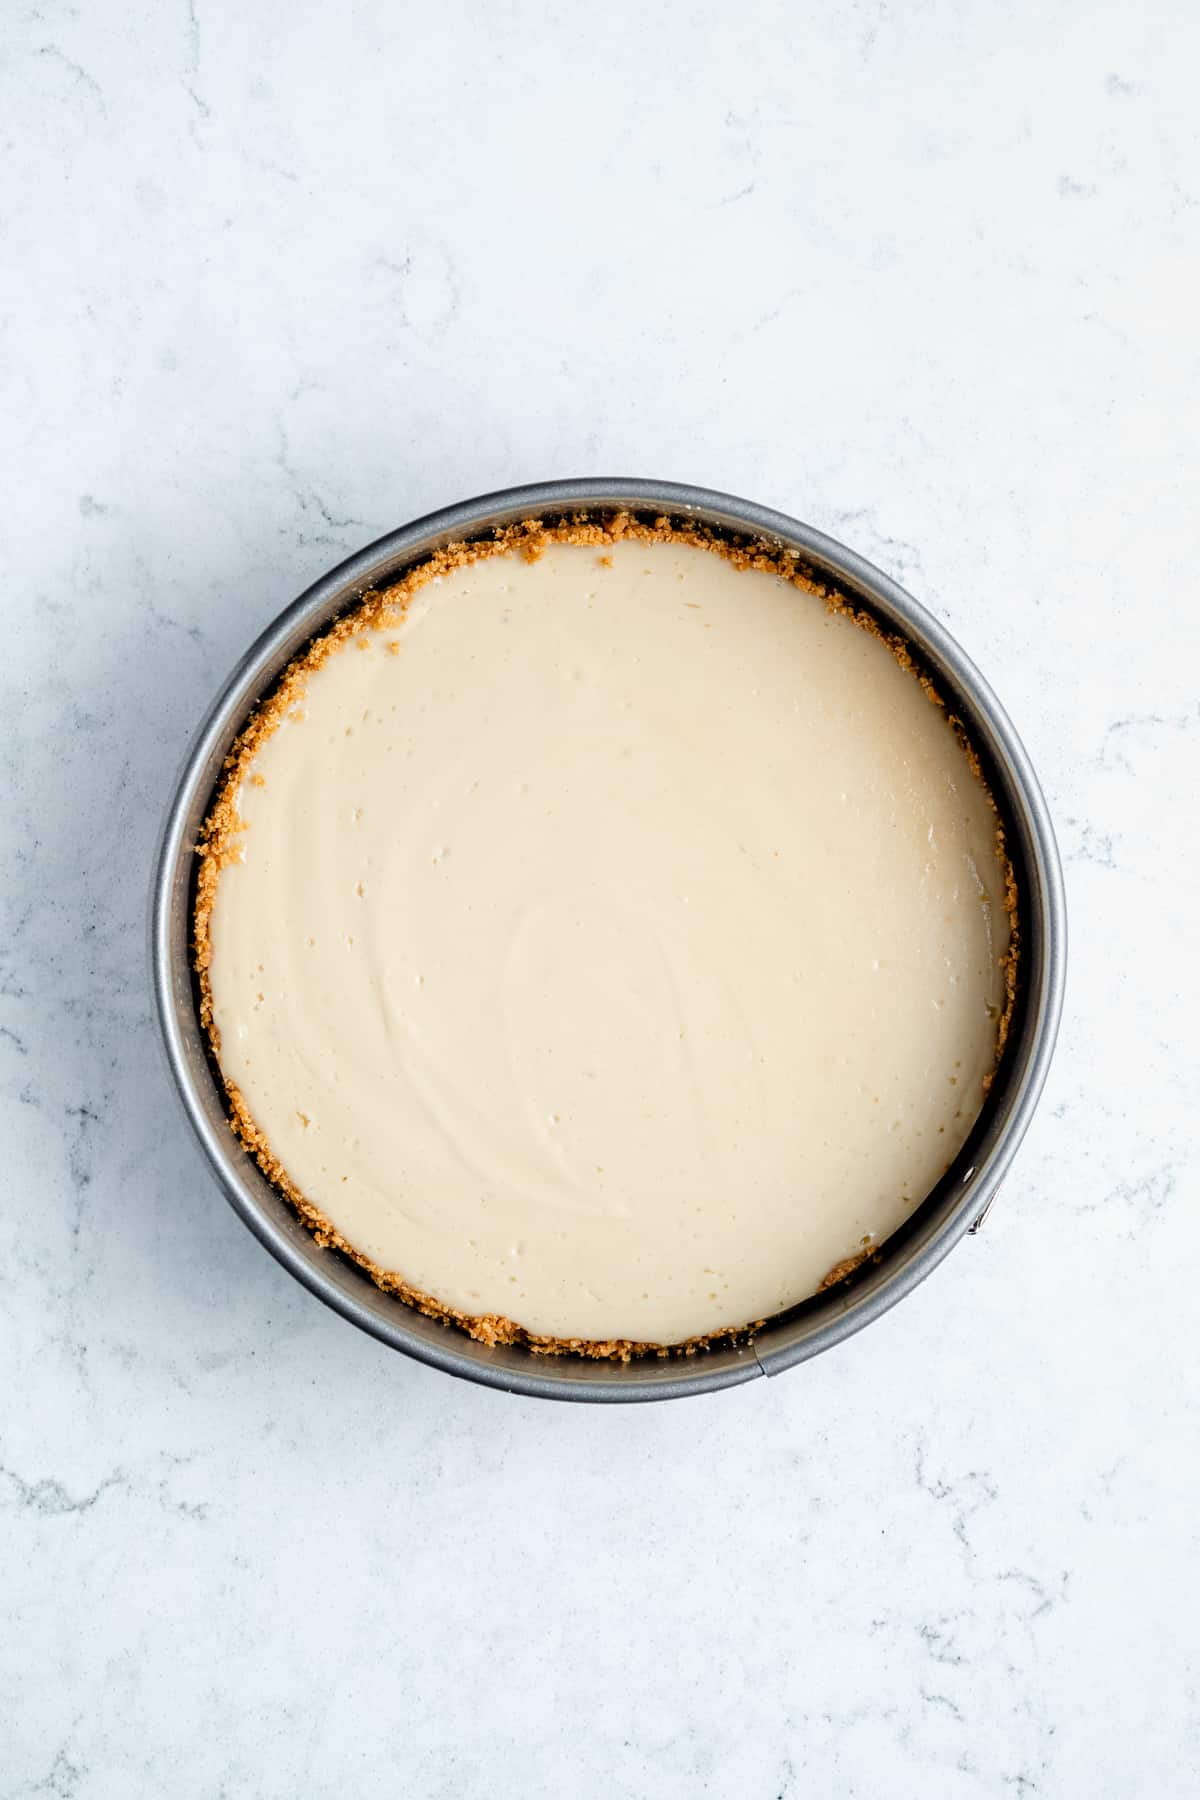
Press the Crust into the Pan: Transfer the crumb mixture to a sprayed/ buttered 9-inch springform pan and press evenly into the bottom. If desired, you could also line the pan with parchment paper but it is not necessary. Pack the crumbs into the base of the springform pan, and also slightly up the sides.
Bake the Crust: Bake for 10 minutes, until fragrant and golden brown. Remove from the oven, and cool on a wire rack to room temperature. Once cooled, wrap in aluminum foil, ensuring that the foil goes all the way up the sides and around the pan (this is for the water bath).
Adjust the Oven: Change the temperature to 325°F/165°C.
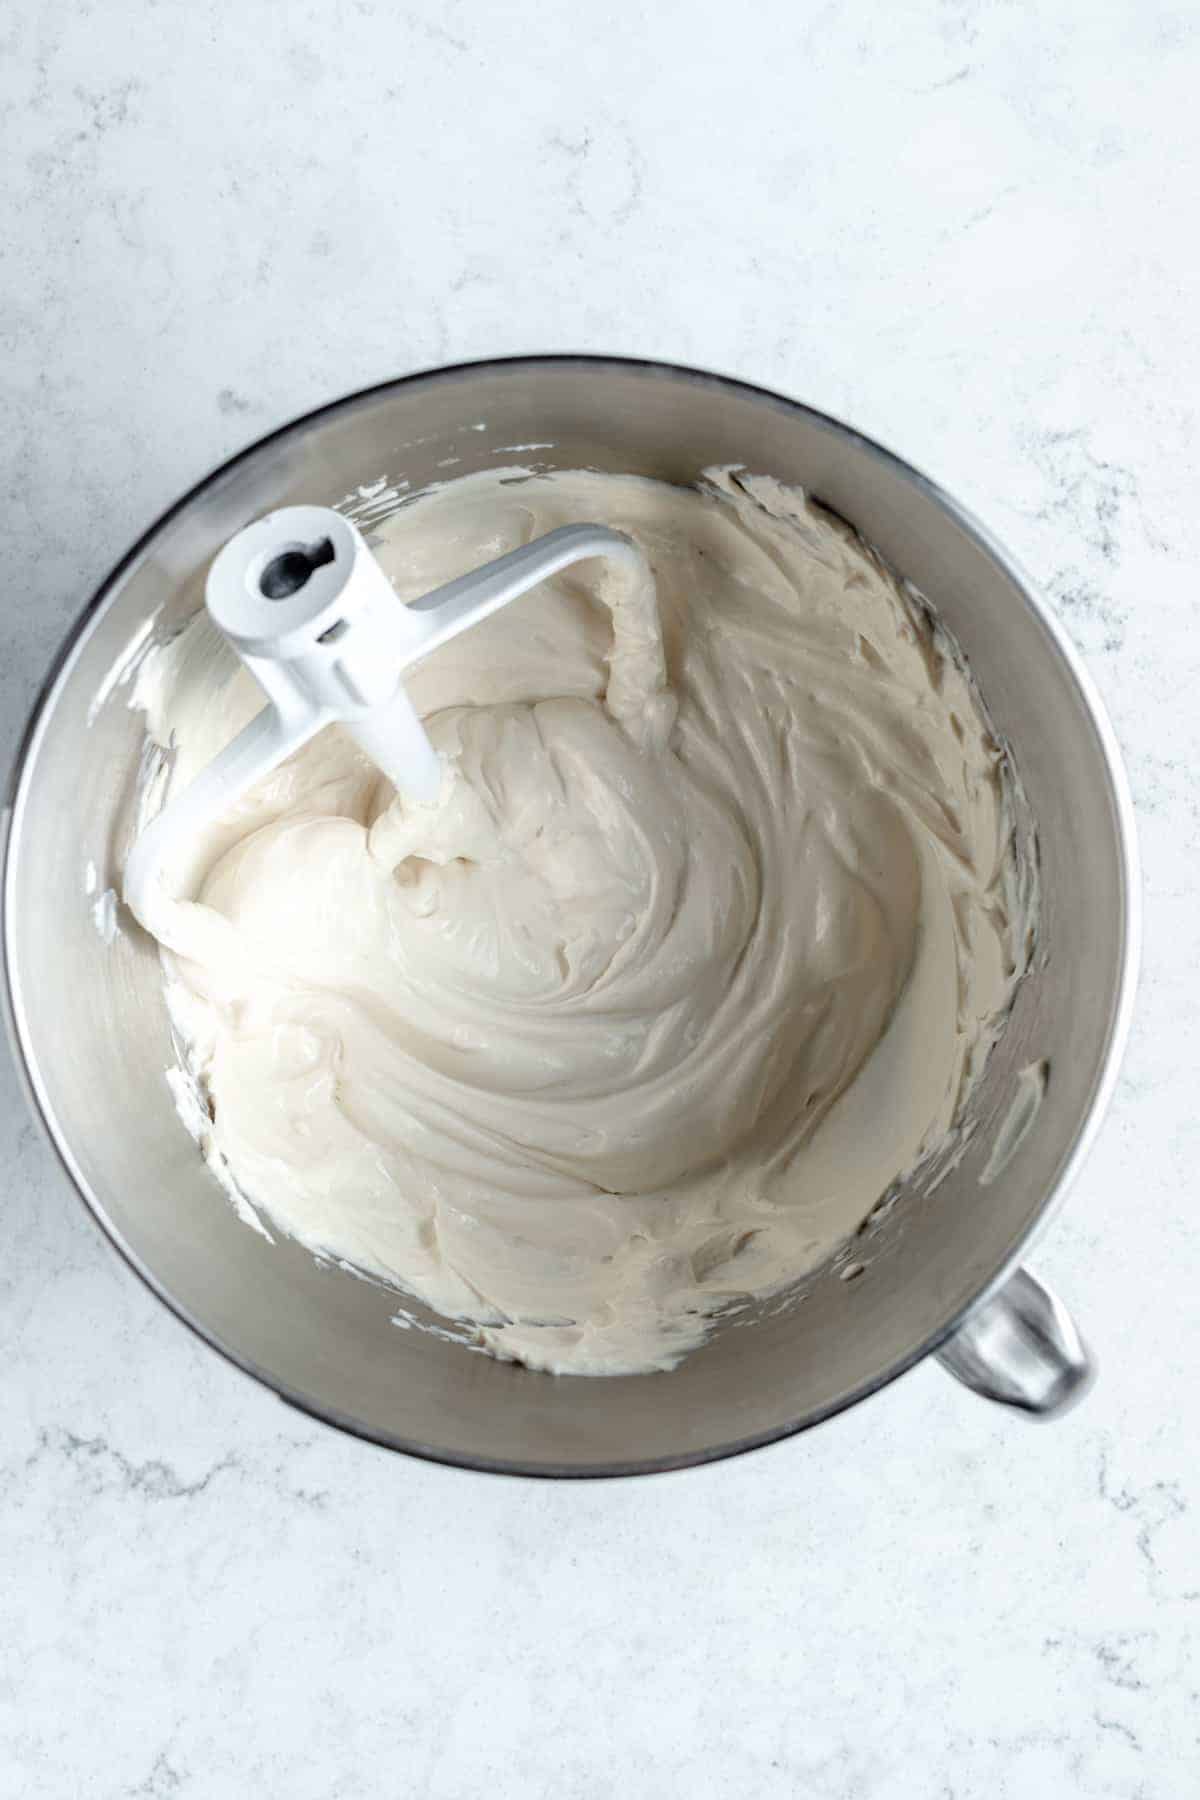
Combine Ingredients for the Filling: In a bowl of a stand mixer, beat the cream cheese to break it up and soften it slightly, about 10 seconds. With the machine running, add the sugar mixture in a slow stream; and beat until combined, creamy and smooth – about 3 minutes on low. Scrape down the sides of the bowl as needed.
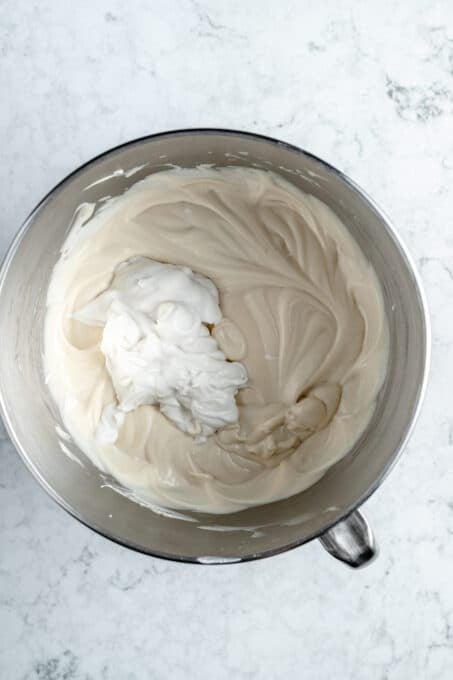
Mix in Cornstarch and Coconut Cream: Add the cornstarch mix and the coconut cream, incorporating for about 15 seconds each. Scrape the bowl after each addition. Add the lemon juice, vanilla and salt and mix to combine.
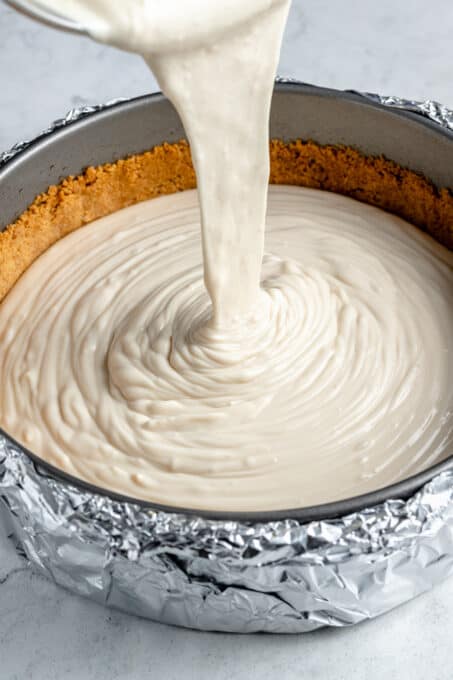
Prepare the Water Bath: Give the bowl a final scrape and pour the mixture into the prepared springform pan. Place the foil wrapped pan into a roasting pan or really any oven safe pan large enough to fit it. Pour boiling hot water in the pan and at least half way on the sides of the pan.
Bake the Cheesecake: Place gently into the oven on the middle rack. Bake until the center jiggles slightly, the sides start to puff, and the surface is no longer shiny, about 70 to 75 minutes and no longer.
Let the Cake Cool in the Oven: Turn off the oven and prop the door of the oven open with a potholder or wooden spoon to allow some heat to escape. Allow the cake to cool in the oven for about an hour.
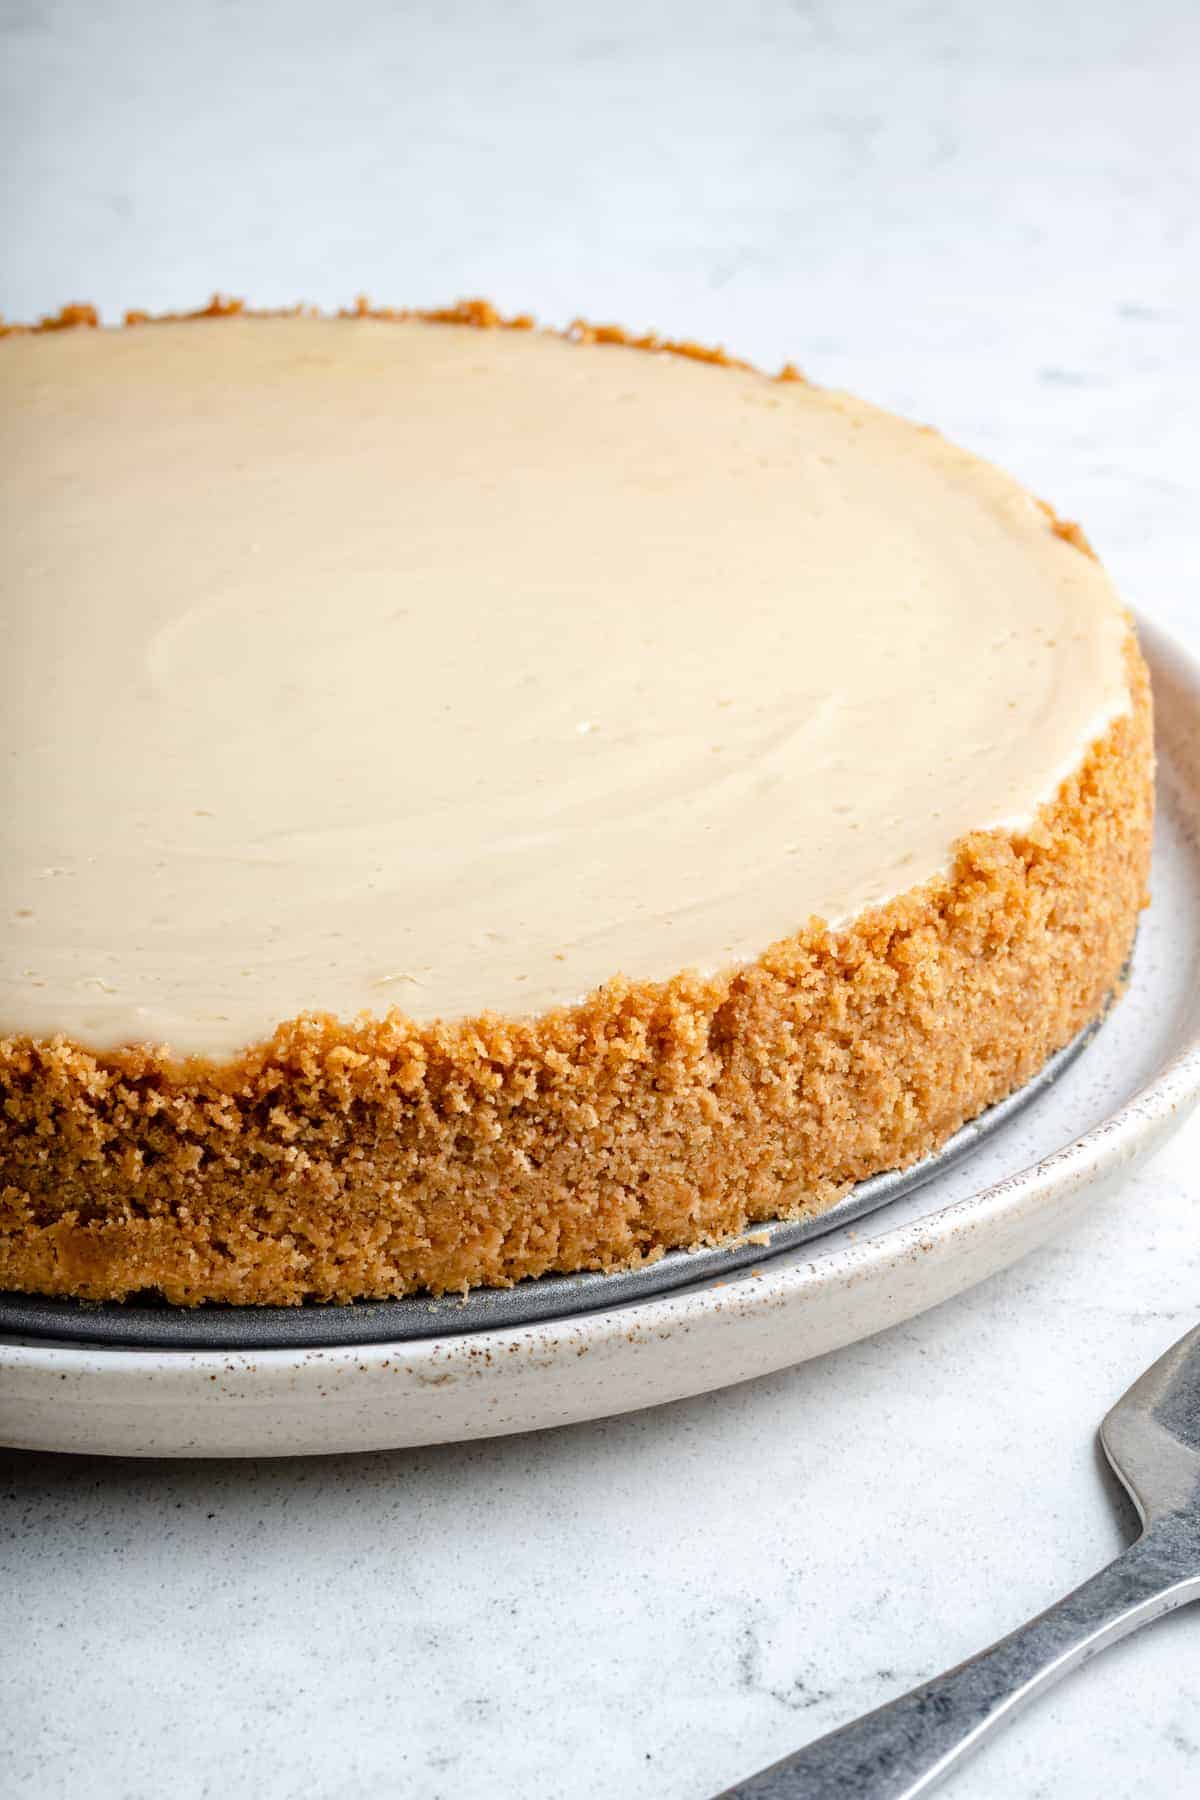
Remove the Cake from the Pan: Transfer the springform pan to a wire rack and run a small paring knife around the edges of the pan to loosen the cake. Let it sit at room temperature for anywhere between 1-3 hours to cool completely. After that, place the cheesecake in the fridge to set for at least 6 hours (overnight is even better!).
Tips for Success
Making cheesecake is complicated, as you can see, so I’ve got some substitutions and overall tips that can help you out before you start:
- How to Get the Coconut Cream: You’ll need 2 cans of full fat coconut milk in the fridge to extract the coconut cream (if you can find coconut cream itself, that’s even better!).
- How to Extract the Coconut Cream: Leave the cans in the fridge for overnight, or at least 12 hours (don’t shake them), then open and scoop off the thick white coconut cream part only.
- What to Do with the Leftover Coconut Water and Cream: You can use the coconut water in smoothies or drink it! If you have extra leftover coconut cream, you can add it to smoothies, curries, to a pasta sauce, and anything you want an extra creamy addition!
- Let ALL Ingredients Come to Room Temp: Bring all ingredients to room temperature, including the separated coconut cream already scooped out of the can. This will mean it’ll probably get thin again but that’s okay since it’s already separated from the coconut water, and that’s all we really wanted. Bringing the ingredients to room temperature also helps to mitigate developing cracks.
- A Cream Substitution to Keep in Mind: You can sub ½ cup of the coconut cream for vegan yogurt. (Instead of asking you to buy a whole host of ingredients, I figured it would make more sense to just grab two cans of coconut milk.)
- If You’re Using Digestive Biscuits: Break them up a little bit before putting them in your food processor to help it blend.
- Refrigerate the Cheesecake After Cooling: If you try to serve it immediately, it will be too soft, and probably will not hold. Chilling it in the fridge (overnight, if possible) will help the cake set and firm up a little.
- What to do if your cheesecake crust cracks: Cracks happen. When we tested this, and tested, and tested, ours didn’t (as you can see in the photos!). But sometimes you forget to bring the cheesecake to room temperature, or over beat, or your oven is wonky. Cracks aren’t that big of a deal for a still beautiful, and still delicious homemade cheesecake. But here’s where to do if it does. You can try to use a hot knife (dipped in boiling water for 15 seconds then wiped clean) and gently spread the top over to try and cover the crack. OR, Cover it with a sauce (such as a cooled fruit sauce or my Caramel Sauce ), or with sliced fruit.
Serving Suggestions
Once you have the cheesecake done (finally) what should you serve with it/on it? There are a couple of different ways you could go about this. Here are my thoughts:
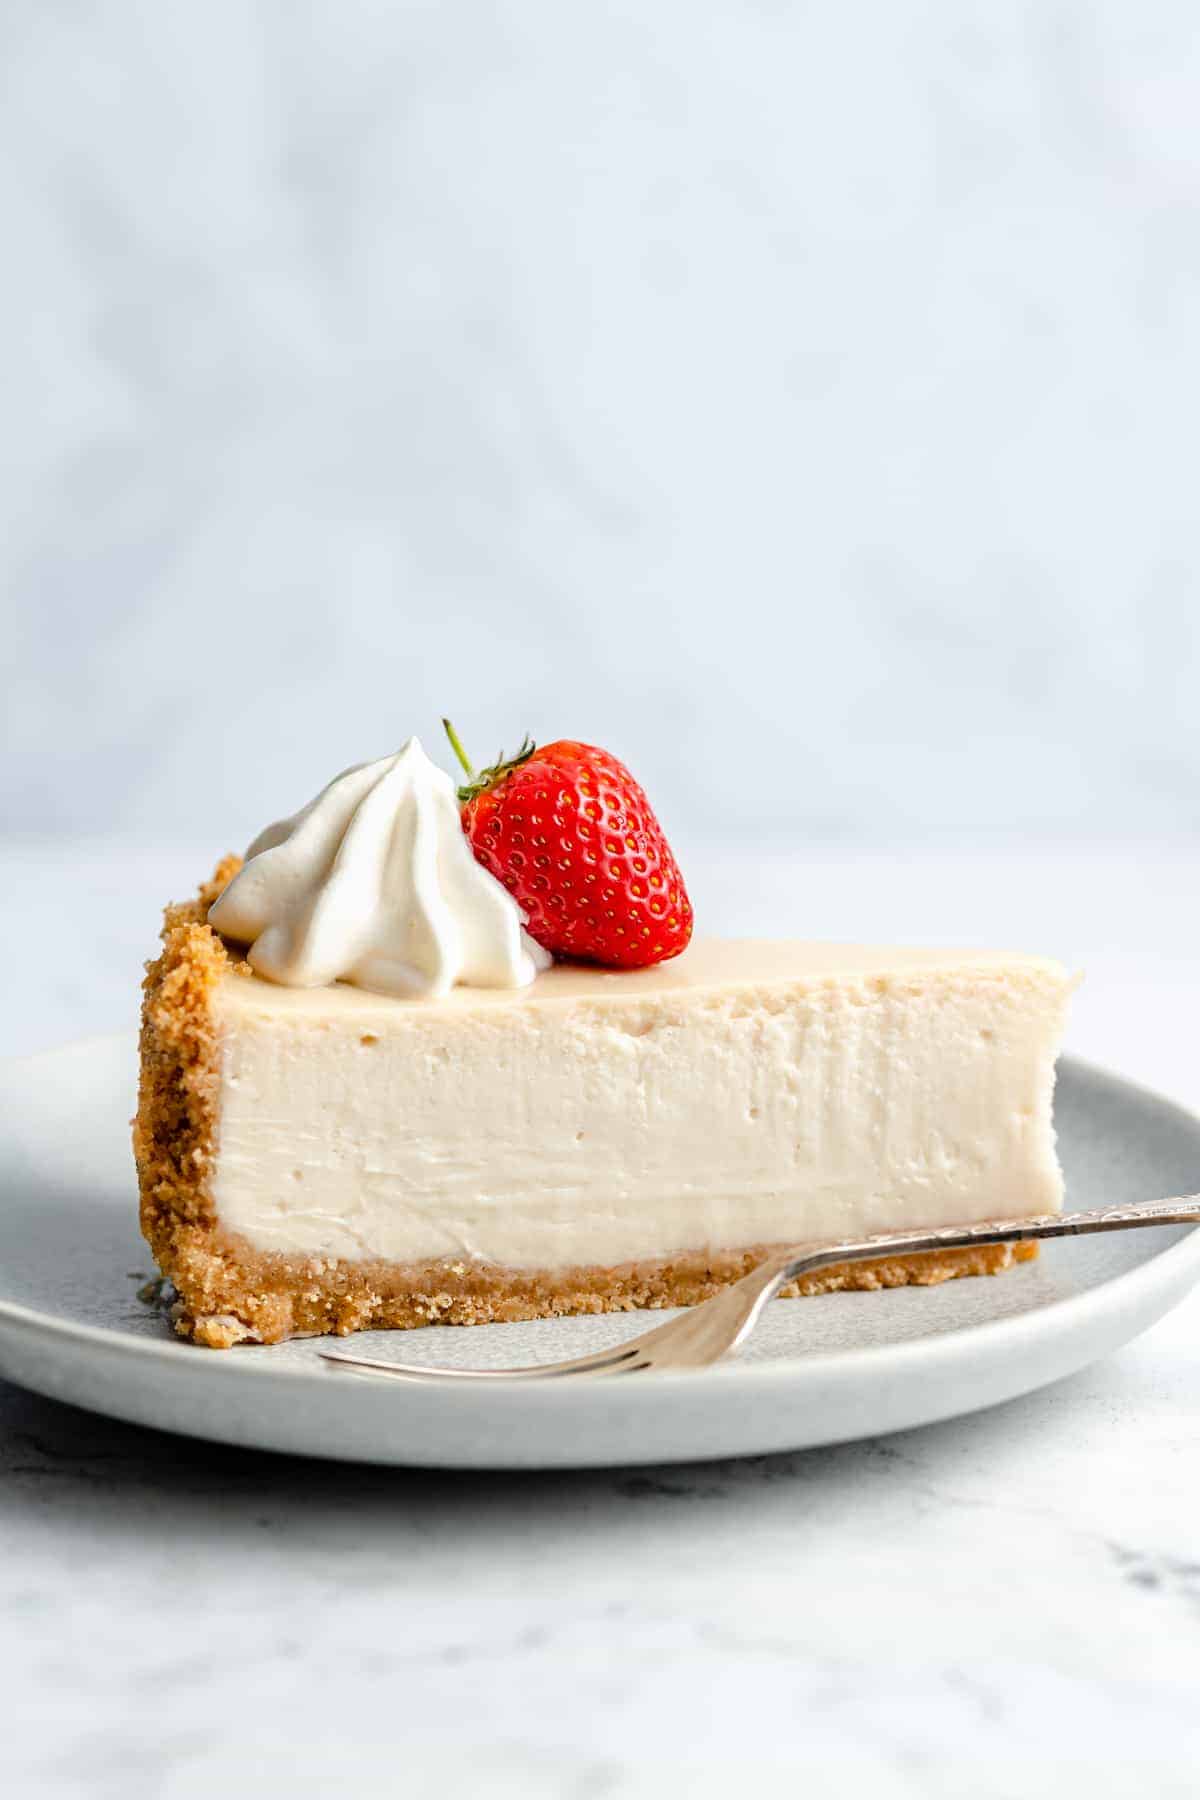
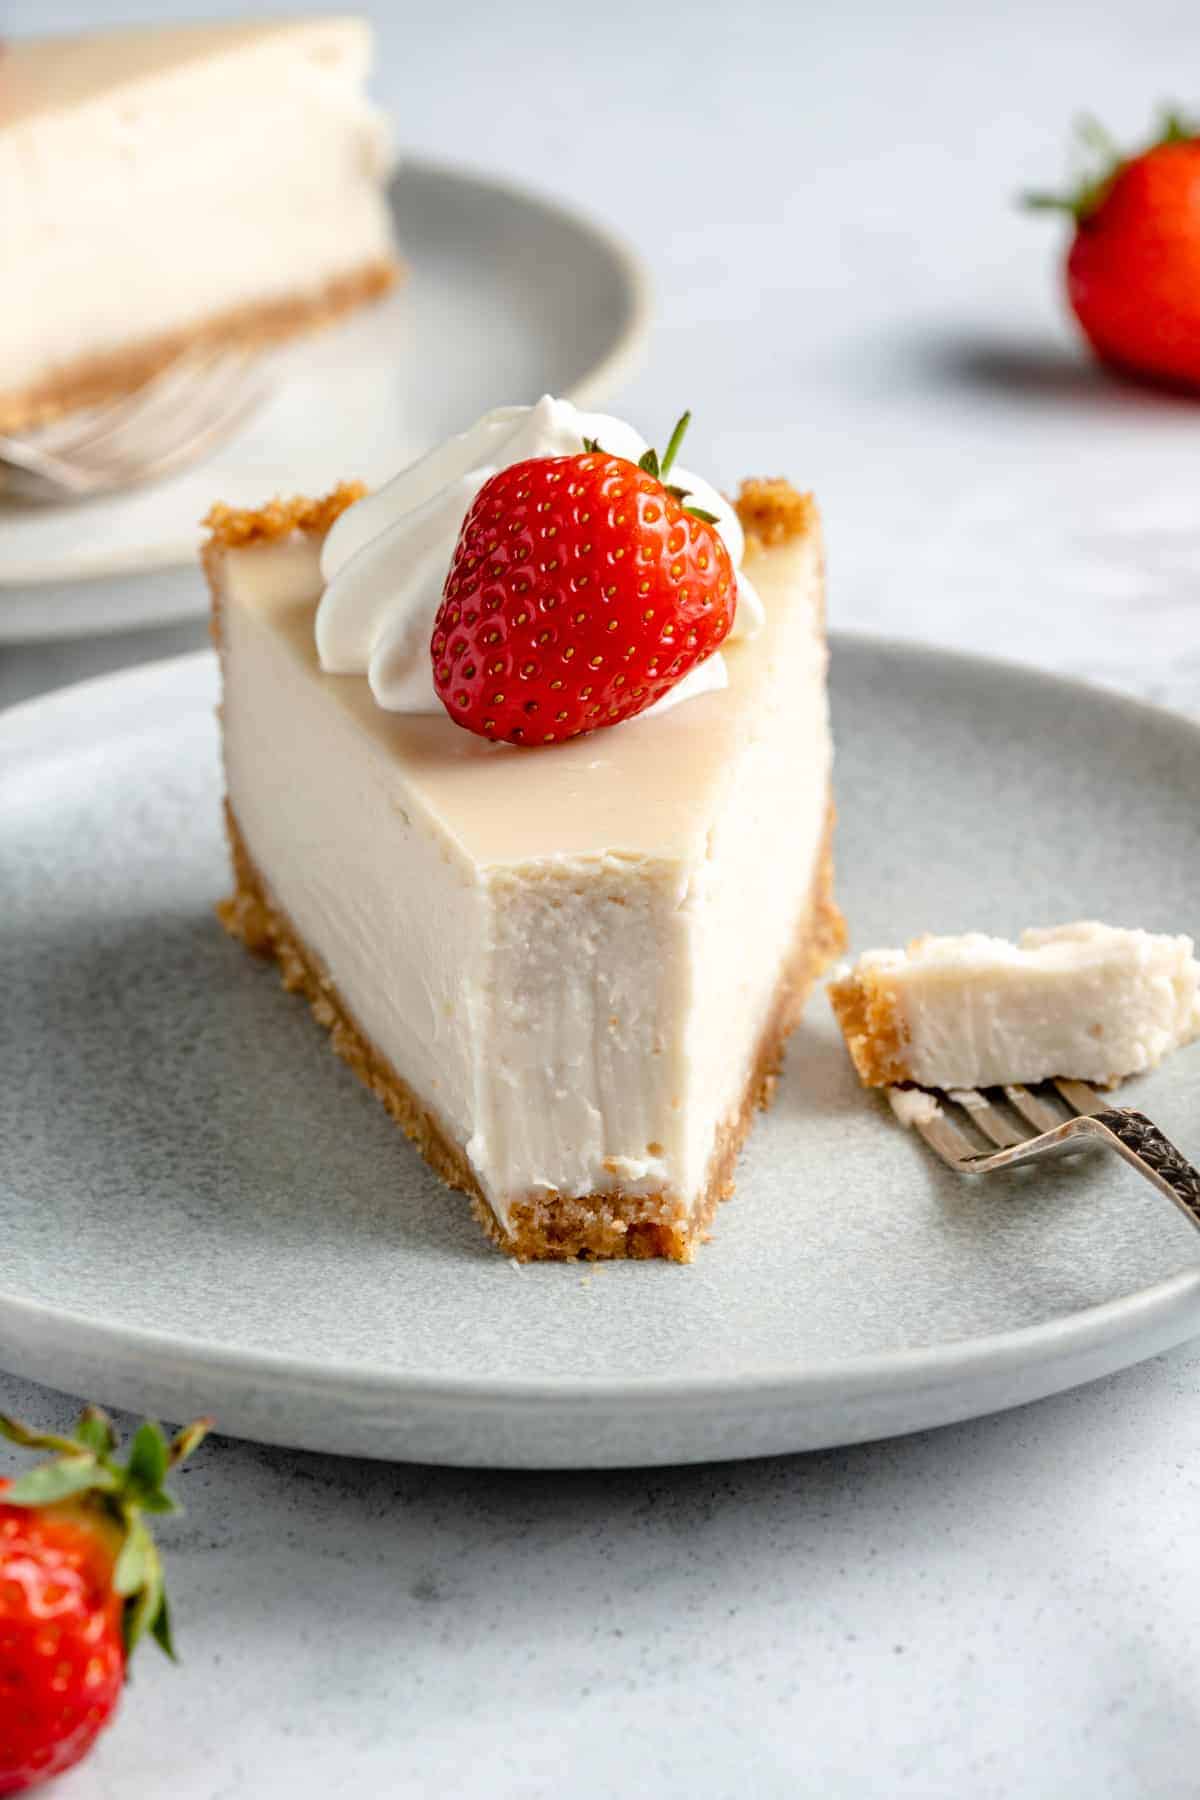
- With Fruit: I love to serve this vegan cheesecake with a strawberry on top. I think fresh fruit pairs perfectly with the rich yet subtle vanilla flavor. You can also serve a slice with raspberries, blueberries, or other sliced fruit, if desired.
- With Caramel Sauce: A drizzle of my vegan caramel sauce would taste amazing on vanilla cheesecake. You could also do chocolate sauce, or try a homemade raspberry sauce if you’re a big fan of fruit.
- With Whipped Cream: This Coconut Whipped Cream recipe is one of my go-to toppings when I’ve got something sweet on the table!
How to Store Homemade Cheesecake
Place your vegan cheesecake into an airtight container in your fridge to store properly! You could also wrap foil around it, or a reusable wrap/seal. It should keep in the fridge properly for 4-5 days – but I doubt it will take you that long to get to it!
Can I Freeze This?
You can! I like to freeze individual slices of vegan cheesecake in airtight containers so that I can save a sweet treat for when I need it. These slices generally keep for 3-4 months. Make sure you let them thaw overnight in the fridge or even for 1 hour on the counter before eating again.
Ingredients
For the 10" Crust
- 12 ounces graham crackers , or 340g, use digestive biscuits if you can’t find Graham crackers – I used digestive biscuits
- 4 tablespoons brown sugar , add another tbsp if you prefer a much sweeter crust
- 8 tablespoons vegan butter , or 112g, melted (salted or unsalted is fine)
- pinch of sea salt , if using unsalted butter
For the Filling
- 32 ounces vegan cream cheese , I used 4 8-ounces blocks (32 ounces/907g total)
- 1 ¼ cups brown sugar , (250g)
- 5 tablespoons cornstarch , (37.5g)
- 1 ⅓ cups full fat coconut cream , only the white part from the can (⅓ of this is stirred together with the cornstarch)
- 2 teaspoons vanilla extract
- 3 tablespoons fresh lemon juice
- ¼ teaspoon sea salt
Instructions
For the Crust
- Adjust an oven rack to the lower-middle position and preheat the oven to 350 degrees Fahrenheit/180C.
- In a food processor, process the graham crackers/digestive biscuits and the sugar until you have fine crumbs. Add the butter while pulsing, bit by bit, for about 10 1-second pulses.
- Transfer the crumb mixture to a sprayed/ buttered 9-inch springform pan and press evenly into the bottom. If desired, you could also line the pan with parchment paper but it is not necessary. Pack the crumbs into the base of the springform pan, and also slightly up the sides.
- Bake for 10 minutes, until fragrant and golden brown. Remove from the oven, and cool on a wire rack to room temperature. Once cooled, wrap in aluminum foil, ensuring that the foil goes all the way up the sides and around the pan (this is for the water bath).
For the Filling
- Change the temperature to 325°Fahrenheit/165°Celsius.
- In a bowl of a stand mixer, beat the cream cheese to break it up and soften it slightly, about 10 seconds. With the machine running, add the sugar mixture in a slow stream; and beat until combined, creamy and smooth – about 3 minutes on low. Scrape down the sides of the bowl as needed.
- In a small separate bowl, mix that ⅓ cup of the coconut cream with the cornstarch, stirring completely until the cornstarch is dissolved.
- Add that cornstarch mix and the remaining 1 cup coconut cream into the mixer, incorporating for about 15 seconds each. Scrape the bowl after each addition.
- Add the lemon juice, vanilla and salt and mix to combine.
- Give the bowl a final scrape and pour the mixture into the prepared springform pan. Place the foil wrapped pan into a roasting pan or really any oven safe pan large enough to fit it. Pour boiling hot water in the pan and at least half way on the sides of the pan.
- Place gently into the oven on the middle rack. Bake until the center jiggles slightly, the sides start to puff, and the surface is no longer shiny, about 70 to 75 minutes and no longer. Turn off the oven and prop the door of the oven open with a potholder or wooden spoon to allow some heat to escape. Allow the cake to cool in the oven for about an hour.
- Transfer the springform pan to a wire rack and run a small paring knife around the edges of the pan to loosen the cake. Let it sit at room temperature for anywhere between 1-3 hours to cool completely. After that, place the cheesecake in the fridge to set for at least 6 hours (overnight is even better!).
- Top with your favorite toppings, slice and enjoy! Place the cheesecake into an airtight container in your fridge to store properly! You could also wrap foil around it, or a reusable wrap/seal.
Notes
- How to Get the Coconut Cream: You’ll need 2 cans of full fat coconut milk in the fridge to extract the coconut cream (if you can find coconut cream itself, that’s even better!).
- How to Extract the Coconut Cream: Leave the cans in the fridge for overnight, or at least 12 hours (don’t shake them), then open and scoop off the thick white coconut cream part only.
- What to Do with the Leftover Coconut Water and Cream: You can use the coconut water in smoothies or drink it! If you have extra leftover coconut cream, you can add it to smoothies, curries, to a pasta sauce, and anything you want an extra creamy addition!
- Let ALL Ingredients Come to Room Temp: Bring all ingredients to room temperature, including the separated coconut cream already scooped out of the can. This will mean it’ll probably get thin again but that’s okay since it’s already separated from the coconut water, and that’s all we really wanted. Bringing the ingredients to room temperature also helps to mitigate developing cracks.
- A Cream Substitution to Keep in Mind: You can sub ½ cup of the coconut cream for vegan yogurt. (Instead of asking you to buy a whole host of ingredients, I figured it would make more sense to just grab two cans of coconut milk.)
- If You’re Using Digestive Biscuits: Break them up a little bit before putting them in your food processor to help it blend.
- Refrigerate the Cheesecake After Cooling: If you try to serve it immediately, it will be too soft, and probably will not hold. Chilling it in the fridge (overnight, if possible) will help the cake set and firm up a little.
- What to do if your cheesecake crust cracks: Cracks happen. When we tested this, and tested, and tested, ours didn’t (as you can see in the photos!). But sometimes you forget to bring the cheesecake to room temperature, or over beat, or your oven is wonky. Cracks aren’t that big of a deal for a still beautiful, and still delicious homemade cheesecake. But here’s where to do if it does. You can try to use a hot knife (dipped in boiling water for 15 seconds then wiped clean) and gently spread the top over to try and cover the crack. OR, Cover it with a sauce (such as a cooled fruit sauce or my Caramel Sauce ), or with sliced fruit.
More Vegan Dessert Ideas
On the search for more easy vegan dessert recipes? If so, these are a few of my favorites:
- Vanilla Cake with Buttercream Frosting
- Chocolate Sheet Cake
- Vegan Brownies
- Pecan Pie
- Vegan Ice Cream

Creamy Vegan Cheesecake
Ingredients
For the 10" Crust
- 12 ounces graham crackers or 340g, use digestive biscuits if you can’t find Graham crackers - I used digestive biscuits
- 4 tablespoons brown sugar add another tbsp if you prefer a much sweeter crust
- 8 tablespoons vegan butter or 112g, melted (salted or unsalted is fine)
- pinch of sea salt if using unsalted butter
For the Filling
- 32 ounces vegan cream cheese I used 4 8-ounces blocks (32 ounces/907g total)
- 1 ¼ cups brown sugar (250g)
- 5 tablespoons cornstarch (37.5g)
- 1 ⅓ cups full fat coconut cream only the white part from the can (⅓ of this is stirred together with the cornstarch)
- 2 teaspoons vanilla extract
- 3 tablespoons fresh lemon juice
- ¼ teaspoon sea salt
Instructions
For the Crust
- Adjust an oven rack to the lower-middle position and preheat the oven to 350 degrees Fahrenheit/180C.
- In a food processor, process the graham crackers/digestive biscuits and the sugar until you have fine crumbs. Add the butter while pulsing, bit by bit, for about 10 1-second pulses.
- Transfer the crumb mixture to a sprayed/ buttered 9-inch springform pan and press evenly into the bottom. If desired, you could also line the pan with parchment paper but it is not necessary. Pack the crumbs into the base of the springform pan, and also slightly up the sides.
- Bake for 10 minutes, until fragrant and golden brown. Remove from the oven, and cool on a wire rack to room temperature. Once cooled, wrap in aluminum foil, ensuring that the foil goes all the way up the sides and around the pan (this is for the water bath).
For the Filling
- Change the temperature to 325°Fahrenheit/165°Celsius.
- In a bowl of a stand mixer, beat the cream cheese to break it up and soften it slightly, about 10 seconds. With the machine running, add the sugar mixture in a slow stream; and beat until combined, creamy and smooth – about 3 minutes on low. Scrape down the sides of the bowl as needed.
- In a small separate bowl, mix that ⅓ cup of the coconut cream with the cornstarch, stirring completely until the cornstarch is dissolved.
- Add that cornstarch mix and the remaining 1 cup coconut cream into the mixer, incorporating for about 15 seconds each. Scrape the bowl after each addition.
- Add the lemon juice, vanilla and salt and mix to combine.
- Give the bowl a final scrape and pour the mixture into the prepared springform pan. Place the foil wrapped pan into a roasting pan or really any oven safe pan large enough to fit it. Pour boiling hot water in the pan and at least half way on the sides of the pan.
- Place gently into the oven on the middle rack. Bake until the center jiggles slightly, the sides start to puff, and the surface is no longer shiny, about 70 to 75 minutes and no longer. Turn off the oven and prop the door of the oven open with a potholder or wooden spoon to allow some heat to escape. Allow the cake to cool in the oven for about an hour.
- Transfer the springform pan to a wire rack and run a small paring knife around the edges of the pan to loosen the cake. Let it sit at room temperature for anywhere between 1-3 hours to cool completely. After that, place the cheesecake in the fridge to set for at least 6 hours (overnight is even better!).
- Top with your favorite toppings, slice and enjoy! Place the cheesecake into an airtight container in your fridge to store properly! You could also wrap foil around it, or a reusable wrap/seal.
Video
Notes
- How to Get the Coconut Cream: You’ll need 2 cans of full fat coconut milk in the fridge to extract the coconut cream (if you can find coconut cream itself, that’s even better!).
- How to Extract the Coconut Cream: Leave the cans in the fridge for overnight, or at least 12 hours (don’t shake them), then open and scoop off the thick white coconut cream part only.
- What to Do with the Leftover Coconut Water and Cream: You can use the coconut water in smoothies or drink it! If you have extra leftover coconut cream, you can add it to smoothies, curries, to a pasta sauce, and anything you want an extra creamy addition!
- Let ALL Ingredients Come to Room Temp: Bring all ingredients to room temperature, including the separated coconut cream already scooped out of the can. This will mean it’ll probably get thin again but that’s okay since it’s already separated from the coconut water, and that’s all we really wanted. Bringing the ingredients to room temperature also helps to mitigate developing cracks.
- A Cream Substitution to Keep in Mind: You can sub ½ cup of the coconut cream for vegan yogurt. (Instead of asking you to buy a whole host of ingredients, I figured it would make more sense to just grab two cans of coconut milk.)
- If You’re Using Digestive Biscuits: Break them up a little bit before putting them in your food processor to help it blend.
- Refrigerate the Cheesecake After Cooling: If you try to serve it immediately, it will be too soft, and probably will not hold. Chilling it in the fridge (overnight, if possible) will help the cake set and firm up a little.
- What to do if your cheesecake crust cracks: Cracks happen. When we tested this, and tested, and tested, ours didn’t (as you can see in the photos!). But sometimes you forget to bring the cheesecake to room temperature, or over beat, or your oven is wonky. Cracks aren’t that big of a deal for a still beautiful, and still delicious homemade cheesecake. But here’s where to do if it does. You can try to use a hot knife (dipped in boiling water for 15 seconds then wiped clean) and gently spread the top over to try and cover the crack. OR, Cover it with a sauce (such as a cooled fruit sauce or my Caramel Sauce ), or with sliced fruit.
Nutrition
Creamy Vegan Cheesecake https://jessicainthekitchen.com/creamy-vegan-cheesecake/ July 19, 2021
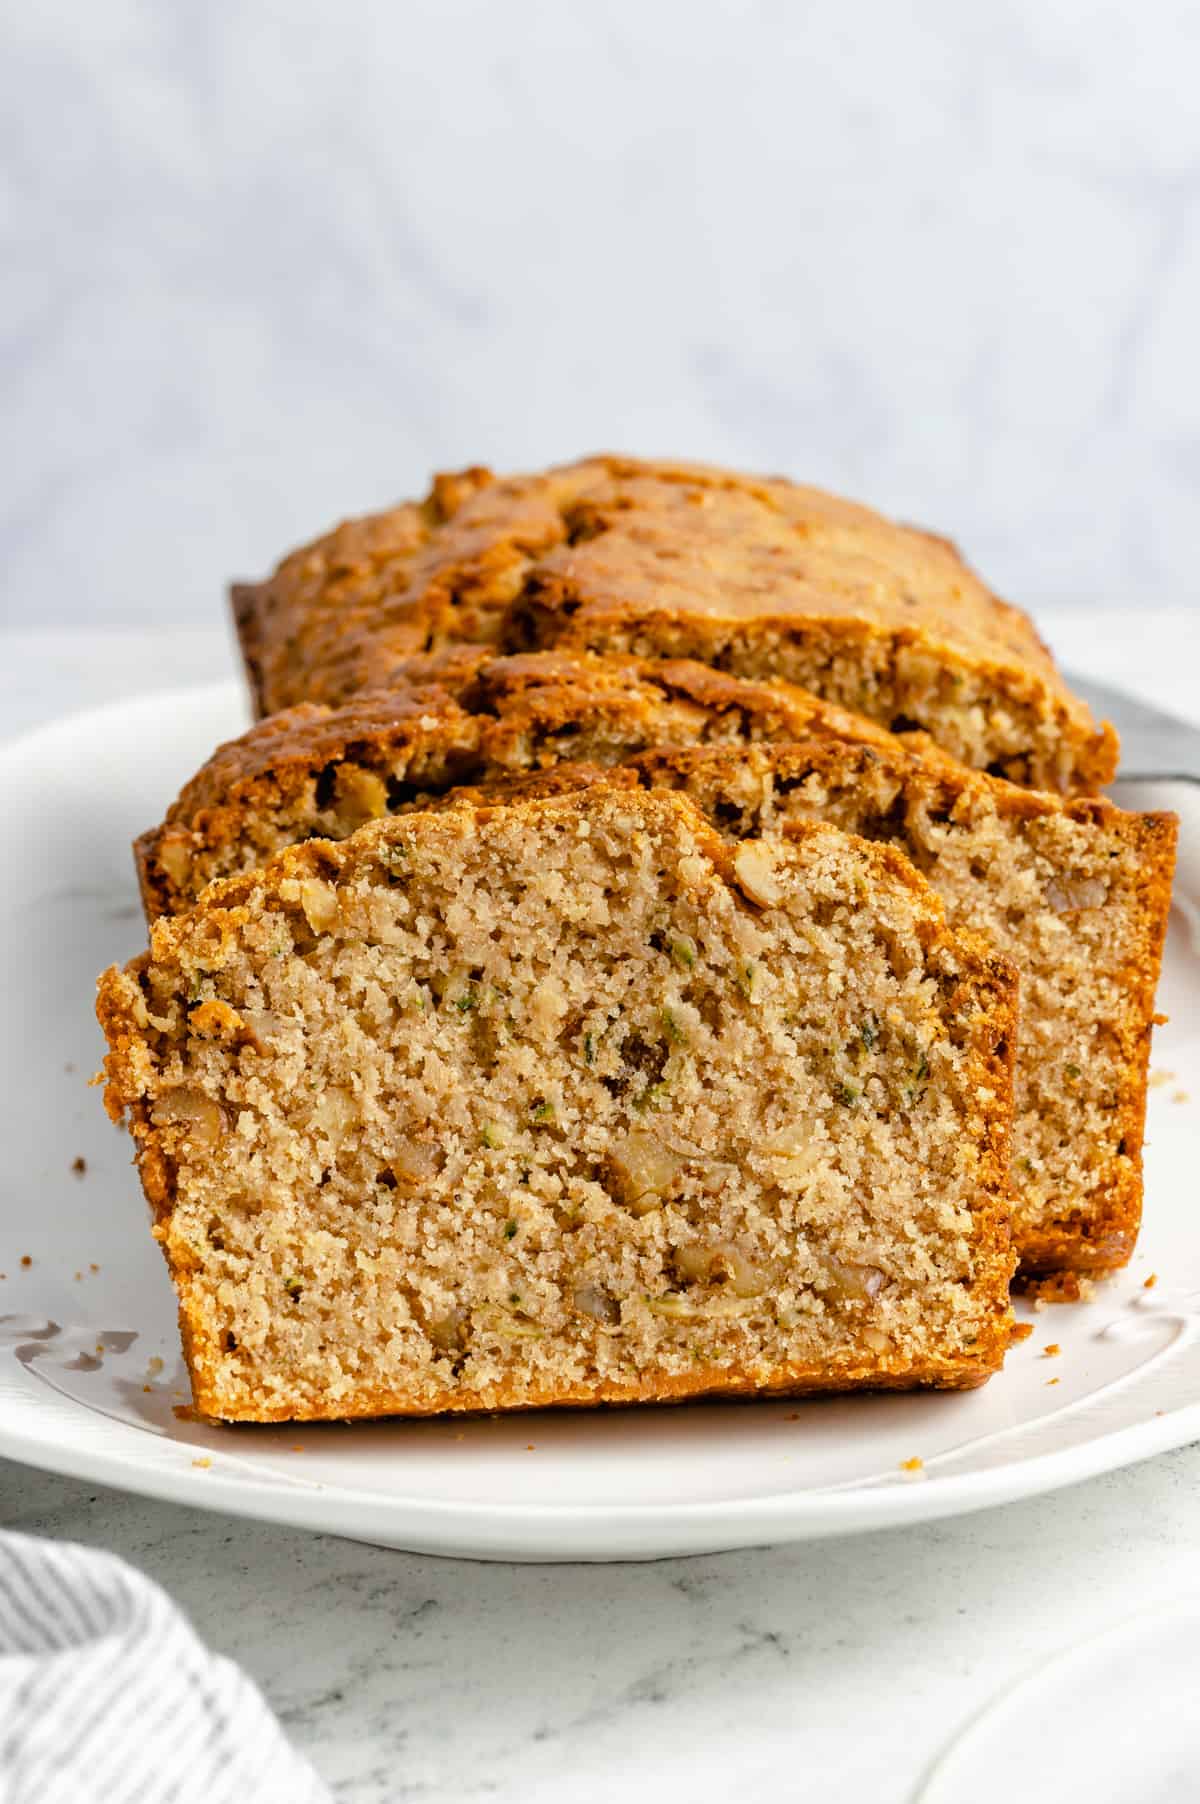
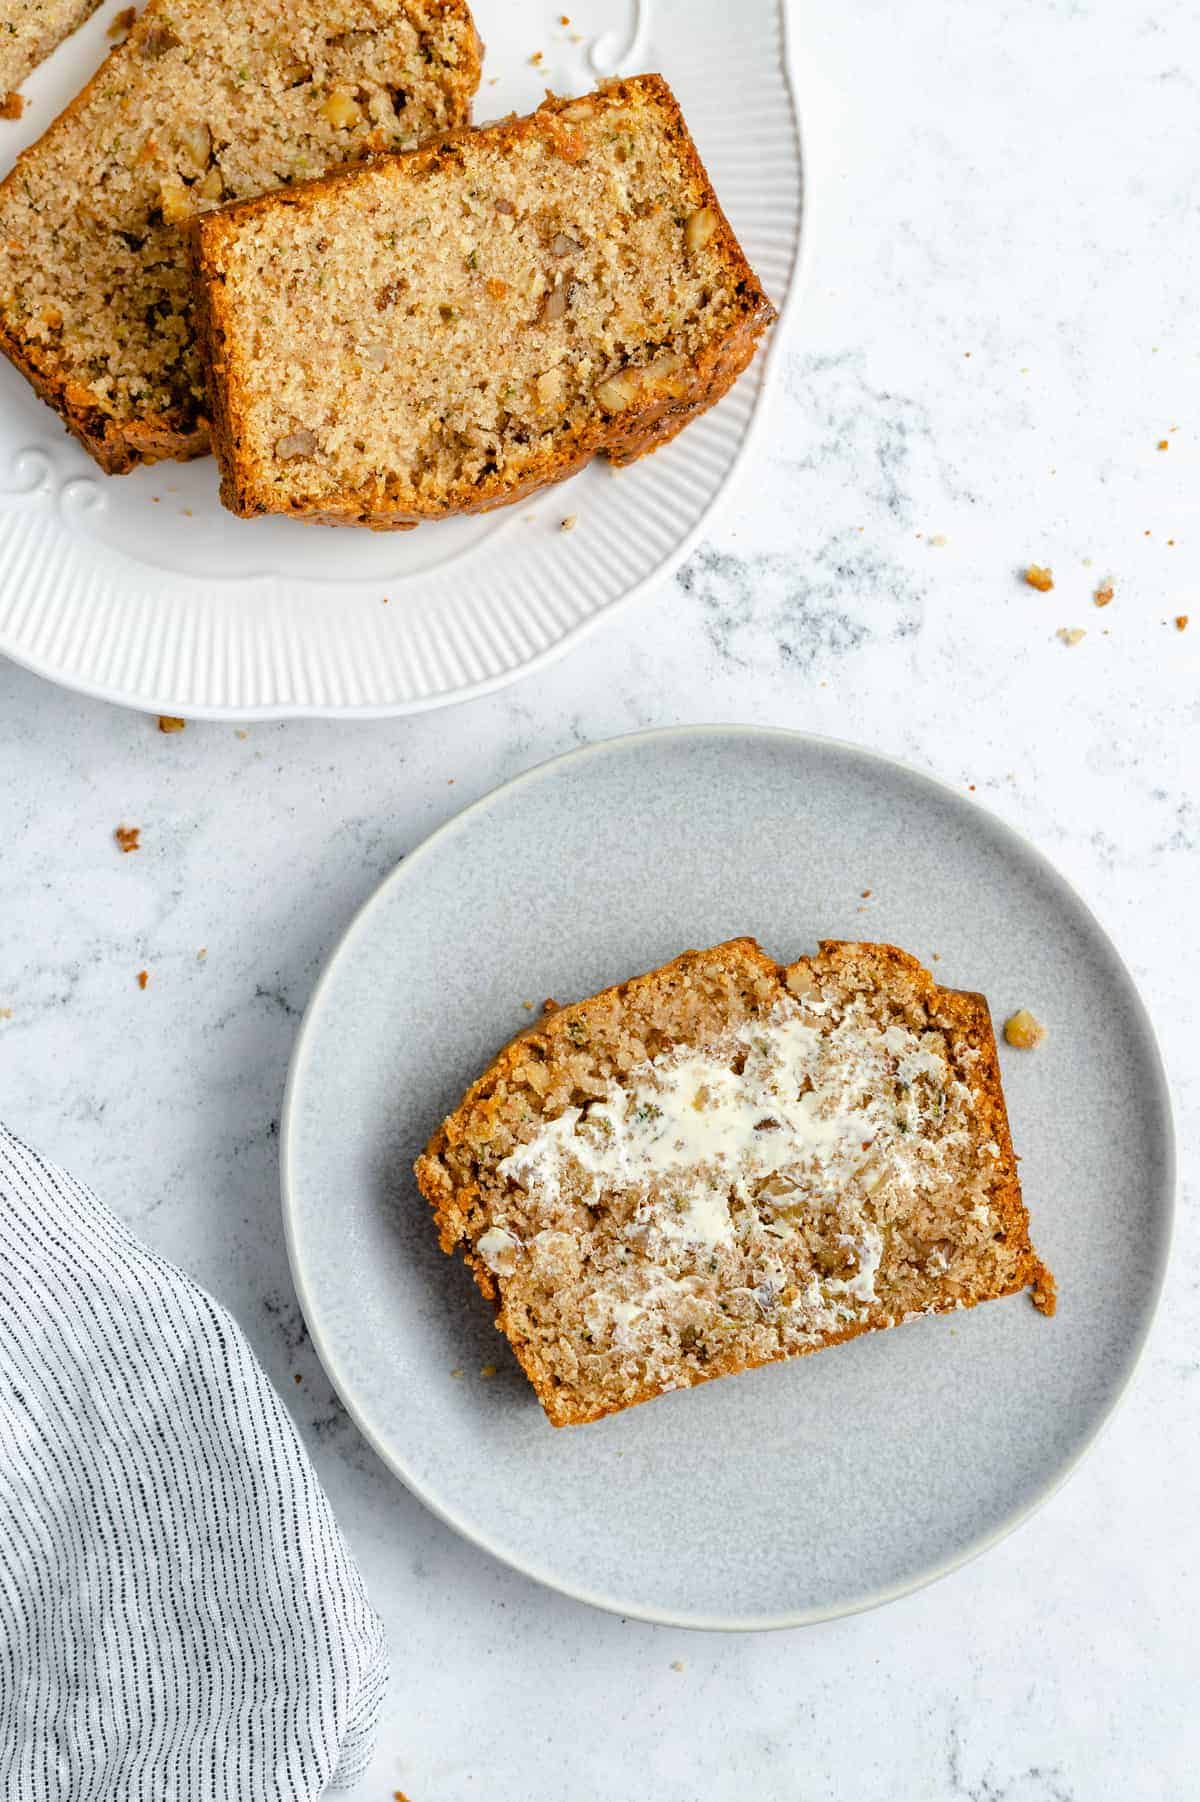
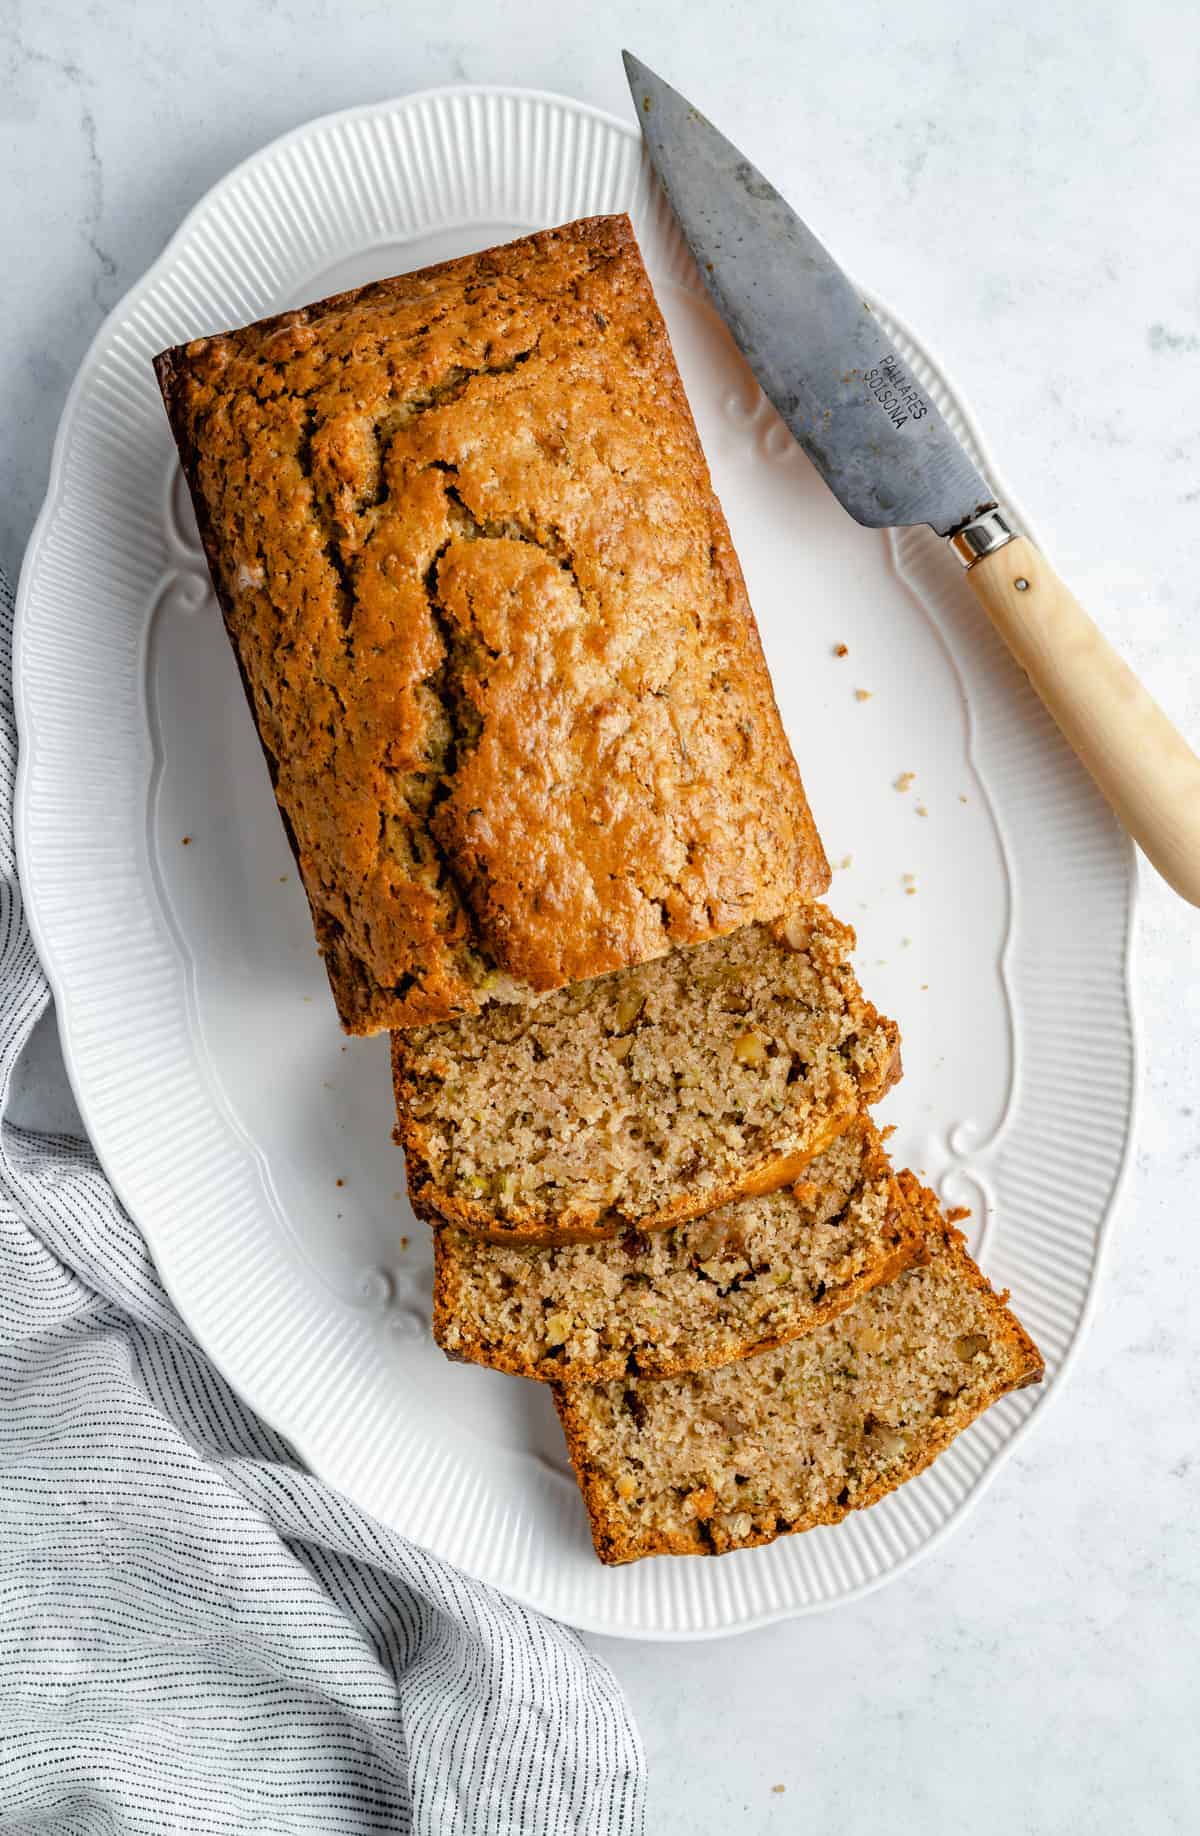
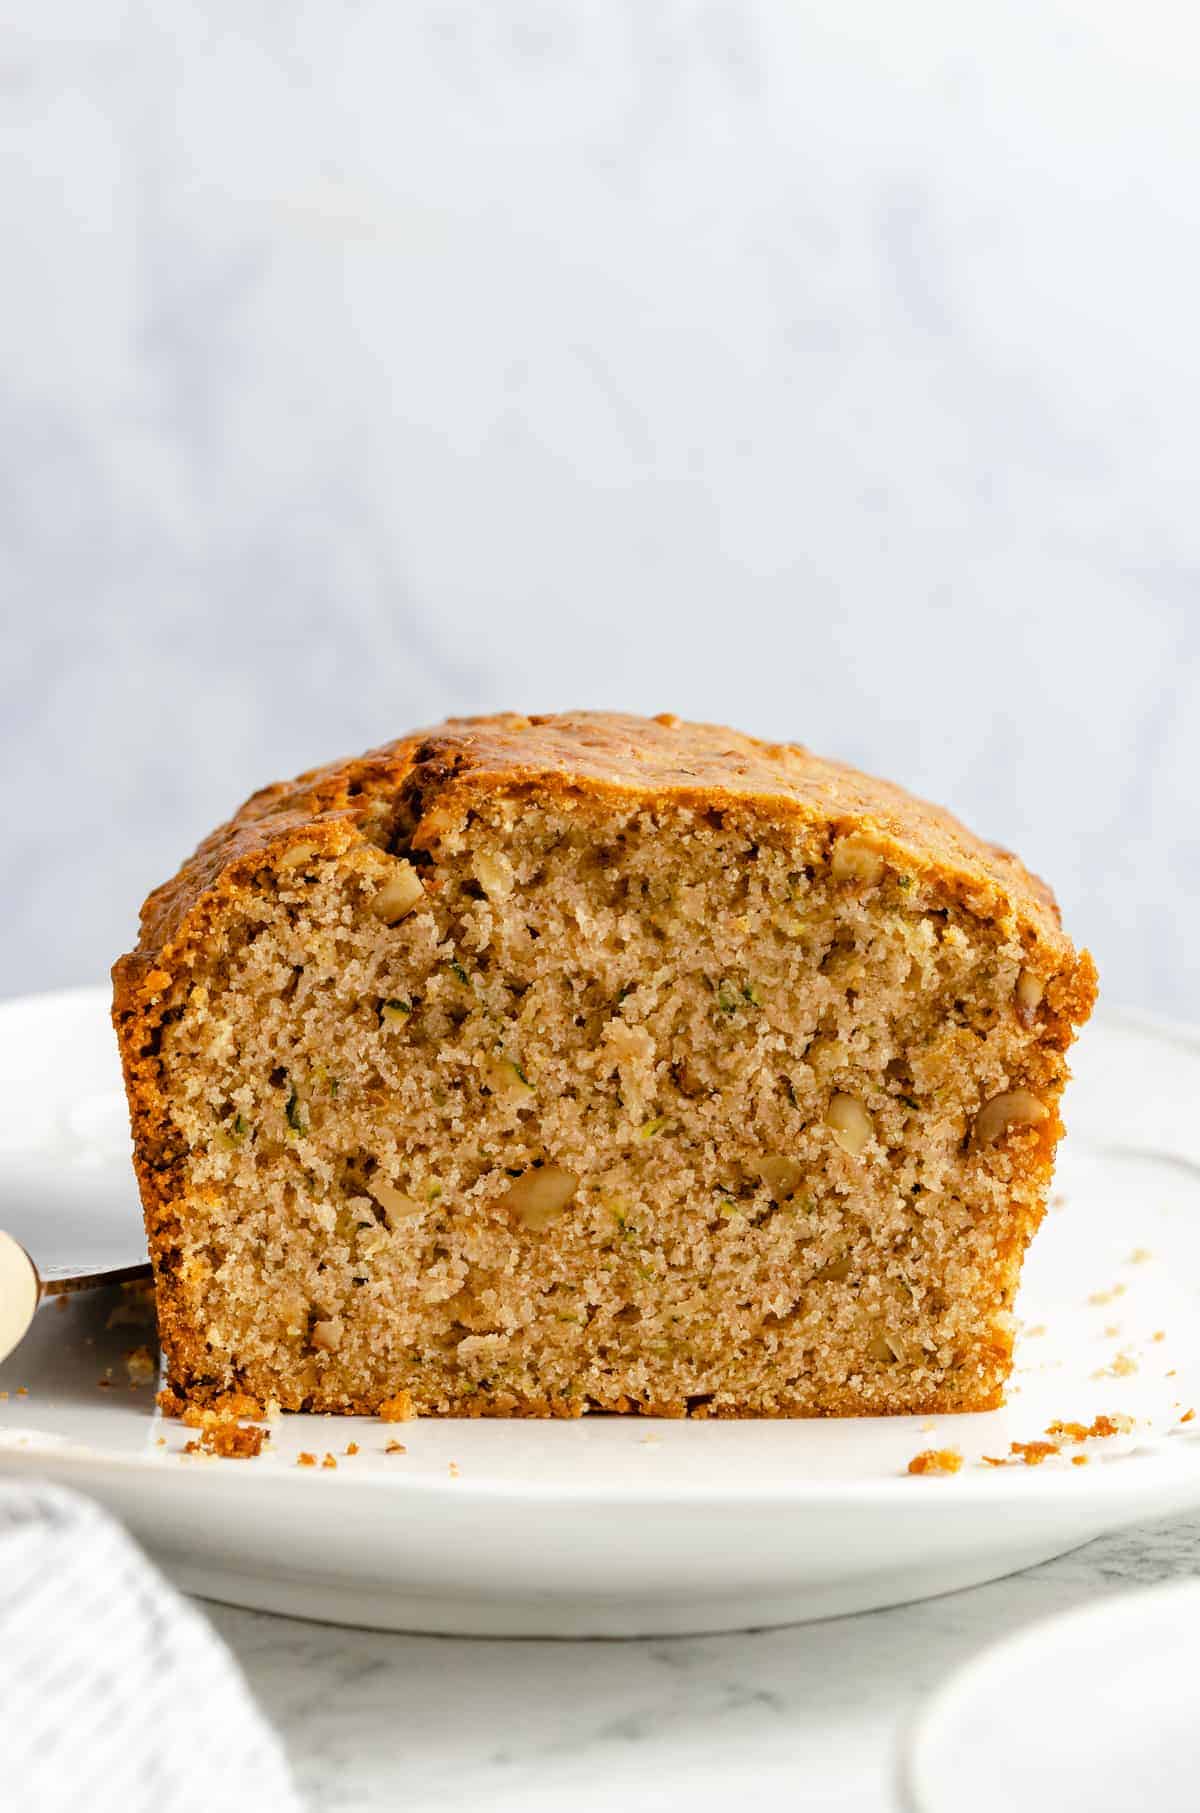
Vegan Zucchini Bread is filled with cinnamon, nutmeg, toasted walnuts, fresh grated zucchini, and even more deliciousness. You won’t believe how soft and spongy this homemade sweet bread is!
Zucchini makes pretty frequent appearances in my kitchen. It’s been grilled , stuffed into tacos , packed into lasagna , etc. My favorite thing to do with it, though, is bake. Muffins, cakes, cupcakes… you name it, I’ll try it. Recently, though, I’ve been making batch after batch of this Vegan Zucchini Bread!
Homemade zucchini bread is truly a blessing. It’s spongy and super moist on the interior (like a good slice of cake!), and baked to crisp, golden-brown perfection on the exterior. And, with the additions of cinnamon, ground nutmeg, and allspice, it’s flavorful without being overpowering or ultra-rich.
Making your own zucchini bread is a great way to use up a surplus of zucchini if you’ve got one. It’s also a great way to get picky eaters (we’re talking kids and adults, here) to gobble up some fresh veggies. So, quick recap: zucchini bread uses up fresh veggies, is cake-like in nature, and provides breakfast and snacks for the next couple of days. Sounds like a good deal to me!
What Makes this the Best Vegan Zucchini Bread?
‘Best’ is a pretty serious qualifier, so does this vegan zucchini bread recipe really live up to the hype? In a word, yes. It’s every bit as fluffy, sweet, and delicious as non-vegan zucchini recipes are. Here are some more words on the matter:
- So Fresh: This zucchini bread subs in applesauce for some of the oil, and uses freshly grated zucchini – from your garden if you have it! Don’t you love making treats that feel indulgent even if they’re really not?
- It’s Simple: Essentially all you have to do to prepare this bread is mix the ingredients together, and then pour them into the loaf pan to bake. So simple! It won’t take you more than 20 minutes to prep everything for the oven. Then all you have to do is wait… which is kind of tedious… but not too labor-intensive!
- You Can Add To It: You can throw in toasted walnuts (highly recommended!), chocolate chips, extra cinnamon, etc. Whatever you like! Make this recipe your own with add-ins. 🙂
Notes on Ingredients
Now that we’re all craving a slice of warm, tender zucchini bread, let’s go over all of the necessary ingredients! Here’s what you’ll need to round up:
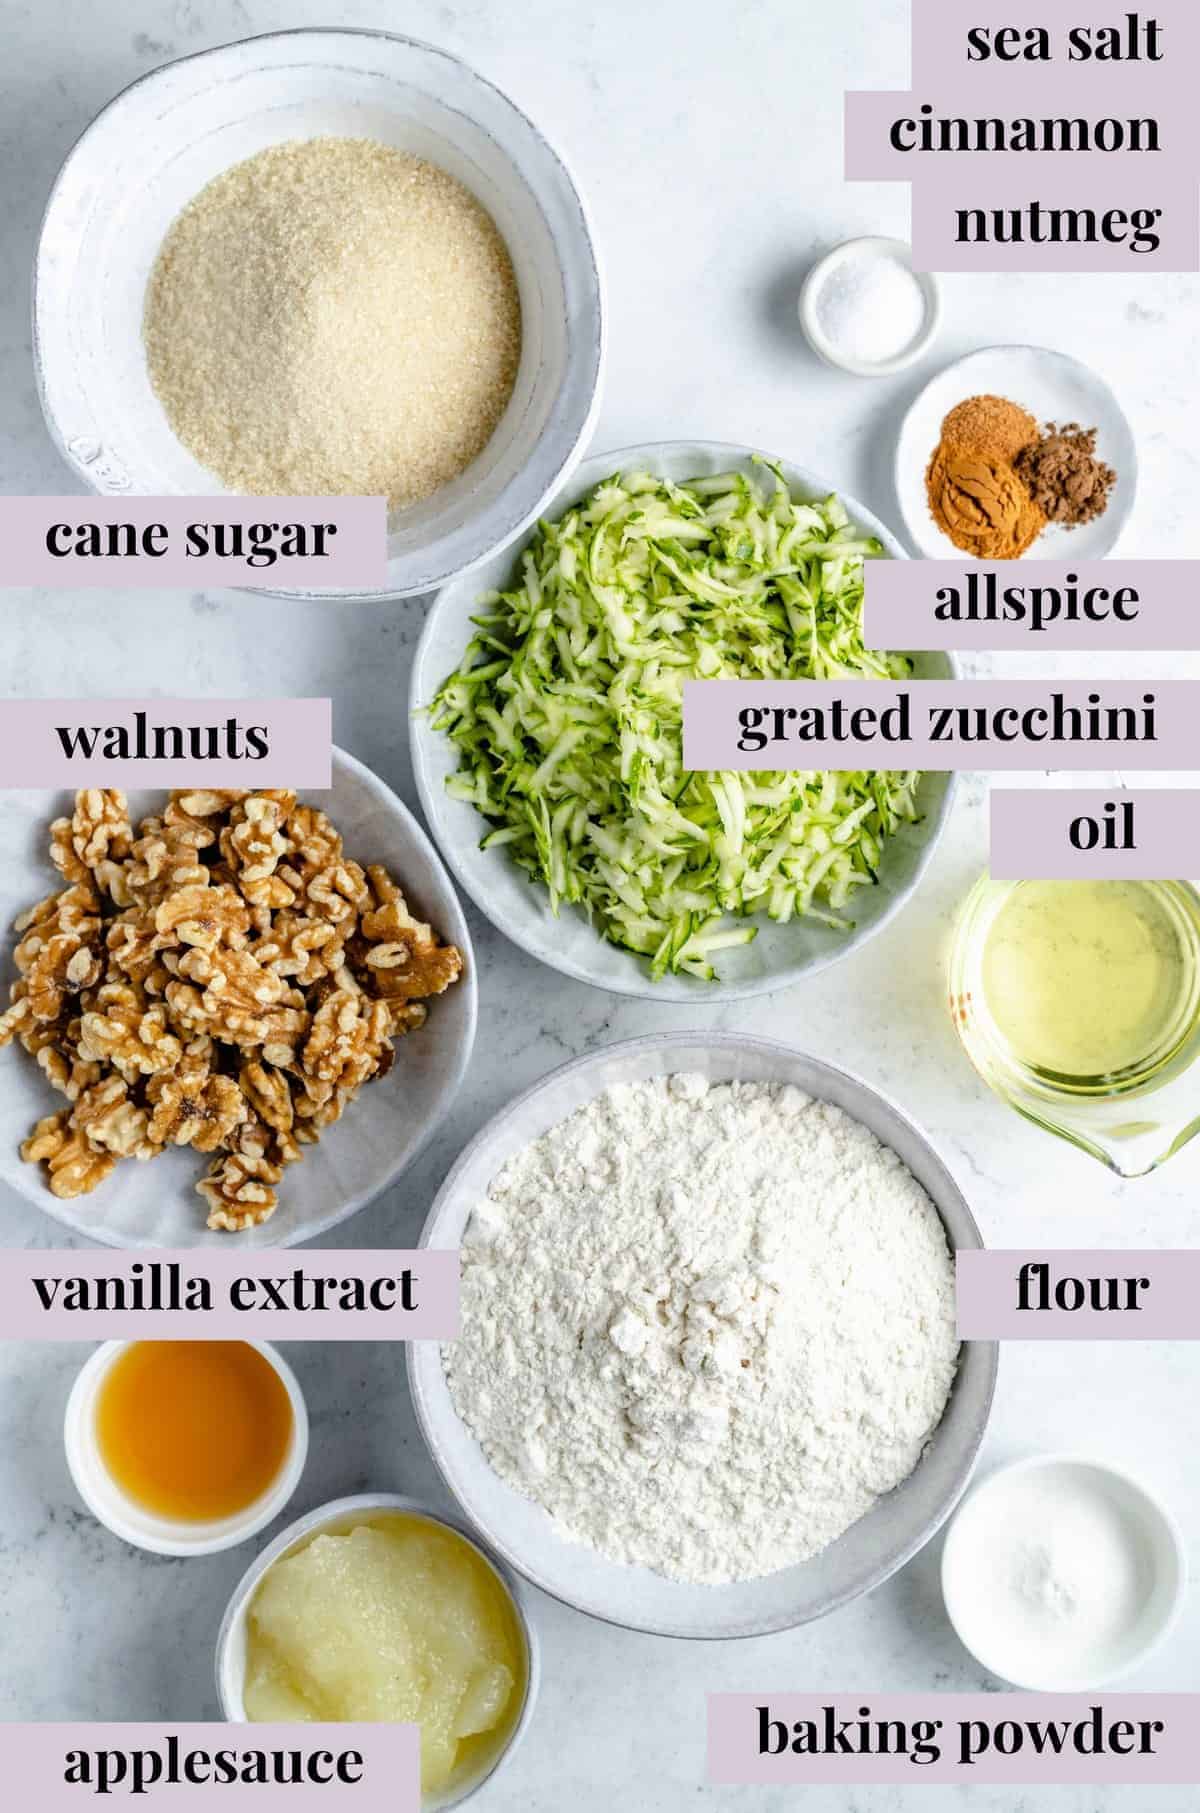
- Sugar: I like to use cane sugar, but you could substitute it with regular granulated sugar or brown sugar if need be.
- Oil: Use something like coconut oil. (If you do end up using coconut oil, make sure that it’s melted.) This adds the necessary moisture to the zucchini bread.
- Vanilla Extract: For extra sweet flavor! Vanilla paste also works.
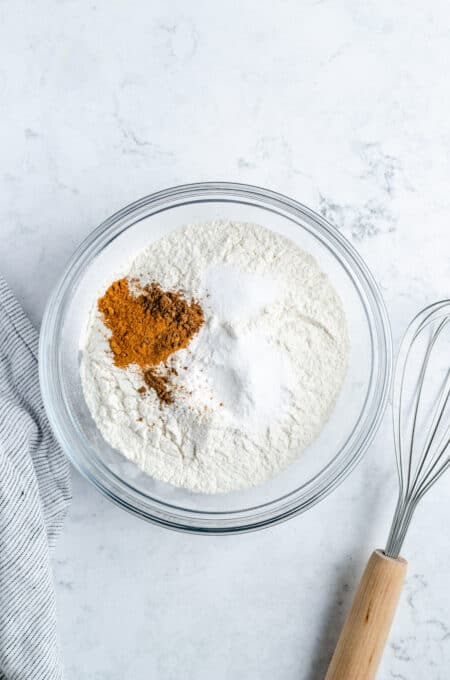
- Flour: I just used all-purpose flour, but you could try this recipe with gluten-free flour. Be sure to sift it first for the fluffiest loaf.
- Baking Powder: To ensure that your loaf will rise.
- Sea Salt: To balance out the flavours (be sure to use less if you’re using table salt)
- Spices: Today we’ll mix together cinnamon, ground nutmeg, and ground allspice which make this zucchini bread perfectly spiced.
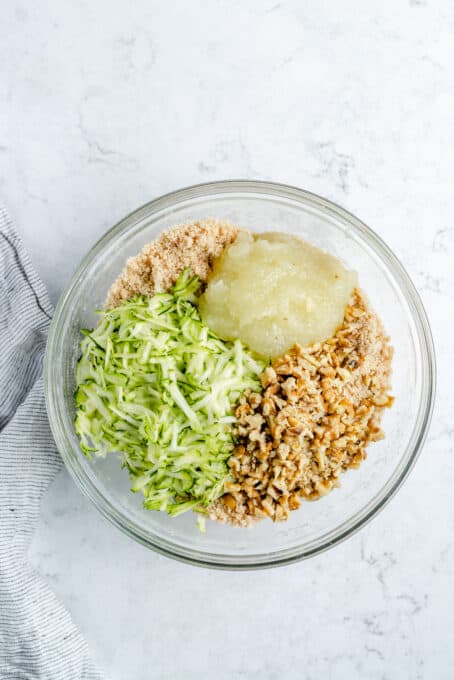
- Applesauce: This will help thicken/bind the batter together, adds sweetness and moisture.
- Walnuts: Chopped and toasted. These are optional, but I love the nutty flavour they add.
- Grated Zucchini: Make sure not to press or drain your zucchini! We are using all that water in the batter to get it to the right consistency.
How to Make Vegan Zucchini Bread
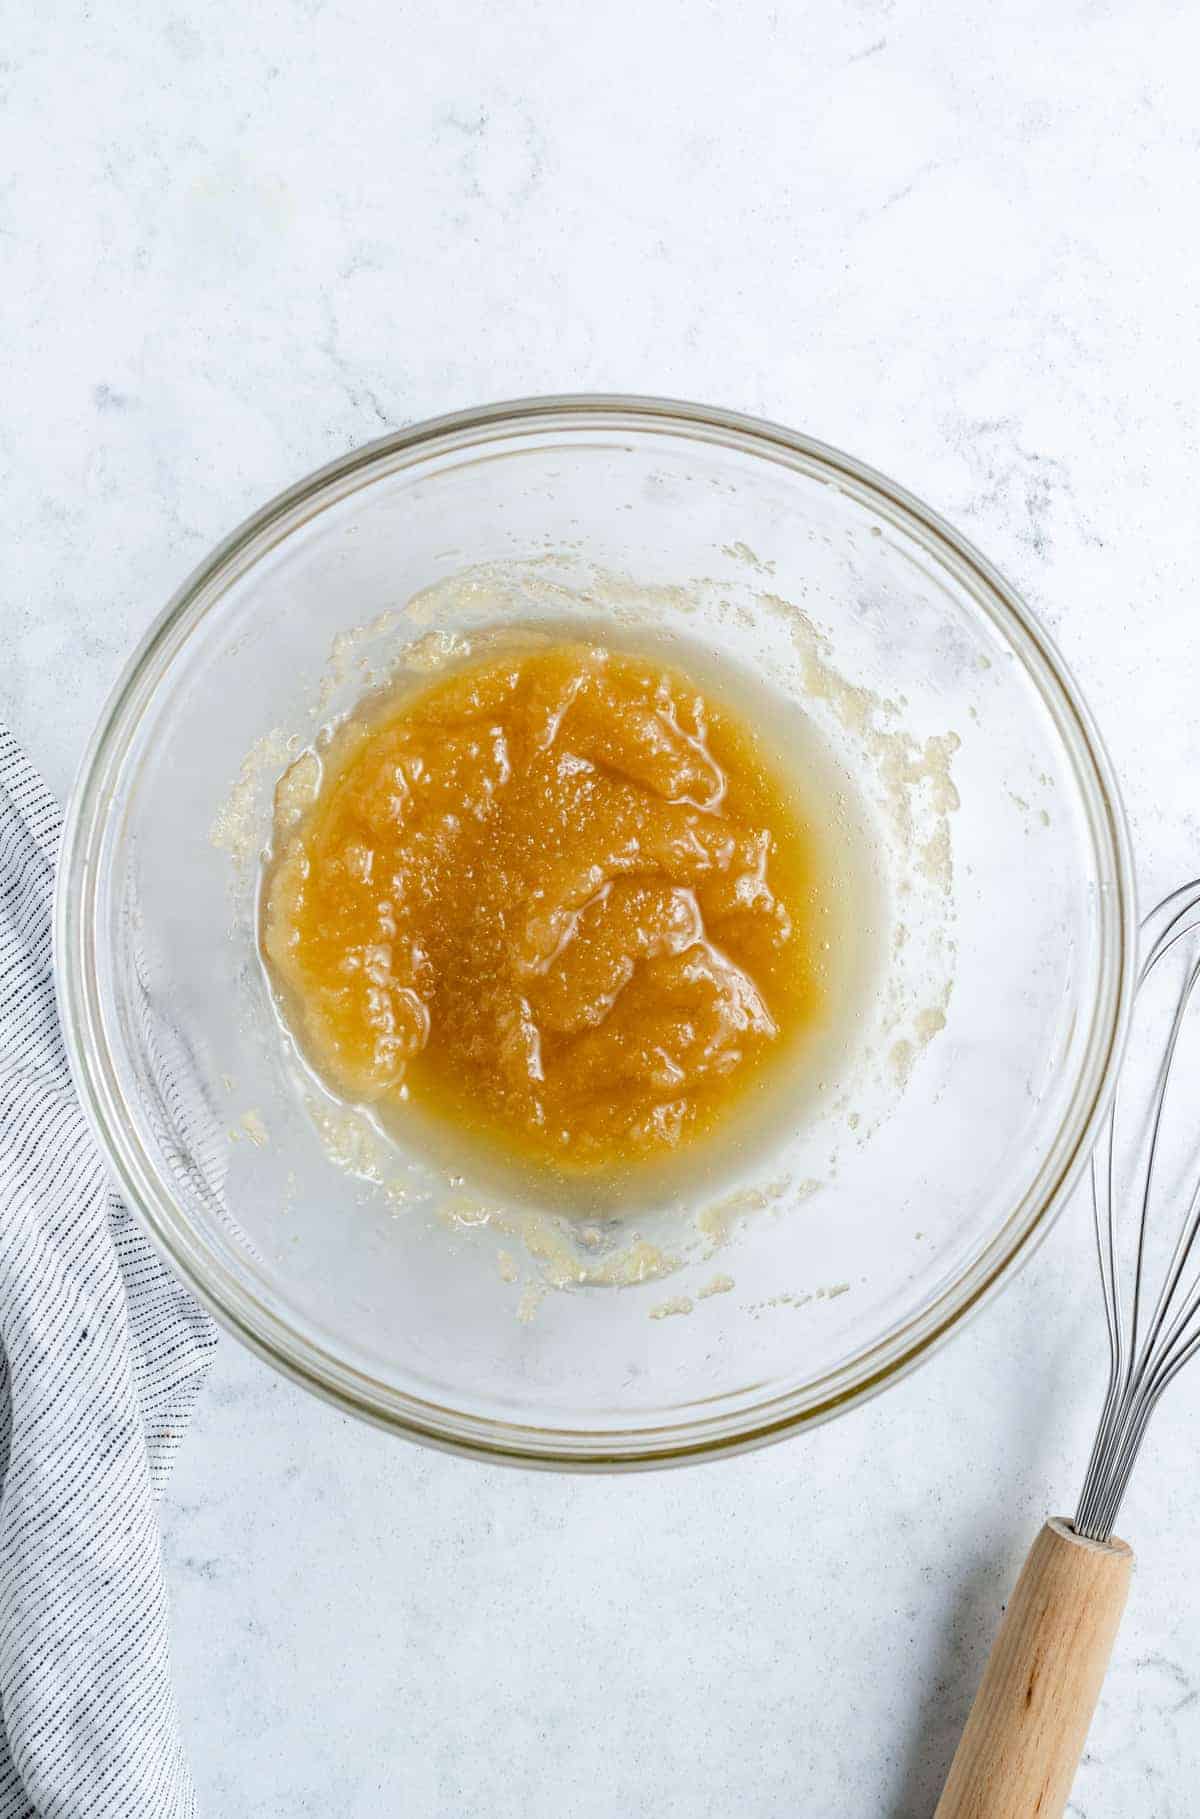
Preheat the Oven to 350°F/180°C: Spray a 9×5 loaf pan with an oil spray to prepare it. Set aside. Mix Sugar, Oil, & Vanilla: In a large mixing bowl or bowl of a stand mixer, add the sugar, oil and vanilla extract. Mix together with a whisk for about 2-3 minutes on low speed until fully incorporated. Scrape down the sides as needed.
Mix the Dry Ingredients: In a small bowl, stir together the flour, baking powder, sea salt, cinnamon, ground nutmeg, and ground allspice. Add into the wet ingredients for a minute on medium speed or with a whisk until just incorporated, typically less than a minute. The batter will be thick and dry (this is normal at this stage). Scrape down the sides again.
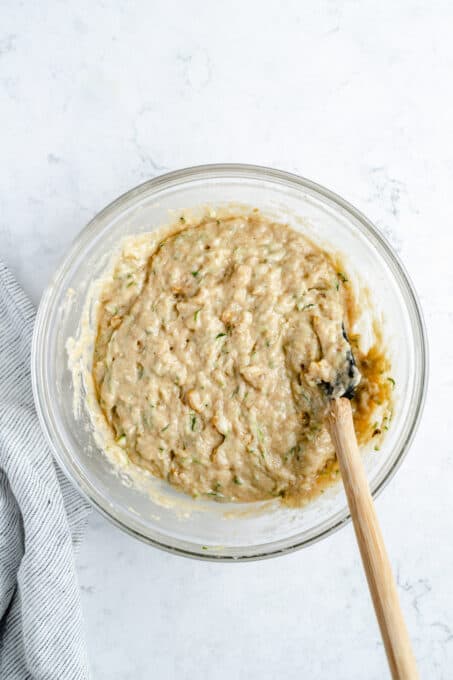
Add the Remaining Ingredients: Add in the applesauce, grated zucchini and the walnuts and mix until incorporated. Using a spatula is easiest. Let the batter rest for about 10 minutes until the zucchini releases some more liquid, then stir again. The batter will still be thick, but a lot more smooth now and more liquid-y.
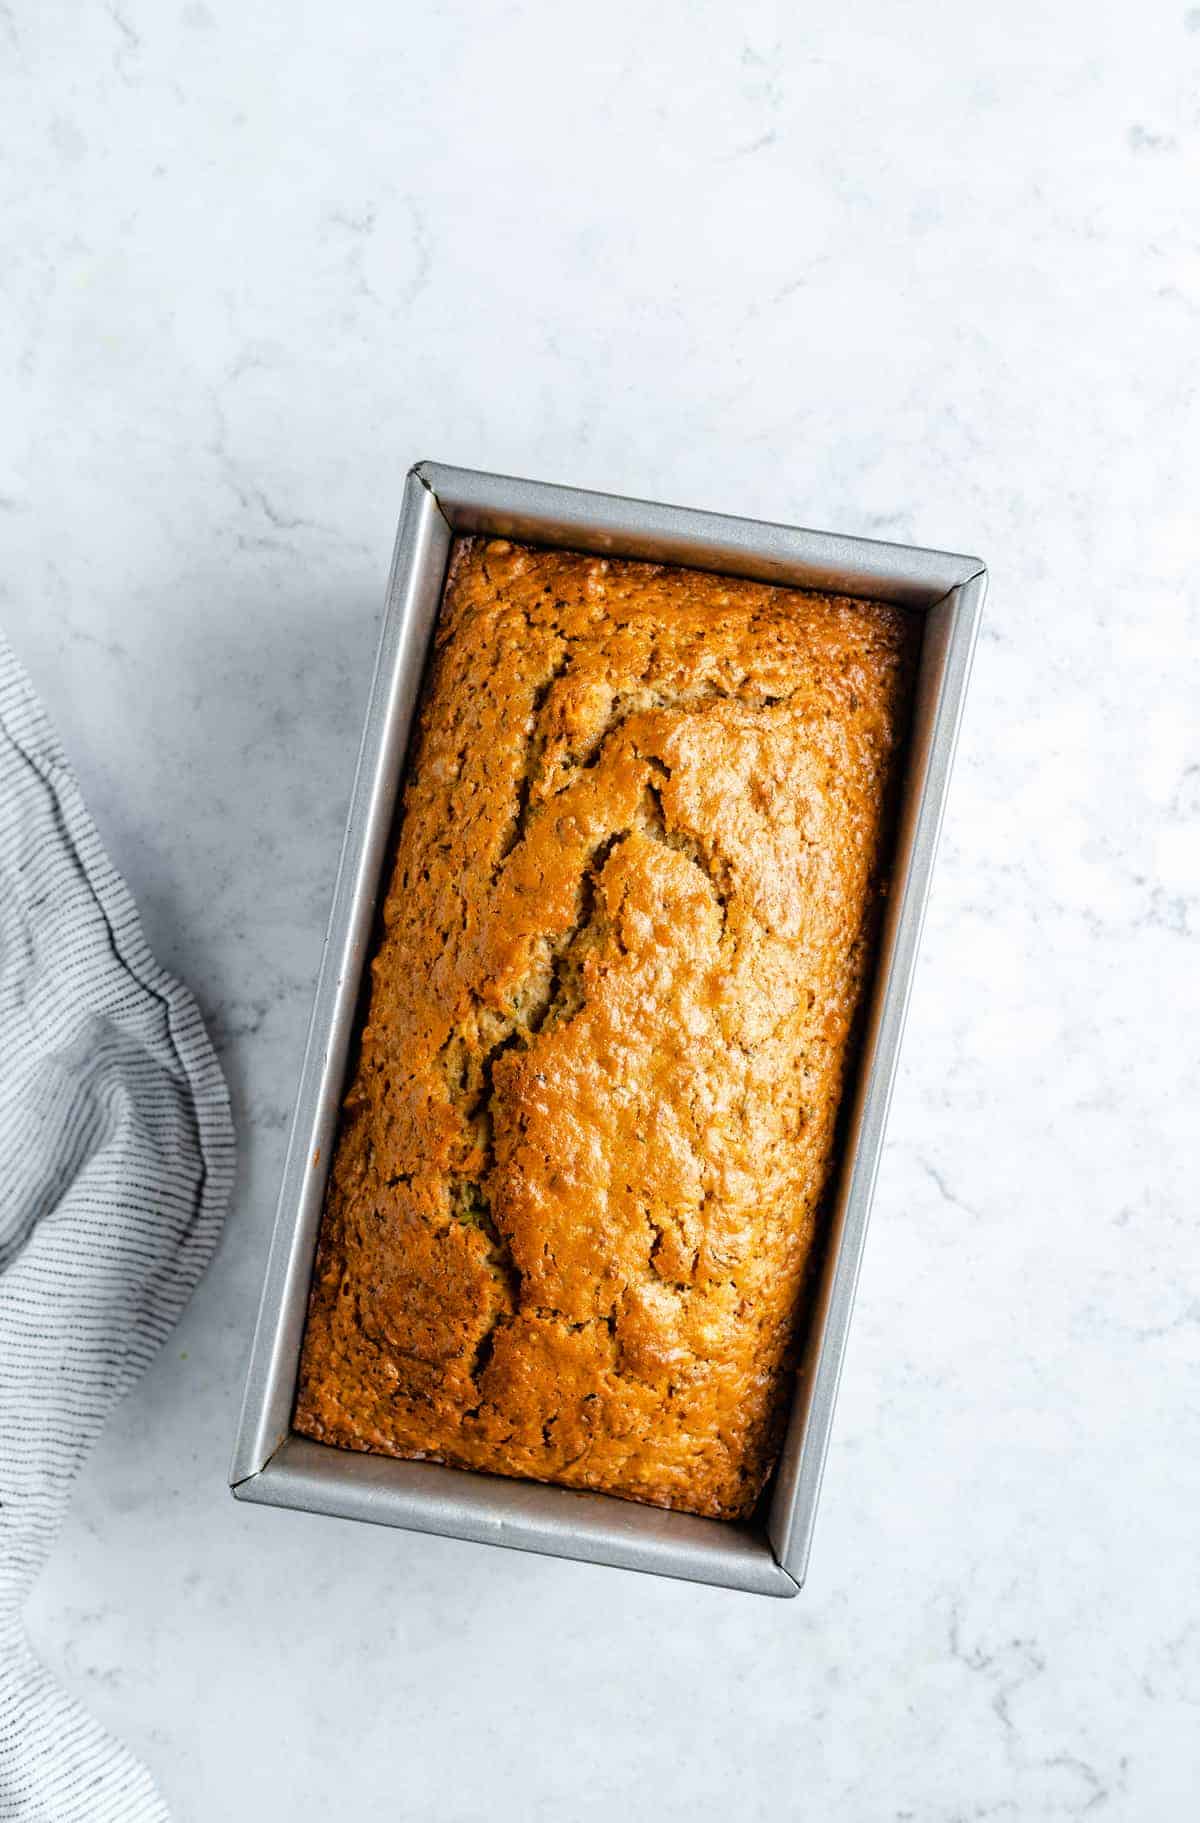
Let Cool: Remove from the oven and allow to cool for 10 minutes in the pan. Transfer the bread to a wire rack by placing the wire rack on top of the bread, then holding the sides of the pan and flipping it over and removing the pan. Hold the sides of the bread to turn right side up. You can also turn the pan over into your hand, and then flip right side up and place the bread on a wire rack. Allow the bread to cool completely. Slice as desired. Enjoy!
Tips for Success
- If You’re Toasting the Nuts: Do it first. Toast the nuts in a lightly oiled pan over medium high heat for about 2-4 minutes until fragrant. Spread them onto a baking sheet or cutting board to cool. You can chop them before or after toasting, it’s up to you.
- Don’t Skip that 10 minute resting time : The 10 minutes to let the zucchini release it’s liquids is crucial! Too soon and your batter won’t be the right texture. It’s totally okay if you go over though to like 20 minutes or so (I recommend just setting a quick timer).
- Don’t Press/Blot the Zucchini: You want the grated zucchini to keep that extra moisture because it will help make the batter smooth later on, hence the 10 minute resting period mentioned above.
- Do I Have to Peel the Zucchini? Nope! You can if you want, but you definitely don’t have to.
- Don’t Over-Mix the Batter: Just mix until everything is combined. Too much stirring can cause the bread to turn out tough and dense after it bakes.
- Let the Bread Cool in the Pan: If you try to remove the bread from the pan too soon, it will probably crumble or start to fall apart. Let it firm up for 10 minutes or so, then remove it and let it finish cooling on the cooling rack.
How to Store
You can store your zucchini bread for up to 3 days at room temperature when stored in an airtight container, or wrapped tightly in plastic wrap. It will keep for a couple more days if you refrigerate it the same way.
Can I Freeze Zucchini Bread?
You can definitely freeze this vegan zucchini bread once it has cooled. Place it in a tightly-sealed freezer bag or an airtight container, and eat within 2-3 months.
Ingredients
- 1 cup cane sugar , (200g)
- ½ cup oil , ( 100g) if using coconut oil, ensure it’s melted – I used sunflower oil
- 2 tsp vanilla extract , or paste
- 2 ¼ cups all-purpose flour , (280g) , sifted
- 2 tsp baking powder
- ¾ tsp sea salt
- 1 tsp cinnamon
- ¼ tsp ground nutmeg
- ¼ tsp ground allspice
- ½ cup applesauce
- 1 cup walnuts , chopped and toasted (toasting optional)* (112g)
- 1 cup grated zucchini , do not press or drain (about 162g)
Instructions
- Preheat the oven to 350°F/180°C. Spray a 9×5 loaf pan with an oil spray to prepare it. Set aside.
- In a large mixing bowl or bowl of a stand mixer, add the sugar, oil and vanilla extract. Mix together with a whisk for about 2-3 minutes on low speed until fully incorporated. Scrape down the sides as needed.
- In a small bowl, stir together the flour, baking powder, sea salt, cinnamon, ground nutmeg, and ground allspice. Add into the wet ingredients for a minute on medium speed or with a whisk until just incorporated, typically less than a minute. The batter will be thick and dry (this is normal at this stage). Scrape down the sides again.
- Add in the applesauce, grated zucchini and the walnuts and mix until incorporated. Using a spatula is easiest. Let the batter rest for about 10 minutes until the zucchini releases some more liquid, then stir again. The batter will still be thick, but a lot more smooth now and more liquid-y.
- Pour the batter into the loaf pan and use your spatula to smooth down the top.
- Bake the zucchini bread on the middle shelf of your oven for 60 minutes, until a toothpick comes out with a few crumbs.
- Remove from the oven and allow to cool for 10 minutes in the pan. Transfer the bread to a wire rack by placing the wire rack on top of the bread, then holding the sides of the pan and flipping it over and removing the pan. Hold the sides of the bread to turn right side up. You can also turn the pan over into your hand, and then flip right side up and place the bread on a wire rack.
- Allow the bread to cool completely. Slice as desired. Enjoy!
Notes
- If You’re Toasting the Nuts: Do it first. Toast the nuts in a lightly oiled pan over medium high heat for about 2-4 minutes until fragrant. Spread them onto a baking sheet or cutting board to cool. You can chop them before or after toasting, it’s up to you.
- Don’t Skip that 10 minute resting time : The 10 minutes to let the zucchini release it’s liquids is crucial! Too soon and your batter won’t be the right texture. It’s totally okay if you go over though to like 20 minutes or so (I recommend just setting a quick timer).
- Don’t Press/Blot the Zucchini: You want the grated zucchini to keep that extra moisture because it will help make the batter smooth later on, hence the 10 minute resting period mentioned above.
- Do I Have to Peel the Zucchini? Nope! You can if you want, but you definitely don’t have to.
- Don’t Over-Mix the Batter: Just mix until everything is combined. Too much stirring can cause the bread to turn out tough and dense after it bakes.
- Let the Bread Cool in the Pan: If you try to remove the bread from the pan too soon, it will probably crumble or start to fall apart. Let it firm up for 10 minutes or so, then remove it and let it finish cooling on the cooling rack.
More Vegan Baking Ideas
On the lookout for more easy vegan baking recipes? Try out these ones!
- Vegan Chocolate Cake
- Oatmeal Chocolate Chip Cookies
- Vegan Scones
- Pecan Banana Bread
- Vegan Chocolate Frosting
