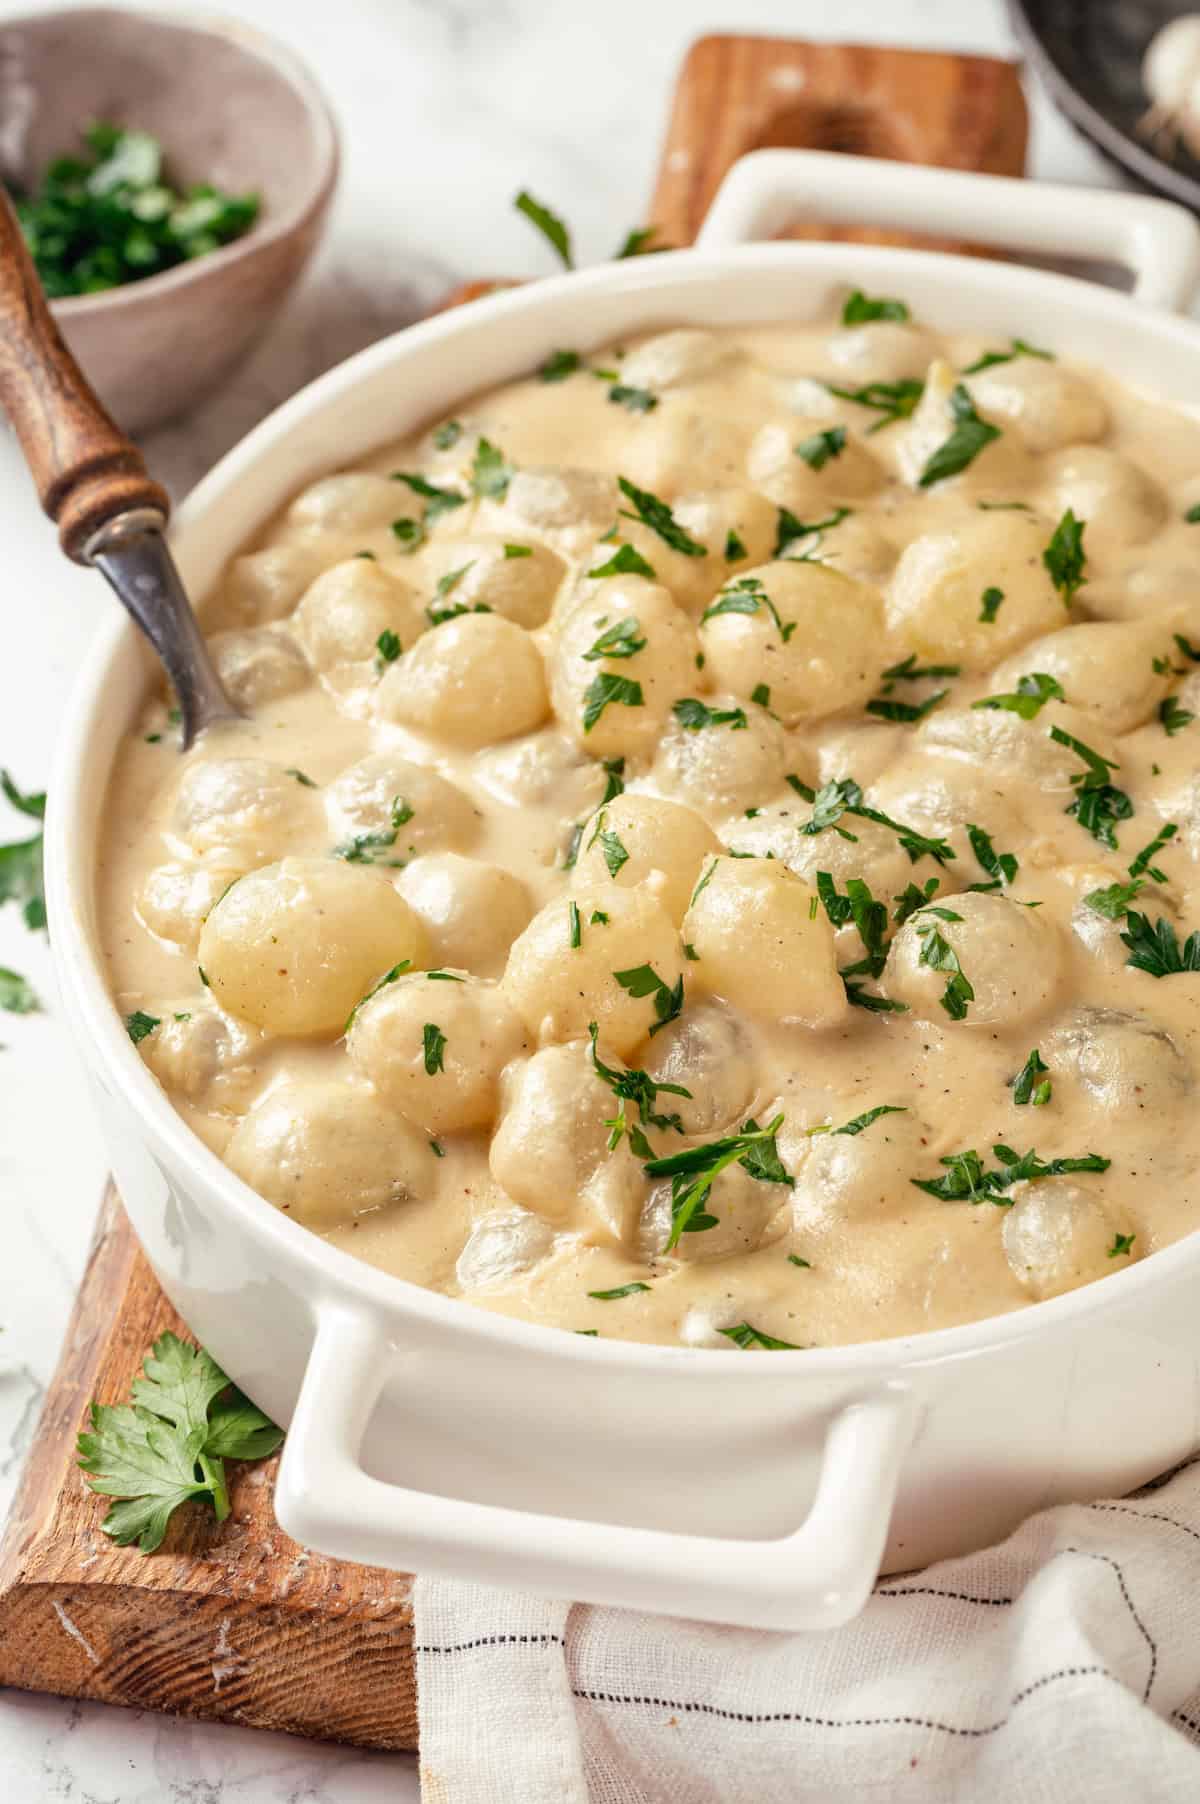
These vegan creamed onions are sweet, savoury, and rich. A cashew-based sauce replaces the dairy with delicious results!

Creamed onions are a classic side dish that often pops up around the holidays . While it might not be as common as green bean casserole and mashed potatoes , it’s a tradition for many families, so I wanted to give this traditional recipe the vegan treatment.
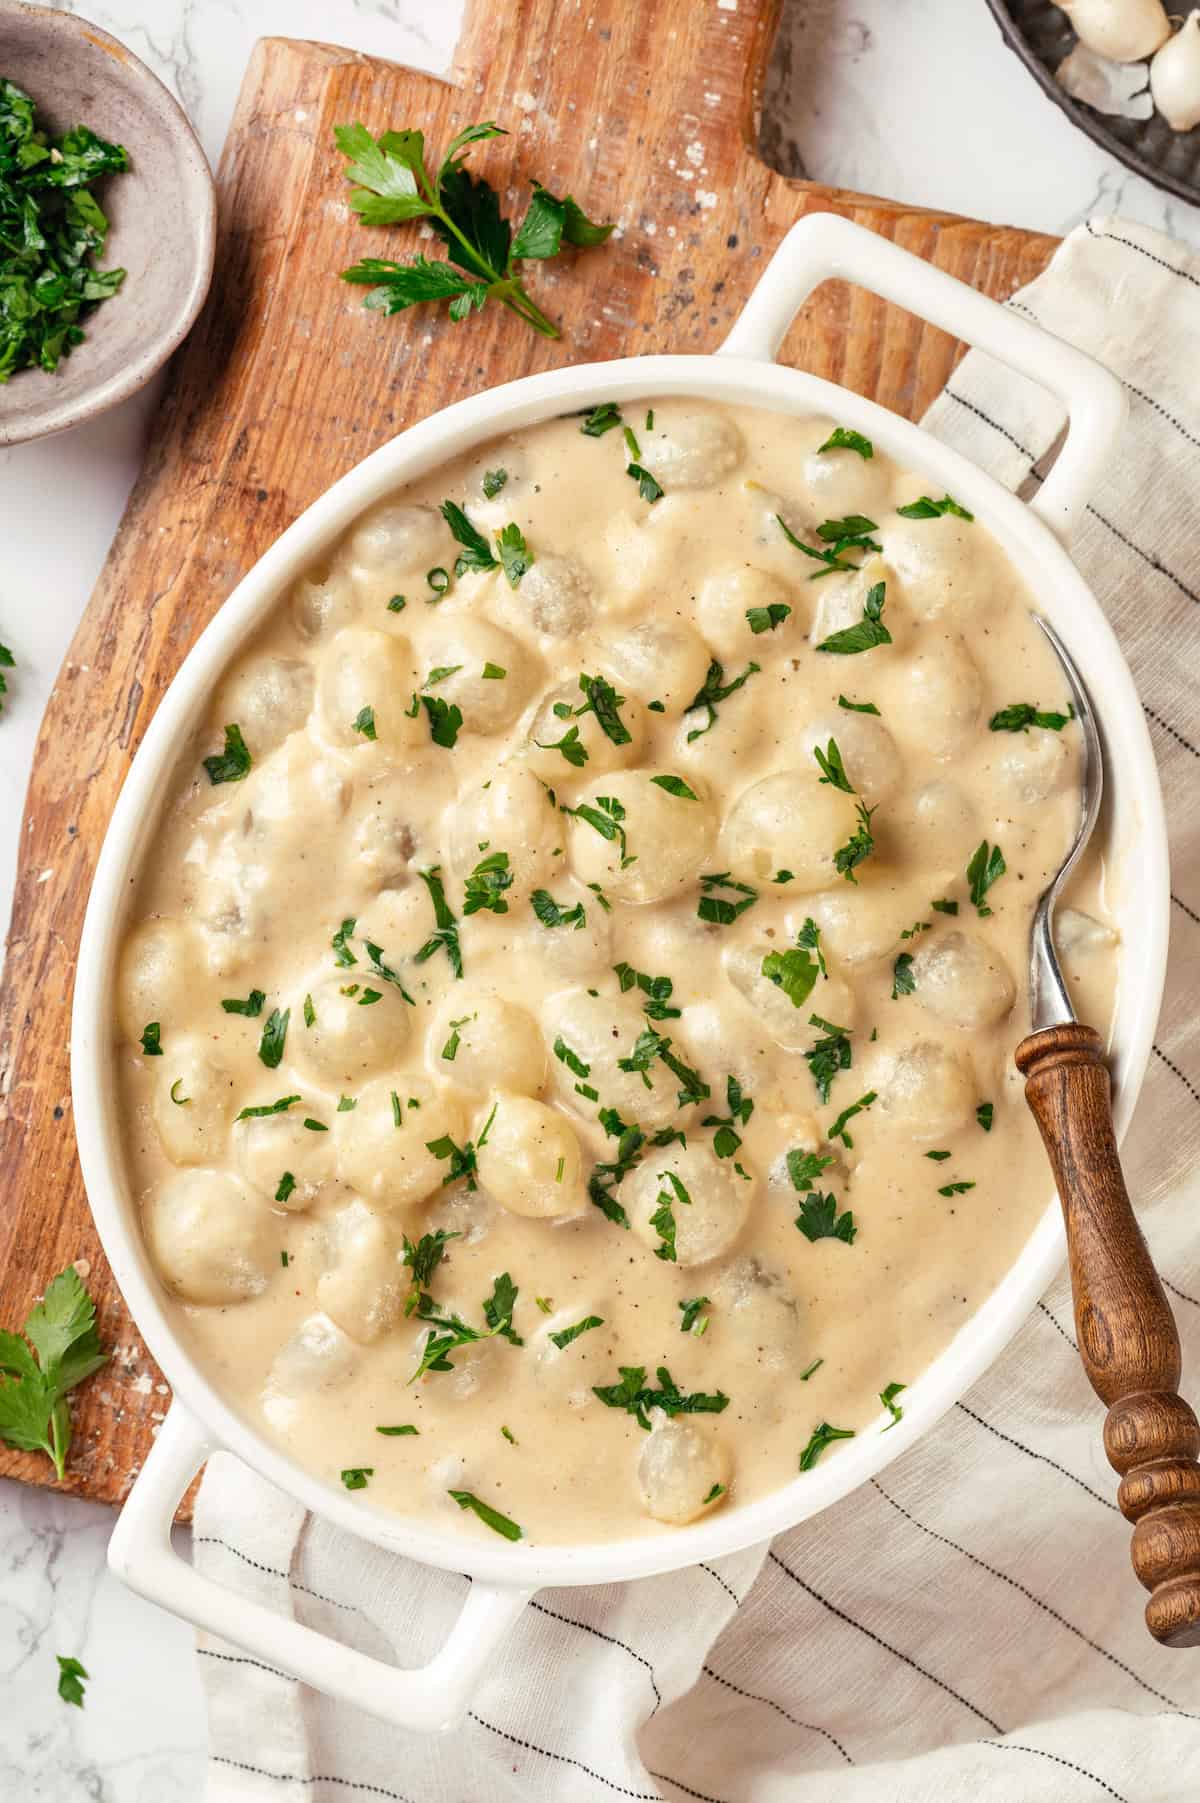
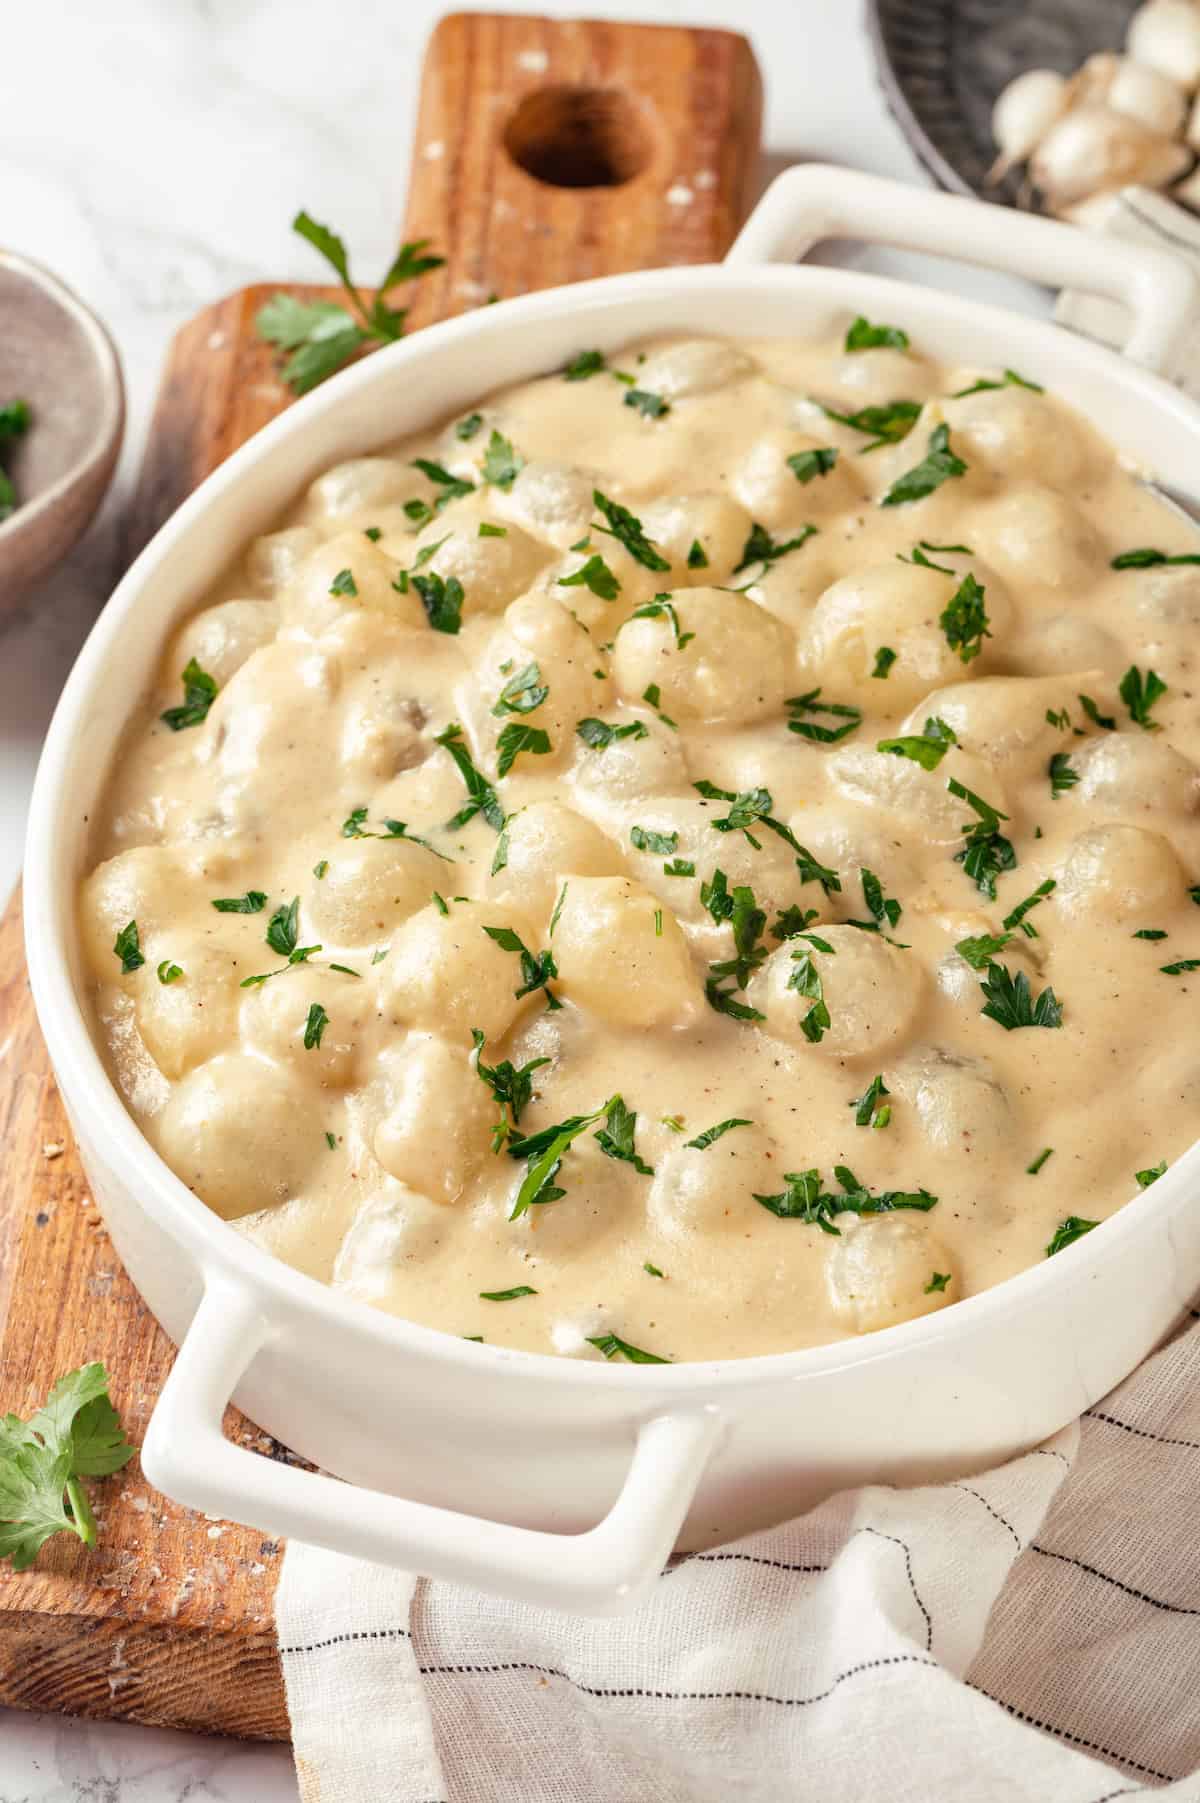
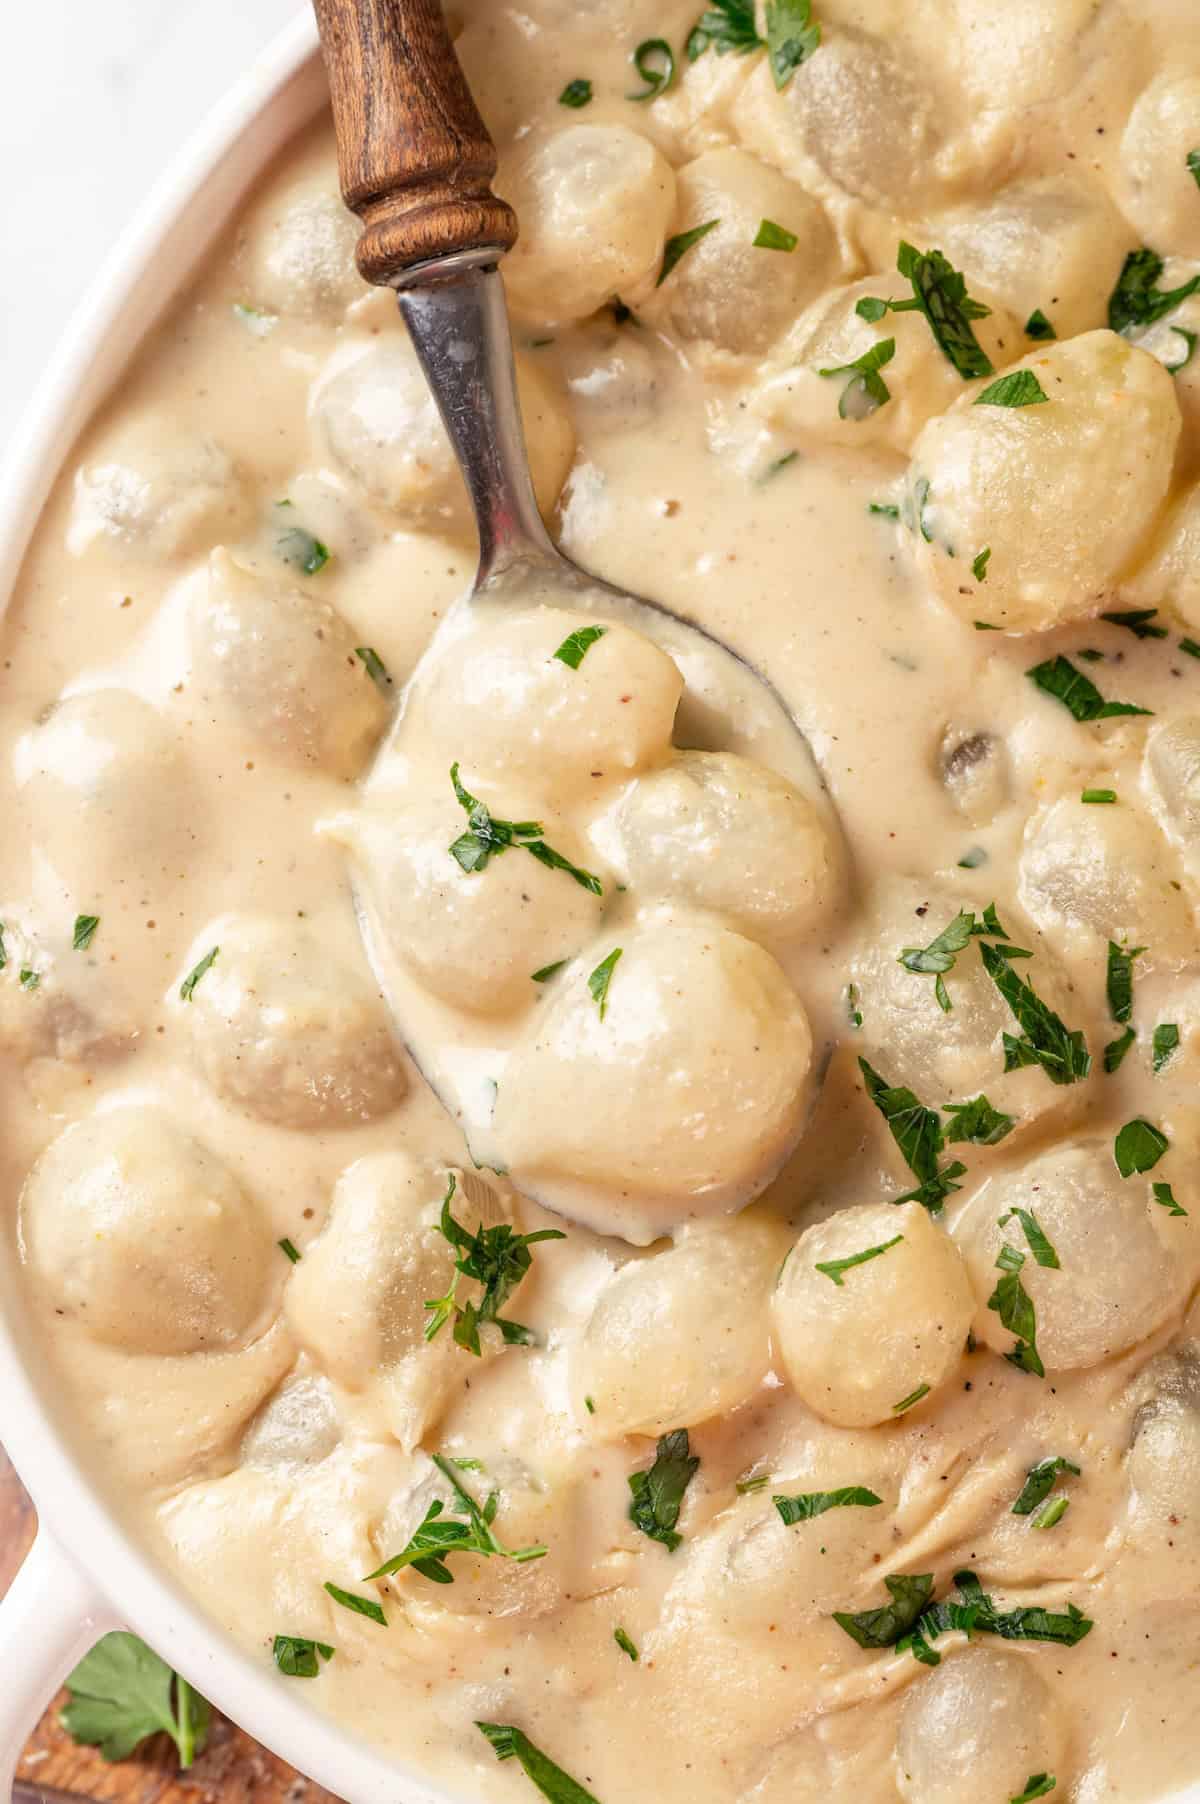
Here, instead of cooking pearl onions in cream and butter, I use a roux and cashew cream. Using all cashew cream would make the sauce a little too rich, but combining it with a roux for thickness without heaviness is perfection. These vegan creamed pearl onions are the perfect easy side dish to add to your Thanksgiving dinner!
Why You’ll Love This Creamed Onions Recipe
- Rich flavour . Creamed onions have that perfect balance of sweet and savoury, plus richness from the creamy sauce.
- Versatile . You can use creamed onions as a side dish, or spoon them over another savoury dish as a sauce. (I think they’d be excellent with vegan meatloaf .)
- Easy to make . This is a stovetop recipe that comes together with minimal effort, but it looks (and tastes!) fancy, which is why I love it as an option for the holidays.
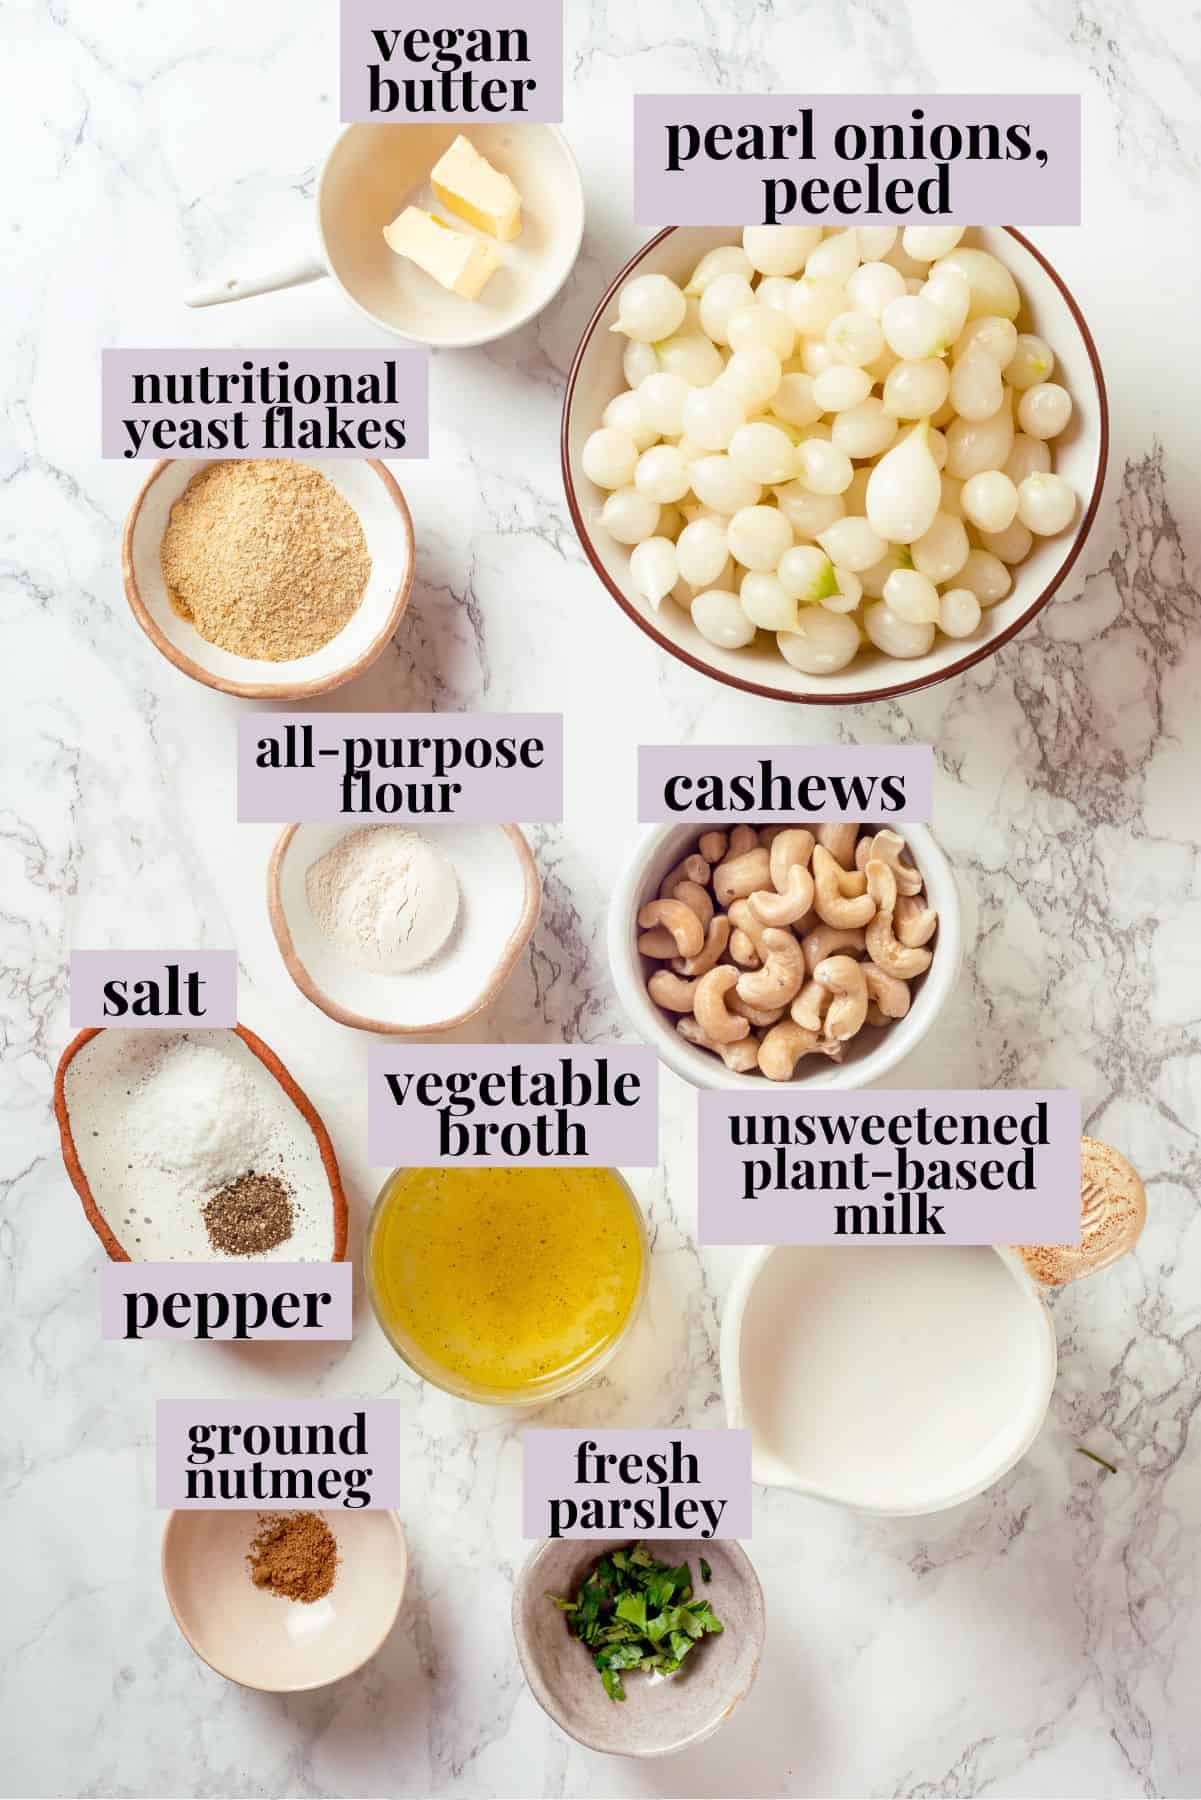
Notes on Ingredients
Scroll down to the recipe card to find the ingredient quantities and recipe instructions.
- Cashews – You’ll need to soak these in water to get them to blend smoothly into the sauce. Use raw cashews, not roasted.
- Plant-based milk – Any kind you like, as long as it’s unflavoured and unsweetened.
- Vegetable broth – I like to use my homemade vegetable broth .
- Nutritional yeast flakes – This adds cheesy flavour to the sauce.
- Pearl onions – You can usually find these in bags near the regular onions, but not all grocery stores carry them. In that case, thawed frozen pearl onions can be swapped in and you can skip boiling them.
- Vegan butter – Use my homemade vegan butter or store-bought.
- All-purpose flour – To thicken the roux. Although I haven’t tried it myself, I think a measure-for-measure gluten-free flour would work as well.
- Seasonings – Ground nutmeg, salt, and pepper.
- Fresh parsley – For garnish, if desired.
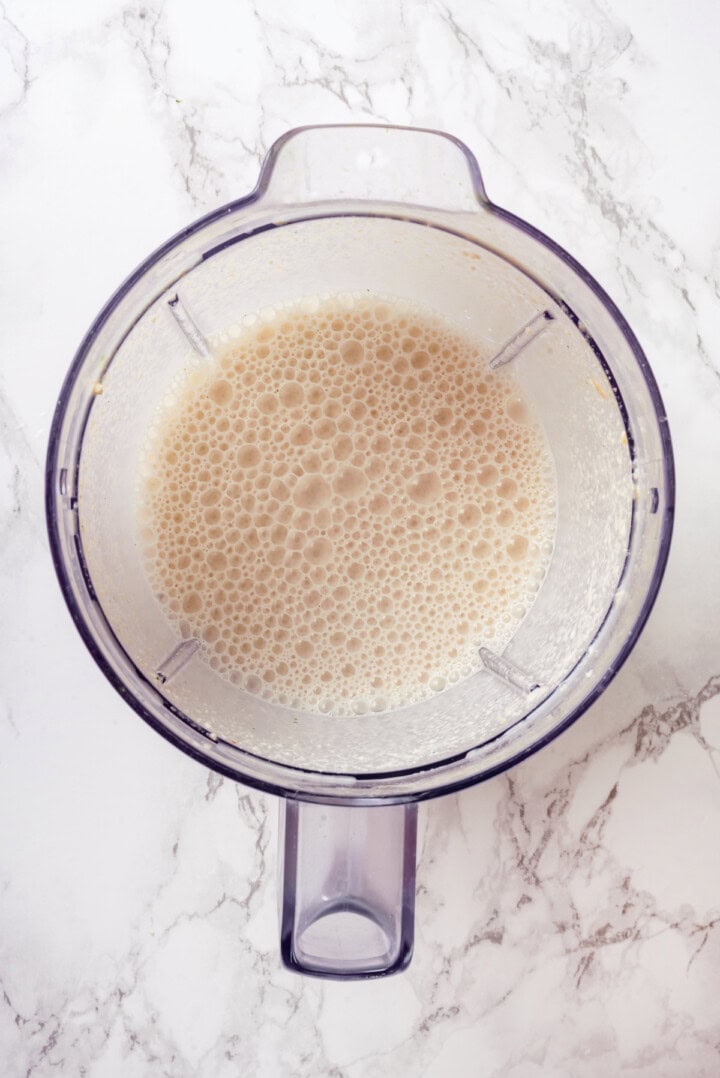
Blend cashews and milk.
How to Make Creamed Onions
- Make the cashew cream . Drain the cashews and blend them with the plant milk, broth, and yeast .
- Boil the onions . Add the onions to a pot of boiling water and cook for 5 minutes, then drain.
- Make the roux . Melt the vegan butter in a skillet set over medium heat. Stir in the flour and cook until it’s golden.
- Finish the sauce . Slowly whisk in the cashew cream and keep whisking until the sauce thickens. Whisk in the seasonings.
- Add the onions . Stir in the onions and simmer for 5 minutes. Season to taste.
- Serve . Transfer the creamed onions to a serving dish and garnish with parsley, if desired.
Tips and Variations
- Blanch the onions first . Pearl onions can be a pain to peel since they’re so small. I recommend blanching the onions by boiling them for a minute, then transferring them to an ice bath. This will make them easier to peel.
- Add other herbs . Thyme, rosemary, and sage all pair well with creamed onions. You can add them instead of parsley as garnish, or stir them into the sauce before adding the onions.
- Top the onions . If you’d like, you can transfer the creamed onions to a baking dish and top them with shredded vegan Parmesan or a mixture of panko and melted vegan butter. Place the dish under the broiler to melt the cheese or toast the breadcrumbs.
What to Serve With Creamed Onions
Pair your creamed onions with a hearty vegan main dish like Vegan Wellington or Vegan Turkey . As part of a holiday dinner, I love serving them alongside other classic sides like Cranberry Orange Sauce , Vegan Garlic Parmesan Dinner Rolls , and Mashed Sweet Potatoes .
How to Store
- Refrigerator : Leftover creamed onions can be stored in an airtight container in the refrigerator for 3 to 4 days.
- Freezer : Transfer to a freezer-safe container and freeze for up to 3 months. Thaw in the refrigerator overnight before reheating.
- Reheat: Place the creamed onions in a saucepan and warm over medium-low heat until warmed through, stirring occasionally. Alternatively, you can reheat them in the microwave.
More Vegan Side Dishes
- Corn Casserole
- Sweet Potato Soufflé
- Air Fryer Green Beans
- Crispy Smashed Potatoes
- Lemon Garlic Grilled Zucchini
Ingredients
- ½ cup raw cashews , soaked overnight or for 30 min in hot water, 65 g
- 1 cup unsweetened plant-based milk , 220 ml
- ½ cup vegetable broth , 110 ml
- 2 tablespoons nutritional yeast flakes
- 1 ½ pounds pearl onions with peels removed , 700 g
- 2 tablespoons vegan butter
- 1 tablespoon all-purpose flour
- ⅛ teaspoon ground nutmeg
- salt and pepper , to taste
- fresh parsley , chopped, for garnish
Instructions
- Drain the soaked cashews and place them in a blender with plant-based milk, vegetable broth, and nutritional yeast.
- Blend until completely smooth. Set aside.
- Bring a large pot of water to a boil. Add the peeled pearl onions and boil for 5 minutes, until slightly tender. Drain and set aside.
- In a large skillet, melt the vegan butter over medium heat.
- Stir in the flour to make a roux, and cook for another 1-2 minutes, stirring constantly, until the flour is lightly golden.
- Gradually whisk in the cashew cream, ensuring there are no lumps. Continue to whisk until first bubbles appear and the sauce begins to thicken.
- Stir in the nutmeg, salt, and pepper to taste.
- Add the cooked onions to the sauce and stir to coat them evenly. Allow the onions to simmer in the sauce for 5 minutes, so they absorb some of the flavor. If the sauce thickens too much, add a bit more vegetable broth.
- Taste and adjust seasoning if needed.
- Transfer to a serving dish. Garnish with fresh parsley, if desired.
Notes
- Bring a pot of water to a boil. Carefully add the pearl onions to the boiling water. Let them boil for about 1 minute. This will loosen their skins.
- While the onions are boiling, prepare a bowl of ice water. After 1 minute, remove the onions from the boiling water using a slotted spoon and immediately transfer them to the ice water. This will stop the cooking process and make them easier to handle.
- Once the onions are cool enough to handle, use a small knife to cut off the root end and peel the skin off.

Creamed Onions
Ingredients
- ½ cup raw cashews soaked overnight or for 30 min in hot water, 65 g
- 1 cup unsweetened plant-based milk 220 ml
- ½ cup vegetable broth 110 ml
- 2 tablespoons nutritional yeast flakes
- 1 ½ pounds pearl onions with peels removed 700 g
- 2 tablespoons vegan butter
- 1 tablespoon all-purpose flour
- ⅛ teaspoon ground nutmeg
- salt and pepper to taste
- fresh parsley chopped, for garnish
Instructions
- Drain the soaked cashews and place them in a blender with plant-based milk, vegetable broth, and nutritional yeast.
- Blend until completely smooth. Set aside.
- Bring a large pot of water to a boil. Add the peeled pearl onions and boil for 5 minutes, until slightly tender. Drain and set aside.
- In a large skillet, melt the vegan butter over medium heat.
- Stir in the flour to make a roux, and cook for another 1-2 minutes, stirring constantly, until the flour is lightly golden.
- Gradually whisk in the cashew cream, ensuring there are no lumps. Continue to whisk until first bubbles appear and the sauce begins to thicken.
- Stir in the nutmeg, salt, and pepper to taste.
- Add the cooked onions to the sauce and stir to coat them evenly. Allow the onions to simmer in the sauce for 5 minutes, so they absorb some of the flavor. If the sauce thickens too much, add a bit more vegetable broth.
- Taste and adjust seasoning if needed.
- Transfer to a serving dish. Garnish with fresh parsley, if desired.
Notes
- Bring a pot of water to a boil. Carefully add the pearl onions to the boiling water. Let them boil for about 1 minute. This will loosen their skins.
- While the onions are boiling, prepare a bowl of ice water. After 1 minute, remove the onions from the boiling water using a slotted spoon and immediately transfer them to the ice water. This will stop the cooking process and make them easier to handle.
- Once the onions are cool enough to handle, use a small knife to cut off the root end and peel the skin off.
Nutrition
Creamed Onions https://jessicainthekitchen.com/creamed-onions/ November 4, 2024
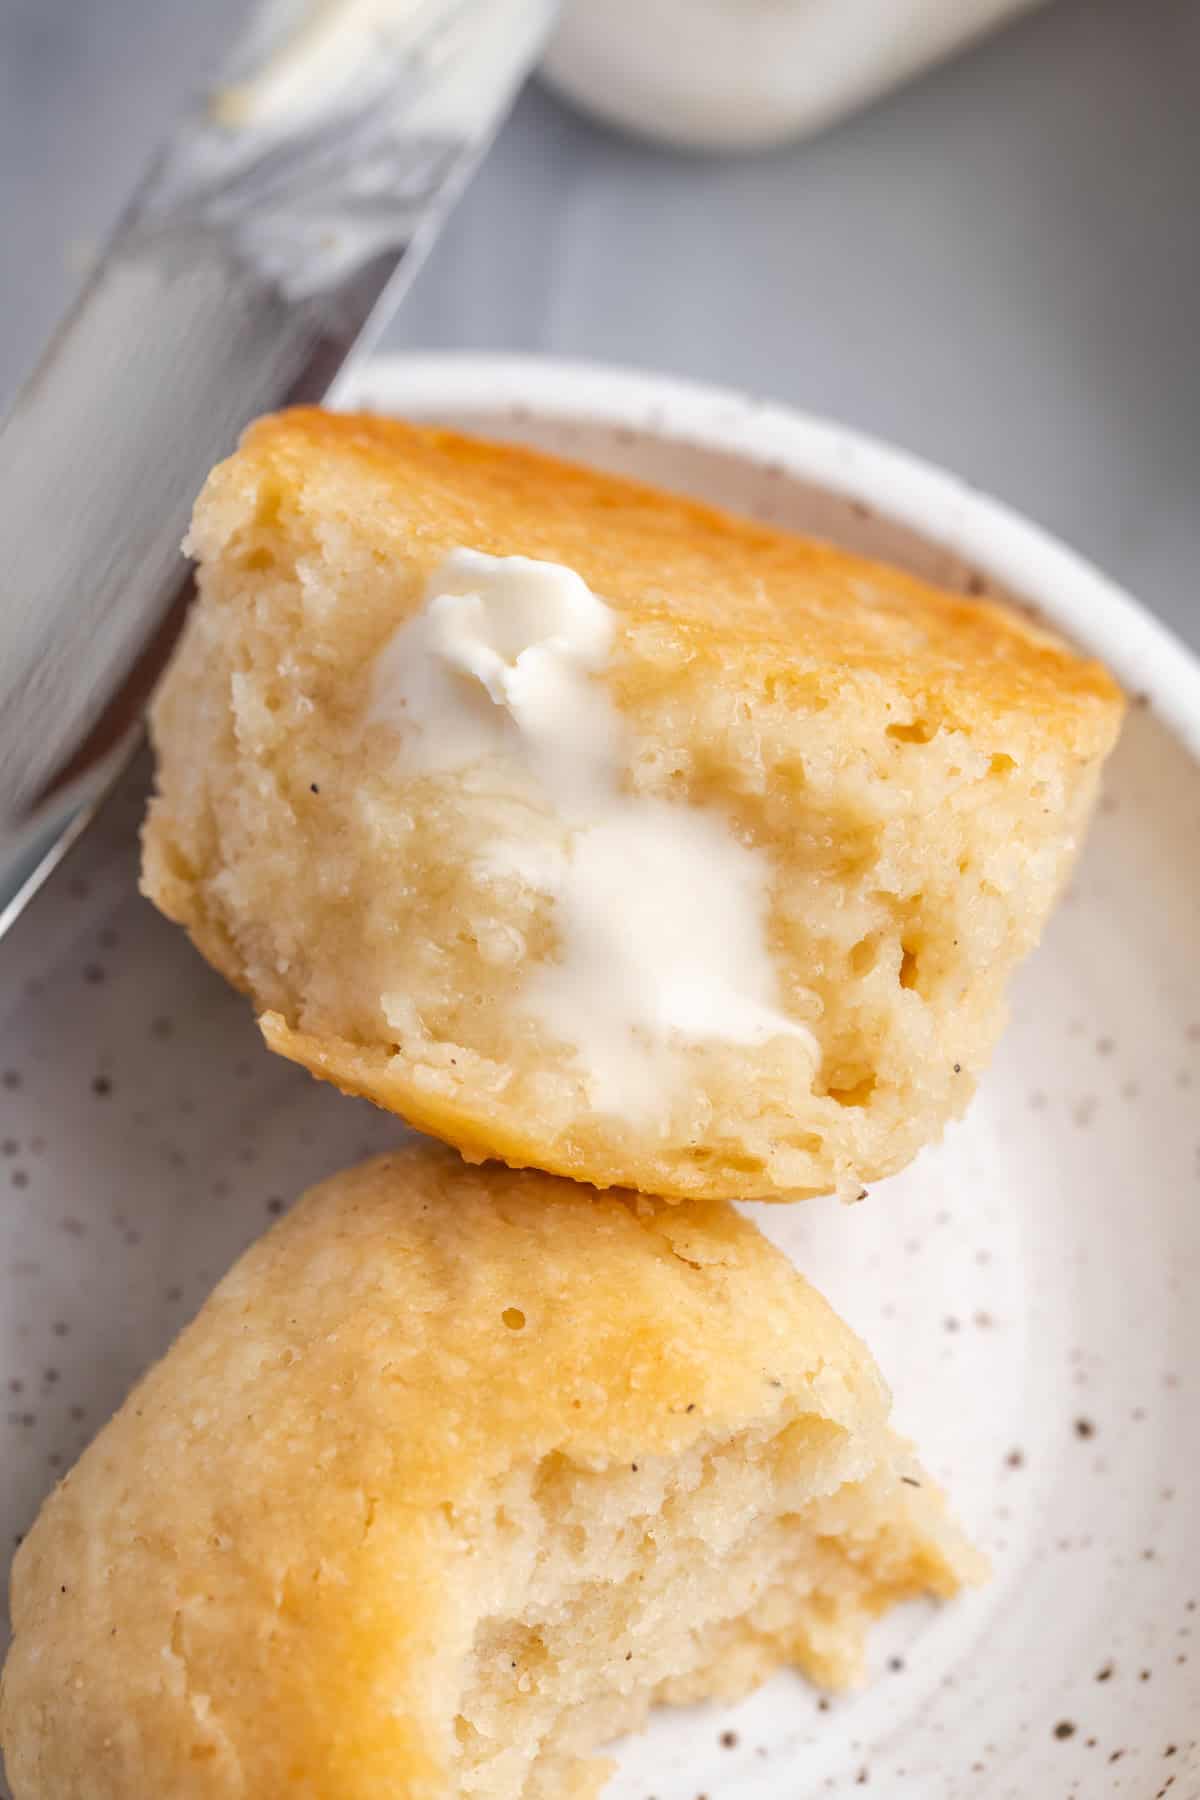
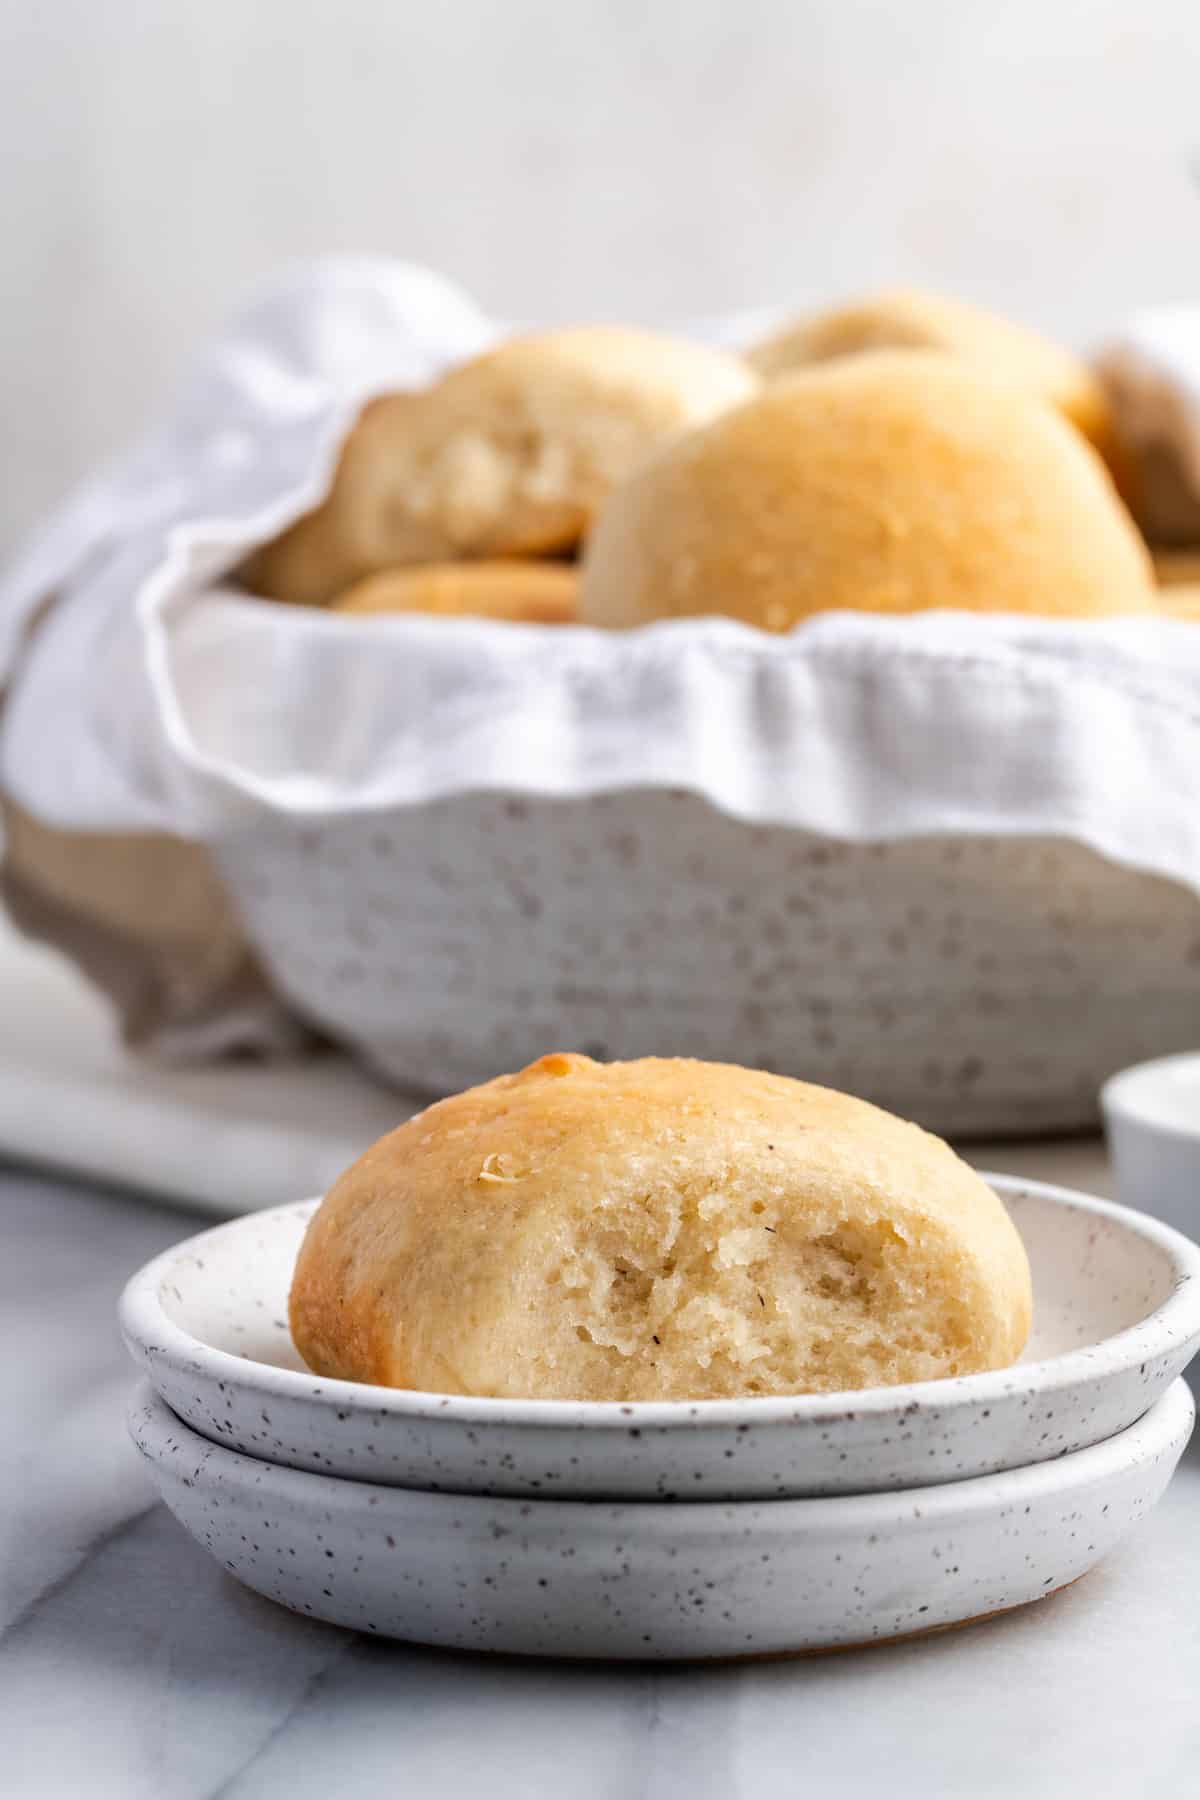
These gluten-free dinner rolls are light, fluffy, and every bit as delicious as the traditional version. They’re vegan too!
With the holidays coming up, it’s a good idea to start planning your menu—and when you’re serving a crowd, it can be a challenge finding recipes that meet everyone’s dietary preferences. These gluten-free dinner rolls check a few different boxes: they’re gluten-free, they’re vegan, and they’re so fluffy and delicious, everyone at the table will love them so you don’t even need to bother making any other rolls! (Although if you do want to offer a wheat-based version, give my vegan dinner rolls a try.)
Why You’ll Love This Gluten-Free Dinner Roll Recipe
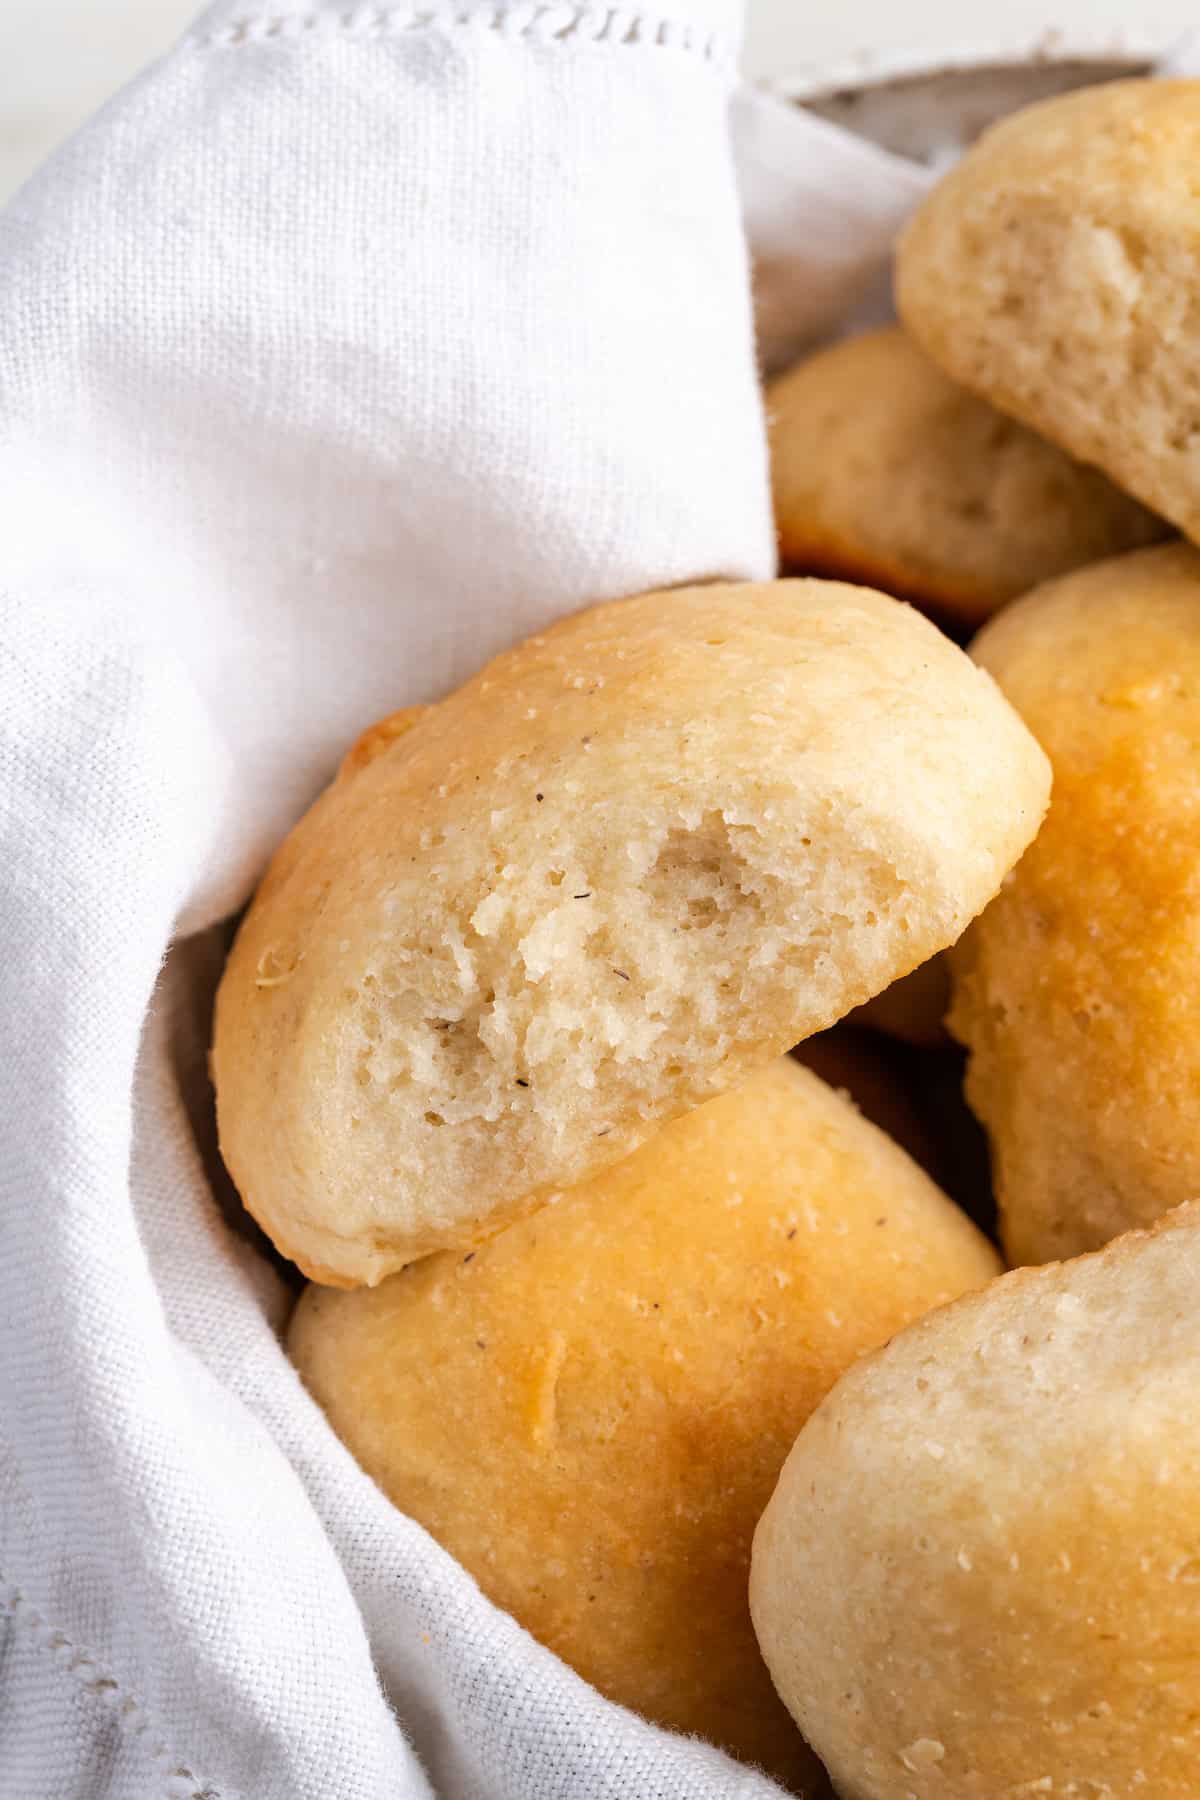
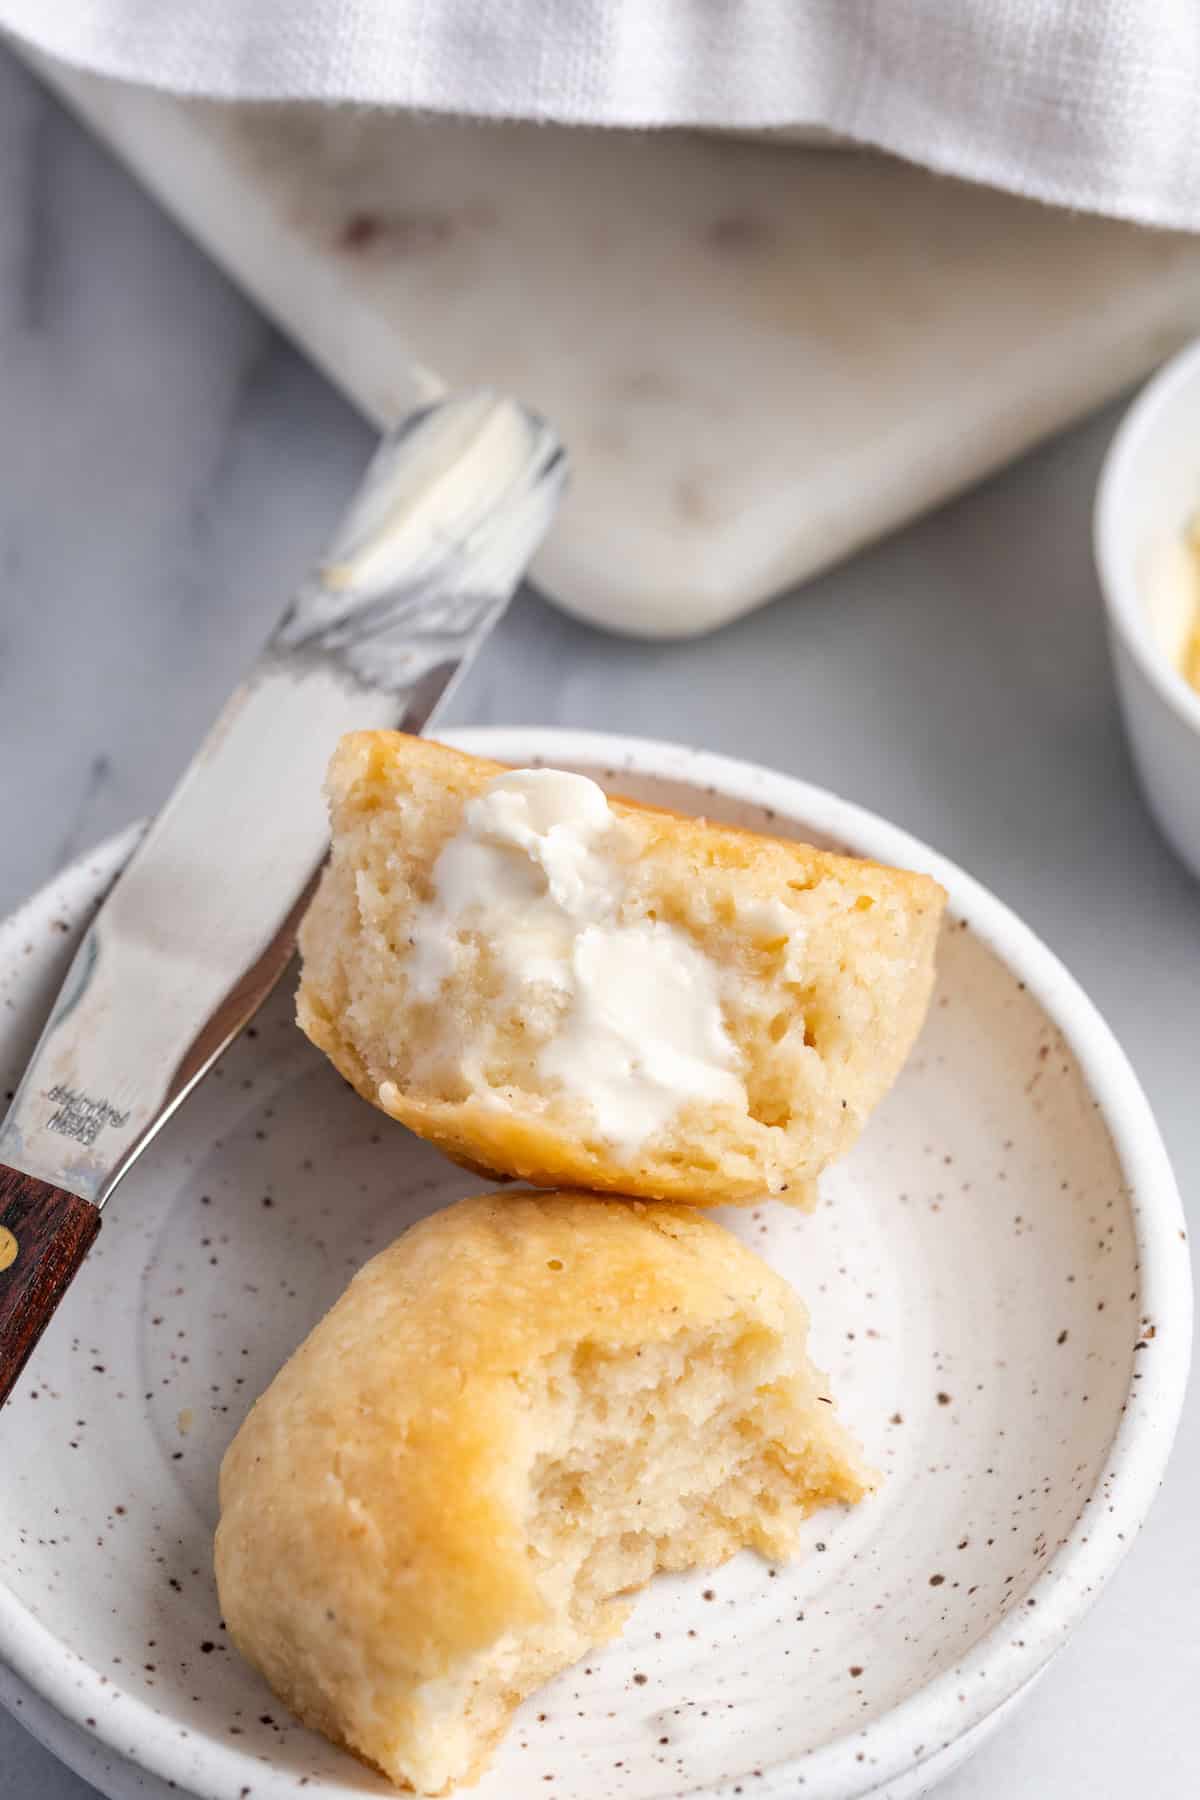
- Light and fluffy . Some gluten-free breads and rolls are dense, heavy, and dry, but these dinner rolls have the perfect texture. They’re soft, airy, and just like traditional wheat-based rolls.
- Versatile . Use your gluten-free dinner rolls as a side, for making sliders, sandwiches, and more.
- Easy to make . Like my gluten-free sandwich bread , this gluten-free dinner roll recipe is great if you’re just getting started with gluten-free baking!
Notes on Ingredients
Scroll down to the recipe card to find the ingredient quantities and recipe instructions.
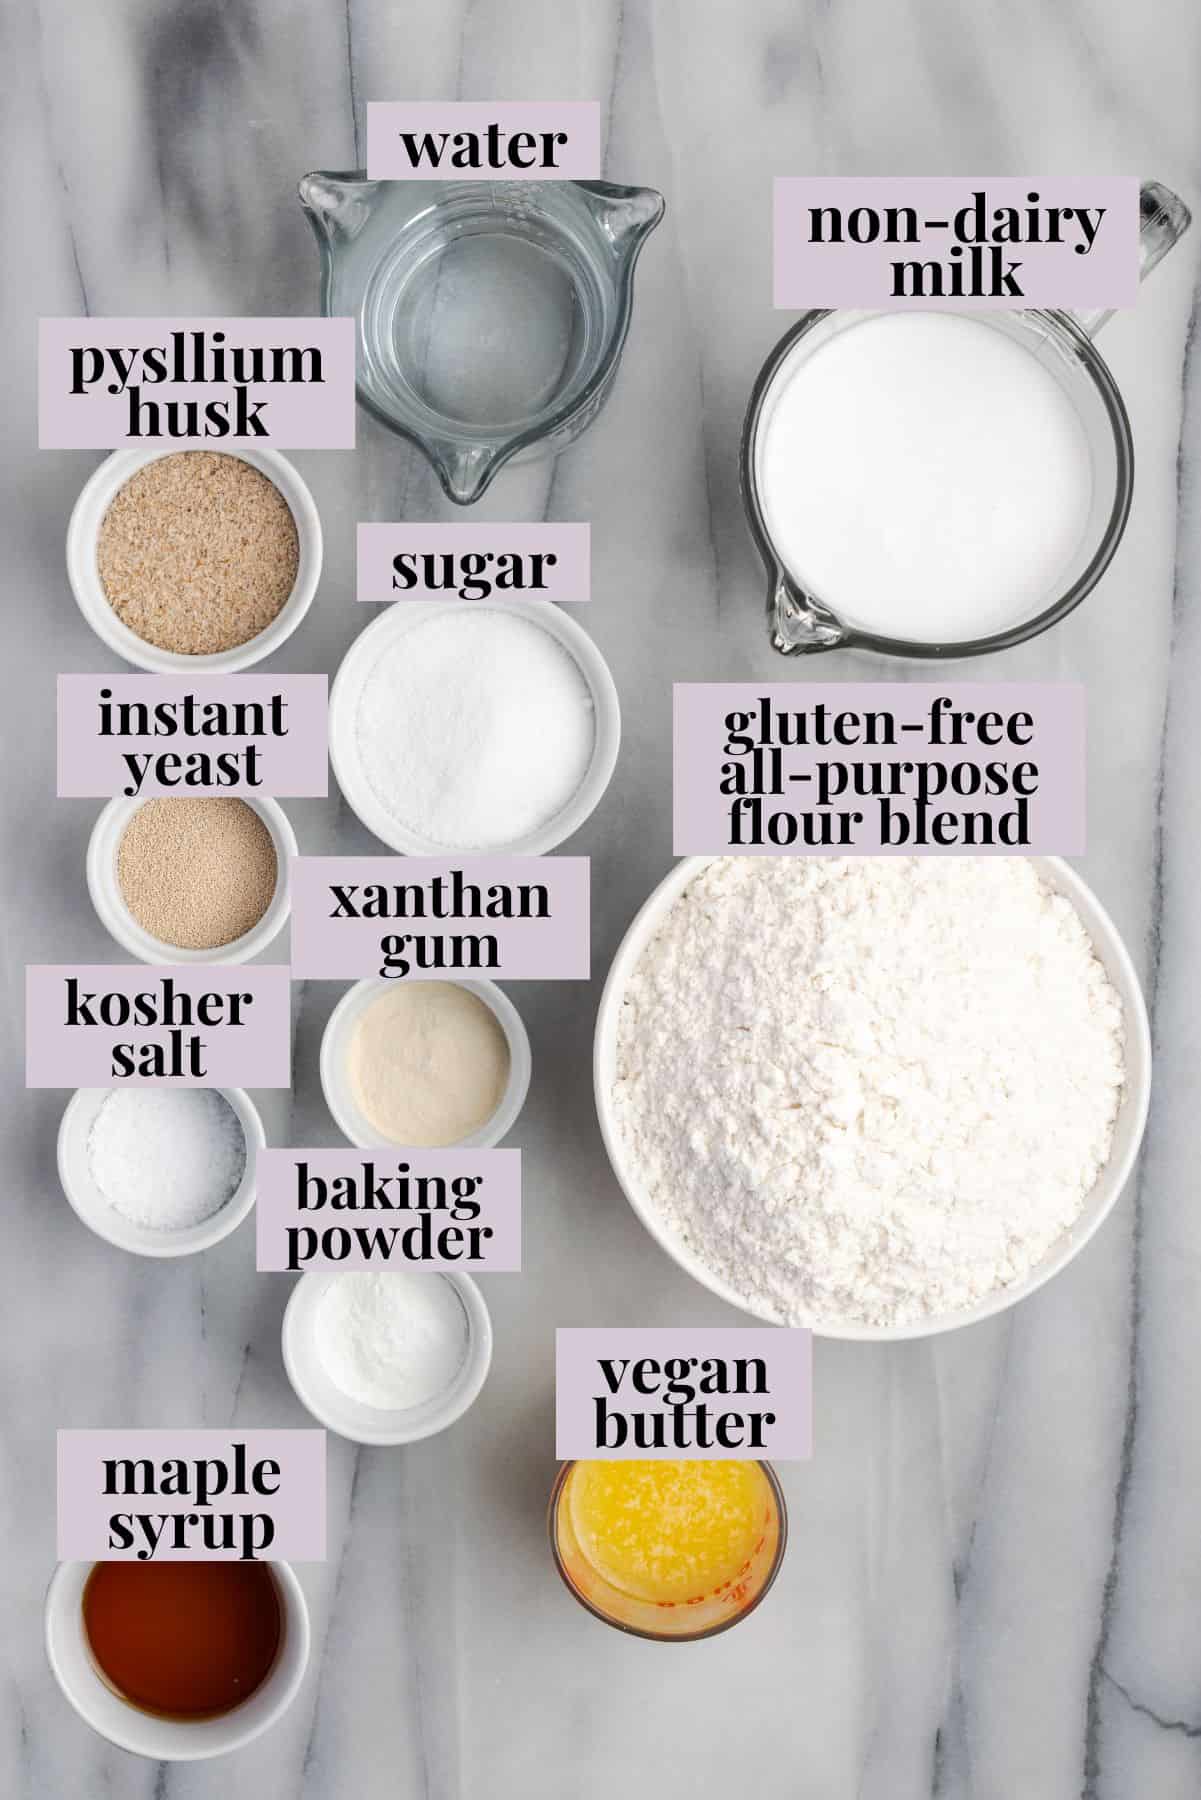
- Non-dairy milk – For the best taste and texture, I recommend soy milk for this recipe. You can also use other non-dairy milk .
- Water
- Gluten-free all-purpose flour blend – I use King Arthur’s Gluten-Free All-Purpose Flour . Do NOT use a single gluten-free flour (like almond flour or coconut flour ), as the recipe will not turn out—you must use a measure-for-measure all-purpose flour substitute.
- Sugar
- Psyllium husk – This is the key ingredient for mimicking gluten in this gluten-free dinner roll recipe. Psyllium husk powder helps with binding and creates a fluffy texture.
- Instant yeast – Here’s how to test yeast to see if it’s still good .
- Xanthan gum – This helps with binding and structure in gluten-free baking. You can find xanthan gum in many grocery stores or online.
- Baking powder
- Kosher salt
- Vegan butter – You’ll need some for the gluten-free dinner rolls themselves and some for topping.
- Maple syrup
- Cornstarch – Dust your work surface with cornstarch to prevent the dough from sticking.
How to Make Gluten-Free Dinner Rolls
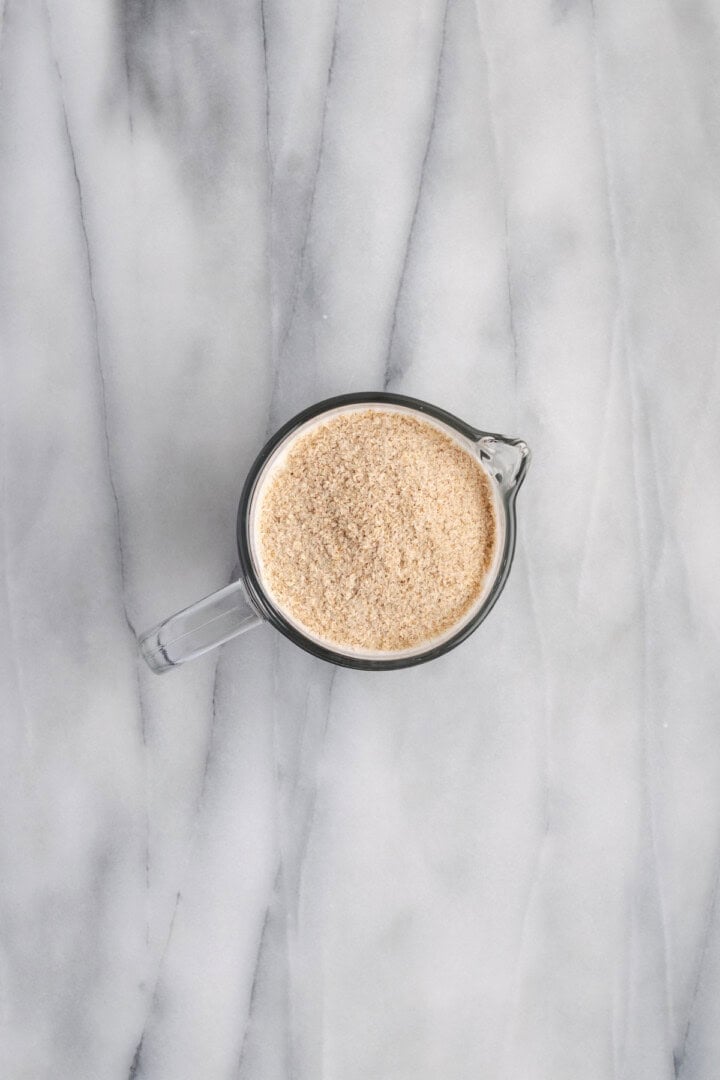
Warm liquids, add psyllium husk.
- Warm the liquids . Combine the non-dairy milk and water. Warm them to 115ºF. Whisk in the psyllium husk and set aside for 5 minutes.
- Mix the dry ingredients . Add the gluten-free flour, sugar, instant yeast, xanthan gum, baking powder, and salt to the bowl of a stand mixer and stir.
- Combine wet and dry . Pour the milk mixture, vegan butter, and maple syrup into the dry ingredients. Mix with the hook attachment on low speed to combine.
- Knead . Once the dough is shaggy, increase the speed to medium-low and knead for 5 minutes.
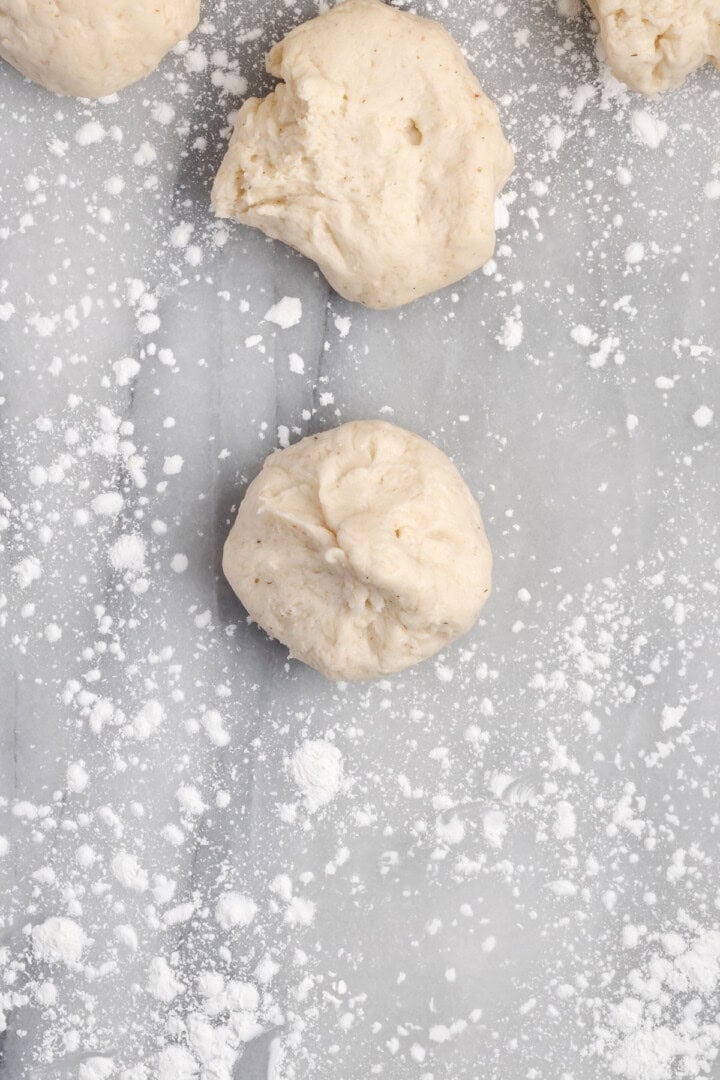
Form rolls.
- Form the rolls . Turn out the dough onto a work surface dusted with cornstarch. Divide into 12 portions and shape into balls. Set the balls into a greased square pan with the seam side down.
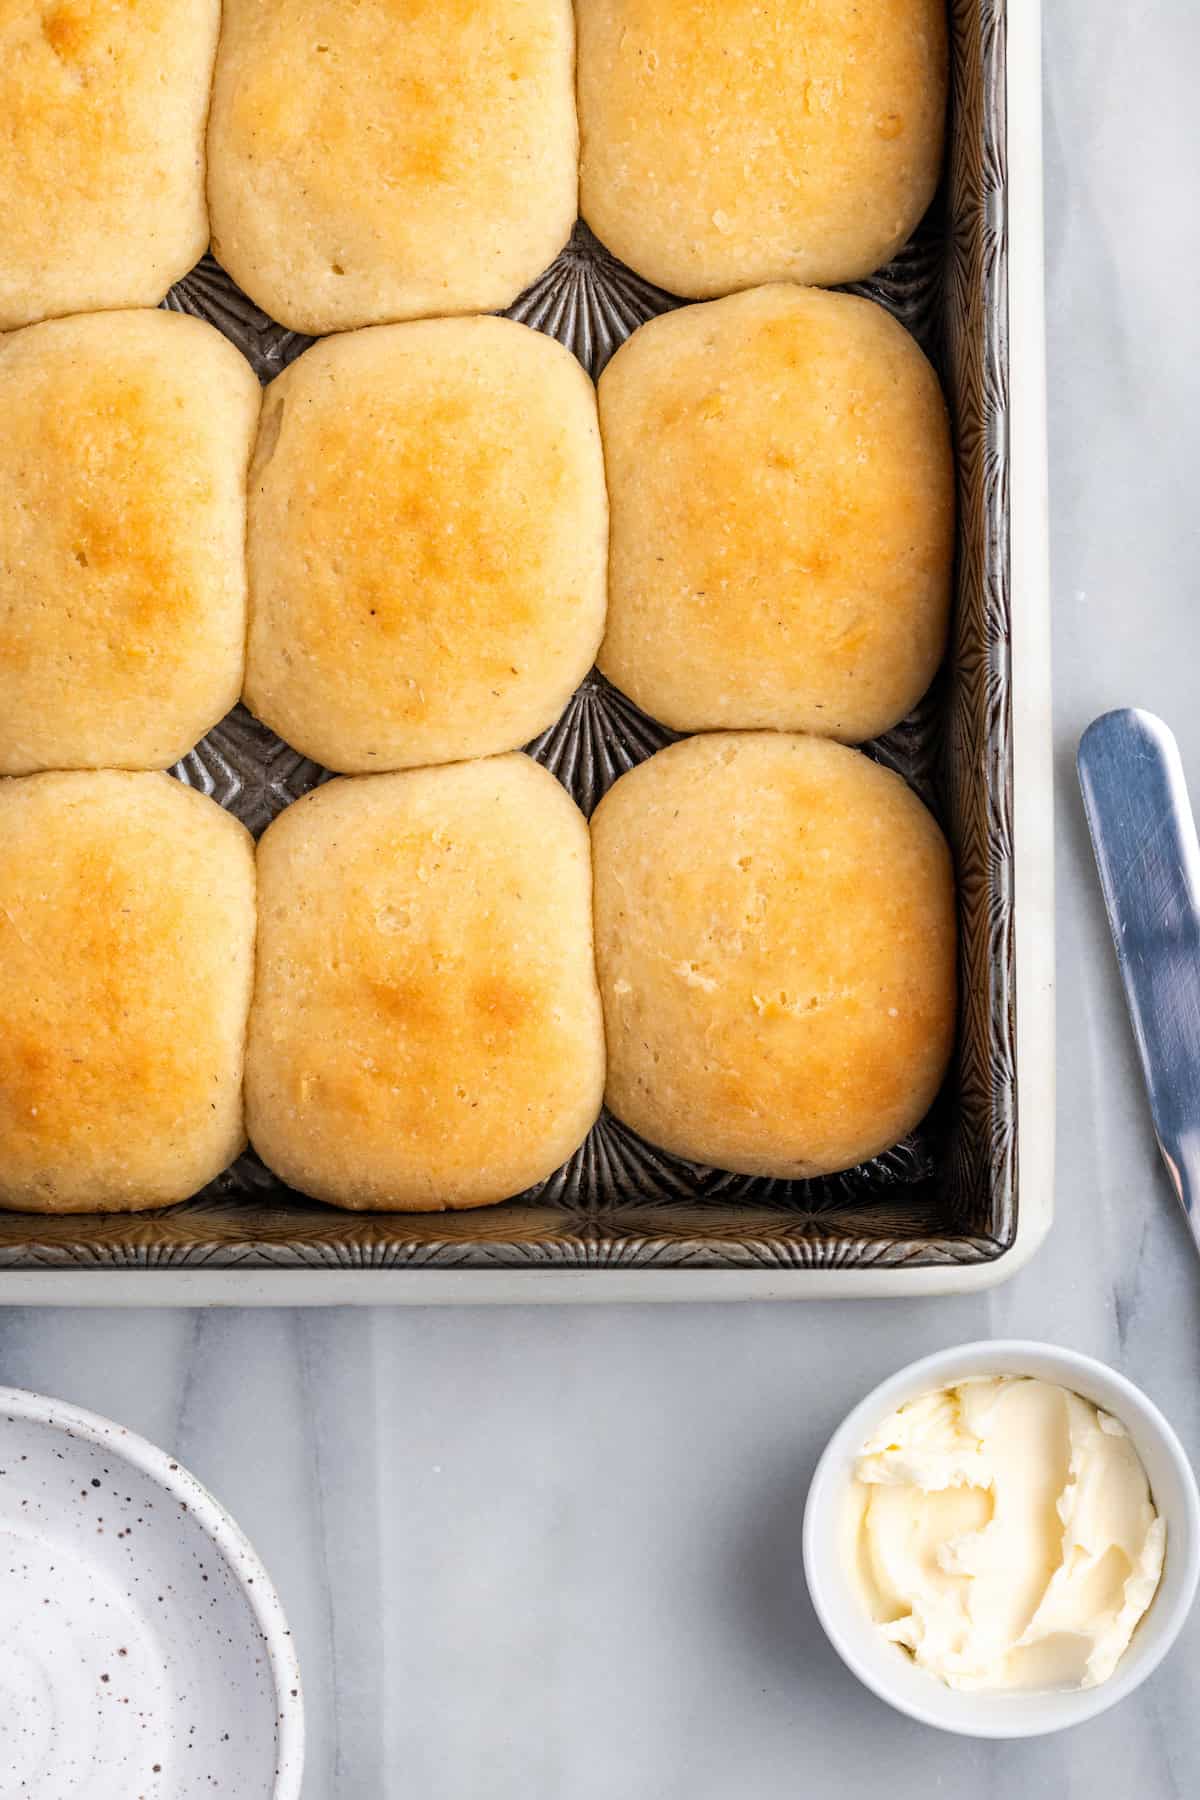
- Rise . Cover the pan with a towel and let rise in a warm place until the rolls have doubled in size. Start preheating the oven to 375ºF about 20 minutes before the rolls are done rising.
- Bake . Brush the tops of the rolls with butter and bake for 22 to 25 minutes, or until the rolls are golden brown and reach 200ºF on an instant-read thermometer .
- Serve . Let the gluten-free dinner rolls cool in the pan for 10 minutes, then serve.
Tips for Success
- Weigh your dry ingredients if possible . Baking bread is all about accuracy. Use a food scale , as it is the surest way to make certain that your measurements are accurate.
- Don’t skip the psyllium husk or xanthan gum . These ingredients are essential for achieving the right texture in gluten-free baking. If you can’t find them at your regular grocery store, you can order them online.
- Use a warm place to proof the dough . This helps the rolls rise faster and more evenly. I like to use my oven with the pilot light on; another good option is your microwave. (Put a post-it note on the oven or microwave so no one tries to use it while your bread is rising!)
- Be patient with the rising time . Don’t rush this step, as it’s crucial for fluffy dinner rolls. It’s better to go by the appearance of the rolls than by the clock—we’re looking for them to double in size.
Serving Suggestions
Pair these gluten-free dinner rolls with your favourite holiday dishes, like vegan meatloaf , vegan mashed potatoes , and vegan green bean casserole . They’re also great for making mini sandwiches with leftovers!
How to Store
- Room temperature : These dinner rolls can be stored at room temperature in an airtight container or bag for up to 3 days.
- Freezer : To freeze, let the rolls cool completely and then place them in a freezer-safe bag. They can be kept in the freezer for up to 3 months. To reheat, simply thaw at room temperature and warm in the oven or microwave before serving.
More Vegan Gluten-Free Recipes
- Gluten-Free Focaccia
- Gluten-Free Vegan Pie Crust
- Vegan Gluten Free Chocolate Cake Recipe
- Gluten-Free Vegan Puff Pastry
- Gluten-Free Vegan Strawberry Pancakes
Ingredients
- 1 cup soy milk , or other non-dairy milk , 240 ml
- ⅔ cup water , 160 ml
- 2 ½ cups gluten-free all-purpose flour blend , I use King Arthur’s, 400 g
- ¼ cup sugar , 50 g
- 2 ½ tablespoons psyllium husk , 13 g
- 3 teaspoons instant yeast , 12 g
- 1 ½ teaspoons xanthan gum , 5 g
- 1 ¼ teaspoons baking powder , 6 g
- 1 ¼ teaspoons kosher salt , 6 g
- 6 tablespoons vegan butter , melted and cooled, 85 g
- 2 tablespoons maple syrup , 39 g
- cornstarch , for dusting the work surface
For top:
- 2 tablespoons vegan butter , melted, 28 g
Instructions
- Combine the non-dairy milk and water. Warm to 115ºF / 46ºC.
- Add the psyllium husk to the milk mixture and stir well. Set aside to gel for 5 minutes.
- Combine the gluten-free flour, sugar, instant yeast, xanthan gum, baking powder, and salt in the bowl of a stand mixer. Stir well.
- Add the milk mixture, melted vegan butter, and maple syrup to the dry ingredients. Using the hook attachment, stir on low speed until the dry ingredients are incorporated. You may need to scrape down the sides of the bowl a couple of times.
- Once the dough reaches a shaggy state with no dry bits remaining, increase the speed on the mixer to medium low and mix for 5 full minutes.
- Lightly dust your work surface with cornstarch. Turn the dough out onto the surface.
- Divide the dough into 12 equal sized balls (mine were 82 grams). Using your fingers, pinch and pull the undersides to shape each ball round.
- Spray a 9×9 baking pan with non-stick cooking spray. Place the dough balls with the seam side down in the dish. They should barely touch.
- Cover with a dish towel and leave to rise in a warm place for 75-90 minutes, until the rolls have doubled in size.
- When there is 20 minutes remaining in the proof time, preheat the oven to 375ºF / 190ºC.
- Use a pastry brush to brush the melted vegan butter on top of the rolls. Bake for 22-25 minutes until the tops are golden brown and the internal temperature reaches 200ºF / 93ºC.
- Remove from the oven and cool in the pan for about 10 minutes before serving.
Notes
- Room temperature : These dinner rolls can be stored at room temperature in an airtight container or bag for up to 3 days.
- Freezer : To freeze, let the rolls cool completely and then place them in a freezer-safe bag. They can be kept in the freezer for up to 3 months. To reheat, simply thaw at room temperature and warm in the oven or microwave before serving.
