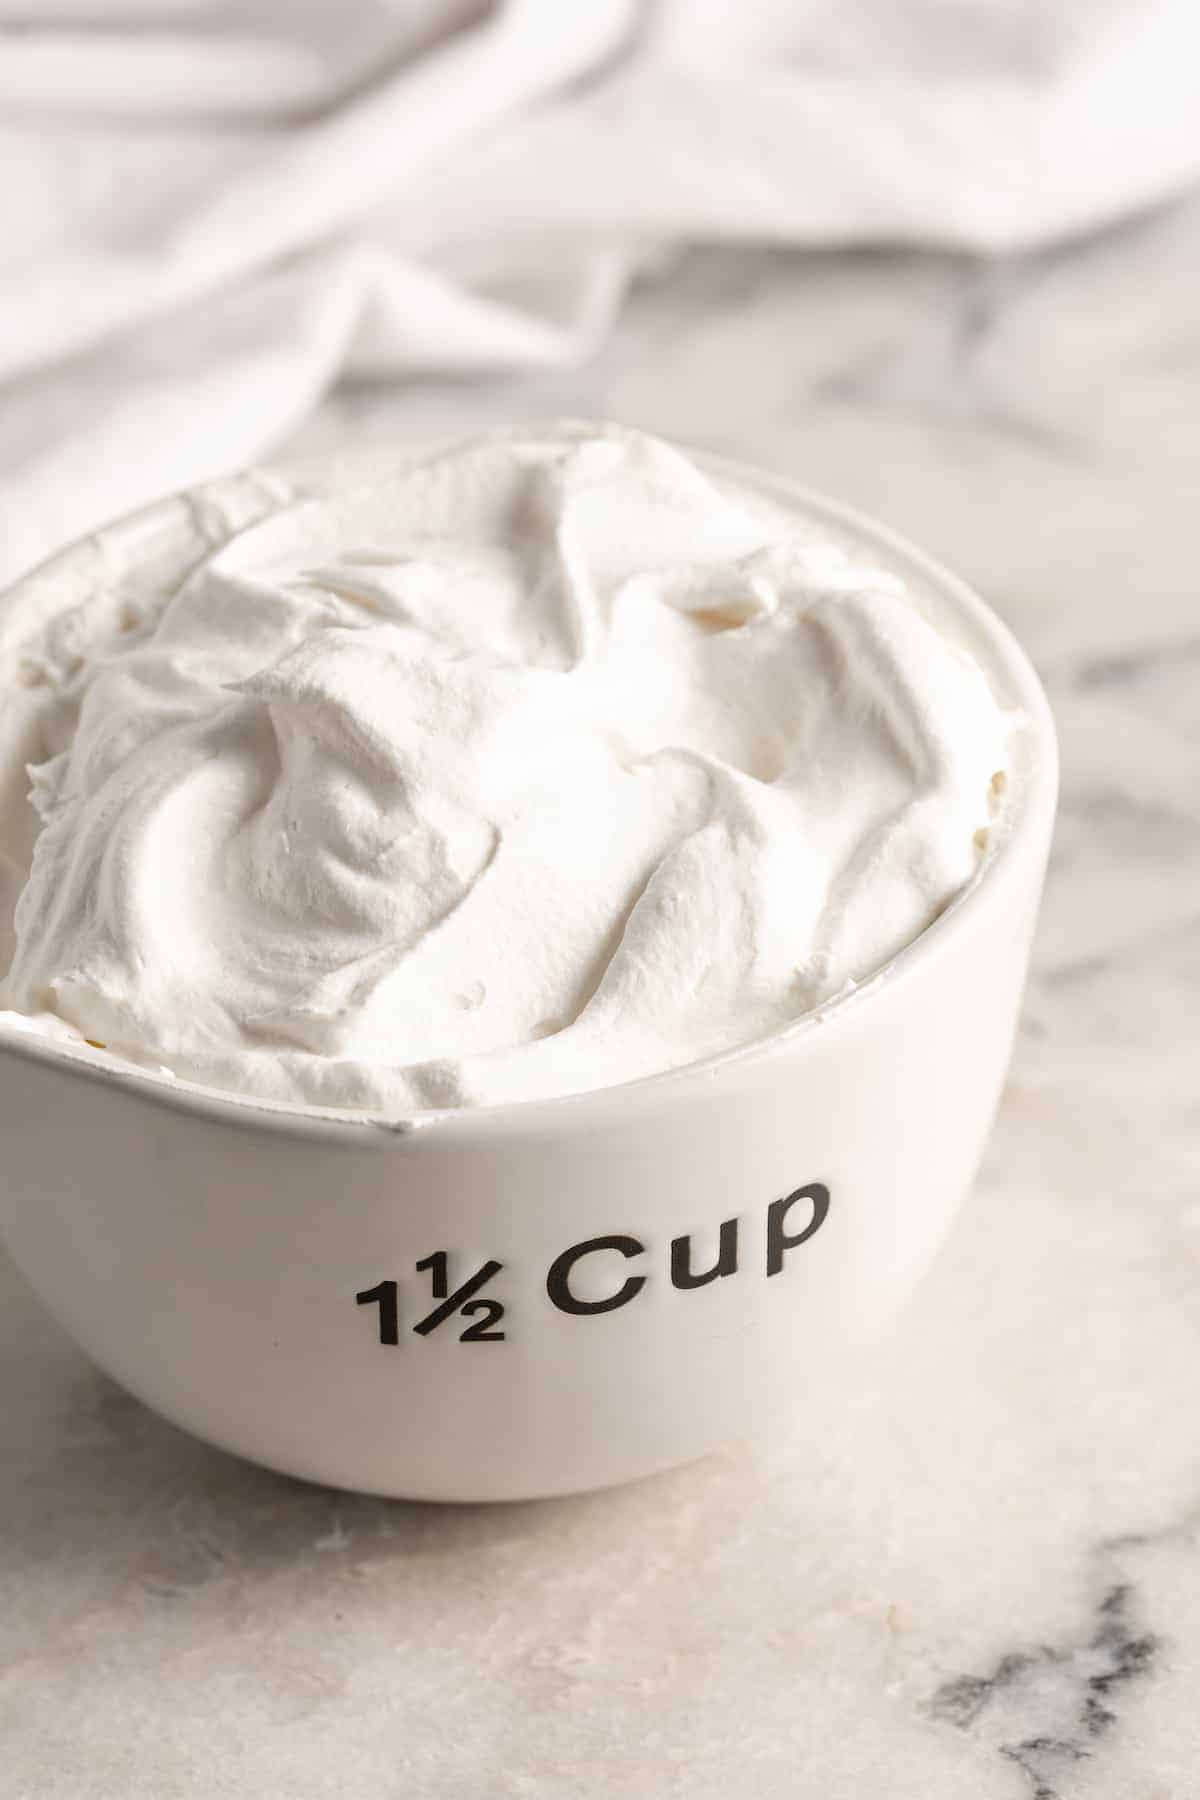
Coconut whipped cream is a dairy-free, plant-based alternative to heavy cream. All you need are two ingredients, coconut milk and your favourite sweetener, for a dreamy, light, and fluffy homemade whipped topping.
Everyone needs a good homemade whipped cream recipe, and if you’re vegan, there’s no reason to settle for store-bought! This coconut whipped cream recipe is incredibly easy to make, with only 2 ingredients. Whip coconut cream that’s been thickened in the fridge with powdered sugar. The result is thick and creamy, dairy-free and vegan whipped topping that’s ready in minutes!
About This Coconut Whipped Cream Recipe
- You need just two ingredients . And you whip it in 10 minutes. It doesn’t get much simpler than that!
- It’s budget-friendly . Making whipped cream from coconut milk is less expensive than store-bought varieties, and it tastes so much better!
- That little something every dessert needs . A dollop of whipped cream takes vegan pecan pie or pumpkin pie and makes it extra delicious .
- It’s delicious, even if you’re not vegan! This coconut whipped cream is a perfect alternative if you’re vegan, have dairy sensitivities, or just want a lighter option to heavy cream .
You’ll Need These 2 Ingredients
The full recipe with amounts and details can be found in the recipe card below the post.
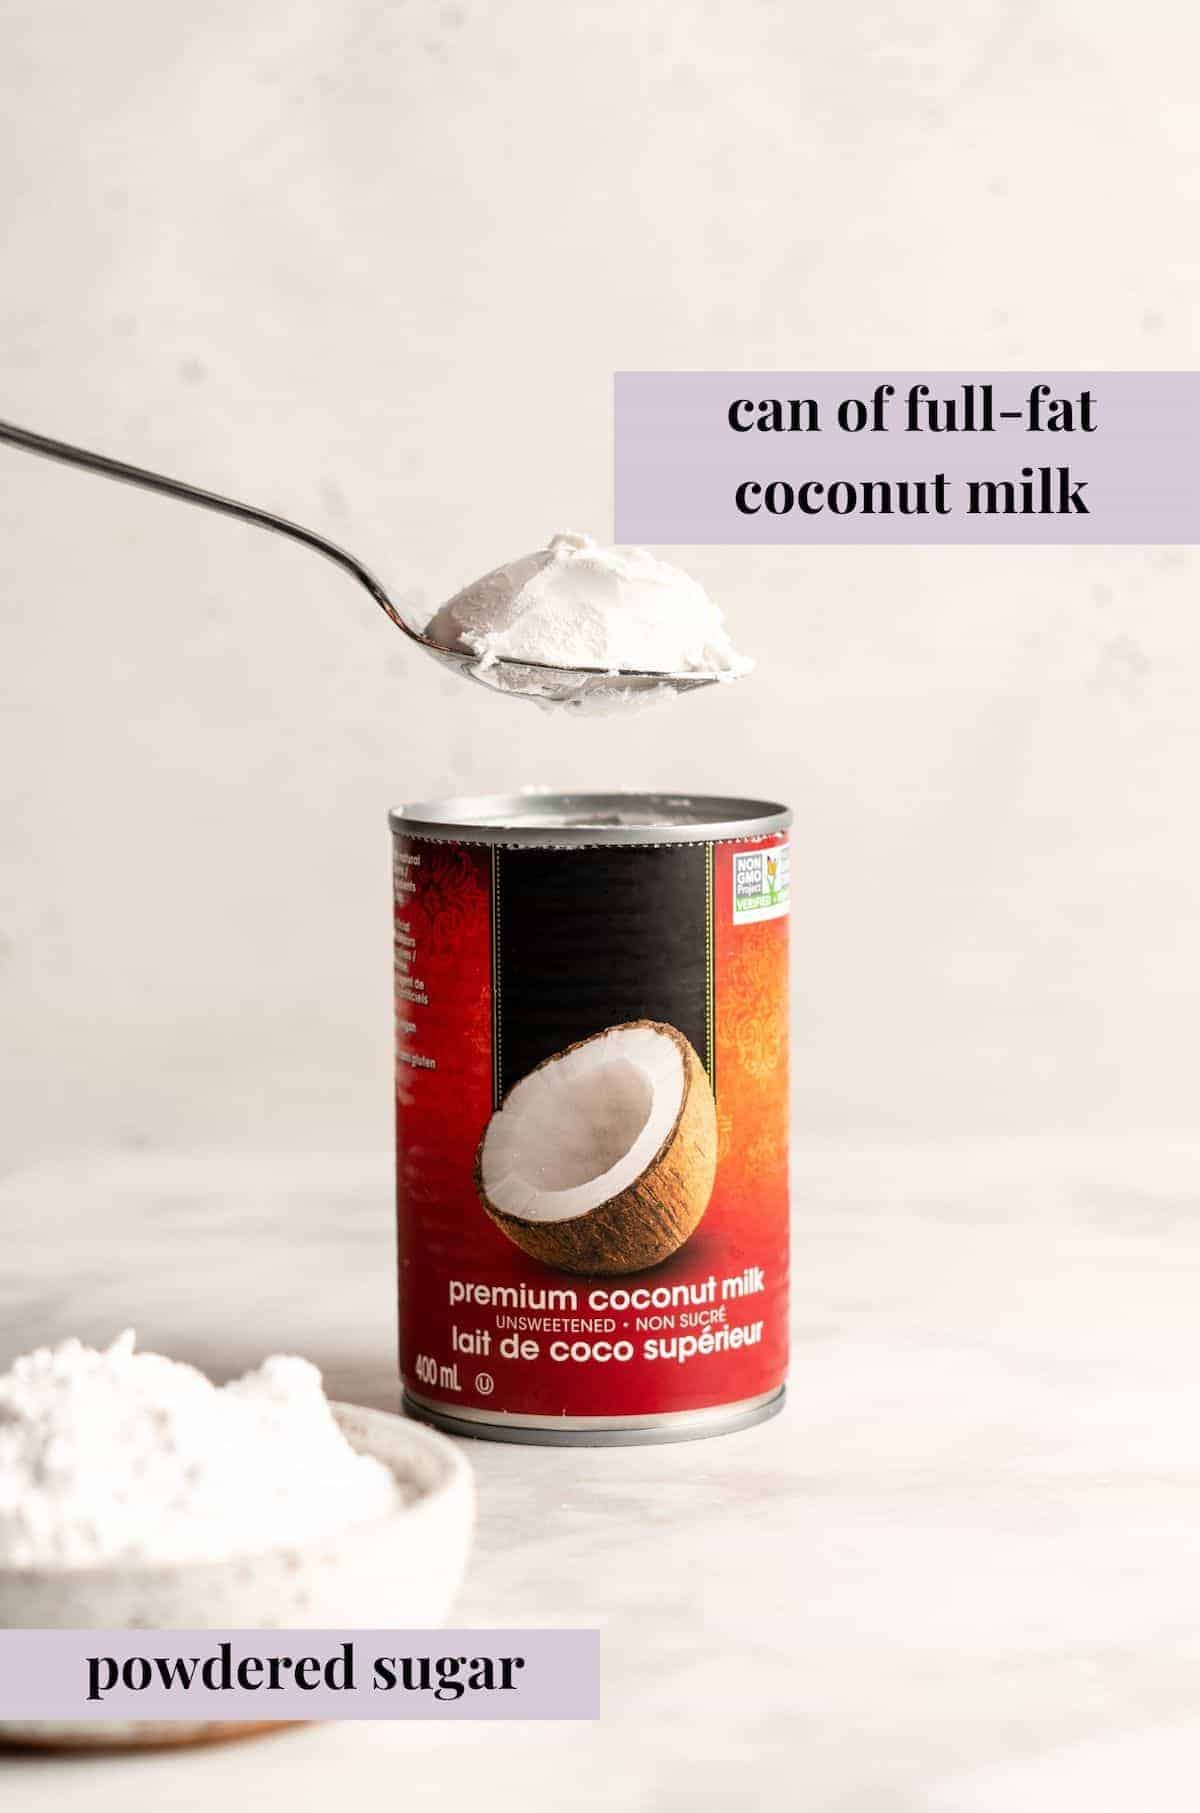
- F ull-fat coconut milk – You’ll need to refrigerate this so the cream separates from the coconut water. Alternatively, you can use a can of pure coconut cream instead. Try using Native Forest, Whole Foods, or Thai Kitchen for best results.
- Organic, unrefined powdered sugar – Or you can use two tablespoons of maple syrup.
How to Make Coconut Whipped Cream
Combine the ingredients.
- Chill the coconut milk overnight. Place a can of full-fat coconut milk in the refrigerator overnight.
- Separate the milk solids. When you’re ready to make your whipped cream, open the can and scoop out the thick solids that have settled at the top. Stop when you get to the liquid (this is the coconut water, which will thin out the whipped cream).
- Chill your tools. Now, place your mixer bowl in the freezer for about 5 minutes to chill.
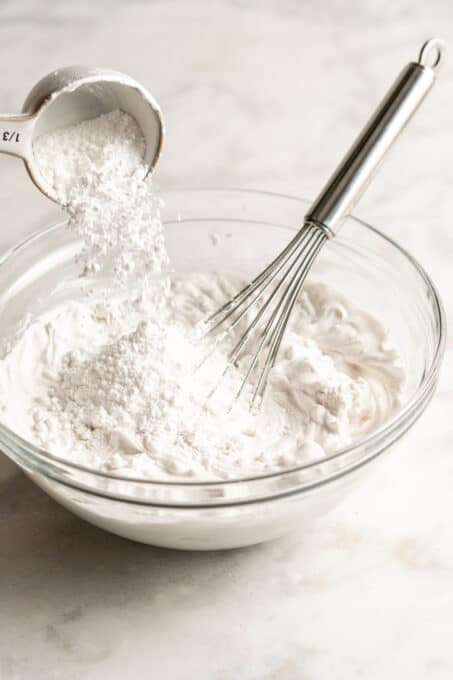
- Combine the ingredients. Once the mixer bowl is frosty, remove it from the freezer and add the coconut cream to the bowl. Add the powdered sugar.
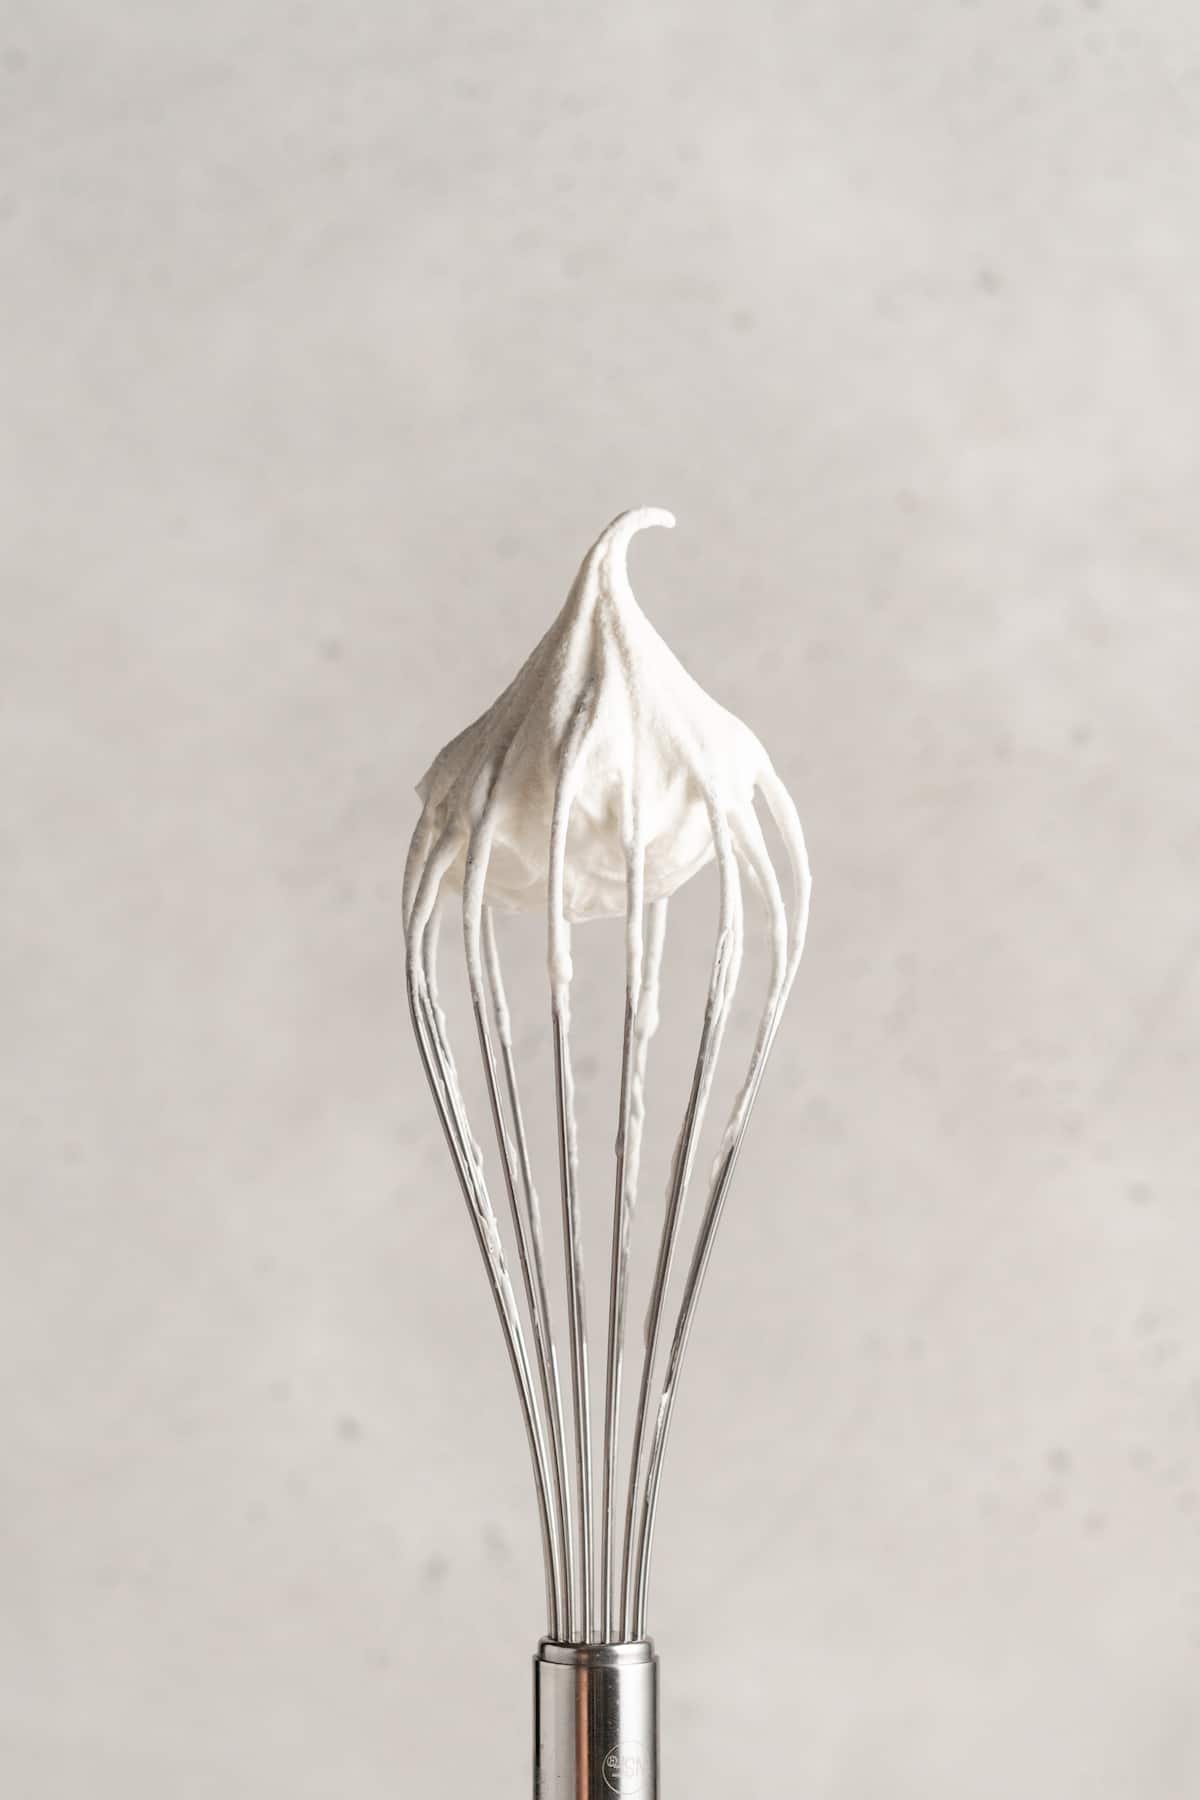
- Whip the cream. Use a hand mixer or stand mixer to whip until the coconut cream and sugar are thick and creamy.
- Chill. Transfer the whipped cream to a resealable bowl or container and place it in the fridge. It will thicken even more once chilled.
Tips forPerfect Coconut Whipped Cream
- Full-fat coconut milk or coconut cream is key. Don’t use the refrigerated cartons or bottles of coconut milk or the cans of lite coconut milk. They won’t whip up into coconut whipped cream!
- Results can vary depending on your coconut cream. Okay, so this isn’t exactly a tip for success, but here’s the thing: coconut milk can vary from one brand to the next and even from one batch to the next. Sometimes, you’ll get a can that won’t whip up into a nice consistency. This is disappointing, but remember that it’s not you, it’s the coconut milk! See my recommended brands in the Ingredients section above.
- Too thin? If you find that your coconut whipped cream is not thickening, you can add some tapioca starch to it. One teaspoon at a time should do the trick.
- Too thick? If the coconut cream is especially hard, it might be difficult to whip. Add a little coconut water from the can, one tablespoon at a time, until the mixture reaches a whipped cream consistency.
- Save the leftover coconut water. Once you’ve skimmed the thick cream from the top, save the liquid from your can of coconut milk. This is coconut water, and you can drink it or add it to smoothies .
Adding Flavors
This vegan whipped cream recipe is super versatile! Add a little vanilla extract or vanilla paste, or almond extract for a richer flavor. Try any of the following variations:
- Add peppermint extract, orange, or lemon extract.
- Whip in a pinch of ground cinnamon or pumpkin pie spice .
- Add in instant coffee, espresso powder, or Matcha powder.
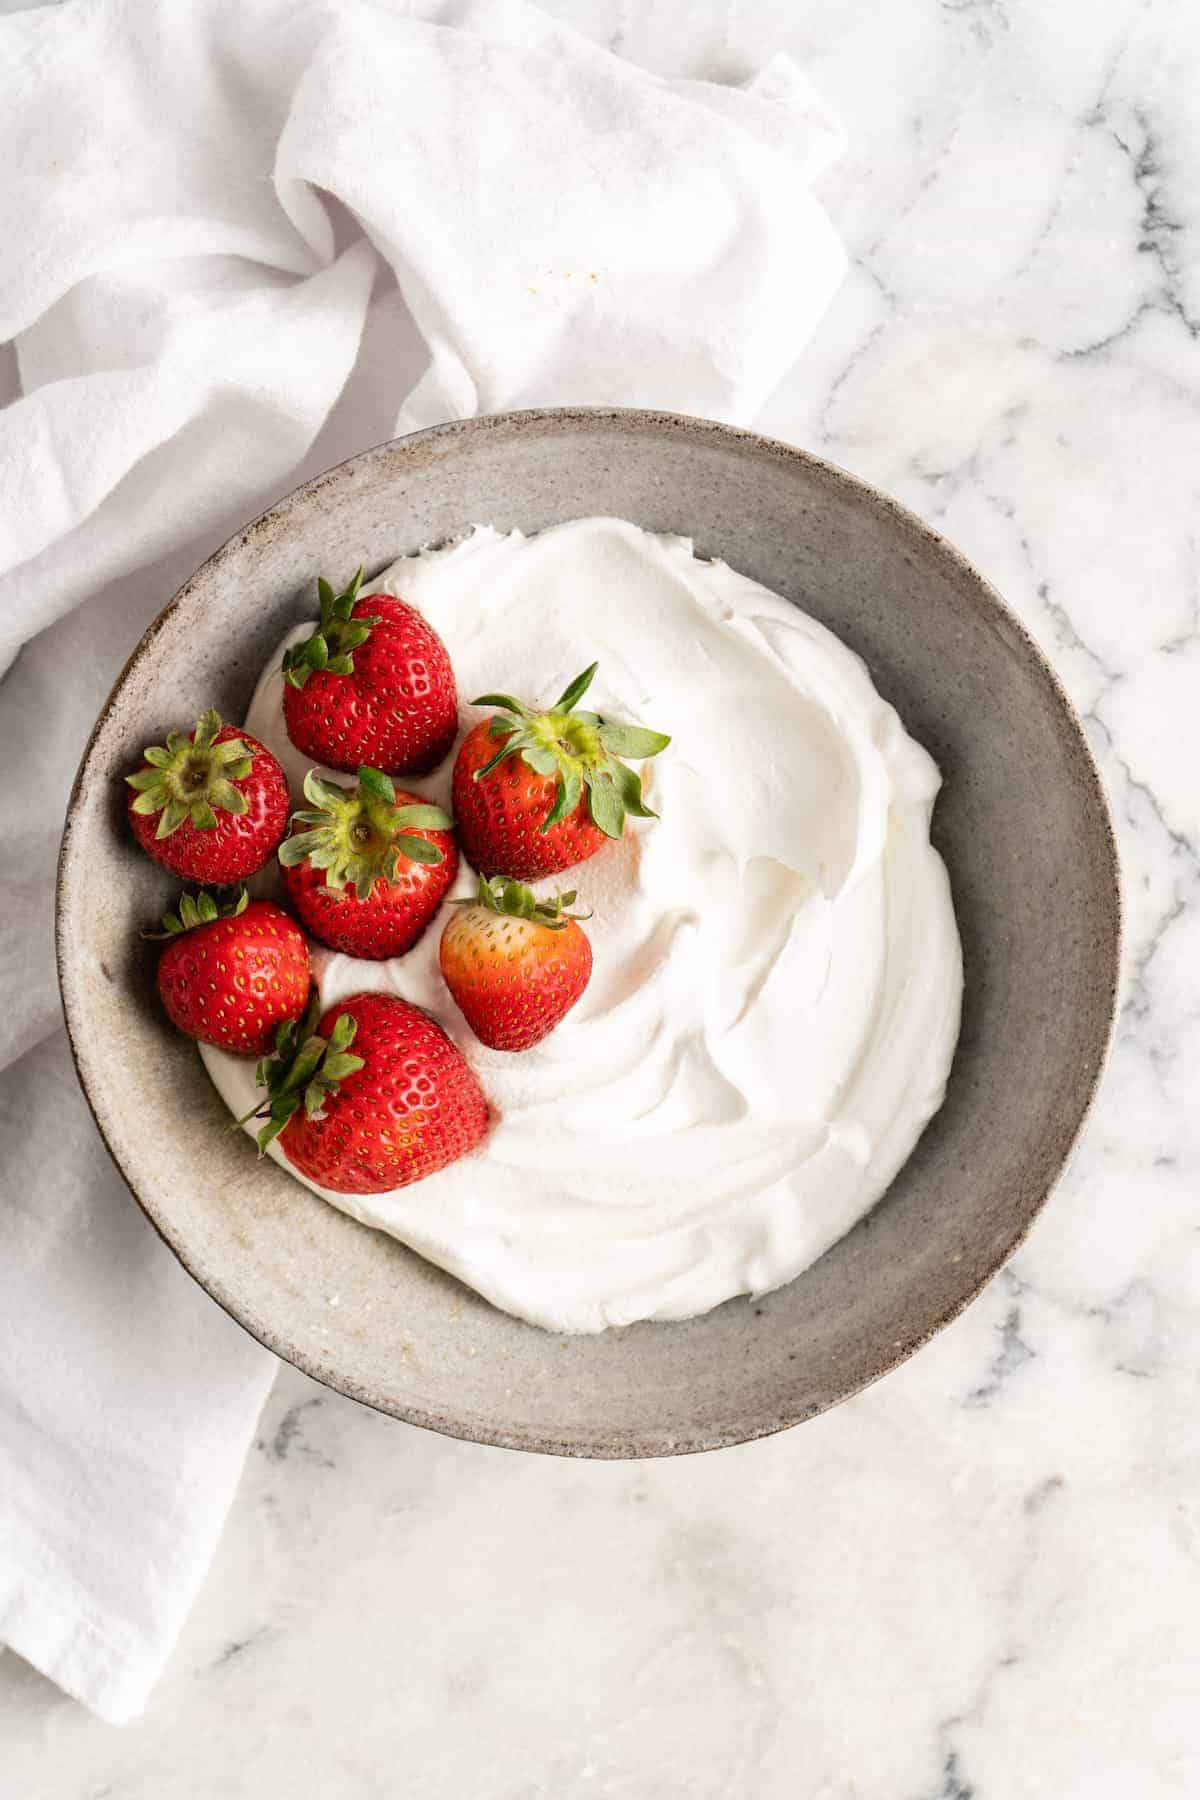
Ways to Use It
Use coconut whipped cream as a delicious topping for vegan sweet potato pie and apple crisp , put a dollop on an ice cream sundae, swirl it on top of hot chocolate or a pumpkin spice latte , or use it as a fruit dip. It’s also excellent paired with breakfast foods like French toast casserole , waffles , and pancakes !
Proper Storage
- Refrigerate. You can store leftover coconut milk whipped cream in the fridge for up to 5 days. Keep in mind that you may need to whip it again before serving.
- Freeze. You can freeze coconut whipped cream, but it’s so easy to make, by the time you thaw it in the refrigerator and whip it again, you could have made a fresh batch!
More Vegan Dessert Toppings
- Vegan Buttercream Frosting
- Cashew Whipped Cream (Vegan)
- Easy Vegan Caramel Sauce
- Homemade Pecan Butter
- Vegan Ice Cream
Ingredients
- 14 ounce can of full-fat coconut milk , refrigerated overnight (or you can use a can of pure coconut cream)
- 1/4 cup organic and unrefined powdered sugar – I use this one OR 2 tablespoons maple syrup
Instructions
- Put a can of full-fat coconut milk in your fridge overnight. After being refrigerated overnight, open the can, and scoop out the thick solids out of the jar. That’s what you want to use! You can set the liquid that’s left-back (the coconut water) in a jar in the fridge or drink it or use it in your smoothies.
- Chill your mixer bowl in the freezer for about five minutes before adding those same thick solids out of the jar.
- Add it to a standing mixer or a bowl with a hand mixer, and add the powdered sugar. Blend together until thick and creamy.
- Scoop into to a bowl and place in the fridge. It will thicken up even more in the fridge. You can use anywhere you would use whipped cream that wouldn’t require it to sit out too long.
Notes
- This recipe is vegan, refined sugar free, and gluten free.
- If you find that your coconut whipped cream is not thickening up, you can add some tapioca starch to it. The powdered sugar brand uses tapioca starch so that should help, but a tablespoon at a time will definitely do the trick. Don’t add too much or else you’ll end up with a very artificial tasting whipped cream. I like to add about 2 teaspoons.
- You can store leftover coconut whipped cream in the fridge for up to 5 days. Keep in mind that you may need to whip it again before serving.
Coconut whipped cream is a dairy-free, plant-based alternative to heavy cream. All you need are two ingredients, coconut milk and your favourite sweetener, for a dreamy, light, and fluffy homemade whipped topping.
Everyone needs a good homemade whipped cream recipe, and if you’re vegan, there’s no reason to settle for store-bought! This coconut whipped cream recipe is incredibly easy to make, with only 2 ingredients. Whip coconut cream that’s been thickened in the fridge with powdered sugar. The result is thick and creamy, dairy-free and vegan whipped topping that’s ready in minutes!
About This Coconut Whipped Cream Recipe
- You need just two ingredients . And you whip it in 10 minutes. It doesn’t get much simpler than that!
- It’s budget-friendly . Making whipped cream from coconut milk is less expensive than store-bought varieties, and it tastes so much better!
- That little something every dessert needs . A dollop of whipped cream takes vegan pecan pie or pumpkin pie and makes it extra delicious .
- It’s delicious, even if you’re not vegan! This coconut whipped cream is a perfect alternative if you’re vegan, have dairy sensitivities, or just want a lighter option to heavy cream .
You’ll Need These 2 Ingredients
The full recipe with amounts and details can be found in the recipe card below the post.
- F ull-fat coconut milk – You’ll need to refrigerate this so the cream separates from the coconut water. Alternatively, you can use a can of pure coconut cream instead. Try using Native Forest, Whole Foods, or Thai Kitchen for best results.
- Organic, unrefined powdered sugar – Or you can use two tablespoons of maple syrup.
How to Make Coconut Whipped Cream
Combine the ingredients.
- Chill the coconut milk overnight. Place a can of full-fat coconut milk in the refrigerator overnight.
- Separate the milk solids. When you’re ready to make your whipped cream, open the can and scoop out the thick solids that have settled at the top. Stop when you get to the liquid (this is the coconut water, which will thin out the whipped cream).
- Chill your tools. Now, place your mixer bowl in the freezer for about 5 minutes to chill.
- Combine the ingredients. Once the mixer bowl is frosty, remove it from the freezer and add the coconut cream to the bowl. Add the powdered sugar.
- Whip the cream. Use a hand mixer or stand mixer to whip until the coconut cream and sugar are thick and creamy.
- Chill. Transfer the whipped cream to a resealable bowl or container and place it in the fridge. It will thicken even more once chilled.
Tips forPerfect Coconut Whipped Cream
- Full-fat coconut milk or coconut cream is key. Don’t use the refrigerated cartons or bottles of coconut milk or the cans of lite coconut milk. They won’t whip up into coconut whipped cream!
- Results can vary depending on your coconut cream. Okay, so this isn’t exactly a tip for success, but here’s the thing: coconut milk can vary from one brand to the next and even from one batch to the next. Sometimes, you’ll get a can that won’t whip up into a nice consistency. This is disappointing, but remember that it’s not you, it’s the coconut milk! See my recommended brands in the Ingredients section above.
- Too thin? If you find that your coconut whipped cream is not thickening, you can add some tapioca starch to it. One teaspoon at a time should do the trick.
- Too thick? If the coconut cream is especially hard, it might be difficult to whip. Add a little coconut water from the can, one tablespoon at a time, until the mixture reaches a whipped cream consistency.
- Save the leftover coconut water. Once you’ve skimmed the thick cream from the top, save the liquid from your can of coconut milk. This is coconut water, and you can drink it or add it to smoothies .
Adding Flavors
This vegan whipped cream recipe is super versatile! Add a little vanilla extract or vanilla paste, or almond extract for a richer flavor. Try any of the following variations:
- Add peppermint extract, orange, or lemon extract.
- Whip in a pinch of ground cinnamon or pumpkin pie spice .
- Add in instant coffee, espresso powder, or Matcha powder.
Ways to Use It
Use coconut whipped cream as a delicious topping for vegan sweet potato pie and apple crisp , put a dollop on an ice cream sundae, swirl it on top of hot chocolate or a pumpkin spice latte , or use it as a fruit dip. It’s also excellent paired with breakfast foods like French toast casserole , waffles , and pancakes !
Proper Storage
- Refrigerate. You can store leftover coconut milk whipped cream in the fridge for up to 5 days. Keep in mind that you may need to whip it again before serving.
- Freeze. You can freeze coconut whipped cream, but it’s so easy to make, by the time you thaw it in the refrigerator and whip it again, you could have made a fresh batch!
More Vegan Dessert Toppings
- Vegan Buttercream Frosting
- Cashew Whipped Cream (Vegan)
- Easy Vegan Caramel Sauce
- Homemade Pecan Butter
- Vegan Ice Cream
Ingredients
- 14 ounce can of full-fat coconut milk , refrigerated overnight (or you can use a can of pure coconut cream)
- 1/4 cup organic and unrefined powdered sugar – I use this one OR 2 tablespoons maple syrup
Instructions
- Put a can of full-fat coconut milk in your fridge overnight. After being refrigerated overnight, open the can, and scoop out the thick solids out of the jar. That’s what you want to use! You can set the liquid that’s left-back (the coconut water) in a jar in the fridge or drink it or use it in your smoothies.
- Chill your mixer bowl in the freezer for about five minutes before adding those same thick solids out of the jar.
- Add it to a standing mixer or a bowl with a hand mixer, and add the powdered sugar. Blend together until thick and creamy.
- Scoop into to a bowl and place in the fridge. It will thicken up even more in the fridge. You can use anywhere you would use whipped cream that wouldn’t require it to sit out too long.
Notes
- This recipe is vegan, refined sugar free, and gluten free.
- If you find that your coconut whipped cream is not thickening up, you can add some tapioca starch to it. The powdered sugar brand uses tapioca starch so that should help, but a tablespoon at a time will definitely do the trick. Don’t add too much or else you’ll end up with a very artificial tasting whipped cream. I like to add about 2 teaspoons.
- You can store leftover coconut whipped cream in the fridge for up to 5 days. Keep in mind that you may need to whip it again before serving.

Coconut Whipped Cream
Ingredients
- 14 ounce can of full-fat coconut milk refrigerated overnight (or you can use a can of pure coconut cream)
- 1/4 cup organic and unrefined powdered sugar - I use this one OR 2 tablespoons maple syrup
Instructions
- Put a can of full-fat coconut milk in your fridge overnight. After being refrigerated overnight, open the can, and scoop out the thick solids out of the jar. That’s what you want to use! You can set the liquid that’s left-back (the coconut water) in a jar in the fridge or drink it or use it in your smoothies.
- Chill your mixer bowl in the freezer for about five minutes before adding those same thick solids out of the jar.
- Add it to a standing mixer or a bowl with a hand mixer, and add the powdered sugar. Blend together until thick and creamy.
- Scoop into to a bowl and place in the fridge. It will thicken up even more in the fridge. You can use anywhere you would use whipped cream that wouldn’t require it to sit out too long.
Notes
- This recipe is vegan, refined sugar free, and gluten free.
- If you find that your coconut whipped cream is not thickening up, you can add some tapioca starch to it. The powdered sugar brand uses tapioca starch so that should help, but a tablespoon at a time will definitely do the trick. Don’t add too much or else you’ll end up with a very artificial tasting whipped cream. I like to add about 2 teaspoons.
- You can store leftover coconut whipped cream in the fridge for up to 5 days. Keep in mind that you may need to whip it again before serving.
Nutrition
Coconut Whipped Cream https://jessicainthekitchen.com/2-ingredient-coconut-whipped-cream/ October 27, 2021
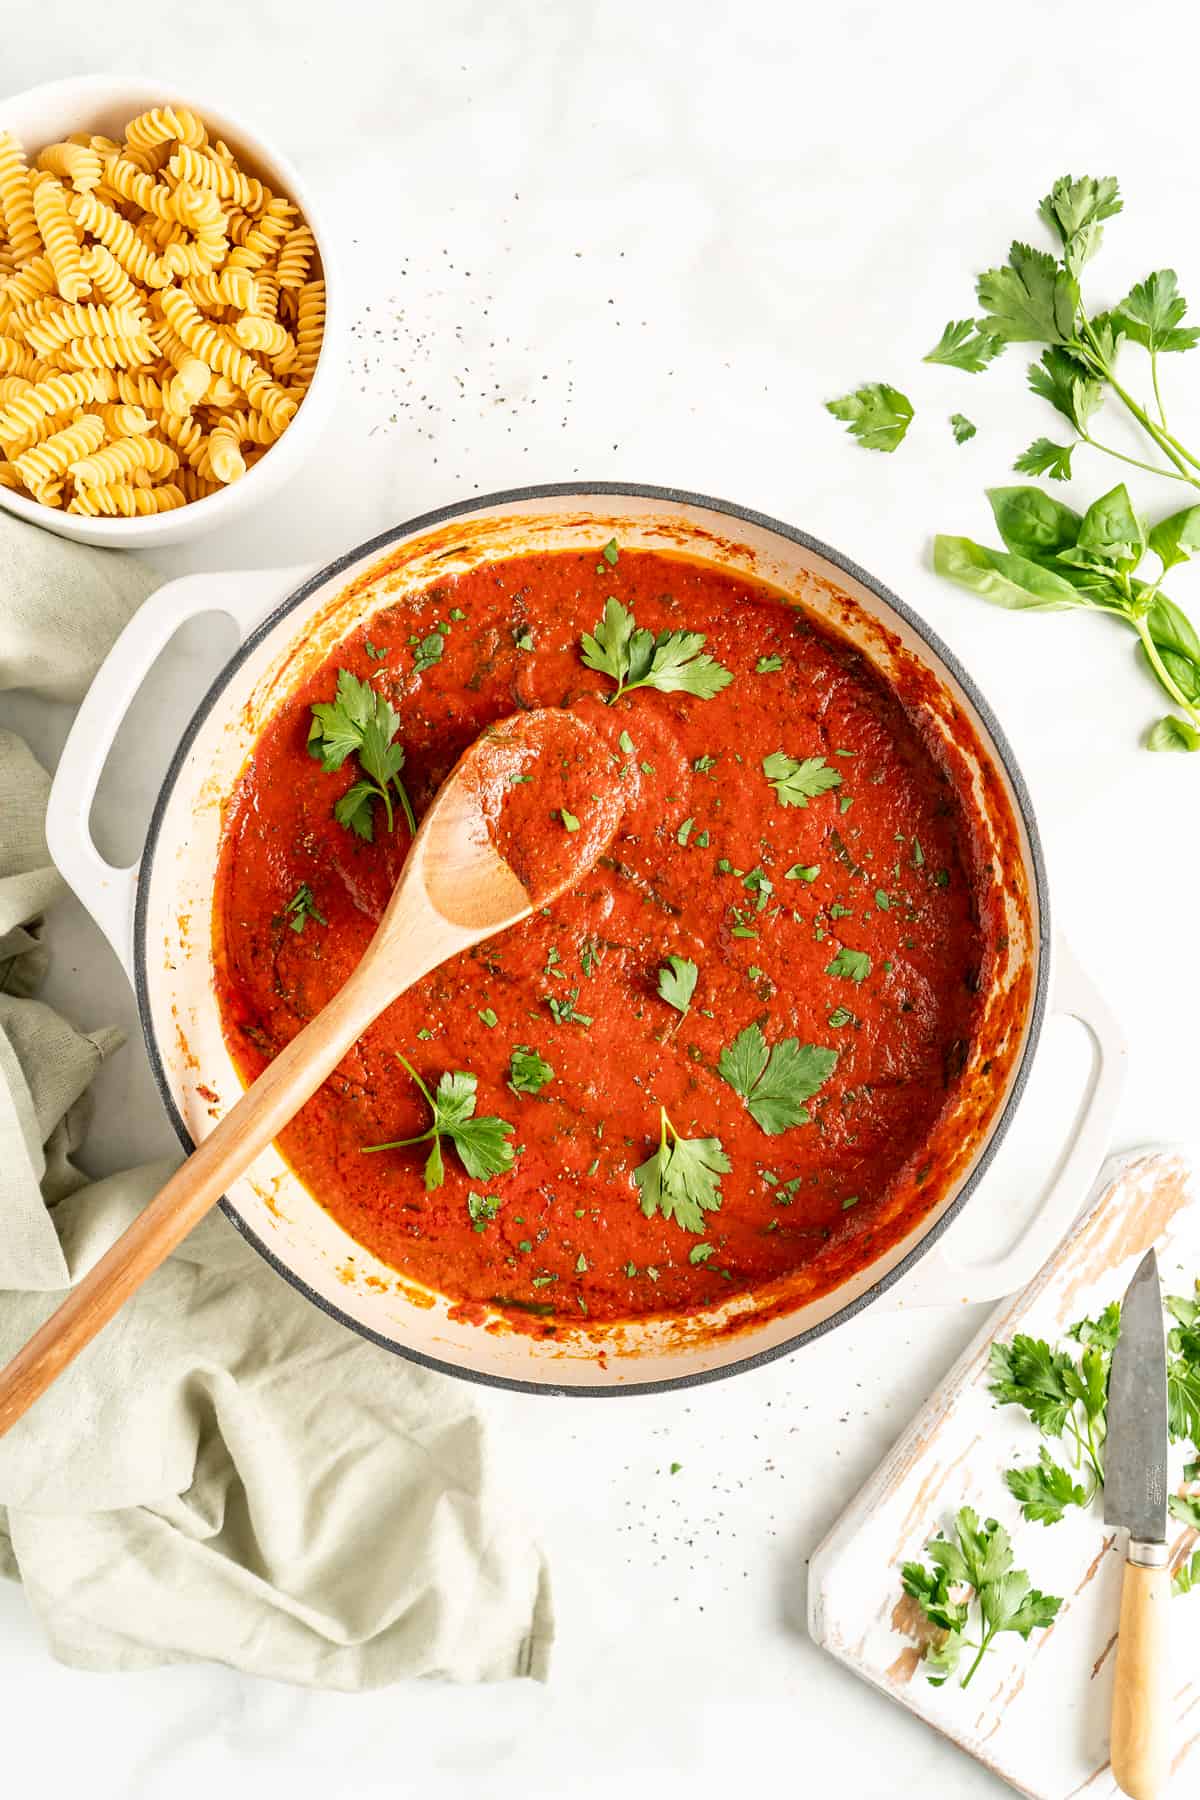
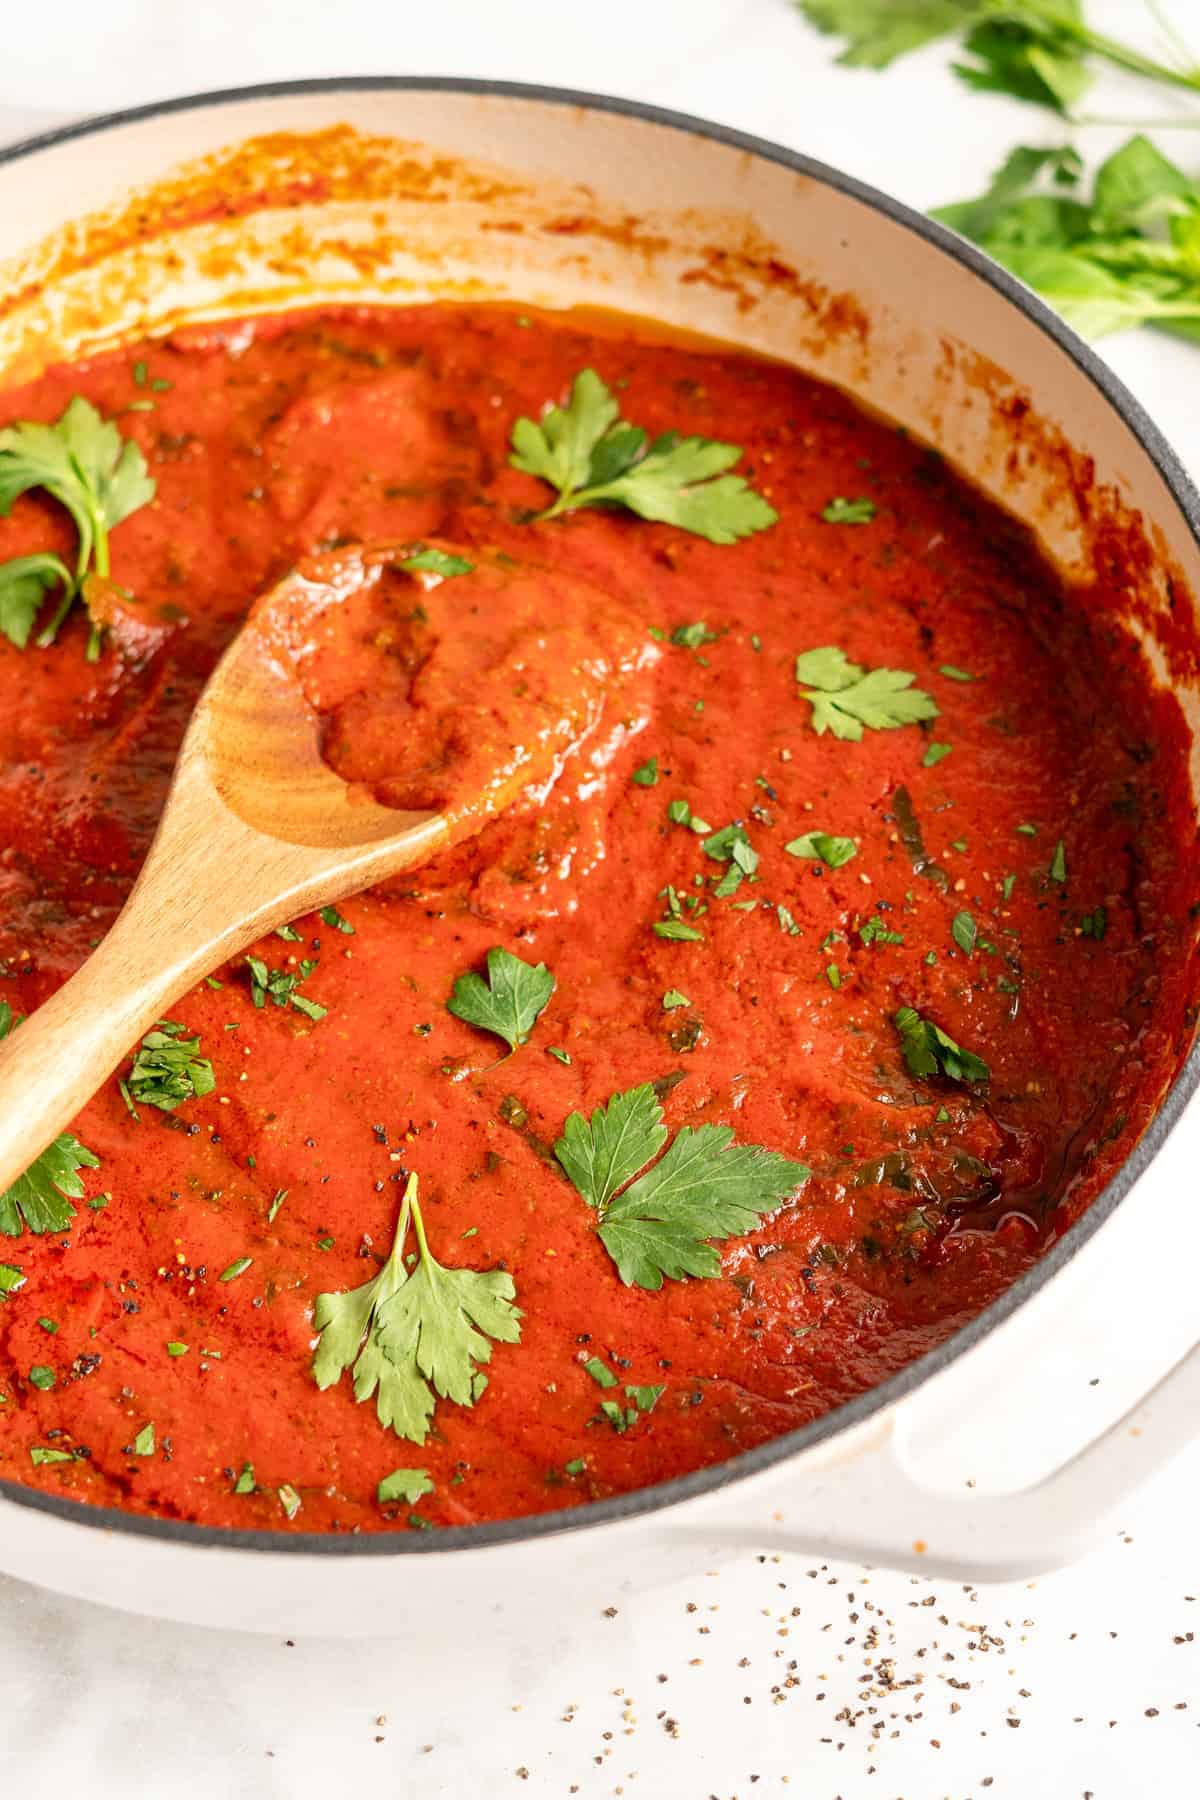
This fresh, flavorful homemade marinara sauce recipe is a cinch to make with just three ingredients: tomato paste, olive oil, and water, plus a handful of Italian herbs. Of course, the best reason to make your own marinara is that it tastes so much better than store-bought!
When I say that this is the EASIEST homemade marinara sauce, I mean it! Instead of peeling and chopping pounds and pounds of tomatoes and standing over the stove while they simmer, I’m sharing a time-saving shortcut.
I make this marinara recipe from tomato paste, olive oil, and water. With a few simple herbs and seasonings to boost the flavor, it’s done in a matter of minutes and ready to use for lasagna , pizza , or dipping arancini .
Reasons to Love This Quick Marinara Sauce Recipe
- No peeling, chopping, or slow cooking. I love homemade tomato sauce and pomodoro sauce made from fresh tomatoes. But on nights when time isn’t on my side, this quick version is ready with a fraction of the effort.
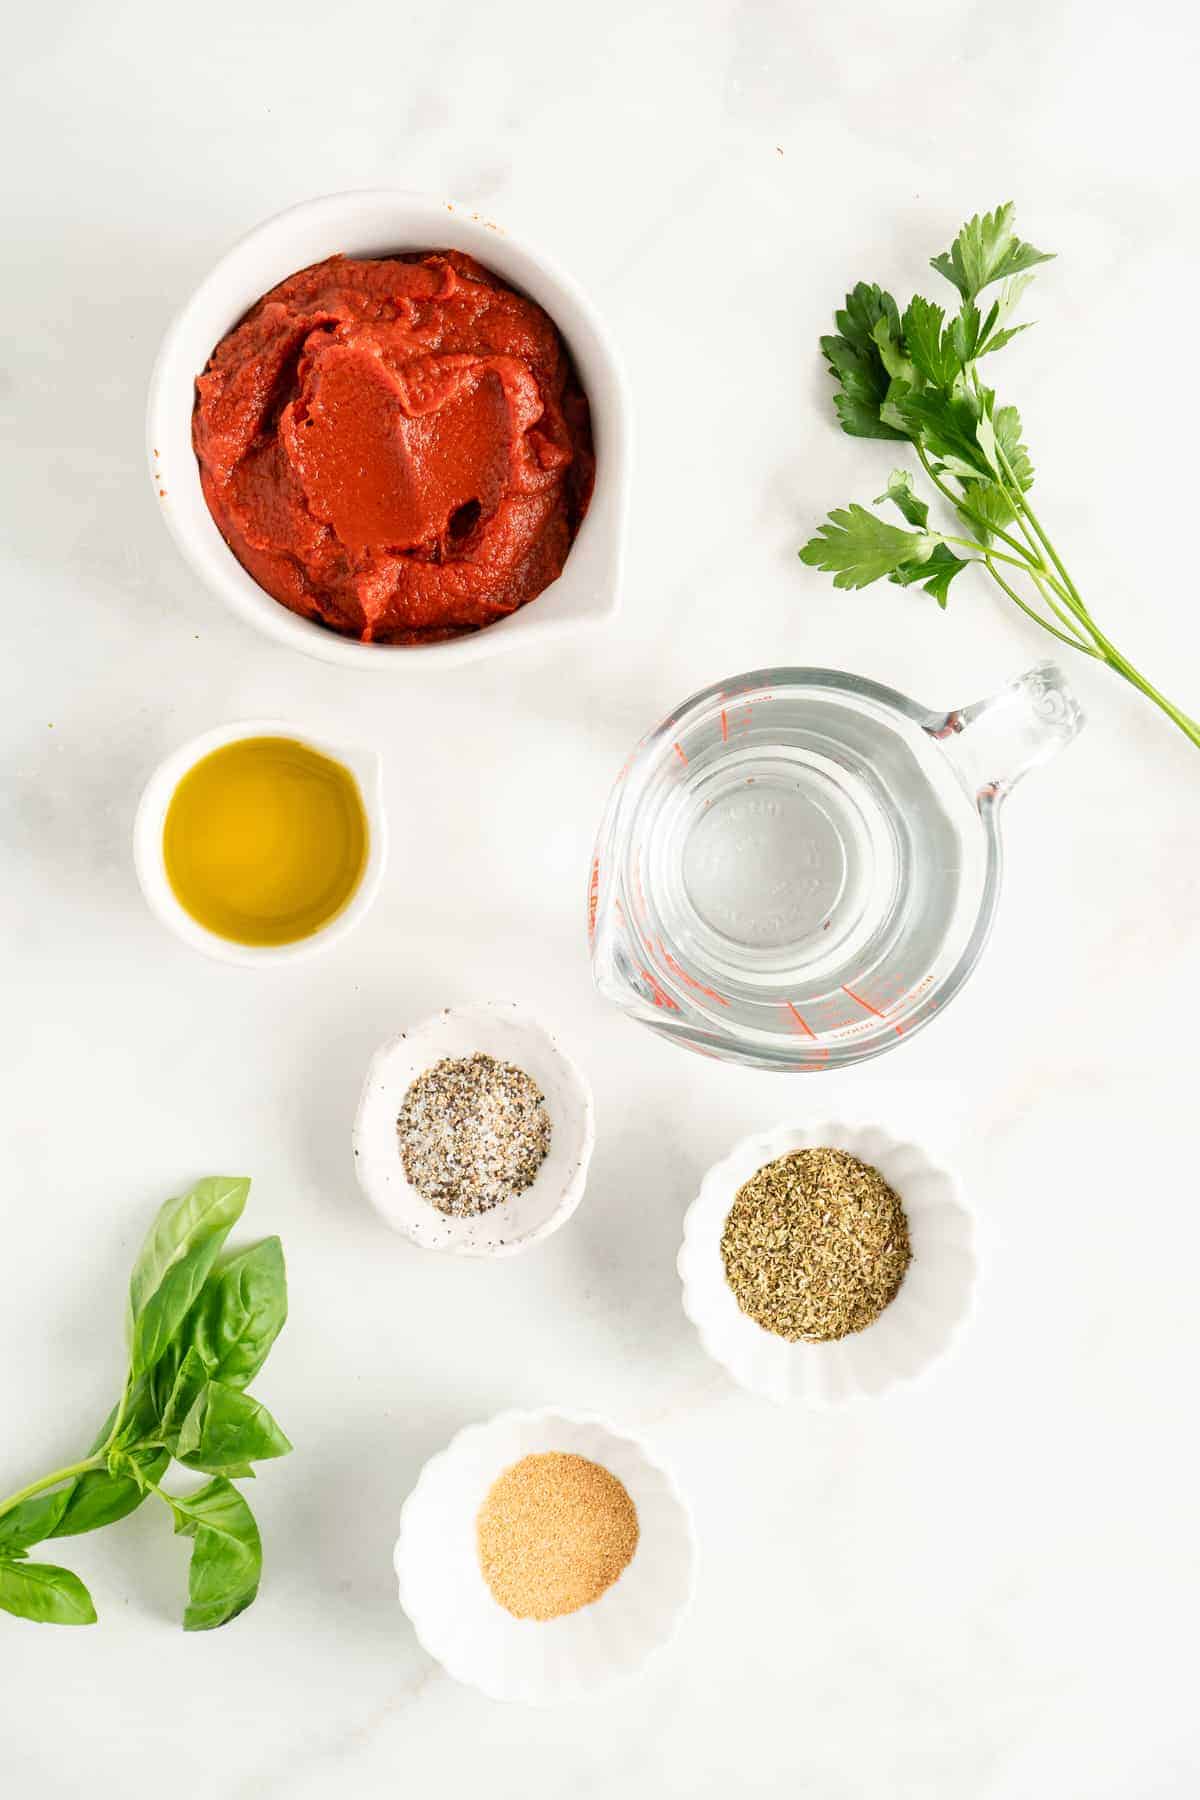
- Three ingredients. The base of this sauce is only tomato paste, olive oil, and water. After that, I add Italian herbs, like oregano, basil, and parsley, to complement the tomato.
- Versatile. This homemade marinara sauce is ideal for pairing with spaghetti and meatballs , pizzas, and vegan chicken parm sandwiches . It packs in all the flavor you want in a classic marinara and goes well with so many recipes. It also freezes beautifully, so you can keep it on hand for whenever you need it.
Notes on Ingredients
Please note that this is important information on the ingredients and instructions. The full recipe, including amounts and details, can be found below (scroll to the recipe card) for your reference.
- Tomato paste – You know how so many recipes only call for a tablespoon of tomato paste, and then you have a whole can left over? This marinara sauce recipe is a great way to use up leftover tomato paste!
- Olive oil – Choose a good-quality olive oil, as the flavor counts.
- Herbs – Oregano, basil, and parsley. I recommend fresh herbs as they have more flavor. If you’re using dried herbs in a pinch, you’ll need one-third of the amount.
- Garlic Powder – In addition to salt and pepper. You could use freshly minced garlic (about 2 fresh cloves) or onion powder will work here, too.
How to Make Homemade Marinara Sauce
Seriously, it doesn’t get any easier than this. In about as much time as it takes to open up and heat a jar of store-bought marinara, you can have your own homemade sauce instead! I like to make a big batch and keep it in the freezer for pasta dinners and pizza.
Combine the ingredients.
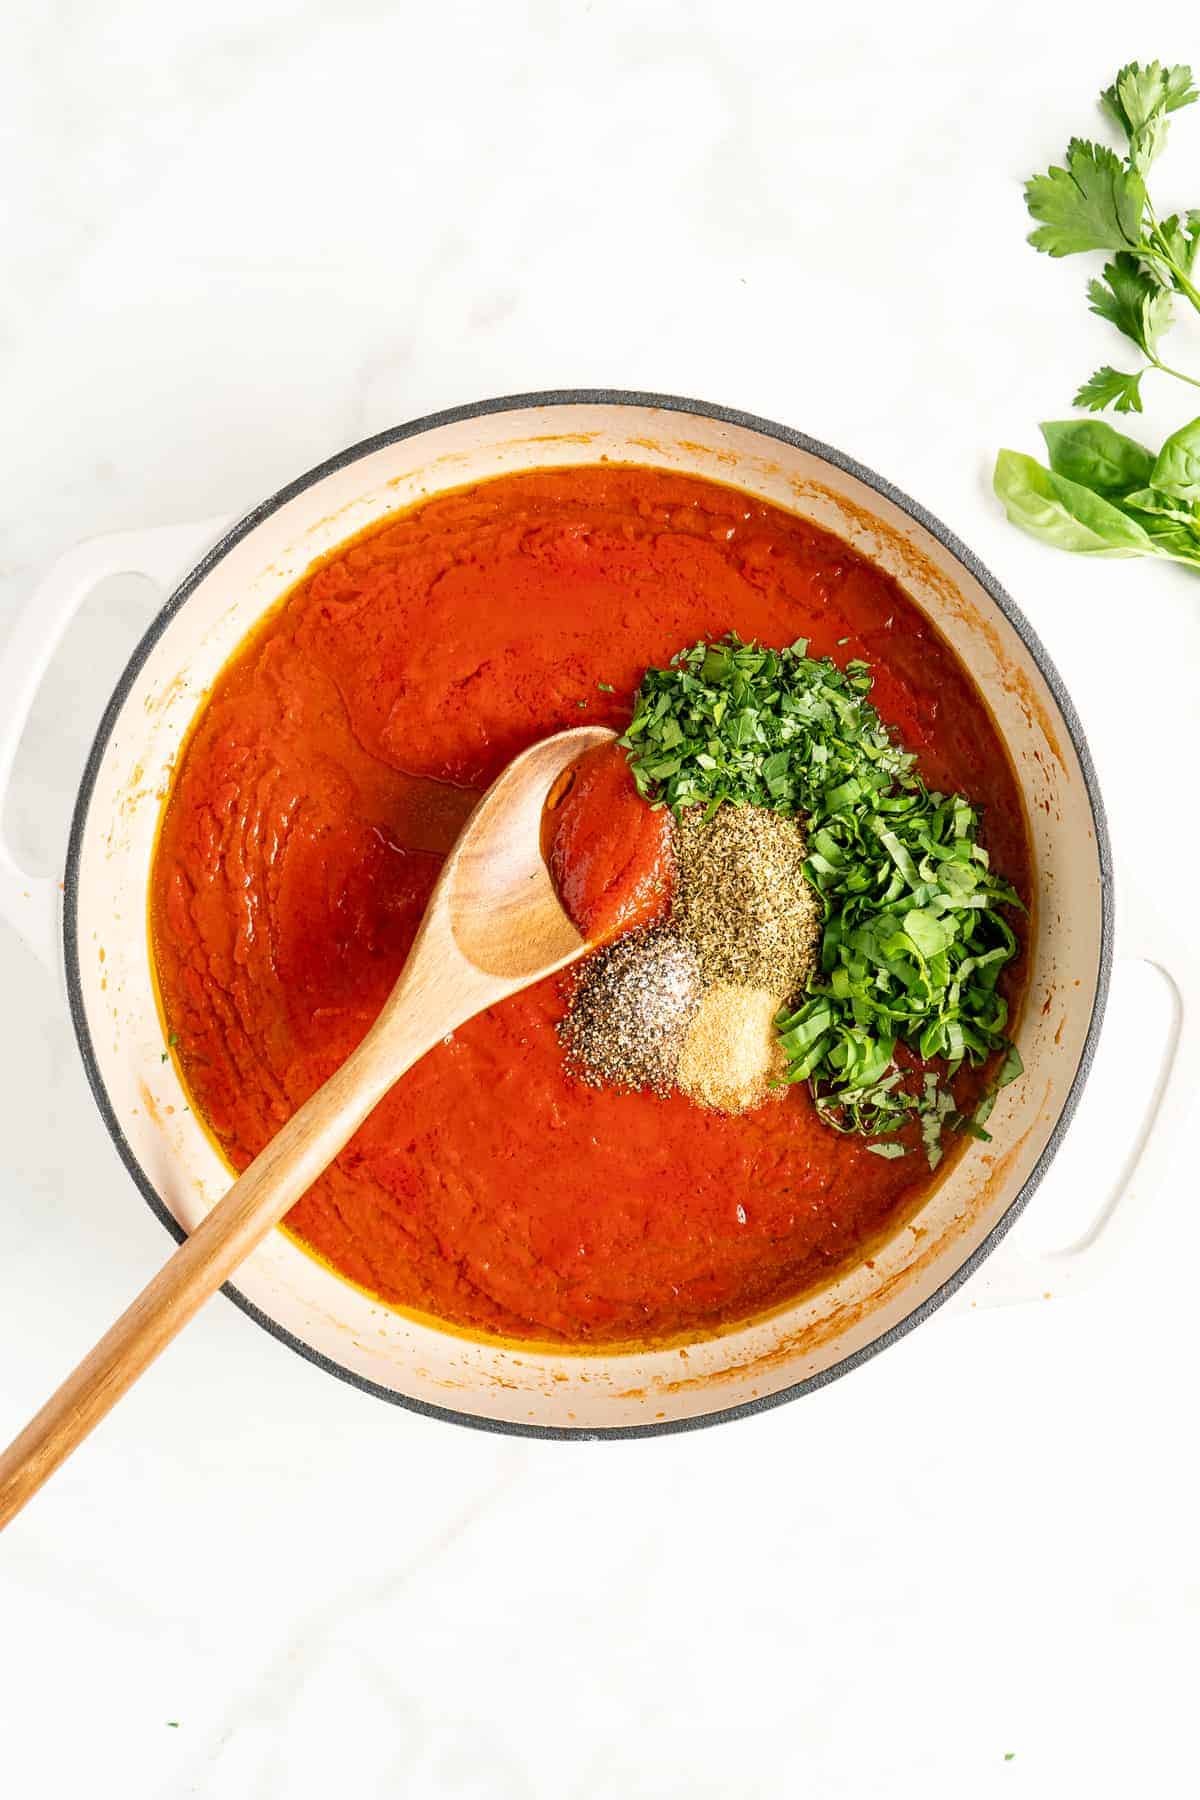
- Start the tomato base. Heat a medium saucepan over medium-high heat. Add the tomato paste, water, and olive oil and stir to combine. Bring to a boil for about a minute, then season with salt and pepper to taste.
- Add the seasonings. Stir in the rest of the ingredients, setting aside some of the parsley for garnish. Reduce the heat to low and cover; simmer for 5 to 8 minutes.
- Finish. Add more water by the tablespoon if you’d like a thinner sauce, then garnish with the parsley.

Recipe Tips
- Use a high-quality tomato paste. Since you’re using paste instead of tomatoes, you want to make sure you buy the best tomato paste you can find. (Tubes of tomato paste are generally more flavorful than canned, although they’re not sold everywhere.)
- Make sure you use a stainless steel or other non-reactive saucepan. Aluminum, cast iron, and copper react with the acid in tomato sauce, so they’re not the best choice.
- Add a pinch of sugar if you need to. Taste the sauce, and if you need to cut the acid a bit, a pinch of sugar helps.
Ways to Use Marinara Sauce
With a batch of this easy homemade marinara sauce ready in 15 minutes, these are some of my favorite ways to put it to use in recipes.
- Pizza. Homemade marinara sauce makes an excellent pizza sauce for classic pizza or French bread pizza recipes.
- Pasta recipes . Toss spaghetti or your favorite pasta with savory marinara sauce and meatballs, or add this sauce to vegan gnocchi , lasagna, or baked ziti .
- As a dipping sauce. Serve marinara sauce as a dip with breadsticks, low-carb pizza bites , or crispy polenta fries .
- More Italian-style dishes. Use this marinara sauce to make vegan chicken parmesan and stromboli .

How to Store
- Refrigerate. Store your homemade marinara in a jar or an airtight container for up to a week in the refrigerator.
- Freeze. Marinara sauce is great for freezing! I like to transfer it to freezer bags and freeze them flat for easy storage. Then, when you’re ready to use it, you can place the bags in a bowl of hot water until they thaw, then heat the sauce in a saucepan on the stove. Marinara will last up to 3 months in the freezer.
More Easy Homemade Sauces
- Arrabbiata Sauce
- Vegan Alfredo Sauce
- Basil Pesto
- Parsley Pesto
Ingredients
- 6 oz. of tomato paste
- 6 oz. of water
- 2 tbsp olive oil
- 2 teaspoons of oregano
- 1 teaspoon fresh basil , chopped
- 1 tbsp of fresh parsley , chopped
- 1/2 teaspoon of salt
- 1 teaspoon garlic powder
- 1/2 teaspoon of pepper
Instructions
- Heat a medium pot over medium-high heat. Add the tomato paste, water and olive oil to heat. Using a spatula or spoon, stir ingredients together frequently until incorporated and begins to boil a little for about 1 minute.
- Add salt and pepper to taste and incorporate. Then add the rest of the ingredients, leaving a little parsley behind. Stir ingredients and lower heat to low. Cover the pot and leave to simmer for about 5 minutes to 8 minutes, checking to make sure the basil and parsley don’t burn. If it’s too thick for you, you can add more water by the tablespoon.
- Garnish with remaining parsley.
