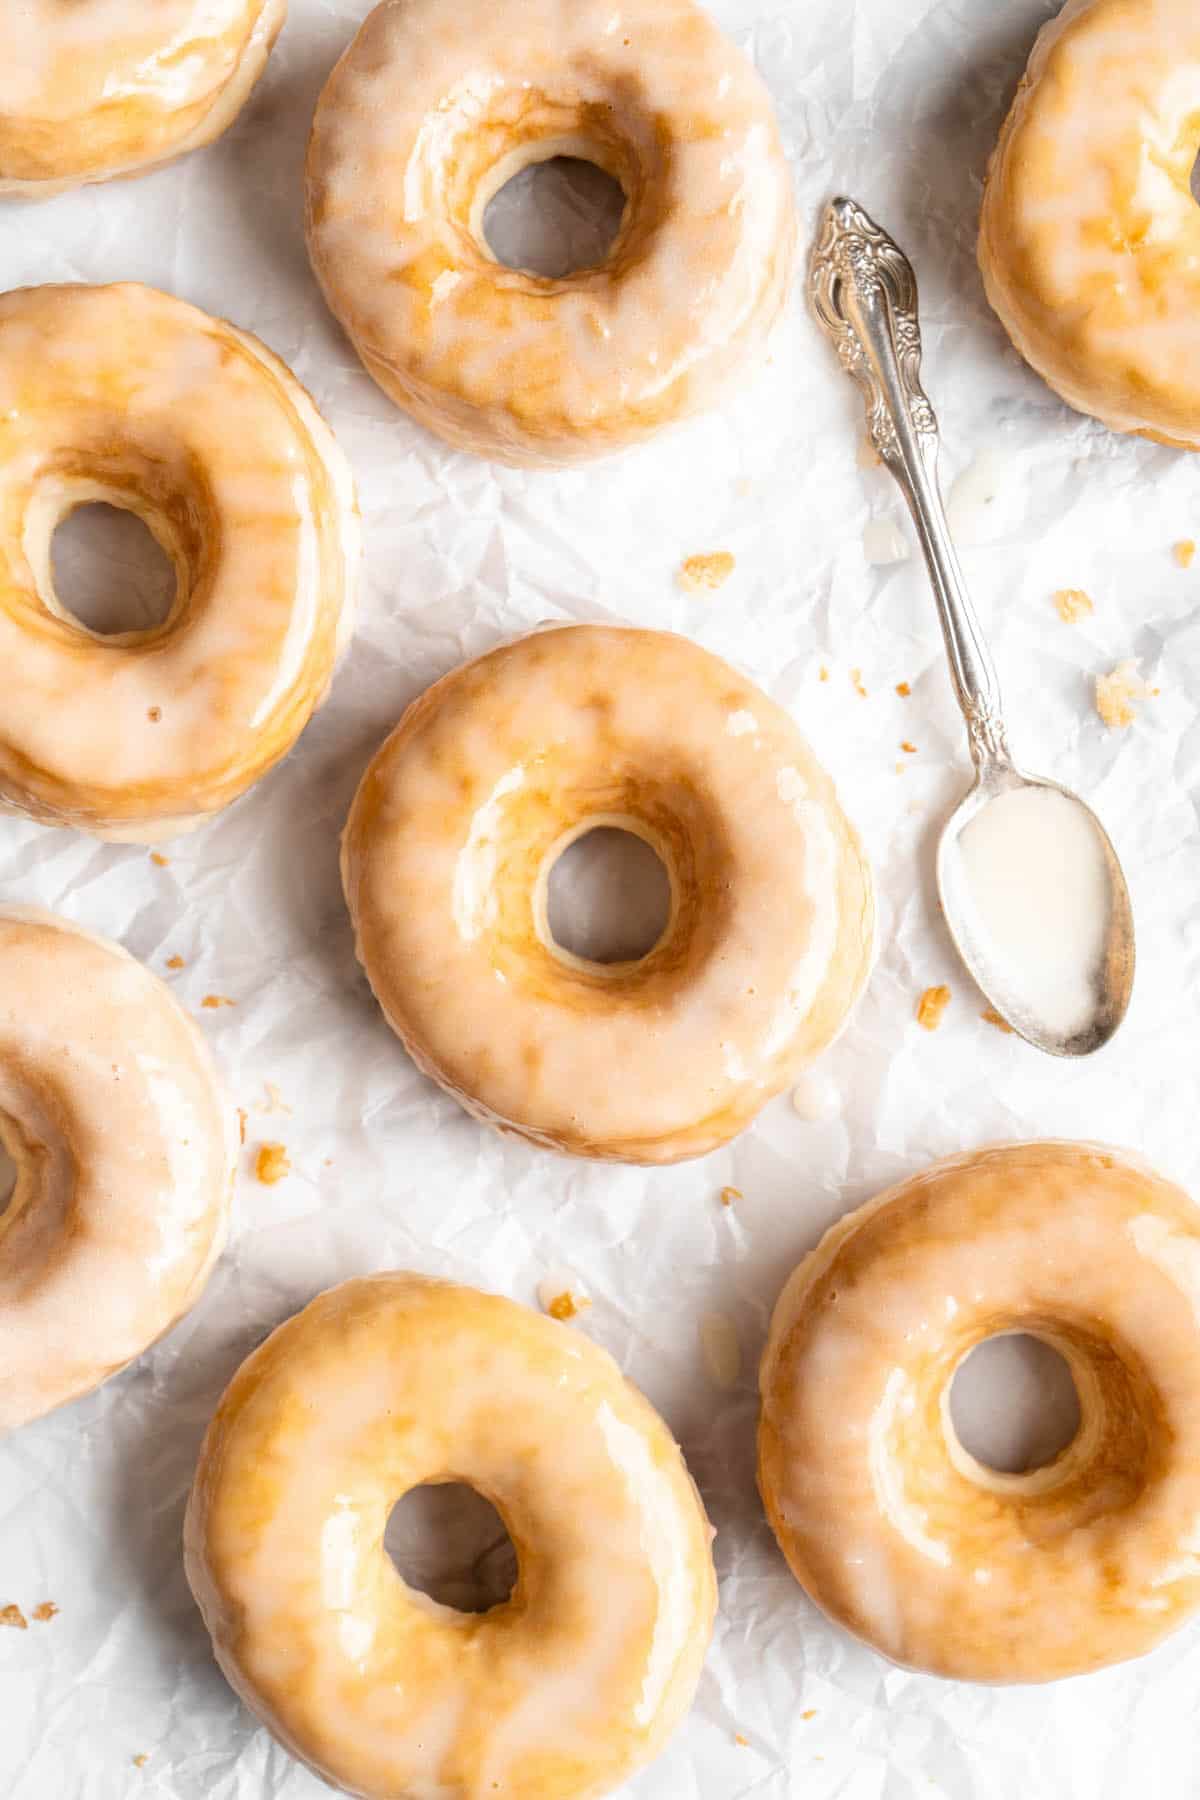
Soft, warm, and encased in a sugary glaze, these vegan donuts are like a plant-based version of Krispy Kreme! They’re the perfect breakfast treat for a special occasion—or just because!

I’ve shared so many yummy breakfast ideas over the years on Jessica in the Kitchen— Banana Oatmeal Breakfast Cookies , Strawberry Coconut Overnight Oats , Coconut Kiwi Green Smoothie Bowls —but today it’s time to share something a little more indulgent. These vegan donuts are just like the ones you get from your favourite donut shop, minus the eggs and dairy!
They’re puffy and soft, with a crispy exterior and sweet, shimmery glaze. They’re practically melt-in-your-mouth tender, and they pack a little bit of nostalgia in every bite. Let’s be real: donuts are fun , and pretty much impossible to resist. Especially when they’re vegan donuts !
Because these are yeast donuts, they take a bit of time to make, but trust me when I say they are so worth it. There’s nothing like biting into a warm, freshly glazed homemade donut!
Is It Better to Bake or Fry Donuts?
When it comes to yeast donuts, deep frying is best. It’s the only way to get that slightly crispy exterior and the soft, pillowy interior.
Now, if you’re nervous about deep frying, I get it! But it’s easier than you think, and if, like me, you take an everything-in-moderation approach to eating, it’s really not a big deal to have a deep fried donut or two as a special treat on occasion.
It’s also important to note that when you make sure your oil is at the right temperature, the food you fry won’t be over-loaded with oil. Instead, the oil quickly sears the outside, forming a barrier that keeps the frying oil from soaking in. If the oil isn’t hot enough, it will seep into your donuts, making them oily and giving them a weird texture.
Notes on Ingredients
Please note that this is important information on the ingredients and instructions and the FULL recipe with amounts and details can be found DOWN BELOW (scroll to it) in the recipe card.
For the tangzhong:
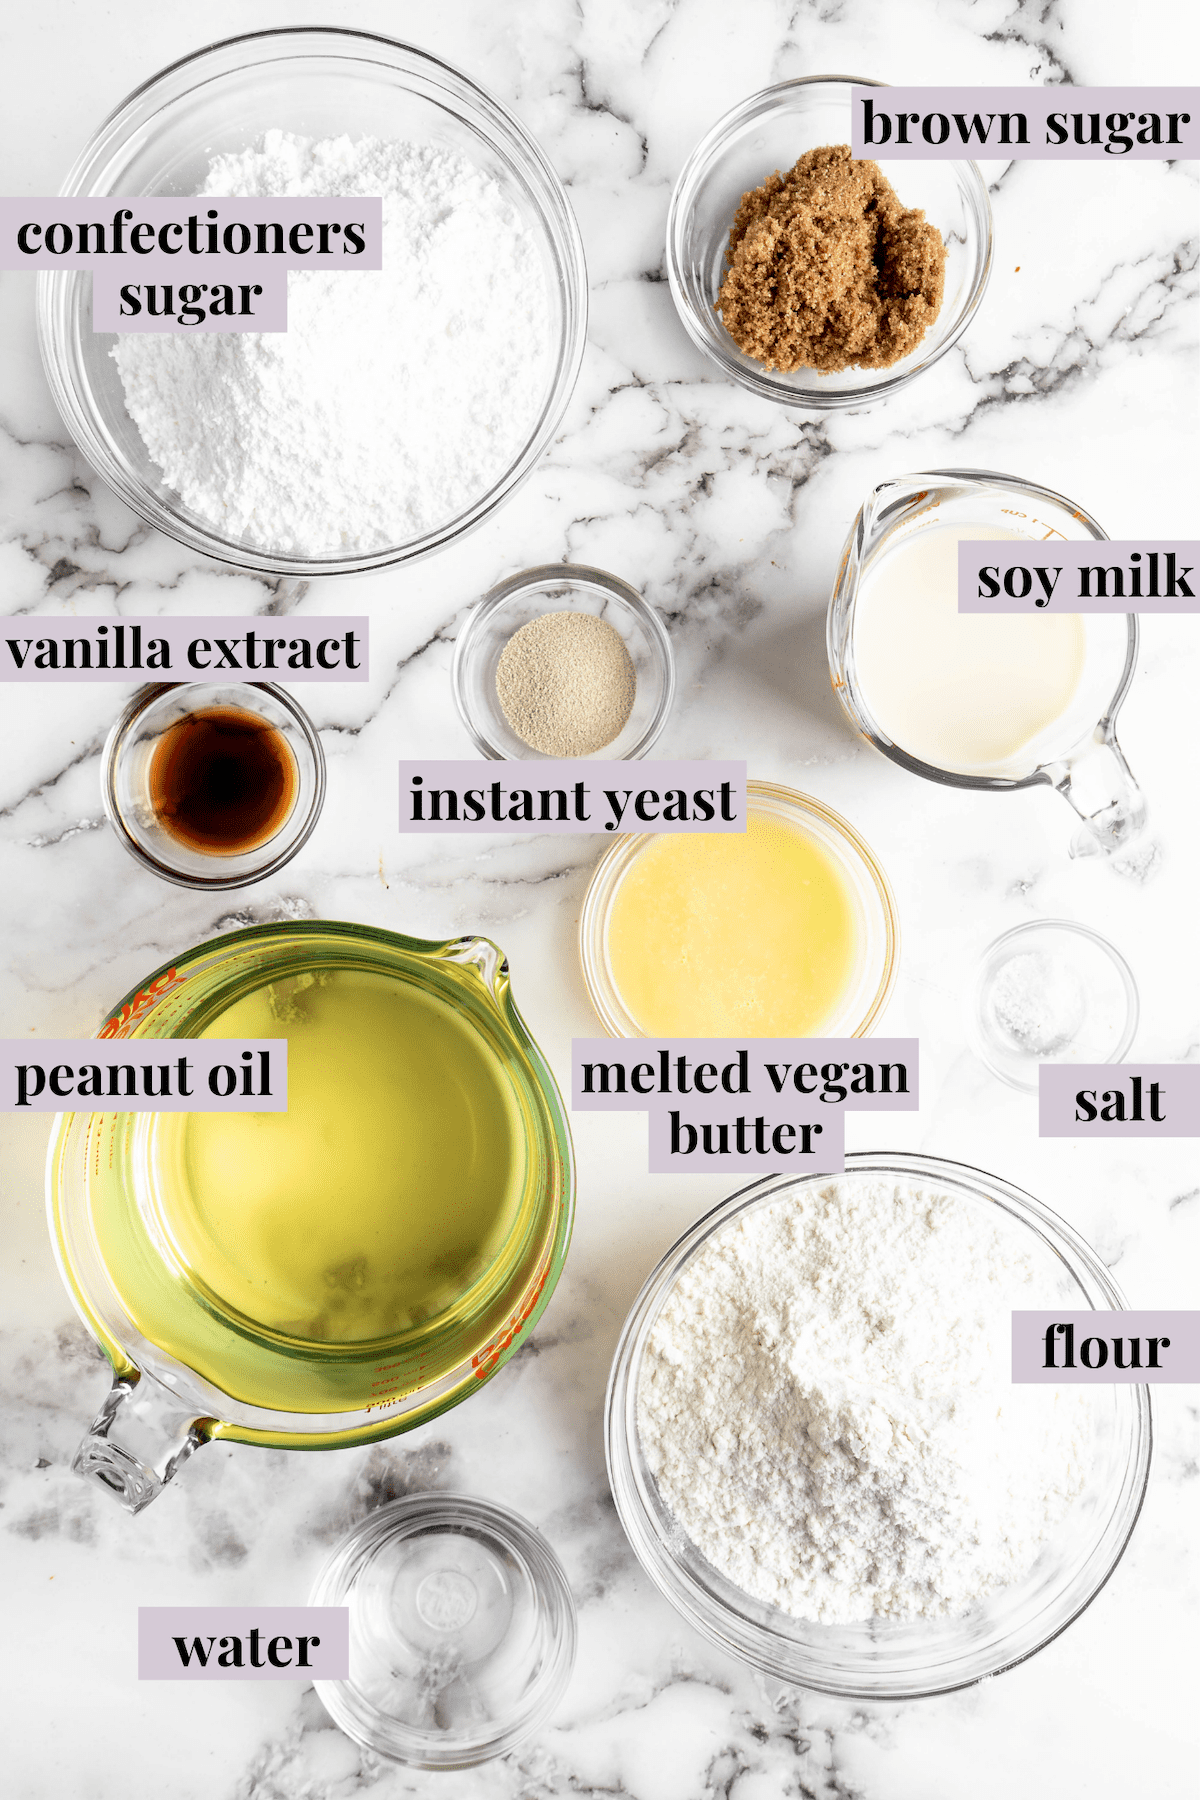
- All-purpose flour
- Soy milk
- Water
For the vegan donuts:
- All-purpose flour
- Brown sugar
- Instant yeast – Be sure to use instant yeast and not another variety. (Also see: How to Test Yeast to see if it’s still Good )
- Sea salt
- Vegan milk – Soy milk is my preference; it should be warm to touch, ranging between 110°F to 120°F.
- Vegan butter – Melt this in the microwave or in a small saucepan on the stove.
- Vanilla extract or almond extract – Vanilla will give you the classic donut shop flavour, while almond extract is a bit more unexpected!
- Peanut oil – Or another oil suitable for deep-frying.
For the glaze:
- Confectioners’ sugar – Sift this first to make sure there aren’t any lumps in your glaze!
- Vegan milk
- Vanilla extract or almond extract
Special equipment:
- Deep fry/candy thermometer
- Large, deep, heavy skillet
- Donut or biscuit cutters
How to Make Vegan Donuts
Like my vegan cinnamon rolls and Japanese milk bread , this vegan donut recipe starts with tangzhong, which is a cooked milk, flour, and water mixture.
Make the tangzhong:
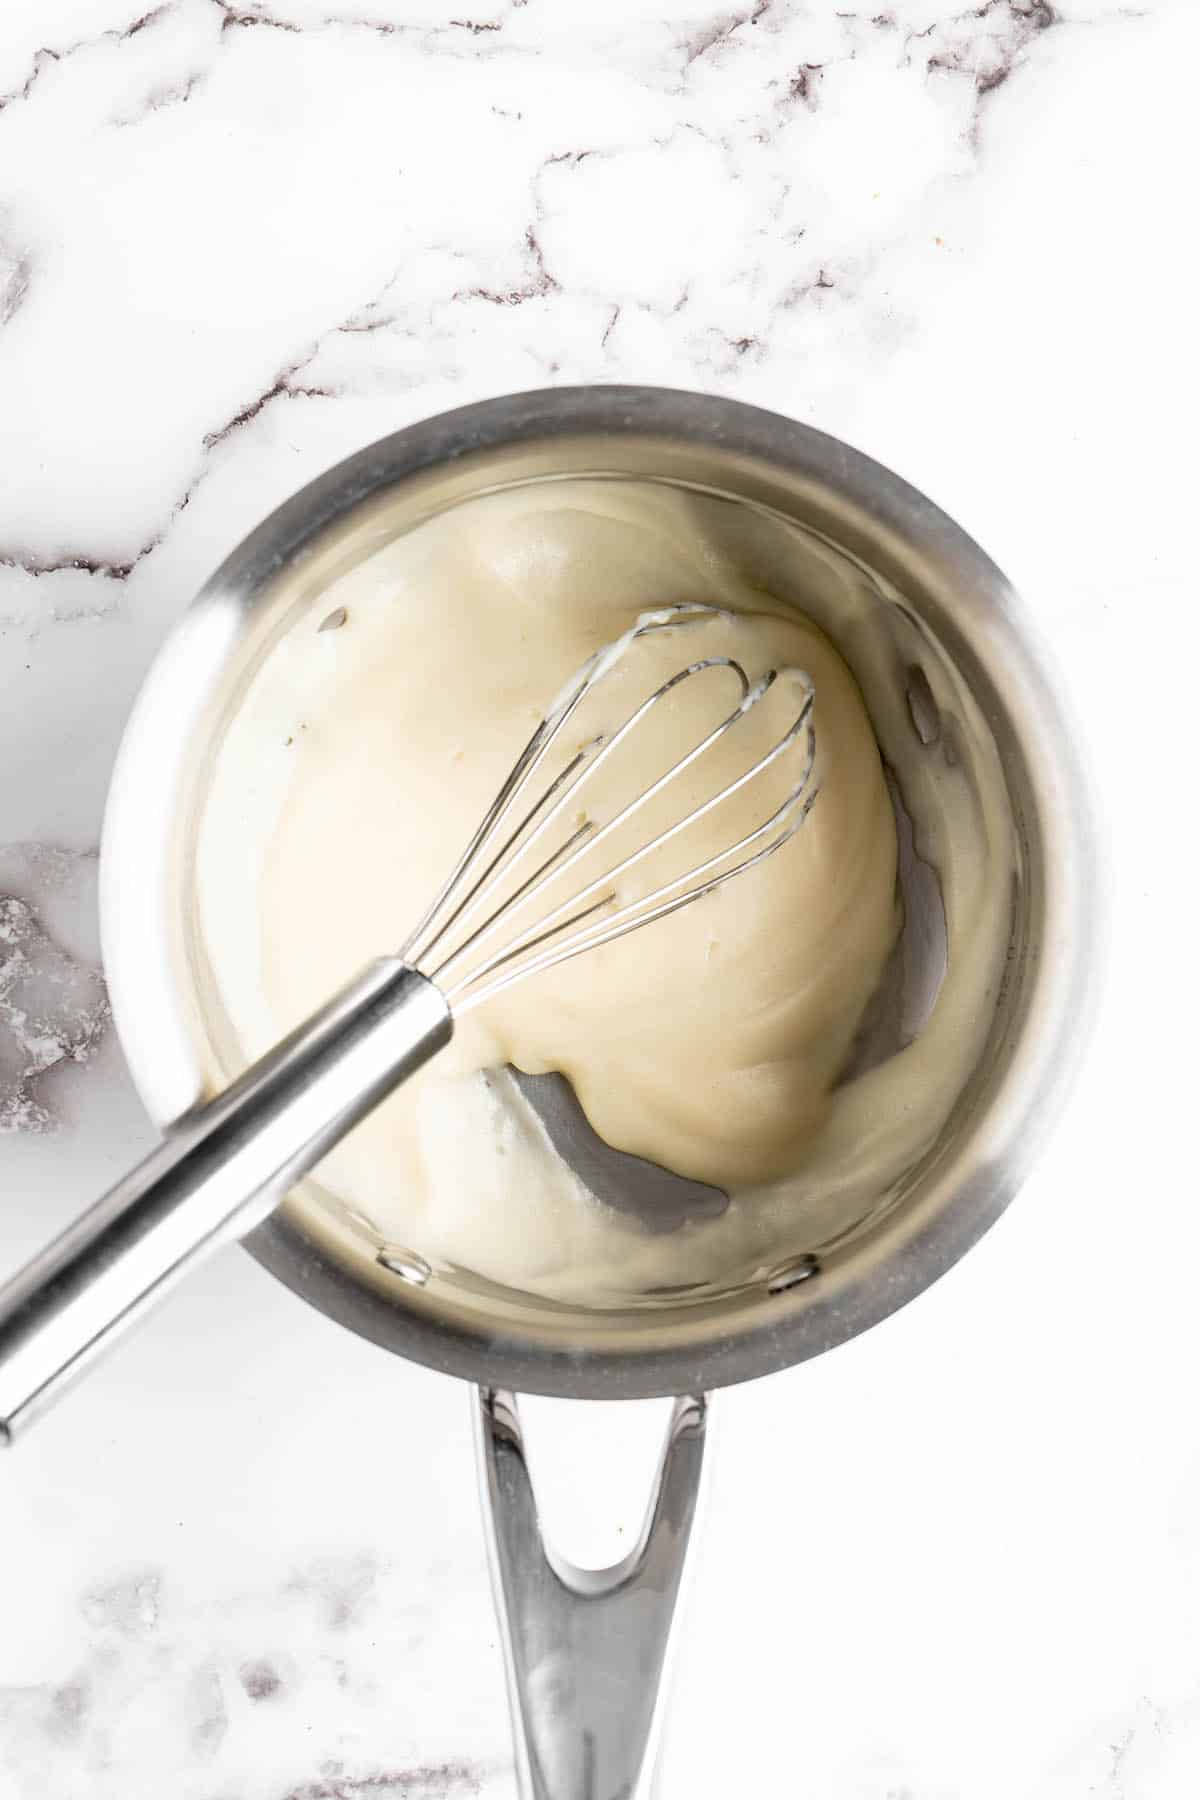
Warm the ingredients . In a small pan set over medium-high heat, whisk the flour, vegan milk, and water until smooth. Continue to stir until the mixture thickens to a pudding-like consistency.
Chill . Remove the pan from the heat and pour the tangzhong into a small bowl. Refrigerate for 10 minutes.
Make the vegan donuts:
Start the dough . Whisk the dry ingredients in a large mixing bowl or the bowl of your stand mixer. In a second, smaller bowl, whisk the tangzhong, milk, vegan butter, and vanilla extract. Pour the wet ingredients into the dry ingredients, then knead by hand or with the dough hook of your mixer until a soft dough forms.
Rest . Cover the mixing bowl with a kitchen towel and let the dough rest for 10 minutes.
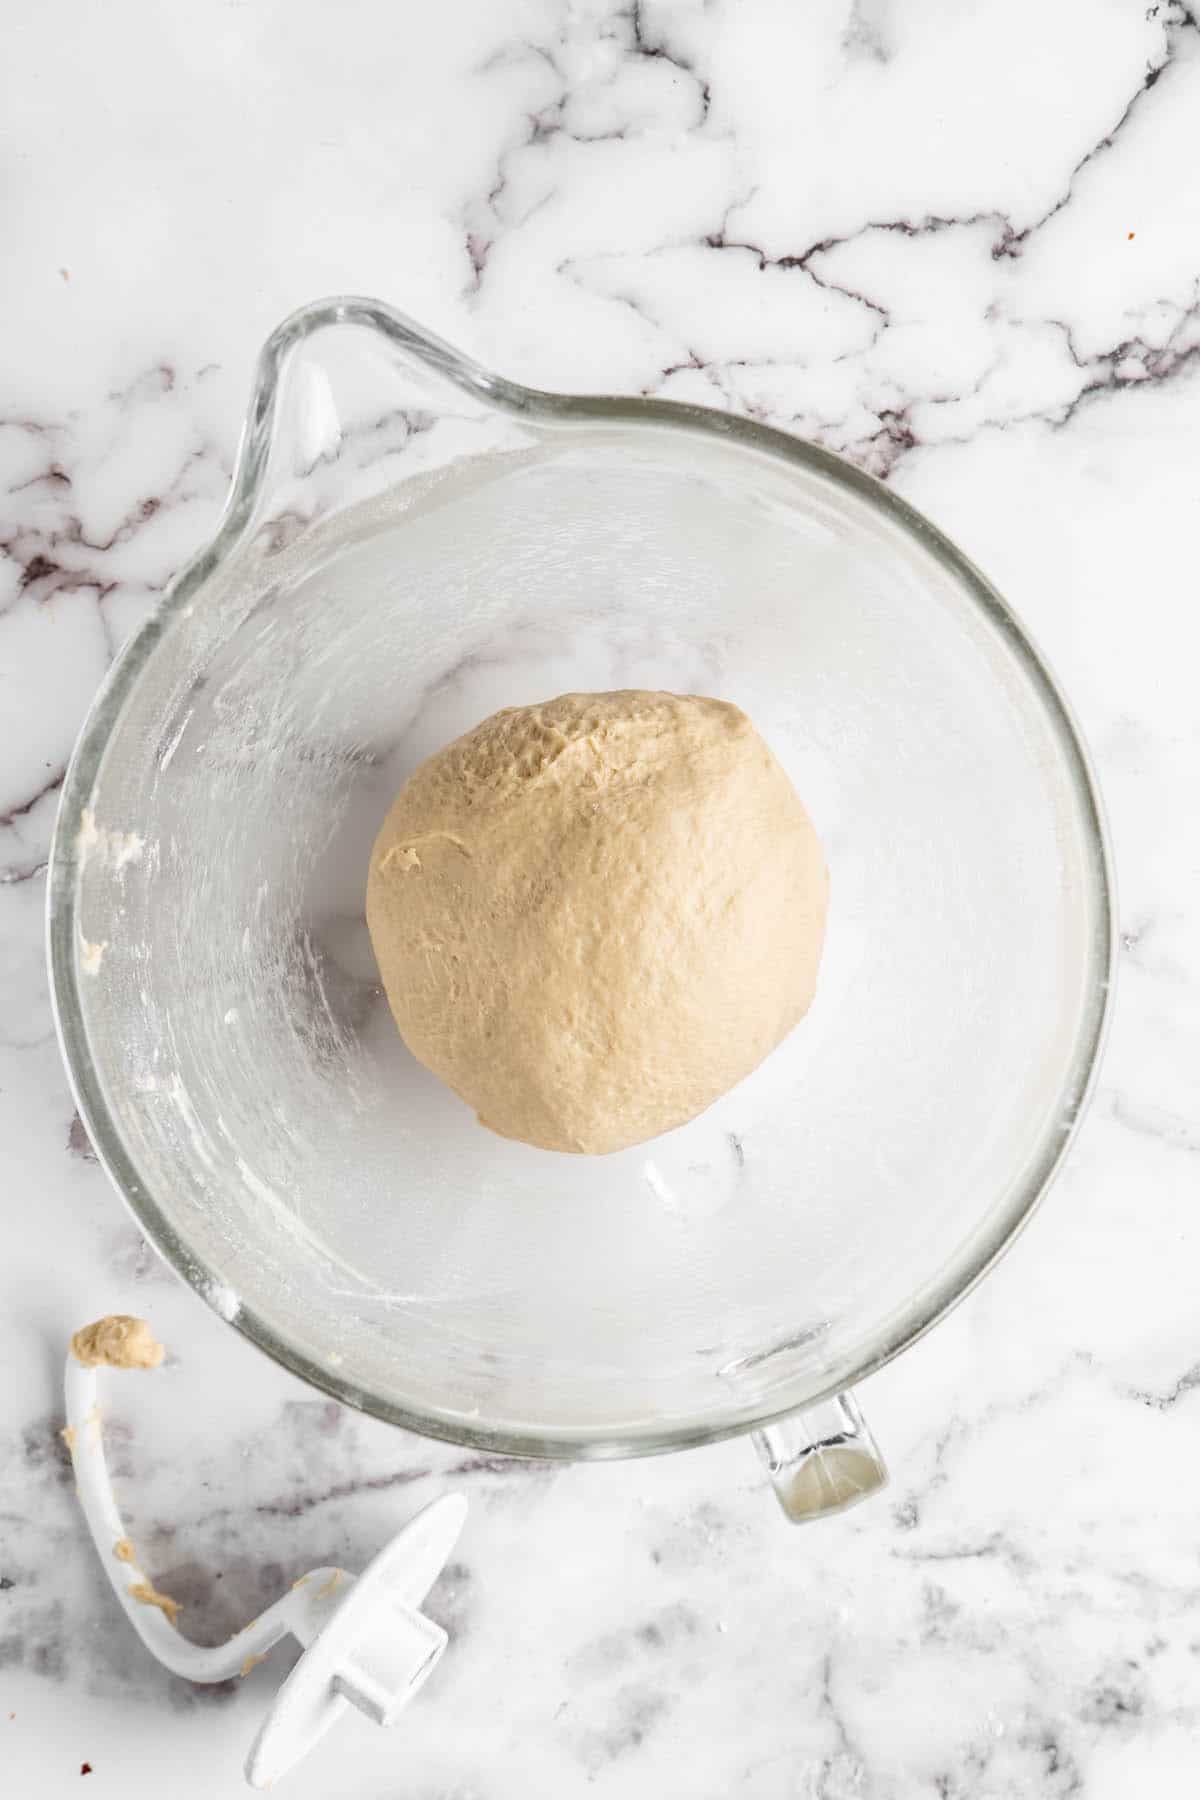
Knead . Now, knead the dough for 6 to 8 minutes using the dough hook or your hands. If you’re kneading by hand, you can simply reach in the bowl and knead it in there. The dough should be smooth, soft, and just a bit sticky, but if needed, you can add up to 2 tablespoons of flour while kneading.
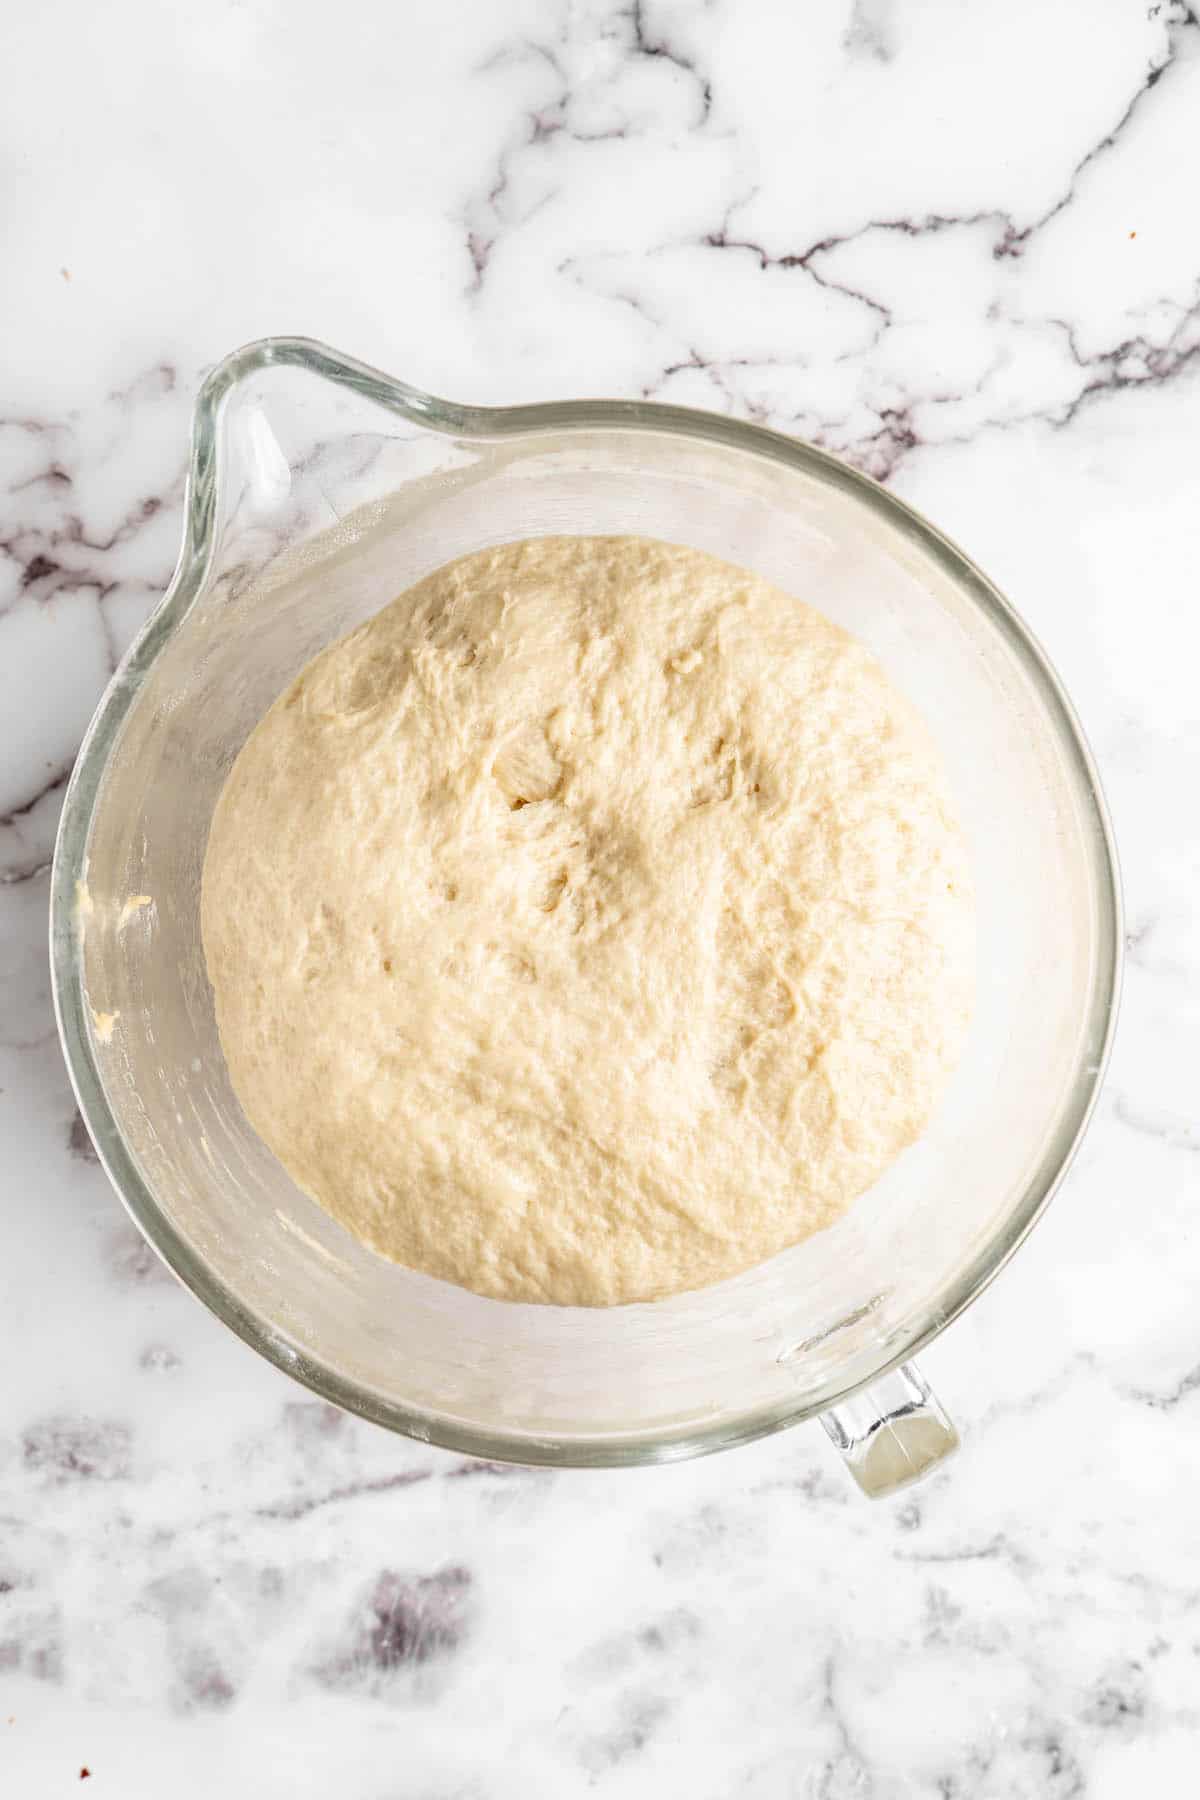
Let the dough rise . Transfer the dough to a large bowl lightly greased with oil. Cover the bowl with the kitchen towel and place it in a warm spot in your kitchen, away from any drafts. Allow the dough to rise for about 2 hours, or until it has doubled in bulk.
Roll out the dough . Gently punch down the dough in the bowl, then turn it out onto a lightly floured work surface. Pat or roll the dough into a rectangle between 1/4- and 1/2-inch thick. If the dough feels too sticky to work with, add a touch more flour, but be conservative here; too much flour will yield tough donuts.
Cut the donuts. Use a donut cutter, a large and small biscuit cutter, or the lip of a cup to cut the doughnuts. Press together the scraps, re-roll them, and cut donuts from those too. (Rather than discarding or re-rolling the donut holes, you can fry them separately. They’re good for testing the oil before you add the bigger donuts!)
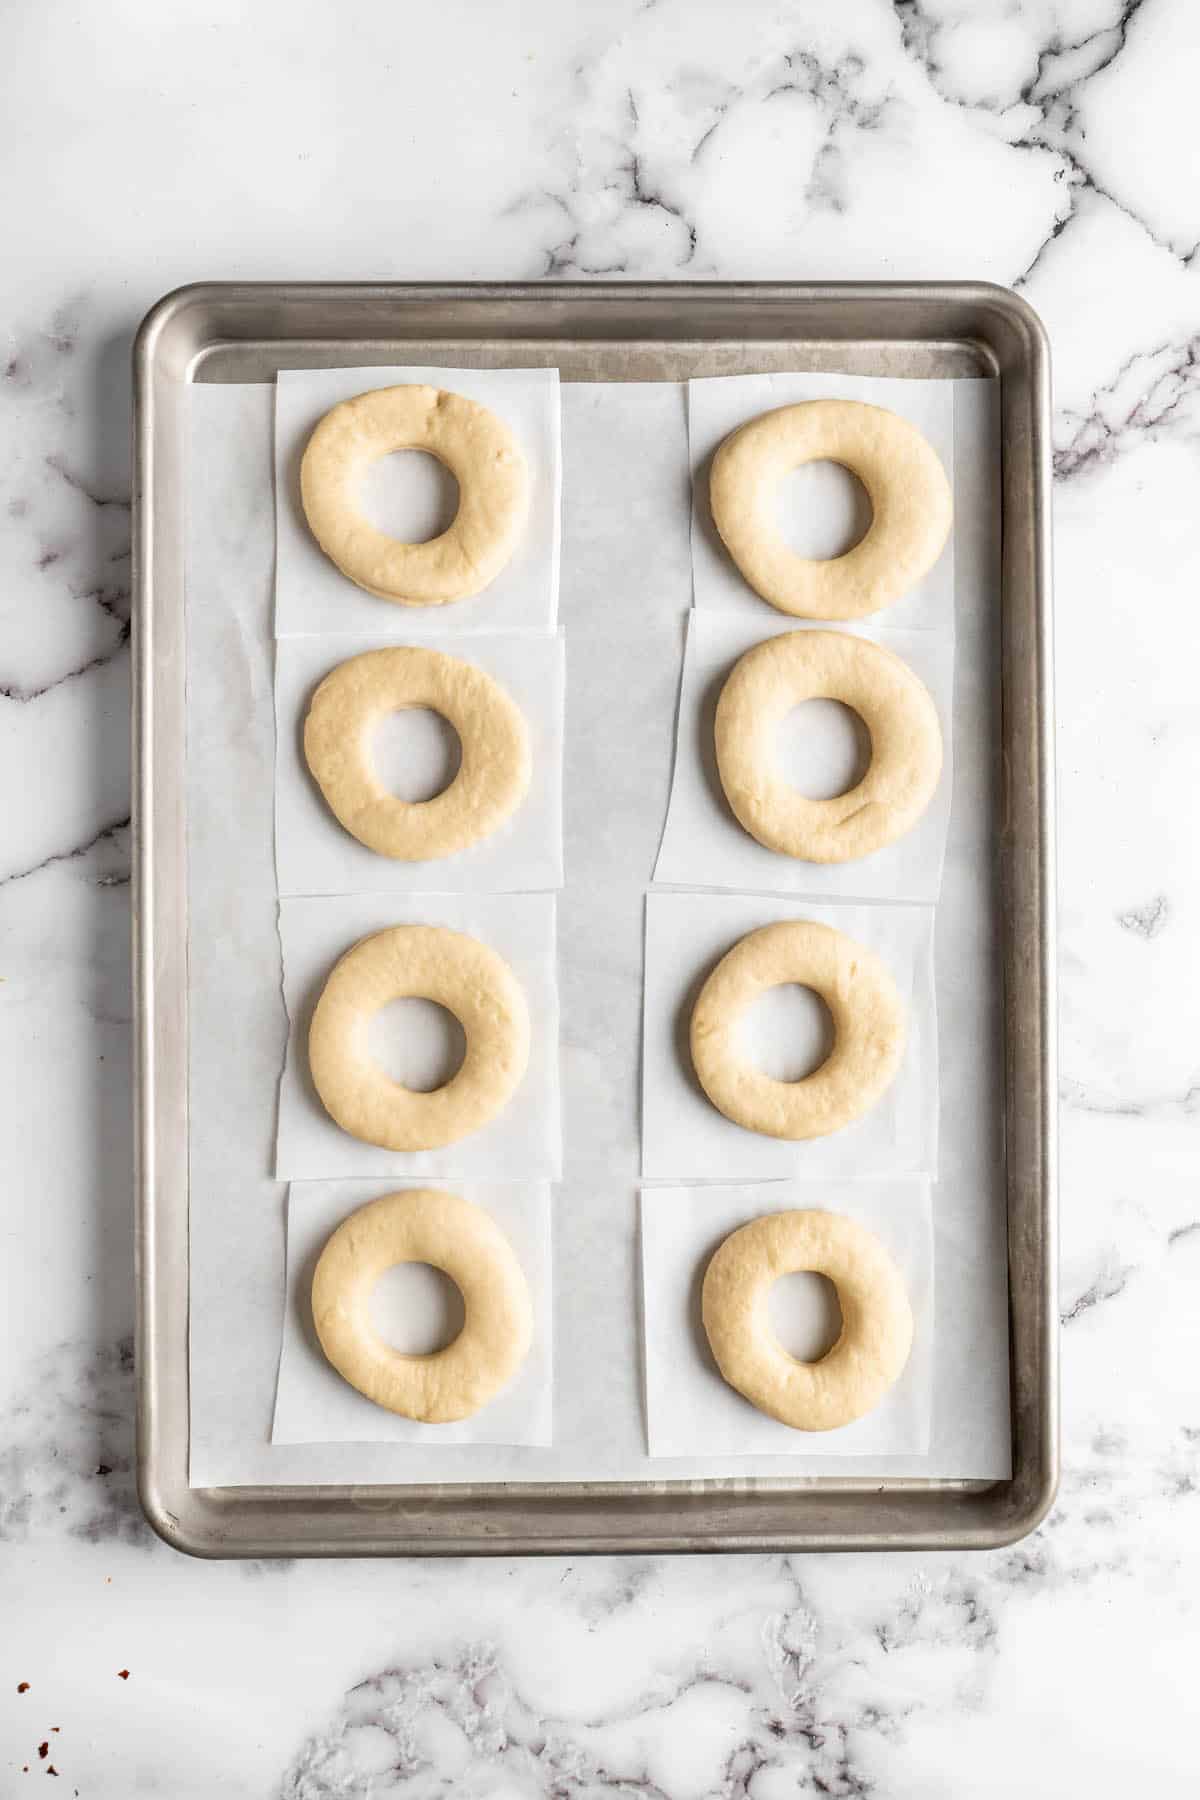
Let the donuts rise . Cover the donuts with greased plastic wrap and let them rise again until they’re about doubled in size, about 45 minutes to an hour.
Prepare . Heat the oil in a deep, heavy skillet to 350ºF/180ºC and line a large baking sheet with paper towels.
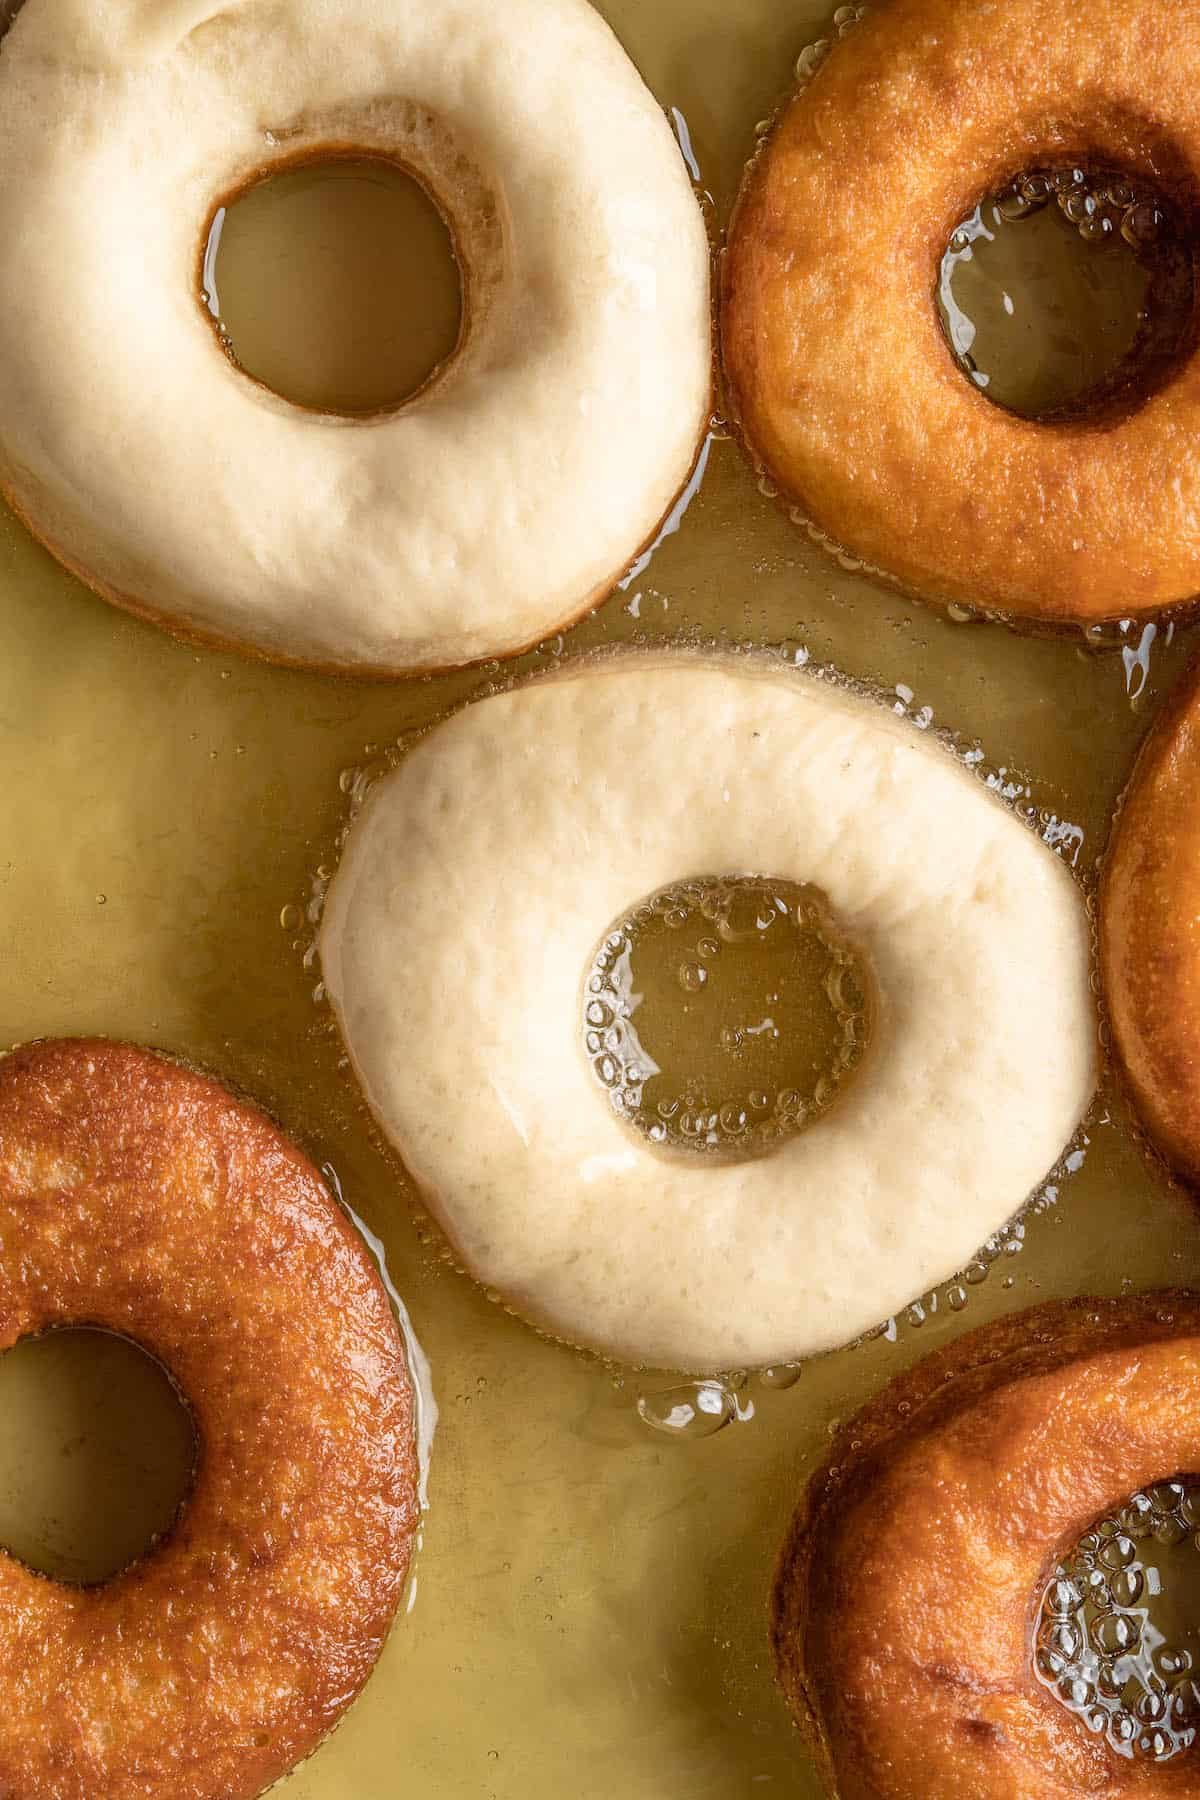
Fry the donuts . Slide a lightly floured bench scraper or metal spatula under a donut and drop it into the oil. Repeat with one or two more donuts, being careful not to crowd them. Fry the donuts until they’re golden brown on the bottom, then flip them and cook the other side. Use a slotted spoon to remove them and transfer them to the prepared baking sheet to let any excess oil drain off.
Glaze the donuts:
Prepare . Place a large wire cooling rack on a baking sheet lined with foil. This helps make cleanup easier!
Make the glaze . Whisk the confectioners’ sugar, warm milk, and extract in a large bowl until the glaze is smooth.
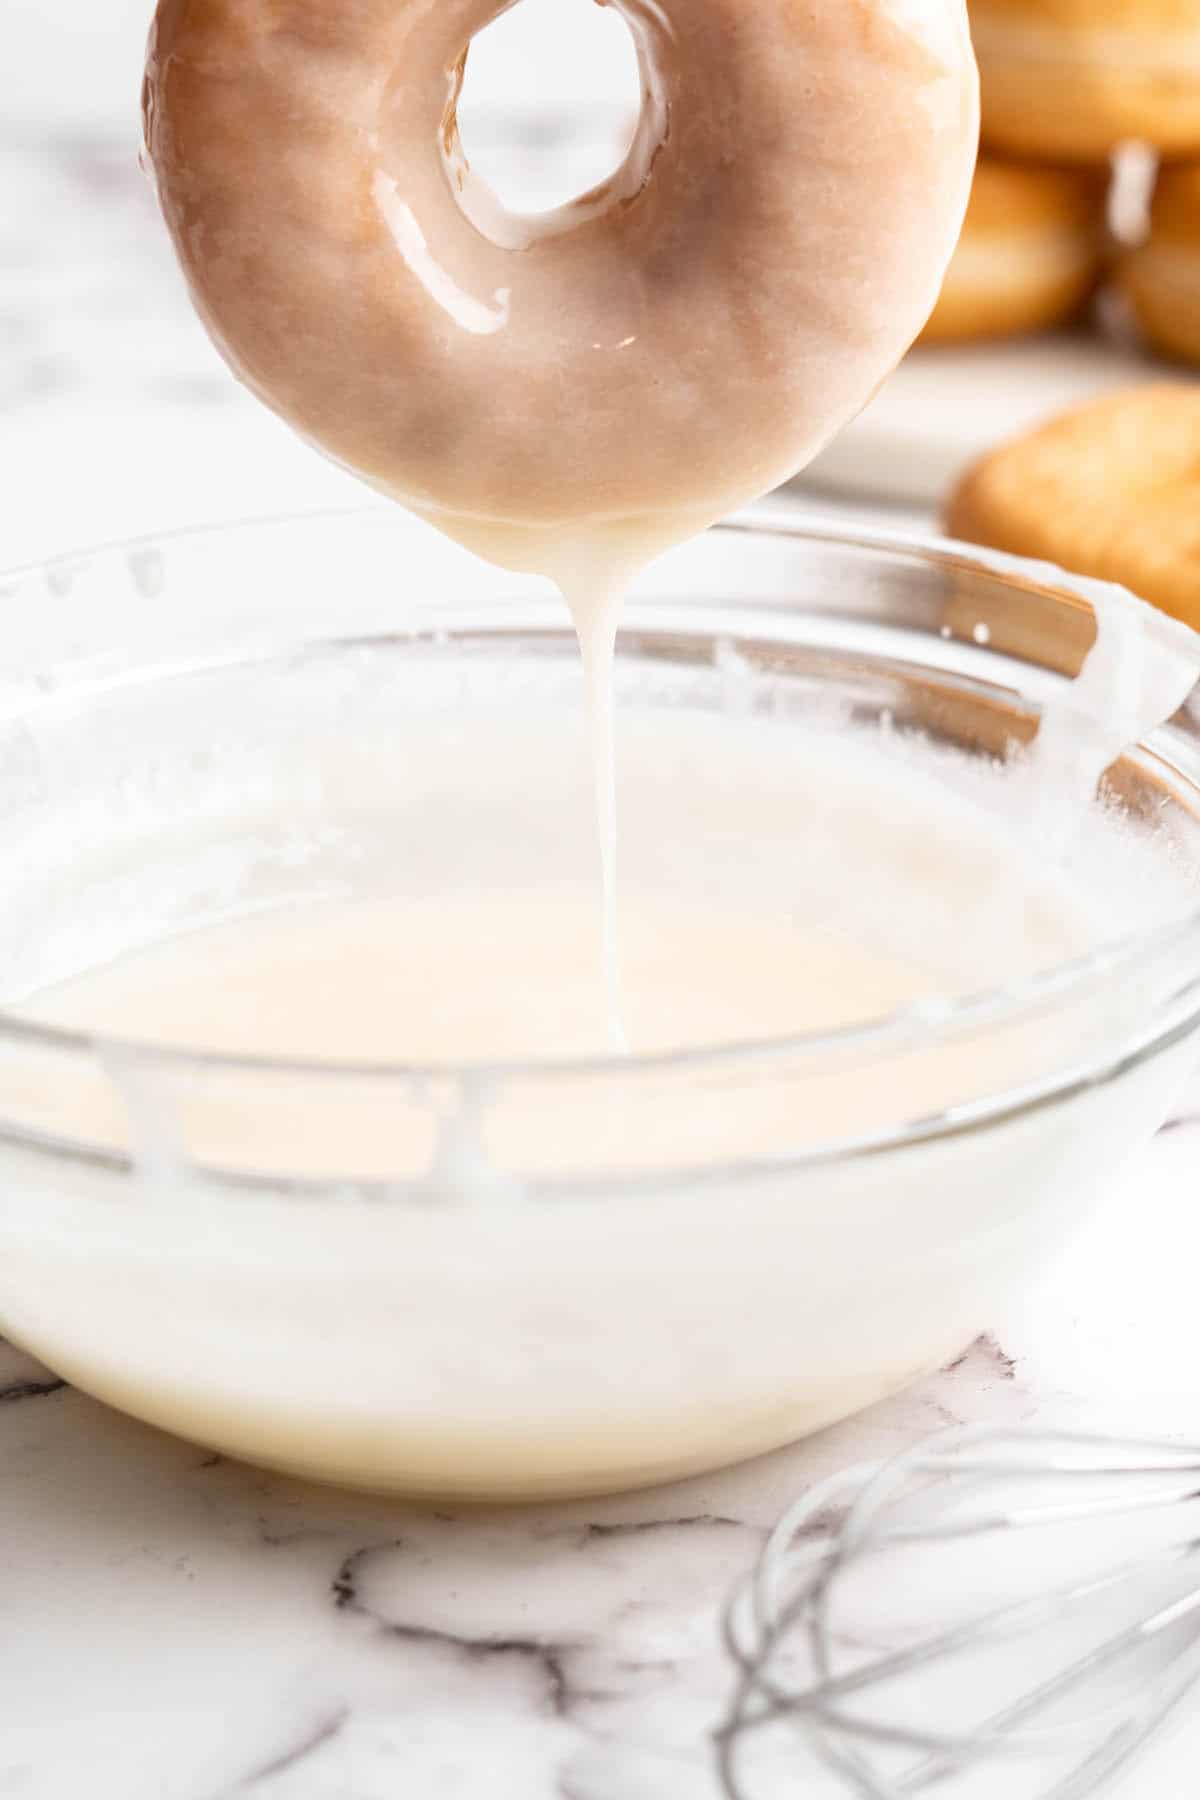
Glaze the donuts. Dip the vegan donuts in the glaze while they’re still warm, but not hot. (If you also fried the donut holes, you can reserve those for the end; put them all in the bowl at the same time, and toss them to coat.)
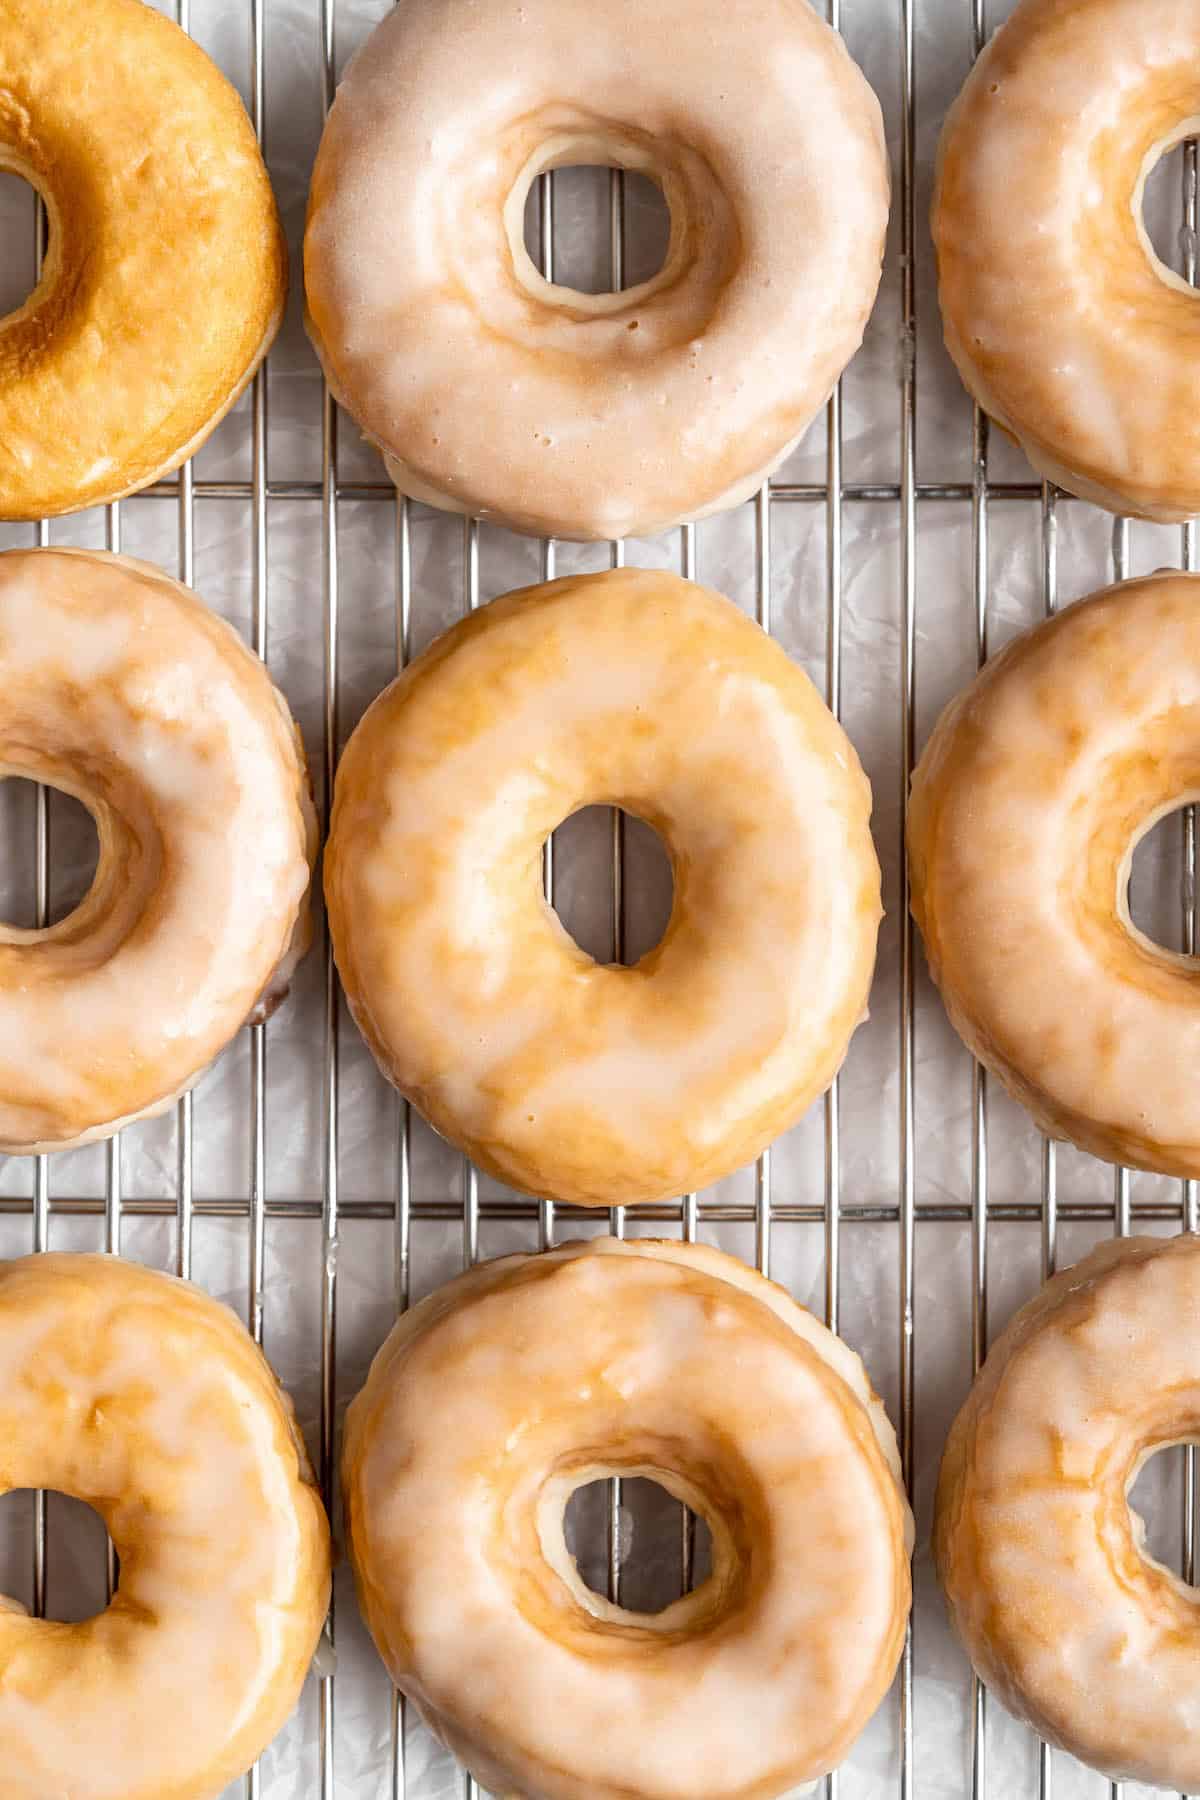
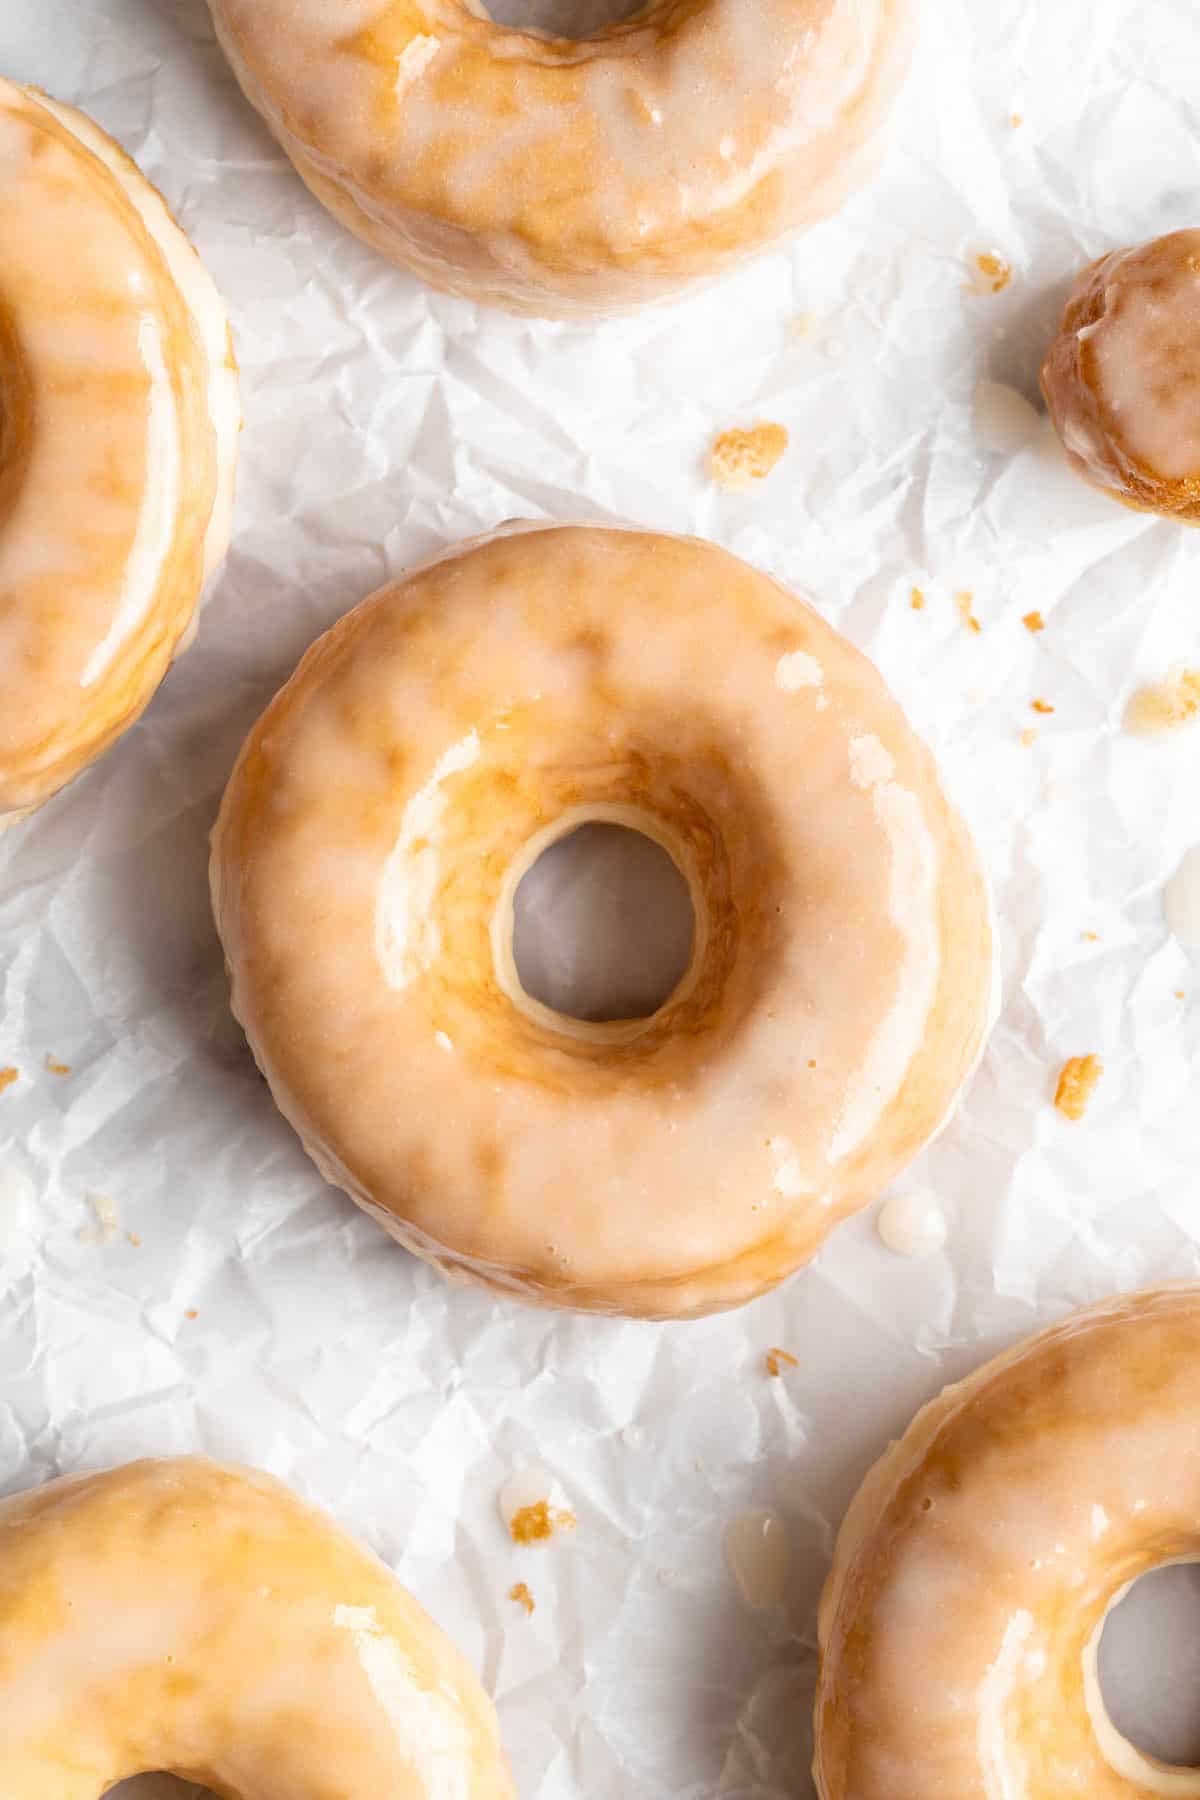
Finish . Place the glazed donuts on the wire rack to let the excess glaze drip off before serving.
Variations
You can glaze and decorate these vegan donuts however you like! If you let the glaze cool and thicken a bit, you can stir in food colouring . Cocoa powder can be added for a chocolate glaze, and you can sprinkle your freshly-glazed donuts with sprinkles to add a pop of colour and crunch.
Another option is to cut the donuts into circles and use a piping bag to fill them with jam, a vegan custard or mousse, or even vegan whipped cream . (If you’re filling your donuts, they’ll need to be cooled completely first!)

Tips for Success
Here are some pointers for perfect vegan donuts!
- Keeping the dough from sticking . You can place the cut donuts on parchment paper to make it easier to remove them before placing them into the hot oil.
- Use chopsticks . Some people like to use chopsticks with deep frying; you can use them to pick up the donuts and place them into the oil and also to flip them and take them out when they’re finished cooking.
- Watch the oil temperature . When you add the donuts, the temperature will fall; as you work through the recipe, the temperature is likely to slowly climb. Adjust the heat as needed to make sure the oil is always right around the 350º mark.
- Glazing tips . Warm donuts and warm glaze will yield the best results here! As the glaze cools, it will thicken and turn white, so if you want that Krispy Kreme look, both the glaze and donuts should be warm.
How to Store
These donuts are best eaten right away, but they will keep up to a day in an airtight container. I don’t recommend freezing this recipe, but if you’re looking for a vegan donut recipe that freezes well, try a baked donut instead, like my Baked Chocolate Cake S’mores Donuts .
Ingredients
For the tangzhong:
- 2 tablespoons all purpose flour , 15g
- ¼ cup non-dairy milk , 60mL – preferably a high protein milk like soy milk but anyone should work
- 2 tablespoons water , 30mL
For the donuts:
- 3 cups all-purpose flour + up to 2 tablespoons more for kneading , 360g
- ¼ cup brown sugar , 50g
- 2 ¼ teaspoons instant yeast
- ½ teaspoon sea salt
- ¾ cup non-dairy milk , warm to touch ranging between 110°F to 120°F (180mL) – preferably a high protein milk like soy milk but anyone should work
- ⅓ cup melted vegan butter , 69g
- 1 teaspoon vanilla extract or almond extract
- 6 cups peanut oil , or other frying oil
For the glaze:
- 2 cups confectioners’ sugar , sifted
- ¼ cup non-dairy milk , warmed
- 1 teaspoon vanilla extract or almond extract
Equipment
- Deep fry/candy thermometer
- Large, deep, heavy skillet
- Donut or biscuit cutters
Instructions
To make the tangzhong:
- In a small pan, whisk together the AP flour, non-dairy milk and water until mixed together. Add the pan to the stove over medium high and stir until the mixture thickens up which will happen quickly, within 1 minute or 2. It’ll look thick, almost like a pudding or a slurry. Remove from heat and pour into a small bowl and allow it to cool for about 10 minutes in the fridge. I like to do this first while I’m assembling the rest of the ingredients.
To make the donuts:
- Whisk the flour, sugar, yeast, and salt in a large mixing bowl or the bowl of your stand mixer. In a second, smaller bowl, whisk the tangzhong mixture, non-dairy milk, vegan butter, and vanilla extract.
- Pour the wet ingredients into the dry ingredients. Knead by hand or with the dough hook on your mixer until a soft dough forms. Cover the bowl with a kitchen towel and let the dough rest for 10 minutes.
- After the dough has rested, knead it for 6 to 8 minutes. If you’re doing this by hand, you can simply reach in the bowl and knead it in there—no need to transfer it to a work surface at this point. You can knead in up to 2 tablespoons of flour while kneading. The dough will be smooth, soft, and just a bit sticky.
- Transfer the dough to a large greased bowl. Cover the bowl with the kitchen towel and place it in a warm spot, away from drafts. Let it rise for about 2 hours, or until it has doubled in bulk.
- Gently punch down the dough in the bowl, then transfer it to a floured work surface. Gently pat or roll the dough into a rectangle between 1/4- and 1/2-inch thick. (1/4 inch is too thin, but ½ inch is too thick, so it really should be just in the middle.) If the dough feels too sticky to work with, you can add a bit more flour, but don’t overdo it—too much flour will give you tough donuts!
- Use a donut cutter, a large and small biscuit cutter, or the lip of a cup to cut the doughnuts.
- Piece together any scraps, re-roll them, and cut donuts from that too. Rather than discarding or re-rolling the donut holes, you can fry them separately—they’re great for testing your oil, especially if this is your first time deep-frying.
- I found splitting them onto 16 parchment pieces made frying them so much easier!
- Cover the donuts with greased plastic wrap and let them rise until they’re about doubled in size—this should take 45 minutes to an hour.
- Heat the oil in a deep, heavy skillet to 350F/180C and line a large baking sheet with paper towels.
- Keep a close eye on the temperature the whole time you’re frying and adjust the heat as
- needed to keep it right around the 350 mark. Slide a lightly floured bench scraper or metal spatula under a donut and carefully drop it into the oil. (If you’re good with chopsticks, you can use those instead for both dropping the dough into the pan and taking the fried donuts out.)
- Depending on the size of your skillet, you should be able to fry 2 to 3 donuts at a time.
- Fry the donuts until they’re golden brown on the bottom, then flip them and fry the other side.
- This should take about a minute per side. Use a slotted spoon to remove the donuts from the oil and transfer them to the paper-towel-lined baking sheet.
To glaze the donuts:
- Place a large wire rack on a baking sheet lined with foil.
- Whisk together the confectioners’ sugar, warm milk, and extract in a large bowl. Dip the donuts in the glaze while they’re still warm, but not hot. If you also fried the donut holes, you can reserve those for the end; put them all in the bowl at the same time, and toss them to coat.
- Place the glazed donuts on the wire rack to let the excess glaze drip off before serving. These donuts are best eaten right away, but they will keep up to a day.
Notes

Vegan Donuts
Equipment
- Deep fry/candy thermometer
- Large, deep, heavy skillet
- Donut or biscuit cutters
Ingredients
For the tangzhong:
- 2 tablespoons all purpose flour 15g
- ¼ cup non-dairy milk 60mL - preferably a high protein milk like soy milk but anyone should work
- 2 tablespoons water 30mL
For the donuts:
- 3 cups all-purpose flour + up to 2 tablespoons more for kneading 360g
- ¼ cup brown sugar 50g
- 2 ¼ teaspoons instant yeast
- ½ teaspoon sea salt
- ¾ cup non-dairy milk warm to touch ranging between 110°F to 120°F (180mL) - preferably a high protein milk like soy milk but anyone should work
- ⅓ cup melted vegan butter 69g
- 1 teaspoon vanilla extract or almond extract
- 6 cups peanut oil or other frying oil
For the glaze:
- 2 cups confectioners’ sugar sifted
- ¼ cup non-dairy milk warmed
- 1 teaspoon vanilla extract or almond extract
Instructions
To make the tangzhong:
- In a small pan, whisk together the AP flour, non-dairy milk and water until mixed together. Add the pan to the stove over medium high and stir until the mixture thickens up which will happen quickly, within 1 minute or 2. It’ll look thick, almost like a pudding or a slurry. Remove from heat and pour into a small bowl and allow it to cool for about 10 minutes in the fridge. I like to do this first while I’m assembling the rest of the ingredients.
To make the donuts:
- Whisk the flour, sugar, yeast, and salt in a large mixing bowl or the bowl of your stand mixer. In a second, smaller bowl, whisk the tangzhong mixture, non-dairy milk, vegan butter, and vanilla extract.
- Pour the wet ingredients into the dry ingredients. Knead by hand or with the dough hook on your mixer until a soft dough forms. Cover the bowl with a kitchen towel and let the dough rest for 10 minutes.
- After the dough has rested, knead it for 6 to 8 minutes. If you’re doing this by hand, you can simply reach in the bowl and knead it in there—no need to transfer it to a work surface at this point. You can knead in up to 2 tablespoons of flour while kneading. The dough will be smooth, soft, and just a bit sticky.
- Transfer the dough to a large greased bowl. Cover the bowl with the kitchen towel and place it in a warm spot, away from drafts. Let it rise for about 2 hours, or until it has doubled in bulk.
- Gently punch down the dough in the bowl, then transfer it to a floured work surface. Gently pat or roll the dough into a rectangle between 1/4- and 1/2-inch thick. (1/4 inch is too thin, but ½ inch is too thick, so it really should be just in the middle.) If the dough feels too sticky to work with, you can add a bit more flour, but don’t overdo it—too much flour will give you tough donuts!
- Use a donut cutter, a large and small biscuit cutter, or the lip of a cup to cut the doughnuts.
- Piece together any scraps, re-roll them, and cut donuts from that too. Rather than discarding or re-rolling the donut holes, you can fry them separately—they’re great for testing your oil, especially if this is your first time deep-frying.
- I found splitting them onto 16 parchment pieces made frying them so much easier!
- Cover the donuts with greased plastic wrap and let them rise until they’re about doubled in size—this should take 45 minutes to an hour.
- Heat the oil in a deep, heavy skillet to 350F/180C and line a large baking sheet with paper towels.
- Keep a close eye on the temperature the whole time you’re frying and adjust the heat as
- needed to keep it right around the 350 mark. Slide a lightly floured bench scraper or metal spatula under a donut and carefully drop it into the oil. (If you’re good with chopsticks, you can use those instead for both dropping the dough into the pan and taking the fried donuts out.)
- Depending on the size of your skillet, you should be able to fry 2 to 3 donuts at a time.
- Fry the donuts until they’re golden brown on the bottom, then flip them and fry the other side.
- This should take about a minute per side. Use a slotted spoon to remove the donuts from the oil and transfer them to the paper-towel-lined baking sheet.
To glaze the donuts:
- Place a large wire rack on a baking sheet lined with foil.
- Whisk together the confectioners’ sugar, warm milk, and extract in a large bowl. Dip the donuts in the glaze while they’re still warm, but not hot. If you also fried the donut holes, you can reserve those for the end; put them all in the bowl at the same time, and toss them to coat.
- Place the glazed donuts on the wire rack to let the excess glaze drip off before serving. These donuts are best eaten right away, but they will keep up to a day.
Notes
Nutrition
Vegan Donuts https://jessicainthekitchen.com/classic-vegan-donuts/ June 3, 2022
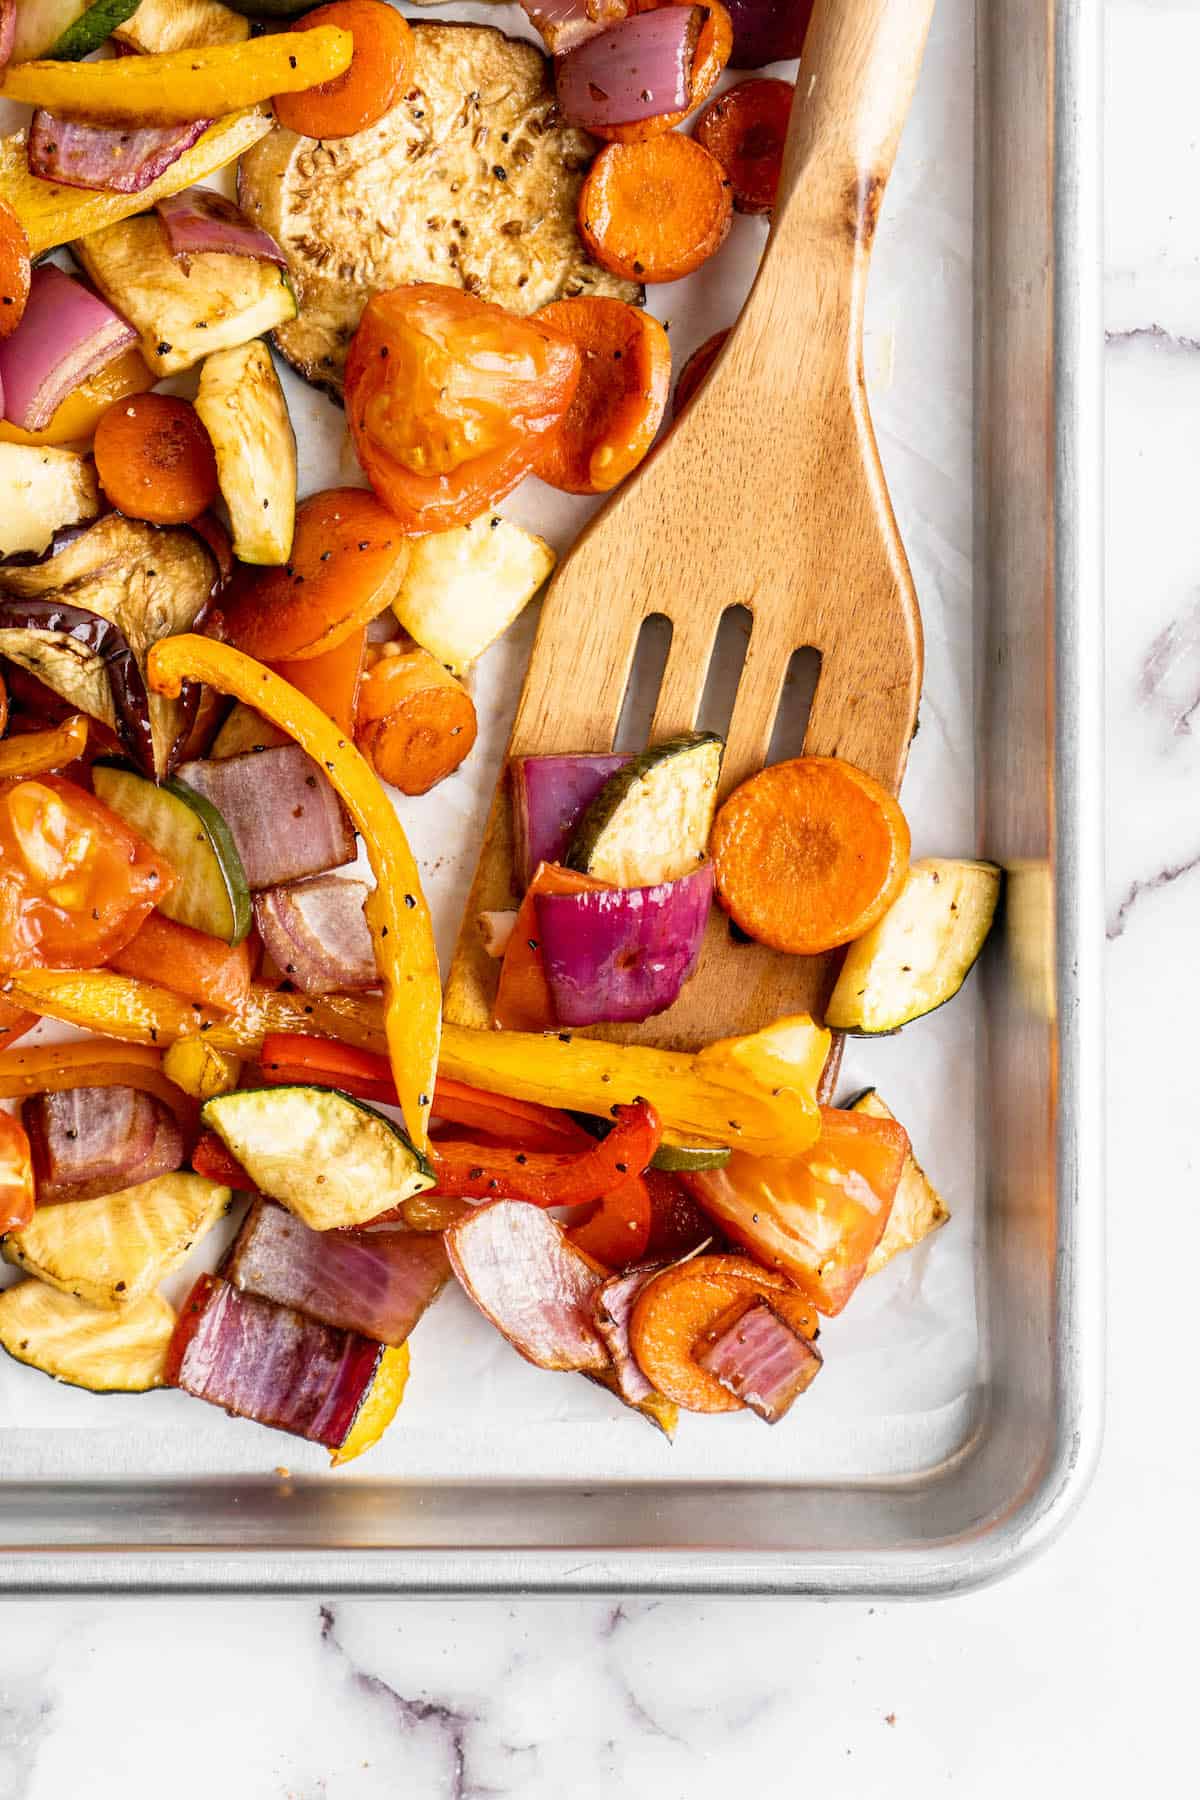
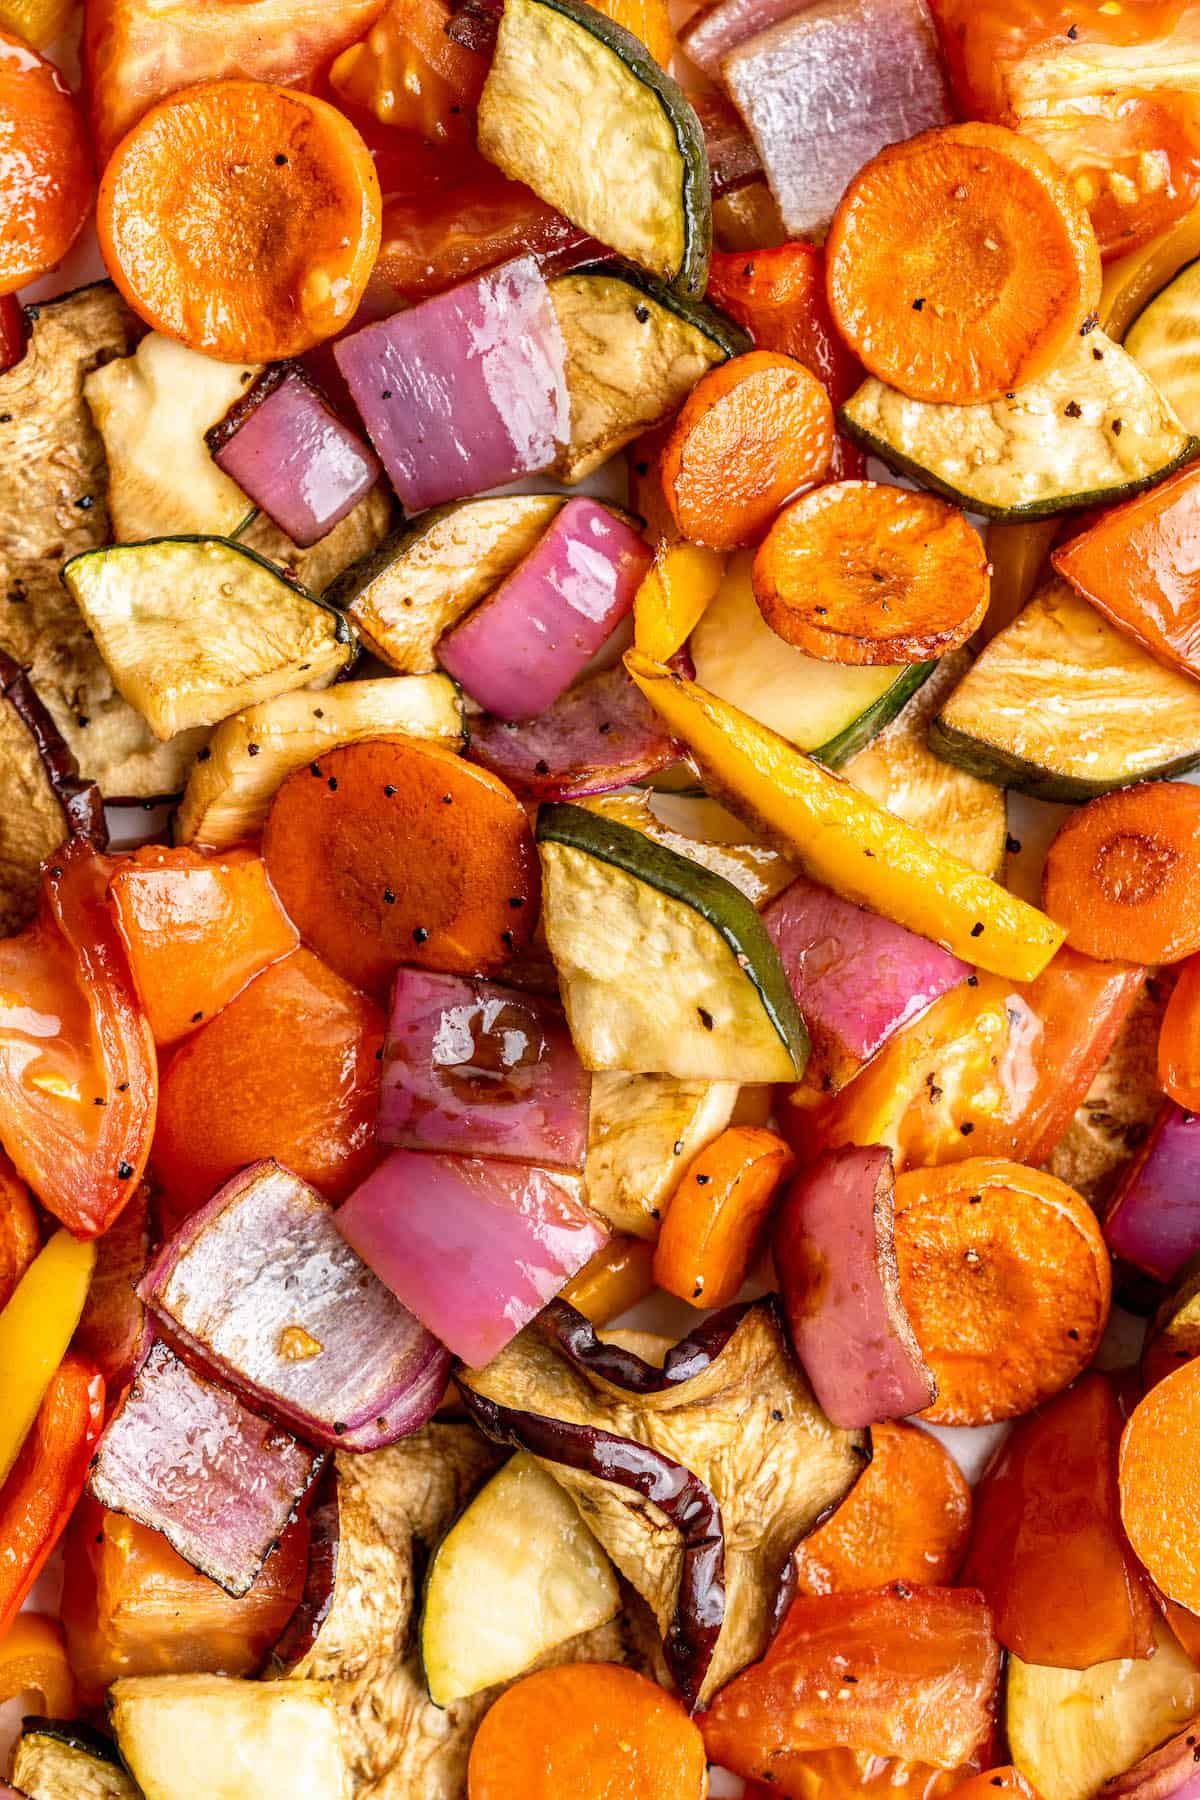
Learn how to roast vegetables in the oven with the most flavourful balsamic vinegar marinade! These tender, caramelised Balsamic Roasted Vegetables are perfect for meal prep and easy weeknight meals .
It’s amazing how many ways there are to cook vegetables. Steamed, boiled, grilled, sautéed… but of all the different methods, roasting is definitely my favorite.
Consider this post both a recipe and a template. You can make these Balsamic Roasted Vegetables as-is, or switch things up with different vegetables, marinades, and sauces.
Roasting is quite easy, and much more hands-off than sautéing or grilling. Once you put everything in the oven, you’re free to prep a main dish or scroll through your Instagram feed and zone out a bit. (Your choice!) That oven time is when the magic happens—crispy raw vegetables transform into tender, caramelised, flavour-packed little morsels.
Now, I used the veggies I had on hand in the fridge, but you can roast pretty much any vegetable successfully. Feel free to try it with sweet potatoes, broccoli, cauliflower, Brussels sprouts…the world is your (veggie) oyster!
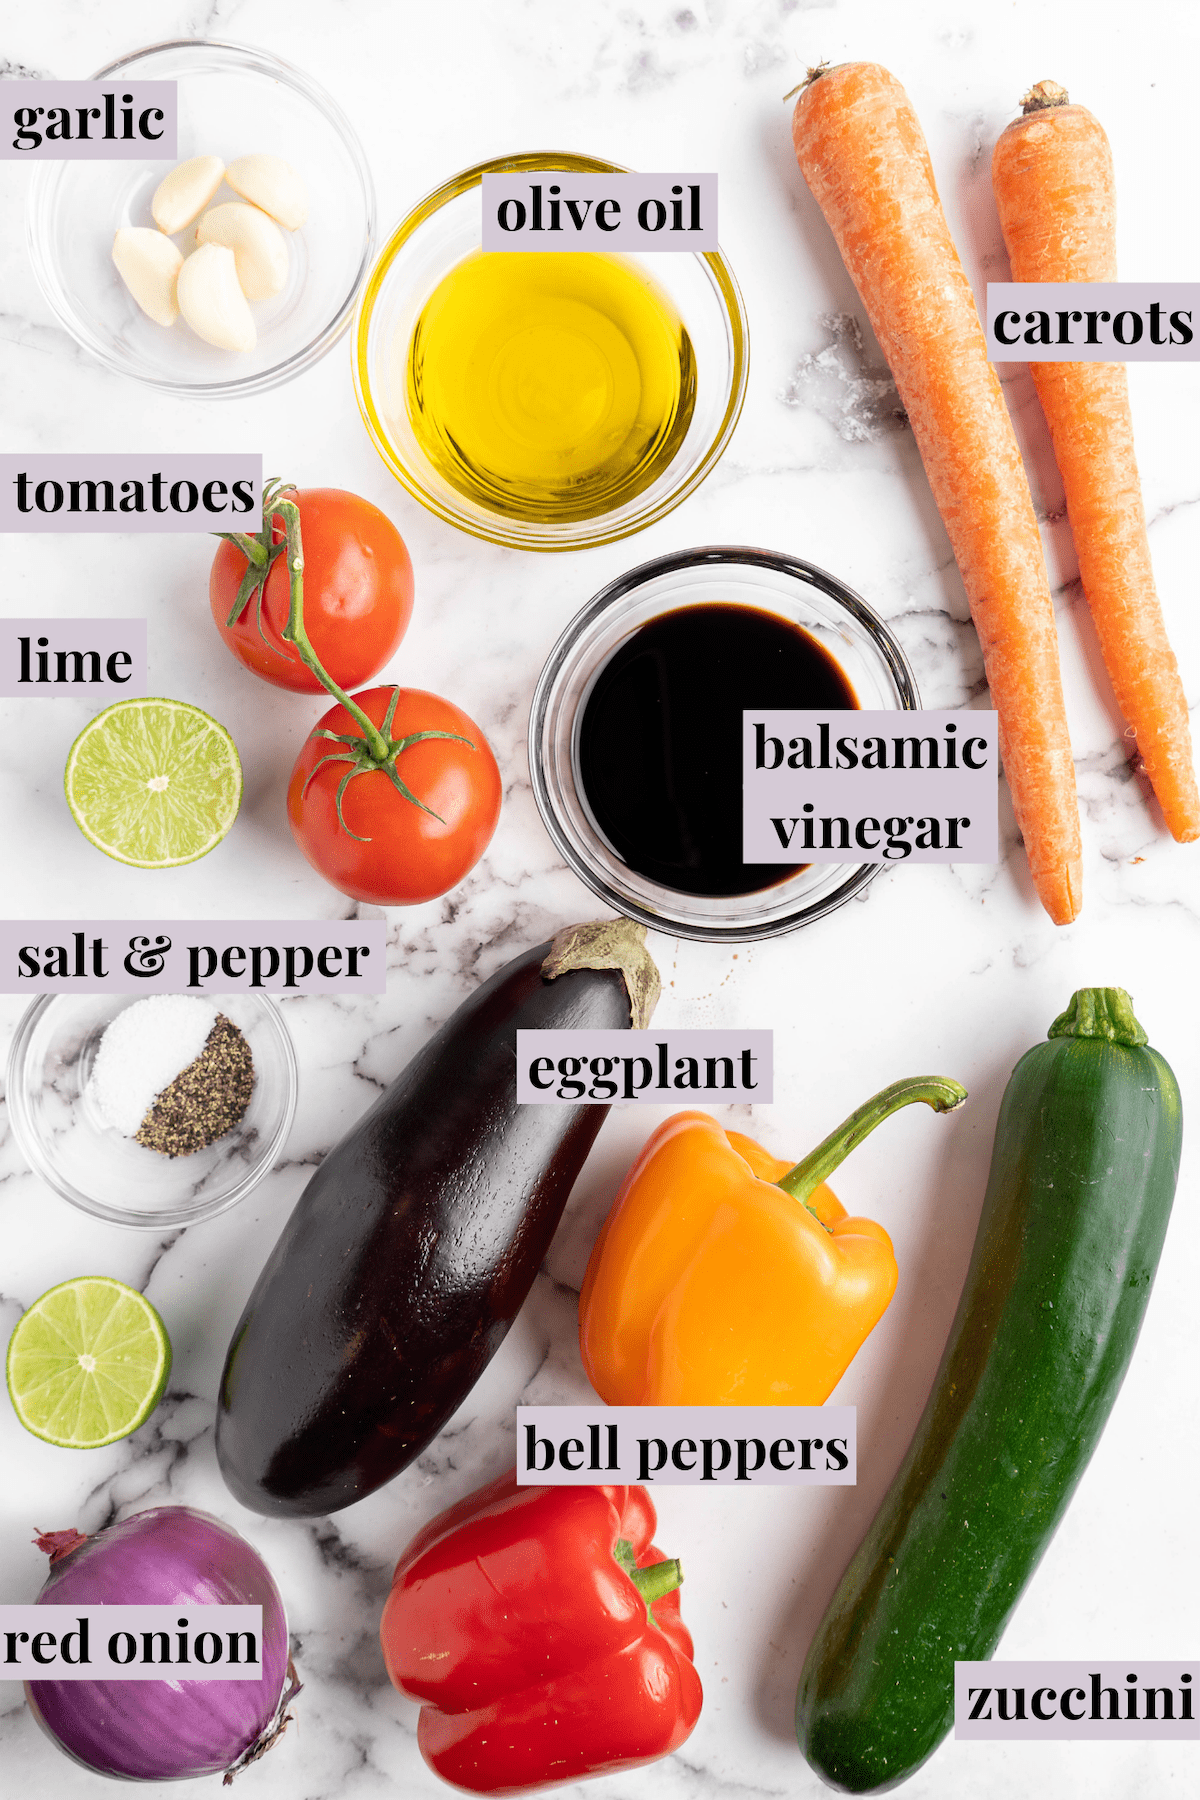
Notes on Ingredients
Please note that this is important information on the ingredients and instructions and the FULL recipe with amounts and details can be found DOWN BELOW (scroll to it) in the recipe card.
- Zucchini
- Eggplant
- Bell peppers – Use any color you like.
- Red onion
- Beefsteak tomatoes – Halved grape or cherry tomatoes will work, too!
- Carrots
For the balsamic marinade:
- Balsamic vinegar
- Olive oil
- Garlic
- Lime juice – Lemon juice can be used instead if you prefer.
- Sea salt
- Freshly ground black pepper – Freshly ground pepper has much more flavour than the kind you buy ground at the grocery store.
How Can You Tell a Good Balsamic Vinegar?
Aged balsamic vinegars are best, and the more thick and syrupy they are, the better! Look for bottles that don’t list other vinegars, caramel, or flavourings on the ingredient list. Another tip? If you see grape must in the ingredients, you’ve got a winner! This means the vinegar is made the authentic way.
How to Roast Vegetables
Some recipes will have you cook the veggies at a very high heat, but this results in vegetables that are burnt on the outside, rather than caramelised, and still have the bite of a raw vegetable, not the tender texture you want in roasted veggies. In my experience, 425ºF is the perfect temperature—not too low, not too high!
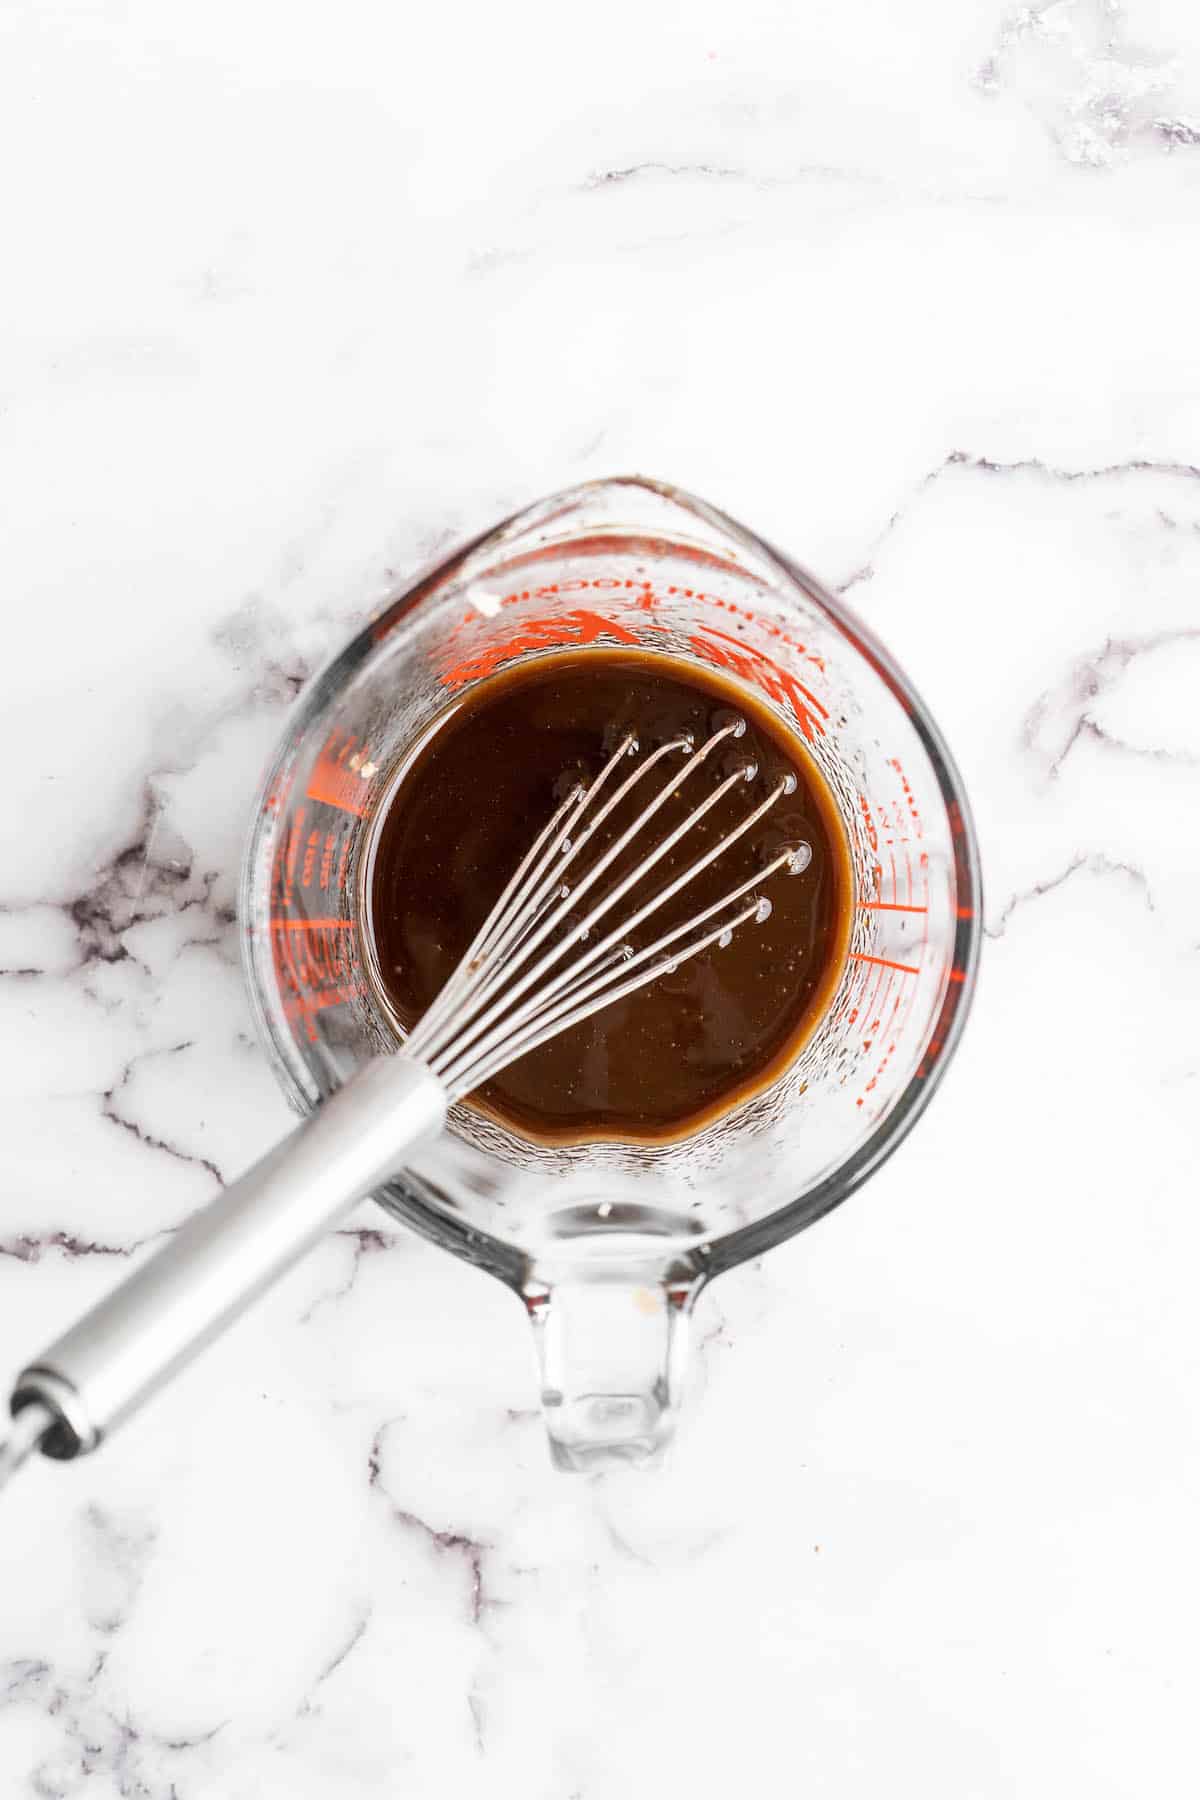
Make the marinade . In a small bowl, whisk the balsamic marinade ingredients until the mixture is emulsified.
Prepare . Preheat your oven to 425ºF. If you’d like, line your baking sheets with foil or parchment paper for easy clean up.
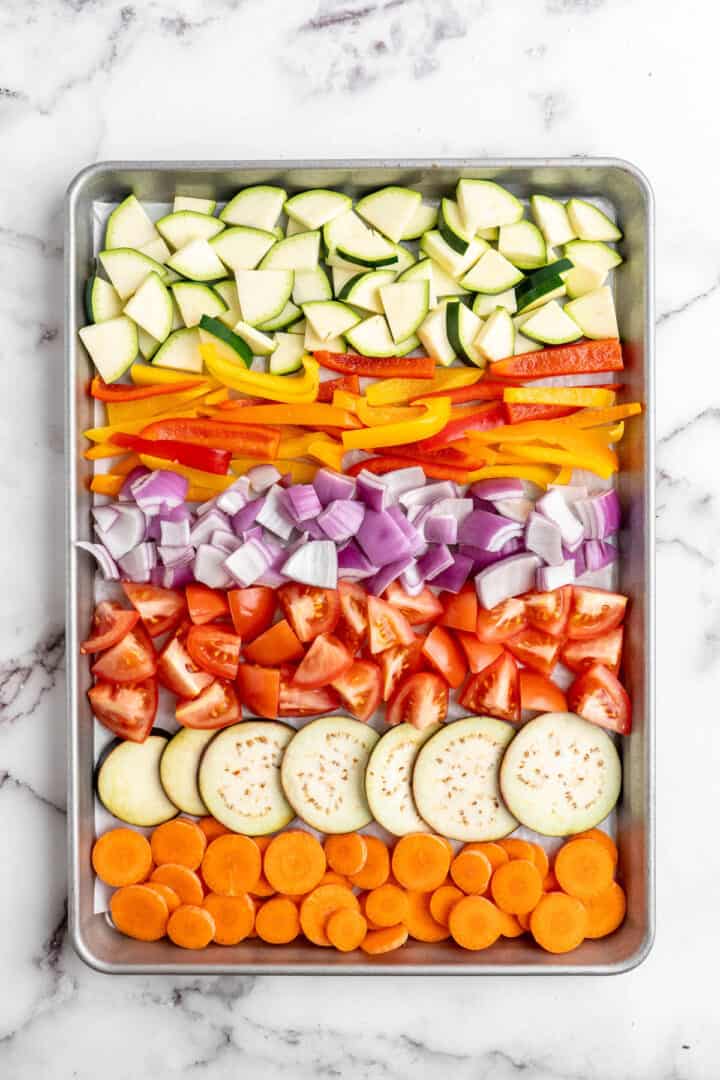
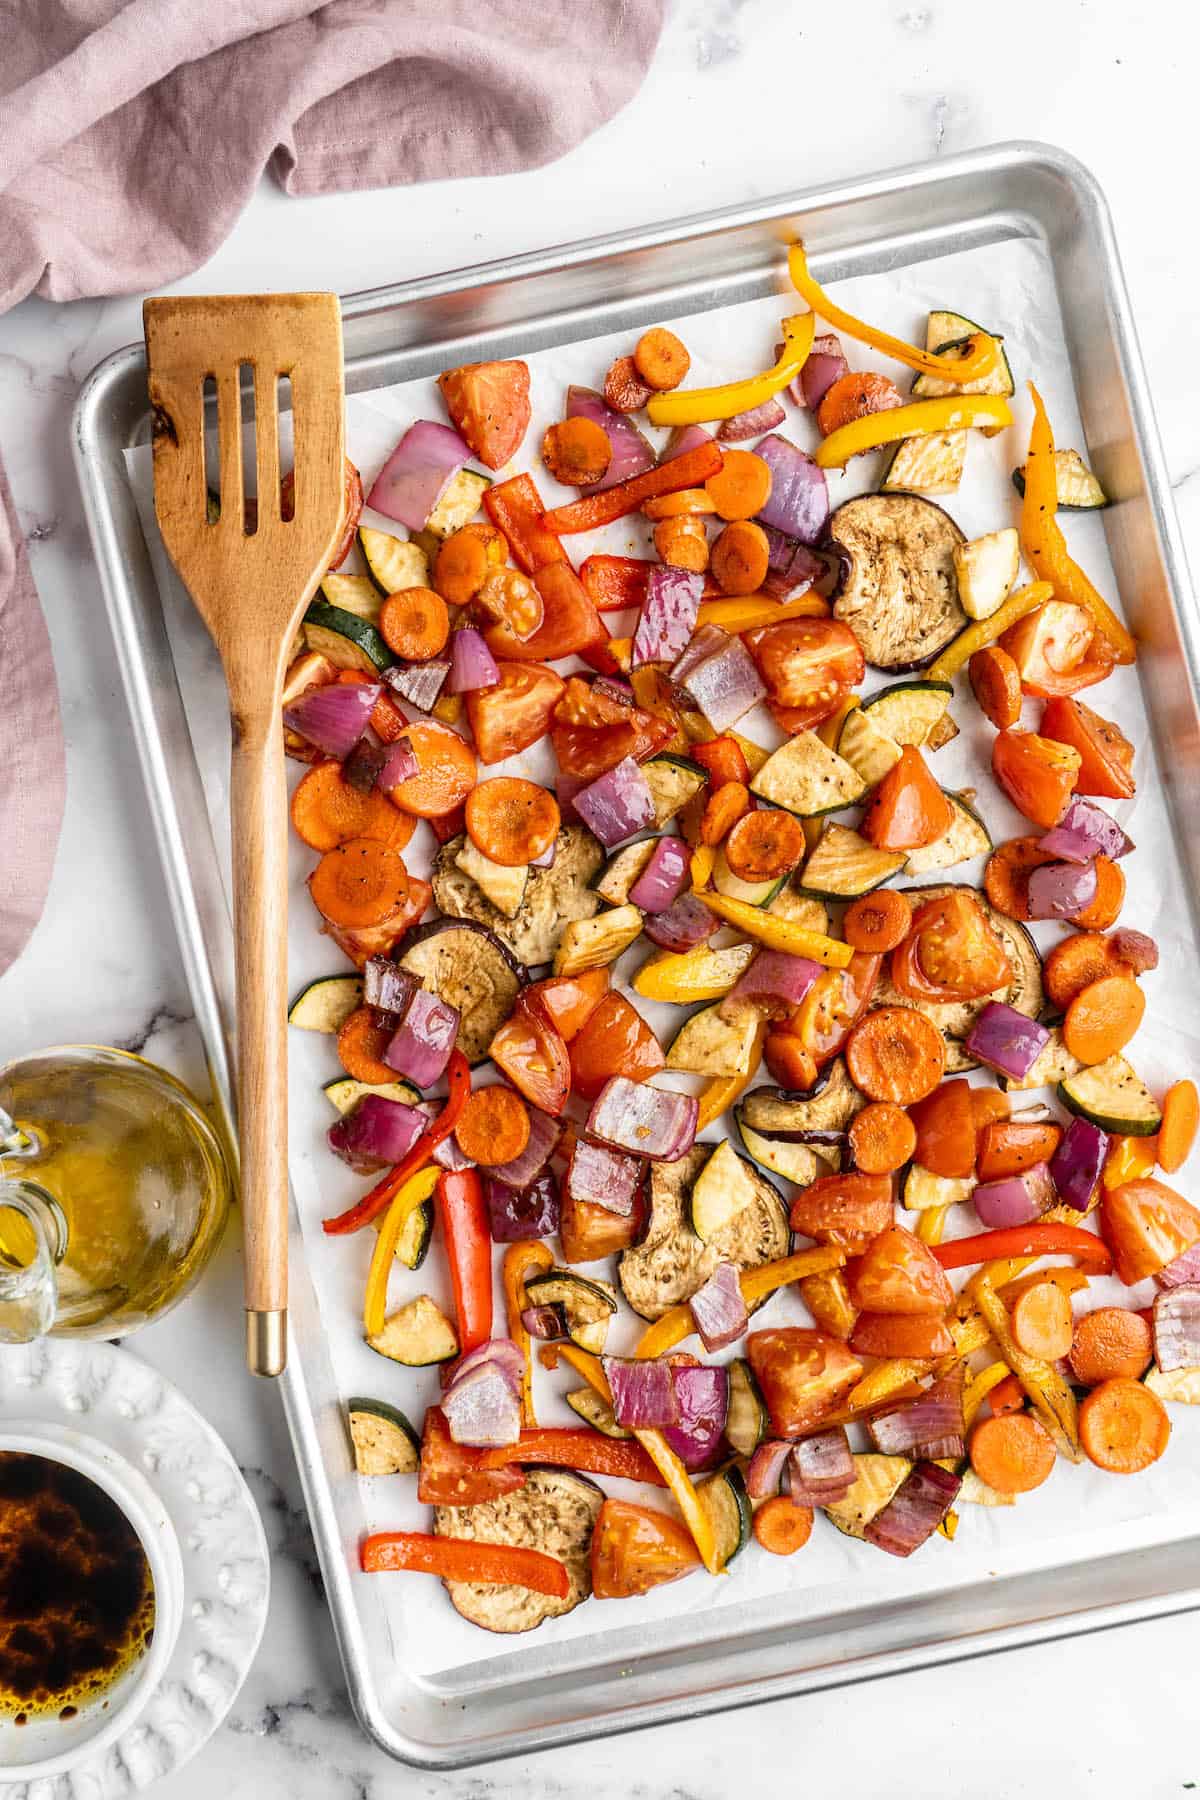
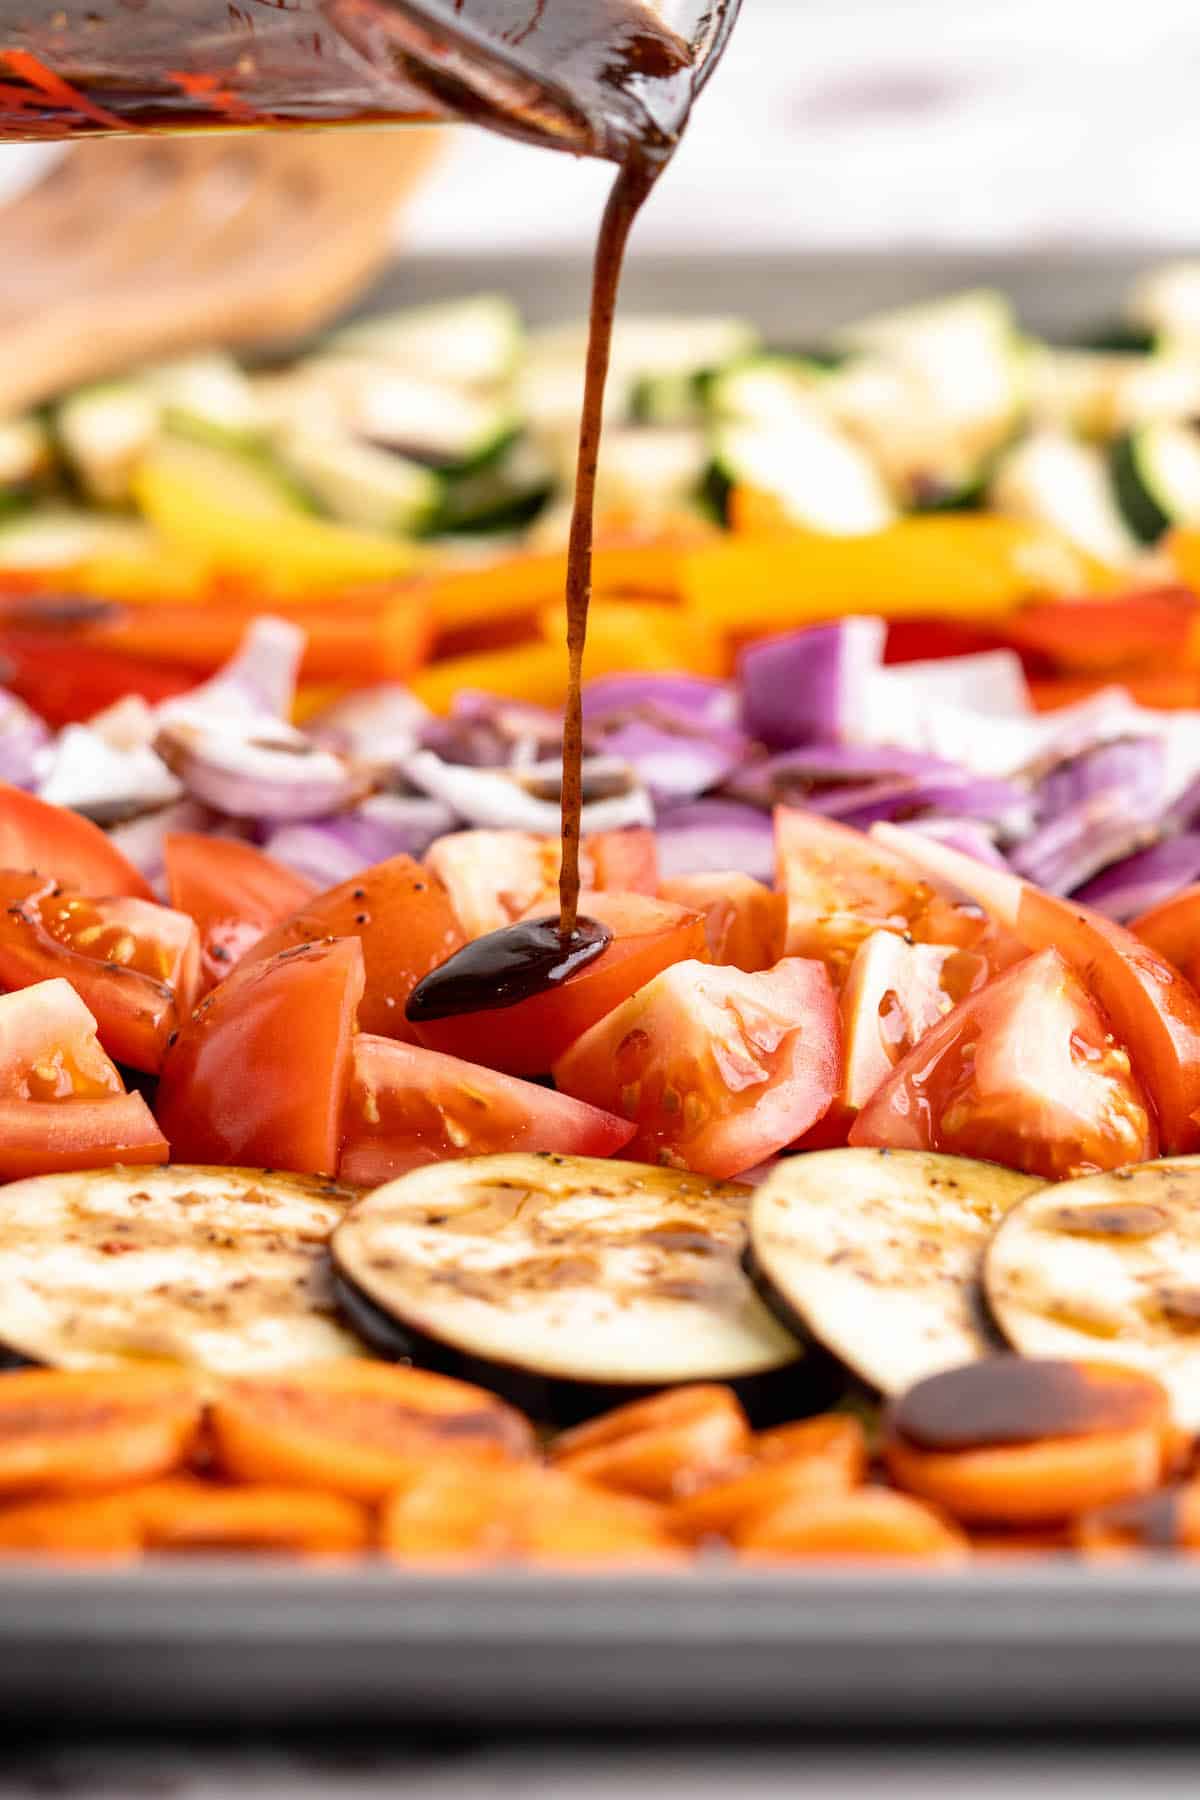
Sauce the veggies . Place the vegetables on the baking sheets, making sure none of them overlap. Pour the marinade over the vegetables and rub it in.
Roast the vegetables . Place the baking sheets in the oven and roast the veggies according to the times listed below. Note that some of them may look blackened, but they aren’t burnt—it’s the balsamic vinegar!
How Long Does It Take to Roast Vegetables?
A few different factors may influence your cooking time here. First, the amount of time needed for roasting can vary from veggie to veggie, oven to oven, and cut to cut. It’s important to cut uniform pieces of vegetables so they cook evenly.
Here are some rough cooking times for different types of vegetables:
- Tomatoes, Eggplants, Zucchinis and Bell Peppers : 15 to 20 minutes
- Carrots & Onions : 25 minutes to 30 minutes (check at 25 minutes)
- Broccoli, Cauliflower and Brussels Sprouts : 15 to 25 minutes
- Sweet Potatoes: 30 to 45 minutes
Tips for Success
Here are a few additional tips for perfect roasted veggies!
- Give them room. I know it’s tempting to fit everything onto one sheet pan, but when you cram too many vegetables together, they’ll steam instead of roasting.
- Don’t drown them in sauce. If the marinade is pooling on the pan, it will burn in the oven, making a mess to clean up! Rub the marinade into the veggies for the best flavour.
- Make them your own . Feel free to add thyme or rosemary during the cooking time, or fresh basil or parsley afterwards. Herbes de Provence are good too!
Serving Suggestions
I love using these Balsamic Roasted Vegetables for meal prep, but they can also be paired with so many different meals:
- Toss them with pasta, olive oil, and vegan Parmesan for a simple weeknight dinner.
- Serve them in a Buddha bowl with couscous or cauliflower rice and Baked Tofu .
- Use them as a topping for vegan pizza or sandwiches.
- Nestle them on top of a bowl of creamy vegan polenta or grits.
How to Store and Reheat Leftovers
You can store these veggies in an airtight container for 4 to 5 days in the fridge. They can be eaten cold, at room temperature, or warmed up in the microwave or a 350ºF oven.
Can This Recipe Be Frozen?
You can freeze Balsamic Roasted Vegetables for up to 3 months. Place them in an airtight storage container or freezer bag. I recommend letting them thaw in the refrigerator before reheating, as this will help them cook more evenly.
P.S. Here are some of the items I used to make this recipe if you’d like to use them too: | WHAT YOU’LL NEED // SHOP MY FAVORITE INGREDIENTS & PREP PRODUCTS |
Ingredients
Veggies, all uniformly cut
- 1 large zucchini , chopped and diced
- 1 eggplant , sliced
- 2 bell peppers , chopped
- 1 large red onion , sliced or chopped
- 2 beef tomatoes , diced
- 2 carrots , chopped
Balsamic Marinade
- 1/4 cup balsamic vinegar
- 1/4 cup olive oil
- 5 cloves garlic , finely diced
- juice of lime juice
- 1/2 teaspoon sea salt
- 1/2 teaspoon freshly ground black pepper
Instructions
How To Roast Vegetables (With Balsamic Vinegar Marinade)
- In a small bowl, mix the Balsamic Marinade ingredients together. Set aside.
- Preheat oven to 425 degrees Fahrenheit.
- Line the veggies up on your baking sheet. Ensure that you give your veggies some room to roast. I actually split everything in the picture onto three different baking sheets to give them some space. You may even want to split them based on cooking them.
- Pour the marinade over the veggies and rub them into the veggies. You can do this separately, or just mixed them all in. I kept mine separate for the pictures. Try not to leave a pool of marinade on the baking sheet, and instead, try to rub all the marinade into the veggies.
- Roast the veggies according to their appropriate times. Remove from oven once roasted. Some of the veggies may looked blackened but they aren’t burned: it’s the balsamic vinegar.
Cooking Times
- Tomatoes, Eggplants, Zucchinis and Bell Peppers: 15 to 20 minutes
- Carrots & Onions: 25 minutes to 30 minutes (check at 25 minutes)
- Broccoli, Cauliflower and Brussels sprouts: 15 to 25 minutes
- Sweet Potatoes: 30 to 45 minutes
