These cheesy Buffalo cauliflower wings up the ante by adding vegan cheese to everyone’s favourite plant-based spicy snack! They’re crispy on the outside, tender on the inside, and the best alternative to traditional chicken wings.

Add cauliflower to the ranks of cashews and tofu for magical vegan ingredients that can be completely transformed by the way you cook them or the ingredients you add to them. And in the case of these cheesy Buffalo cauliflower wings, it’s both! A cheesy, fiery batter and panko coating makes these vegan wings crispy and delicious, with the bold flavour you want (no, DEMAND!) of a game day snack. Like my BBQ cauliflower wings and mango habanero cauliflower wings , these are an instant crowd-pleaser!
What Makes These Cauliflower Wings Better Than the Real Deal
I could not stop eating these cheesy Buffalo cauliflower wings when I first made them and I honestly could not tell the difference between this and chicken. Even my vegetable-hating little brother ate these up, shocked by how much they tasted like chicken!
- Baked, not fried . Traditional wings (and even cauliflower wings at restaurants!) are made in the deep fryer, but my Buffalo cauliflower wings are baked in the oven, which means less mess and way less oil.
- Double-crispy . Using a batter and panko instead of choosing one or the other makes these cauliflower wings extra crispy. And putting the hot sauce in the batter means you don’t have to stir the wings into the sauce after baking, which keeps them crispy-crunchy.
- Spicy and cheesy . I love traditional Buffalo cauliflower wings , but adding vegan cheese makes these wings a little more indulgent!
Note on Ingredients
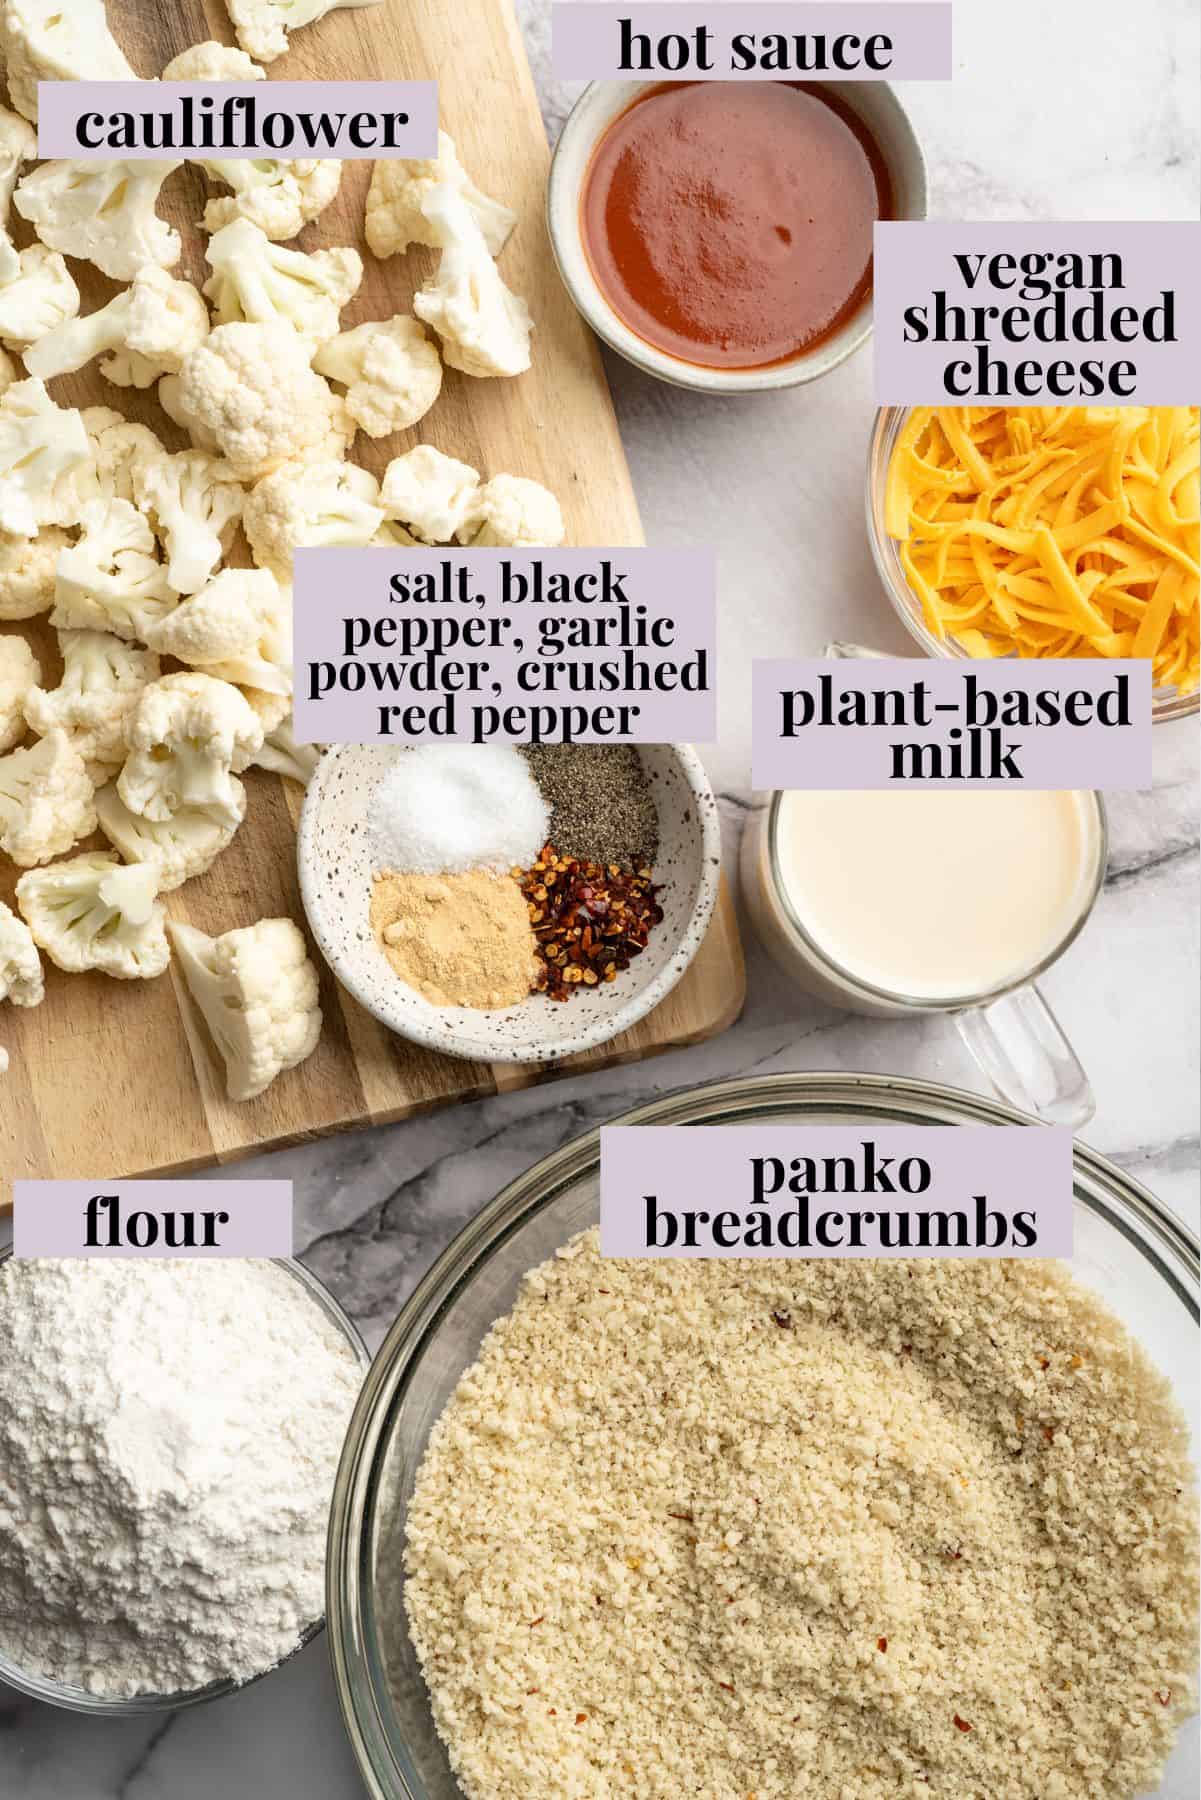
You don’t really need all that much to make these cheesy Buffalo cauliflower wings! Scroll down to the recipe card to find the ingredient quantities and recipe instructions.
- Cauliflower – You can save yourself some prep time by buying a bag of pre-cut florets.
- Flour – I’ve successfully tested this recipe with all-purpose, whole wheat, and gluten-free flour, so use whichever fits your needs.
- Non-dairy milk – Make sure it’s unsweetened and unflavoured.
- Seasonings – Salt, ground black pepper, garlic powder, and crushed red pepper flakes.
- Hot sauce – Choose your favourite. Frank’s is the classic choice and it’s fairly mild as far as hot sauces go.
- Vegan shredded cheese – I like to use cheddar or mozzarella.
- Panko bread crumbs – Use gluten-free panko if needed.
How to Make Cheesy Buffalo Cauliflower Wings
This step-by-step guide will show you how it’s done!

Cut the cauliflower into “wings.”
- Prepare. Preheat your oven to 450°F and line a baking sheet. Cut the cauliflower into wing-sized florets.
- Make the batter. Whisk the flour, non-dairy milk, salt, spices, hot sauce, and cheese in a bowl.

Coat the cauliflower.
- Coat the cauliflower. Toss the florets in the batter, then dredge them in the seasoned panko.

Spread onto sheet pan.
- Bake. Arrange the cauliflower wings on the prepared pan. Spray with oil for extra crispiness if you’d like, then bake for 22 minutes or until crispy.
- Serve. Enjoy immediately with vegan ranch dressing or your favorite dipping sauce.
Tips for Making Cauliflower Wings
From sticky sesame cauliflower wings to these cheesy Buffalo cauliflower wings, I’ve made LOTS of cauli wings over the years. Here are some tips I’ve picked up along the way!
- Don’t discard the smaller bits . It’s hard to cut cauliflower into florets without having smaller pieces fall off. You can bake those with the bigger pieces; they get extra crispy and browned. I think they’re delicious!
- Use cooking spray for extra crunch . After adding the cauliflower wings to the pan, you can coat them generously with cooking spray or an oil mister. This will get your wings extra golden and crispy.
- Let the excess batter drip off . Then, press the cauliflower into the panko so it’s evenly coated. Too much batter will simply slide off the cauliflower onto the pan.

Serving Suggestions
Serve these cheesy Buffalo cauliflower wings as an appetizer with vegan ranch or blue cheese dressing alongside celery and carrot sticks. If I’m making a game day spread, I’ll pair them with other fun snacks like creamy vegan queso and vegan cranberry meatballs .
Storage and Reheating
- To store : Store leftover cheesy Buffalo cauliflower wings in an airtight container in the refrigerator for up to 3 days. I don’t recommend freezing this recipe, as the wings will lose their crispiness.
- To reheat : Warm the wings in a 375°F oven for 5 to 7 minutes to re-crisp. The air fryer is a great option too!

More Magical Cauliflower Recipes
- Orange Cauliflower
- Cauliflower Gnocchi
- Roasted Cauliflower Hummus
- Cauliflower Pizza Bites
Ingredients
- 1 head of cauliflower , may have to double ingredients below for a large head
- 1 cup flour , whole wheat flour works fine, so does white flour, 120 g
- 1 cup non-dairy milk , unsweetened or original flavour, 240 mL
- ½ teaspoon salt , 2.5 g
- ½ teaspoon ground black pepper , 1 g
- 1 teaspoon garlic powder , 5 g
- ½ teaspoon crushed red pepper flakes , 1.25 g
- ¼ to ½ cup hot sauce , Frank’s is a good all around option and not too spicy, 60 – 120 mL
- ½ cup vegan shredded cheese , cheddar or mozzarella, 50 g
- 2 cup panko bread crumbs , ( 100 g) seasoned with an extra ½ teaspoon sea salt ( 2.5 g), ½ teaspoon ground black pepper ( 1 g) and ¼ teaspoon crushed red pepper flakes ( 0.5 g)
Instructions
- Preheat oven to 450°F/230°C. Prepare a baking sheet by lining it with a silicone baking sheet or greased foil.
- Using a knife, remove florets from the cauliflower (aka cut off the leaves and don’t use the stems). Chop the cauliflower into smaller pieces to resemble the size of the wings and place in a bowl.
- In a separate bowl, mix the flour, milk, salt, ground black pepper, garlic powder, crushed red pepper flakes, hot sauce and cheese together. Line it up beside the batter bowl.
- Toss the cauliflower in the batter mixture (you can add them all at once), using a spatula or spoon to coat them all.
- Transfer them to the breadcrumbs (you can do this in two or three batches) to coat completely, then place onto the baking sheet, giving each wing enough space. Repeat until all of the wings are coated. If you’d like you can use a cooking spray oil to spray the “wings” before baking to help deepen their colour.
- Bake for 22 minutes. Please ensure your oven is completely preheated and hot. While baking, prepare the ingredients for the sauce by whisking together.
- Remove from oven and serve immediately. Serve with a dipping sauce such as vegan ranch .
Notes
- To store: Store leftover cheesy Buffalo cauliflower wings in an airtight container in the refrigerator for up to 3 days. I don’t recommend freezing this recipe, as the wings will lose their crispiness.
- To reheat: Warm the wings in a 375°F oven for 5–7 minutes to crisp. The air fryer is a great option too!
These cheesy Buffalo cauliflower wings up the ante by adding vegan cheese to everyone’s favourite plant-based spicy snack! They’re crispy on the outside, tender on the inside, and the best alternative to traditional chicken wings.
Add cauliflower to the ranks of cashews and tofu for magical vegan ingredients that can be completely transformed by the way you cook them or the ingredients you add to them. And in the case of these cheesy Buffalo cauliflower wings, it’s both! A cheesy, fiery batter and panko coating makes these vegan wings crispy and delicious, with the bold flavour you want (no, DEMAND!) of a game day snack. Like my BBQ cauliflower wings and mango habanero cauliflower wings , these are an instant crowd-pleaser!
What Makes These Cauliflower Wings Better Than the Real Deal
I could not stop eating these cheesy Buffalo cauliflower wings when I first made them and I honestly could not tell the difference between this and chicken. Even my vegetable-hating little brother ate these up, shocked by how much they tasted like chicken!
- Baked, not fried . Traditional wings (and even cauliflower wings at restaurants!) are made in the deep fryer, but my Buffalo cauliflower wings are baked in the oven, which means less mess and way less oil.
- Double-crispy . Using a batter and panko instead of choosing one or the other makes these cauliflower wings extra crispy. And putting the hot sauce in the batter means you don’t have to stir the wings into the sauce after baking, which keeps them crispy-crunchy.
- Spicy and cheesy . I love traditional Buffalo cauliflower wings , but adding vegan cheese makes these wings a little more indulgent!
Note on Ingredients
You don’t really need all that much to make these cheesy Buffalo cauliflower wings! Scroll down to the recipe card to find the ingredient quantities and recipe instructions.
- Cauliflower – You can save yourself some prep time by buying a bag of pre-cut florets.
- Flour – I’ve successfully tested this recipe with all-purpose, whole wheat, and gluten-free flour, so use whichever fits your needs.
- Non-dairy milk – Make sure it’s unsweetened and unflavoured.
- Seasonings – Salt, ground black pepper, garlic powder, and crushed red pepper flakes.
- Hot sauce – Choose your favourite. Frank’s is the classic choice and it’s fairly mild as far as hot sauces go.
- Vegan shredded cheese – I like to use cheddar or mozzarella.
- Panko bread crumbs – Use gluten-free panko if needed.
How to Make Cheesy Buffalo Cauliflower Wings
This step-by-step guide will show you how it’s done!
Cut the cauliflower into “wings.”
- Prepare. Preheat your oven to 450°F and line a baking sheet. Cut the cauliflower into wing-sized florets.
- Make the batter. Whisk the flour, non-dairy milk, salt, spices, hot sauce, and cheese in a bowl.
Coat the cauliflower.
- Coat the cauliflower. Toss the florets in the batter, then dredge them in the seasoned panko.
Spread onto sheet pan.
- Bake. Arrange the cauliflower wings on the prepared pan. Spray with oil for extra crispiness if you’d like, then bake for 22 minutes or until crispy.
- Serve. Enjoy immediately with vegan ranch dressing or your favorite dipping sauce.
Tips for Making Cauliflower Wings
From sticky sesame cauliflower wings to these cheesy Buffalo cauliflower wings, I’ve made LOTS of cauli wings over the years. Here are some tips I’ve picked up along the way!
- Don’t discard the smaller bits . It’s hard to cut cauliflower into florets without having smaller pieces fall off. You can bake those with the bigger pieces; they get extra crispy and browned. I think they’re delicious!
- Use cooking spray for extra crunch . After adding the cauliflower wings to the pan, you can coat them generously with cooking spray or an oil mister. This will get your wings extra golden and crispy.
- Let the excess batter drip off . Then, press the cauliflower into the panko so it’s evenly coated. Too much batter will simply slide off the cauliflower onto the pan.
Serving Suggestions
Serve these cheesy Buffalo cauliflower wings as an appetizer with vegan ranch or blue cheese dressing alongside celery and carrot sticks. If I’m making a game day spread, I’ll pair them with other fun snacks like creamy vegan queso and vegan cranberry meatballs .
Storage and Reheating
- To store : Store leftover cheesy Buffalo cauliflower wings in an airtight container in the refrigerator for up to 3 days. I don’t recommend freezing this recipe, as the wings will lose their crispiness.
- To reheat : Warm the wings in a 375°F oven for 5 to 7 minutes to re-crisp. The air fryer is a great option too!
More Magical Cauliflower Recipes
- Orange Cauliflower
- Cauliflower Gnocchi
- Roasted Cauliflower Hummus
- Cauliflower Pizza Bites
Ingredients
- 1 head of cauliflower , may have to double ingredients below for a large head
- 1 cup flour , whole wheat flour works fine, so does white flour, 120 g
- 1 cup non-dairy milk , unsweetened or original flavour, 240 mL
- ½ teaspoon salt , 2.5 g
- ½ teaspoon ground black pepper , 1 g
- 1 teaspoon garlic powder , 5 g
- ½ teaspoon crushed red pepper flakes , 1.25 g
- ¼ to ½ cup hot sauce , Frank’s is a good all around option and not too spicy, 60 – 120 mL
- ½ cup vegan shredded cheese , cheddar or mozzarella, 50 g
- 2 cup panko bread crumbs , ( 100 g) seasoned with an extra ½ teaspoon sea salt ( 2.5 g), ½ teaspoon ground black pepper ( 1 g) and ¼ teaspoon crushed red pepper flakes ( 0.5 g)
Instructions
- Preheat oven to 450°F/230°C. Prepare a baking sheet by lining it with a silicone baking sheet or greased foil.
- Using a knife, remove florets from the cauliflower (aka cut off the leaves and don’t use the stems). Chop the cauliflower into smaller pieces to resemble the size of the wings and place in a bowl.
- In a separate bowl, mix the flour, milk, salt, ground black pepper, garlic powder, crushed red pepper flakes, hot sauce and cheese together. Line it up beside the batter bowl.
- Toss the cauliflower in the batter mixture (you can add them all at once), using a spatula or spoon to coat them all.
- Transfer them to the breadcrumbs (you can do this in two or three batches) to coat completely, then place onto the baking sheet, giving each wing enough space. Repeat until all of the wings are coated. If you’d like you can use a cooking spray oil to spray the “wings” before baking to help deepen their colour.
- Bake for 22 minutes. Please ensure your oven is completely preheated and hot. While baking, prepare the ingredients for the sauce by whisking together.
- Remove from oven and serve immediately. Serve with a dipping sauce such as vegan ranch .
Notes
- To store: Store leftover cheesy Buffalo cauliflower wings in an airtight container in the refrigerator for up to 3 days. I don’t recommend freezing this recipe, as the wings will lose their crispiness.
- To reheat: Warm the wings in a 375°F oven for 5–7 minutes to crisp. The air fryer is a great option too!

Cheesy Buffalo Cauliflower Wings
Ingredients
- 1 head of cauliflower may have to double ingredients below for a large head
- 1 cup flour whole wheat flour works fine, so does white flour, 120 g
- 1 cup non-dairy milk unsweetened or original flavour, 240 mL
- ½ teaspoon salt 2.5 g
- ½ teaspoon ground black pepper 1 g
- 1 teaspoon garlic powder 5 g
- ½ teaspoon crushed red pepper flakes 1.25 g
- ¼ to ½ cup hot sauce Frank’s is a good all around option and not too spicy, 60 - 120 mL
- ½ cup vegan shredded cheese cheddar or mozzarella, 50 g
- 2 cup panko bread crumbs ( 100 g) seasoned with an extra ½ teaspoon sea salt ( 2.5 g), ½ teaspoon ground black pepper ( 1 g) and ¼ teaspoon crushed red pepper flakes ( 0.5 g)
Instructions
- Preheat oven to 450°F/230°C. Prepare a baking sheet by lining it with a silicone baking sheet or greased foil.
- Using a knife, remove florets from the cauliflower (aka cut off the leaves and don’t use the stems). Chop the cauliflower into smaller pieces to resemble the size of the wings and place in a bowl.
- In a separate bowl, mix the flour, milk, salt, ground black pepper, garlic powder, crushed red pepper flakes, hot sauce and cheese together. Line it up beside the batter bowl.
- Toss the cauliflower in the batter mixture (you can add them all at once), using a spatula or spoon to coat them all.
- Transfer them to the breadcrumbs (you can do this in two or three batches) to coat completely, then place onto the baking sheet, giving each wing enough space. Repeat until all of the wings are coated. If you’d like you can use a cooking spray oil to spray the “wings” before baking to help deepen their colour.
- Bake for 22 minutes. Please ensure your oven is completely preheated and hot. While baking, prepare the ingredients for the sauce by whisking together.
- Remove from oven and serve immediately. Serve with a dipping sauce such as vegan ranch .
Notes
- To store: Store leftover cheesy Buffalo cauliflower wings in an airtight container in the refrigerator for up to 3 days. I don’t recommend freezing this recipe, as the wings will lose their crispiness.
- To reheat: Warm the wings in a 375°F oven for 5–7 minutes to crisp. The air fryer is a great option too!
Nutrition
Cheesy Buffalo Cauliflower Wings https://jessicainthekitchen.com/cheesy-buffalo-cauliflower-wings-2/ January 12, 2026
This vegan Sweet Potato Gnocchi is soft, pillowy, and delicious, especially when it’s finished with a fabulous rosemary-infused garlic butter sauce! This is a restaurant-quality dinner that’s easier than you think.

It took me a long time to come around to making my own gnocchi because I thought it was going to be fussy and difficult. But making Cauliflower Gnocchi showed me just how wrong I was! So this homemade sweet potato gnocchi was next on my list and I don’t think my family will ever let me buy it from the store again. The dough comes together with just a handful of ingredients, letting the natural sweetness of the potatoes shine. The gnocchi is lightly crisped in rosemary garlic butter, studded with toasted walnuts, and finished with a sprinkle of vegan Parmesan for one of those meals that you eat sloooowly because you just don’t want it to end!
Why You’ll Love Making Sweet Potato Gnocchi From Scratch
Trust me: it’s so worth it.
- Satisfying to make. The meal itself is satisfying, but so is the process! If you love that feeling of satisfaction you get from making your own crusty French Bread or Almond Milk from actual almonds, you’ll appreciate this sweet potato gnocchi recipe too.
- Simple ingredients. No egg substitutes required for this vegan gnocchi—just sweet potatoes, flour, oil, and salt.
- Restaurant-worthy flavor. The rosemary garlic sauce is rich, fragrant, and makes this gnocchi dish taste like it came straight out of a restaurant kitchen. Perfect for a date night at home!
Notes on Ingredients
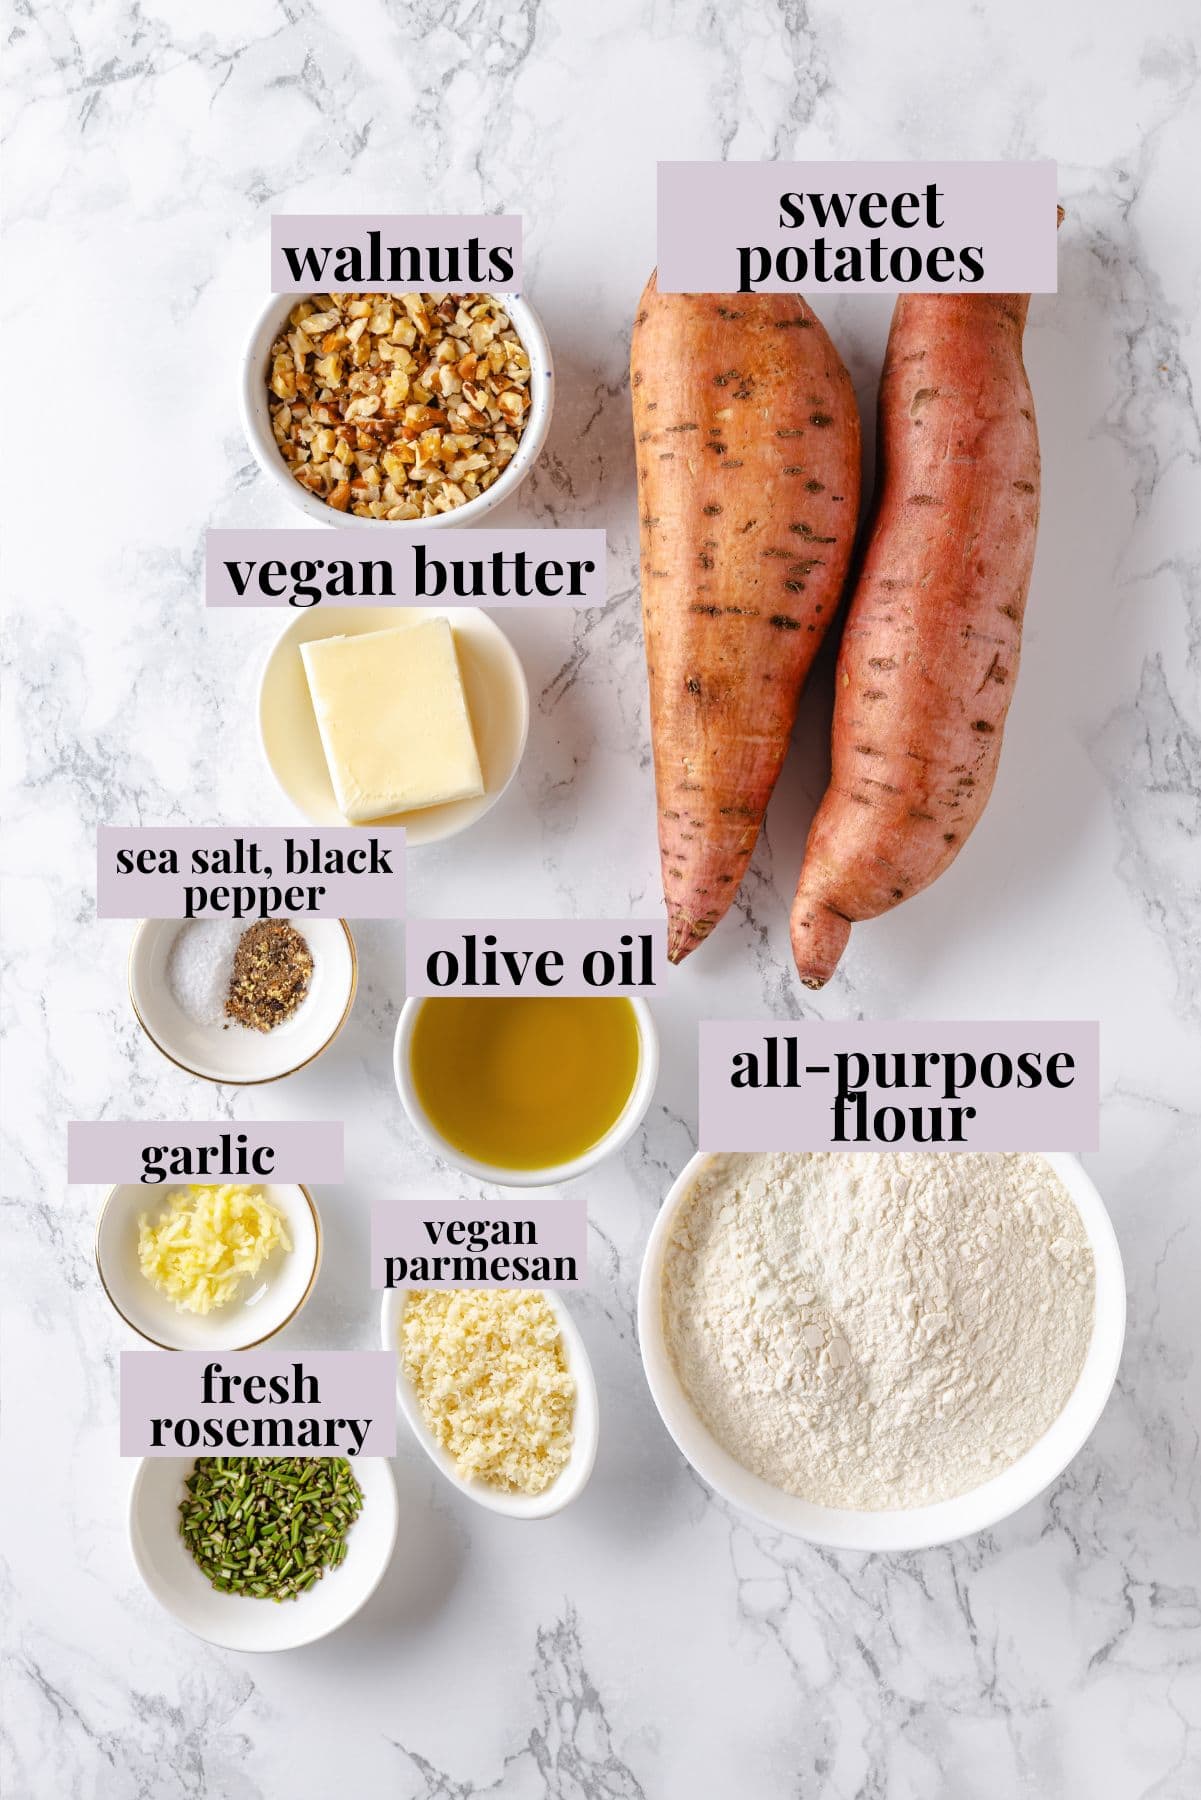
While this dish delivers big flavour, the ingredient list is shorter than you might expect! Scroll down to the recipe card to find the ingredient quantities and recipe instructions.
For the Gnocchi:
- Sweet potatoes – Use orange sweet potatoes for making this sweet potato gnocchi. White and purple varieties are starchier, so the potato-to-flour ratio would be different.
- All-purpose flour – You’ll need some for the gnocchi and some for dusting your work surface.
- Sea salt
- Olive oil – Adds richness to the dough.
For Serving:
- Vegan butter – I love using my Homemade Vegan Butter .
- Olive oil
- Fresh rosemary – Earthy and fragrant rosemary is a fantastic pairing with sweet potatoes, but thyme or sage would also work if you prefer them.
- Garlic
- Walnuts – For a crunchy contrast to the pillowy gnocchi. Hazelnuts or pecans can be used as an alternative, or try pepitas for a nut-free option.
- Salt and pepper
- Vegan Parmesan – Optional. You can use store-bought if you want it to melt a bit, or my Vegan Parmesan Cheese for the flavour without the melt.
How to Make Sweet Potato Gnocchi
Here’s a step-by-step guide showing you the process.
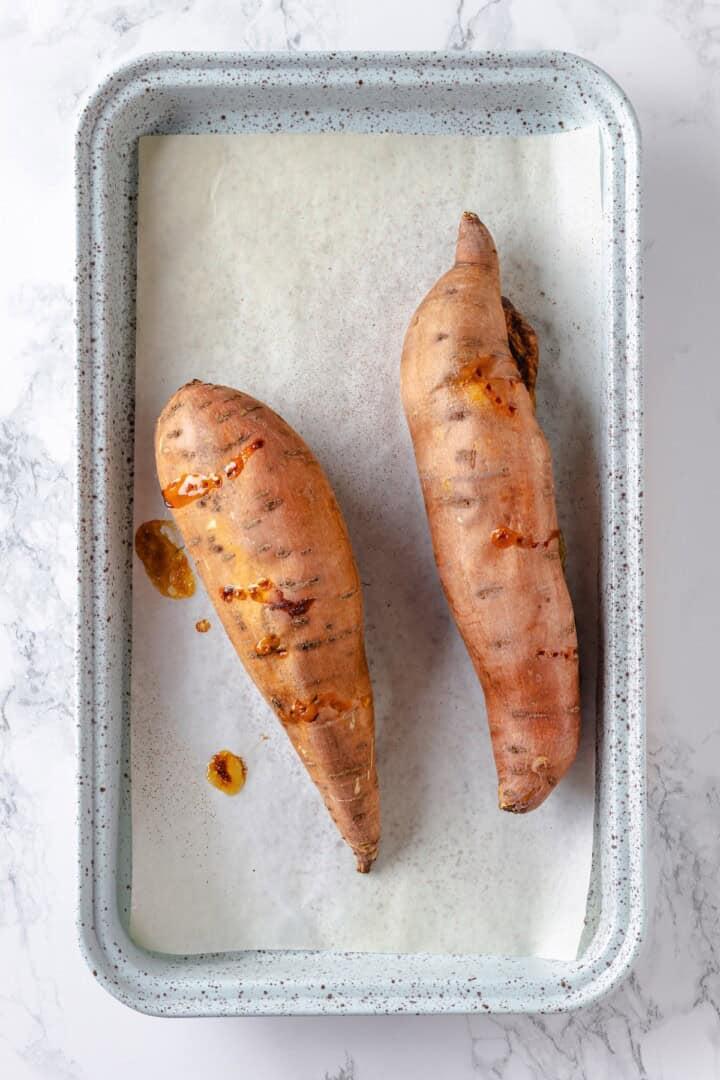
Roast the potatoes.
- Bake the sweet potatoes. Pierce and roast the potatoes in a 400ºF oven until tender. Scoop out the flesh and mash until smooth.
- Make the dough. Mix the olive oil and salt into the mashed sweet potatoes, then gradually add the flour until a soft dough forms.
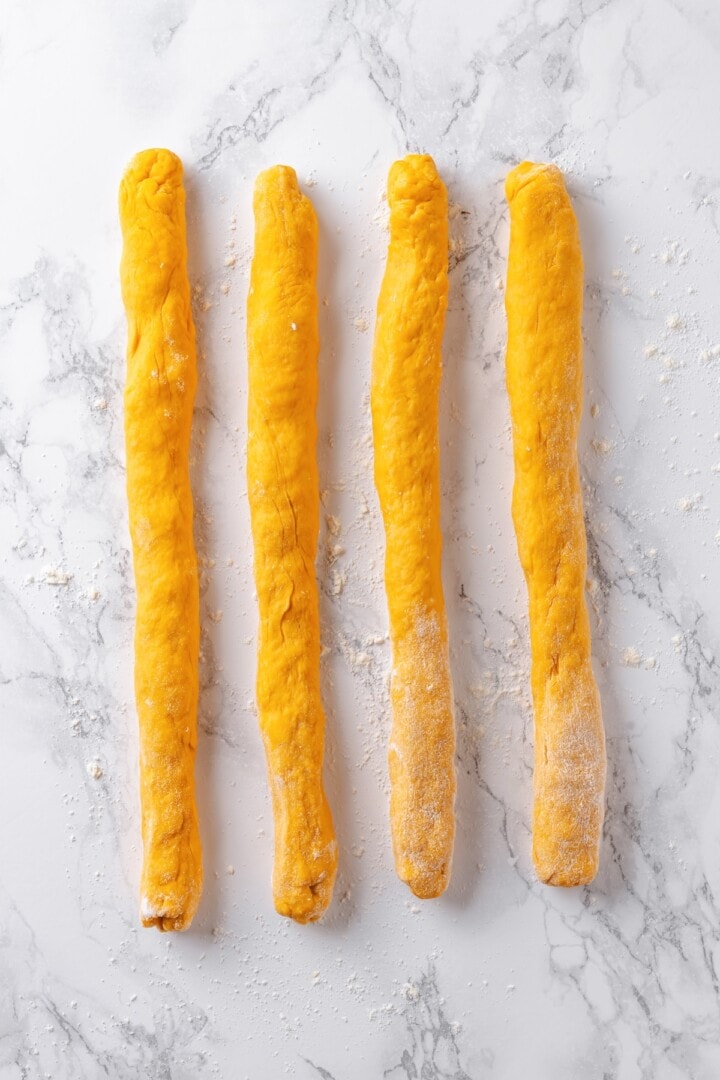
Form dough into ropes…
- Shape the gnocchi. Roll the dough into 4 ropes, cut each rope into pieces, and shape them using the tines of a fork.
Boil the gnocchi.
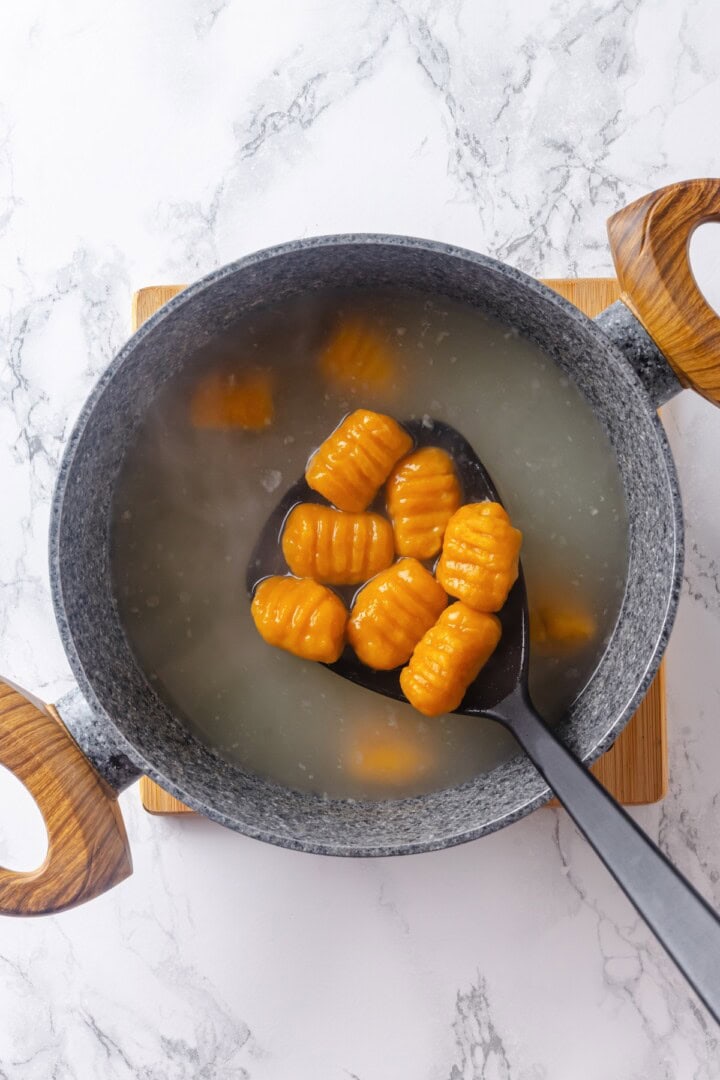
- Boil the gnocchi. Cook the gnocchi in a pot of salted water. Once they float, boil 30 seconds more, then transfer to a plate with a slotted spoon.
- Make the sauce. Melt the vegan butter with the oil. Sauté the garlic and rosemary, then toast the walnuts.
- Toss and serve. Add the sweet potato gnocchi to the skillet, crisp lightly, then season and serve warm with the vegan Parmesan, if you’re using it.
Tips for Success
I have a few additional pointers for perfect sweet potato gnocchi!
- Don’t over-flour the dough. Too much flour makes dense gnocchi—keep it soft and slightly sticky for the best results.
- Use roasted sweet potatoes. Some recipes will have you boil or microwave the sweet potatoes, but after testing this recipe, I’ve found that roasted potatoes are worth the extra time. They have much more flavour!
- Bonus points: brown the butter. If you use my homemade vegan butter, good news: it browns! (Not all store-bought varieties do.) So you can go the extra mile and brown the butter before adding the gnocchi.

Perfect Pairings for Gnocchi
Serve your sweet potato gnocchi with a simple salad to balance the richness. My Beet Feta Salad would be fantastic, as would this Pear and Gorgonzola Salad . You can also pair the gnocchi with a veggie side dish like Grilled Maple Mustard Brussels Sprouts or Balsamic Roasted Vegetables .
Storage and Reheating
- Refrigerator: Store the sweet potato gnocchi and sauce in an airtight container for 3 to 4 days.
- Freezer: I don’t recommend freezing cooked and sauced gnocchi. Instead, freeze uncooked gnocchi on a parchment-lined baking sheet until firm, then transfer to a freezer bag for up to 2 months. Boil from frozen, then make the sauce as directed in the recipe.
- To reheat: Sauté leftovers in a skillet over medium heat with a splash of oil or butter until warmed and lightly crisp. The microwave also works, but the texture won’t be as good—they’re likely to get mushy.

More Vegan Sweet Potato Recipes
- Sweet Potato Fries
- Sweet Potato Chips
- Air Fryer Baked Sweet Potatoes
- Sweet Potato Soufflé
Ingredients
For the Gnocchi
- 2 medium sweet potatoes , about 1 pound – 450 g
- 1 ¾ cups all-purpose flour , plus more for dusting – 210 g
- 1 teaspoon sea salt , 6 g
- 2 tablespoons olive oil , 30 mL
For the Rosemary Butter Sauce
- 3 tablespoons vegan butter , 42 g
- 1 tablespoon olive oil , 15 mL
- 2 teaspoons fresh rosemary , finely chopped – 2 g
- 1 clove garlic , minced – 3 g
- ¼ cup chopped walnuts , 30 g
- Salt and freshly ground black pepper , to taste
- Optional: vegan parmesan , for serving
Instructions
Prepare the Sweet Potatoes
- Pierce the sweet potatoes several times with a fork and bake at 400°F (200°C) for 45–50 minutes, or until very tender.
- Let them cool slightly, then scoop out the flesh into a large bowl and mash until completely smooth.
- Stir in the olive oil and sea salt. Gradually add the flour, starting with a spoon, then switching to your hands. Mix just until a soft, slightly sticky dough forms. Add a little extra flour only if needed, but keep the dough soft.
Make the Gnocchi
- Lightly flour your work surface. Divide the dough into 4 equal portions.
- Roll each portion into a long rope about ¾ inch (2 cm) thick.
- Cut the ropes into 1-inch (2.5 cm) pieces.
- To create gnocchi ridges, place each piece at the top of the fork tines and gently press down, rolling it forward with your thumb.
- Place the shaped gnocchi onto a lightly floured baking sheet.
- Bring a large pot of salted water to a gentle boil.
- Drop in the gnocchi in batches to avoid overcrowding.
- Once the gnocchi float (2–3 minutes), cook for 30 seconds more, then remove with a slotted spoon and set aside.
Make the Rosemary Butter Sauce
- In a large skillet, melt the vegan butter with the olive oil over medium heat.
- Add the garlic and rosemary; sauté for 1–2 minutes until fragrant.
- Add the walnuts and toast for 1–2 minutes until lightly golden.
- Add the cooked gnocchi directly into the skillet and toss gently to coat, allowing the edges to become lightly crisp.
Serve
- Season with salt and freshly ground black pepper.
- Top with vegan parmesan if desired and serve warm.
Notes
- Refrigerator: Store the sweet potato gnocchi and sauce in an airtight container for 3 to 4 days.
- Freezer: I don’t recommend freezing cooked and sauced gnocchi. Instead, freeze uncooked gnocchi on a parchment-lined baking sheet until firm, then transfer to a freezer bag for up to 2 months. Boil from frozen, then make the sauce as directed in the recipe.
- To reheat: Sauté leftovers in a skillet over medium heat with a splash of oil or butter until warmed and lightly crisp. The microwave also works, but the texture won’t be as good—they’re likely to get mushy.
