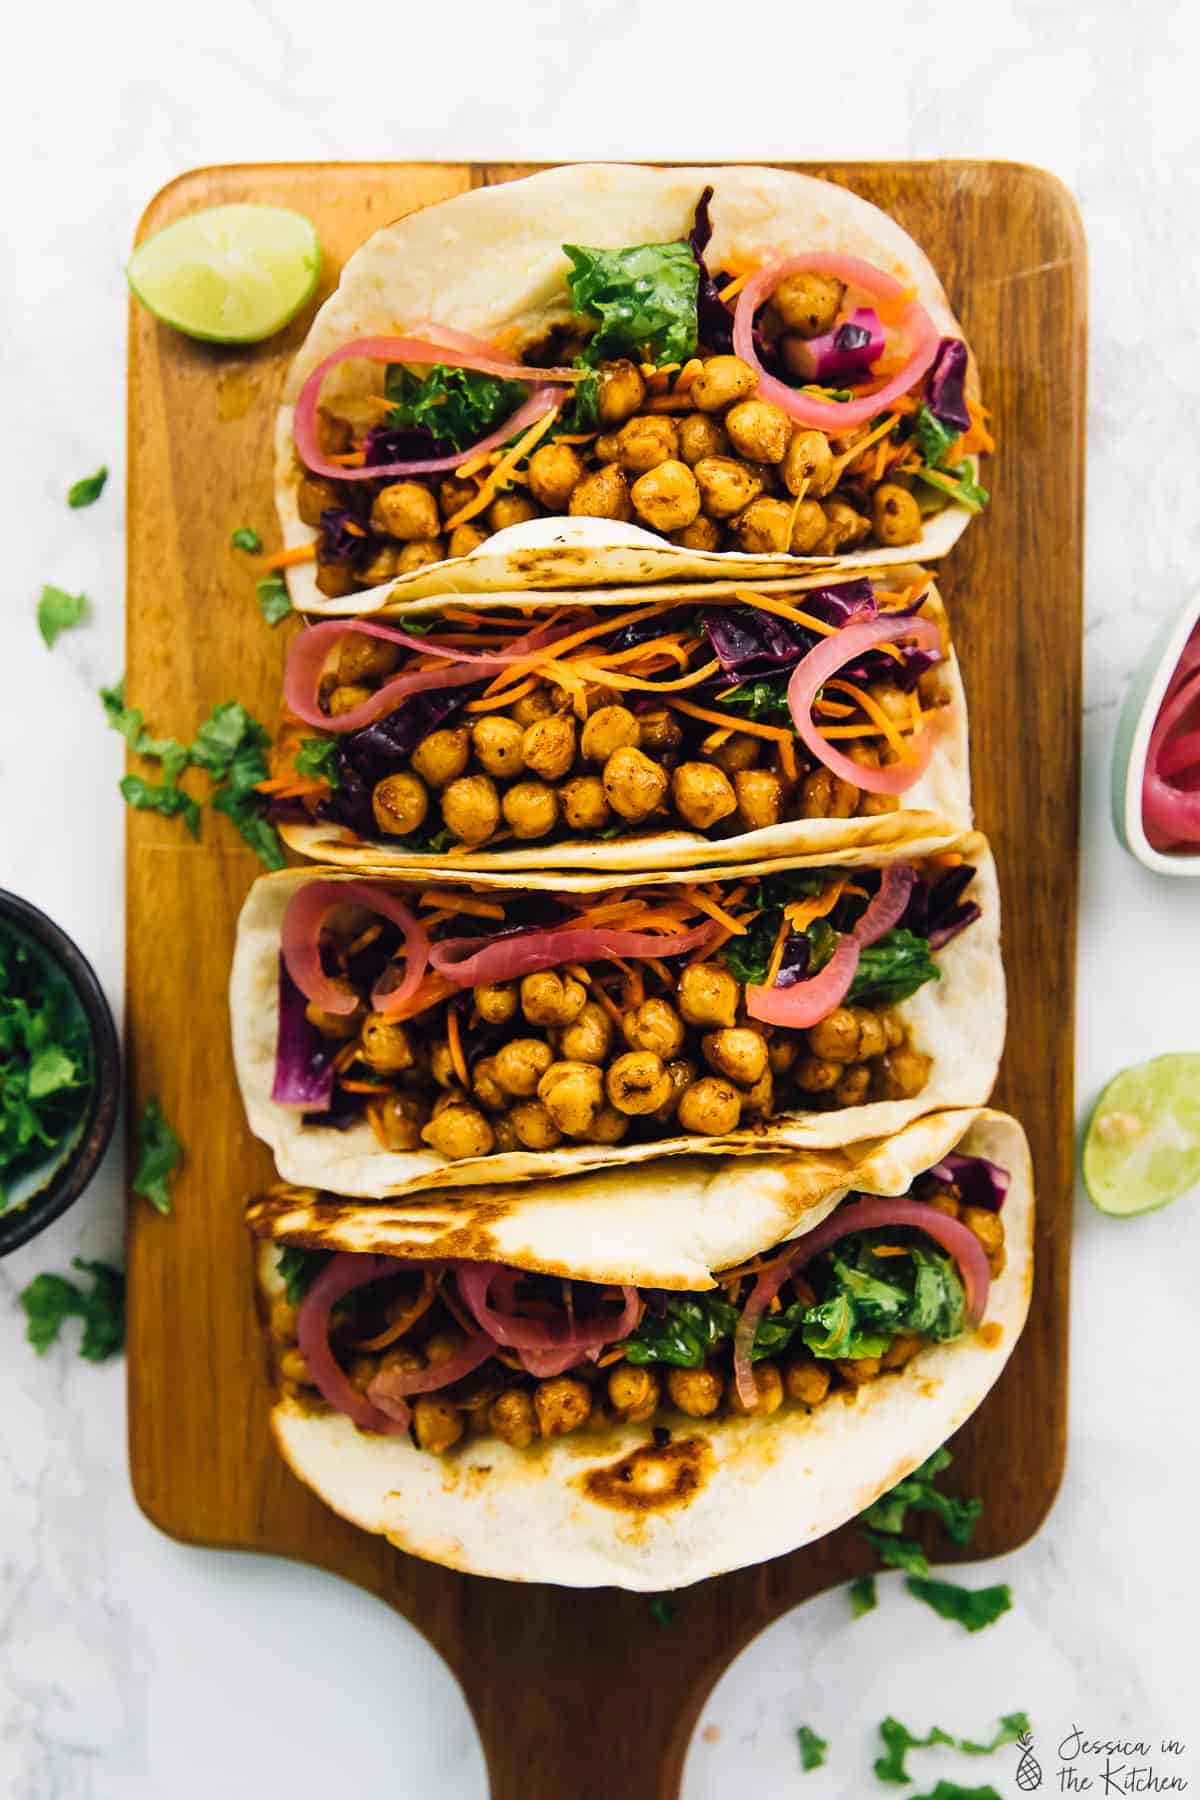
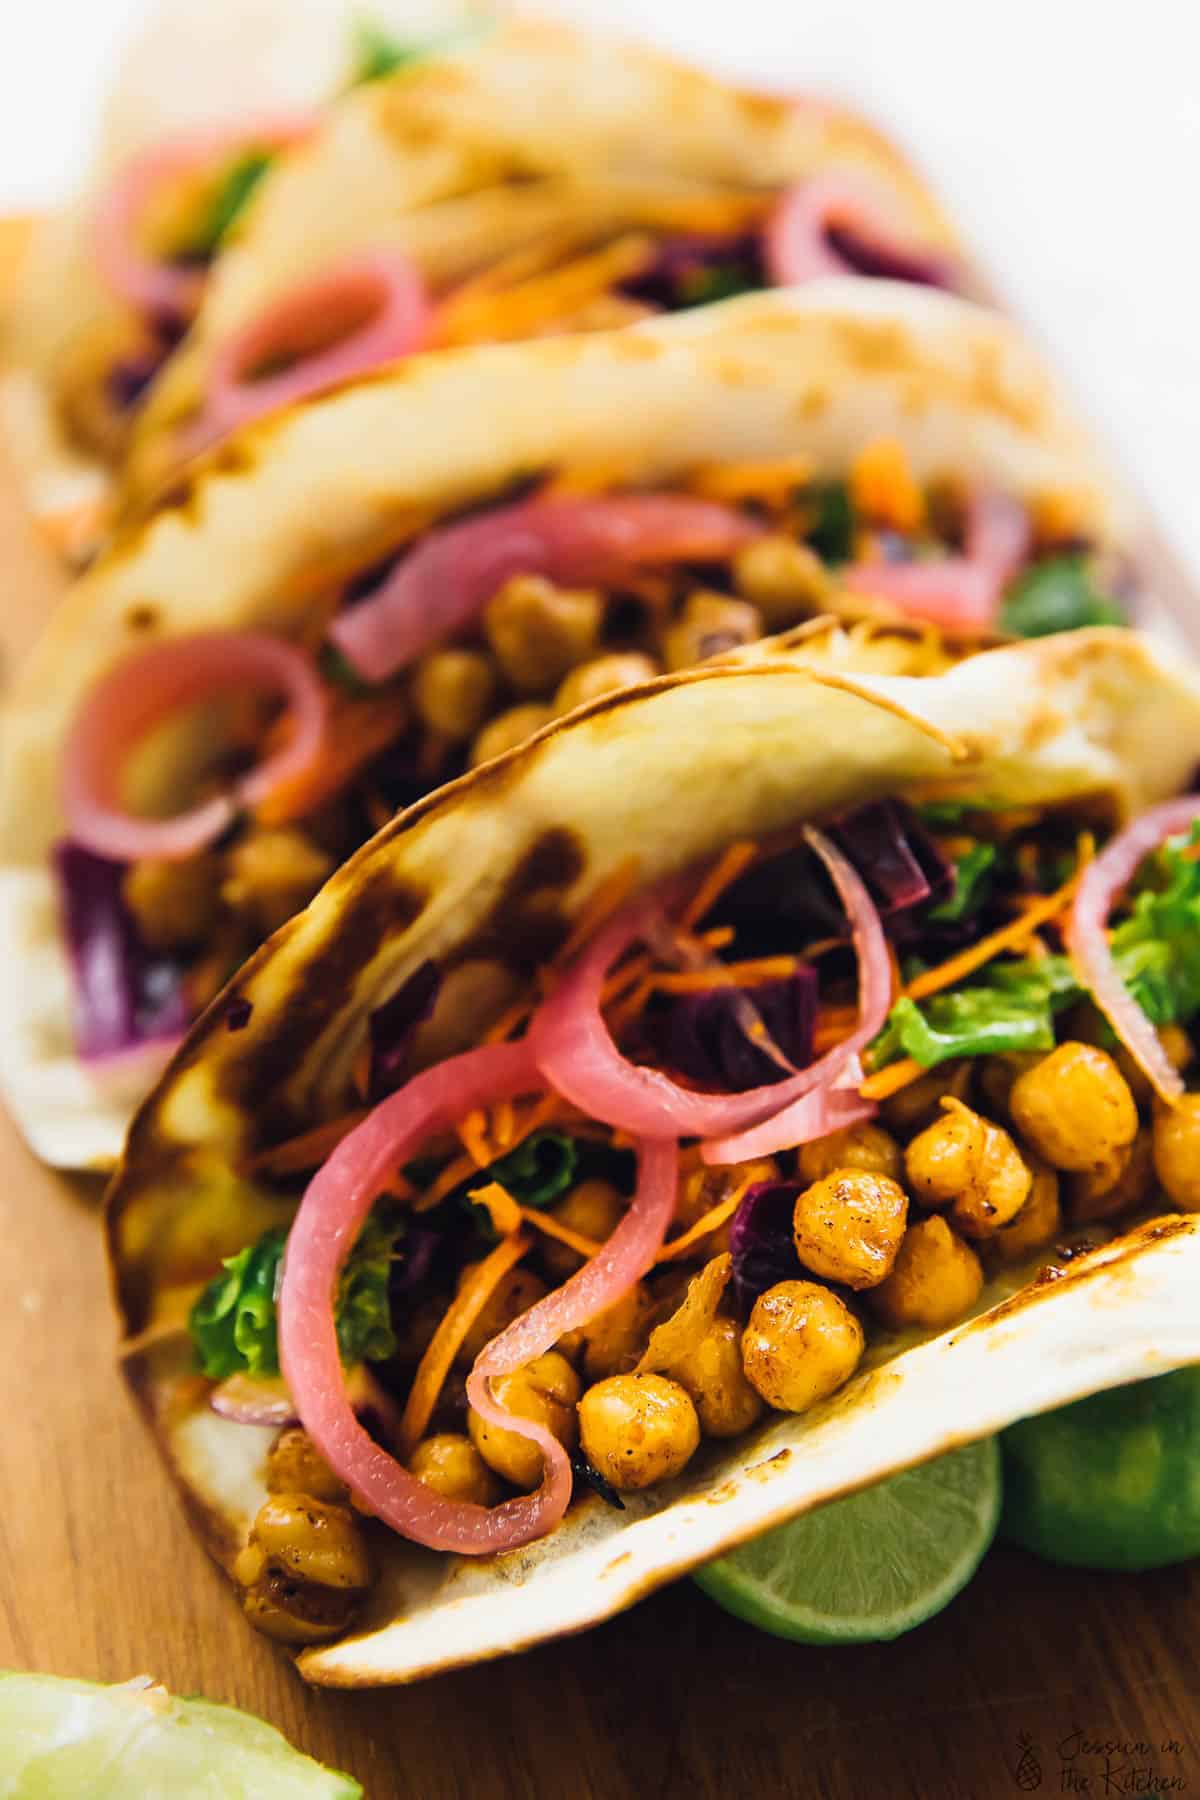
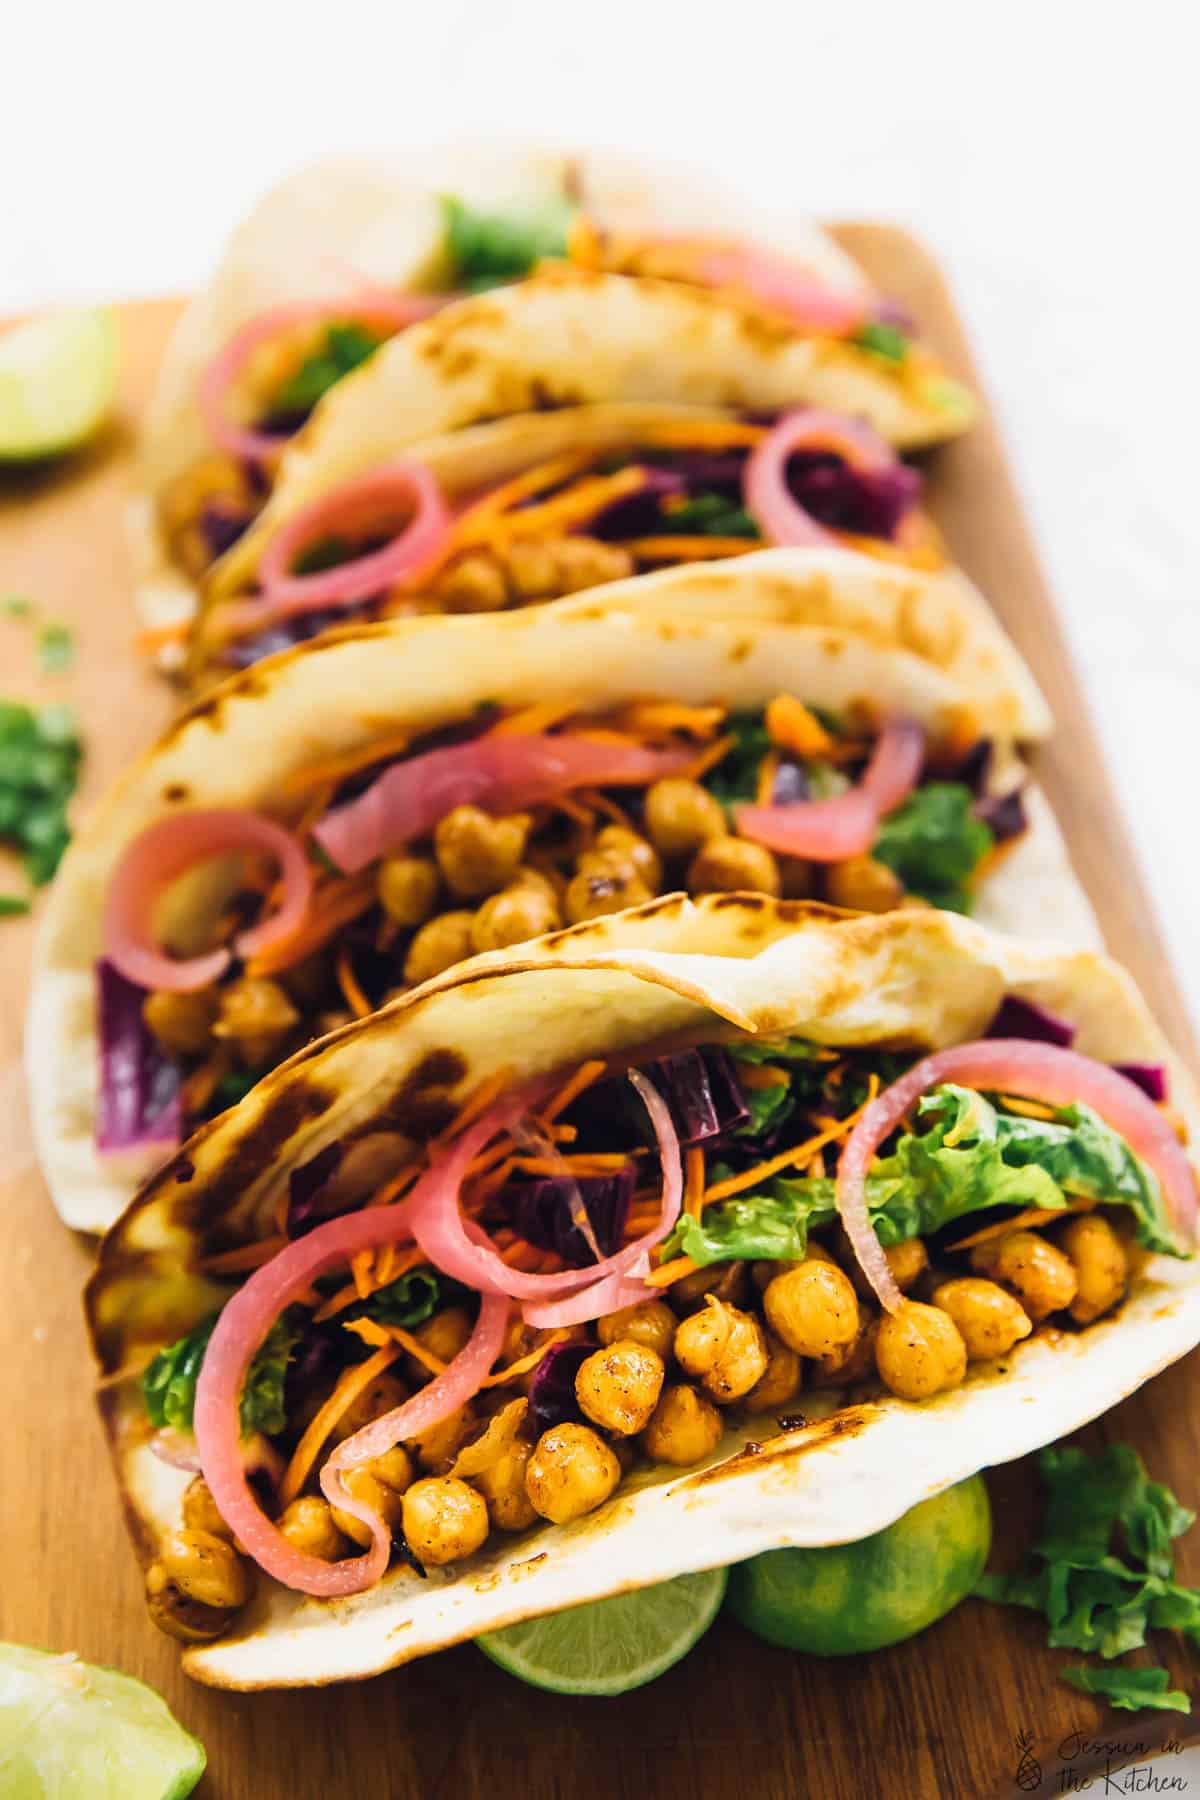
These BBQ chickpea tacos are an easy dinner recipe that comes together in minutes! Chickpeas are coated in a sticky BBQ sauce, topped with tangy pickled onions and crunchy kale slaw, then tucked into tortillas for a flavour-packed meal.
If you’ve been reading Jessica in the Kitchen for a while, then it’s no secret that I love tacos. Crispy cauliflower tacos , zucchini tacos , sweet potato and black bean tacos —I’ll take tacos any way I can get them. (As long as they’re vegan, of course!)
This BBQ chickpea taco recipe is truly made for busy weeknights. It comes together super fast, and if you make the pickled onions and slaw ahead of time, you’re literally 5 minutes away from a delicious dinner!
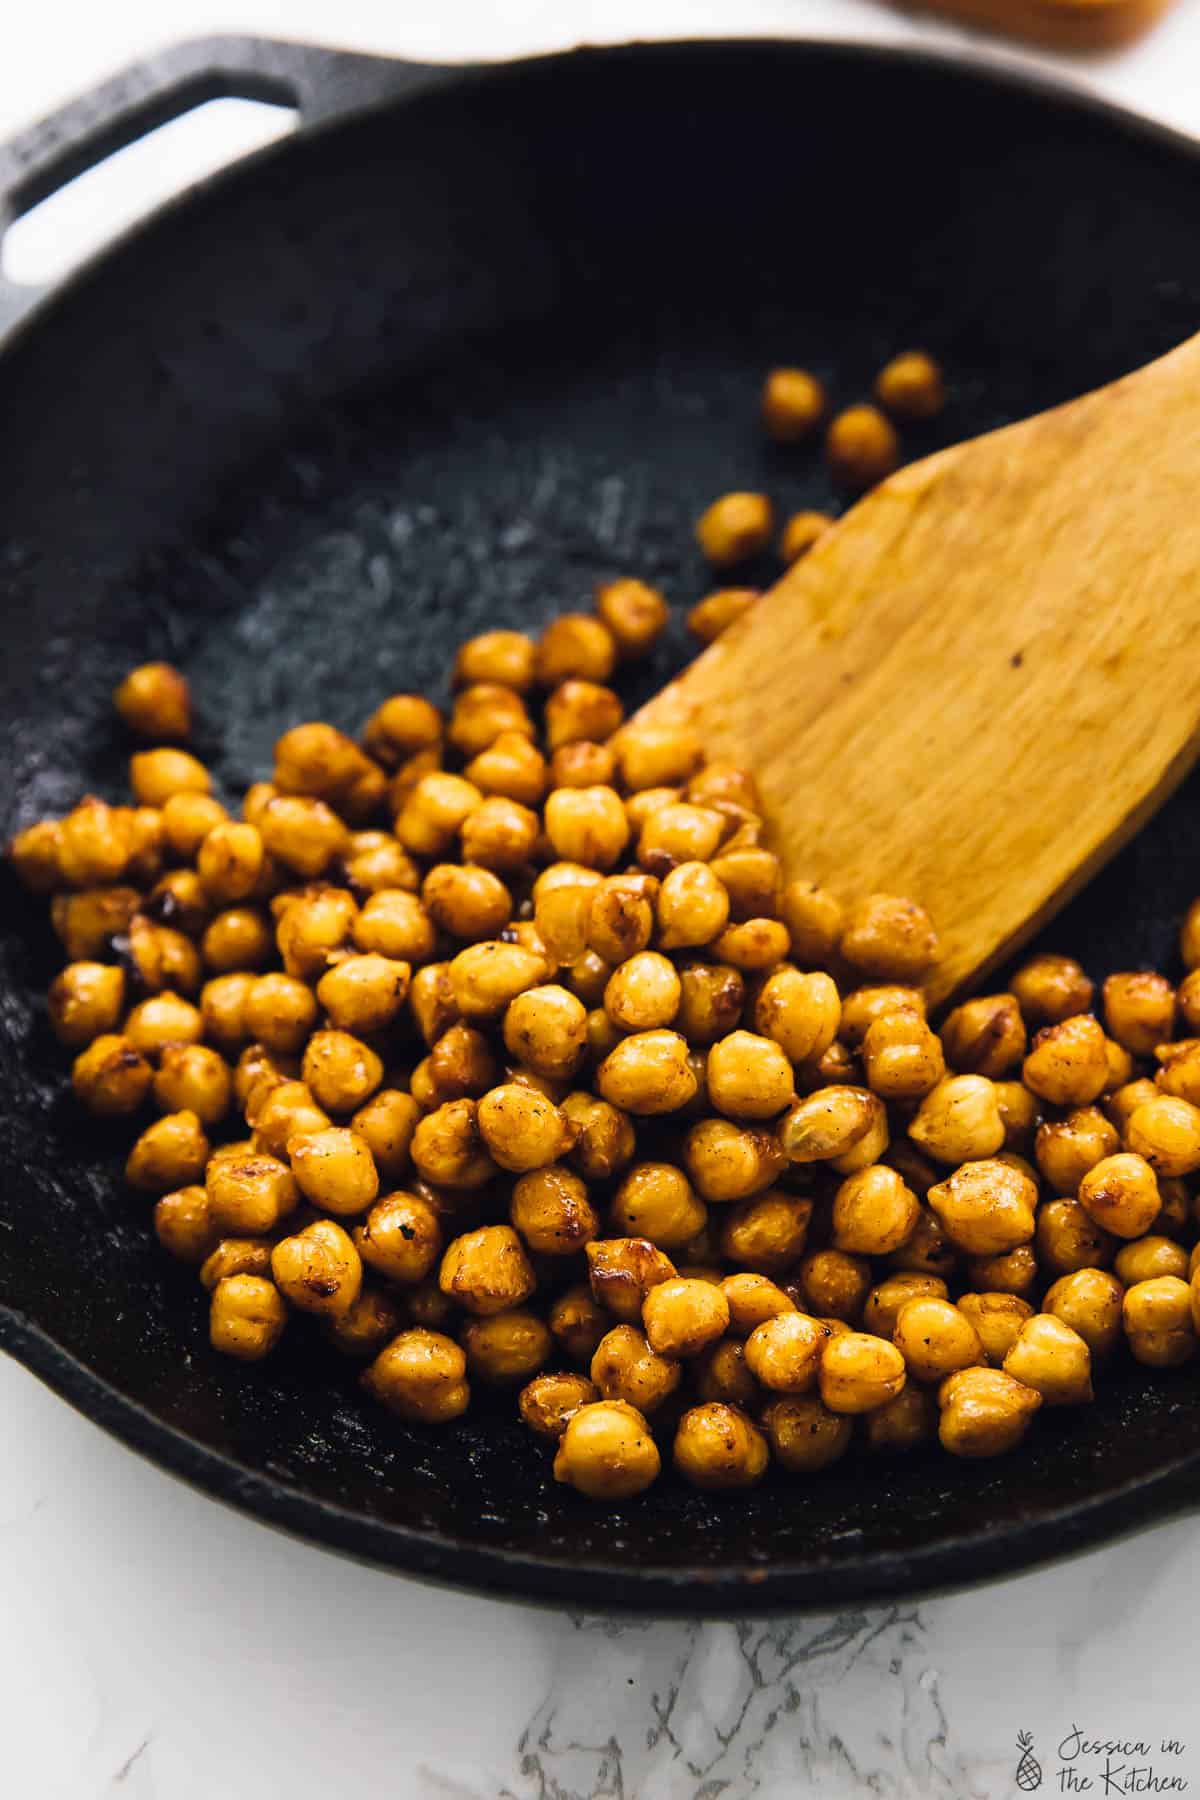
The chickpeas are pan-roasted in BBQ sauce until they’re warmed through and sticky. With the sweet BBQ sauce flavour, the chickpeas pair perfectly with the tangy onions and slaw. This recipe has all kinds of flavours and textures, but put them all together and they blend seamlessly. So good.
Notes on Ingredients
Scroll down to the recipe card to find the ingredient quantities and recipe instructions.
- Canned chickpeas – Rinse and drain these well, then dry them as much as possible.
- BBQ sauce – Use homemade BBQ sauce or store-bought. Just make sure it’s vegan—some brands contain honey!
- Kale Cabbage Slaw
- Quick Pickled Onions
- Soft taco shells – Flour or corn tortillas both work, so use whichever you prefer.
- Lime wedges
How Much Dried Chickpeas Equals One 15-Ounce Can?
If you’d like to use dried chickpeas instead of canned for this recipe, start with 3/4 cup of dried beans and cook them according to the package instructions.
How to Make BBQ Chickpea Tacos
Follow the recipes for the pickled onions and slaw, then cook the chickpeas and assemble according to the instructions below.
- Cook the chickpeas. Place the chickpeas in a small pot set over medium heat. Stir in the barbecue sauce and cook for about 5 minutes, or until the chickpeas are coated and the sauces thickens and gets sticky.
- Warm the tortillas. Heat a teaspoon of olive oil in a skillet set over medium heat. Warm the tortillas one at a time; once they’re puffy and browned in spots, flip and cook the opposite side.
- Assemble. Top the tortillas with the chickpeas, slaw, and onions. Serve with a squeeze of fresh lime juice.
Tips for Success
My BBQ chickpea tacos couldn’t be any easier to make, but these tips will help you make sure they turn out perfect!
- Dry the chickpeas after rinsing. This will keep the BBQ sauce from getting watered down and help it get thick and sticky.
- Add more sauce. Once the chickpeas are warmed through, you can stir more sauce into the pan, or allow everyone to customise their own tacos with the amount of sauce they want.
- Don’t skip the slaw and onions! They are essential to the flavour of this recipe, balancing the sweetness of the chickpeas.
Variations
There are so many ways to make this recipe your own. You can skip the tortillas and serve the BBQ chickpeas, slaw, and onions over rice or quinoa for taco bowls, or serve them over greens for a BBQ chickpea taco salad.
You can also try different toppings. Vegan ranch is delicious on these tacos, or add your favourite plant-based cheddar shreds .
Serving Suggestions
Serve your BBQ chickpea tacos with a simple side dish like Grilled Mexican Street Corn or Black Bean Avocado and Corn Salad .

How to Store Leftovers
For maximum freshness and flavour, store each component of these BBQ chickpea tacos separately; they can be refrigerated for up to 4 days. Then, reheat the tortillas and chickpeas in a skillet or the microwave and assemble.
Can This Recipe Be Frozen?
This recipe isn’t ideal for freezing, although the BBQ chickpeas will keep in the freezer for up to 3 months. (The other components should not be frozen.) Store them in an airtight container or freezer bag, then thaw in the refrigerator before reheating.
More Recipes With Chickpeas
- Vegan Chickpea Tuna Salad
- Mediterranean Chickpea Salad
- Easy Chickpea Tikka Masala
- Vegan Spicy BBQ Chickpea Pizza
Ingredients
- 1 15 ounce cooked chickpeas, rinsed and drained , 1 ½ cups
- ¼ cup bbq sauce
- Serve with Kale Cabbage Slaw
- Serve with Quick Pickled Onions
- 5 10 ” inch soft taco shells
- Serve with limes
Instructions
BBQ Chickpeas
- In a small pot over medium heat, place the chickpeas and 2 tablespoons barbecue sauce. Heat for about 5 minutes until warm and the sauce becomes sticky and coats the chickpeas.
- Remove from the heat and coat with the remaining barbecue sauce. If desired, you can add more barbecue sauce.
Assembling the Tacos
- Heat 1 teaspoon olive oil in a skillet over medium heat (if possible, brush with a pastry brush). Place a taco shell in the heat until golden brown spots appear and they are slightly puffy for a few seconds, then flip and cook the same. Set on a plate to assemble.
- Layer with kale cabbage slaw, chickpeas and pickled onions over the soft taco shells. Serve with limes. Enjoy!
Notes
- If you’re gluten free remember to check that your taco shells are gluten free!
- To store: Store each component of these BBQ chickpea tacos separately; they can be refrigerated for up to 4 days. Then, reheat the tortillas and chickpeas in a skillet or the microwave and assemble.
- To freeze: This recipe isn’t ideal for freezing, although the BBQ chickpeas will keep in the freezer for up to 3 months. (The other components should not be frozen.) Store them in an airtight container or freezer bag, then thaw in the refrigerator before reheating.

BBQ Chickpea Tacos with Kale Cabbage Slaw
Ingredients
- 1 15 ounce cooked chickpeas, rinsed and drained 1 ½ cups
- ¼ cup bbq sauce
- Serve with Kale Cabbage Slaw
- Serve with Quick Pickled Onions
- 5 10 " inch soft taco shells
- Serve with limes
Instructions
BBQ Chickpeas
- In a small pot over medium heat, place the chickpeas and 2 tablespoons barbecue sauce. Heat for about 5 minutes until warm and the sauce becomes sticky and coats the chickpeas.
- Remove from the heat and coat with the remaining barbecue sauce. If desired, you can add more barbecue sauce.
Assembling the Tacos
- Heat 1 teaspoon olive oil in a skillet over medium heat (if possible, brush with a pastry brush). Place a taco shell in the heat until golden brown spots appear and they are slightly puffy for a few seconds, then flip and cook the same. Set on a plate to assemble.
- Layer with kale cabbage slaw, chickpeas and pickled onions over the soft taco shells. Serve with limes. Enjoy!
Notes
- If you’re gluten free remember to check that your taco shells are gluten free!
- To store: Store each component of these BBQ chickpea tacos separately; they can be refrigerated for up to 4 days. Then, reheat the tortillas and chickpeas in a skillet or the microwave and assemble.
- To freeze: This recipe isn’t ideal for freezing, although the BBQ chickpeas will keep in the freezer for up to 3 months. (The other components should not be frozen.) Store them in an airtight container or freezer bag, then thaw in the refrigerator before reheating.
Nutrition
BBQ Chickpea Tacos with Kale Cabbage Slaw https://jessicainthekitchen.com/bbq-chickpea-tacos-vegan/ January 24, 2023
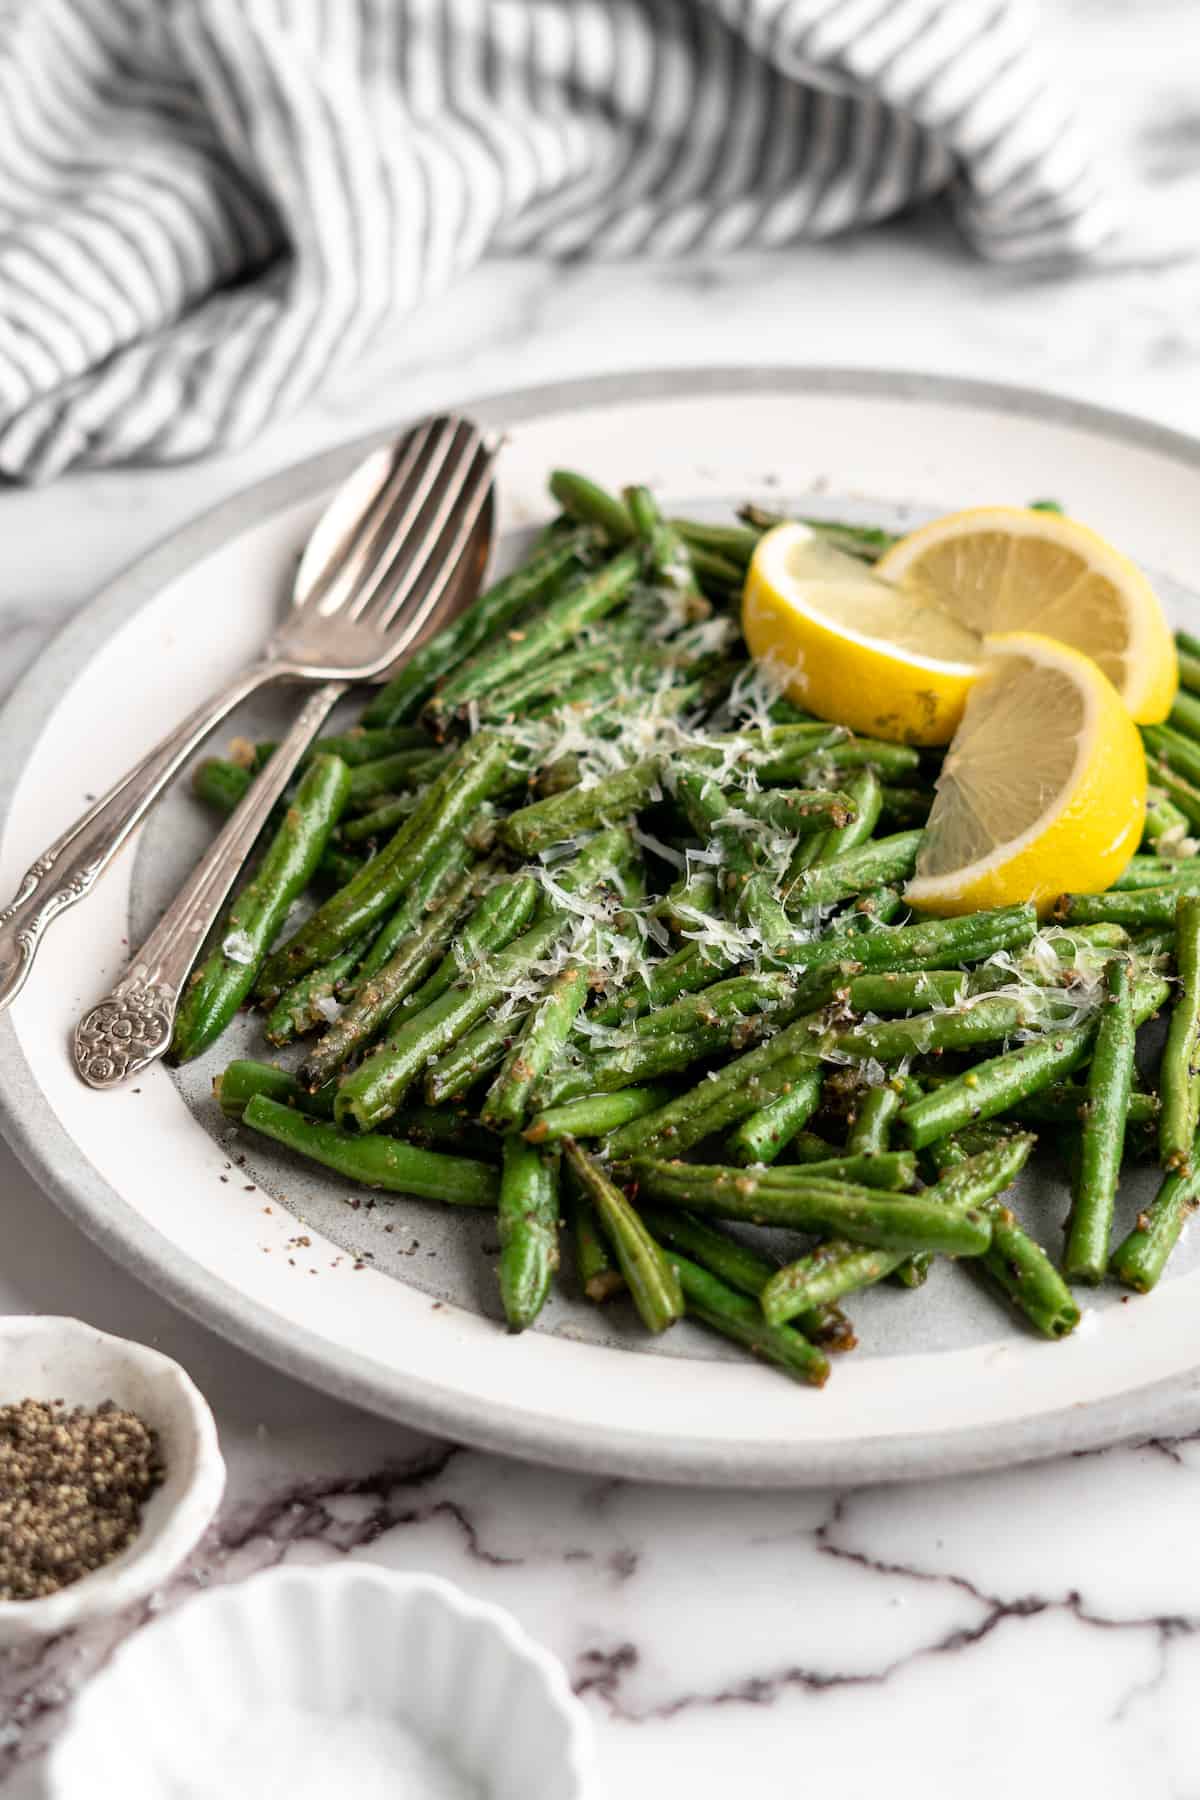
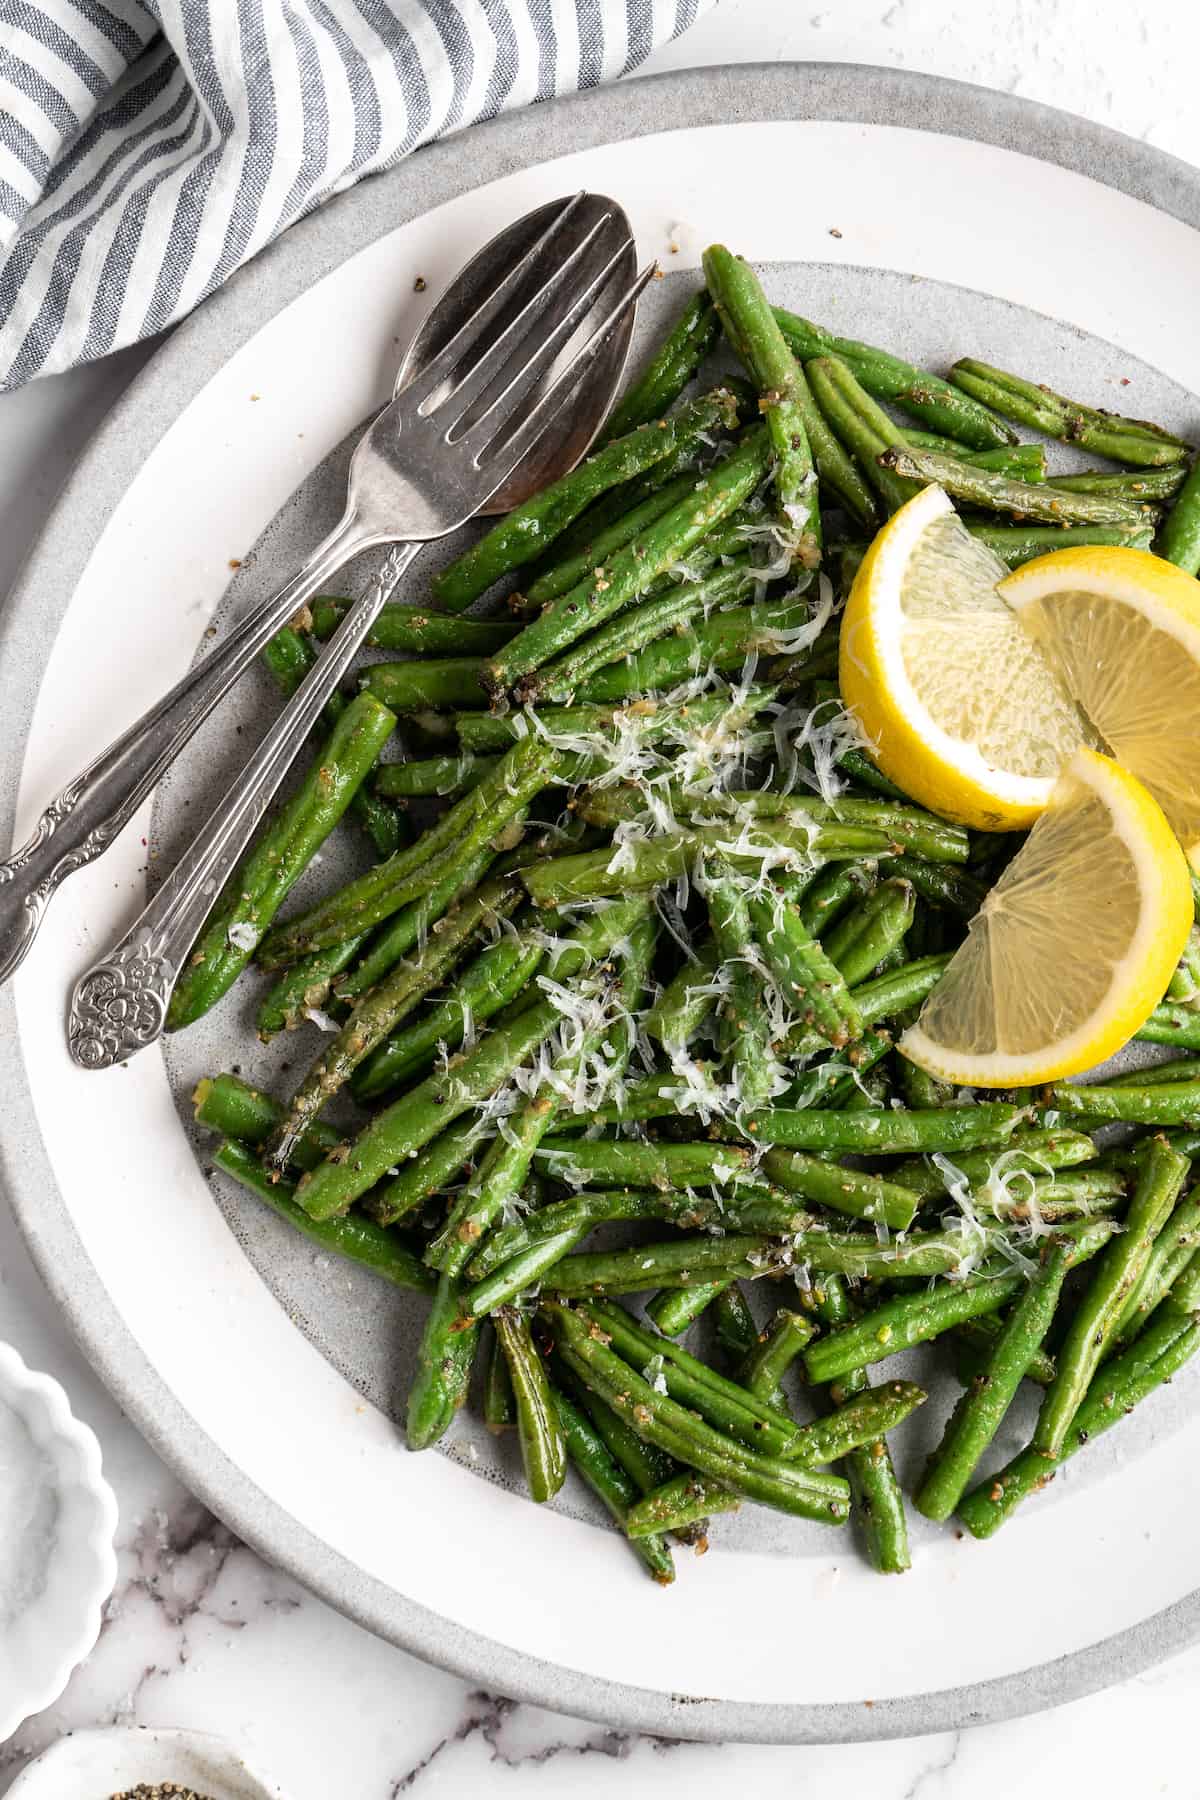
These air fryer green beans are a simple vegan side dish that goes with just about any meal! Seasoned with garlic powder, plant-based Parmesan, and lemon juice, they’re full of flavour and oh-so-easy to make.
Whenever there’s a new kitchen appliance on the scene, it’s hard to know if it will end up being a passing fad or the next slow cooker—something we rely on for easy weeknight meals. I think it’s safe to say that the air fryer has definitely earned its place in the kitchen at this point. I mean, air fryer asparagus , air fryer orange tofu , air fryer chocolate chip cookies , and now these air fryer green beans—what’s not to love?!
Cooking green beans in the air fryer is a game changer. They’re cooked quickly and evenly with just a little bit of oil, making them a great snack or side dish. The air fryer maintains that signature crunchy-crisp texture of fresh green beans and cooks them to absolute perfection.
Air frying uses hot air to cook food quickly. The green beans are placed in the fryer basket and a fan circulates hot air around the entire appliance, speeding up the cooking process. This method locks in moisture and flavor, while also creating a crispy outer layer—without adding a lot of extra fat.
Best of all, air fryer green beans are incredibly easy to make! Simply toss the green beans with oil, add some seasonings, pop them in your air fryer, and voila! Perfectly cooked green beans in minutes. Friends, you’ll never want to cook green beans any other way after you try this recipe!
Notes on Ingredients
Scroll down to the recipe card to find the ingredient quantities and recipe instructions.
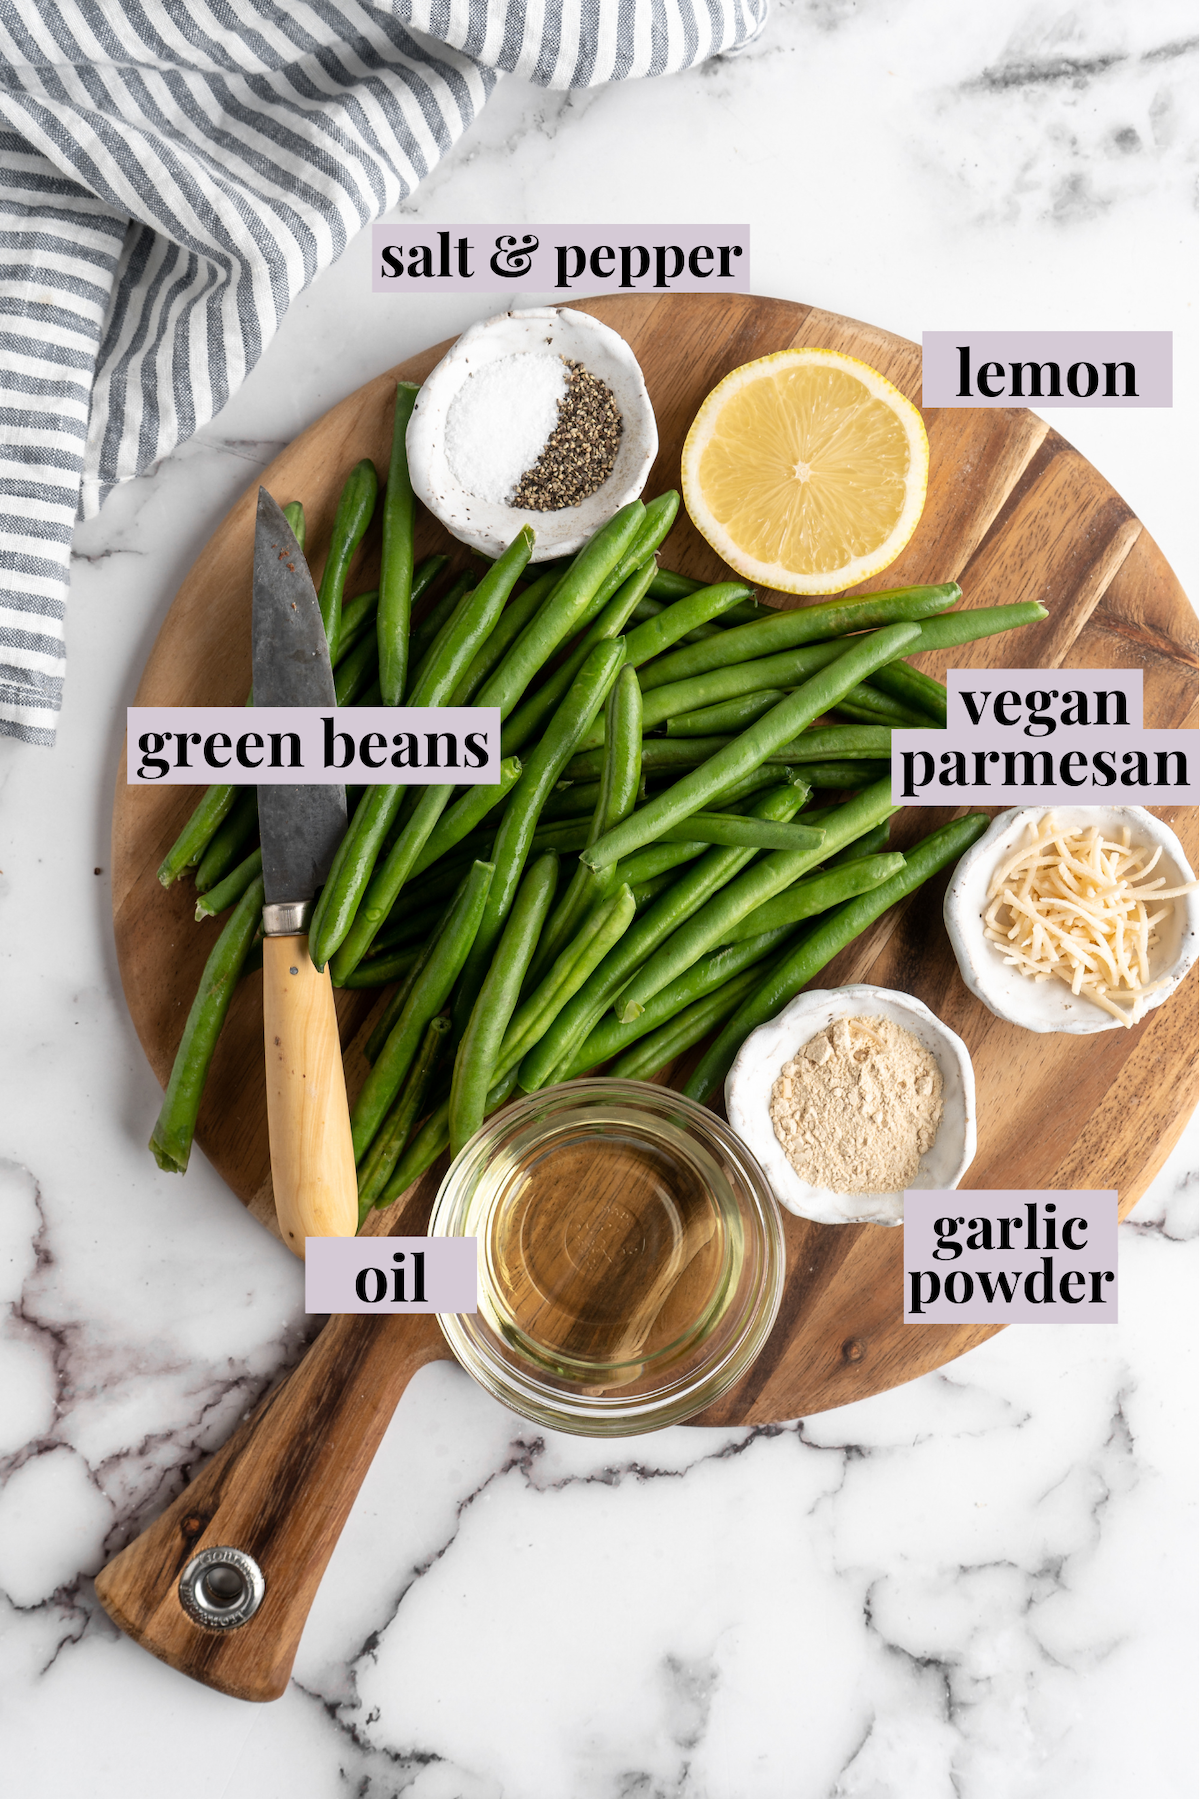
- Green beans – Yellow beans or other heirloom varieties can be used as well; just note that if they’re thinner or thicker than the average green bean, the cooking time will need to be adjusted accordingly.
- Oil – Olive oil or any other cooking oil you like or have on hand; cooking spray can be used, too.
- Garlic powder
- Sea salt
- Ground black pepper – Freshly ground has the most flavour!
- Vegan Parmesan cheese – Use store-bought or homemade vegan Parmesan.
- Lemon juice
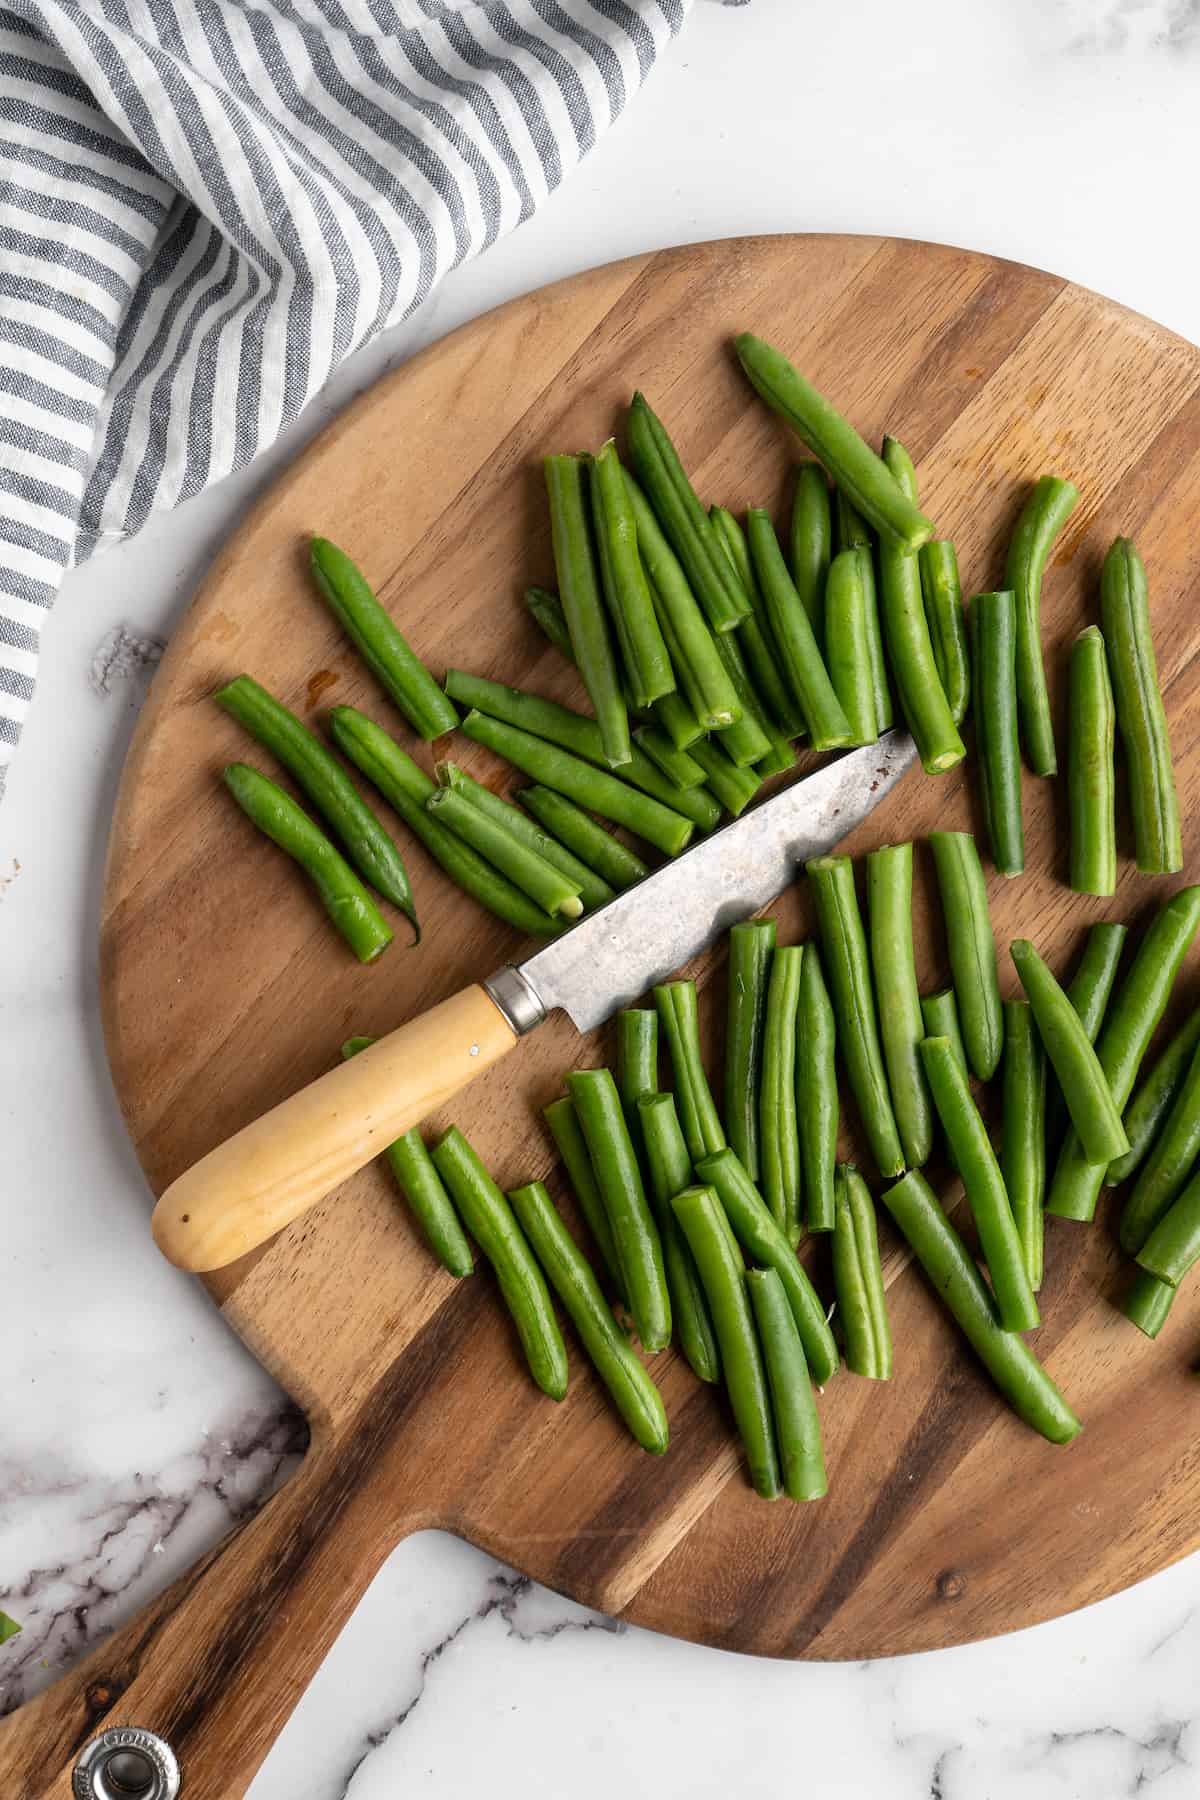
What Part of the Green Bean Do You Trim?
You really only have to trim the top stem from green beans—in other words, the part that attaches to the plant. The bottom of the bean can be left on, or you can trim that too for a more uniform appearance. It’s up to you!
How to Make Air Fryer Green Beans
Making green beans in the air fryer is easy as can be! Here’s what you’ll need to do.
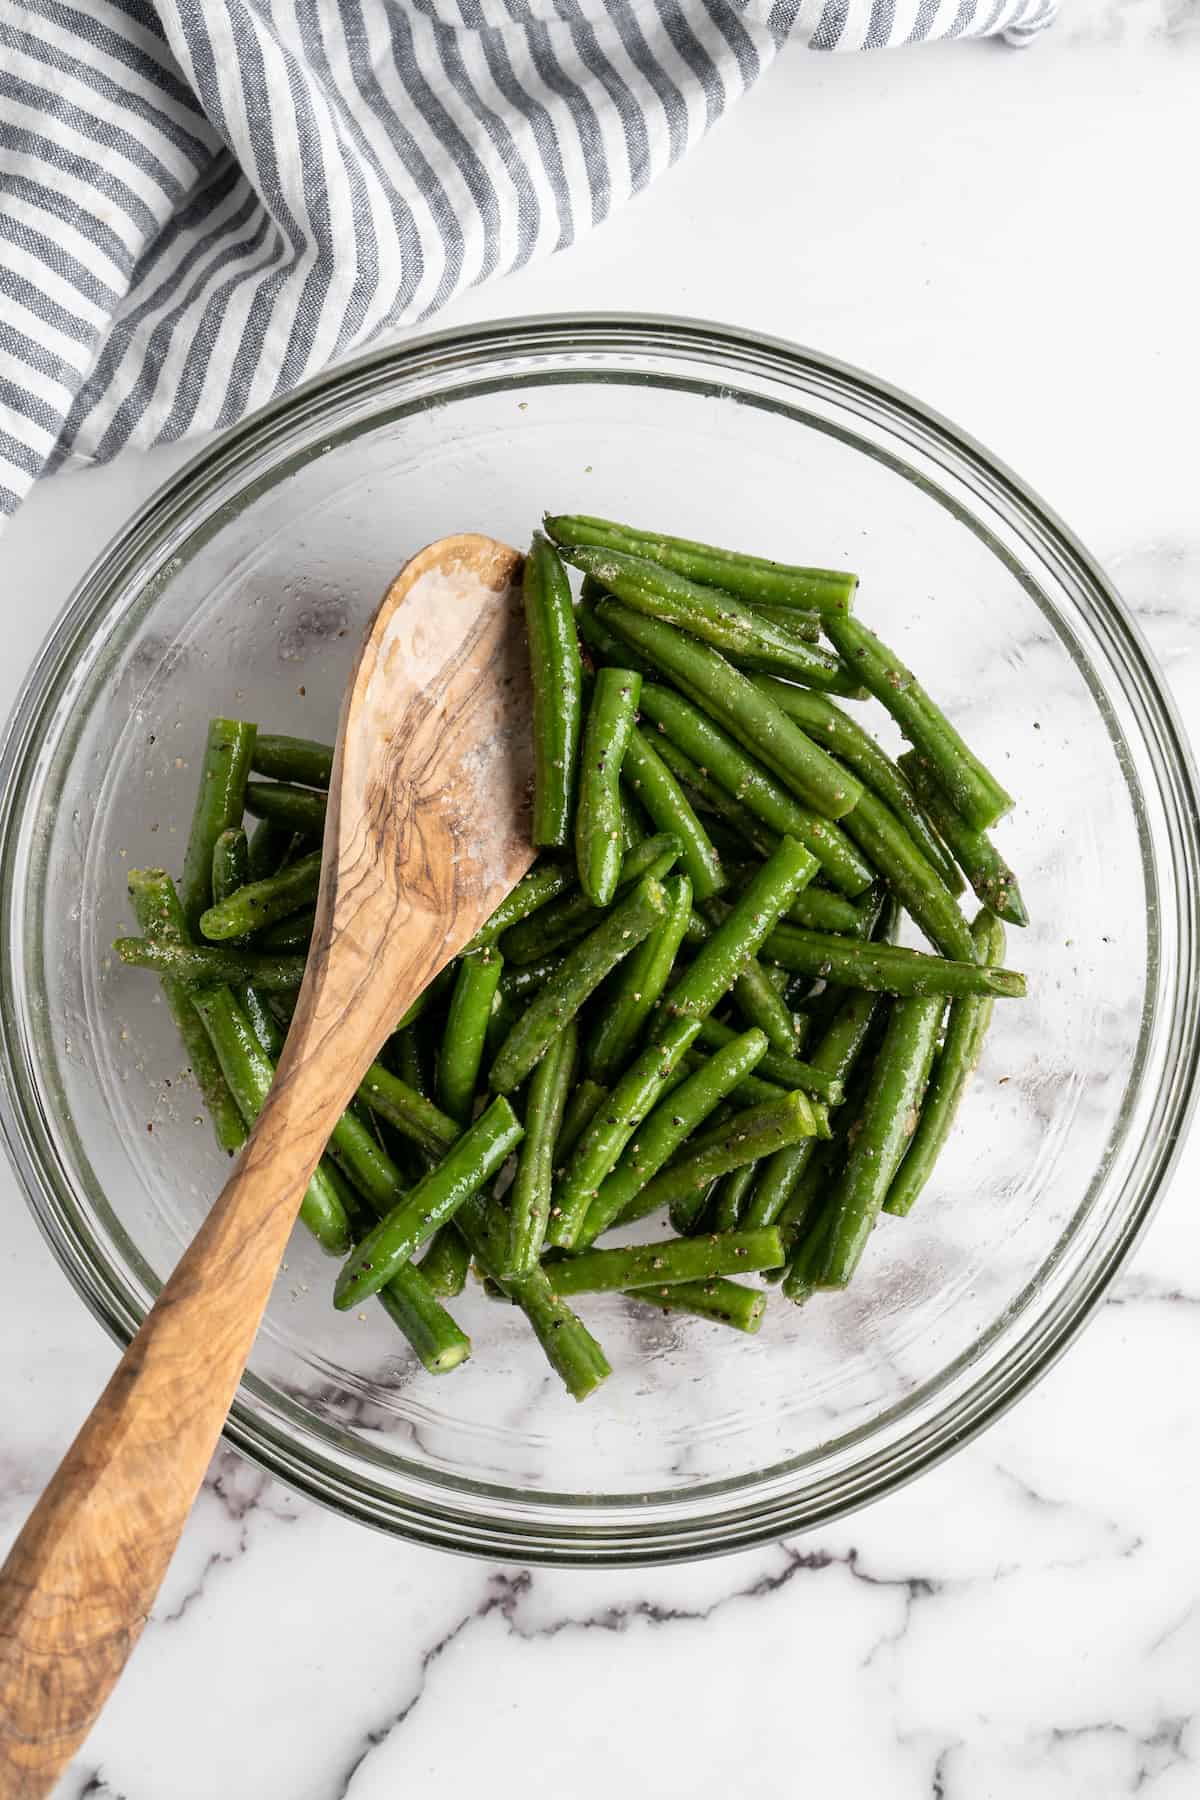
Season the beans. Place the trimmed green beans in a large bowl. Add the oil, garlic powder, sea salt, and ground black pepper, then toss to coat.
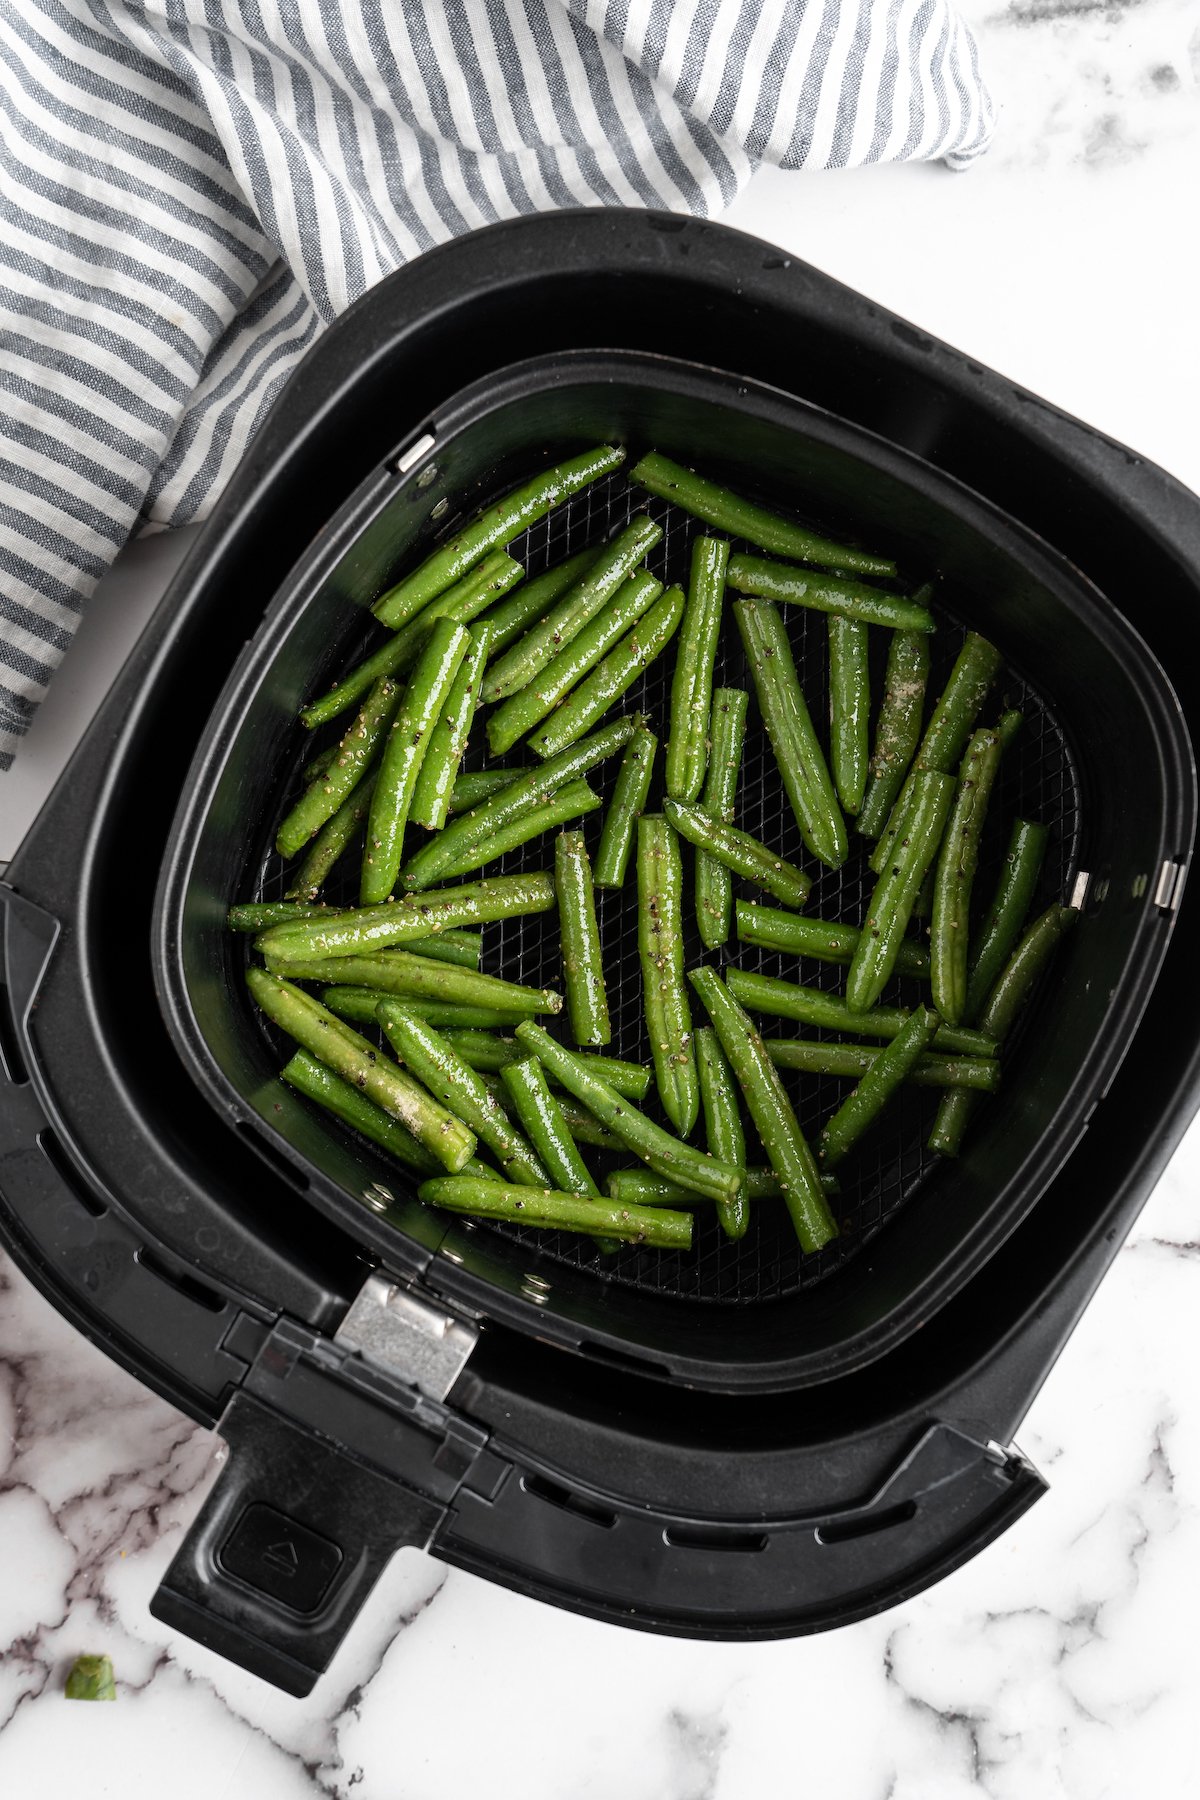
Add the beans to the air fryer basket. Transfer the seasoned green beans to your air fryer basket and arrange them in a single layer.
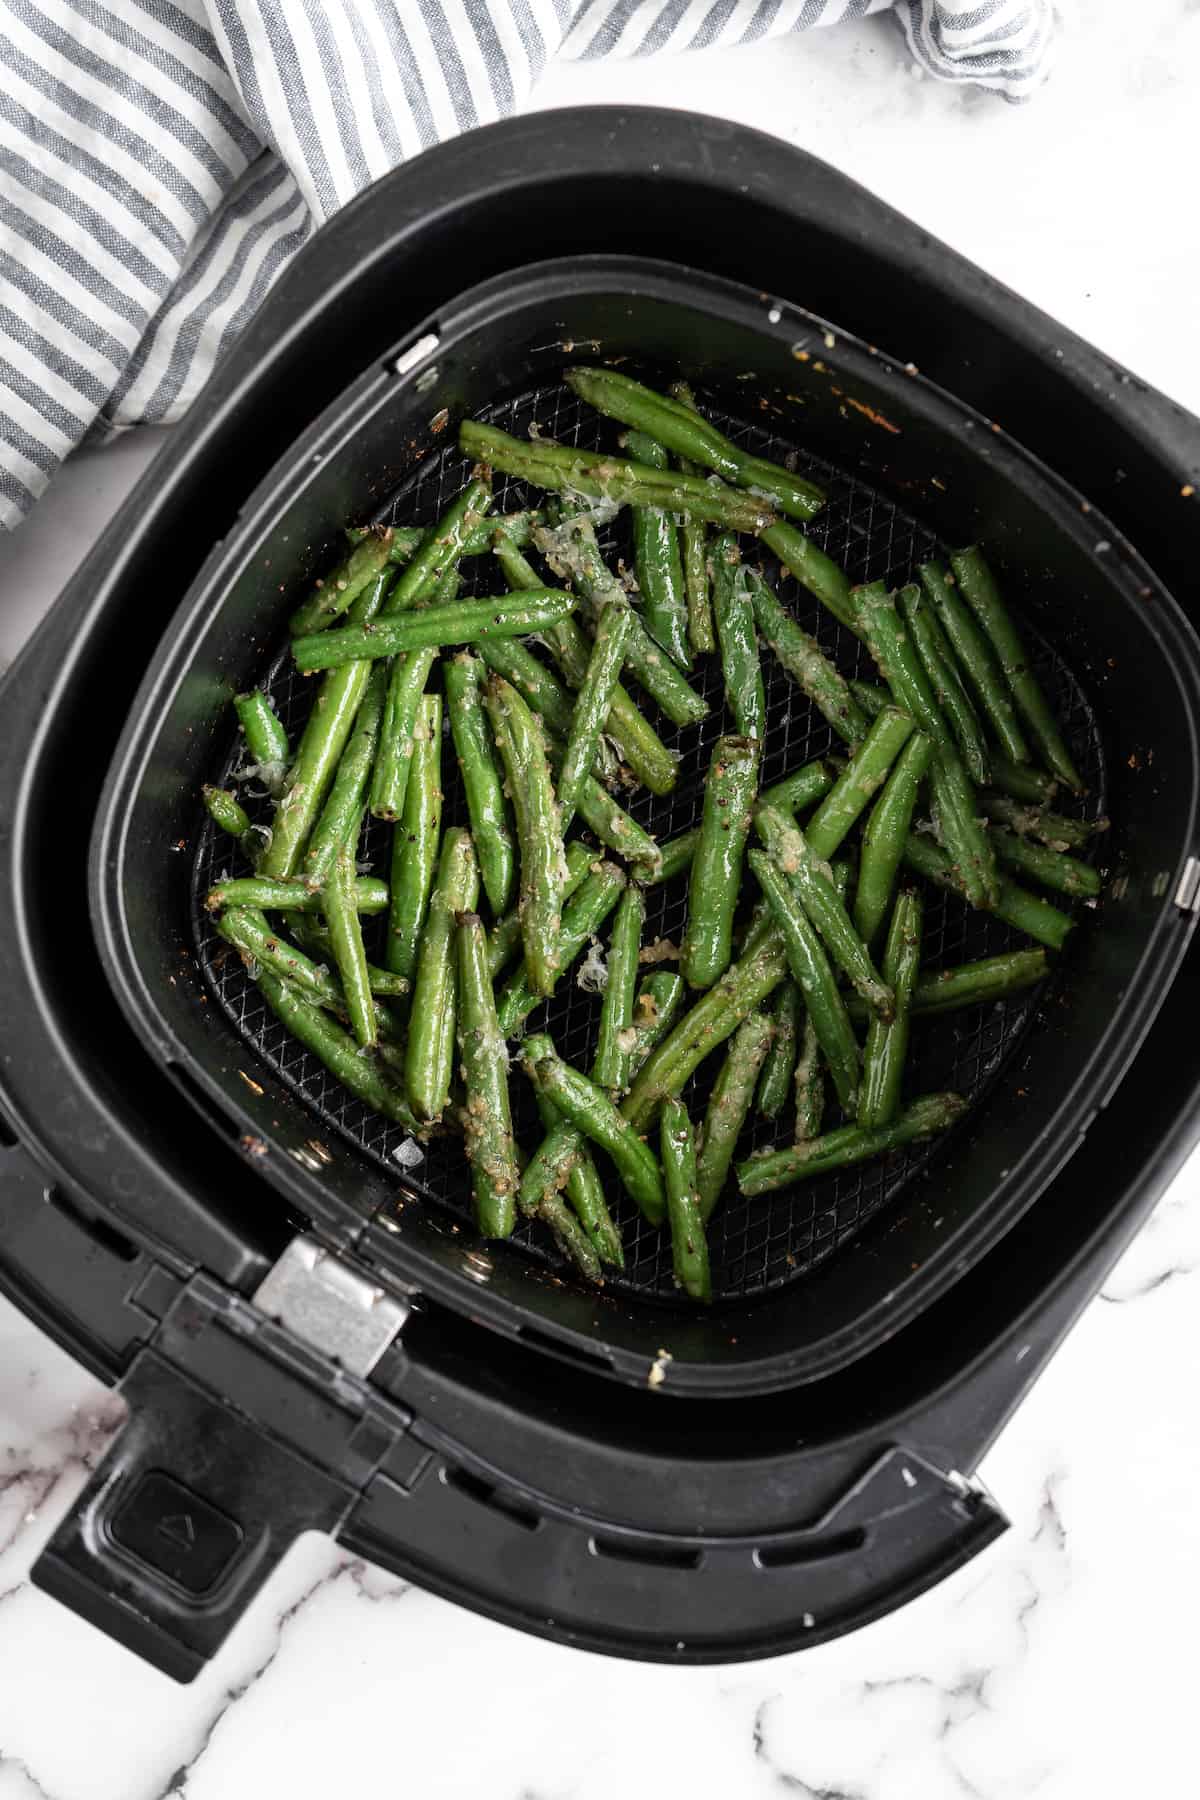
Cook. Turn the air fryer to 400°F and cook for 4 minutes. Shake the basket, top the beans with the vegan Parmesan cheese and toss to coat. Air fry again for 5 to 6 minutes.
Finish. Squeeze lemon juice over the green beans, toss, then serve.
Tips for Success
Here are some simple tips for perfect air fryer green beans:
- Don’t crowd the beans. It’s better to make the beans in two batches than to crowd them in the air fryer. Giving them space is key to cooking them evenly!
- Shake the air fryer basket. Don’t skip this part! You really want to shake the basket enough that the green beans turn. This also helps them cook evenly.
- Preheat the air fryer if needed. Some air fryer models need to be preheated, while others do not. If yours does, preheat it before adding the green beans.
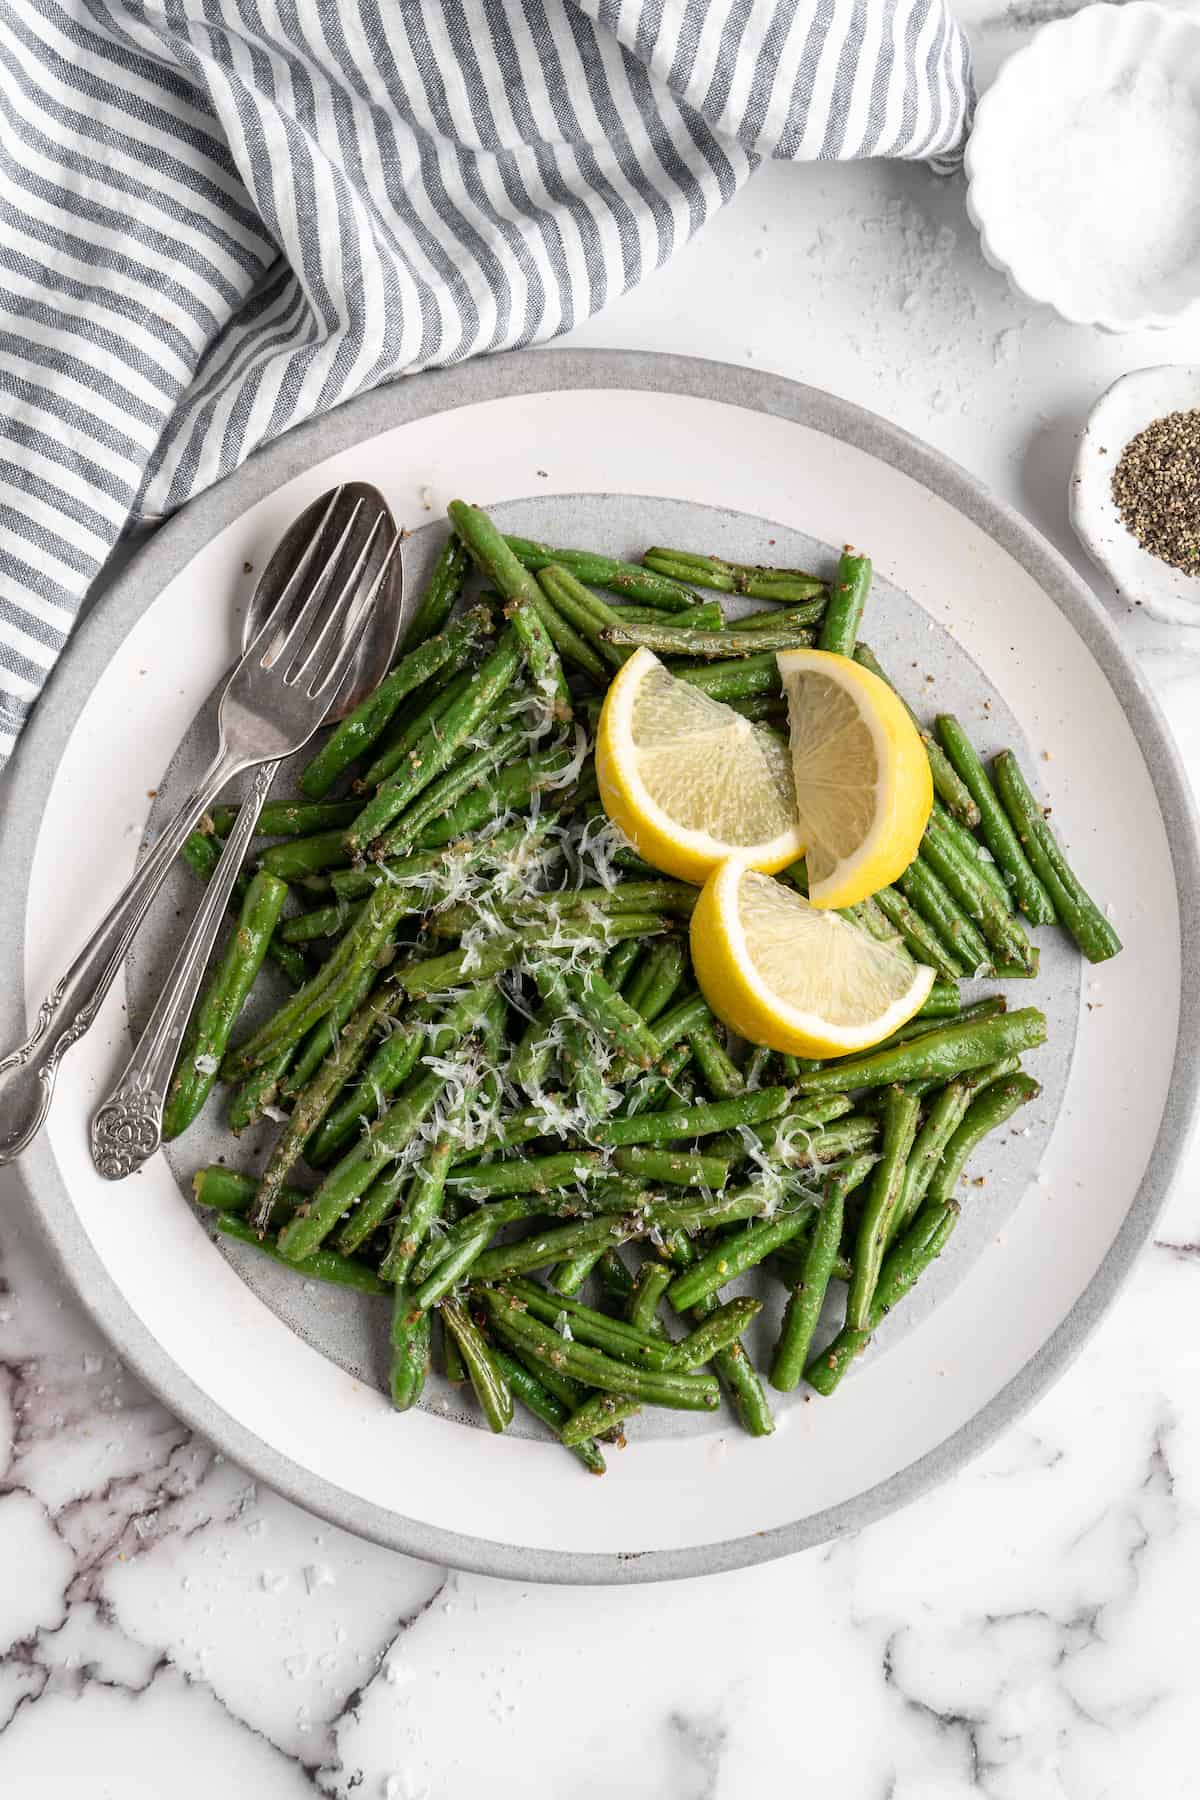
Serving Suggestions
You can serve these air fryer green beans as a snack with marinara for dipping, or go the traditional route and serve them as a side dish. I love them with vegan meatloaf and mashed potatoes , or serve them as a side with vegan stuffed shells or creamy garlic mushroom pasta .
Variations
This is one of those wonderful recipes where you just can’t go wrong—add your favourite seasonings and make these air fryer green beans your own!
Give them an Asian-inspired spin by cooking them with sesame oil and garlic powder, then garnishing them with sesame seeds when they’re done cooking. You can also skip the Parmesan and lemon and instead finish them with a drizzle of tahini dressing , chili crisp, or peanut sauce .
How to Store Leftovers
Leftover green beans can be stored in the refrigerator in an airtight container for up to 3 days. To reheat, return them to a 400ºF air fryer for 2 to 3 minutes. You can also eat them chilled or heat them up in the microwave, although they’ll be softer this way.
Can I Freeze This Recipe?
Unfortunately, air fryer green beans do not freeze well. The texture will become mushy and the flavour won’t be as bright and fresh.
Ingredients
- 1 pound green beans , throughly washed, with ends trimmed and cut in half
- 2 teaspoons oil , or use an oil spray
- 1 teaspoon garlic powder
- 1/2 teaspoon sea salt
- 1/2 teaspoon ground black pepper
- 1 teaspoon vegan Parmesan cheese , grated
- Squeeze of lemon juice
Instructions
- Once cleaned and ends trimmed and cut in half, place the green beans in a bowl. Add in the oil, garlic powder, sea salt and ground black pepper. Toss to coat and combine.
- Add the green beans in a single layer in your air fryer.
- Air fry for 400°F for 4 minutes. Shake, top with the vegan Parmesan cheese and toss to coat, air fry again for 5-6 minutes.
- Squeeze lemon all over, toss to combine, then transfer to a plate to enjoy!
