This air fryer roasted garlic is quick, easy, and the perfect complement to just about any savory recipe!
If you’re a regular reader, you know that I love roasted garlic . I put it in just about everything, from Homemade Roasted Garlic Tomato Sauce to Jalapeño Cornbread Waffles . It’s one of those ingredients that can really take a dish to the next level.
But up until recently, I always roasted my garlic in the oven. I mean, it’s called roasted garlic, of course you make it in the oven, right? You can’t grill it or boil it…
…but you can air fry it. And friends, air fryer roasted garlic is a game-changer.
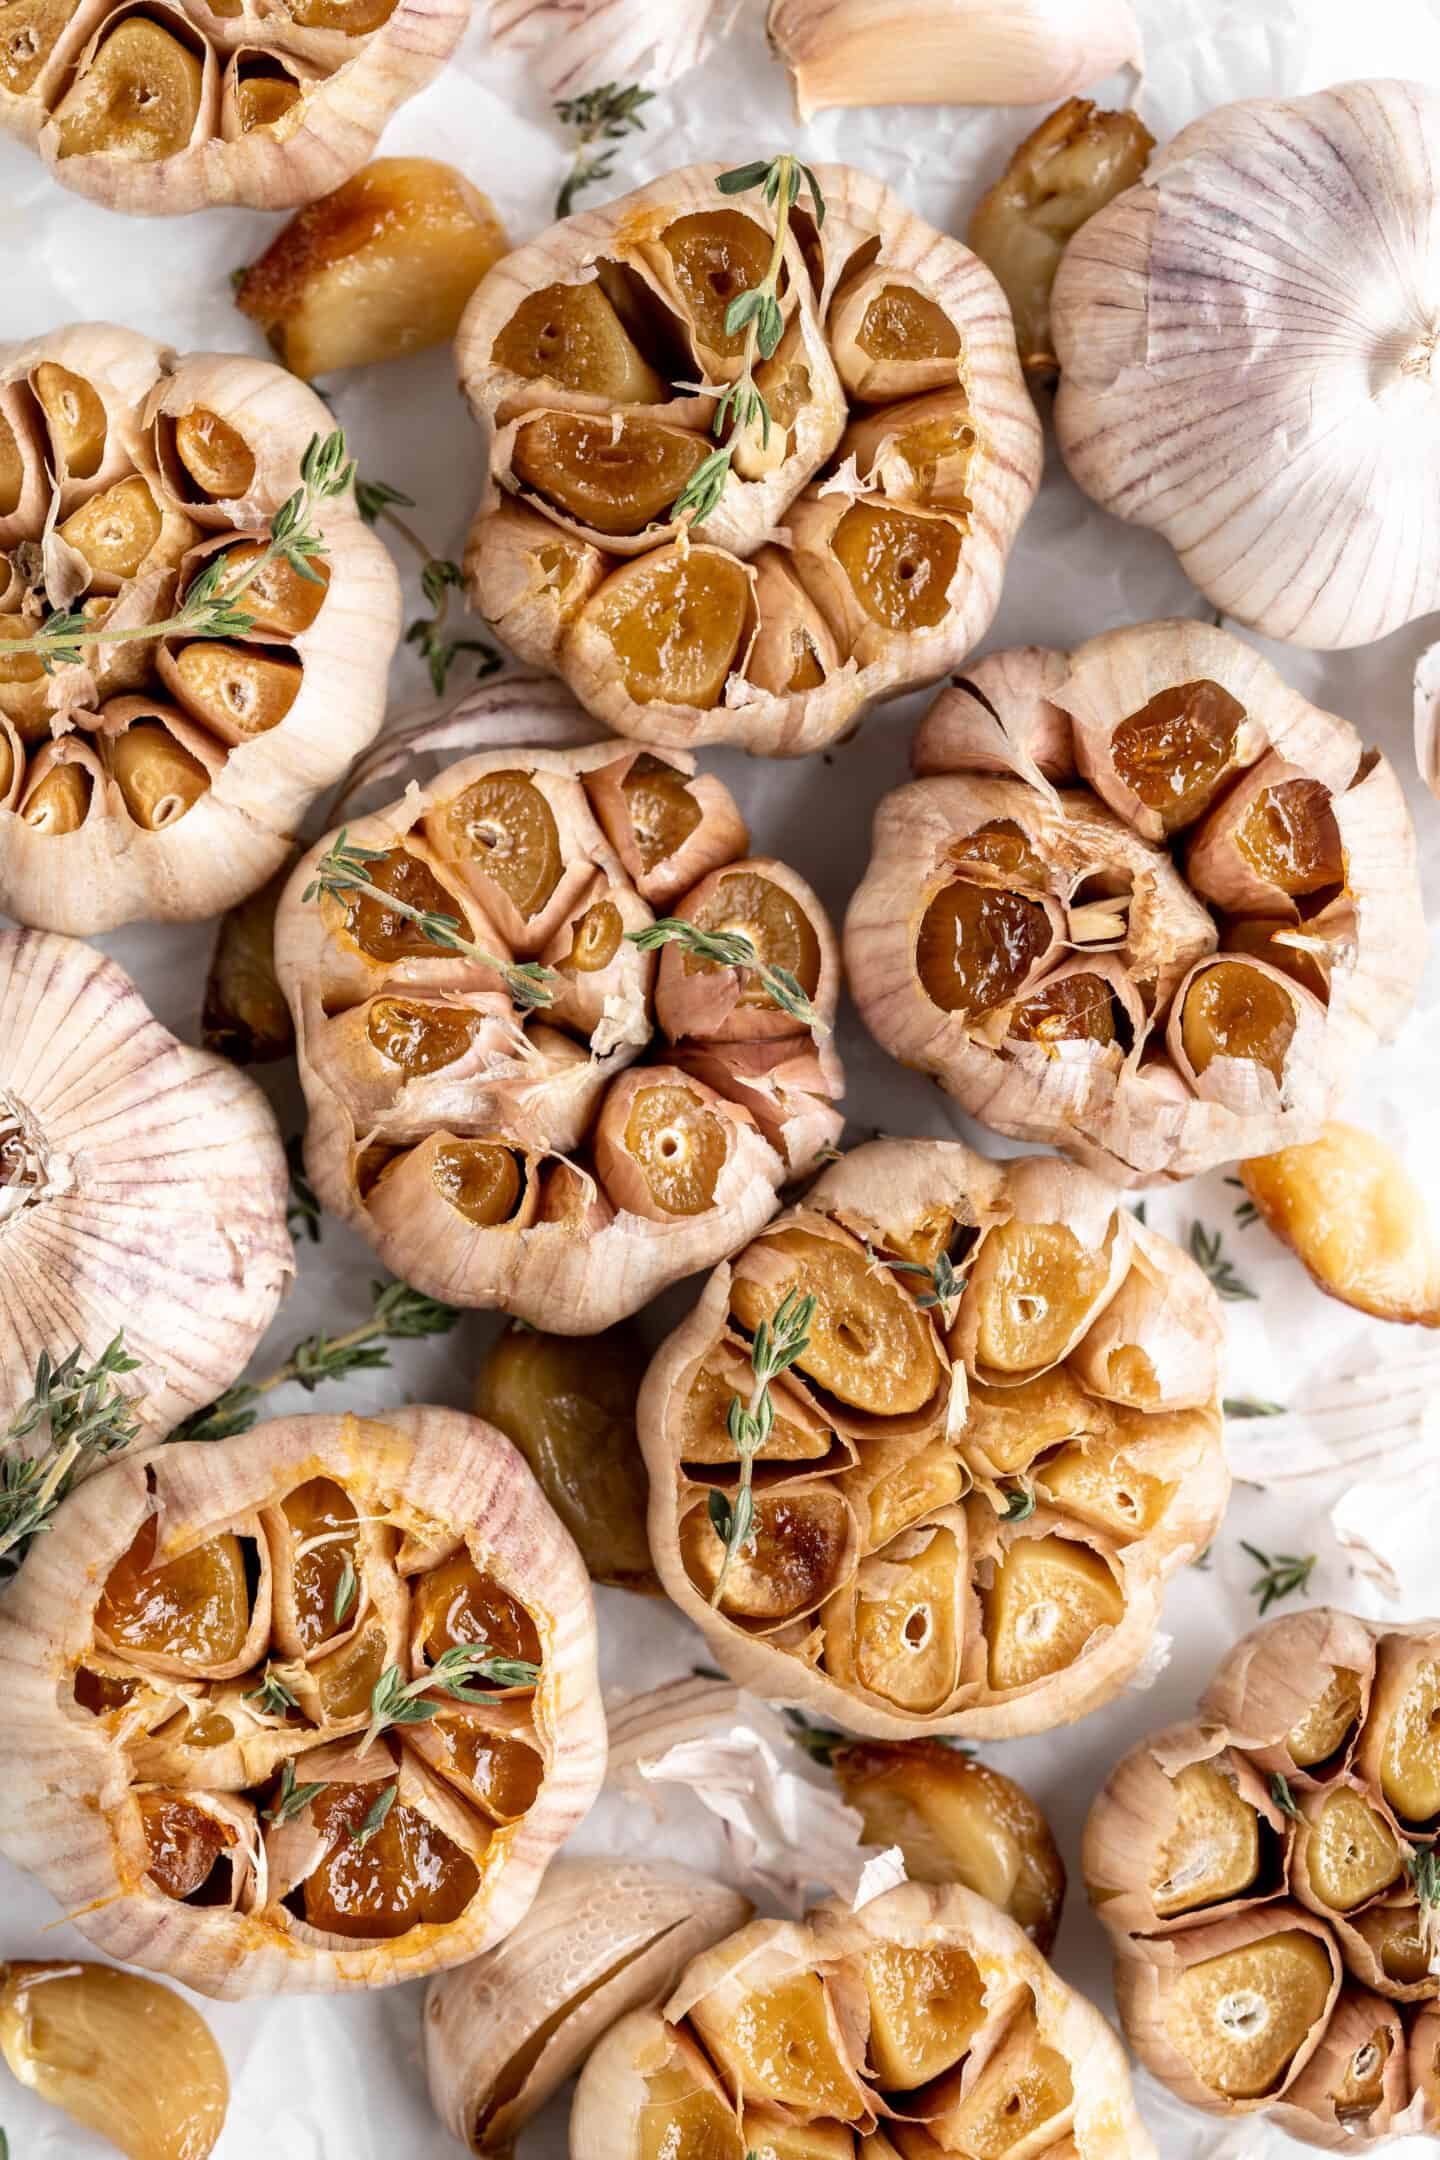
Don’t get me wrong, it’s easy to make traditional roasted garlic, and the results are delicious. But it does take some time and patience. Air fryer roasted garlic is quick, easy, and produces perfectly caramelized, buttery cloves every time.
Does Roasting Garlic Make It Less Strong?
One of the great things about roasted garlic is that it’s much less pungent than raw garlic, so it’s perfect for recipes where you want to add a lot of flavour without overwhelming the other ingredients. Even if you’re not usually a fan of garlic, you might just find that you love it when it’s roasted!
Notes on Ingredients
Please note that this is important information on the ingredients and instructions and the FULL recipe with amounts and details can be found DOWN BELOW (scroll to it) in the recipe card.
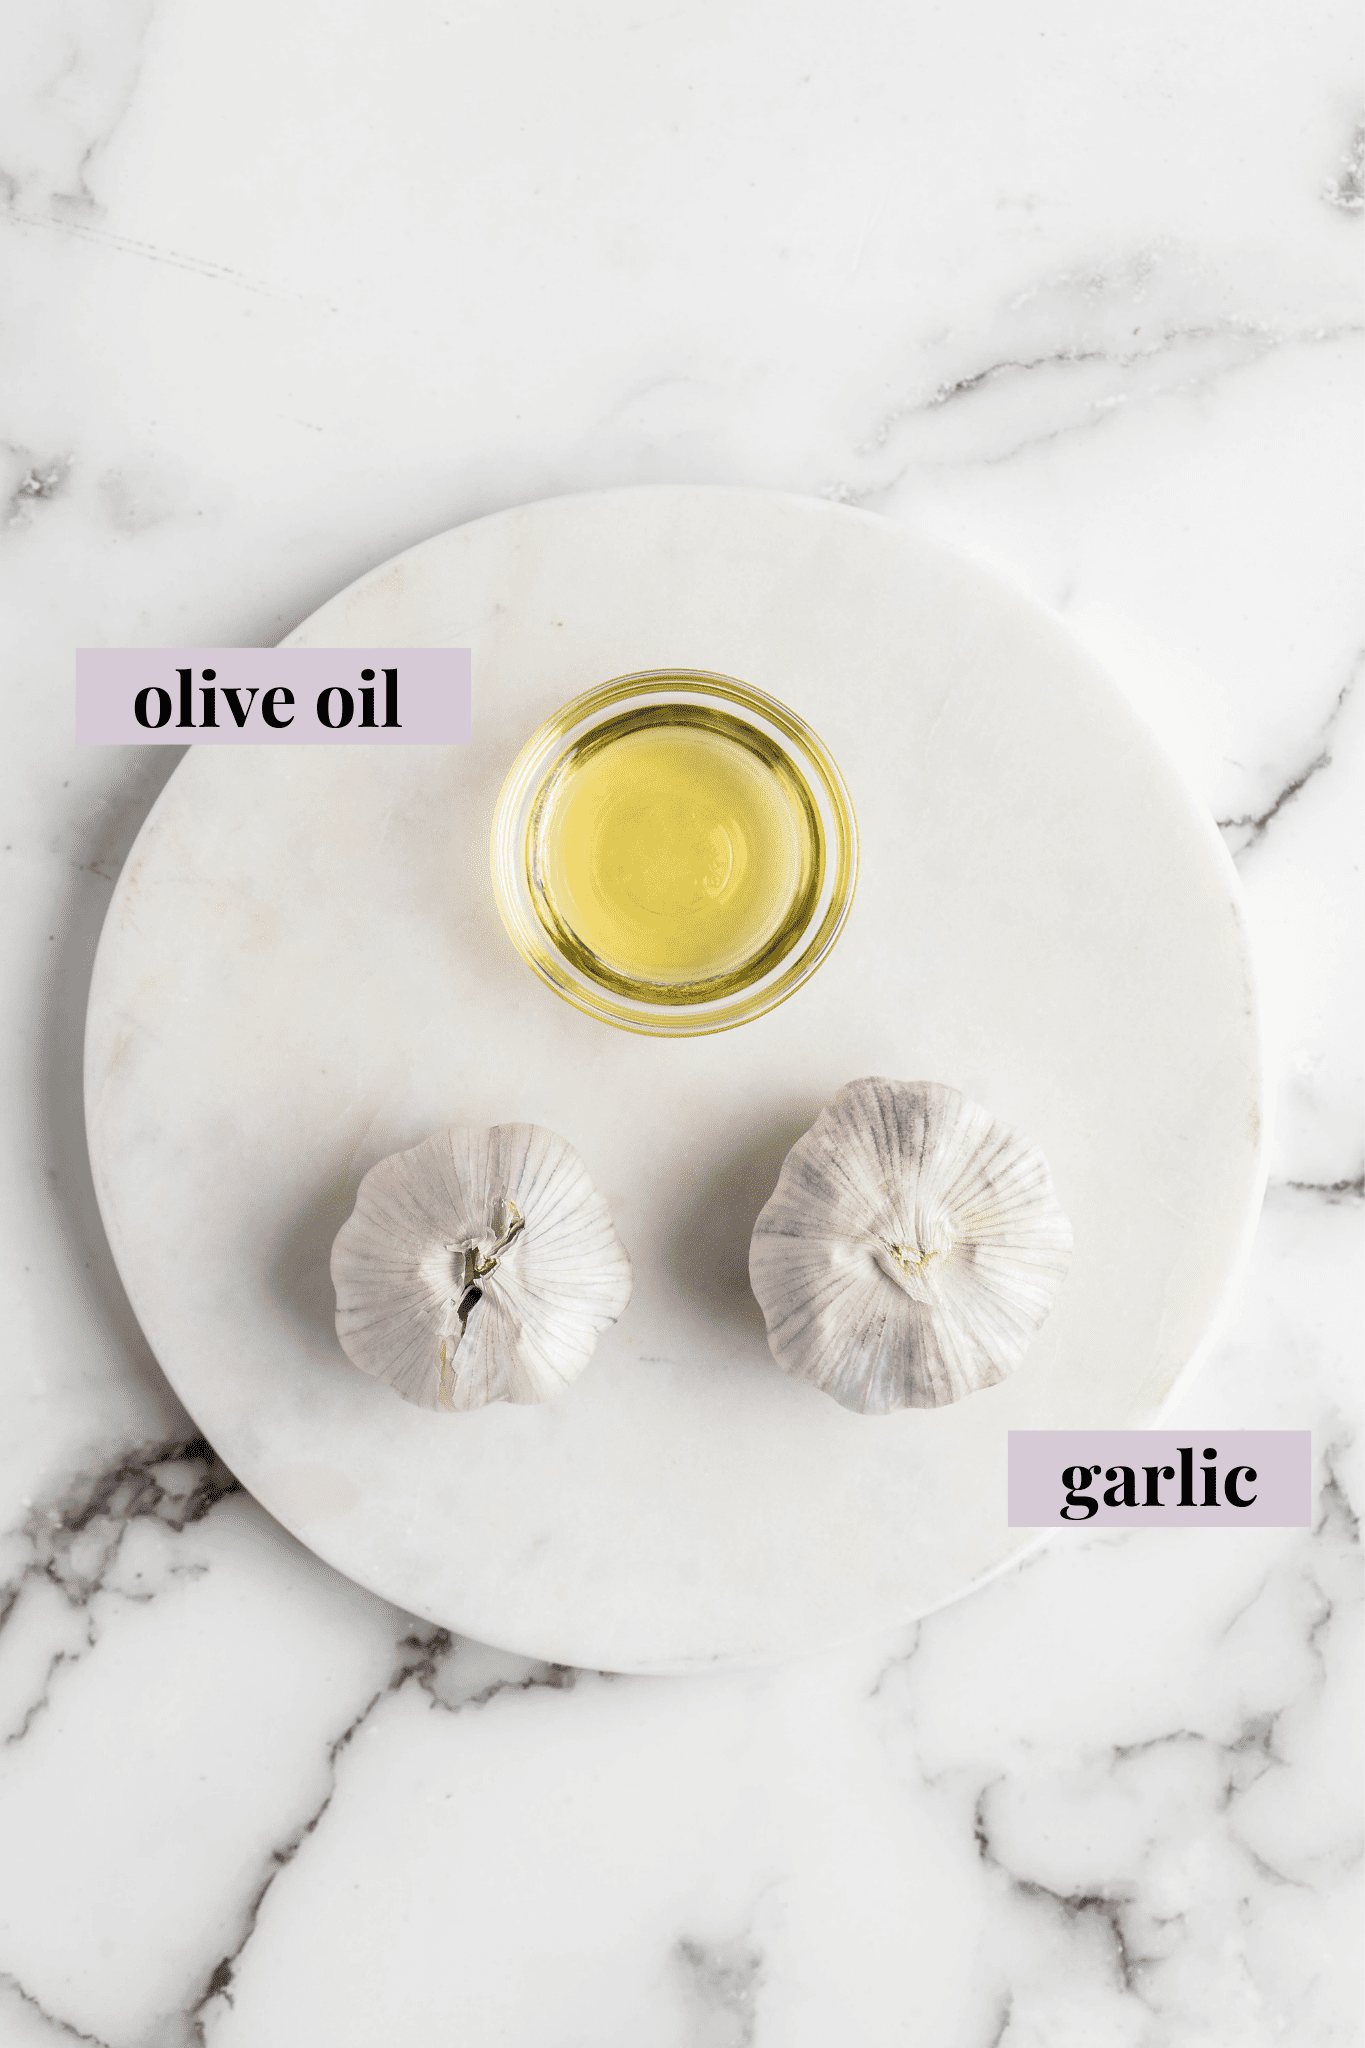
- Garlic – Choose two heads that are similar in size to ensure that both are finished cooking at the same time.
- Olive oil
What Should I Look for When Buying Garlic?
Look for heads of garlic that are large and firm, with plenty of cloves. Avoid any heads that are starting to sprout, or that feel either mushy or “empty” when you give them a squeeze. (That empty feeling means the head is drying out.)
How to Make Air Fryer Roasted Garlic
So, how do you make roasted garlic in an air fryer? It’s this easy:
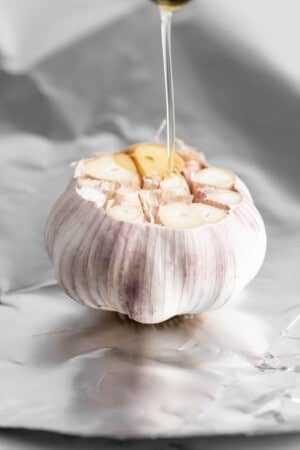
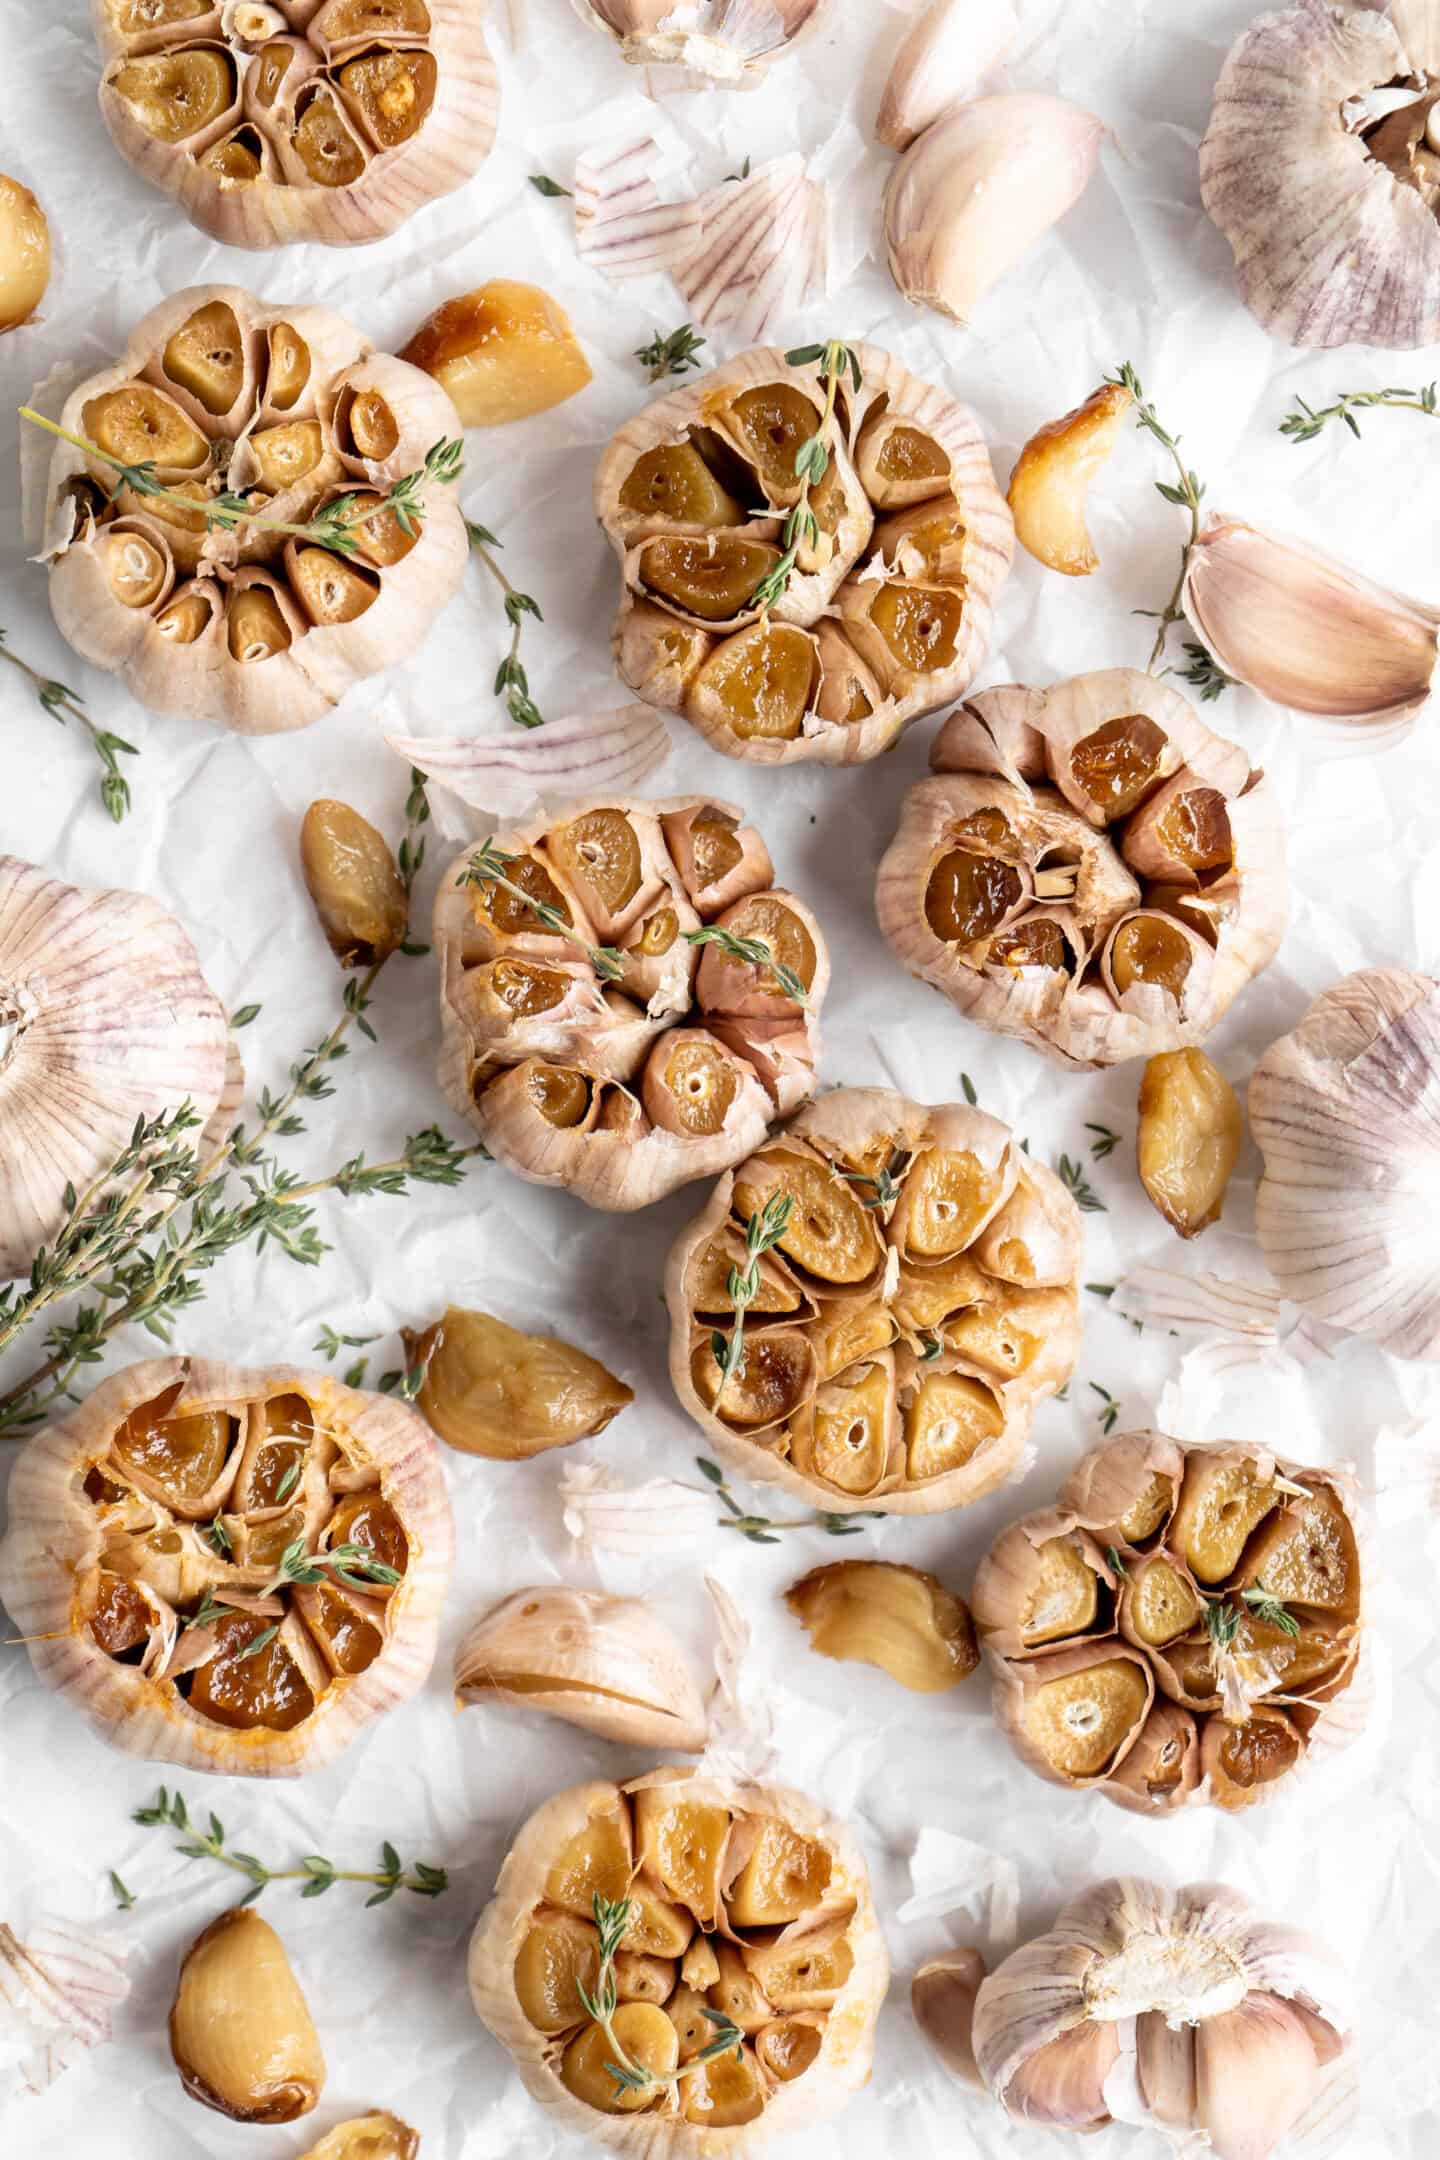
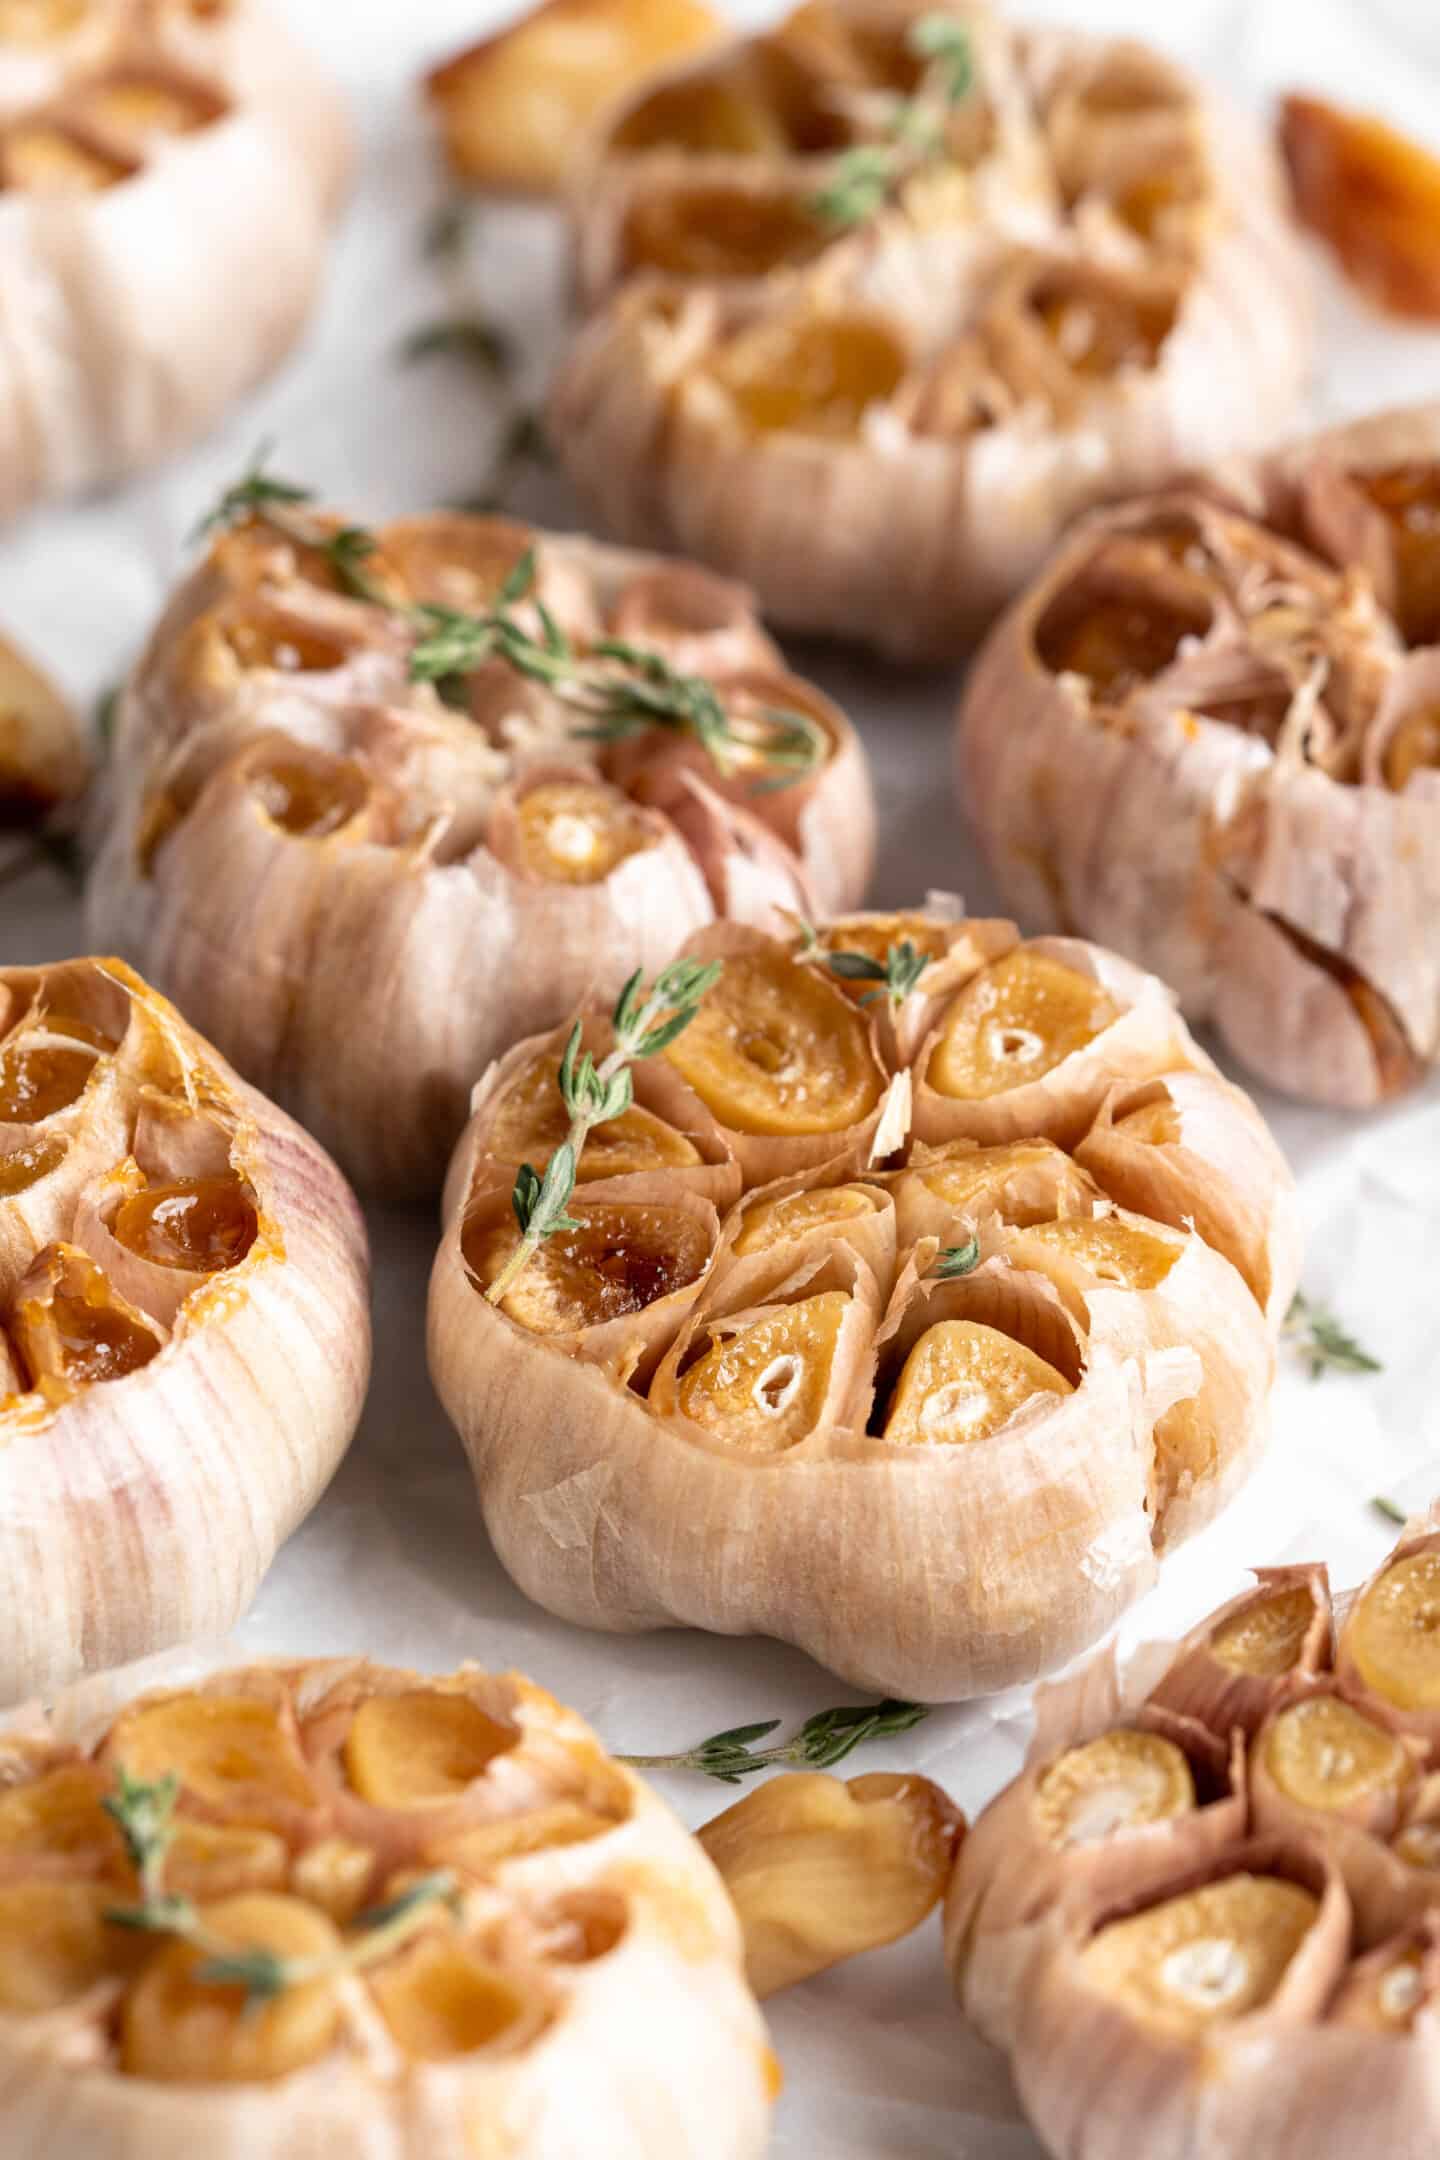
Prepare the garlic. Cut the tops off of the garlic heads, exposing the cloves. Place each head on a piece of foil, then drizzle a teaspoon of olive oil over the exposed cloves. Wrap the foil around the garlic.
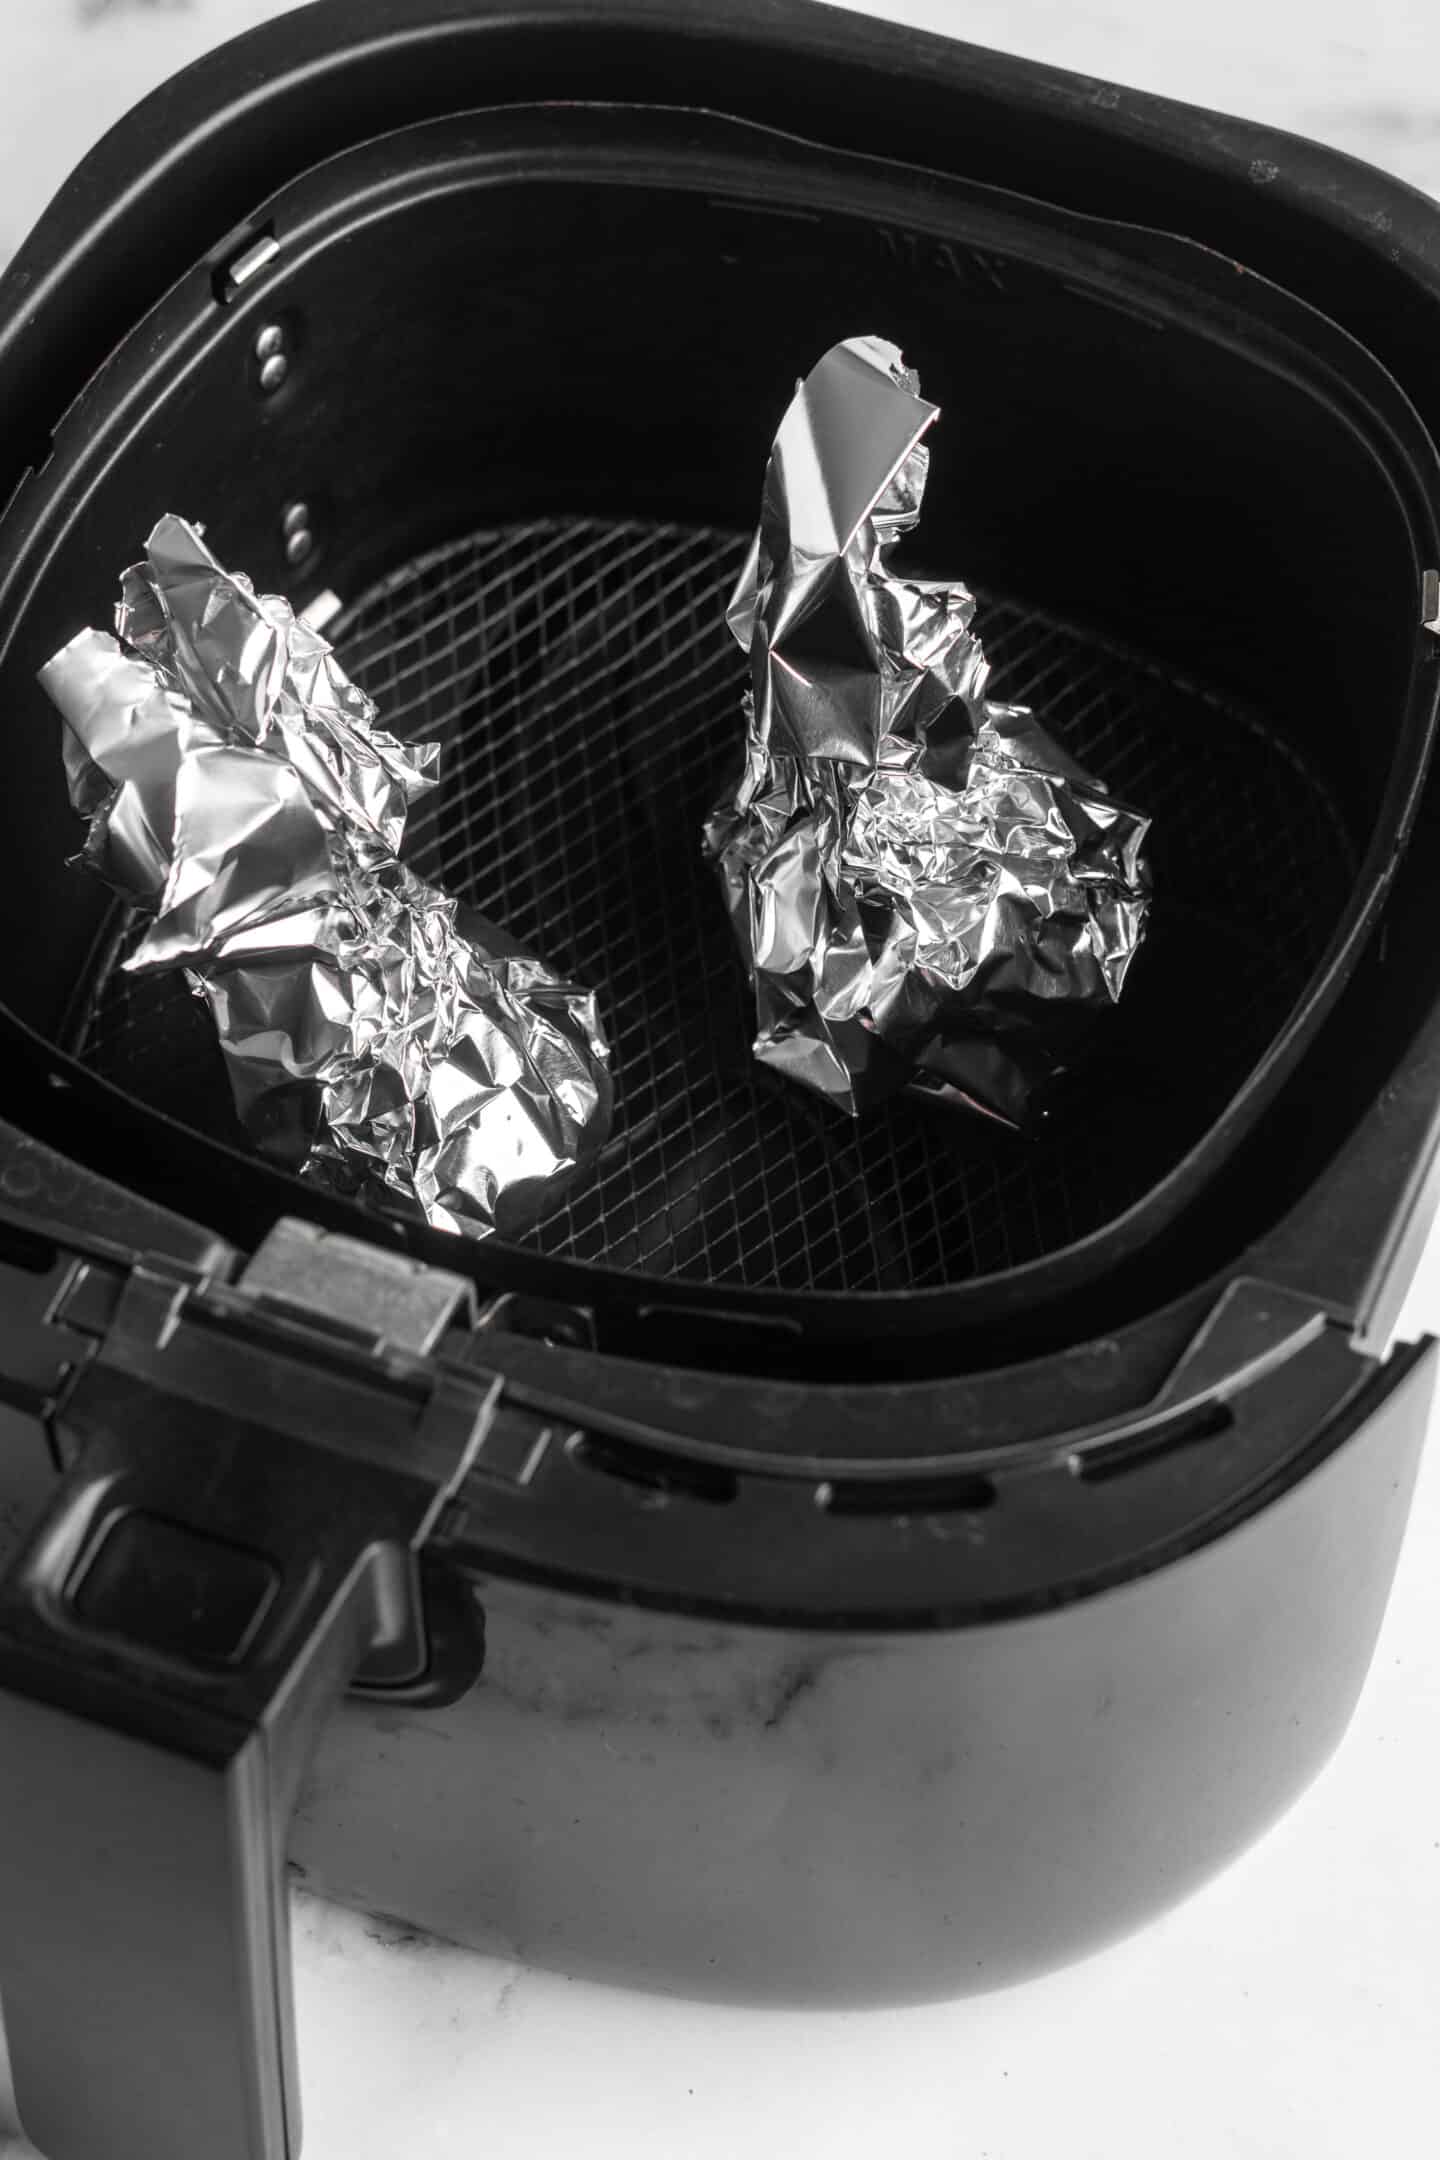
Air fry. Air fry the garlic at 380°F/193°C for 25 minutes. Let it cool in the air fryer with the door closed for about 5 to 10 minutes.
Remove the garlic cloves . If you want whole or sliced garlic cloves, use your fingers to peel off the skin to remove them. If you’re using the roasted garlic as a spread, you can simply squeeze them out into a bowl.
Tips for Success
There’s really not much to this recipe, but here are some must-know tips before you get started.
- Make sure all of the cloves are exposed . Sometimes there are smaller cloves on the side of the head of garlic that you miss when you lop off the top. Don’t forget to cut those open too!
- Doubling or tripling the recipe . As long as you don’t crowd your air fryer basket, you can make more than two heads of garlic. Since it can be frozen, you might just want to make a big batch!
- Let it cool . Even if it feels cool on the outside, the cloves inside can burn your fingers when you try to squeeze them out if you’re not careful.
How to Store
Roasted garlic will keep in the fridge for up to 4 days in an airtight container.
Can This Recipe Be Frozen?
To freeze roasted garlic, simply place the cloves in a freezer-safe bag or container and store in the freezer for up to six months.
When you’re ready to use, you can immerse the freezer bag in hot water to soften them, let them thaw in the fridge, or simply throw them into the pot of whatever you’re cooking while they’re still frozen (the heat from cooking will thaw them).
10 Ways to Use Roasted Garlic
And here are some of my favourite ways to use this air fryer roasted garlic!
- Add it to homemade salad dressings for a flavour boost.
- Stir it into marinara sauce for an instant upgrade.
- Use it as a spread on sandwiches or veggie burgers .
- Mix it into vegan meatballs , or press a whole clove of roasted garlic into the centre of each one.
- Spread it onto a loaf of bread for the best garlic bread ever.
- Toss it with roasted balsamic vegetables for an extra-flavourful side dish.
- Swap it in for regular garlic in your next batch of homemade hummus .
- Scatter whole cloves onto a pizza , or use mashed garlic cloves instead of a traditional pizza sauce.
- Puree it into creamy soups like vegan potato soup.
- Make roasted garlic white bean dip .
Ingredients
- 2 heads of garlic
- 1 teaspoon olive oil
Instructions
- Cut off the top of the head of garlic, with the cloves still connected, but just enough to expose them a bit. You want all the cloves slightly exposed. Place in some foil and drizzle 1 teaspoon of olive oil over the top of each head. Wrap the foil around the garlic and air fry at 380°F/193°C for 25 mins. Let it cool in the air fryer (with the door closed) for about 5/-10 minutes before squeezing – else it’ll probably burn your fingers!
- Remove softened cloves from the skin if using in a recipe with a knife or a tiny spoon or squeeze the cloves out. If not using immediately, refrigerate for up to 4 days (or freeze). Enjoy!
Notes

Air Fryer Roasted Garlic
Ingredients
- 2 heads of garlic
- 1 teaspoon olive oil
Instructions
- Cut off the top of the head of garlic, with the cloves still connected, but just enough to expose them a bit. You want all the cloves slightly exposed. Place in some foil and drizzle 1 teaspoon of olive oil over the top of each head. Wrap the foil around the garlic and air fry at 380°F/193°C for 25 mins. Let it cool in the air fryer (with the door closed) for about 5/-10 minutes before squeezing - else it’ll probably burn your fingers!
- Remove softened cloves from the skin if using in a recipe with a knife or a tiny spoon or squeeze the cloves out. If not using immediately, refrigerate for up to 4 days (or freeze). Enjoy!
Video
Notes
Nutrition
Air Fryer Roasted Garlic https://jessicainthekitchen.com/air-fryer-roasted-garlic/ July 13, 2022
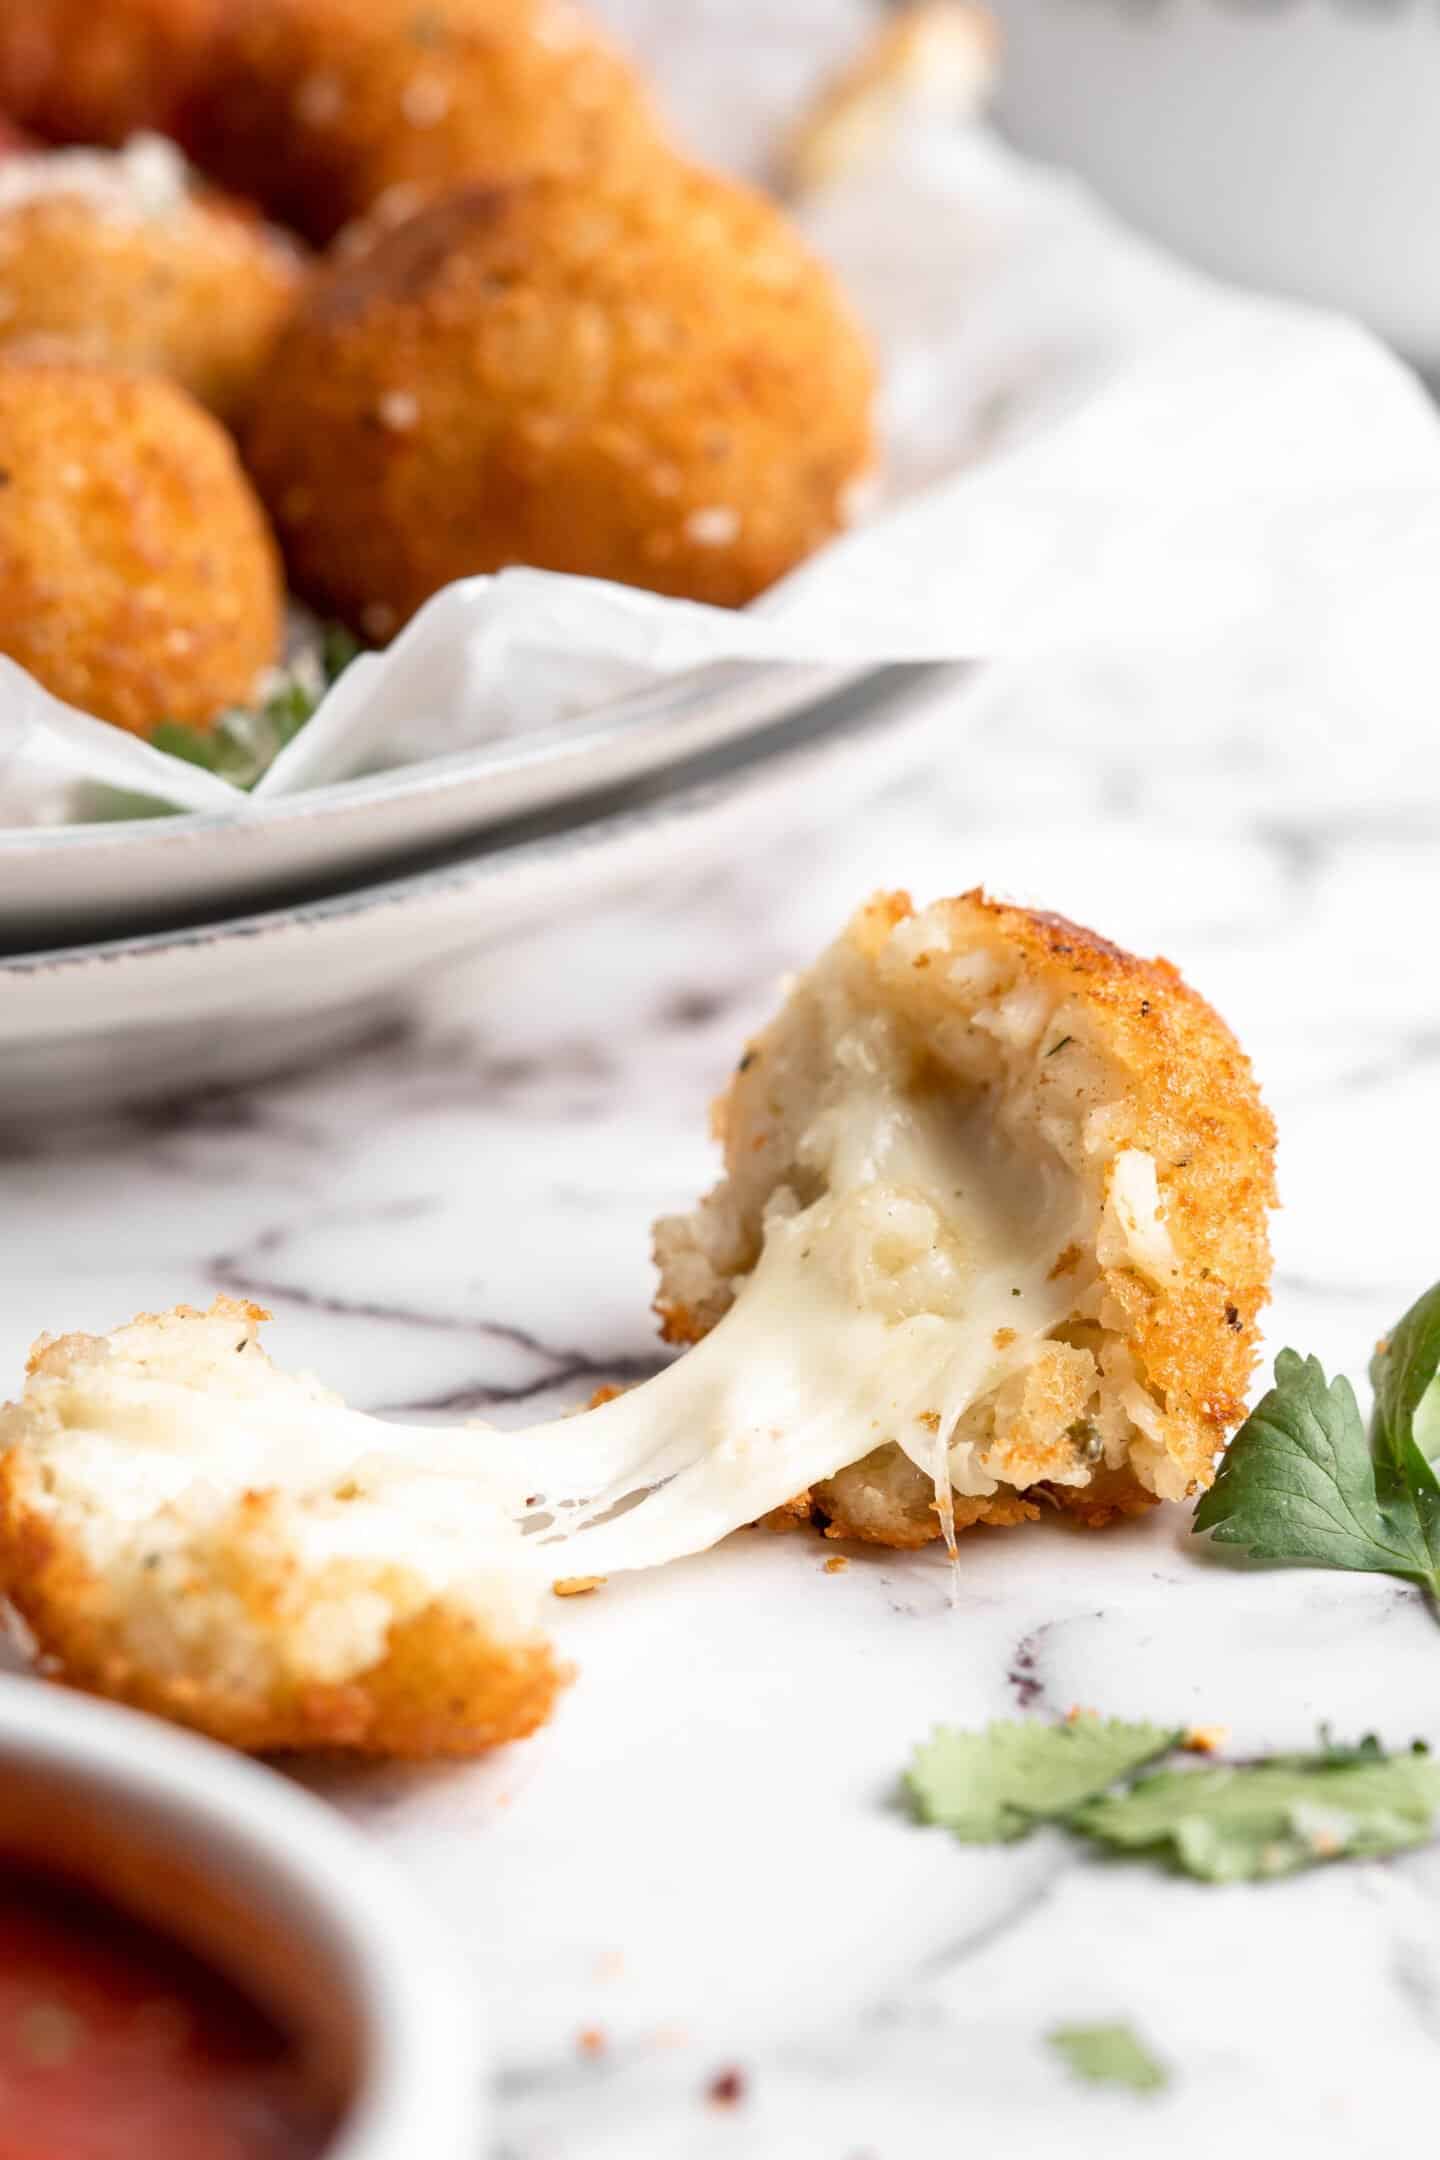
These vegan arancini are the perfect way to use up leftover risotto! They’re filled with melty plant-based mozzarella, crispy on the outside, and all-around delicious!

If you’ve ever made homemade risotto before, you’re probably well aware of the fact that the leftovers… well, they aren’t great. What was once a creamy, rich dish is now congealed into a solid mass the shape of the Tupperware container you stored it in.
I’m pretty sure this is how arancini came to be invented.
What Are Arancini Balls Made Of?
Arancini are traditionally made with leftover risotto. The risotto is shaped into balls; sometimes they’re also filled with cheese or other ingredients. After this, the balls are breaded, fried, and then devoured. (Seriously, they are so good.)
You really can’t substitute other leftover rice, or freshly cooked rice here. You need risotto!
If you don’t want to fry your arancini, no problem! I also included an air fryer option and I’m happy to say these babies are super tasty in the air fryer. (Let’s be honest, if they are 10/10 deep fried they are 8/10 air fried because they never get quite as crispy, but you’ll still love them, I promise!)
Notes on Ingredients
Please note that this is important information on the ingredients and instructions and the FULL recipe with amounts and details can be found DOWN BELOW (scroll to it) in the recipe card.
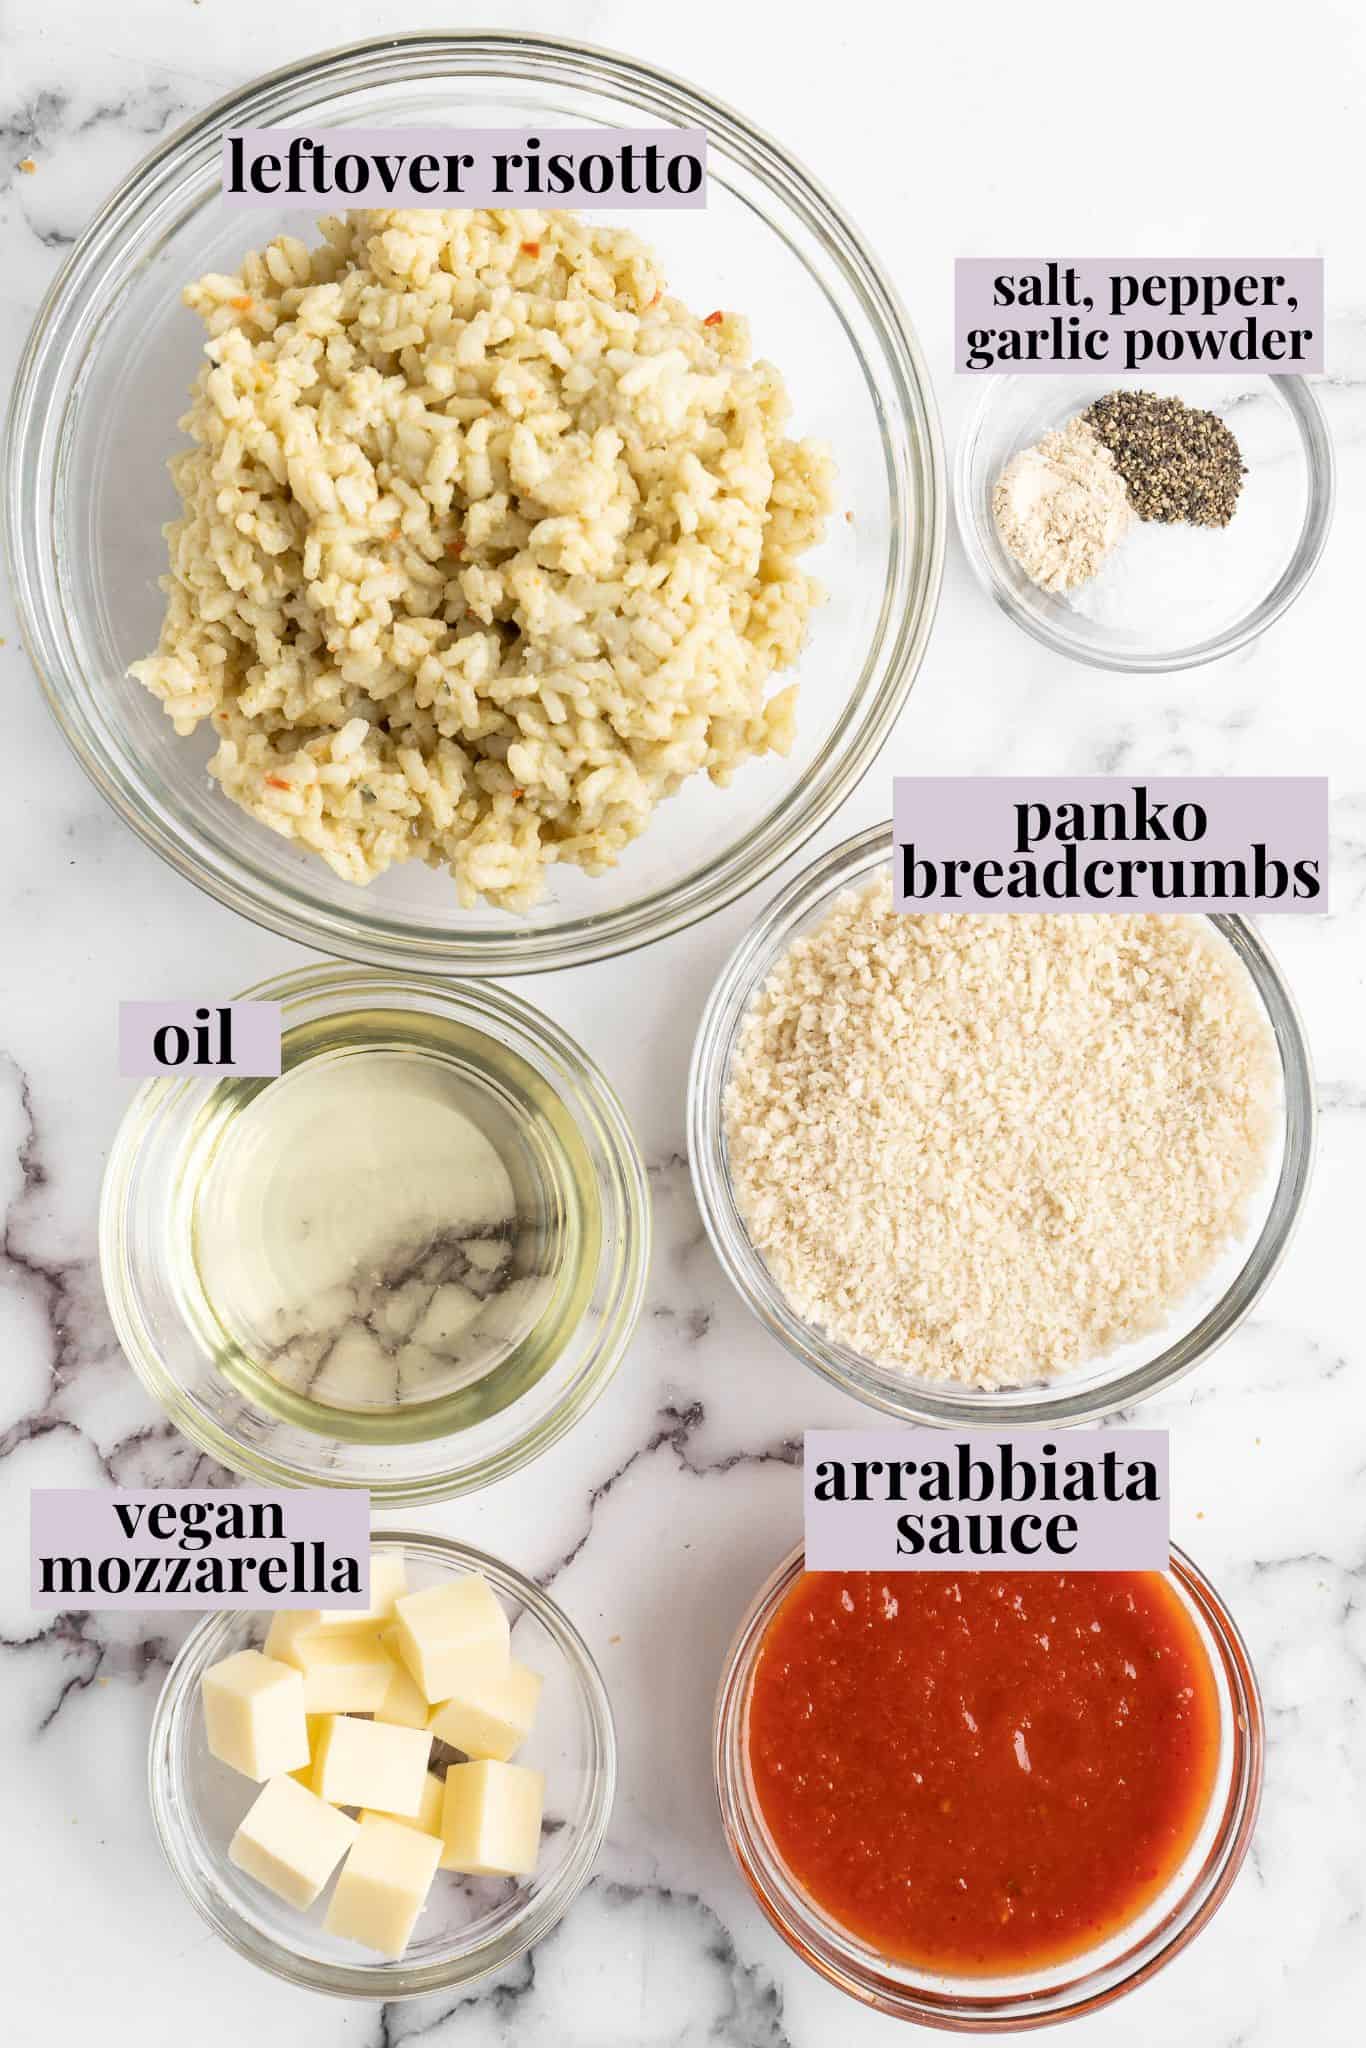
- Leftover risotto – Use my Creamy Vegan Mushroom Risotto , your own favourite risotto recipe, or leftovers from a restaurant meal. Whatever!
- Plain panko breadcrumbs
- Sea salt
- Ground black pepper
- Garlic powder
- Oil for frying – Choose something with a high smoke point.
- Vegan mozzarella – Make sure this is room temperature before starting the recipe.
- Arrabbiata sauce and parsley – For serving.
What Is the Difference Between Rice and Risotto?
Rice is, well, rice. Risotto is a dish made from a specific type of rice called Arborio rice. This rice is higher in starch than other varieties, which makes it extra creamy and delicious.
In other words, risotto isn’t a type of rice; it’s a dish made with rice.
How to Make Vegan Arancini
Here’s what you’ll need to do to make your leftover risotto into irresistible vegan arancini!
Prepare . Place the panko breadcrumbs in a shallow bowl and crush them a bit. In another bowl, set the vegan mozzarella. Heat at least an inch of oil in a deep pan.
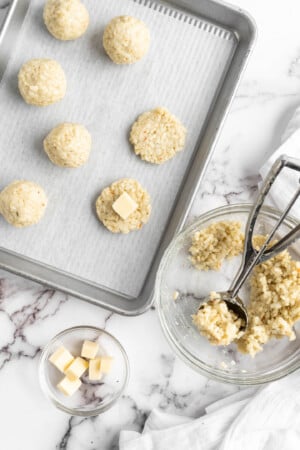
Shape the arancini . While oil is heating, flatten one tablespoon of the risotto into your palm, then place about a teaspoon of vegan mozzarella into the centre. Add another tablespoon on top, then roll into a tight ball. Roll the ball in the panko, coating it evenly, then repeat with the remaining risotto.
Cook the arancini . Test the oil to see if it’s hot enough by adding a pinch of panko; if it sizzles and floats, it’s ready. Drop the risotto balls into the oil, being careful not to over-crowd them, and cook for about 5 minutes on one side. Flip and cook for about 2 to 3 minutes on the other side, until the balls are golden brown.
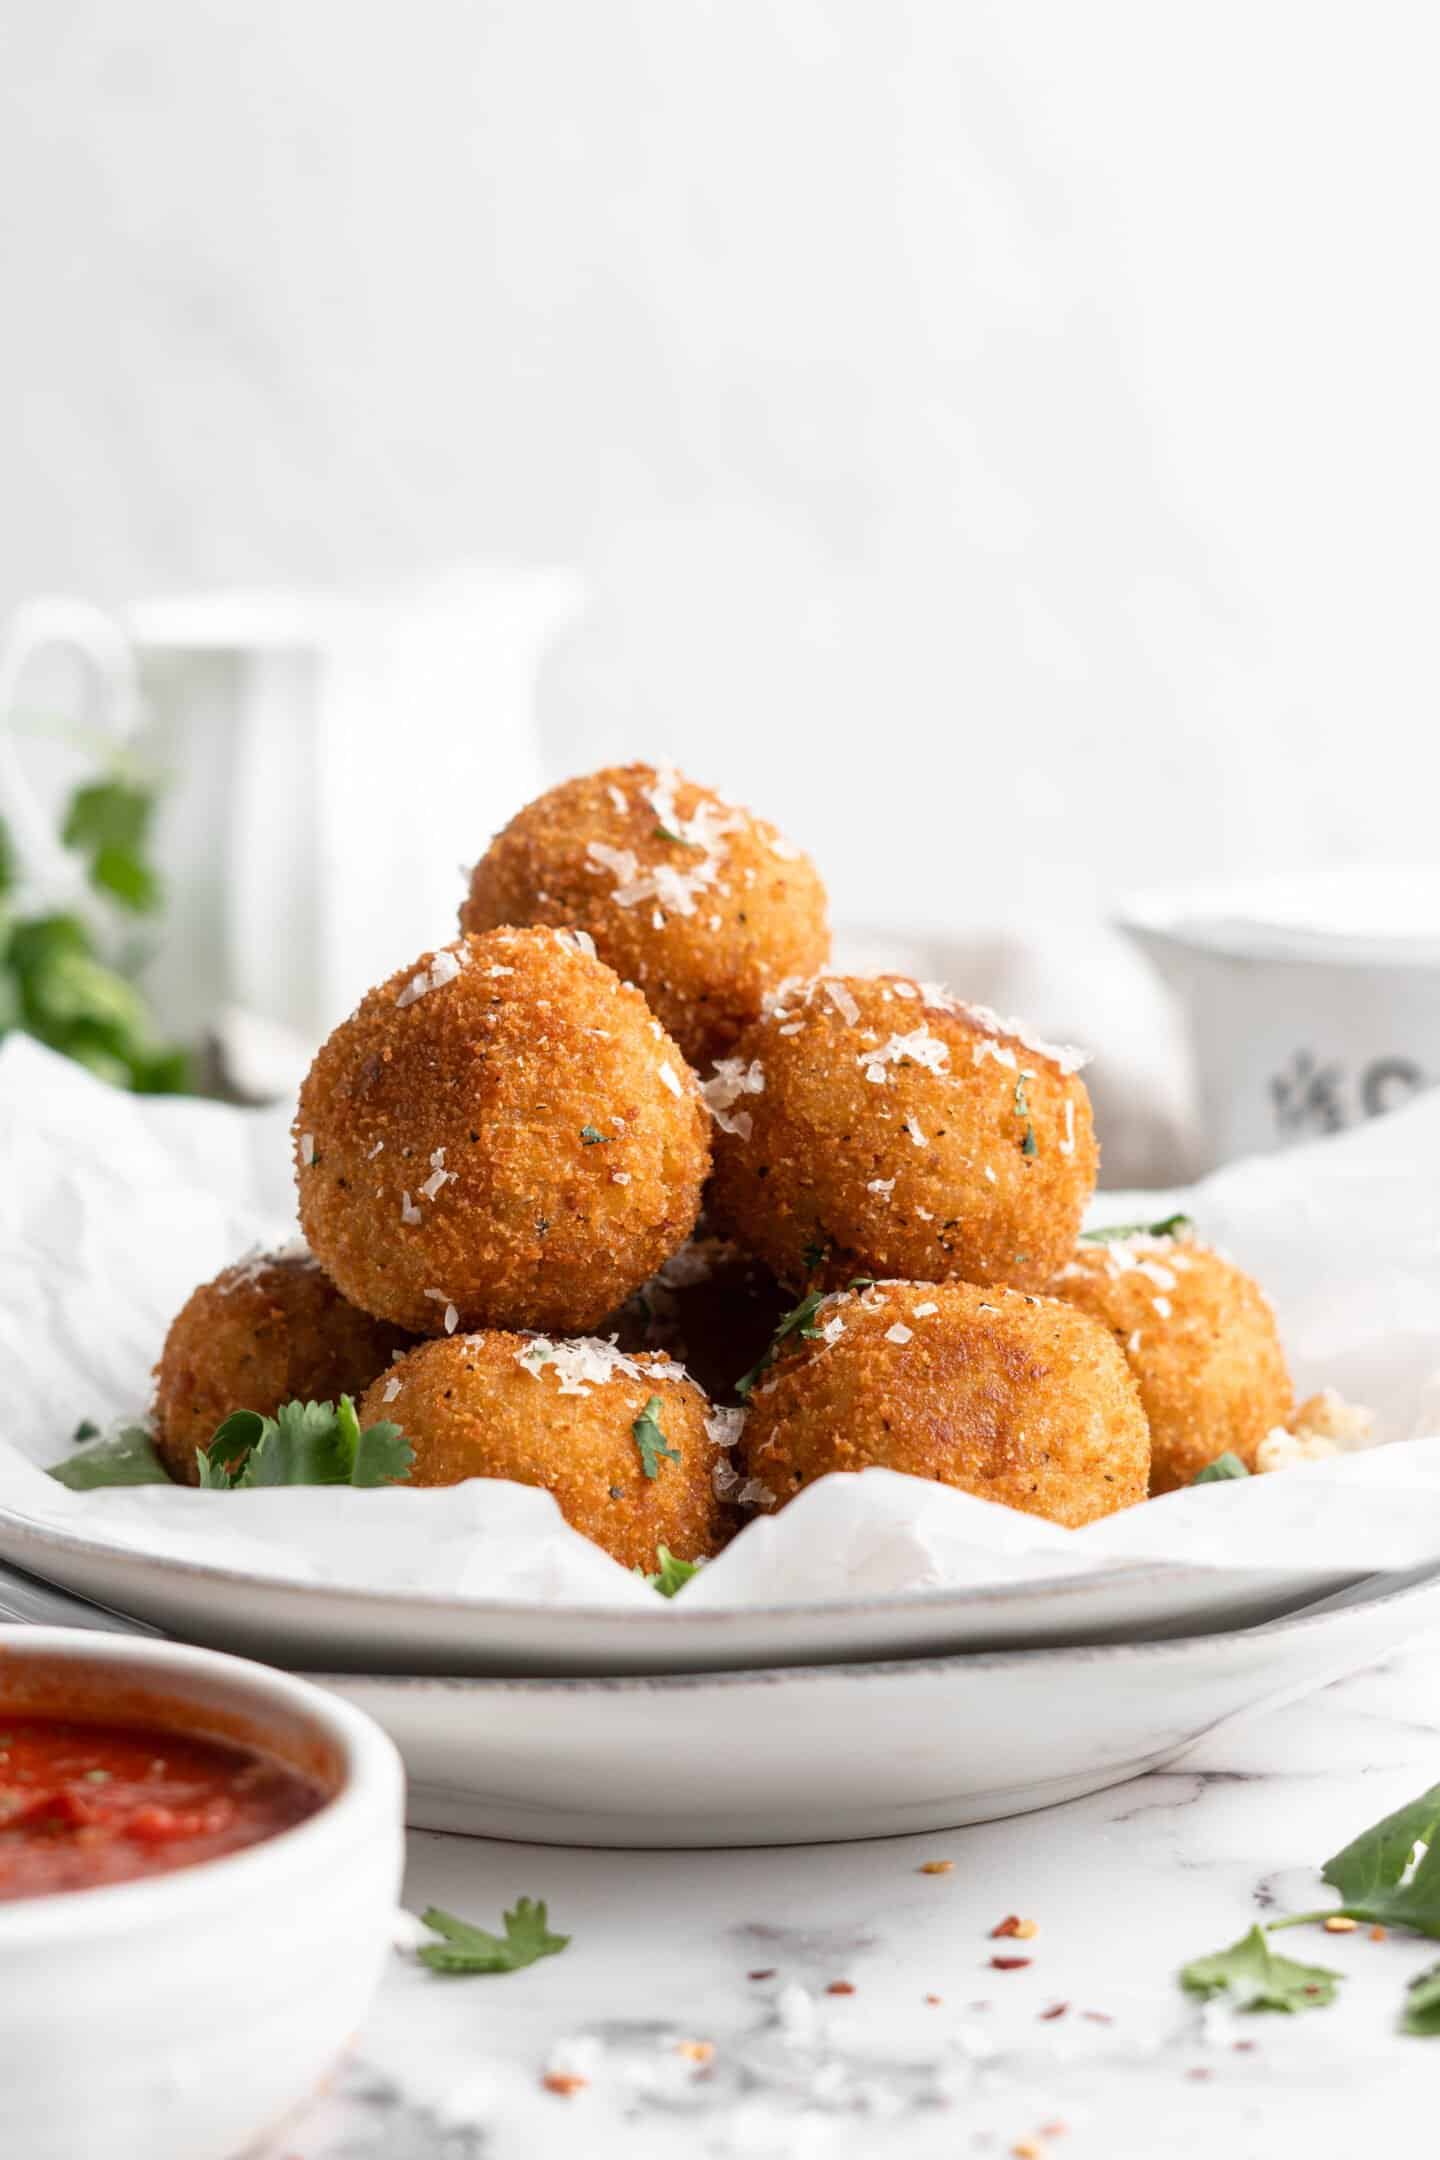
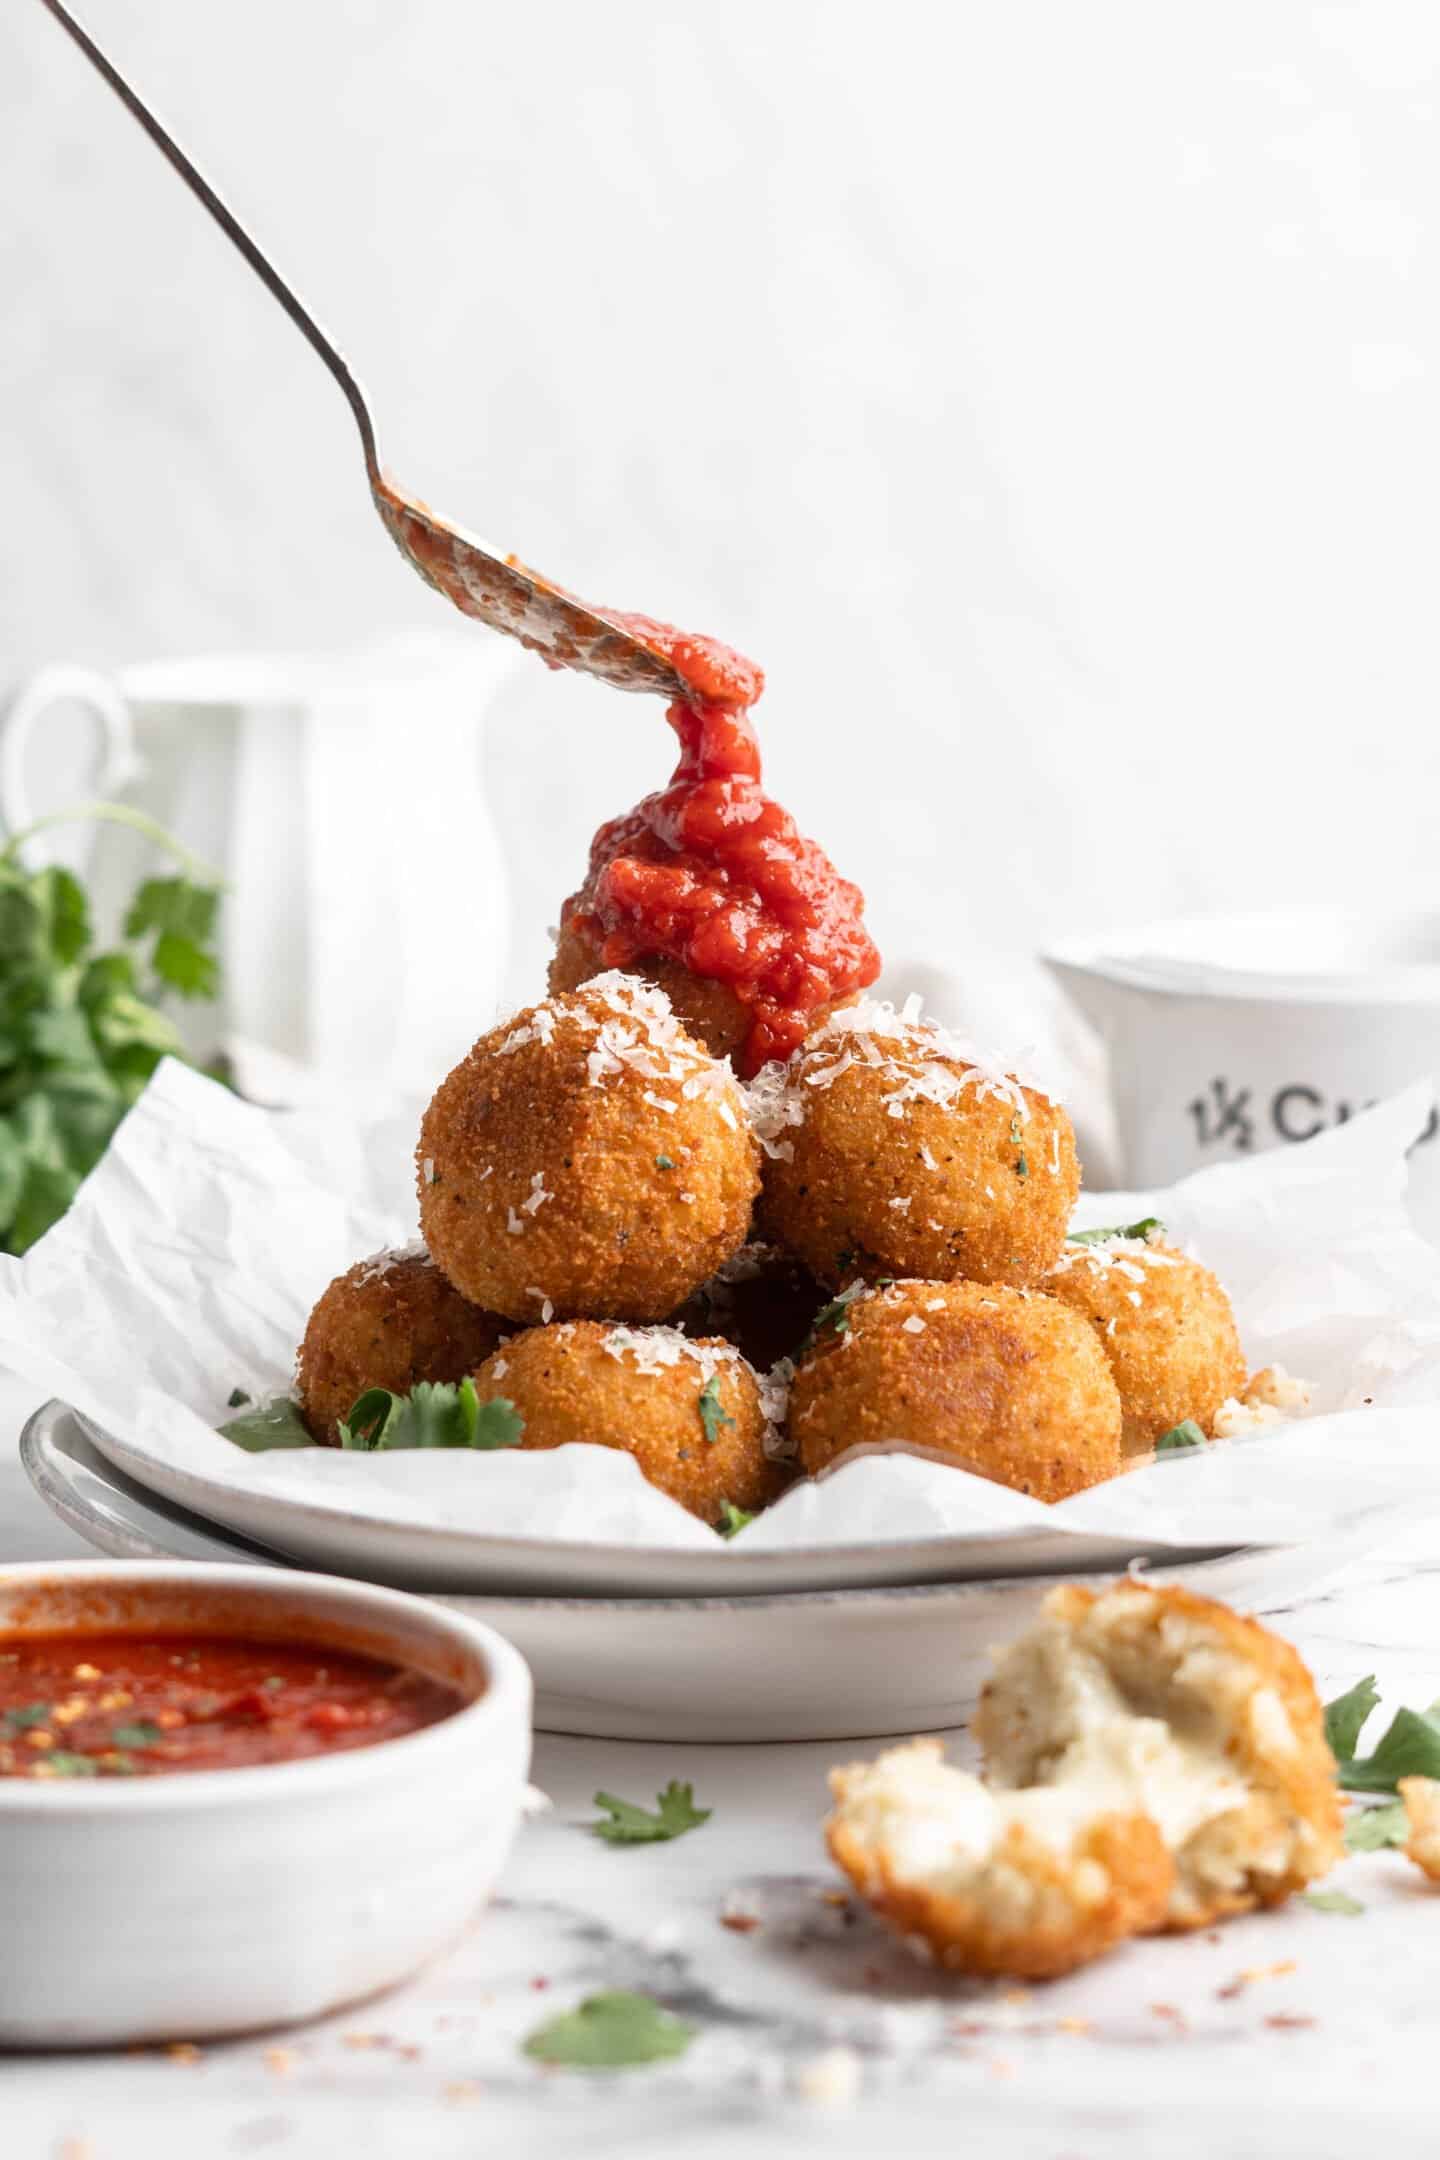
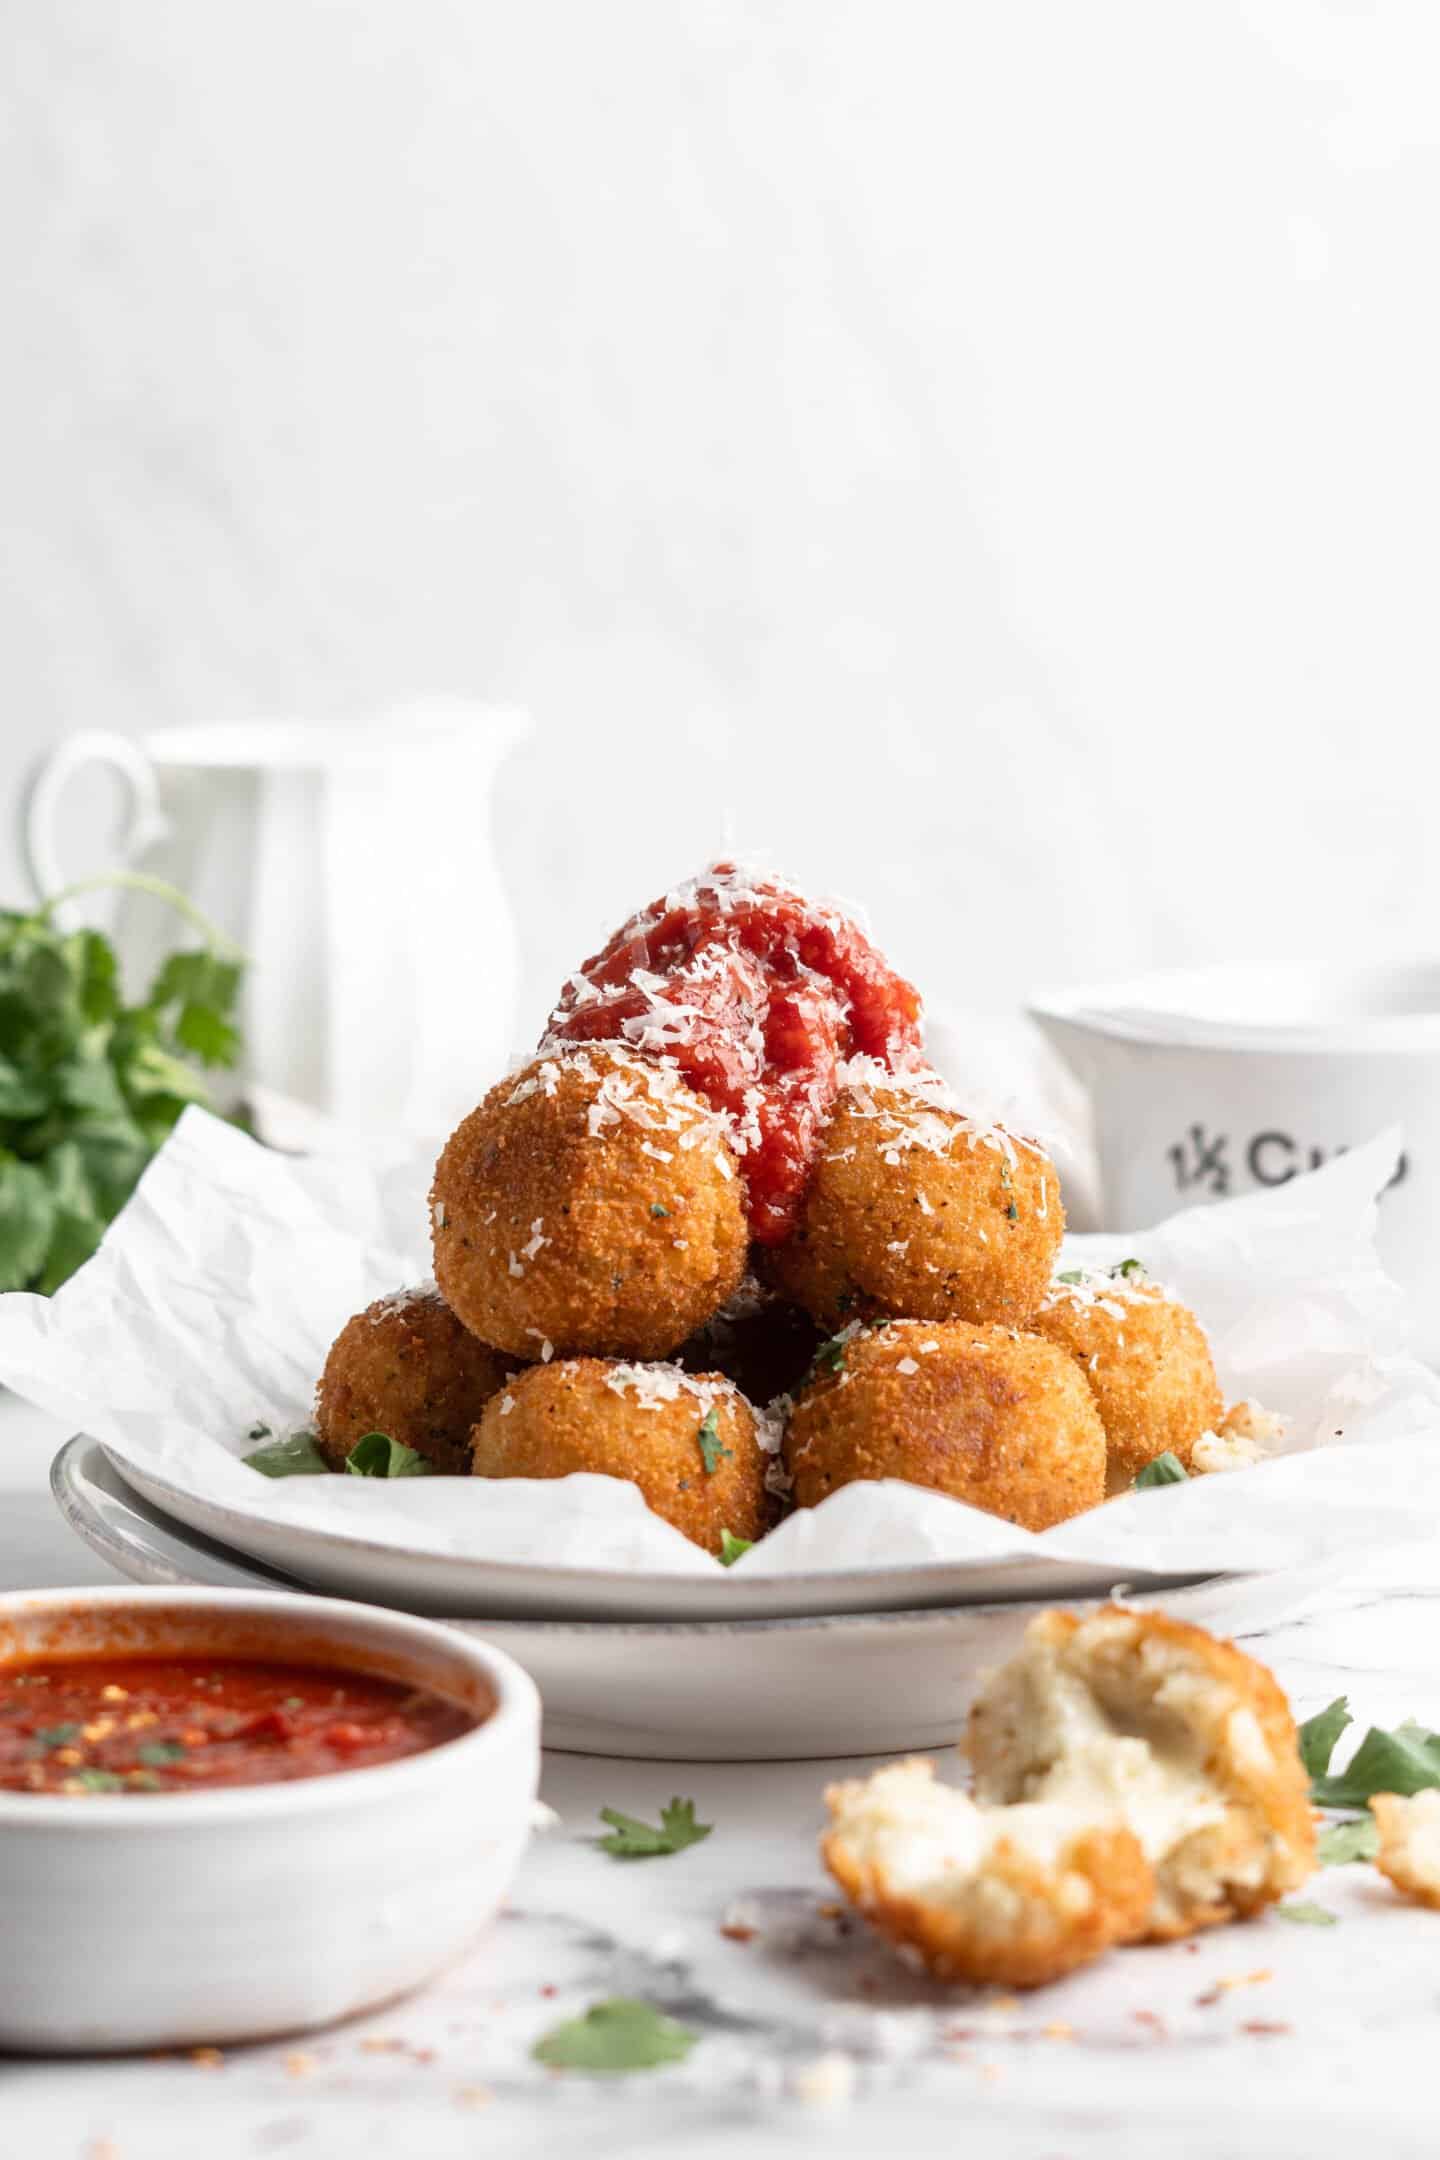
Cool and serve . Remove the finished arancini from the oil and set them on a plate lined with a paper towel to absorb any excess. Serve with parsley and Arrabbiata sauce.
Air Fryer Arancini Instructions
Here’s how to make arancini in your air fryer:
- Refrigerate the risotto balls to firm them up even more.
- Preheat your air fryer to 450ºF for about 5 minutes while the arancini are chilling.
- Drizzle or brush each risotto ball with oil. Air fry for about 8 minutes, working in batches to avoid over-crowding.
Tips for Success
Here are a few tips and pointers for making vegan arancini:
- Getting the arancini to hold together . My leftover risotto was creamy and sticky, so I didn’t need to add anything to keep it together. If you feel that yours isn’t sticking, you can add a flax egg and/or 1/4 cup of breadcrumbs to help it all stick together.
- Scooping the risotto . If the leftover risotto is too hard to scoop out of the container, you can add a tablespoon of vegetable broth or water to loosen it up just a bit.
- Gluten-free option . If you want to make these gluten-free, simply use gluten-free panko or breadcrumbs.
Serving Suggestions
Serve vegan arancini with a simple marinara sauce or arrabbiata sauce for dipping. They would also be delicious with a vegan aioli or even a spoonful of pesto over the top. Arancini are traditionally an appetizer, but you can make them a meal by pairing them with a vegetable side like garlic roasted asparagus or balsamic roasted vegetables .
How to Store and Reheat Leftovers
These vegan arancini are best served hot, straight out of the pan (or air fryer), but leftovers can be stored in an airtight container in the fridge for up to 5 days. Reheat them in a 350ºF oven or air fryer until they’re hot.
Can This Recipe Be Frozen?
You can freeze these vegan arancini balls before or after frying. If you’re freezing them before frying, simply place them on a baking sheet lined with parchment paper and freeze for 2-3 hours, or until solid. Then transfer them to an airtight container or freezer bag and store in the freezer for up to 3 months. When ready to fry, there is no need to thaw, simply cook as directed in the recipe.
If you’re freezing after frying, place the arancini in an airtight container and store in the freezer for up to 3 months. Heat them in your air fryer or a 350ºF oven.

Ingredients
- 2 – 2 1/2 cups leftover risotto
- 1 cup plain panko breadcrumbs
- 1/4 teaspoon sea salt
- 1/4 teaspoon ground black pepper
- 1/4 teaspoon garlic powder
- Thrive Algae Oil for frying
- Vegan Mozzarella , at room temperature
- Serve with Arrabbiata Sauce and garnish with parsley
Instructions
- Set up a breading and stuffing station – one bowl for the panko breadcrumbs, and one bowl for the mozzarella. Crush the panko breadcrumbs a bit in their bowl so they are more crumb texture.
- Heat up a pan with the oil, you want it to come at least 1 inch up the side of the pan or more. That way you can fry them like I did (turning them over), or even deep fry them.
- While oil is heating up (or you can do this before), roll the risotto into golf size balls, which is about two tablespoons. Flatten one tablespoon into your palm, then spoon or pull about a teaspoon of vegan mozzarella into the centre. Add the other tablespoon on top and then roll into a tight rice ball, squeezing slightly. It should not fall apart easily, if it does see notes below.
- Roll that ball into the panko breadcrumbs to cover completely, or place it in the bowl then cover it with more breadcrumbs by sprinkle it over it, turning it.
- Test the oil to see if it’s hot enough (a sprinkle of panko breadcrumbs should sizzle and float). Drop one risotto ball into the oil with a tongs or a spider. Allow to cook about 5 minutes on one side, then flip and cook for about 2-3 minutes on the other side. The balls should be golden brown. Remove and set on a plate lined with a paper towel.
- Only make as many balls as you’re going to eat, but the entire recipe makes about 12-15 fried risotto balls. Serve with parsley and Arrabbiata sauce. Enjoy!
