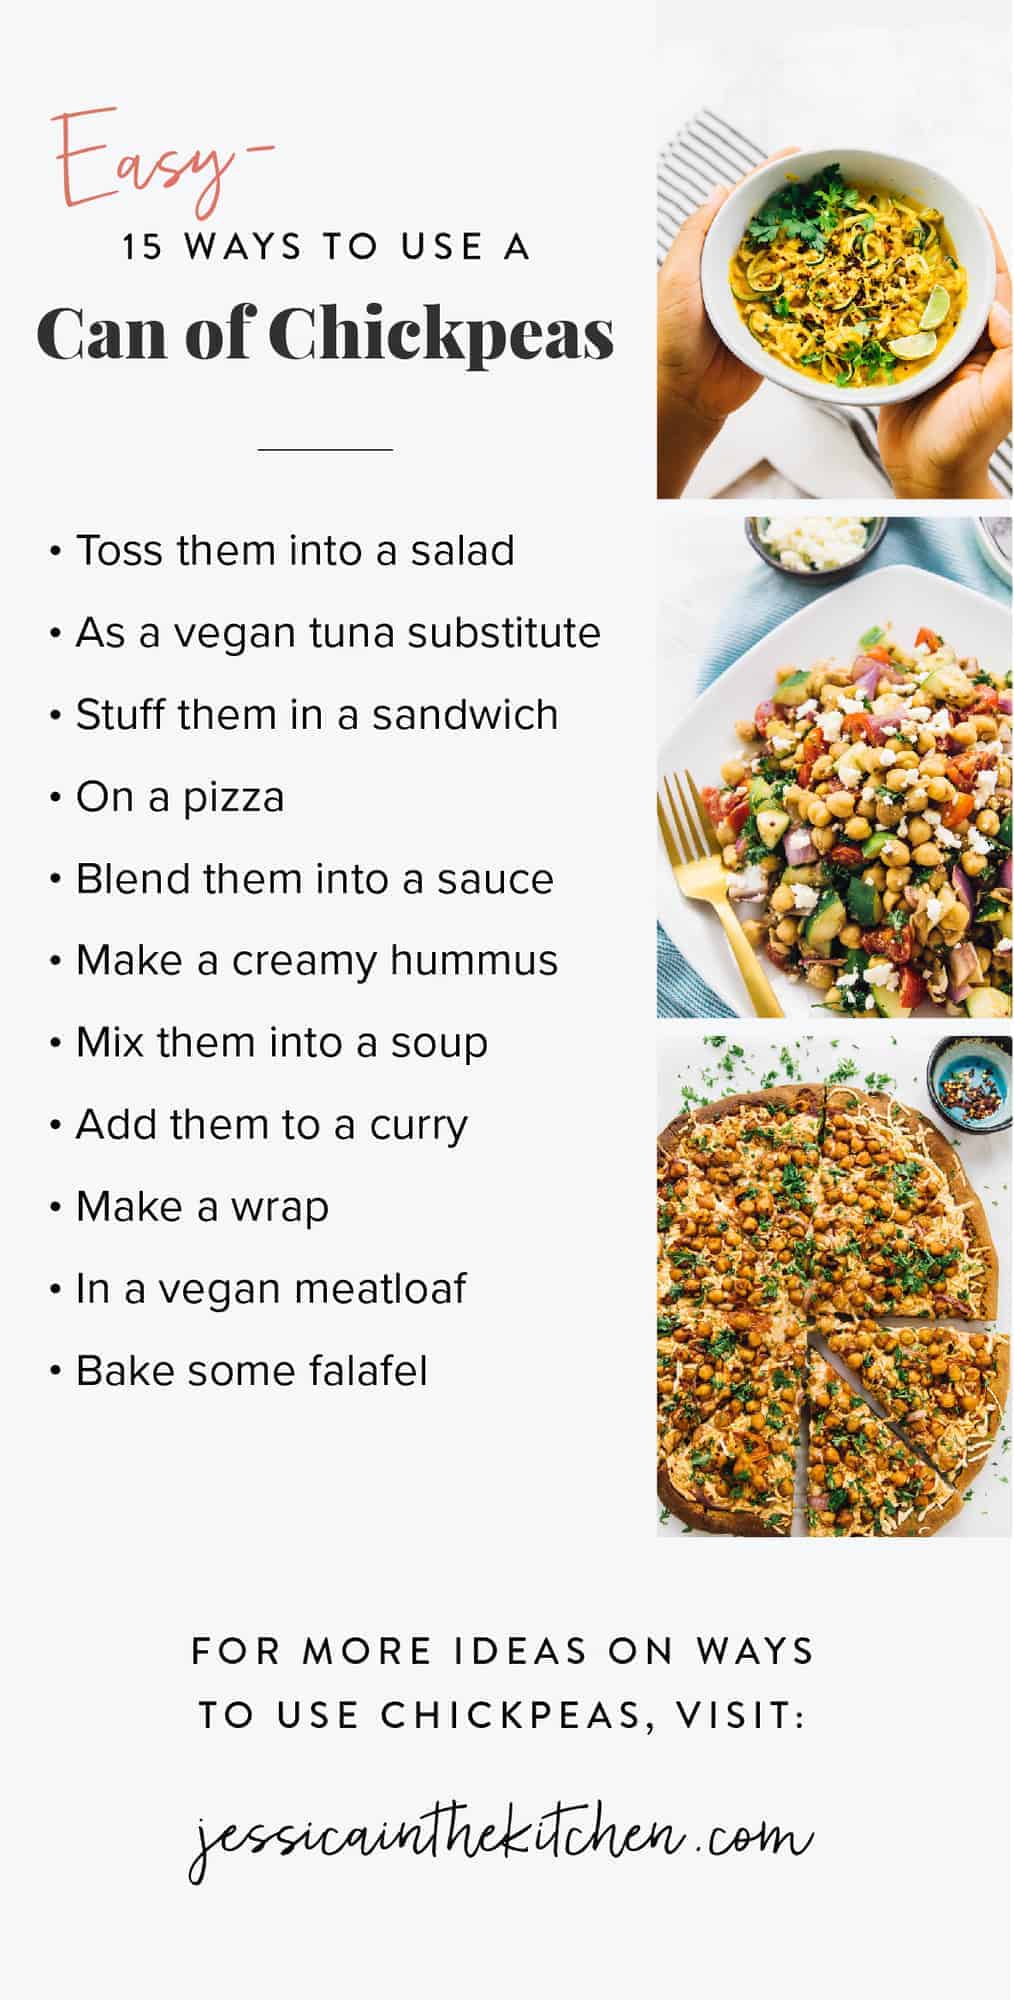
Wondering what to do with those canned chickpeas in your pantry? Here are 15 easy ways to use a can of chickpeas that are all different, unique, and delicious! From dips to whole meals, everything you need is here!
If you were to ask my what my favourite legume was, I would 100%, without a doubt, say chickpeas. They are the powerhouse ingredient that keep our household going, being featured in at least one recipe every week, and sometimes up to four in our fridge.
In fact, these “beans” are definitely in my top ten favourite ingredients of all time. So it’s no surprise that I have so many chickpea recipes (and also that I desperately need to add my new hummus recipe to the blog). I didn’t even think of doing this roundup, but I know one of the questions you guys ask me all the time is,
What can I do with a can of chickpeas?
We used to have that can of chickpeas sitting in the back of our pantry, so I get it. Now however, we are constantly buying more because we go through them so quickly. Today, I’m here to share all the things you can do with chickpeas. Whether you’re completely clueless on how to use them, or that you’re bored of your current go-to recipes, you’ll find something that you will adore in this list.
What are chickpeas?
Chickpeas are legumes that are a part of the plant family Fabaceae, subfamily Faboideae. It’s high in protein, fibre and is super nutritious. It’s also known as garbanzo beans! So if you’ve ever wondered “what’s the different between chickpeas and garbanzo beans,” they are the same thing!
One of the greatest things about these legumes is that it is incredibly versatile. Thanks to its creamy texture after it is cooked, it can pretty much take on any shape that you want it to. The same goes for its flavour — chickpeas has a distinct yet semi-neutral flavour, perfect for anything from a vegan tuna sandwich to chickpea blondies.
One last thing — the great debate — canned vs. dried chickpeas. We always have cans of them on hand because they are very easy to use, and as you know here at Jessica in the Kitchen I’m all about sharing easy, attainable and delicious recipes. That being said, the dried varieties are much cheaper, and not very difficult to boil. Just ensure that you are buying the right kind (I do not enjoy Canadian chickpeas, for example), and watch a few YouTube videos about how to cook them first!
I have also been getting another question which is “ are canned chickpeas cooked ?” Yes, they are already cooked and ready to eat! You’ll just need to drain them and rinse before you use them for your recipe.
15 Easy Ways To Use A Can of Chickpeas
Put that can of chickpeas to good use with this list of easy ways to use chickpeas every day! From meal prep snacks to decadent dinner recipes, I’ve got it all with just humble and nutritious chickpeas!
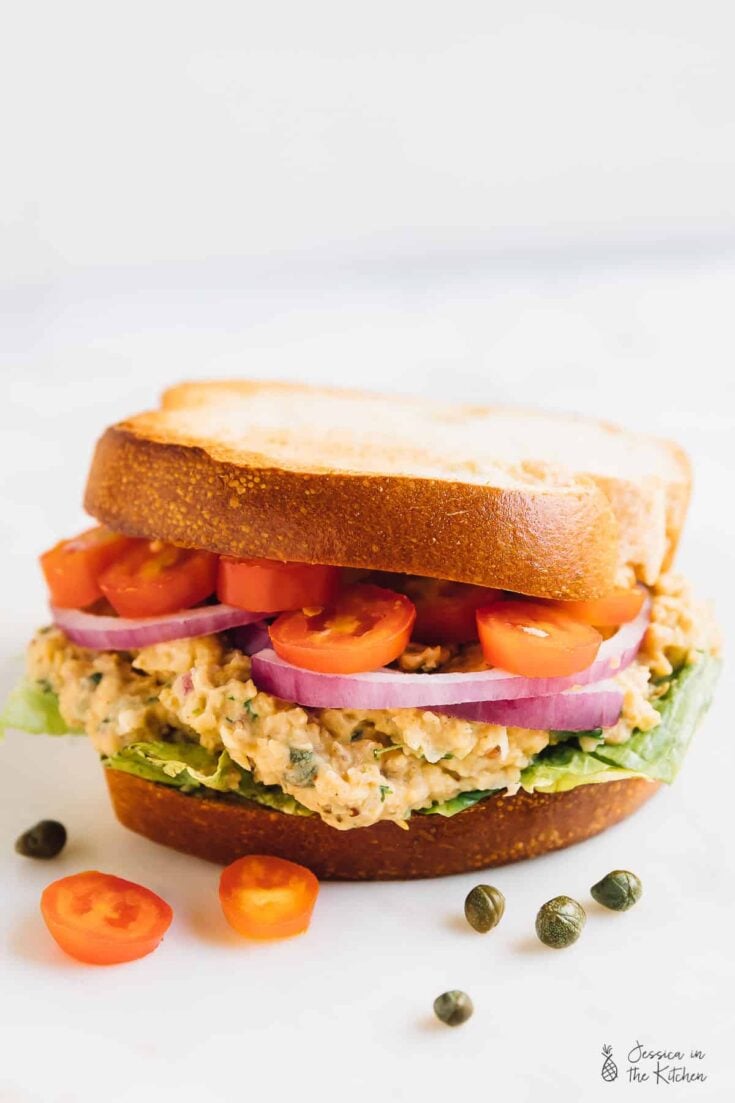
Vegan Tuna Sandwich
When I say that this tastes like a tuna salad, I mean it tastes JUST like a tuna salad! Thanks to the texture of chickpeas and its ability to absorb pretty much any flavour, your new favourite quick lunch is born! We always have a container of this in the house. It goes great in sandwiches, by itself, in lettuce wraps, and pretty much anywhere you would use a tuna salad!

15-Minute Mediterranean Chickpea Salad
If you’ve never had chickpeas in your salad, it’s time to try them. They add such a great texture, protein, fibre, and nutrition. Plus, they taste literally any combination of veggies from a plate to veggies, to a full meal. Don’t forget my chickpea Panzanella salad and my crunchy kale and chickpea salad with a homemade lemon poppyseed dressing !
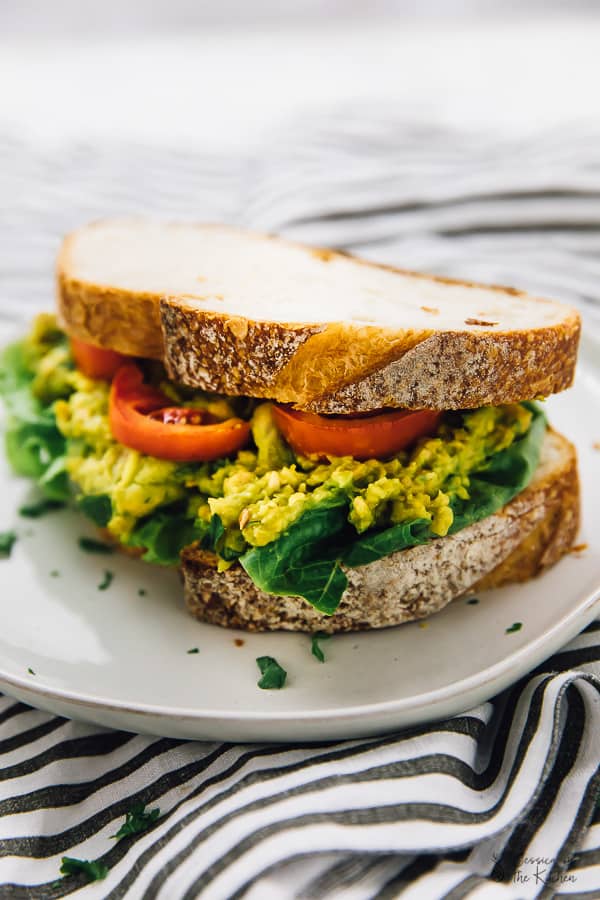
Smashed Chickpea Avocado Sandwich
This is one of my favourite sandwiches! It’s perfect if you also need to use up an avocado, too. This smashed chickpea sandwich is quick and easy to make. Thanks to a little lime, you can prep the filling ahead of time for a creamy vegan meal prep lunch.
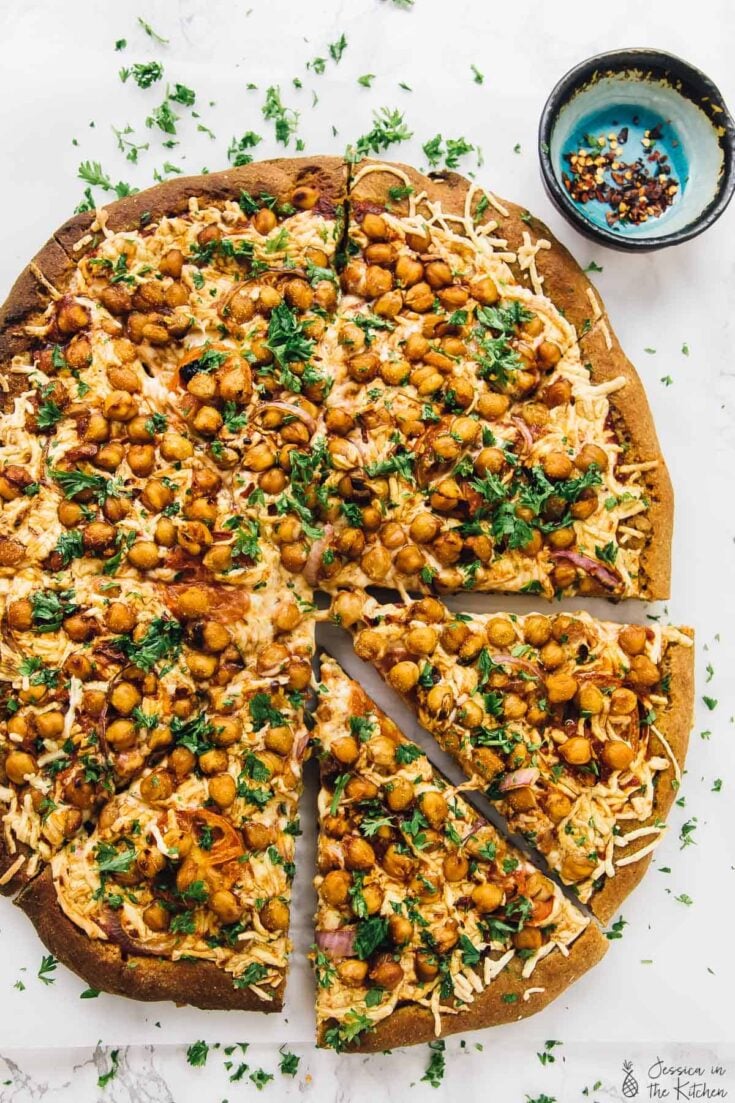
Vegan Spicy BBQ Chickpea Pizza
Out of all the ways to use chickpeas, this is probably my favourite way ever! This is such a delicious and unexcited pizza combination, and so worth trying, trust me! The chickpeas are tossed in a barbecue sauce then baked on top of the pizza. Yum!
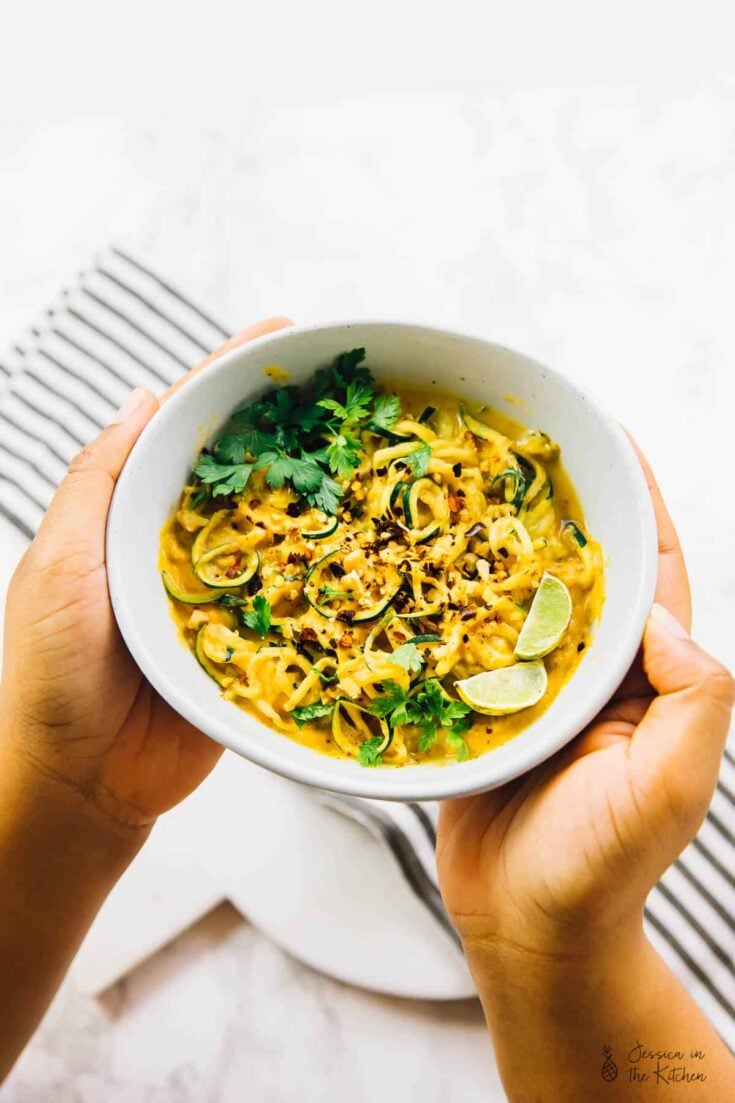
Curried Satay Veggie Bowls
It never occurred to me to use chickpeas in a sauce until I shared this recipe from my friend Lindsay’s cookbook. The Mr. really devoured this one. The chickpeas make a creamy and protein-rich sauce that you’ll want to put all your veggies in!
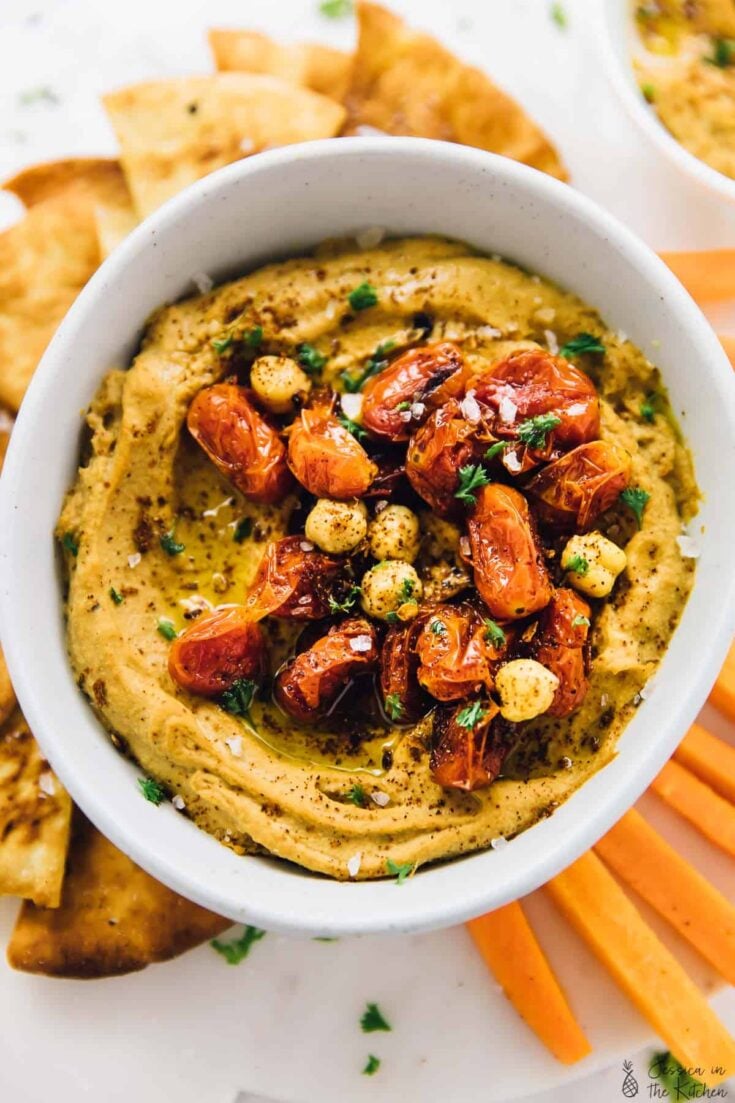
Spicy Roasted Red Pepper Hummus
Hummus is a go to chickpea move that can get a little boring sometimes. When you have a great recipe base though, you’ll be eating it for days! This Roasted Red Pepper Hummus is super creamy and rich in flavour. When you make it, you can also prepare a crunchy crudités platter , too!
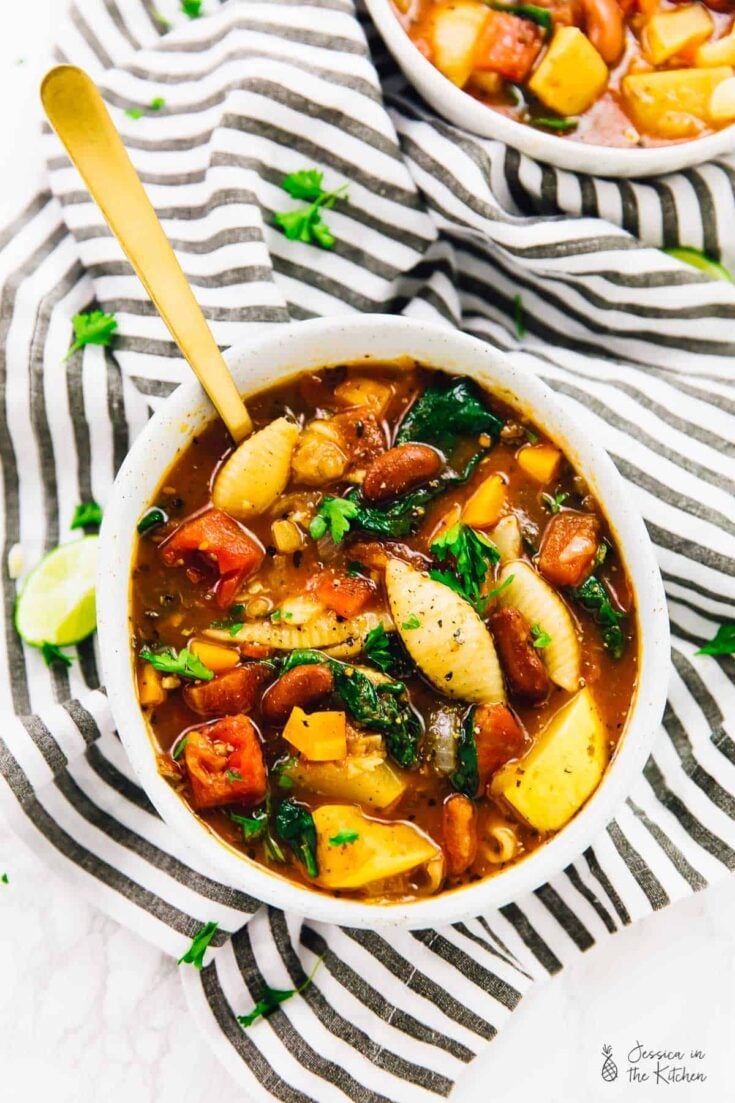
Hearty Minestrone Soup
Even though I didn’t use chickpeas originally in this winter vegetable soup, it’s the kind of broth and tomato-based soup that would happily and easily invite them. Chickpeas add a healthy dose of protein to your soup, while absorbing lots of delicious flavour.
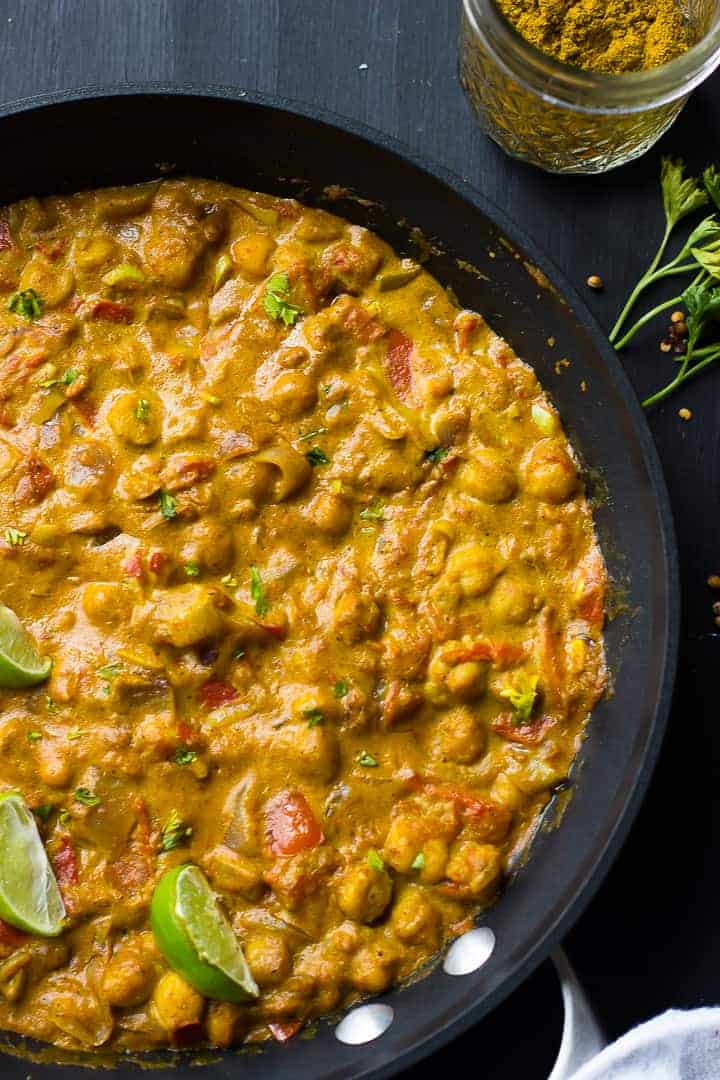
Coconut Chickpea Curry (Vegan & Gluten Free)
This is one of my most popular recipes ever, and once you try, you’ll see why! The chickpeas are everything in this delicious tomato based curry sauce. You’re bound to remake this if you try it, and it freezes beautifully for meal prep.
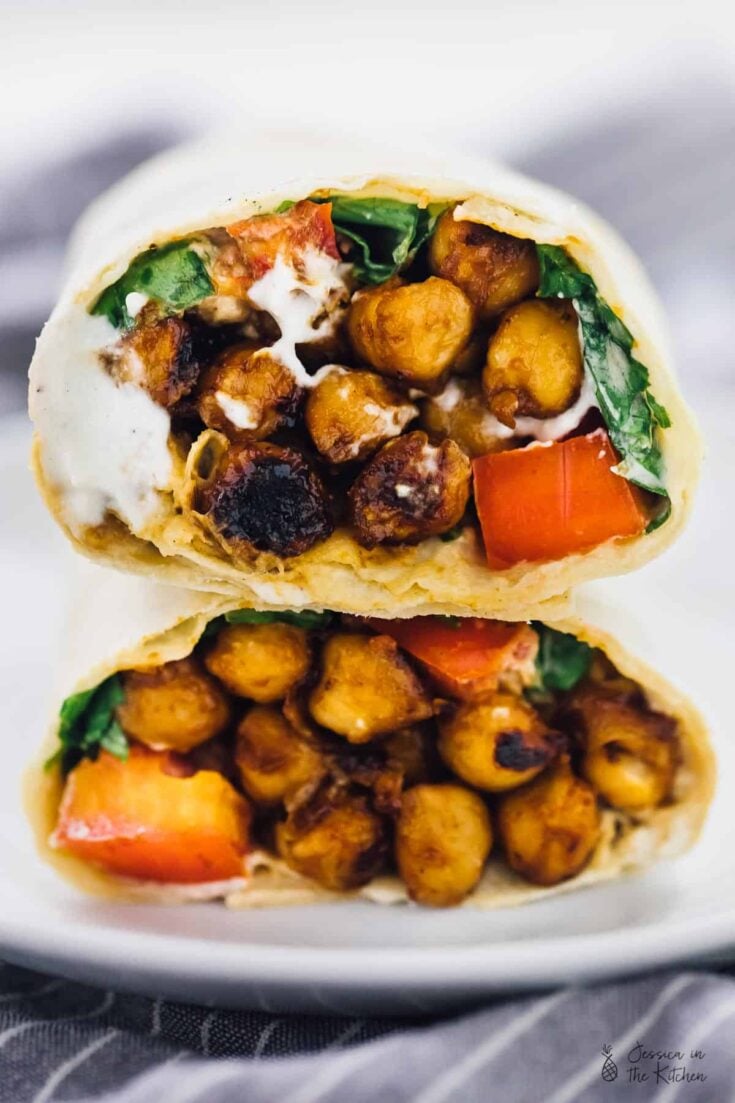
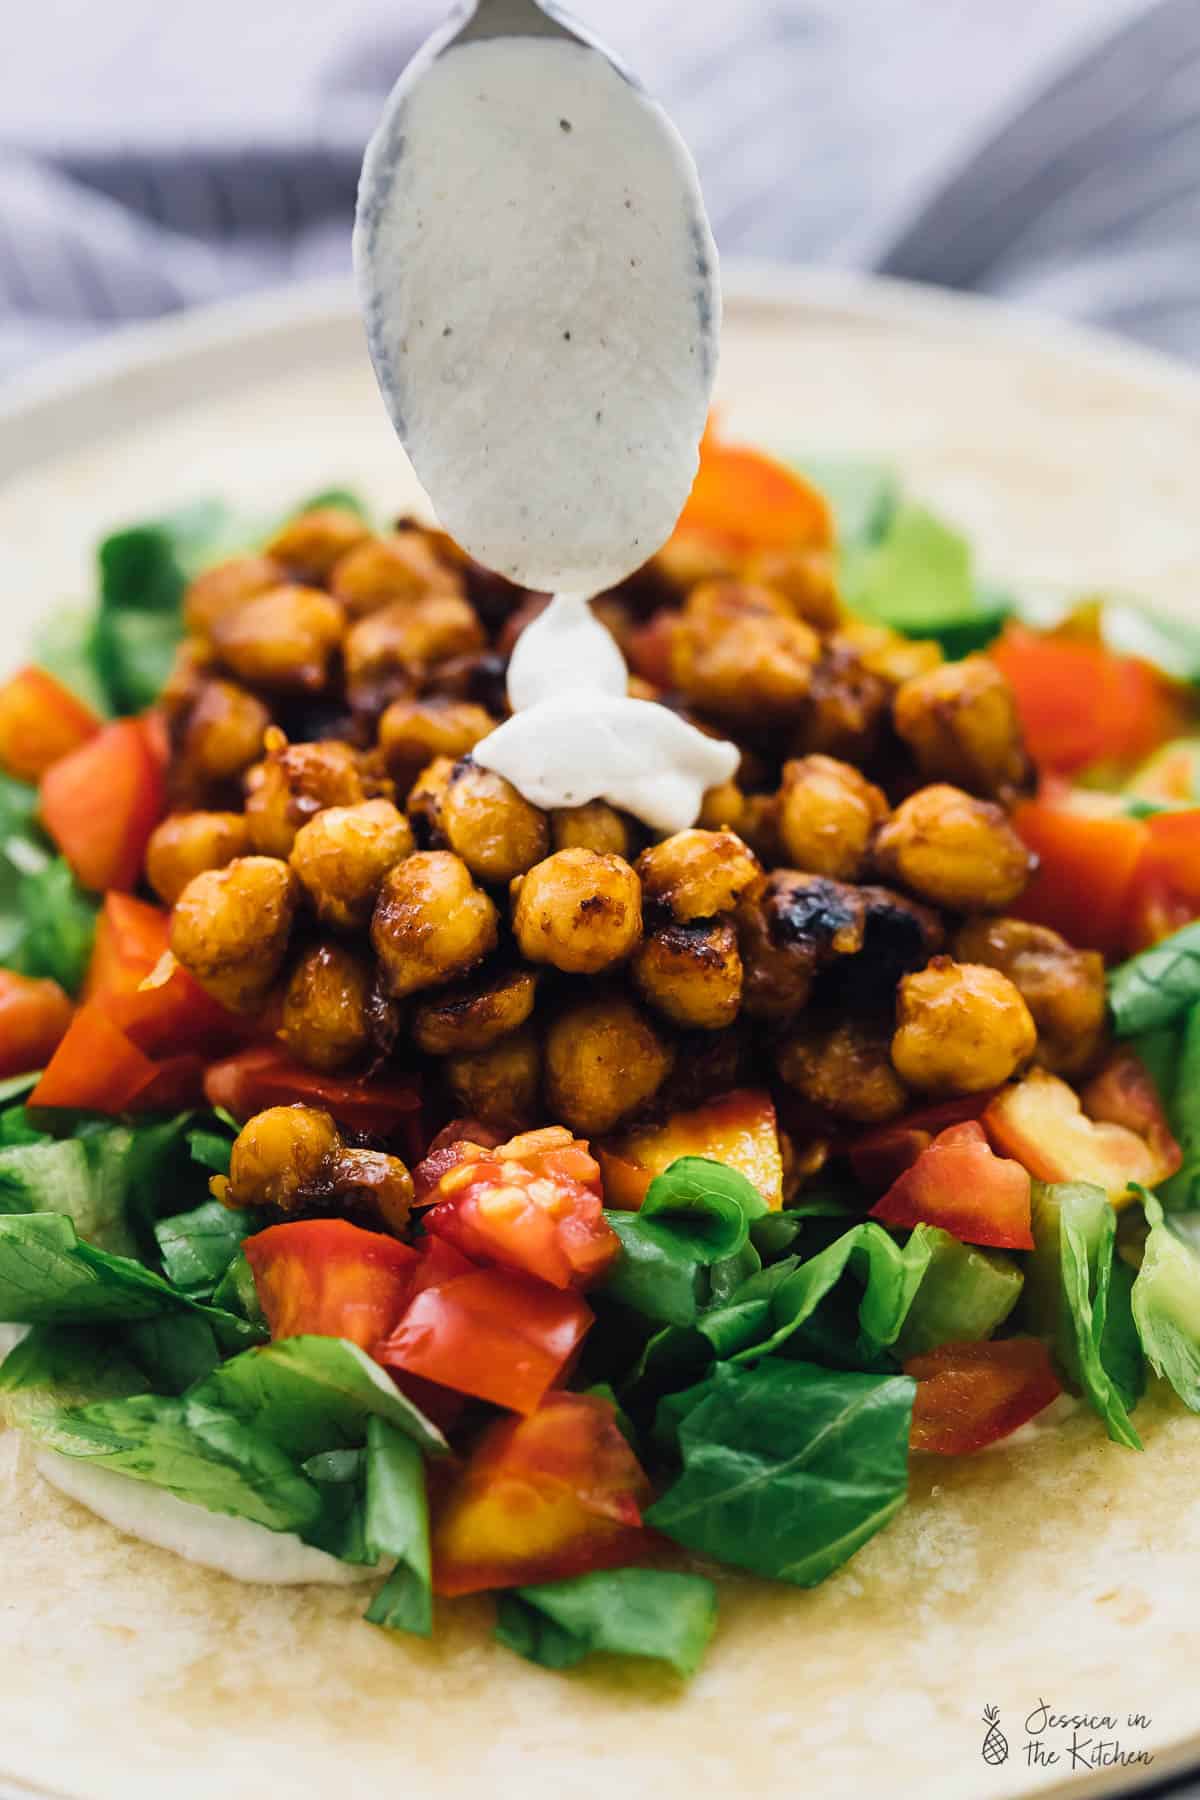
BBQ Chickpea Wraps with Ranch Dressing
Could this BBQ Chickpea Wrap be more beautiful? Paired with my oil-free ranch dressing, it’s a dream lunch or dinner. The chickpeas are baked down in barbecue sauce, which adds that beautiful char to them and a depth of yummy flavour.

BBQ Chickpea Tacos with Kale Cabbage Slaw (Vegan)
Before I made these BBQ Chickpea Tacos, I wondered how it took me so long to think of this idea! Chickpeas make a great taco filling because they absorb any flavor you throw at them. Combined with pickled onions and a kale cabbage slaw, these tacos are quick and quite the treat.
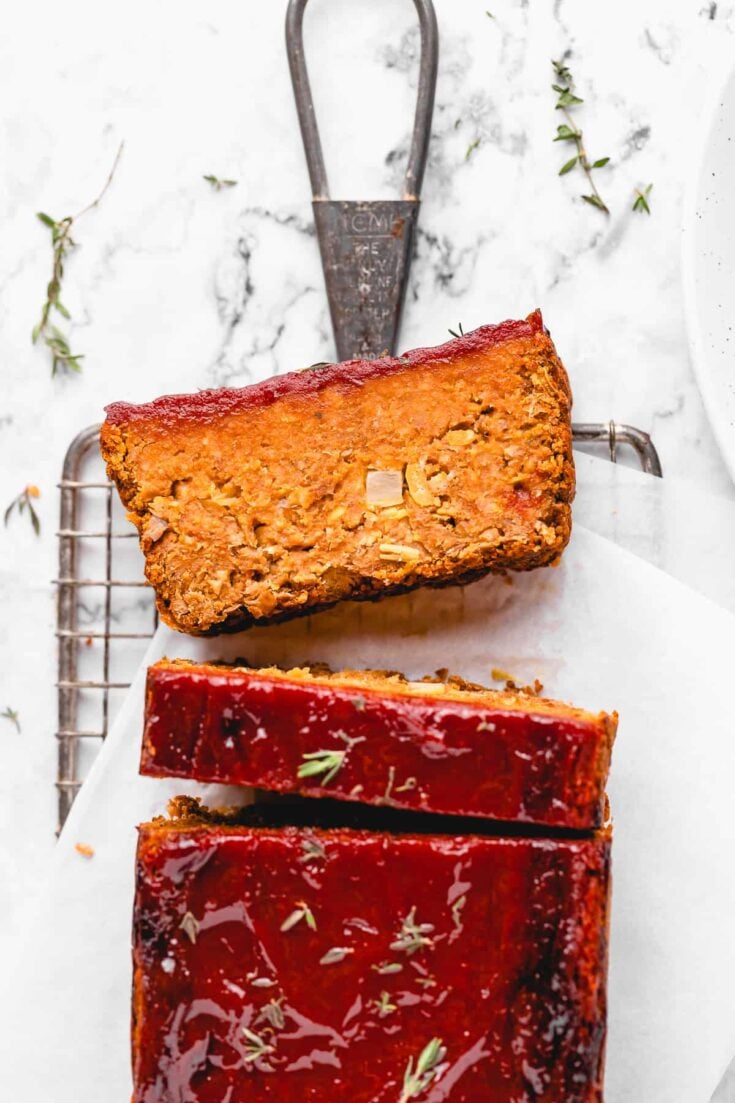
Vegan Meatloaf
This is how chickpeas go from canned to an amazing meal. This Vegan Meatloaf is incredibly easy to make and really transforms the chickpeas. Here they act as a binder and protein source alongside the lentils, bake quickly, and serve you for days! Some people even put slices into sandwiches, so this dish can be transformed into any way you want it to be.
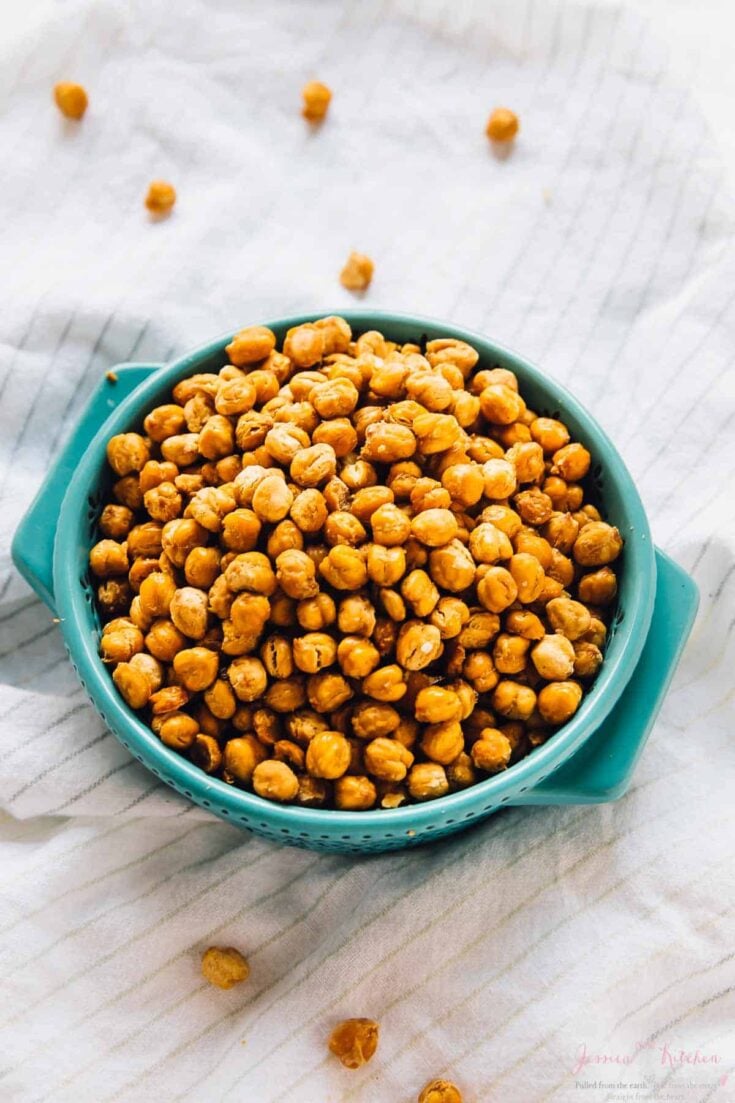
How to Make Crispy Roasted Chickpeas
This has got to be one of my favourite snacks, ever! This is actually a popular Trinidadian snack too with spicy spices on it. Making Crispy Roasted Chickpeas will change the way you see this little legume. It’s addictive, perfect for snacking and adds protein and fibre to your day! Plus, they stay crispy for a couple of days in an air tight container for the best meal prep snack.
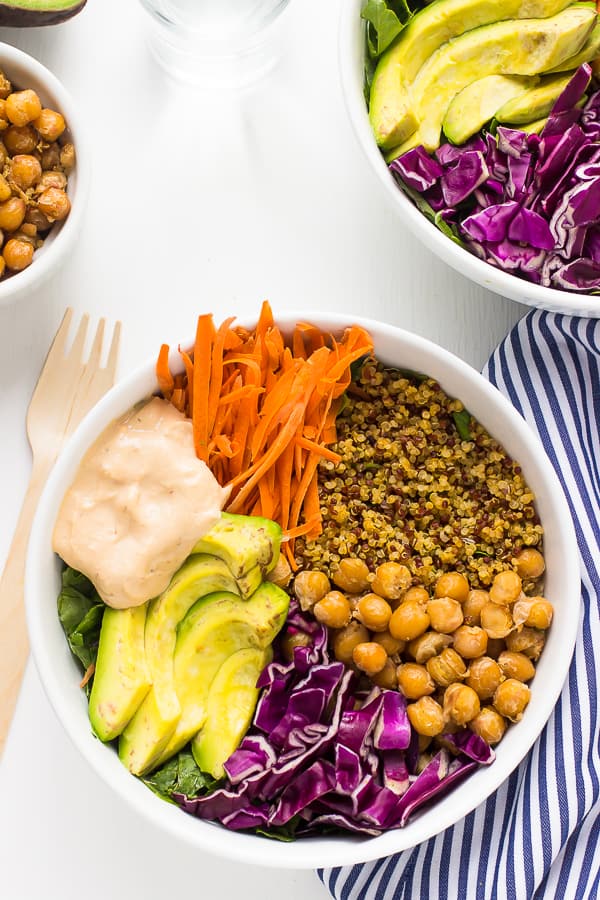
Nourish Buddha Bowl with Harissa Tahini Dressing
Who doesn’t love a great Buddha bowl? Chickpeas make the perfect side because you can swirl them into other ingredients or right into the sauce, and they add protein to the dish! You can dress them up by toasting them first or in barbecue sauce, or just rinse them and have them plain.
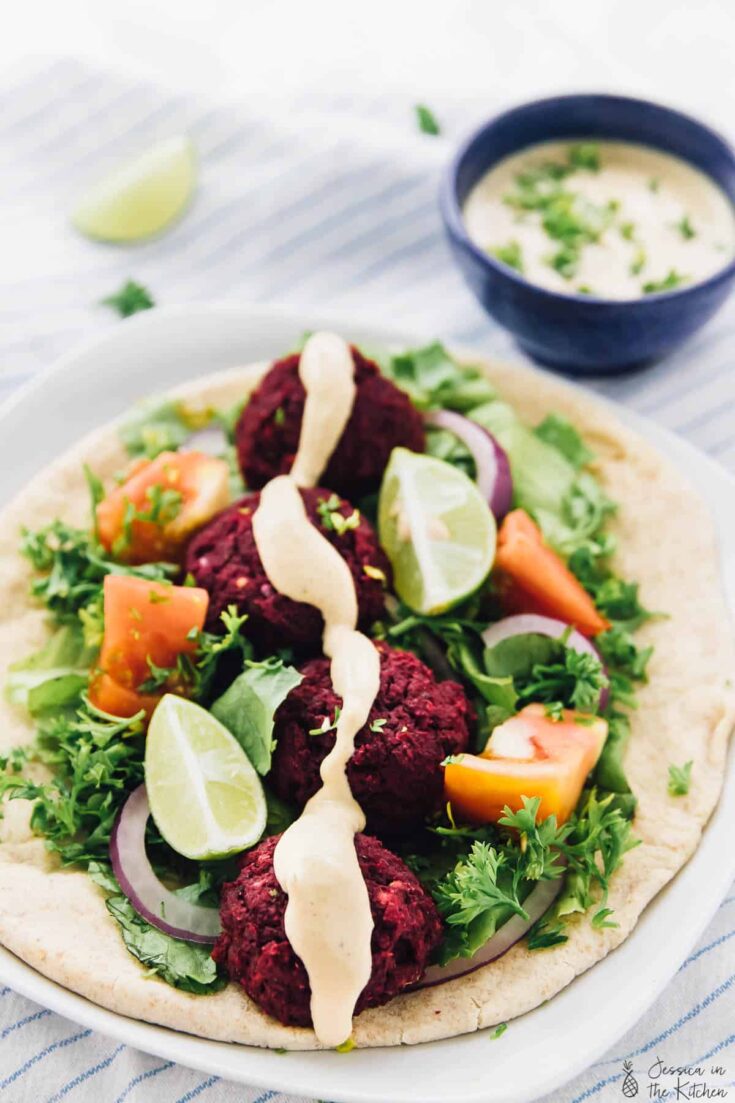
Vegan Beet Falafel with Harissa Tahini Dressing
This is a very common and popular way to use chickpeas, but this Beet Falafel adds a colour and playful twist to the classic. Plus instead of being fried, it’s a baked falafel that tastes fried. Perfect if you don’t like frying and want to cut back on the oil.
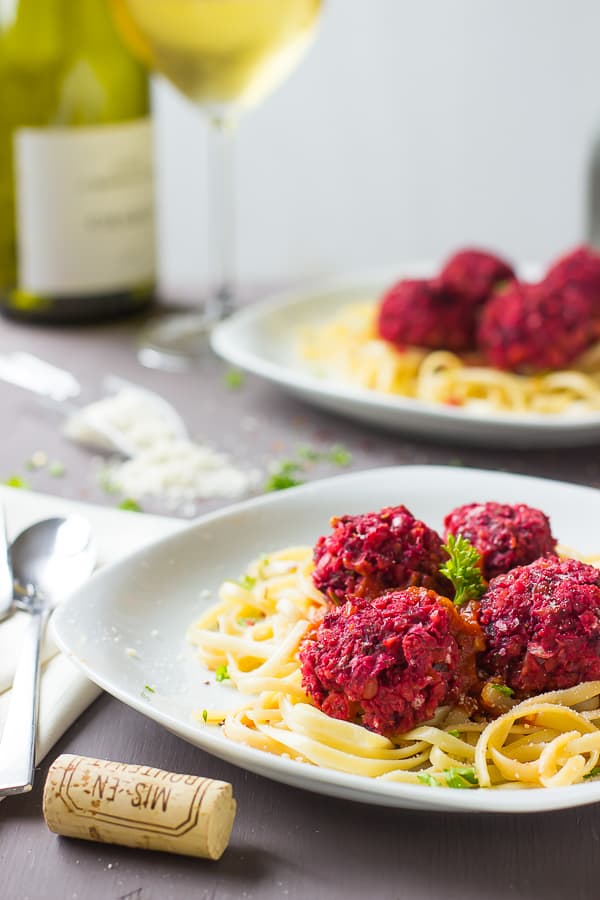
Chickpea and Beet Vegan Meatballs
This oldie but goodie uses chickpeas and beets again (clearly, a favourite combination of mine by this point) to produce a gorgeous and almost luxurious looking vegan meatball! They are so easy to make that you could easily double this recipe to meal prep them for the week.
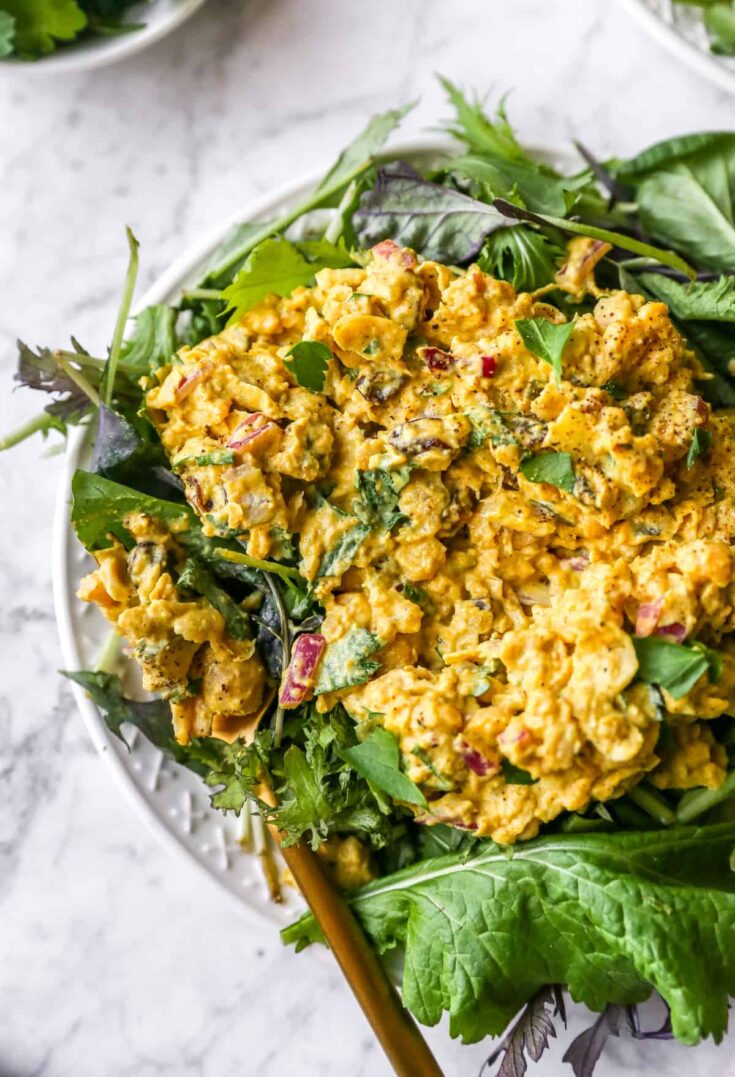
Curried Chickpea Salad (15 Minutes)
Bonus item! Curried Chickpea Salad is just like your favourite curried chicken salad, veganised! This recipe takes only 15 minutes to make & is perfect for meal prep and on-the-go meals. This salad is perfect for putting in wraps, on a bed of greens, and more. It’s loaded with so much flavour and is SO delicious!
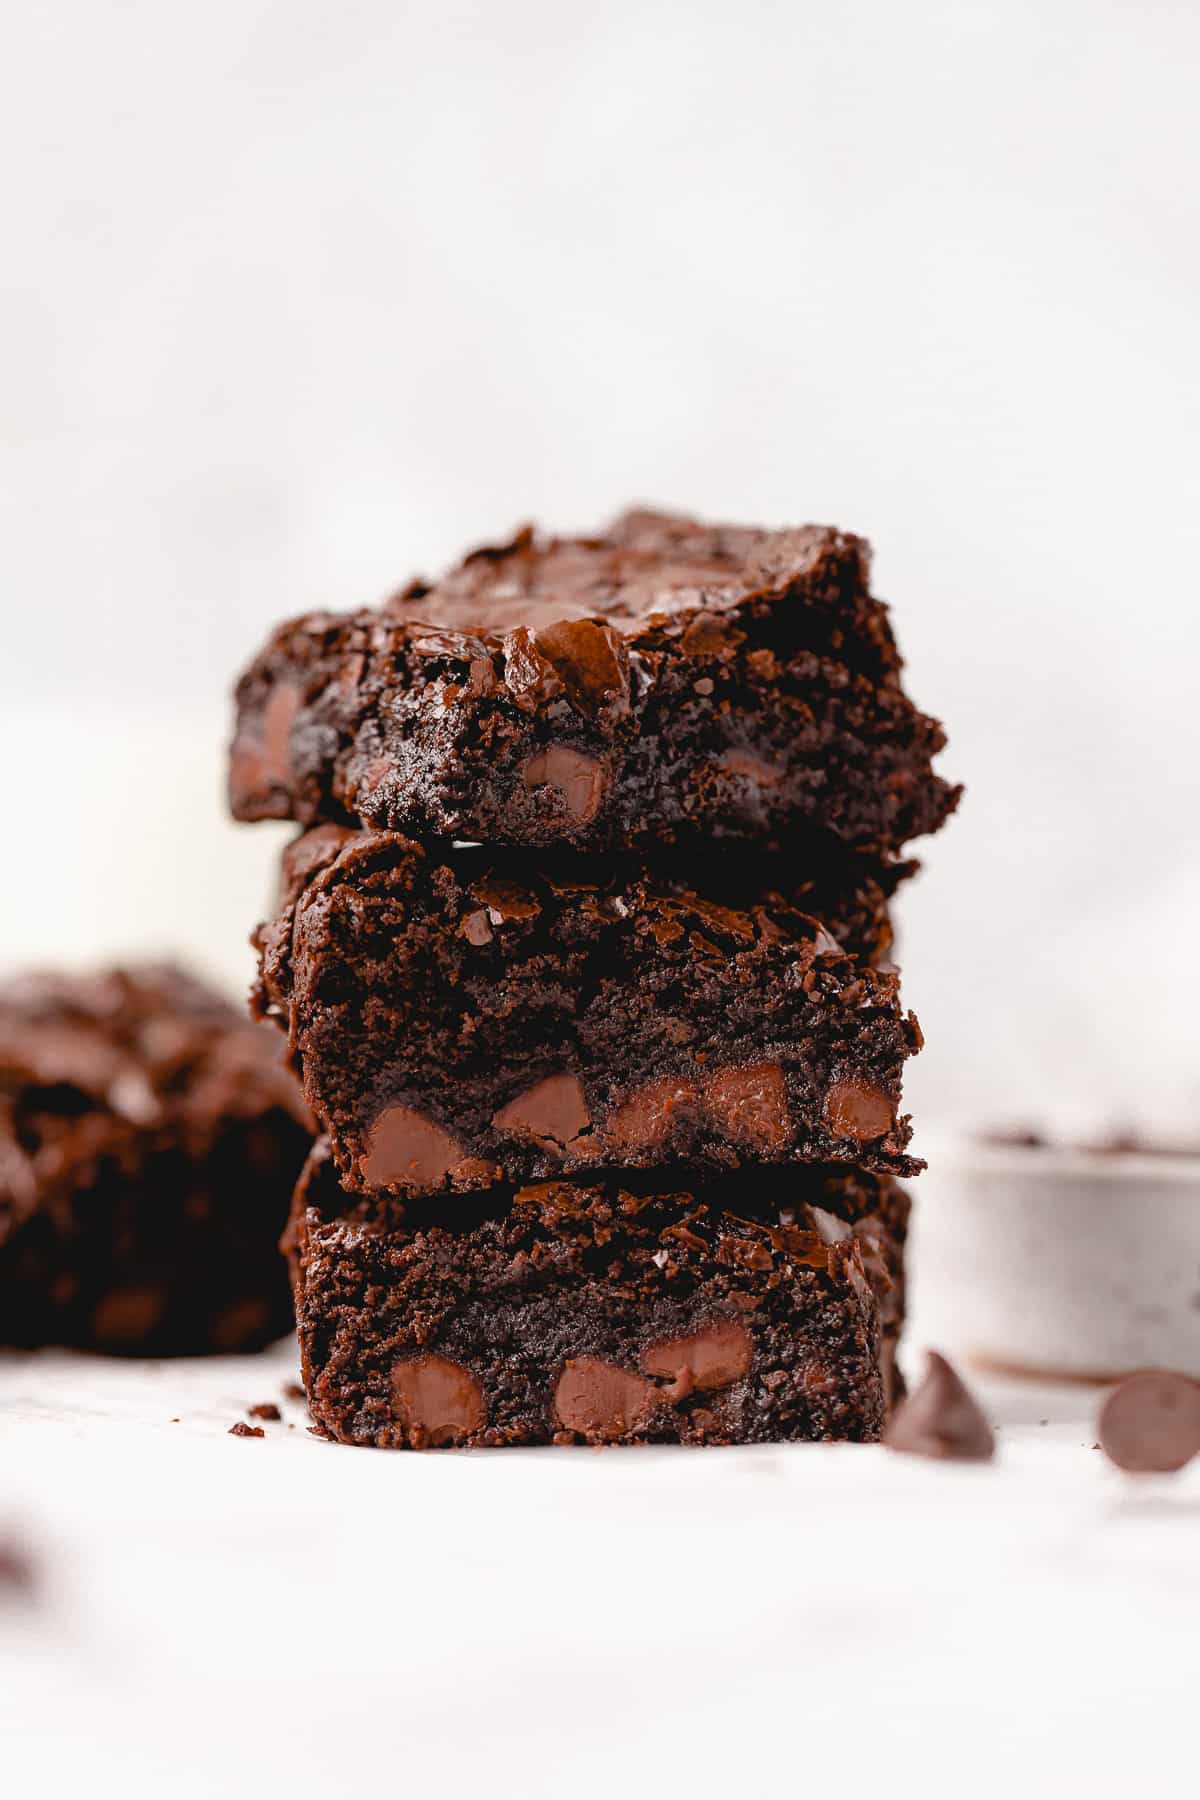
These gluten free brownies are thick, moist, chewy and taste incredible! They only need 10 ingredients, and are perfect for your gluten free and allergy friendly needs! Follow my tips for the best results every time!
Estimated reading time: 7 minutes
Thanks to Bob’s Red Mill for sponsoring this blog post! Thanks so much to you for supporting the brands who support Jessica in the Kitchen! All texts and opinions are my own.
This gluten free brownies recipe has been requested for such a long time and they’re finally here! They’re dairy free, egg free, and vegan! If you or someone in your life has certain allergy needs, these brownies are THE best place to be! Best of all? These are the best gluten free brownies made from scratch that I’ve ever had.
As usual, these gluten free brownies are made with Bob’s Red Mill , my favourite gluten free flour brand! Let me tell you, I’ve been using this flour for years . It’s basically on permanent rotation in our household. Whether you’re making these brownies, or my chocolate mug cake , or even my chocolate cake – this flour will give you the results you desire!!
Notes on the Ingredients:
Please scroll to the recipe for the full detailed ingredients and instructions!
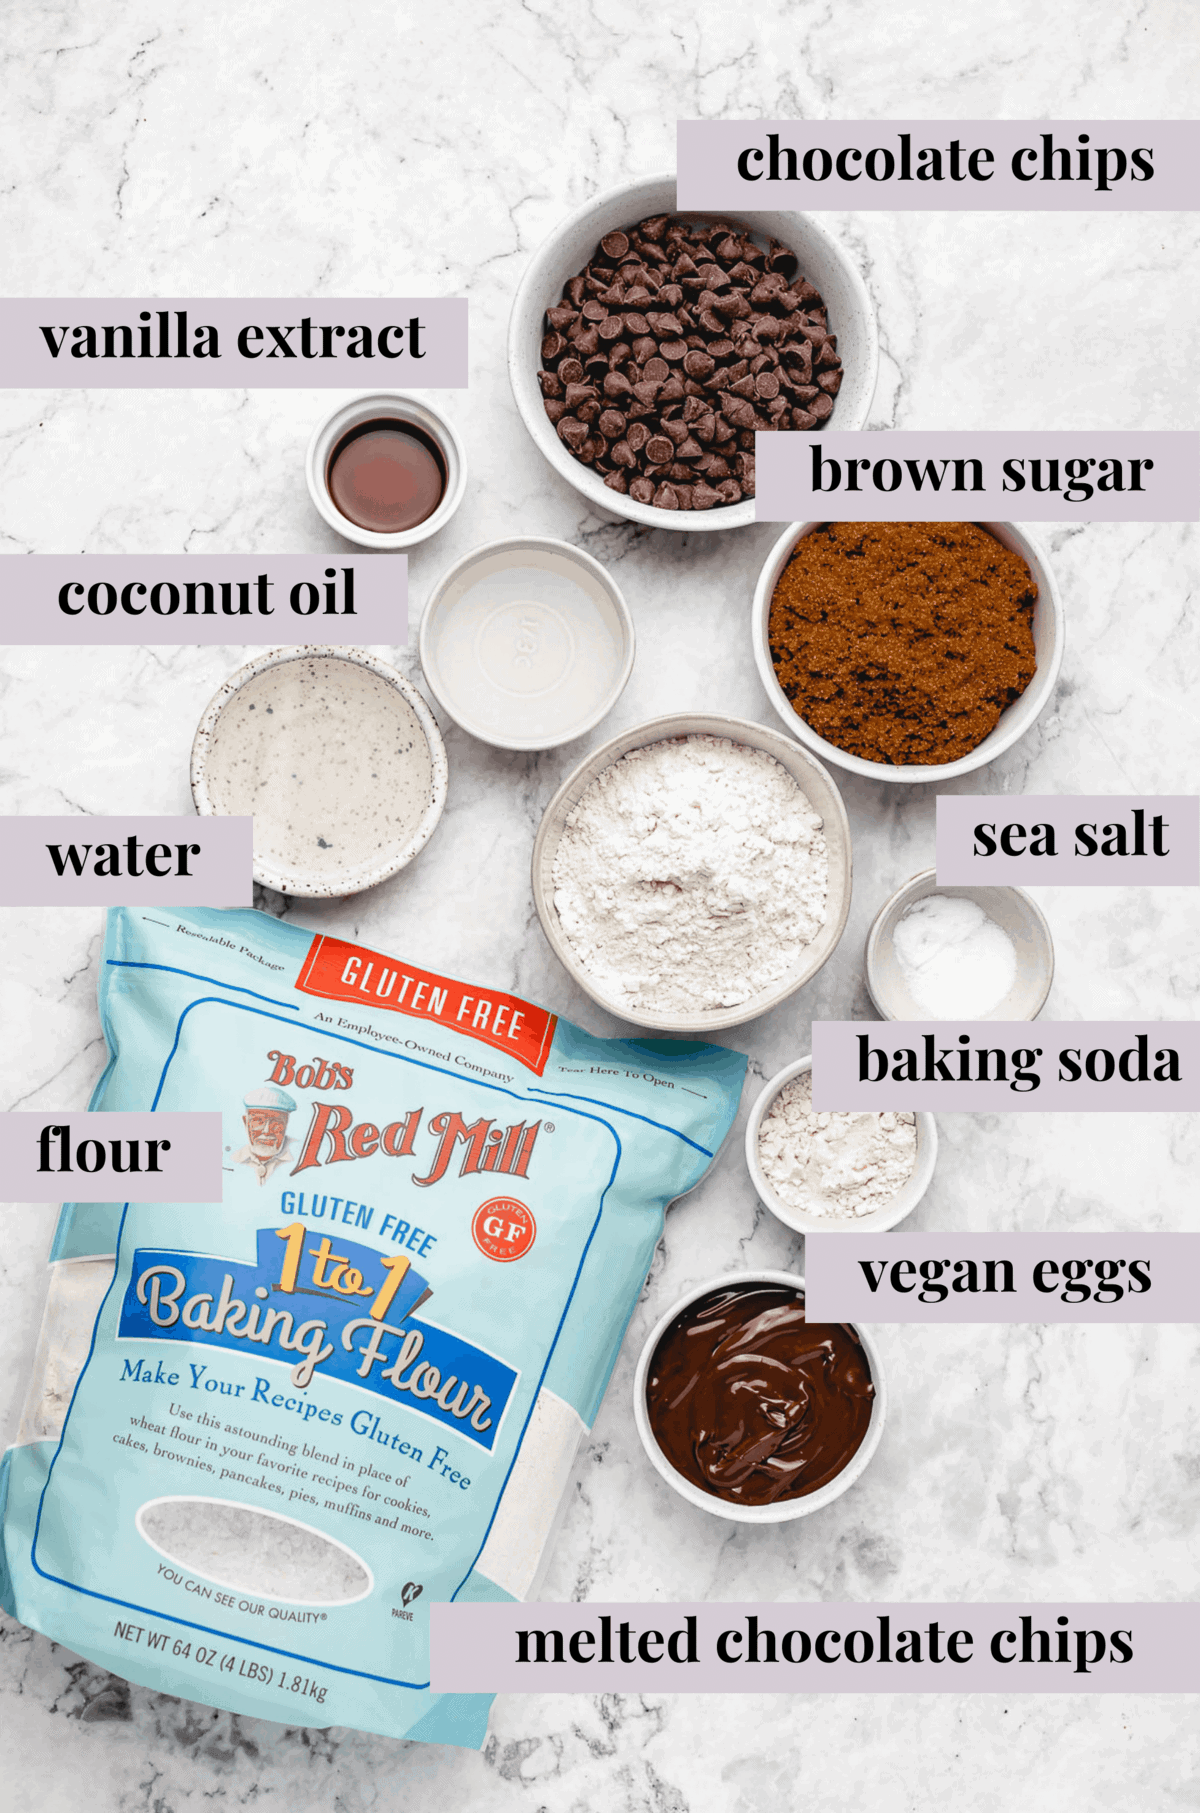
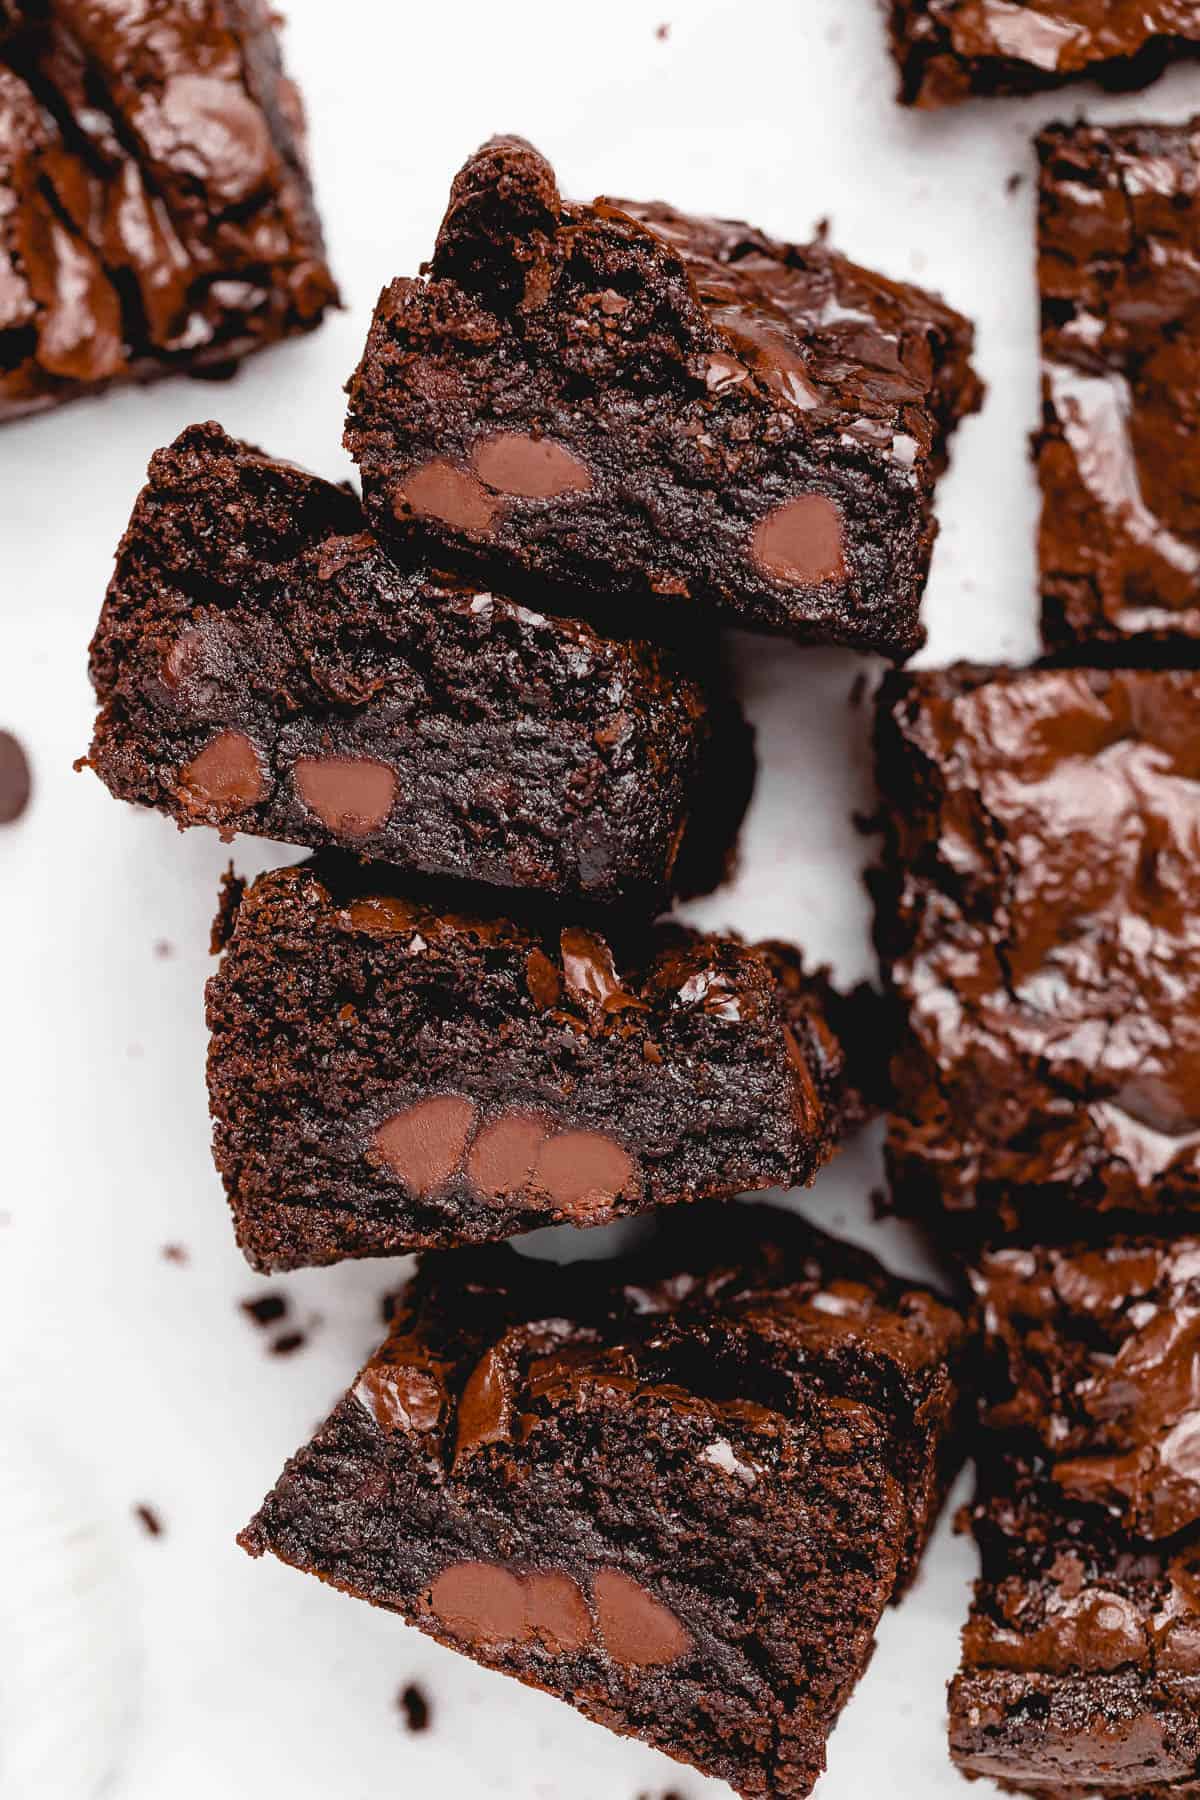
- Chocolate Chips : you’ll need some for melting, and some to mix into the brownie batter for double chocolate brownies!
- Bob’s Red Mill Gluten Free 1-to-1 Baking Flour : Always weigh out your flour for the best results! I love this gluten free flour for the texture and consistent results.
- Sea Salt : I like to use sea salt instead of regular salt. Sea salt granules are bigger than regular salt granules though, so if you want to use regular salt, I recommend reducing the measurement.
- Baking Soda: using a little baking soda gives the brownies a great lift.
- Vegan Eggs: For the best texture, the Bob’s Red Mill Egg Replacer is my go-to. Flax eggs are also a great option, but as there is natural oil in flax seeds, it can produce a slightly “oily on the bottom” results. This doesn’t happen when you’re using the egg replacers. One bag lasts a while, and I just always keep one in the fridge for whenever I’m ready to use it.
- Brown Sugar : white sugar will also work here, and so will pure cane sugar if you prefer.
- Melted Coconut Oil (or any oil): is the substitute for butter in this recipe; it makes for fabulously rich brownies. You don’t have to use any coconut oil. You can use refined coconut oil for no flavour, or any other oil!
- Water: make sure to only add the amount in the recipe. Adding too much water makes the brownies less thick, and less likely to hold together after baking.
- Pure Vanilla Extract: for extra yummy flavor!
How to Make Gluten Free Brownies(Step by Step)
These brownies come together in 6 easy steps. Once you’ve melted the chocolate chips, all you really have to do is mix the rest of the ingredients together, and pop the brownies in the oven to bake. You’re welcome for that wonderful, chocolate-y smell! For the full ingredients and instructions, scroll to the recipe!
Preheat the Oven: Preheat oven to 325°F/160°C.
Melt the Chocolate Chips: Melt chocolate chips in the microwave for a minute, stirring after to see if chips have melted. See full recipe below for complete melting instructions.
Combine Flour, Salt & Baking Soda: In a medium bowl, whisk the flour, salt and baking soda until combined. Set aside.

Mix Wet and Dry Ingredients : In a separate bowl, add the flax eggs, sugar and oil and mix until combined for about 2 minutes. Add the water and the vanilla extract and mix again.
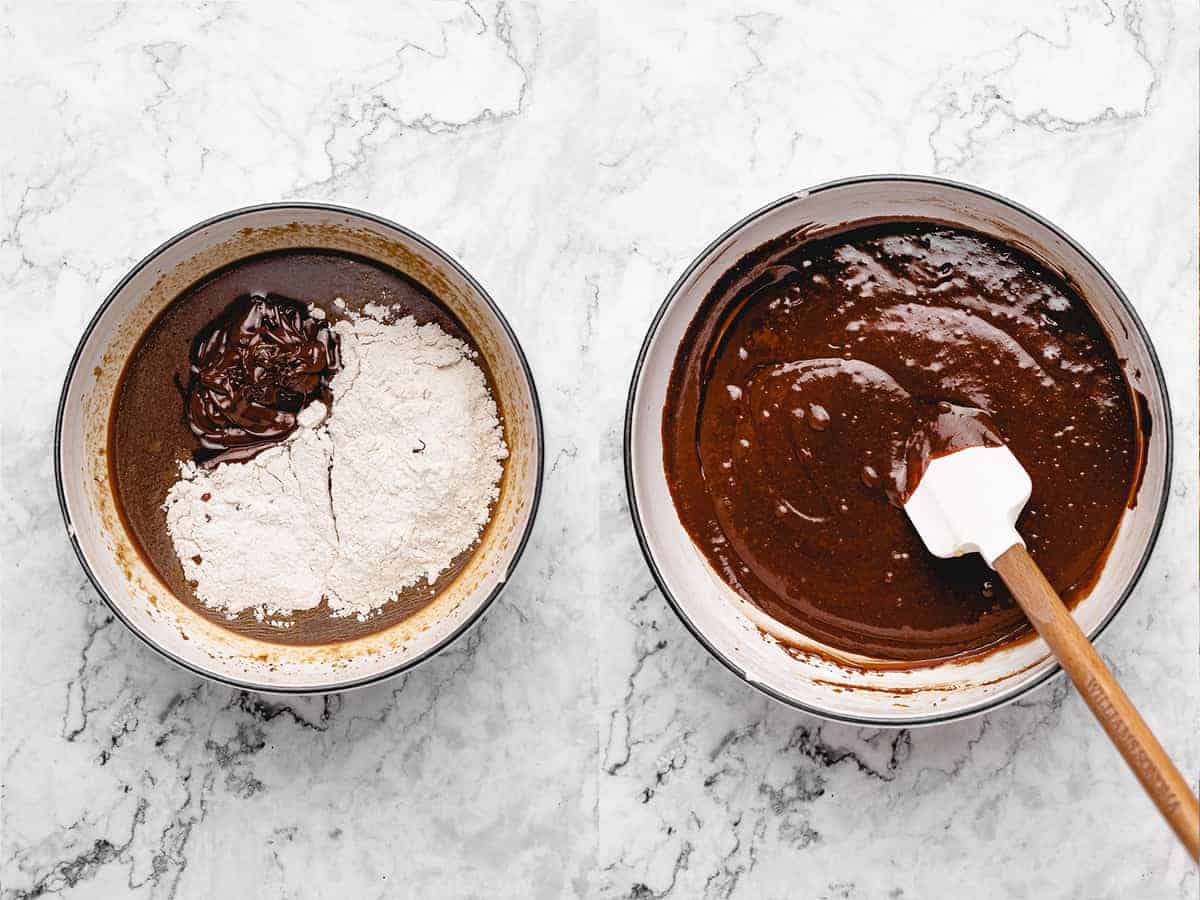
Then add the dry mixture to the wet mixture and melted chocolate chips and stir for about 3 minutes until combined.
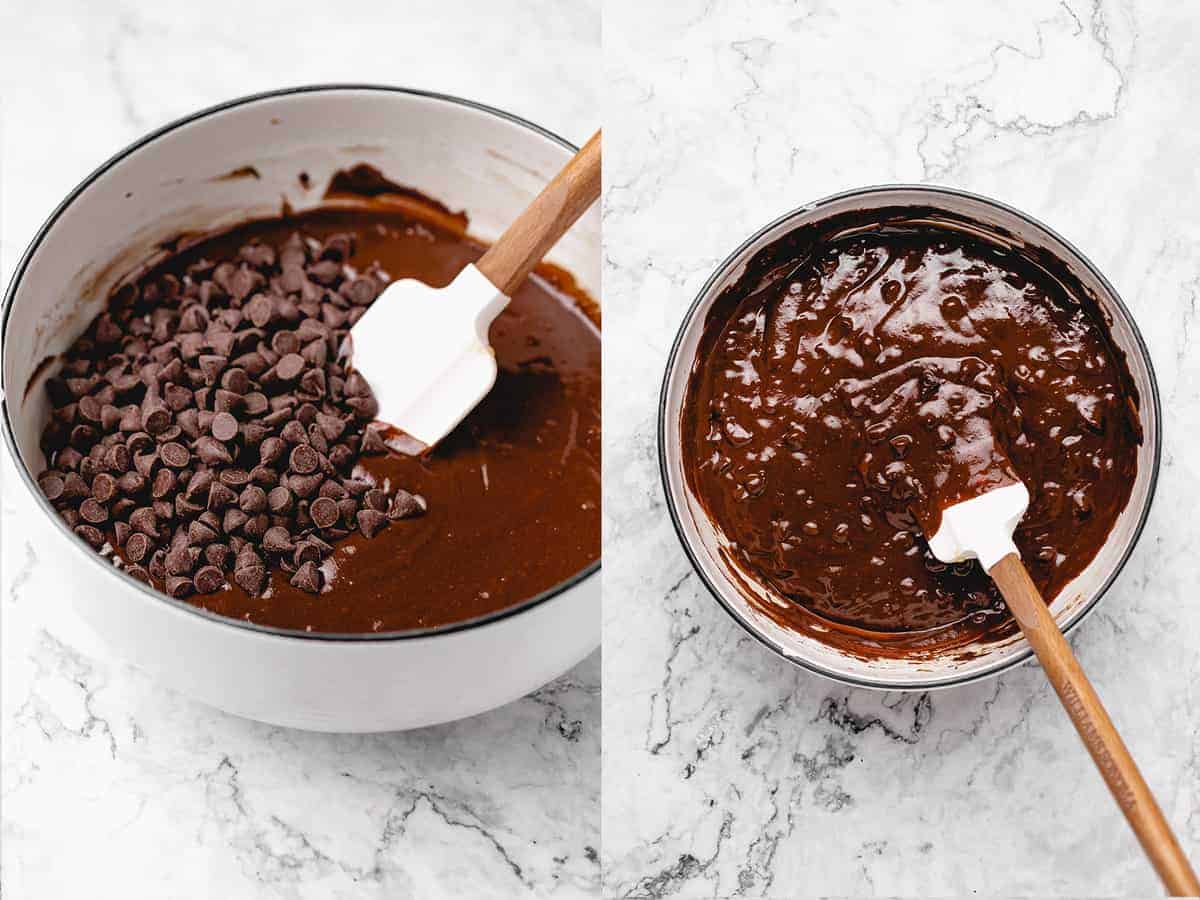
Add Chocolate Chips: Stir in 1 cup chocolate chips. Pour into a greased, parchment lined, or a greased foil-lined 8×8 square pan.
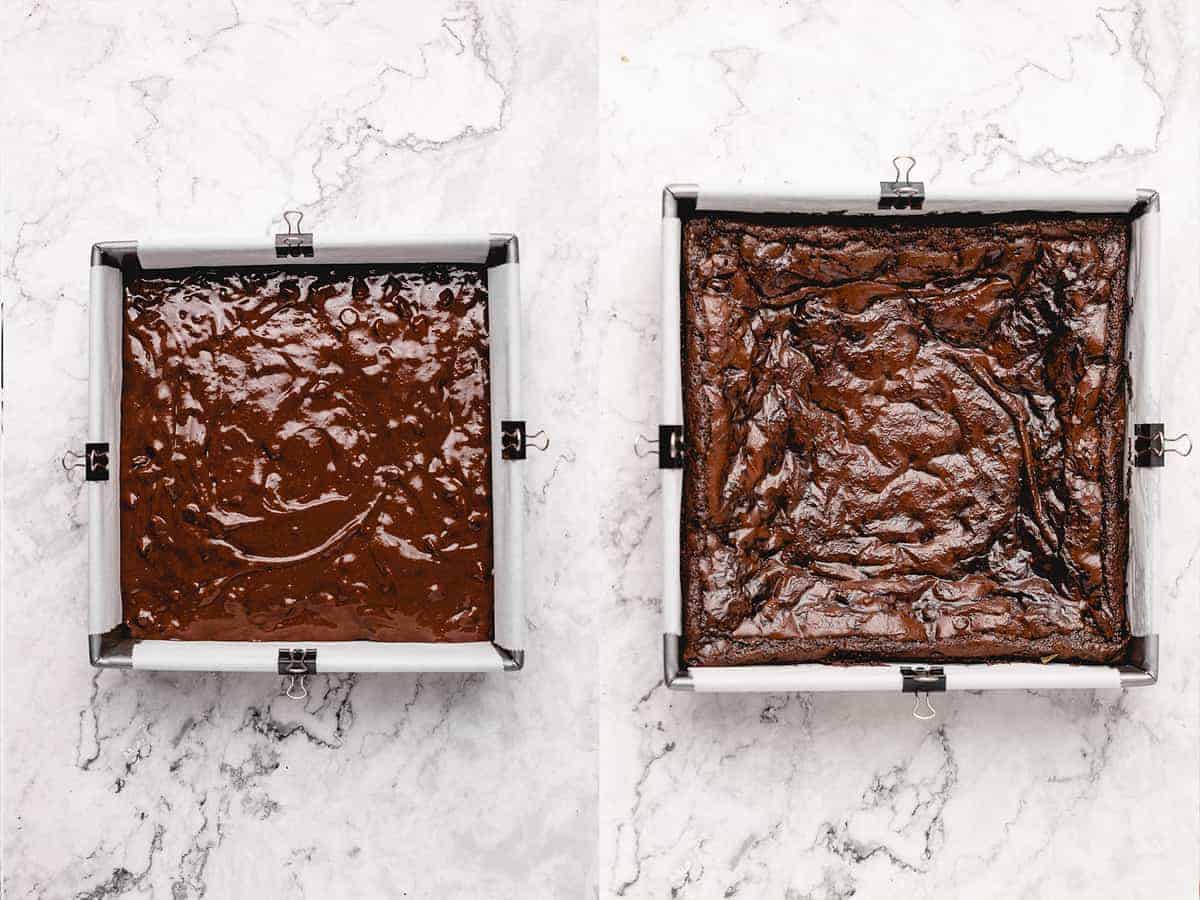
Bake for 35 minutes.
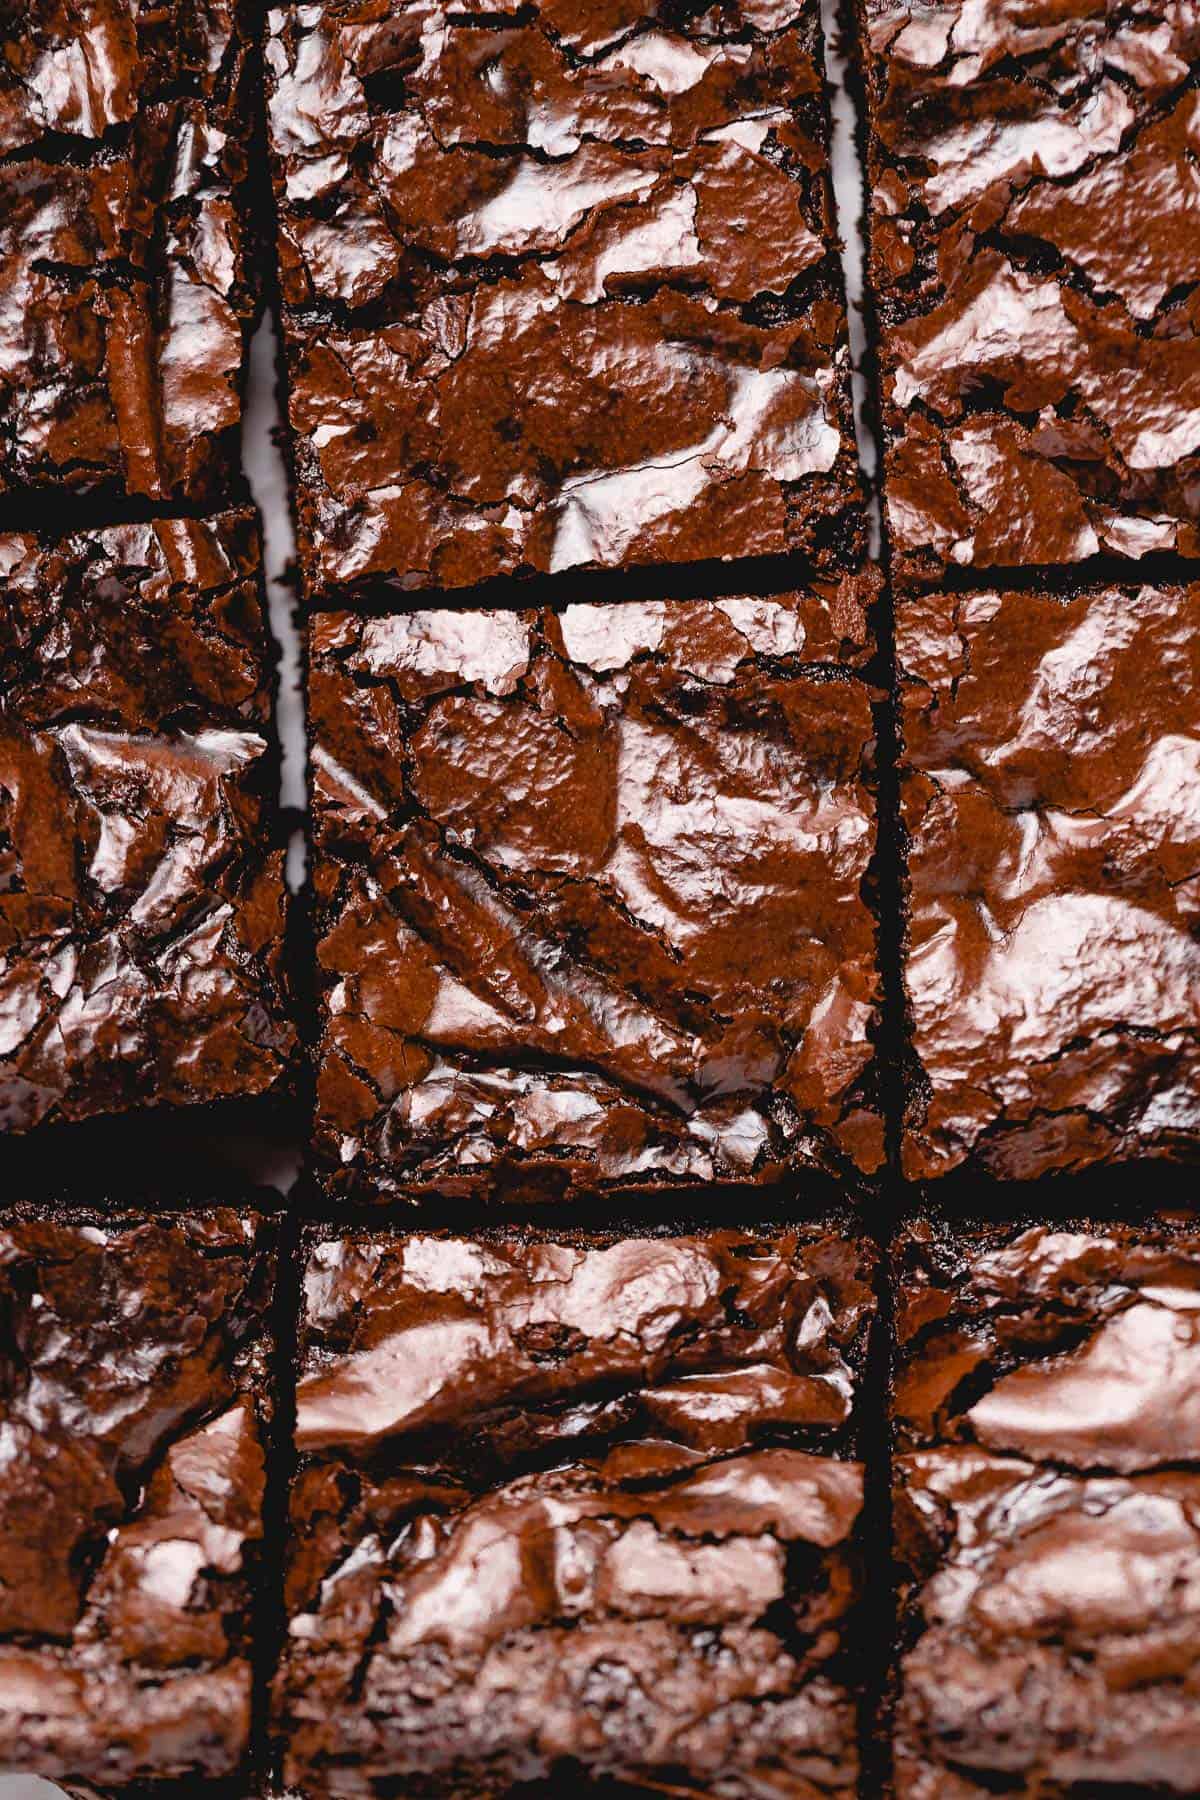
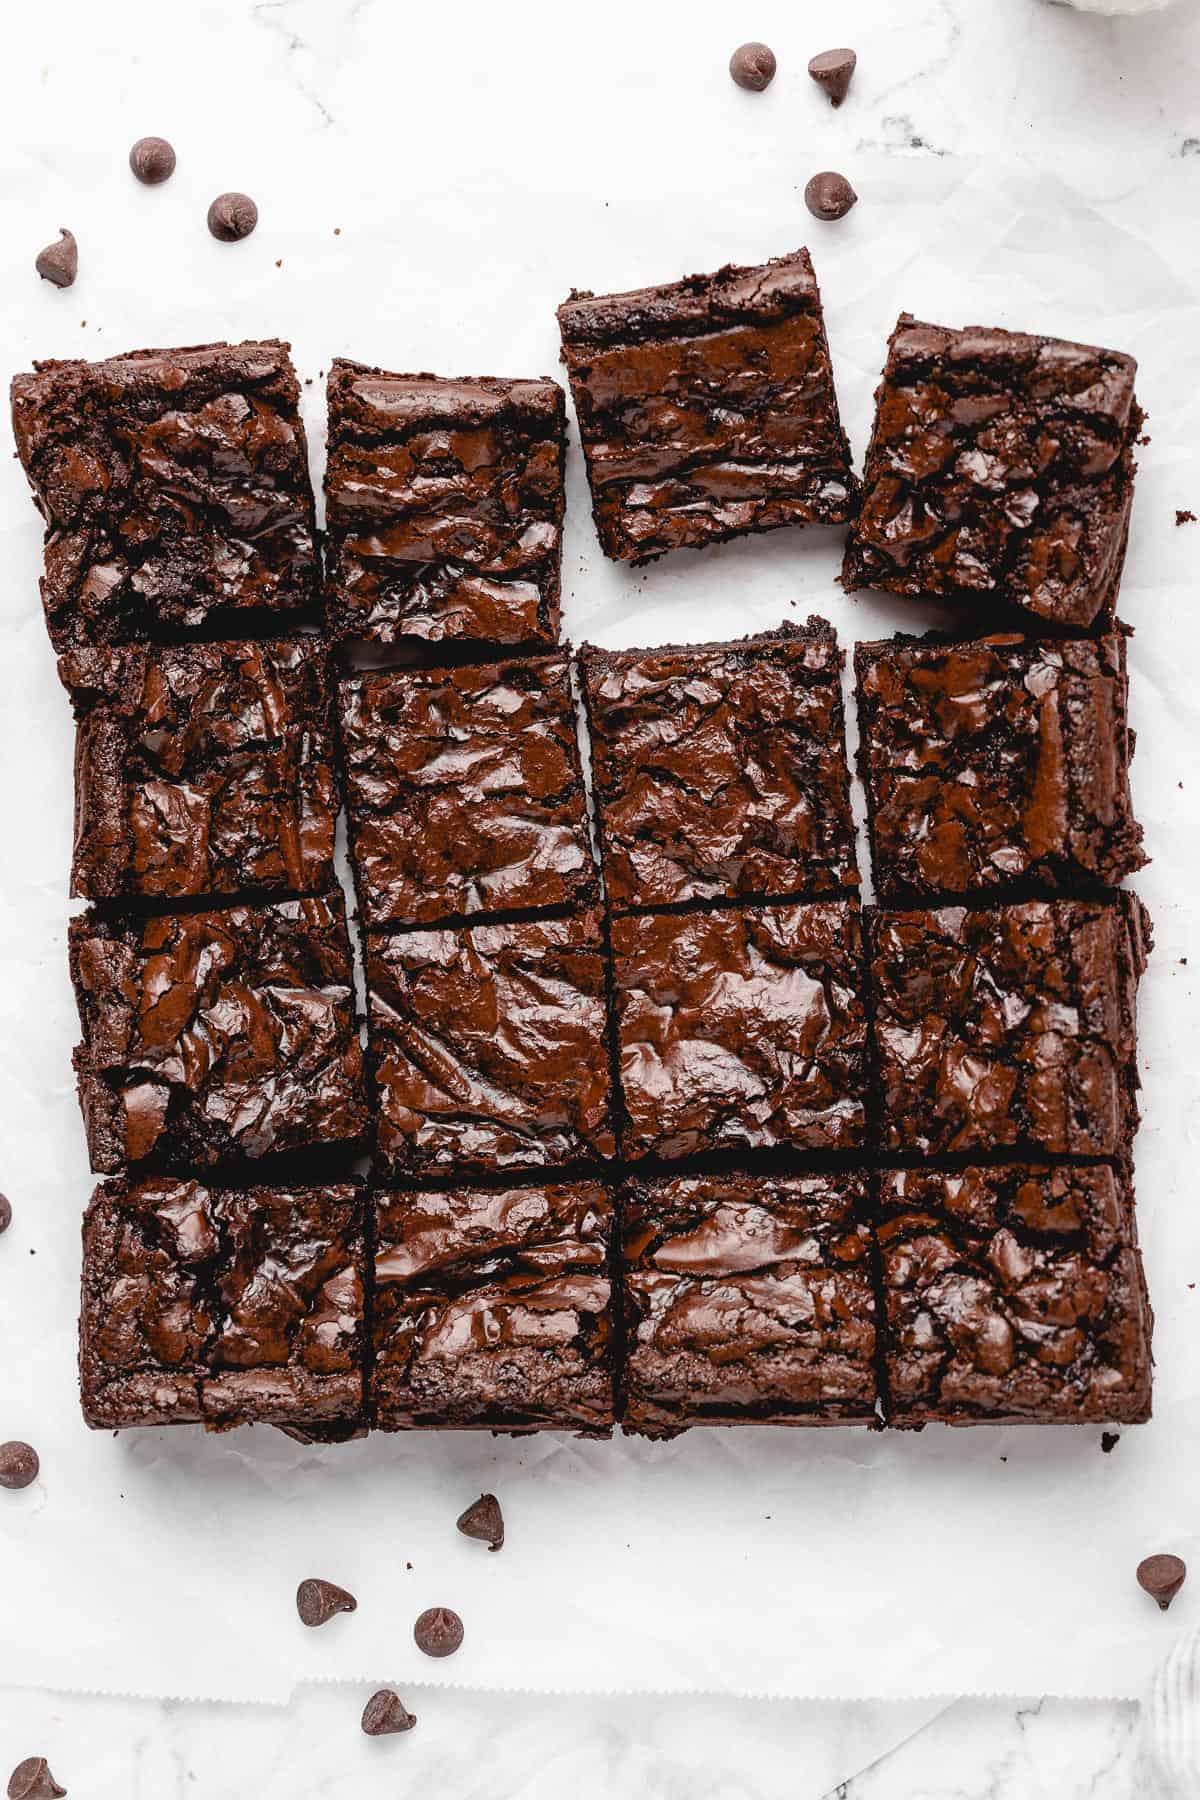
Let Brownies Cool: When finished, remove from the oven and allow to cool completely in a pan on a wire rack. Slice into 9, 12 or 16 slices. Enjoy!
Tips for Success:
- Pan Size: Don’t change the pan size! It’s crucial for the success of the right texture and outcome of brownies.
- Especially for gluten free flour, I always recommended weighing out your flour. If you look on the back of the flour, it actually weights differently than wheat flour, and that’s why it’s extra important to weigh it out. I just use a regular kitchen scale, and get guaranteed results each time. Plus, weighing out my ingredients removes ANY stress from the baking process as to whether you’re “doing it correctly”.
- For Extra Fudgy Brownies: once the brownies have cooled, let them firm up in the fridge for an hour or two. If you’re a fan of really thick, dense brownies (i.e. not cake-like), this is the way to go.
- Also, let the brownies cool before you cut them so that they don’t crumble.
- For the best texture, the egg replacers are my go to. Flax eggs are also a great option, but as there is natural oil in flax seeds, it can produce a slightly “oily on the bottom” results. This doesn’t happen when you’re using the egg replacers. One bag lasts a while, and I just always keep one in the fridge for whenever I’m ready to use it.
- Especially if you’re using an older baking pan, I recommend using parchment paper to line your pan. It makes sticking basically impossible, and allows you to lift the entire brownie out of the pan!
- Now, your chocolate chips. The chocolate chips you use in this recipe can actually make a huge difference on whether your brownies come out cake-y or fudgy! I highly recommend using a semi-sweet or vegan milk chocolate here. It tends to have more cocoa butter/chocolate liquor base, which results in a creamier and fudgier consistency.
- Especially ensure that you weigh out your oil. I can’t tell you how many times I eye-ball oil and it’s way over the actual weight, which can produce an over-oily end product.
- Always check that your baking soda is still fresh before starting!
How to Store Extra Brownies
Extra brownies can be refrigerated for about a week in an airtight container. When you want to enjoy them again, I recommend microwaving them for a couple of seconds so that they’ll be nice and warm.
Can I Freeze Homemade Brownies?
You can totally freeze homemade brownies. They store really well in tightly-sealed freezer bags, or stacked in an airtight container. Once frozen, they will keep for 2-3 months. When you want to eat them again, it’s a good idea to thaw them in the fridge overnight.
Related Recipes
- Chocolate Mug Cake
- Vegan Chocolate Cake
- Almond Flour Brownies
Ingredients
- 1 cup chocolate chips , melted (188g)
- 1 cup Bob’s Red Mill Gluten Free 1-to-1 Baking Flour , (133.75g)
- 1/2 teaspoon sea salt
- 1/4 teaspoon baking soda
- 2 Bob’s Red Mill Egg Replacer* , or flax eggs (see notes below)
- 3/4 cup brown sugar , or cane sugar or coconut sugar (158g)
- 1/3 cup melted coconut oil , or any oil (66g)
- ¼ cup water
- 1 teaspoon pure vanilla extract
- 1 cup chocolate chips , unmelted
Instructions
- Preheat the oven to 325°F/160°C.
- Melt chocolate chips in the microwave for a minute, stirring after to see if chips have melted. If not, microwave in increments of 30 seconds until completely melted. Alternatively, you can melt it over a small pot of boiling water (Not a lot of water in the pot) and put the chocolate chips in a heatproof and melt proof bowl over the pot and stir until melted.
- In a medium bowl, whisk the flour, salt and baking soda until combined. Set aside.
- In a separate bowl, add the egg replacers, sugar and oil and mix until combined for about 2 minutes. Add the water and the vanilla extract and mix.
- Add the dry mixture from earlier to the wet mixture along with the melted chocolate chips and stir for about 3 minutes until combined.
- Stir in 1 cup chocolate chips. Pour into a parchment paper lined 8×8 square pan. Bake for 35 minutes.
- When finished, remove from the oven and allow to cool completely in a pan on a wire rack.
- Slice into 9, 12 or 16 slices. Enjoy!
Notes
- Pan Size: Don’t change the pan size! It’s crucial for the success of the right texture and outcome of brownies.
- Especially for gluten free flour, I always recommended weighing out your flour. If you look on the back of the flour, it actually weights differently than wheat flour, and that’s why it’s extra important to weigh it out. I just use a regular kitchen scale, and get guaranteed results each time. Plus, weighing out my ingredients removes ANY stress from the baking process as to whether you’re “doing it correctly”.
- For Extra Fudgy Brownies: once the brownies have cooled, let them firm up in the fridge for an hour or two. If you’re a fan of really thick, dense brownies (i.e. not cake-like), this is the way to go.
- Also, let the brownies cool before you cut them so that they don’t crumble.
- For the best texture, the egg replacers are my go to . Flax eggs are also a great option, but as there is natural oil in flax seeds, it can produce a slightly “oily on the bottom” results. This doesn’t happen when you’re using the egg replacers. One bag lasts a while, and I just always keep one in the fridge for whenever I’m ready to use it.
- Especially if you’re using an older baking pan, I recommend using parchment paper to line your pan. It makes sticking basically impossible, and allows you to lift the entire brownie out of the pan!
- Now, your chocolate chips. The chocolate chips you use in this recipe can actually make a huge difference on whether your brownies come out cake-y or fudgy! I highly recommend using a semi-sweet or vegan milk chocolate here. It tends to have more cocoa butter/chocolate liquor base, which results in a creamier and fudgier consistency.
- Especially ensure that you weigh out your oil. I can’t tell you how many times I eye-ball oil and it’s way over the actual weight, which can produce an over-oily end product.
- Always check that your baking soda is still fresh before starting!
